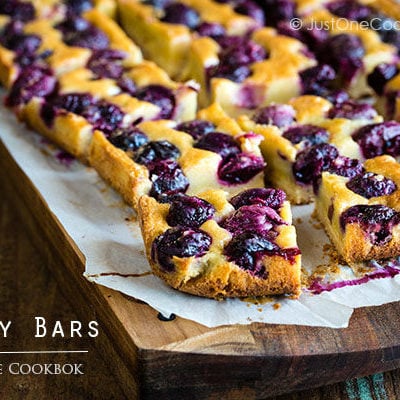
Sweet and tart cherry bars with crispy butter crust. Made with fresh cherries drizzled in a savory custard, these delicious bars are as glorious as the summer sun. Enjoy while the fresh cherries are in season!

I love it when summer arrives; besides the warmer weather, it’s also cheery season! My family has been going cherry-picking with our friends and their children (five families!) for the past several years. With the fresh cherries we picked, I’ve made Cherry Clafoutis and Cherry Ice Cream in the past, and this year I made these really delicious Cherry Bars.

Best Cherry Bars Recipe with a Magic Ingredient – Brown Butter
My friend Laura of Tutti Dolci recently shared her delicious looking cherry bar recipe, and I knew right away that’s the first cherry dessert I was going to make this year. What makes these cherry bars extra delicious? Brown butter.
Ever since I made the Nutella Stuffed Brown Butter Chocolate Chip Cookies with Sea Salt, my family is hooked on brown butter. It’s a magical ingredient for us. The smell of cooking brown butter makes my house smell like a cookie factory and the kids just want to hang around the kitchen waiting to see what delicious dessert I am making.
In case you are not sure what brown butter is (don’t worry I didn’t know about it until very recently), it’s not something you “buy”. It’s basically melted butter you can easily whip up at home. It is one of those secret ingredients that can enhance the flavor of just about anything! It’s rich, nutty and incredibly fragrant. I added a video clip at the end of the recipe to show you how you can make brown butter by cooking unsalted butter in a pan.
The result of the cherry bars was absolutely stunning that my family is already asking me to make these bars again! They were a big hit with my neighbor and my husband’s coworkers too.

On a side note, can you tell that I really enjoyed taking pictures of these bars? I make savory dishes for the blog most of the time and I have to move swiftly when taking pictures of them. There is very little time to play around. But these bars can tolerate a long photo shoot session.
And the best part of sharing dessert recipes? I can make them at night time when the kids are asleep and photo shoot the following day (if I can control my desire to eat right out of the oven).
I hope you enjoy seeing some dessert recipes from time to time, and try making these cherry bars especially when they are in season. They are sooooo good!

Wish to learn more about Japanese cooking? Sign up for our free newsletter to receive cooking tips & recipe updates! And stay in touch with me on Facebook, Pinterest, YouTube, and Instagram.
Cherry Bars
Ingredients
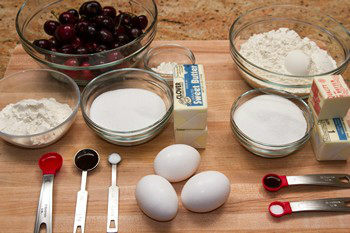
- 4 cups cherries (fresh, pitted)
- 2 tsp all-purpose flour (plain flour)
Crust:
- ¾ cup unsalted butter (12 Tbsp; melted)
- ½ tsp pure vanilla extract
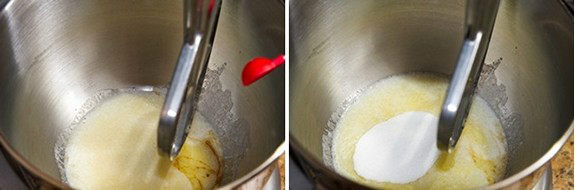
- ⅔ cup sugar
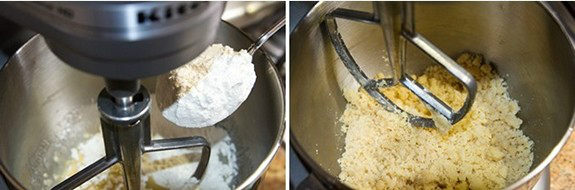
- 2 cups all-purpose flour (plain flour)
- ⅛ tsp Diamond Crystal kosher salt
Filling:
- 1 cup unsalted butter (16 Tbsp)
- 3 large eggs (50 g each w/o shell)
- ⅔ cup sugar
- ⅛ tsp Diamond Crystal kosher salt
- ½ cup all-purpose flour (plain flour)
- 1 tsp pure vanilla extract
- 1 tsp almond extract
Instructions
- Gather all the ingredients.

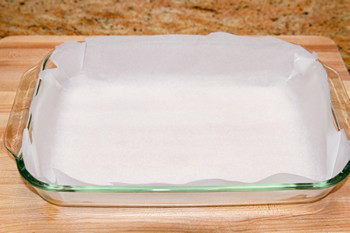
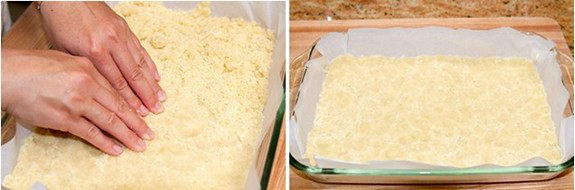
- Preheat oven to 375ºF (190ºC). For a convection oven, reduce cooking temperature by 25ºF (15ºC). Line a 13 x 9-inch (33 x 23 cm) baking dish with parchment paper.
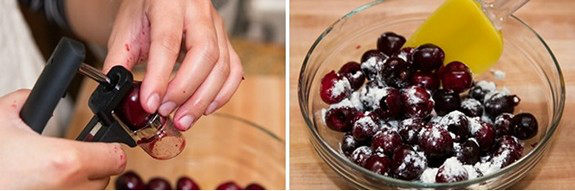
- Pit cherries and toss them with 2 tsp flour.

- In the bowl of an electric mixer, combine melted butter, vanilla and sugar. Mix on medium speed until well blended and smooth.

- Blend in flour and salt and stir until incorporated.
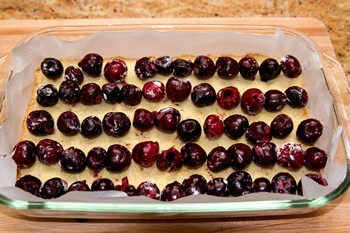
- Press dough evenly into bottom of prepared baking dish. Bake until crust is golden and slightly puffed, about 18 minutes.
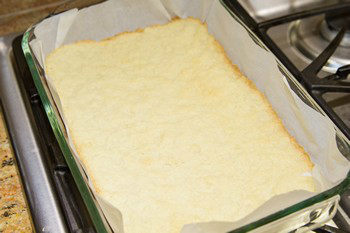
- When the crust is done, transfer to a wire rack and cool crust in pan.
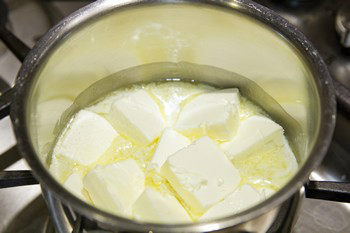
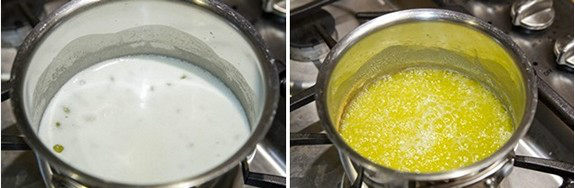
- Meanwhile, let’s make the filling. Cut the butter into a few pieces and place in a saucepan over medium heat. Melt the butter completely stirring frequently with the spatula.
- As the butter heats, it will begin to foam and then bubble. After several minutes, the milk solids will start to become brown on the bottom of the pan. Make sure that milk solids do not stick to the pan. Continue stirring until the butter is evenly browned, being careful not to burn. Remove from the heat and pour browned butter into a glass bowl to cool slightly.

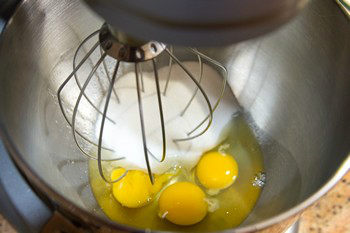
- In the bowl of an electric mixer, combine eggs, sugar, and salt in a medium bowl and whisk all together.
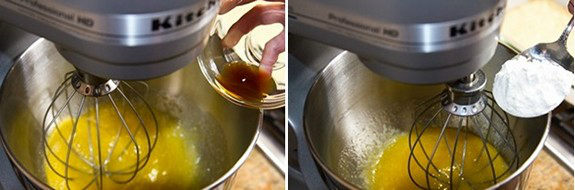
- Add extracts and blend in flour by ⅓ at a time. Whisk all together until smooth.
- Gradually blend in browned butter and whisk mixture until completely blended.
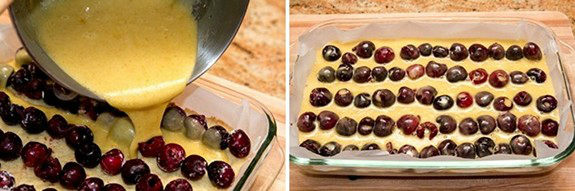
- Arrange cherries over cooled crust.
- Carefully pour filling evenly over fruit.
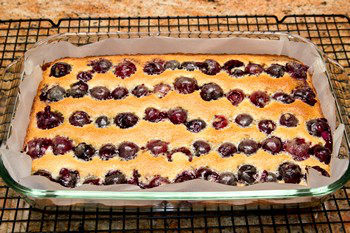
- Bake at 375ºF (190ºC) for about 30 minutes, until filling is puffed and golden. A skewer inserted in the center should come out clean. Cool bars completely in pan on a wire rack.
- Carefully lift the parchment paper to remove cooled bars from the pan and place them on a cutting board. Cut them into squares using a knife.
To Store
- Store bars in an airtight container for up to one day at room temperature, then store any remaining in the refrigerator.


Hi Nami, I love your blog and have made several of your Japanese recipes. Your photos and instructions are so clear and easy. I have made the cherry bars twice already and will be constantly making it while cherries are in season. My husband loves it heated in the micro and with vanilla ice cream, I love it with cool whip! Because there is just the two of us, I cut into bars and freeze layers so we always have them handy to thaw and eat! Thank you thank you!
Hello, Marsha! Thank you very much for trying Nami’s recipe and providing such positive comments.
Nami and all of us at JOC are thrilled to hear that the photographs and directions are simple to follow and that you and your husband enjoy the homemade Cherry Bars!
Thank you for sharing your favorite way to enjoy this! Happy Baking!🥰
Hello! Love your recipes and your precision instructions, pics and vids. They”re super helpful. Just a question about this recipe. I’m allergic to cherries. Can this recipe be made with fresh raspberries and blueberries?
Hi KaT, Thank you so much for reading Nami’s post and for your kind feedback!
We haven’t tested it with raspberries or blueberries, but it should work. Please keep us updated on how things go!
[…] Cherry Bars […]
Not a fresh cherry to be found in Massachusetts this time of year. Can i use this recipe with frozen cherries, well drained.
Hi Beth! I think fresh cherry would work best, and I am afraid I am not too sure how frozen cherries would work in this recipe. In some baking recipes, frozen fruits are not recommended, but I’m not sure this could be the case. I hope it will be ok… but can’t guarantee… I’m sorry!
Can you use frozen cherries? would that work too?
Hi Koko, I am positive you can use it, but make sure you drain the cherries well. 🙂 Let me know if it didn’t work…
とてもおいしいです! I baked it for my son’s 1st Birthday for my guests. We live in Singapore and Cherries aren’t easy to come by in fresh produce and so I used canned versions for baking recipes. This was 1 year ago and I loved the recipe so much, I plan to bake for my colleagues this year. 本当にありがとうございます。
Hi Juliana! ありがとう! I’m so glad to hear you enjoyed this recipe! Instead of cherries you can use other fruits that are available in Singapore too. 🙂 This is one of my favorite bars as well. Thank you for your kind feedback! 🙂
Very nice. Thank you and have a great weekend!
Thank you so much, Liz! I hope you have a great weekend too! xo
My daughter tried this recipe and everyone loved it! The almond adds such a nice touch to the cherries! We will be making this again! Would encourage any of your fans to try it.
Hi Sheri-Ann! So happy to hear your daughter made this recipe and you liked it! Thank you so much for your feedback. 🙂
I tried making these and they turned out AWESOME! would be even better with ice cream!! 🙂
Yay! So glad to hear you enjoyed it. True, next time I should eat with vanilla ice cream! 😀 Thank you so much for your feedback!
Hi Nami! I stumbled upon your blog this morning and I’m so glad I did. I am literally squealing with delight right now!!! I cannot wait to try so many of your recipes! The illustrations that accompany your instructions are very helpful (as I am a bit of a novice, haha).
I am so excited to share your blog with my family as well!
Thank you for all your hard work, you absolutely made my day and I’m sure many more days ahead as well!
Thanks again! 🙂
Hi Emily! Welcome to my blog! I’m so happy to hear you like my blog. Hope you find some recipes here that you and your family can enjoy. Thank you for your kind comment! You made my day. 🙂
These look scrumptious! I saw your pic on Instagram when you were waiting for it to cool off. The close up shots are gorgeous! Hope to try this one day.
Hi Donna! If you saw the instagram (right after baked), you can tell what iphone with indoor light, and good DSLR with natural light (and edit) can do to the same bars… LOL! I hope you will try this. SUPER delicious!
Oh, and of course, delicious looking bars!
Thank you Janice!
Hi Nami! Since we’re both residents of the bay area, I was wondering if you have a recommendation where to go cherry picking. I haven’t gone since I was a small child and would love do it again. Thanks!
We go to Brentwood area, and tried Nunn Better Farms, Pease Ranch and other places (sorry I don’t remember names).
http://www.yelp.com/search?find_desc=Cherry+Picking&find_loc=Brentwood%2C+CA
You can get peaches this time too! 🙂