
Baked Cheese Tarts
Make the perfect creamy and crispy snack at home with my Baked Cheese Tarts recipe. I'll teach you to whip up the heavenly cream cheese filling and a flaky short-crust pastry that's tender yet crunchy. It's delicious warm, cooled, or chilled!
Equipment
- 3-cup food processor, (or stand mixer with paddle attachment)
- 8 egg tart molds, (or a standard muffin pan or mini tart pan)
- 3½-inch round cookie cutter, (9 cm)
- 8 parchment baking liners, (cupcake size)
- pie weights, (or dried beans)
- piping bag and tip, (or a resealable plastic bag snipped on one corner with scissors)
- rolling pin guides, (optional)
- resealable plastic bag, (gallon size)
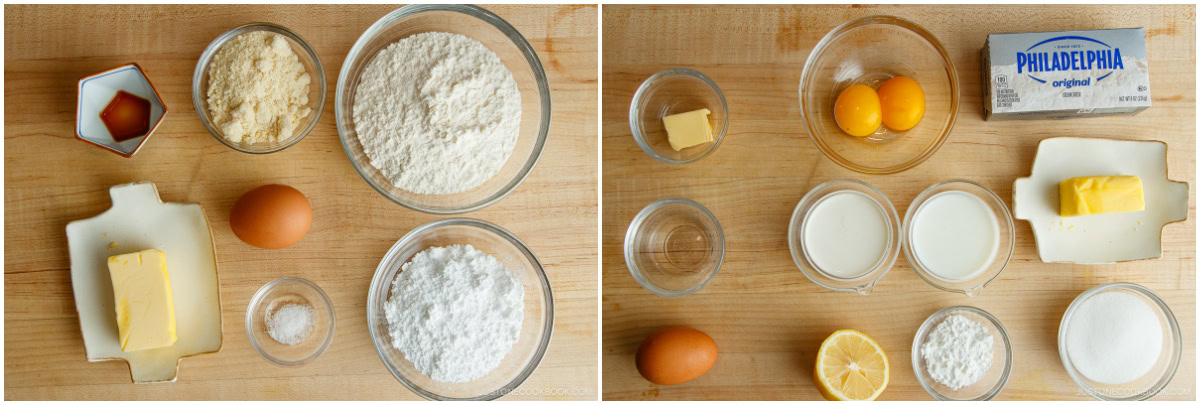
Ingredients
For the Pastry Dough
- ¼ cup unsalted butter
- ½ cup confectioners’ sugar
- 1 large egg yolk (or substitute 1½ Tbsp, 22 g milk; reserve 1–2 tsp egg white to use, if needed)
- ¼ tsp pure vanilla extract
- ¼ cup almond flour (weigh your flour; for weights, click the Metric button above; I use King Arthur Almond Flour)
- ⅛ tsp Diamond Crystal kosher salt (1 pinch)
- 1 cup cake flour (weigh your flour; click the Metric button for weights; or use the “fluff and sprinkle“ method and level it off; you can make homemade cake flour; I use King Arthur Unbleached Cake Flour)
For the Cheese Filling
- ¼ cup sugar (granulated)
- 2 large egg yolks
- 1 Tbsp cornstarch
- 3 Tbsp whole milk (you can substitute low-fat milk; do not use nonfat milk)
- 3 Tbsp heavy cream
- 3 Tbsp unsalted butter
- 8 oz cream cheese (full-fat; 1 brick, 1 cup; I use Philadelphia brand)
- 2 tsp lemon juice
For Baking
- 1 Tbsp unsalted butter (for greasing the pan)
- 1 large egg (50 g each w/o shell) (for the egg wash)
- 1 tsp water (for the egg wash)
Instructions
Before You Start...
- Please note that this recipe requires a pre-chilling time of 1–2 hours for the equipment and ingredients to make the pastry dough and a chilling time of 3 hours or overnight for the pastry dough. First, gather all the ingredients. I highly encourage you to weigh your ingredients using a kitchen scale. For weights, click the Metric button above. If you‘re using a cup measure, please follow the method in my post How to Measure Flour: Fluff your flour with a spoon, sprinkle it into your measuring cup, and level it off. Otherwise, you may scoop more than you need.
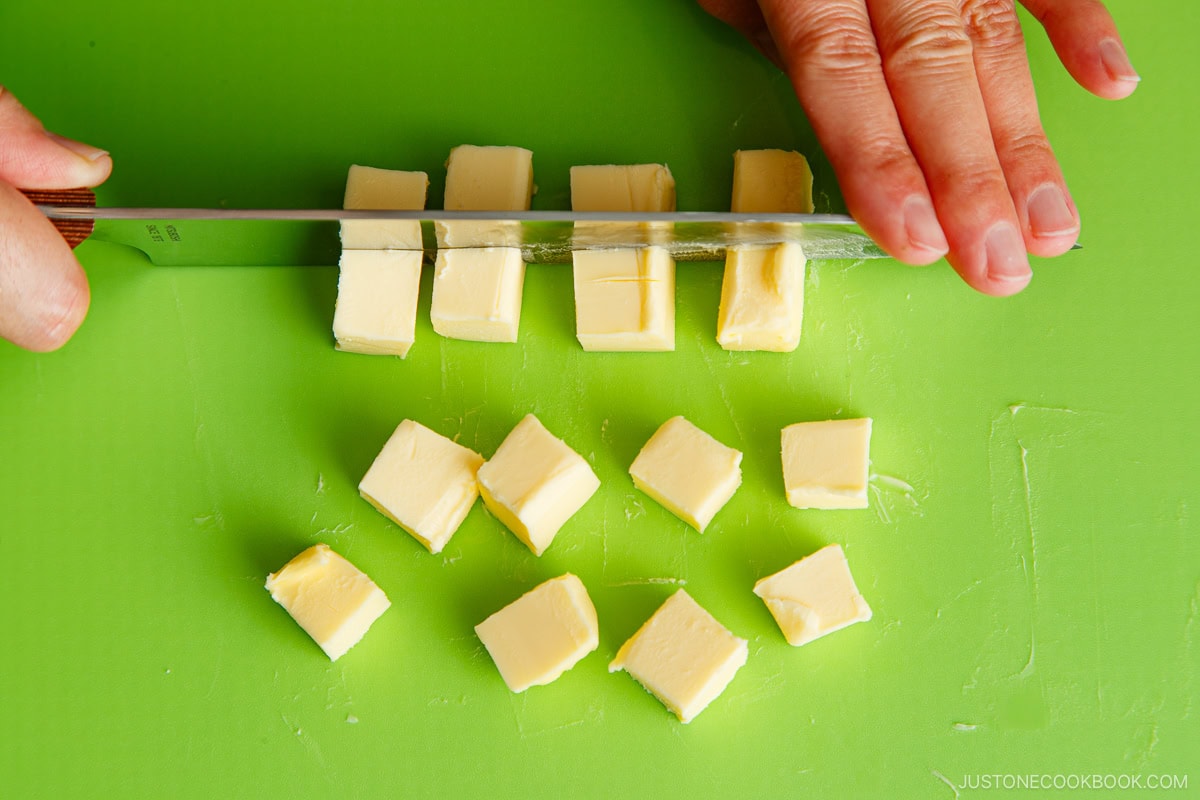
- Next, chill your pastry dough ingredients and equipment so they're very cold when you start. Cut the butter into ¾-inch (2-cm) cubes and place them in the freezer. Place the cake flour, powdered sugar, almond flour, salt, and egg in the refrigerator. Finally, place the removable parts of a 3-cup food processor (for one batch; or a stand mixer) in the fridge. Chill everything for at least 1–2 hours.
To Prepare the Pastry Dough
- In a food processor (I recommend a 3-cup mini processor for one batch), add ¼ cup unsalted butter and process.
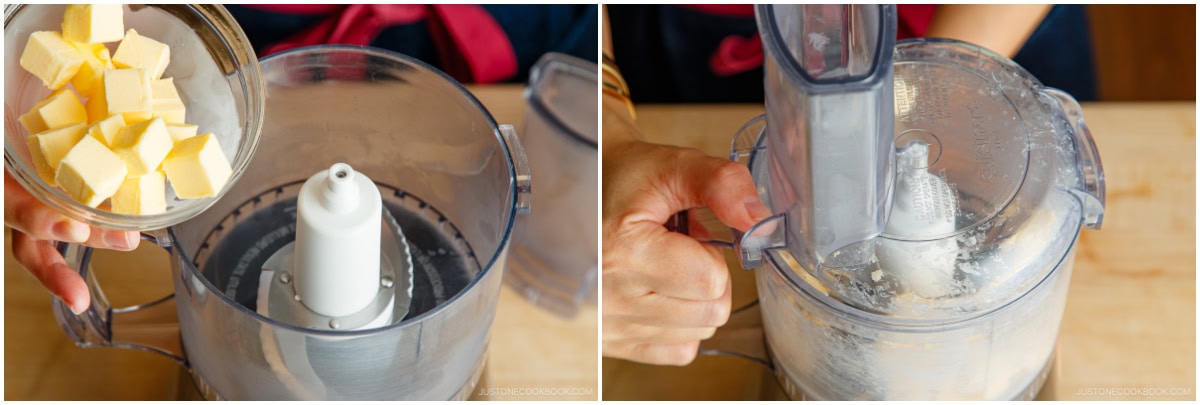
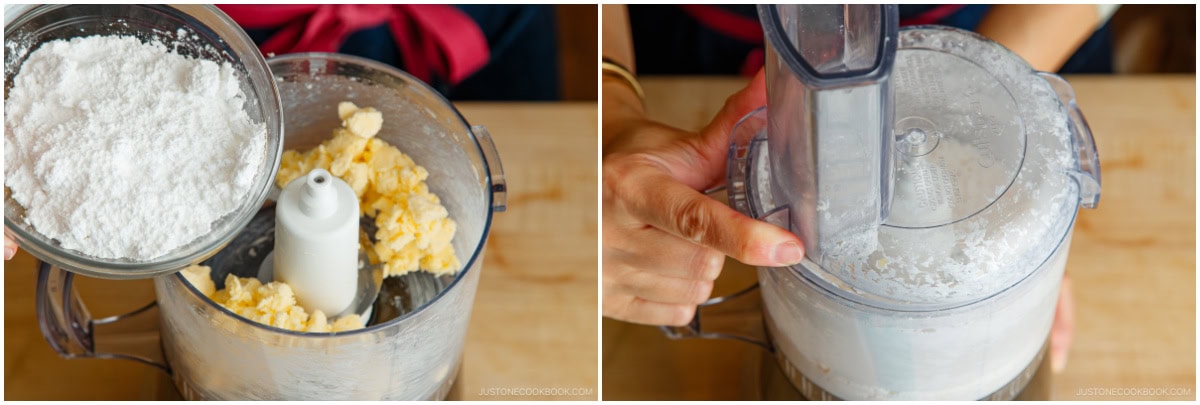
- Then, add ½ cup confectioners’ sugar and process until smooth. Alternatively, in a stand mixer with a paddle attachment, cream together the butter and sugar until smooth.
- Add 1 large egg yolk and ¼ tsp pure vanilla extract, mixing until incorporated.
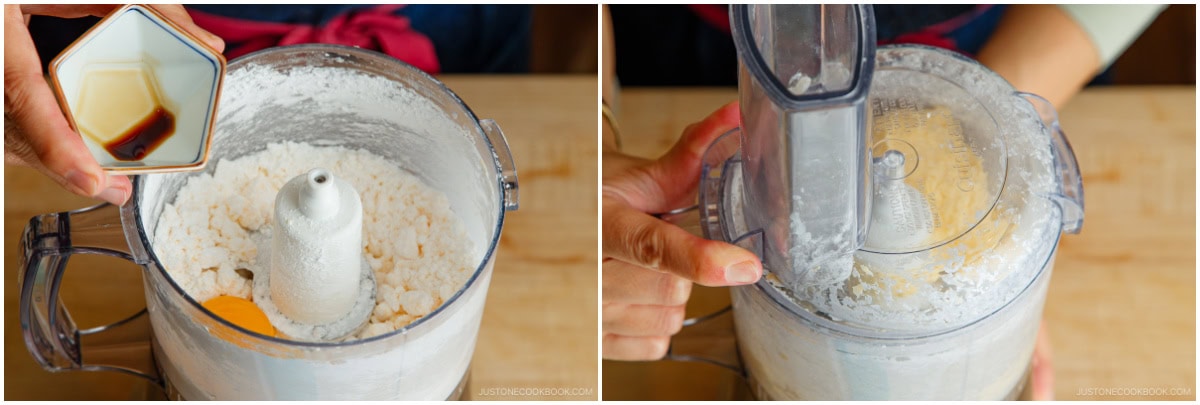
- Add ⅛ tsp Diamond Crystal kosher salt and ¼ cup almond flour and mix until smooth.
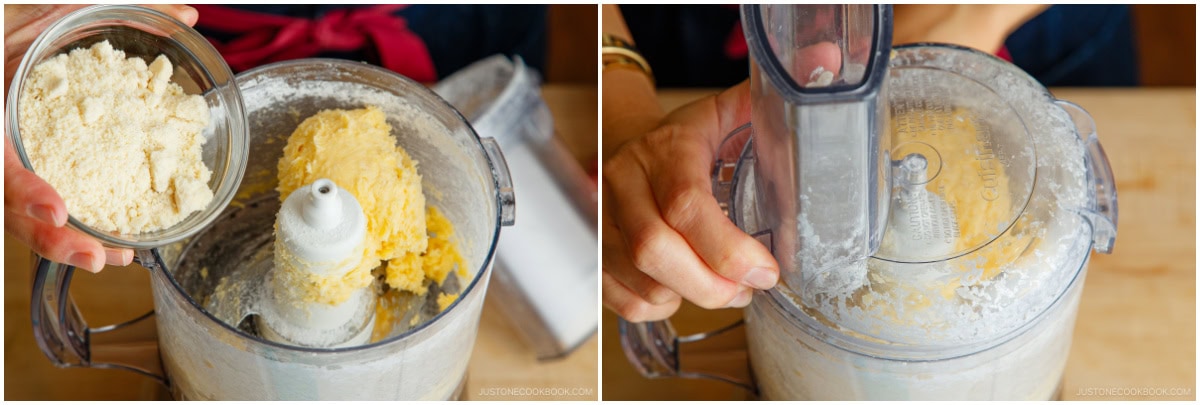
- Add 1 cup cake flour and process on low.
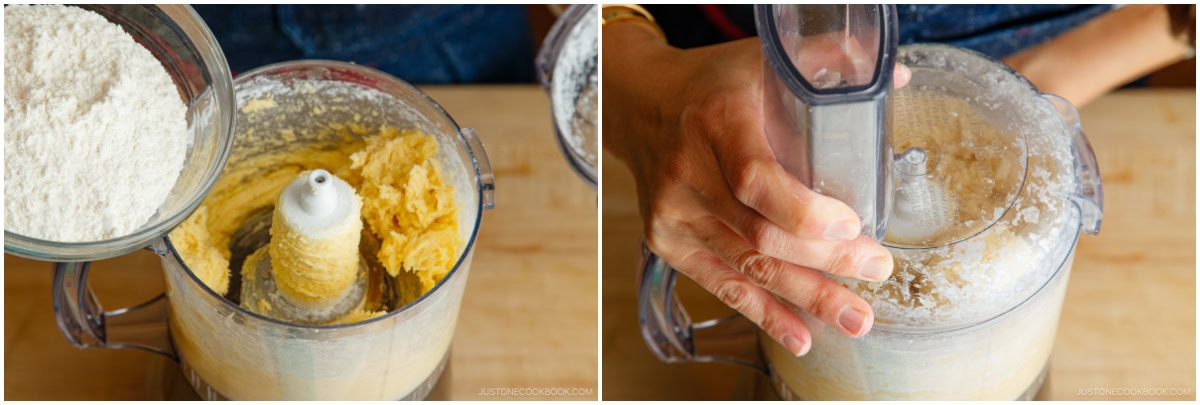
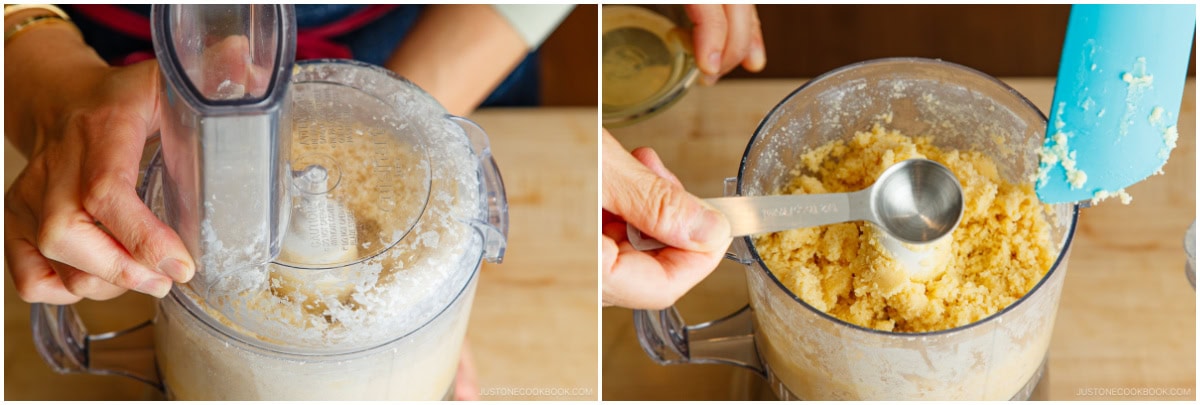
- Scrape down the sides of the bowl with a spatula. Keep mixing.
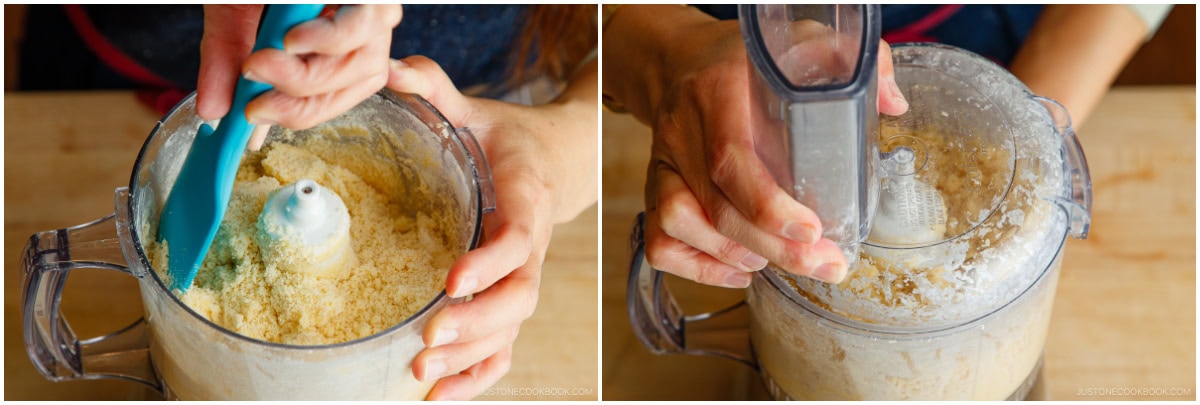
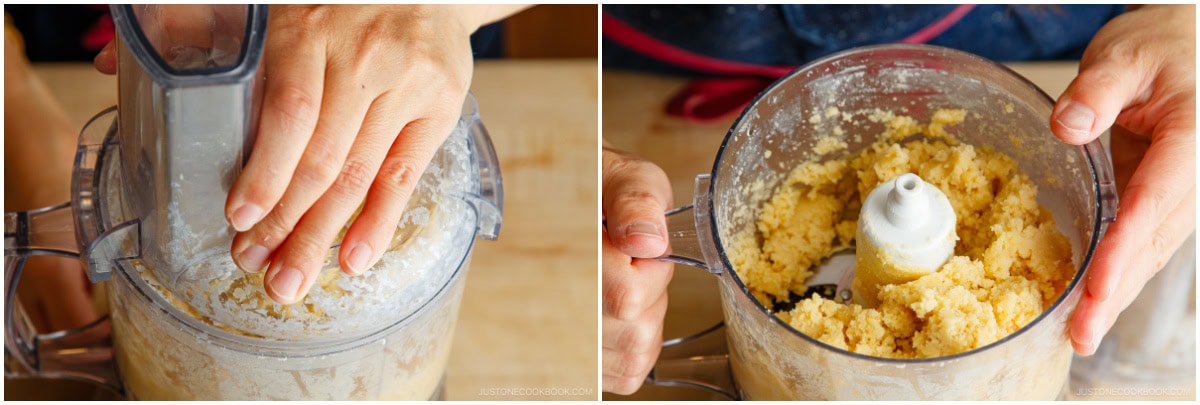
- Mix until the butter is fully incorporated. The dough should come together yet be a bit crumbly. If it doesn't, add reserved egg white or more egg yolk to help it bind. Mine is still too fluffy, so I added 1 tsp reserved egg white.
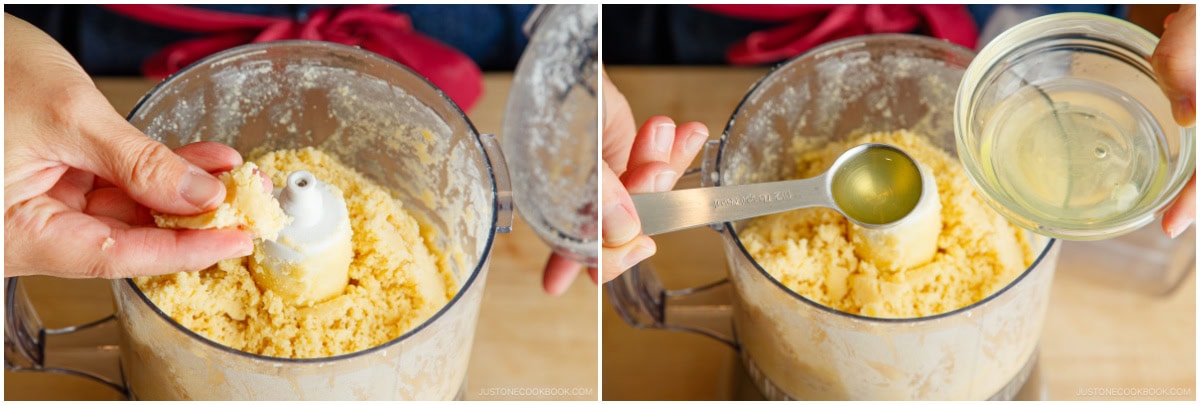
- Blend again and check the consistency. I added another 1 tsp of egg white.
- Blend and check if the dough comes together. Now, it looks great.
- Transfer the dough to a 1-gallon resealable plastic bag. Press out the air from the bag and seal it.
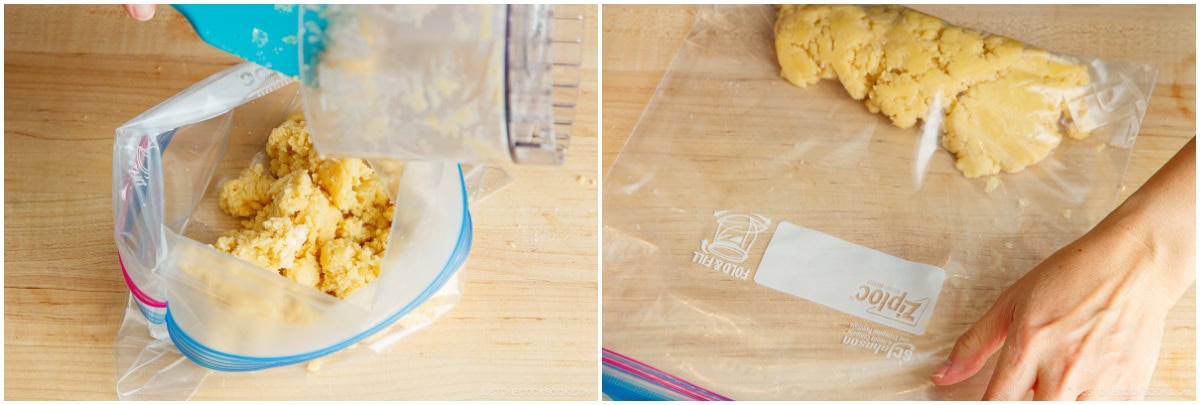
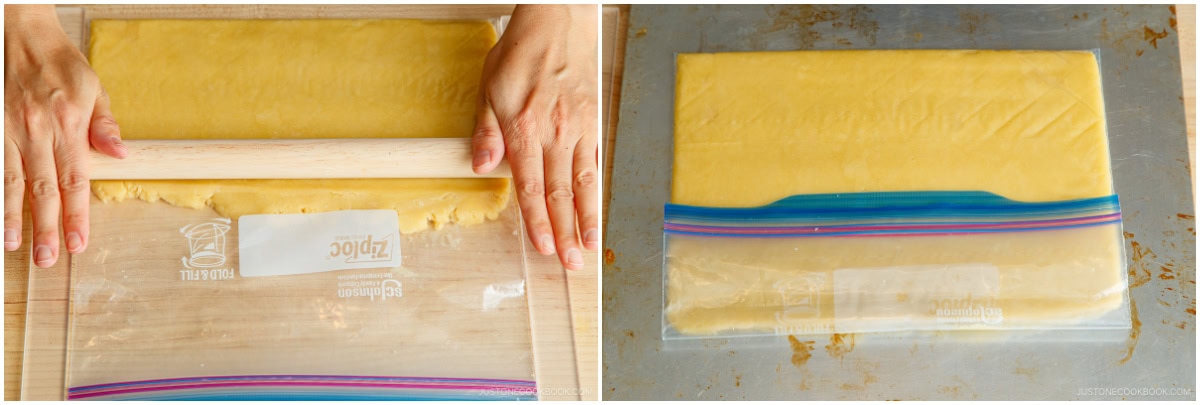
- Use a rolling pin to flatten the dough in the bag to 5 mm (a bit less than ¼ inch) thick. We'll fix the thickness after chilling, so it doesn't have to be perfect at this stage. I placed rolling pin guides (I used acrylic balance rulers) on either side of the bag to help roll it evenly. You could also use wooden rolling pin guides or square-sided disposable chopsticks.
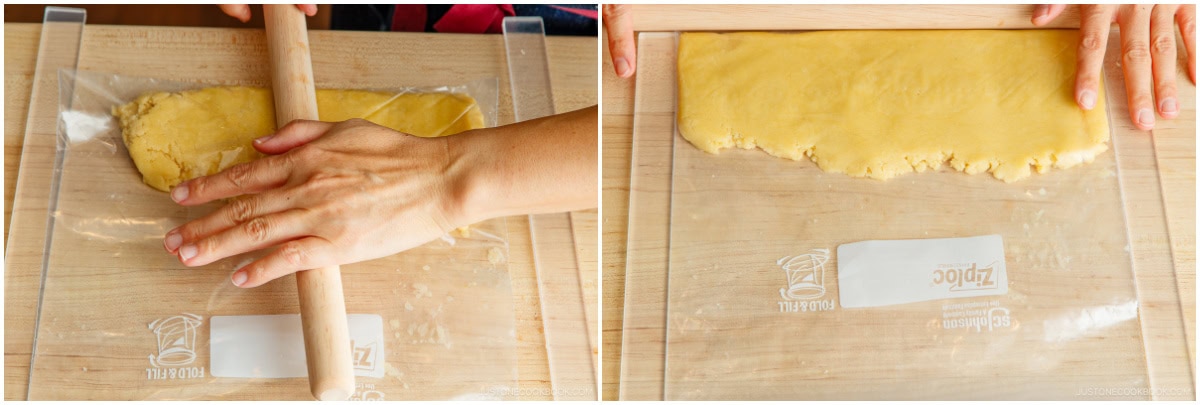
- Keep rolling until the dough's a flat and even thickness, filling the bag about three-quarters of the way (to about 8 x 10 inches or 20 x 25 cm). Place the bag on a flat tray or sheet and chill in the refrigerator for at least 3 hours or overnight (or freeze for 1 hour if you’re in a hurry).
To Prepare the Cheese Filling
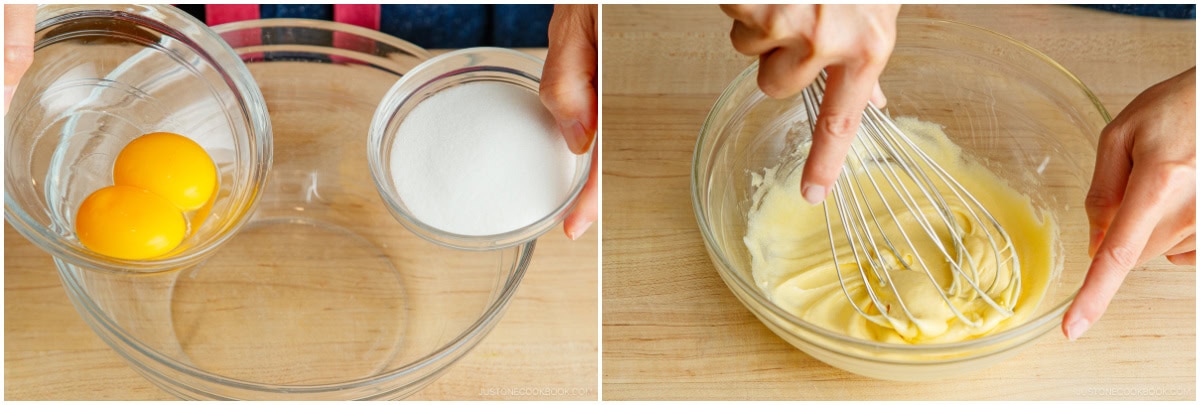
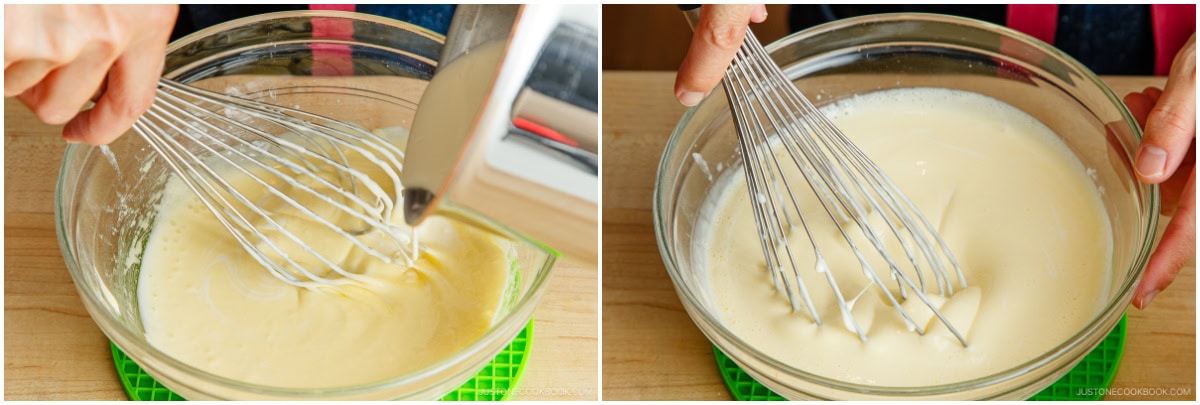
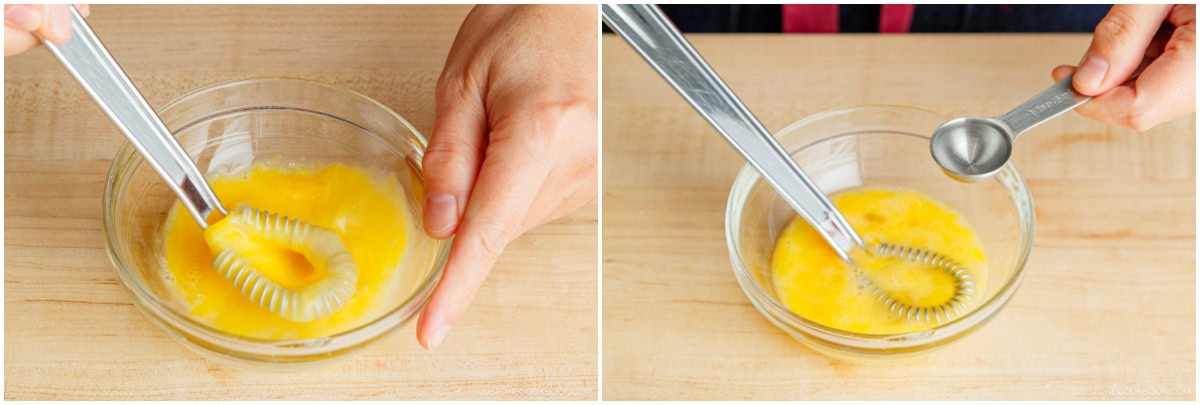
- In a large bowl, whisk together ¼ cup sugar and 2 large egg yolks by hand until slightly fluffy, about 1–2 minutes.
- Add 1 Tbsp cornstarch and whisk until you have a smooth paste.
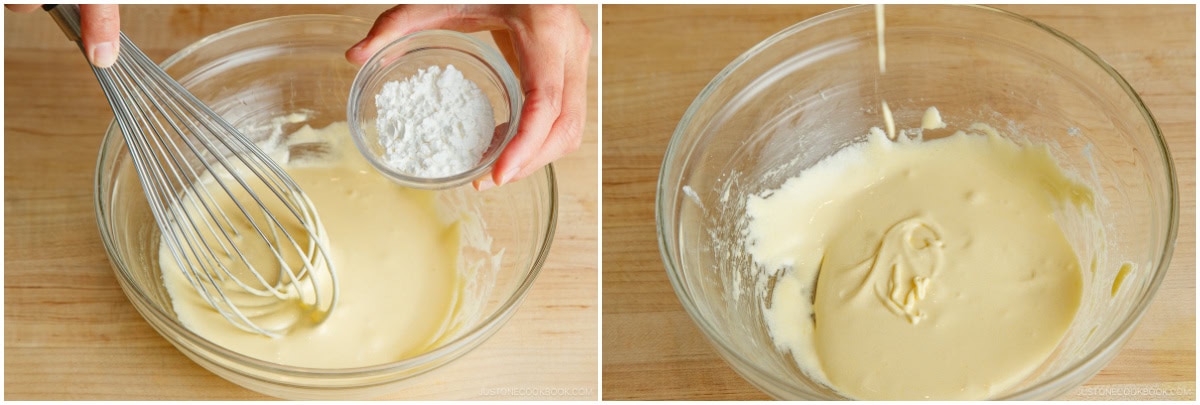
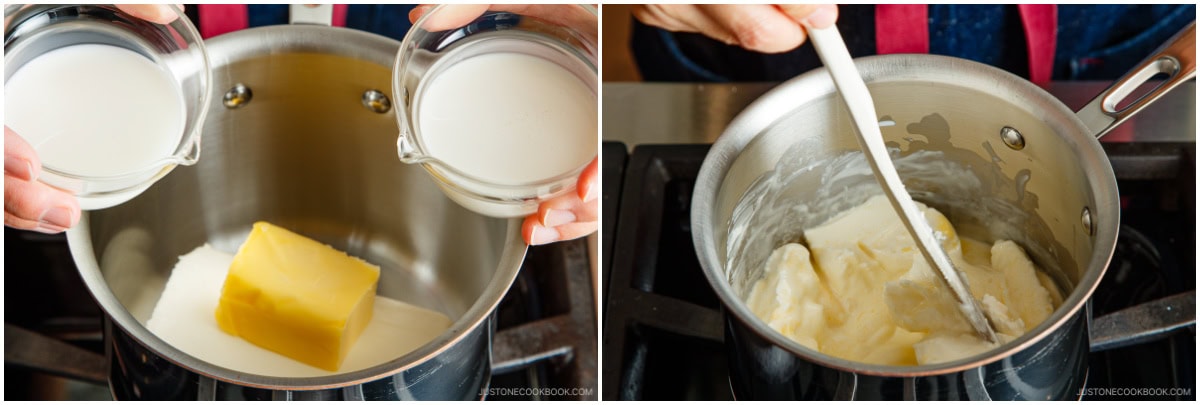
- In a saucepan, heat 3 Tbsp whole milk, 3 Tbsp heavy cream, 3 Tbsp unsalted butter, and 8 oz cream cheese over low-medium heat. Use a spatula to break up the cream cheese, and once it begins to melt, whisk until smooth. Remove from heat as soon as the ingredients are combined, just before simmering.
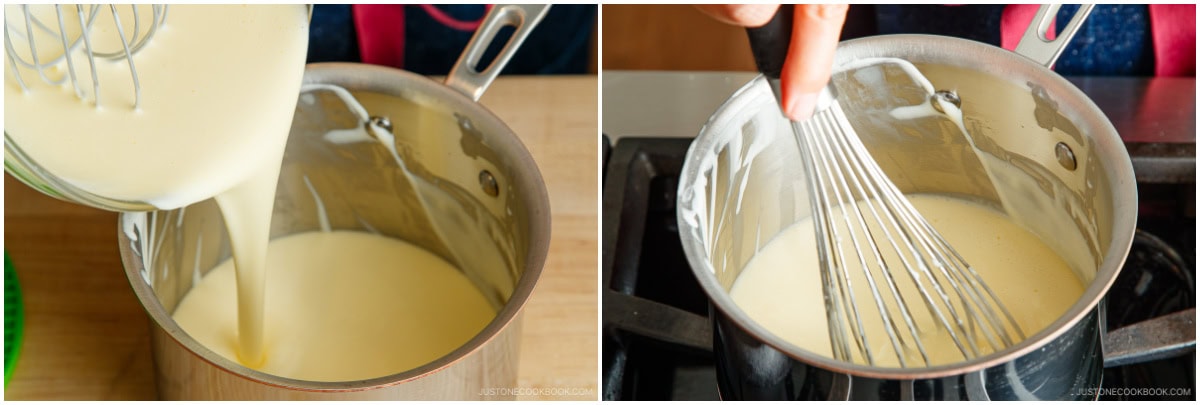
- Now, temper the egg yolk mixture. Gradually pour the warm cheese mixture into the bowl with the egg yolk mixture while whisking vigorously. The mixture should thicken slightly.
- Pour the mixture back into the saucepan. Cook, stirring frequently, on medium heat for a few minutes. Stir vigorously for about 1 minute after it begins to boil (you see small bubbles around the edges).
- At this stage, the temperature is around 160°F (71°C) and it will start to thicken.
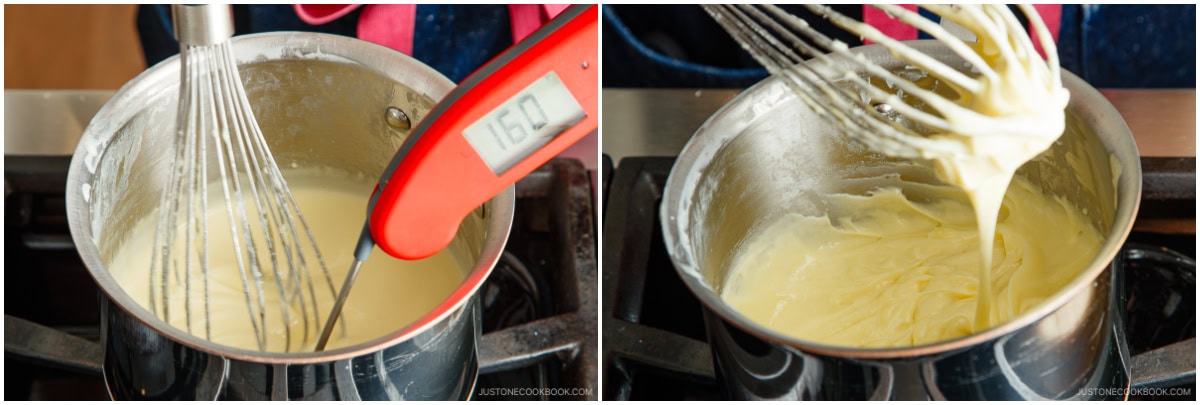
- When the mixture has thickened, remove from the heat. Then, add 2 tsp lemon juice, which will loosen and smooth out the mixture a bit. Mix until incorporated.

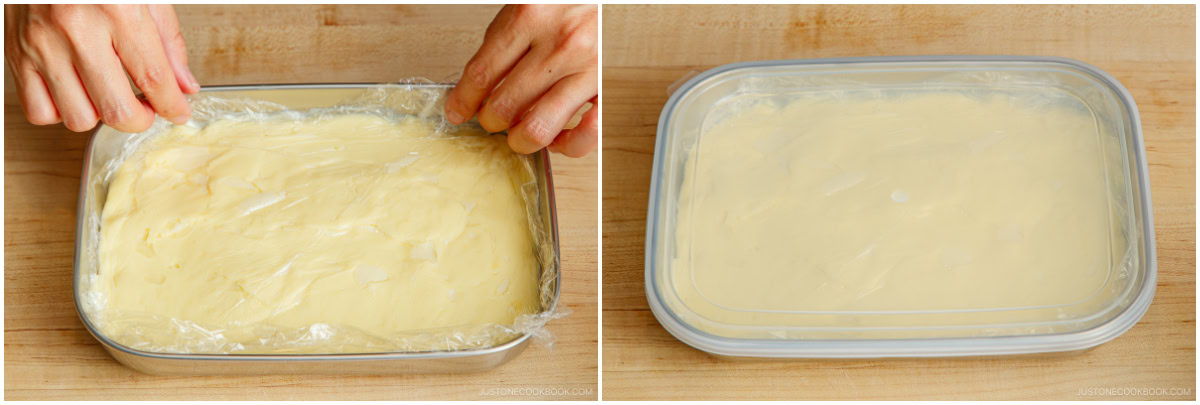
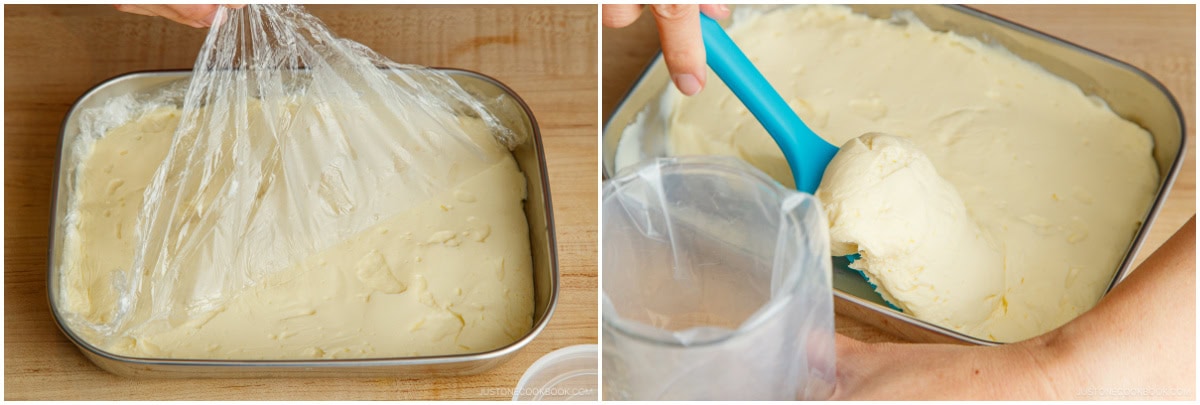
- Pour the cheese filling into a shallow tray or bowl (I used a prep tray from JOC Goods). Level it and smooth the top with a spatula.

- Place a sheet of plastic wrap or parchment paper directly on the surface of the cheese mixture to prevent a skin from forming. Cover the tray or bowl with a lid. Cool to room temperature, then store it in the fridge until ready to use.
To Make the Pastry Shells
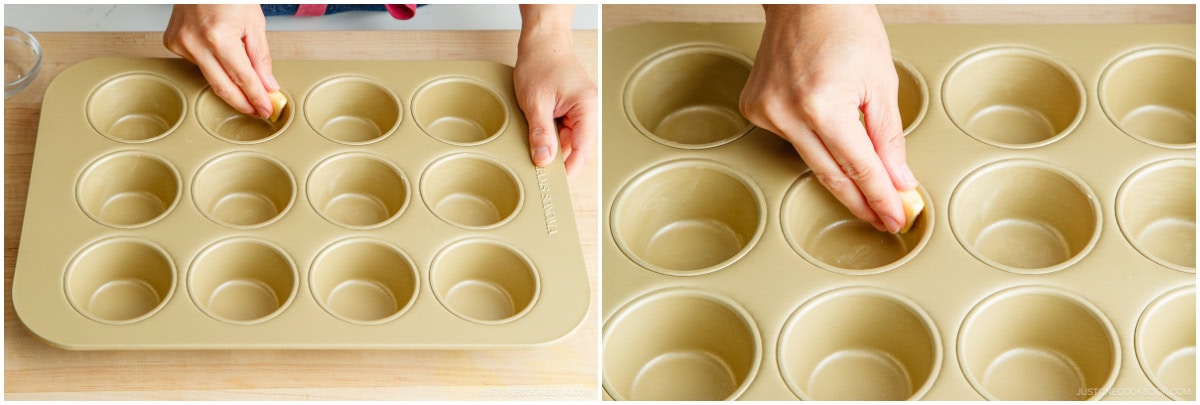
- Grease the tart molds or muffin pan cups with 1 Tbsp unsalted butter. You don't have to use all the butter.
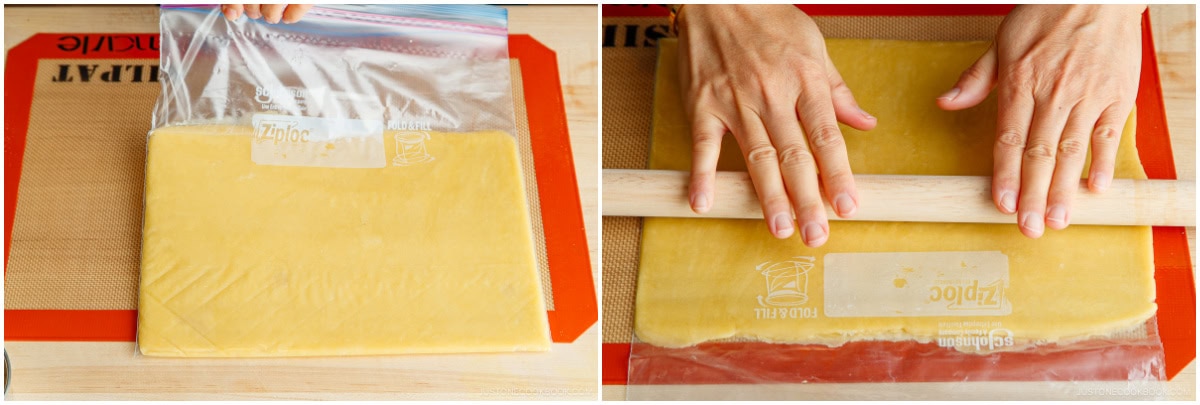
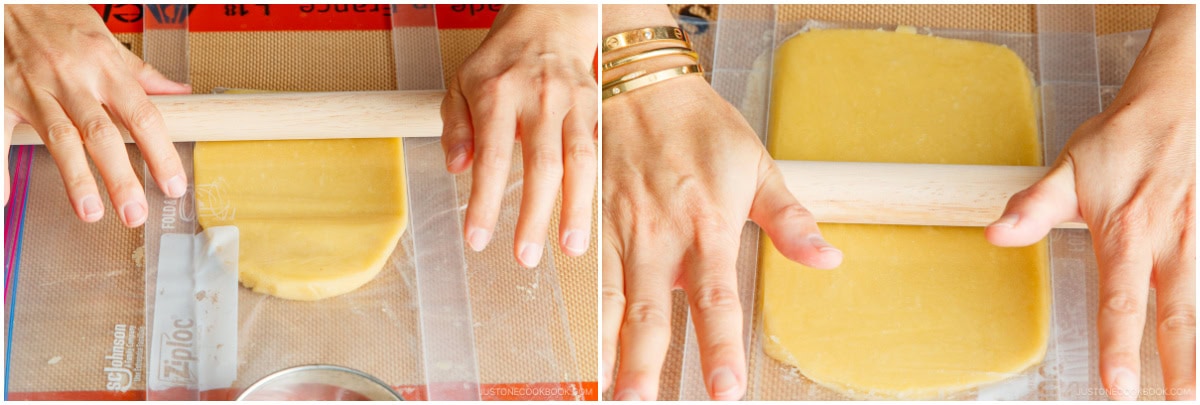
- Place the bag of chilled dough on top of your work surface. I use a Silpat baking liner to prevent sticking. Through the bag, roll the chilled dough again to exactly 5 mm (a bit less than ¼ inch) thick.
- Cut the sides of the resealable bag with a knife and peel away the top side, leaving the bottom side in place.
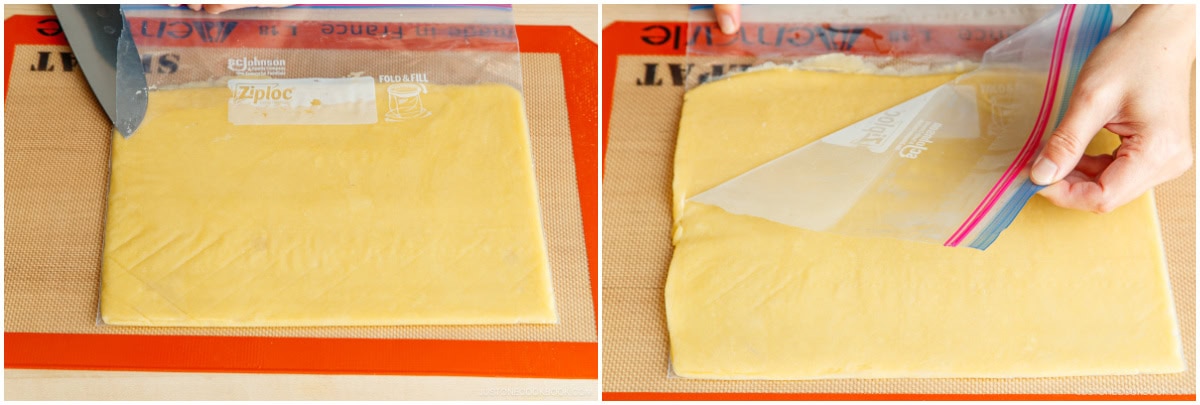
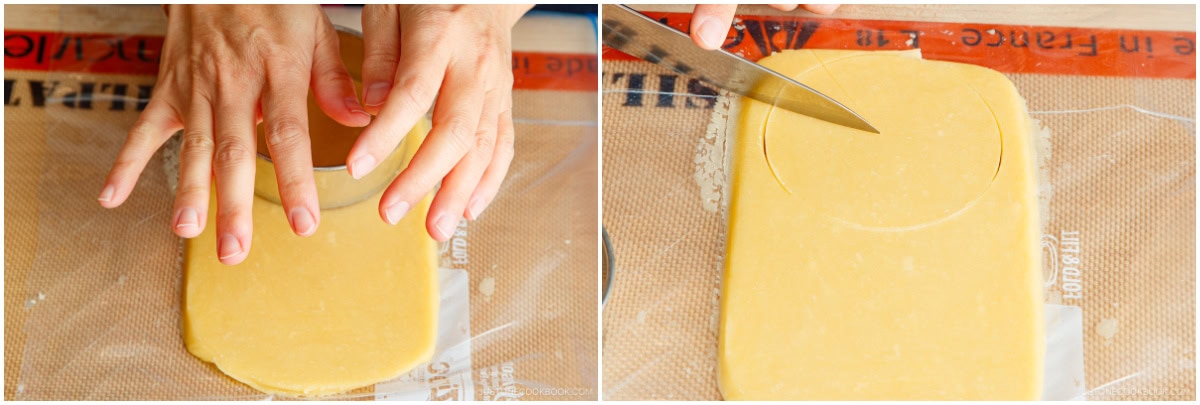
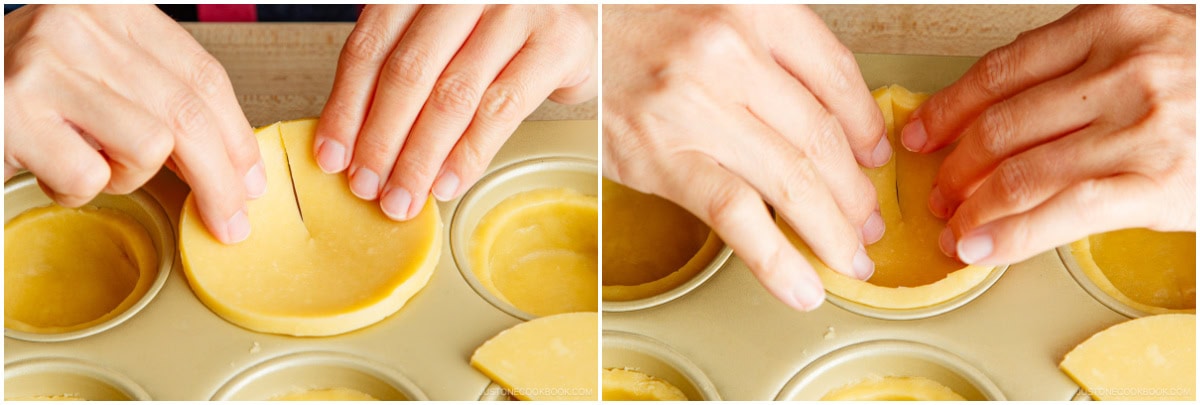
- Using a 3.5-inch (9-cm) round cutter, punch out a circle of dough.
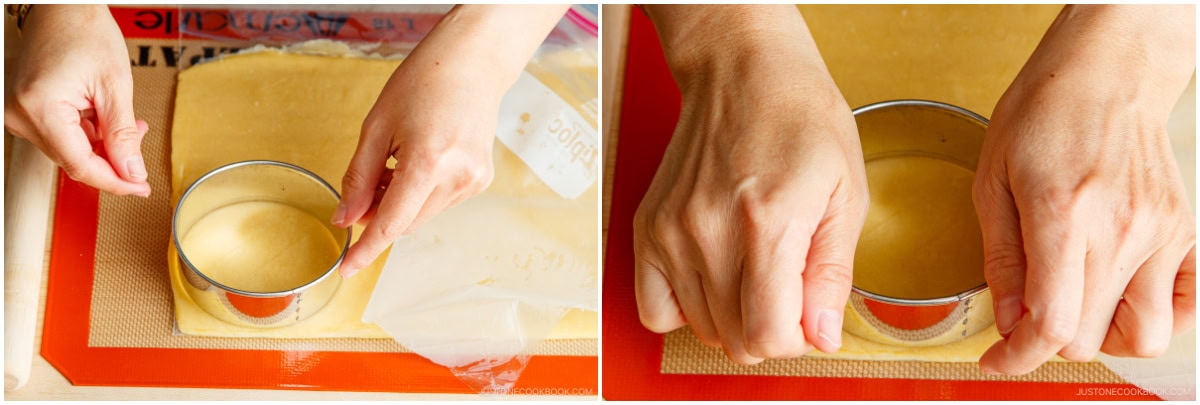
- Use a knife to cut out a small, pie-shaped wedge (about one-eighth of the circle) from the dough round. This will help the dough fit neatly into the mold. Then, set the dough round on top of a tart mold or muffin cup. While working on the next rounds, the chilled dough will warm up and become a bit more pliable. You don't want to wait too long, either, because the dough will tear easily if it's too warm.
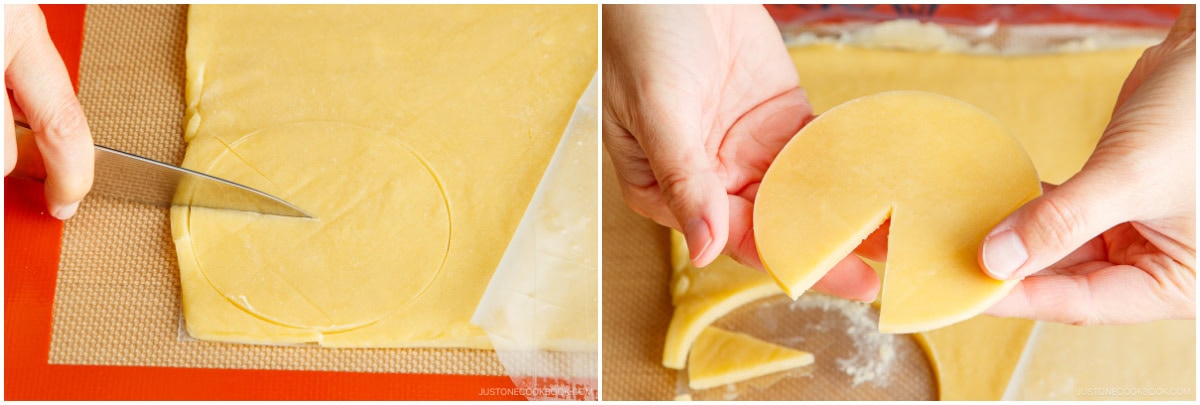
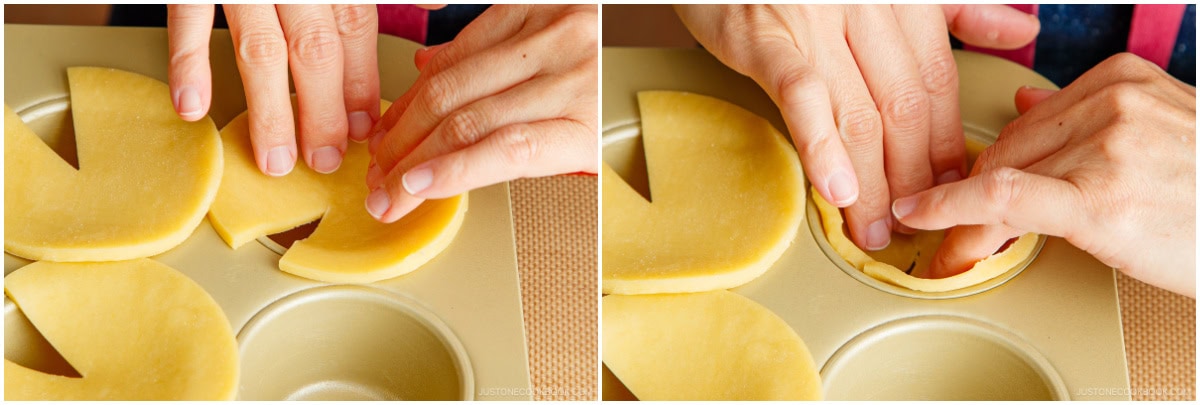
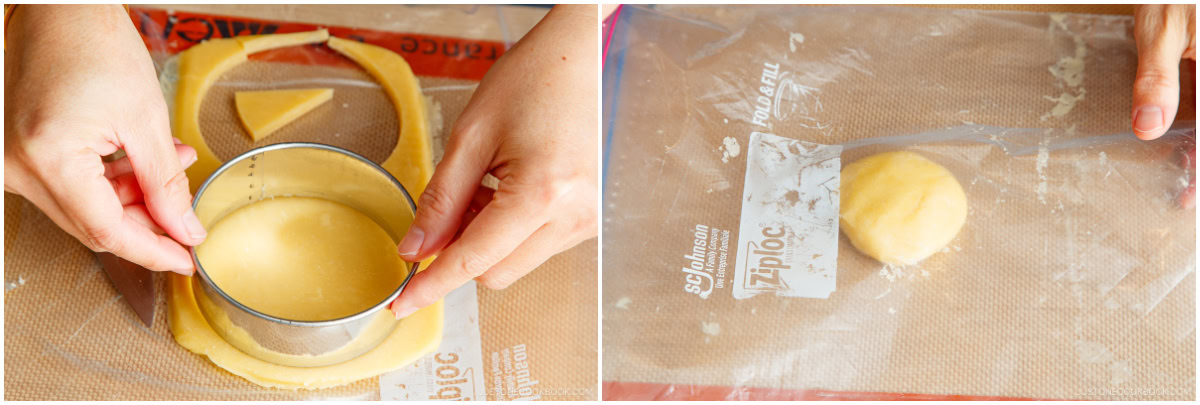
- Repeat punching more rounds from the dough, cutting out small wedges, and transferring them on top of the molds.

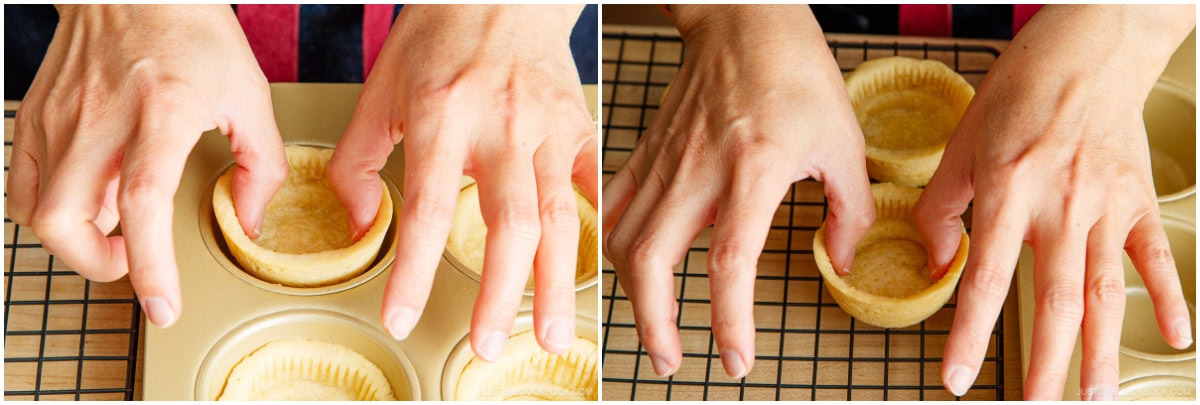
- As soon as the dough rounds look pliable, fit them into the molds to make pastry shells that are about 1 inch (2.5 cm) deep. They should slide in easily. Press the dough gently into the corners and smooth the edges. Tip: Don't stretch or extend the dough, which will make the pastry shell too thin. For a typical muffin cup or tart mold, there won't be enough dough to cover the sides all the way up to the top edge. Also, avoid touching on the outer rim of the dough round and ruining its sharp edge and neat appearance.
- Re-roll the leftover dough between the sheets of the same plastic bag.
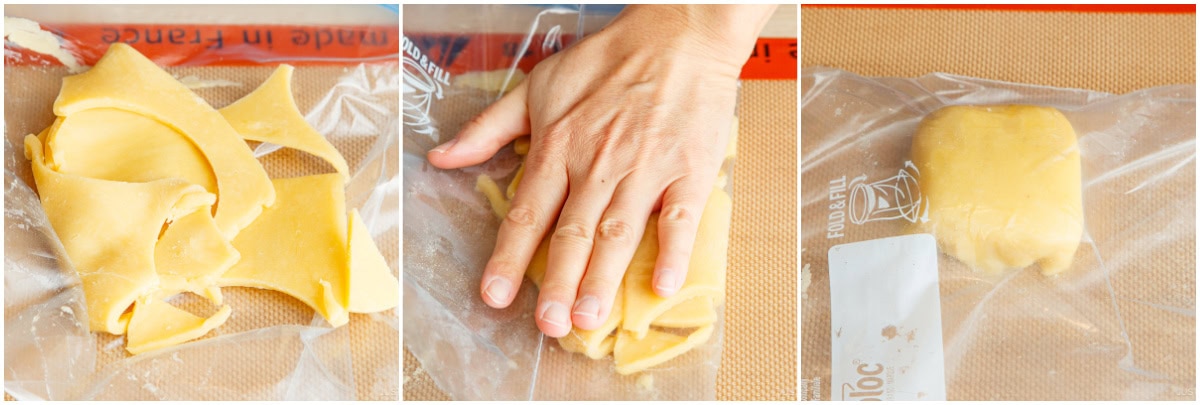
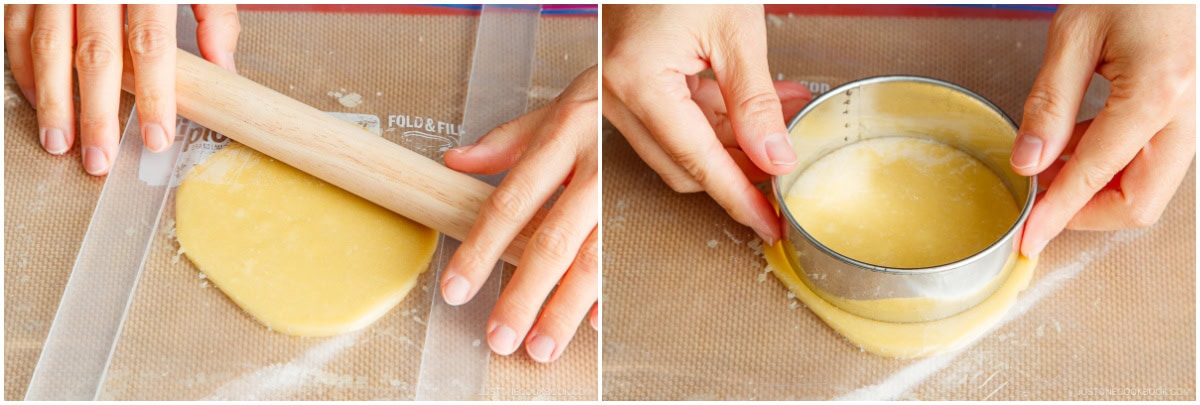
- Roll to a thickness of 5 mm (a bit less than ¼ inch) over the plastic so the rolling pin doesn't stick.
- Use the cutter to punch out more dough rounds and cut out small wedges.
- Re-roll the leftover pieces again.
- Repeat until you use all the dough.
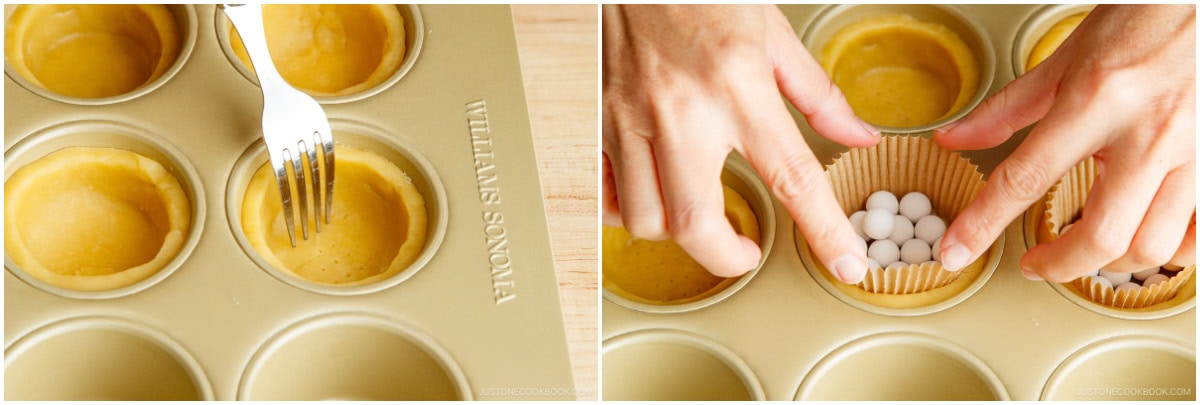
- Press the pastry dough into the corners and sides of the molds to form the shells to 1 inch (2.5 cm) deep. Make the top edges of the shells neat for presentation.
To Blind Bake the Pastry Shells
- Preheat the oven to 350°F (180°C). Prick the bottom of each tart shell with a fork. Place a parchment liner in each shell, and fill with pie weights.
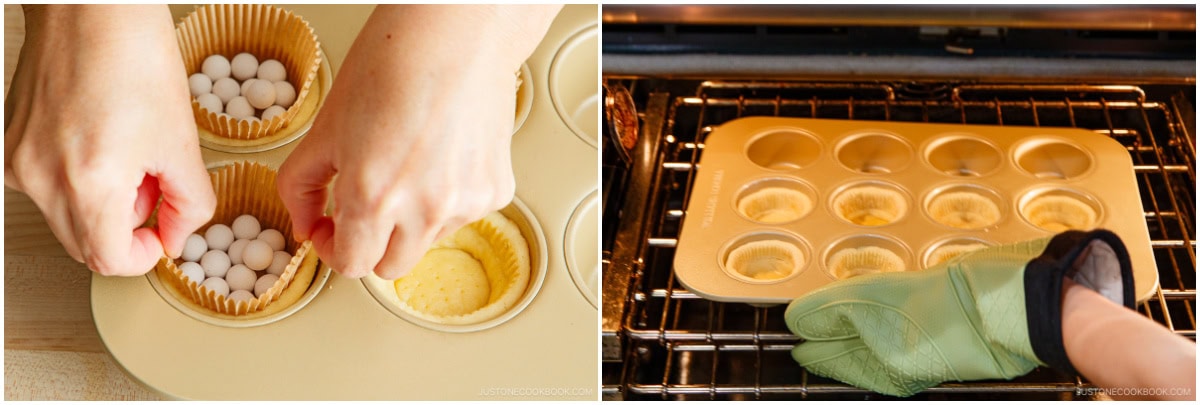
- Repeat with the rest of the shells. Bake at 350°F (180°C) for about 15 minutes.

- Take out the muffin pan, remove the liners and pie weights, then return the pan to the oven. Lower the temperature to 320°F (160°C), and bake for 5 more minutes or until set but still pale.
- When the shells are set but still slightly pale, remove them from the oven.
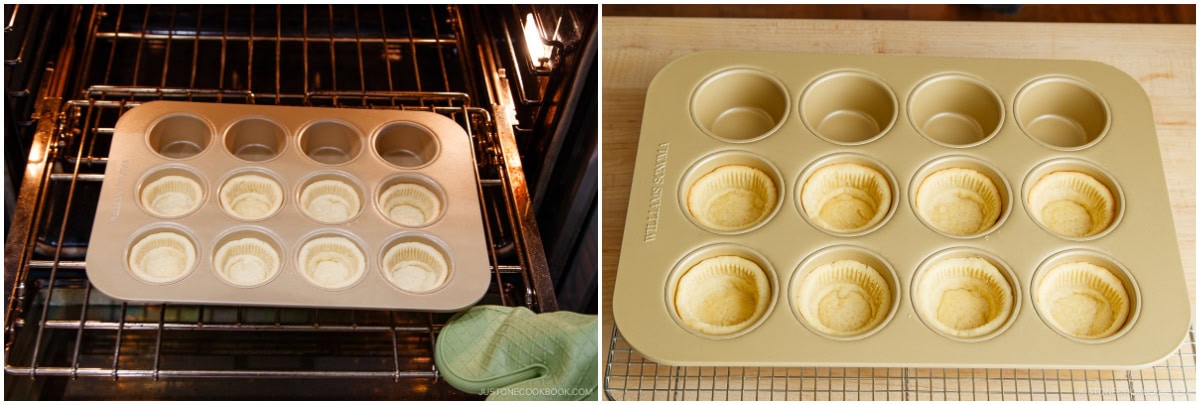
- Gently lift out the shells from the pan and place on a wire rack to cool. Tip: With my thumbs inside the pastry, I apply gently outward pressure to lift them up and transfer them to the cooling rack.
To Assemble and Bake the Cheese Tarts
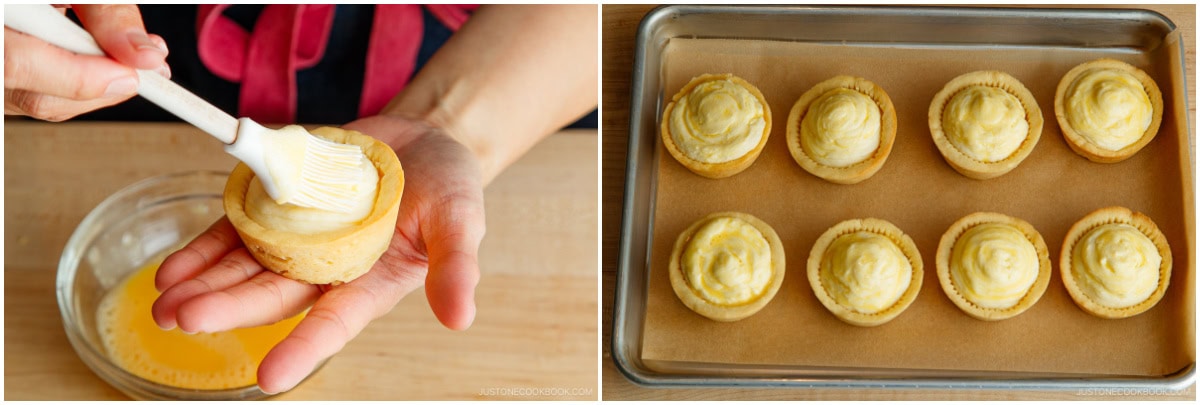
- Preheat the oven to 425°F (220°C). To make the egg wash, beat 1 large egg (50 g each w/o shell) with a whisk in a small bowl. Add 1 tsp water and whisk again. Set aside.
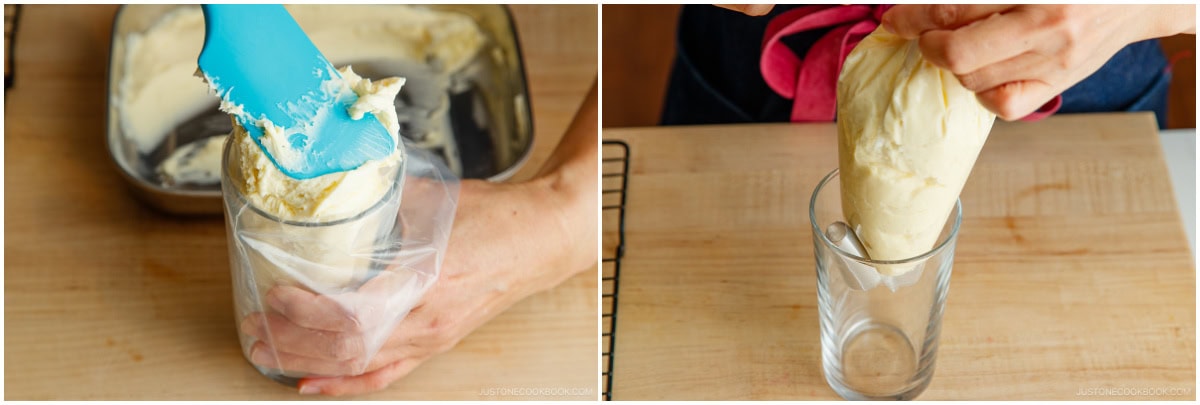
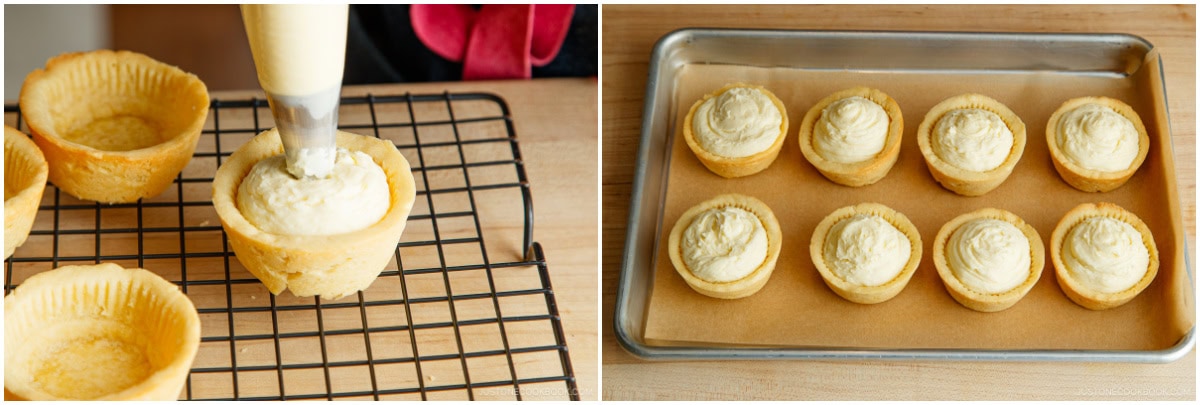
- Remove the cheese filling from the refrigerator. Place a piping tip in a pastry bag and set it over a cup.
- Transfer the cheese filling to the piping bag with a spatula.
- Pipe the cheese filling into the cooled tart shells. Squeeze the filling into close to the center bottom, staying in that position until it fills up all the way and looks overfilled, and then pull out. If the cheese filling is too firm, let it sit for a bit at room temperature to soften for easier piping.

- Set the filled tarts on a baking sheet lined with parchment paper.
- Brush the egg wash over the surface of each filled tart.
- Place the tarts on the upper-middle rack in the oven and bake at 425°F (220°C) for 10–15 minutes.
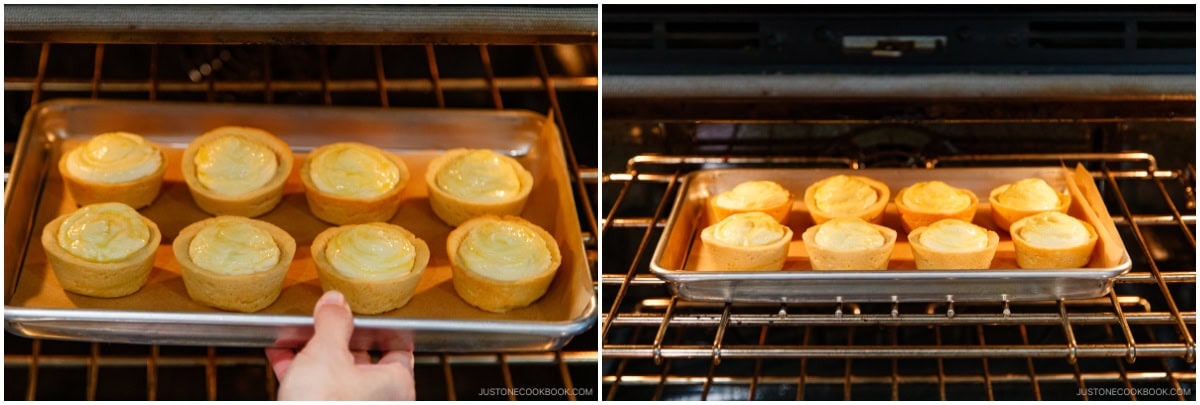
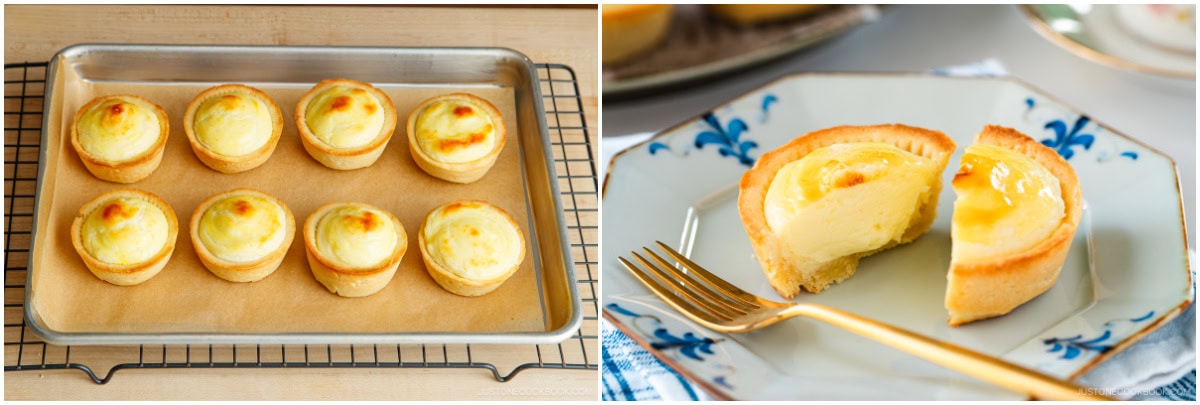
- Rotate the baking sheet halfway through for even coloring. The cheese tarts are done when the surface is dry and turns golden.
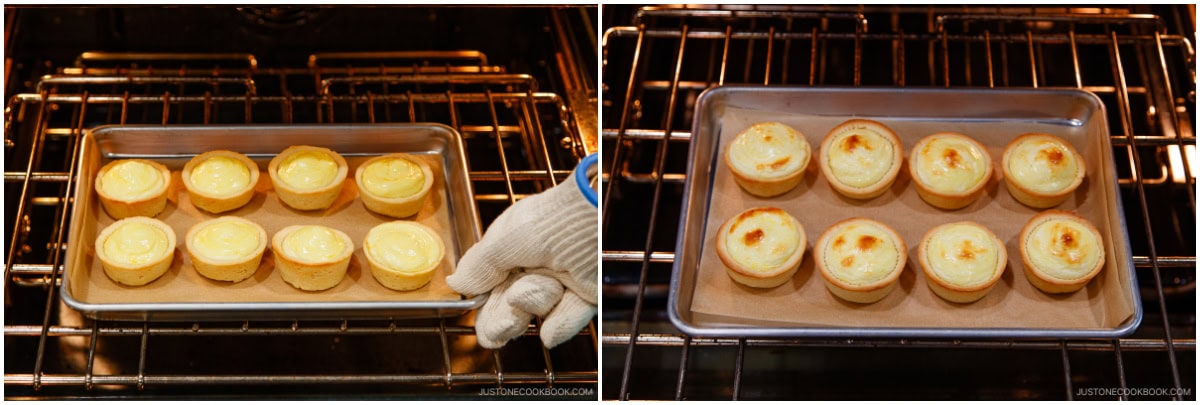
- Let cool on the wire rack for a few minutes. For the best flavor, enjoy them warm or at room temperature on the same day they’re baked. When chilled in the refrigerator, the filling becomes denser, allowing you to enjoy a texture similar to a Japanese rare cheesecake.
To Store
- If you plan to eat the tarts the same day, keep them at room temperature. Cover them lightly with plastic wrap or place them in an airtight container to prevent drying. For longer storage, keep the tarts in an airtight container in the refrigerator for up to 3 days. This will preserve the texture of the filling, giving it a dense, creamy consistency similar to cheesecake. You can also freeze them for up to one month. Wrap each tart individually in plastic wrap, then place them in an airtight container or freezer bag in the freezer. To serve, thaw at room temperature or enjoy them frozen for a texture similar to ice cream.
To Reheat
- If you prefer a freshly baked texture, lightly warm refrigerated or thawed tarts in a preheated oven or toaster oven for a few minutes. This will restore the crispy crust and slightly soften the filling.
Nutrition
Calories: 366kcal, Carbohydrates: 28g, Protein: 6g, Fat: 26g, Saturated Fat: 15g, Polyunsaturated Fat: 1g, Monounsaturated Fat: 7g, Trans Fat: 0.4g, Cholesterol: 133mg, Sodium: 116mg, Potassium: 80mg, Fiber: 1g, Sugar: 14g, Vitamin A: 897IU, Vitamin C: 1mg, Calcium: 61mg, Iron: 1mg
