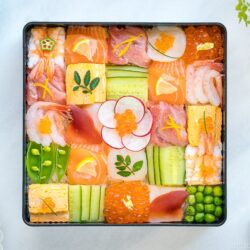
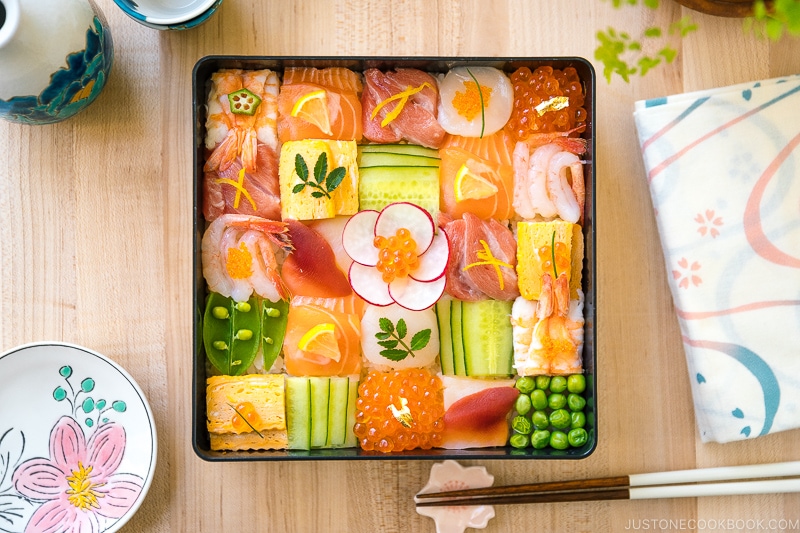
Mosaic Sushi
This colorful Mosaic Sushi features sashimi, tamagoyaki rolled omelette, and vegetables arranged in a checkerboard pattern over sushi rice. It‘s a feast for the senses! Despite its exquisite presentation, anyone can make it at home. I’ll teach you an easy method to prepare this modern take on sushi that‘s sure to impress.
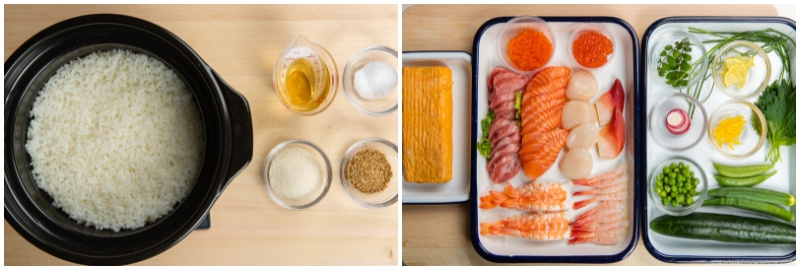
Ingredients
For the Sushi Rice
- 3½ cups cooked Japanese short-grain rice (2 rice cooker cups (180 ml x 2 = 360 ml or 300 g) of uncooked Japanese short-grain rice yield 3½ US cups (660 g) of cooked rice)
- 4 Tbsp rice vinegar (unseasoned)
- 2 Tbsp sugar
- 1 tsp Diamond Crystal kosher salt
- toasted white sesame seeds
For the Toppings (use this as an example; feel free to choose your own)
- 3 slices sashimi-grade salmon
- 3 slices sashimi-grade tuna (I used otoro)
- 6 pieces sashimi-grade shrimp (amaebi)
- 2 pieces cooked shrimp
- 1 piece sashimi-grade scallop
- 2 pieces cooked surf clam (hokkigai)
- 4 Tbsp Ikura (save some for the garnish)
- 1 Tamagoyaki (Sweet Rolled Omelette) (only need a few thin slices)
- 1 Japanese or Persian cucumber (only need a few slices)
- 2 snap peas
- 1 red radish (thinly sliced)
- 2 Tbsp green peas (blanched)
For the Garnishes (optional)
- 1 okra (blanched; only need a slice or two)
- 1 slice lemon
- yuzu zest (you can use lemon zest)
- kinome leaves (you can use a tiny parsley leaf)
- chives
- tobiko (flying fish roe)
- edible gold leaf flakes
Instructions
Before You Start...
- Gather all the ingredients. It‘s helpful to use a ruler to measure a precise checkerboard pattern for the Mosaic Sushi. Please use my topping ideas as just an example. I asked the fishmonger at the Japanese grocery store (Suruki Market in San Mateo) to slice the sashimi for me. If you buy a block of sashimi, slice it ⅛–¼ inch (3–6 mm) thick.
To Make the Sushi Rice
- To make the sushi vinegar (sushizu), combine 4 Tbsp rice vinegar (unseasoned), 2 Tbsp sugar, and 1 tsp Diamond Crystal kosher salt in a small saucepan and bring it to a boil over medium heat. Whisk until the sugar is completely dissolved. Alternatively, you can put the ingredients in a microwave-safe bowl and microwave for 1 minute or until the sugar is dissolved. Set aside to let it cool.

- If using a wooden sushi oke (also called hangiri), moisten it with running water and drain well. You can also use a baking sheet. Transfer 3½ cups cooked Japanese short-grain rice, freshly cooked, into the sushi oke. Spread out the hot rice evenly so it will cool faster.
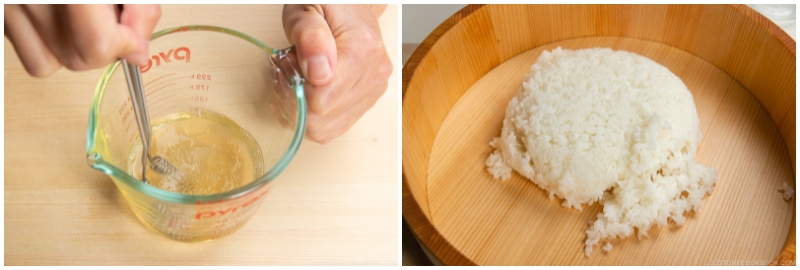
- Drizzle the sushi vinegar over the rice. With a rice paddle, gently “slice” the rice at a 45-degree angle to incorporate the sushi vinegar mixture and separate the chunks of rice. Do not stir or mix the rice because the grains may break and the rice will become mushy. If your rice is freshly cooked, vigorously fan the rice with a paddle fan or another type of fan while using this slicing motion. This cools the rice and takes away the excess moisture. Fanning makes the rice shine and keeps it from becoming mushy. Gently flip the rice between slices. Repeat this process until the rice is cooled to the temperature of human skin.
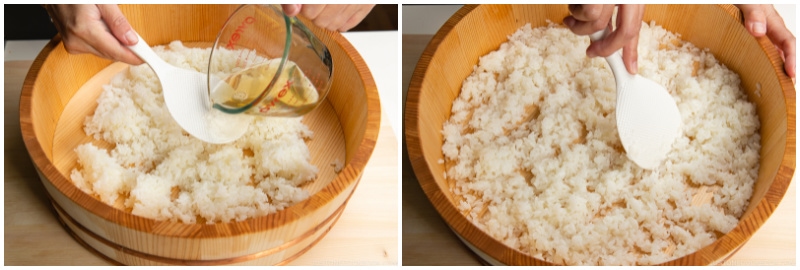
- Sprinkle toasted white sesame seeds on top and gently distribute them throughout the sushi rice using a “slicing“ motion. Set aside.

To Pack the Sushi Rice
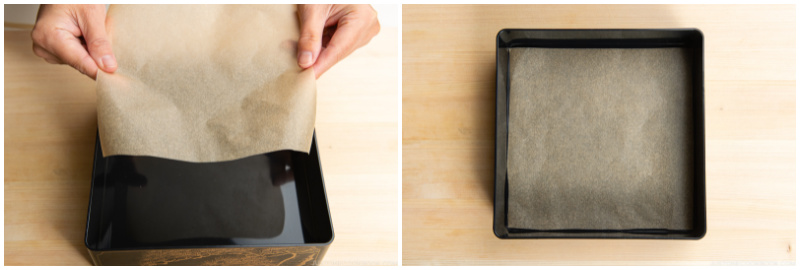
- Place a sheet of parchment paper on the bottom of the container you‘re using. Here, I‘m using a 7½- x 7½-inch (19- x 19-cm) Japanese lacquered box called jubako (this traditional box is used for Osechi Ryori or as a lunch box). If you do not place parchment paper inside the container, the rice will stick to the bottom and it will be very hard to pick up the individual sushi pieces.
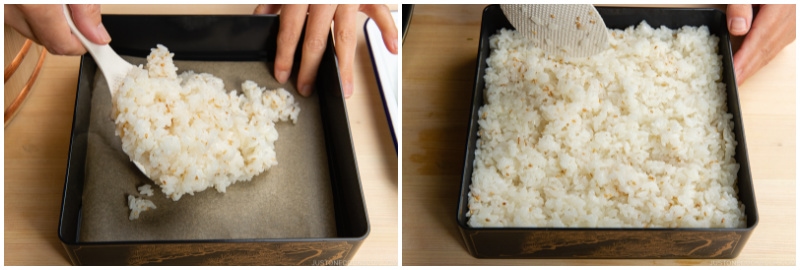
- Transfer the prepared sushi rice into the container. The measured rice (the whole 2 rice cooker cups you‘ve cooked) is just the perfect amount for this standard jubako size. With the rice paddle, evenly distribute the sushi rice to the corners and edges of the container, making sure the bed of sushi rice is level.
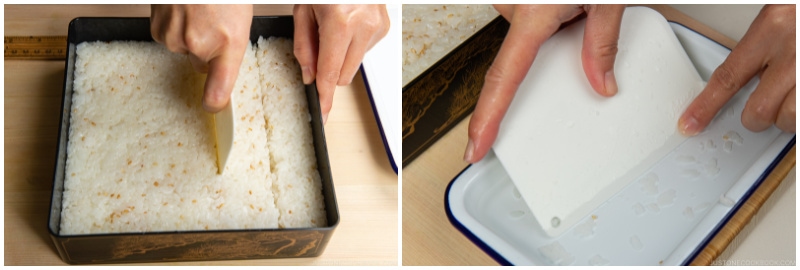
- Moisten a plastic dough scraper in water and use it to firmly press down the sushi rice. We don‘t want to overpress the rice and mash the grains, but the rice should be tightly packed so the sushi cubes hold their shape when you pick them up.
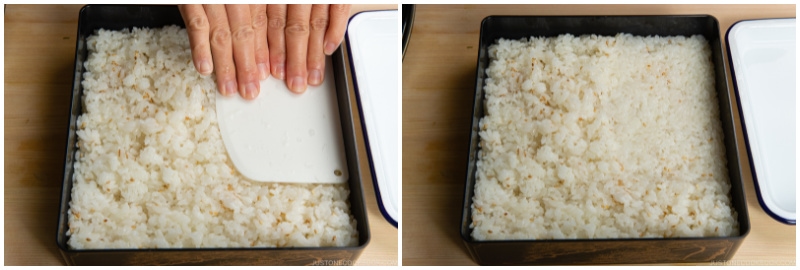
- Continue to press down the sushi rice with the dough scraper. Don‘t forget to moisten it so the rice doesn‘t stick to it. This type of sushi is called oshizushi or pressed sushi, so it is considered normal to press the rice grains.
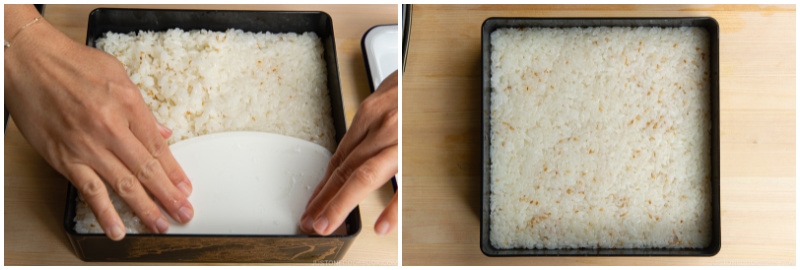
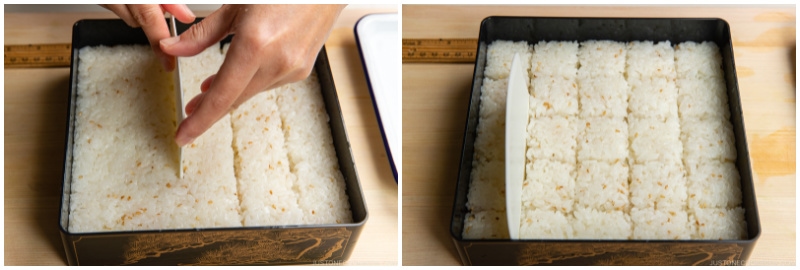
- Now, cut the sushi rice into squares or cubes. Moisten the dough scraper with water and use it to makes a series of lengthwise slices through the bed of sushi rice across the width of the sushi box. The slices should be the same distance apart so you will have neat squares for the checkerboard pattern. Measure your sushi box so that your slices are equally distanced, about 1¼ inches (3 cm) to 1½ inches (4 cm) apart. For my 7½- x 7½-inch (19- x 19-cm) container, I cut the sushi rice about 1⅓ inches (3.5 cm) wide. Moisten the scraper after each slice to prevent sticking.
- Then, rotate the container 90 degrees, and again make lengthwise slices across the width of the box that are the same distance apart (1⅓ inches or 3.5 cm in my case) as the previous slices you made. You now have cubes about 1⅓ inches (3.5 cm) square. Set aside.
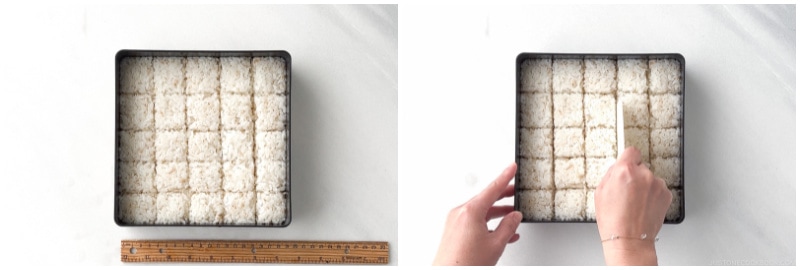
- Go over your slices a second time to separate and compress the sushi squares further; this will make it easier to remove the individual cubes when serving. Start by inserting the clean dough scraper that you’ve moistened with water into the first slice you made earlier. Move the scraper back and forth in a sawing motion along the entire length of the slice, ensuring a clear separation between the two sides. Next, press the scraper along the right side, firmly packing in the rice. Repeat along the left side. There will now be a gap of about 1 mm between the two sides. Move onto the next slice and repeat this “separate and compress” process. Moisten the scraper with water between slices and keep it clean of any rice grains or residue. Continue until you’ve finished all the lengthwise slices in that direction. Then, rotate the container 90 degrees and repeat with the remaining slices.
To Prepare the Toppings
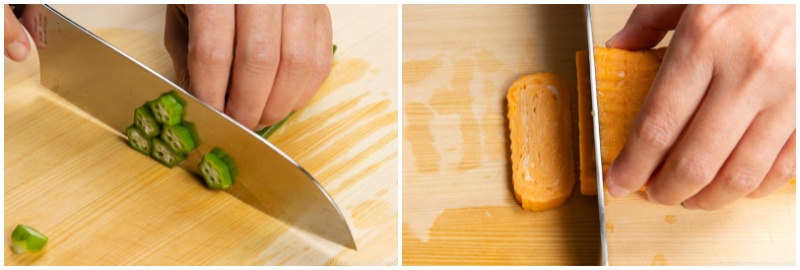
- Start cutting your topping ingredients into square pieces slightly larger than your sushi cubes; I cut mine about 3.6 cm wide for my 3.5-cm sushi cubes. Tip: For the best look, cut the topping ingredients slightly larger than the cube size so that the toppings cover the sushi rice completely and there are no visible gaps. For 1 Japanese or Persian cucumber, I use a vegetable peeler to slice it into paper-thin ribbons. Stack 3–4 ribbons and cut them into squares 3.6 x 3.6 cm wide.

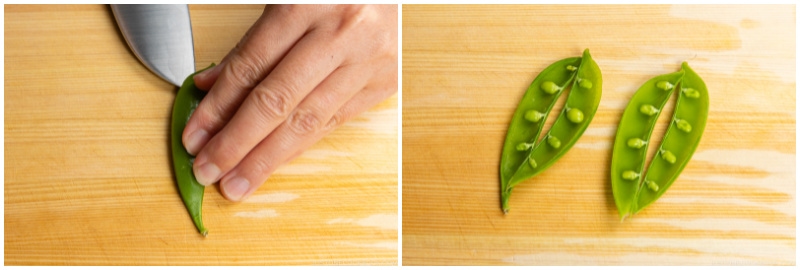
- For 2 snap peas, insert the knife to open the pea pods. Cut them into squares 3.6 x 3.6 cm wide.
- For 1 okra (blanched), cut it into rounds ⅛ inch (3 mm) thick. For 1 Tamagoyaki (Sweet Rolled Omelette), cut it into ⅛-inch (3-mm) slices and further cut them into square pieces 3.6 cm wide.
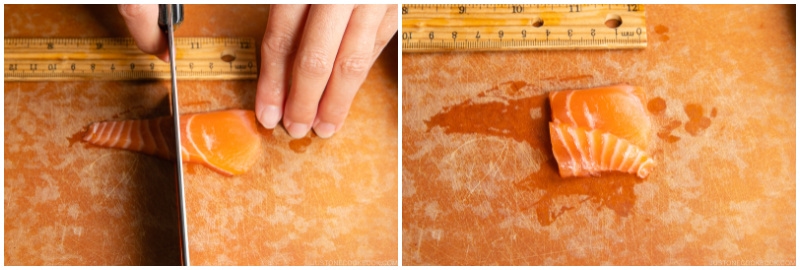
- For the sashimi—3 slices sashimi-grade salmon, 3 slices sashimi-grade tuna, 6 pieces sashimi-grade shrimp (amaebi), and 2 pieces cooked shrimp—try your best to create a square shape. Here, I cut one slice of the salmon sashimi in half and layered it so it will look square.
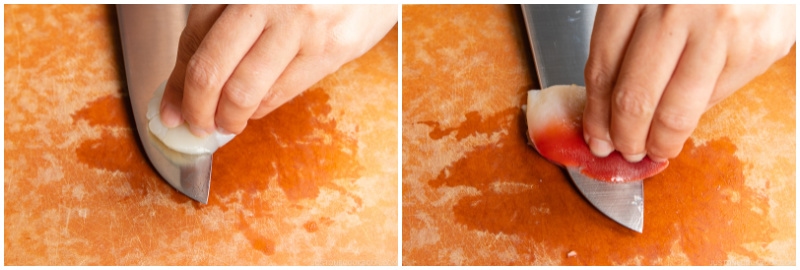
- For 1 piece sashimi-grade scallop, slice it in half crosswise so each piece is thinner. For 2 pieces cooked surf clam (hokkigai), slice them in half and cut to shape the slices into squares.
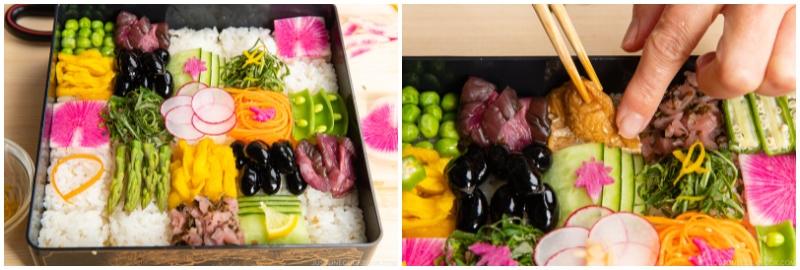
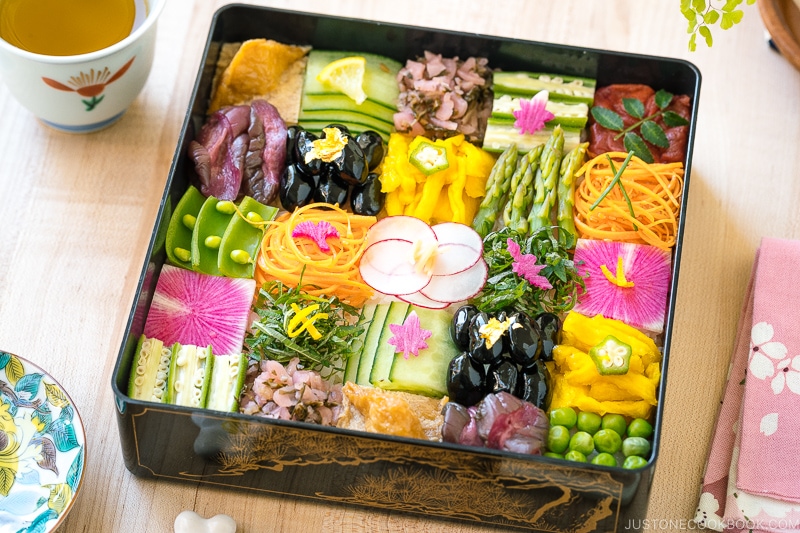
To Decorate the Mosaic Sushi
- Decorate the Mosaic Sushi by placing a single type of topping onto each square. Make sure to maintain the straight lines of the checkerboard pattern and completely cover the sushi rice with the toppings.

- Consider the color, texture, and orientation of each ingredient as you place the toppings. For example, avoid putting similar-colored ingredients next to each other. For toppings like 2 Tbsp green peas or 4 Tbsp Ikura, simply place them kinome leavesto completely fill a square. Use a tiny garnish like ikura4 Tbsp Ikura, tobiko (flying fish roe), yuzu zest, slivers of 1 slice lemon, edible gold leaf flakes, and herbs like kinome leaves or chives to create dimension. I thinly sliced 1 red radish and formed the slices into a flower as a finishing touch.
To Make a Vegan Version of Mosaic Sushi
- If you would like to make a vegan version of this recipe, please read the blog post for the ingredients I used for my vegan Mosaic Sushi and other topping ideas.
- Here is my finished vegan Mosaic Sushi.
To Serve
- Enjoy Mosaic Sushi with soy sauce and wasabi for dipping. Serve green tea and pickled sushi ginger (gari) on the side.
To Store
- You can cover the leftovers with plastic and store in the refrigerator for 24 hours. For sashimi-grade fish, consume within 24-36 hours after purchasing.
Nutrition
Calories: 465kcal, Carbohydrates: 75g, Protein: 24g, Fat: 6g, Saturated Fat: 2g, Polyunsaturated Fat: 1g, Monounsaturated Fat: 1g, Trans Fat: 1g, Cholesterol: 160mg, Sodium: 560mg, Potassium: 396mg, Fiber: 1g, Sugar: 10g, Vitamin A: 757IU, Vitamin C: 13mg, Calcium: 42mg, Iron: 4mg
