
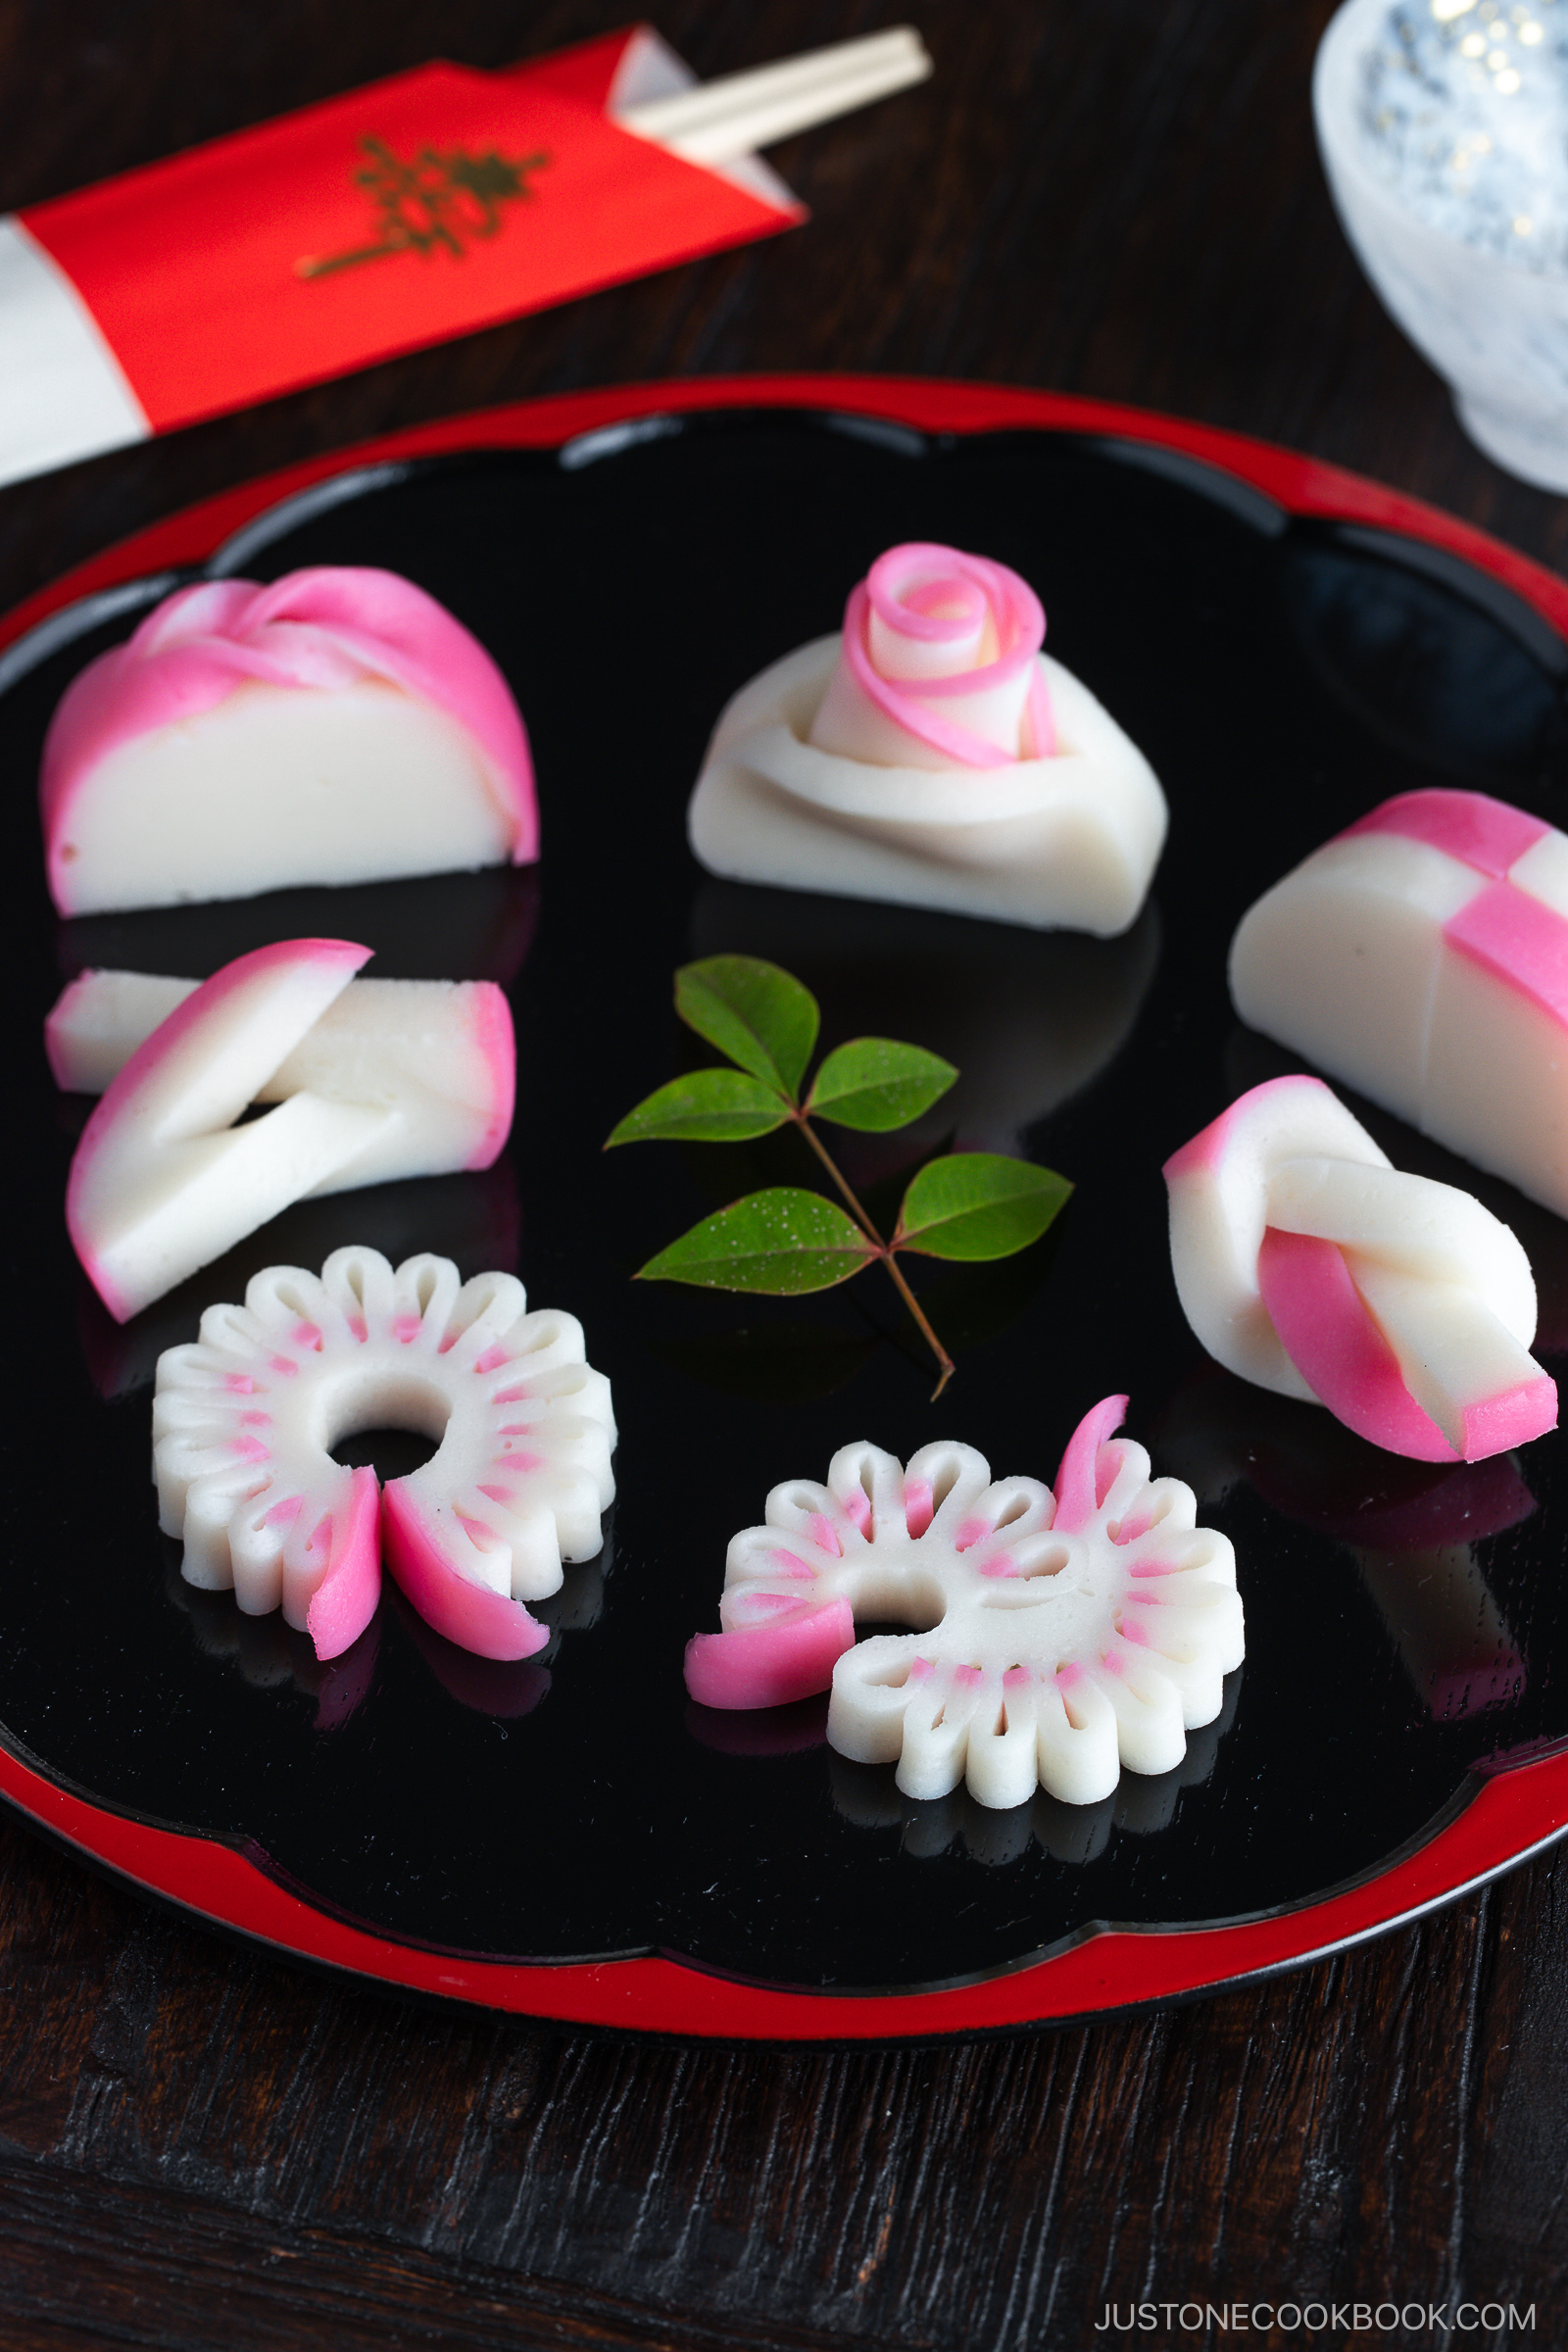
Oshōgatsu (Japanese New Year) is the most festive celebration in Japan. Even simple everyday foods, like kamaboko fish cake, get a special makeover for the occasion!
Today, I’ll show you how to make seven beautiful kamaboko decorations—from quick and easy to a little more intricate. Each design carries a special meaning, perfect for bringing good luck and joy to the New Year’s table.
What is Kamaboko?
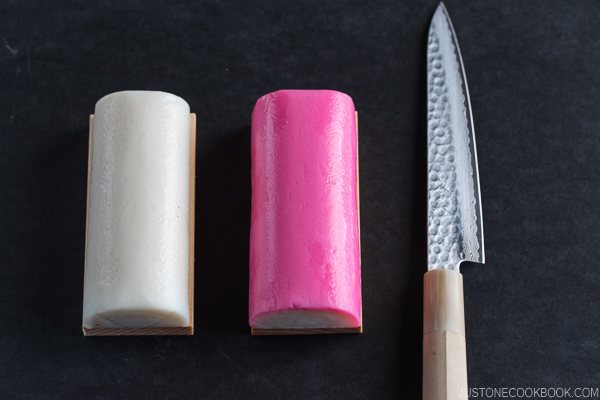
Kamaboko (かまぼこ or 蒲鉾) is a Japanese fish cake, which is made from surimi (white fish paste), shaped into a half-moon log, and steamed on a wooden board.
You’ll often see it sliced and served chilled with a dipping sauce, or added to soba or udon noodle soup, donburi rice bowls, or stir-fried noodles.
For celebrations and holidays, red (or pink) and white kamaboko are the stars! These colors are considered auspicious in Japan. Thanks to its firm yet springy texture, kamaboko can be easily cut into beautiful shapes. It is perfect for decorative dishes like those enjoyed at the New Year table and in the osechi ryori (New Year Foods) box.
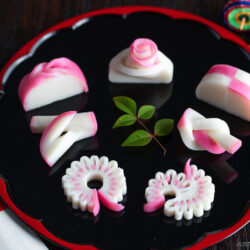
7 Decorative Kamaboko Designs
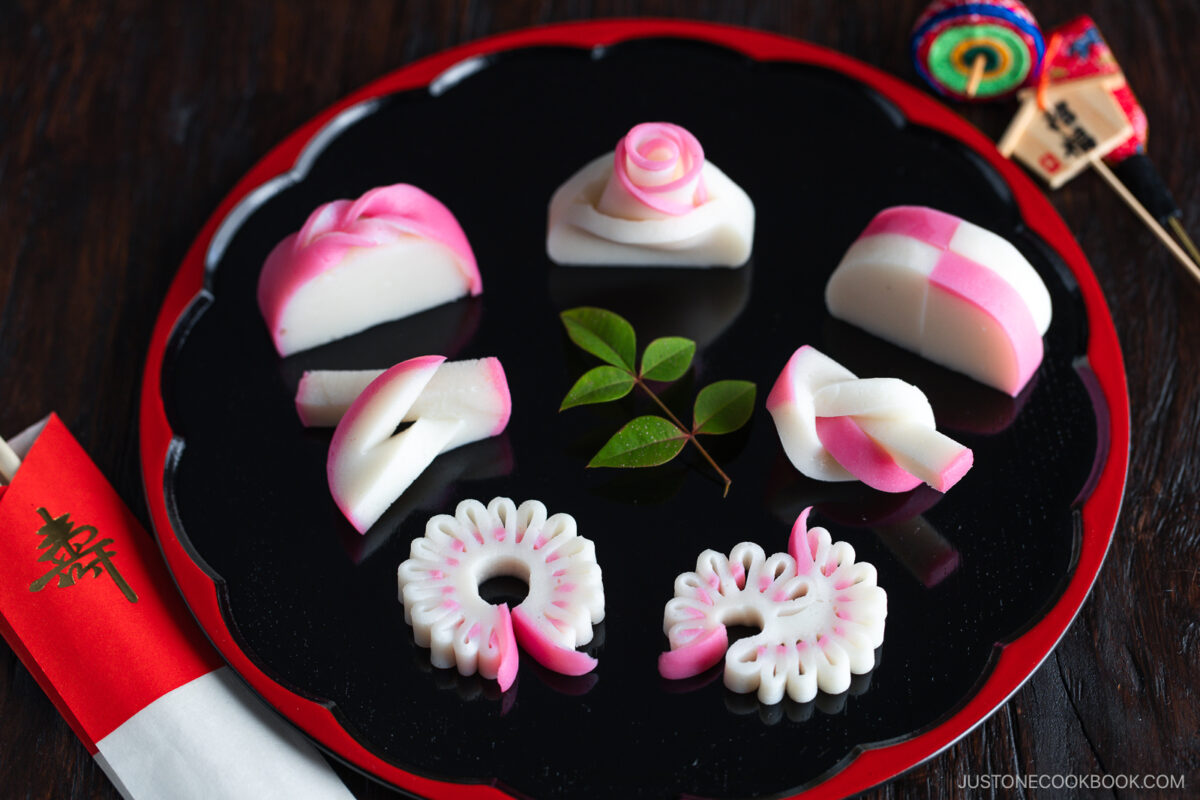
1. Checkered Pattern (Ichimatsu 市松)
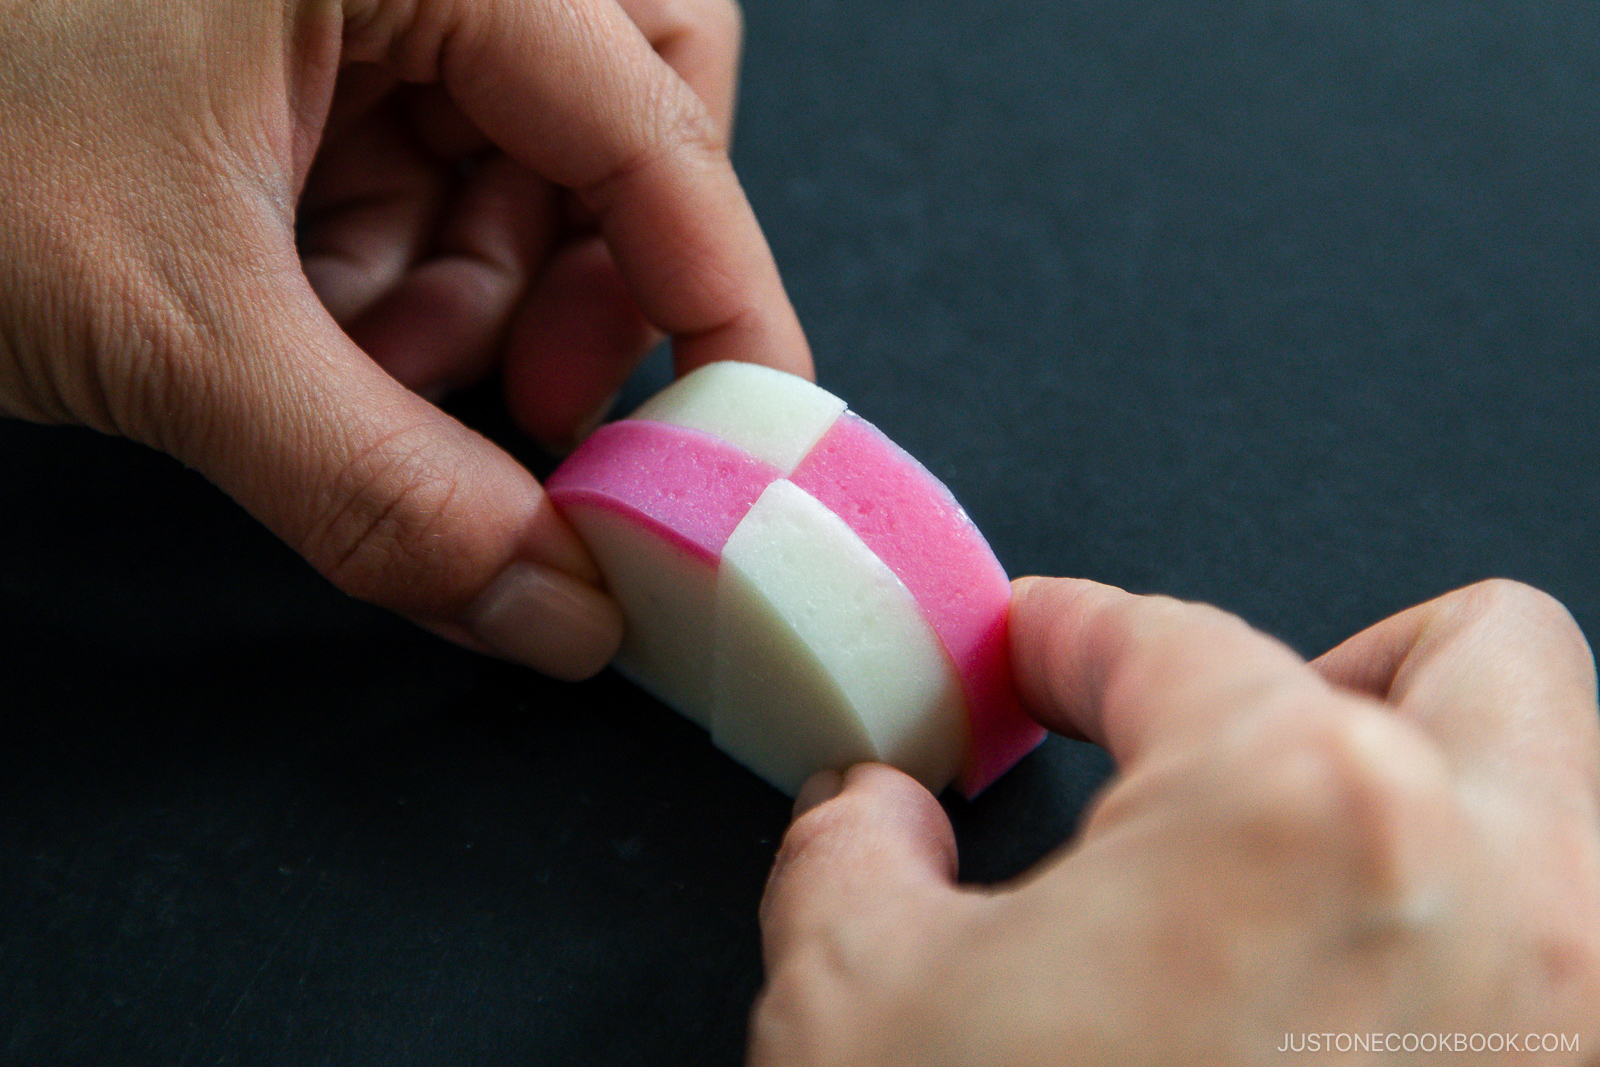
The checkered pattern is the easiest and quickest to make. All you need are both pink and white kamaboko fish cakes. Slice them in half and stack them together. No fancy skill is required!
2. Pine Needle (Matsuba 松葉)
Pine needle design gives a nice three-dimensional effect even though it may not be as obvious. It’s a great fish cake design for your appetizer platter that doesn’t require any knife-cutting skill.
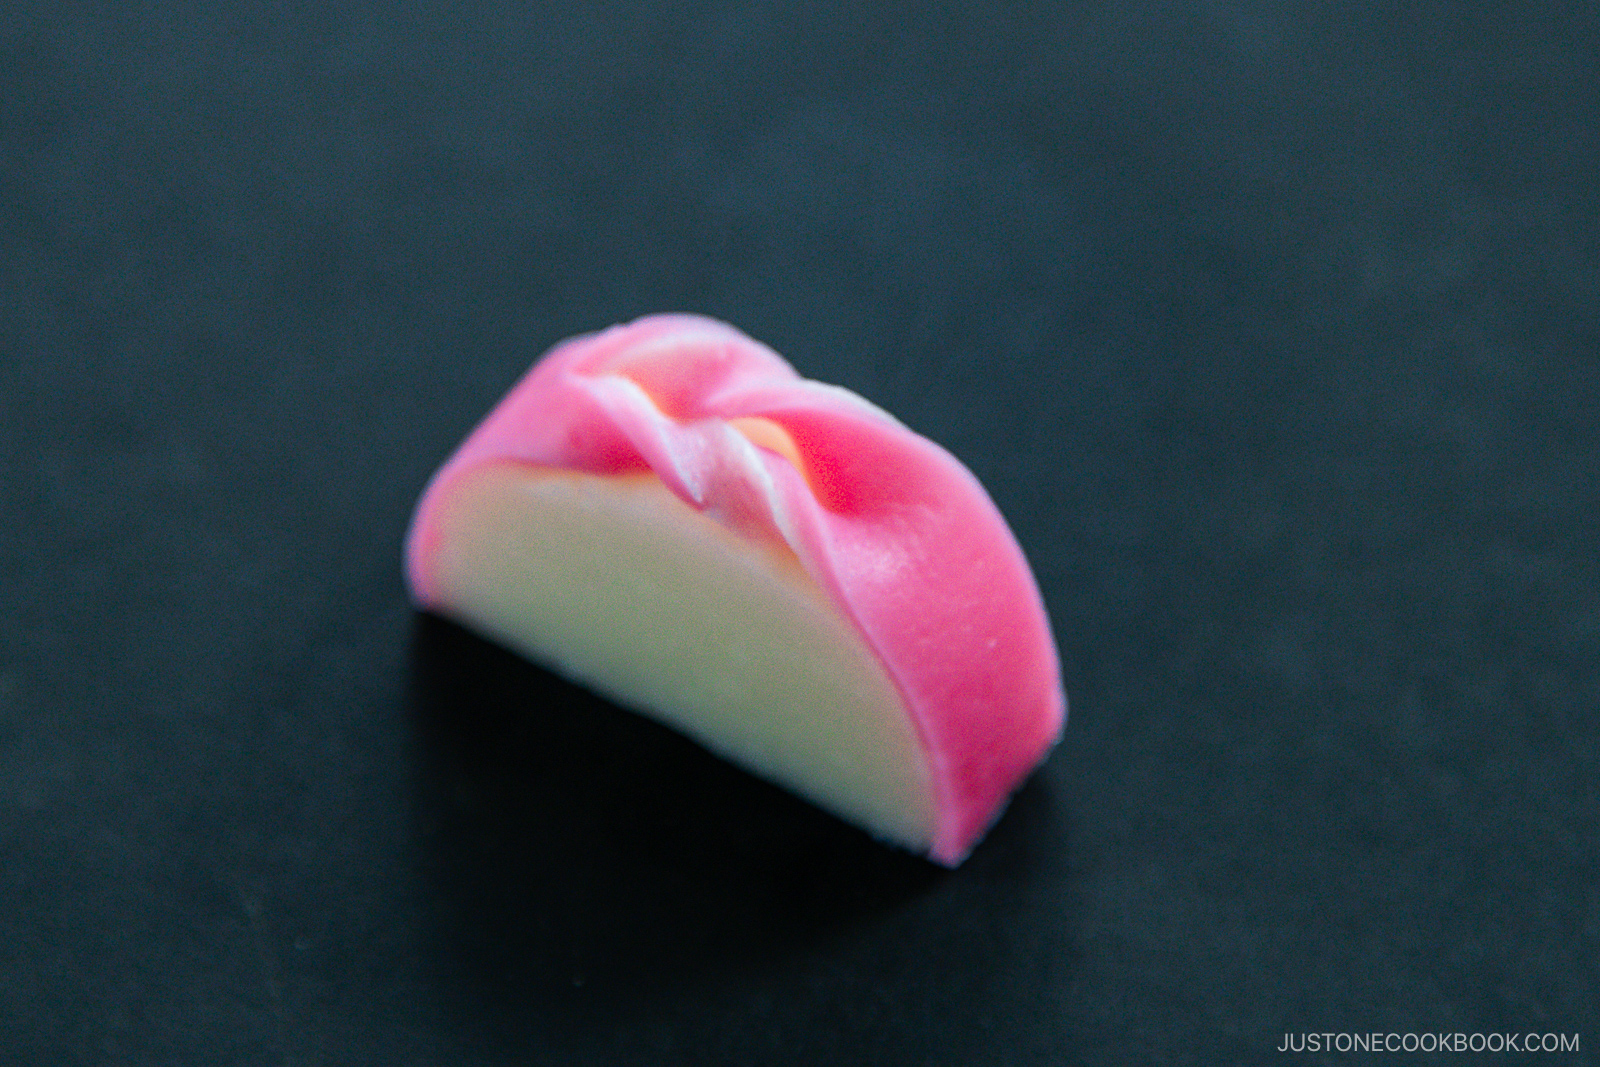
3. Knot (Musubi 結び)

The knot design is universal, and it is very pretty to look at on a platter or as a garnish on top of the food. The elasticity of the fish cake makes it possible to create this beautiful design.
4. Reins (Tazuna 手綱)
This design focuses on the patterns on top of Kamaboko. Even if you are using a small platter with little room for 3-dimensional motifs, you can still upgrade your ordinary slice of fish cake into a pretty visual design.
5. Rose (Kohaku Bara 紅白薔薇)
Use red-skin and white kamaboko fish cakes for this rose design. Girls would love this decorative design in their bento box! Other happy occasions that you can use is for garnish on Chirashi Sushi on Girl’s Day (March 3 in Japan).
6. Peacock (Kujaku 孔雀)

The peacock design is probably my favorite of all the designs I share here. The red skin of the fish cake makes a perfect peacock’s eyespot. This design requires some fine motor skills to cut the fish cake into thin slices, and the use of chopsticks to create the delicate shape (particularly useful if you have big fingers).
7. Pine Tree (Matsu 松)
This design is the traditional Japanese pine tree pattern. Slightly complicated to make, but the final result makes it truly special and unique. I recommend watching the video for this design.
Watch How to Make 7 Beautiful Kamaboko Designs
Beginner-Friendly Version
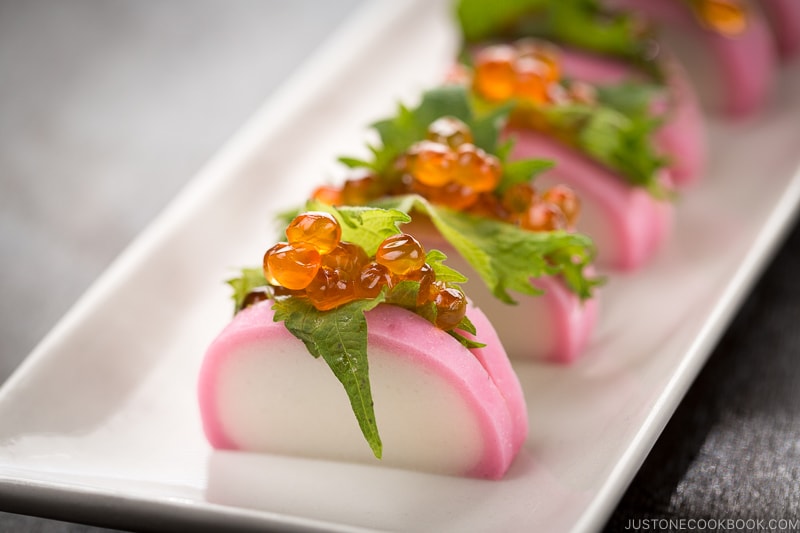
Kamaboko with Salmon Roe – You can also make a simple appetizer dish using kamaboko fish cake and salmon roe (ikura).
I hope you have fun decorating kamaboko fish cake. Japanese New Year is a special time to spend with your loved ones, and making these delicacies in the kitchen is one creative way to kindle the relationship.
How to Make Decorative Kamaboko Designs
Equipment
Ingredients
- kamaboko (fish cake) (pink and white)
Instructions
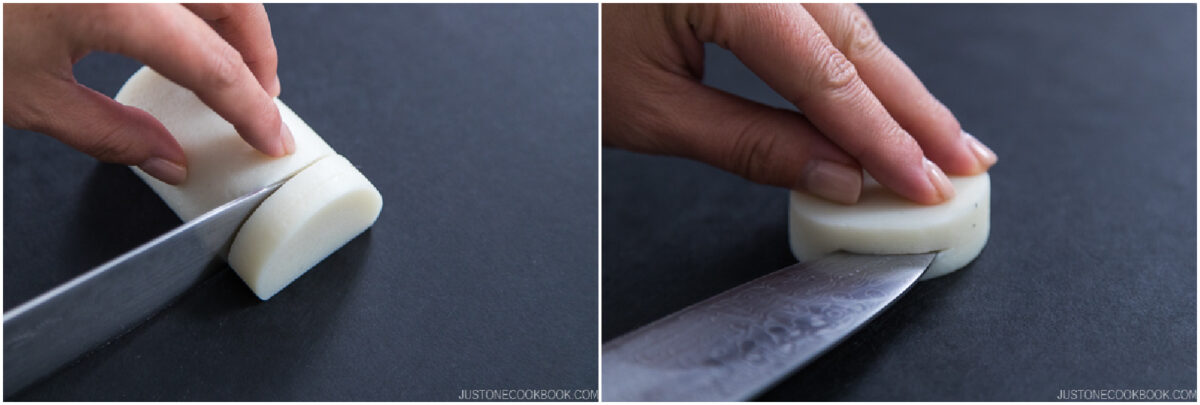
To Prep the Kamaboko
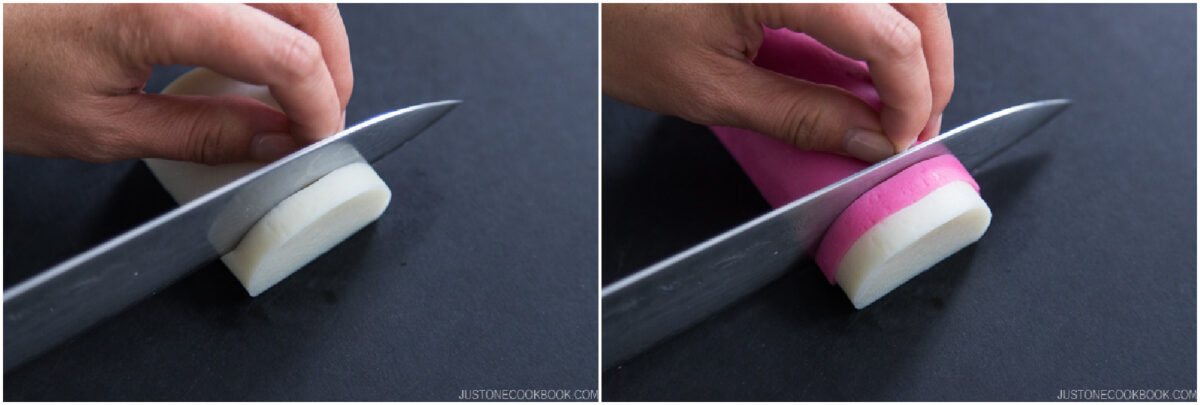
- Remove the kamaboko from the wooden board with a knife. Slice off the uneven edge on both ends.
Checkered Pattern (Ichimatsu 市松)
- Cut one slice each of white- and red-skinned kamaboko. Make each piece ⅓ inch (0.8 mm) thick.
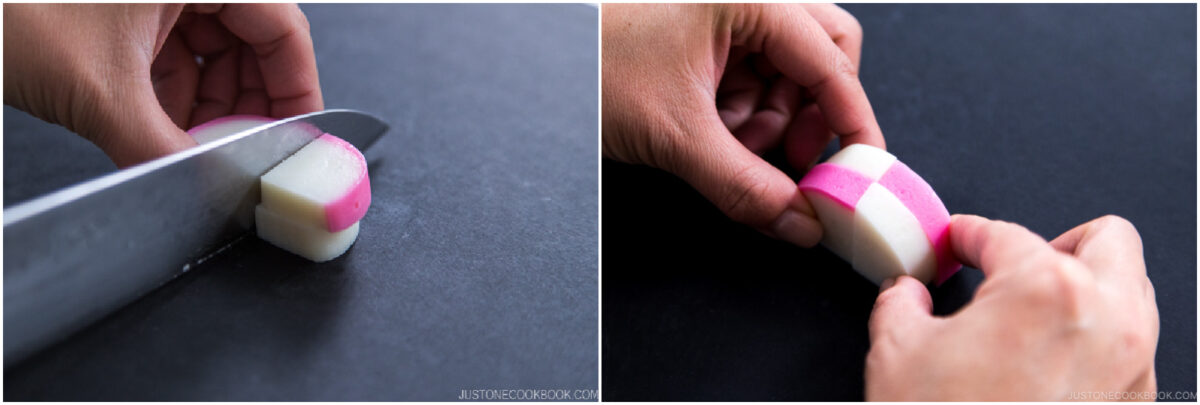
- Stack them and cut in half to make quarter rounds. Swap one set of red and white pieces to alternate the colors. Now you have checkered-pattern kamaboko (ichimatsu) in auspicious colors for your celebratory feast.
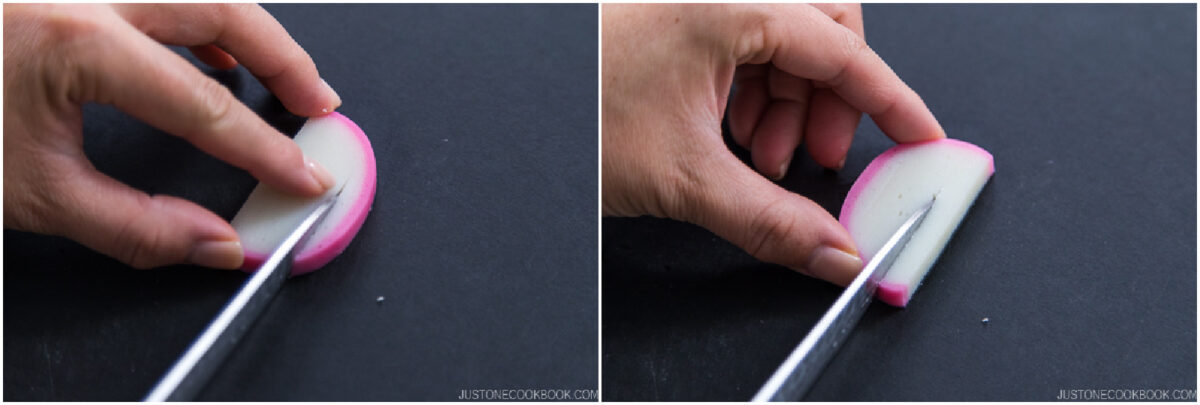
Pine Needle (Matsuba 松葉)
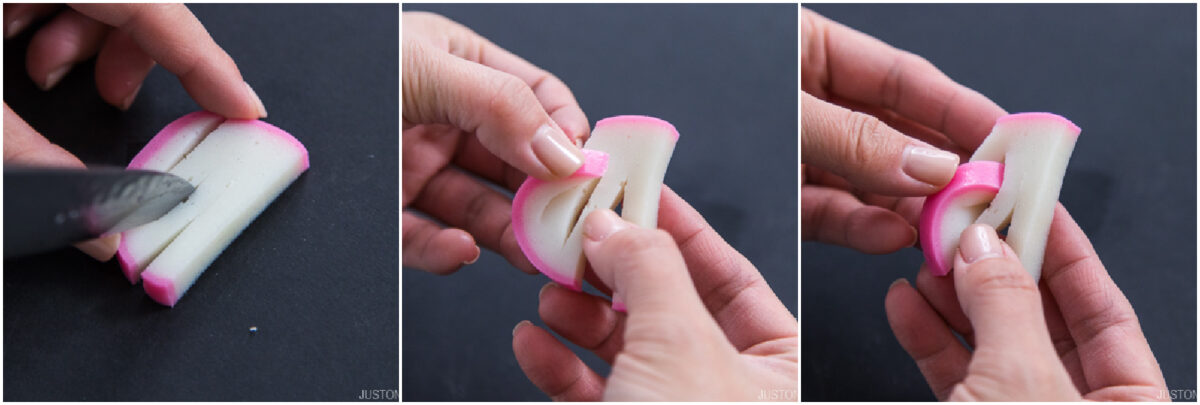
- Cut a slice of red-skinned kamaboko ⅓ inch (8 mm) thick and lay it flat with the rounded top to one side. Make a 1-inch (2.5-cm) cut about one-third of the way down and in from the rounded side and parallel to the straight side. Rotate it 180 degrees so the cut you made is pointing away from you. Next, make a similar cut on the opposite end about one-third of the way in from the straight side.
- Lift up both ends. Lock the ends against each other. And now you have a kamaboko pine needle (matsuba) that symbolizes longevity, wisdom, and youth.
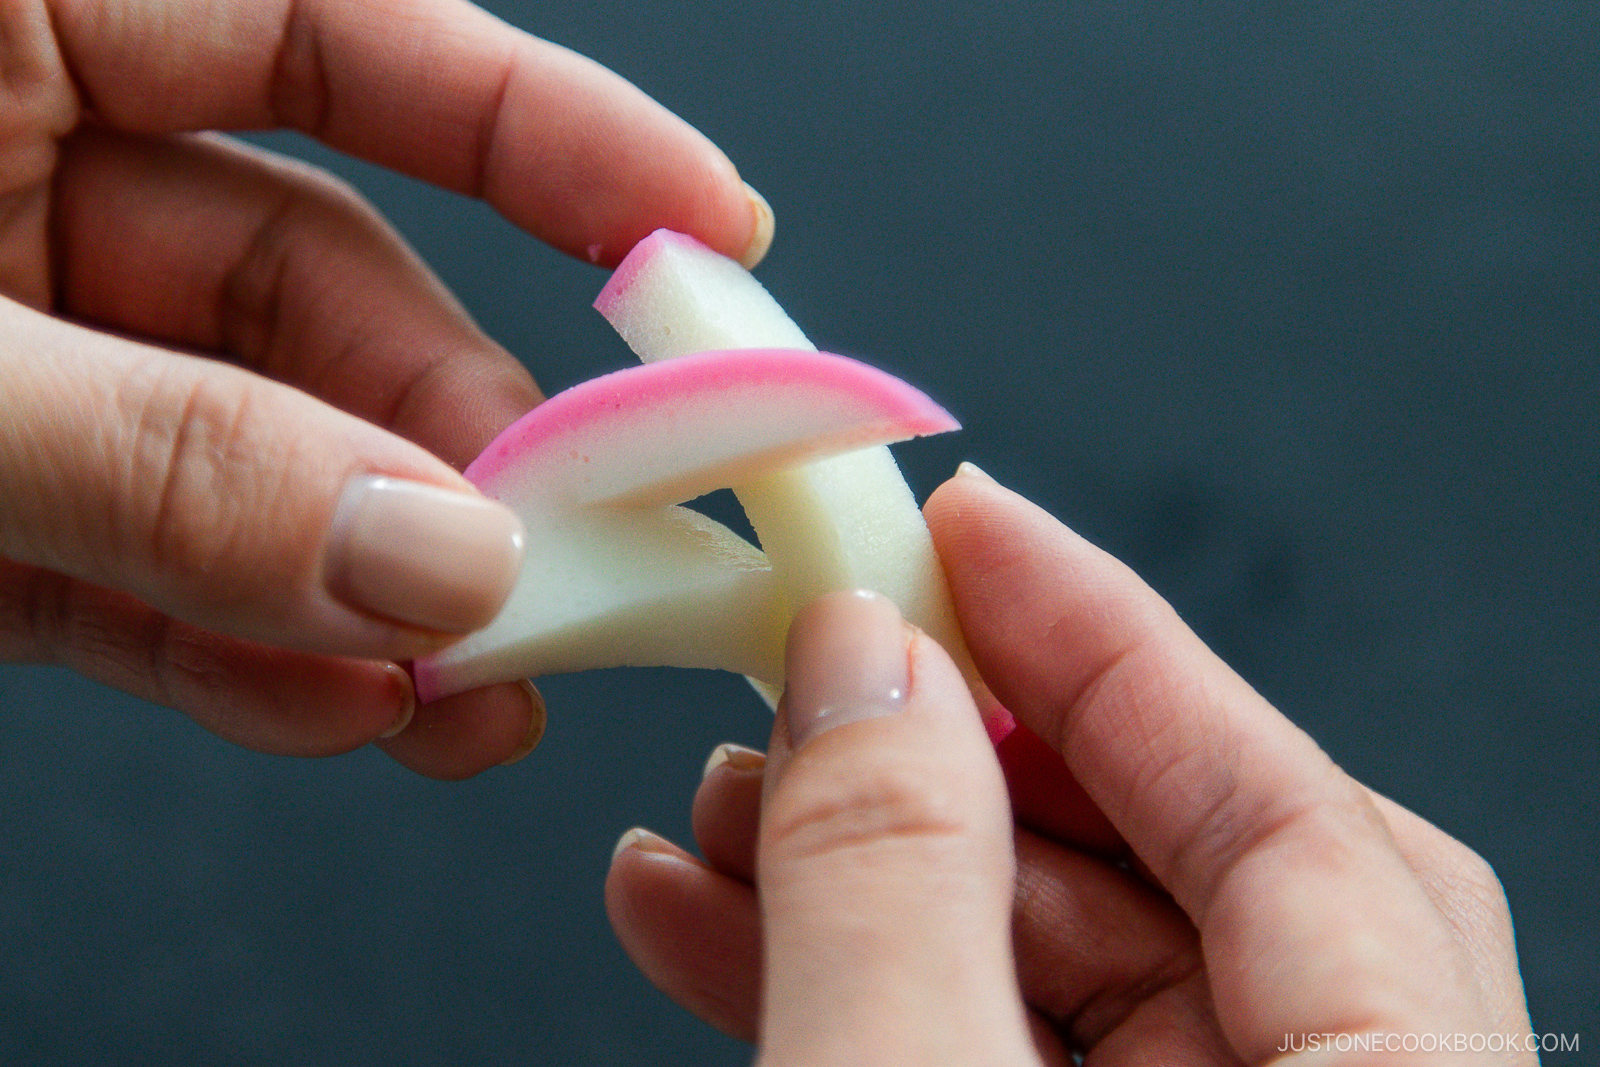
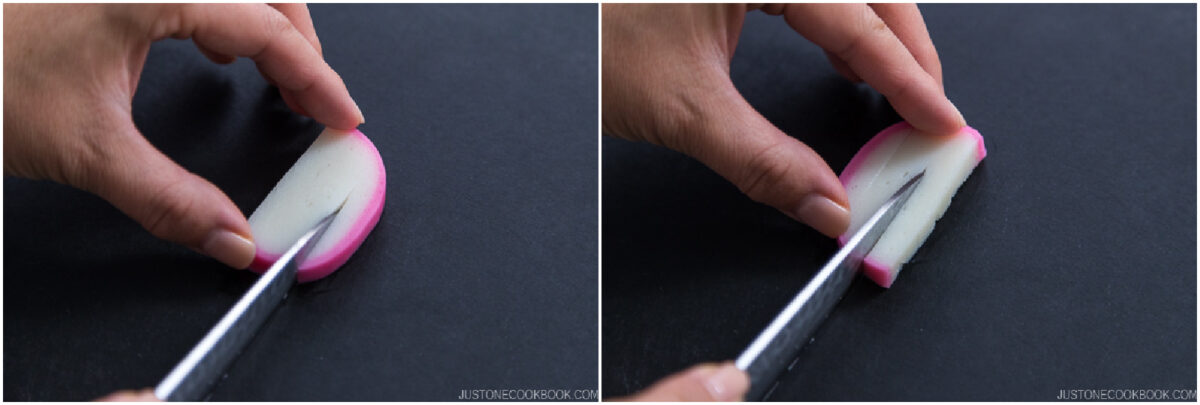
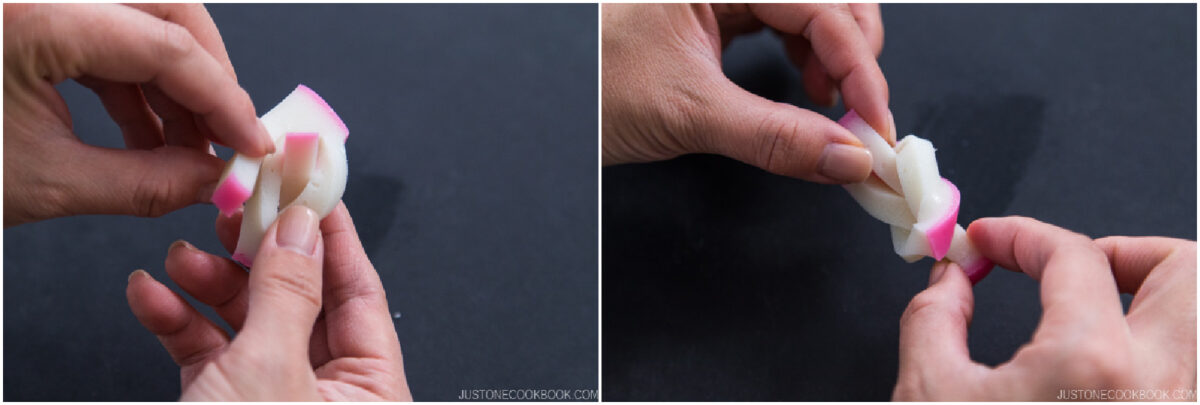
Knot (Musubi 結び)
- Cut a slice of red-skinned kamaboko ⅓ inch (8 mm) thick and lay it flat with the rounded top to one side. Starting about one-third of the way down from the edge, make a 1-inch (2.5-cm) cut that's one-quarter of the way in from the rounded side and parallel to the kamaboko's straight side. See the next step's image for reference.Rotate it 180 degrees so the cut you made is pointing away from you. Next, make a similar cut on the opposite end, about one-quarter of the way in from the straight side.
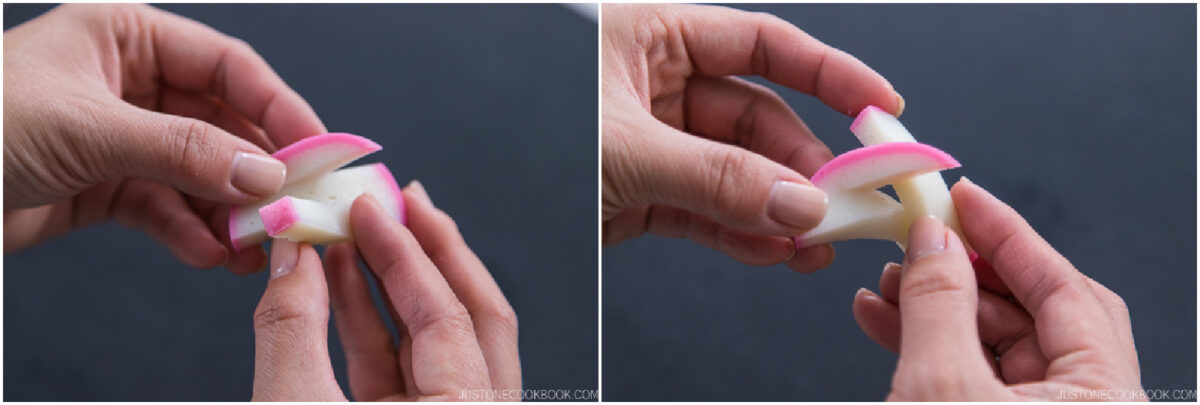
- In the center white section, cut a small slit that's parallel to the other two cuts, about ¾ inches (2 cm) long. Next, lift up and insert the ends in the center slit, one from the front and one from the back (next step).
- Gently pull out both ends. Here, you have a beautiful kamaboko knot (musubi) that symbolizes a happy union.
Reins (Tazuna 手綱)
- Cut a slice of red-skinned kamaboko ½ inch (12 mm) thick. Flip it onto its rounded top, then begin to carefully trim back the red skin with the tip of your knife.
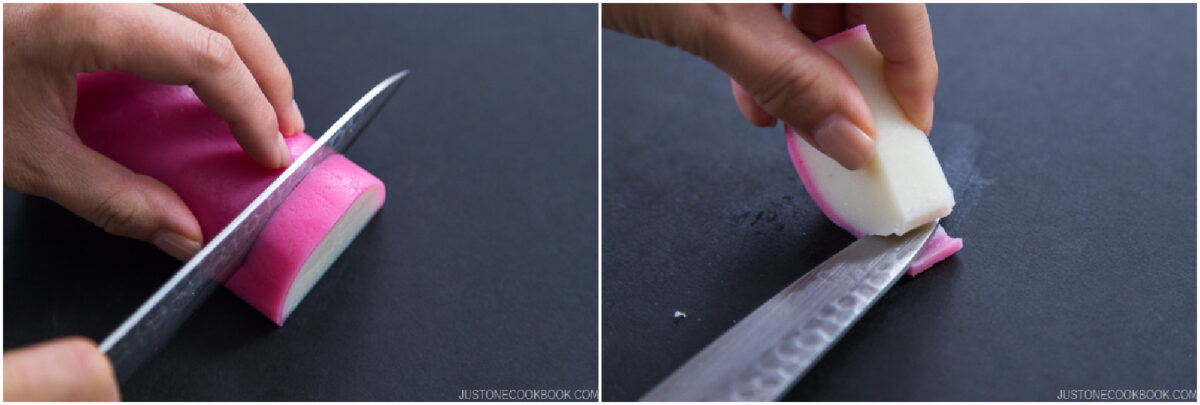
- Continue until you've peeled back about two-thirds of the red part. In the center of the red strip, cut a lengthwise slit about ¾ inches (2 cm) long without cutting through the end.
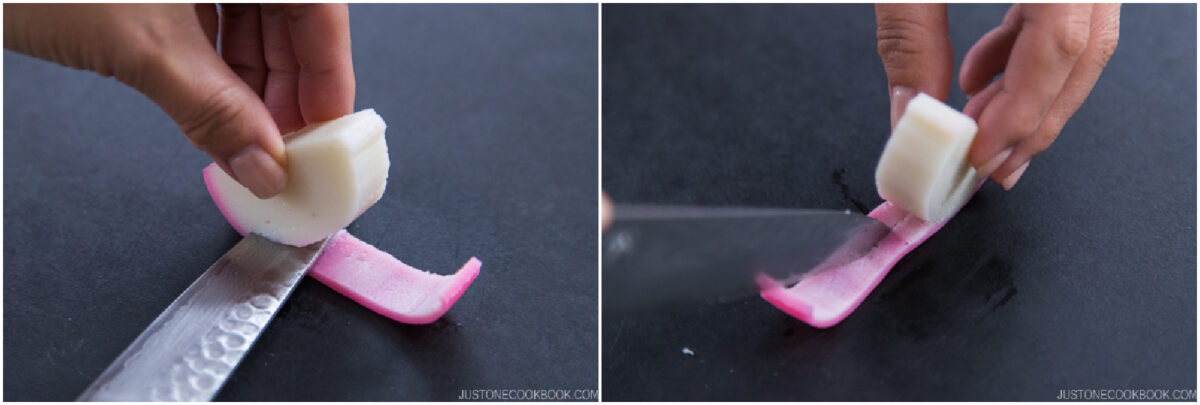
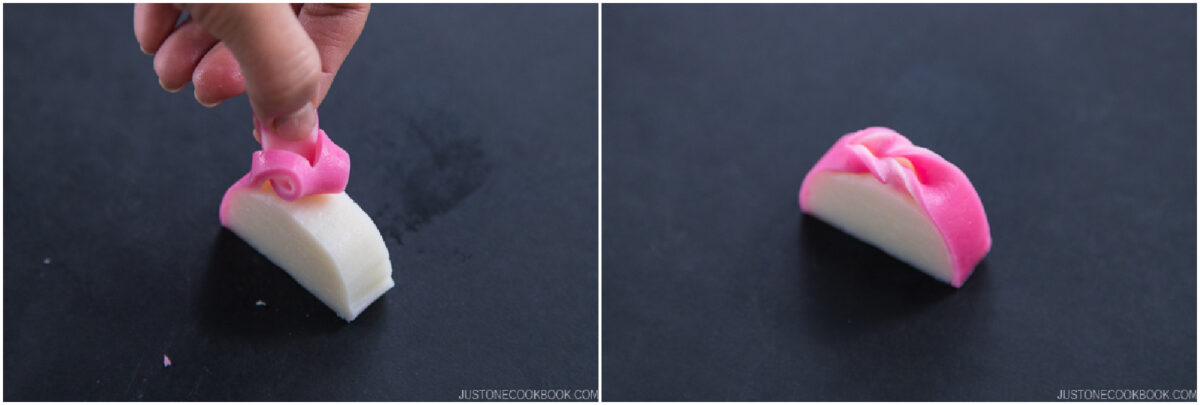
- Tuck the end of the red skin through the bottom of the slit. Pull it out from the top so the sides twist, then lay the red strip back down so it covers the white part. Now, you have a fine ribbon detail that resembles auspicious horse reins (tazuna).
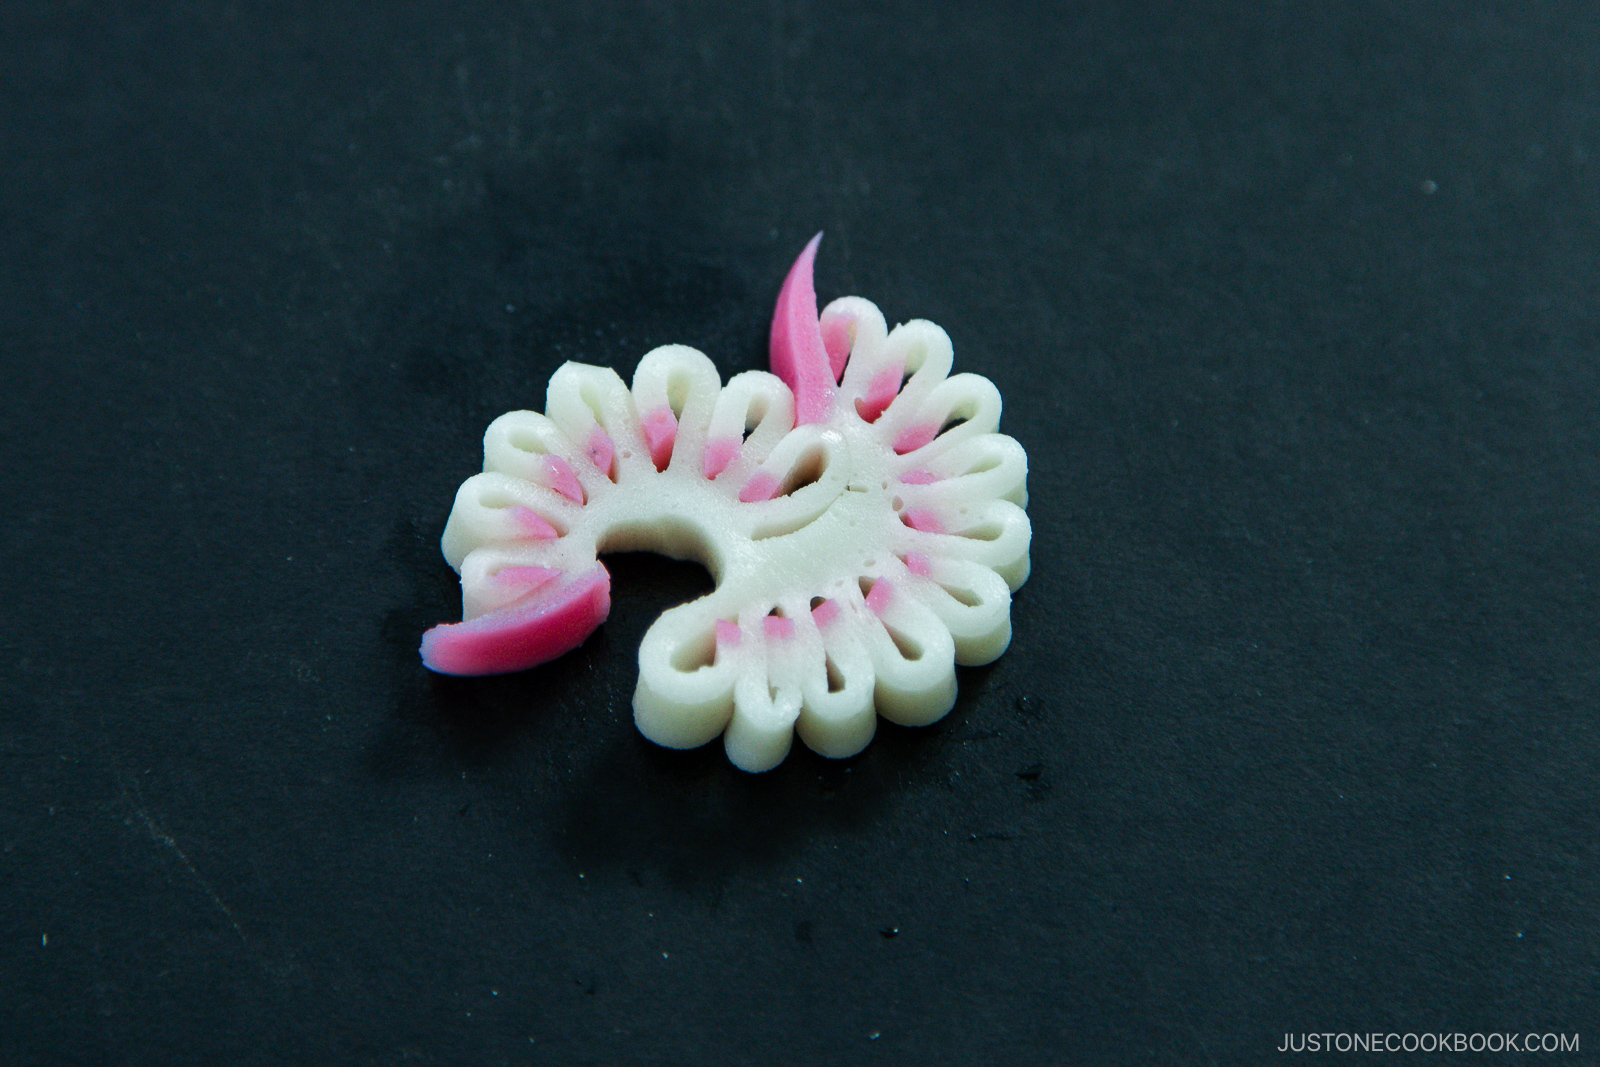
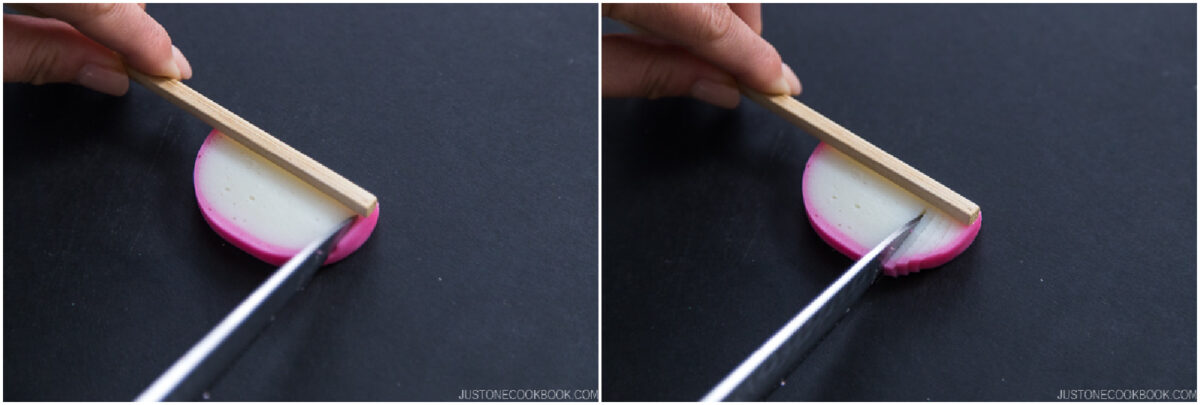
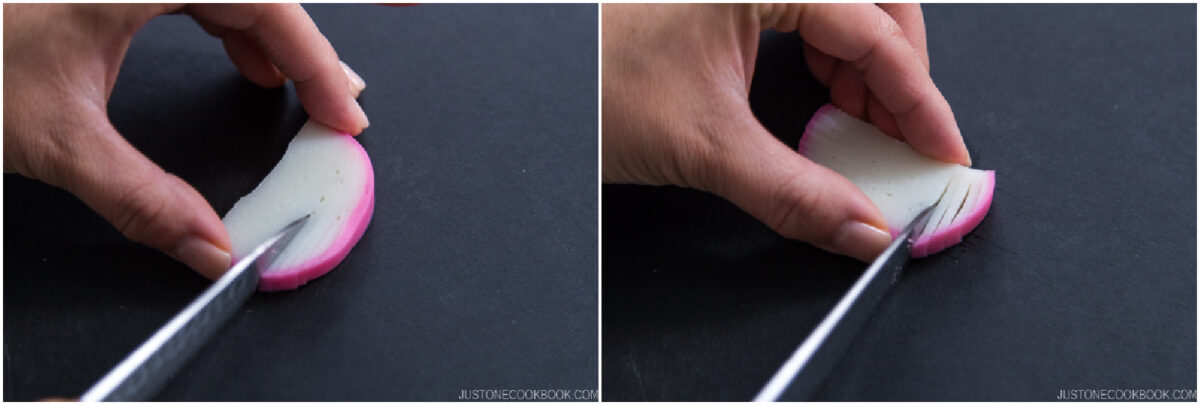
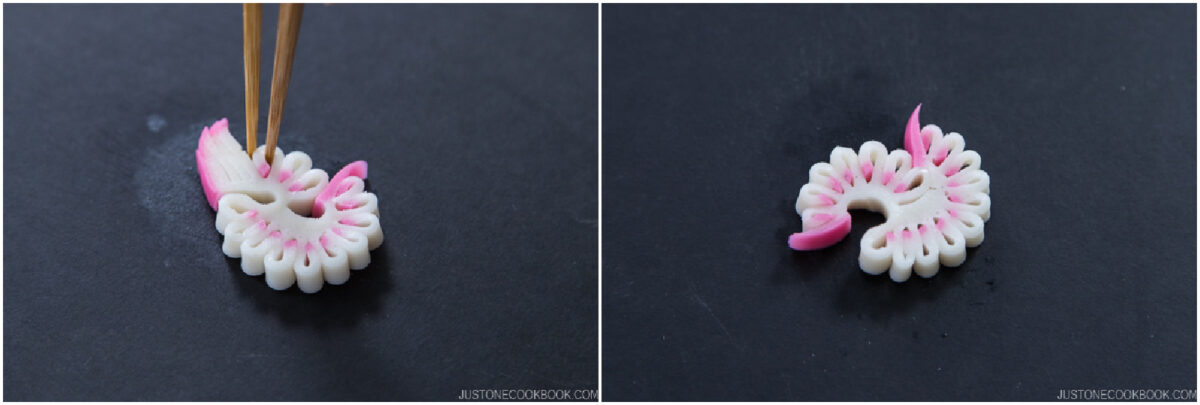
Peacock (Kujaku 孔雀)
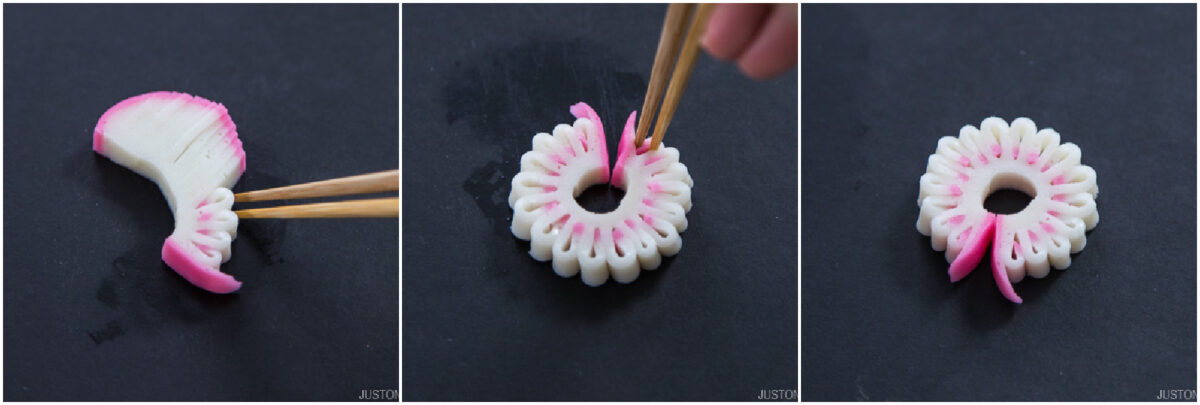
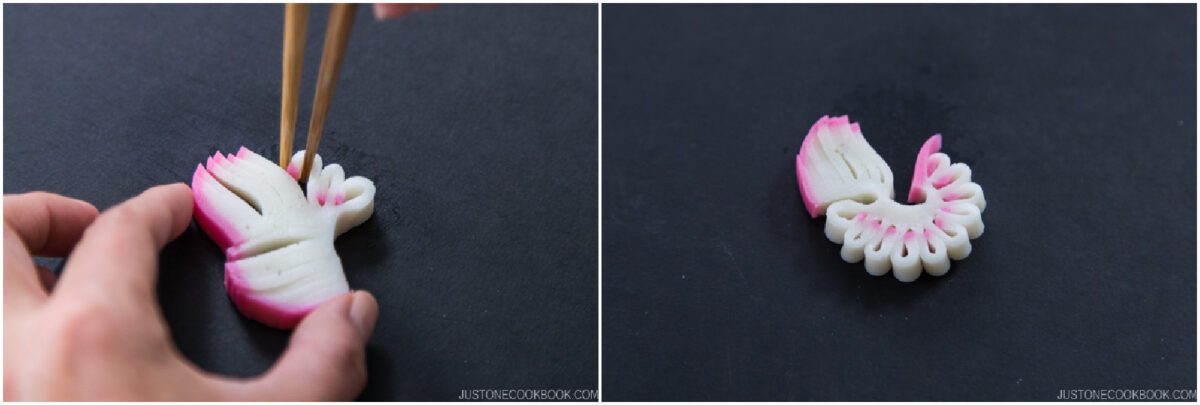
- Cut a slice of red-skinned kamaboko ¼ inch (6 mm) thick. Lay it flat with the rounded side closest to you. Place a chopstick along the kamaboko's straight side and start cutting thin slits every 2–3 mm from right to left, using the chopstick as a guide so you don‘t cut through the straight bottom edge.
- Gently roll up each strip and tuck in the end using chopsticks. Continue in the same direction with all the strips. Leave the first and last strips (pink edge) unrolled. Now, you have an impressive kamaboko peacock (kujaku) to adorn your New Year‘s platter that symbolizes compassion and good health.
Pine Tree (Matsu 松)
- Cut a slice of red-skinned kamaboko ¼ inch (6 mm) thick. Lay it flat with the rounded top to one side. Starting from the center line, make thin cuts every 2–3 mm on one half of the kamaboko, from the rounded side across to the straight side.Rotate it 90 degrees so the rounded top is closest to you. About 1/10 inch (2.5 mm) down from the kamaboko's straight side, cut similar thin strips every 2–3 mm. Start from the rounded edge and stop within 1/10 inch (2.5 mm) of the center line.
- Starting from the straight side, gently roll up each strip and tuck in the ends using chopsticks. Continue in the same direction all the way to the rounded top of the kamaboko. Leave the last strip (pink edge) unrolled.
- Continue to roll and tuck the other slits in the same direction. And here you have a kamaboko pine tree (matsu) that symbolizes long life and good fortune.
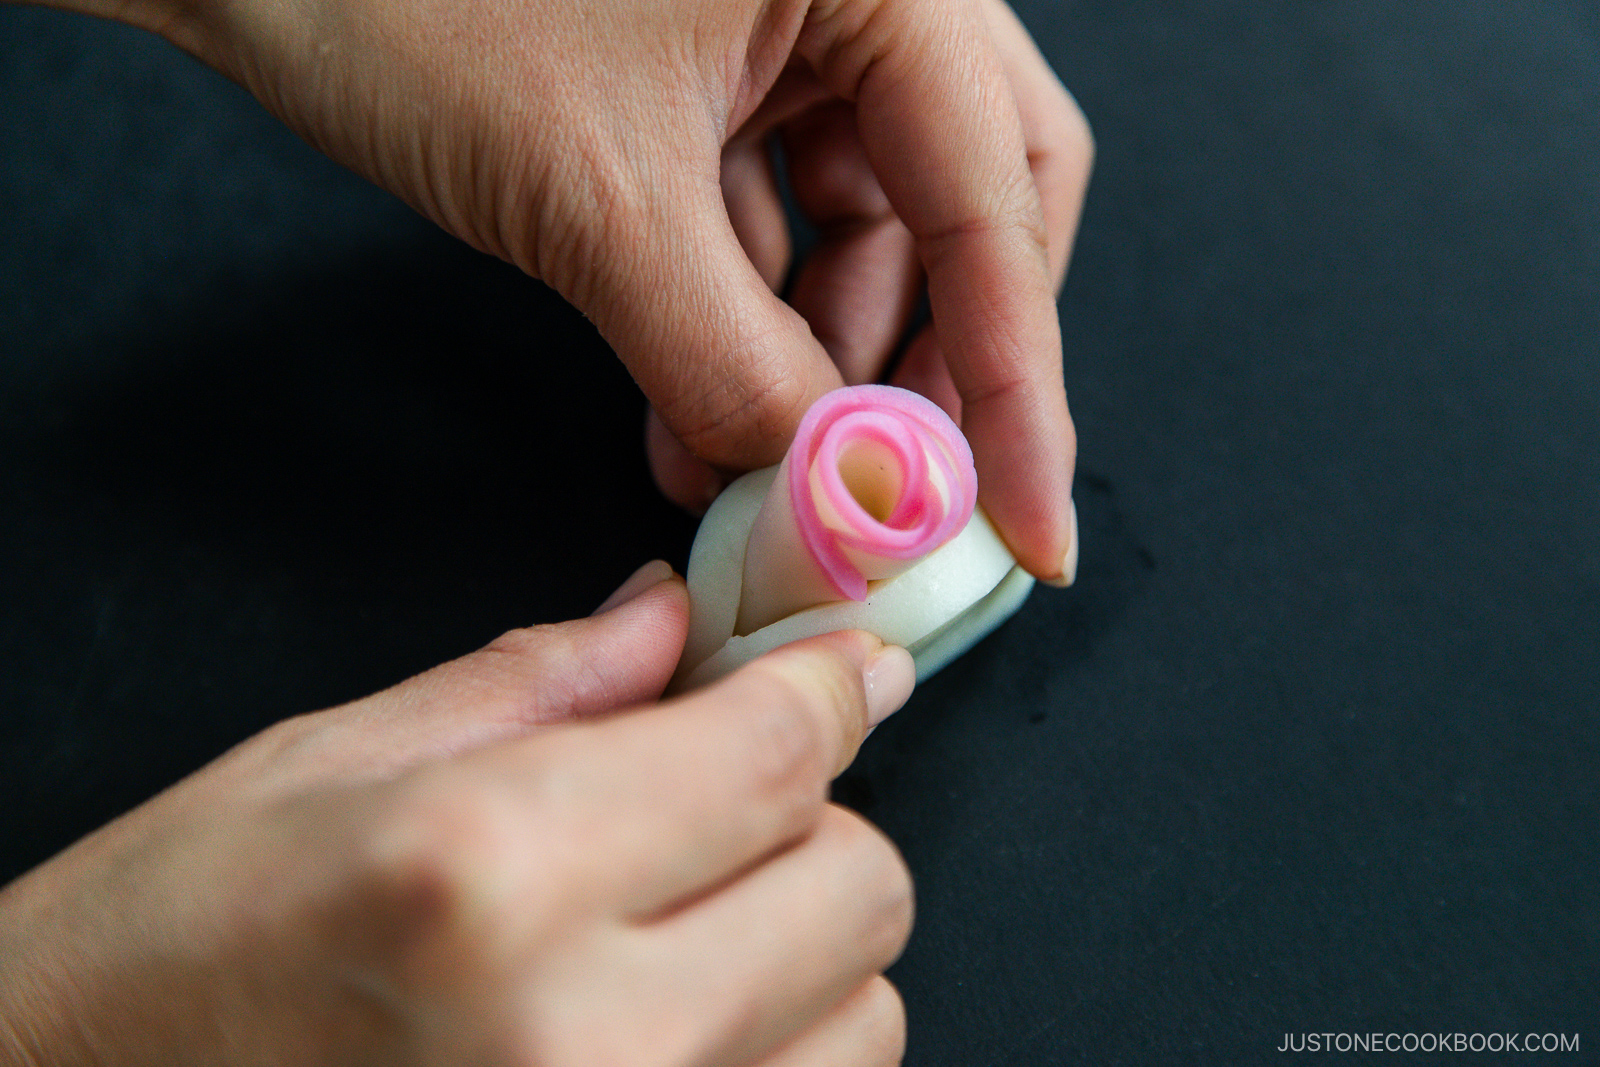
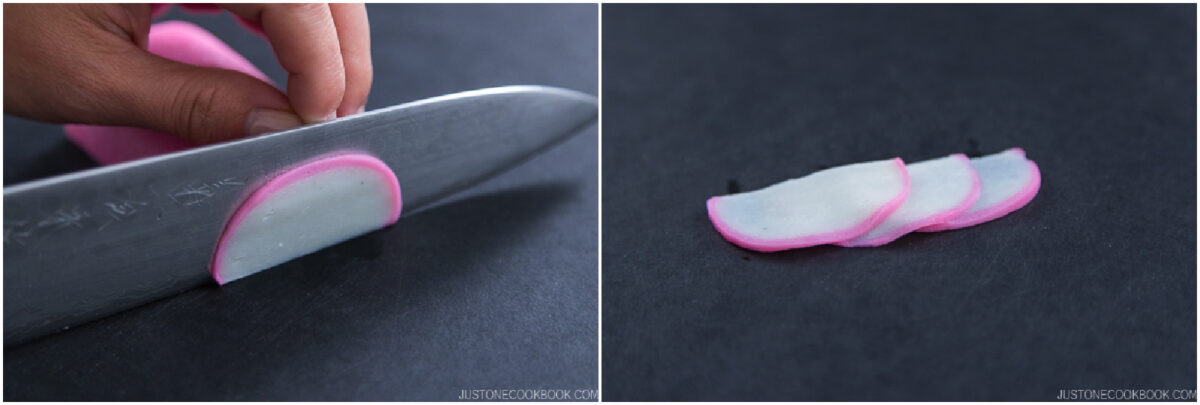
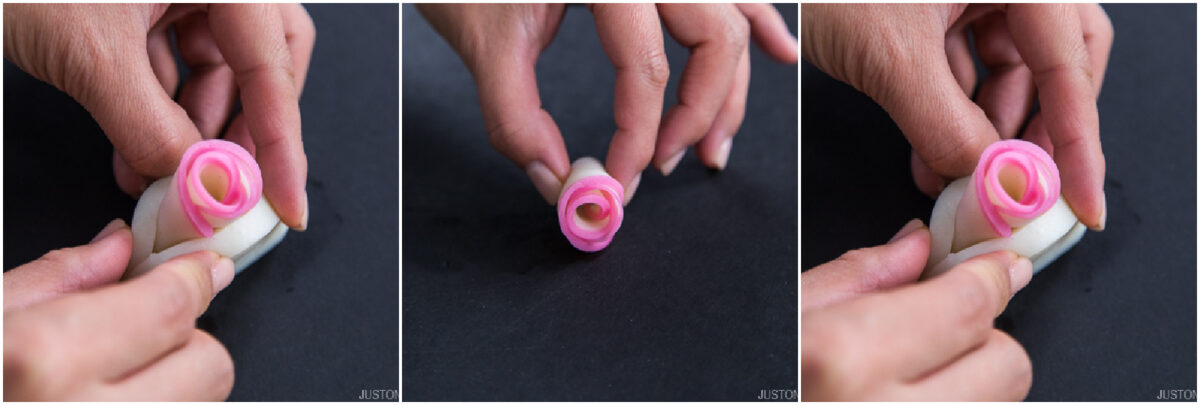
Rose (Kohaku Bara 紅白薔薇)
- Cut one slice of white kamaboko ½ inch (12 mm) thick and make a small slit in the middle from the top.
- Cut three thin slices of red-skinned kamaboko, each 1 mm thick. Stagger the 3 thin red kamaboko lengthwise on the work surface so they overlap. Then, roll them up snugly.
- Tuck the kamaboko roll into the slit of the white kamaboko with the pink side sticking out. Now, you have a beautiful kamaboko rose (kohaku bara) that symbolizes love and joy.
Did you make this recipe?
Tag @justonecookbook on Instagram so we can see your delicious creation!
Editor’s Note: This post was originally published on December 29, 2017, updated on December 31, 2021, and republished with more information and the recipe card on August 12, 2025.