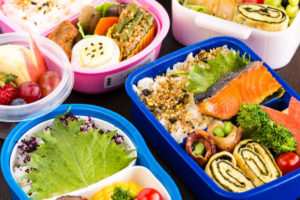
This is your ultimate guide to bento box Lunch! Whether you’re making school lunches for your little ones or work lunches for yourself, this guide will help you plan and pack a healthy and colorful bento. Plenty of tips and tools for you to get started.
These days, bento boxes have become synonymous with lunch boxes. I have seen so many wonderful bento lunch boxes filled with all kinds of food – from American comfort food, Tex-Mex, Indian, Italian to fusion – and it makes me really happy that the bento culture has gone global.
As a Japanese mother, packing bento boxes for my two children is the ultimate act of love. And I believe it is the same no matter your background. In this post, I will share how I make bentos for my children.
Table of Contents
What is Bento?
In Japanese, bento (弁当 bentō) or obento (お弁当 obentō) refers to a compact, nutritiously balanced, visually appealing meal served in a box. We call the bento container “bento-bako” (弁当箱).
Did you know that Japanese bentos are meant to be eaten at room temperature? Because of it, we slightly modified the way we prepare food for bento. Examples include:
- The food tends to be more heavily seasoned with salt or sauce when prepared for bento so it tastes better at room temperature.
- Avoid dishes that may not taste good at room temperature such as Japanese Curry and very fatty meats like pork belly slices. If the food cools and a lot of fat solidifies, it’s not ideal for bento.
- Deep-fried food is reheated in the toaster oven in the morning and allowed to cool completely before being packed into the lunch box. Deep-fried food such as karaage, tempura, and wings are very popular on bento menus and are enjoyed even at room temperature.
Why Should We Make Bento?
There are some great benefits to bringing a bento to school or the office.
- Healthy – If you follow the rule of thumb for bento packing, you naturally have a good portion of carbs, proteins, vegetables, and fruits in your lunch box. As the bento comes in compartmentalized containers, they serve as a helpful reminder of the portion sizes for your meal.
- Economical – Bringing food, or even leftovers, from home is always more economical than spending money at restaurants. In another words, it will save you a lot of money!
- Eco-Friendly – Bento boxes are reusable, which means you can reduce the amount of plastic bags, disposable containers, and waste.
Chapter 1: Bento Boxes and Accessories
In this chapter, we’ll go over different bento box options and helpful tools for bento making.
1. Bento Boxes (Lunch Boxes)
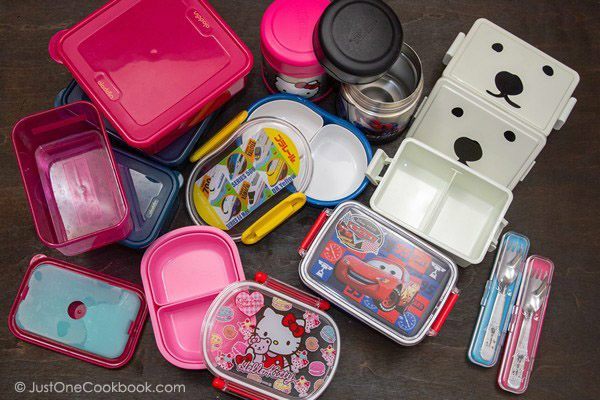
It doesn’t have to be a Japanese bento box. You will need some sort of container or lunch box to put your food in. I use thermal lunch boxes for warm food like pasta and grilled cheese sandwiches.
- Japanese character lunch boxes: I brought them back from Japan but you can probably find some on Amazon or online. Bento&Co sells a variety of bento boxes and ships internationally.
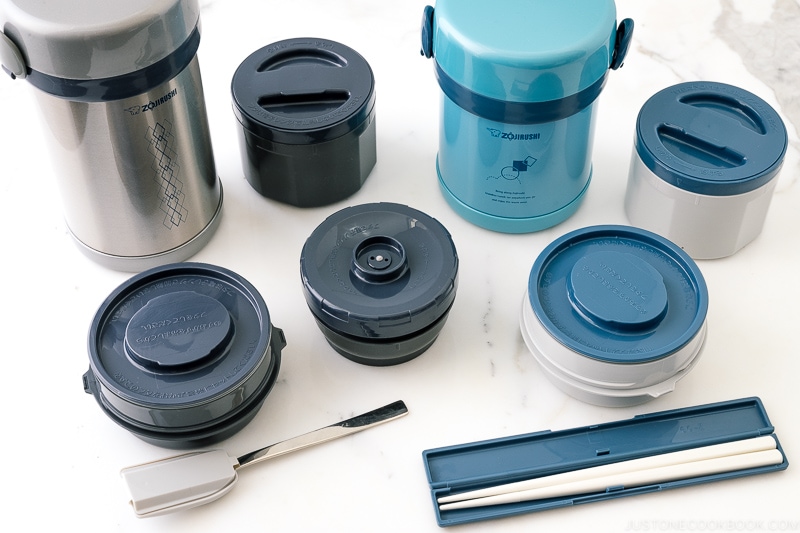
- Thermal food jars: I used them for hot food like pasta and grilled cheese sandwiches. After trying several jars over the years, I think Zojirushi jars keep the food warmer than Thermos.
- Zojirushi lunch jars: Kids have used Ms. Bento® Stainless Lunch Jar SL-MEE07 (2 inner bowls) and Ms. Bento® Stainless Lunch Jar SL-NCE09 (3 inner bowls) until they became too busy to eat a full lunch during a short lunch break.
- Stainless steel lunch boxes: Kids still use these Lunchbots containers to bring sandwiches.
- Utensil sets: The sets like this and this are pretty convenient.
- Magewappa (曲げわっぱ): I do not use these wooden bento boxes for my children, but the traditional wooden box makes it a popular choice among adults. You can get it on Amazon and Bento&Co.
2. Bento Accessories
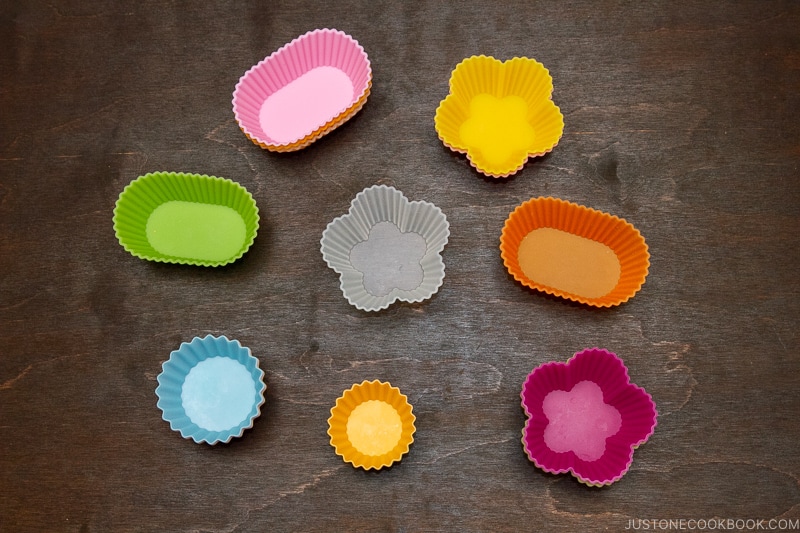
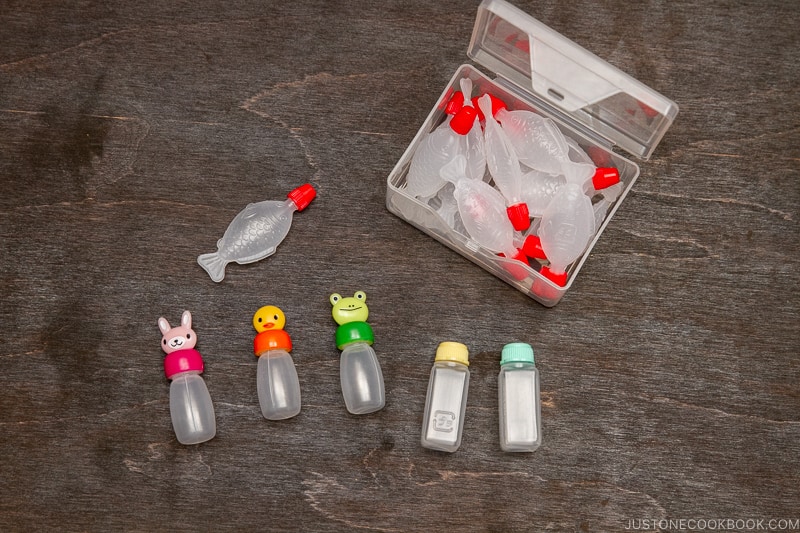
- Silicone cups: The silicone cups are great for keeping wet things away from dry foods and holding loose items like blueberries in one place. Usually, silicone cups come in bright and cheerful colors, which improve the presentation of the bento. They are reusable and come in many different sizes and colors.
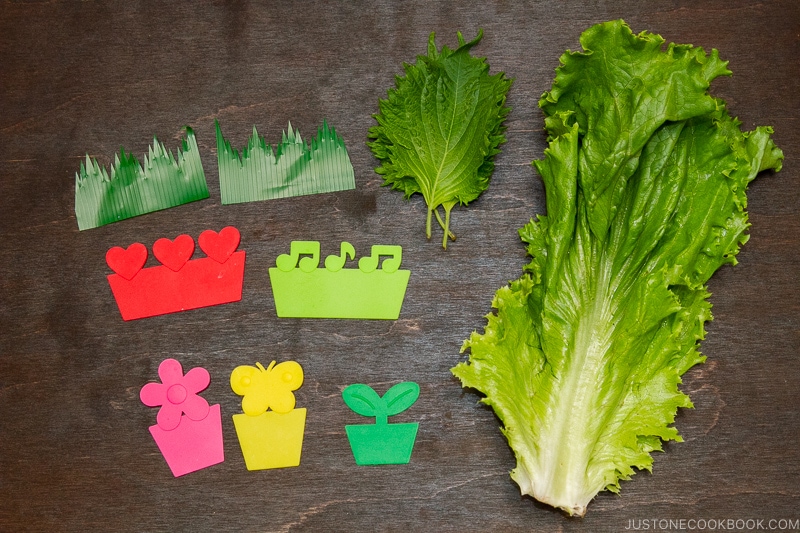
- Dividers: The silicone dividers come in bright colors to improve the presentation for the bento and they help separate one food from the other without mixing up the flavors. You can also use edible separators such as lettuce, shiso leaves, cucumber slices, etc.
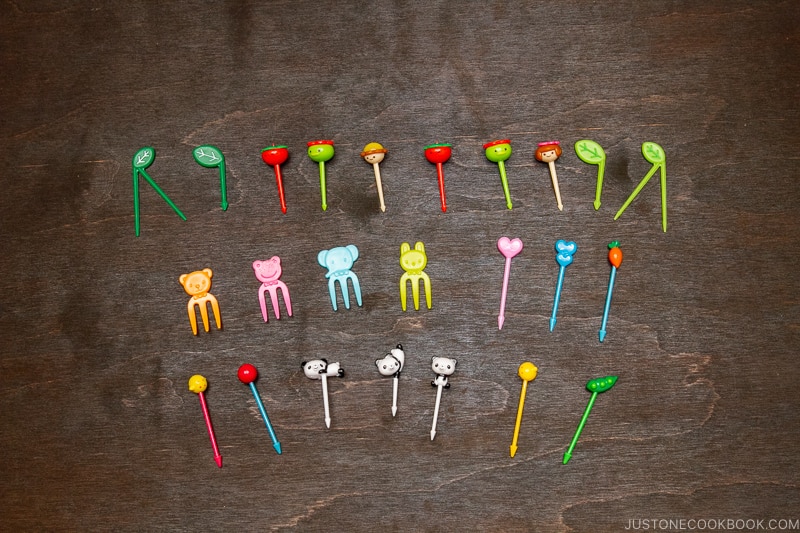
- Food picks: These picks come in many shapes, patterns, and colors and some are really playful and cute (like my little panda picks)! They are helpful to put small foods together (like meatballs and berries) and also add extra color to your bento. Children are gravitated to eating foods with those picks.
- Sauce containers: The sauce containers help you store the sauce separately so that the food will stay dry until lunchtime. It’s not so pleasant when the sauce ends up getting mixed with foods it’s not meant for.
- After trying different containers, I prefer jar-style containers like this and this with a twist lid so it’s easy to wash.
- For those who prefer a cute soy sauce container, here are animal containers and fish-shaped containers.
Chapter 2: Plan Bento Menus
First, use your creativity to visualize how a bento should look. Bento making doesn’t have to be complicated, and you can start with simple dishes that you are familiar with.
Since I mostly cook Japanese food at home, I mainly focus on packing Japanese dishes.
Tip #1: Prepare 5 Types of Foods

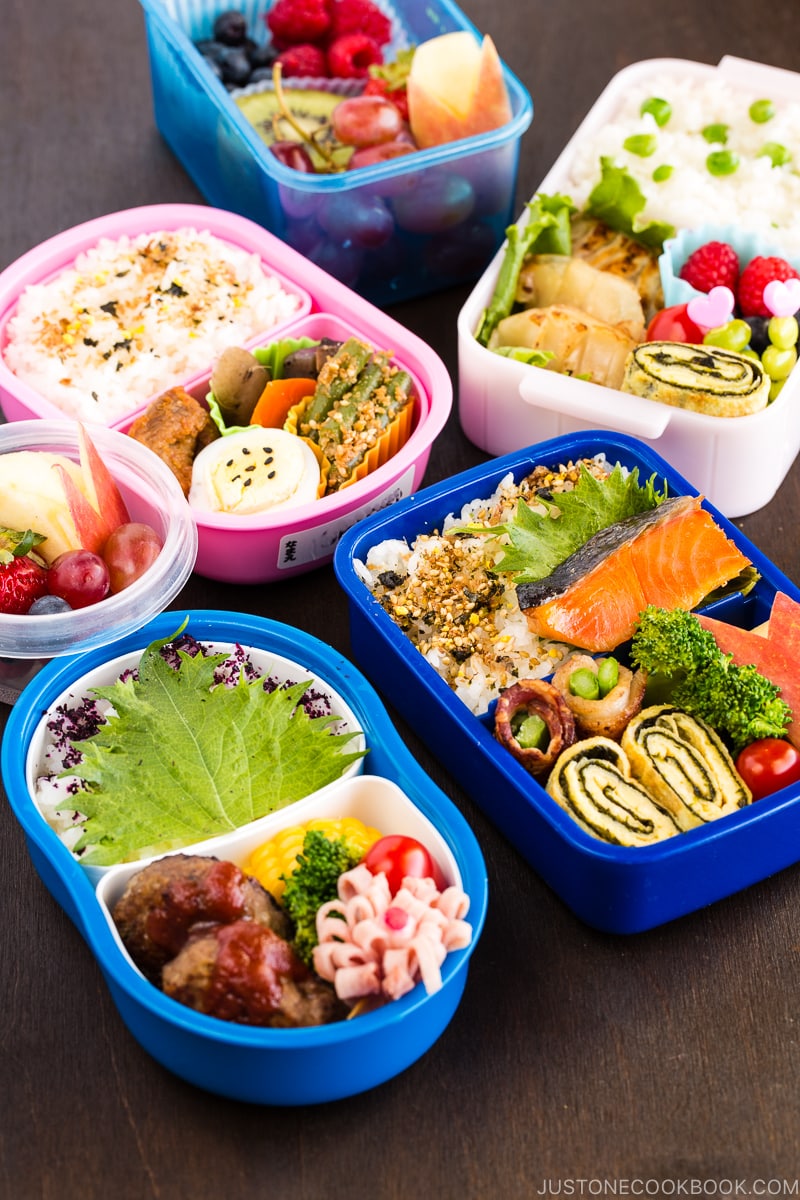
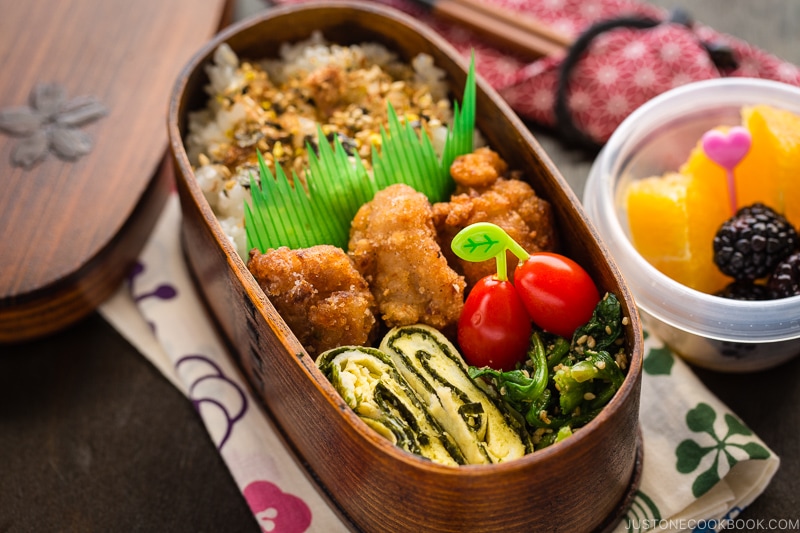
For a Japanese-style bento, we commonly include 5 types of food in the lunch box:
- Carb – Fill up tummy! (rice, yakisoba, yaki udon, fried rice, or mixed rice like the classic takikomi gohan or Japanese corn rice)
- Main (Protein)– Meat, fish, and seafood (karaage, gyoza, bulgogi, teriyaki salmon)
- Sides (Vegetables) – Also, tofu, egg, or mushroom dishes (potato salad, tamagoyaki, green bean gomaae)
- Fillers – Simple yet colorful ingredients to brighten the bento (edamame, blanched broccoli, cherry tomatoes, boiled egg)
- Fruits – In the bento box or in a separate container (berries, grapes, apples)
This will help you assemble a nutritiously balanced meal.
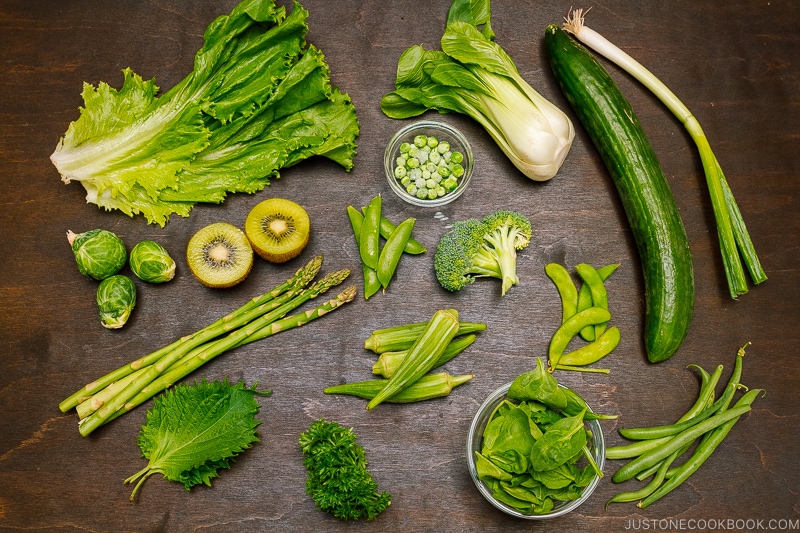
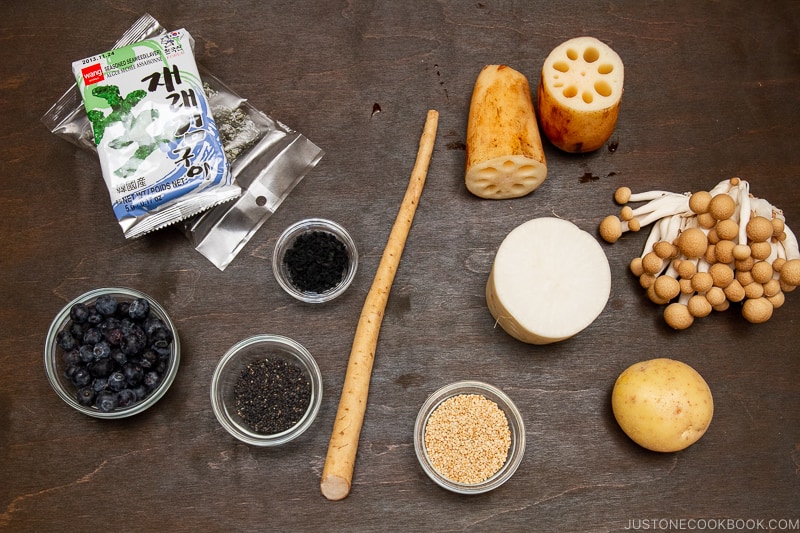
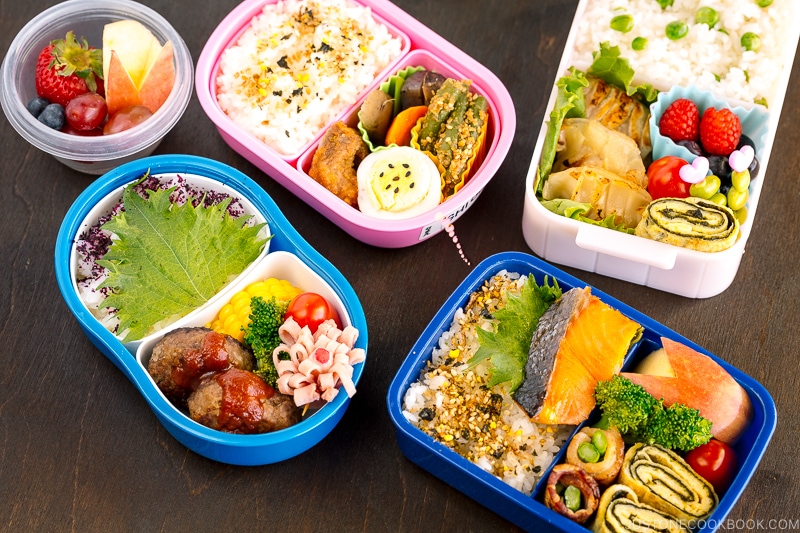
Tip #2: Keep Rainbow Colors in Mind
When making choices about which foods to include in the bento box, choose bold colors to provide visual impact. Echoing doctors’ advice to ‘eat your colors’, colorful vegetables and fruits are often high in nutrients.
If I have similarly colored dishes like broccoli and asparagus, I separate them and place other foods in between to make the bento more visually appealing. Sprinkling colorful furikake (rice seasonings) or garnishing with chopped parsley and green onion adds a nice accent to the overall presentation.
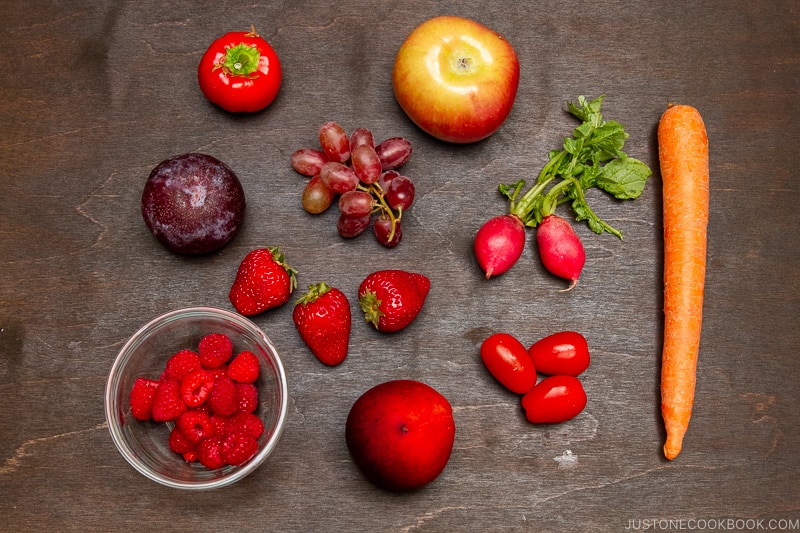

- Red: Tomato, carrot, red radish, bell pepper, apple, grapes, strawberries, plum, raspberries, nectarines, etc.
- Yellow and orange: Corn, sweet potatoes, pumpkin, bell pepper, orange, lemon, banana, etc.
- Green: Lettuce, cucumber, green onion, edamame, broccoli, spinach, okra, shiso, snap peas, asparagus, parsley, bok choy, green beans, Brussels sprouts, green peas, kiwi, etc.
- White, black, and brown: Daikon radish, potato, onion, lotus root, enoki mushroom, white sesame seeds, blueberries, shiitake mushroom, gobo (burdock root), wakame (dried seaweed), nori (dried seaweed sheet), hijiki (dried seaweed), black sesame seeds, etc.
Chapter 3: Meal Prep for Your Bento
Meal prepping can potentially save a lot of time and energy and you can do that with bento-making too. For me, I don’t want to wake up early, so here’s what I do.
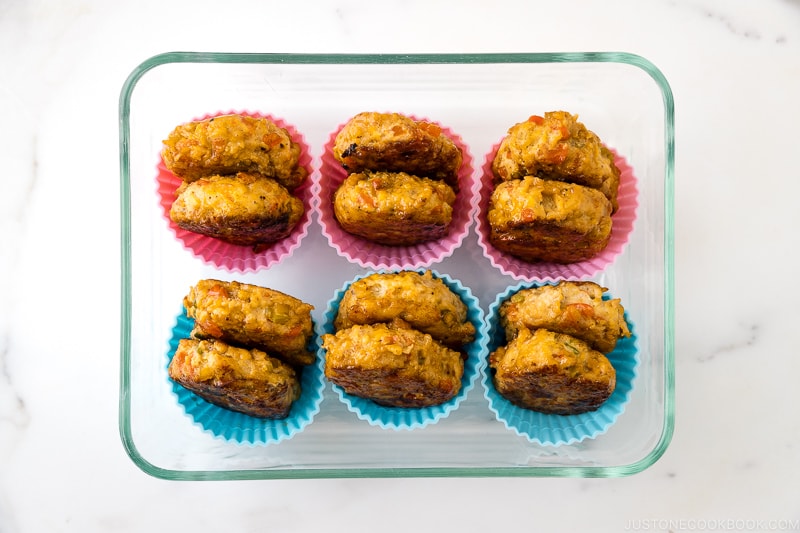
Tip #1: Make extra portion (main or side dishes)

I double up the portion especially when I’m making a freezer-friendly dish for dinner. The extras can be reheated and packed in the bento the next day, OR freeze for later use.
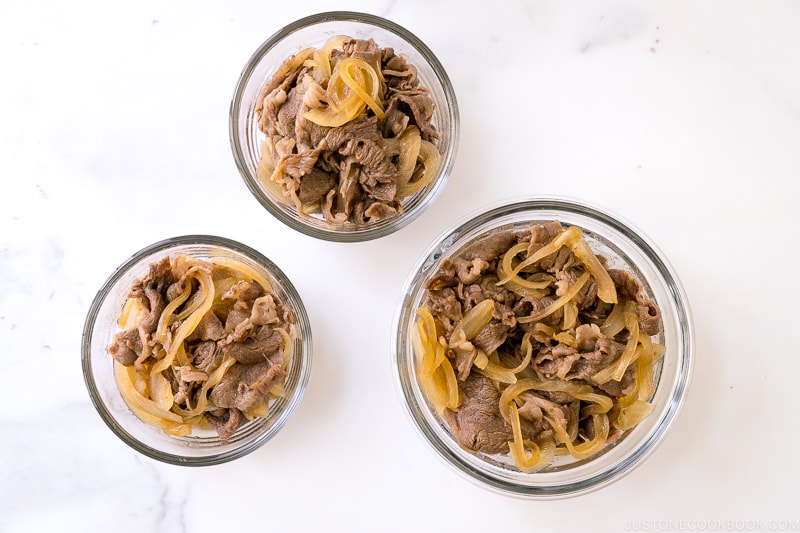
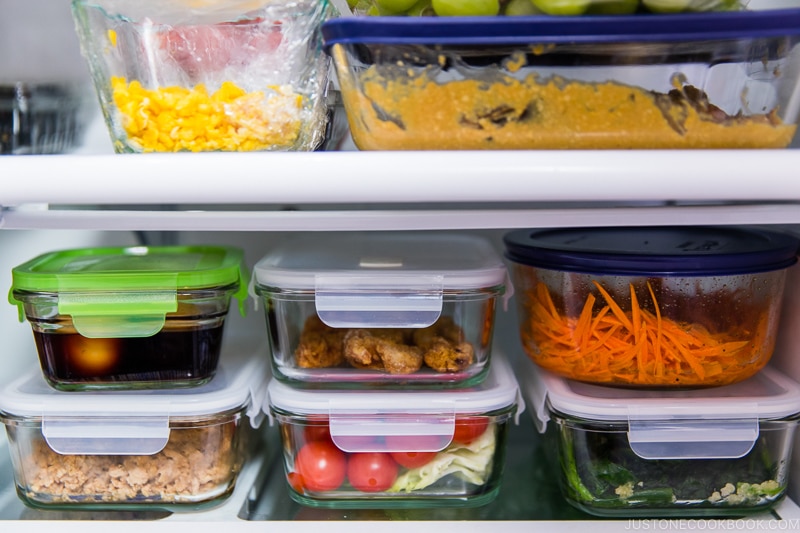
Tip #2: Stock up on bento dishes in the freezer and fridge
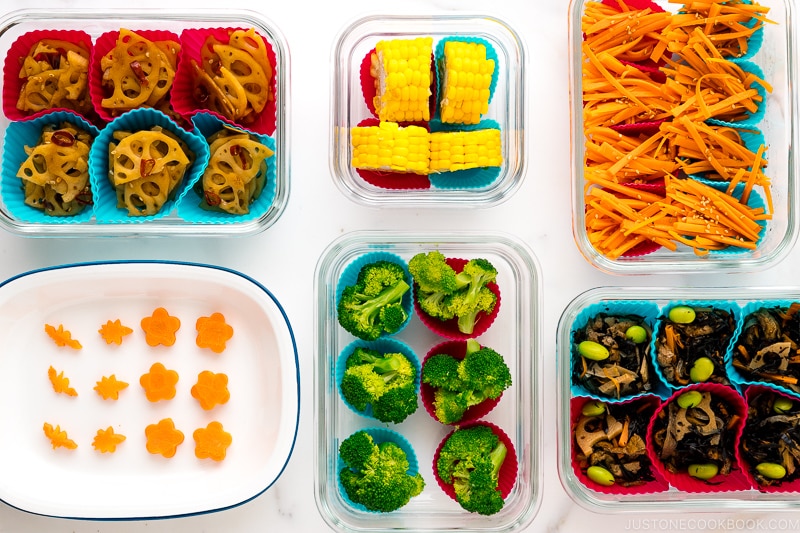
Whenever I have leftovers, I always freeze them and use them in the bento later. And if I have an extra 5 minutes in the kitchen, I blanch vegetables and freeze them (like broccoli), which I will use as bento fillers.
👉🏻 Here is the tutorial on How to Freeze Food for Bento.
- You can purchase these silicone cups and mini ones, and I also use these meal-prep glass containers and love them!
- Make sure to date the container so you can keep track of which food to use sooner. In general, food lasts 2-4 weeks in the freezer.
👉🏻 I have a list of Freezer-Friendly Bento Dishes that you can bookmark. 🔖
If you don’t have a big freezer space, you can also use your fridge to store some of the meal prep-friendly dishes and leftovers.
Tip #3: Plan Ahead
I know, for some people including myself, “planning ahead” can be hard. But trust me, planning actually helps you save time and money in the long run, and you will always be more prepared despite the busy schedule.
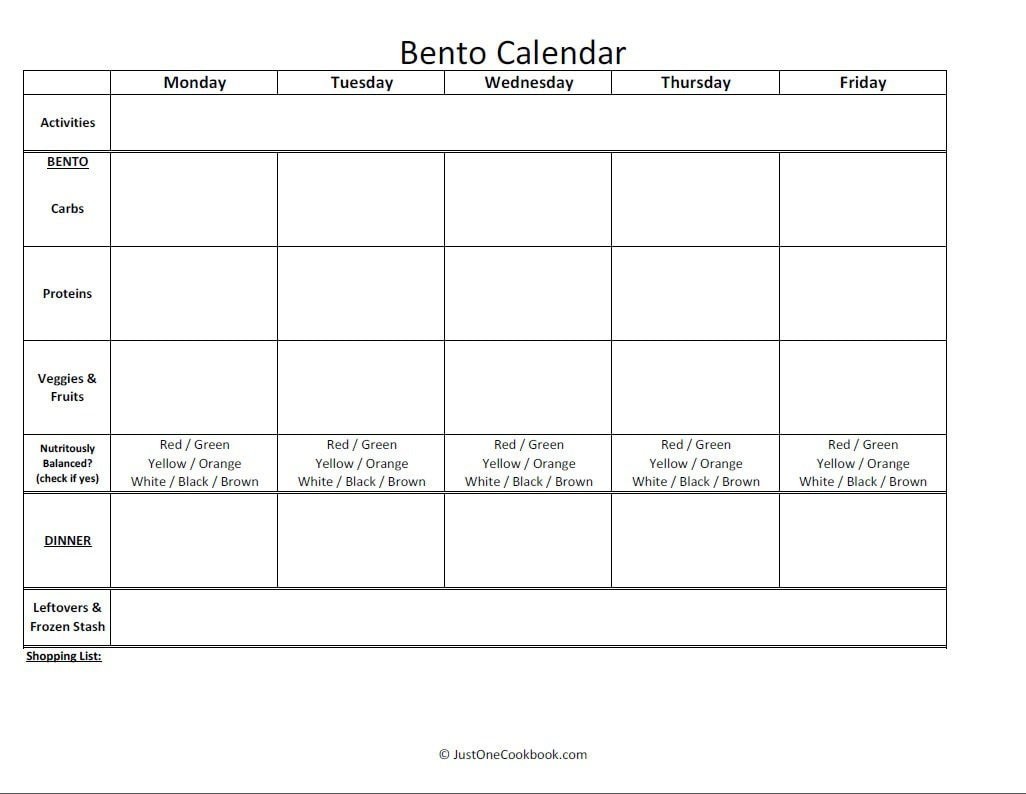
Allocate 15-30 minutes of your time during the week; figure out what you have in the refrigerator, what you will be cooking throughout the week, and what you will need from the grocery stores.
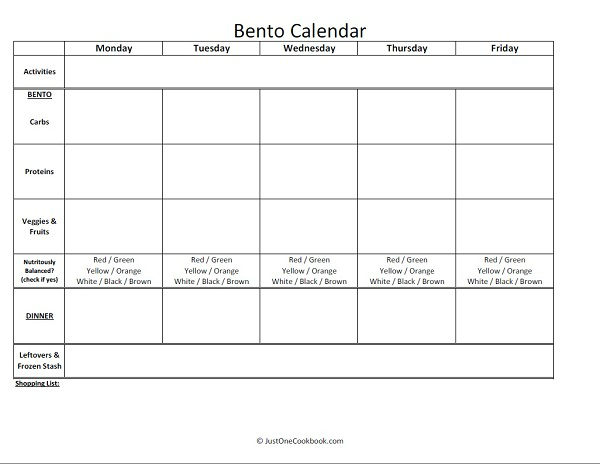
A friend of mine in Japan uses a meal planner to organize her dinner and bento menus. I adapted hers and made a simplified Bento Calendar. With this calendar, you can visually plan out your weekly dinners and bento menus. If you would like a copy, please click here.
Chapter 4: Pack Bento in the Morning
When you wake up in the morning, here’s what we do:
- Reheat the frozen food and prepare the food you were planning to cook (read Chapter 5 below if you are not sure why we reheat the food).
- Hot food should be packed immediately if you’re using a thermal lunch jar.
- Otherwise, let the hot food cool and then pack it into a non-thermal bento box.
- Add the fillers and do the rainbow color check!
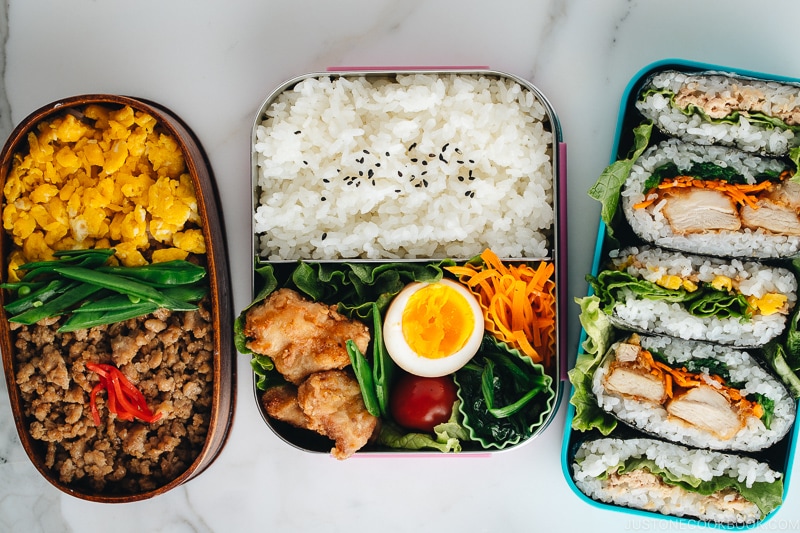
How To Pack Food in the Bento Box
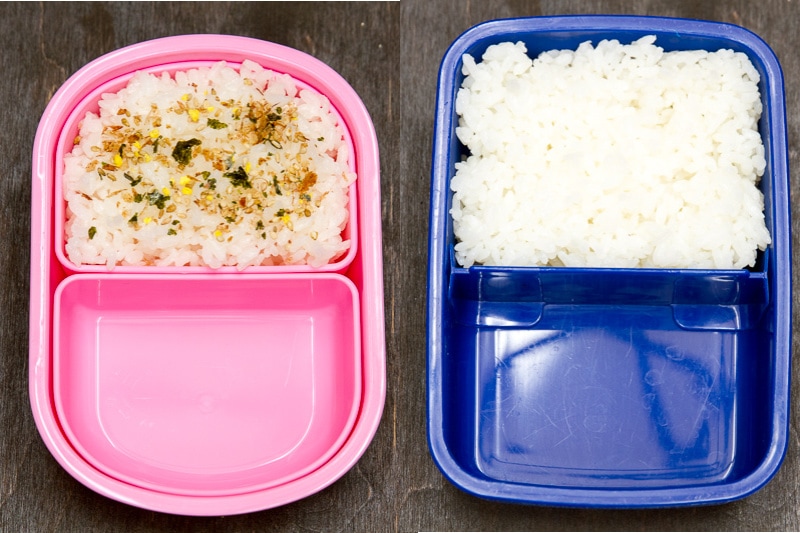

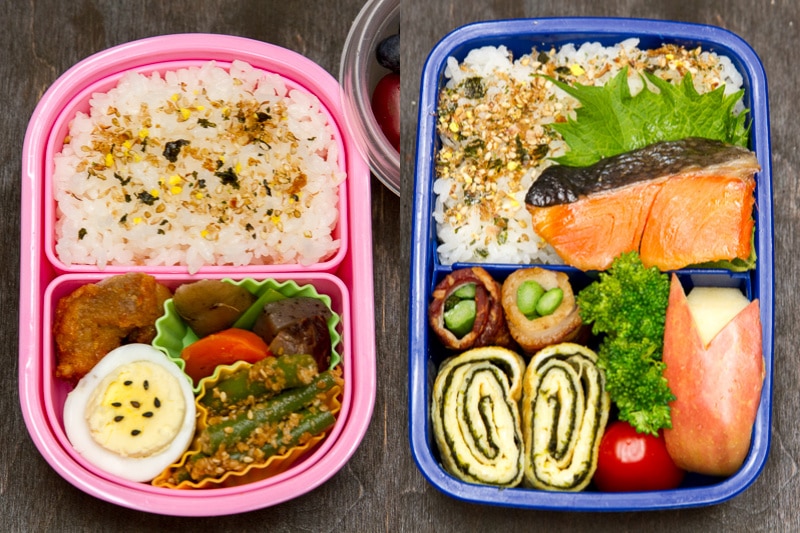
- Put carbs: I usually fill 1/2 of the bento box with carbs. Of course, you can pack brown rice, pasta, wraps, sandwiches, bread, etc instead of white rice.
- Put main dish (protein): Any kind of beef, chicken, pork, tofu, beans, eggs, or other protein sources can be packed in 1/4 of the bento box. If possible, add 2 kinds of protein dishes in the spot.
- Put side dishes (vegetables) and fruits: Vegetables and fruits should be filled up in the remaining 1/4 of the bento box. Packing at least 2 kinds of vegetable dishes is ideal. If you have more vegetable dishes, pack the fruits in a separate container.
Bento Packing Tips
- Pack from big to small dishes: The main dish tends to be bulky, so pack that first in the bento box. Then, add smaller and flexible-shaped side dishes in a silicone cup in the remaining spaces. Any gap can be filled with vegetable “fillers” such as a cherry tomato and blanched broccoli. These fillers prevent the food from shifting inside the box.
- Pack the food tightly: It helps prevent the food from shifting in the bento box. You don’t want to see messy bento when you (or your children) open the bento box at lunchtime. Try packing from bulky food and in the following order.
- Remove cooking liquid: Always drain sauce/dressing before packing it into the bento box. If you like to add some sauce, put it on top of shredded cabbage/lettuce and put food on top to avoid spilling. You can also use a sauce container and pour it at mealtime. Also, the liquid could spoil the food faster, so it’s best for food safety as well.
Watch the Video Tutorial on How to Pack Bento
Chapter 5: Food Safety Tips
Food safety is important when it comes to bento making. Remember to wash your hands and use clean utensils when you handle the food. I highly recommend re-heating the food before packing and cooling down the food completely before closing the bento. And don’t forget to keep ice packs in a lunch bag!
I have a blog post on Food Safety Tips for Bento. And if you’re new to making bento, I highly encourage you to check out this post.
Chapter 6: Final Thoughts
Honestly speaking, packing bento does take longer than packing a sandwich and it’s more work than eating out. Why do we go through extra steps when our life is already busy?
I believe bento is much healthier overall and it’s more economical than eating out. But above all, I want to brighten my children’s day with colorful and cheerful bento. They look forward to their lunchtime, just like how I used to look forward to my mom’s homemade bento. It only requires a little bit of time and effort to make the bento once you get used to making the bento.
I also hope this Japanese bento culture and technique will improve your eating habits to stay healthy and make everyone’s lunchtime more fun. Good luck!
Useful Bento Resources on JOC
Basics
- The Ultimate Guide to Bento Box Lunch
- Food Safety Tips For Bento
- Frequently Asked Questions About Bento – Check this post if your question hasn’t been answered.
Helpful Tips
- How to Pack Bento in 15 Minutes
- How To Freeze Food for Bento
- Meal Prep Freezer-Friendly Bento Dishes
- Meal Prep Bento Recipes Ideas: 3 Dollar Bento Challenge
Menu Ideas
- Bento Menus for Inspiration
- Back to School Easy Bento Box Ideas
- Back to School Easy Bento Ideas & Recipes
- How to Make Cute Bento (Video)
Wish to learn more about Japanese cooking? Sign up for our free newsletter to receive cooking tips & recipe updates! And stay in touch with me on Facebook, Pinterest, YouTube, and Instagram.


Many thanks Namiko, I wanted to start preparing Bento for my teenage daughter, who is fascinated by the Japanese culture. Your guide helps me to get started.
Hello, Sergiusz. Aww. Nami and all of us at JOC are happy to hear that Nami’s guide was helpful.🥰
If you have questions about the recipe or Bento, please do not hesitate to ask. We’re here to help. Happy Bento!
i am going back to school on tuesday after not going for a year and i am defenitly making a bento box with all the help u have given me.xoxo
Hi Venus! How exciting! We hope you enjoy making bento!
https://www.justonecookbook.com/tags/bento/
I’m going to be making bento instead of eating the schools food for the upcoming school year so this was really helpful!
My only question is what if you don’t have a asian grocer in your area?
Hi Emma! I’m glad this was helpful! Well, it depends on what you want to cook and pack… it doesn’t have to be Japanese food. These days Amazon is great for shopping for some Asian ingredients, too. 🙂
[…] have written step-by-step pictorial instructions on How To Make Bento. For the video click, click […]
[…] 1. Bento Tutorial 101 […]
I’m living in Japan but my kanji reading skills are a little lacking, which makes recipes and shopping a stressful experience! Your English recipes for traditional Japanese cuisine have made a huge difference in how I live here! It means a lot to me to be able to cook and eat like my coworkers and friends. I’m also living on a budget, so the fact you use all the ingredients that are in season and in my nearest grocery store makes things infinitely easier. Lastly, the fact this repository of Japanese cooking is free online absolutely blows my mind. It means everything to me, so thank you so much! Me and my bento box thank you!
おつかれさまです!
Hi Mellie! Thank you so much for your kind words and I’m really happy to hear JOC has been very helpful. Hope you continue to enjoy cooking Japanese food in Japan! 🙂 どうもありがとう!!
[…] Just One Cookbook […]
[…] Just One Cookbook – How to Make Bento […]
[…] If you are new to packing lunches and interested in making bento-style lunch, check out my short video below on How To Make Bento. […]
This is super adorable! I’m not a good cook but I think I can do it if I follow these instructions because the picture is very clear and easy to follow.
Thank you so much for your kind words. Start making changes slowly so it’s not overwhelming. 🙂 Having many colors in bento helps the look (instead of all one color or few colors). 🙂