
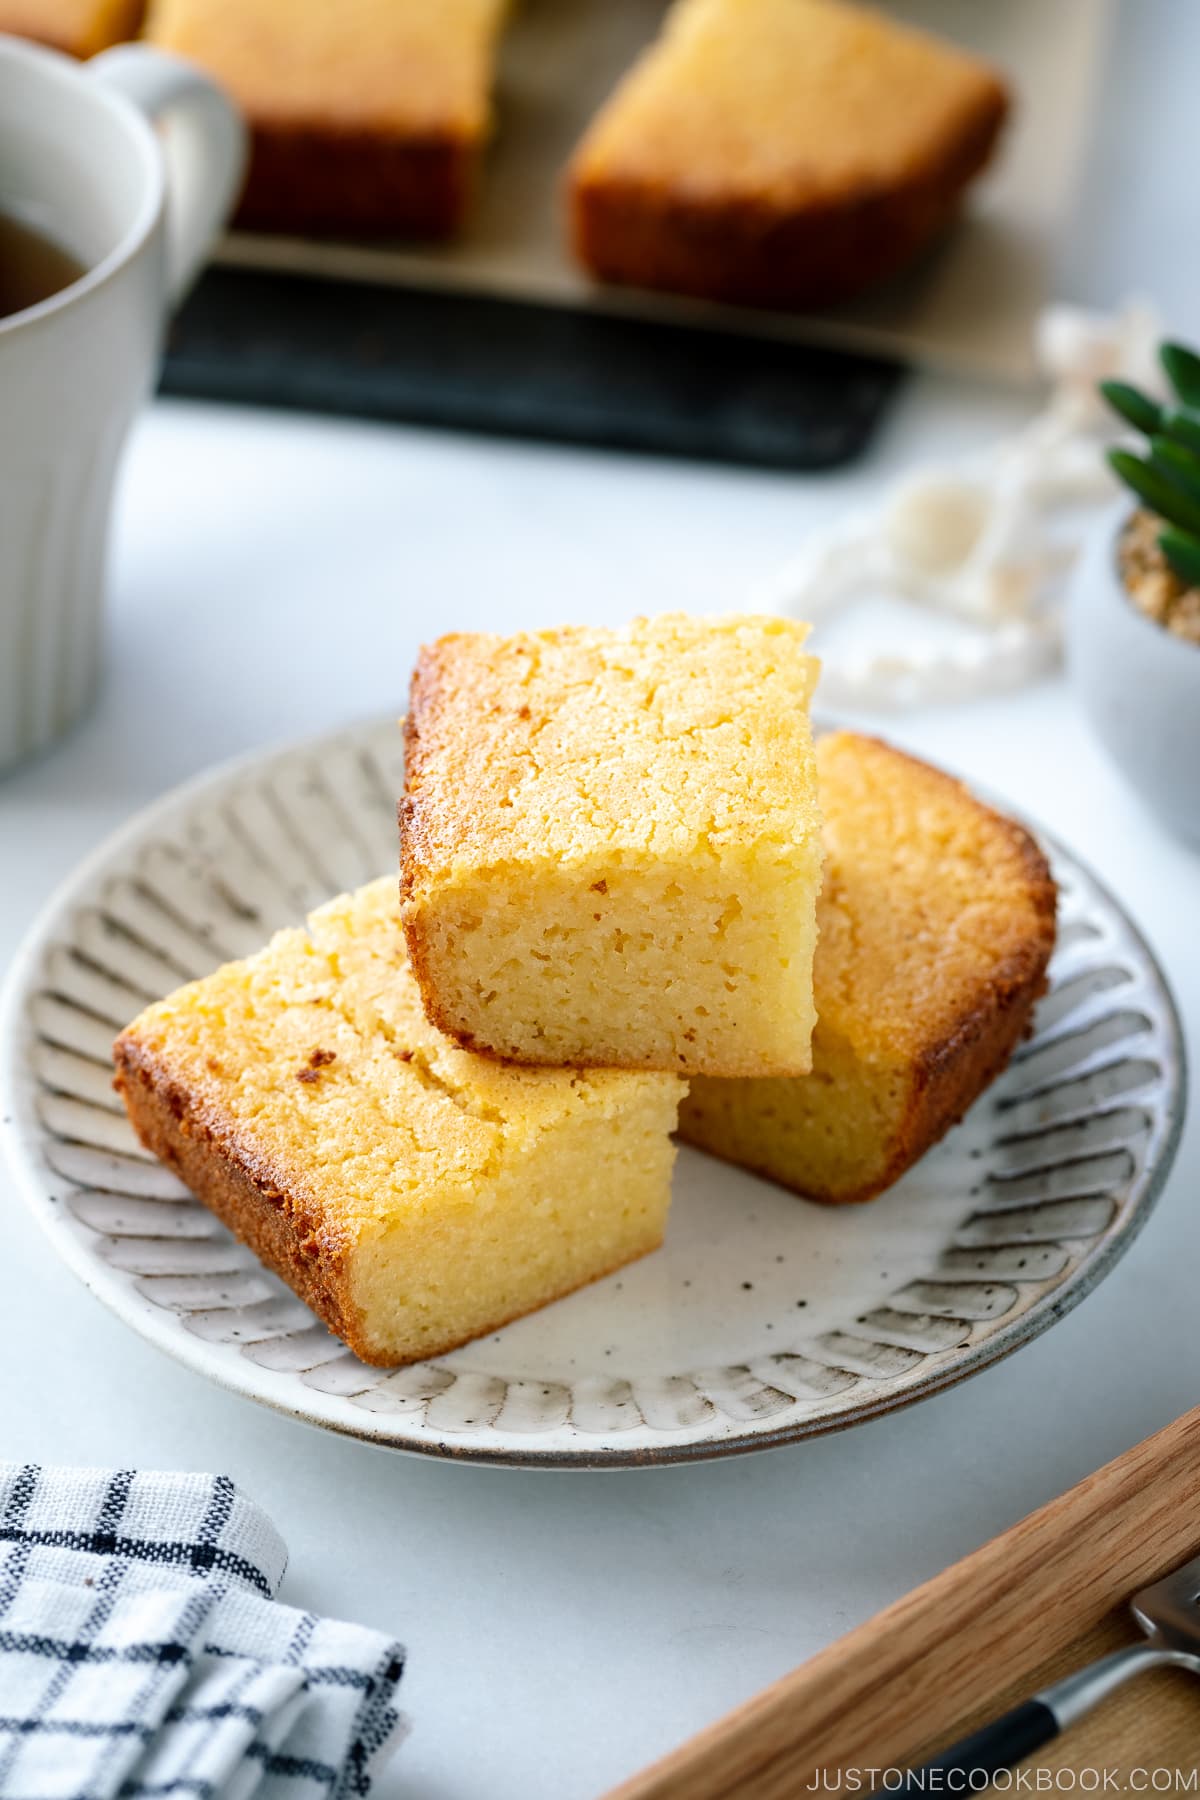
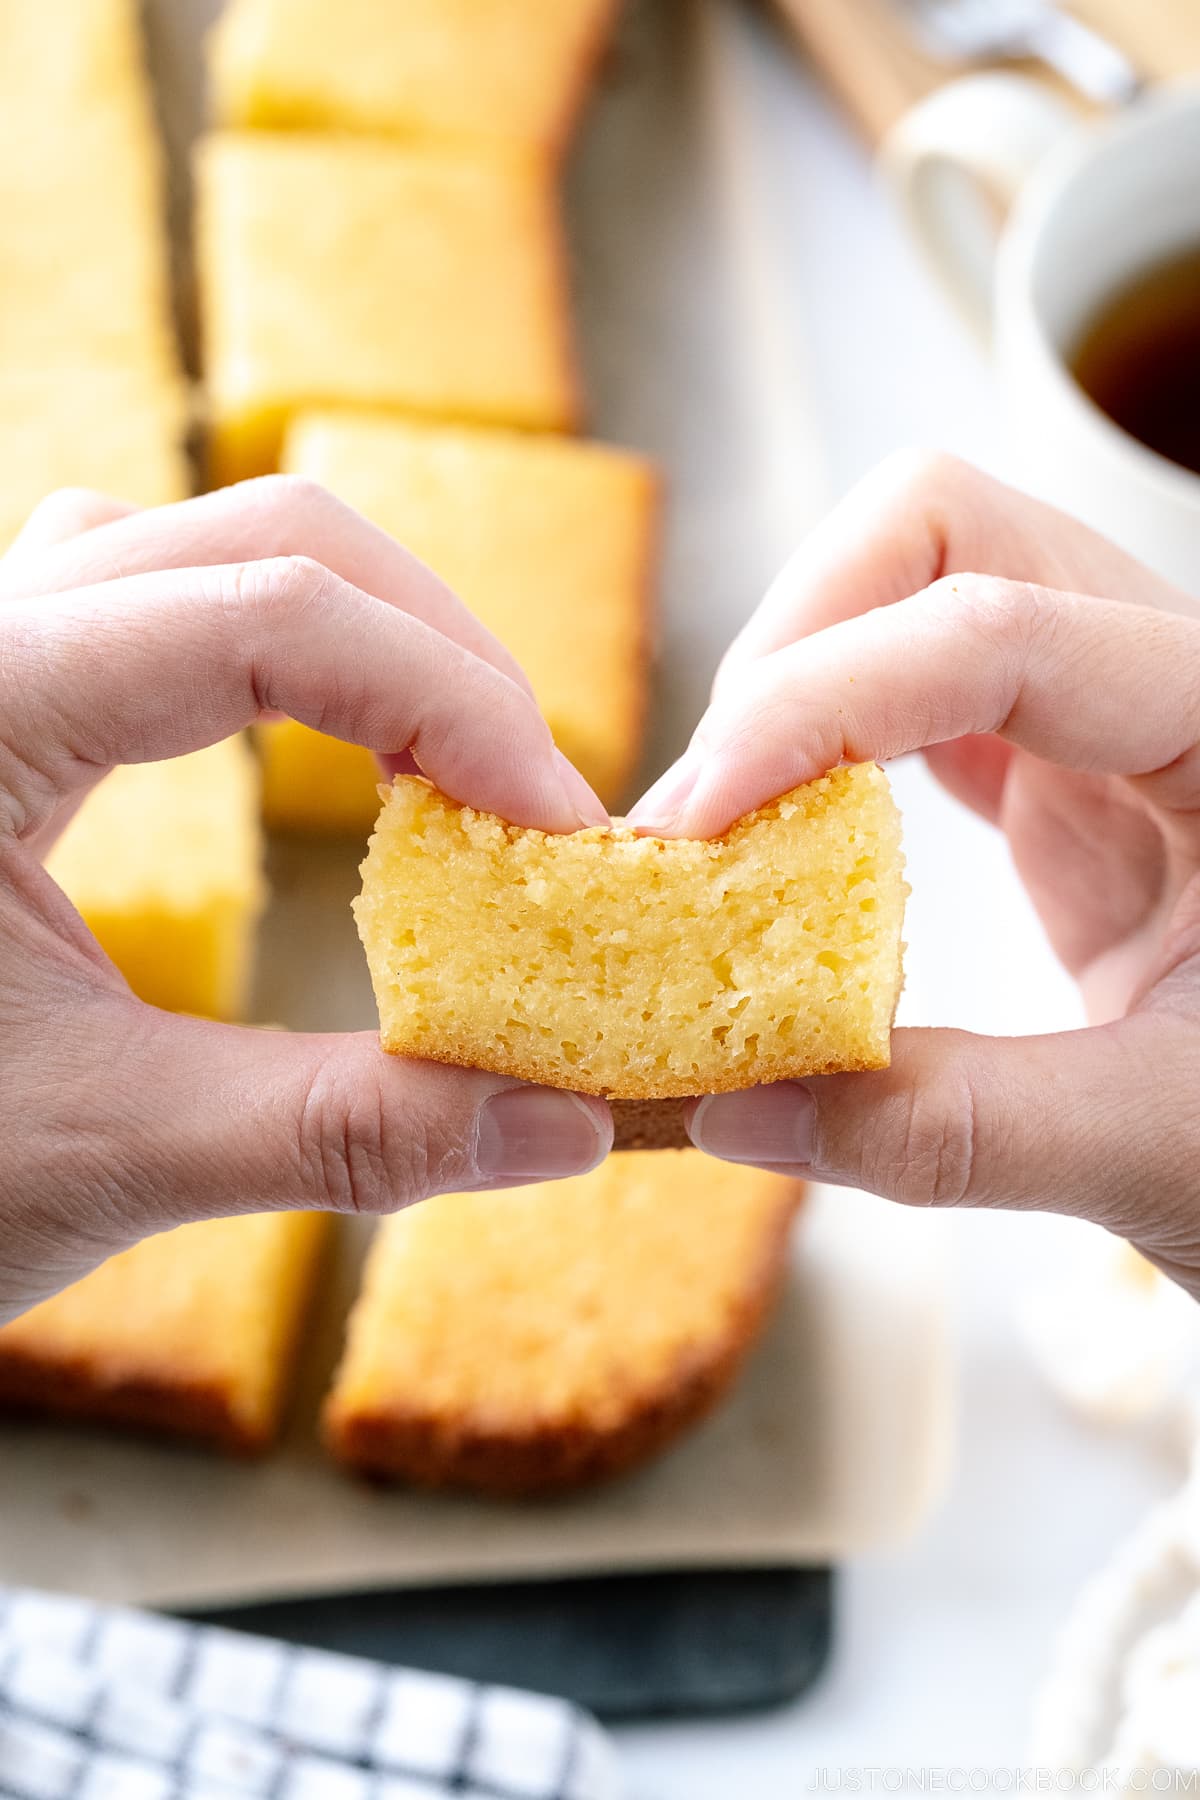
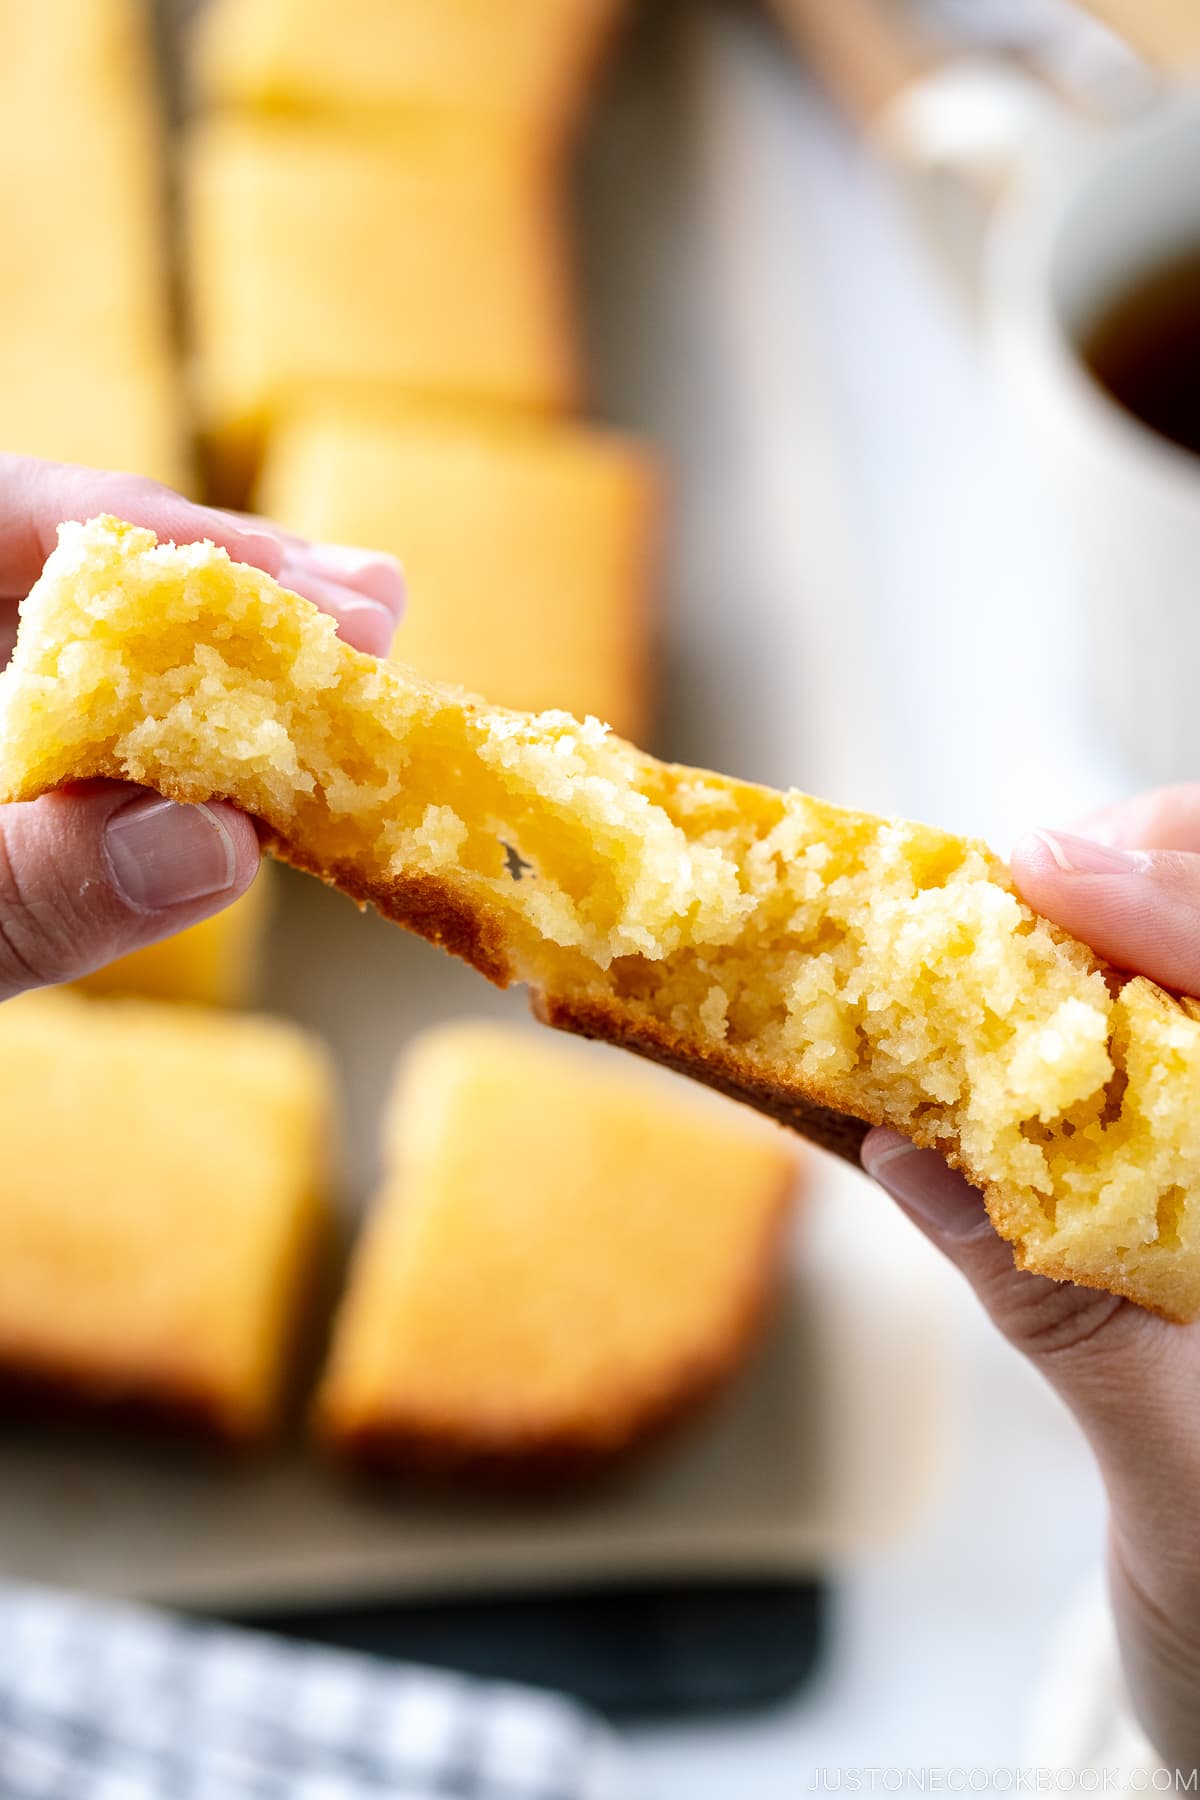
With crisp, caramelized edges and a chewy center full of coconut flavor, butter mochi is one of Hawaii’s most beloved desserts. It’s a delicious hybrid of Japanese mochi and local coconut cake.
My family has enjoyed butter mochi many times—whether from Shueido, a Japanese confectionery in San Jose, souvenirs from Hawaii, or Naomi’s homemade version (she’s part of our JOC team). Today I’m excited to share our family’s version!
Love Hawaiian-inspired recipes? Try my Poke Powl, Tuna Poke, and Furikake Chex Mix recipes next!
What is Butter Mochi?
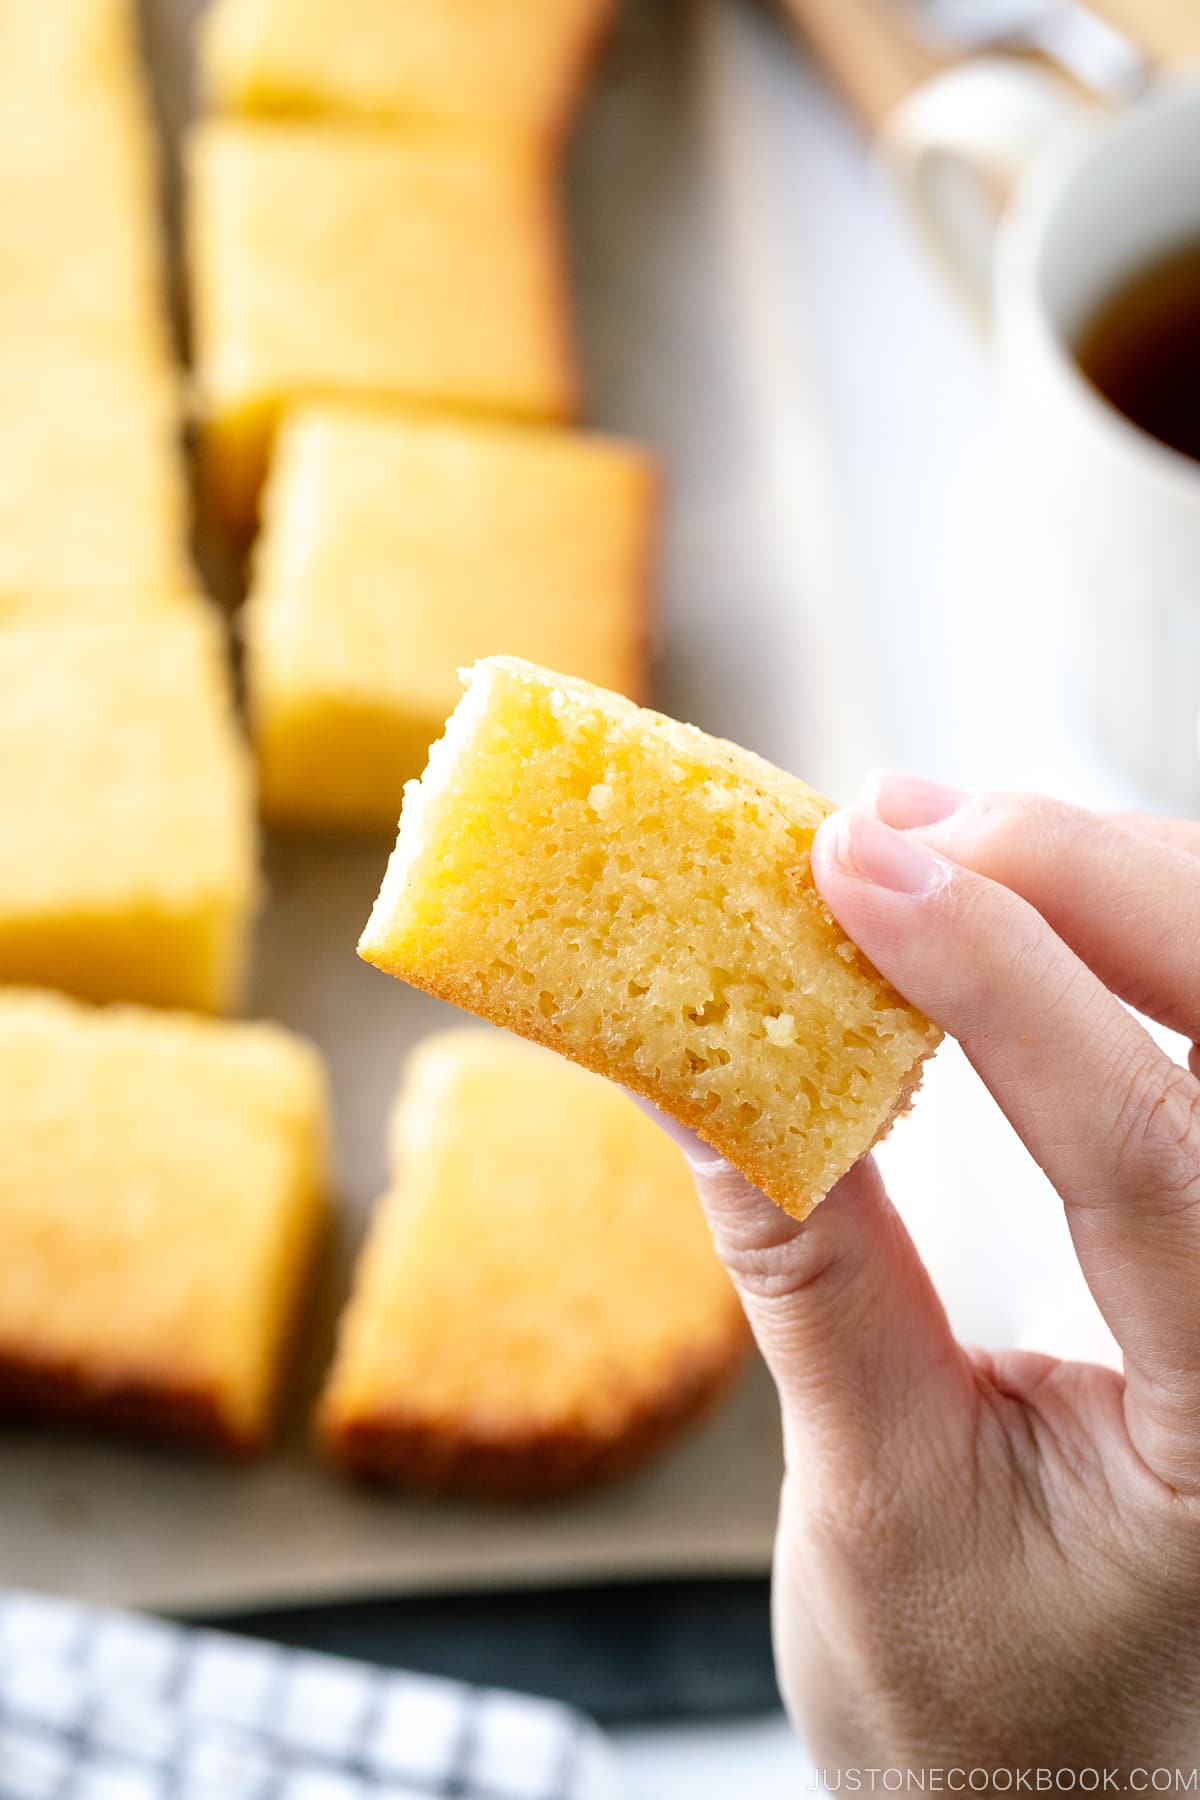
Butter mochi is a beloved Hawaiian sweet made with butter, mochiko (glutinous rice flour), coconut milk, and another type of milk (usually evaporated or whole milk). The result is a chewy, slightly sticky custard-like rice cake with a crisp golden crust. Baked in a pan and cut into squares, it may look humble, but it’s a staple dessert in Hawaii—often served at potlucks, parties, and family gatherings.
Like many foods in Hawaii, its exact origins are hard to trace. Some say it was inspired by bibingka, a Filipino coconut rice cake, while others point to chichi dango (乳団子), a Japanese sweet from Hiroshima that also became popular in Hawaii.
In recent years, butter mochi has grown beyond the islands, even appearing as a pre-mix box at Trader Joe’s in the U.S. It’s simple, comforting, and that’s exactly what makes it so loved.
The Recipe Inspiration
Since I didn’t grow up eating butter mochi, I had to do some experimenting to get it just right for my family. After researching and comparing recipes (yes, I made a spreadsheet!), I realized the ingredients were mostly the same—it was all about finding the right ratios. My kids especially loved this testing phase, and after eight trials, we finally landed on the version we all agreed was the best. Our neighbors also enjoyed the extra butter mochi deliveries!
Most recipes say it keeps well for 3 days, but we found out that we prefer freezing on Day 1 while fresh and enjoying it after a quick warm-up. Use my recipe as your base, then feel free to tweak it to suit your taste.
Ingredients for Butter Mochi
The ingredients for this recipe are all pantry-friendly. If you have butter and eggs, you can make this any time! If you have an unexpected guest over, butter mochi is a great dessert to make, especially when you serve it warm.
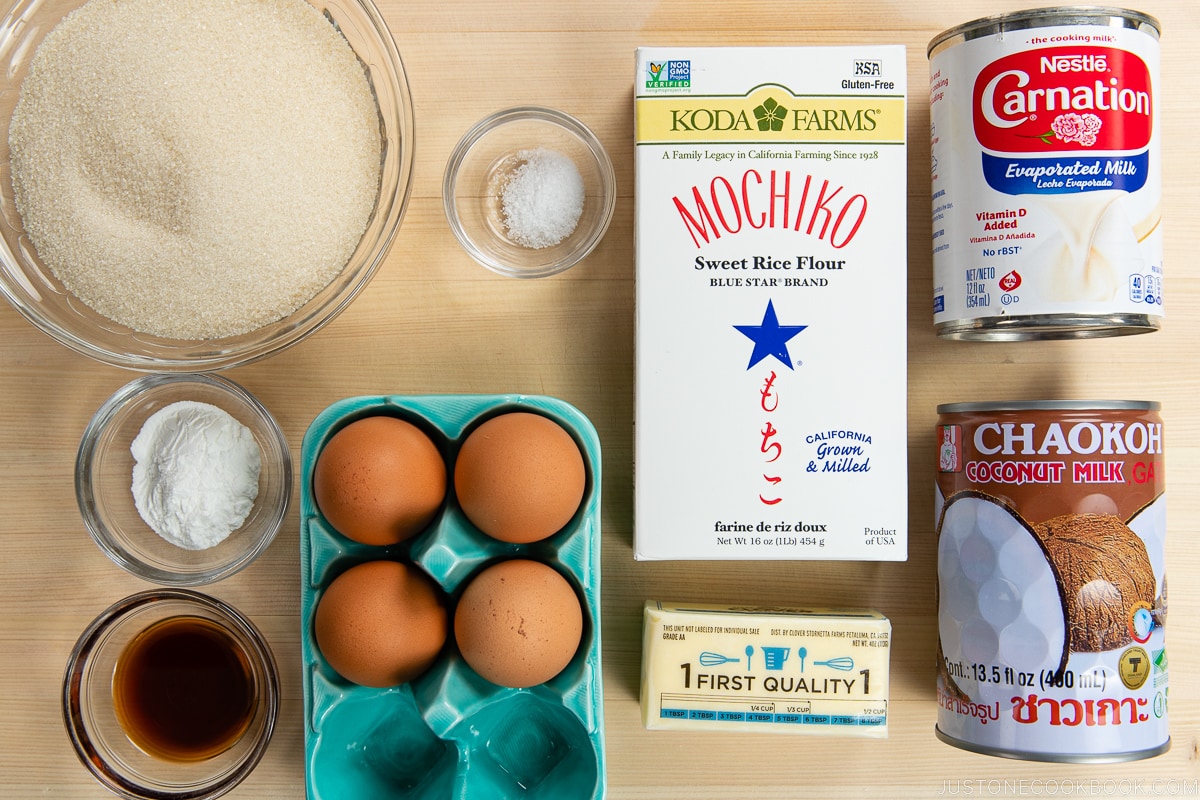
- Unsalted butter
- Mochiko (glutinous rice flour) – I’ll talk more about this ingredient below.
- Baking powder
- Salt
- Eggs
- Sugar
- Unsweetened coconut milk
- Evaporated milk
- Vanilla extract
How to Make Butter Mochi
- Preheat the oven, grease the baking pan, and melt the butter in the microwave.
- Mix all the ingredients (I used my stand mixer, but you can hand-whisk).
- Pour the batter into the baking pan.
- Bake at 350ºF for 50–60 minutes.
- Let cool slightly, cut into pieces, and enjoy!
What is Mochiko?
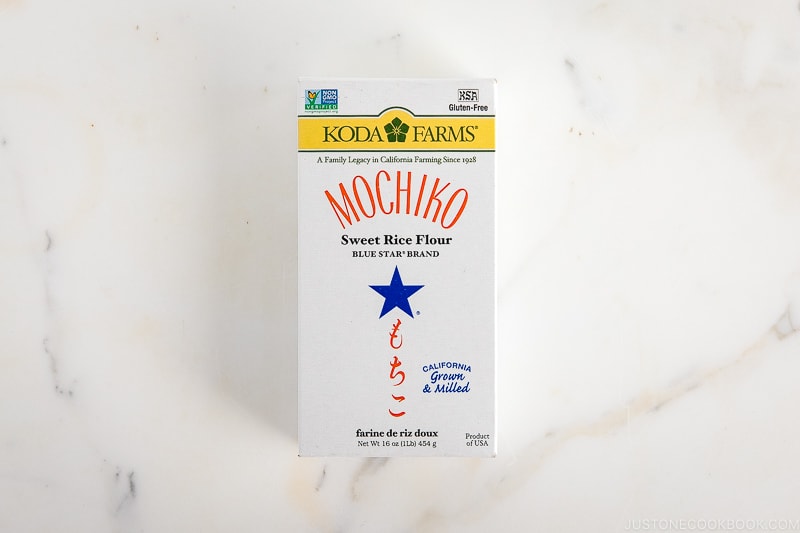
Mochiko (餅粉, もちこ) is a fine, gluten-free flour made from glutinous rice. In Japan, it’s a key ingredient in wagashi (traditional sweets) such as Daifuku Mochi, Yatsuhashi, rice crackers, and Dango. In the U.S., the most popular brand is Koda Farms Mochiko, sold in Asian and many American grocery stores.
Nami’s Recipe Tips
- Thoroughly grease the baking pan. This will help to achieve clean-cut pieces when you slice the cake. I love the buttery crispy crust (they are all mine!) so I take it seriously. If the butter wrapping has some residual butter, use it to grease the pan. You can also use the leftover in the bowl/measuring cup after melting the butter for greasing. No waste!
- Do not whip – To get the classic mochi chew, gently stir the eggs and sugar until just combined. Whipping adds air and will make it lighter, fluffier, and more cake-like.
- Gently fold – Mix the dry ingredients into the wet ingredients until no dry pockets remain. Stir gently so the batter doesn’t aerate. If you’re using a hand whisk to mix the batter, press it gently against the sides of the bowl to mix.
- Bake at 350ºF (190ºC) for 50–60 minutes for crispy edges and a chewy center.
- Cool in the pan – Let the cake cool and firm up before removing from the dish. If you try to lift it out while it’s hot, it may break apart.
- Rinse the knife – I rinse off and dry the knife halfway through slicing to prevent sticking.
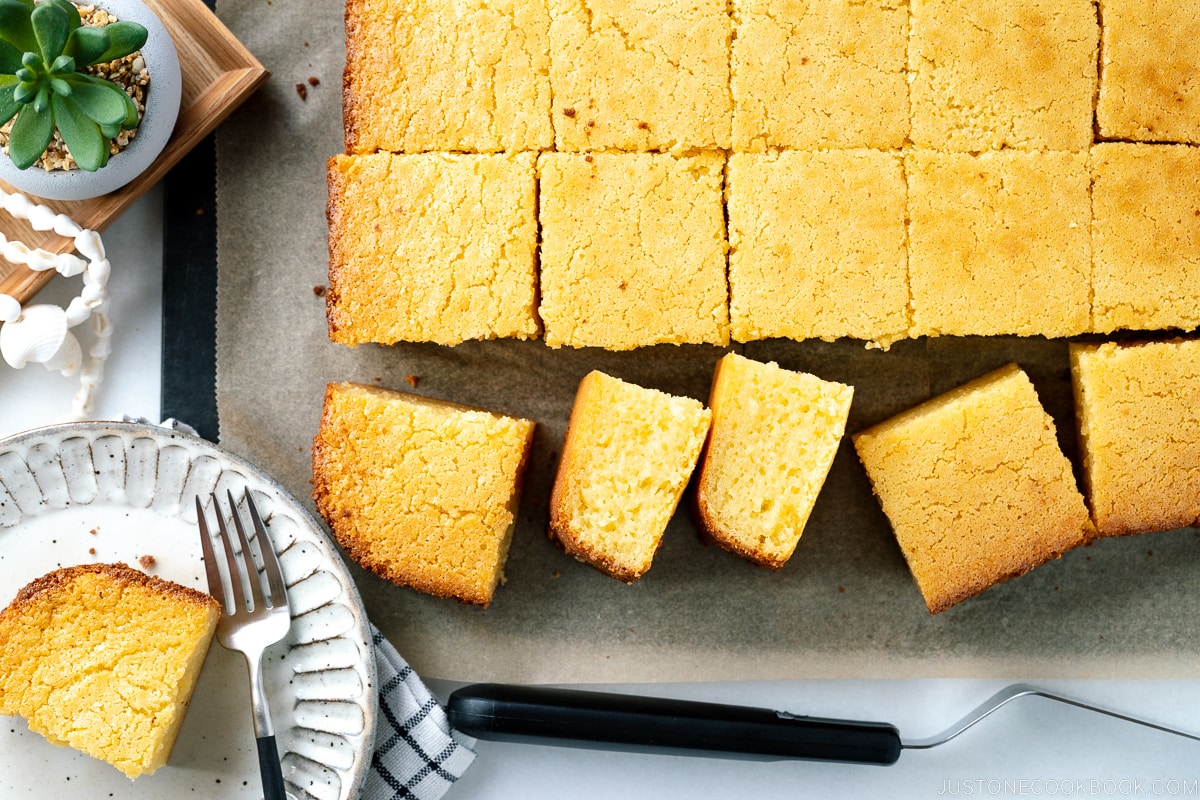
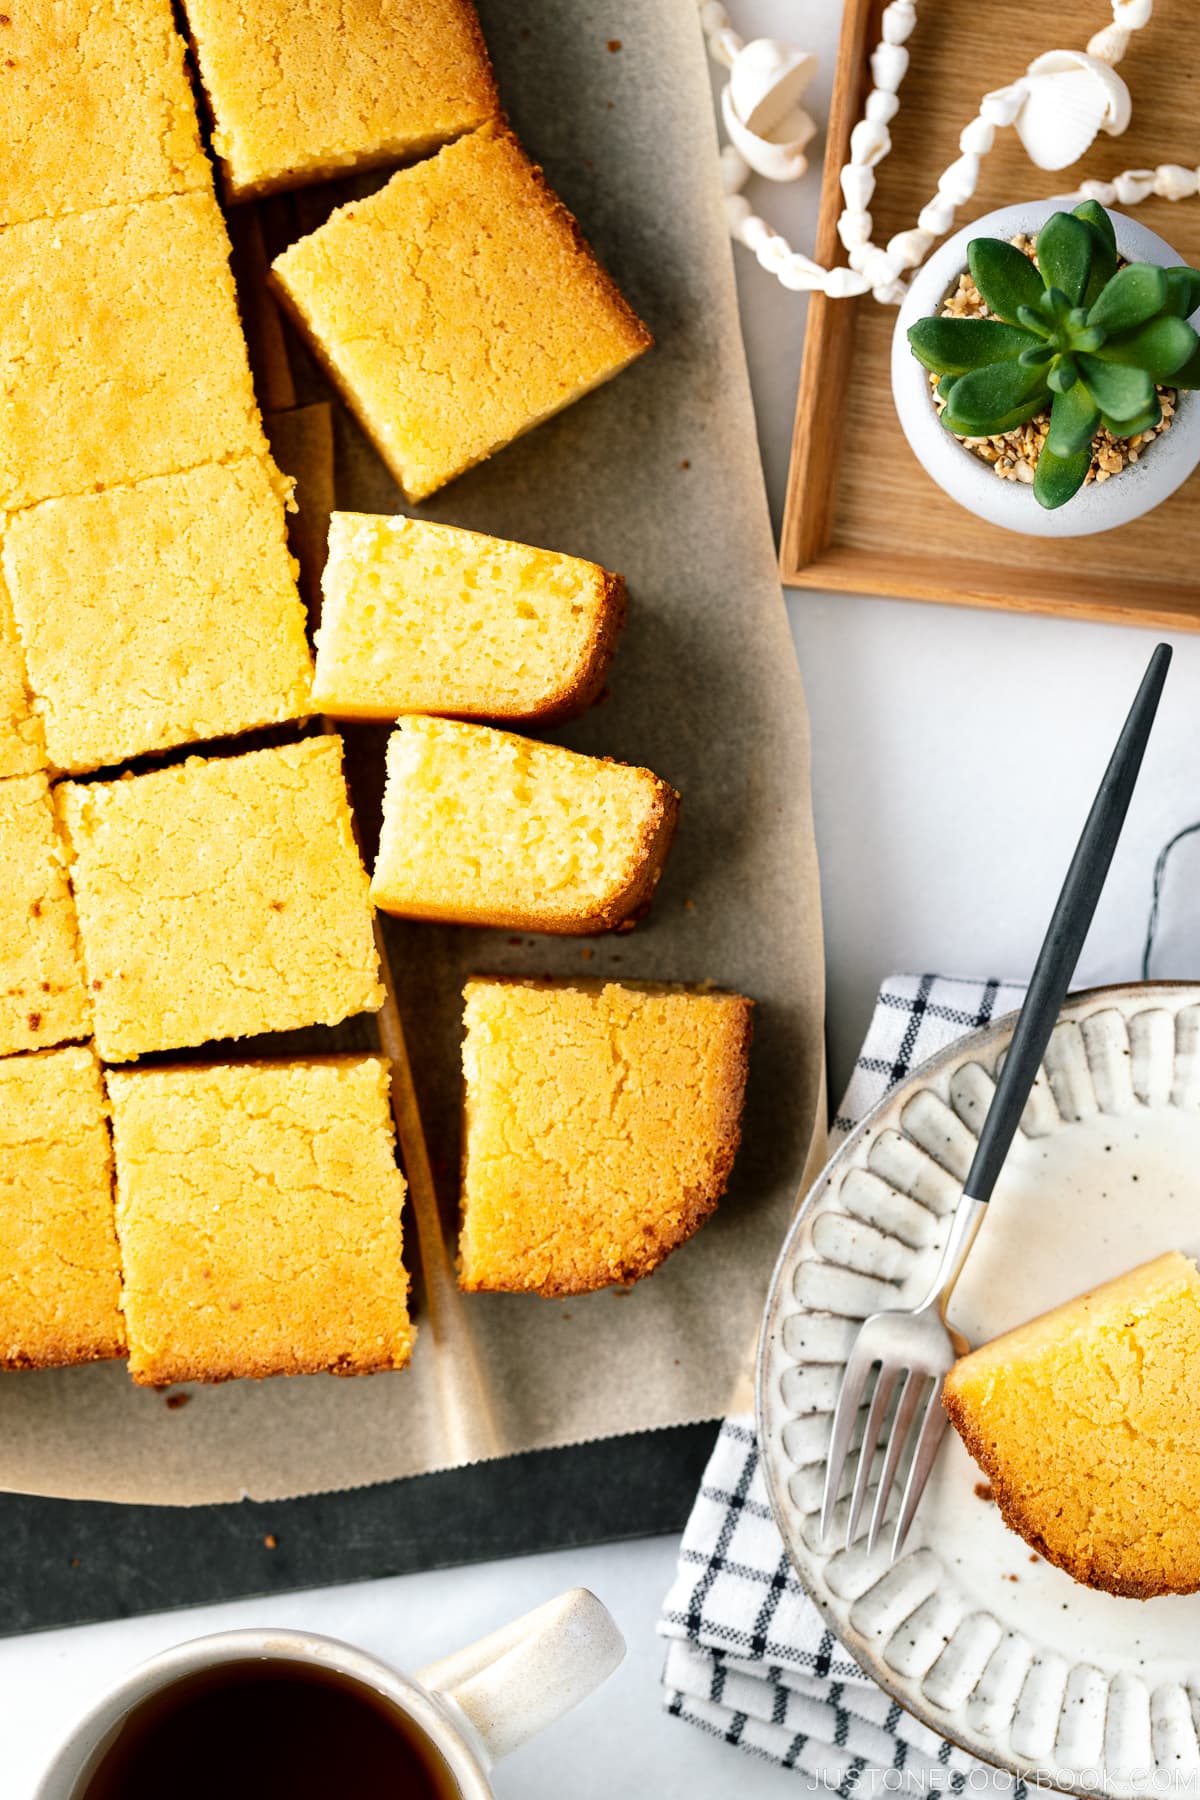
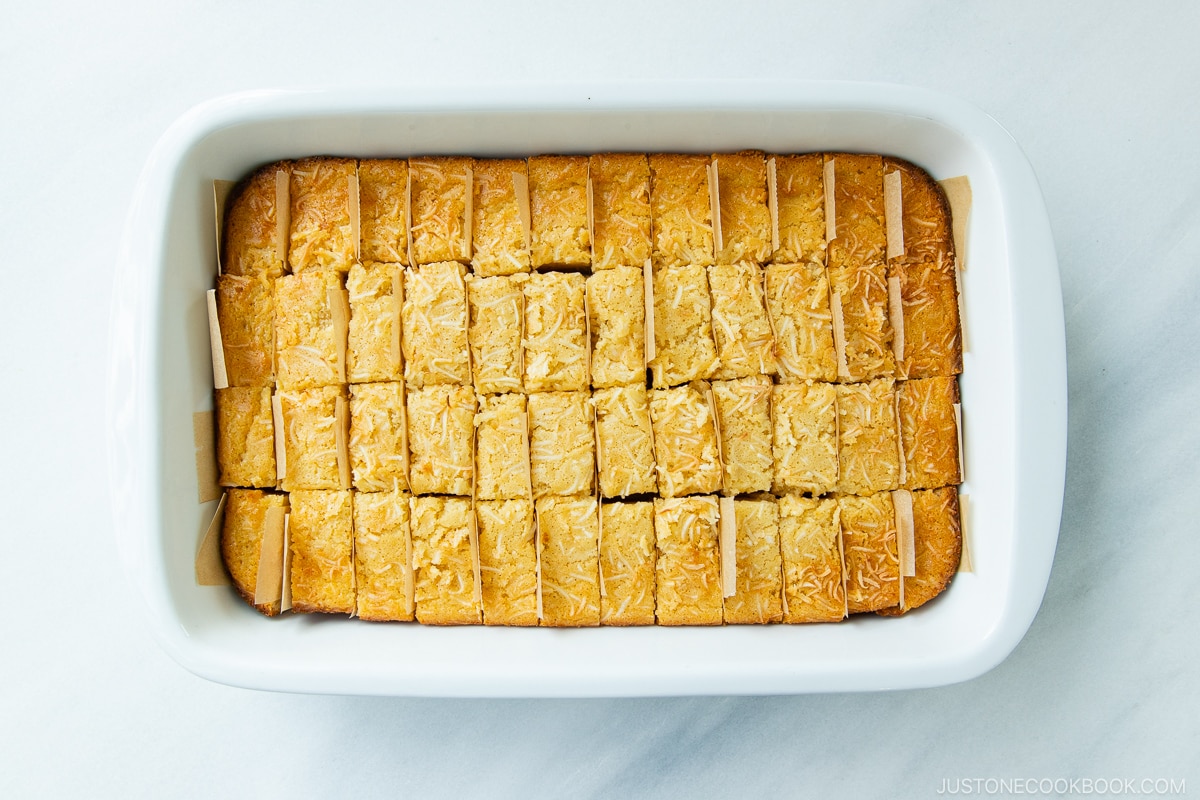
- Finger food size – Standard pieces are 2 x 2 inches (5 x 5 cm), which look nice. For serving, I cut them half as big so they’re easier to enjoy with your fingers (see below).
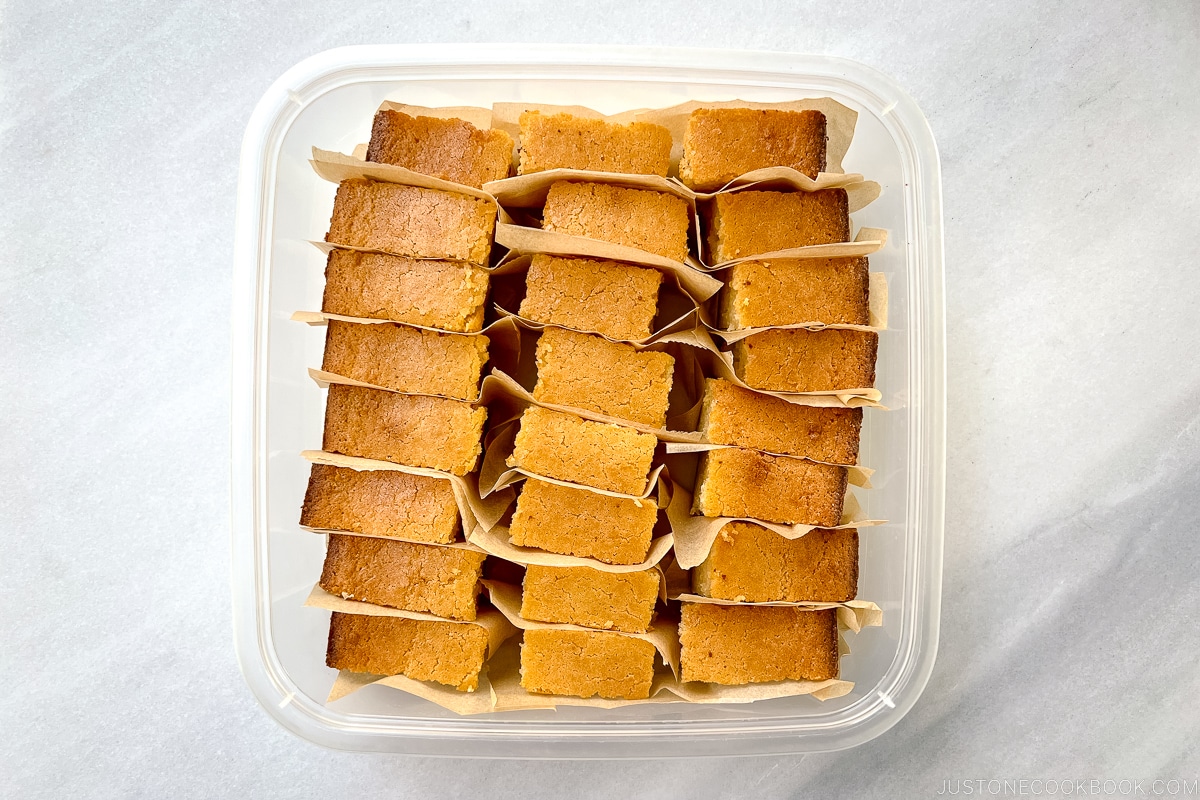
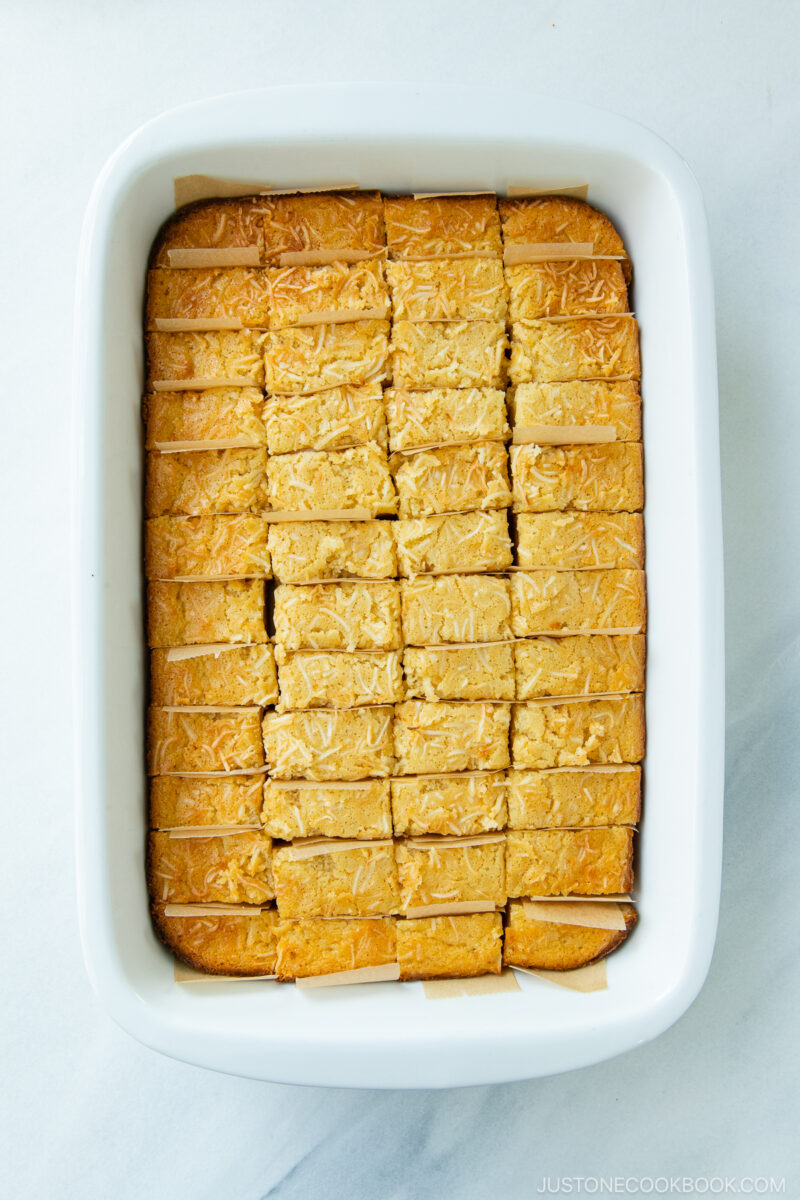
- Freeze while fresh on day 1 – Place pieces on parchment paper squares and store in an airtight container (see how I layer them below). Leftover butter mochi will keep in the freezer for a month.
Variations and Customizations
- Add dried shredded coconut. Sprinkle unsweetened coconut flakes on top or mix them into the batter before baking.
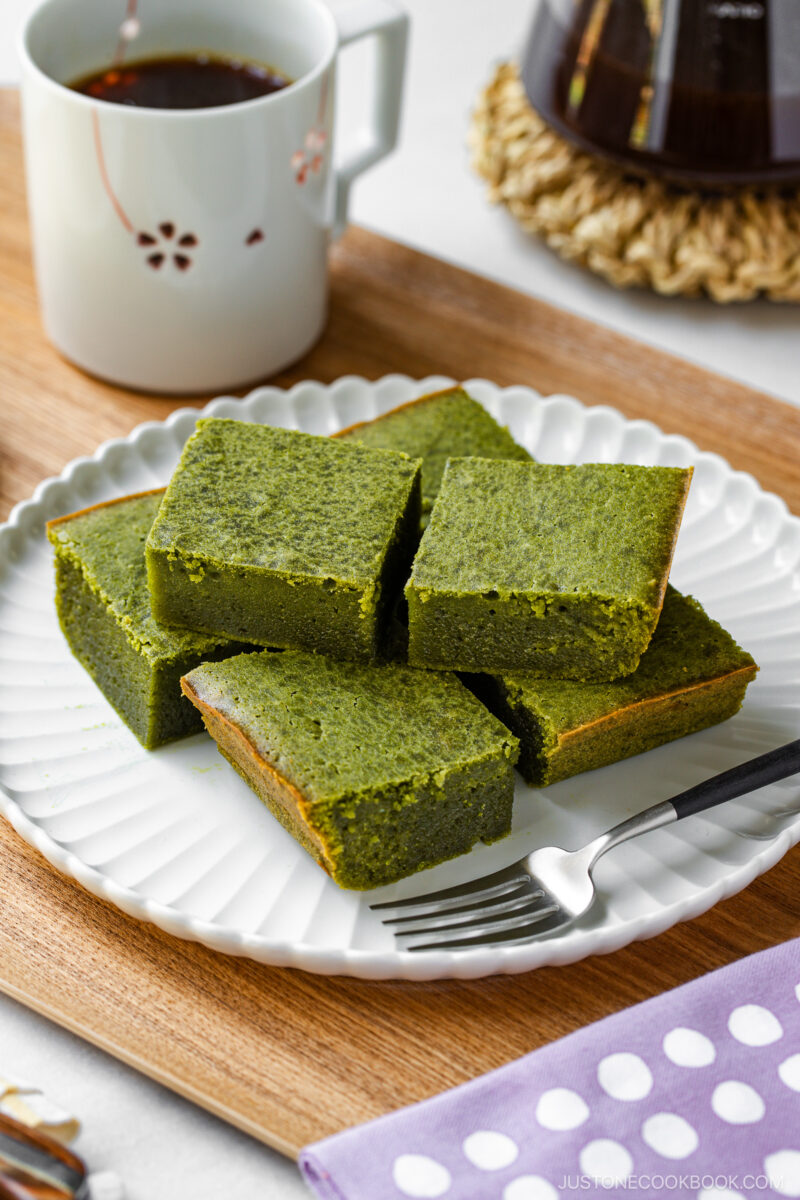
- Make a matcha version. If you love matcha, definitely try my Matcha Butter Mochi!
Storage and Reheating Tips
To store: I recommend freezing butter mochi on the first day while it’s fresh (don’t wait until Day 3). Wrap each piece tightly in plastic to prevent freezer burn, drying, or sticking. Then place the wrapped pieces in a freezer bag or an airtight container, and freeze for up to 1 month.
To reheat: Thaw overnight in the refrigerator or at room temperature. Serve at room temperature or heat in a microwave for 5–10 seconds until slightly warm.
Frequently Asked Questions
You can use two 8×8-inch baking pans or cut the recipe ingredients in half to make one 8×8-inch baking pan.
This recipe is meant to use up all cans of coconut milk and evaporated milk, as well as the whole box of mochiko. It’s a hassle to measure half and leave the half-empty can/box behind. Therefore, may I suggest making the whole batch and:
1) Share the love: Give half of the freshly baked butter mochi to neighbors, friends, or family—they’ll love you for it and look forward to your next batch.
2) Freeze the rest: Once completely cooled, freeze for later (see tips below). It tastes fresh when you thaw and microwave (gently warming up).
Yes, I recommend freezing butter mochi on the first day while it’s fresh (don’t wait until day 3). Wrap each piece tightly in plastic to prevent freezer burn, drying, or sticking. Then place the wrapped pieces in a freezer bag or an airtight container.
Storage time: Up to 1 month for best flavor, or 2 months if needed.
To thaw: Leave in the refrigerator overnight or at room temperature.
To serve: Warm in the microwave for 5–10 seconds.
I love having a few pieces tucked away in the freezer—it’s such a treat to enjoy with afternoon tea!
Although I have not tried it, many recipes online use whole or reduced milk instead of evaporated milk to make butter mochi. Evaporated milk makes the batter creamier and thicker than regular whole milk. We don’t keep whole milk in my house, so I like using evaporated milk for this recipe. I can keep cans of both evaporated milk and coconut milk in my pantry all the time, and when I feel like I want to make butter mochi, I can quickly make it.

Butter Mochi
Ingredients
- ½ cup unsalted butter (1 stick; plus more for greasing the pan)
- 1 lb mochiko (glutinous rice flour/sweet rice flour) (1 box Koda Farms brand)
- 1½ tsp baking powder (use 1 tsp for a slightly less fluffy version)
- ½ tsp Diamond Crystal kosher salt
- 4 large eggs (50 g each w/o shell) (at room temperature)
- 2 cups sugar
- 1 (13½-oz) can unsweetened coconut milk (full fat; see Notes)
- 1 (12-oz) can evaporated milk
- 2 tsp pure vanilla extract
Instructions
- Gather all the ingredients. Arrange a rack in the middle of the oven and preheat the oven to 350ºF (180ºC)*. For a convection oven, reduce the cooking temperature by 25ºF (15ºC). *See Notes
- First, melt ½ cup unsalted butter: Place the butter in a liquid measuring cup and microwave for 60–70 seconds (W1000). Alternatively, you can melt it in a pot on the stovetop. Set the melted butter aside. Keep the butter wrapper for the next step.
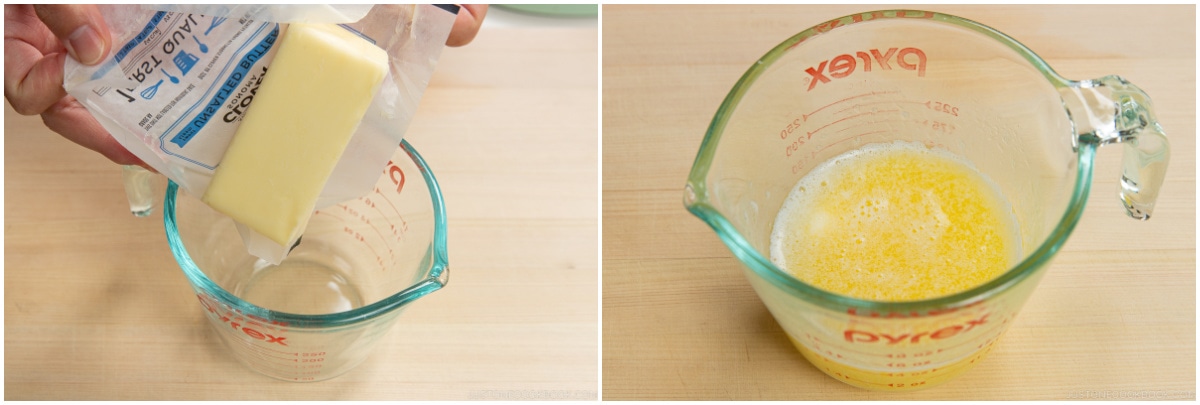
- For one batch, grease a 9 x 13-inch baking pan (or two 8 x 8 x 2-inch pans) with the butter left on the wrapper; you also can use neutral-flavored oil, if you‘d like. I use the leftover butter on the wrapper first, then use additional butter if needed. Later, once you pour the melted butter into the batter, you also can use the leftover butter in the measuring cup to grease the pan with a pastry brush.

To Make the Batter
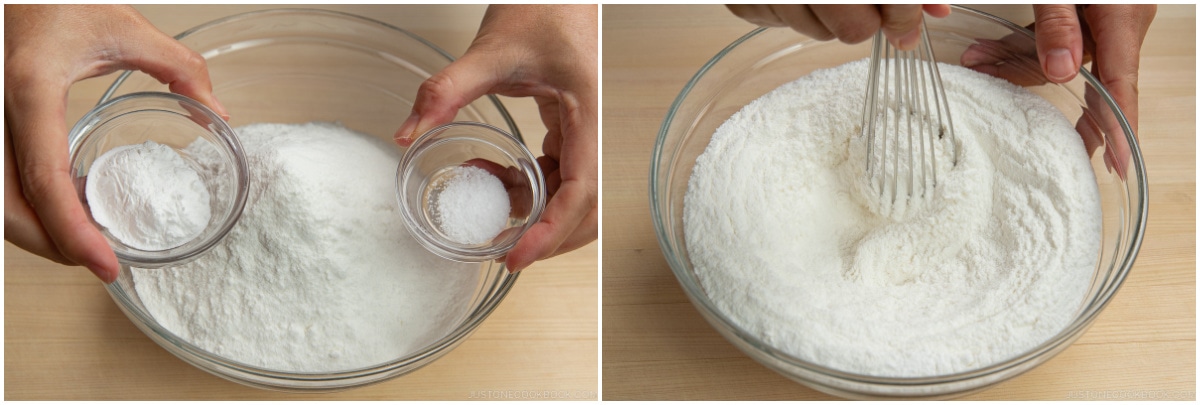
- In a medium bowl, combine 1 lb mochiko (glutinous rice flour/sweet rice flour), 1½ tsp baking powder, and ½ tsp Diamond Crystal kosher salt and whisk to combine. It‘s important to equally distribute the baking powder and salt into the mochiko flour. Set it aside.
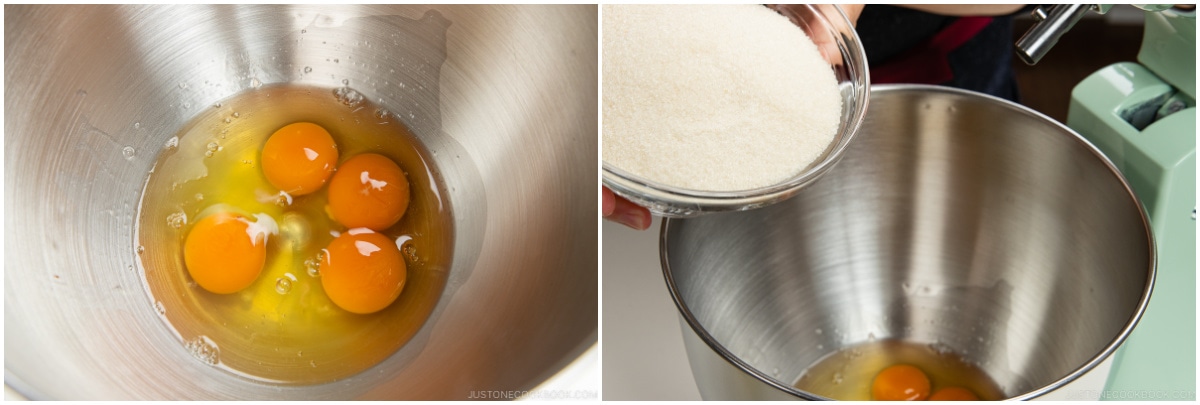
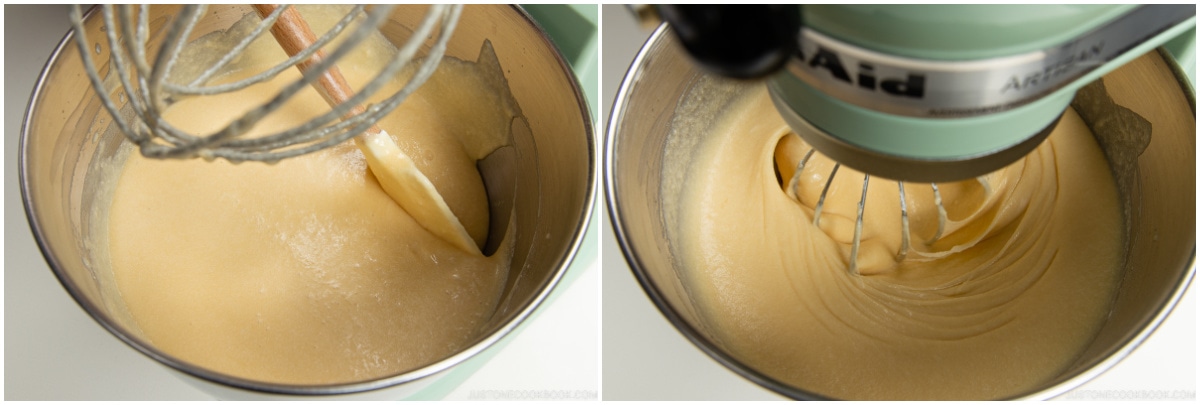
- In a stand mixer bowl or a large bowl, crack 4 large eggs (50 g each w/o shell) and add 2 cups sugar. Tip: Do not incorporate the air; Use "Stir" or "Speed 2" on the stand mixer, so you can use a hand whisk, electric hand mixer, or stand mixer for this job.
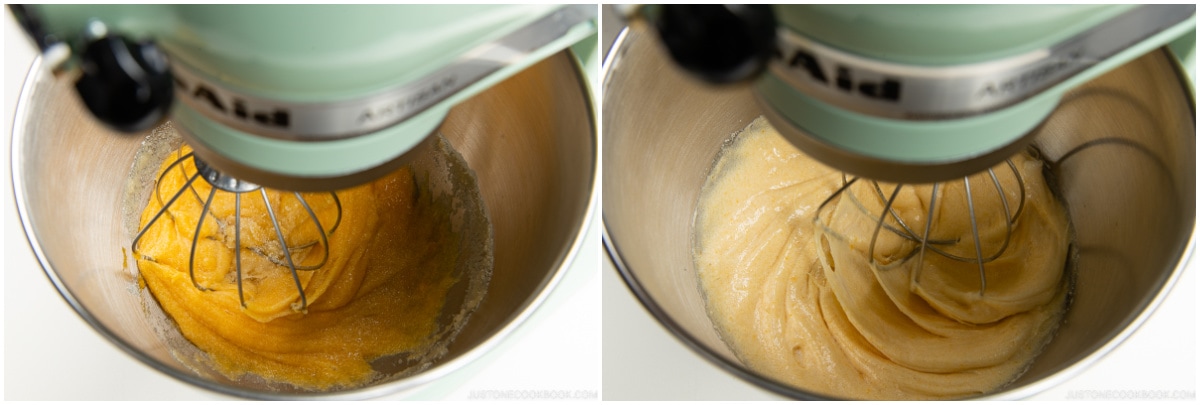
- Mix the eggs and sugar until combined. If you're hand-mixing, use the whisk to mix the batter, pressing it gently against the sides of the bowl, instead of whipping.
- Add 1 (13½-oz) can unsweetened coconut milk and stir to combine.
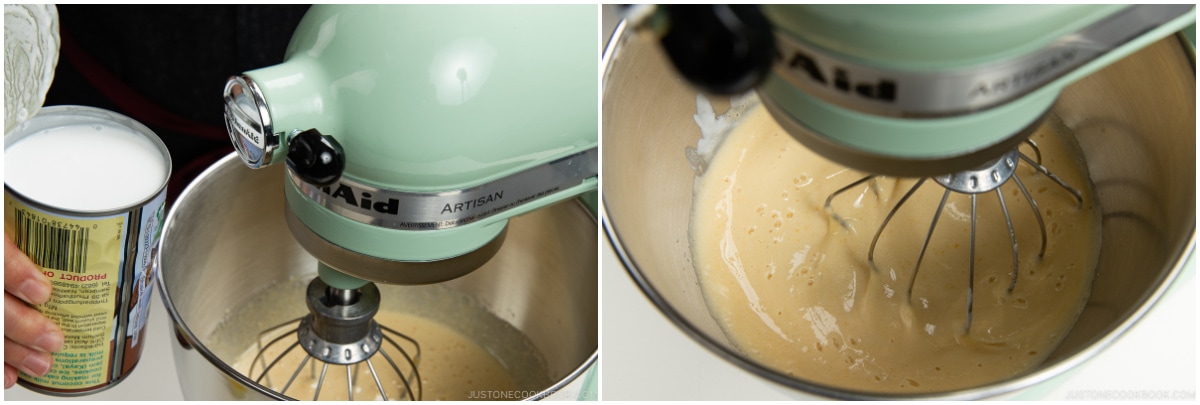
- Add 1 (12-oz) can evaporated milk and stir to combine.
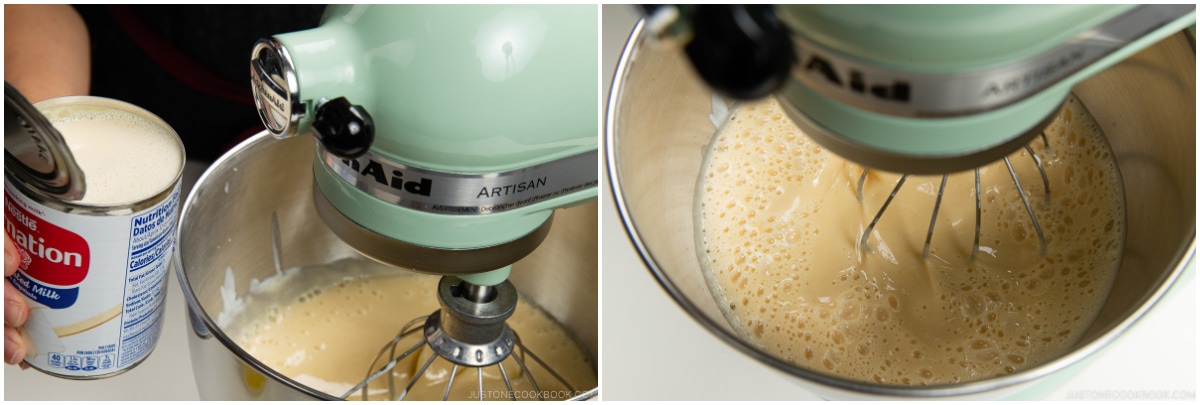
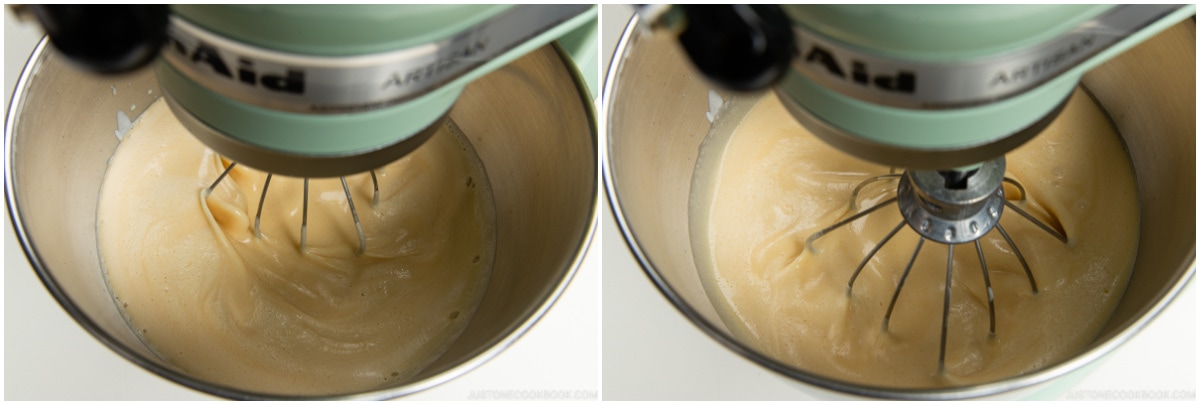
- Add 2 tsp pure vanilla extract and slowly add the melted butter to the batter while mixing.

- Mix to incorporate everything.
- Next, add the dry ingredients to the mixing bowl. Mix to incorporate everything. If you're hand-mixing, use the whisk to mix the batter, pressing it gently against the sides of the bowl instead of whipping.
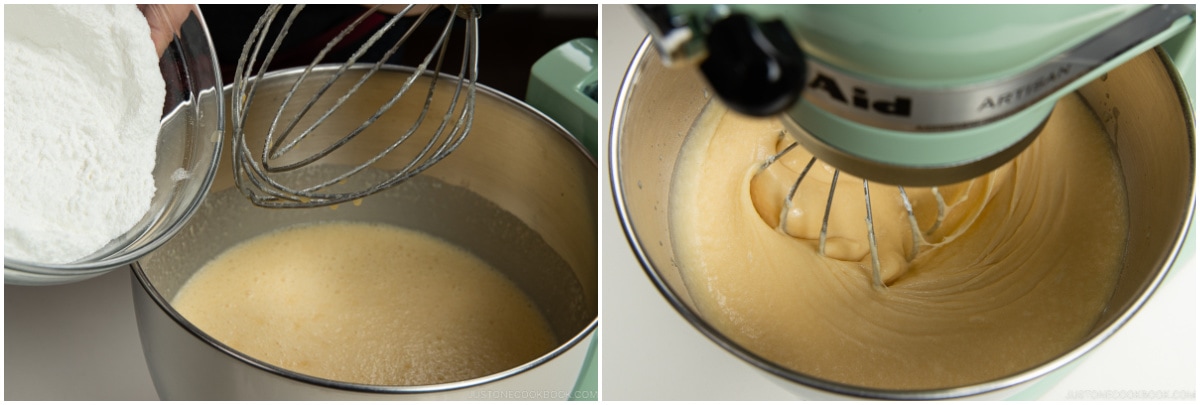
- Scrape down the sides and bottom of the bowl with a silicone spatula. Make sure there are no lumps. If you're hand-mixing, use the whisk to mix the batter, pressing it gently against the sides of the bowl.
To Bake
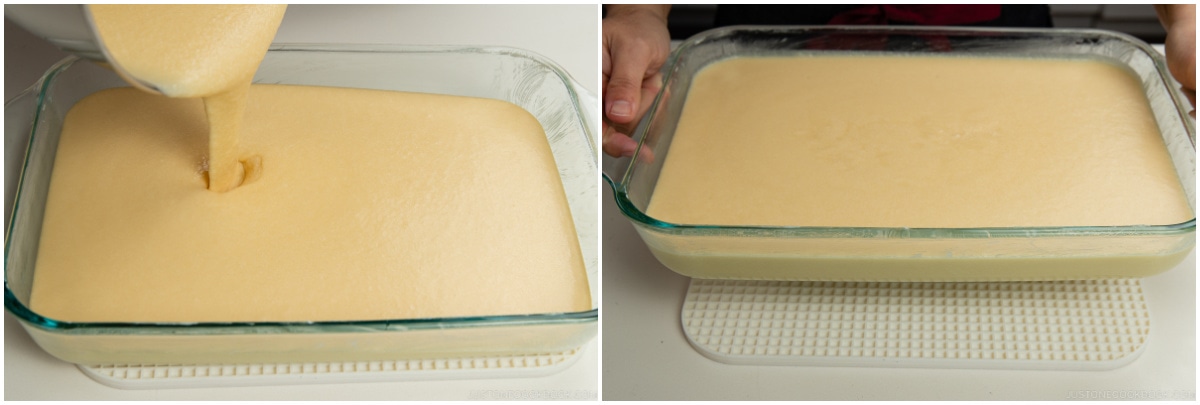
- Pour the batter into the center of the prepared pan. Using the silicone spatula, draw a zigzag around the center of the pan to smooth out the batter. Tap the pan on the counter several times to bring any air bubbles to the surface. Tip: If you don‘t smooth out the batter, the finished butter mochi may have a ripple mark or air bubbles on the surface. Note: If you like to add unsweetened coconut flakes, sprinkle them on top.
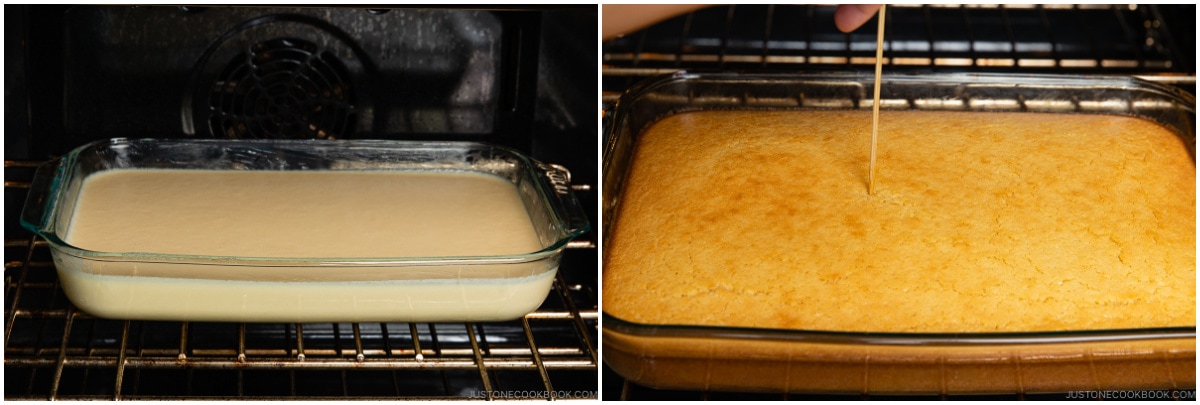
- Bake at 350ºF (180ºC)* for 50–60 minutes, or until an inserted skewer comes out clean. The mochi should be set and golden brown on top.
- Set the baking pan on a wire rack and let the butter mochi cool. You can either slice it into clean-cut pieces or serve it directly from the baking pan. To serve from the pan, leave it to cool completely on the wire rack for about 1 hour before slicing and serving. To slice clean pieces, let the mochi cake cool for 30 minutes. Remove it from the pan while it‘s still warm by running an offset spatula or butter knife along the edges to release it.

- Then, invert the butter mochi cake onto a tray or cookie sheet lined with parchment paper.
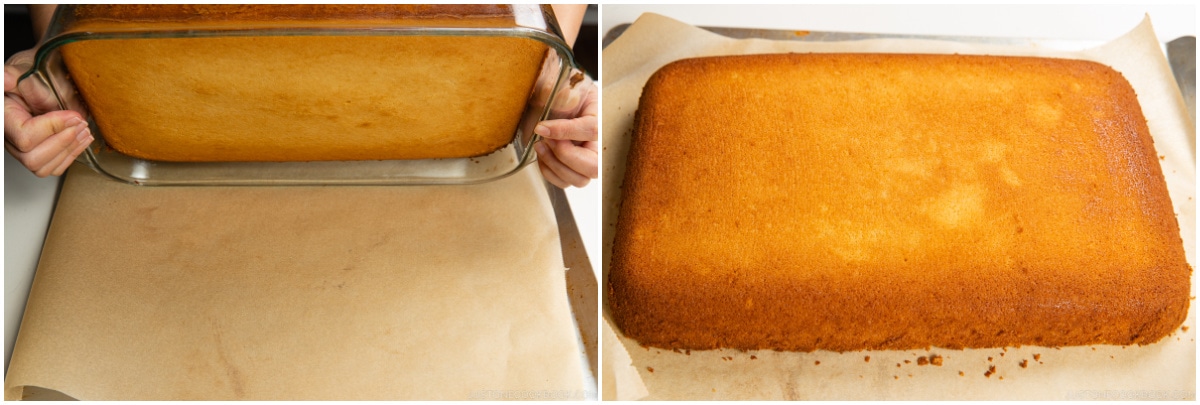
- Next, flip the butter mochi right side up: Place another sheet of parchment paper on top of the cake, followed by a cutting board. Then, hold the cookie sheet and the cutting board together, with the butter mochi sandwiched in between, and flip it over onto the cutting board. Remove the cookie sheet and parchment paper and save it for wrapping the butter mochi later.
To Serve
- Slice the mochi cake into small pieces. I cut 6 columns and 4 rows from one 9 x 13-inch baking pan to make 24 pieces that are about 2 x 2 inches (5 x 5 cm). I read that a plastic knife won‘t stick to the butter mochi, but I don‘t have one, so I just rinsed my knife once halfway through slicing.
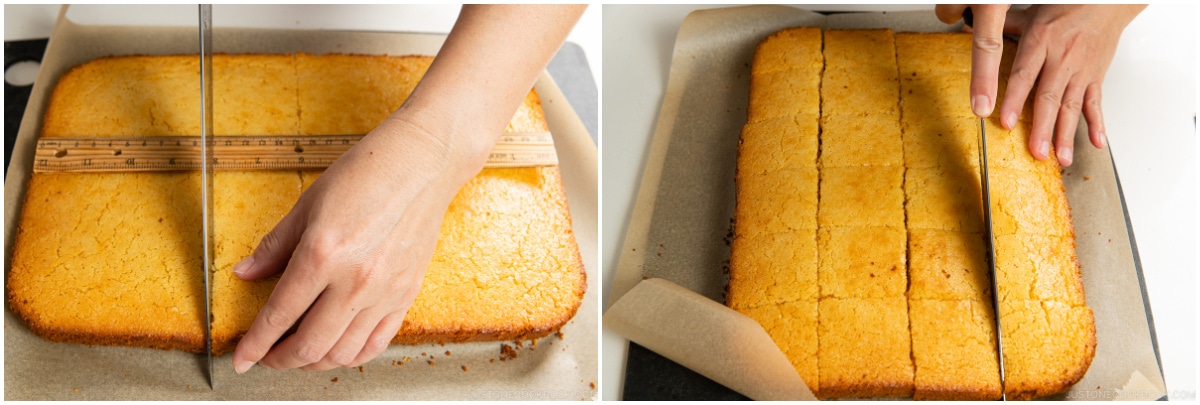
- I usually cut the 2 x 2-inch pieces in half because it‘s easier to eat. To keep them from sticking to each other, I separate each piece on the bottom and sides with small squares of parchment paper that I cut using the two sheets I repurposed from flipping over the butter mochi cake.
- Enjoy the butter mochi at room temperature. I personally like mine slightly warm, so I microwave it for 5–10 seconds before eating.
To Store
- Keep the butter mochi in an airtight container and store it at room temperature for up to 3 days. If you‘d like to keep it longer, wrap each piece (or the portion you will serve at one time) in plastic wrap to avoid freezer burn and drying out. Then, place them in a freezer bag or airtight container and freeze for up to 1 month. Thaw overnight in the refrigerator or at room temperature before serving. Serve at room temperature or heat in a microwave for 5–10 seconds, if you‘d like.
Notes
- Unsweetened coconut milk: I recommend using coconut milk with a short, clean ingredient list and a smooth, rich consistency. Some cheaper brands can be watery or separate or rely on stabilizers and thickeners like guar gum and xanthan gum, which can affect the texture or taste.
- Bake at 350ºF (180ºC) for 50–60 minutes: Updated the recipe card with the oven temperature and baking time on August 22, 2025. Previously, it was 375ºF (190ºC) for 45 minutes. I made the decision based on testing my Matcha Butter Mochi recipe.
Nutrition
Did you make this recipe?
Tag @justonecookbook on Instagram so we can see your delicious creation!