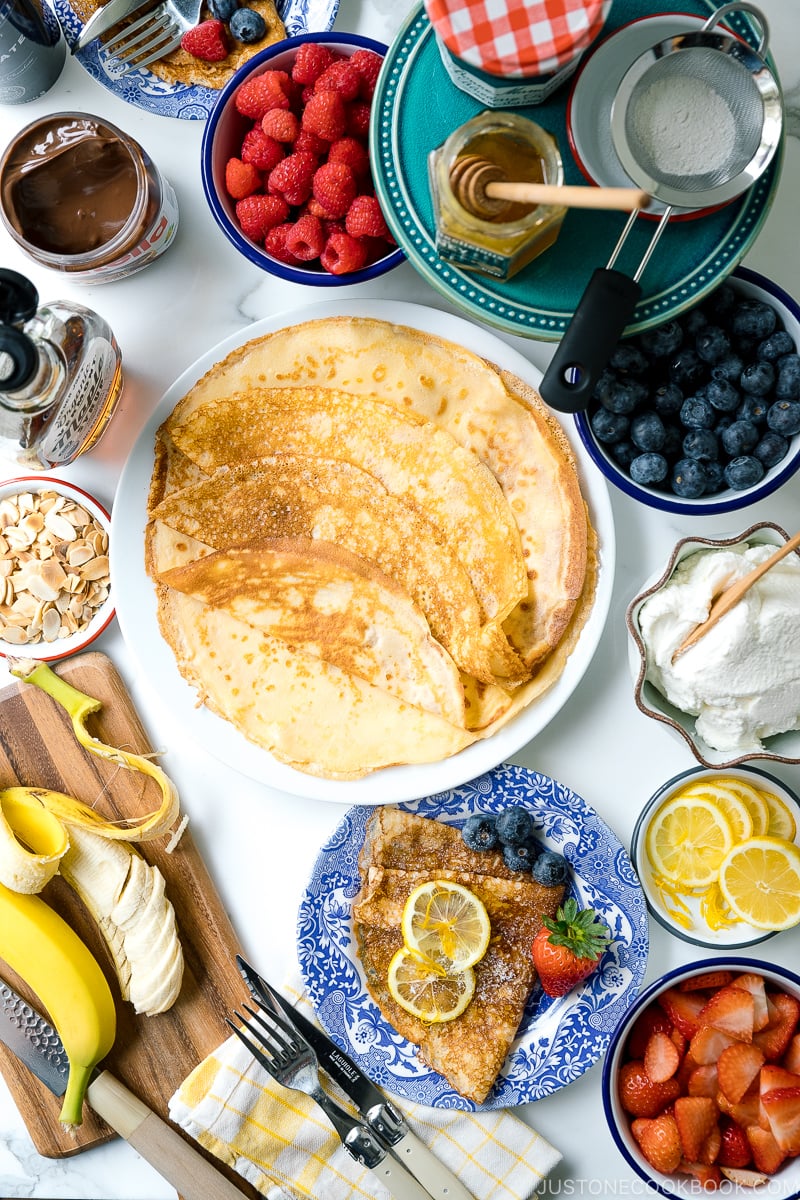
Learn how to make the best homemade crepes! Perfectly thin and deliciously buttery, they are a staple for a weekend breakfast, brunch, kids’ snacks, desserts, or a DIY crepe party! Only 6 ingredients needed.

Crepes are one of my favorite things to enjoy for brunch, but I used to think they were hard to make. They seem so fancy, but it turns out they are easier to make than you think.
Since my kids also love them, I was determined to find the best crepe recipe and finally created the perfect one after many trials. Today, I’m going to share all the tips and techniques with you. After reading this post, you will be ready to make mouth-watering crepes for any occasion.
And the best thing about these homemade crepes? You can fill or top them with literally anything!
Table of Contents

What Are Crepes?
Crepes are very thin, delicate pancakes made of flour, milk, egg, butter, sugar, and salt. They can be enjoyed sweet or savory, depending on what you serve them with. For example:
- Sweet crepes: lemon and sugar (aka classic French crepes), Nutella, jams, honey, maple syrup, fresh fruits (strawberries, blueberries, raspberries, and bananas), chocolate syrup, whipped cream, etc.
- Savory crepes: ham, cheese, eggs, mushrooms, tomatoes, avocado, bell peppers, onion, herbs, etc.
The Crêpes originated in the Brittany region of France but the love for crepes has spread all over the world, including Japan.

Popular Harajuku Crepes in Japan
In Japan, crepes are considered street food, and we don’t really have the custom of eating crepes at home.
If you visit Japan, you will see endlessly creative Japanese adaptations of crepes. Takeshita Street in Harajuku is known for its numerous crepe shops, and I used to hang out there to eat crepes with friends in high school. Crepes are more of a destination food, whether it’s in Harajuku, at a festival, or at an amusement park.


Japanese crepes are folded or rolled up and filled with lots of whipped cream, fruits, and sweet syrup. They are often wrapped in a paper cone, so it’s easy to carry and enjoy.

Why is this the Best Homemade Crepe Recipe?
It feels boastful to name this recipe “The Best” crepes, so I wanted to explain why. In my humble opinion, this is the best because:
- Uses only 6 easy ingredients – You most likely have them in the pantry already.
- No special equipment – You don’t need to use a blender like some recipes suggest; just a whisk and bowls will do.
- No need to rest the batter – Yet it yields great results!
- Easy to multiply or halve the recipe – An important factor for me as I’m horrible at math.
- Perfect result. Every. Single. Time.
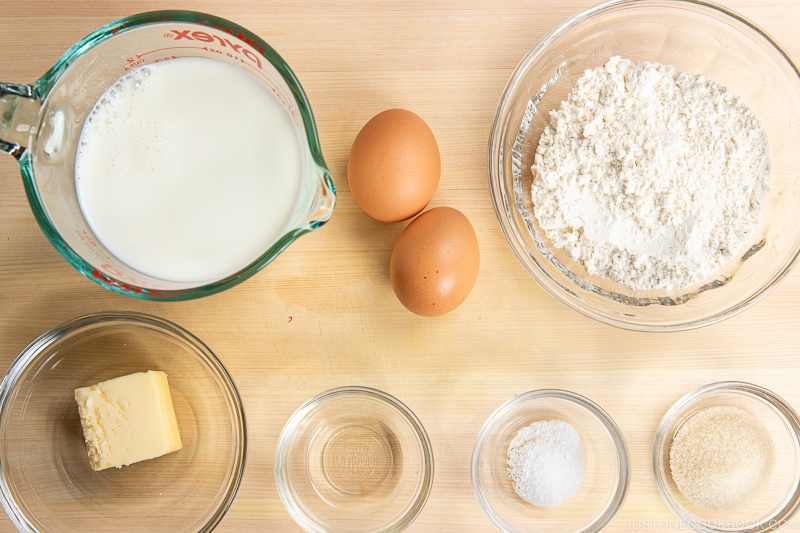
Ingredients You’ll Need
- Cake flour
- Sugar
- Salt
- Eggs
- Milk (whole or reduced-fat)
- Butter (you can use salted, but omit salt)
That’s it! I’ll talk about topping choices later in the post.
Jump to RecipeHow to Make The Best Homemade Crepes
- Make crepe batter by combining the above ingredients.
- Heat the crepe pan (or regular pan) and make crepes until all the batter is used.
- Fill the crepes with fruits, whipped cream, syrup, or dust with powdered sugar, and garnish with toppings.

13 Must-Read Tips to Make The Best Homemade Crepes
A smooth batter is crucial for making a light and springy crepe. Before you head straight into the kitchen, read these tips and techniques:
Tip #1: Let the eggs and milk come to room temperature
Cold eggs and milk can re-harden the fat in the batter (butter in this recipe), making the batter appear curdled or grainy. I learned this the hard way when I started making crepes. To avoid this, remove the eggs and milk from the refrigerator about 30 minutes before use.
👩🏻🍳 My last-minute hack is to heat the milk until lukewarm in the microwave (or pot) and place the cold eggs in lukewarm water.
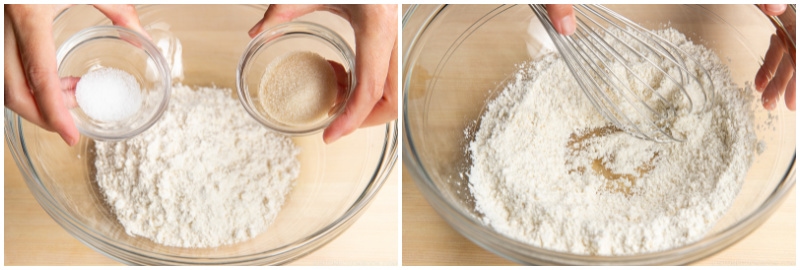
Tip #2: Mix the flour with a whisk
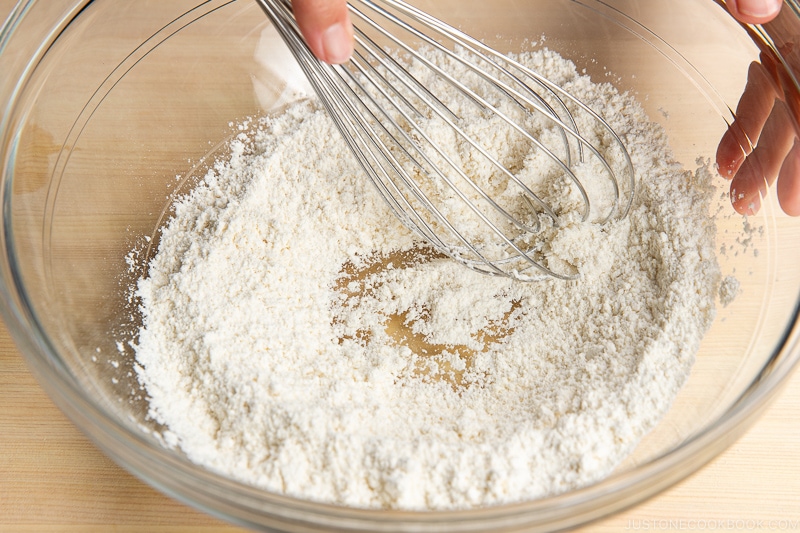
You can always sift the flour using a fine-mesh sieve or sifter, but a quick method is to whisk the flour in a bowl a few times until you see no big chunks of flour.
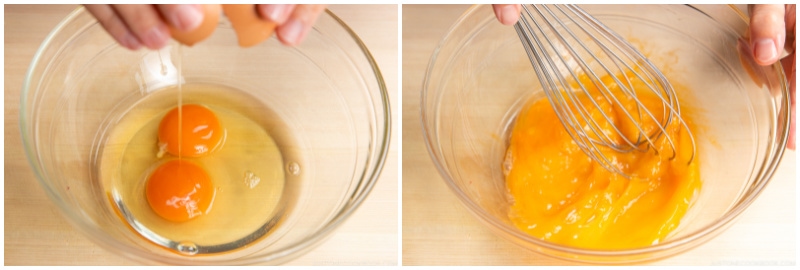
Tip #3: Combine eggs and milk first
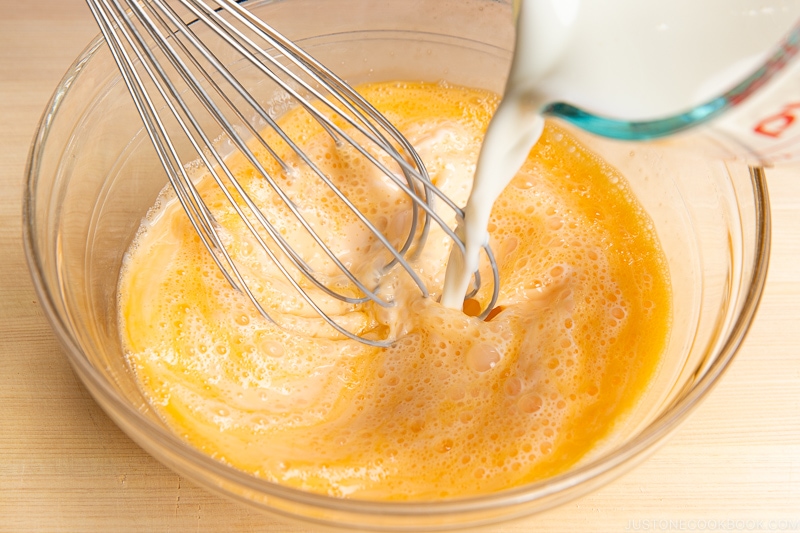
Instead of adding eggs and then milk to the flour mixture, I realized it works best (for me, at least) to combine the eggs and milk in a bowl first until smooth and homogenous, then add the egg/milk mixture to the flour in another bowl.
👩🏻🍳 I also recommend beating the eggs thoroughly first before adding milk, as it requires a bit more effort to beat the eggs in milk.
Tip #4: Gradually add the egg/milk mixture to flour
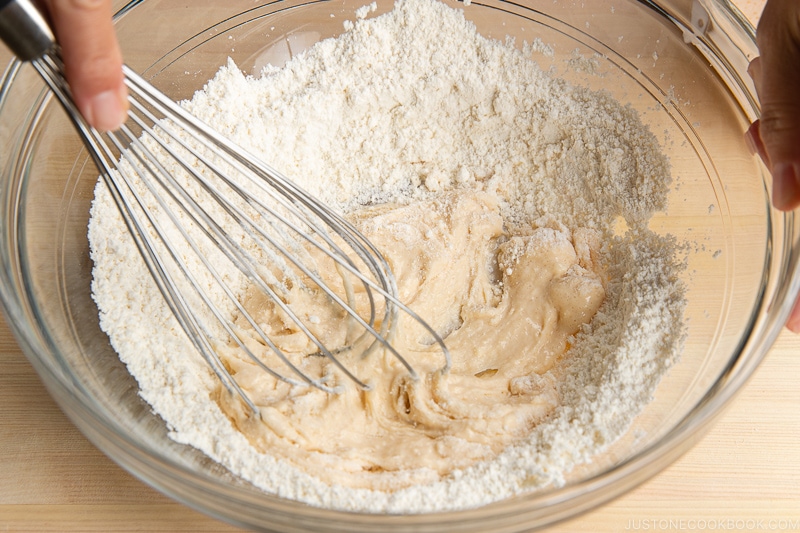
We must avoid lumps in the batter, which is our ultimate goal here. If you pour a lot of liquid into the flour at once, it will quickly form lumps and float in the liquid.
Therefore, add a small amount of liquid and incorporate it into the flour until it forms a paste. Then, add another small amount of liquid, allowing the paste to slightly loosen. This way, your batter will be lump-free.
Tip #5: Add melted butter to room temperature batter
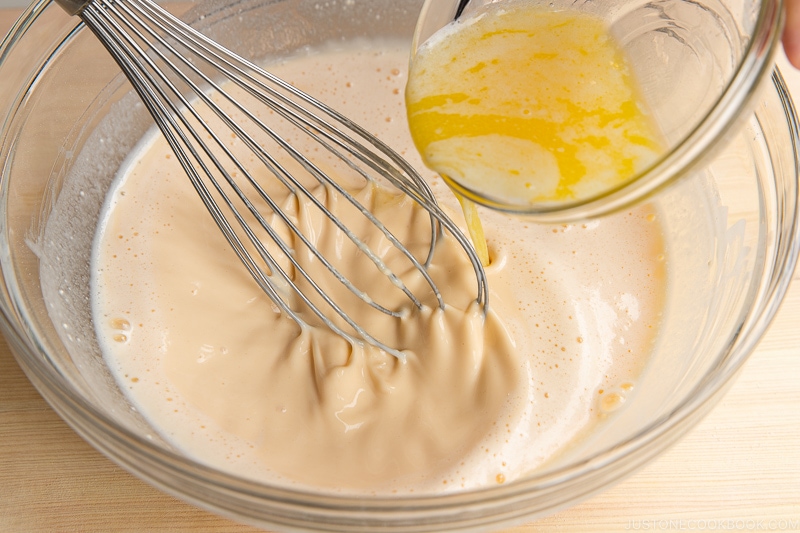
If you plan to make the batter ahead of time and keep it in the fridge overnight, make sure to bring the batter to room temperature before adding melted butter. Otherwise, the butter will solidify in the cold batter, resulting in a grainy texture. When combining ingredients, both should be at room temperature.
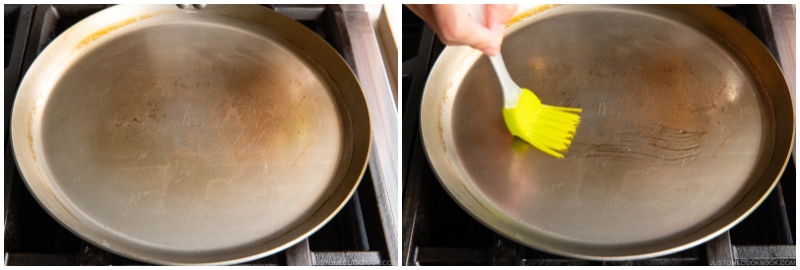
Tip #6: Lightly grease the pan
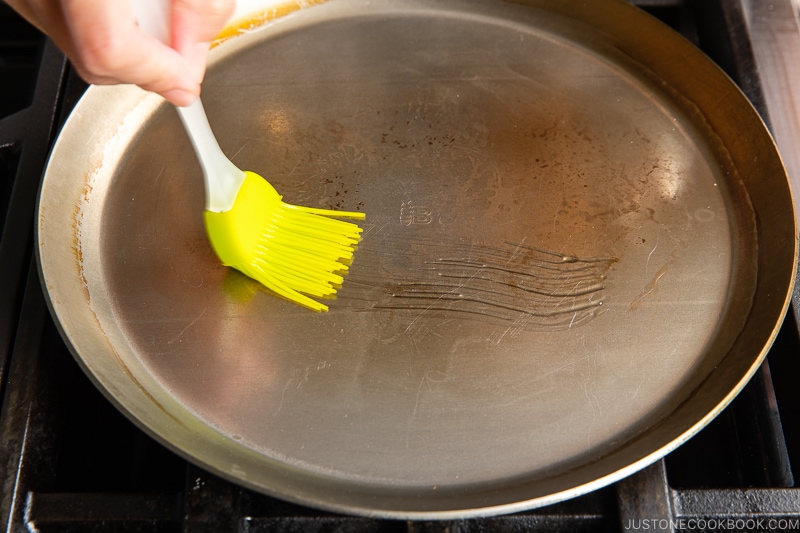
Grease the pan between batches with a pastry brush, silicone brush, or paper towel. You should not see any oil streaks, and that’s how thin the oil should be. I usually don’t use butter in the pan as it burns easily. Plus, there’s plenty of butter flavor in the batter. However, I’ve tried cooking the crepe with butter, as some JOC readers from France recommended. It did add more butter flavor and was delicious. Just make sure your heat is not too high.
Tip #7: Splash a bit of water to see if the pan is hot
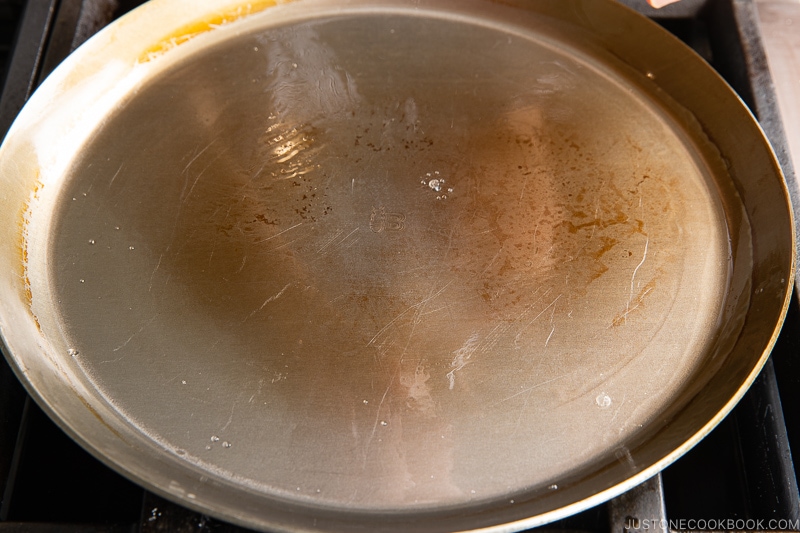
This is my favorite trick to determine if the pan is hot and ready. The batter should make a sizzling sound when you add it to the pan. If water doesn’t sizzle, the pan is not ready yet. Don’t forget to splash water toward the edge of the pan as well, since that area takes longer to heat up.
👩🏻🍳 You will need to adjust the heat based on your stove type, whether gas or electric. I use medium heat on my stove and slightly reduce it toward the end of cooking, as my crepes tend to brown too quickly.
Tip #8: Use a 1/3-cup measuring cup

A 1/3-cup measuring cup fills up the surface of a 10-inch (25 cm) crepe pan perfectly. The biggest mistake when making crepes is to either underfilling or overfilling the pan.
Depending on the consistency of the batter and the size of the pan, you may need to experiment with different sizes of measuring cups or ladles. A standard-sized ladle of batter should fill a 12-inch (30 cm) pan. I prefer smaller crepes, which I’ll discuss further in my crepe tool section.
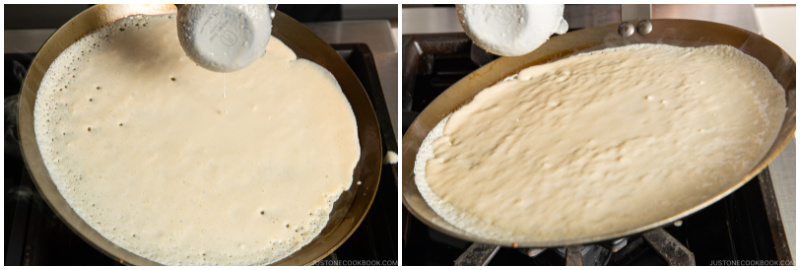
Tip #9: Tilt and swirl the pan
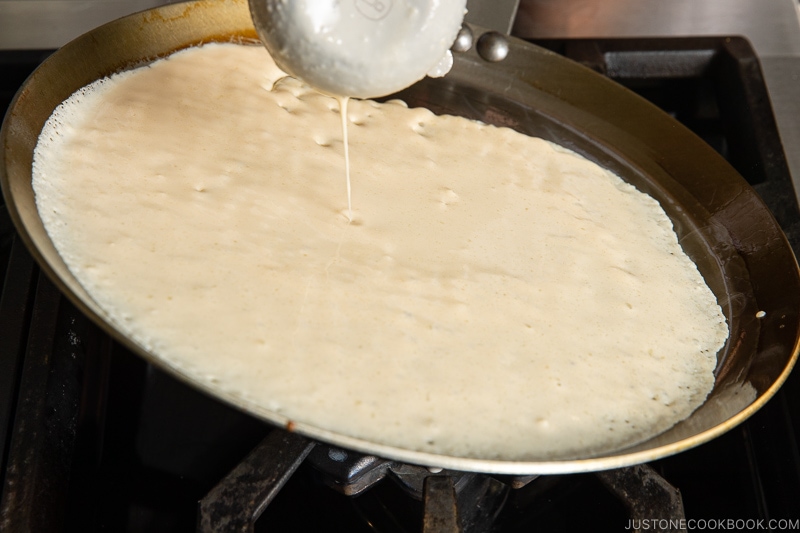
Pour the batter into the center of the pan and quickly tilt the pan to let the batter run toward one edge. Then swirl the pan to evenly distribute and cover the surface. If you see any small holes, shake the pan sideways to fill them in.
Tip #10: Don’t touch the crepe until the edges are golden brown
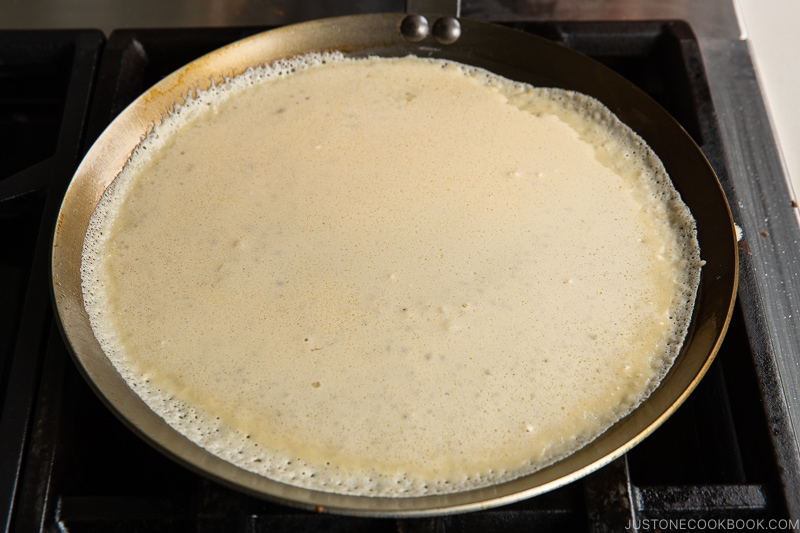
The crepe needs good heat contact, so avoid lifting and checking it frequently, as this will slow down the browning process. Depending on the crepe’s thickness and your stove type (gas or electric), the cooking time varies but should be between 1 to 2 minutes.
If it’s taking 3 minutes, I’d say the heat is likely too low.
👩🏻🍳 If your stove doesn’t distribute heat evenly, turn the pan around to ensure uniform heating. You can tell by the color of the crepe. Make sure that the less-browned areas of the crepe get heated properly.
Tip #11: Use a long cooking chopstick or spatula to flip
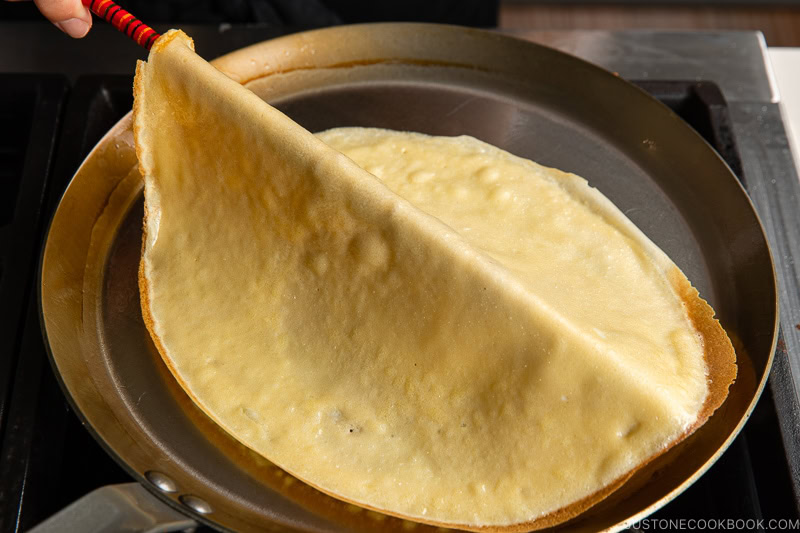
I assume most of my readers own a pair of long cooking chopsticks (for cooking Japanese food)? I love using long cooking chopsticks for making crepes. The wooden material is gentler than a metal spatula, but either tool works.
I spin the chopstick between my fingers as I slide it under the crepe and detach it from the pan.
👩🏻🍳 If you use a carbon-steel crepe pan like I do, some parts of the crepe may stick to the pan. But don’t worry! With a gentle poke from the chopstick, you should be able to remove the crepe from the pan easily. Just nudge it. If you have a non-stick pan, the crepe might even slide around, allowing you to lift it with your fingertips.
Cook for 10-15 seconds on the second side. Insert the chopstick under the crepe, lift it up and transfer to a plate.
Tip #12: Place the “pretty side” of the crepe down

Because I usually fold or roll up the crepes and want to show the “pretty side” for presentation, I stack them with the “pretty side” down.
To prevent the crepes from sticking to each other, it’s important to stack them in the same direction.
Tip #13: Remove crumbs from the pan
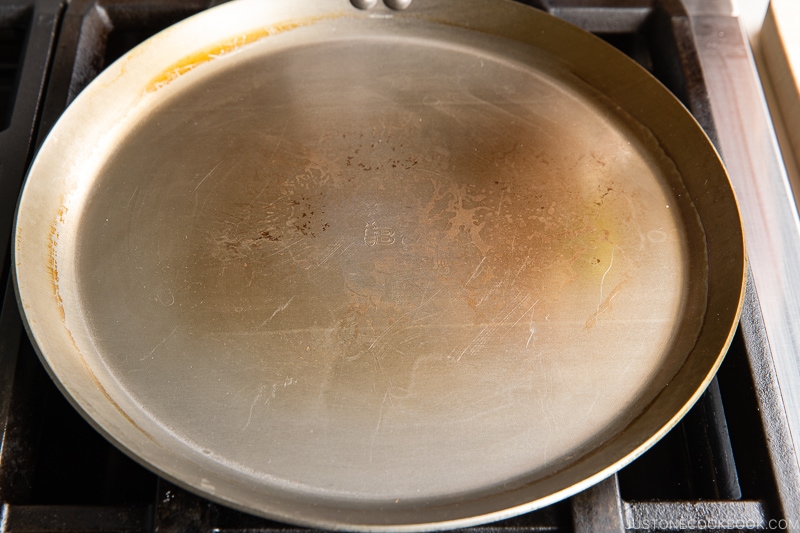
If you’re using a carbon-steel crepe pan as I do, it’s important to clean the pan after every batch. Be sure to pick up any crumbs with a paper towel before greasing the pan.
If anything is sticky and doesn’t come off, I recommend washing the pan and starting over. Otherwise, the batter will stick to that spot and may burn.
Equipment to Make Homemade Crepes
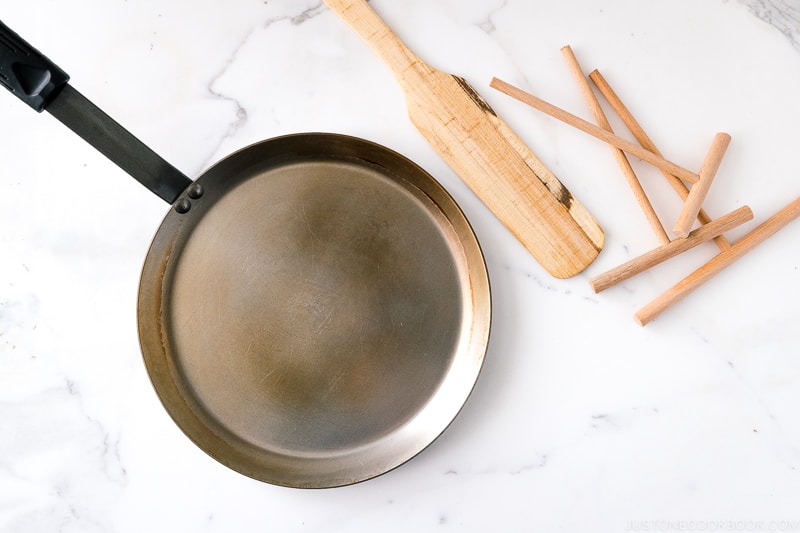
Do we need a crepe pan?
You don’t need a dedicated crepe pan and make excellent crepes.
If you’re using a regular frying pan, a non-stick pan is probably the easiest choice, especially if you’re new to making crepes.
Ever since I watched the non-stick pan documentary “The Devil We Know” (Amazon Prime / Apple TV), I’ve switched all my non-stick pans to carbon-steel ones.
For this reason, I bought a 10-inch (25 cm) carbon-steel crepe pan ($55), and here’s why:
- It’s much lighter than regular carbon-steel pans (with no walls and a smaller handle), so I can swirl the pan with one hand. Larger crepe pans can be slightly heavier.
- The sides of the pan are lower so it makes it easier to check how far the crepe is browning and to slide a chopstick/spatula under it for flipping.
- A 10-inch crepe is a good size for adding filling ingredients.
I have to say I love my carbon-steel crepe pan and highly recommend it!
Do I need a Crepe Tool?
I bought a crepe spreader and spatula set ($13) to test whether these tools would help me make better crepes. After a few trials, I realized I didn’t really need them to make good-looking crepes. So, would I recommend you get these? No, I’d save the money and invest in a crepe pan instead.

How to Save Crepes for Later
Cover the crepes with another plate and store them in the refrigerator for up to 2 days.
When you’re ready to eat, you can pop them in the microwave and reheat them for 2 minutes until warmed through.
How to Serve Crepes
Typically, my family eats 2-3 crepes per person, so I usually make 1-2 batches depending on how hungry they are. Here are some delicious ideas for serving your crepes:
Sweet Crepes
- Lemon and Sugar: Sprinkle a crepe with a teaspoon of granulated sugar and squeeze some fresh lemon juice over it. Fold into quarters, top with chocolate sauce, dust with powdered sugar, and garnish with lemon zest and slices.
- Nutella and Banana: Spread a thin layer of Nutella over a crepe and top with sliced bananas. Fold into quarters, dust with powdered sugar, and garnish with strawberries.
- Jam, Fresh Fruits, and Whipped Cream: Spread your favorite jam over a crepe and top with fresh fruits and whipped cream. Fold into quarters and garnish with additional fruits.
- Japanese-Style Crepe in a Cone Shape: Roll up your favorite filling and topping inside the crepe for a fun, cone-shaped treat!
Savory Crepes
- Ham and Cheese: Sprinkle grated cheese and sliced ham over a crepe. Grill until the cheese is melted and bubbly, then fold the crepe in half. This is similar to a cheese quesadilla.
- Smoked Salmon and Cream Cheese: Spread a thin layer of cream cheese over a crepe. Top with smoked salmon and either fold into quarters or roll up.

The Best Homemade Crepes
Video
Ingredients
For the Crepe Batter (I use a kitchen scale to measure the weight)
- 1 cup cake flour (weigh your flour; for weights, click the Metric button; or use the “fluff and sprinkle“ method and level it off; you can also use all-purpose flour)
- 1 Tbsp sugar
- ½ tsp Diamond Crystal kosher salt
- 2 large eggs (50 g each w/o shell) (at room temperature)
- 1½ cups milk (whole or reduced fat; at room temperature)
- 3 Tbsp unsalted butter (melted in a microwave or a small saucepan)
For Cooking the Crepes
- 1 Tbsp neutral oil (you can also use butter, but do not let it burn before adding the crepe batter to the pan)
For the Fillings/Toppings (Optional)
- toppings of your choice (confectioners’ sugar, lemon, Nutella, maple syrup, honey, banana, strawberries, blueberries, chocolate syrup)
- 1 cup heavy (whipping) cream (for the optional fresh whipped cream)
- 2 Tbsp sugar (for the optional fresh whipped cream)
Instructions
Before You Start…
- Gather all the ingredients. It’s very important to let the milk and eggs come to room temperature. If you’re in a hurry, you can microwave the milk to room temperature and place the cold eggs in lukewarm water. I share a lot of tips and techniques in my blog post, and I encourage you to read them before you start making the crepes.

- I highly encourage you to weigh your ingredients using a kitchen scale for this recipe. For weights, click the Metric button above. If you‘re using a cup measure, please follow the “fluff and sprinkle“ method: Fluff your flour with a spoon, sprinkle it into your measuring cup, and level it off. Otherwise, you may scoop more than you need.
To Make the Crepe Batter
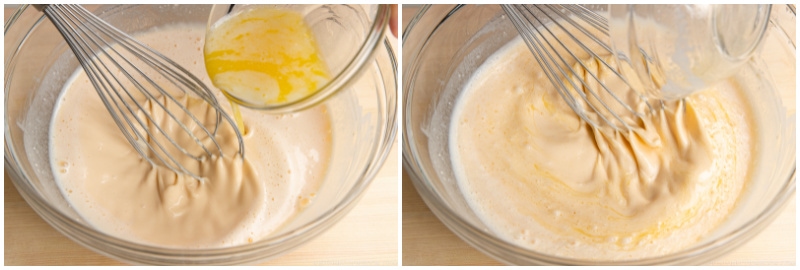
- In a large bowl, combine 1 cup cake flour, 1 Tbsp sugar, and ½ tsp Diamond Crystal kosher salt and whisk to combine. Set aside.
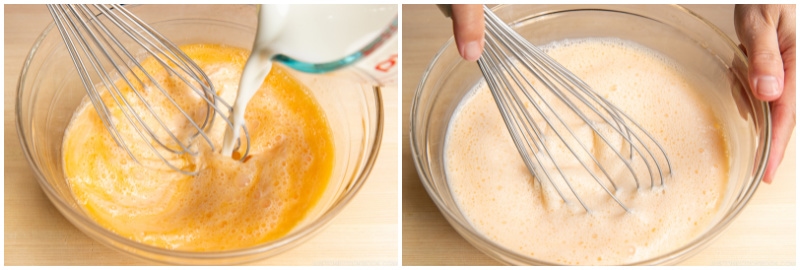
- In a separate medium bowl, beat 2 large eggs (50 g each w/o shell) with the whisk until smooth.
- Add about one-third of the 1½ cups milk to the eggs and beat well. Add the remaining milk in two parts, whisking it all together.
- Add one-third of the egg/milk mixture into the flour and gently whisk to form a smooth paste.
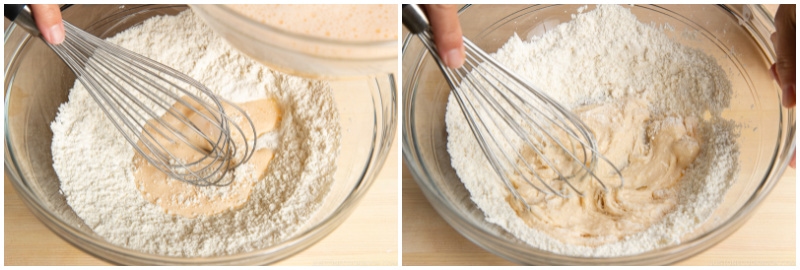
- Add half of the remaining mixture and whisk until completely incorporated.
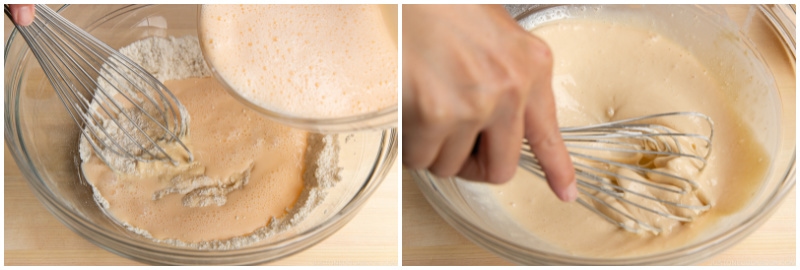
- Add the rest of the mixture and whisk to combine until it becomes a smooth batter. Optional: If you’re making the crepe batter ahead of time, you can cover and refrigerate it at this point.
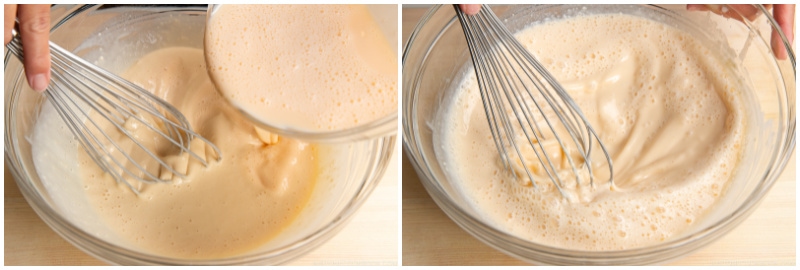
- Add 3 Tbsp unsalted butter (melted) to the mixture and whisk to combine. Do not overmix the batter. Important: The batter must be at room temperature. If the batter is cold, the fat in the butter will solidify and make the batter grainy.
To Cook the Crepes
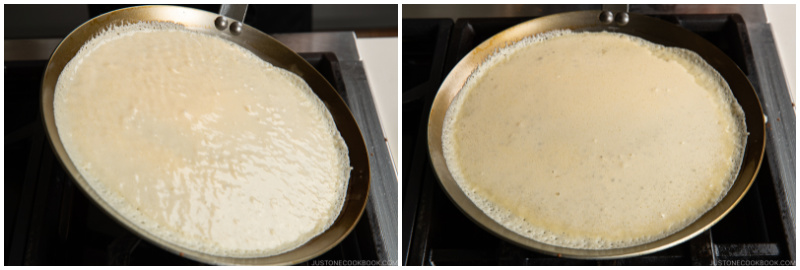
- Heat a 10-inch (25-cm) crepe pan (or regular pan) over medium heat. When it’s warm, lightly grease the pan with some of the 1 Tbsp neutral oil using a silicone brush or paper towel. Make sure you don‘t see any oil streaks left on the pan. If you do, wipe off the excess oil with a paper towel. Tip: Splash a small amount of water into the pan to see if it makes a sizzling sound. If the water dances around, the pan is hot and ready!
- Pour ⅓ cup batter into the center of the pan and swirl it around the pan to evenly coat the surface. Tilt the pan steeply so that most of the batter spreads from the center to the rim.
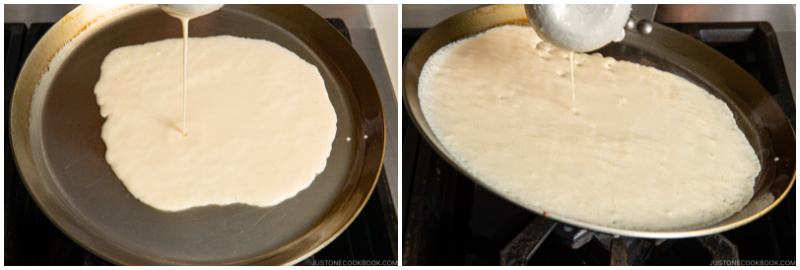
- Then, rotate the pan to spread the batter around and distribute it evenly. If you see any small holes, shake the pan vigorously side to side to fill up the holes while the mixture is still runny.
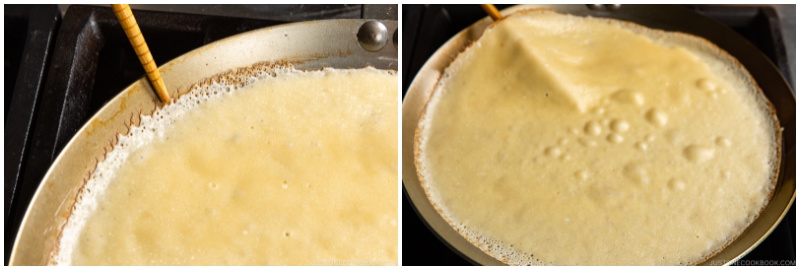
- Cook the crepe until the batter looks dry on top and the edges begin to brown, about 1 to 2 minutes.
- Slide a long cooking chopstick (or a long, skinny metal spatula or an offset spatula) under all sides of the crepe, loosening it from the bottom of the pan. If you have a nonstick pan, your crepe may slide around.
- After you slide the chopstick under the crepe, raise it up in the middle and flip it over. You can use your fingertips to flip it, but I use the chopstick and turn my wrist to flip the crepe (see the video).
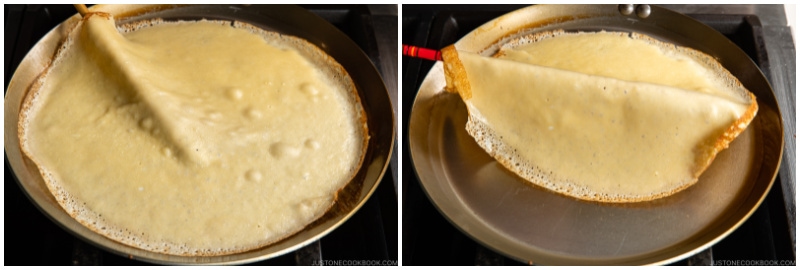
- Cook the other side for 15–20 seconds until golden brown.
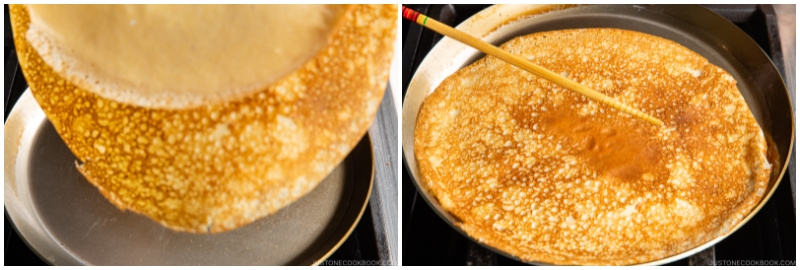
- Slide the chopstick under the crepe again, raise it up in the middle, and transfer it to a plate, with the bottom side (the pretty side) facing down.

- Repeat with the remaining batter, adjusting the heat if the crepes are cooking or browning too fast. Important: Remove any crumbs in the pan and lightly grease the pan before you start another crepe. If the crepe gets stuck and burnt on the same spot, wash the pan and start over again.
To Serve
- Use the crepe as desired (see below for some ideas) and serve immediately. To make fresh whipped cream: Using a hand mixer or a stand mixer fitted with a whisk attachment, whip 1 cup heavy (whipping) cream and 2 Tbsp sugar on medium-high speed until medium peaks form, about 3–4 minutes. Medium peaks are between soft peaks and stiff peaks and are the perfect consistency for topping and piping on desserts. Use immediately or cover tightly and chill in the refrigerator for up to 24 hours.

- To Make a Lemon Sugar Crepe: Sprinkle sugar on a crepe and squeeze some juice from a lemon on top.
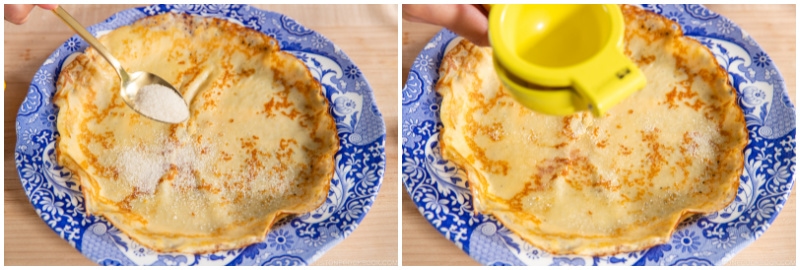
- Fold the crepe into quarters, garnish with lemon slices, and sprinkle with confectioners' sugar. toppings of your choice

- To Make a Nutella Banana Crepe: Spread a crepe with Nutella, and put some banana slices on top.
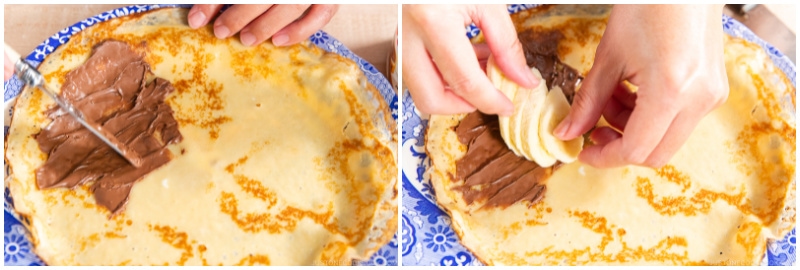
- Fold the crepe into quarters, drizzle with chocolate syrup, and sprinkle with confectioners' sugar.

- To Make a Japanese-Style Crepe: Put some freshly whipped cream on a quarter of a crepe and place some sliced strawberries and banana on top of whipped cream.

- Drizzle some chocolate syrup and fold the crepe in half.

- Roll up the crepe into a cone shape starting from the filling side.

- You can also wrap the crepe in a sheet of wax paper (here‘s a similar kind). Place the crepe on one corner.

- Fold up the bottom corner and roll it up.

To Store
- Cover the crepes with an inverted plate and store them in the refrigerator for up to 2 days. You can pop them in the microwave and reheat for 2 minutes until warmed through.
Nutrition
Editor’s Note: This post was originally published on April 15, 2011. The post was updated with new images, a new video, and a revised recipe on December 1, 2021, and republished on August 7, 2024.


Very well done how-to video even with the ‘oops’. Ha.
Hi Brian! Thank you for watching Nami’s video!😃💞
Thank you so much for the awesome recipe and the meticulous details.
Hello, Adel! Aww. Thank you very much for your kind comments!
Nami and everyone at JOC are thrilled to hear you appreciated Nami’s recipe. 🥰
Next project is to use the crepes for a crepe cake, like Lady M’s would be awesome!!! My favorite is their earl grey -yum! Thanks Nami for an easy recipe.
Hi, Karen! Thank you for trying Nami’s recipe.
Nami also has a recipe for matcha mille crepe cake. I hope you will give it a try.🤗
https://www.justonecookbook.com/matcha-mille-crepe-cake/
You offer only two savory filling suggestions, yet I am sure in Japan there must be many others? Can you suggest some more? Thanks!
Hello, Joe. Thank you for reading Nami’s post and trying out her recipe!
There are so many different variations. It is similar to a sandwich wrap.😃
Here are a few examples.
1)Egg, avocado, lettuce and meatballs
2)Teriyaki chicken with lettuce
3)Sausage, tuna salad with lettuce
4)Corn, mayonnaise, and lettuce
5)Honey mustard chicken with lettuce
6)Tuna, potato, corn salad
I’m happy it shows the consistency because I noticed cup measurements sure are different across the world. Noticed 1.5 cups was 300 ml here but the recipe metric says 360 ml. Bit of a difference for the milk.
Hello, Albert. Thank you for trying Nami’s recipe.
A US cup measures 237 ml. For baking recipes, we highly recommend using matrix measurements.🙂
We hope you enjoy many recipes from our site.
Thanks for giving those tips part by part. It’s soo helpful.
Hi Tanvir! Thank you very much for your kind feedback!
Nami and JOC team are so happy to hear Nami’s instructions are helpful. It means so much to us.
Happy Cooking!
I use rice flour to make gluten-free option.
Hi Mary! Awesome! Thank you very much for trying Nami’s recipe and sharing your experience with us!🙂
I’m confused about the crepe recipe. You tell us to weigh all ingredients instead of measuring and then you proceed to tell me to use one (1) cup of flour. Say what? You just told me to weigh not measure so what does one cup weigh? Am I supposed to leave the recipe to look up what one cup weighs. You tell me that measuring over weighing can produce results that can be up to 120 grams off…120 grams weighs almost 4 ounces. Can that possibly be right? Anyway, now you are probably confused as well. Please help!?
Hi Pauline! Do you see the “US Customary” “Metric” buttons? You have to click “Metric” to see all the measurements. The majority of my readers are US-based, and they prefer my recipes to be written in “cups.” However, whenever I think accuracy is important in the recipe (baking recipes, especially), I always encourage my readers to get a kitchen scale (as it’s $10-15 these days). For this recipe, how we measure flour with a cup changes the consistency of the batter. I want everyone to succeed, so I use metric measurements in this recipe, but always provide “US Customary” as standard for the recipe plugin (I have no control over). Hope this is clear. Basically, for you, you just need to click the “Metric” button. 🙂
Hi! Should I leave out the sugar for savoury crepes? Thank you for so many delicious recipes. My kids now eat eggplant thanks to you!
Hi Roz! Thank you very much for reading Nami’s post and trying her recipe!
You can reduce the sugar amount (about 30% minus) if you think the original recipe is sweet for your taste, but we usually do not leave it out.
We hope this helps!
Crepes are one of my personal favorite. As a suggestion for variety, try substituting some (or all) of the milk with buttermilk. Crepes will come out more tender, and have a hint of sourness that complements sweet fillings wonderfully.
Hi Aelita! Thank you very much for reading Nami’s post and sharing your tip with us!🙂
Sour cream and a berry syrup/jam make a yummy filling combo.
Hi Stephen! It sounds yummy! Thank you very much for sharing your cooking experience with us!🙂
Hi! Do you have a recipe for making fresh whipped cream? I find American pre-packaged whipped cream (Cool Whip, Reddi-Wip) too sweet. I loved the whipped cream I had with my crepes in Japan, but I don’t know how to make it! Thanks!
Hi Umi, Yes, we have the whipped cream recipe! Please check the cream recipe inside this link!
https://www.justonecookbook.com/japanese-strawberry-shortcake/
We hope this helps!
Wonderful!!! Thank you so much!
it tasted so good can u give me more breakfast recipies please
Hi Keyla, We are glad to hear you enjoyed this recipe. Here is a list of Nami’s recommended breakfast recipes. https://www.justonecookbook.com/categories/recipes/breakfast/
We hope you enjoy them.😊
Growing in Japan with crepes, I am so happy to make crepes just like Iused to. This is awesome. Not heavy yet healthy. Another home run recipe from JOC.
Hi Minako! I’m so glad to hear you enjoyed this recipe. Thank you for your kind feedback. xo
This is by far my favorite crepe recipe I’ve tried. I’ve made it twice now. Thank you so much for sharing.
Hi Huong! I’m so happy to hear you like this recipe! Thank you so much for your kind feedback! 🙂