This post may contain affiliate links. Please read my disclosure policy for details. As an Amazon Associate I earn from qualifying purchases.
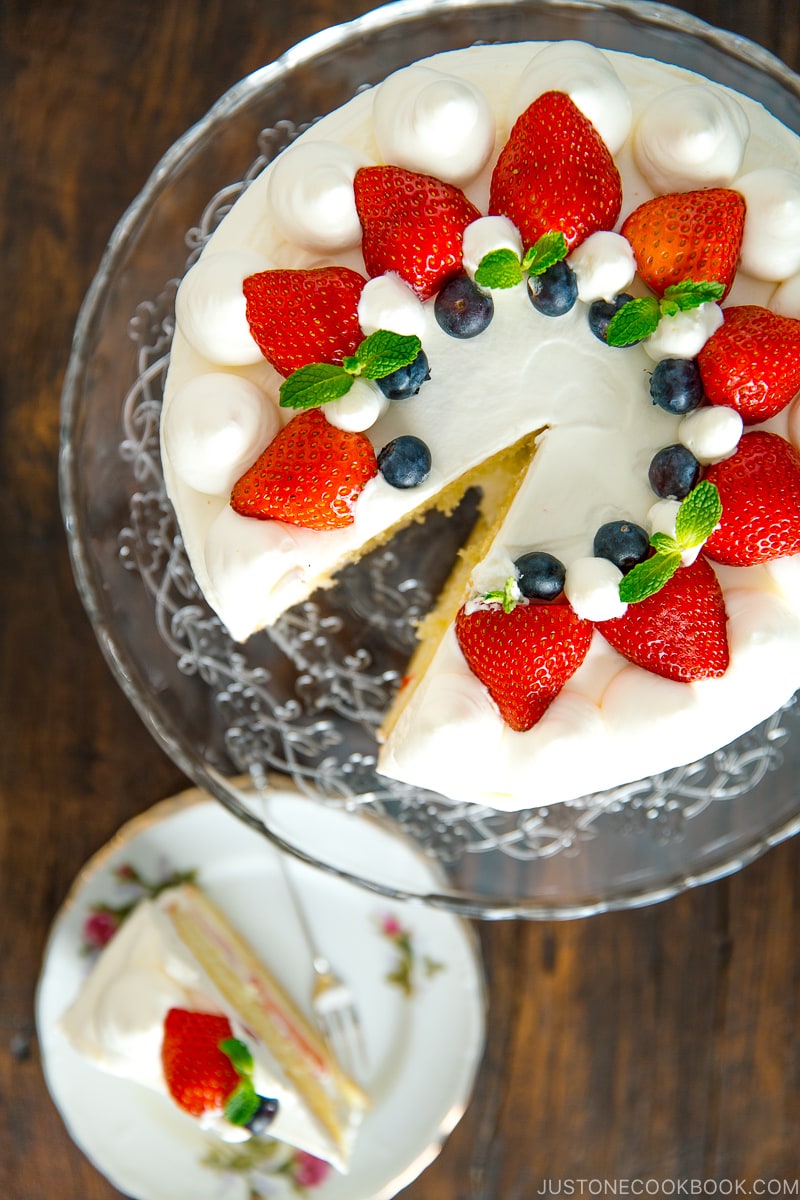
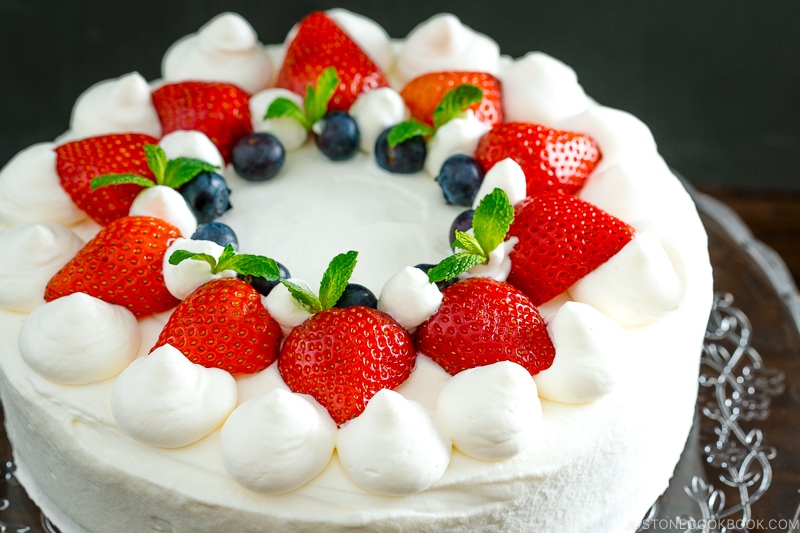
Moist, airy, and light Japanese strawberry shortcake recipe with homemade whipped cream. This simple and elegant cake is perfect in celebrating all occasions. Detailed step-by-step picture instructions included.
Strawberry Shortcake is probably one of the most popular and classic cakes in Japan. Whether it’s for birthdays, Christmas (did you know this cake is also sold as “Christmas Cake”?) or any type of celebration, we enjoy Strawberry Shortcake all year round. Cakes have such a special place in Japanese culture that we even bring them when we visit friends and family.
If you need a classy dessert to serve at your dinner party or something special for a bridal shower, a beautiful homemade Japanese Strawberry Cake fits the bill for the most special occasions. With some basics from the pantry, this simple yet elegant cake is one to remember when celebration season hits. Or when the strawberry is in season in your area, you have good enough reason to whip up this sweet treat to celebrate. I promise, your guests will fall hard for it!
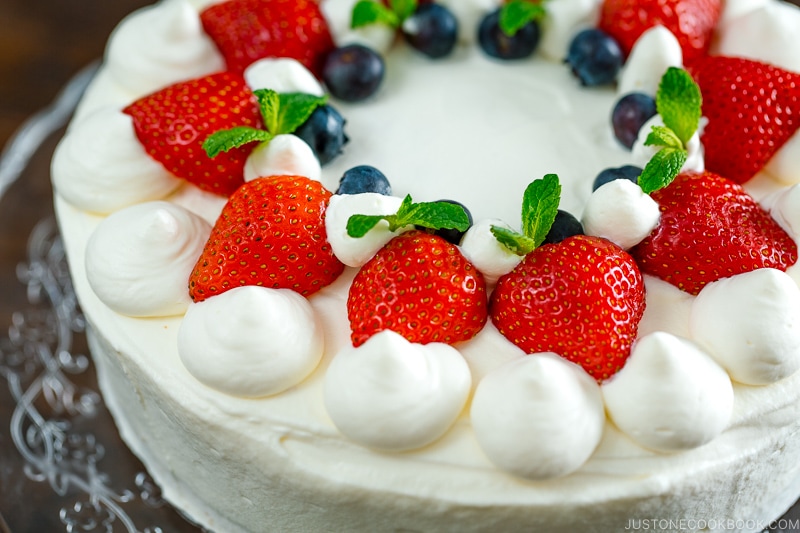
What is the Japanese Strawberry Shortcake?
The concept of Japanese Strawberry Shortcake may have been originated in the US with some adaptation. Instead of sweet biscuits, a Japanese strawberry shortcake is made of 2-3 layers of sponge cake, with fresh strawberry slices, whipped cream filling, and whipped cream frosting.
This cake might seem rather simple, yet when all the components are prepared perfectly, it comes together as an amazing dessert.
The majority of recipes for Japanese strawberry shortcakes are very similar, so what makes them different? It all comes down to the various techniques you use when making it. I want to thank my dear friend Naomi for spending hours in my kitchen testing different variations of strawberry shortcake recipes with me. We spent days testing and made so many cakes, and we decided this is by far the best one.
Because this recipe requires detailed explanations, it was impossible for Mr. JOC to take step-by-step pictures AND film the video at the same time. Therefore, we decided to focus on the step by step pictures this time because I can’t explain everything in our short video. We’ll add a video for this recipe in the future.
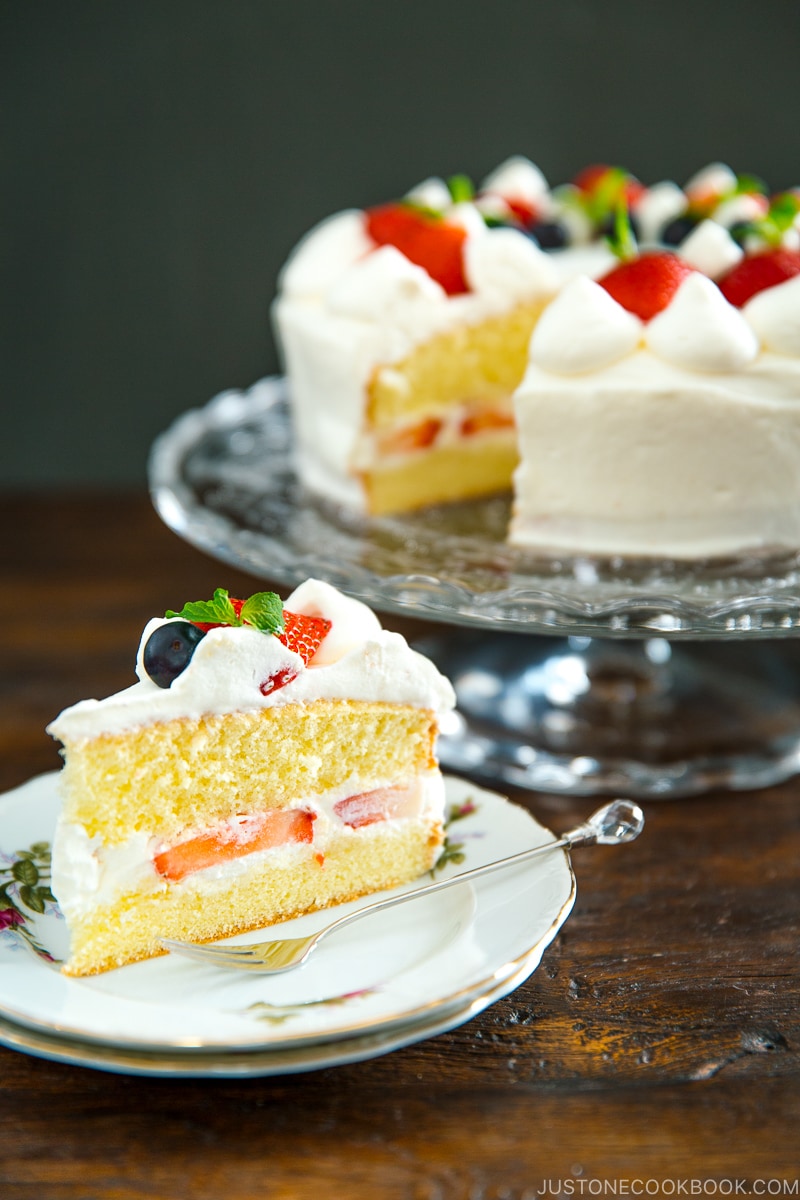
Components of Japanese Strawberry Shortcake
This recipe is probably the longest recipe ever on my blog, with close to 50 steps. I know it’s a bit of an overkill but I really think these step-by-step pictures are helpful and I can explain the step a little more in detail along the way.
Japanese strawberry shortcake consists of 3 components: sponge cake, whipped cream, and strawberries. It’s simple as that. However, to create the perfect sponge cake and whipped cream involves many techniques.
And to make a really good shortcake, precise measurement (please use a kitchen scale and thermometer!) really helps, especially if you don’t bake often.
Sponge Cake
Japanese sponge cake is very moist, airy, light, and it’s not overly sweet. Personally I think this is the most important part of the cake.
The sponge cake is a genoise cake, made by beating air into the eggs to make it rise rather than using a chemical leavening agent like baking soda or baking powder.
The dimensions of the sponge cake we need to consider include sweetness, elasticity, and texture.
The sponge cake cannot be too sweet or else it overpowers the whipped cream and the tartness of the strawberry. The sweetness has to be perfectly balanced with the rest of the cake.
When you bite into the sponge cake, it needs to have some elasticity and firmness of bite. Once again, if it’s too hard or too soft, it ruins the cake.
Lastly and probably the most critical is the texture of the sponge cake. The size of the bubbles within the sponge needs to be consistent. It should not be too rough on the tongue yet it does need some structure so you can feel them. This is probably the part I tested the most to achieve the perfect result.
By the way, if you want to bake a flat cake (my cake is a little curve on the top), I found a great article to solve this problem!
Freshly Whipped Cream
To make fresh whipped cream is not too difficult. Before you begin whipping cream, make sure to chill your bowl and the heavy cream so that the cream will stay cold longer during the whipping process. Basically, cream whips better when it’s cold. The temperature affects how long it requires to whip, how light and fluffy it will get, and how long it is likely to stay that way (more science here).
My friend and I have tested the different amounts of sugar and we concluded that 8% of sugar to heavy whipping cream ratio gives perfect sweetness for the cake.
Fresh Strawberries
Fresh strawberries might not be the easiest ingredient to purchase depends on where you live. I know I’m spoiled in California where we literally have strawberries all year round. When you select the strawberries, make sure they are equal in size and not too large so they’ll be more visually appealing.
Last note, since we do not wash the strawberries but clean them with a damp cloth (to prevent them from going bad and adding moisture to the cream.), I do recommend buying organic ones.
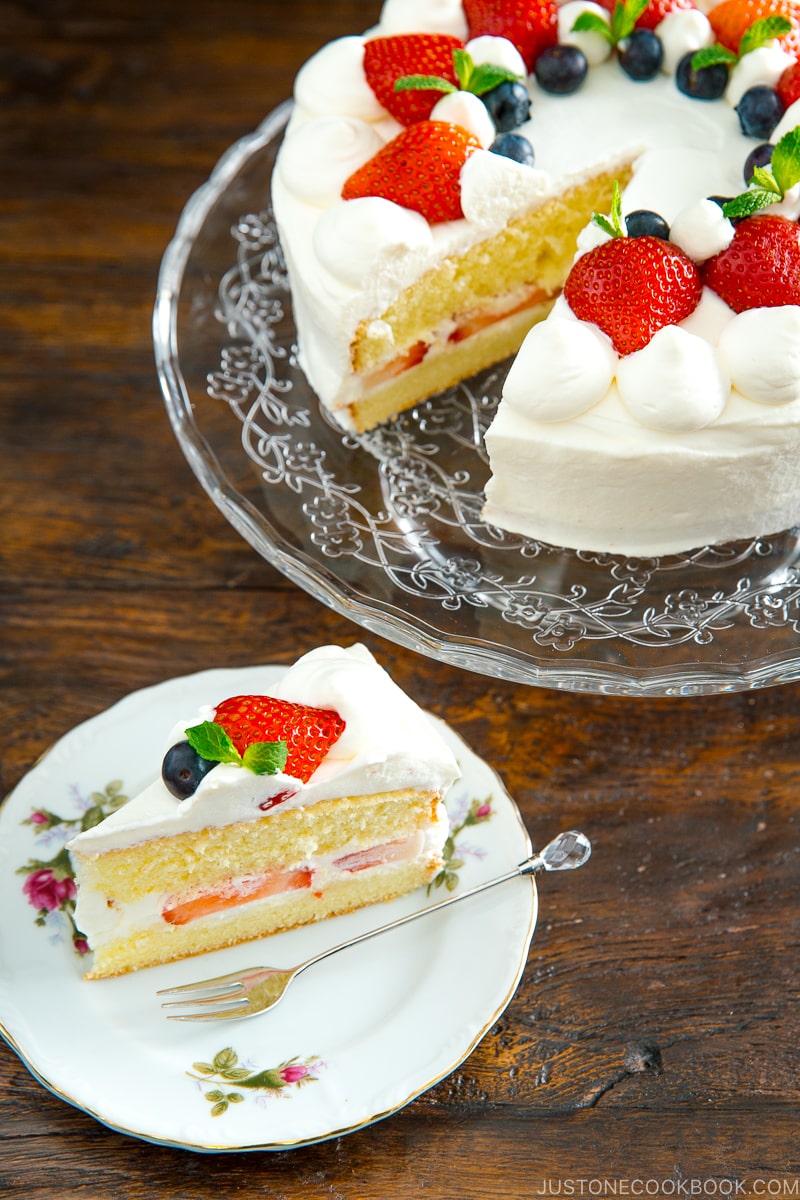
Japanese Strawberry Shortcake for the Holidays
After several recipe testings, I am really happy with my results. My friends and family who enjoyed the cake agreed as well. Since then, I’ve served the Japanese strawberry shortcake several times over the holidays and it’s been a huge hit.
The flavor and texture of strawberry shortcake get even better if you let it rest overnight, so it is also a great make-ahead treat.
Sign up for the free Just One Cookbook newsletter delivered to your inbox! And stay in touch with me on Facebook, Pinterest, YouTube, and Instagram for all the latest updates.
Moist, airy, and light Japanese strawberry shortcake recipe with homemade whipped cream. This simple and elegant cake is perfect for celebrating all occasions. Detailed step-by-step picture instructions included.
- 40 g unsalted butter (3 Tbsp)
- 30 ml whole milk (2 Tbsp) (See Note)
- 4 large eggs (50 g each w/o shell)
- 120 g sugar (½ cup + 2 Tbsp)
- 120 g cake flour (roughly 1 cup) (No cake flour? See Notes)
- Shortening/Cooking Spray/Butter
- 30 ml water (2 Tbsp)
- 38 g sugar (3 Tbsp)
- 1 Tbsp your liquor of choice (Optional; See Notes)
- 473 ml heavy (whipping) cream (2 cups/1 Pint package) (36%, at least 30-35% fat)
- 38 g sugar (3 Tbsp) (use 8% of heavy cream: 473 ml x 8 % = 38g)
- 450 g Strawberries (1 lb) (for filling and decoration – buy extra) (See Notes)
- 10 blueberries
- mint leaves
-
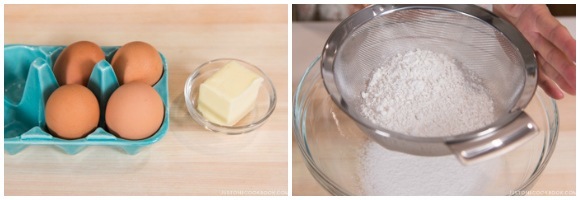
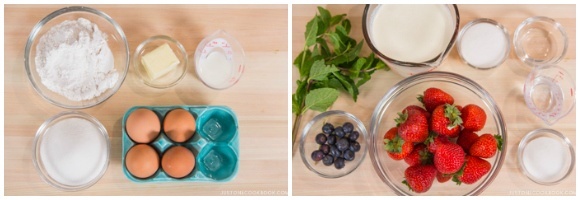
Gather all the ingredients.
- Make sure the eggs and butter are at room temperature. Sift the cake flour at least twice.
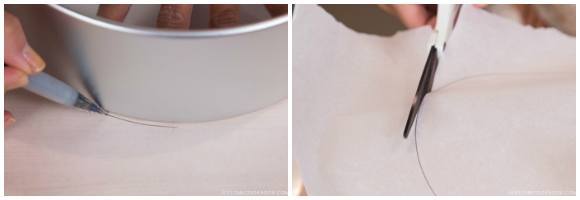
- Place the cake pan on top of parchment paper, trace around the pan and cut out the circle. Grease one side of the parchment paper and also both bottom and sides of the cake pan with shortening/cooking spray/butter. Then fit the parchment paper in the cake pan. (I avoid parchment paper on the side because sometimes it pulls the batter and affect the final result of the cake).
-
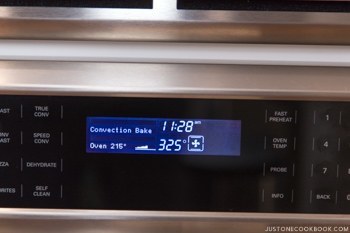
Preheat oven to 350 ºF (180 ºC). If you use a convection oven, preheat to 325 ºF (160 ºC). It’s always better to preheat longer, preferably 15-20 mins longer. (see Notes below for the reason).
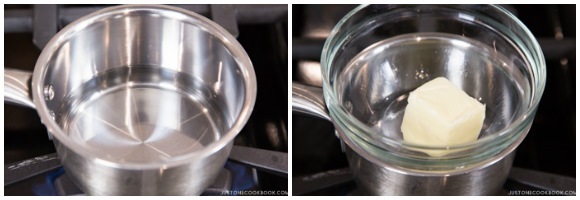
- Prepare a double boiler. If you have never done this before, please see Notes section below. Turn on the stove’s heat to high and bring the water in the saucepan (Pot A) to a rapid boil. When boiling, reduce heat to maintain a steady simmer. Put the 40g (3 Tbsp) of butter in the small bowl (Bowl #1) and set over the saucepan. Let the butter melt gently.
-
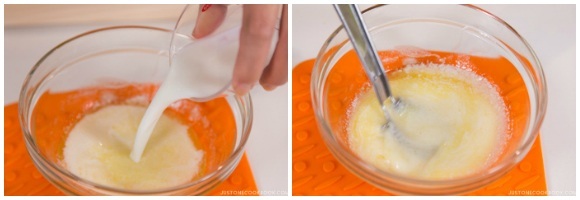
Once the butter is melted, remove the bowl from the saucepan. Then add 30 ml (2 Tbsp.) whole milk and whisk to combine. Set aside to keep it around 104 ºF (40 ºC).
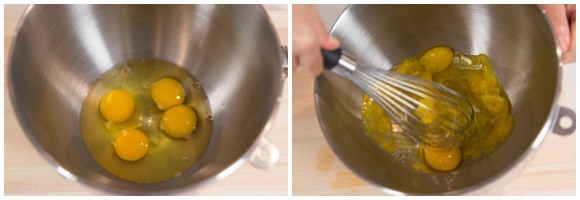
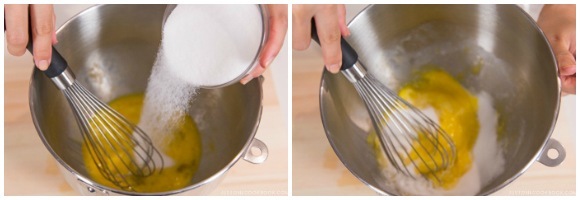
- In the stand mixer bowl (Bowl #2), add 4 eggs and break the egg yolks and whites.
- Add 120 g (½ cup + 2 Tbsp) sugar and whisk to combine.
-
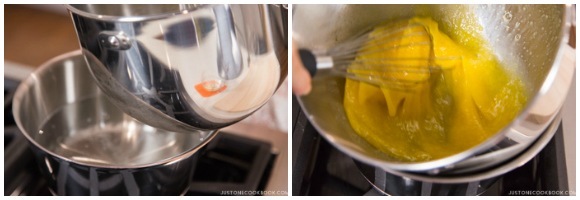
In the large pot (Pot B), bring about 2 inches of water to 140 ºF or 60 ºC and maintain the temperature. Then set the stand mixer bowl (Bowl #2) directly in the pot and whisk constantly so the eggs don’t become scrambled eggs. This method is called bain marie (or water bath), where the bowl of food is set directly in a larger container of hot or simmering water. You can also use the double boiler method, where you set the egg mixture bowl (Bowl #2) over the Pot B. The bowl doesn’t touch the simmering water of the pot. In both cases, the water tempers the heat to permit gentle, even cooking.
-
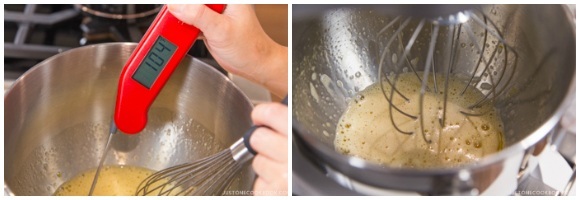
Whisk until the temperature of the egg mixture reaches 104 ºF (40 ºC). Remove Bowl #2 from Pot B and set it up on the stand mixer with the whisk attachment.
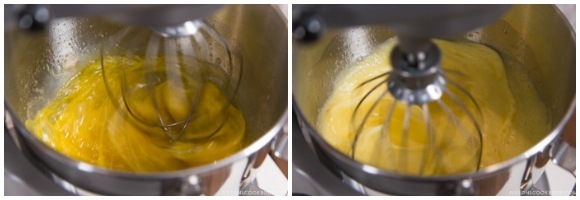
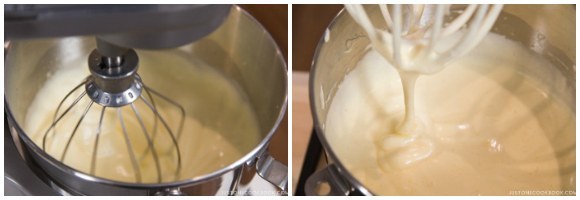
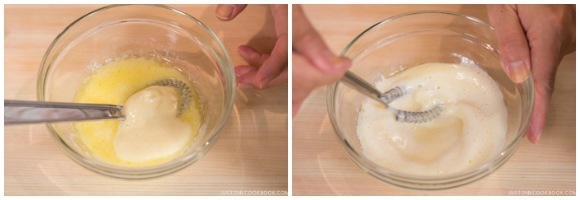
- Whisk on high speed (level 10) until the mixture is fluffy, for about 2 minutes. The batter should be loose yet thick and glossy.
- When the batter is pale and fluffy and tripled in volume, slow down to low speed (level 4) for several seconds. Stop and lift up some of the mixture and fold it in, and if the batter stays on top of the mixture, that’s “ribbon stage” (see Notes). Remove from the stand mixer.
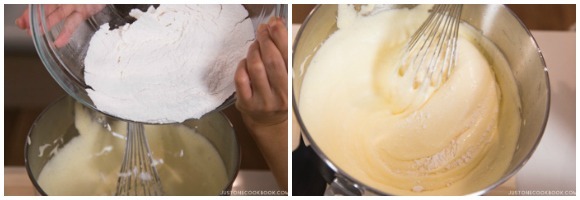
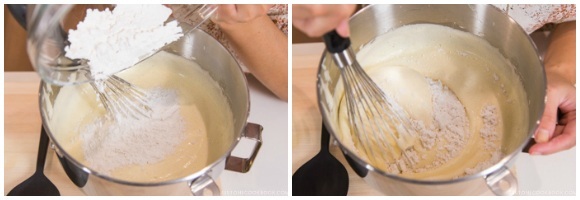
- Add half of the flour. Using the whisk, fold gently but thoroughly. Do this by rotating your bowl slowly, and simultaneously moving your whisk in a downward-then-over motion.
- Add the rest of the flour and fold gently to make sure all the flour is incorporated quickly so your mixture doesn’t deflate.
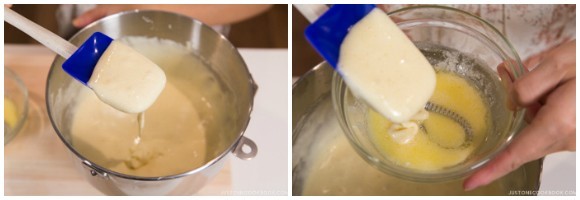
- Take out 1 (spatula) scoop of the batter from the bowl and add to the butter & milk mixture.
- Mix very well. We incorporate butter into batter first because fat in butter will deflate the batter if we add the butter directly.
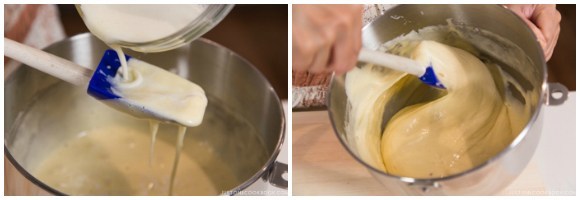
- Add the mixture back to the batter by pouring over the silicon spatula. This prevents the mixture from deflating the batter and helps disperse the mixture. Gently fold in. When you lift the spatula, the batter should fold down like ribbon.
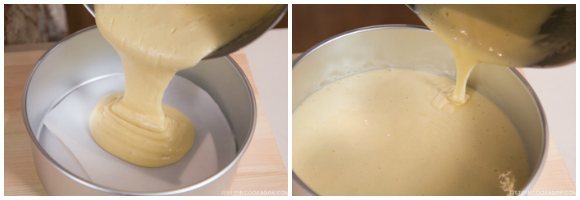
- Pour the batter into the center of the cake pan, from right above the cake pan. You want to avoid introducing extra air into the batter at this point. Collect the leftover batter in the bowl and pour around the edges of the cake pan, not the center.
-
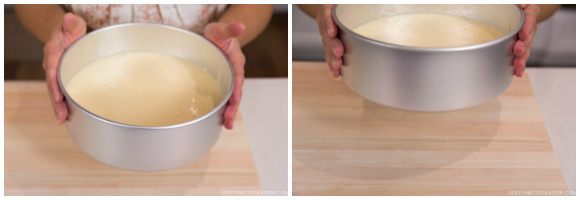
Drop the cake pan on the counter to release air bubbles in the batter.
-
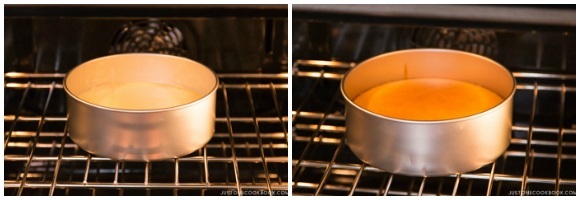
In the preheated oven, bake at 350 ºF (180 ºC) (or for a convection oven 325 ºF (160 ºC)) for 20-25 minutes. Check if the sponge cake is done by inserting a skewer in the middle and comes out clean. Meanwhile, move on to the cake assemble prepping stage.
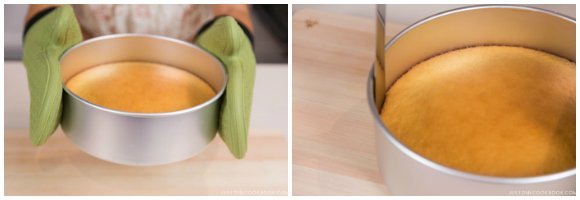
- As soon as you take out the cake pan from the oven, drop it on the counter to give shock to the cake (so it stops shrinking). Separate the cake from the pan by running a sharp knife or offset spatula around the pan.
-
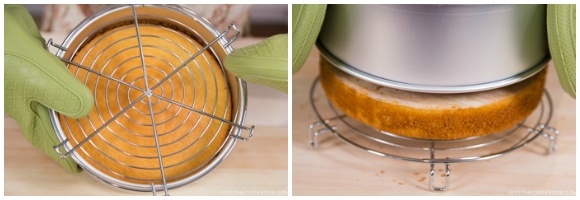
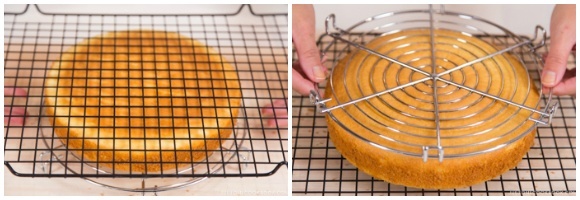
Take the cake out of the pan by placing the wire rack on top and flipping it over.
- Immediately remove the parchment paper.
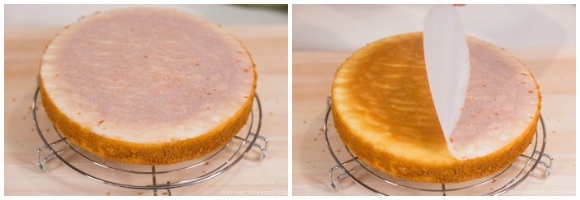
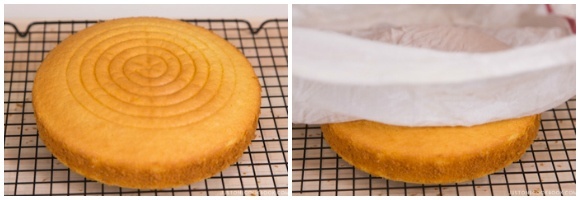
- Place another wire rack on top and flip it back. The top of the cake is now facing up.
- Cover the cake with a damp towel until cooled (to keep moisture in the cake). Make sure the towel is thin (not heavy) and squeeze the water out VERY tightly so that it’s damp, not wet. I use IKEA’s thin dish towel. If you keep the sponge cake for later use, wrap with plastic wrap and keep it in the fridge (See Notes).
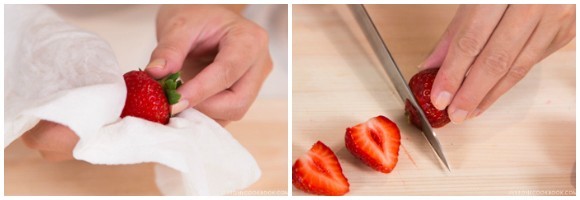
- Divide the strawberries into 2 groups, for decoration and for filling. Keep the beautiful, same-sized strawberries for the decoration. Remove the husk and clean the strawberries with damp paper towel (do not wash, as we don’t want strawberries to have moisture and become moldy). Slice off the core for all the strawberries.
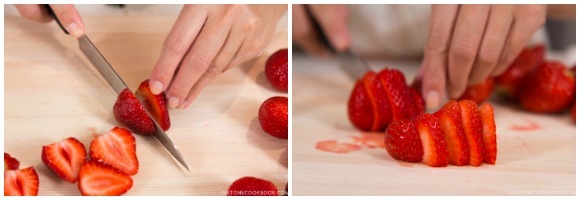
- For the strawberries that we use for topping, cut in half. For the strawberries that we use for filling, slice them into ¼ inch (5 mm) slices.
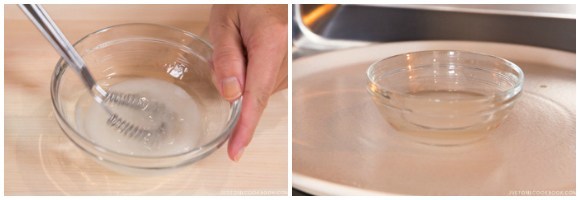
- To make syrup, in a small bowl (Bowl #3), combine 30 ml (2 Tbsp) water, 38 g (3 Tbsp) sugar, 1 Tbsp. liquor, and microwave for 1 minute to dissolve the sugar.
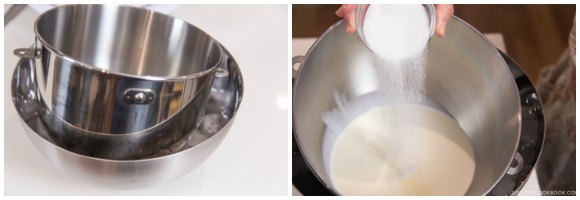
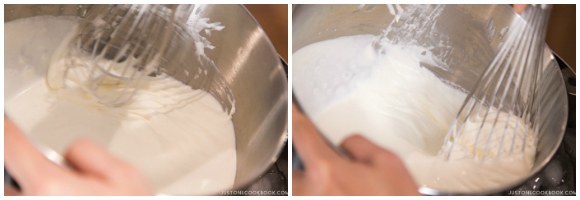
- Prepare ice bath by placing ice cubes and water in a large bowl (Bowl #4). Place a clean and dry mixing bowl (Bowl #2) over and add 473 ml (1 Pint) heavy cream and 38 g (3 Tbsp) sugar to keep cool.
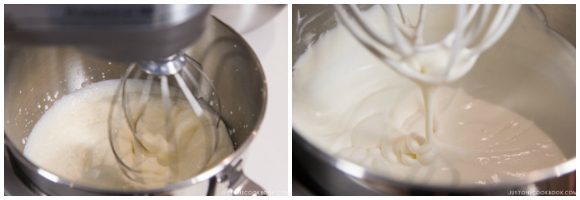
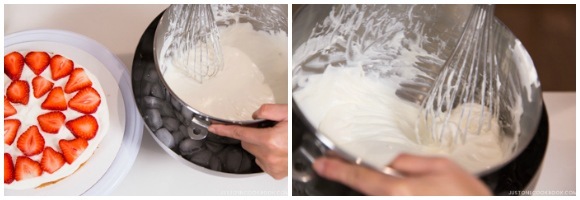
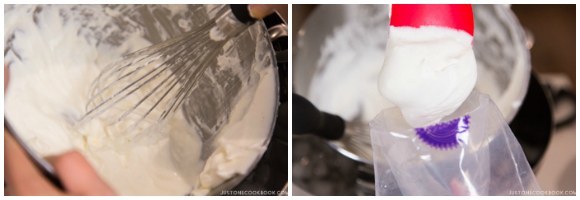
- Once cooled, transfer the mixing bowl to the stand mixer and whisk on high speed. The cream will become thicker and smooth. When you lift the whisk out of the cream while it’s still liquid, but holds it shape as it drops, then it’s ready. Remove the bowl from the stand mixer and put it back in the ice bath.
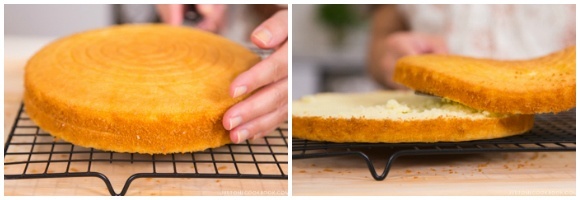
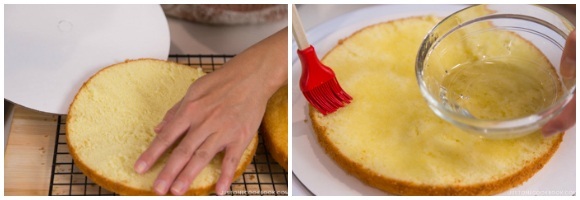
- With a serrated knife, slice the middle of the cake horizontally into half. Now you have 2 layers (top and bottom).
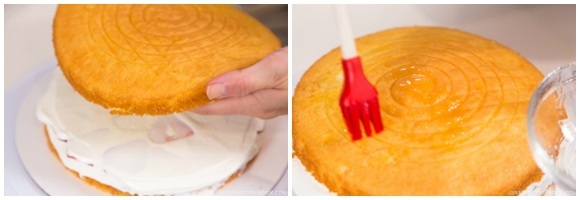
- Place the bottom of the cake on the cake circle. Brush the syrup on top and the sides of the bottom layer. This will keep the sponge cake stay moist.
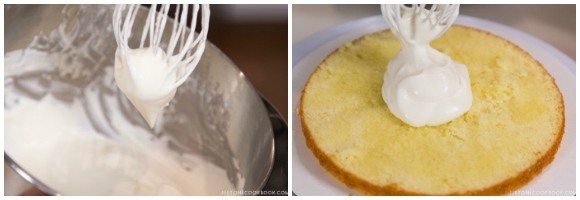
- Start to whisk the cream at one location by the edge of the bowl instead of whisking the entire cream. We will be making the whipped cream as we need. With this approach, we can also control the hardness of the cream.
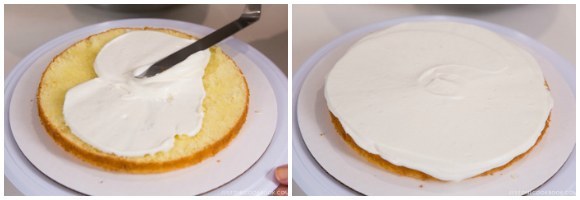
- When the cream reaches “soft peaks”, take out the cream and transfer to the bottom of the cake. Soft peaks means when you lift the whisk, the cream will hold its line but the top peaks will be soft and after a second or two will fall back on itself.
- Spread the whipped cream evenly. If the whipped cream is not enough, whip more and add onto the cake.
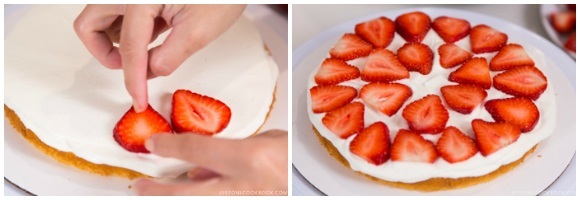
- Place the strawberries on top of the whipped cream as you see in the pictures. Keep the center area open by not covering with strawberries. This will be easier to cut the cake into slices.
- Whip the cream again at the edge of the bowl.
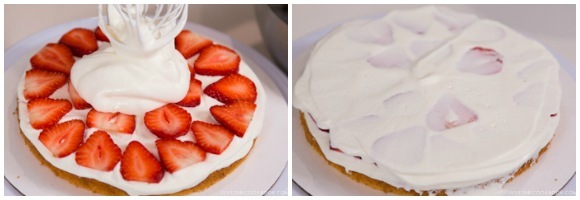
- Transfer the whipped cream to the top of the strawberry layer. Spread just enough cream to cover the strawberries, do not put too much.
- Place the top layer of the sponge cake. Brush the syrup on the top and sides of the sponge cake.
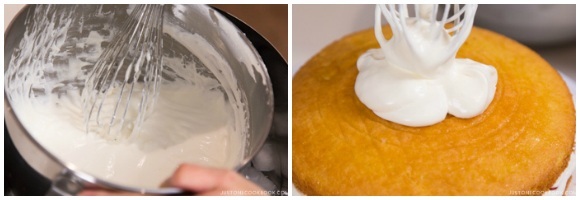
- Whip more cream and place on the top.
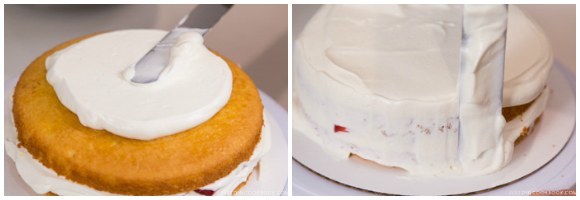
- Place the tip of the offset spatula in the center at 30 degree angle, turn cake turntable toward you to create a smooth top. Lightly cover the sides of the cake with thin layer of the cream.
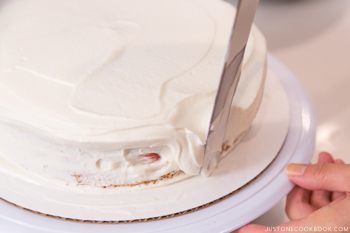
- Now add more cream to the side little by little. Place the offset spatula at 90 degree angle and push the turning table away from you.
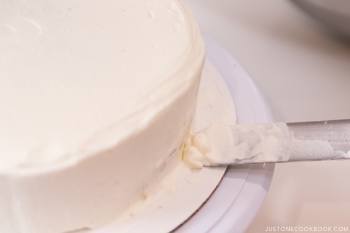
- Remove the excess cream from the cake and put back into the bowl.
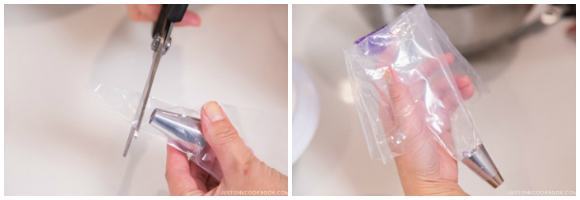
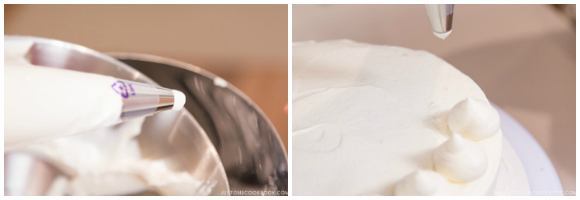
- For a basic decoration, I use Wilton 2A decoration tip. Put the tip in the piping bag and cut off the tip so the metal will show from the bag. Fold the top half of the bag outward as you see in the picture (over the hands).
- Whip the cream to “stiff peaks”. When you lift the whisk, the peaks will hold firm. Put the cream into the piping bag. Once you fill out the bag half way, lift the bag and push the cream down to the tip.
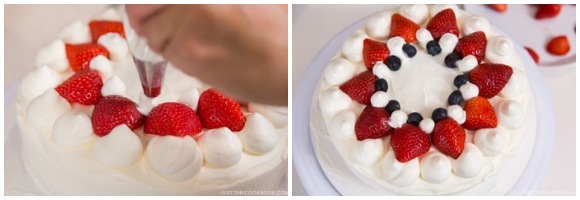
- Squeeze the pipe to test to make sure the cream comes out smoothly. When you’re ready, hold the piping bag at 90 degree angle and squeeze about 1 inch diameter of whipped cream around the edge of the cake. This will be the base for the strawberries.
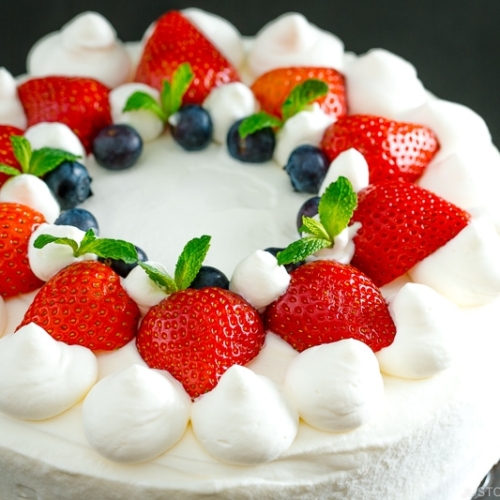
- Decorate and place the strawberries sideways on top of the whipped cream. Then squeeze more whipped cream in between strawberries, dropping small whipped cream all around. Place blueberries between the whipped cream dollops. Place the small mint leaves in some area to add colors.
-
I recommend putting the cake in a cake stand with dome or a cake box to keep the cake shape while preventing it from drying. Keep the cake in the refrigerator and enjoy it in 2 days.
Cake flour: If you don’t have cake flour, you can substitute with all-purpose flour and corn starch. Here’s how.
- 1 cup Cake Flour = Measure 1 cup All Purpose Flour, then take away 2 Tbsp All Purpose Flour, and add 2 Tbsp cornstarch. Be sure to sift the flour to distribute the cornstarch well before using it in your cake batter.
Whole milk: I highly recommend using whole milk instead of reduced fat milk. I’ve tried using both, and I concluded that whole fat milk makes a difference with the final result.
Liquor of your choice: I like orange liqueurs like Grand Manier or Cointreau. You can skip the alcohol in the syrup.
Strawberries: If you like to decorate your cake with strawberries, you want to look for similar size strawberries to make it look pretty. Buy an extra pack to increase your chance of finding same size strawberries!
Preheat oven: You preheat the oven so that all the surfaces inside your oven (walls, floor, door, racks) are the desired cooking temperature, which makes for more even temperatures throughout the oven and you won’t lose as much heat when you open the door for a few seconds. Depending on your oven, preheating might take 10 to 20 minutes.
Double boiler: Put 1 to 2 inches of water in the bottom saucepan and set a glass/metal mixing bowl over it. Just make sure the bottom of the mixing bowl doesn’t touch the surface of the water. The water from the bottom saucepan transfers a gentle, steady heat to whatever you're cooking in the bowl above. Check the bottom pan every now and then to make sure the water hasn’t boiled off, and add more water if needed.
Bain-marie: It's the fancy term for a hot water bath, creating a gentle and uniform heat around the food.
Ribbon stage: a cooking term used to measure how well egg yolk and sugar are beaten together. When you lift the whisk into the air with some of the mixture on it, the mixture will fall back into the bowl in ribbons, which only slowly disappear back into the mixture.
Make ahead: You can make the sponge cake a day before. It actually tastes better and it's easier to slice the cake into half. Make sure to wrap the cake with plastic wrap after it's cooled completely. If you decide to make the shortcake ahead of time, remember that it tastes great for 2 days after you assembled the cake. Due to fresh strawberries and whipped cream, the cake won't taste as good on the 3rd day.
Equipment you will need:
- 1 small heat-resistant bowl (Bowl #1)
- 1 small saucepan that fits Bowl #1 for double boiler (Pot A)
- 1 stand mixer bowl or large mixing bowl (Bowl #2)
- 1 large pot that fits the Bowl #2 for bain-marie (Pot B)
- 1 small bowl (Bowl #3)
- 1 large bowl that fits Bowl #2 for ice bath (Bowl #4)
- Parchment paper
- cake pan (8"/20 cm)
- 1 good whisk
- Silicon spatula
- 2 wire racks
- Offset spatula
- Cake decoration tip Wilton 2A & plastic bag
Optional Equipment (but nice to have!):
- Thermometer
- Serrated knife
- cake circle (10"/25 cm)
- Cake turntable
- Cake stand with dome or cake box
Recipe by Namiko Chen of Just One Cookbook. All images and content on this site are copyright protected. Please do not use my images without my permission. If you’d like to share this recipe on your site, please re-write the recipe in your own words and link to this post as the original source. Thank you.
Editor’s Note: The post was originally published on December 14, 2015
Thank you for putting in so much time and effort to explain the recipe. This really helps new and experienced bakers alike! Very thorough and clear. Thanks for sharing!
IMO, a short explanation with more steps is more helpful, especially in instances when I am not familiar with the recipe. It is like checking off a checklist as I go through the steps of the recipe.
Sometimes, reading a long paragraph can make me miss or skip some steps. Information overload! Haha…
Just my two cents… Hope it helps!
Thank you so much for your feedback, Jeanette! I feel the same way, and I’m glad you think so too! 🙂
Hi, Can i substitute the whole milk for plant milk?
Hi Deborah! I have never tried it but I hope that will work… 🙂
Can I use coconut sugar instead of normal white sugar? Are there any other substitutes for whipping cream (don’t like the taste of dairy and coconut cream)? Hope to hear from you asap, can’t wait to make this cake 🙂 Byw, love your website, I have tried so many of your recipes, so so good, my family love them. My kids want to move to Japan so they can eat Japanese food everyday
Hi Connie,
Thank you very much for your kind feedback. I’m so glad to hear you and your family enjoy many of Nami’s recipes!
This is a very classic cake in Japan and usually made with whipped cream filling, and whipped cream frosting. If you find good substitutes for whipping cream, please share with us!
As for sugar, we have never use the coconut sugar for this recipe before, so we are not sure how the outcome will be…. It may cause volume and texture change. If you try this recipe, please let us know how it goes!
I tried this recipe yesterday and I think I saw the sponge batter deflate when I added the 2nd round of flour. I don’t think I follow the steps on how to mix the flour properly. Also, I was a little confused by how to incorporate the butter milk mixture. Do you turn the whisk while you turn the bowl? Do you stir the milk butter flour mixture after pouring it in the batter via spatula? The sponge cake turned out pretty dense and not light and fluffy. However, I am cooking at high altitude. Do you think I need to make adjustments for that?
Hi Tammie! Thank you so much for trying this recipe.
Flour is heavy so sprinkle in and then fold the batter. You turn the bowl (for me, counterclockwise) with the left hand, while you use your right hand and fold the batter with scooping up motion from the bottom of the bowl (Step 7). Yes, at Step 11, I do fold in with a spatula.
Now the high altitude… I feel like this is the part that could be an issue. I do not know enough about high altitude baking, but I’ve heard adjustment is always necessary. I wish I have some experience but I have never baked in the environment. I’m sorry I can’t be helpful. 🙁
King Arthur Flour’s website has a great section on high altitude baking!
https://www.kingarthurflour.com/learn/resources/high-altitude-baking
I live at high altitude so I have to play with recipes. Will definitely try this one out thanks!
Hi Angela! Thank you so much for this helpful information!
An update. I made the forth cake batter. I changed all purpose flour to a gluten free flour (because my friend has gluten allergy). I realized in the process of measuring the gluten free flour, 1 cup of flour measured more than 120g (recommend people read the blogger’s how to measure flour post or get a scale and measure 120g of flour). Also, since I don’t own a digital thermometer, reading temperature off from non-digital thermometer was difficult (I kept converting in my head the increments into Celsius when I have a Fahrenheit thermometer.) Getting the wrong temperature when mixing the eggs and sugar on bain-marie and not getting the right flour weight were what caused the batter to collapse for me. Thanks for the receipt. Now I got this recipe correct, I’m more confident to try out other cake recipes.
Hi Snow! Thank you for keep trying this recipe and sharing your experience. I’m glad you are confident to make other cake recipes! 🙂
Thank you thank you! I’m excited to make this. We always go to Fujiya in Japan and now we can enjoy at home.
Hi Mariko! Ohh you’re so lucky you can go to Fujiya! 🙂 Well, it’s always good to make homemade, so I hope you give it a try (at least once?). 🙂
Hi, very detailed explanation & I’ll try it soon. Can I ask if I need to add any stabilizer like pudding powder, etc to make whip cream last longer in hot climate? Thanks!
Hi Jerine! Thank you for your kind words. Unfortunately, I’ve never worked with a stabilizer before. I’m so sorry I wish I can give advice. 🙁
This is a great time to make this cake! My family just went to Iceland for a week so I will have free time to make it before they come back! For the recipe, is it okay to eliminate the alcohol or does it taste better with it? Also hope you have a nice and happy holiday!
Hi Allison! Definitely! I was so worried I’m running behind in publishing this! I wanted to give some ample time for everyone so they can shop ingredients and tools for this recipe… and maybe some time enough time for practice….
Yes, you can skip alcohol, but make sure to apply syrup for extra flavor and moisture to the sponge cake. 🙂 Alcohol gives nice fragrance and flavor… I don’t drink alcohol (except for occasional wine), but I actually like adding liquor to syrup. Taste better! Happy holidays to you and your family!
p,s. I wish I could go to Iceland! That’s so cool!
I’m not much of a baker but I can’t wait to try to make this. It reminds me of my favorite cream cakes (they were usually more like slices) in the bakeries in Hong Kong when I was younger. Sadly they are almost impossible to find here in South Florida and have been getting hard to find even in Hong Kong.
Hi Cherry! I’m not much of a baker (you see my blog, not too many baked recipes compared to other food blogs. :)), so I tried my best to explain in details. I hope you give it a try! I think maybe this cake in square/rectangular in HK? Try not to make a perfect cake (I mean, “look” perfect). It will still taste delicious and you just have to practice with applying whipped cream to the cake… which for me was difficult part… especially to make it look pretty for the blog… haha.
Hi. I truly enjoy your recipes and reading the background info. It’s nice to have a better appreciation for the food we cook/eat.
I tried this recipe today and my cake turned out grainy. Does it mean that I haven’t mixed the flour in well enough? I was afraid of deflating the batter. If that’ the case, what can I do or how can I tell that flour has been mixed in well?
Hi Su! Thank you for your kind feedback. 🙂 It’s tricky, as you don’t want to deflate the batter but you have to incorporate the flour into the batter well. There should be no trace of flour but with a scooping (?) motion, it should be mixed from the bottom of the bowl.
Looks fantastic! What a great tutorial. In Los Angeles, Phoenix bakery is well known for its strawberry cake (it is my family’s favorite) but I never knew it was a Japanese tradition.
Hi Julie! I should check out Phoenix Bakery… I’ll be down in LA this week! Yes, Japanese strawberry shortcake is pretty much the classic cake in Japan!
Yes, do! Its in Chinatown. Have a great trip”
So excited to make this! I’m thinking of making this before school starts agaiN!
Hi Khadijah! Good luck!!! Hope you enjoy this cake! 🙂
Thank you for an amazingly detailed recipe! My son is home from Japan for Christmas and has brought his Japanese girlfriend. She has been eager to try American foods, but I know she loves the beautiful and elegant cakes common to Japan, and has mentioned Strawberry Shortcake in particular, so I hope to try your recipe for our Christmas dinner dessert. I hope I can find ripe berries where we live – it won’t be easy!
Hi Susan! How exciting that your son is back with his Japanese girlfriend! I remember my first time trying American foods (I was homestaying in Berkeley, lots of choices!). 🙂
She’ll be surprised to see Japanese strawberry shortcake at the dinner table! 🙂 Hope everyone will enjoy it!
p.s. I know, strawberries are hard to find this season, right? We still have really good strawberries here in California… Very sweet ones from farmers market…
50 steps is a long recipe but since I have never in all the years I have been trying to perfect strawberry shortcake, managed to bake a perfect one, I am so grateful for the detail!! If it works for me will post a pic!!
I shouldn’t have scared my readers with “50 steps”! LOL. It’s actually lots of baby steps that can be one step… I just wanted to be thorough, as if I was next to my reader when I explain. 😀 Hope this recipe will help… Good luck!
Hello!
Thanks so much for this amazing recipe, I am so excited to make it!!
Just wondering- is it possible to double the recipe without making any adjustments?
Thanks
Hi Essie! You can double the recipe. But if you’re pouring the batter into the same cake pan, you will need to cook for a longer time. 🙂
What a gorgeous cake!! Thank you so much for the effort that went into perfecting and teaching us this recipe. Especially with baking, I think that the more details in the recipe certainly help. I like the trick you mentioned with helping the cake from shrinking; I’ll keep that in mind with other baking projects too. I suspect that you and your family are just about ready for the holidays!
Thank you Kimmi! I took notes in details while I baked this recipe many times, so hopefully they are helpful…. but I am not sure if my English was good enough to explain in details (or I might have confused even more! LOL). 😀 Happy holidays to you and your family!
Hi, thanks for the great details on the step-to-step recipe.
I manage to make this cake, fluffy and soft, despite I don’t really bake and that’s my first sponge cake. I was delighted.
I tried making it again today but with slight reduced sugar (90g) cos my family prefer less sweet. The cake still turns out nice but denser and not as fluffy as the original recipe. I wonder if I might have over mixed during the adding of flour or undermixed the egg batter or even perhaps I shouldn’t reduce the sugar too much….
Hope u might read this and could share some advise
Hi Brosche! Thank you for trying my recipe! I know that baking is science and reducing sugar can cause volume and texture change. The sugar and cake flour should be equal as well, and the ratio for eggs is no longer the same. So I recommend not changing the working recipe, or if you need to change, you may need to adjust slowly and not drastically. 🙂 Hope this helps! 🙂
Hi Nami,
Thanks so much for sharing this! Quick question, if I don’t have food grade thermometer with me, what do you suggest I should do to measure the temperature of certain steps? Especially like the butter that should be maintained at a certain temperature. Any suggestion or estimates on how warm they should be like? Thank you!
Hi Laura! Hmm it’s a bit hard without thermometer for this method. 104F (40C) is like a bit warmer than human body temperature. 140F (60C) is hot but you can quickly touch.
https://www.jm.com/en/blog/2015/february/too-hot-to-handle/ (this kind of gives you some idea).
Thanks Nami for the reply! I decided to get a thermometer so hopefully I can make this a success hehe. Thanks again for sharing and replying! Will keep you posted 🙂
Hi Laura! I really believe having a thermometer in the kitchen is very important (and a scale!). 🙂 Good luck and please keep me posted. xo
The cake looks like heaven. Can’t wait to tryit.
Thank you Theresa! Hope you enjoy! 🙂
Yet again another wonderful recipe that you have shared with us. Thank you once again. And the extra details are appreciated.
And yes, you really should rest your body more than 4-5 hours a day. I’m sure people will understand if you spent a few hours less keeping in touch with them. You must above all take care of yourself first.
Hi Jerry! Thank you! I know, I need more discipline. I get too excited when it comes to working on a to do list… and I have this urge to cross out the check out list. =P I’ll do better job! Thank you for caring about me. 🙂
Your welcome, Nami. I do look forward to see your videos of your wonderful recipes, so please don’t overwork yourself.
This cake looks so beautiful!! Do you think one batch of cake will be enough batter for two 6 inch cake pans?? Thank you!
Hi Jackie,
This recipe is for one 8 inches (20 cm) cake, but feel free to adjust the amount for two 6 inch cake pans!🙂
Hi!
My brother just linked me this recipe, saying that “If you want to bake so badly, then do this!” His birthday’s next week, but unfortunately I can’t get any of these fruits at winter where I live. Are there any alternatives maybe? I really would love to surprise him.
Cheers
Hi Lea! If no fresh fruits, you can try with canned peach, maybe. 🙂 Happy Birthday to your brother!
Wow. Looks absolutely fantastic! I was waiting for this recipe for years and it finally came! I’m looking forward to baking this one! 🙂 Thanks for the recipe!
Hi Megumi! Thanks so much for waiting! I hope you enjoy this recipe!
Thanks! I was wondering if you were considering about making a video for this recipe as well… (?)
Hi Megumi! Yes, I plan to shoot a video one day as we couldn’t fit in our shooting schedule this year. I know it’ll be very helpful to see it visually. 🙂
Thanks! I’m looking forward to it! 🙂 🙂
Hello Nami,
Another amazing recipe I tried from you! My family love every dish that i cook with your recipes! Thank you so much! Just a quick question for this recipe, what’s the purpose behind warming the eggs a little on a double bath before putting it to the mixer? Thanks for explaining!
Hi Natalie! Thank you so much for your kind feedback. I’m glad to hear your family enjoyed my recipes too. 🙂 We refer to this method as Tomodate ( “Genoise method in Japan (https://en.wikipedia.org/wiki/Genoise). It creates a moist and finer texture. Maybe you can translate this article to see the difference? https://www.cotta.jp/special/article/?p=541
This is our favorite cake! so happy that You posted this recipe. But, my oh my, look so hard lol. Iam not a baker, but will try someday!
Thanks Nami. Aloha!
Hi Yulie! I hope you enjoy making this cake! I am not a baker (or I wouldn’t call myself a baker), so that’s why I tried to write a detailed explanation for each step. I know how hard it is to have one sentence of explanation when a beginner baker try to bake. 🙂 So don’t let many steps intimidate you, it’s actually for the beginners. 🙂
The cake looks beautiful! It looks just like it came from a japanese bakery. I wanted to make this recipe but is it okay to use 2 regular 9inch cake pan. That’s all I have and I wouldn’t want to overflow the batter by putting it all in one pan. Sorry if it’s a silly question but I’m not much of a baker.
Hi Quynh-Anh! I haven’t tried with 2 9-inch cake pan, but sure. That way the sponge cake is flatter and you use 2 cakes to stuck up one on the other. I hope you enjoy this recipe! 🙂
Hello,I was wondering if it is ok to use store brought whipped cream to use as the icing.I tried to make this cake last month but my icing didn’t get to the thickness I needed it to get when I tried to make it and I and to replace it with chocolate icing..Also can I refrigerated this cake after I finish putting the icing on it?
Hi Ree! Sorry for my late response. Store-bought whipped cream like Cool Whipped? I have never used it, but I don’t think it tastes good… Are you using your hand to whip? If you’re not sure how much you have to whip, I highly recommend using your hand to whip the cream. Beginning can be done with a mixer (like I did), but when you want to control how hard/soft your whip cream is, it’s much easier to control when you hand whip. You won’t over whip or under whip. I’m a beginner too, so that’s how I felt.
And yes, you have to keep it in the fridge after you make the cake. 🙂
I used a hand whisk to mix it and it didn’t come out thick enough but thanks for the tips.
Love your website and recipies Nami! Thank you for sharing your wonderful recipies.
Thank you Angela! 🙂
I’m having trouble to get my eggs that pale yellow with the ribbon. My electric whisk is smaller and thinner than yours– do you think that’s why? Or is it the temperature of the eggs on top of the Bain Marie?
By the way, thank you for this recipe– I’m planning on making it for my mother’s birthday!
Hi Nik! No, a lot of people use hand held too, so it should not be the reason. Do you use a thermometer? So you’re saying you didn’t get to stage 6.
I really want this to work for your mom’s birthday!
Since the thermometer was optional I didn’t buy it but maybe it might be a good investment.
And thank you Nami! I can’t wait to try other recipes from you. I was inspired to go back to baking because of this Japanese tea and dessert room in NY: Cha-an. You should try it if you’re in the state:)
Hi Nik! I heard about Cha-an from my readers a few times, so I really wanted to go when I was in NYC 2 years ago… couldn’t make it but it’s on my list of places to visit next time! And thermometer is pretty helpful (although you don’t use it all the time), and I use it for my recipes. 🙂
Hi again Nami. I bought a thermometer but I still get to stage 6. Is it necessary to make sure the eggs are room temperature? That’s the only thing I can think of that could be a problem.
Hi Nik! Thanks for the feedback again! I do believe room temp egg is important. Cold eggs and room temp eggs behave differently. I wish I am there to see how you make it – it’s hard to know what is going on without being there… is there any unclear part in my recipe when you were making?
Your recipe is very clear! I just tend to be a bit loose when following directions sometimes. Okay, I’ll definitely let the eggs though reach room temp before whisking them.
I tried it again by making sure the eggs were room temp. This attempt was much better as the cake wasn’t as dense and it was a bit more spongey. Now the only thing I can think of is that I whisked the eggs with a fork instead of a whisk. Everything else in the recipe I followed exactly.
Hi Nik! Sorry for my late response. I’m glad my recipe is clear. 🙂
Glad to hear this time was a bit better. Whisk gives really nice air and I highly recommend. My favorite is OXO whisk. I tried different brands and this is by far the BEST.
http://amzn.to/26VGLdt (11 inch)
http://amzn.to/26VGLKq (9 inch)
Nami- I made your strawberry shortcake this morning for my mother for Mother’s Day. I was so nervous, but oh my goodness it turned out amazing! My decorating skills need some work, but your instructions were so detailed that everything turned out just like in your pictures! Thank you so much for all the hard work you put into this recipe, I will be making it every Mother’s Day from now on, at my mom’s request!
Thank you thank you!
Hi Alexa! Yay!!!! I’m so so happy to hear your cake came out well! AWESOME! I don’t decorate cakes so I am not so good at it too. But it’s okay, as long as it tastes good! 🙂 My family appreciate it and I’m sure yours did too!
I’m glad to hear my instructions were helpful. We couldn’t do both video AND step-by-step pictures for this recipe and decided to go with taking more step-by-step pictures so readers can follow as they cook. Thank you for your kind feedback! 🙂
Hi Nami, if I would like to make chocolate Genoise instead, what would be the recommended of cocoa powder I should add? TY!
Hi Sho! So sorry for my late response. Add the cocoa powder to flour and sift together – remember to omit some of the four to replace cocoa powder. 🙂
Hi Nami, I’m just wondering how much cocoa powder i should add in would be recommended? 😉
Hi Florence,
We have not tried this recipe with cocoa powder before, and we can not give you much advice… not sure how the outcome will be.
But, It’s up to how much chocolate flavor you would like to taste in your cake.
It can be a 1 to 2 ratio (40 g cocoa powder: 80 g cake flour) to 1 to 6 ratio (20 g cocoa powder: 100 g flour).
Please let us know how it goes!
I just assembled the cake today using the sponge cake I baked ytd. It was good but the sponge was a little dry.. may I know why? Thanks for detailed recipe! ????
Hi Velynn! I need to know entire process and ingredients to find out exactly why it was dry, but while I was testing, I realized few things.
Do not decrease the amount of sugar unless you’re comfortable baking the cake already. It’s important. 🙂
Do not use fat free milk etc. Use WHOLE milk to get good sponge.
Make sure batter is not hot. And heat up the bowl as I indicated at Step 3.
At step 6, make sure you mix enough to get ribbon stage. Under mixing is not good but you can’t over mix either.
At Step 11, incorporate more air into it without breaking air pockets in the batter, but if you over mix, it’s not good.
Make sure to add syrup.
While testing, I had a dry sponge once. That time I had only reduced fat milk and I’m pretty sure that was the reason for me. Also, I really think step 6 is very important for good sponge cake.
I don’t have the dry issue with this recipe, but I am happy to help out if you could provide more information and maybe picture.
Hi Nami, Thanks for the quick reply! 😀
From the points that you have mentioned, i reduce the sugar for the spongecake and also in Step 11, i may have over mix the batter as i started noticing the batter getting lower and lower. :C
Or leaving the spongecake in the fridge one day before made it dry.
Hi Velynn! Okay, leaving the sponge for one day is okay as long as it is wrapped in plastic wrap etc to avoid from drying. Small things make differences when it comes to baking, so experiment helps. I make the recipe many times before sharing on the blog and it’s interesting to see how the recipe improve or go wrong by doing different things when it comes to baking… 🙂
Hi! I made this cake according to your recipe this morning, and it tastes great! Unfortunately, even though I followed the steps exactly, my cake come out dry. Do you have any suggestions? I baked it for 25 minutes and covered with a damp towel immediately.
Hi Mariann! It’s kind of difficult to know why, because ingredients and techniques you used affect the result and without me baking with you, I really don’t know what could be the reason. I listed some points here so please check:
Do not decrease the amount of sugar unless you’re comfortable baking the cake already. It’s important. 🙂
Do not use fat free milk etc. Use WHOLE milk to get good sponge.
Make sure batter is not hot. And heat up the bowl as I indicated at Step 3.
At step 6, make sure you mix enough to get ribbon stage. Under mixing is not good but you can’t over mix either.
At Step 11, incorporate more air into it without breaking air pockets in the batter, but if you over mix, it’s not good.
Make sure to add syrup.
While testing, I had a dry sponge once. That time I had only reduced fat milk and I’m pretty sure that was the reason for me. Also, I really think step 6 is very important for good sponge cake.
I don’t have the dry issue with this recipe, but I am happy to help out if you could provide more information and maybe picture.
I made the cake exactly as specified in your recipe… and actually the texture of the cake is MUCH better today than it was yesterday!! Is this typical?
Hi Mariann! It’s commonly known that 2nd day tastes better because the flavors are nicely soaked in. 🙂 I mentioned in the post that you can make ahead of time too. 🙂
Dear Namiko
Thank you so much for the detailed guide and recipe. I am new to baking, and I must say with your guide, my cake turn out very well this time. Today is my second time baking a sponge cake. My first attempt baking a sponge cake failed (I used another recipe), so I did not proceed to frost it. With this sponge cake, I frost it as per your recipe. The result turns out well. My hubby and son loves this cake. Thanks, once again. Thumbs up.
Hi Denus! I’m so happy to hear your cake came out well! I wish I could make a video for this recipe, but it was very difficult to film and take step by step pictures at the same time, so I opted for just focusing on step by step pictures. Thank you for your kind feedback. I’m happy your husband and son loved this recipe! Thank you for letting me know! 🙂
I ended up having to make two cakes because it doesn’t rise at all. I followed the recipe to the T but it still doesn’t work, how is it supposed to work?
Hi Roux! Small things (ingredients, technique, skill) matter. Many of my readers have tried this recipe already and succeeded, so I hope you give it a try again! Make sure to incorporate more air into the batter and keep it fluffy (step 3-11).
Hey Nami! I’m so glad you shared this recipe and all the detailed explanations. I tried this spongecake recipe today and it was a success, though not as perfect like yours..the cake wasn’t flat, it didn’t deflate (yay!)..however there’s one problem: the surface of the cake was not quite smooth, it felt like it had granules and it was a bit sticky. I wonder if it was because the sugar didn’t dissolve well into the eggs? Do you know what could be wrong? Thanks!
Hi Asl! Thank you so much for trying this recipe! I’m happy to hear you liked it. From your description, it looks like the sugar crystallized?
I’m not exactly sure if the sugar crystallized, but the surface felt as if there were sugar granules. When I made the cake, the eggs were at room temp and I whisked the sugar and eggs well. So I don’t know what’s the problem.
Hi Asl! I did a little bit research and some people shared 2 reasons.
1) Oven temp is too low. If you have a thermometer, check inside the oven temp, and don’t trust what oven says. It’s good to know the REAL temp vs. oven temp.
2) You didn’t cool down COMPLETELY. Steam from the cake end up sticky surface. Let it on the counter until completely cool down.
Hope this helps!
Hmm I’m guessing it’s probably because of reason 2…I let the cake cool inside the cake pan upside down on a wire rack. I didn’t take the cake out of the pan when it was done baking…Anyways thank you so much for giving me these tips! I’ll do more research 😀
Oh! You must take it out to cool down. Let me know if the problem still stays after you try. Should work!! 🙂
I love this recipe! I made it twice and both turned out so perfect. Thank you for the detailed steps and instructions! It was more steps than the usual cakes I make but so much more worth the effort!
Hi Rayne! I’m so glad to hear yours came out perfectly! Thank you so much for leaving your kind feedback here. 🙂
For the cake flour, you showed how to substitute it, but is it the same cake flour from a grocery store or different? I am pretty excited to try this for my boyfriend birthday.
Hi Genesis! It’s very common method. Depends on cake flour brand, there are some other stuff, but a lot of bakers make their own cake flour this way. 🙂 Hope your boyfriend will like this cake, and happy birthday to him. 🙂
okay, thank you! Also another question, I am using a 9 inc pan instead of an 8 inc pan, do you believe there be different taste or look to it?
Hi Genesis! The sponge cake will be flatter because it’s a bigger cake pan. I recommend making double batch and bake the cake twice (or use 2 pans). If you see in my step by step pic, 8 inch give the thickness of the cake just enough to cut in half widthwise. If it’s 9 inch, the cake layer will be thinner. Hope this makes sense.
Hi Nami, thank you for your recipe! May I use brown sugar instead of granulated sugar for the sponge cake? Thanks! (:
Hi Chelsea! Sorry, but you can’t. Please use granulated sugar for this recipe – it’s very important. 🙂
Alright sure, thanks Nami! (:
I made this for my bible study and it was a huge hit! I made the cake a day ahead and it baked up perfectly 🙂 Thank you for such detailed instructions! I’ve never made a homemade cake before (if fact, I don’t really like cake all that much) so I was quite nervous but it tasted soooo good!
The only thing that went wrong was due to my serious lack of cake cutting skills. I couldn’t get an even horiztonal cut so my layers weren’t even… whoops
Hi Carolyn! I am with you, I’m not very expert either as I don’t have much patience… I found this trick to cut nice even layer.
http://www.marthastewart.com/964899/htb106-how-level-and-split-cake-layer-web-version-hi-resmov
So happy to hear your cake came out well for the first time! I’m glad my recipe wasn’t too long for you. 😀 I know I wrote too much. Hehe.
Great recipe! Thanks!
Thank you Kimberley! 🙂
Hi Namiko, am I supposed to use all the syrup? Thank you, Dana
Hi Dana! I use all of it. 😀
Thank you! One more question….Can I double the recipe?
Yes, you can. 🙂 Are you making a huge cake or two? 😀
Is there any tips to add flour into the egg mixture in ribbon stage? I got it deflated every time I tried and the egg mixture is no longer puffy.
Hi Rita! It’s really hard to judge how it is deflated based on the mixture… I need to know more details about it. If you think it’s the way the flour is added, how about sifting the flour into the batter? Maybe it helps?
Hi thank you for this very detailed recipe & instructions. I have encountered 2 problems during my attempt to bake this today – cake so fluffy that it fell into bits when I cut it spreads the whip cream. Then the whip cream couldn’t hold its shape & turn a little runny. Can you please advise where I have gone wrong? Otherwise, the taste of the Genoise cake was perfect! Thank you.
Hi Florence! Thank you for trying my recipe! The whipped cream part is easy answer – yours weren’t whipped enough, and it was still too runny. If you whipped a little longer, they will hold up a little more. So that’s an easy fix. The first part “the cake is so fluffy and it fell into bits”. It’s moist sponge, but I’m not sure it would fell into “bits”. That sounds like it’s dry and crumbly. Is that how you meant to describe? If so, I think the liquid content in the cake batter is not enough or the oven temperature was too high for your oven. Hope this helps!
Hi!
I’m planning to make this cake for my boyfriend’s birthday but I only have a 10 inch cake pan at home. Is it possible to use that or do I have to adjust the recipe?
Hi Pristina! Happy Birthday to your BF! Hmm… if you use 10 inch cake pan, the cake will be flatter than mine. If you don’t mind the look that’s okay, but at step 19, you can tell how “thin” it is already with 8 inch cake pan. So.. if you use 10 inch, I’d increase the recipe. Now, I really do not like calculating the ingredients, so I’d always double the recipe, and make a smaller cake with the leftover batter, than trying to create 10 inch cake recipe… Good luck, and I hope he’ll have a fantastic birthday!
I just baked this cake. It was delicious!!!
Thank you so much for your kind feedback! 🙂
Thank you for this very detailed recipe. I tried making the sponge cake today, but I don’t think it rose well. I used an 8-inch pan and got a sponge cake that was only an inch thick. Could you please tell me how tall your sponge cake was?
Hi Ella! That’s a little flat compared to mine (even though we both use 8″ cake pan). Maybe mine was 1.5 inch (including the round top part). Do you see my cake in “Cake Assembly” step 1? My two fingers plus a bit extra is about 1.25 inches. That’s about right. Was yours similar? .25 for the round part.
Hi. My sponge cake turned out flat, around 1 inch thick only. The only step that I failed to do was to add back the butter mixture thru the spatula. Cpuld that have deflated the air so much? Thanks!
Hi Peachie! I assume you used the same size cake pan as mine… yeah 1 inch is very flat. You mean Step 11. That little trick helps improve, but will not cause the cake to decrease half inch. My cake is about 1.5 inch, INCLUDING the top round part. If your “1 inch” is flat part only, then we’re talking about the same height.
Hi !You showed me the most detailed and
excellent directions that I have ever seen before. Many thanks to you.
Hi Alex! Thank you for your kind words. Hope you enjoy(ed) this recipe. 🙂
hello, thank you for the recipe. it seems to be very hard to find one for (specifically) the cake part that is not more like a biscuit. I would like to ask if you recommend making syrup on the stove in a double boiler, if a person has no microwave?
thank you!
Hi Kat! You can simply make syrup in a small saucepan, instead of using a microwave. 🙂 Hope you enjoy this recipe!
I have a 7″ and 9″ cake pan. Would it be ok to use either or do you suggest I buy an 8″?? Any tips would be appreciated! Thanks for posting this cake! It is very similar to the Chinese bakery cakes 🙂
Hi Amanda! I’d go with 7″ cake pan as thicker cake is better than too thin when you cut in half. 🙂 Hope you enjoy this recipe! 🙂
Hi Nami, thank you for this recipe. I love your detailed way of describing the method but albeit my cake came out looking like a two layer cake, the top part is fluffy but the bottom is almost hard solid, it seems like there is some heavy substance in the batter that sinked in during the baking, what went wrong?
Hi Lennie! Thanks for trying this recipe! It’s hard to say what went wrong without seeing the process, but maybe you didn’t mix thoroughly enough at some point and each ingredient didn’t incorporated well (so it went to the bottom). Also it’s possible that your oven is too high and the outside cake is done while inside was still not cooked through. The volume should go up when you mix. However, be careful with overmixing too…. Hope this helps!
OMG!! I really love it!!
Thank you Camilia! 🙂
I made this cake once and it turned out so perfectly delicious.Thx for such a useful recipe.Gonna be making this again in future.
Hi Kimmyss! Thank you for your kind feedback! I’m so glad your cake came out well and you liked this recipe! Thanks for trying this recipe!
Too cool the cake without it falling, place 4 coffee cups in a circle and place the pan with the cake upside down so the 4 cups support the cake pan. Gravity will keep the cake from falling and it will be nice and airy.
Hi Mike! Thank you for sharing your tip!
Amazing cake, Nami!
Also I realise how much work it is to do the step by step photos but I have to say it makes reading your recipes extra enjoyable!
Thank you for your kind words Kitty! All the photos made my recipe super long… but I was hoping they would be helpful. 🙂
Thank you SO much for this extremely detailed recipe! I grew up in Japan and I have always wanted to recreate what for many years was my birthday cake. Not only have I never baked this type of cake before, I’ve never baked before at all. However, thanks to your detailed instructions (and thank you so much for your little glossary at the end, too, I had no idea what many of those terms were before now) my cake turned out better than I could ever have hoped. I think the tradition of this cake for bithdays will be coming back in my family.
Hi Madeline! Thank you for your kind feedback. I’m truly happy to hear you tried this recipe and your cake came out well! Glad to hear my recipe was helpful for you to bake this cake. Thank you for trying this recipe!
Hello! I made this recipe today and I have 1 question.
“Grease one side of the parchment paper […] Then fit the parchment paper in the cake pan.”
But which side of the parchment paper should face upwards? The greased side? c:
Hi Karolina! I hope your cake came out well! The greased side will be touching the cake batter. 🙂
Thank you so much Nami for your great recipes ! I’m from France, I’m learning Japanese, and I made this strawberry cake for a party with my Japanese teacher and classmates. For me, the difficult point of the recipe was to slice the cake in half, a real desaster because I think I took a too large cakepan and the cake wasn’t high enough. Happily the desaster disappeared under the coat of cream, It was nice and delicious, and my friends and teacher told me it was exactly the taste of the Japanese cake. Thank you so much again,
Marie
Hi Marie! I think, next time if you want to make this cake again, you can make 2 sponge cakes. Then you don’t need to cut in half. If your cake pan is larger than mine, the height must be thinner too. So it should be okay if you have 2 sponge cakes. 🙂 Hope this helps!
Thanks for posting this recipe!! If I were to use a 7 inch pan would I need to adjust the baking temp or duration? Please advise! Thank you!
Hi Amanda! Your cake will be slightly taller but should be okay! Baking temp is same, but please look out for the baking time. Each oven is different too, so it’s best to set your timer earlier and keep an eye on it. 🙂
How about i want make it more bigger cake? So i just double it all the ingredients?
Hi Evelyn! I’d suggest to double/triple it based on your cake size, because it’s harder to calculate how many % you need more…
When leaving it overnight for the flavors to develop, would it be more ideal to frost and decorate right before serving or just complete everything first?
I’m currently assuming that the change is in the syrup absorbing into the cake, and nothing to do with the cream.
Hi Cassie! I agree, in terms of flavors. The cream firms up (and hold the shape) more after keeping in the fridge, compared to when you make the cream and serve for example. I guess you can do either way, but make sure the spongecake will not be dry. The cream helps keeping the moist. As long as you can control the moisture in the sponge, you can make the rest next day. 🙂
Nami San,
What brand of cake flour are you using? I’ve read that unbleached cake flour can affect the cake rise in fluffier cakes. I wonder if you are using a bleached or unbleached cake flour and maybe you can share how this has affected your cakes.
Thanks!
Hi Craig! I use King Arthur brand’s unbleached cake flour (blue box). I’ve only used this one so I can’t tell the difference… sorry….
Due to time contrainsts I am planning to make the sponge cake layers a couple of days in advance and was wondering if I can freeze it? Will then put the cake together with the cream and decorations the day before the celebration.
Hi Jules! I’m sorry for my late response. I haven’t frozen this sponge cake before, but I know that you can freeze it for up to a month. One day before you use, defrost in the refrigerator. I recommend putting into a largest ziploc bag to make sure it’s airtight and keep the moisture in the spongecake. 🙂
Hi Nami!
Just tried this recipe yesterday, unfortunately my sponge fell flat (I’m not a good baker :/)
I was wondering if I could ask you about it to help troubleshoot 🙂
My whipped eggs had more bubbles than your picture, I wasn’t sure if I had under- or over-beaten them
Once I put the flour in and started folding, the mixture started sinking, so it was unbeaten, then 3 times, then maybe down to 2 times.
Do you think you know where I went wrong?
Thank you!
Hi Ming! I apologize for my late response and wish that I could write you back sooner. It’s hard to say what exactly went wrong (plus I’m not a specialist when it comes to baking). It could be under-beaten, if the batter deflate so fast when adding in flour. So your mixture didn’t look like mine at step 11? Kinda like airy and fluffy? Did you properly heat the egg mixture at step 4? That step (step 3-4) is important. It seems like it didn’t have enough air in the sponge. Hope this helps a bit…
hello nami-san, ^^
i really really love to read your recipe and the progress so detaillll…. thanks before, for sharing the recipe and put the pic on every step… ^0^ you really take so much time and effort to explain the step.
i’m a newbie, in baking cake, and sometime its hard for me to practice it. but now i’ll try on your recipe… yeay… ^^ i hope i’ll success to bake it.. hahahah
but this a little question, because its hard to find cake Flour in my town, lolz
may i ask you, 1cup AP flour is how much in g?
or may u converse it into gram for me?
“1 cup AP flour – 2 Tbsp. AP flour + 2 Tbsp. cornstarch = 1 cup cake flour”
thank you so much Nami-san ^^
Cant wait for your new recipes… ^^
Ganbatte Kudasai
“sorry my english so bad, hope u can understand what i say lolz”
Hi Liexiah! A properly measured cup of all purpose flour weighs 4.25 oz (120 g). 🙂
Thank you for your kind feedback. I’m so happy you enjoy my recipes! Arigato for your support. xoxo
On the part that says break the egg yolks and white. And add sugar, do we still use the white? The picture looks like the white is also with the egg with you combine the sugar? I’m just confused.
Hi Michaela! Sorry for the confusion. I meant that we need to beat the eggs (both yolks and whites).
Made this cake tonight and it’s so good, tastes just like the one my favorite Asian bakery makes! I’m not a skilled baker but this was really easy to follow and is definitely one of the best things I’ve ever cooked.
Hi Luna! Aww your kind feedback made me happy! Thank you for trying this recipe. I’m glad you didn’t get intimidated by my long step by step recipe…. LOL. Thank you for writing nice compliment. 🙂
Hi, can I ask why is there a dense rubbery bottom in the cake? Thank you!
Hi Yuan! From your description, it sounds like the bottom part is not cooked through. Possibly 1) the batter wasn’t combined well before pouring into the cake pan, hence the heavy contents went to the bottom, 2) maybe your oven temperature is not optimal (it’s good to check/know your oven as each oven has hot spots and sometimes temperature is not accurate as the display says), 3) Maybe you didn’t measure the ingredients correctly (did you use a measuring cup or scale? if cup, I highly recommend the method I provided here (https://www.justonecookbook.com/faqs/#Measurements).
Can I split the batter into two shallow cake pans and then just stack them?
I probably should also bake them for a shorter time
Hi Ai! I apologize for my late response. Yes you can. Please reduce the bake time so it won’t be dry. 🙂
Hi Namiko, I followed your recipe and my cake rised up very nicely! Thanks for your recipe 🙂
Hi Rina! AWESOME! I’m so happy to hear that. Thank you for your kind feedback. 🙂
Hi! I was wondering if I could stack this cake? Or is the sponge too soft . Am thinking of doubling recipe and cooking in three 6 inch tins , so I’ll have 3 layers.
Hi Julia! I apologize for my super late response. Yes, you can do that. The sponge won’t be too soft, so don’t worry!
Hi Nami, i followed ur recipe diligently but my cake came out with a dense bottom layer & upper layer has lots of air pockets. What happened? Can you kindly advise? Thkank you.
Hi Eileen! First of all, thank you so much for trying this recipe. Sorry that your cake didn’t come out well. Having two layers is often due to lack of mixing the batter thoroughly. It happened to me sometimes too, as I worry about over-mixing. But It’s important to mix thoroughly so heavy parts don’t stay bottom. 🙂
Love the look of this shortcake.
Thanks so much! 🙂
Hi Nami, if I want to make 2 of this cake but in 6 inches, do I need to make any adjustment in the amount of ingredients used?
Hi Rina! I do not like adjusting the recipe (ingredients) that already works, so if I were you, I would just make this cake, but use 6 inch cake pan. Each layer will be thicker, but it will look nice – slightly taller cake.
Hi, thanks for the detailed recipe and lovely pictures! I just made this cake today, it tasted great but the sponge cake was slightly hard and was not a soft sponge. The height of the cake seems to be the same as your pictures. Any tips on trouble shooting a hard sponge cake? I followed as closely as I could and used 160c convection oven. Would it help to use 180c without the convection for baking? Thank you!
Hi Rosanna! Thank you so much for your kind feedback. The reason of hard sponge cake usually due to over-mixing the batter. You just need to mix just enough to combine everything. I have convection oven, but for the blog I always use regular baking (no fan), so everyone is on the same page. If it wasn’t the oven mixing, then maybe possible that the oven temperature is high? Sometimes the temperature does not display the right temperature inside the oven, so it’s good to test the real temperature by placing the thermometer inside and see if there is any hot spot. 🙂
Fantastic recipe! Just made it for a friend’s birthday and it was reaaally good. We all loved it.
Hi En En! I’m so happy to hear you enjoyed this recipe! Thank you so much for your kind words and feedback. xoxo
Thanks Nami! I made this recipe multiple times and my family says that it tastes as good as those sold in the store, thank you for sharing the recipe (: I didn’t have a thermometer to check the temperature of the egg mixture so I just put my finger in and when I couldn’t feel the difference in temperature, I knew it was done (primitive but it worked hehe)
By the way, do you have any tips on how I can change the sponge cake into different flavours (e.g. chocolate, matcha, earl grey, etc.)?
Hi En En! I’m so happy to hear you enjoy this recipe and made multiple times! Thank you!
Yes, replace some of cake flour with cocoa powder (good quality please), matcha powder, ground earl grey (+ maybe make a strong tea and add to replace milk or swap with half milk?). I’ve never done it, but you have to test and see how much is good enough… like it is for chocolate, use 160 g cake flour and 40 g cocoa powder, etc. Hope this helps!
Hi Nami, thanks so much for your detailed instructions. I’ve always feared baking Japanese strawberry cake, but I’m going to pull through with your help! Just a couple of questions. 1) Wanted to ask why is it necessary to remove the parchment paper immediately after baking? 2) Is it okay to use dark rum for the liquor? 3) After frosting the cake, can I leave it in the refrigerator before serving or should I leave it out at room temp? I’m living in a very warm and humid environment. Thanks for your help! 🙂
Hi Sara! I hope you give this recipe a try! Practice makes it perfect, and I’m one of those who need practice and make many times to learn… 🙂
1) I know there are both ways – some people peel after cooled down and some pull while it’s hot. Both reasons seem like “it’s easier to peel”. I tend to believe in peeling while it’s hot. While cooling down, the paper seems like getting stuck more with moisture. That’s what I feel.
2) Sure!
3) Please put it inside the fridge because we use fresh cream. NO OUTSIDE period. Maybe 5 mins before serving, so the sponge is fluffier at semi-room temp. 🙂 .
Good luck!!
Do you have a measurement for 12” inch of this cake recipe please?
Hi Yenn! I’m sorry I don’t…. I recommend doubling the recipe and use the leftover batter to make a second cake.
Hello, my baking tin is 24cm. Should i double the recipe or just half? Would be attempting to make the cake for my son’s birthday thursdathursday ????
Thankyou for your advice.
Hi Kris! I apologize for my late response (due to my traveling). You can do 1.5 or 2 x for your 24 cm tin. If you double it, the layer of the sponge cake will be thicker. 🙂
If I may suggest ☺️ Use « Kirsch » for the liquor ! It’s so delicious ???? As a French girl, I’m using Grand Marnier, Cointreau or Rhum Brun in crêpes ! But Kirsch is better for the whipping cream in fruits cake ☺️
HI Angie! Thank you so much for suggesting Kirsch! I’ve never tried it. I’ll definitely look into it! (but I first need to translate to Japanese and then learn how to pronounce it. hahaha).
So excited for this recipe! I messed up the first one pretty badly. Again using my KitchenAid Countertop Convection oven 1st attempts are always hit and miss. I went for the suggested 325 degrees F and browned on top too quickly because of the size of the oven. I was deceived; toothpick came out clean, but it went plopped and splooge when I flipped it onto the wire rack…. >.< Anyways, 2nd attempt at the cake, it’s now cooling nicely on the wire rack. I plan on assembling tomorrow, but if it’s anything as magical like the cheesecake I’m sure this will be great too. Been craving a good strawberry shortcake that isn’t made with cool whip as the frosting… Thank you so much again for sharing this awesome recipe! (FYI I made an adjustment of lowering the temp to 250 degrees F and baking for 50-60 minutes from what I can tell. Still looks moist but not as browned)
Hi Jay! Hope you enjoy(ed) this recipe! 🙂
I made this recipe for Christmas and it turned out amazing. It was my first time making a double layer cake/ sponge cake from scratch and the instructions made it super simple to follow. Instead of regular whipping cream I used Greek yogurt infused whipped cream!
Hi Lydia! I am so happy to hear your cake came out well and thanks so much for your feedback. And your greek yogurt infused whipped cream sounds light and delicious! Thanks for trying this recipe!
Hi, i tried making strawberry short cake, i failed my cake, it turn out looking like pancake and it didnt rise. Are you able to to tell what went wrong? 🙁
I love the whipped cream! is great! The best i ever had.
Hi Stephanie! Step 4 to 11 is very crucial for this recipe. If something went wrong, I assume maybe one of these steps didn’t get done correctly. Was the temperature of the batter optimal? Did you have the right ribbon stage? If your batter didn’t have the same volume as mine, it didn’t have enough air in the batter and that could end up with flat sponge cake. Sorry, I wish I could help more, but it’s hard to tell without seeing your steps. 🙁
Thank you for the detailed instruction! I baked the cake but it was a little dry and not as spongy. I live in Reno NV elevation 5000. Do you have any adjustment for high elevation baking or any suggestions?
Hi Keiko! Thank you for trying this recipe and I’m sorry it didn’t come out well. I’m not familiar with high elevation baking at all, and all I know is that you will need some adjustment in the recipes… 🙁 So sorry I wish I can give you proper advice or suggestion.
I’m very excited to try this recipe, thank you for putting it together! Does it really take 2 hours to prep?
Hi Riley! More or less… if you’re a baker, you probably won’t take as much time as I did? 😀
You mentioned under note, “Liquor of your choice” that “You can skip the alcohol, but do not skip the syrup.” I am not exactly sure what that means. Could you please explain this to me in detail. I definitely want to skip the alcohol because I want to make this for my baby daughter’s birthday. However, I am not understanding what type of syrup I need to use and how much. Thank you so much for your help.
Hi Lydia! I fixed that sentence to avoid the confusion. What I meant is basically you can skip alcohol in the syrup. I didn’t want the syrup to be omitted just to skip alcohol, which is why I wrote “do not skip the syrup”. You can skip liquor in the recipe. 🙂 Happy Birthday to your baby daughter!
I wanted to make my husband a birthday cake and I was missing the デパ地下ケーキ we used to buy when we were living in Japan so your recipe solved both my issues perfectly! Your detailed explanations and notes helped even a complete amateur baker like me make a perfect strawberry shortcake. Thank you so much for your hard work!
Hi Karyn! Wow, thank you so much for your kind feedback. I’m so happy that you gave my recipe a try and the cake came out well! Happy Birthday to your husband and thank you again for trying this recipe!
Hello Nami,
Once in a while I’d like to make the easy sushi rice and wondered if you preferrer the mizukan sushi vinegar or Tamanoi? Is one tastier or healthier?
Thank you again
Hi Florence! I do use the sushi vinegar (marukan or mizukan) for quick sushi rice making, too. 🙂 It’s nice to be able to make sushi vinegar on our own. Even though it doesn’t take too long to make sushi vinegar, it’s just nice to make sushi rice instantly. Tamanoi Sushinoko Rice has more unwanted things in ingredients I think… but if you don’t eat it too often, I think that’s okay. No judging. 🙂
hello i’m concerned about the the ingredient listing “4 large eggs (1 egg no shell = 47-50 g)”. I added the 3 eggs with the shell and they began to get crushed and they added a sharp crunchy texture to my cake. I’m scared this maybe be a choking hazard for my 3 year old diabetic. Is there no risk with the egg shell?
Hi Karen! Did you mean you included the eggs WITH SHELL? I did not write or show in any step by step pictures to include egg shell… 47-50g is the weight for one egg (excluding shell’s weight – meaning that I weigh after cracking the egg since the shell weight varies). I do not recommend feeding your 3-year-old this cake. I’m sorry if my recipe was not clear to you.
Fantastic recipe!! Made it for a birthday celebration and now this is my go-to recipe for strawberry shortcakes. The detailed steps really helped as a checklist for me. Only thing I would change is to half the amount of sugar used in the simple syrup that is spread over the sponge. Thanks Nami!
Hi Liam! Thank you so much for your kind feedback, and I’m so glad your cake came out well. Thanks for trying this recipe! 🙂
I’m going to try to make the cake for Christmas. I have one question. What type of thermometer do you use? Is it a meat or candy type?
Arigato!
Hi Gina! I use this instant-read thermometer. It can be used both and I use it for many recipes. I love that it reads very fast. I have two and use them all the time for a long time! 🙂
Domo arigato for the information and link regarding the instant-read thermometers!
Hi Gina! Anytime! Good luck with the recipe! 🙂
Thank you so much for the detailed instructions! Everytime I see a recipe that calls for me to “fold” the batter, I get nervous (I’m not a baker). But your abundance of photos boosts my confidence enough to want to give this recipe a try for Christmas! I hope you get around to making the video soon, as more visuals are always helps to a novice baker like me!
Hi Christina! I used to get scared of making meringue (beating egg whites). But after making several mistakes and see what was wrong, I know what to avoid. So making mistakes is actually not a bad thing. If I didn’t over-beat egg whites, I wouldn’t know what it looked like. So… make mistakes in the early stages of baking. 🙂 I still make mistakes too! When folding, you want to make sure you thoroughly mix (don’t be afraid, because sometimes if you don’t mix well, it’s not a good thing). Use your left hand to rotate the bowl counter-clockwise while you use your right hand to scoop up from the bottom of the bowl and fold into the batter in a circurate motion. Try watching a youtube video. The visual guide helps! Good luck! I’ll try to make a video one day… 🙂
Thank you so much for posting this, can’t wait to try it!
I’ve worked as a baking manager for about 4 years and make sponge cakes a lot, but I’ve always wanted to know if there is a difference between traditional American sponge and Japanese sponge. My fiance is Korean so his family also loves this kind of cake. I make it all the time for them but I am always looking to improve and find an even better recipe, can’t wait to see how this one compares!
Hi Bryce! I hope you enjoy this recipe and let me know how it goes! 🙂
I finally got around to making this cake and it was amazing! Like I said before, I’ve made many sponge cakes but have yet to come across a recipe that I was happy with, until now! The technique for making this cake is quite unique, but it is absolutely worth it. It was soft, moist, and spongy. Perfect, thank you so much for sharing!
Hi Bryce! Thank you so much for trying this recipe! Aww, I’m really happy to hear that. Thank you so much for your kind feedback. 🙂
Hi Namiko,
I really enjoy baking from JOC and appreciate you using a scale for ingredients, especially for the Strawberry shortcake . So please put the milk and eggs in gram form for consistency. Many thanks!
Hi Linda! It’s already mentioned in the recipe ingredient list. Milk is 30 ml so the weight is the same (30 g). And a large American egg is 47-50g, so 4 eggs should be between 188-200 g.
Hi!
I made your Japanese pancake to rave reviews from my 9 year old. I want to make this cake for his birthday on Saturday, however I have a crowd of 20 people to feed! How do I make this into a sheetpan cakes?
Hi Kanakapriya! I apologize for my late response due to my traveling and Japanese New Year celebration. I haven’t made this recipe into a sheet pan cake size before so I’m not sure if double or triple would be an appropriate size… However, it is possible to make it into a big size as you suggested. Hope it worked out well (and Happy Belated Birthday to your son/daugther!).
I made this for Christmas although I was fully intimidated! I made the sponge cake on the 24th and my 14 year old assembled it the 25th adding her own creativity to it. We ate it after having an all Japanese Christmas dinner. We were all amazed at how light, fluffy, and just the right sweetness the cake was. It turned out perfect. Arigato Nami for the wonderful recipe.
Hi Gina! I’m so happy to hear you enjoyed this cake with your family! Thank you very much for your kind feedback! xo
I want to post the pictures to Facebook but I don’t know how to tag you in the post. I’ll see if I can look it up and learn. Always grateful for your insanely oishii recipes.
Thank you Gina! You can share it on Just One Cookbook Facebook page, or post it on IG with #justonecookbook. 🙂 I’ll check the hashtag once in a while.
Hi Nami San! I am a hapa that grew up in Japan and my daughter and I love Japanese cakes (and food in general). We now live in Hawaii and I wanted to make this cake for my daughter’a birthday tomorrow. I don’t know exactly where I went wrong but my sponge turned out very dense 😕 I didn’t have a thermometer to check the temperature of the eggs but I am not sure if it was not hot enough or I didn’t whisk long enough. Also, I noticed the batter got thick but not really ribbon like. Also it was very bubbly when I poured it into the pan to bake. Do you think I should have whisked it for longer or maybe the temperature of the eggs was off? I am going to keep trying to master this recipe because it’s our favorite cake! 😁
Hi Tiffany! Happy Birthday to your daughter! I’m sorry for my late response. Hmmm… to be honest, it’s hard to tell without looking at it. You don’t need a thermometer (but it is nice to have!), as long as the temp is 104F. The batter should be ribbon-like. Next time, I would like to see the pictures and maybe I can help a little more. 🙂 I hope next one will come out nicely!
Just wanted to say thank you so much for putting some much effort into explaining how to bake this cake. I baked it last Sunday for my husband’s birthday and it was delicious. I think this is the best cake I’ve ever baked (although I don’t really bake much). I had some leftovers and brought it to the office and it was gone! Everyone loved it! Thank you!
Hi Rachel! WOW!!! I’m so glad to hear that your cake came out well! Thank you for your kind feedback! 🙂
this was my first time baking a cake from scratch. i followed the recipe exactly (minus checking the temperature because i dont have a thermometer) but my cake turned out quite dense, especially the bottom half. I did use a different size circle pan (9″) and I used less sugar than the recipe called for and baked it on the middle rack.
Is it due to over mixing or maybe I could use less yolk? And how can I adjust the measurements so that it fits a 9″ circle pan. Since mine was bigger than the one you used my cake was a bit flat but I was still able to separate it into two.
Hi Mina! First of all, thank you for trying this recipe! Hmm… proportion in ingredients for baking is so important (like science), and if you’re new to making the cake from scratch, I wouldn’t adjust the ingredient amount unless you’re sure how it would turn out. It’s kind of risky. For your bigger pan, I would double/ or 1.5 my recipe so it’s the proper size. The flatter sponge cake will cook faster, and it will overcook (dense) so you have to take it out from the oven earlier. If I were you, I would slowly adjust the amount of sugar, after trying the recipe first see what can be cut off.
This article may help: https://thecakeblog.com/2016/02/sugars-impact-on-cake.html
Thank you again for trying my recipe!
Hello, I was wondering if this cake is shelf stable to were I’d be able to keep it out of the fridge for a day or 2.
Hi Lexi! I googled and it seems like it’s okay as long as it is kept in a cool place for up to 2 days. So if you live in a cooler place, probably a day would be definitely safe? 🙂
1. I was born in Oakland CA, raised in Mililani HI, and currently living in Emmett ID.
2. I truly cannot remember how I found JOC but I do know it started on October 23, 2019, when I made your homemade charshu and I have been on fire with your recipes ever since.
3. Learning more about Japanese etiquette while visiting Japan would be helpful. Tips on the best options for international cell phone service, for example, is a Japanese SIM card a good idea? Regional versus JR pass for transportation if going to regions just outside Tokyo. How much spending money is reasonable to bring for a 3-week vacation. Best economical way to convert dollars to yen since bank fees add up. Best festivals to go to in November. Types of birds found in Japan.
The reason for all the above is I am saving money to take my 13-year-old to Japan in November since she is fascinated with all things Japanese. She reads manga, watches anime, has been studying the language in written and spoken form. She wants to wear a yukata and go to a festival this fall. My daughter’s Obachan is full-blooded Japanese from Kagoshima.
Hi Gina! You left your giveaway entry on a wrong post (this is strawberry shortcake post). Please copy and paste into this page: https://www.justonecookbook.com/9-year-blog-anniversary/
Good luck!
Thank you for letting me know!! Much appreciated.
Has anyone tried making this gluten free?
I really want to make this cake for my birthday but I have a gluten allergy.
What do you think I use use?
Hi Evana! I haven’t tried it myself, but I receive comments from readers who use GF flour to replace my baking recipes and so far I’ve received only positive feedback. If you end up trying, please let us know how it goes.
And wishing you a very happy birthday! 🙂
Hi Nami,
I tried making this strawberry shortcake last weekend. It tastes really good. But the sponge cake is very firm, not fluffy at all. Also, the centre of the cake is higher..is it suppose to be like that? Am I missing some steps?
Thanks
Mary
Hi Mary! Thank you for trying this recipe! This is not a “fluffy” sponge cake, but it should not be firm or dry. Maybe the heat source was too close to the top or overbake the spongecake? My center of the cake is slightly higher too (See step 15). 🙂
For step 8, should I put the mixture (with the flour) back on the stand mixer like your picture? If we do, what setting should it be at? The step only say to keep folding it with a hand whisk. Thanks!
Hi Crystal! This picture was for making whipped cream (step 2). If you scroll down, you can see the same picture of the heavy cream getting beaten in the stand mixer. We had some recipe plugin issue last year where our step by step images kept disappearing from the recipe. I believe we have misplaced this wrong picture when we were quickly fixing. Thanks so much for bringing this up. I immediately noticed that the color of the batter is too white (it should be creamy yellow) and I noticed the wrong image was used for this step. I just replaced and now it’s a correct image.
You do not need to put back on the stand mixer. Just hand whisk to fold in the four. 🙂
Hi Nami, was planning on trying out this recipe soon! Unfortunately, all my mixing bowls are plastic so is there another method besides the bain marie for the egg mixture, such as mixing the whites and yolks separately? Thank you!
Hi Sophie! You can use that method too! There are so many articles written about two methods. If you can translate this (use google chrome), read the difference.
https://ainone-memo.com/tomo-tate-to-betsu-tate-the-difference/
Been doing some quarantine baking, and tried this recipe out and it came out pretty nice, the instructions were thorough and easy to follow! However, it was really dry when I cut a slice the same day it was baked – despite the simple syrup soak, but a lot more moist the next day, no clue why. I wonder if increasing the fat content would help. I also added some vanilla extract to the butter before incorporating it into the batter and found it made things more flavorful. I like the simplicity of the cake, proportions are good, the level of sweet is satisfying, could use some more flavor though!
Hi AS! Thank you for trying this recipe and for your kind feedback. Maybe try baking for 20 minutes next time? It could be over-bake. I added the baking time range 20-25 minutes in the recipe so that some people may not need to bake for 25 and be okay with 20 minutes. 🙂
Wonderful cake recipe – thank you. How do you serrate the cake in half evenly? I can’t see the other end of the cake while I am cutting!
Hi Carol! I just estimated and slice in half (I may not be the most detailed person though). I go slowly while I see the cake from the side to make sure my knife is parallel to the countertop.
I also see this trick: https://www.wikihow.com/Cut-a-Cake-Layer-in-Half
Thank you, Nami! Great trick with slicing the cake. During this period with the coronavirus, I finally made this cake, and again, and again! It is so beautiful and delicious. I posted pictures to my friends and now they all want one. 😊
Hi Carol! Aww I’m so happy to hear you’re mastering this cake during this time! Such a great use of your time! 🙂
Hi Nami,thanks for the wonderful cake recipe! I dont bake often hence followed ur steps closely and baked using my Bosch Series 8 oven – 4D Hot Air for 180deg for 22mins. Im definately making this cake again next weekend! 1) The top 3/4 of the cake was spongy and flavourful! However the base 1cm was more densed. What happened and how to rectify? 2) How do i make the top of baked cake top flat rather than domed? 3) how to make the cake less eggy taste and more vanilla taste whole keeping the great spongy texture? Thanks for ur advice in advance!
Hi Adeline! Thank you for trying my recipe!
1) Hmm did it look like this? https://www.kingarthurflour.com/blog/2014/07/15/how-to-prevent-dense-gluey-streaks-in-your-cake
How about your oven? check your oven temp to make sure it’s hot enough. A cake that bakes too slowly takes longer to set and may fall, causing a dense texture.
2) You can buy this or make one:
https://www.kingarthurflour.com/blog/2018/07/12/how-to-bake-cake-evenly
https://www.acozykitchen.com/how-to-bake-flat-cake-layers
I don’t own these and personally, I don’t mind as long as it doesn’t show on the final product. 🙂
3) Maybe add vanilla extract?
Hello Nami,
I am planning to make this for my mom as this was one of her favorite cakes when she lived in Japan. I was wondering if it was possible to scale this recipe down to a 6 inch layer cake?
Hi Tram! I think so, you may use the same amount but maybe make the sponge a bit thicker (I’m not sure if you need all the batter…). This spongecake is not as thick, so with 6 inch pan, you will get a bit thicker spongecake. It should work, but check the doneness by inserting the skewer and make sure it’s cooked through. 🙂
I made the batter three times. Each time the batter deflated when I add the second portion of flour (I am using all purpose flour with cornstarch) . I don’t know what I am doing wrong. I am going to try the fourth time and this time I am going to use cake flour. If it’s still not working, I am going to need another technique.
Hi Snow! I’m sorry you’re struggling. Your flour is sifted, right? Maybe when you add, sprinkle in, instead of pour in? Good luck!
thankyouu so much im gonna make it today 🎉 and i just finished analysing the recipe and it’s so well written and detailed which is honestly perfect for such an inexperienced baker like me 🙂 just curious, is it a must to keep it for two days before eating HAHAH we’re too excited to try the cake 🤩
Hi Eden! Thank you for your kind words. No, you don’t have to wait for 2 days. You “could” make ahead. Hope you enjoyed the cake. I’m so sorry for my late response.
Hello Nami! I’ve made this recipe for my family before and we found that it was a little too sweet for our tastes. Is there a way we can lessen the sugar used because I am scared it will alter the texture and moisture of the cake. If I did that, will I have to change other factors in the recipe as well? Thank you so much! Also, I love your recipes!
Hi Ophelia! Thank you so much for trying this recipe! Is it possible to keep the sugar amount for the sponge? Being a Japanese cake, this sponge cake should already be less sweet than western cake. I worry about the moisture in the spongecake too, if you reduce the sugar… How about reducing sugar in whipped cream? Thank you for your kind words – I’m glad you enjoy my recipes!
I need some troubleshooting tips – my batter, after I add in the butter, kind of fizzes up? Up until then, folding in the flour, it does resemble the ribbon stage… but after the butter, the batter becomes less ribbon-stage like. Please help 🙂
Hi Ashley! Thank you for trying this recipe! Hmmm. How did the cake turn out after having fizzles in the batter?
Hi I was going to use this recipe to make a cake for a friend. I wanted to make it a 3 layer matcha sponge cake that is still light and airy. How can I change this recipe to match my wants? Thank you so much!
Hi Julia! Hmmm I have never tried to adapt this recipe, so I’m not too sure if you can make it to a 3 layer cake with this recipe though. Sorry! I wish I could help…
Hello! Can i ask if I do not have thermometer, how do i measure the temperature? Is it important?
Thank you! 🙂
Hi Hx! I’d say it’s really good to know, especially if you’re making it for the first time… but the worst case you have to rely on your best judgment. 🙂
Hi, I tried this out today. The oil sank to the bottom causing a thick dense layer at the bottom. And is it typical that the top of the cake is brown and slightly crusty.
How do I incorporate the butter well ? And is it ok to substitute butter with neutral tasting oil? Thanks for your time.
Hi Jaclyn! Thank you so much for trying this recipe! Oh… it sounds like the batter is separated and not incorporated at all. Something is not right. Did your batter reached “ribbon stage”? Please read the instruction carefully. I tried my best to explain carefully and it’s important that you read it through before following the recipe (so it’s not chaotic). For this recipe, please do not substitute butter. 🙂
Hi , thanks so much for your reply . I will try it again:)
Hi Jacklyn! Good luck!!! 💪🏼
Hi Nami,
Should I double this recipe for a 9in cake pan? Or will it be too tall? If so, how much longer will I need to bake the cakes for? I’m thinking around 25-30 min?
Also, I have heard that adding gelatin to the whipped cream will allow it to hold up better and make frosting easier. do you agree with this?
Thank you for such a detailed recipe! I’m new to baking so it’s much appreciated. This is my boyfriends favorite cake so I plan to make this for his birthday 🙂
Hi Grace! Doubling might be too much if you just have one cake pan, so maybe 1.5 x? Slightly taller would be okay as this cake could be a bit taller too. And yeah I’d aim 25 minutes but make sure to check with a skewer to see if the cake is done. You don’t want to over-bake this spongecake. Yes, I’ve heard of it and I see why it would work but I had never tried it for myself. It will be less watery, but if you plan to eat it within 2 days, I wouldn’t worry too much. This recipe is “slightly” harder so read carefully and prepare all the ingredients taken out and measured first. Good luck, and happy birthday to your boyfriend! He’s so lucky!!! 🙂
Thank you for replying so quickly! I have one more question. I need to transport this cake about 3 hours away. Or does this cake freeze well? I have put whipped cream cakes in the freezer before and it thawed in the fridge perfectly overnight. I was thinking about popping it in the freezer for just a few hours before I leave so that it doesn’t melt in the car.
Thanks again!
Hi Grace! People do freeze this cake, but I had never done it before. Hope that would work!
Wonderful cake! Thank you for the pictures and the details in the recipe.
Hi Geralyn! Thank you so much for trying my recipe! So happy to hear you enjoyed the recipe. 🙂
Hi I made this for the first time today, I liked the outcome, however my cake came put a bit dry in the inside, it wasn’t soft and fluffy. Do you have any pointers on how I can avoid this? Thanks for the great recipe.
Hi Umamah! Thank you for trying this recipe! Maybe try baking for 20 minutes next time? It could be over-bake. I added the baking time range 20-25 minutes in the recipe so that some people may not need to bake for 25 and be okay with 20 minutes. 🙂 Do you think your oven temperature (real temperature inside) can be higher too?
What adjustments should i make if using a 9“ cake pan instead?
Hi Cristina! Hmmm how about making it 1.5 x? That way you just need to add 2 more eggs. I think it’s easier to calculate by the number of eggs.
Thank you for the recipe! The instructions were so clear that even though this was my first time making a cake like this it came out pretty good!! I look forward to making this cake again in the future!
Hi Rani! Thank you so much for your kind feedback and I’m really happy to hear your first strawberry shortcake came out good! Thank you for trying this recipe!
Although this recipe was far from easy, it was fun to make and not a bad recipe for a first-time cake baker! I loved this cake, it was so moist and the strawberries and cream with the cake together just tasted so good. My family loves it so much too! I’ll definitely be making this every summer now!! I love your recipes, Nami! Thank you for sharing 🙂
Hi Ashley! Thank you so much for trying this (time-consuming!) recipe. I’m glad to hear your cake came out well and you and your family enjoyed it! Thank you for trying my recipes. I’m glad to hear you enjoy them. 🙂
Hello, this year for my birthday, I wanted to make this Cake. However, how can I change it to become a 4 layer Cake 6 inch diameter? Thanks!
Hi Julia! I’ve never made it so I’m not quite sure how much batter is needed to make it. You probably need to test and see… sorry I wish I knew!
Hi Nami, thank you for the thorough recipe. I plan to make it one day ahead for this weekend. Should the cake be refrigerated prior to adding the cream/decoration? Wish me luck. This will be my first ever cake! 😊
Hi LinhLinh! Yes, store in the fridge (Step 19). Good luck with making this cake. I put a lot of tips, so read the recipes well and prepare ingredients ahead of time. 🙂
Hi again Nami, just realized my baking pan is 9”, can I still use this recipe or must I use an 8” pan? Thanks again!
Hi LinhLinh! I’d say you need to increase the ingredients 1.5 x, if not double. The sponge cake is pretty thin, so if you use 9″ cake pan, it will be flatter. So it’s best to increase the amount. 🙂
This is seriously the best recipe in the entire world. I’m a complete amateur baker, but I followed this recipe step-by-step, measuring everything precisely with a food scale, using a food thermometer, etc. It took a bit longer for me (three or four hours) to make the cake since I’m new to baking, but the cake turned out absolutely perfect, and all of my friends loved it. Thank you so much for this amazing recipe!!!
Hi Jessie! Aww! I’m so happy to hear your strawberry shortcake came out well! Thanks so much for trusting and trying my recipe!!
Hi,
What is the temperature and timing for a 9 inch baking pan? Ingredients all the same as well or do i need fo change the amount?
Hi Yana! This is a 8-inch cake pan recipe, so for a 9-inch cake pan, you need to increase the amount… otherwise, the spongecake will become flat. The oven temperature should be the same. 🙂
If one were to add lemon zest, when/how would they do it?
Hi El,
You may add to the syrup! But we don’t recommend adding to the cake batter.
We hope this helps!🙂
Hi Nami! I’ve tried this recipe three times now and it always comes out flat and dense. I think it’s a problem with beating the eggs and sugar? I make sure that my eggs start at room temp and that the egg/sugar mixture gets up to 104. When I beat the eggs I get a lot of big bubbles on top, but not that nice, pale, homogenous mixture you have in your pics, no matter how much I whisk. Is it because I’m using a hand mixer? Do you have any other ideas?
Hi Frankie!
First of all, thank you for trying this recipe!
When using a handheld mixer, make sure you circulate it through the mixture as though it were a whisk. Also please note that it usually takes a longer time than a stand mixer. The egg foam passes through various stages during the beating and a lot of big bubbles on top are normal at the beginning. As you whip them they reach different stages. Hence your case, probably need to whisk more longer.
We hope this helps!😊
Hello, I made the strawberry shortcake and its the best I have ever made. However my sponge is on the rough and hard side, may I know what could have caused that? Thank you~
Hi Jasper!
Thank you very much for trying this recipe!
These are possible reason;
1) The egg foam did not reach the “ribbon stage.”
2) Your oven temperature is not optimal (it’s good to check/know your oven as each oven has hot spots, and sometimes the temperature is not accurate as the display says).
3) Maybe you didn’t measure the ingredients correctly (did you use a measuring cup or scale? If cup, We highly recommend the method Nami provided here (https://www.justonecookbook.com/faqs/#Measurements).
We hope this helps!🙂
Hello! I am wondering if I can use icing sugar and add mascarpone into the cream to stabilise it because I live in a country with a really hot weather but I am going to bake this in an airconditioned kitchen. Any tips on how much mascarpone to add or do I not add it at all? Thankyou! I can’t wait to bake this cake tomorrow.
Hi Amelia!
Hum… If you live in hot weather, how about making “Buttercream” with icing sugar and butter instead of mascarpone in the cream?
Hello, I followed the recipe but the batter didn’t rise. Any tips on how to fix this issue?
Hi Jarrin!
Thank you very much for trying this recipe!
We are sorry to hear your cake did not rise.
This sponge cake is a genoise cake, made by beating air into the eggs to make it rise rather than using a chemical leavening agent like baking soda or baking powder. Make sure to incorporate more air into the batter and keep it fluffy (For the sponge cake: Step 3-11).
We hope this helps!
Hi!
I made this cane twice but didnt succeed. A couple things happen:
– the cake is flat, and doesnt curve up in the middle
– the side is very rough and dry, the cake is also a little dry
– the bottom is a little rubbery
– my cake wont brown on the side and top and bottom like your photo, it’s very pale all around (But its cooked)
– the top and sides of the cake have visible holes
– when I put the damp towel on top, it makes the cake top sticky
A lot of things seemed to go wrong for me there… any tips are appreciated 🙂 i use a weigh and a thermometer so mayb it’s my folding? Thank you!!
Hi Zoe,
First of all, Thank you very much for trying this recipe!
-curve up, visible hole;
When you see visible holes in the cake, it’s possible that the egg’s temperature got too high during your beating.
Eggs foam well when the temperature rises, but care must be taken as the bubbles tend to grow accordingly.
Large bubbles swell in the oven at once, causing the surface to crack, leave holes or curve up in the middle.
-little dry, pale all around, sticky top;
Even you use the thermometer inside the oven, your oven may have a hot spot, and the temperature is not evenly distributed.
Adjust the baking rack position and baking time for your oven.
-Rubbery bottom;
Most likely due to over mixing cake batter or too much grease at the bottom when you bake.
Did you use parchment paper in the bottom of the cake pan? We recommend using parchment paper and lightly grease one side of the parchment paper. (not too much grease)
Melted butter should be at room tempurecher when you add it to the cake batter to be mixed in evenly.
And lastly, do not over mix the batter so that the gluten in the flour doesn’t act too much and casing the rubbery bottom. Mixing the cake batter from the bottom to up to incorporate more air in the batter is the best way to mix.
If all of this doesn’t make it better, it could be the flour itself. Try a different brand to see if it has a better gluten amount in it. (8% is best) https://www.justonecookbook.com/cake-flour/
We hope this helps, and your next baking will be successful! Good Luck! 😊
My husband has been dreaming about a strawberry shortcake so I gave it a go. Your recipe is so detailed and precise – really appreciate it! My cake came out near perfect except that I did the stupidest thing after assembling it. I left it uncovered in the fridge overnight 🙁 🙁
Next morning the cake had dried out a fair bit. At room temperature it tasted great but nothing close to the juicy cake it was the night before.
Will definitely make it again and will NOT forget to cover it.
Hi Aditi!
Thank you very much for trying this recipe!
We are sorry to hear that your cake got dried in the refrigerator. We recommend using something like this to cover the cake next time. https://www.amazon.com/dp/B01FSID5C8/?ref=exp_justonecookbook_dp_vv_d
We hope you enjoy this cake more when you bake next time!🙂
Hello! I’m a newbie baker and I was unable to get the cake to rise much. I am sure I did not mix it properly. One issue I had is my mixer only went up to 6 (instead of 10) and it took forever to get to the ribbon stage (like maybe 8 minutes or more…I just kept going). Another is, when I added flour, I had to mix a lot to get the flour to mix properly, which probably deflated the mixture. I also accidentally mixed in the butter mixture with the whisk instead of folding it with a spatula.
Also, the top of the cake did not have as deep a color as yours but the sides were hard/burnt. My oven had already been preheated to 350F for 20 minutes. I wonder if it’s my pan? I am using a pan with the release valve (the ones for cheesecake).
This is my first time making a cake and I realized I didn’t have a way to store it in the fridge (store bought cakes come with a box…). Any suggestions on some make-shift container? Does the cake need to be stored airtight?
Thanks for the recipe!
Hi Mox,
Thank you very much for trying this recipe!
For storing the cake overnight, it does not need to be airtight. The paper box should be fine as well. Something like this will be a great tool too. https://www.amazon.com/dp/B01FSID5C8/?ref=exp_justonecookbook_dp_vv_d
As for the cake color, we recommend checking your oven’s internal temperature and make sure you are not baking with higher heat.
A tip for beating eggs is to check the egg temperature. The eggs will foam easily when at the right temperature, 104 ºF (40 ºC).
And Mixing the cake batter from the bottom to up to incorporate more air in the batter is the best way to mix.
We hope this is helpful.🙂
Will this recipe be ok to make a day in advance?
Hi Cassandra,
Yes. You may refrigerate it overnight. We recommend covering the cake. 🙂
Thanks Nami, fabulous recipe. As you mentioned, quite a few steps. However, you provided so much detail that this was a no fail recipe. After making once, the cake was easy to make again. Made for my daughter’s 21st birthday. Made 2 cakes, each 1.5 original recipe to feed 16 people. As I needed to adjust the cooking time through trial and error, my second one came out a little better than the first. Regardless, the texture of the cake (not that I have had a Japanese strawberry shortcake before) was perfect – especially for layering. The cake had 3 layers of strawberries and cream and 4 layers of cake. I assembled the day before and did not skip the use of a liquor (a nice cherry blossom one). For the final layer of cream, around the outside, I blended some freeze-dried strawberry powder with the cream to give a delicate strawberry flavour and pretty pink hue. The end result was both delicious and visually gorgeous. Perfect for my Japan and Japanese loving daughter. Wish I could post a pic. Will keep this recipe and make again and again.
Hi Lenny,
Wow! Thank you very much for trying this recipe, and read and follow Nami’s instructions carefully!
We are so happy to hear you made this cake for your daughter’s 21st birthday! Happy Birthday!
Hi Nami,
I only have a 6 inch or 9 inch pan. Which one do you recommend? Also do I need to adjust the ingredient amounts and the baking time? If so, what do you recommend?
Hi Crystal,
The sponge cake will be flatter if you use a 9-inch pan because it’s a bigger cake pan than Nami’s 8-inch pan. If you see the cake assembly photo, you may see the thickness, and it’s just enough to cut in half widthwise.
We recommend making a double batch and bake the cake twice with a 6-inch pan and 9-inch pan or make one batch with a 6″ pan and make cupcake size with leftover batter, etc.
We hope this helps!
Thanks for this recipe. Very inspiring and easy to understand.
Hi Diana, Thank you very much for your feedback!
I have never had a sponge cake fail so spectacularly which is a bit of a disappointment. I had a real hard time getting the thrice sifted cake flour to incorporate and I feared the sponge would not rise, and indeed that is what happened. I’ll be following my own sponge recipe the next time I try this. At least strawberries and cream are delicious on their own!
Hi Jennifer! Thanks for trying this recipe and I’m sorry yours didn’t come out well. From your comment, you might have over mixed the batter, maybe? You mentioned you had a hard time incorporating the flour. I’m certain that this recipe works, as it’s one of the popular cakes JOC fans make and I see the cakes all the time on IG/FB or in their email… Thank you for trying this recipe, and I hope your sponge cake can be the base of a delicious strawberry shortcake.
Thanks for the reply, Namiko. Yes, the problem I encountered with the recipe was that I only mixed the flour until it was just incorporated, but this took longer than I expected. At this point in the recipe I could tell the cake would fail either because (1) mixing was taking too long, or had stopped mixing, (2) because the flour would not end up being properly incorporated. I used the weighted measurements listed in the recipe because I find these to be more precise than volume when baking, so I don’t think measurement was the culprit. I suspect the issue is that the Canadian cake flour I used was simply too high in protein (10%) compared to the typical US brand of cake flour (5%-8%) for this particular recipe to work unfortunately.
Hi Jennifer! Thanks for your response and for further explanation. This is helpful for other Canadian readers who want to try this recipe. I’m not sure how we can adjust the recipe to make it successful, but I now learned that Canadian cake flour is not quite same as American ones. Thanks for sharing the info with us! I’m sorry again it didn’t come out well.