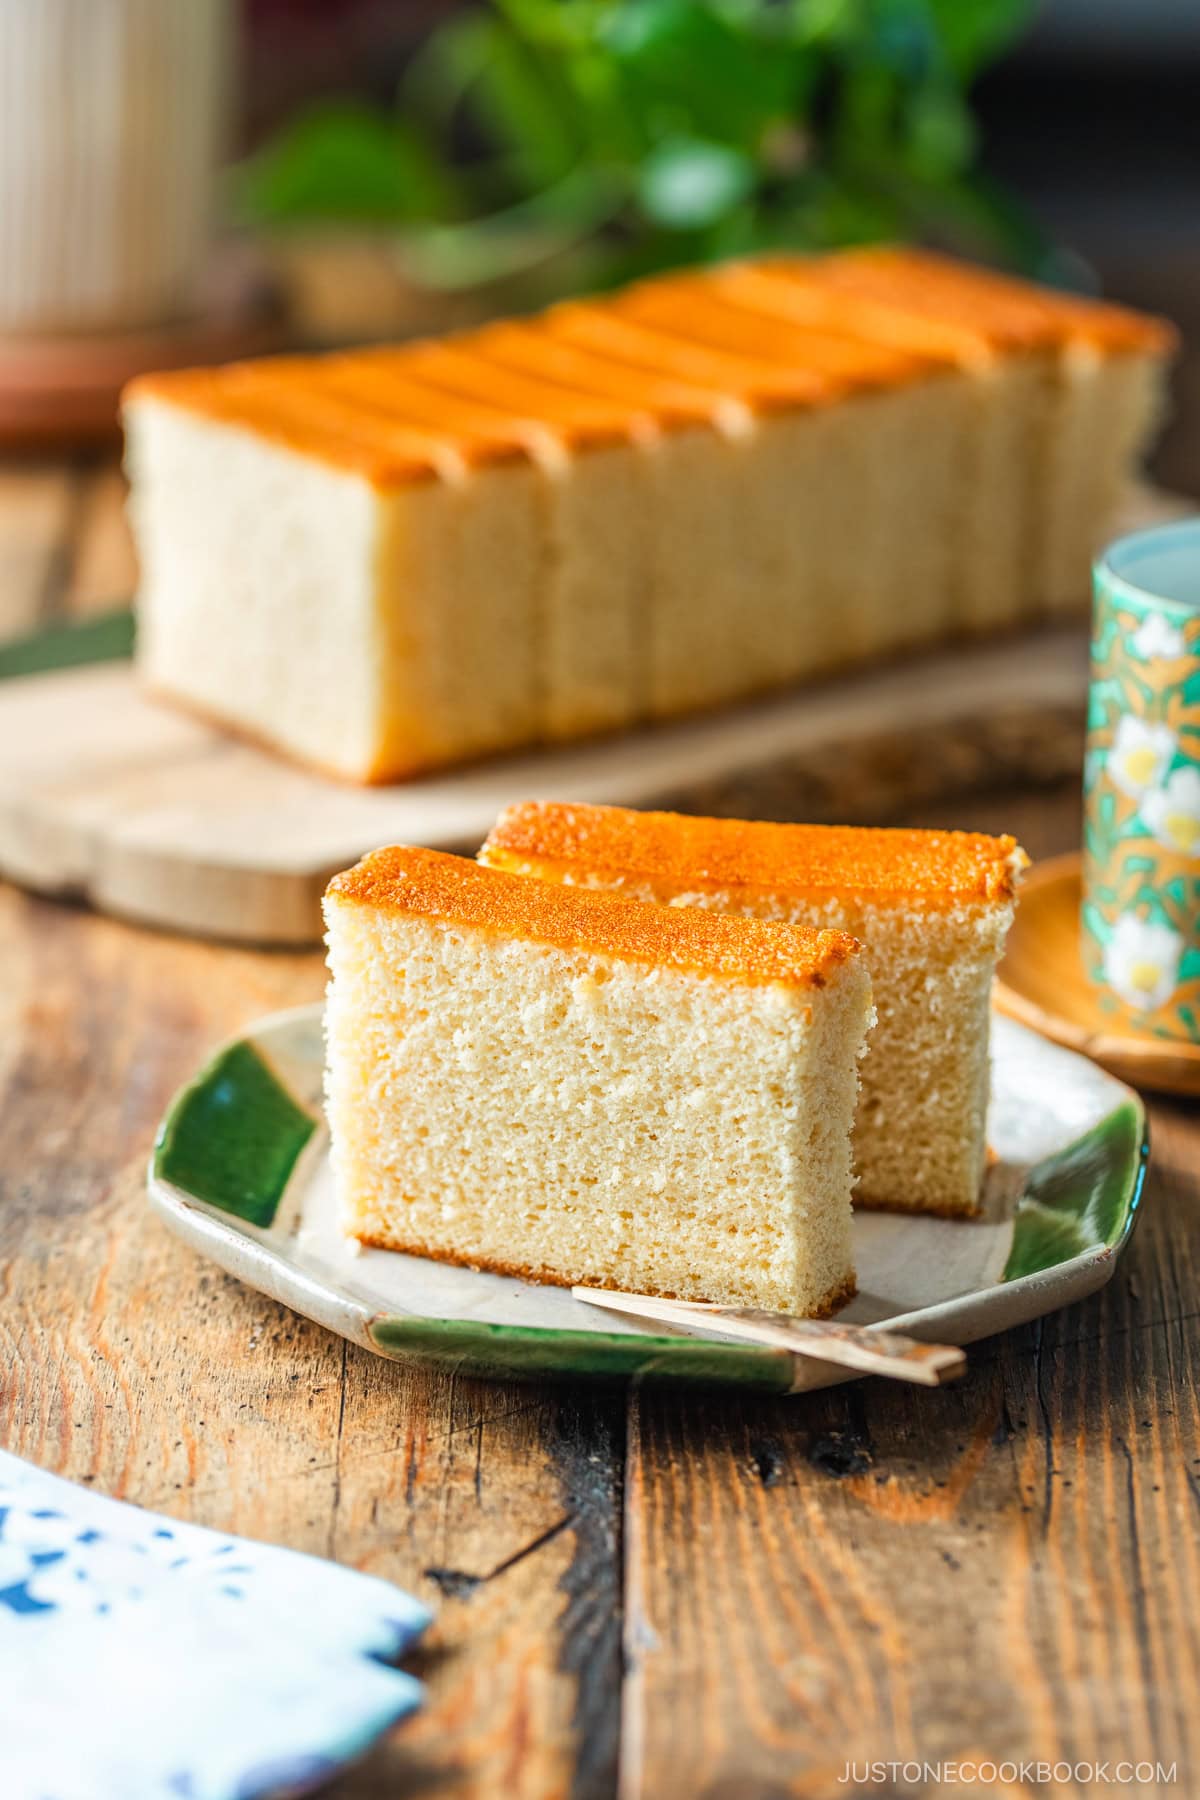
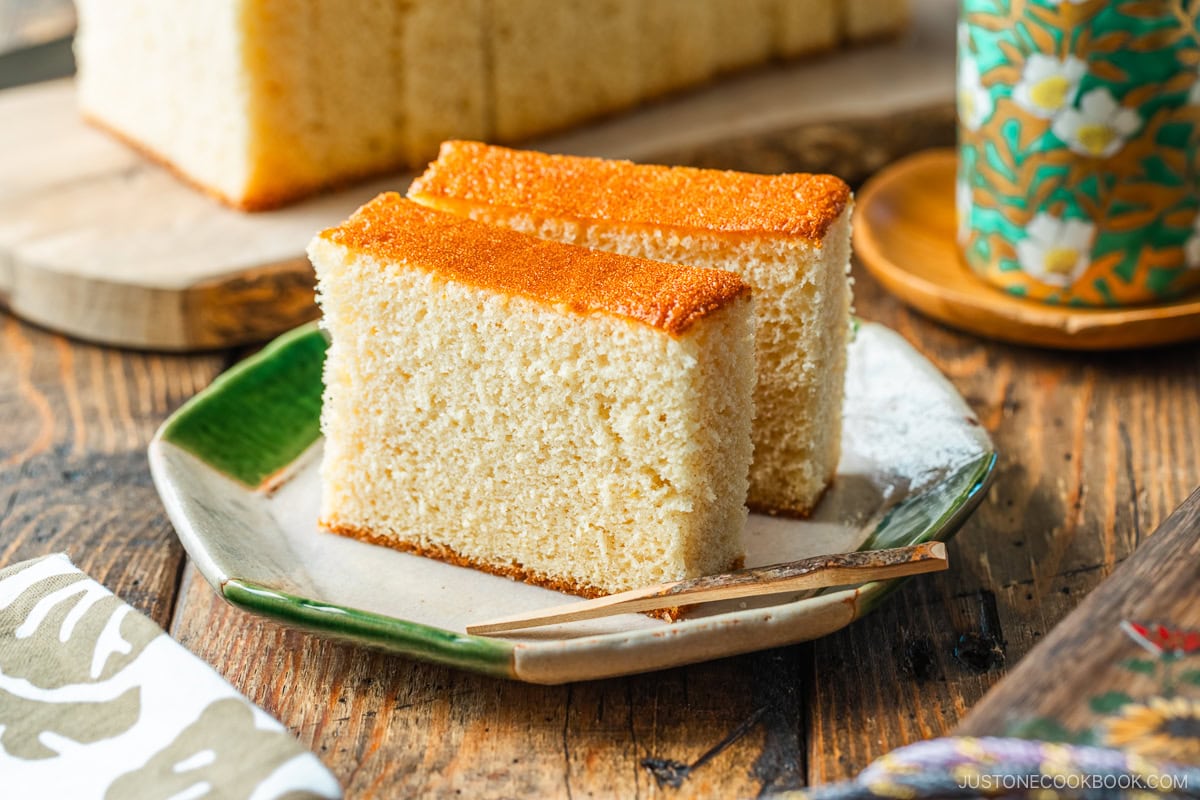
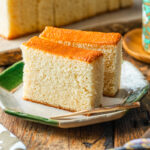
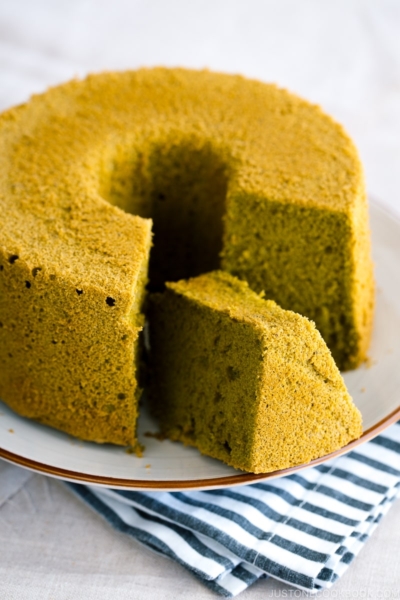
Treat yourself to this moist and bouncy Japanese sponge cake called Castella. Prized for its delicate crumb and sweet honey flavor, it’s a beloved tea snack and a great hostess gift, too. Bake a perfect Castella Cake at home with my techniques and tips!
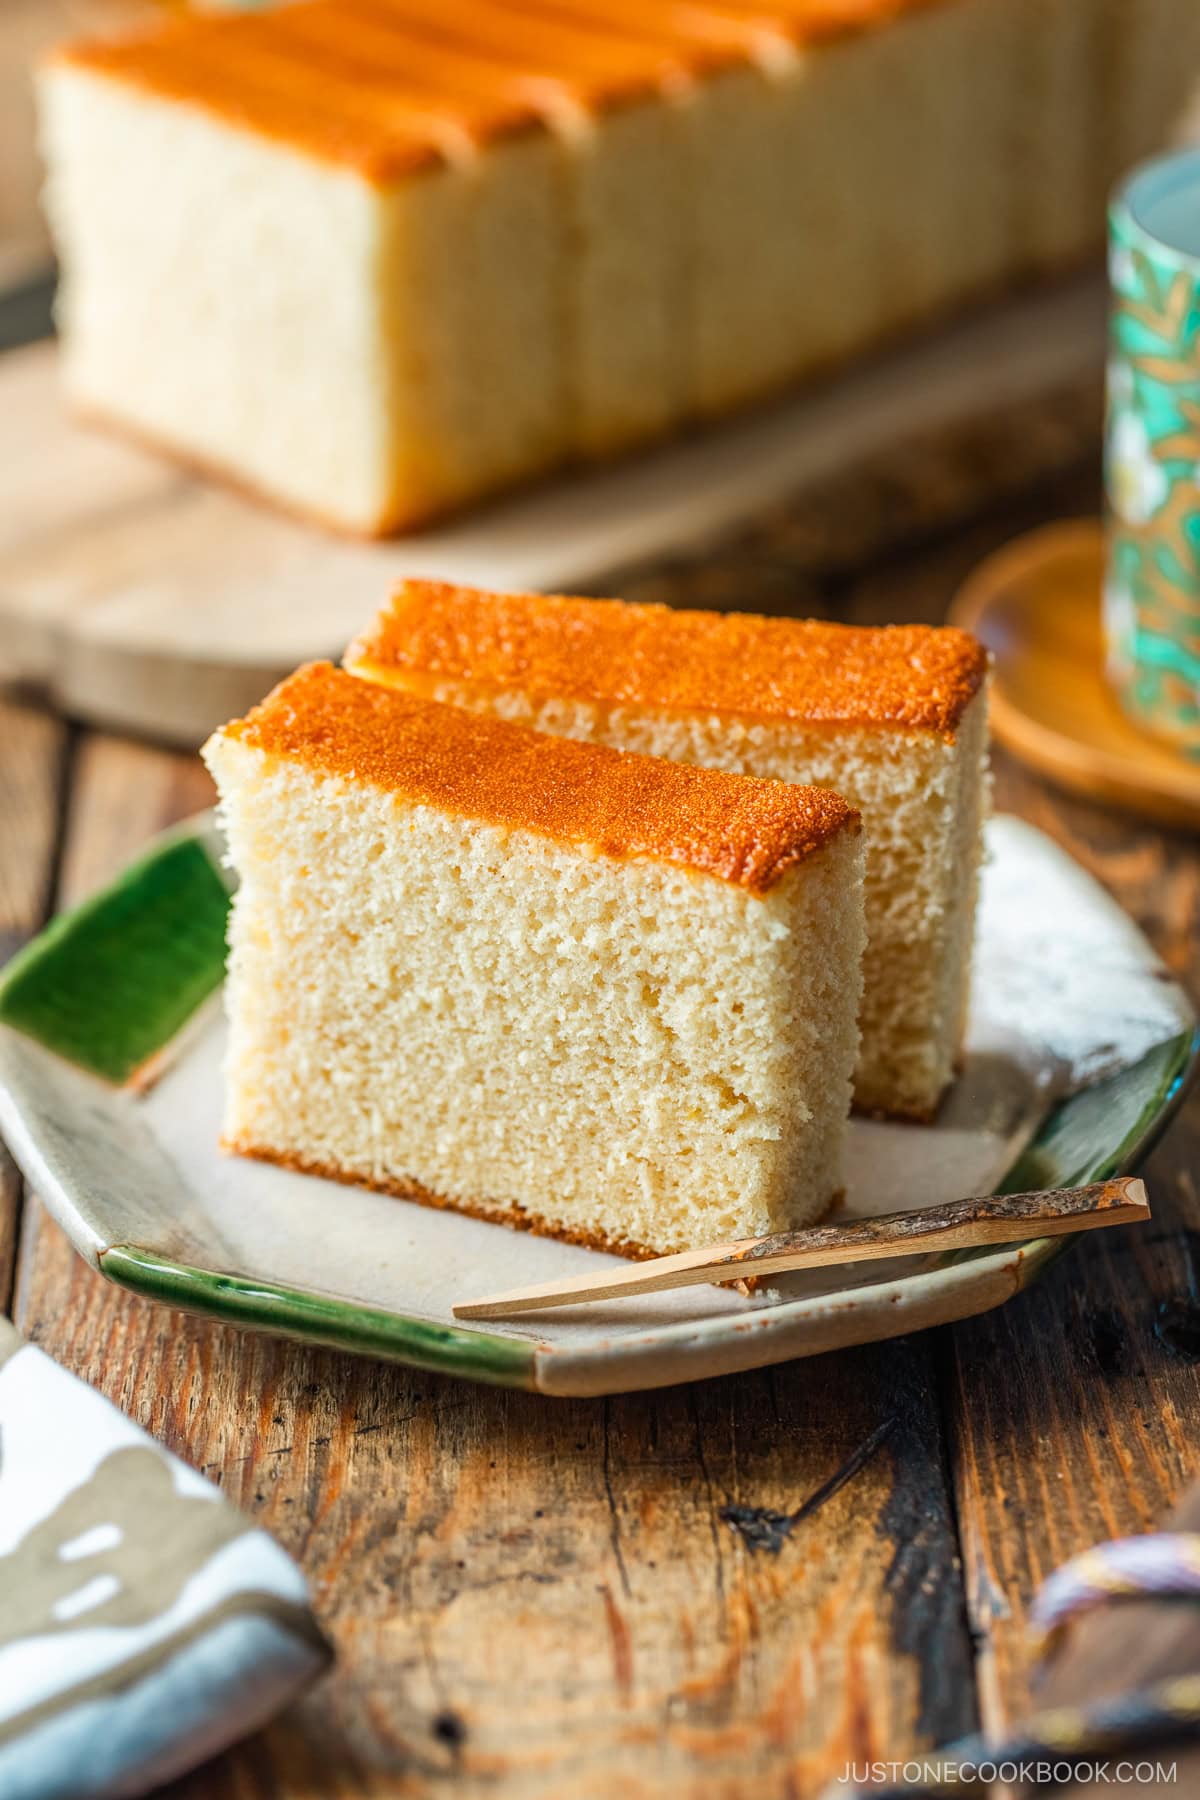
One of my favorite sweets of all time is Japanese Castella Cake (カステラ). It’s a moist and bouncy sponge cake with a sweet honey flavor. My family enjoys this refined confectionery with green tea or a cup of coffee for our three o’clock oyatsu (snack) time.
It’s one of the most popular cakes in Japan, too. You‘ll find it sold just about anywhere—at department stores, specialty sweet shops, kissaten (coffee shops), and even convenience stores. Don’t worry if you’re not in Japan to buy this delicious treat, though. Today, I’ll share my recipe with special tips and techniques so you can make this exquisite Castella Cake at home!
Table of Contents
What is Castella?
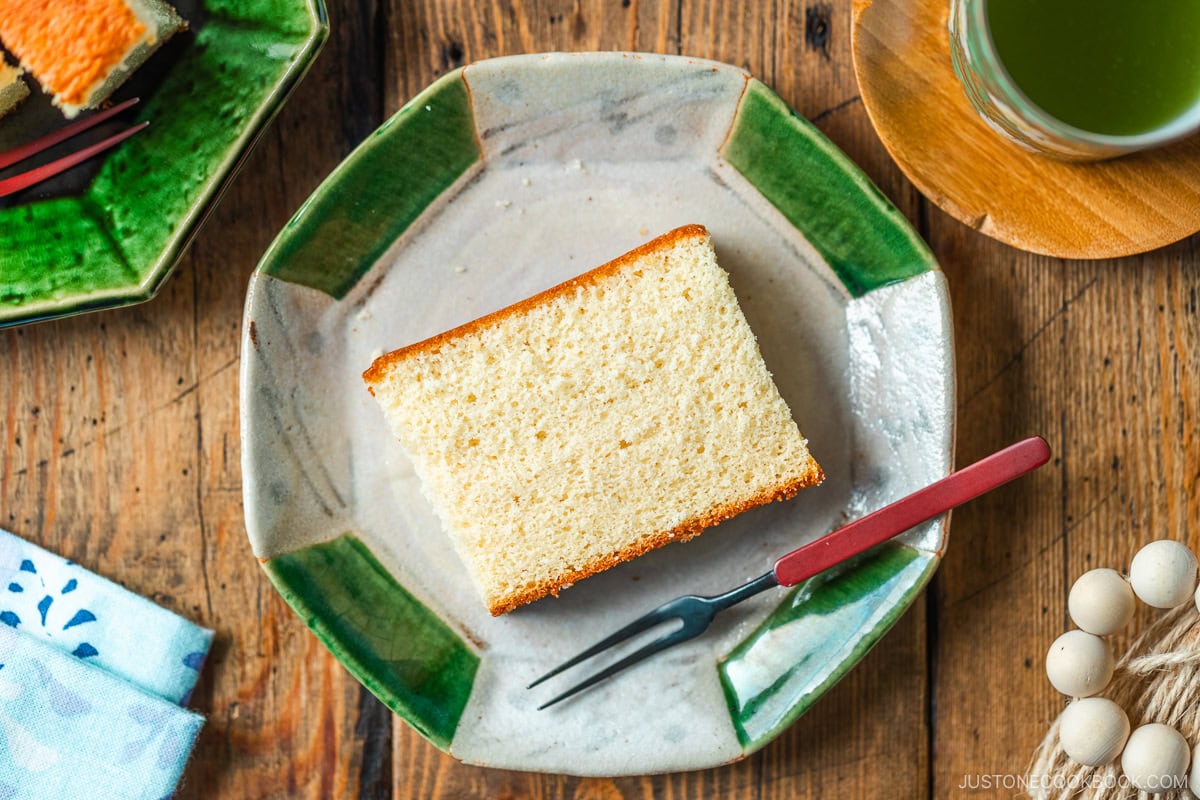
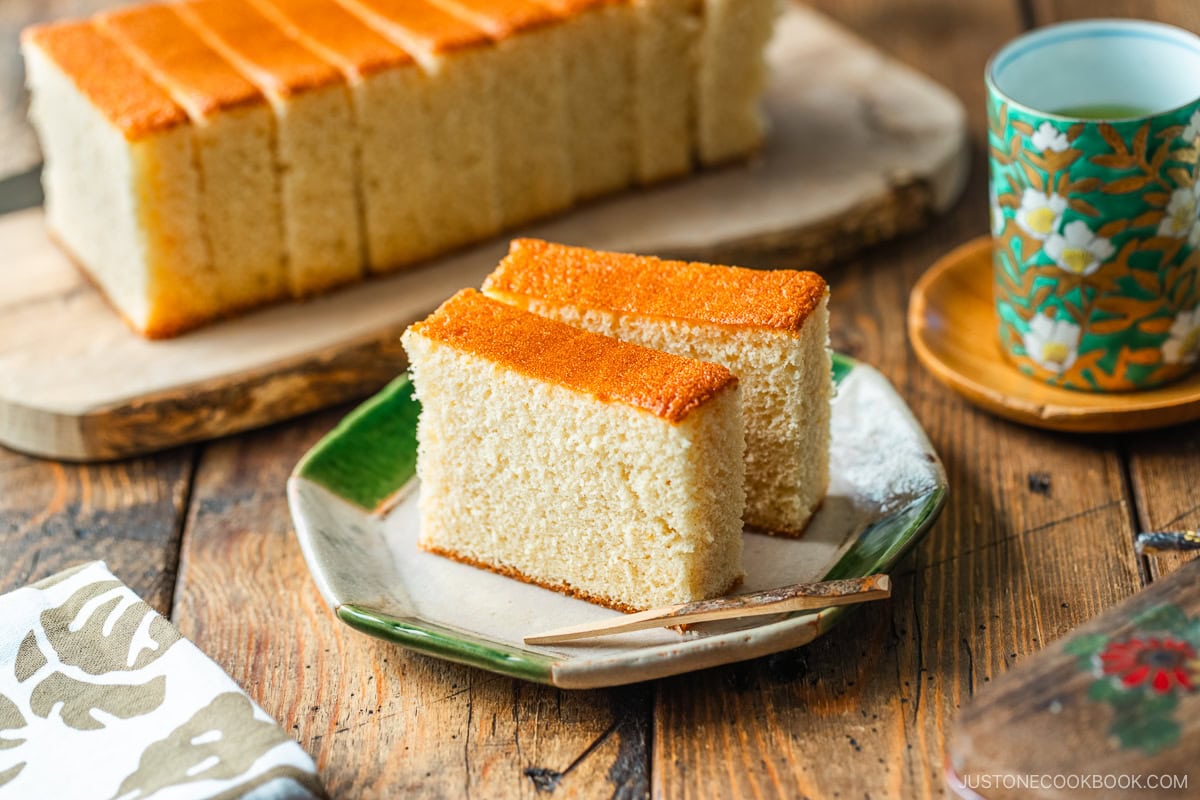
Castella, or Kasutera (カステラ), is a beloved Japanese honey sponge cake known for its sweet taste and airy texture. More delicate and bouncy than a regular sponge cake, castella is famous for its fine and moist crumb. It’s cherished nationwide as a tea snack, souvenir, and gift, making it one of Japan’s most popular confections.
This famous cake originated in 1543 in the port town of Nagasaki on the southern Japanese island of Kyushu. That’s when Portuguese merchants and missionaries arrived with a firm and simple bread called pão de Castela (“bread of Castile” referring to Spain’s Kingdom of Castile).
Since the 16th century, Japanese artisan bakers have transformed the recipe into a sweet cake thanks to Nagasaki’s abundance of imported sugar. They have also incorporated eggs, honey, and sugar to give it a more delicate and sponge-like texture. It’s a Western-style confectionery that is uniquely Japanese!
Why You’ll Love This Recipe
You’ll be amazed that you can make this Nagasaki specialty in your own kitchen!
- Uses a standard loaf pan – Castella is traditionally baked over low heat in a wooden frame because metal pans transfer heat faster and can result in a dry cake. However, you can use a regular 1 lb. loaf pan with excellent results if you apply the techniques that I share here.
- Makes a very moist cake – I use a very thick Japanese sweetener that helps yield a perfectly moist texture.
- Takes just 1 hour of active baking and prep time – Prep and bake this castella in just an hour. Relax while it chills overnight. The wait is worth it!
Ingredients for Castella Cake
Here’s what you’ll need to make Japanese castella:
- Bread flour – Adds an elastic, bouncy texture
- Large eggs – Use at room temperature so your ingredients blend more evenly and cohesively
- Water
- Sugar – Binds with the water to keep the crumb soft and tender
- Honey – Provides castella’s signature flavor; adds moisture and a rich color
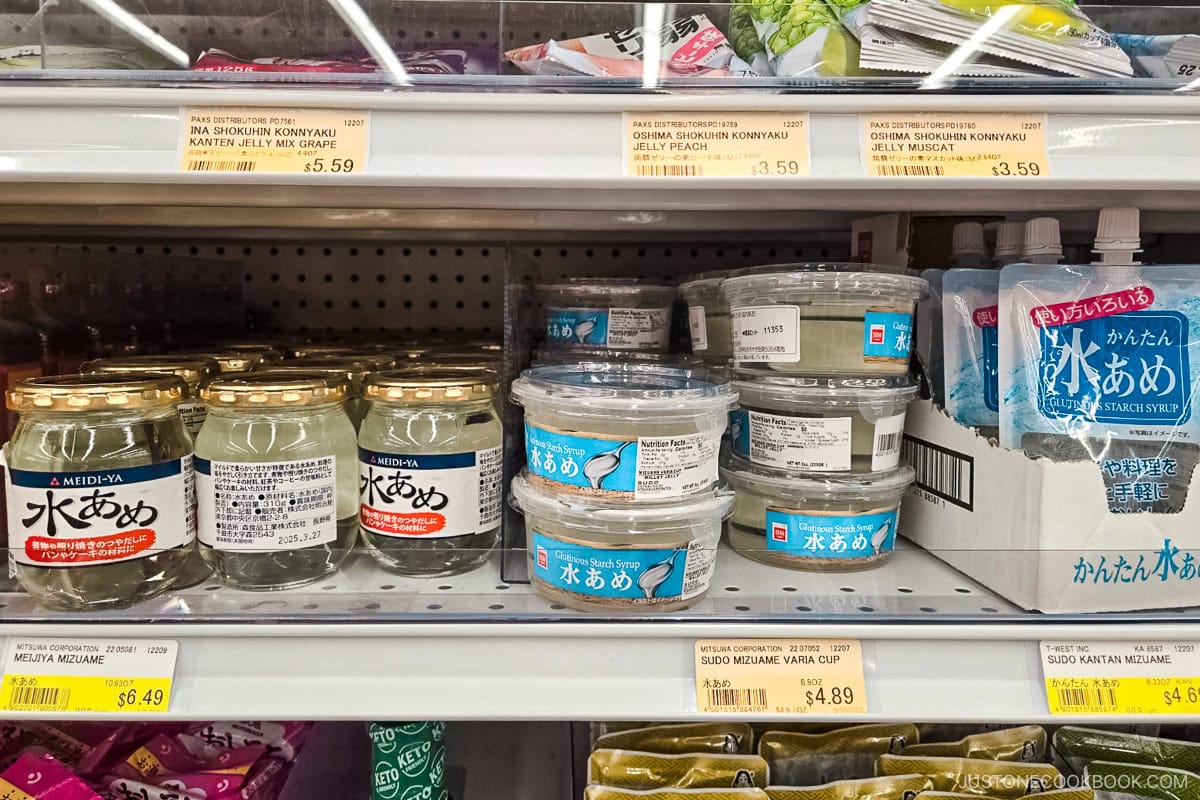
- Mizuame (水飴, glutinous starch syrup) – Keeps the cake more moist (see below)
- White sparkling sugar (or zarame ザラメ, Japanese coarse sugar) – Adds a golden brown crunch to the bottom crust
Substitution Tips and Variations
- While my recipe calls for white sparkling sugar, authentic Japanese castella commonly uses zarame (ざらめ, ザラメ), a coarse sugar. Since it’s not easy to find outside of Japan, I decided to use sparkling sugar that you can find on Amazon. You can also use demerara sugar.
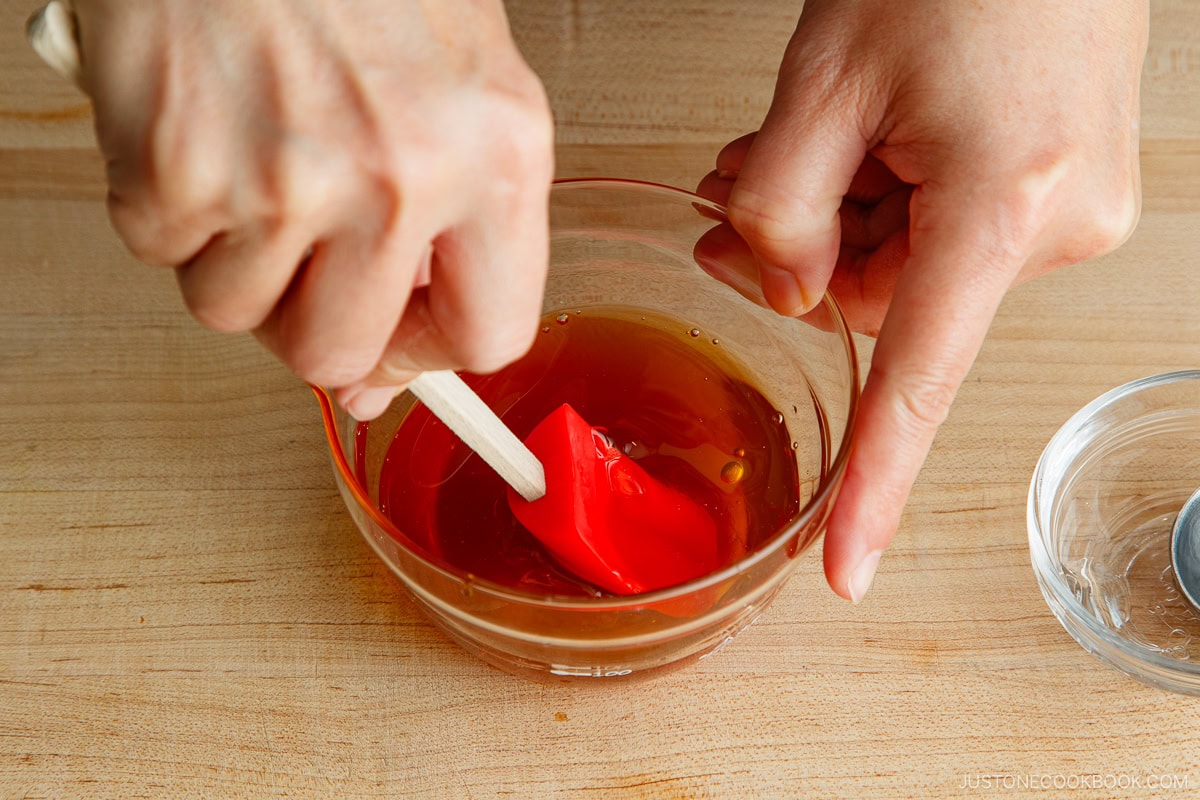
- Mizuame (literally “water candy;” also called millet jelly) is a traditional Japanese sweetener made of starch. It‘s a super sticky and clear syrup that’s extremely thick (see the image below). Be sure to use the thick type sold in a jar. It’s about the consistency of molten candy that’s almost cool enough to pull into hard candy. It’s hard to find outside of Japan, but some Japanese markets (like Nijiya Market in my area) may carry it. If you can’t find it, leave it out entirely. Do not use the thin type of mizuame sold in pouches. It’s runny and fluid like honey, and it contains too much moisture for this recipe.
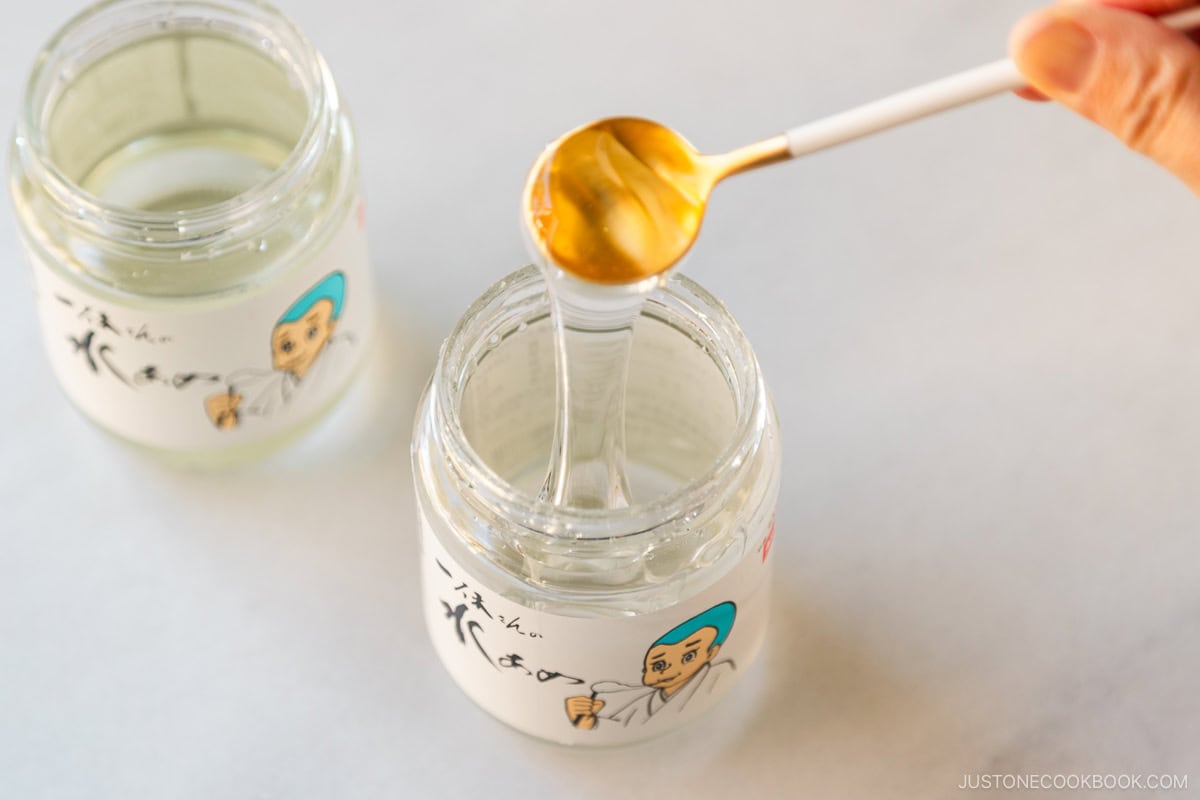
Left image: Mitsuwa sells 3 mizuame brands: The ones on the left and middle have good consistency (super thick). Do not buy the one on the right in the pouch (too watery).
Right image: Nijiya sells this brand (Ikkyu san no mizuame) and I use it.
How to Make the Best Castella
Follow my precise instructions and techniques, and you’ll be rewarded with the most delicious homemade castella cake!
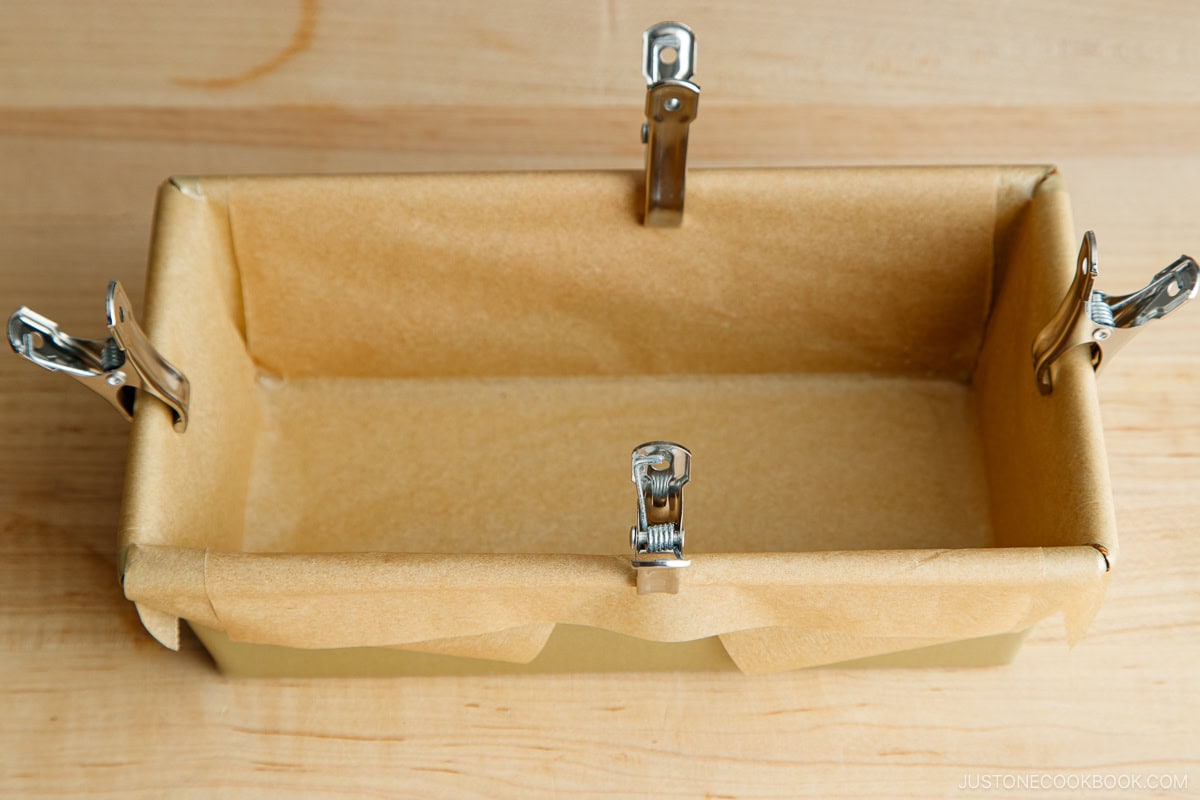
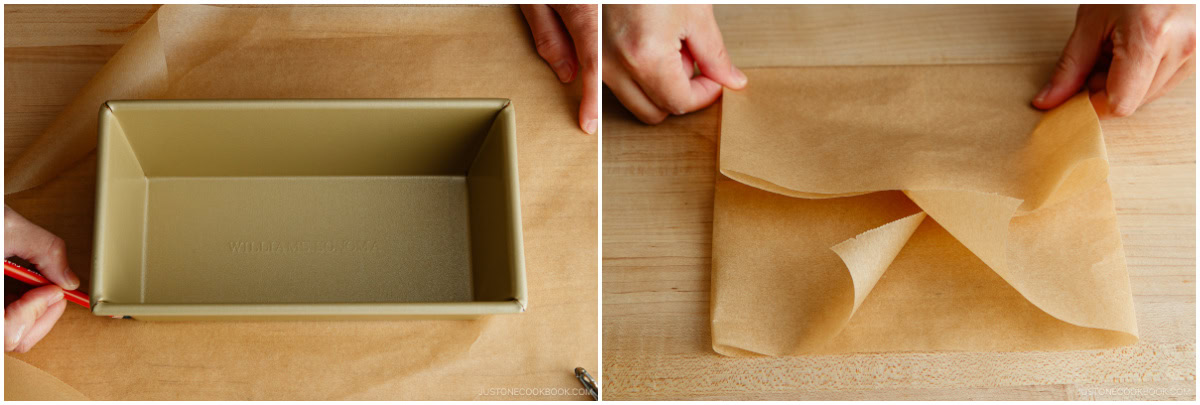
- Line the baking pan with parchment paper.
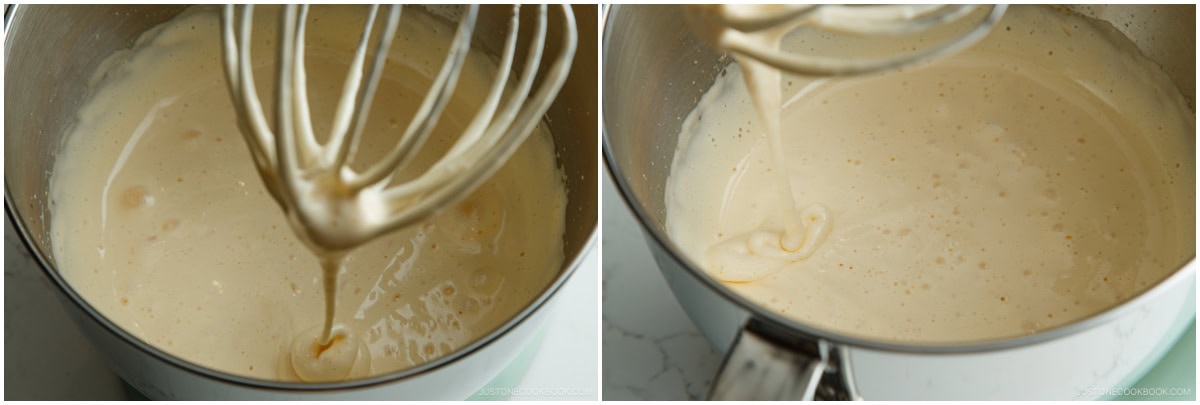
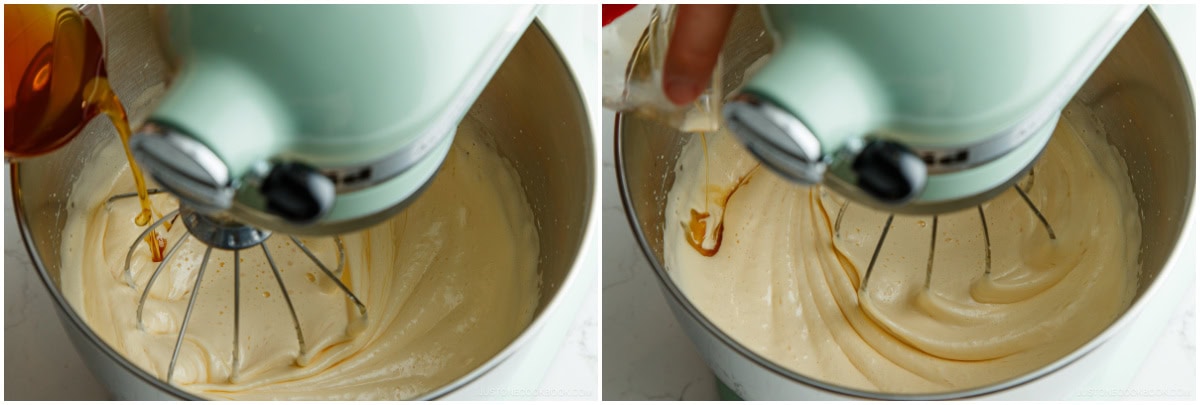
- Make the batter. First, beat the sugar and eggs together in a mixer on high speed. Next, fold in the honey and mizuame, and finally add the flour.
- Pour the batter into the pan; remove the air bubbles.
- Place in a preheated 350°F (180°C) oven.
- Mix the batter 4 times during the first 12 minutes of baking. Then, bake for another 28–30 minutes. It’s done baking if it bounces back when you touch it with your finger. No need to test it with a toothpick.
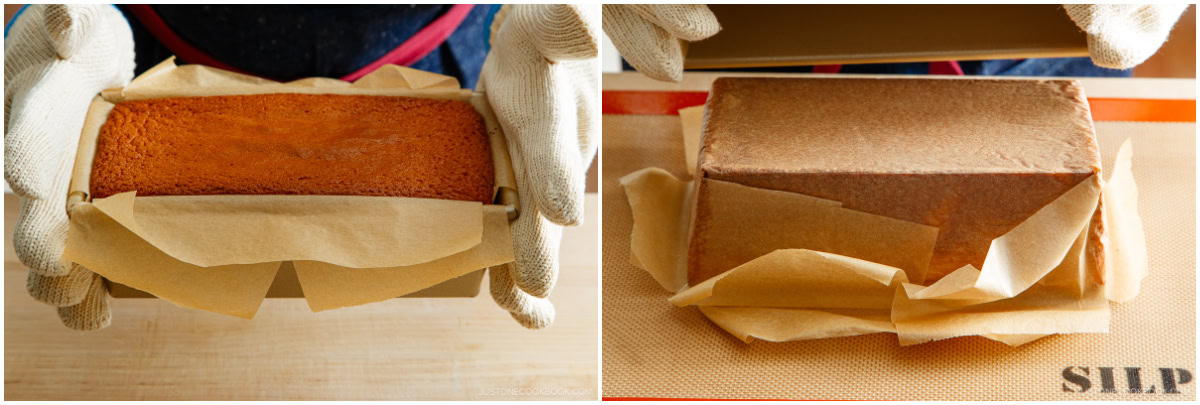
- Invert the cake onto a nonstick mat and let it cool.
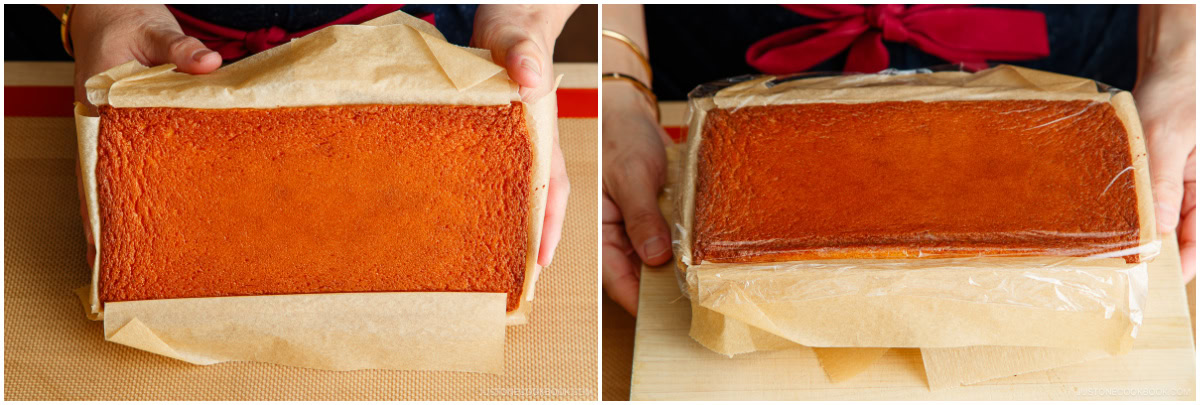
- Wrap in plastic and chill overnight.
- Trim the side crusts with a sharp bread knife. Slice and serve!
Recipe Tips and Techniques
- Bring the eggs to room temperature. This is very important. I leave them on the counter for several hours. You can also fill a bowl with very warm (but not hot) tap water and submerge the cold eggs until they reach room temperature, for about 10 minutes.
- Weigh your ingredients. Precision is important in baking, and weighing your ingredients with a digital kitchen scale is the most accurate way to measure. I highly encourage you to weigh your flour and sugar instead of using measuring cups, as you may scoop more than you need.
- Use a light-colored pan. I recommend a light-colored loaf pan for this recipe. A dark-colored pan may have hot spots, overbake on the sides and bottom, and bake the cake too fast.
- Use stainless steel clips to hold the parchment paper. I’ve tried different ways to attach the paper to the cake pan, but nothing worked until I used the clips.
- Don’t microwave the honey mixture. I know it’s tempting to heat the mixture to facilitate dissolving, but we don’t want to increase the batter temperature with a warm honey mixture. Press down and mash the thick mizuame with the mini spatula to facilitate dissolving.
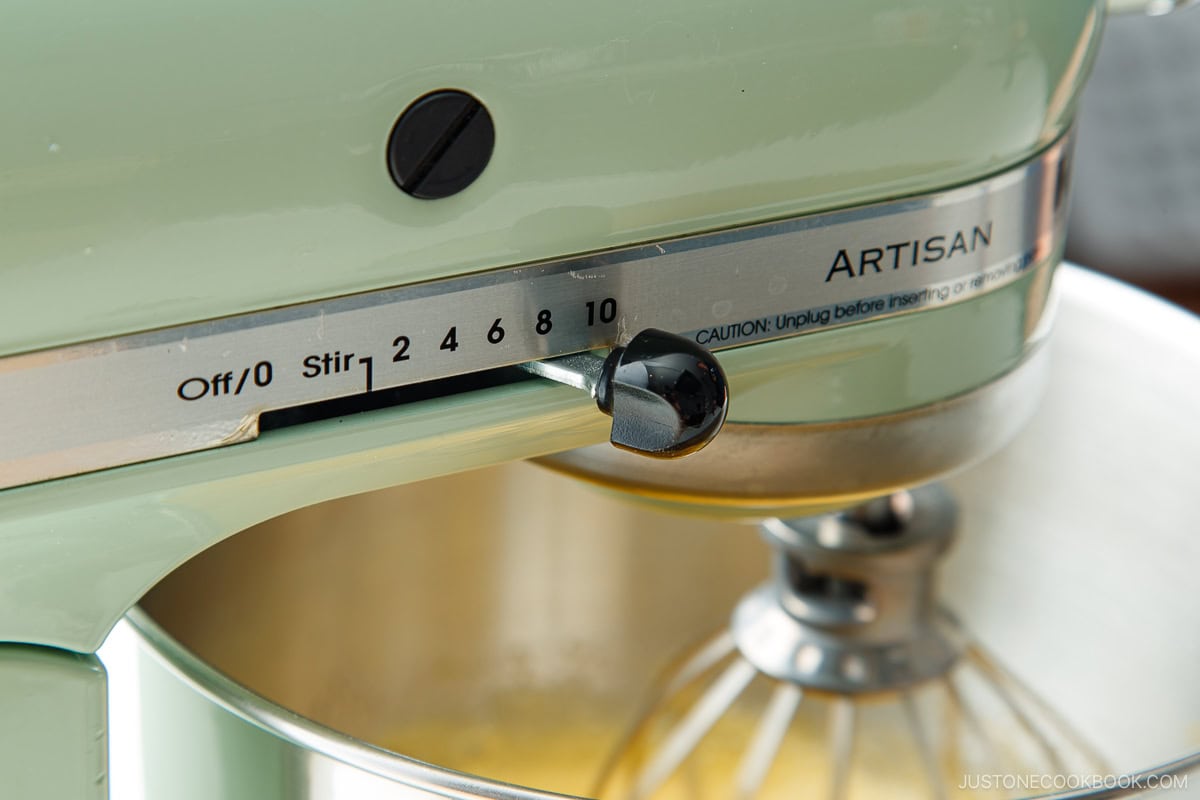
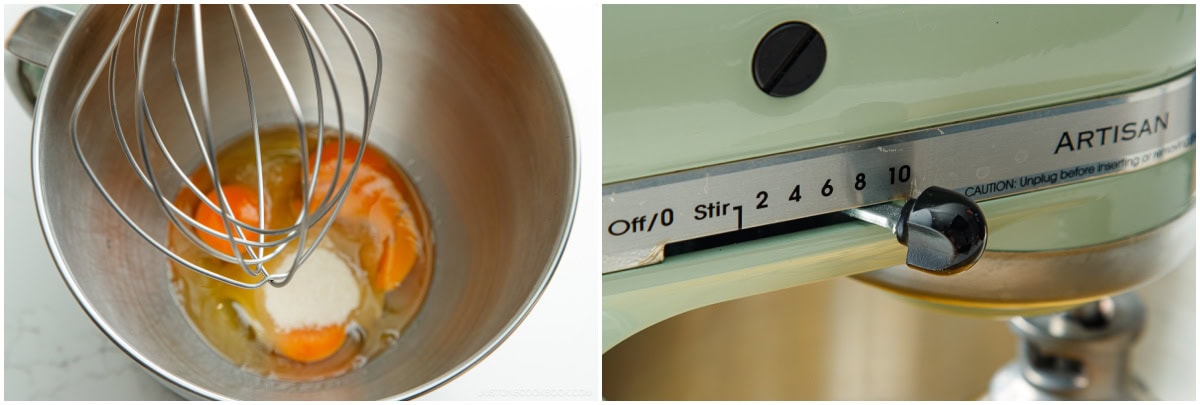
- Whisk the eggs and sugar for 5 minutes on Speed 10 (for this KitchenAid). This setting worked perfectly. The batter should quadruple in volume and fall in ribbons. If you double the recipe, you can still whisk for 5 minutes on Speed 10.
- Don’t overmix the batter after adding the honey mixture and flour. Just 30 seconds after each addition is enough. Overmixing could deflate the egg mixture and overdevelop the gluten in the flour.
- Mix the batter during baking with an offset spatula. The Japanese mixing technique called awakiri (泡切り, “bubble cut“) helps to even out the batter‘s temperature so the cake will rise without cracking.
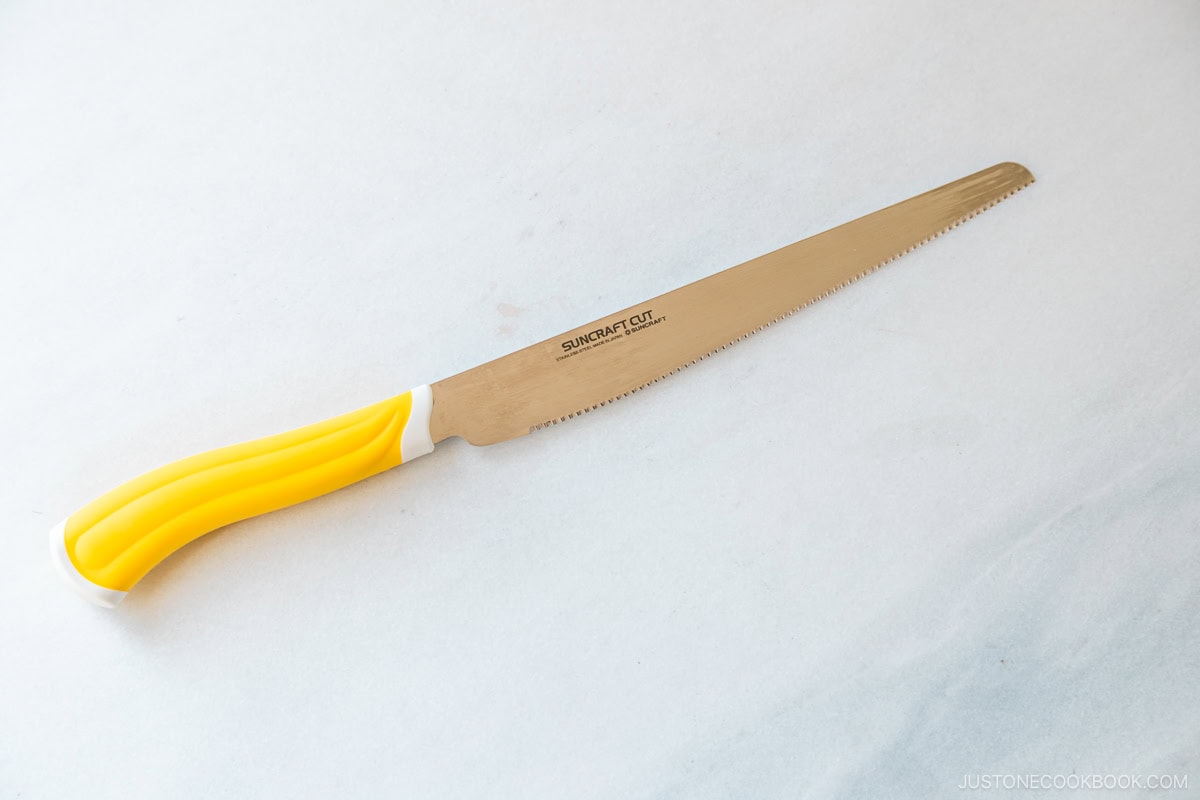
- Use a serrated knife with small teeth. I’ve tried all kinds of knives to cut castella. The only one that worked well was the SUNCRAFT CUT brand bread knife, as per JOC baking assistant Haruka’s advice.
How to Store
To save for later, wrap the individual pieces with plastic wrap. Store for up to 3-4 days at room temperature, 5–7 days in the refrigerator, and 1 month in the freezer.
Frequently Asked Questions
For authentic Japanese castella, you need bread flour. It gives the cake an elastic, bouncy texture. All-purpose flour just cannot produce this texture. The high protein in bread flour also helps the castella achieve a chewier and denser crumb than a regular sponge cake made with cake flour, which has less gluten.
If your cake top starts to wrinkle, you may have overbaked it. If so, your cake will be drier inside and have hard, dry edges. Next time, start checking 10 minutes sooner to see if the cake is done. Also, I encourage you to check your oven’s temperature with an oven thermometer, as the actual temperature inside may differ from the display setting. Every oven is different; please adjust your setting to achieve the correct actual temperature.
You may have underbaked your cake if the top sticks to the Silpat mat. When the moisture in the cake hasn’t fully evaporated, it’s more likely to stick (the top of the cake is moist and soggy) and also more prone to shrinking. Next time, try baking it a few minutes longer until the top is a bit darker and drier (but not wrinkled). Also, your oven’s actual temperature may be lower than what your oven displays. Next time, check it with an oven thermometer and adjust the setting accordingly.
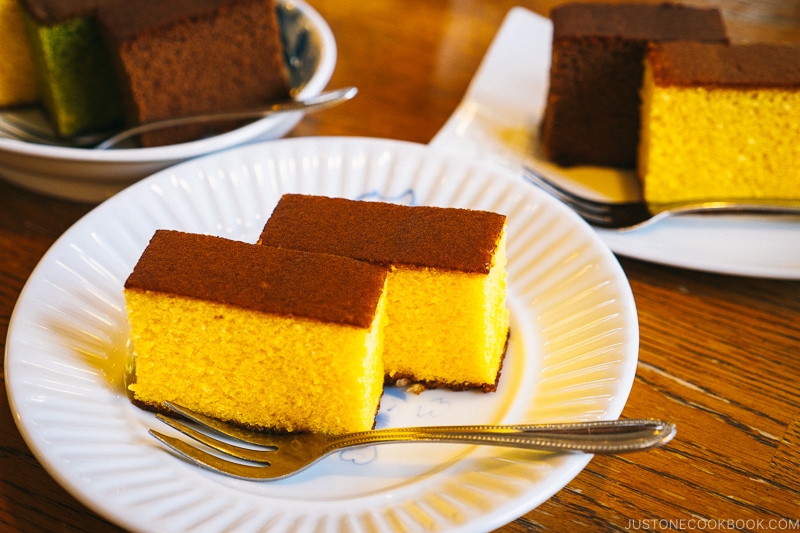
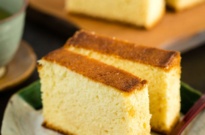
Taiwanese castella cake (or Taiwanese soufflé castella) is an adaptation of Japanese castella cake. It’s jiggly, eggy, and pillowy soft while the Japanese version is denser. Taiwanese castella is similar to a soufflé, where you separate the egg yolks and whites, then whip the egg whites to medium peaks. You fold this meringue into the egg yolk mixture, pour the batter into a cake pan, and bake it in a water bath inside a baking tray. Taiwanese castella also uses different ingredients like cake flour, oil or unsalted butter, vanilla extract, milk, lemon juice, or vinegar.
What to Serve with Castella

- Green Tea
- Japanese Iced Coffee
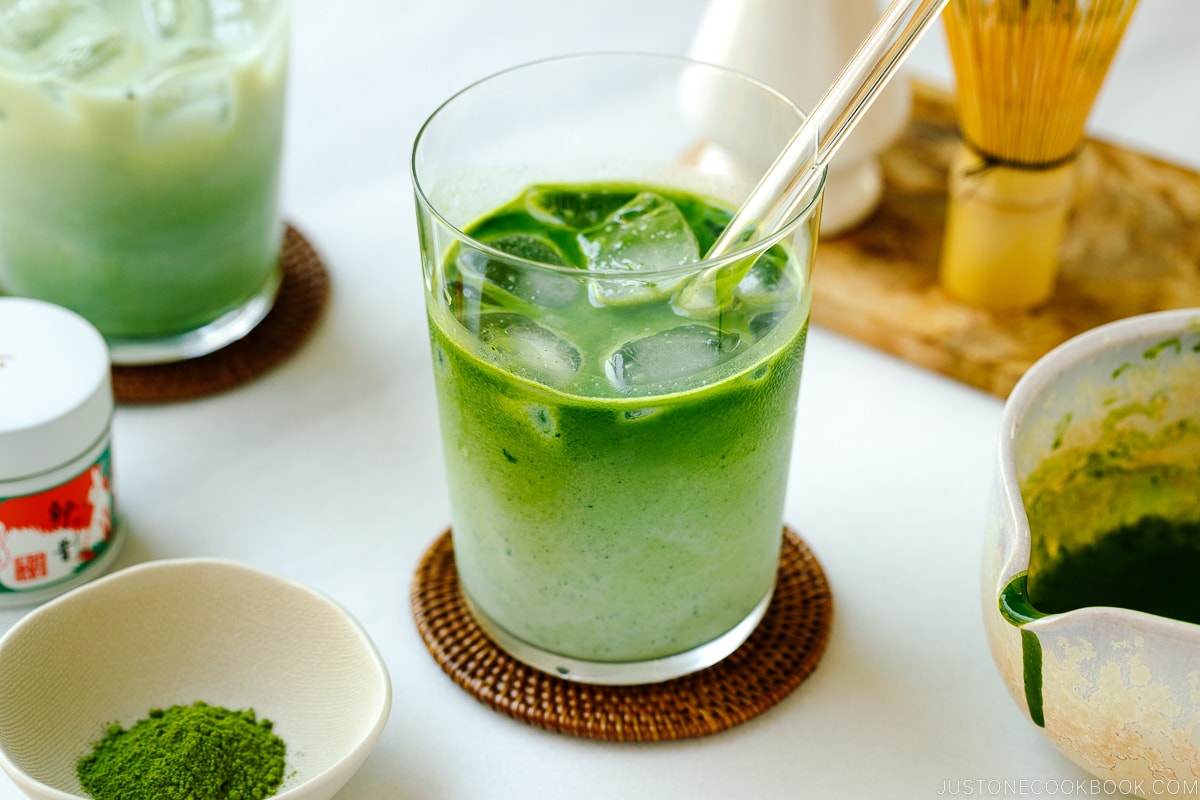
- Iced Matcha Latte
- Hojicha Latte
- In a Japanese Fruit Parfait
Japanese Castella Cake
Video
Ingredients
- 2 Tbsp water
- 3 Tbsp honey
- 1 Tbsp mizuame syrup (glutinous starch syrup) (use the thick type sold in a jar; see the blog post for details; skip if you can't find it)
- 100 g bread flour (¾ cup + 1½ Tbsp; weigh your flour or use the “fluff and sprinkle“ method and level it off)
- 3 large eggs (50 g each w/o shell) (at room temperature—very important!)
- 100 g sugar (½ cup)
- ½ Tbsp white sparkling sugar (you can buy it on Amazon; use zarame coarse sugar if you can find it)
Instructions
Before You Start…
- Please note that this recipe requires a chilling time of 12 hours or overnight.I highly encourage you to weigh your ingredients using a kitchen scale. For weights, click the Metric button above. If you‘re using a cup measure, please follow the “fluff and sprinkle“ method: Fluff your flour with a spoon, sprinkle it into your measuring cup, and level it off. Otherwise, you may scoop more than you need.
- Gather all the ingredients. The eggs must be at room temperature. Preheat the oven to 350ºF (180ºC). *Please see my latest update in the Notes below regarding the oven temperature. For a convection oven, reduce the oven temperature by 25ºF (15ºC) to 325ºF (165ºC). Prepare a spray bottle with water, an offset spatula, and a bamboo skewer. Use a 1 lb baking pan that is light-colored for the best outcome.

To Line the Baking Pan
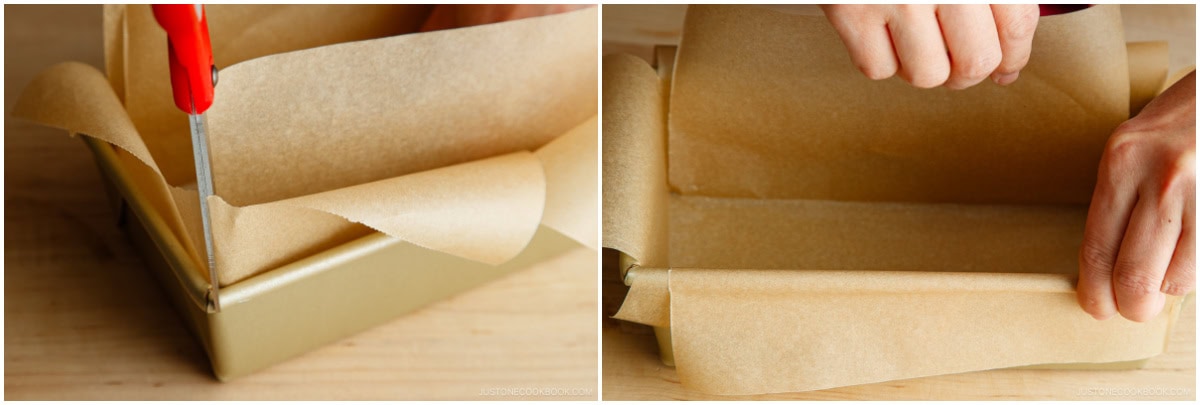
- On your work surface, place a sheet of parchment paper that‘s 13 x 16 inches (30 x 40 cm). Set a 1 lb loaf pan on top (I use a light-colored 1 lb loaf pan that‘s 8½ x 4½ x 2¾ inches or 22 x 11 x 7 cm). Mark the four corners of the loaf pan on the paper. Fold and crease the paper on all four sides following the corner marks.
- Unfold the paper so that the long side of the creased rectangle is in front of you. On the two crease lines pointing toward you, cut slits up to the rectangle‘s left and right corners. Rotate the paper and cut two slits on the opposite long side. You will have four slits total. Then, place the paper in the baking pan, folding and layering the flaps to fit.
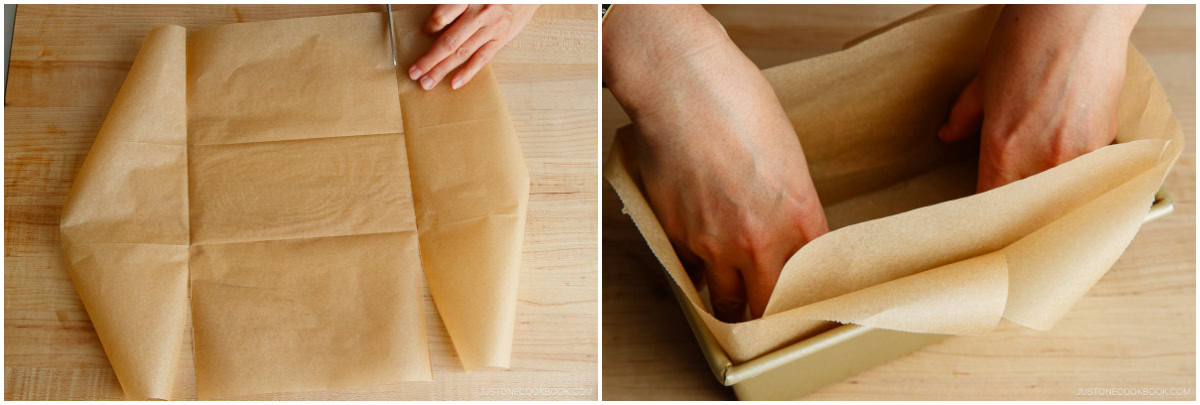
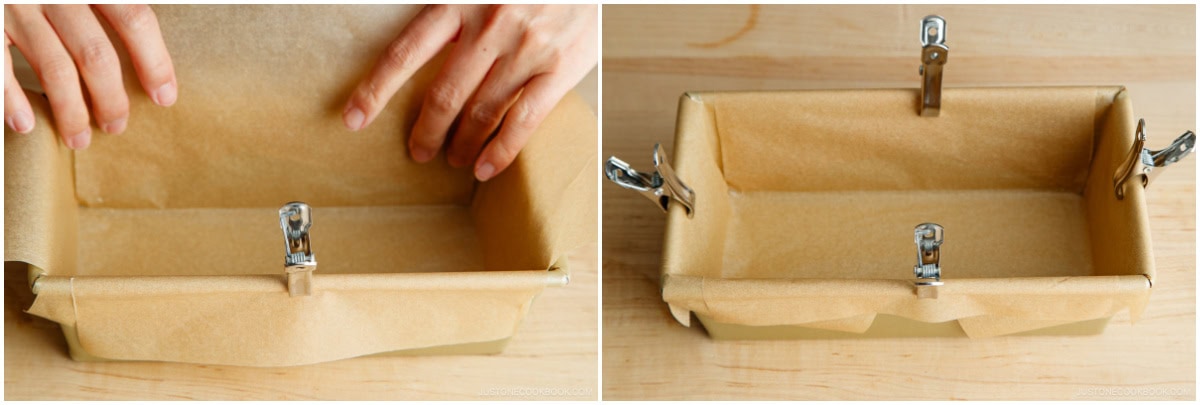
- Cut a slit in each of the corner flaps down to the top edge of the pan. Then, fold down the paper over the pan‘s edges.
- Secure the folded paper onto the edges with stainless steel clips to keep the lining from moving when you mix the batter during baking.
To Prepare the Ingredients
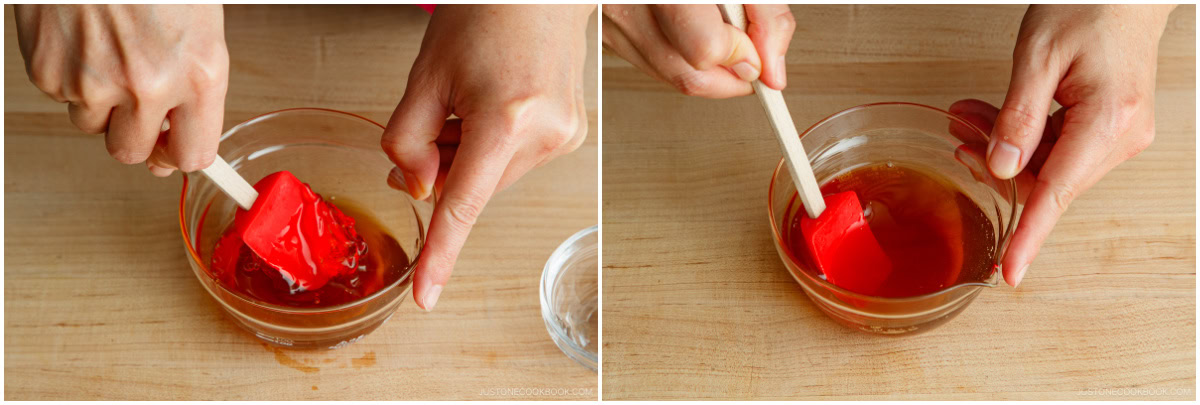
- Combine 2 Tbsp water and 3 Tbsp honey in a small bowl. Then, add 1 Tbsp mizuame syrup (glutinous starch syrup). It‘s super sticky and extremely thick, so use a mini spatula to scrape it from the measuring spoon.
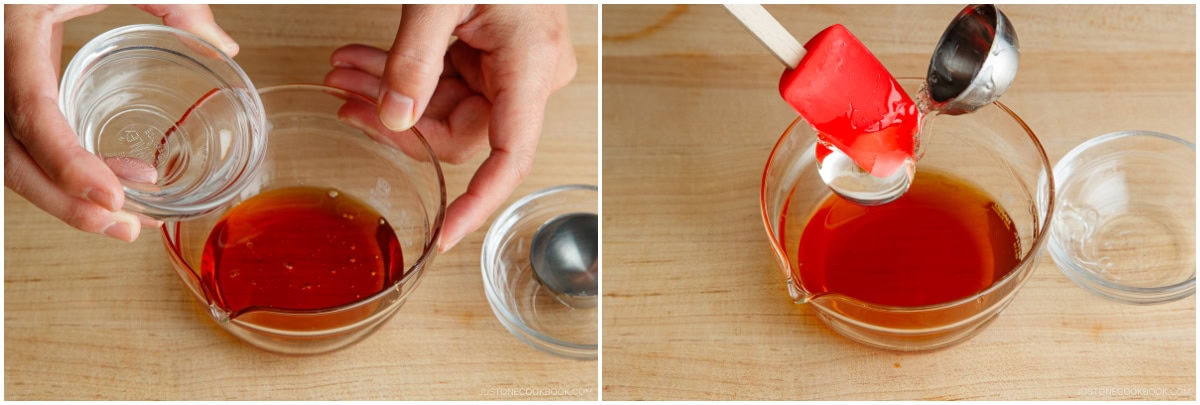
- Take your time to dissolve the mizuame. Press down and mash the mizuame with the mini spatula to facilitate dissolving. Do not microwave the mixture as we do not want to increase the temperature of the batter. Set aside.
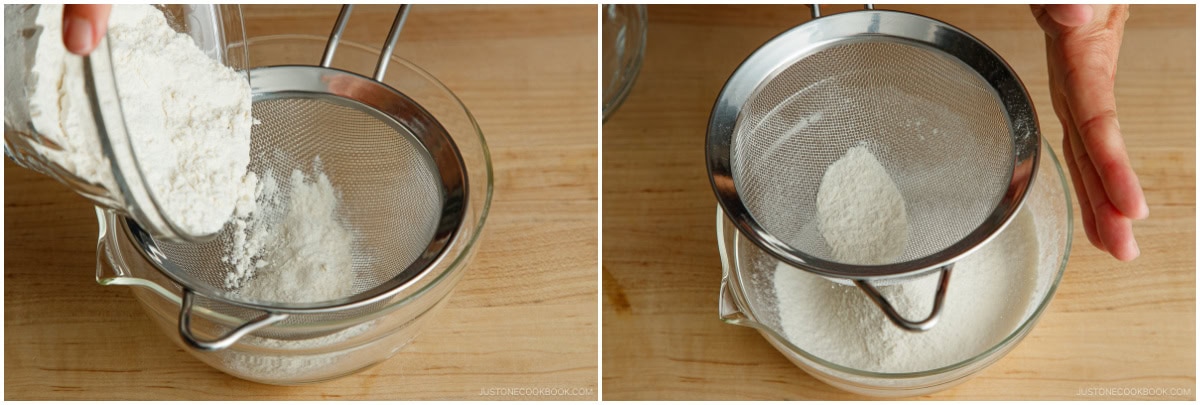
- Sift 100 g bread flour with either a sifter or fine-meshed strainer. Hold the strainer‘s handle with one hand as you gently tap the strainer with the other, and the flour will gradually sift through. Tip: Why bread flour? That's what's traditionally used, and it gives the cake an elastic, bouncy texture that you cannot achieve with all-purpose flour.
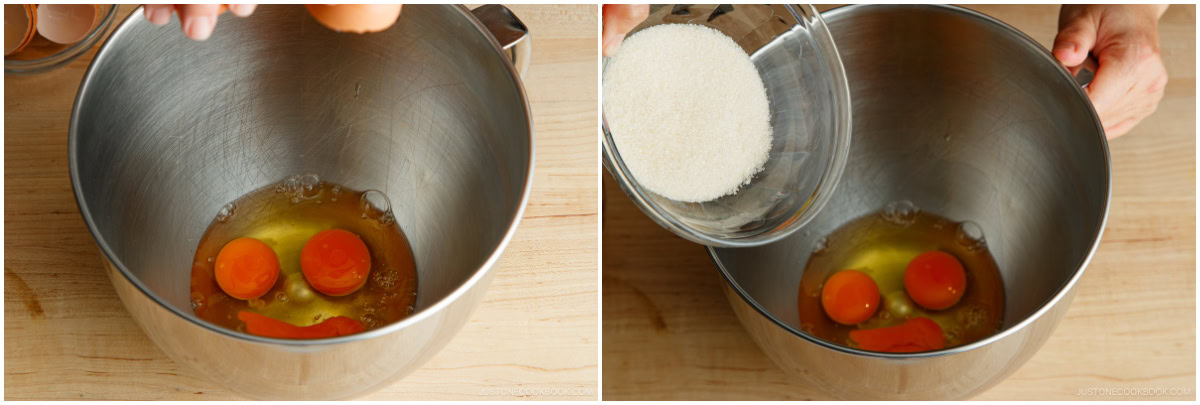
- In the bowl of a stand mixer, crack 3 large eggs (50 g each w/o shell) that are at room temperature. Add 100 g sugar.
To Mix the Batter
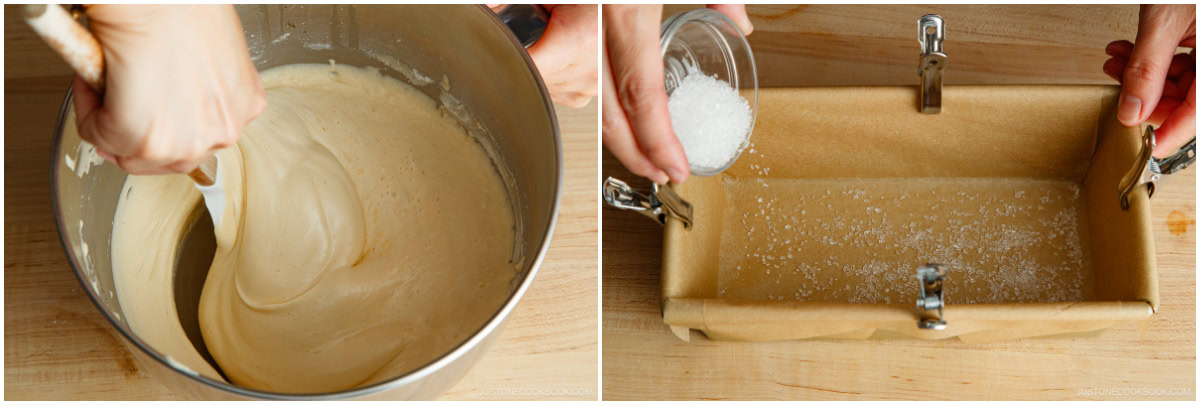
- Fit a stand mixer with the whisk attachment and vigorously beat the eggs and sugar on high speed (Speed 8/10) for 3–5 minutes without stopping. If you beat the eggs with a handheld mixer, it will take more time.
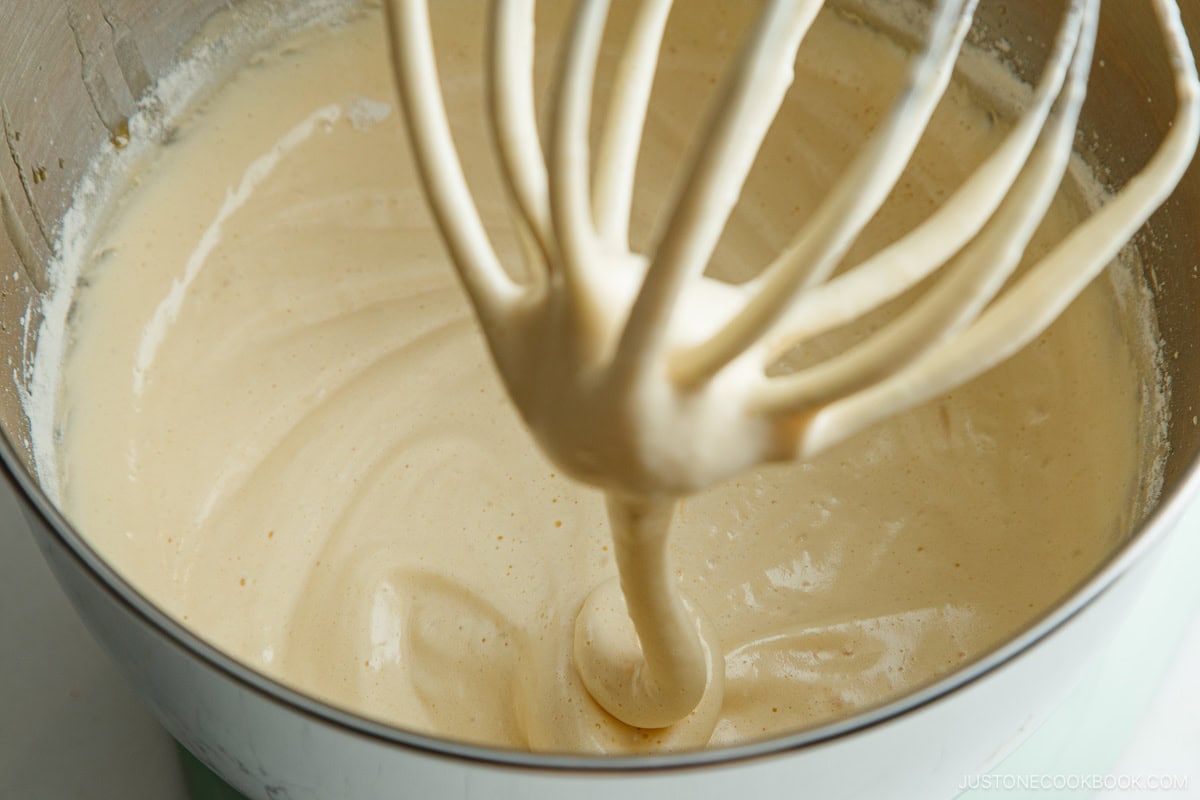
- The beaten eggs will quadruple in volume and have a thick texture and pale yellow color.
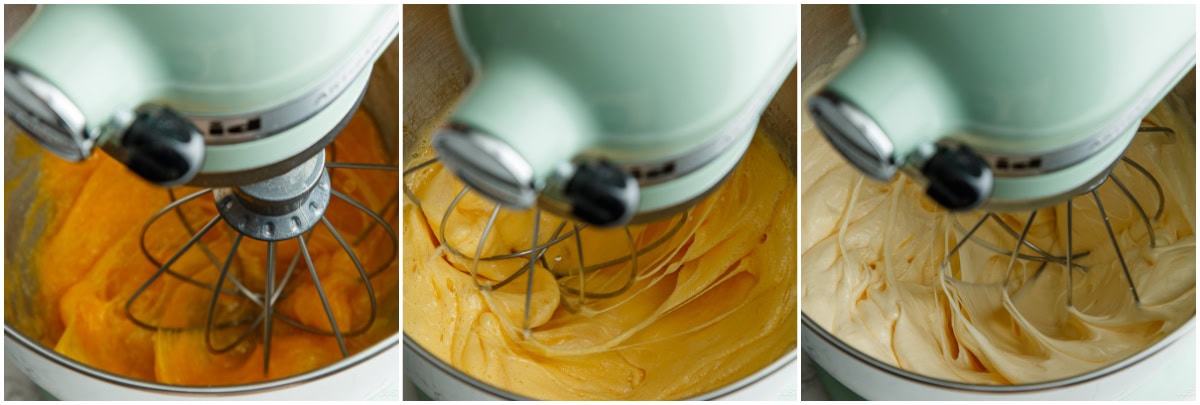
- When you stop the mixer and lift the whisk attachment, the mixture should fall in ribbons.
- Gradually add the honey mixture to the batter while whisking on low speed (Speed 2) until combined, about 30 seconds.
- Gradually add the bread flour while whisking on low speed (Stir) until just combined, for about 30 seconds. Do not overmix.
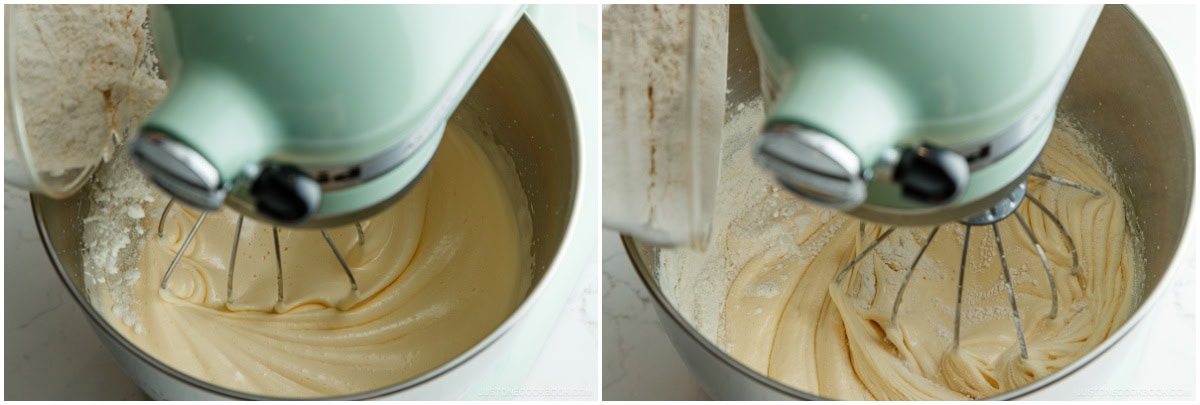
- When the flour is just combined, stop whisking. When you lift the whisk, the batter should fall in ribbons.
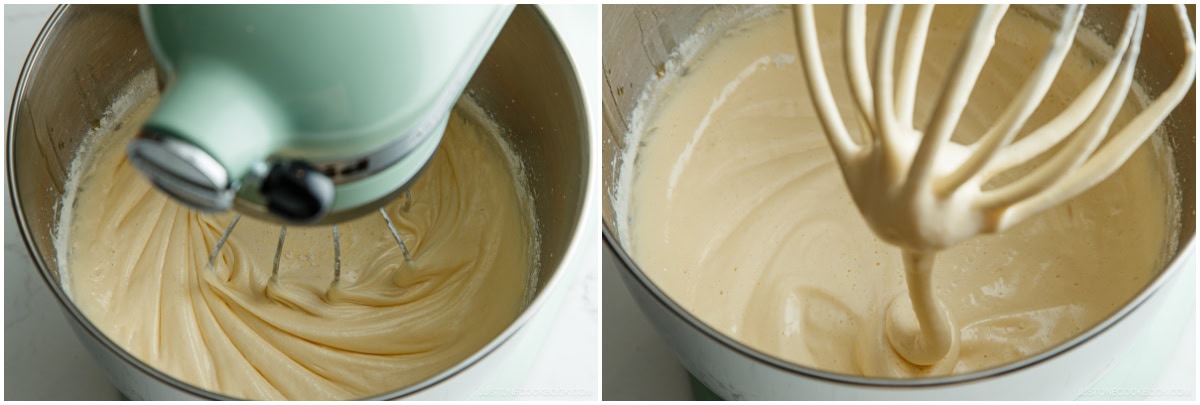
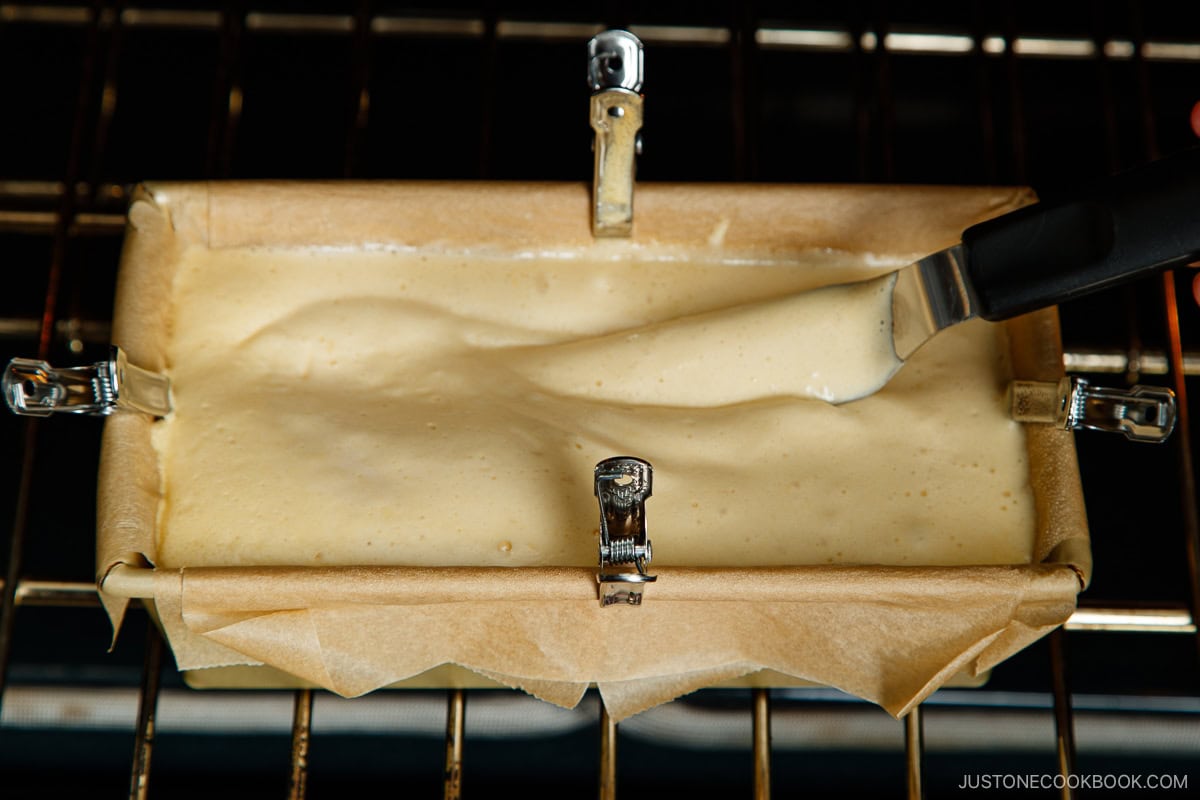
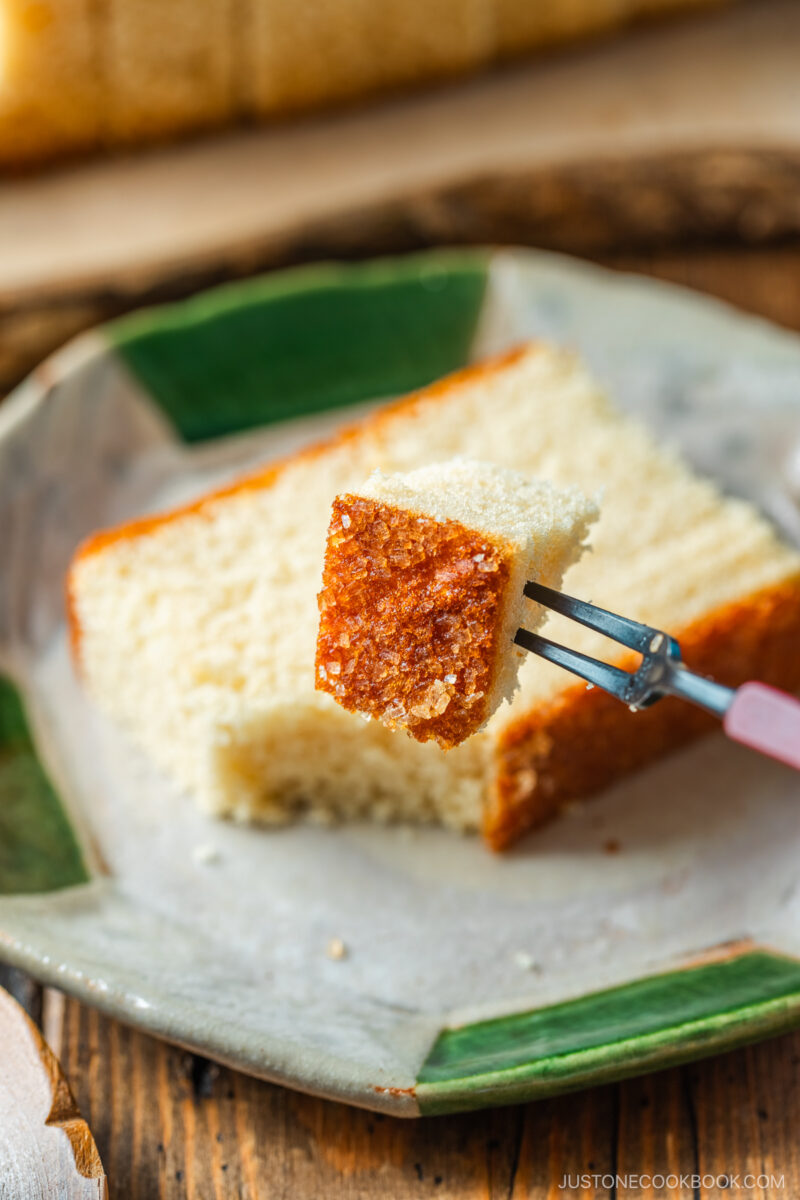
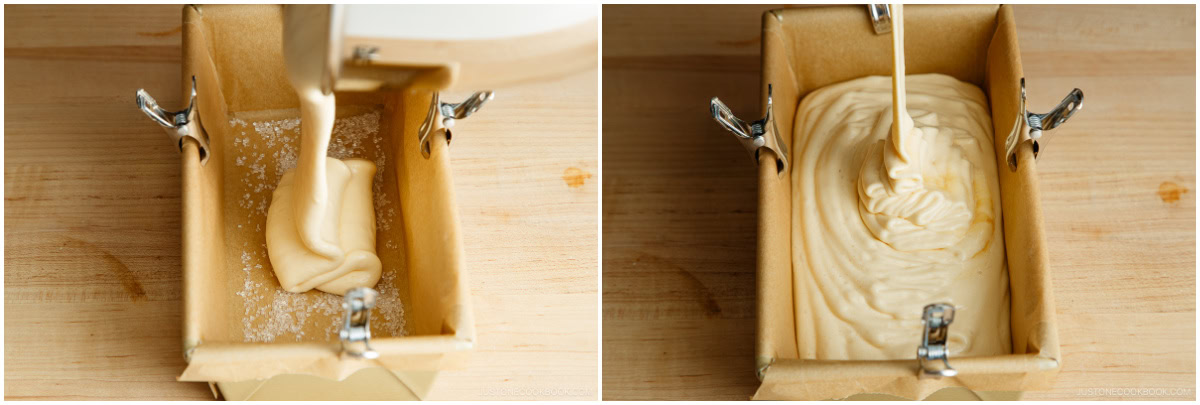
- Using a silicone spatula, scrape the batter from the bowl‘s sides and bottom and gently fold the batter a few times. Next, sprinkle ½ Tbsp white sparkling sugar on the bottom of the lined pan. This sugar will add a crunchy texture to the cake‘s bottom and help retain moisture.
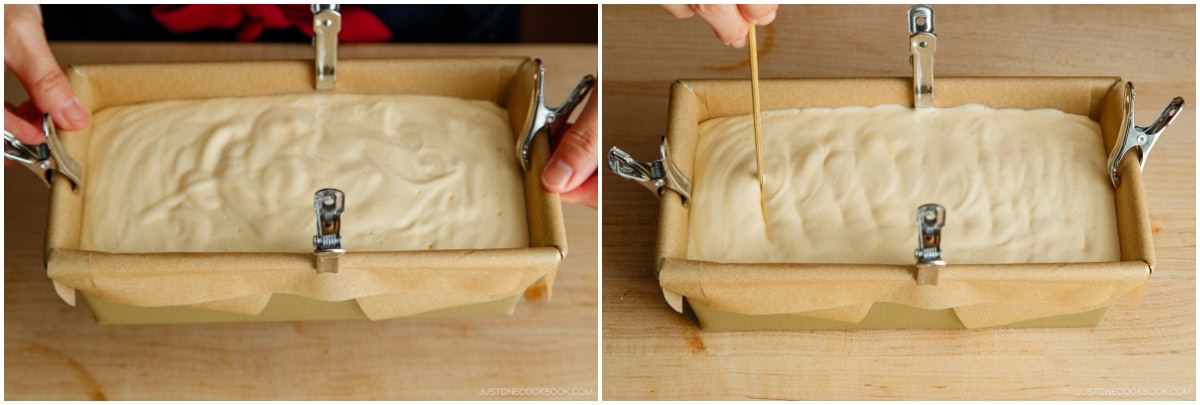
- Pour the batter into the cake pan in just one spot. This helps to minimize air pockets and smooth the top of the batter. Tip: If your pan is smaller than mine, you‘ll need to add the excess batter to another smaller pan and use a shorter bake time.
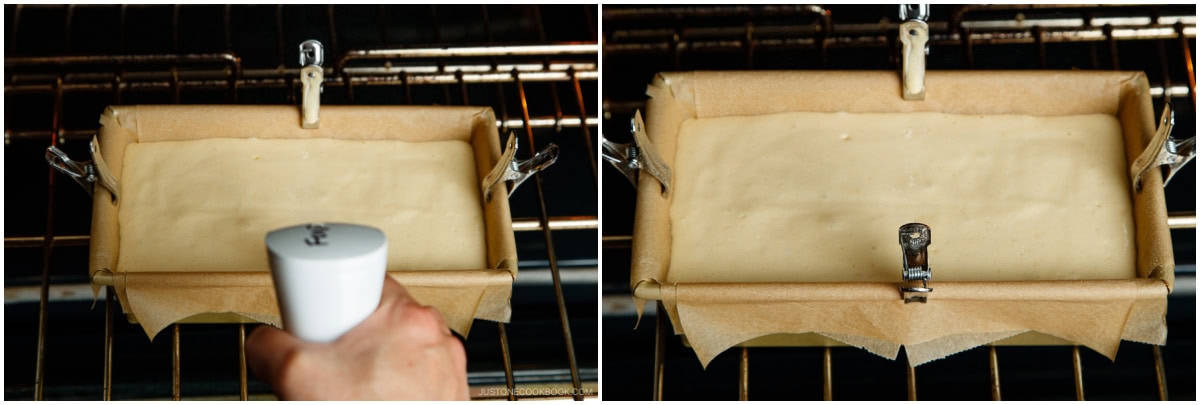
- To level the batter and help remove air pockets, hold the cake pan 2 inches above the counter and drop it flat onto the counter. Then, draw a zigzag line through the batter with a bamboo skewer to further eliminate air bubbles.
To Bake
- Place the cake pan on the middle rack of the preheated oven at 350ºF (180ºC). Close the oven door and set a timer for 2 minutes.

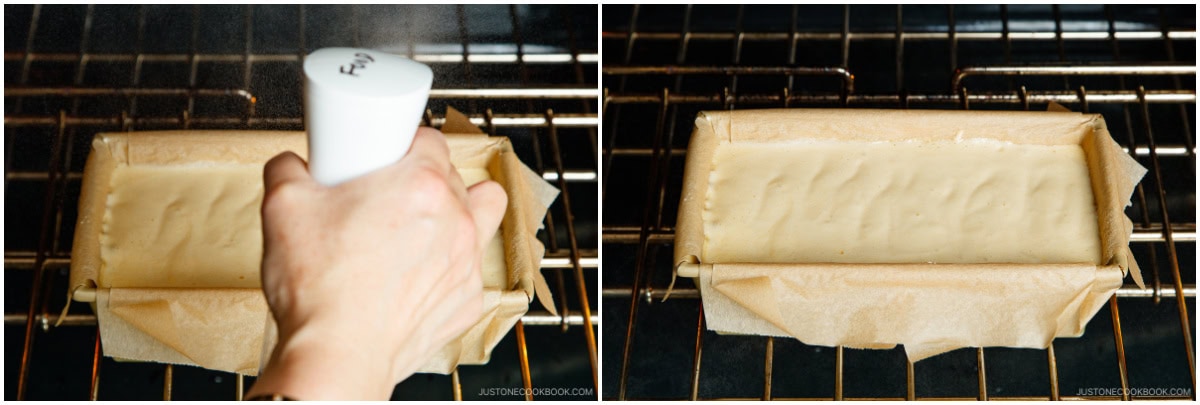
- After the 2-minute timer beeps, reset the timer to 1 minute and complete the following several steps within the next minute (Ideally, within 30–40 seconds, so you can close the oven door ASAP). First, open the oven and spray twice above the cake batter with the spray bottle.
- Next, use an offset spatula to quickly mix and circulate the batter 15 times from the left side, without touching the sparkling sugar at the bottom of the pan. This mixing technique, called awakiri (泡切り, “bubble cut“) in Japanese, helps to remove air pockets and even out the batter‘s temperature so the cake rises evenly without cracking.
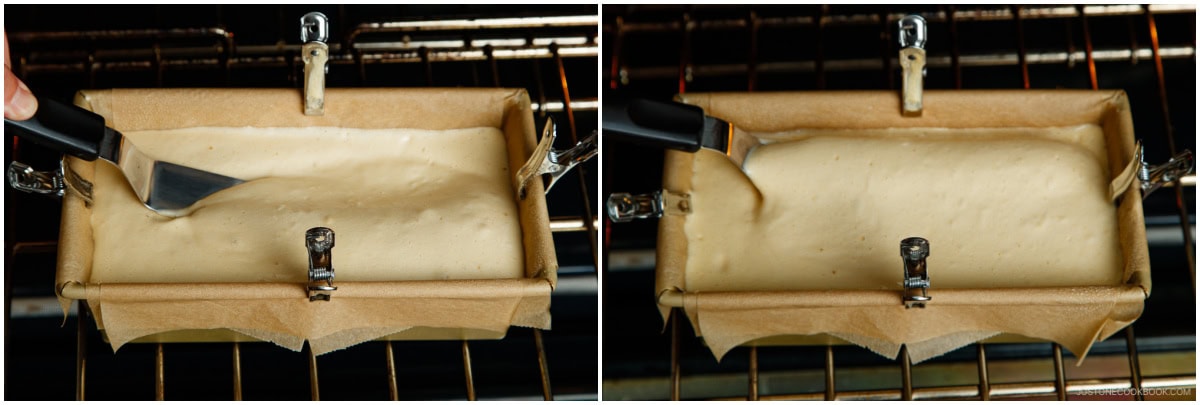
- Finally, quickly mix and circulate the batter 15 times from the right side. Shake off the excess batter from the spatula and close the oven door. Reset the timer to 2 minutes. Repeat this process (Step 2 to Step 4) 3 more times.
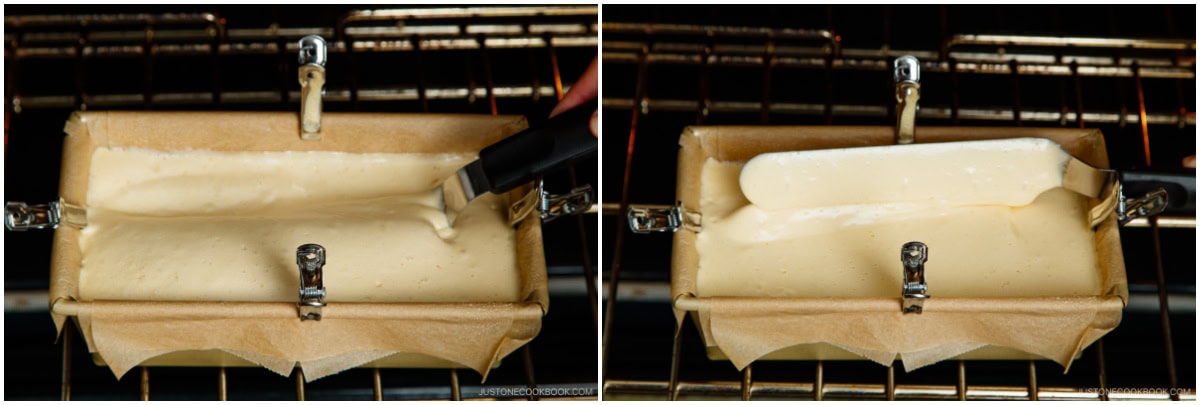
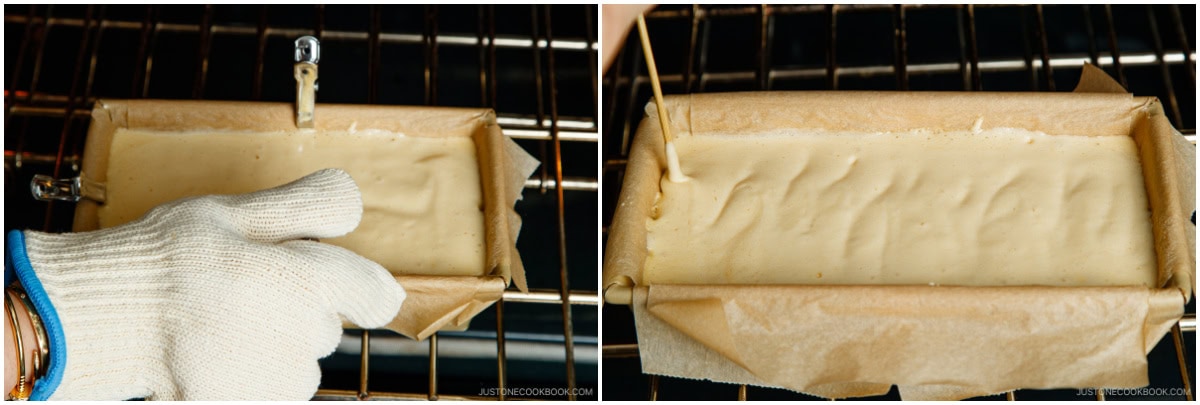
- On the 4th and final time, after you finish the mixing process, remove the stainless steel clips. Run the bamboo skewer through the batter. If any of the clips were submerged in the batter, fill in the clip marks in the batter with the skewer.
- Spray water into the oven, then continue to bake for another 30–40 minutes.
- The cake is done if it bounces back when you touch it with your finger. Tip: If your cake top looks wrinkled or cracked, you may have overbaked it. Next time, check earlier to see if it‘s done. If the top is lighter in color and sticky, you may have underbaked it. Next time, you need to increase the oven temperature. I highly encourage you to check your actual oven temperature with an oven thermometer to see if it‘s running hotter than the display setting and adjust accordingly.
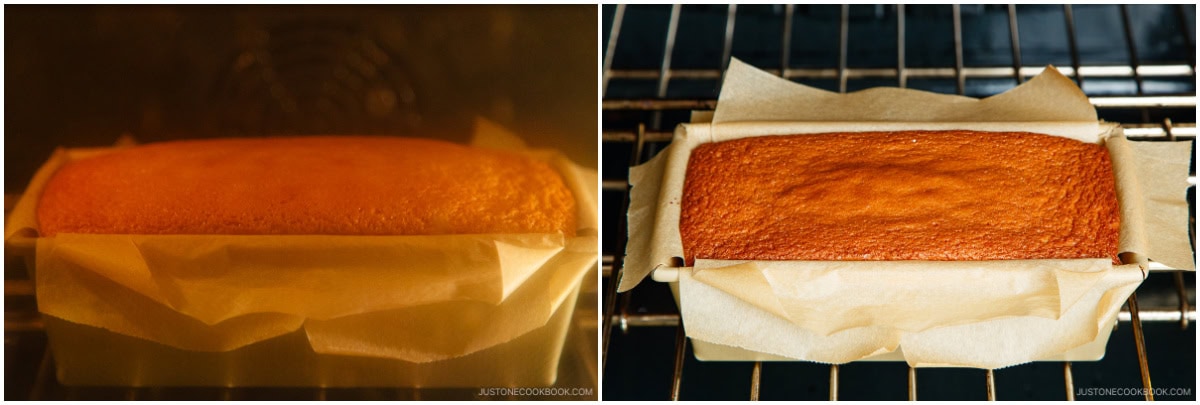
- Remove the castella from the oven. To help prevent shrinkage, drop the pan twice onto the countertop to release the steam vapors from the cake. Next, invert the cake from the pan onto a nonstick silicone mat (I use Silpat and highly recommend it). Leave the parchment paper in place. Leave it upside down and let it cool to room temperature, about 45–60 minutes. Tip: I found that a nonstick silicone mat works perfectly here, as parchment paper may stick to the cake. However, if your cake sticks to the silicone mat, you may have underbaked it. Next time, increase the oven temperature or bake it a few minutes longer. Also, check your actual oven temperature to see if it's running cooler than the display setting and adjust accordingly.
To Chill Overnight
- Once cooled, immediately wrap the cake with its parchment paper in plastic wrap to retain moisture. Then, put the wrapped cake in the refrigerator and store overnight (8–12 hours). This will help the cake develop a fine and moist texture.
To Trim the Castella
- Remove the cake from the refrigerator. Discard the plastic and carefully peel off the parchment paper.
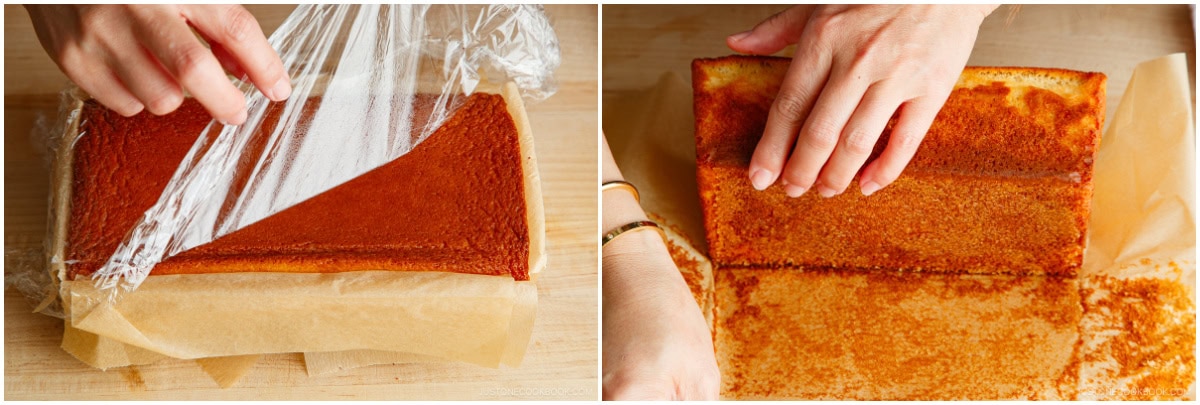
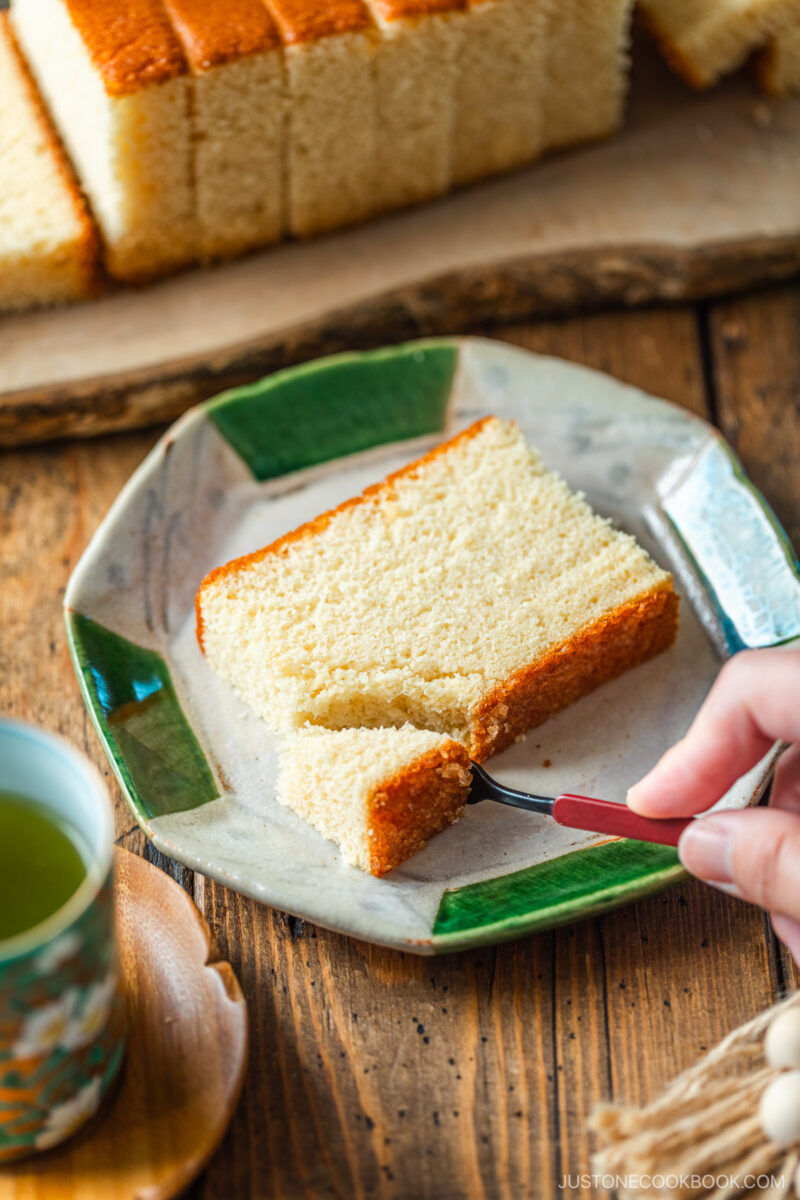
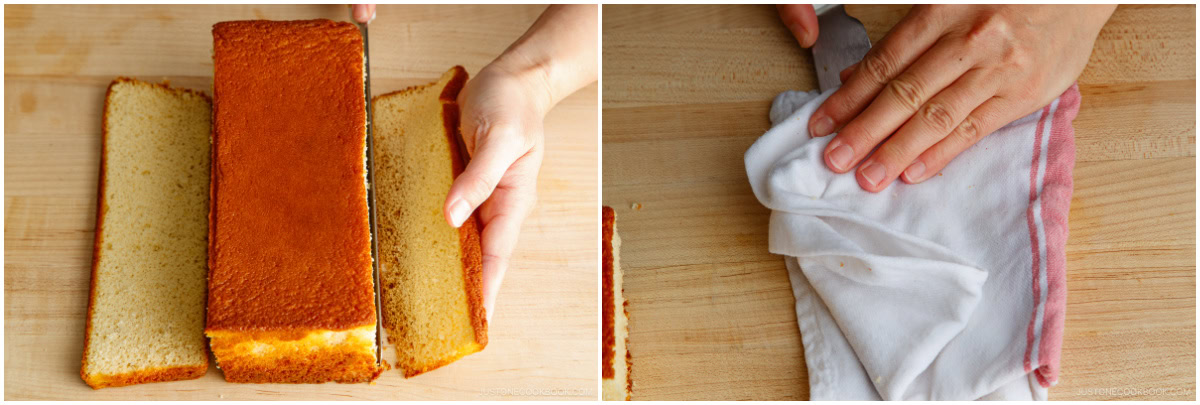
- Now, we‘ll trim the sides of the castella to expose the yellow body of the cake. First, slice off the crust from the two long sides of the cake with a sharp bread knife (I highly recommend using a Suncraft bread knife). Use a damp towel to wipe off the crumbs from the blade after every cut. Tip: These castella crusts are moist and delicious to snack on!
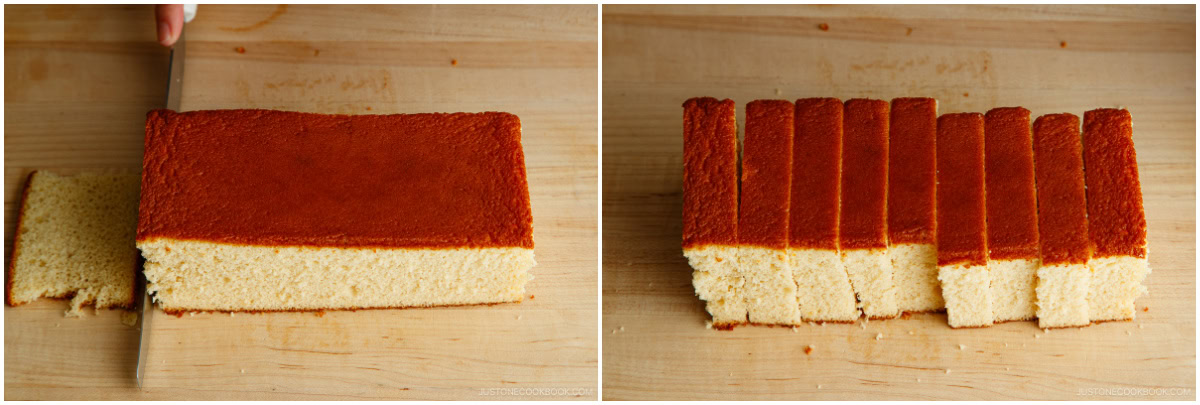
- Then, slice off the crust from the two short sides of the cake. Do not trim the top and bottom of the cake. Cut the cake crosswise into slices about ¾ inch (2 cm) thick. You will get 8–9 slices total.
To Serve
- Serve it with tea or coffee, if you‘d like. Enjoy!
To Store
- To save for later, wrap individual pieces with plastic wrap. Store for up to 3–4 days at room temperature, 5–7 days in the refrigerator, and 1 month in the freezer.
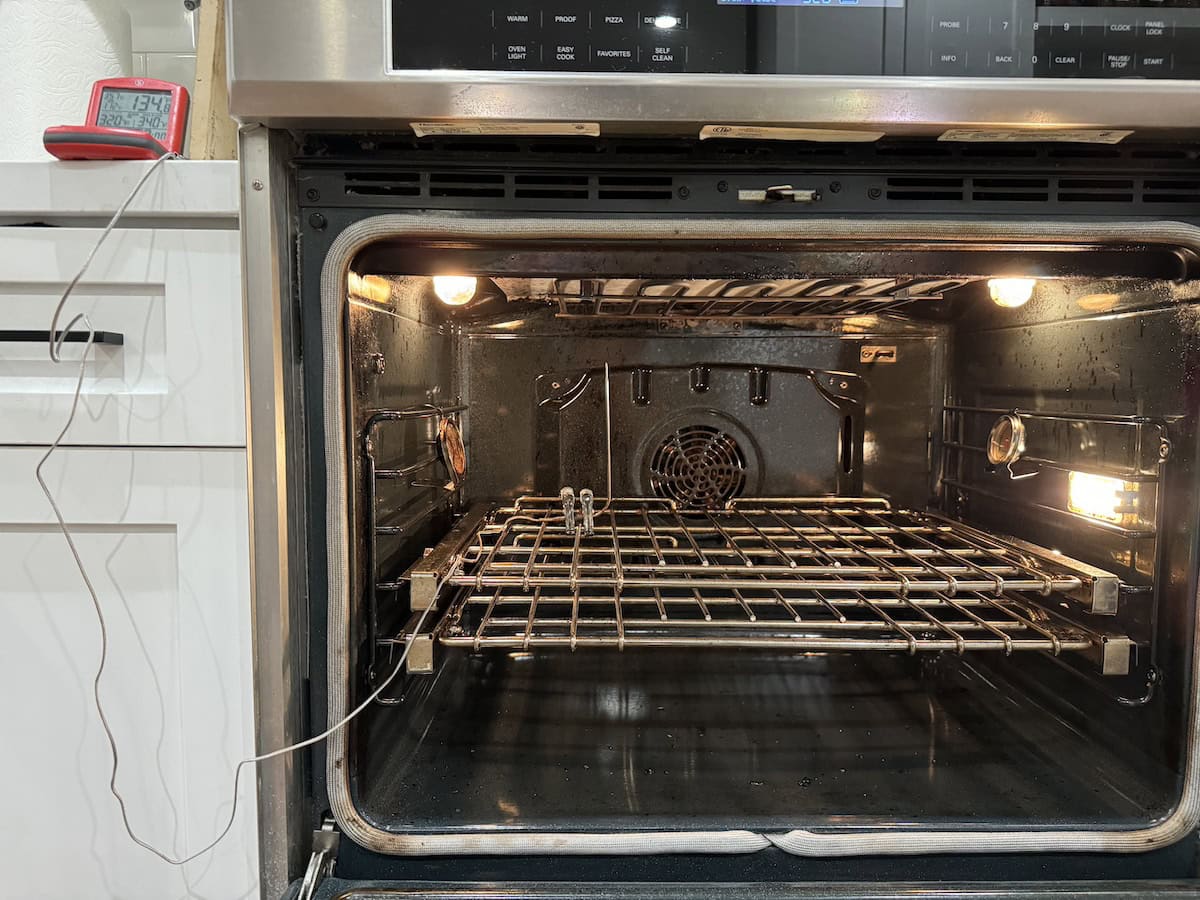
Notes
- Preheat oven to 350°F (180°C) for 10 minutes
- Before placing the loaf pan in the oven — 350°F
- When you close the oven door — 324°F
- Before Mix 1 — 339°F
- After Mix 1 — 162°F
- Before Mix 2 — 302°F
- After Mix 2 — 131°F
- Before Mix 3 — 282°F
- After Mix 3 — 142°F
- Before Mix 4 — 271°F
- After Mix 4 — 113°F
- 15 minutes (halfway) — 340°F
- 20 minutes — 355°F
- 30 minutes (before taking out of the oven) — 353ºF
Nutrition
Editor’s Note: This post was originally published on September 14, 2013. It was updated with a slightly revised recipe, helpful tips and techniques, and new images on May 2, 2024, and republished on May 24, 2024. In April 2025, after baking more Castella cakes and observing variables—like not always being able to close the oven door quickly—I realized how easily a large American oven can lose heat during multiple awakiri steps. For some readers, the oven struggles to return to the correct temperature, which affects the final result. To address this, I made two small adjustments: 1) I increased the oven temperature from 340°F (170°C) to 350°F (180°C). 2) I shortened the awakiri time. Circulating the batter is still essential, but we no longer need the full minute to do so. These changes help reduce drastic heat loss while keep the process intact. That said, we still expect a slight temperature drop, which is why we now start at a slightly higher setting. If you’re using a smaller oven (such as a microwave-sized one in Japan), you may continue to use 340°F (170°C).


I watched your video many many times until I was sure on how to make the Castella cake.Finally I tried to bake it and it turned out well. So I decided to make six cakes for the church lunch and the following week another six cakes for the senior center.They all loved them! They did not turn out as beautiful as yours but tasted delicious.Thank you.
Hi Dorothy! Thank you so much for watching the YouTube video! I’m SO impressed that you made 6 cakes!!! That’s amazing. I’m really really happy that your friends at the church liked them. Thank you very much for your feedback. 🙂
I failed ogura cake 8 times so I never thought I could succeed in baking a castella on my first try! Thanks to your detailed recipe and instruction! It is sooooo delicious but I have a small problem. When I slice the cake, there is a lot of crumbs, do you know why? I’ve watched your video and you sliced the cake without any falling crumbs. Anyway, I’m really thankful to find your blog, there are so many lovely recipes that I wanna try!
Hi Anna! Is Ogura Cake like a sponge cake? I like anko and that sounds delicious. I’m so happy to hear your Castella was successful! YAY!
About slicing the cake…. I use a very sharp knife! I love this knife… no crumbs when I cut bread etc. This should help you!
http://www.amazon.com/gp/product/B0000DJYF3/ref=as_li_qf_sp_asin_il_tl?ie=UTF8&camp=1789&creative=9325&creativeASIN=B0000DJYF3&linkCode=as2&tag=jusonecoo-20
Yes ogura cake is like a sponge cake but it is very light, cottony and soft. Do give it a try and share with us! Thanks for the tips, I’ll try again next time, cheers!
Thank you so much for this recipe! Luckily for me you posted this right before my cookery lesson where I had to make a decorated sponge cake from another country, and both the recipe and the cake were great: the cake tasted amazing and was, I thought, really unusual. So thank you for the recipe! 🙂
Hi Abbey! Thank you so much for your feedback! I’m glad you enjoyed it. 🙂
Hi Nami!
I tried this recipe yesterday and just got it out of the fridge today and it tasted delicious! Itˊs got a light sweetness to it which I really enjoyed! One question though, the texture of the cake came out a little bit my crumbly then I think it should be, so do you have any suggestions maybe? Thanks for the awesome recipe 😀
Hi Michelle! Thank you so much for trying this recipe! I’m glad you liked the flavor. Now about the texture. So it was crumbly instead of spongy, right? Hmm… For all my trials, I never had “crumbly” texture and texture was always correct (besides the time that bottom of castella wasn’t cooked). I wonder if reducing dry ingredients will help the texture more moist. But I’m afraid that cake may sink by changing the ratio. How about the length of baking time. Do you think you can cut down and keep it a little more moist? Make sure to wrap the cake ASAP to keep the moist as well. Hope this helps… 🙂
Ah I see! I didnˊt wrap the cake straight away but Iˊll definitely wrap it it asap next time I make it again. I also gave some to my Mom today and she loved it! She said it reminded her of something she used it eat when she was little so thanks again!! 🙂
hi Nami, i have tried this recipe and it works, thank you, it’s such a delicious cake! but when i made another experiment that i put matcha powder together with the flour, the batter sink and when i bake it in the oven, it won’t rise. what do you think the problem is?
Hi Quinn! I’m so happy! Yay! I started to get more positive responses from readers (not just me!) and I feel like I can finally breathe! Thank you for letting me know.
I wonder if wet vs dry ratio didn’t work out. I’m not sure if you tried my original recipe or updated recipe (I added 1 1/2 Tbsp more bread flour) but maybe you can adjust the green tea powder/bread flour amount – it’s easier than reducing wet ingredients?
What do you think?
I’ve tried your original recipe, (1 cup + 1 tbs flour) and i added 2.5 tbs of matcha powder, and suddenly the fluffy egg batter sink, not sure if i added to much matcha. i might give it another try. However, the honey castella is really good. thank you for the recipe! one of the easiest recipe for castella yet so good..waiting forward for another yummy recipe 🙂
Hi Quinn! Eventually I want to make green tea version too, and thank you for trying it and letting me know your experience. How about adding green tea powder into water? I wonder if that helps as I saw it in some other recipes before. But I’m super happy to hear you think the regular one is good!! Thank you!!!
Nami,
Thank you for the hardwork to develop the castella recipe. On the recipe, it said 200 g bread flour. In the video, it showed a different number ( less flour). Does it make it softer by using less amount indicated in the video? I bake a batch with 200 g. Just wondering??
Hi Lily! Thank you for reminding me. As I noted in the post, I updated the recipe just recently after trying with readers’ suggestion (to add more flour). Yes, 200 g is updated version. It’s too bad I cannot fix the video… I think I can make a note of it in the YouTube. I’ll try to update it soon. I hope your Castella turned out well. 🙂
I tried making this cake yesterday and it turned out really really well. I just think that its a tad too sweet. So the next time i make it, i’ll put in less castor sugar. Great recipe!! Thank you so much for the step by step photos and video. Much appreciated!
Hi Sally! Thank you so much for trying this recipe! I’m so happy to hear the cake turned out well. Yay! Hope you find the right amount of sugar for your preference next time. 🙂 Thank you for writing feedback!
Your Castella is beautiful! I agree with you, each oven works differently and even the different brand of ingredients would make a difference in the end result of the baked goods too! Guess we all have to give it a try and make the adjustment, if any.
I really enjoyed watching your video. You did a nice job and detailed tutorial in lining the cake pan too, love it. 🙂
I know the reason for the winkle cake top! (I bake quite a lot and I noticed this from my experience). If the flour to “wet ingredients” ratio is low, it’s easy to result with a wrinkle cake top as the cake shrink a little when it’s done baking/as it cools. Because the air bubble you beat into the batter is not substantial enough to hold the shape of the cake. That’s why when you open the oven door to add the foil on top, your cake sunk.
Of course, for texture reason, you might not want to increase the amount of flour just to avoid this because that would change the taste and texture of your cake. My trick to solve the wrinkle top is to leave the cake inside the oven to cool after the baking is done, with the oven turn off and oven door ajar. This works like a charm! Give this trick a try, it works on my cakes all the time. 😉
Hi Amy! Sorry about my late response. Thank you for your compliment and great advice!!! Yeah, adjustment is almost necessary when we require an oven. I haven’t been a baker, so I only know my oven and I was hoping my oven acts “standard”…despite it’s pretty old. :/
Thank you so much for letting me know the reason of wrinkle cake top! In fact, I tested again this past weekend by adding a little more flour (1 1/2 tbsp. more) and it worked!!!! I also left the oven door ajar for a little bit too (but I think the trick was the flour).
THANK YOU SO MUCH Amy!! I can finally move on to different recipes after trying this recipe for xx times (you probably don’t want to know. Haha!).
No need to apologize at all. I know we all have busy schedules, especially with the kids. 🙂
I’m glad to hear that adding a little more flour worked for you and solved the issue. And I totally know what you’re talking about when testing recipes for the xx times, especially in baking! It takes a while to perfect a recipe. 🙂 It’s a lot easier in cooking than baking though. Won’t you agree?
Hi Amy! I do agree, and which is why I have been a bit reluctant when it comes to baking. My mom wasn’t a baker and I didn’t grow up seeing someone bake… so I don’t have any common sense knowledge about baking which makes me very… uncomfortable. I seriously consider I need a baking teacher who would bake with me to tell me what I do wrong! 🙂 Thank you again for your great help! xo
Hi Nami, is this recipe already included 1 1/2 tbsp or more flour? Thanks.
Hi Inge! Yes, the recipe was already updated to 200 gram, but please use 1 ½ cup + 2 ½ Tbsp if you’re using a cup measurement. And Please do measure correctly following this method.
https://www.justonecookbook.com/how-to-measure-flour/
Dear Ms. Nami
I have tried this recipe for two time but the top of cake always became curved and broken. Could you please offer me any tip to solve it? どうもありがとうございました
Hi Jend! Thank you for trying this recipe! Please read the post – I mentioned about similar issue (under Failure 2″) and wrote some tips. The stage where you beat eggs and folding in flour part is the most crucial part (and I cannot see how you do it so it’s a bit hard to give advice what was wrong or what went wrong). Also adjust the baking time according to your oven. Hope you won’t give up. 🙂 がんばってください!
Hi there, just wondering if I can beat the eggs with less sugar? Will it affect the volume?
Hi Grace! Yes, you can. 🙂 But you really have to test it out as I haven’t reduced the sugar yet. Some recipe uses less sugar but I really think this flavor is just right for Castella. 🙂
Nami-san,
Thank you for this recipe! I never thought I’d make Castella at home! 早速作ってみました。
The flavor was just perfect, but I had some issues with the texture. Actually, the bottom was perfect, but the top was a bit too light, more like a sponge cake. 何ででしょう?
Hi Aya-san! わぁ、早速作ってくれてありがとう! I’ll write in English so others can read. 🙂 I’m glad the flavor was perfect – I believe the taste is very good too. Now about the texture. Did you mean, bottom and top have two different texture, bottom is more like Castella’s bouncy texture (もっちり) and top is more like crumby like typical sponge cake (ぼそぼそっとした感じ?)? I assume you followed my recipe precisely without adapting. The texture of the cake is different on the first day before storing in the fridge and next day after 12 hours. The texture becomes more refined than first day. I have to ask if you store enough hours in the fridge. When I first tried Castella, I couldn’t resit to eat on the first day…but completely amazed how the texture and flavor improved the next day. Maybe the moisture in the wrap does great magic. What do you think?
Nami-san,
thank you for your reply! My observations are based only on the first slice I had after leaving it in the fridge overnight 🙂
The bottom (when it was baking, not when it was cooled in the fridge) is very nice and very typical Castella texture (もっちり、しっとり)while the top is much lighter (ふわっふわ). Maybe I beat the eggs too long?
I will try again later today and see if the ‘magic’ from the wrap made any difference!
Aya-san, from what you wrote, it sounds like you didn’t mix the batter enough after you added flour. Do you think it could be possible? It’s hard to know when to stop mixing, as you cannot overmix or undermix it… You just need to make sure you fold the flour in and mix it all together. Some recipes say to mix very well and others say not too much. Kasutera recipe is really confusing! You can tell right away when you cut one of the kasutera cakes after you bake it and see inside the sponge and taste it. Then the other cake you put it in fridge overnight. It’s a lot easier to cut after being refrigerated because the kasutera becomes refine texture. Hope it worked well the 2nd time. 🙂
Hi Nami, I tried this last night and refrigerated it overnight. Although the flavour is spot on, the texture came out all wrong. It’s a bit rubbery and dense, and I also got a big crack on top. Do you perhaps know where I went wrong..? Thank you!
Hi Naomi,
Thank you very much for trying this recipe!
If the oven temperature is too high, the top of the cake will crack. It’s possible that your oven temperature was a little higher than your oven shows. We recommend lowering the temperature next time and make sure to use parchment paper inside the pan.
As for texture, review the instruction in Step 8,9,10 and don’t over mix the eggs or batter.
We hope this helps, and next time will be successful!🙂
I’m thinking your cake sank when you try to cover with the aluminium foil is due to the change in temperature. Once you open the oven door, the hot air in the oven escapes and cool air goes in, hence the cake sinks as its structure is not firm yet. You can try baking at a lower temperature for a longer period, once the centre structure is firm, you then place the aluminium foil over the top to prevent over browning. I hope this helps!
Hi Lyng! Thank you for your feedback!
When I started at higher temp to brown the top, and lower the temperature to cook slowly (following someone’s recipes), I needed to put the foil pretty early in baking process as the top is already getting too brown. I think maybe oven temp was too high that I needed to cover such an early stage of baking process (at least for my oven).
For other times, I cover with aluminum foil toward the very end. So maybe the structure wasn’t firm that time. The baking time was pretty long time already by then, so I assume somehow it took a longer time to make the cake to be firm. Could be wrong temp, again.
I never imagined It’s so hard to control the right oven temperature to bake and the right amount of baking time. If I bake at low temp for too long, do you think the Castella will be drier? I remember I tried once baking at lower temp than this recipe, and the top didn’t turn rich golden brown like Castella should have despite the long baking time.
Thank you so much for helping me! The current recipe doesn’t require aluminum foil for me, but I’ll make sure if the cake is firm before covering the aluminum foil next time I need to do that!
Now only problem is the wrinkly top. I assume this is partly due to small sinking… I wonder if the cake rise too high and couldn’t support when it slowly decrease the height… So much to think about (and I’m still obsessed to fix this. haha).
You have tried so many times to get things right, I must salute you for all your efforts!
If you have tried baking the cake at a lower temperature previously and the top didn’t turn golden brown, maybe towards the last 5 mins of baking, you can up the temperature by 10 degrees celcius to give the cake a nice golden hue on top.
The other option I can think of to prevent the cake getting dry by the long baking time is to bake the cake with a bain marie. The water should help to prevent the cake from drying up and keep the moisture intact.
To address the shrinking issue, maybe you can slowly let the cake cook down in the oven by leaving the oven door slightly ajar. Usually the shrinking is caused by the impact of the cooler air. If the cake can gradually cool down, the shrinking may minimise. However, you gotta take note that the residual heat may still cause the cake to continue cooking, so you gotta factor in this “additional cooking time” by adjusting the total baking time.
Hi Lyng! Thank you so much. I’m just very stubborn and wanted to get it right, especially if I share the recipe publicly… 🙂
Thank you again for your helpful tips as they are not only helpful for me but also for other readers!
Okay, I will remember to raise the temp by 50F (10C) for the final 5 minutes. That’s good to remember when the top is not golden brown. It’s better than baking for a long time, waiting and waiting to turn the color…
Yeah bain marie creates a gentle and uniform heat around the food – I wonder if it works for this recipe. I may check it out one of the loaf to compare.
My Japanese Cheesecake recipe requires leaving the oven door ajar, but I haven’t done it for this. I’ll stop baking slightly earlier and try this method. I think my cake starts wrinkling a bit already by the time I take out from the oven. I wonder if it rises too high which ends up with falling a bit and that creates wrinkles.
Ahhhh so many things to still test and improve. Thank you so so much for your helpful tips!
I love Castella, paired with a nice cup of green tea. Delish. I live in Germany though and we have different flour distinctions… type 405 and 505 are the most popular. Your instructions had bread flour, type 505 is used to make yeast dough and bread, so I guess this is the German equivalent?
I did some research and bread flour is always made from hard wheat, which is a different type of flour here, mostly reserved for pasta making lol. I’m confused.
Hi Asami! Oh wow sounds complicated! Bread flour (強力粉) is used to make Chinese style noodles and bread. I think if you use the flour mainly used for making bread, it should work. Can you search Castella recipe in German? Maybe someone made a recipe and explain which flour to use. For Castella texture, you must use bread flour, not all-purpose flour or cake flour.
Hmm, most German recipes just said ‘flour’. Very helpful…, one said to use type 405 flour which I think is more all purpose or cake flour. (In the pictures, the Kastella was much more dense or crumbly).
I think I will just use Type 505 and see how it goes.
Haha! Yes, Kasutera is very spongy and bouncy when you touch it. We have expression called “もっちり” (mocchiri) explaining it’s elastic bouncy texture. Sounds like 505 is more appropriate than 405. Hope it will work out. 🙂
Hi Asami, I’m also in Germany and wanting to make this – did 505 work out for you?
Also Nami – do you think it’s possible to make this using a whisk, rather than an electric beater?
Thanks!
Hi Jo,
Yes! You may use a whisk.
Thank you for trying this recipe. Happy Baking!☺️
Do you think it would make any difference baking it in a glass loaf pan? Also, I wondered about putting a small pan of water in the oven as well. I know I do that with cheesecakes to keep the top from splitting.
Hi Gloryj! Ohh…I never thought of using a glass loaf pan I have. I should test it out next time. I also have never tried with a small pan of water for Castella recipes I tried (for my recipe and other recipes). But I remember some recipe spray water to the cake top right before you put it in the oven. Maybe it’s worth test out that one too. Sorry I can’t answer from my experience…Hope you give it a try and let us know. 🙂
Thanks you very much Nami! It’s obviously that you have worked very hard to make this works for everybody! Really appreciate it! I will try this recipe in the next few days and let you know how it turns out.
Hi Norma! Hope it will come out nicely. After trying so many other recipes, and I still fail, I am sort of scared that my recipe won’t work for some people too… >_< This recipe works perfectly in my kitchen, but as it's one of the difficult cakes to bake (It looks so simple!), I'm very nervous about this one... Good luck!
I have just tried this recipe yesterday, success! I halved the recipe to bake one loaf with a tinted glass loaf pan. It took about 50 minutes to cook through. Other than that I followed your recipe exactly and the result is a beautiful springy sponge cake! Thank you!
I have 2 questions:
1/ after wrapping and resting the cake in the fridge overnight, how should I store the finished cake? Should I leave it in the fridge until ready to serve or should I take it out and let it return to room temperature? Is Castella supposed to be served cold?
2/ I saw some variations of the cake with green tea powder or other flavors. Any tips on that?
Thanks again and keep up the good work!
Hi Norma! What a relief – I’m glad it went well! Below is my answers to your questions.
1) So here’s what I do (and probably should write in a recipe later). After overnight in fridge, I take out, and slice the cake. We eat several pieces of first loaf (or majority of it) and I wrap the cake individually (or maybe two pieces for each package) with plastic wrap. To serve, it’s nice to return to room temperature so the texture is not as dense as it’s in fridge. By the way, you can also freezer them. You can keep in the fridge up to 5 days.
2) Yeah, I want to try that after I figure out the wrinkle problem I have. LOL. Try adding 1 Tbsp. matcha powder in the bread flour (sift together). Depending on the brand and quality, you probably need to adjust the amount.
Hope that helps!
The recipe works like a charm for me! Thank you so much Nami! I love Castella, and always get it when I went to Japan. But none available in my country, so now I can enjoy it whenever I want. Need to add the recipe though since my loaf pans are bigger (9×5″). Should I just add the ingredients proportionally?
Hi Fifi! I’m so glad to hear your castella comes out well! Are you making half portion? Maybe make this recipe and use whatever need for your pan, and make a small one out of the leftover batter?
Hi Nami, I made your 1.5x recipe for two 9×5″ loaf pans, and it worked nicely. I tried adding 20% recipe the first time, and still short on the batter, but 50% is just right. The cake finished in 1-2 days only 😀
Hi Fifi! Thank you so much for your kind feedback! Glad to know 1.5 x recipe for two 9×5″ loaf pans! 🙂
I tried recipe GREAT it was rising WELL finally as my other recipe didn’t rise. It just had cracks Why?
Hi Audrey! Thank you so much for trying this recipe! Hmmm probably 1) oven heat was too strong or too close? 2) Maybe raised too fast and the structure couldn’t support? I’m not fully sure without knowing what happened. Sorry… 🙁