
Recipe Highlights
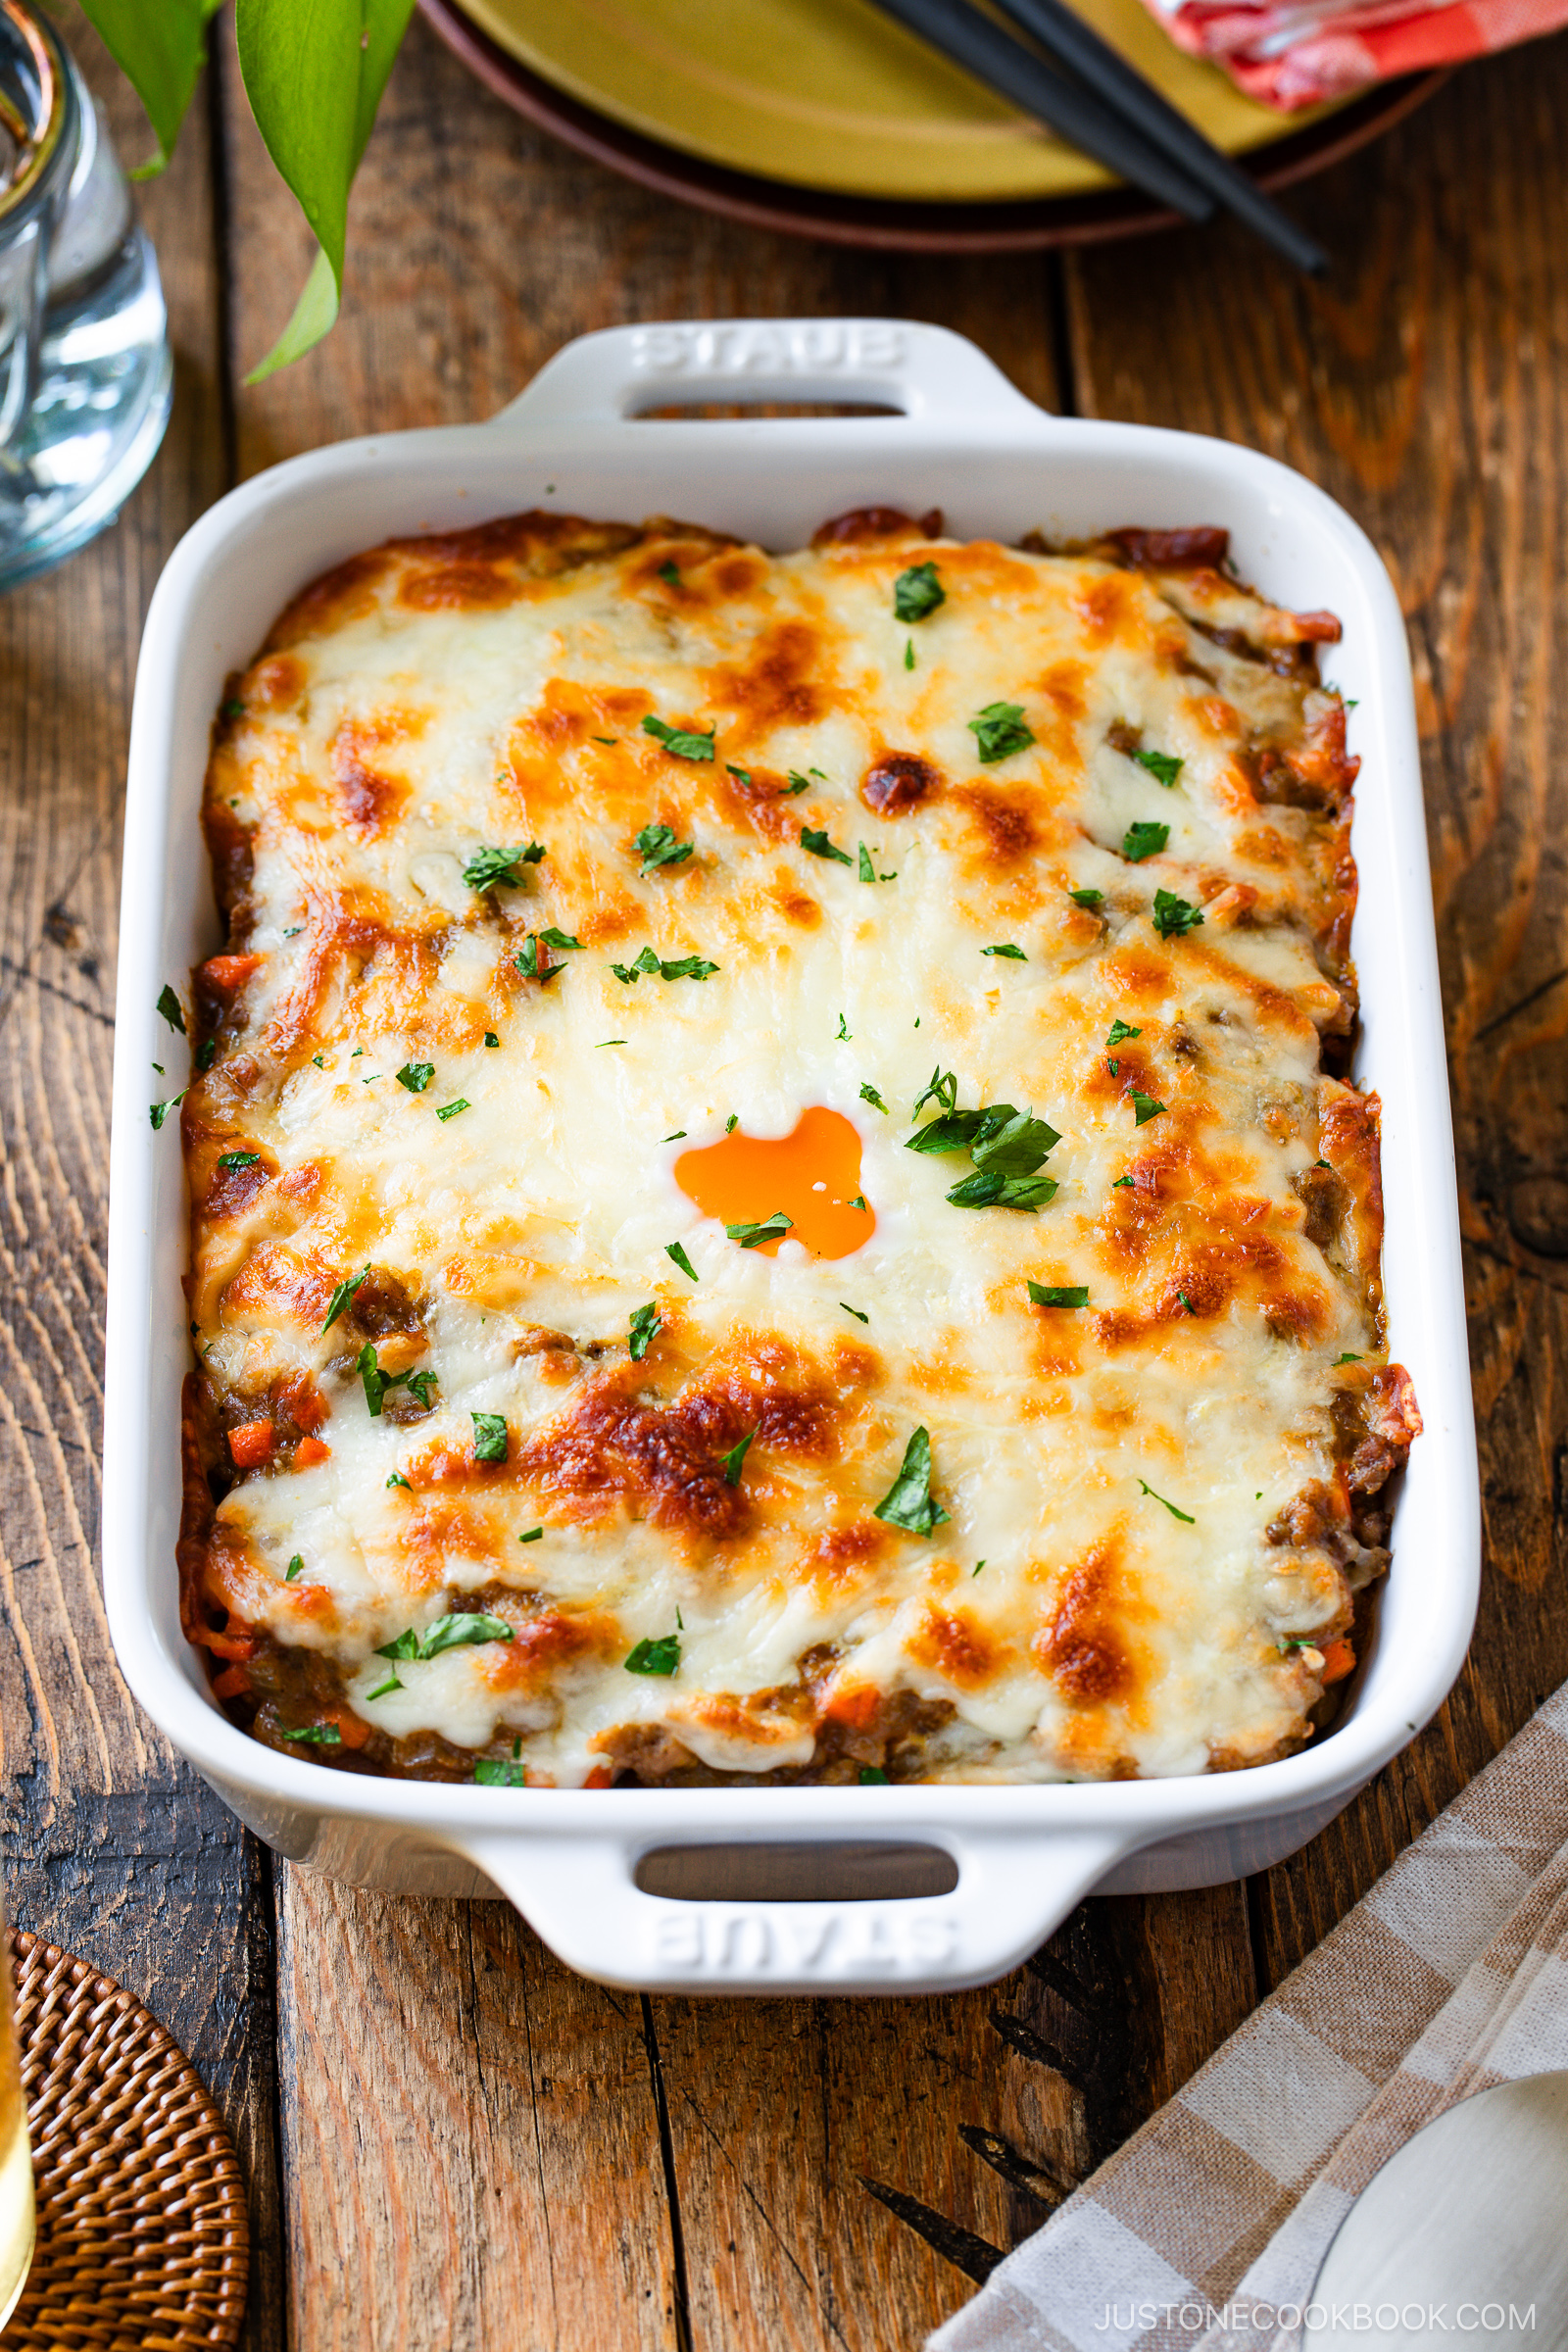
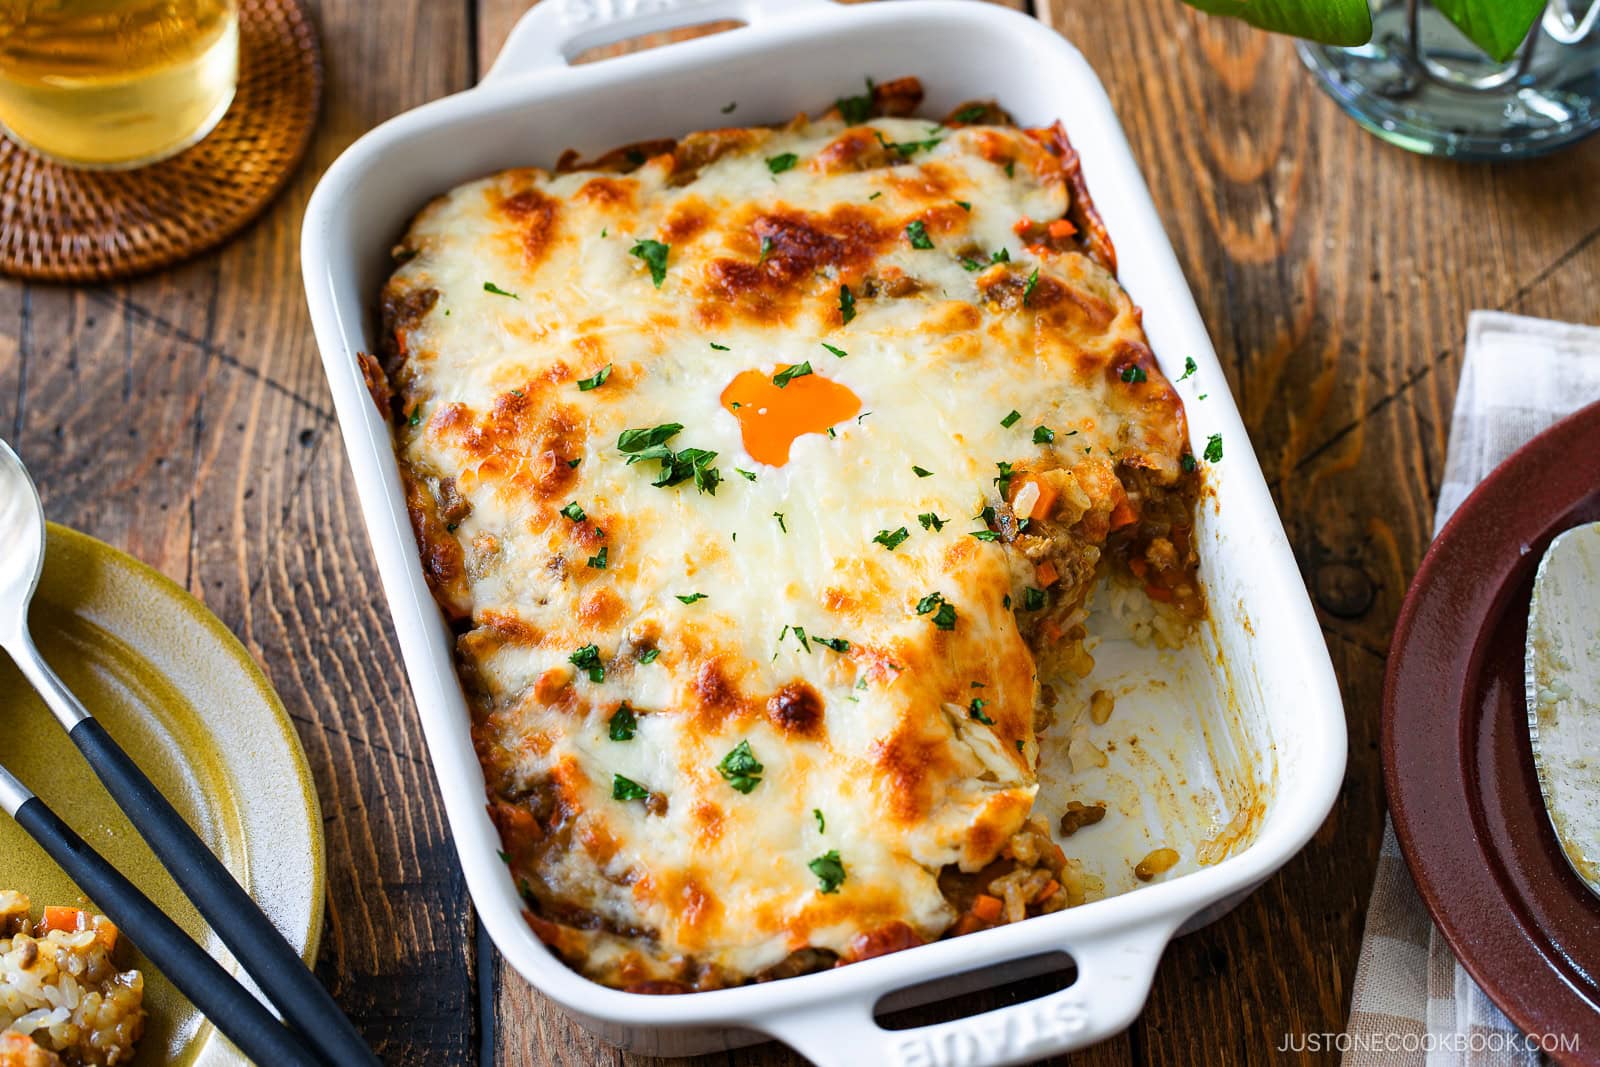
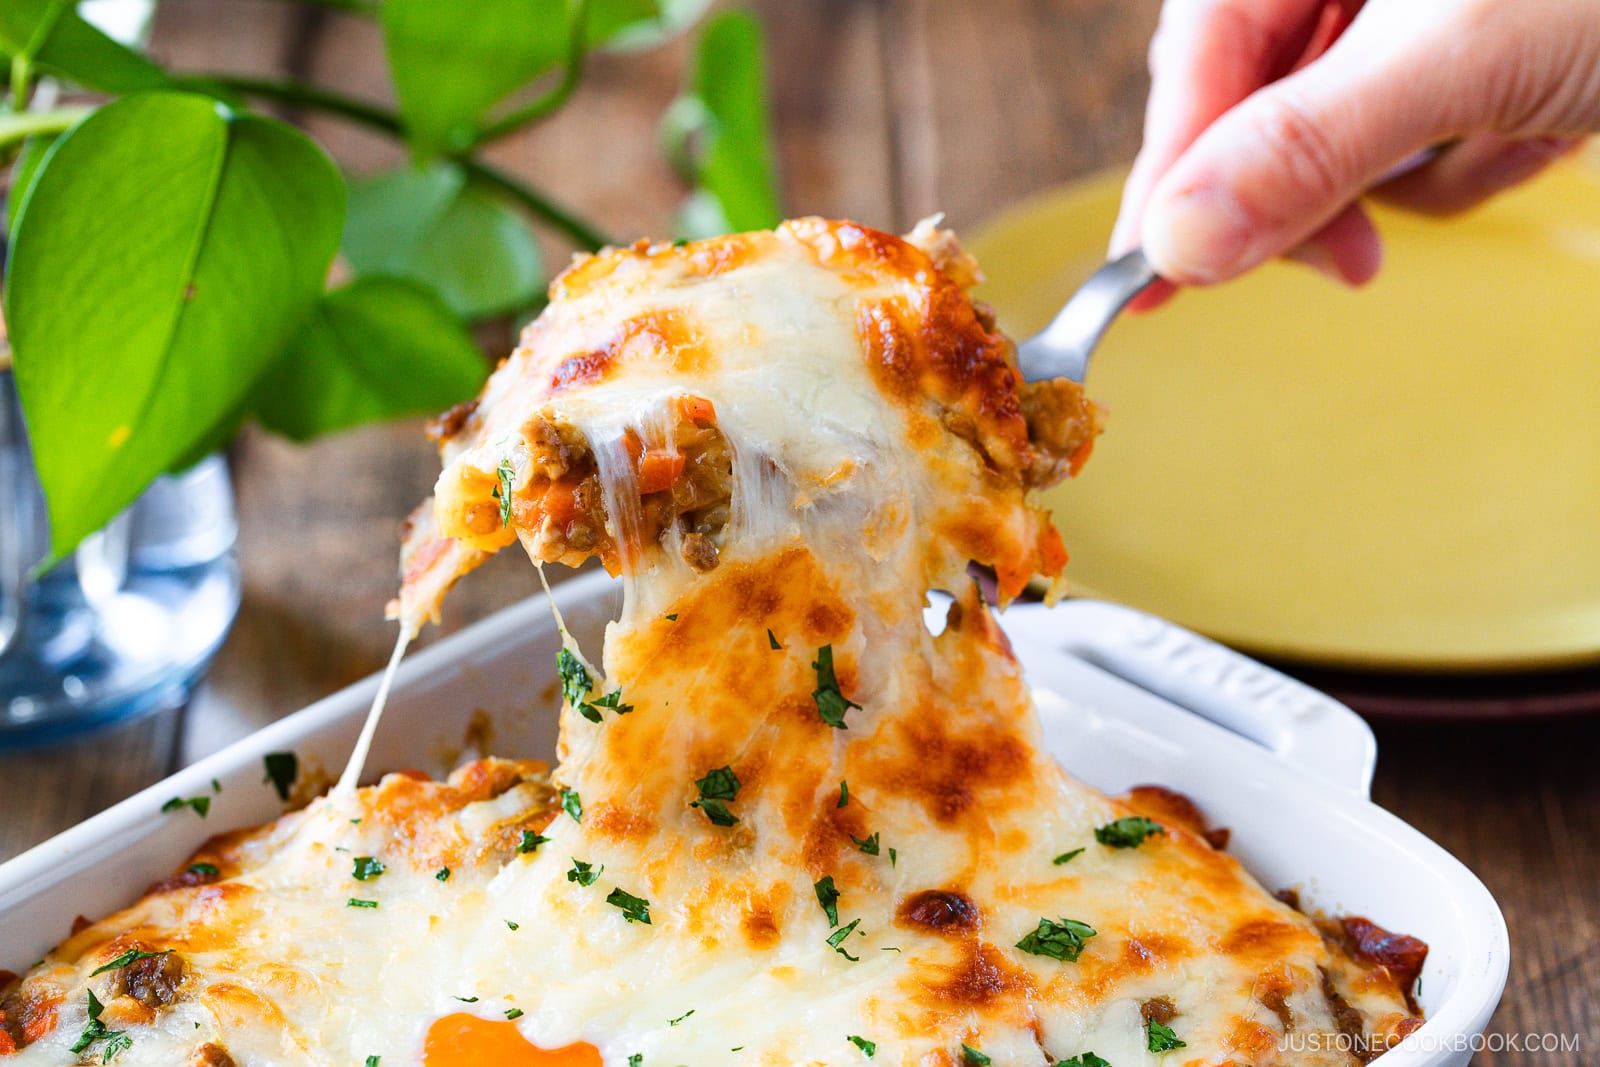
Yaki Keema Curry is my baked twist on classic Japanese curry rice. I layer thick, savory ground meat curry over steamed rice, crack an egg in the center, and top everything with melty mozzarella before baking until golden and bubbly. It’s simple comfort food with a café-style presentation that feels extra special straight from the oven.
- Cozy Japanese curry rice casserole with a golden, bubbly top
- Family-friendly and satisfying with egg and cheese
- Simple pantry ingredients and easy steps
If you love Japanese curry dishes, try my Japanese Chicken Curry, Japanese Beef Curry, and Pressure Cooker Japanese Curry recipes next!
What is Yaki Curry?
Yaki curry (焼きカレー) is a Japanese baked curry made by layering curry sauce over rice, then topping it with cheese and often an egg before baking it in the oven. The result is a rich, comforting meal with a bubbly, golden top and a creamy, savory center.
It’s typically served piping hot in the baking dish, similar to a gratin. Originating in Moji Port in Fukuoka, yaki curry has become a popular café-style comfort food in Japan — think of it as a baked, cheesy upgrade to classic Japanese curry rice.
Yaki Keema Curry is my version of the dish using Japanese-style Keema Curry.
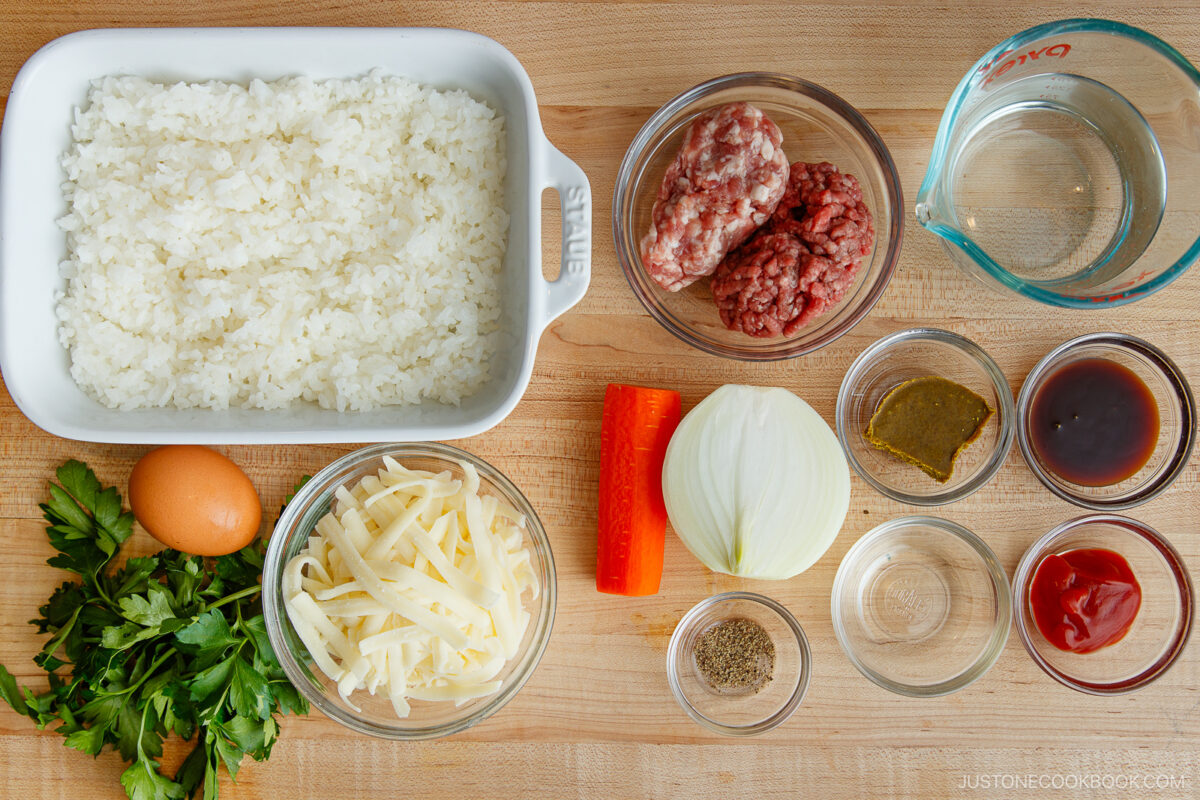
Ingredients for Yaki Keema Curry
- ground beef + ground pork – or use one type of your favorite ground meat
- onion
- carrot
- Japanese curry roux – or see How to Make Homemade Curry Roux
- tonkatsu sauce – or make Homemade Tonkatsu Sauce with four ingredients
- ketchup
- water
- salt and black pepper
- neutral oil
For the Casserole:
- cooked Japanese short-grain rice
- large egg
- shredded mozzarella cheese
- butter
- Italian parsley
Find the printable recipe with measurements below.
Jump to RecipeHow to Make Japanese Baked Curry
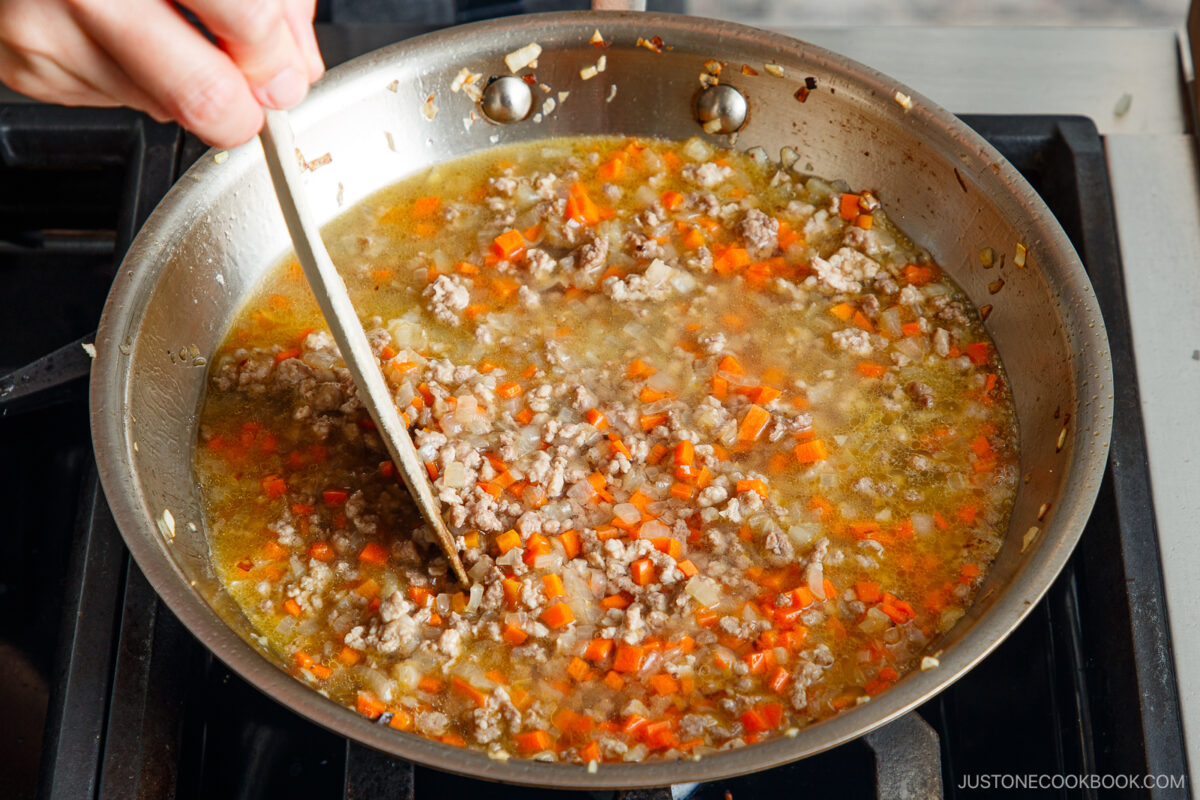
- Cook the keema. Chop the ingredients and cook the ground meat and vegetables. For full details and step-by-step instructions, see my Keema Curry recipe.
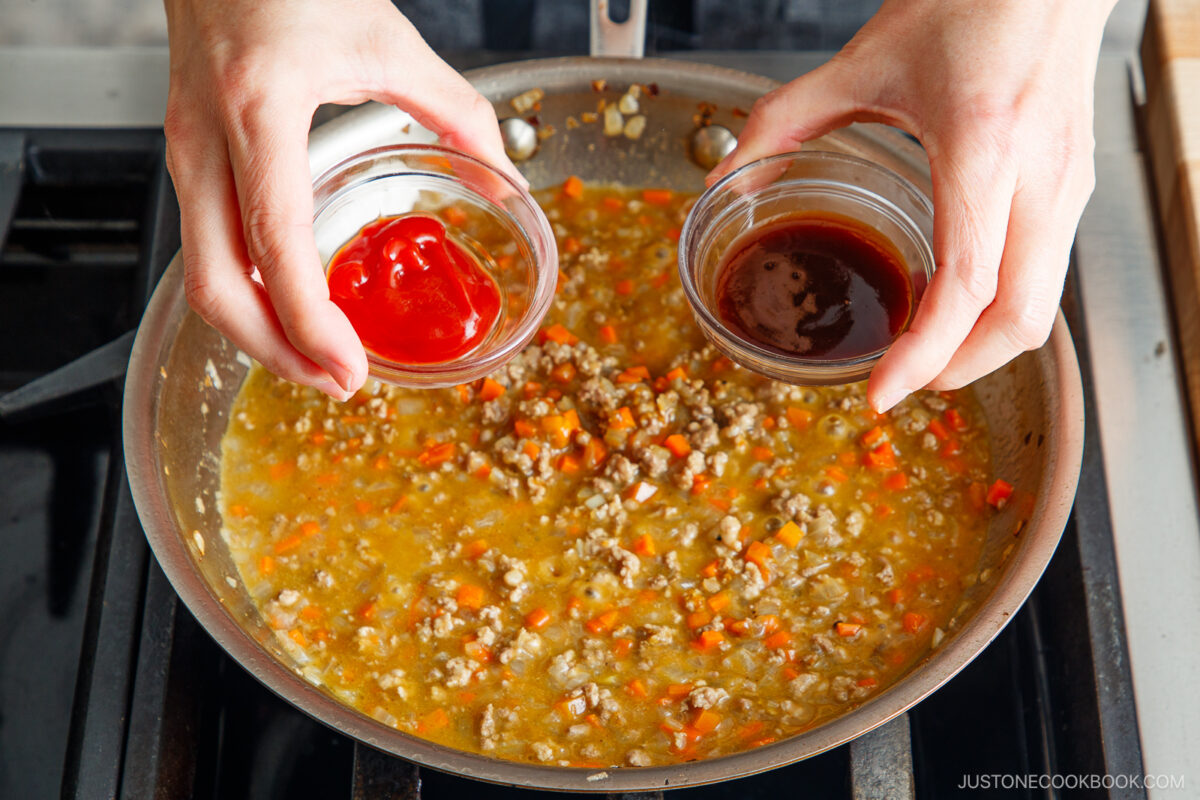
- Season. Add the curry roux and seasonings, bring to a boil, then simmer the curry until thick and glossy.
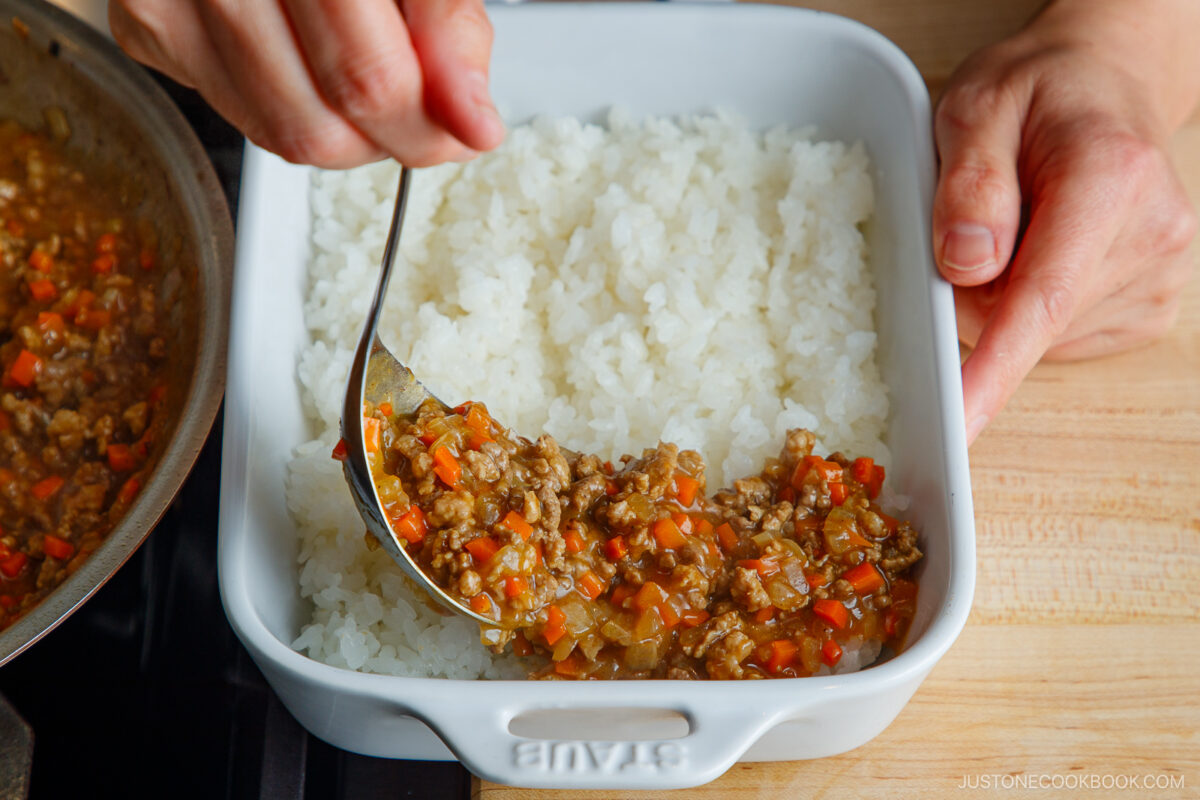
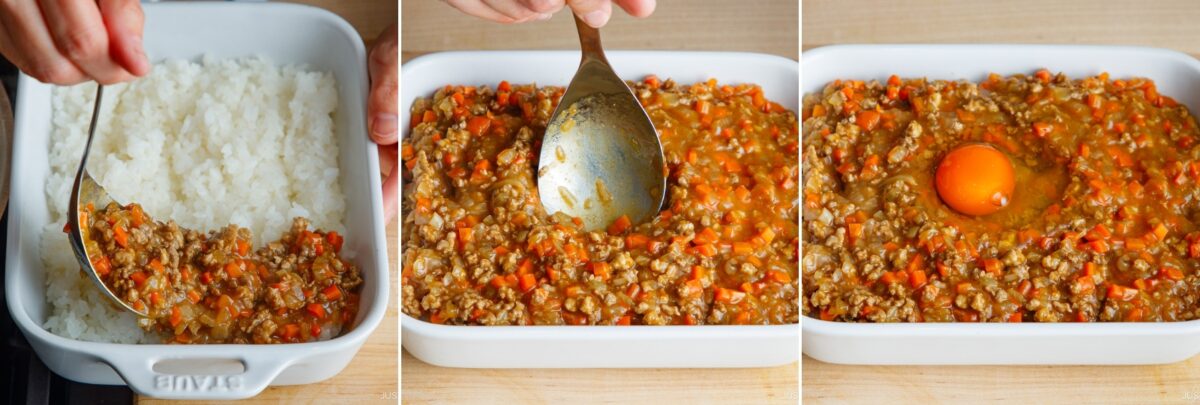
- Assemble the casserole. Butter a baking dish and spread the cooked Japanese short-grain rice evenly on the bottom. Spoon the keema curry over the rice.
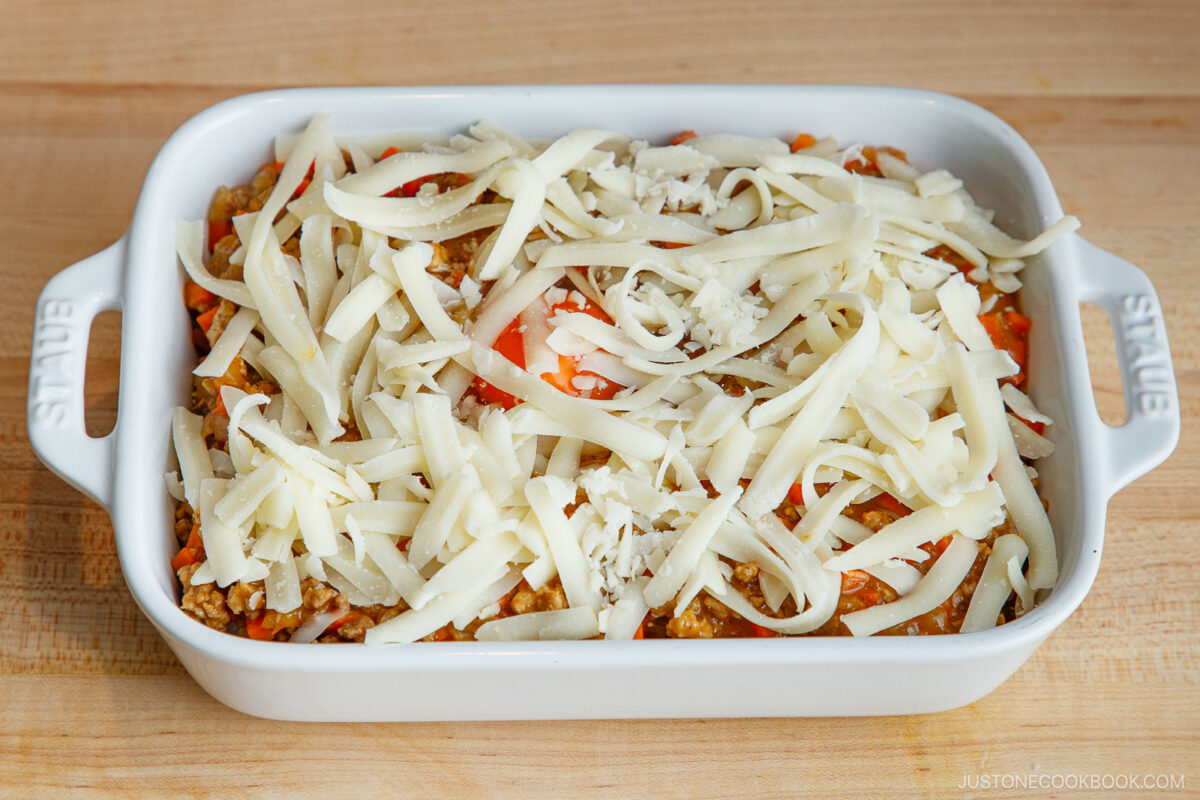
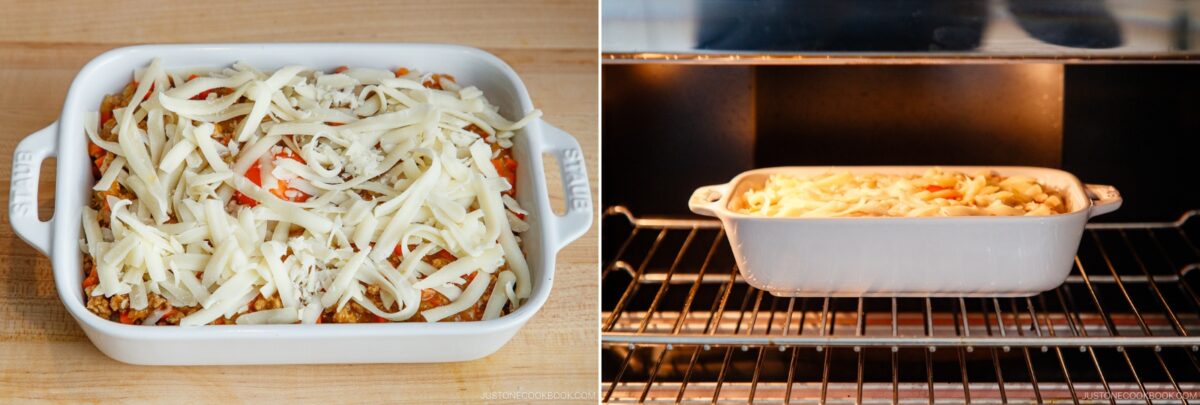
- Top with egg and cheese. Make a small well in the center and crack in the egg. Sprinkle mozzarella on top.
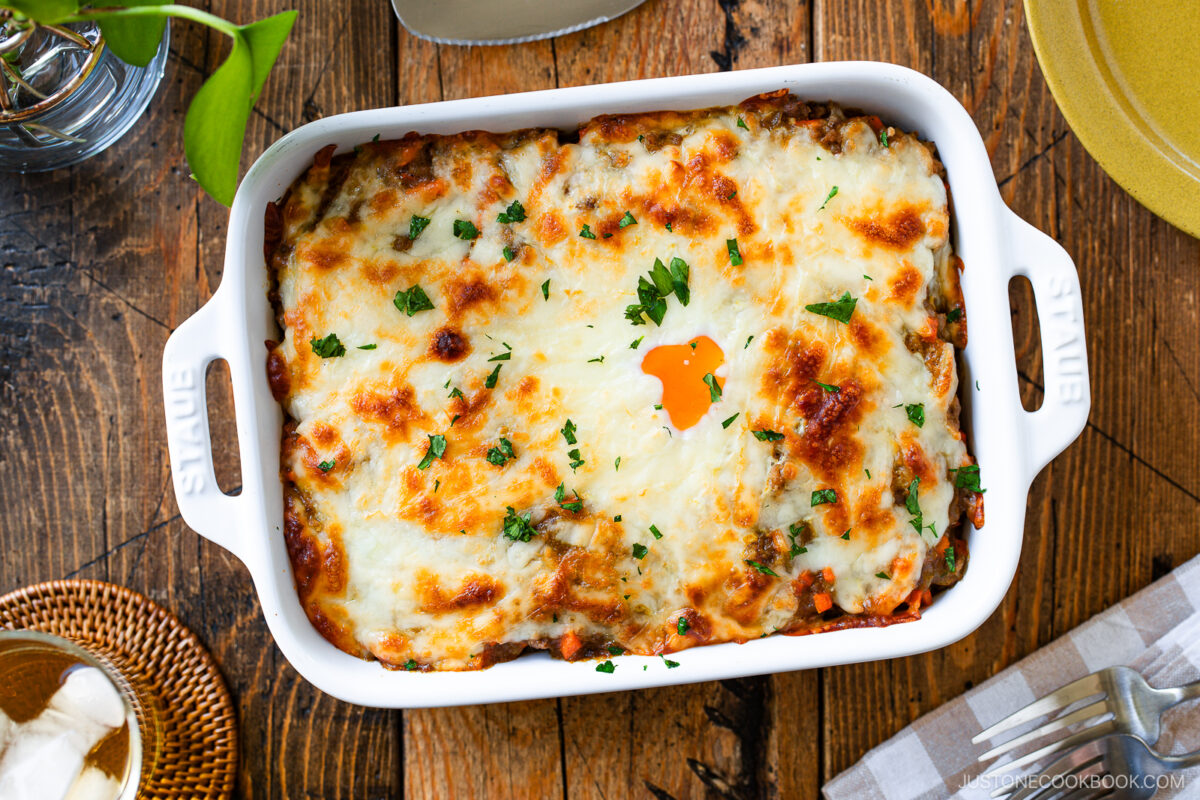
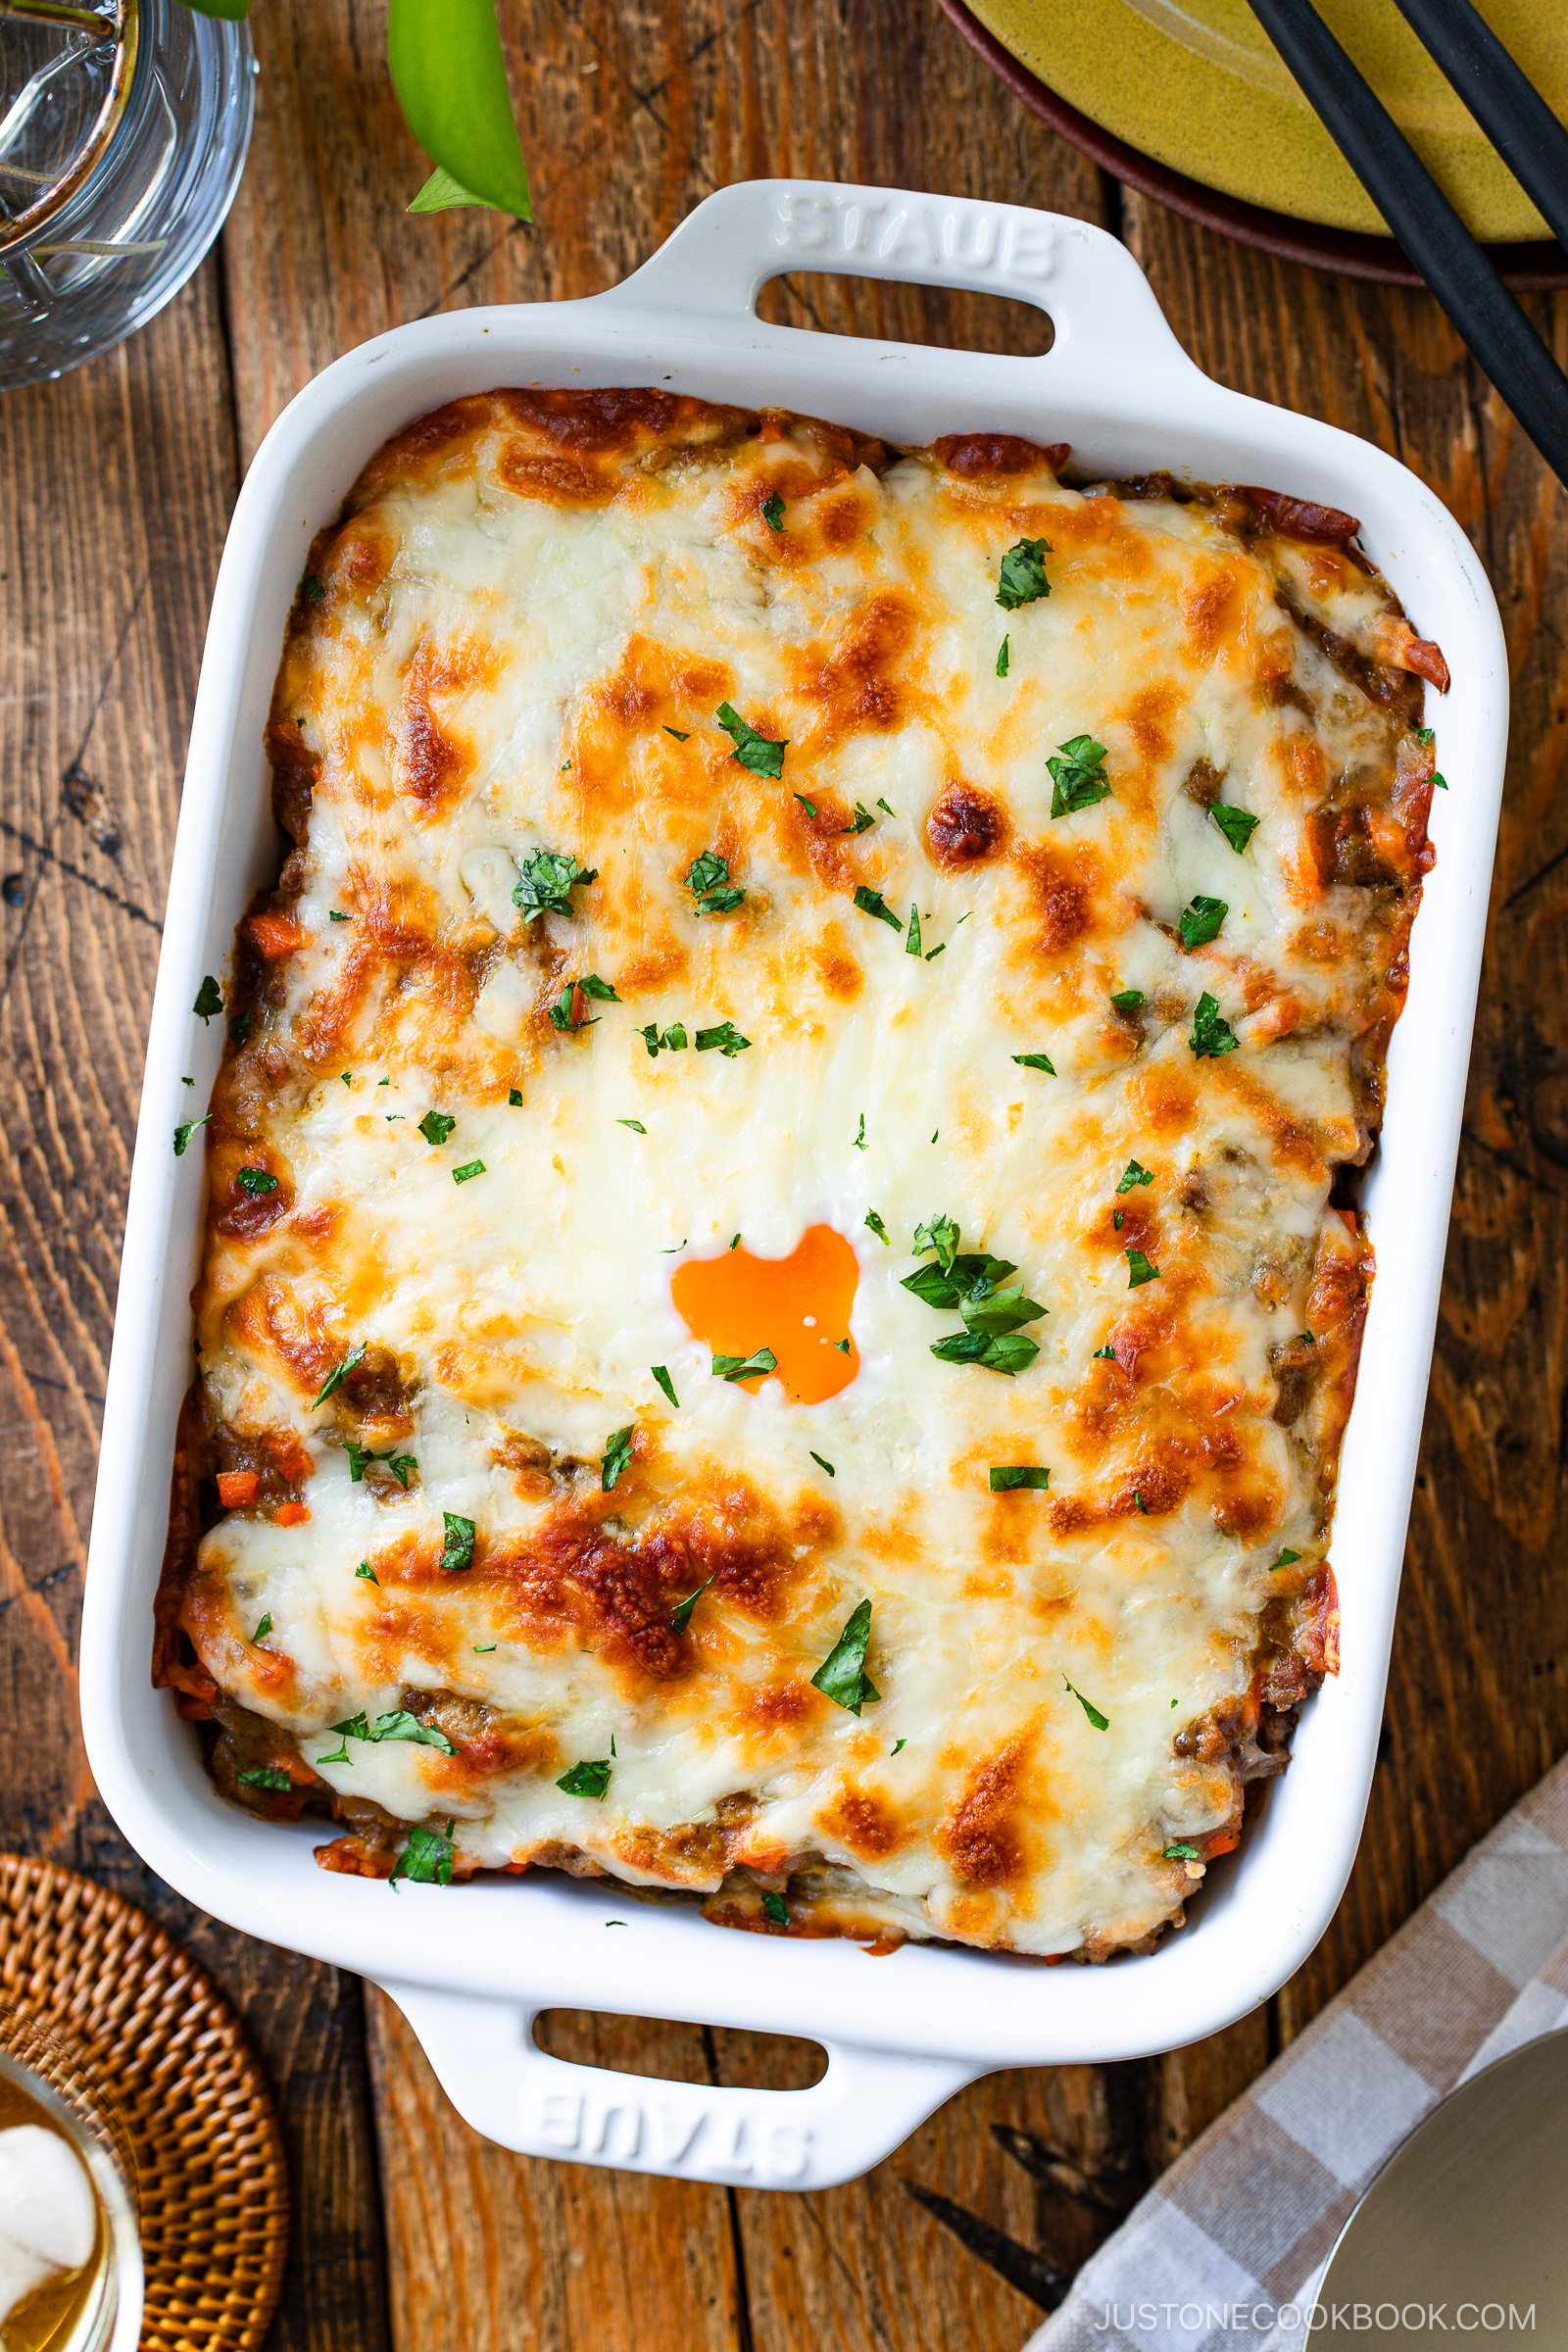
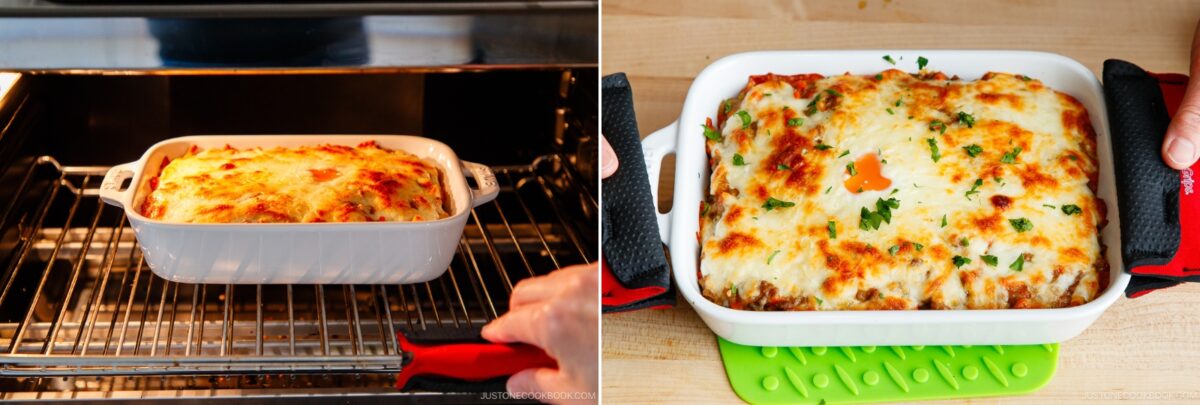
- Bake and serve. Bake at 400°F (200°C) for about 15 minutes, until bubbly and lightly browned. Garnish with chopped parsley and serve hot.

Nami’s Recipe Tips
These simple tips will help you make Yaki Keema Curry perfectly every time.
- Use a hot pan. Test your stainless steel pan with a drop of water. If it beads and glides, it’s ready. Wipe it dry before adding oil.
- Crumble the meat well. Break up the ground meat finely so the texture stays even and tender.
- Simmer until thick. If the keema curry is watery, cook it longer until you can draw a line through it with a spatula and see the bottom of the pan for 2 seconds.
- Butter the dish well. This prevents sticking and helps the edges brown nicely.
- Serve piping hot. In Japan, Yaki Keema Curry is enjoyed straight from the oven while still bubbly.
Variations and Customizations
Looking to change things up? Try these easy and tasty ideas!
- Use a different protein. Ground chicken or ground lamb works just as well.
- Make it plant-based. Swap in diced mushrooms, zucchini, eggplant, or tofu crumbles.
- Change the cheese. Try provolone, Gruyère, Parmesan, or your favorite melting cheese.
- Try a different egg topping. Skip the baked egg and finish with a silky Onsen Tamago, fried egg, or boiled egg instead.
- Boost the aromatics and spices. Add garam masala, curry powder, ground cumin, turmeric powder, crushed garlic, or cayenne pepper—Sauté with meat for extra depth and flavor.
- Add more vegetables. Stir in green peas or chopped tomatoes for extra color, fiber, and flavor.
- Garnish with toppings. Finish with chopped cilantro (coriander) leaves, mixed herbs, or plain yogurt.
- Serve with flatbread. Pair with naan, chapati, paratha, or roti, for a heartier meal.
What to Serve with Yaki Keema Curry
This baked keema recipe pairs well with a variety of sides. Here are some of my favorites.
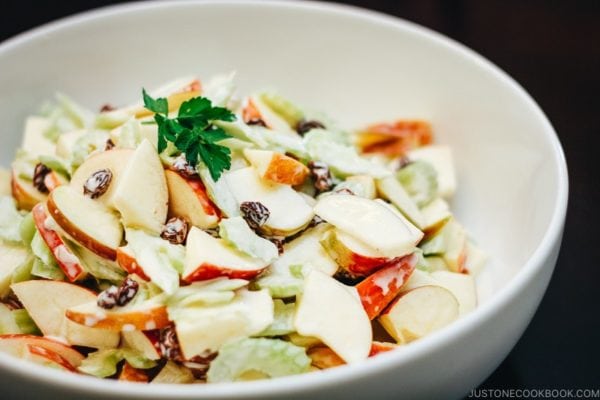
- Japanese Apple Salad – Inspired by my mom’s recipe, this salad is cool and refreshing thanks to the homemade yogurt dressing.
- Okra with Ginger Soy Sauce – This quick and tasty veggie side comes together in minutes. The ginger soy sauced also works beautifully with broccoli or asparagus!
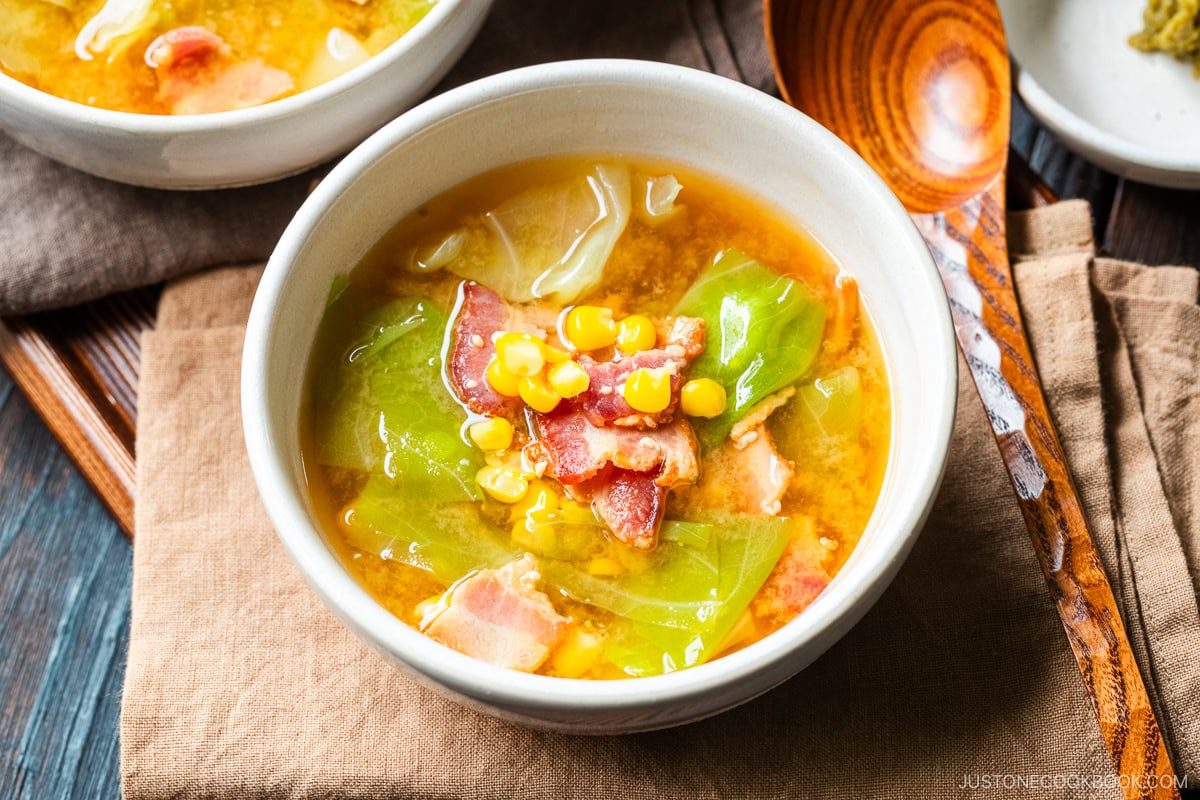
- Bacon and Corn Miso Soup – This satisfying soup strikes a perfect balance of umami and natural sweetness.
Storage and Reheating Tips
To store: Cool Yaki Keema Curry to room temperature. Store in an airtight container in the fridge for up to 3 days or in the freezer for up to 1 month. If frozen, thaw in the refrigerator overnight before reheating.
To reheat: Cover loosely with foil and reheat in the oven at 350°F (180°C) for 10–15 minutes, until warmed through. You can also reheat individual portions in the microwave, though the cheese topping won’t be crispy.
FAQs
Can I make Yaki Keema Curry ahead of time?
Yes. You can prepare the keema curry and assemble the layers in advance. Cover and refrigerate, then add the egg and cheese just before baking. For the best texture, bake just before serving.
Can I use only ground beef for Japanese Baked Curry?
Yes. You can use all ground beef or all ground pork instead. Using two types of meat adds depth, but using just one type still gives a rich and satisfying flavor.
Can I bake Yaki Keema Curry without the egg?
Yes, it’s perfectly fine to skip the egg when baking. Anyone who prefers can top their serving with a fried egg, onsen tamago, or a halved boiled egg.
I’d love to hear how yours turned out! 💛 Please leave a star rating and comment below to share your experience. Your feedback not only supports Just One Cookbook but also helps other home cooks discover recipes they can trust.

Yaki Keema Curry (Japanese Baked Curry with Egg & Cheese)
Ingredients
For the Keema Curry
- ¾ lb ground meat (I highly recommend a blend of 6 oz / 170 g each of beef and pork for the best flavor, but using just one type works too)
- ½ onion
- 3 inches carrot
- 1 cube Japanese curry roux (or see How to Make Japanese Curry Roux at home)
- 1 Tbsp tonkatsu sauce
- 1 Tbsp ketchup
- 1 cup water
- ¼ tsp Diamond Crystal kosher salt
- freshly ground black pepper (to taste)
- 1 Tbsp neutral oil
For Baking
- 2 servings cooked Japanese short-grain rice (about 2 large rice bowls)
- 1 large egg (50 g w/o shell)
- 1 cup shredded mozzarella cheese
- 1 Tbsp butter (for greasing the dish)
- a few sprigs Italian parsley (for garnish)
Instructions
- Gather all the ingredients. Start preheating the oven to 400°F (200°C).
To Prepare the Ingredients
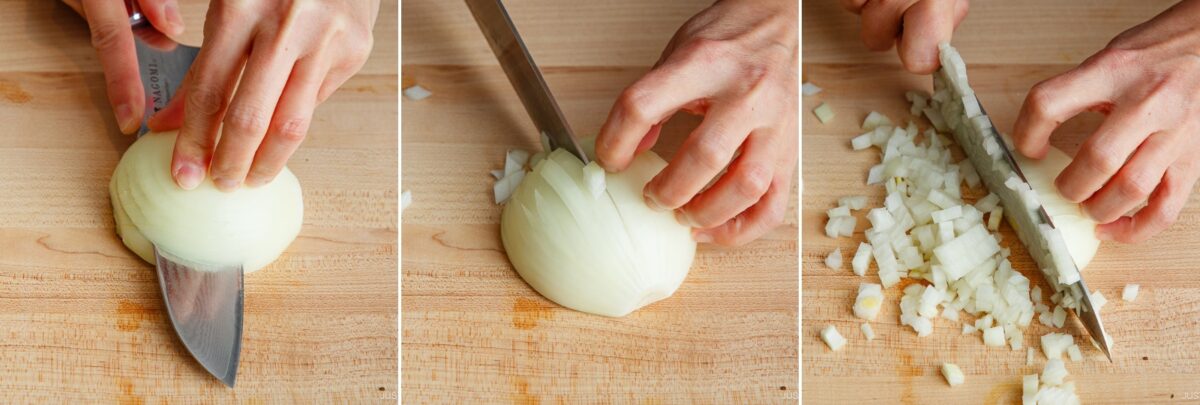
- Finely dice ½ onion: Place it cut-side down and make ¼-inch horizontal cuts toward the root, then vertical cuts, and finally slice crosswise evenly.
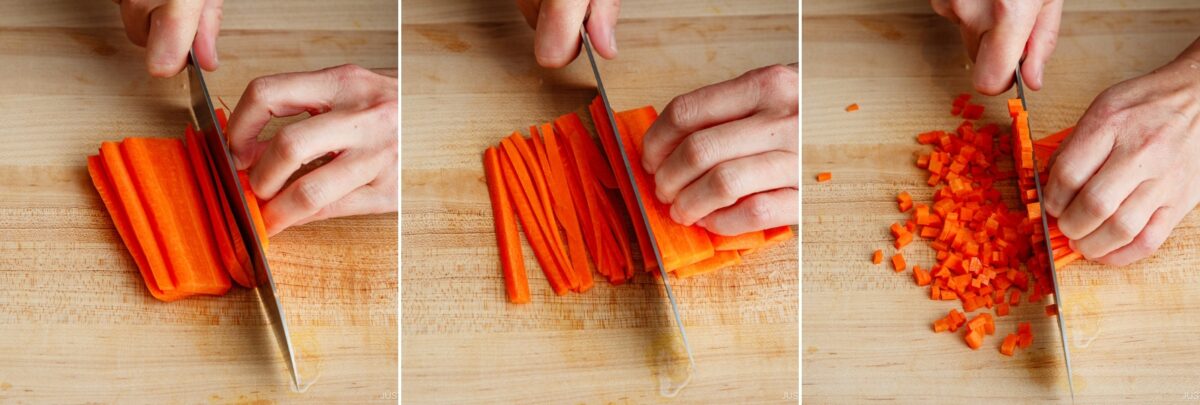
- Cut 3 inches carrot into ⅛-inch thin slices. Cut the slices into thin sticks, then slice crosswise into a fine dice.
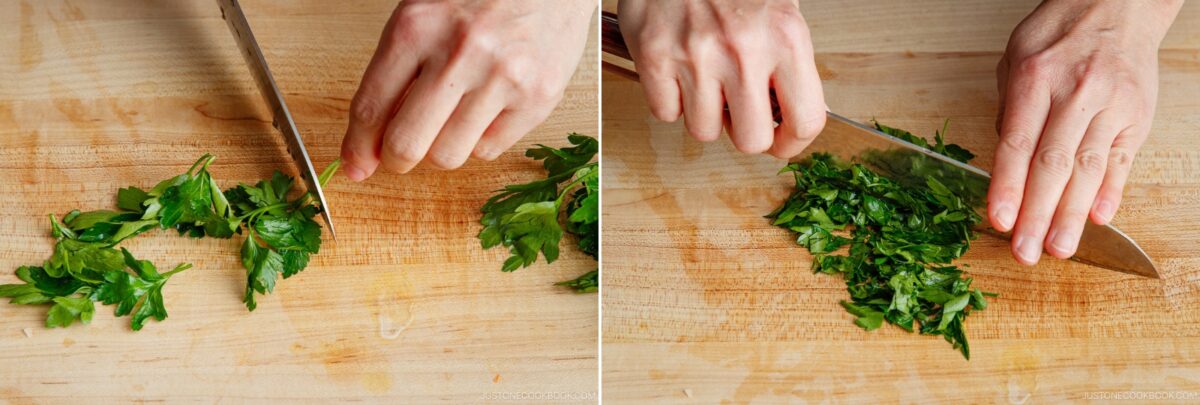
- Finely chop the leaves of a few sprigs Italian parsley.
To Cook the Keema Curry
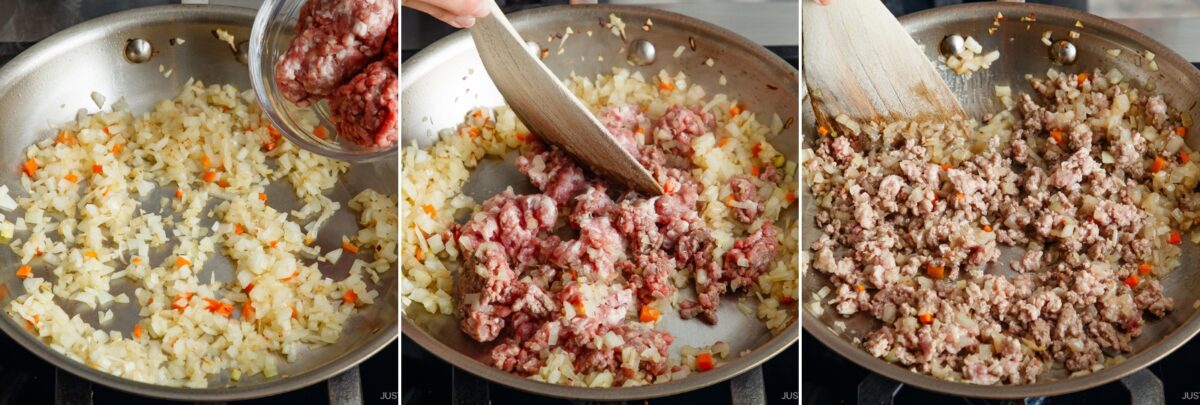
- Heat a stainless steel pan over medium heat. When it's hot, add 1 Tbsp neutral oil and swirl to coat. Add the onion and sauté, stirring occasionally.Nami's Tip: To test if your stainless steel pan is hot enough, add a drop of water. If it beads and glides, you're good to go. Wipe it dry before adding oil. If the water evaporates or scatters, it’s not ready.
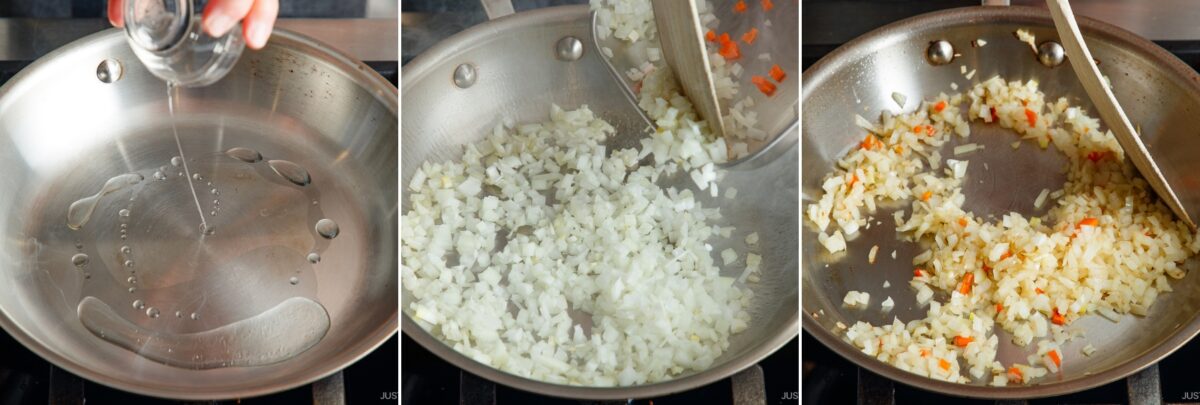
- Add ¾ lb ground meat (I used beef and pork). Cook, breaking up the chunks with a wooden spatula, until the meat is no longer pink.
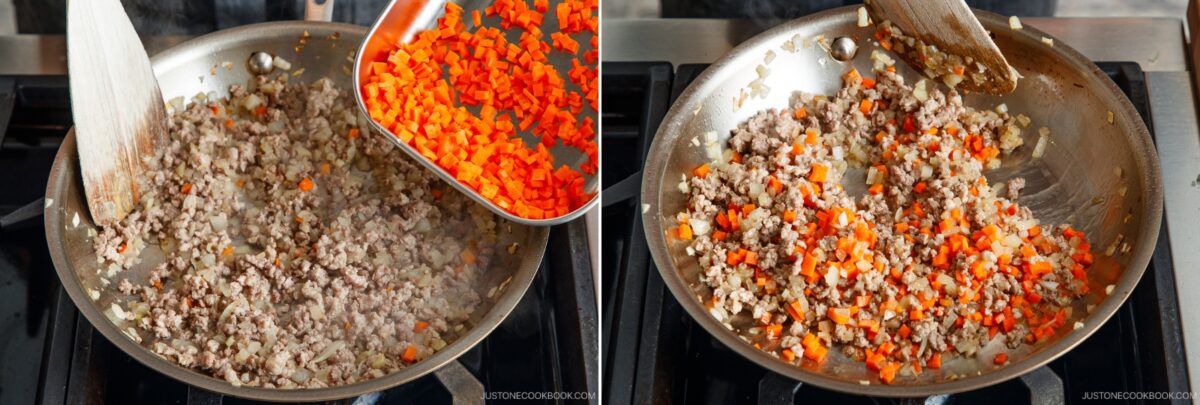
- Add the carrot.
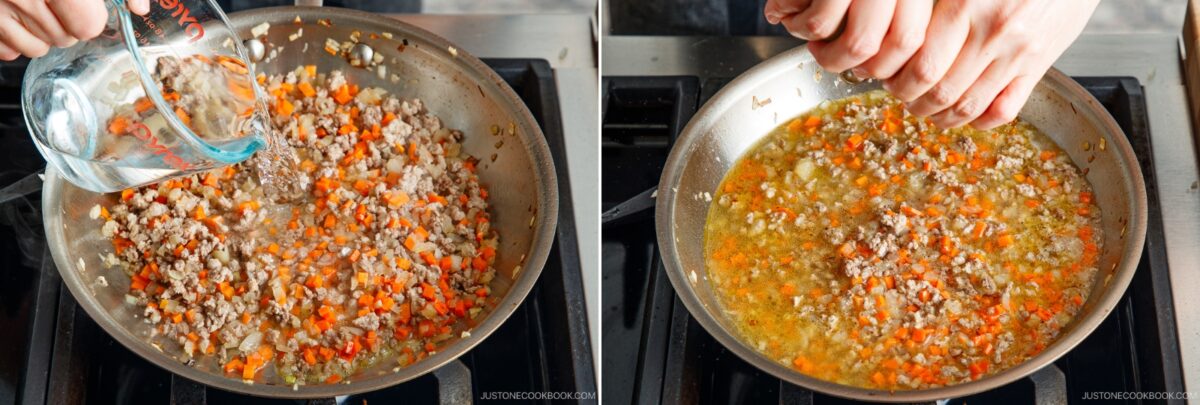
- Add 1 cup water. Season with ¼ tsp Diamond Crystal kosher salt and freshly ground black pepper to taste.
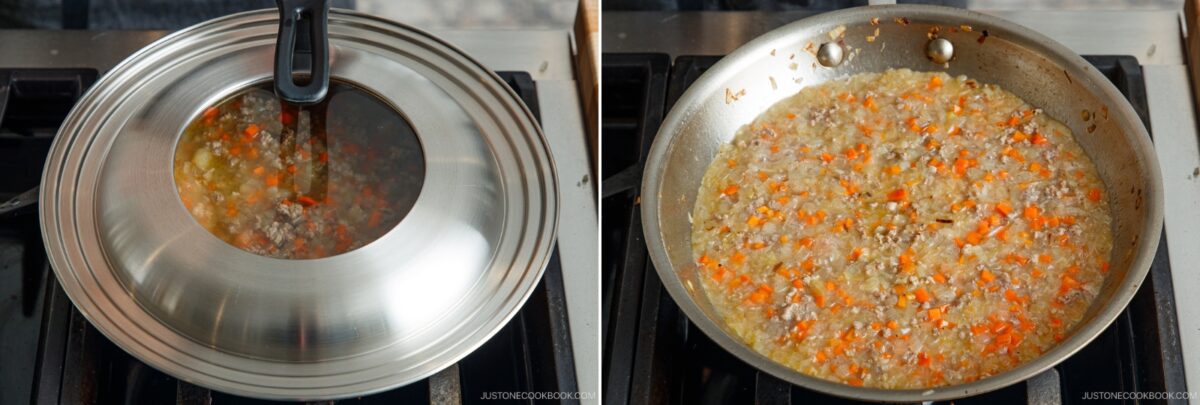
- Cover and cook for 3 minutes.
- Add 1 cube Japanese curry roux and let it dissolve.
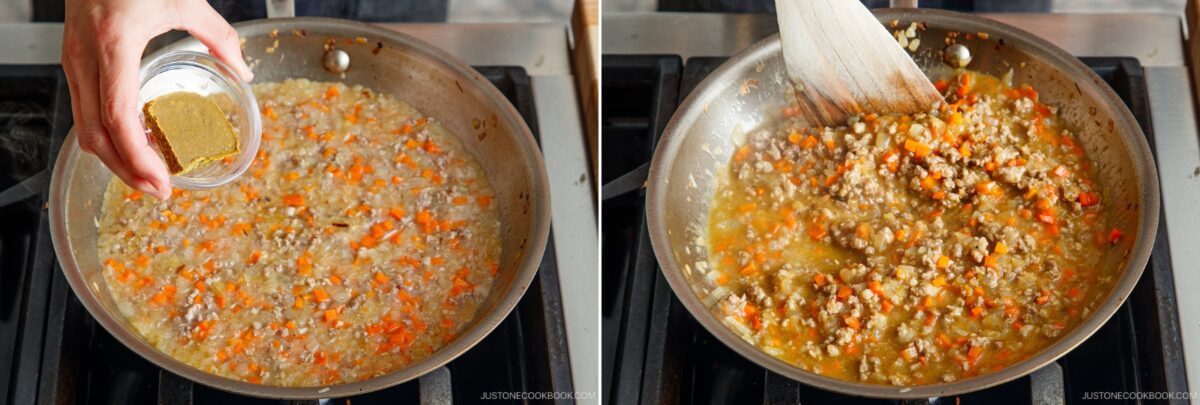
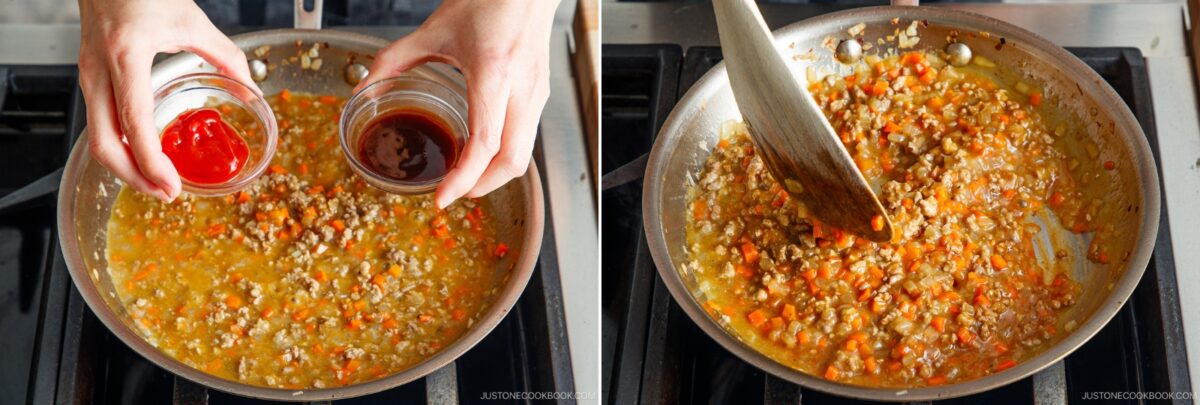
- Add 1 Tbsp ketchup and 1 Tbsp tonkatsu sauce and stir to combine. Bring it back to a simmer for 1–2 minutes. If it's watery, continue to simmer and reduce the sauce until you can draw a line through it with a spatula and see the bottom of the pan for 2 seconds.
To Assemble and Bake
- Spread 2 servings cooked Japanese short-grain rice evenly in a buttered 6 × 8-inch (15 × 20 cm) baking dish. Ladle the keema curry on top in an even layer and make a well in the center. Crack 1 large egg (50 g w/o shell) into the well.
- Sprinkle 1 cup shredded mozzarella cheese all over the top. Bake in a preheated 400°F (200°C) oven for 15 minutes or until the egg is cooked to your liking and the cheese is bubbling and lightly browned on top.
To Serve
- Remove from the oven. Sprinkle with freshly chopped parsley. Serve hot (or warm) directly from the baking dish.Nami's Tip: In Japan, we serve the dish piping hot, right out of the oven while it’s still bubbly. If you'd like, you can let it rest for a few minutes and enjoy it warm.
To Store
- Keep the leftovers in an airtight container and store in the refrigerator for up to 3 days and in the freezer for up to a month.
Did you make this recipe?
Tag @justonecookbook on Instagram so we can see your delicious creation!