This post may contain affiliate links. Please read my disclosure policy for details. As an Amazon Associate I earn from qualifying purchases.
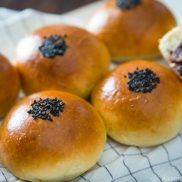
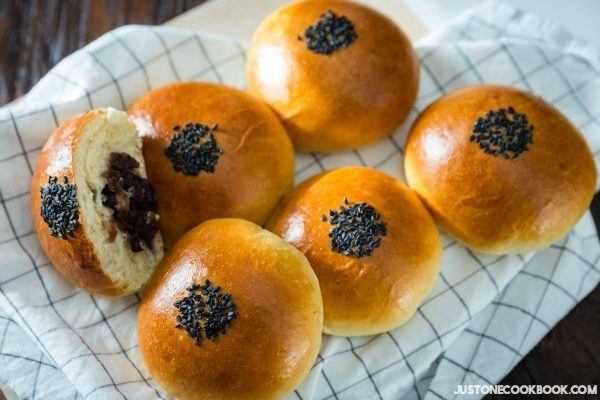
Are you a big fan of Japanese pastry and baked goods? If yes, you’d enjoy Anpan, a classic Japanese pastry with sweet red bean paste inside a soft bread. This homemade version comes with step-by-step tutorial to guide you through the bread-making process.
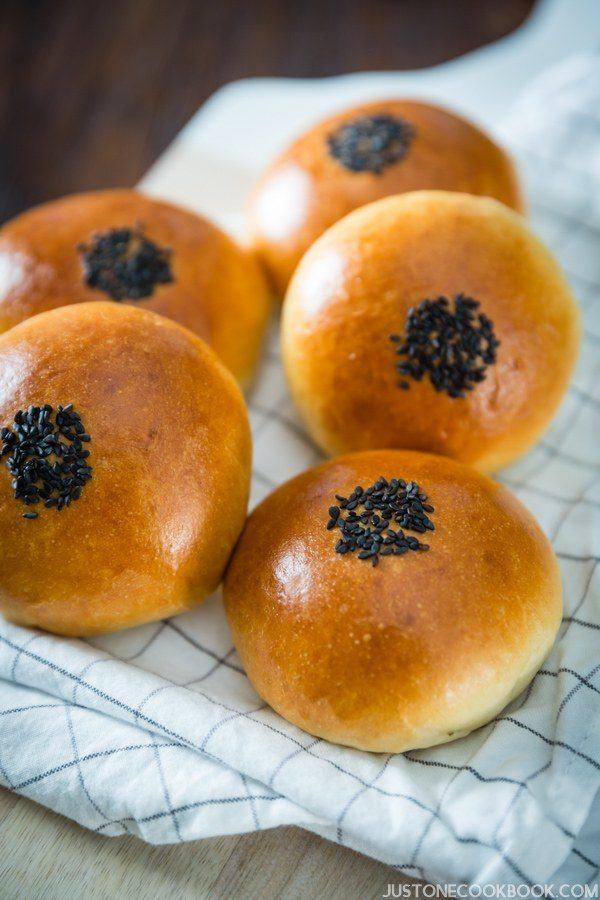
Anpan (あんパン), or sweet red bean bun, is my favorite Japanese bread growing up. It’s no secret that I absolutely love anko (red bean paste), and I love this Japanese bun that has a hint of sweetness, wrapped in a soft delicious bun.
Watch How To Make Anpan, Japanese Sweet Red Bean Bun あんパンの作り方
Amazing homemade Anpan recipe, classic Japanese pastry with sweet red bean paste wrapped inside soft bread.
My mom is a self-proclaimed bread connoisseur, and she loves exploring new bakeries and trying their bread in Japan. Unlike the US, there are many bakeries in most Japanese neighborhood and stations and many of them are outstanding. She would buy different types of bread from each store, and among them is always, my favorite anpan.
My favorite one is from Pompadour, one of my favorite bakeries in Japan. Yokohama-born Pompadour bakes European-style bread and their baguettes are incredibly delicious. Their anpan is quite unique because unlike Japanese style soft bread, their buns are French-style and it’s more crusty (but not quite as hard as baguette).
When my mom visited me in the U.S. in the past, she used to “smuggle” them in for me! She knew how much I would love this anpan.
This is just one of my nostalgic moments with the Japanese red bean bread, and I truly enjoyed testing this recipe, daydreaming about all the delicious anpan I enjoy back in Japan…
Invention & History of Anpan
So you may wonder, who came up with the idea to put anko (red bean paste) in a roll? It piqued my curiosity as well when I decided to test my anpan recipe, so I looked up its history.
Wiki explains well here, but basically it was first made in 1875 by a samurai named Mr. Kimura. He lost his job due to the dissolution of the samurai as a social class back in Meiji period. During that time, Japan was becoming more westernized and bakeries started to appear. His new job was a baker.
The Original Kimuraya (Photo Credit: By No machine-readable author provided. Kici assumed (based on copyright claims). [Public domain], via Wikimedia Commons)
Soon after Mr. Kimura founded the now well-known bakery Kimuraya, he created a bread that was more to Japanese tastes. He replaced the traditional Japanese red bean mochi with western bread instead of mochi, and this bread stuffed with red bean paste was a brilliant one.
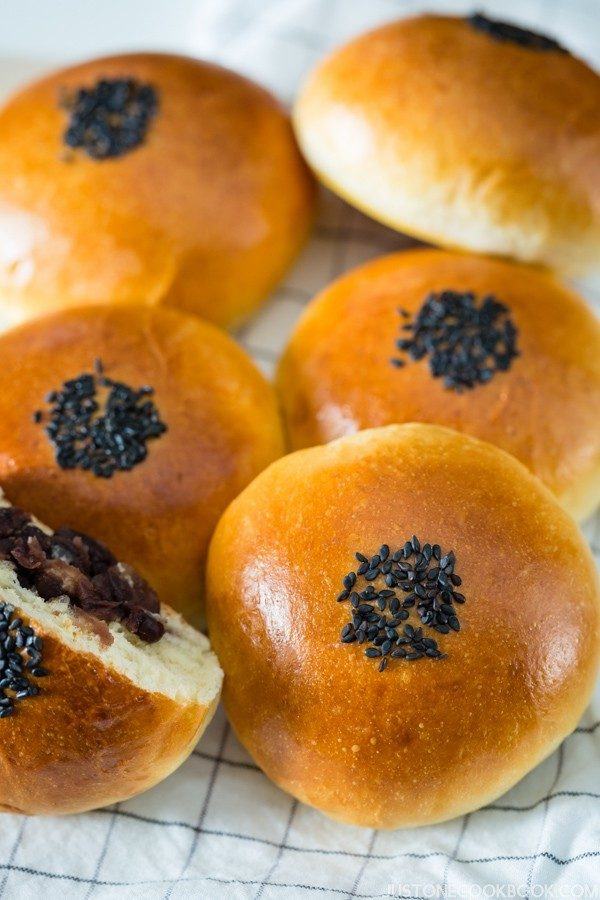
Making Anpan あんぱん
If you plan to make anko (red bean paste) from scratch, I recommend making anko ahead of time to save time on bread making day. I love making Pressure Cooker Anko recipe with my favorite Instant Pot (recipe here). Of course, to save time, you can always buy pre-made red bean paste from an Asian grocery store.
Anpan is one of the easiest Japanese bread to make at home, if you want to try making bread for the first time. Trying to make homemade bread could be intimidating, but the more you try, the easier it becomes. And this homemade anpan recipe is relatively easy, so I hope my video and step-by-step pictures will help you go through this journey.
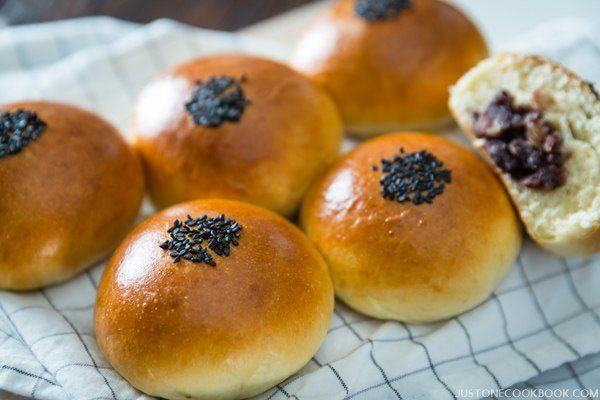
I hope you enjoy making this Anpan recipe! If you try it, don’t forget to share your picture on Instagram, Facebook, or Twitter with #JustOneCookbook. Thank you so much for reading, and till next time!
Don’t want to miss a recipe? Sign up for the FREE Just One Cookbook newsletter delivered to your inbox! And stay in touch on Facebook, Google+, Pinterest, and Instagram for all the latest updates.
- 225 g bread flour (1¾ cup) (and extra for sprinkling)
- 25 g cake flour (scant ¼ cup) (No cake flour? See Notes)
- 50 g sugar (¼ cup)
- 4 g kosher/sea salt (I use Diamond Crystal; Use half for table salt) (1 tsp)
- 3 g instant yeast (1 tsp) (Are you using active dry yeast? See Notes)
- 1 large egg (50 g w/o shell) (46-50 g/ml)
- 50 ml whole milk (3½ Tbsp) (keep at 86F/30C, See Notes)
- 50 ml water (3½ Tbsp) (keep at 86F/30C, See Notes)
- 35 g unsalted butter (2½ Tbsp) (cut into small cubes)
- 280 g red bean paste (anko) (See Notes for the recipe)
- 1 large egg (50 g w/o shell) (46-50 g/ml)
- 2 Tbsp water
- 2 tsp toasted black sesame seeds
-
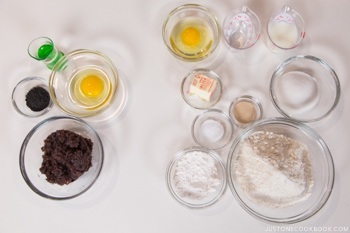
Gather all the ingredients.
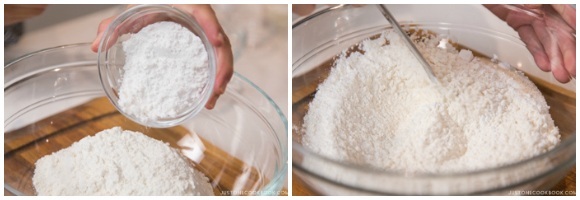
- In a large bowl, combine 225 g (1 ¾ cup) bread flour, 25 g (scant ¼ cup) cake flour, 50 g (¼ cup) granulated sugar, 4 g (1 tsp.) kosher salt, and 3 g (1 tsp.) dry yeast.
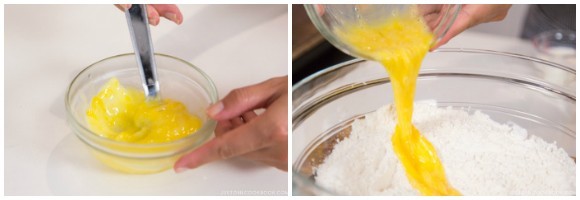
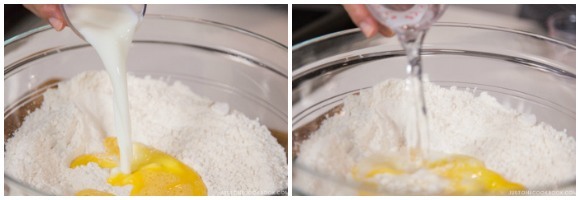
- Beat 1 large egg in a small bowl and add to the bowl with dry ingredients.
- Add 50 ml (3 ½ Tbsp.) milk and 50 ml (3 ½ Tbsp.) water, both which have been kept at 86F (30C).
- Using your fingertips or a wooden spoon, gently mix the ingredients together until they are combined. In the beginning, dough is very sticky and wet, but keep mixing until it forms a loose, sticky ball. Also use the dough to pick up the flour on the sides of the mixing bowl. This step should take about 2 minutes.
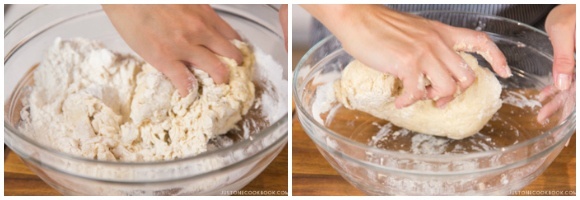
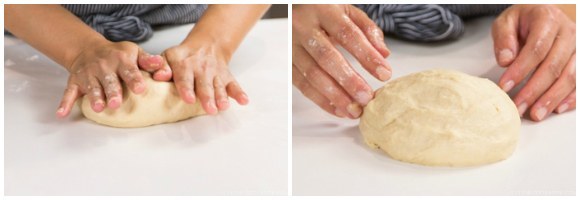
- Sprinkle a clean, stable surface with flour and transfer the dough from the bowl. Press the heels of your hands into the dough, pushing forward slightly. Fold the top half of the dough in half back toward you. Rock forward on the lower part of your palm to press it flat. Turn the dough slightly (to clockwise), fold it in half, and rock into it again with lower part of your palm. This process is called "punching" the dough and the goal is to lengthen and stretch the gluten strands in the dough. Repeat for 5 minutes or so. Tip: If the dough doesn't seem to be losing its stickiness, sprinkle more flour over the top and work it into the dough. You can lightly dust your hands with flour to keep the dough from sticking too much.
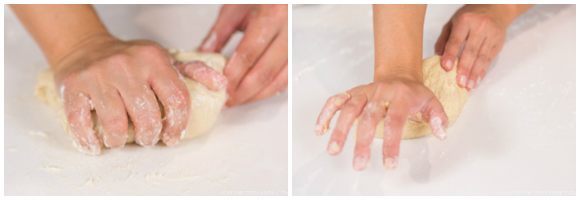
- After “punching” for 5 minutes and the dough gets more elastic, press and stretch the dough for 10 inches (25 cm). Then put small cubes of 35 g (2 ½ Tbsp.) unsalted butter on top of the dough. Roll up the dough tucking the butter in, and then continue the kneading process.
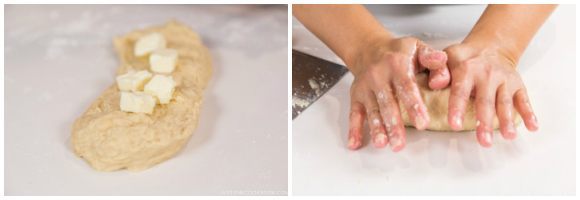
- Your hands, dough, and the working surface will get oily and messy in the beginning. I recommend using a metal/silicone dough scraper to collect the dough stuck on the working surface.
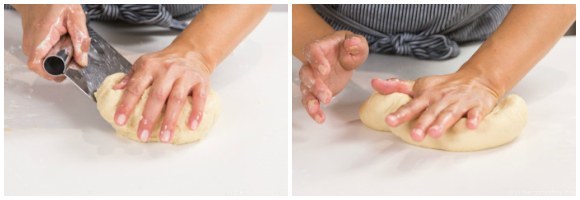
- As you knead, the dough will absorb the butter and it will eventually become very smooth and easier to work with.
- When the dough becomes smooth, start banging the dough onto the counter and fold it over away from you. This helps develop gluten (elasticity). Bang the dough, turn it 90 degree, and “punch” it, using the lower part of your palm. Continue this process for 10 minutes or until the dough is smooth, supple, and silky. Tip: Don’t let go of the dough when you are banging onto the counter. Don’t let it rest for too long between turns.
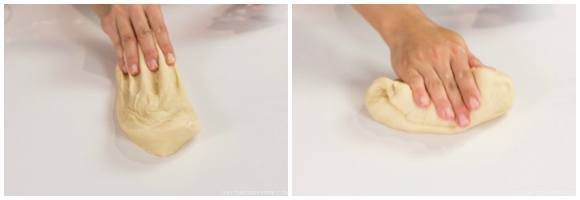
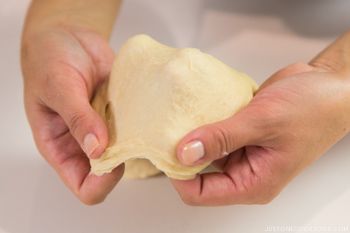
- Near the end, pull the end of your dough with your thumb and fingers. Keep spreading the dough with your fingers, stretching the dough into thin translucent membrane. This test is called Windowpane Test to see if the dough's gluten has been developed enough. Your dough is now ready to rise. If the dough tears, the gluten isn’t quite ready yet. Knead the dough for another 2 minutes and test again.
- Shape the dough into a ball by pulling all sides of the ball to the bottom and pinching them together.
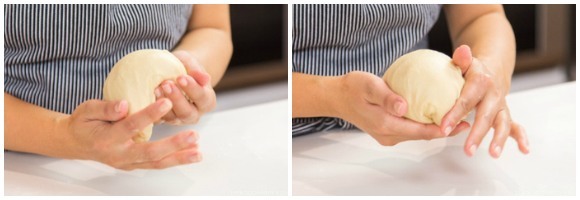
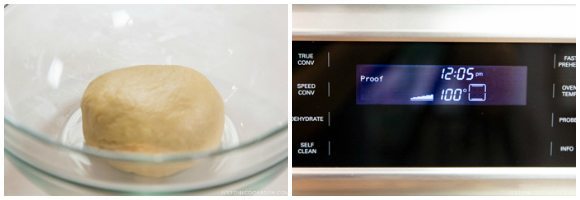
- Place the dough in a bowl (the seam on the bottom) and cover with a plastic wrap. Let the dough rise in a warm place until the dough has doubled in size, about 1-2 hours. I use a Proof setting (100F / 38C) in my oven.
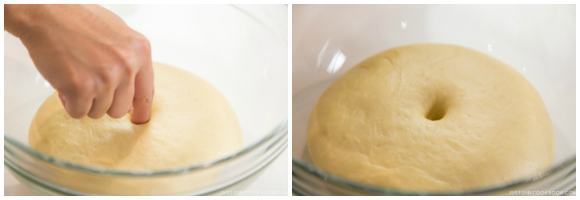
- Once the dough has doubled in size, dust your index finger with flour and put it in the center of the dough. If the hole doesn’t close, then the dough is ready for next step.
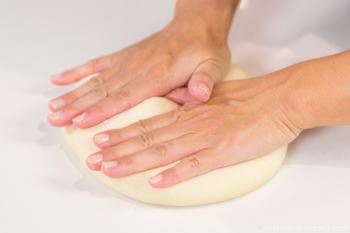
- Press the dough with your hands to release gas in the dough and deflate.
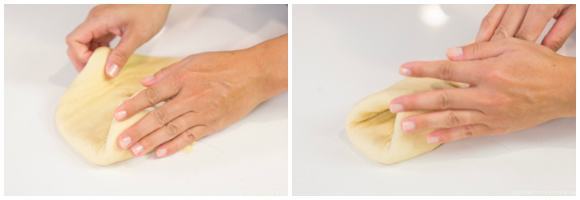
- Fold both sides of the dough toward center.
- Then fold in thirds toward the middle. Flip, keeping the seam side on the bottom.
- Shape the dough into a ball, rotating (clockwise) with both hands while the seam line is touching the work surface.
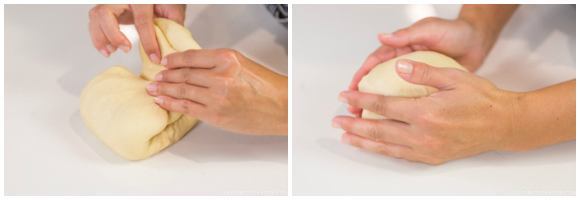
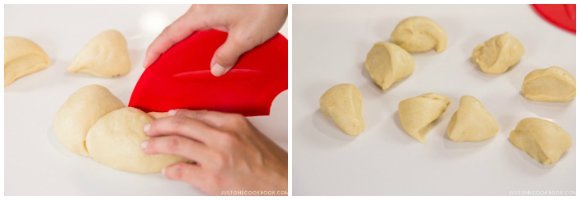
- Using a dough scraper cut the dough into 8 equal pieces. If you need to adjust the size of dough, pinch off the center of the big dough and add to the center of the small dough and knead to combine well.
- Shape each dough piece into a nice round ball, pulling from all the sides and tuck into the bottom. Place the dough on your left (right) palm, and rotate it with your right (left) hand, keeping the seam side on the bottom.
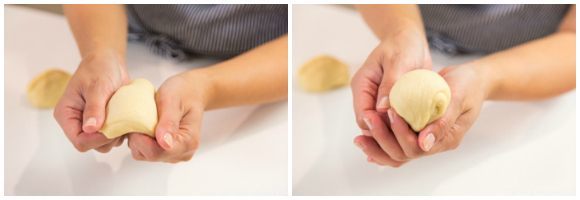
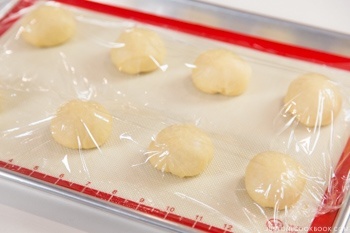
- Put the dough on a baking sheet lined with parchment paper or silicone baking mat. Cover the dough with plastic wrap to prevent from drying. Rest the dough for 15 minutes at the room temperature.
- After resting, flatten the dough with your hand, fold in thirds twice (just like you did earlier), and shape it into balls.
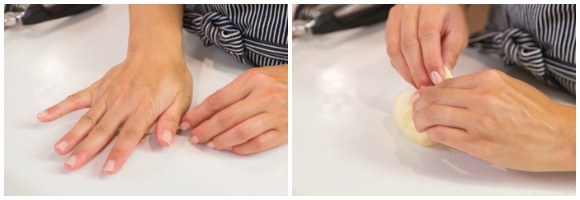
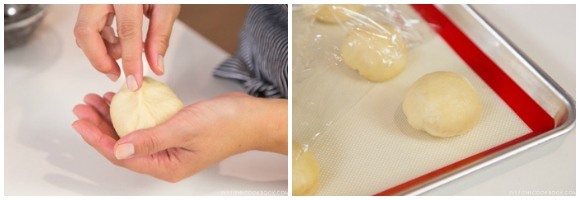
- Press the dough so stretches to 3 inch (8 cm) diameter. Then put 35 g of red bean paste in the middle of the dough. Then pull all sides of the dough around and wrap the red bean paste tightly to seal.
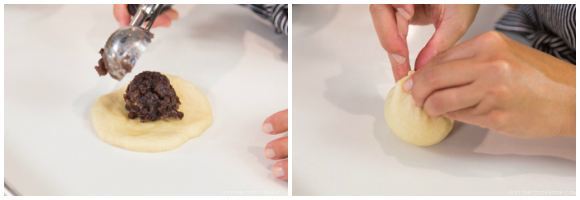
- Pinch the seam very well and put the seam on the bottom. Place the dough on your left (right) palm, and rotate it with your right (left) hand a few times, keeping the seam side on the bottom. Put the dough back into the baking sheet, seam side on the bottom.
- Cover the dough with plastic wrap to prevent from drying. Let the dough rise in a warm place until the dough has doubled in size, about 30 minutes (I used the Proof setting (100F / 38C) in my oven). When the dough has risen half way, preheat the oven to 400F (200C). Note: If you are using the oven for proof, you have to transfer the dough to a warmer place so you can preheat the oven.
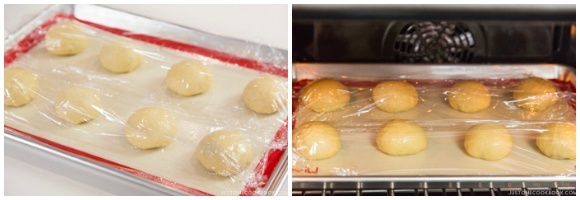
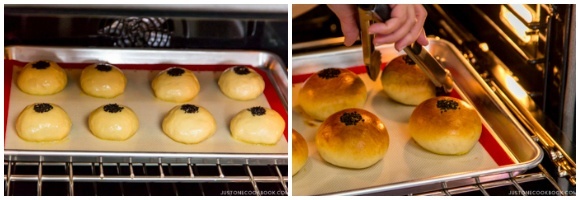
- In a small bowl, add 1 egg and 2 Tbsp. water and whisk very well. Using a pastry brush, brush all sides of the dough with an egg wash.
- Put 2 tsp. black sesame seeds in a small bowl. Dip the flat round side of a rolling pin (about ¾ inch diameter) in the egg wash and black sesame seeds and stamp on top of the dough. Alternatively, you can simply sprinkle the black sesame seeds on top.
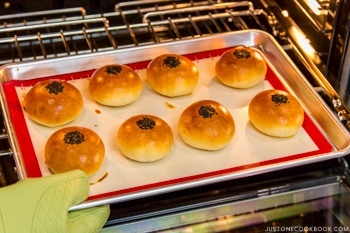
- Bake at 400F (200C) for 13-15 minutes. Toward the end of baking if you see the bread is not being browning equally, rotate the bread once so that the bread gets equal color.
- Once bread is baked, transfer to a wire rack and let it cool. Serve immediately or store in an airtight container or bag after it’s been cooled. Enjoy!
Prep Time includes resting time for dough.
Cake flour: If you don’t have cake flour, you can substitute with all-purpose flour and corn starch. Here’s how.
1 cup cake flour = 1 cup AP flour - 2 Tbsp AP flour + 2 Tbsp cornstarch
Be sure to sift the flour to distribute the cornstarch well before using it in your cake batter.
Instant Dry Yeast If you're using active dry yeast, it requires being activated in a little bit of warm water (110F/43C) before being added to the rest of the ingredients. In this recipe, add the active dry yeast in 110F/43C milk, hotter than the temperature specified in the recipe because if the milk is not hot enough, the yeast won't dissolve nicely. More about the difference between instant dry yeast and active dry yeast, read here.
Whole milk: I highly recommend using whole milk instead of reduced fat milk, but it's up to you.
Red Bean Paste: I use coarse red bean paste but you can use fine paste. Pressure Cook Anko recipe here and Stove Top Anko recipe here.
Recipe by Namiko Chen of Just One Cookbook. All images and content on this site are copyright protected. Please do not use my images without my permission. If you’d like to share this recipe on your site, please re-write the recipe in your own words and link to this post as the original source. Thank you.
Hi Nami,
I know this is going to sound very lazy but is it possible to knead the dough (all or in part) in a stand mixer rather than by hand? I’d love to try making this for my Mom.
I’ve just ordered my Instant Pot and am eagerly awaiting its arrival so I think your tsubuan is in one of the first things I’ll make as I’ve had a craving for Zenzai for about two years! Mom’s homemade mochi in the freezer, azuki beans in the cupboard just waiting…
Hi Rumi! Yes, totally you can! I know a lot of people don’t have a stand mixer and this is a popular recipe so I wanted to show the way without a stand mixer. You can shorten kneading process – see the dough texture in the video/pictures and compare with yours when you use a stand mixer. 🙂
I”m so excited about your Instant Pot! You’ll love it! Homemade zenzai is the best, especially you have your mom’s homemade mochi! So nice!!!
Hi Nami! Instant Pot came last week and the first thing I did (after the water pressure test) was make your pressure cooker tsubuan and then zenzai. It was perfect! Then I made Osekihan with the drained liquid from the anko. Happy dance!
Today, my four year old niece and I made my Mom some Anpan. I doubled the recipe for the dough, threw everything in the mixer and waited. They lack the gorgeous colour of your anpan and I didn’t have any black sesame seeds but they are a hit! (I forgot the water in the egg wash so they came out a bit spotty instead of all over consistency.) My niece isn’t a fan of anko so we made four chokopan. Everyone’s happy (except maybe my jeans…)
Thanks for all the easy to follow directions!
Hi Rumi! AWESOME! I hope you had fun making anko! I love homemade zenzai…and pressure cooker anko is so easy to make! Your osekihan must be so delicious. Chocopan is a great idea! I’m so happy that your family enjoyed the recipes! Thank you for writing your kind feedback. 🙂
Hi Nami,
I’m baking Anpan today and I’m thrilled to see the final result. I used a stand mixer to kneel the dough. Will this recipe work for other breads like hotdog bun or BBQ bun, too?
Hi Catherine! Hope your anpan comes out well. Yes, you can use that for those buns. 🙂
Hi Nami,
They came out dry ☹️ and the texture is more like bread. My oven may be too hot. I will try it again this weekend.
I made a dozen of variety “asian style” bread with the dough ingredients, turned out great! Because the bread itself is not really sweet, I made with both sweet and savory fillings 🙂
FYI I use All-purpose flour and stand mixer to knead. Don’t know what the taste would diff with bread flour but AP is good enough for me (I knead for a longer time)
Hi Danielle! Thanks so much for your kind feedback! So glad you’re enjoying the Asian bread with different fillings!
I love anpan but usually buy mine at the Happy House Hippo pastry shop at Mitsuwa Marketplace. (the one near Chicago). I’ve tried some from various shops in Chicago’s Chinatown, but prefer the ones from Happy House Hippo. I do make taiyaki with sweet bean paste, but haven’t tried making my own anpan. I’ll have to give your recipe a try.
Hi Linda! We’re lucky to get Anpan in a Japanese bakery and grocery store. Though I have to say homemade anpan is soooo awesome… If you have a stand mixer, the process is a bit easier. I was working out by kneading so I feel better eating more anpan. 😉
Hi Nami san,
Your recipe is nearly the same as the one of “Pains au lait”, a classic french recipe. I use it to prepare “tresse”, “couronnes”, “petits pains au lait”, “petites boules au sucre”….
The flour used is T45 which gives much elasticity to the dough (gluten)…
I use milk powder not liquid one and fresh yeast…not many differences in fact.
Amazing…
All the best and thank you for your work !
JP
Hi JP! Yes, it’s very similar. I love European style bread more than American bread and it’s so delicious! Thank you for reading my blog! 🙂
Hello Jean Pierre. I am living in Paris and when I went supermarket it was difficult to find out which flour i should pick. So i will try with T45!. My first anpan trial didn’t go well, but i won’t give up!.
こんにちは。初めて投稿します。美味しそうなあんパンレシピですね。
イーストをぬるま湯で溶かさずにそのまま粉物と一緒に混ぜてしまうと、イーストが溶けず粒々が残ってしまったのは私だけでしょうか?イーストは先に必ず液状の材料と一緒に溶かしておいた方が良さそうです。そのせいか、パンの膨らみが悪かったです。次回は イーストを溶いて使います。
こんにちは、さくらさん!優しいお言葉、どうもありがとうございます。Instant Dry YeastとActive Dry Yeastがあって、私はInstantの方を使ったので、ぬるま湯なしで、直接ドライのパウダーのまま混ぜれます。でもActive Dry Yeastの方は、必ずぬるま湯に入れて、ちゃんと溶けてから使うイーストです。種類によって使い方が違うので、気をつけて下さいね。あともう一つ。Activeの方は、ぬるま湯に入れた後、イーストが生きているかチェックするのも大事です。Expiration Dateがまだ大丈夫でもイーストが死んでしまった可能性あるので、必ず新しい日付のイーストを買うのをおすすめします!同じ日にちでも、パッケージによっても違ったりするそうなので、念入りにチェックした方が良いです。
アクティブイーストの注意書きが下に書いてあったのに今気がつきました!そしてインスタントイーストの存在に今気が付きました。笑 とても御丁寧な返答をありがとうございます。昨晩このあんパンできました。家族にも好評でした!強力粉を普段使わないので、全部オールパーパス粉を使いましたが、ちゃんと美味しく出来上がりましたよ。個人的にはクリームチーズと一緒に食べるのが好きです。是非お試しください! 素敵なレシピありがとうございます😊これからも頑張ってくださいね!(私はカナダbc州在住です)
さくらさん、あぁ〜良かった!ご家族の方にも気に入ってもらえて良かったです!クリームチーズと餡、合いそうですね。どこかで食べた事あるような?!木村屋のバターと餡のコンビのあんぱんも好きです!カナダBCいいところですね。数回バンクーバーとビクトリアを訪れた事があります。これからもどうぞよろしくお願い致します!
How would we go about freezing this? If at all possible? Thank you!
Hi Serena! Yes you can freeze the baked anpan in an airtight bag. Thaw overnight in the refrigerator and bake at 350-375 ºF till warm. 🙂
Oh I am so glad to read this anpan recipe! I would like to try it out and make my own homemade anpan, the reason why I haven’t done it before is the fact that I can eat gluten because of celiac disease… Have you any recipe that I can use baking glutenfree anpan?
And by the way, I’m wondering about eating glutenfree/lactosefree in Japan? Is it easy to find such alternatives in restaurants/groceries? Am I right, people don’t drink/eat much milk products in Japan, anyway, it’s not so common with milk products in japanese recipes? Is it common eating/buying/cooking glutenfree, too?
Hope you’ve had a wonderfull beginning of the new year Nami!
Hi Genus! I’m sorry but I haven’t tried making GF anpan recipe before. I wonder if swapping with GF flour will work… Japan started to be more aware of GF products and GF dieting. Some people do it because of celiac disease, and some do it because of trend they see from oversea (more like healthy diet type). But overall, it’s not easy to eat out if you’re GF (even in the US it’s not always an easy option). Lactose free is more common, and milk is treated differently, I think as most of Asians are lactose intolerant. We do have many milk products in Japan, but it’s just treated differently I think. 🙂
Yesss! Thank you so much for filling my request Nami! Super! I love this recipy <3.
Love
Skye
You’re very welcome Skye! Thank you so much for your request! 🙂
Can the buns be eaten the next day? Or only fresh on day it is baked?
Hi Vivienne! Keep them in the air-tight plastic bag or container, and next day is great! 🙂
Hi Nami san,
I have looked at the recipe used by bakers for doing “pains au lait”. I wanted to know exactly the differences between this french recipe and yours.
The two differences are:
The weight of sugar, double for you
The weight of butter, 35 g yours and 50 g mine…
You can use milk liquid or dry, it doesn’t matter.
About the yield if you use fresh just x3 the weight of the dry one…
all the best
JP
Hi JP! You know, Japanese breads are influenced highly by European bread (not American), so I completely agree that this is similar to pains au lait.
I read a documentary on Japanese bread on TV before, and I remember Japanese bread (majority) is slightly sweet (and sugar in the recipe – not American’s). The reason is that our tastebuds are so used to eating rice, that has sweet taste, so when we introduced bread culture in Japan, sugar was added to the dough.
And the butter – this recipe can have more butter for sure, and I’ve seen some recipes with more butter. But it’s extremely difficult and time consuming to include more butter if kneading by hands. Even with 35 g, it takes a long time for the dough to become smooth… but I know 50 g butter will be very nice for bread. 😀
These look so good! My favorite Japanese buns are the ones with sweet custard, I dont know what they are called. I wish I could get anpan where I live, or maybe not because I would eat too much. Beautiful job photographing these.
Oh and that is a great new year resolution, good luck on that Nami!
Your favorite bread is called Cream Pan and it’s our favorite too! Maybe I’ll make it one day! I also have problem with the portion control when it comes to delicious bread…. it’s so dangerous! Thank you so much for your kind words. I’ll try my best on my resolution. 😀
Please do give a recipe for that! I have tried it once and have been wishing I could have it again.
Thank you Emy! It’s on my list already. 🙂 I just have so many recipes that I want to share… so little time to film and edit. 🙂
I look forward to it! Then again, I look forward to them all.
I’m glad that you shared this recipe! I will make it on my next day off. I have anko in the freezer. 🙂
Near us there is a japanese restaurant and grocery store where I used to buy anpan and one another type called melonpan. Both are my favorites.
Have you got the recipe of melonpan too? Dough is similar as anpan’s and has a sweet, biscuit crumbs layer on the top.
Hi Majacica! I hope you will enjoy this recipe! I’m working on Melon pan recipe… Hope to make a video soon (but I’m booked with other recipes so I have to wait a bit). 🙂
Hello Nami, I have tried this recipe several times and I must compliment you it comes out perfect everytime!
Your recipes are truly excellent.
I just wanted to ask you, my father is vegetarian and does not consume egg, can you suggest what I can use to substitute the egg in the recipe?
Hi Urvi! Awww that’s such a sweet compliment! Thanks so much for trying this recipe many times! I wish I have more knowledge about egg-less cooking, but I am not… 🙁 I have never used the egg substitute or try making baked goods without eggs before. I’m so sorry I can’t help. 🙁
Thank you for this recipe! One of my favorites. Up to what steps can this be made in a stand mixer? I can’t wait to try these out.
I also grew up on a fried an pan, rolled in granulated sugar. So, good!
Thanks again.
Hi Helene! All the kneading process can be done in a mixer (with hook attachment). Ohhh what is that called in Japanese… Ah I remember, it’s called Agepan (揚げパン)! That was my favorite “dessert” in school lunch menu! So nostalgic… 🙂
Oh YES! Definitely on the list of my all-time favorite treats. Thanks for the recipe.
Thank you Damie! Hope you enjoy this recipe! 🙂
I decided to try making these, because I’m really bad at baking in my own opinion, and the instructions are so good I figured I couldn’t fail. And I didn’t!!:D
These were a complete success, although I had no ankommen at home and still haven’t managed to make it right, so I used apples and cinnamon instead. Lots of apple bits in cinnamon and a little sugar- it’s like the perfect snack/treat for when you want something fluffy but also filling!
Thank you Nami for the highly detailed instructions – couldn’t have done it without:)
Hi Julia! I’m so happy to hear you made this recipe already and it came out well! Thank you so much for your kind feedback. I’m glad my recipe and instructions worked for you! The filling sounds delicious! My daughter who loves apples said she wants this filling, so I have to give it a try! 🙂 Thank you!
Hello Nami,
As usual this is another wonderful recipe that you have demonstrated so clearly with all the details and wonderful photography for anyone to be successful in making Anpan.
I have made the anko on my stovetop pressure cooker and it looks great and as you say in your demonstration the pressure cooker is a great time saver.
What if we take it another step further and make the dough in a bread maker instead of a mixer or by hand?
I just purchased a Panasonic bread maker model SD-YR2500 and i would like to experiment with this recipe. Would I still need to continue any of the kneading after the machine has finished?
Thank you so much for all the effort you put you put into your wonderful site. We truly are so lucky to reap the benefits of you hard work.
Best regards,
Ken Cameron.
Hi Ken! I apologize for my late response. I do remember reading your comment, and also remember answering… but somehow my response is not here. Maybe it didn’t go through before I closed window or something. I am sorry I couldn’t write you back sooner.
Thank you for your kind words about my recipe. 🙂 It’s great to hear you use your stovetop pressure cooker to make anko!
You can totally make the dough with bread maker! I am still hesitant to purchase it, because I won’t be able to share a recipe using it (it’ll be much less people who would purchase it, unlike a pressure cooker, for example). I even made the bread dough with hands (for people who don’t have a stand mixer.. :)).
You do not need to knead (besides reshaping to small dough pieces etc) on top of what bread maker does for you. It’s going to be much easier for you to make bread! 🙂
Thank you for your kind words and support, Ken!
Good evening, I was wondering if I could put the anpan in the fridge overnight to bake for tomorrow and is it possible to fry them?
Hi Tienna! Do you mean to put the shaped and ready-to-go anpan dough in the fridge, and transfer to the oven in the morning? The dough will be cold and I’m not sure how that will affect the baking time. Also, I’m not an expert in baking, but I remember you’re not supposed to leave it out for too long before baking… but forgot the scientific reason…. Sorry! Maybe google and see if anyone asks questions about it? It doesn’t have to be anpan. 🙂
Thanks for the tip! Some sites on Google says its fine to put dough in the fridge overnight I’ll have to just wait on the dough to become room temperature. Thanks for the help! ????
Hi Tienna! Thanks so much for letting us know! Hope it’ll work out. Good luck! 🙂
Thanks for sharing, very yummy! I did it!!
Hi Sarah! Wooo hooo! So happy you tried this recipe! Hope you enjoyed. 🙂
Hello.. I only have active dry yeast. Would it be the same measurement?
Hi PC! I’m so glad you asked this question! I use instant dry yeast and for active dry yeast, you will need to dissolve in liquid first. I updated the information in Note section of the recipe. Hope this helps! And thank you for asking this question!
Hello Nami, I just love Anpan. My favorite. May I know instead equally divided the dough to 8 pieces, what is the weight of each dough. I know the filling is 35 gm each. I am not good at divided them evenly. Thank you.
Hi Ng! I didn’t weigh each dough… Sorry! Make a perfect round ball, so that you can cut it evenly 8 easily. 🙂
how many buns does this recipe yield?
8 pieces. 🙂
the first time i tryed to bake something… well i needed two hours more to knead the dought case i put in too much egg, and then put even more flour, and then added more~…
in the end i had 12 large anpan but they tasted really good, even my grandma was suprissed… noone thought i could bake something >.>
Hi Philipp! Aww! Congratulations on baking for the first time!!! Baking is like science – it’s really important to follow the recipe (especially if it’s well-tested already). 🙂 Glad you make it work – I think you should give more credit to yourself! 😉 Thank you for your kind feedback. 🙂
Hontoni umasodesu arigato! I cant wait to try this recipe, I love ampan.
Hi Ethan! Arigato! Hope you enjoy this recipe! 😀
Hi Nami, I was just wondering how far in advance can these be made? Thanks!
Hi Lisa! If you pack very well in an airtight container, maybe 2 days… Honestly thru are THE BEST out of the oven!!!!! You can toast a little bit before serving too. 🙂
Oh okay, thank you! 🙂 And just out of curiosity (I’ve never worked with yeast before), could I put the dough in the refrigerator to slow down any of the rising processes? If so, how long can I leave it in there for?
Hi Lisa! I’ve never tried that, but I heard that you can “slow down” the rising process in the fridge (not STOPPING). I’m not sure your time frame but you might want to test and see if 1-2 day old is acceptable. 🙂
Ah, okay! And I’m sorry for all of my confusion >~< but do you happen to know if it would be possible to prep the dough one day and bake it the next?
Hi Lisa, I haven’t done it, but maybe if you prep before you sleep, and continue in the early morning, it might work? Bread making is already quite stressful for me (to make sure it rises well etc), so I don’t like to change up things… so I can’t confidently say it’s possible… Sorry!
Hi Nami,
I absolutely love red bean paste, but have never actually gotten to try anpan before. Currently, I’m in the middle of making it for the first time, but no matter what I do, I can’t seem to get that elasticity mentioned in step 10. Nothing I do helps, so I’m going to go ahead and let it sit the hours to rise and hope for the best. Your advice for my next batch would be greatly appreciated!
Much thanks, Maru
Hi Maru! I’m happy to help. Let me know a bit more details. Are you kneading with your hands? Please confirm that you used and exact ingredients without substituting, and measure precisely (hopefully you used a kitchen scale). Otherwise I can’t give my advice as the result may be different. How far did you knead? Initially when you start kneading, your dough is too tough and won’t extend. You have to knead to get to that point. If your yeast is not old, it should work. If you cut down on butter etc, I’m not sure if it will work the same way.
Have you watched the video (around 2 minute in) where I show how it looks like?
https://www.youtube.com/watch?v=Ofob7LKg19k
Let me know a bit more details. 🙂
Hi Nami! My anpan actually came out alright, and very tasty! I have shared them with my friend today and felt very happy with my first attempt; I’m sure the next batches will be even better!
However, yes, I was kneading by hand for about 40 minutes in total I am guessing? I am thinking it might have been because it was cold in my kitchen, because when I let it rise in the proofing, it ended up being decently elastic! I think my yeast may have been old; it was stored in a cool place in my cupboard as opposed to a refrigerator. I did substitute a good bit; I was using active yeast in warm milk and made my own cake flour mix as described. Also, I only had salted butter so I cut down on the pure salt added in! Otherwise, everything was as normal.
Oh, there was a video! I was looking on my phone this whole time and didn’t realize. This will be great to look at for next time!
Thank you for the detail info, Maru! I’m glad the final result was good. The video is a bit long, but I hope it helps visually. 🙂
Hi Nami, I just tried these with few adjustments to your recipe and they turned out so pretty and delicious!! My family absolutely loved them and said they were even better than a bakery’s. I thought it was one of the softest, fluffiest, best bread I’ve ever made. I just hope they will still remain soft the next day.. 🙂 Just a question, how do I store these anpan? Thanks Nami for the recipe! 😀
Hi Asl! So sorry for my late response. It’s been a few days already since you left the question. I usually keep it in a ziploc bag, if I was going to eat the next day. Then reheat before I eat. Our anpan disappear before I even have a chance to freeze…but freezing should work too. 🙂
I’m so happy to hear you and your family enjoyed it! Thank you for your kind feedback. I want to eat homemade anpan too, but I gained too much weight over the holidays so I banned myself from baking (for a short time at least). LOL!
We just got back from a 2 week vacation in Japan and I will probably miss anpan the most. I had it for breakfast nearly everyday! The first place we had it in Asakusa (TomTom bakery) decorated their anpan to look like Anpanman! So cute. There was even sakura anpan at some shops due to the season. I’m really looking forward to trying your recipe to recreate the feelings I had while in Japan <3 Thanks Nami!
Hi Alexa! Hope you had a great trip. I assume you could see some sakura! So lucky! I’m so happy you enjoyed anpan, especially sakura anpan! Oh those anpan with salted cherry blossom is so good, perfect combination of saltiness and sweetness! Hope you enjoy making these at home!
Hi, I just made this recipe last night but I used kitchen aid mixer with the dough hook to knead the dough instead. I love the taste that it came out, however the texture was kinda tough. Did I do something wrong? Did I over knead? Or I didn’t let it rise enough in the final proofing? Please help. Thank you
Hi Sirirat! Thank you for trying this recipe! It’s hard to know if you over-knead or under-knead without seeing how you made it. It’s baking and science so each step/detail is important. It should be pretty soft, moist and fluffy. If you add more butter (which will be harder to knead and incorporate), it gets even fluffier! Hope this helps.
Hello Nami-san,
Thank you for sharing all these amazing recipes with us.
I literally love anpan and miss it a lot when out of Japan.
I’m preparing anko right now, following your recipe… and tomorrow I’ll try to make anpan (and dango). We’ll see how it goes 🙂
Thank you again!
Mai
Hi Mai! Thanks for trying my recipe! How did it go? Hope you enjoy homemade Anpan and Dango! xo
I am also of an Southeast Asian decent, and of course our palate is on the “sweetness” side after meals, during breakfast and during snacks. Therefore, watching on the video or following in FB triggers my liking for Asian baking. So, thank you for sharing.
Hi Minda! Thank you for reading my blog post. 🙂
Hey Nami! My daughters are teaching themselves (with some help from me) how to bake! I was wondering if you have ever done these with flour other than wheat. So far, our attempts with the current mix we are using result in a biscuit texture rather than the light texture seen with wheat flour. If you have any ideas, they would be greatly appreciated! And…if we find a solution, I’ll let you know! We love your blog and have made many of your recipes successfully! The breads are messing with us a little though, since we are unable to use wheat flour.
Hi Lynna! Thank you for trying my recipes! I’m happy to hear you enjoy them. I am sorry but I don’t have experience in using non-wheat flour much. I wish I could help… 🙁 I’m sorry!
I love your recipes!!! I have made your matcha madeleines, chinese almond cookies, earl grey chiffon and melon pan. All were very successful. I want to make anpan for a Japanese friend. However I have never tasted one so I don’t know what to expect from the finished product. What is the ratio of bread to anko ? And what is this ratio if you bought an anpan from a Japanese bakery?
Hi Natalie! Thank you for trying my recipes and I’m so happy to hear yours came out well. Regarding the ratio… each bakery is slightly different. But it should look like this:
https://www.google.co.jp/search?q=%E3%81%82%E3%82%93%E3%81%B1%E3%82%93&rlz=1C5CHFA_enUS727US727&source=lnms&tbm=isch&sa=X&ved=0ahUKEwic0cLF07PVAhXElVQKHUxYBuoQ_AUICigB&biw=1680&bih=876
Hi, Nami San
I was just looking through your blog for anpan recipe preferably w/ kurogoma. Can you tell me how to make kurogoma fillings please? It can be a rough idea of black sesame & sugar ratio. I had similar bread in Kobe. It was so good that I was dreaming about them. It’d be great to eat with a cup of houjicha in the morning. Thank you
Hi Ima! I don’t have the recipe for kugoroma filling. I’ve made the black sesame paste before (recipe on my blog) but it’s too loose for your filling I think…
Every time I make this recipe, the bread stays the same size as the 8 little rolled buns; never expands. I added yeast, the only things I didn’t do were use bread flour (I used all-purpose), and I gave up kneading after 30 minutes because the dough wasn’t become elastic and stretchy like the video.
Hi Kisuke! Thank you for trying this recipe! It’s kind of hard to pin point what went wrong, but I’ll try my best to see what could cause not rising. 1) Was your yeast old?
2) How was the temperature during proof time? Was it warm environment?
3) 30 minutes seems like over-kneading. Try letting it rise a little longer before shaping it. You can’t really undo the damage of over-worked gluten, but the longer rise can help the dough to relax a little. Over-kneaded dough will end up with a rock-hard crust and a dense, dry interior.
4) Were you using instant dry yeast or active dry yeast? They are prepared differently. Maybe yours was active dry yeast?
Hope that helps to investigate what went wrong…
Hi Nami, thank you so much for responding!!!!! 1. My yeast was brand new, and it was the active dry kind. Does this make a big difference?
2. I wrapped the dough in seran wrap just like in the video, and put it in the oven at 100 degrees, so it was slightly warm. Maybe the yeast were overbaked?
3. I know 30 minutes is probably too long, but the dough was still slightly stiff and clumpy so I figured I should just keep going. Do you think there might be a problem with my kneading technique?
Hi Kisuke! Good to know that you used active dry yeast. Yes, it has to be prepared differently. I mentioned in the Notes area: If you’re using active dry yeast, it requires being activated in a little bit of warm water (110F/43C) before being added to the rest of the ingredients. In this recipe, add the active dry yeast in 110F/43C milk, hotter than the temperature specified in the recipe because if the milk is not hot enough, the yeast won’t dissolve nicely. I think your yeast wasn’t activated in your bread.
Can you freeze them before baking or after?
Hi Rayna! You can freeze after baking. 🙂
This was wonderful! I used my own recipe for anko, I prefer koshian, but otherwise this was great.
I’m so happy to hear that! Thank you for trying my recipe and for your kind feedback. 🙂
That’s one of my favourite sweet buns. If I would like to add matcha powder, how much would you recommend? Do I need to reduce the amount of flour? Thank you
Hi Christine! If it’s a little bit of matcha, I wouldn’t reduce flour… but when it’s more than 1 Tbsp, I may reduce a tiny bit. I’d add matcha into cookie dough… don’t know how much exactly, but start with small amount and increase as you test?
This turned out so well! I had left over anko in the freezer from when I tried the taiyaki recipe and this looked like a great way to use it up. This is the first time I have had a bread product turn out perfectly — the yeast rose, the gluten formed, and the buns came out so light and fluffy. I can’t believe it! Definitely laborious when compared to other pastries like taiyaki, but a great recipe for when you have extra time. I wish I could post pictures but they came out just as advertised!
Hi Jennifer! I’m so happy to hear your Anpan came out well for the first trial! Thank you for trying this recipe and for your kind feedback. 🙂 I agree, this recipe is pretty labor intensive but there is nothing like homemade Anpan… so delicious. Totally worth it (once in a while). 🙂 Thank you again!! xo
“4. Add 50 ml (3 ½ Tbsp.) milk and 50 ml (3 ½ Tbsp.) water, both which have been kept at 86F (30C).”
I think it is not 50 ml (half liter).. I found out in the worst way! I should’ve payed attention to tablespoons… Maybe i can do pancakes with the mix i got?
Hi Sol! Wait, sdid you mean you got confused with 500 ml? 50 ml is roughly 3 ½ Tbsp. So you ended up adding 1000 ml (1 L)!?!? Oh no! Sorry to hear…
I should have watched the video first!! Cooking while tired is not the best idea.
Once I tried to do dorayaki and it wasn’t good, until I found your video! I don’t know was the difference between the two dorayaki recipes, but yours worked beautifully.
Hi Sol! Yeah especially when the recipe is more complicated. 😀 I’m glad to hear my dorayaki recipe came out well! 🙂
Hi Nami!
I used this recipe to make my own anpan because I was craving for some and I didn’t know any bakeries in our town that sell these. I have to tell you that this is the best anpan I ever had! The bread was so light and fluffy while the anko filling (I also used your recipe) was rich and not too sweet and the two combined is just magnificent! After eating two buns, I shared the rest to my family who also loved them! Although mine were burnt at the bottom (maybe it’s because of the oven temp) so I might buy an oven thermometer to make sure none of my future batches of anpan get burnt! Thank you so much for this recipe!
Hi El! I’m so happy to hear you enjoyed this recipe! Thank you! I had so much fun eating (and gained some weight) from testing this recipe. LOL. Maybe the heat from the bottom of your oven is too strong/close? Either way it’s good to test the real temperature inside the oven. 🙂 Thanks so much for your kind feedback on my recipes. It meant so much to me. xoxo
Hi! My dough was a bit tough. I used a stand mixer – about how long should the stand mixer run after adding in the dough? I felt like it went from being sticky to hard very quickly. Should I have run it even longer? Or maybe I did it for too long? Thanks!
Hi Jenny! Did you do a windowpane test (Step 11)? Until you get it right, you have to knead. I feel like you didn’t knead enough. But it’s hard to tell without seeing any pictures… Just my guess.
I would have lived to read your entire article, ingredients and cooking instructions for your anpan, unfortunately… there were large, reoccurring ads covering the entirety of your page. To bad, the history sounded interesting and the buns looked tasty.
Thank you for your feedback, Angela! I’ll let the advertising company know about this.
I do not hv cake flour, can I substitute with self rising flour?
Hi Roselynn!
Self-rising flour: a combination of all-purpose flour, baking powder, and salt (The blend is typically comprised of 1 cup of all-purpose flour plus 1 1/2 teaspoons baking powder and 1/4 teaspoon fine salt).
Cake flour: a finely milled, delicate flour with a low protein content; it’s usually bleached. When used in cakes, it results in a super-tender texture with a fine crumb, and a good rise. The primary difference between cake flour and all-purpose (AP) flour is the protein content (which becomes gluten). The protein content of cake flour is about 8%, while the protein content of AP flour is slightly higher.
As you see, they are different. I would feel more comfortable if you use AP flour instead of self-rising flour… In this recipe, we do not need baking powder and 1 tsp salt for roughly 2 cup flour (bread flour + cake flour).
I am not sure how the bread will turn out. For sure edible, but it might not be the right type of bread at the end… since it takes a long time to make, I don’t like failing after spending hours… so my recommendation is to stick with the recipe (especially making bread…). 🙂
Hi Nami,
I was wondering if I made with all purpose flour only, instead of bread and cake flour. What do you think?
Hi Miho! The texture will be different but if that’s okay, then you can use all-purpose flour. All-purpose flour is basically a type of flour between bread flour and cake flour in terms of gluten in the flour. You can control the texture by using bread flour and cake flour. It won’t be bad, but if you want to make the anpan texture, I recommend creating the own blend. 🙂
After visiting the famous Kimuraya, I have to make this, but with salted sakura topping. My sakura is currently drying after being soaked in the ume wine (no vinegar was available). I am hoping for the best! Managed to buy bean paste in the local Asian shop, so almost ready to make anpan. Thank you very much for your recipe!
Hi Moni! I’m so happy you got to try the Kimuraya anpan!! That’s best… sigh I miss it. I have tried salted cherry blossom one too. So good!
Good luck with making Anpan! I hope you will enjoy this recipe! xo
Made these for the second time tonight- turned out even better this time. Used stand mixer with dough hook till step 9. My dough did not look as wet as video and never got to “windowpane stage.” It kept tearing even though I had worked it for 10+ minutes. (Very satisfying!)
Also I find step 22 ( re-shaping doughballs after their 15 min. rest) to be redundant–only serves to make the filling with red bean paste more challenging since dough was very “bouncy”. Even after a rest of 30 minutes, I needed to work fast after spreading out dough to 3 “.
Resulting buns were wonderfully tender with extra flavor from those black sesame seeds. Thank you, Nami, for precise measurements and clear directions!
Hi Peggy! Thank you so much for your detailed feedback. We really appreciate that. I’m happy to hear you enjoy the recipe. Thank you!!!
Would doubling this recipe work out okay?
Hi Ryan! You will be busy, and you don’t want to over-proof. Make sure you can handle a lot of dough at once, and also oven space. 🙂
Hi Nami,
I have been dying to try and make these at home but I am fairly new to the homemade bread making game. I see in your recipe that you let the dough rise in your oven at a proof setting of 100. My oven unfortunately does not have a proof setting. Is this necessary or is it okay to just let it rise at room temperature? Do you have any recommendations of places that tend to be warm where it can rise?
Thank you!
Hi Christine! I am so sorry I couldn’t get back sooner. I had been sick for 2+ weeks and I’m finally back.
Yes, normally you would just let it rise at room temperature or warm place. I’ve tried to put it on top of a laundry dryer machine, preheated warm oven, etc… but in general, my house is cold. So I was thankful to have this proof setting when we got a new oven (I had no idea this thing existed!).
Thank you! I am glad you are feeling better!
Thank you! I’m still coughing…and it will freak out a lot of people at this time… 🙁
Love Anpan!!! But I can’t make my dough as soft as yours… is it because I didn’t knead enough? Or did I kneed too much?? My Anpan came out dense and hard… not soft… but I will try again!!! Any tips??
Hi Dorothy! It’s hard to say if you didn’t knead enough or over-knead without being there. But “typically”, the reason is lack of moisture (we sometimes need to adjust the amount of liquid based on weather/season) and lack of kneading. How was your windowpane test? When you knead with your hands, you are afraid of the wet dough sticking to your hands and tend to add too much flour, but that can lead to hard bread. Hope this helps and see some progress next time when you try. 🙂
Hi Nami,
Have you made Anpan with Active Dry yeast before? If so, is there any difference in the final product between using Active Dry and Instant yeast?
Thanks a whole lot 🙂
Hi Andy! I don’t know about the difference in the final product because I’ve never had a chance to try and compare… Sorry, I wish I could tell.
That’s fine, sometimes life gets busy…
Hi dear, I just made this bread based on your recipe and it turns our really good. I’m looking to make around 16 (or more) pcs next round, should I just x2 of every ingredients?
Hi Wendy! I quickly googled to check and it looks like yes, you can simply double the recipe (including yeast). I’m not sure about your oven size and if you’re working with someone else to make 16, but don’t let the dough stay out too long (overproof). It might be better you work one batch at a time.
Hi Nami,
I just made these and they were delicious! Do you have any tips on freezing and reheating? Can they frozen after they are baked?
Thanks!
Hi Nicole! Thank you so much! I’m so happy to hear that you enjoyed this recipe!
Sorry for my late response… yes, you can freeze after you finish baking and letting them cool down completely. Store in a Ziploc bag and freeze.
When you’re ready to eat, either defrost in the fridge overnight and reheat in the oven or microwave until “warm” and then reheat in the oven. 🙂
Made this and it turned out beautiful and tasty. It looks difficult but actually easier than it seems. But my bread turned out a little bit chewy though, does it mean overkneading? Or I added too much flour? Still the bread is soft though and the colour is beautiful, Insta-worthy.
Thank you Benny for trying this recipe! I would think it’s due to the lack of kneading, instead of overkneading… Bread making is a bit tough to see what went wrong without seeing how you made it. I would say try making a few times and see the result to compare how you made differently. 🙂 I’m glad they came out beautifully!
Ah I see. I thought the more I knead, the more elastic it was because when I flattened them to fill in the paste, the dough was pretty elastic. I will try to knead more next.
Hi Benny! More you knead, it should make softer tender bread. Not sure what you mean by “chewy”, so I thought it’s not tender…
Hi Nami!
My anpan is doing it’s final proof in the oven right now and I’m SO excited! I wish I had read the comments first because it would have been a lot easier to do all that kneading in the stand mixer! 😂 Is there a good step that you could overnight the dough/buns in the refrigerator so you could bake the anpan fresh in the morning? Maybe the proof right before you add the anko (I used your recipe for this too and it turned out so good!)?
Hi Jennifer! I hope your Anpan came out well! Thanks for trying this recipe and Anko recipe. 🙂
Hmm, I know you can slow down the proof in the refrigerator (instead of leaving out in a warm place) but I’ve never done/tested and I don’t feel comfortable saying that will work overnight. You may want to try and see if that will work… 🙂
This recipe is AMAZING. I can’t believe how easy and straightforward it was. My two year old daughter loves Anpanman (of course!) and asked for anpan this morning. We’re very rural in Northern CA and have no access to Japanese baked goods when we’re state side so I told her we could try to bake some. This recipe was SO SO fun to make with her and turned out so yummy and delicious. We used Baba’s recipe for Anko filling but other than that I followed the bread recipe to a T. I am so pleased with the result and my daughter was so happy. Thank you so much for creating/sharing. You have given our family a gift. We look forward to trying “Melonpanman” and “Karepanman” next!
Hi Christi! Thank you so much for your kind words! I’m so happy to hear you enjoyed this recipe! 🙂 I grew up with Anpanman so I love that you made this for her and with her! Your sweet message warmed my heart. Thank you! I hope you enjoy making Melonpanman and Karepanman (this one, tricky, but SOOOO GOOOOOOOOD!). 🙂
I’ll have to add an extra mile to my run after discovering your wonderful blog! Sorry I forgot to rate on the first comment. Definitely 5 star! Thank you again.
Haha! That’s good at least you’re keeping your good health! 🙂 Thank you so much for your 5 stars. 🙏
Hi! Do you recommend using chunky red bean paste or smooth?
Hi J! This is really up to your preference. I always like my anko to be chunky. 🙂
Hi Nami! I made the anpan buns today 🙂 they were so light and fluffy! I bought the red bean paste from a shop but the buns were sooo good! Thank you so much for your instructions 🙂 I was wondering what the purpose of the cake flour was? Would there be a big difference if I didn’t add it?
Hi Carissa! Wow you made this too! Thank you so much for trying this recipe! The cake flour is for the texture. You can’t make the bread only with bread flour. It would not be fluffy. 🙂 It’s the gluten in the flour we want to control. 🙂
Hello! For this recipe, I do not have cake flour and am struggling a little with the conversion to All-purpose flower. Could you help? Also, is there anyway to find the nutritional information on this?? Thank you!
Hi Storm! So you have bread flour and all-purpose flour? You have cornstarch to make homemade cake flour? Please follow this method shared in this post:
https://www.justonecookbook.com/cake-flour/
Also, I’m sorry. I do not have the nutritional information at this time, but it’s in our plan… we just don’t have the capacity right now to work on 700+ recipes to add this information.
Hi Nami
May I know the reason for 30 deg water and milk?
Hi Cecilia! It’s for the yeast to activate better and for the bread dough to have the right temperature before proofing. 🙂
Want to try your anpan recipe but is it possible to use arrowroot flour and oat flour instead?
Hi Jo! I really wish I know the answer but I’ve never used them so I can’t tell if you can use them. Sorry!
Hello! I’m so happy I found this blog! I’m Japanese, but live in the U.S. and I love anpans!! And, am always looking for other asian recipes. Anyways, I’ve tried a different anpan recipe in the past, but this was one is much better. Turned out so good!
Oh, and also I have a question — why do you have to fold it in thirds after making the individual balls? Is it to knead it a little more before finally baking them? Just curious.
Hi Mihane! It’s important to create a “smooth” surface when you prepare the dough. By folding, the dough extends and creates a smooth surface. You also need to release the gas in the dough too. It’s very common way to make it into a small ball (shape) by folding into thirds.
A really good friend is moving back to Japan after 20 years in the US. I will miss her so much. Before she goes, we will be meeting up to make Anpan bread. So excited to try your recipe, experience this with her, hear her stories of Japan and her hopes for the future. Thanks for the easy to follow instructions!
Hi Krysia! Wow after 20 years! I hope you two will get to mee in Japan! Hope you two have a great time making Anpan. 🙂
Hi,
During the pandemic I’ve been trying to keep my children mentally active. So this recipe helped me understand more of the science behind bread. And of course this was THE BEST bread recipe I’ve used. I’d like to know if I can put something else inside besides Anko?
Hi Rachel! Aww thank you so much for trying this recipe and I’m so glad you thought it was the best. Thank you for your kind feedback.
Sure! Add custard cream, jam, chocolate, nutella… anything that you want to fill up the bun with. 🙂
Hi Nami, I followed the recipe except I used 25g of sugar instead of 50g. I didn’t quite get the rolling technique right so my filling ended up towards the top when I cut it open but otherwise, it looked fine. I need to find a video that shows how to make the seam smooth. The egg wash ended up being very pale and not that even (although not too bad). I normally don’t add water to my egg wash. Are there any tips you can provide on this? Thanks in advance!
Hi Pam! Thank you so much for trying this recipe! Hope the dough was moist enough with the 25 g of sugar. 🙂
The filling is toward the top – this implies that you pulled a bit too much to seal the dough, so the big chunk of dough ended up on the bottom. Next time pull the edges of the dough just slightly OR roll out the dough slightly bigger circle and pull less dough to encase the filling. To seal, all you need to do is to pinch the two edges with two fingers. If you add too much flour, it will prevent sticking/sealing. So don’t use too much. You just need to dust your finger a bit of flour, just enough that dough won’t stick like crazy… Hope I’m making sense?
As for egg wash, you want thin coat of egg wash on the bread not thick, which is why we add water. See my step 27? It’s pretty pale, not even yellow egg color? Or are you talking about the final color of the bread being pale? If so, maybe your bread is not golden brown yet. You can adjust the heat/oven temperature or baking time. Also uneven color is due to oven’s hot spot. You can rotate the baking sheet to prevent that happens. 🙂
Hi Nami, I just watched your video on Facebook. I think I rolled the dough too thin with a rolling pin, and then I rolled it using a cupped hand, as if I were making normal buns which inadvertently pushed the filling up. (I went to culinary school so I know how to make bread and not filled buns). I saw another video where the person did the cupped hand method but will try your method next time. BTW, do you have a recipe for taro buns?
Yes, I did see that your egg wash was pale too, so I probably should have left them in the oven longer to attain the darker colour. However, the bottom was already dark so that’s why I pulled them out. They looked ok, just not like yours so you are right, I should probably rotate the tray and may need to do a double-tray if the bottom was browning faster. My rack is in the middle of the oven.
I cut the sugar in the dough since the paste is already very sweet. It came out fine but perhaps more sugar would extend the shelf life. If baking for my friends, I will not cut the sugar. Thanks again!
Hi Pam! Thank you for your response! Ohh I thought you had a problem with rolling the dough to extend. Sorry, my bad. I didn’t know it was the opposite! I see now, so you rolled out too thin (= too big) so all the extra dough will be at the bottom of the filling. It made sense now.
No, I don’t know how to make the taro filling. We don’t eat taro (purple one?) or taro flavors in Japan, so I’m not sure how to make it but I assume you boil, mash, and sweeten with sugar? It should be similar to red bean paste method…
Is your baking sheet dark color? Dark ones make the bottom of food (cookies, bread) darker too. Thank you again for trying this recipe! 🙂
Hi Nami, I tried it again with purple yam and it turned out great! I didn’t roll it too thin and the filling stayed in the centre. My baking sheet is not a dark colour. I double-trayed it and also rotated it halfway. The colour came out even and nice like yours this time. Thanks again!
Hi Pam! Awww! I’m super happy to hear this! Thank you so much for updating me! I now want to eat purple yam version… 🤤
I made this yesterday as a surprise for my Kumamoto-born mother (Issei). It came out better than I could have imagined. One of the anpan exploded from the bottom during baking (I didn’t pinch it closed enough) so that was my taster. Delicious. My mom was very impressed. The bread was soft and flavorful — a perfect counterbalance to the sweet anko. Thank you for this recipe!
Hi Dianne,
Aww. We couldn’t be happier to hear how much joy and excitement Nami’s recipe has brought to you and your family!
Thank you for trying this recipe and for your kind feedback.💞
Hi Nami,
Thank you for sharing this wonderful recipe. My husband and I loved the first batch so much, I’m now trying to make it for the second time!
Hi Shannon, Aww… we are so happy to hear you love this Anpan! Thank you very much for trying this recipe and for your kind feedback!
Hello! I’m excited to try this recipe. Can I substitute heavy cream for the whole milk? if so, what modification do I need to make?
Hi Shirley, Whole milk is about 3.5% fat, and heavy cream is about 36-40% fat. You can dilute it with a little water, but we have never tried it before for this recipe. Sorry.