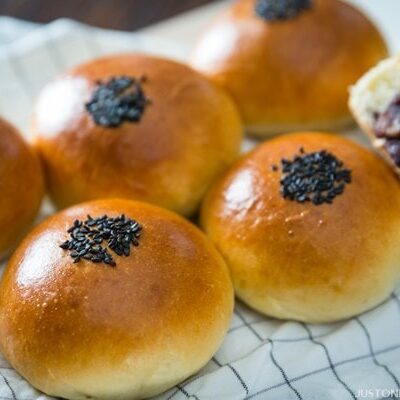
Are you a big fan of Japanese pastries and baked goods? If so, you’ll enjoy Anpan, a classic Japanese pastry with sweet red bean paste inside soft bread. This homemade recipe comes with my step-by-step tutorial to guide you through the bread-making process.
Anpan (あんパン), or sweet red bean bun, is my favorite Japanese bread growing up. It’s no secret that I absolutely love anko (red bean paste), and I love this Japanese bun that has a hint of sweetness, wrapped in a soft delicious bun.
My mom is a self-proclaimed bread connoisseur, and she loves exploring new bakeries and trying their bread in Japan. Unlike the US, there are many bakeries in most Japanese neighborhood and stations and many of them are outstanding. She would buy different types of bread from each store, and among them is always, my favorite anpan.
My favorite one is from Pompadour, one of my favorite bakeries in Japan. Yokohama-born Pompadour bakes European-style bread and their baguettes are incredibly delicious. Their anpan is quite unique because unlike Japanese style soft bread, their buns are French-style and it’s more crusty (but not quite as hard as baguette).
When my mom visited me in the U.S. in the past, she used to “smuggle” them in for me! She knew how much I would love this anpan.
This is just one of my nostalgic moments with the Japanese red bean bread, and I truly enjoyed testing this recipe, daydreaming about all the delicious anpan I enjoy back in Japan…
Invention & History of Anpan
So you may wonder, who came up with the idea to put anko (red bean paste) in a roll? It piqued my curiosity as well when I decided to test my anpan recipe, so I looked up its history.
Wiki explains well here, but basically it was first made in 1875 by a samurai named Mr. Kimura. He lost his job due to the dissolution of the samurai as a social class back in Meiji period. During that time, Japan was becoming more westernized and bakeries started to appear. His new job was a baker.

Soon after Mr. Kimura founded the now well-known bakery Kimuraya, he created a bread that was more to Japanese tastes. He replaced the traditional Japanese red bean mochi with western bread instead of mochi, and this bread stuffed with red bean paste was a brilliant one.
Making Anpan あんぱん
If you plan to make anko (red bean paste) from scratch, I recommend making anko ahead of time to save time on bread making day. I love making Pressure Cooker Anko recipe with my favorite Instant Pot (recipe here). Of course, to save time, you can always buy pre-made red bean paste from an Asian grocery store.
Anpan is one of the easiest Japanese bread to make at home, if you want to try making bread for the first time. Trying to make homemade bread could be intimidating, but the more you try, the easier it becomes. And this homemade anpan recipe is relatively easy, so I hope my video and step-by-step pictures will help you go through this journey.
Wish to learn more about Japanese cooking? Sign up for our free newsletter to receive cooking tips & recipe updates! And stay in touch with me on Facebook, Pinterest, YouTube, and Instagram.
Anpan
Video
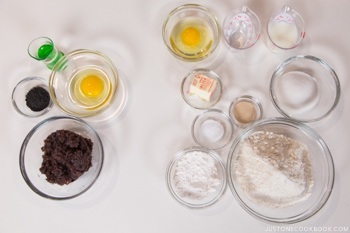
Ingredients
- 225 g bread flour (2 cups minus 2 Tbsp; plus more for dusting; weigh your flour or use the “fluff and sprinkle“ method and level it off)
- 3½ Tbsp cake flour (you can make Homemade Cake Flour)
- ¼ cup sugar
- 1 tsp Diamond Crystal kosher salt
- 1 tsp instant yeast (to use active dry yeast, see Notes)
- 1 large egg (50 g each w/o shell)
- 50 ml whole milk (3 Tbsp + 1 tsp; keep at 86ºF/30ºC; I highly recommend using whole milk instead of reduced-fat milk)
- 50 ml water (3 Tbsp + 1 tsp; keep at 86ºF/30ºC, see Notes)
- 2½ Tbsp unsalted butter (cut into small cubes)
For the Filling
- 10 oz sweet red bean paste (anko) (I use tsubuan, a coarse red bean paste, but you can use koshian, a fine paste; you can make my Pressure Cooker Anko or Stovetop Anko)
For the Toppings
- 1 large egg (50 g each w/o shell)
- 2 Tbsp water
- 2 tsp toasted black sesame seeds
Instructions
- Before You Start: Gather all the ingredients. I highly encourage you to weigh your ingredients using a kitchen scale for this recipe. Click on the “Metric“ button at the top of the recipe to convert the ingredient measurements to metric. If you‘re using a cup measurement, please follow the “fluff and sprinkle“ method: Fluff your flour with a spoon, sprinkle the flour into your measuring cup, and level it off. Otherwise, you may scoop more flour than you need.

To Mix the Dough
- In a large bowl, combine 225 g bread flour (2 cups minus 2 Tbsp), 3½ Tbsp cake flour, ¼ cup sugar, 1 tsp Diamond Crystal kosher salt, and 1 tsp instant yeast.

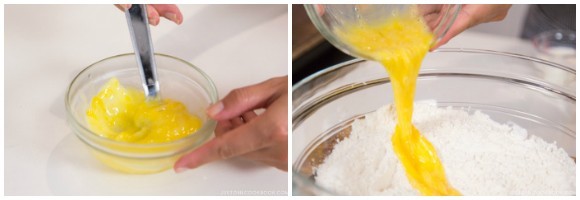
- Beat 1 large egg (50 g each w/o shell) in a small bowl and add to the bowl with the dry ingredients.
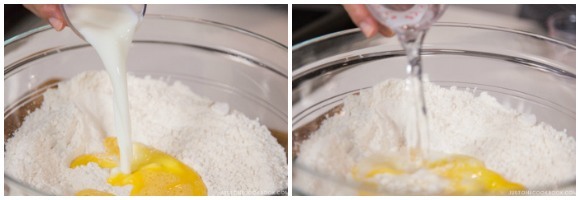
- Add 50 ml whole milk (3 Tbsp + 1 tsp) and 50 ml water (3 Tbsp + 1 tsp), both of which you‘ve kept at 86ºF (30ºC).
- Using your fingertips or a wooden spoon, gently mix the ingredients together until combined. In the beginning, the dough is very sticky and wet, but keep mixing until it forms a loose, sticky ball. Also, use the dough to pick up the flour on the sides of the mixing bowl. This step should take about 2 minutes.

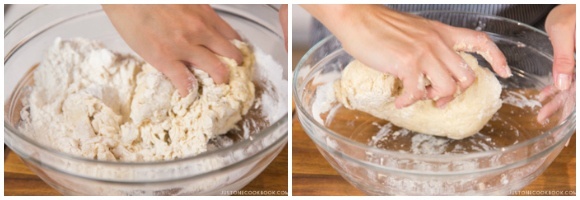
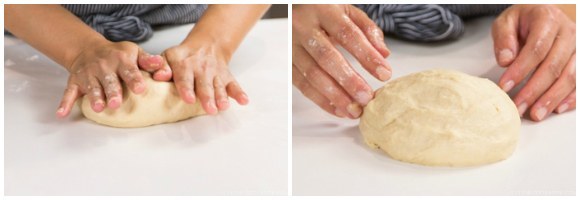
To Knead the Dough
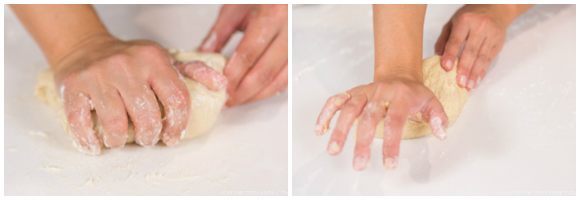
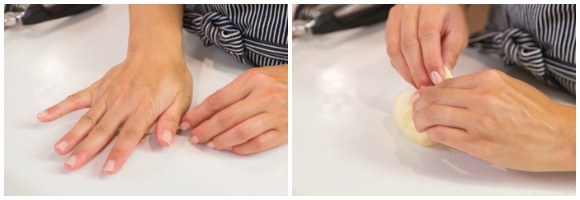
- Dust a clean work surface with bread flour and transfer the dough from the bowl. Press the heels of your hands into the dough, pushing forward slightly. Fold the top half of the dough in half back toward you. Rock forward on the lower part of your palm to press it flat. Turn the dough slightly (to clockwise), fold it in half, and rock into it again with the lower part of your palm. This process is called “punching“ the dough and the goal is to lengthen and stretch the gluten strands. Repeat for 5 minutes or so. Tip: If the dough doesn‘t seem to be losing its stickiness, sprinkle more flour over the top and work it into the dough. You can lightly dust your hands with flour to keep the dough from sticking too much.
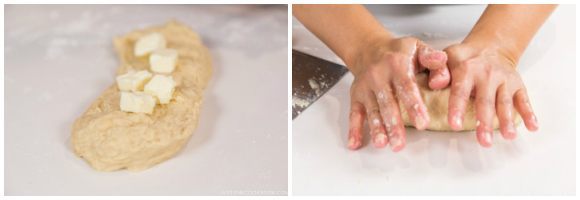
- After “punching” for 5 minutes, the dough will become more elastic. Press and stretch the dough until it measures 10 inches (25 cm). Then, put small cubes of 2½ Tbsp unsalted butter on top of the dough. Roll up the dough, tucking in the butter, and then continue the kneading process.
- Your hands, dough, and the working surface will get oily and messy in the beginning. I recommend using a metal/silicone dough scraper to collect the dough stuck on the working surface.
- As you knead, the dough will absorb the butter and it will eventually become smoother and easier to work with.
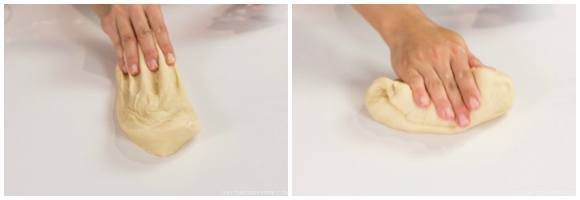
- When the dough becomes smooth, start banging the dough onto the counter and fold it over away from you. This helps develop the gluten (elasticity). Bang the dough, turn it 90 degrees, and “punch” it, using the lower part of your palm. Continue this process for 10 minutes or until the dough is smooth, supple, and silky. Tip: Don’t let go of the dough when you are banging onto the counter. Don’t let it rest for too long between turns.
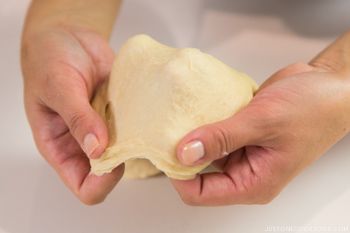
- Now, it’s time for the windowpane test. Either pull on a part of the dough or tear off a small piece. Hold the dough in both hands and gently pull it into a square with your fingers. It should be very elastic, smooth, and shiny. If it‘s strong enough to stretch to a super-thin membrane without tearing and light can pass through the center, your dough passes the test. If it doesn’t stretch or it tears too easily, knead it again for another 2 minutes and test again.
The First Rise (Bulk Fermentation)
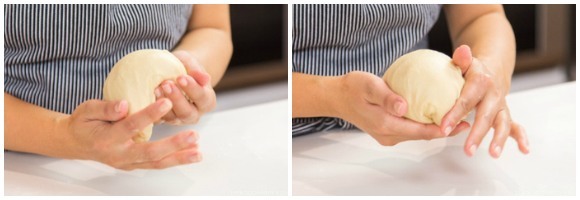
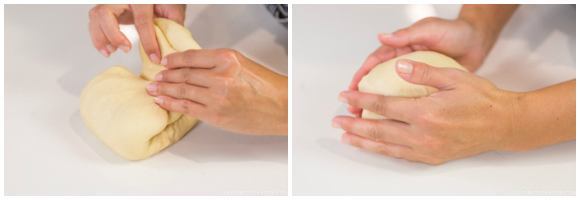
- Shape the dough into a ball by pulling all sides of the ball to the bottom and pinching them together.
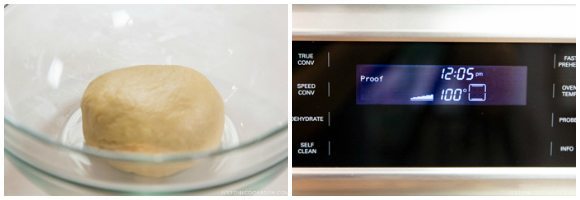
- Place the dough in a bowl, seam side down, and cover with plastic wrap. Let the dough rise in a warm place until it has doubled in size, about 1–2 hours. I use the Proof setting (100ºF/38ºC) in my oven.
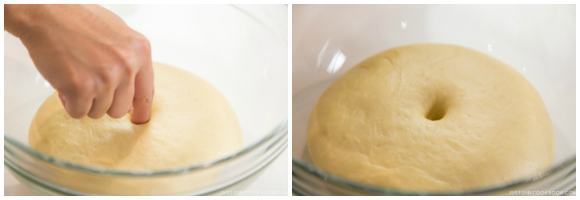
- Once the dough has doubled in size, use the finger test. Dust your index finger (or the top of the dough) with flour and use your index finger to poke the middle of the dough. If the hole does not close up, it’s ready for the next step. If the dough closes up immediately, proof the dough a little longer and test again.
To Divide the Dough
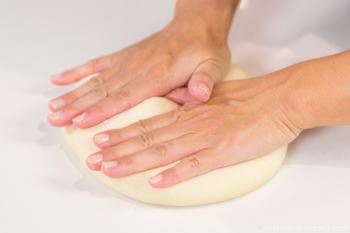
- Press the dough with your hands to release the gas and deflate the dough.
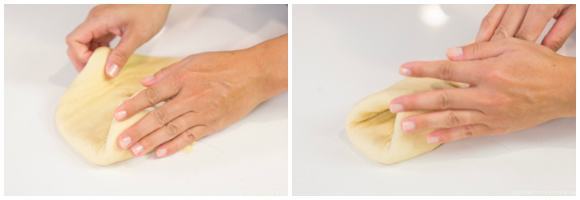
- Fold both sides of the dough toward the center.
- Then fold it in thirds toward the middle. Flip, keeping the seam side on the bottom.
- Shape the dough into a ball, rotating (clockwise) with both hands while the seam line is touching the work surface.
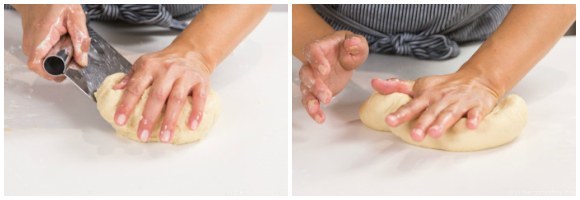
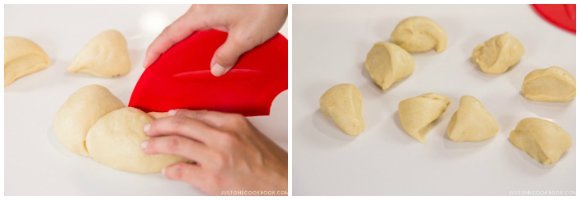
- Using a dough scraper, cut the dough into 8 equal pieces. If you need to adjust the size of dough, pinch off the center of the big dough and add to the center of the small dough and knead to combine well.
- Shape each dough piece into a nice round ball, pulling from all sides and tuck into the bottom. Place the dough on your left (right) palm, and rotate it with your right (left) hand, keeping the seam side on the bottom.
- Put the dough on a baking sheet lined with parchment paper or a silicone baking mat. Cover the dough with plastic wrap to prevent it from drying. Rest the dough for 15 minutes at room temperature.
To Form the Anpan
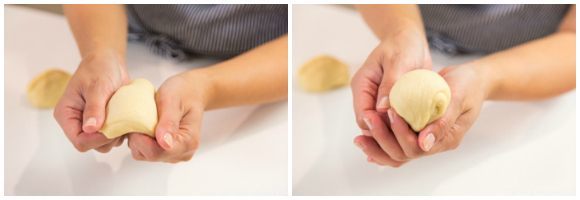
- After resting, flatten the dough balls with your hand, fold in thirds twice (just like you did earlier), and shape into balls again.
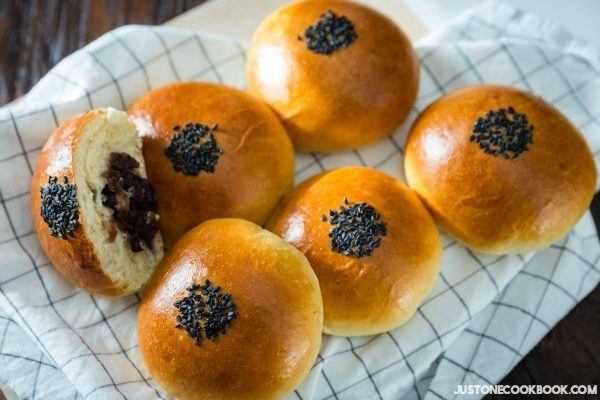
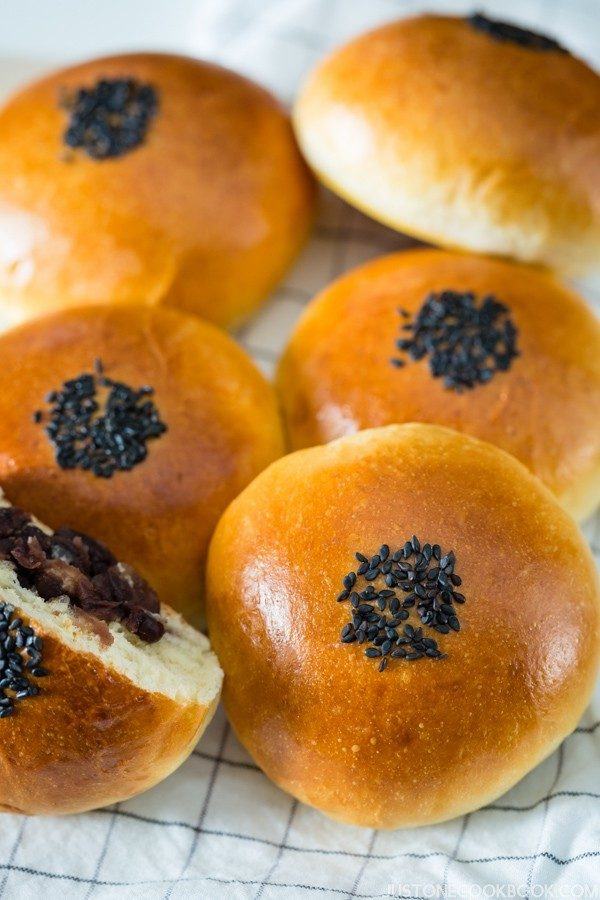
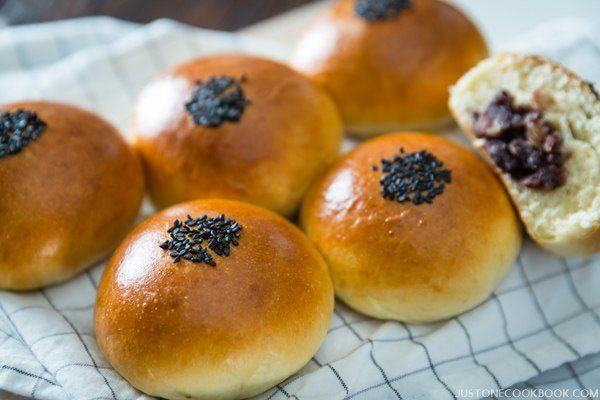
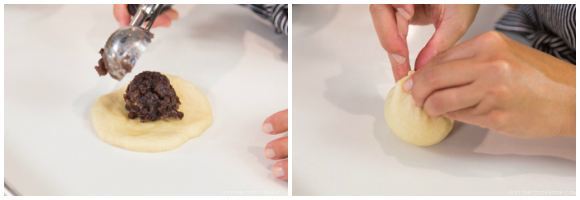
- For each dough ball, press it so it stretches to a 3 inch (8 cm) diameter. From the 10 oz sweet red bean paste (anko), scoop 35 g and place in the middle of the dough. Then pull all sides of the dough around and wrap the red bean paste tightly to seal.
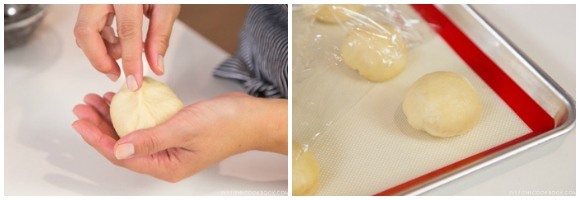
- Pinch the seam very well and put the seam on the bottom. Place the dough on your left (right) palm, and rotate it with your right (left) hand a few times, keeping the seam side on the bottom. Put the dough back into the baking sheet, seam side on the bottom. Continue forming the rest of the anpan.
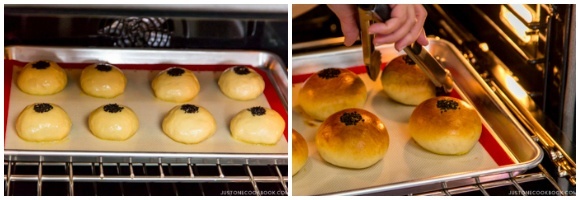
The Final Rise (Proofing) and Oven Preheat
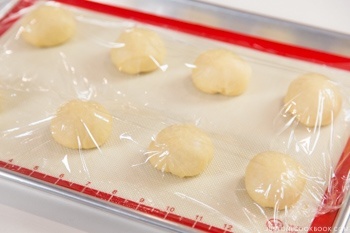
- Cover the dough with plastic wrap to prevent it from drying. Let the dough rise in a warm place until the dough has doubled in size, about 30 minutes (I used the Proof setting (100ºF/38ºC) in my oven). When the dough has risen halfway, preheat the oven to 400ºF (200ºC). For a convection oven, reduce cooking temperature by 25ºF (15ºC). Note: If you are using the oven to proof, you have to transfer the dough to a warmer place so you can preheat the oven.
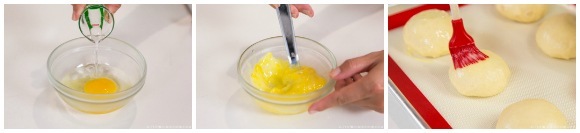
- In a small bowl, add 1 large egg (50 g each w/o shell) and 2 Tbsp water and whisk very well. Using a pastry brush, brush all sides of the dough with an egg wash.

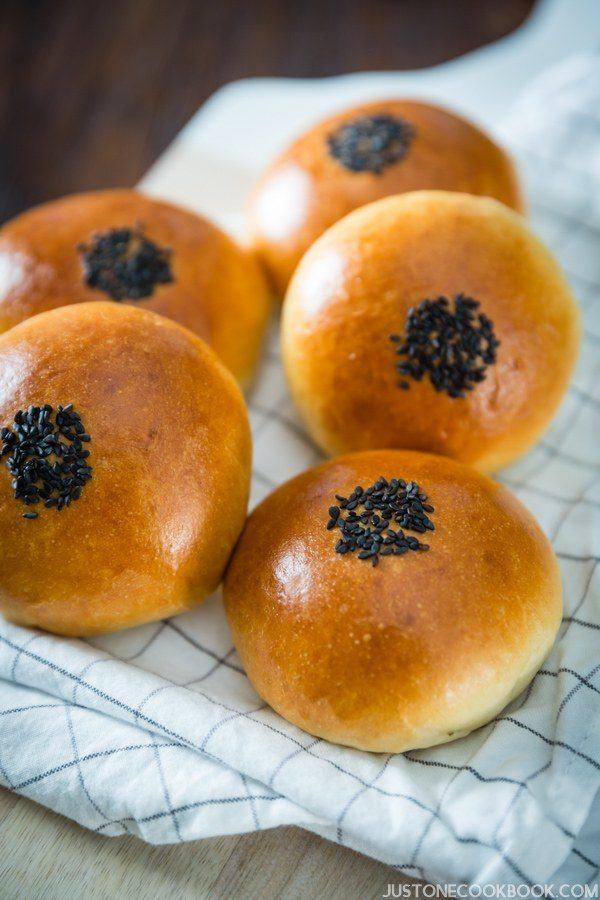
- Put 2 tsp toasted black sesame seeds in a small bowl. Dip the flat round side of a rolling pin (about ¾ inch (1.9 cm) diameter) first in the egg wash, then into the black sesame seeds, and finally into the top of the dough to stamp it with the seeds. Alternatively, you can simply sprinkle the black sesame seeds on top.


To Bake
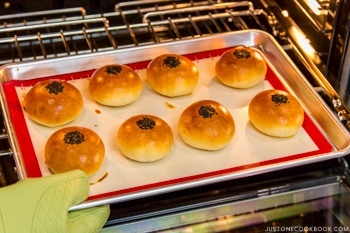
- Bake at 400ºF (200ºC) for 13–15 minutes. Toward the end of baking if you see the bread rolls are not browning equally, rotate the baking sheet once so that the anpan brown evenly.
- Once the bread is baked, transfer to a wire rack and let it cool. Serve warm or at room temperature immediately. Enjoy!
To Store
- You can keep the bread in an airtight container after it’s been cooled and store at a cool place for 2–3 days or in the freezer for a month.


Hi Nami! I made the anpan buns today 🙂 they were so light and fluffy! I bought the red bean paste from a shop but the buns were sooo good! Thank you so much for your instructions 🙂 I was wondering what the purpose of the cake flour was? Would there be a big difference if I didn’t add it?
Hi Carissa! Wow you made this too! Thank you so much for trying this recipe! The cake flour is for the texture. You can’t make the bread only with bread flour. It would not be fluffy. 🙂 It’s the gluten in the flour we want to control. 🙂
Hi! Do you recommend using chunky red bean paste or smooth?
Hi J! This is really up to your preference. I always like my anko to be chunky. 🙂
This recipe is AMAZING. I can’t believe how easy and straightforward it was. My two year old daughter loves Anpanman (of course!) and asked for anpan this morning. We’re very rural in Northern CA and have no access to Japanese baked goods when we’re state side so I told her we could try to bake some. This recipe was SO SO fun to make with her and turned out so yummy and delicious. We used Baba’s recipe for Anko filling but other than that I followed the bread recipe to a T. I am so pleased with the result and my daughter was so happy. Thank you so much for creating/sharing. You have given our family a gift. We look forward to trying “Melonpanman” and “Karepanman” next!
Hi Christi! Thank you so much for your kind words! I’m so happy to hear you enjoyed this recipe! 🙂 I grew up with Anpanman so I love that you made this for her and with her! Your sweet message warmed my heart. Thank you! I hope you enjoy making Melonpanman and Karepanman (this one, tricky, but SOOOO GOOOOOOOOD!). 🙂
I’ll have to add an extra mile to my run after discovering your wonderful blog! Sorry I forgot to rate on the first comment. Definitely 5 star! Thank you again.
Haha! That’s good at least you’re keeping your good health! 🙂 Thank you so much for your 5 stars. 🙏
Hi Nami!
My anpan is doing it’s final proof in the oven right now and I’m SO excited! I wish I had read the comments first because it would have been a lot easier to do all that kneading in the stand mixer! 😂 Is there a good step that you could overnight the dough/buns in the refrigerator so you could bake the anpan fresh in the morning? Maybe the proof right before you add the anko (I used your recipe for this too and it turned out so good!)?
Hi Jennifer! I hope your Anpan came out well! Thanks for trying this recipe and Anko recipe. 🙂
Hmm, I know you can slow down the proof in the refrigerator (instead of leaving out in a warm place) but I’ve never done/tested and I don’t feel comfortable saying that will work overnight. You may want to try and see if that will work… 🙂
Made this and it turned out beautiful and tasty. It looks difficult but actually easier than it seems. But my bread turned out a little bit chewy though, does it mean overkneading? Or I added too much flour? Still the bread is soft though and the colour is beautiful, Insta-worthy.
Thank you Benny for trying this recipe! I would think it’s due to the lack of kneading, instead of overkneading… Bread making is a bit tough to see what went wrong without seeing how you made it. I would say try making a few times and see the result to compare how you made differently. 🙂 I’m glad they came out beautifully!
Ah I see. I thought the more I knead, the more elastic it was because when I flattened them to fill in the paste, the dough was pretty elastic. I will try to knead more next.
Hi Benny! More you knead, it should make softer tender bread. Not sure what you mean by “chewy”, so I thought it’s not tender…
Hi Nami,
I just made these and they were delicious! Do you have any tips on freezing and reheating? Can they frozen after they are baked?
Thanks!
Hi Nicole! Thank you so much! I’m so happy to hear that you enjoyed this recipe!
Sorry for my late response… yes, you can freeze after you finish baking and letting them cool down completely. Store in a Ziploc bag and freeze.
When you’re ready to eat, either defrost in the fridge overnight and reheat in the oven or microwave until “warm” and then reheat in the oven. 🙂
Hi dear, I just made this bread based on your recipe and it turns our really good. I’m looking to make around 16 (or more) pcs next round, should I just x2 of every ingredients?
Hi Wendy! I quickly googled to check and it looks like yes, you can simply double the recipe (including yeast). I’m not sure about your oven size and if you’re working with someone else to make 16, but don’t let the dough stay out too long (overproof). It might be better you work one batch at a time.
Hi Nami,
Have you made Anpan with Active Dry yeast before? If so, is there any difference in the final product between using Active Dry and Instant yeast?
Thanks a whole lot 🙂
Hi Andy! I don’t know about the difference in the final product because I’ve never had a chance to try and compare… Sorry, I wish I could tell.
That’s fine, sometimes life gets busy…
Love Anpan!!! But I can’t make my dough as soft as yours… is it because I didn’t knead enough? Or did I kneed too much?? My Anpan came out dense and hard… not soft… but I will try again!!! Any tips??
Hi Dorothy! It’s hard to say if you didn’t knead enough or over-knead without being there. But “typically”, the reason is lack of moisture (we sometimes need to adjust the amount of liquid based on weather/season) and lack of kneading. How was your windowpane test? When you knead with your hands, you are afraid of the wet dough sticking to your hands and tend to add too much flour, but that can lead to hard bread. Hope this helps and see some progress next time when you try. 🙂
Hi Nami,
I have been dying to try and make these at home but I am fairly new to the homemade bread making game. I see in your recipe that you let the dough rise in your oven at a proof setting of 100. My oven unfortunately does not have a proof setting. Is this necessary or is it okay to just let it rise at room temperature? Do you have any recommendations of places that tend to be warm where it can rise?
Thank you!
Hi Christine! I am so sorry I couldn’t get back sooner. I had been sick for 2+ weeks and I’m finally back.
Yes, normally you would just let it rise at room temperature or warm place. I’ve tried to put it on top of a laundry dryer machine, preheated warm oven, etc… but in general, my house is cold. So I was thankful to have this proof setting when we got a new oven (I had no idea this thing existed!).
Thank you! I am glad you are feeling better!
Thank you! I’m still coughing…and it will freak out a lot of people at this time… 🙁
Would doubling this recipe work out okay?
Hi Ryan! You will be busy, and you don’t want to over-proof. Make sure you can handle a lot of dough at once, and also oven space. 🙂
Made these for the second time tonight- turned out even better this time. Used stand mixer with dough hook till step 9. My dough did not look as wet as video and never got to “windowpane stage.” It kept tearing even though I had worked it for 10+ minutes. (Very satisfying!)
Also I find step 22 ( re-shaping doughballs after their 15 min. rest) to be redundant–only serves to make the filling with red bean paste more challenging since dough was very “bouncy”. Even after a rest of 30 minutes, I needed to work fast after spreading out dough to 3 “.
Resulting buns were wonderfully tender with extra flavor from those black sesame seeds. Thank you, Nami, for precise measurements and clear directions!
Hi Peggy! Thank you so much for your detailed feedback. We really appreciate that. I’m happy to hear you enjoy the recipe. Thank you!!!
Hi Nami,
I was wondering if I made with all purpose flour only, instead of bread and cake flour. What do you think?
Hi Miho! The texture will be different but if that’s okay, then you can use all-purpose flour. All-purpose flour is basically a type of flour between bread flour and cake flour in terms of gluten in the flour. You can control the texture by using bread flour and cake flour. It won’t be bad, but if you want to make the anpan texture, I recommend creating the own blend. 🙂
After visiting the famous Kimuraya, I have to make this, but with salted sakura topping. My sakura is currently drying after being soaked in the ume wine (no vinegar was available). I am hoping for the best! Managed to buy bean paste in the local Asian shop, so almost ready to make anpan. Thank you very much for your recipe!
Hi Moni! I’m so happy you got to try the Kimuraya anpan!! That’s best… sigh I miss it. I have tried salted cherry blossom one too. So good!
Good luck with making Anpan! I hope you will enjoy this recipe! xo
[…] than cooking to me. I feel like any change to your baking can determine the results. I changed my recipe to fit what my family is more likely to eat. In fact, I want to make to make it again, but change […]
[…] Odawara Castle, eat regional seafood at the local soba-ya, and try the renowned red bean bread (anpan) from Yanagi […]