
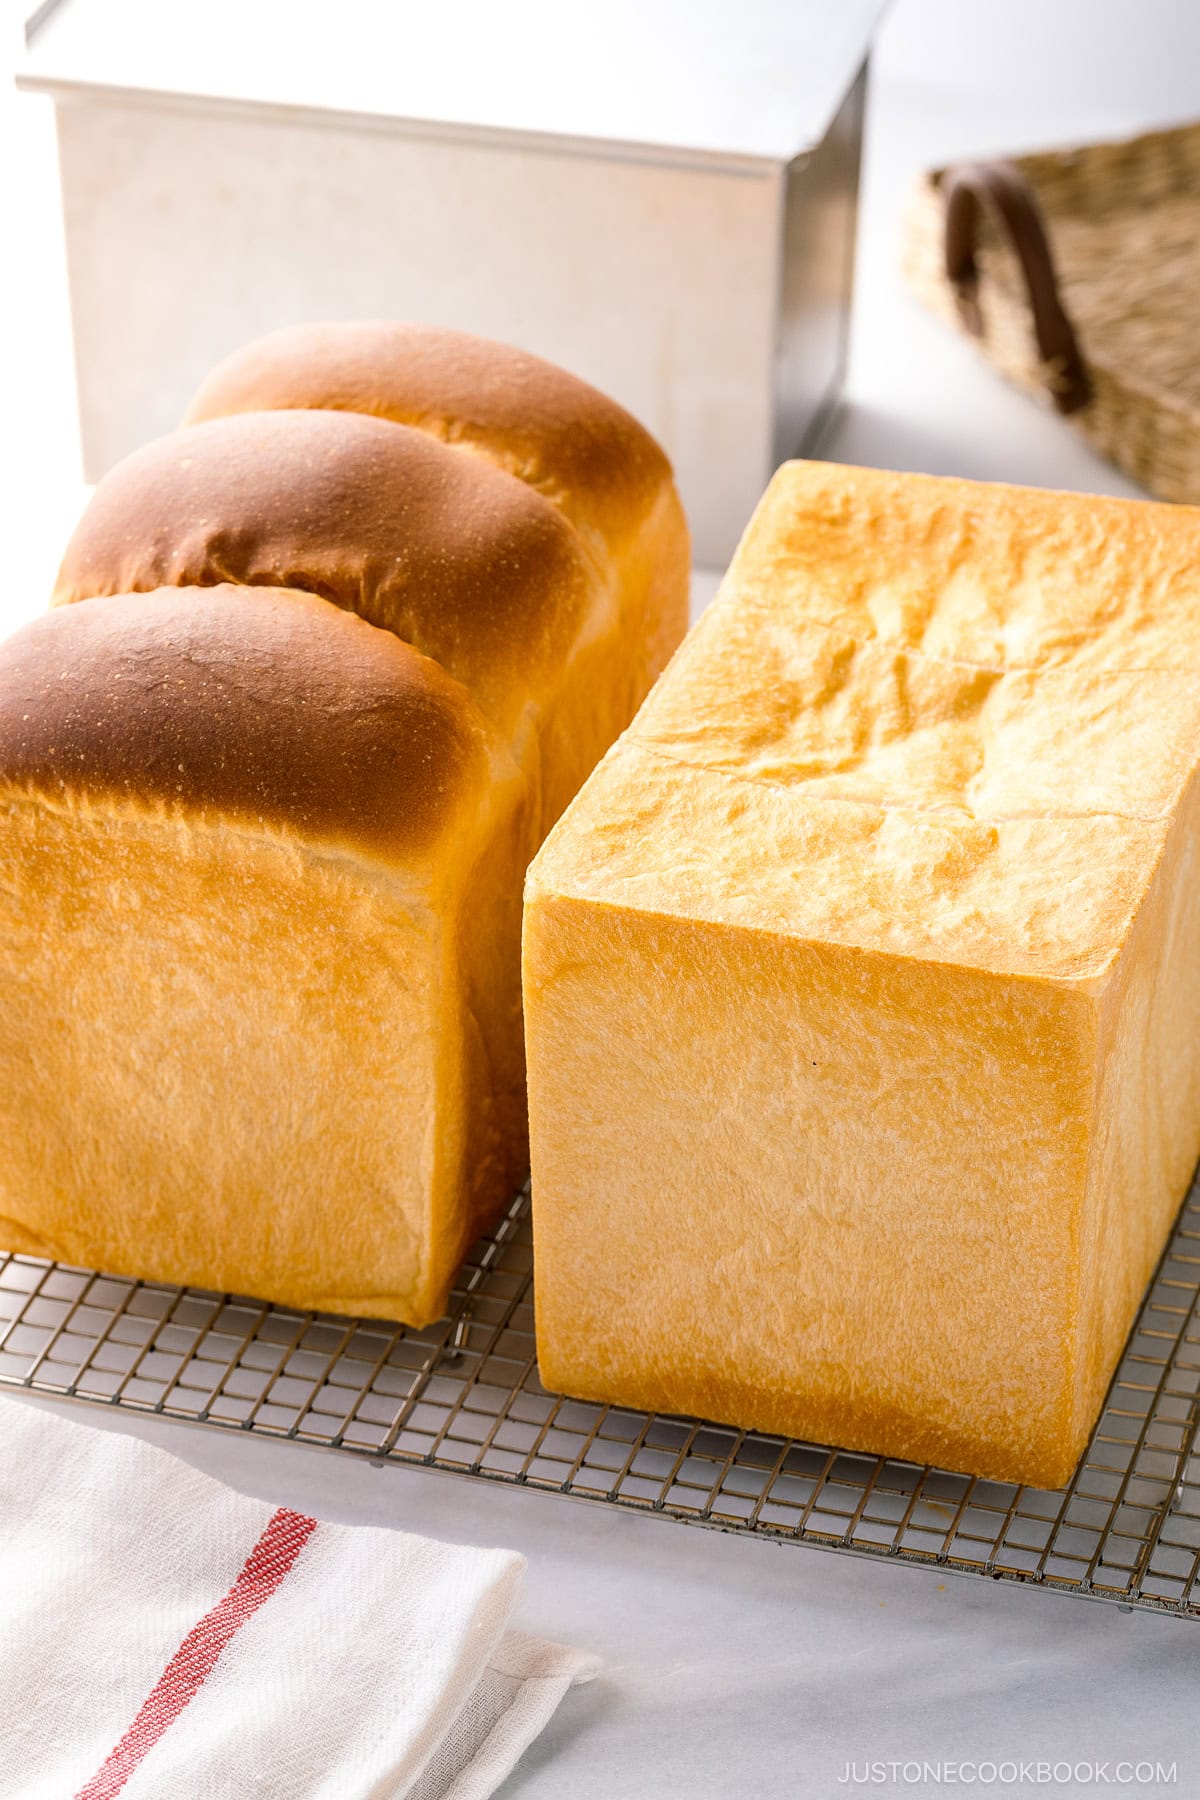
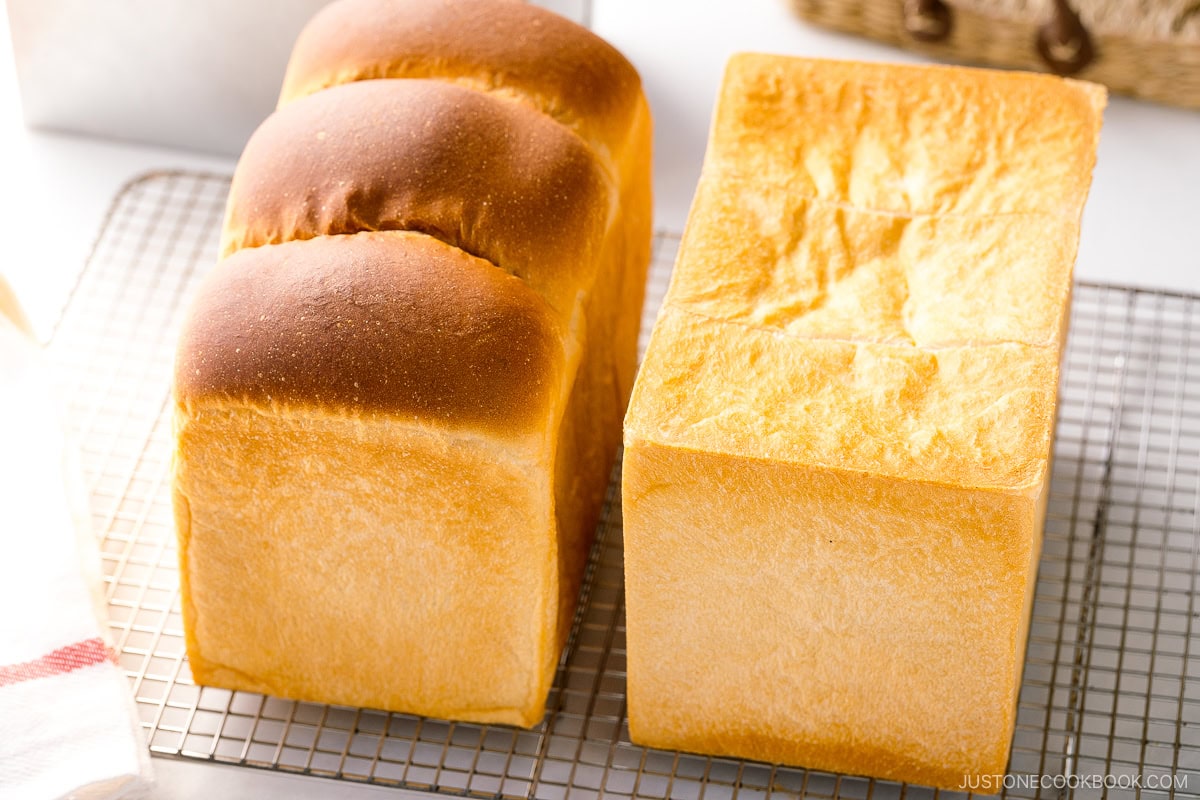
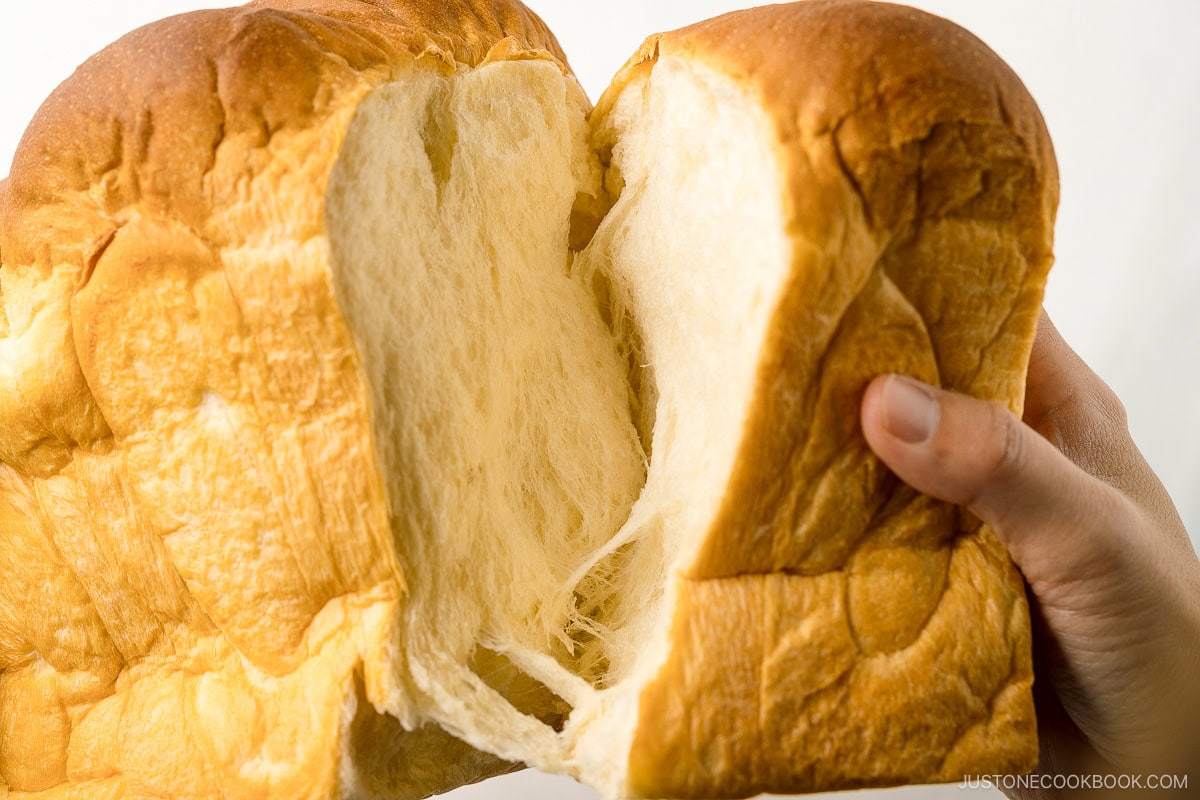
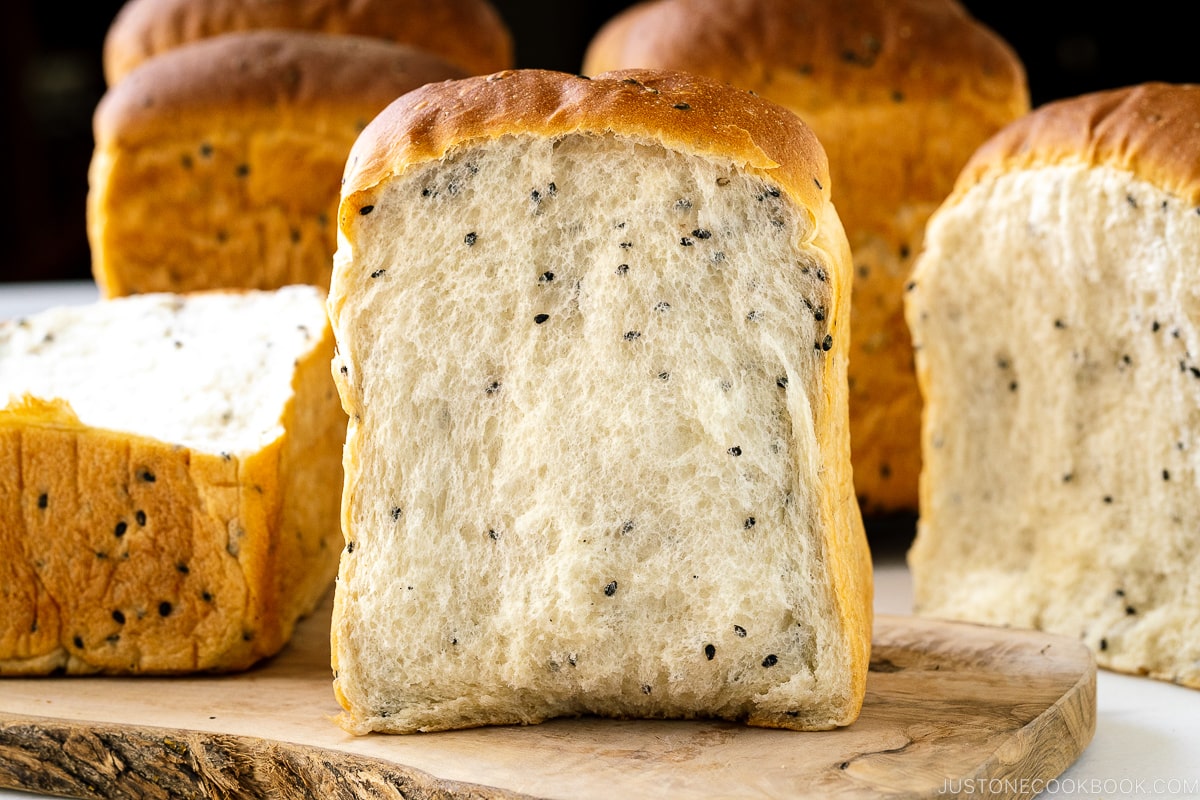
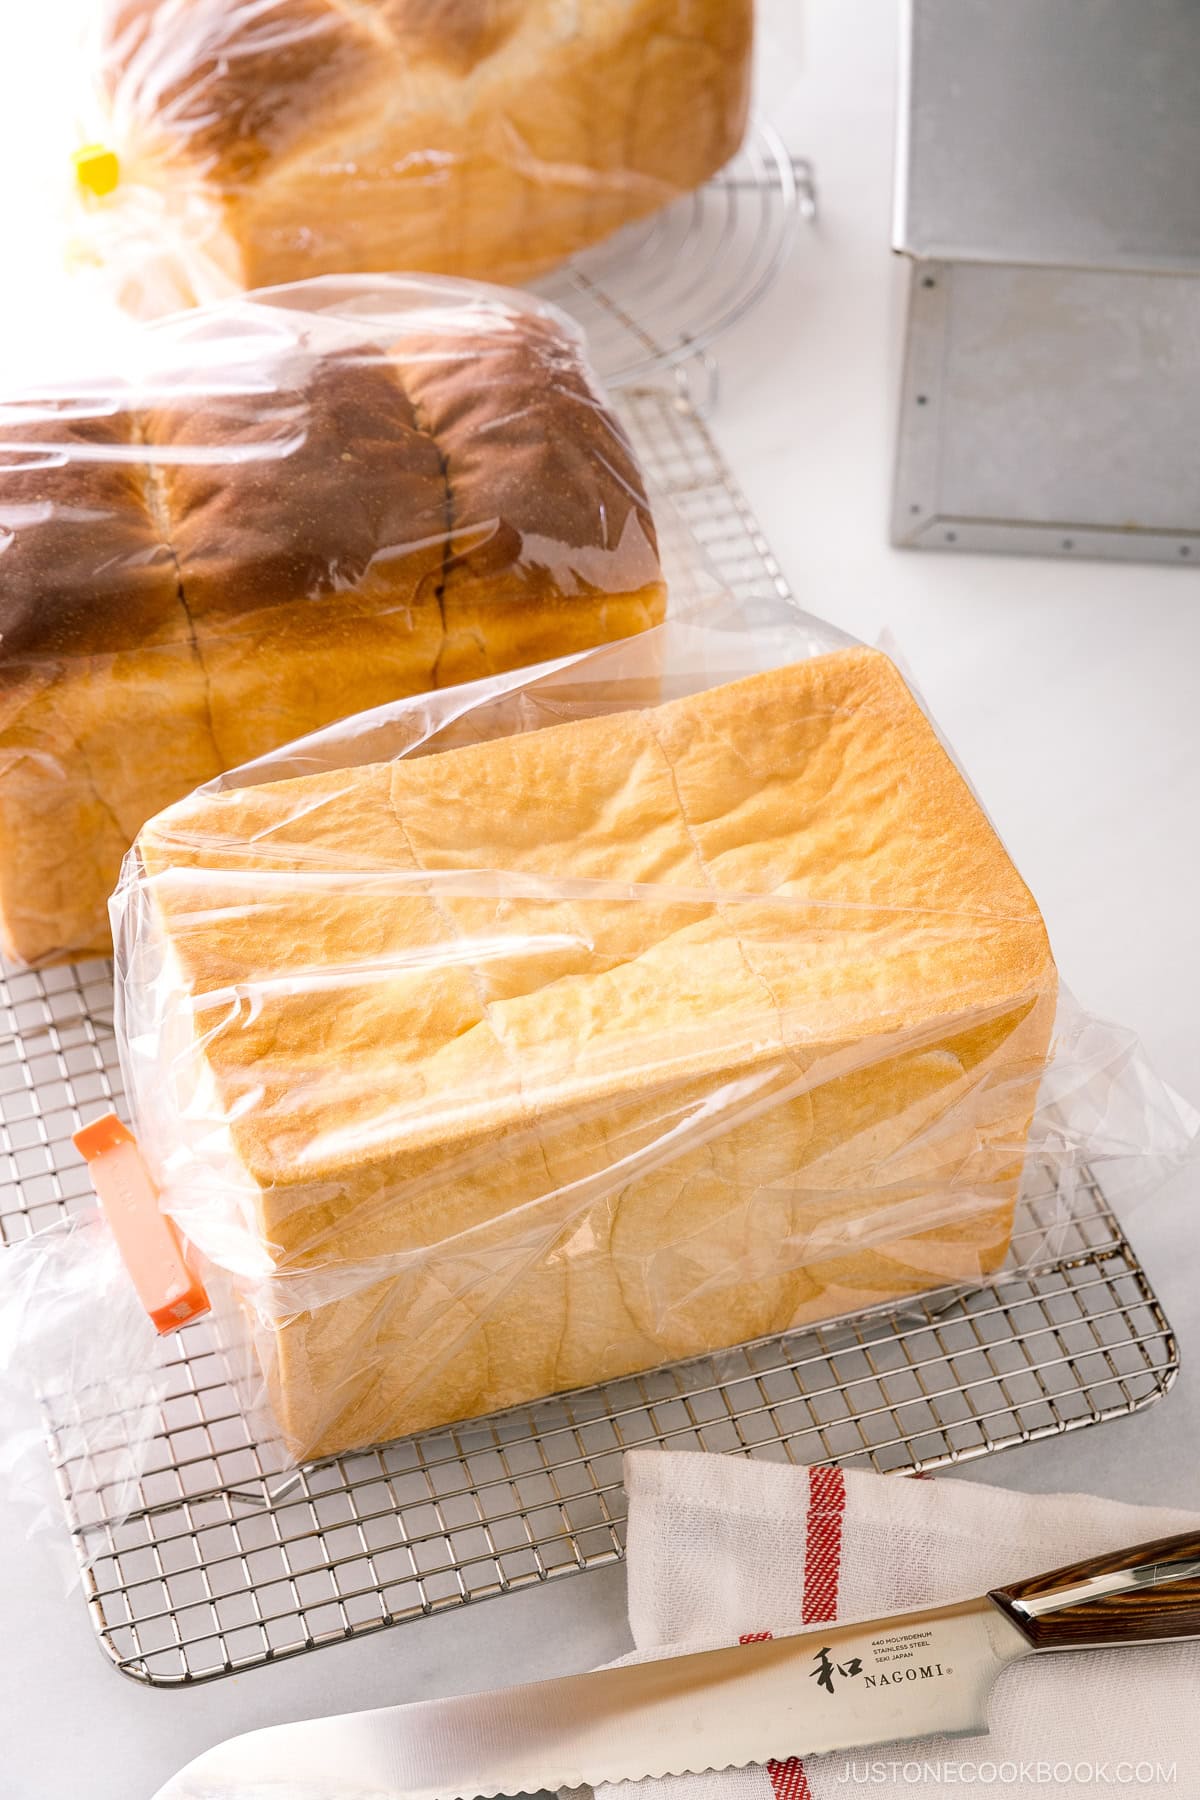
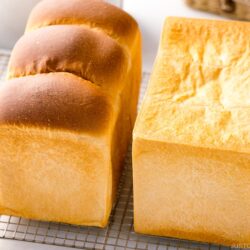
Growing up in Japan, I ate Japanese milk bread called shokupan (食パン) every morning for breakfast. Sometimes called Hokkaido milk bread, this enriched Pullman loaf is incredibly delicate and fluffy with a subtly sweet and milky taste. With my step-by-step instructions in this recipe, even a beginner home baker can make this iconic loaf. There’s nothing more delicious than homemade shokupan, and I’m confident you’ll fall in love with it like I have!
If you love Japanese bread, try my Black Sesame Milk Bread, Curry Bread (Kare Pan), and Melon Pan recipes next!
What is Japanese Milk Bread (Shokupan)?
The Portuguese first introduced bread to Japan in 1543—that’s why we call it pan, from the Portuguese pão meaning “bread.” Yet, it wasn’t consumed regularly by the Japanese; neither was British round-topped white bread called honshoku pan (本食パン) introduced in the late 1800s. After World War II, the American Resident Army brought the flat-topped Pullman loaf to Japan for sandwiches to feed stationed soldiers. Japanese bakers gradually adapted it to suit the local palate, and shokupan was born. Now sold across the country, Japanese milk bread is a staple food and popular alternative to rice that has become a huge part of Japanese food culture.
Why I Love This Recipe
With my tips, techniques, and a little practice, you’ll master how to make the most delicious Japanese milk bread at home!
- For bakers of any skill level – I break down the multi-step process of making shokupan into clear tasks. It’s manageable even for a beginner baker.
- Makes a fast loaf of bread – I love how easy and perfect this recipe is. I can finish making a fantastic shokupan in just 3.5 hours from start to finish!
- Uses everyday ingredients – The delicate balance of buttery, milky, and slightly sweet flavors comes from just seven common ingredients found in your pantry and fridge.
- Your stand mixer does the work – Save some elbow grease and let your Kitchen Aid stand mixer knead the dough! My method makes the most of your favorite kitchen appliance for hassle-free dough kneading.
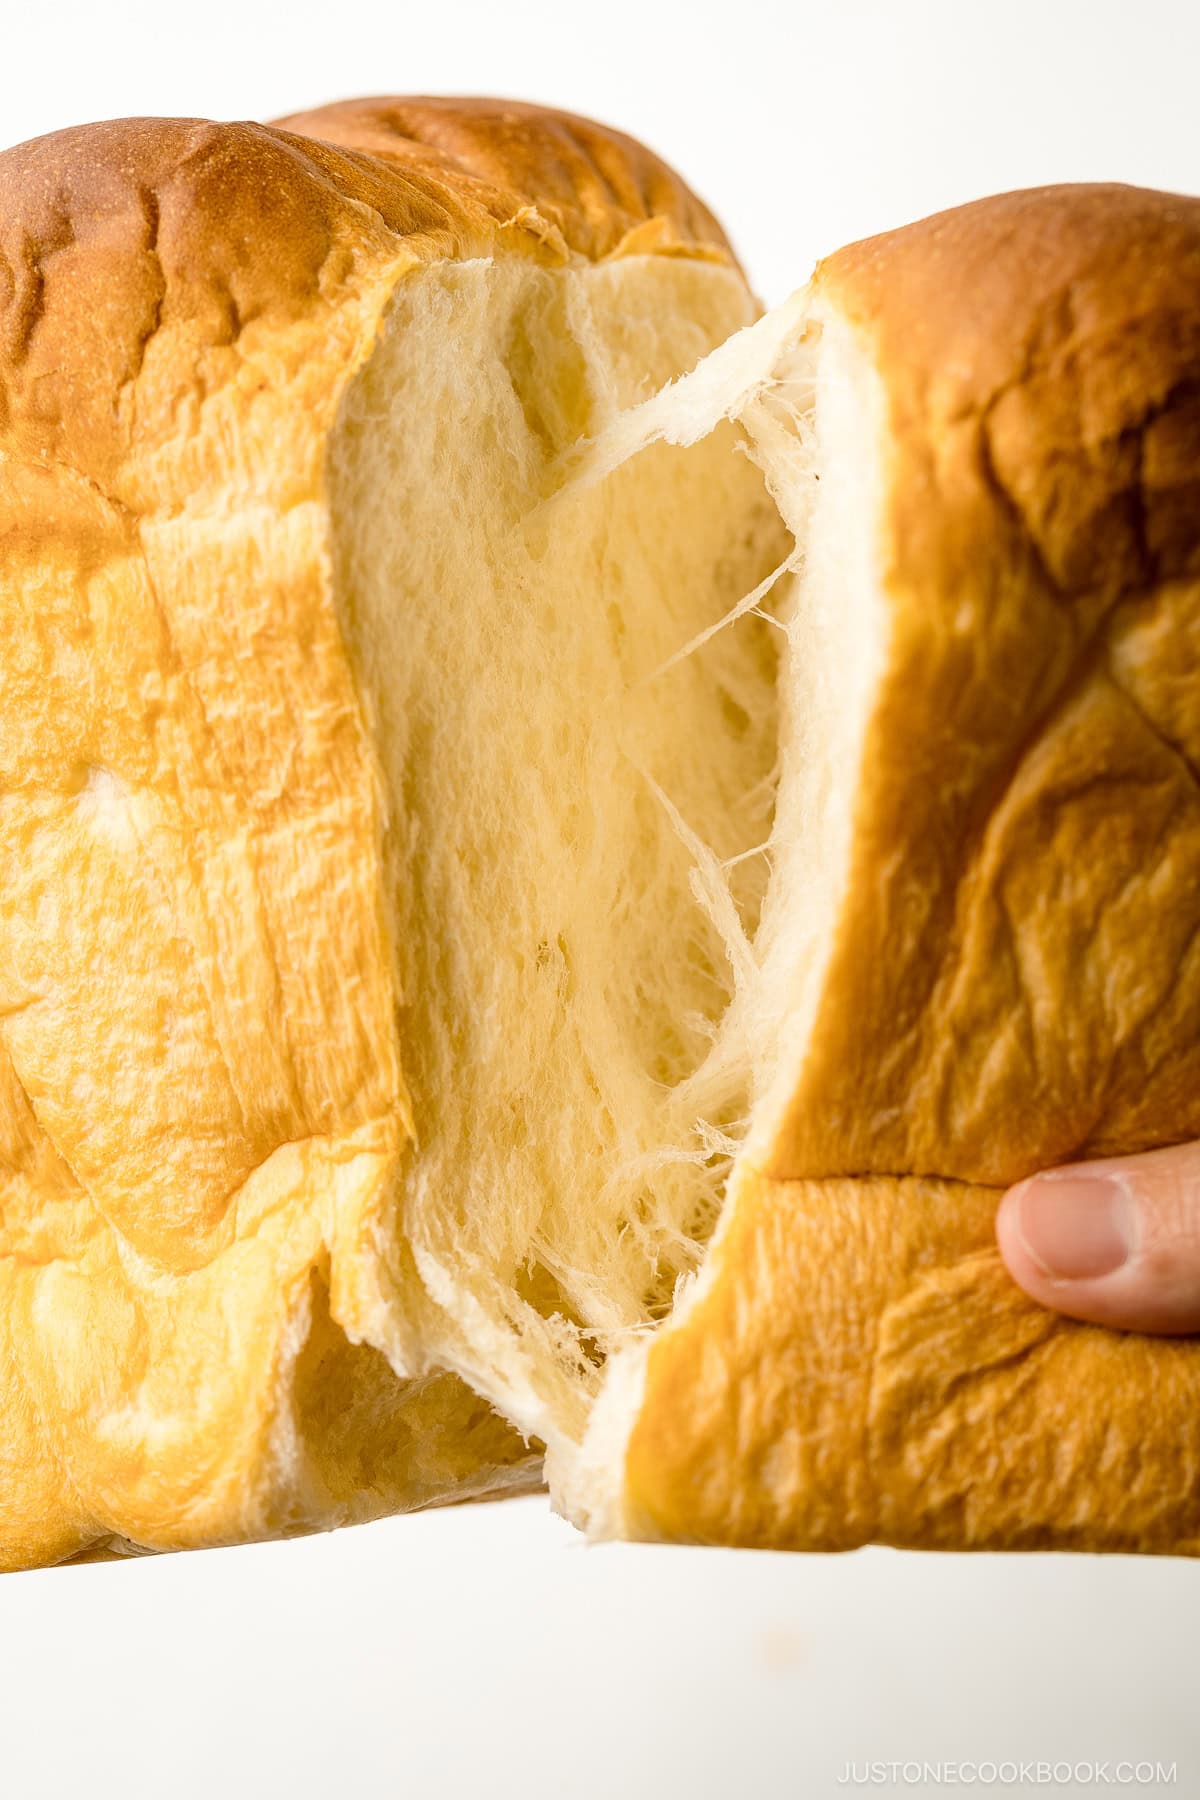
- Light as a cloud and fluffy as cotton! – I’ll show you how to make the most tender and irresistible white bread you’ve ever tasted!
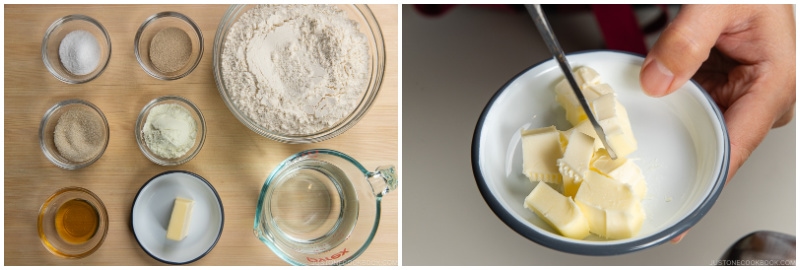
Ingredients for Shokupan
(Baker’s percentages in parentheses)
- Warm water (71%) – at 104ºF (40ºC)
- Sugar (6%) – I use organic cane sugar
- Diamond Crystal kosher salt (2%)
- Honey (3%)
- Instant yeast (2%)
- Bread flour (100%)
- Skim milk powder or nonfat dry milk powder (6%)
- Unsalted butter (7%) – for the bread dough; plus more to grease the pan
- Neutral oil – for greasing the bowl
Find the printable recipe with measurements below.
Jump to Recipe
Substitutions
- Instant yeast: You can use the following yeast interchangeably: Instant yeast = RapidRise® yeast = quick-rise yeast = bread machine yeast. I use Fleischmann’s® bread machine yeast. To substitute active dry yeast, use the same amount per the recipe or up to 25% more; please give it a try and adjust. Proof active yeast first by dissolving it in a portion of the warm water from the recipe before adding it to the rest of the ingredients. Please DO NOT use old yeast that‘s more than 6 months old.
- Dry milk powder: Skim and nonfat dry milk powders differ. Skim milk powder has 34% protein while nonfat dry milk powder has 18%. In Japan, shokupan is made with skim milk powder. Here in the US, you can only find nonfat dry milk powder, and I use Bob’s Red Mill brand. For a vegan alternative, you can use coconut milk powder. Please avoid soy milk powder as the dough does not rise well.
- Unsalted butter: I use Kerrygold brand. For a vegan alternative, I recommend Miyoko’s unsalted vegan butter as a substitute. Please DO NOT use salted butter. For greasing the pan, you can substitute cooking oil spray.
- Bread flour: Please do not substitute with all-purpose flour if you want to make a proper shokupan. For the dough to rise high enough, you will need the higher protein that bread flour has. I use King Arthur bread flour, which is 12.7% protein—a whole point higher than other US brands.
Key Kitchen Tools
Precision is required for a successful outcome. Those few grams of liquid or dry ingredients do make a difference. You may need to buy some special kitchen and baking tools you do not have yet. I’m confident you’ll love the results and find these tools worth purchasing.

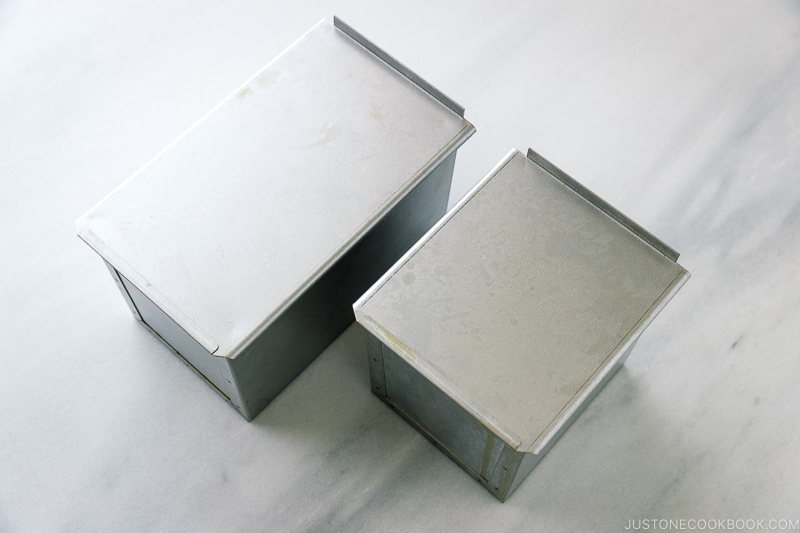
- A lidded Pullman loaf pan – If you want to make true shokupan at home, then you have to get a rectangular lidded 1.5 kin loaf pan (4.7 in. x 7.8 in. x 5.1 in.) and/or a square lidded 1 kin loaf pan (4.7 in. x 5.3 in. x 5.1 in.) from Asai Shoten (浅井商店) in Japan. The loaf size in Japan is measured in “kin (斤),” an old Japanese unit for measuring bread weight. The British-style round-topped bread was 1 pound (450 g) back then and was called “1 kin.” Continue reading more in my Japanese Loaf Pans: Where to Buy and Care Instructions post.
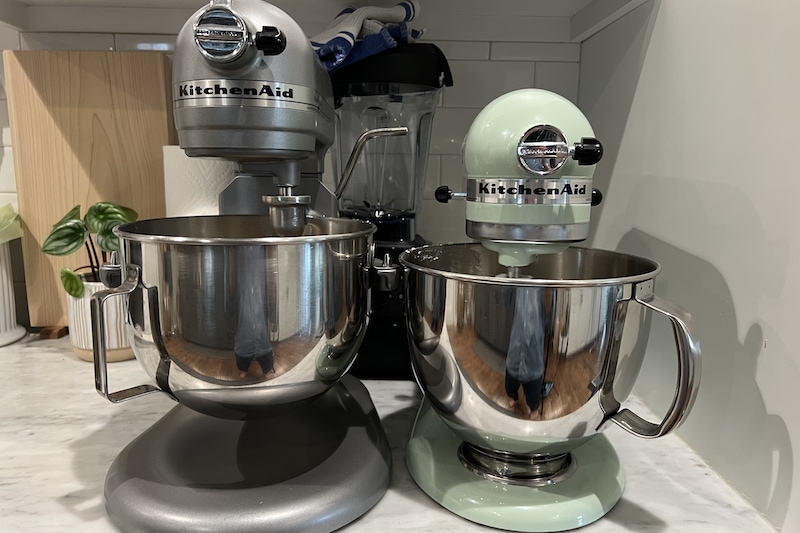
- KitchenAid Artisan Series stand mixer – 5 QT, 325 watts; I do not recommend the bowl-lift Professional Series with a spiral hook unless you double the rectangular loaf recipe.
- C-dough hook
- Digital kitchen scale
- Large bowl
- Dough scraper
- Rolling pin
- Misting bottle – for spraying water on the round-topped loaf
- Wire rack
- Bread knife
- Nice-to-haves:
- Flour duster or shaker
- Plastic bags – for storing your loaf
- From your kitchen:
- Tea towel
- Plastic wrap
How to Make Japanese Milk Bread
Making the Dough
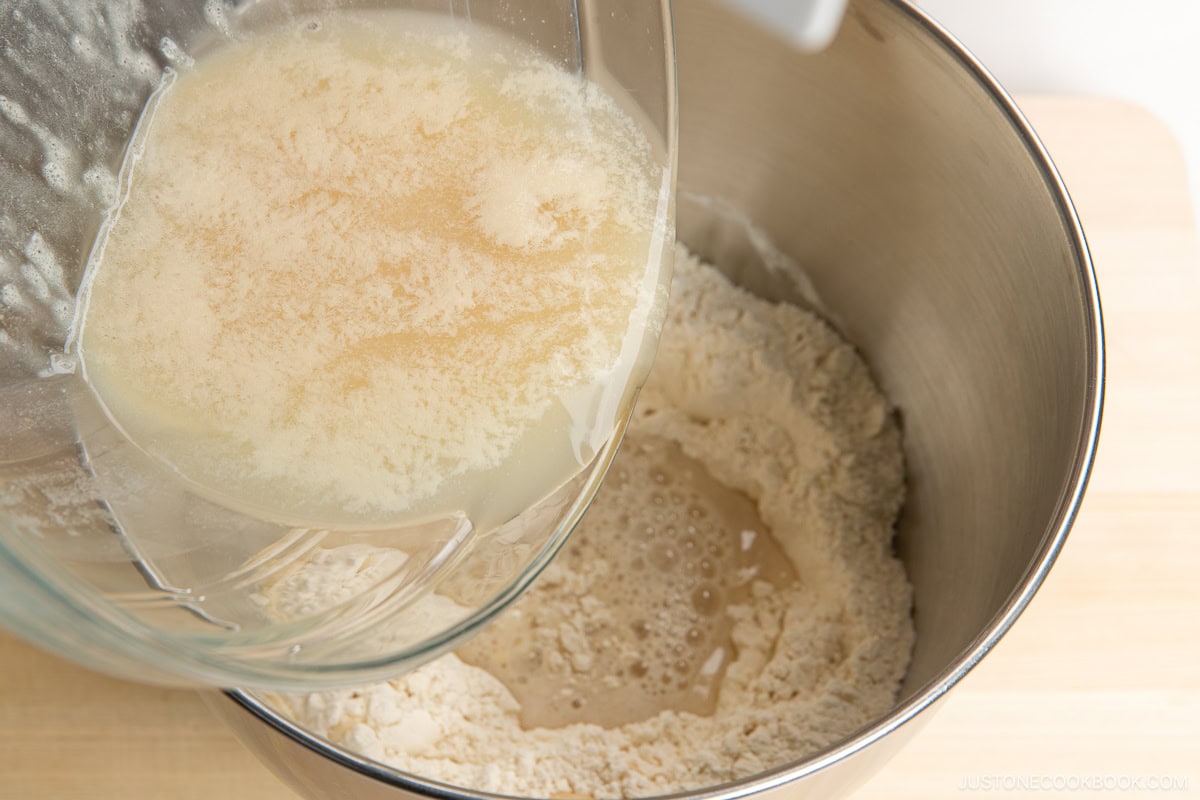
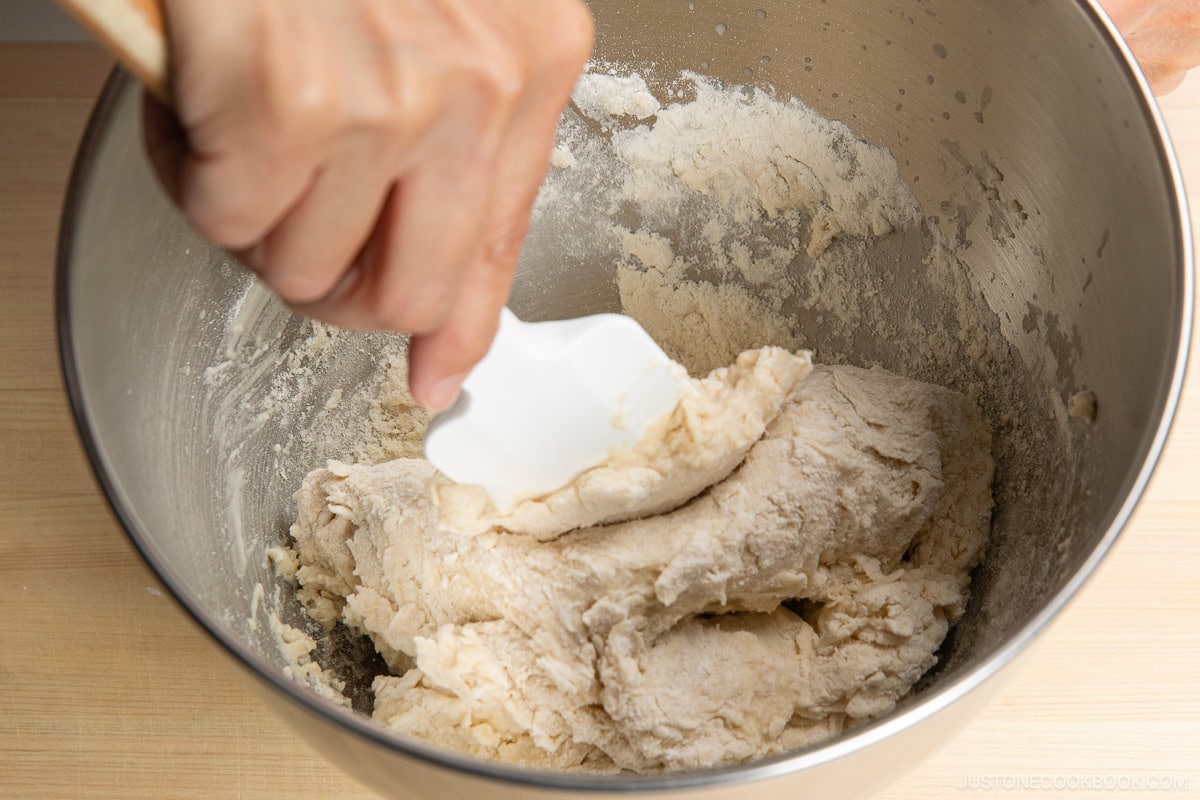
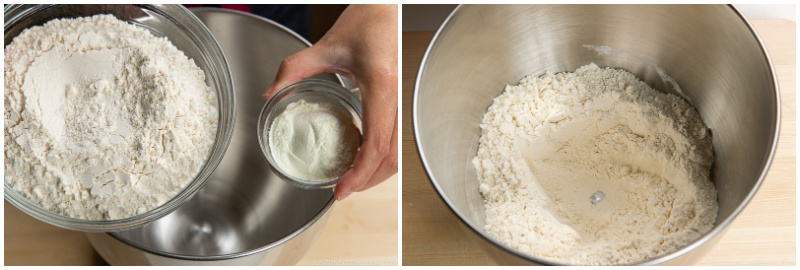
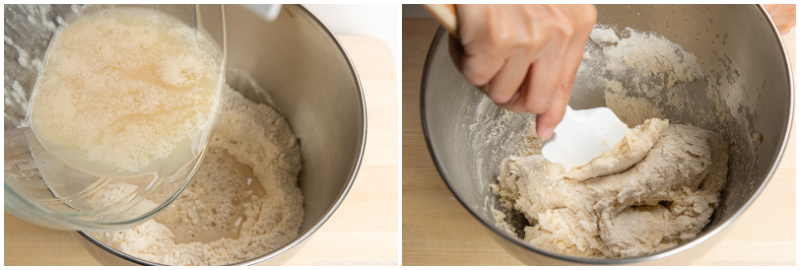
Step 1 – Weigh the ingredients and mix together. In a large bowl, combine the warm water, sugar, salt, and honey. Whisk in the instant yeast and let it sit in a warm place until a foamy surface forms. In the stand mixer bowl, whisk together the bread flour and dry milk powder. Pour the liquid mixture into the dry ingredients and combine with a spatula.
Step 2 – Knead the dough with a stand mixer until shiny, silky, soft, and smooth. Stir on Speed 2 until well combined, then increase to Speed 4 for 4 minutes until it’s a bit smoother. Mix in the butter cubes on low speed, then increase again to Speed 4 for 4 minutes. Finally, knead at Speed 6 for 3 minutes while holding down your mixer. Check the dough’s elasticity with the windowpane test.


Step 3 – Slam and fold the dough, then let it rise for 40 minutes. Pick up the dough ball, slam its smooth side onto a dusted work surface, and fold the dough in half. Slam the smooth side down again, but this time fold it in the opposite direction. Repeat three more times while alternating folding directions. Form the dough into a ball and place in a large greased bowl. Cover and let rise until it triples in size.

Dividing and Shaping
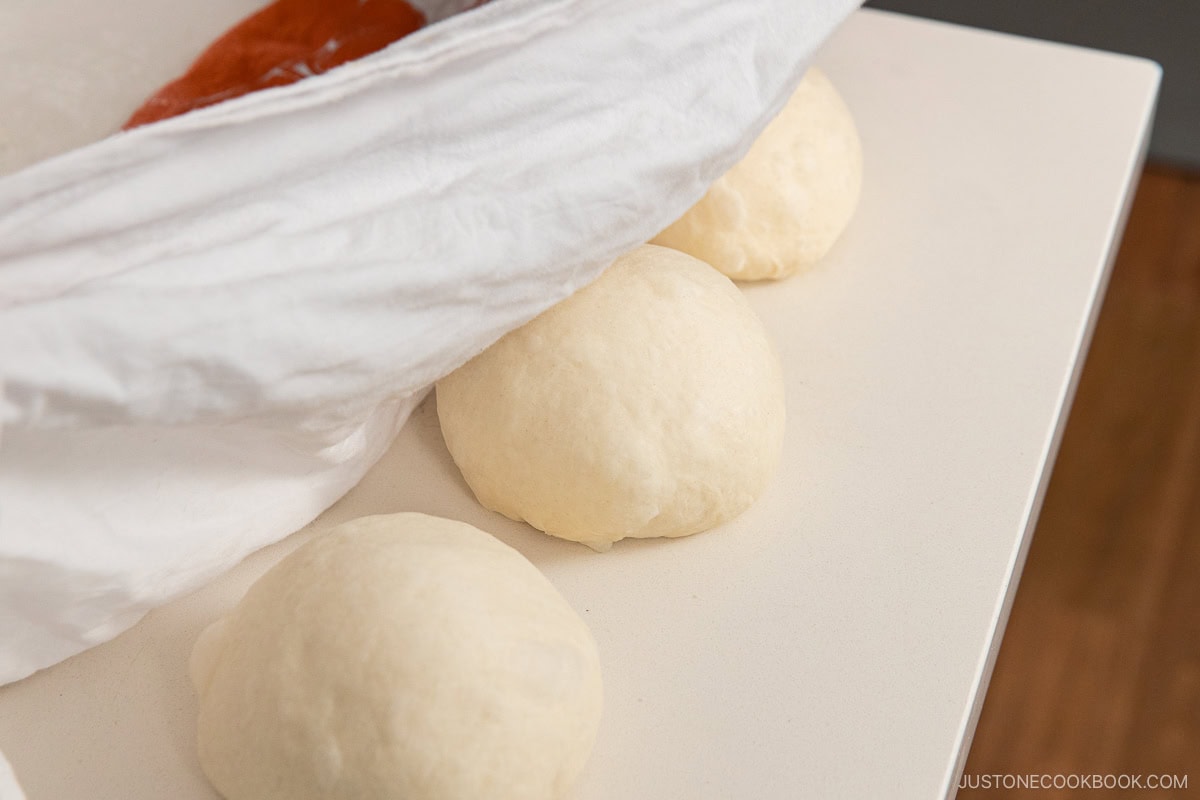
Step 4 – Divide and shape the dough into rectangles. Invert the dough onto your work surface and gently press to deflate it. Form it into a ball with the smooth side up. Weigh and divide the dough into three equal pieces. Form them into taut balls, cover with a damp towel, and let rest for 15 minutes.
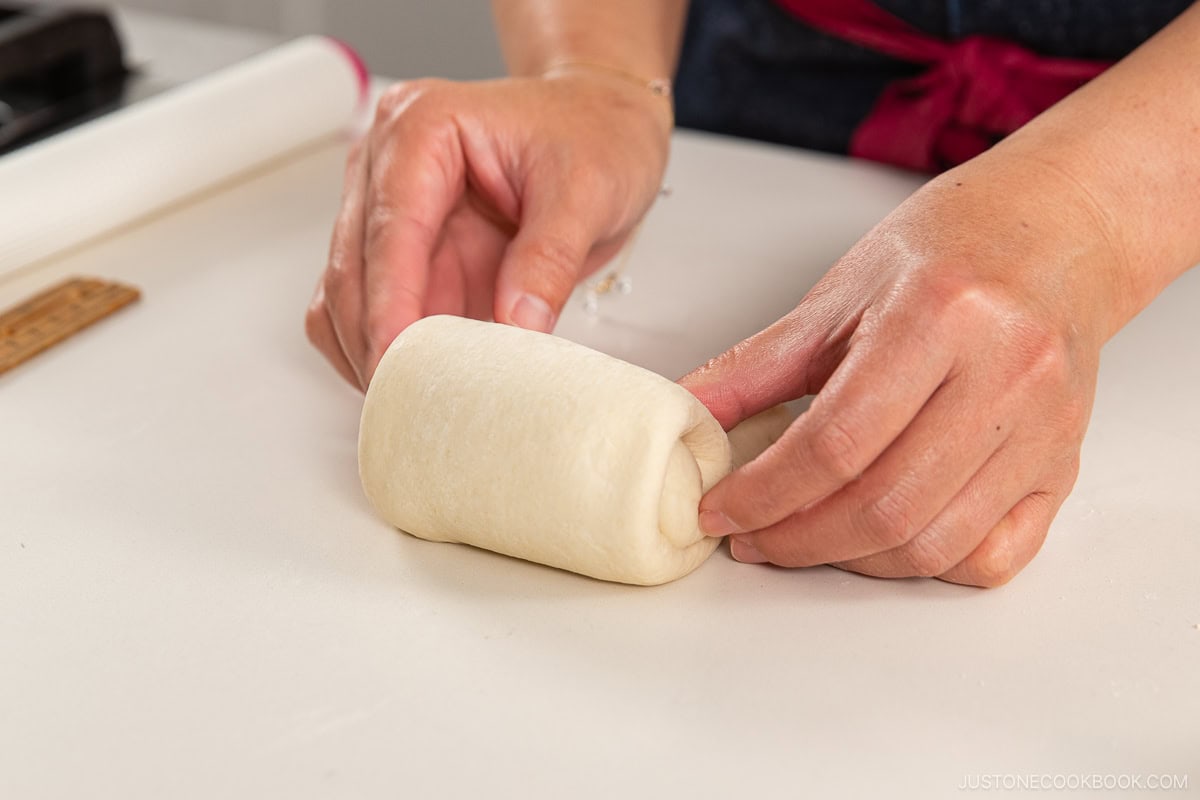
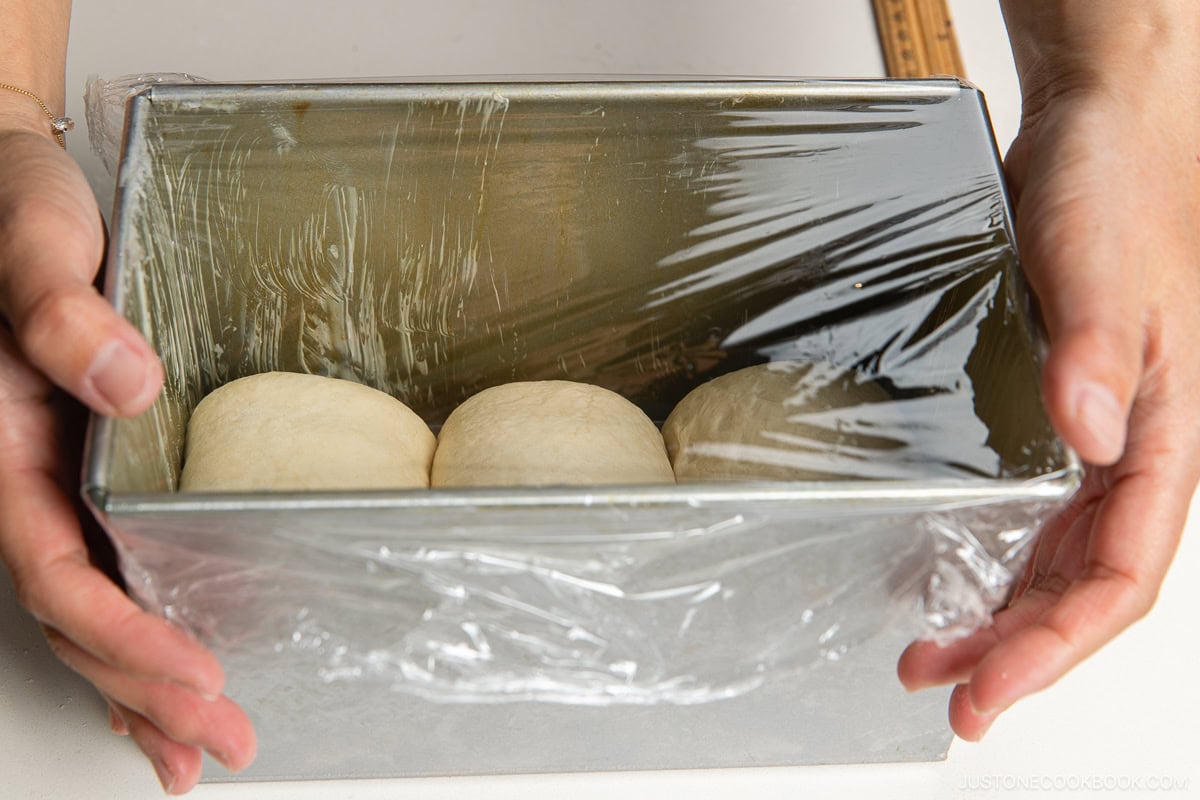
Step 5 – Make the dough rolls and place in the pan. Form one ball into a flat rectangle with a rolling pin. Fold the rectangular dough in thirds lengthwise, then roll it up and pinch the edges to seal. Repeat with the remaining dough. Brush the shokupan mold with butter, place the rolls in it, and cover with plastic.
Step 6 – Proof the dough and preheat the oven. Let the dough rise for about 1 hour until it’s 75–80% of the mold’s height for a flat-topped loaf or 85–90% for a round-topped loaf. When you have 30 minutes of proof time remaining, start preheating the oven to 425ºF (220ºC) with the rack set to a lower position.
Baking
Step 7 – Lower the oven temperature and bake the bread. For flat-topped shokupan, reduce the temperature to 410ºF (210ºC) and bake for 25–30 minutes. For round-topped shokupan, lower to 385ºF (195ºC) and bake for 30 minutes.
Cooling
Step 8 – Cool the shokupan completely on a wire rack. Remove the shokupan mold from the oven and drop the pan firmly on the work surface once or twice. This allows the water vapors to escape. Remove the lid and unmold the bread onto a wire rack. Let it cool for 2–3 hours, then slice when completely cooled.
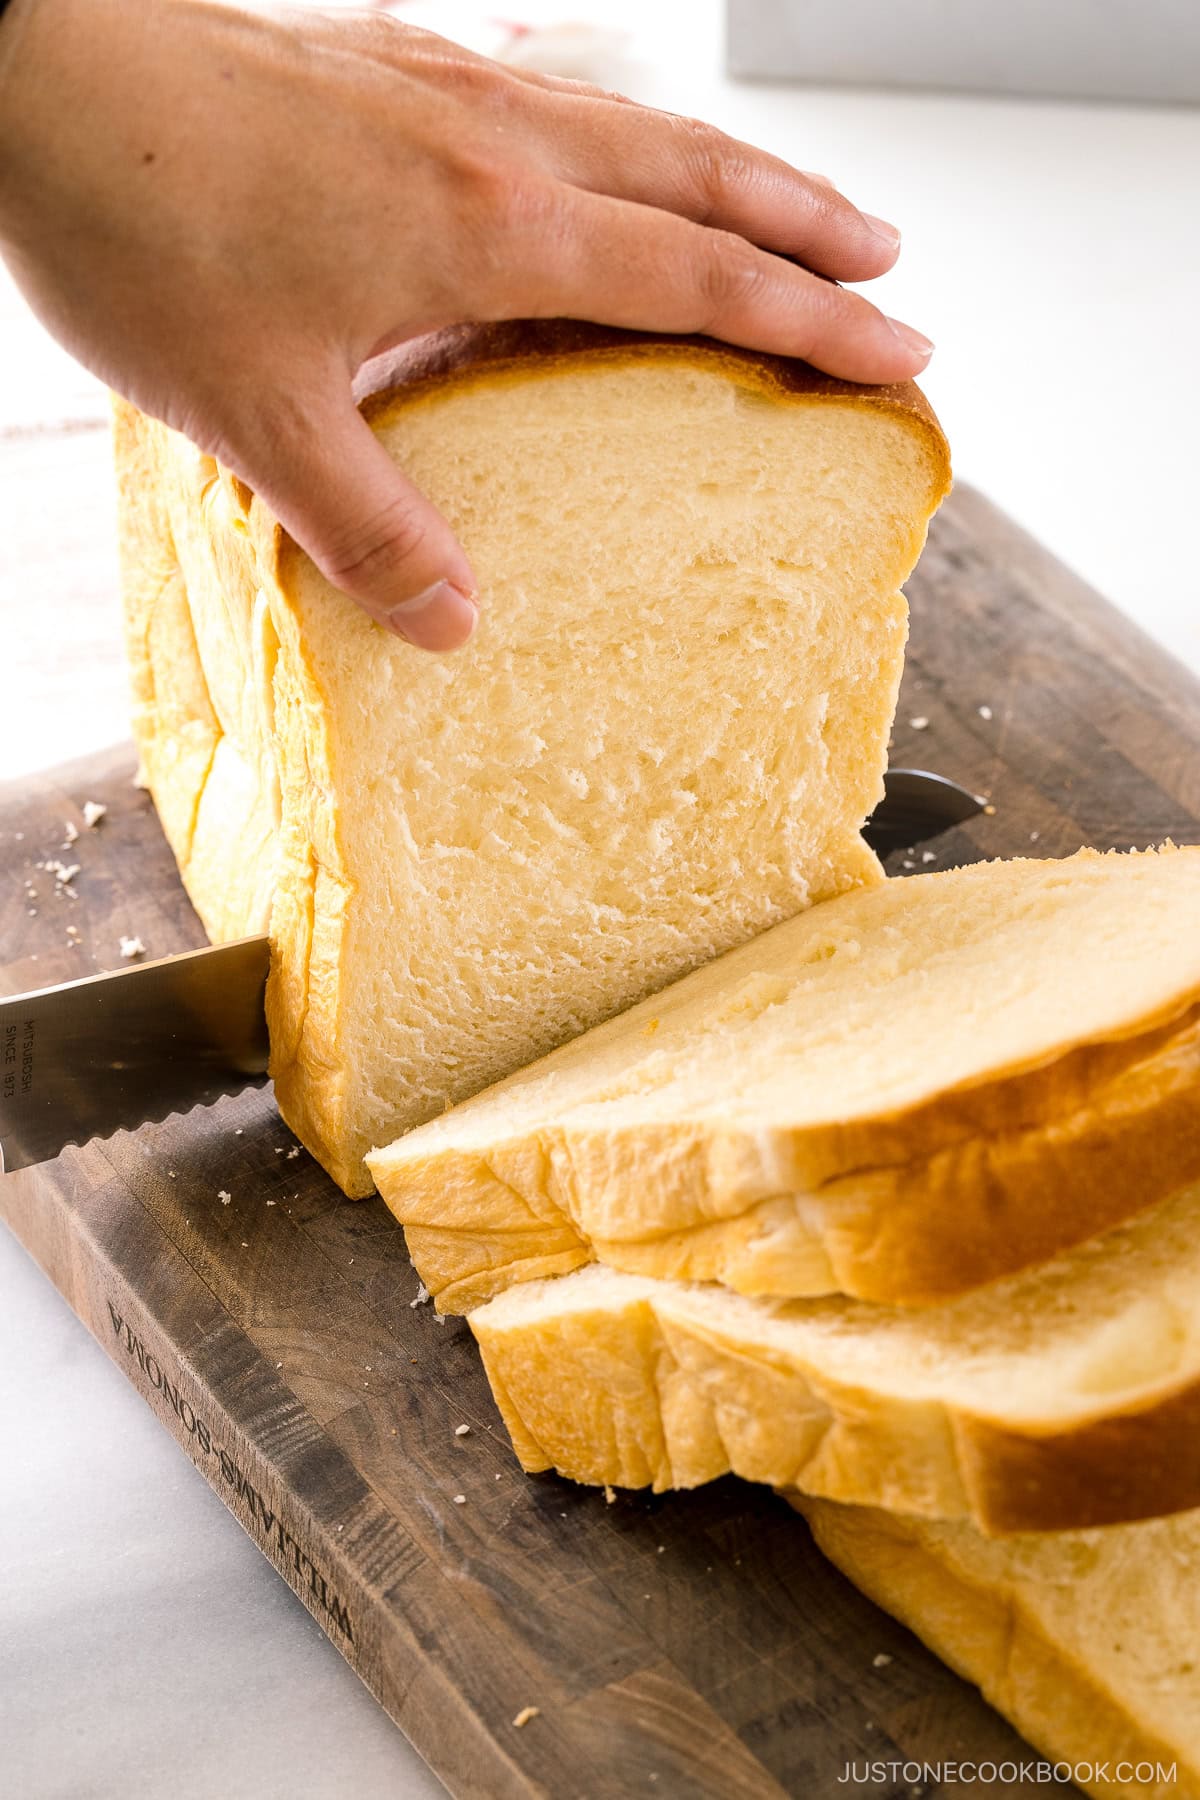
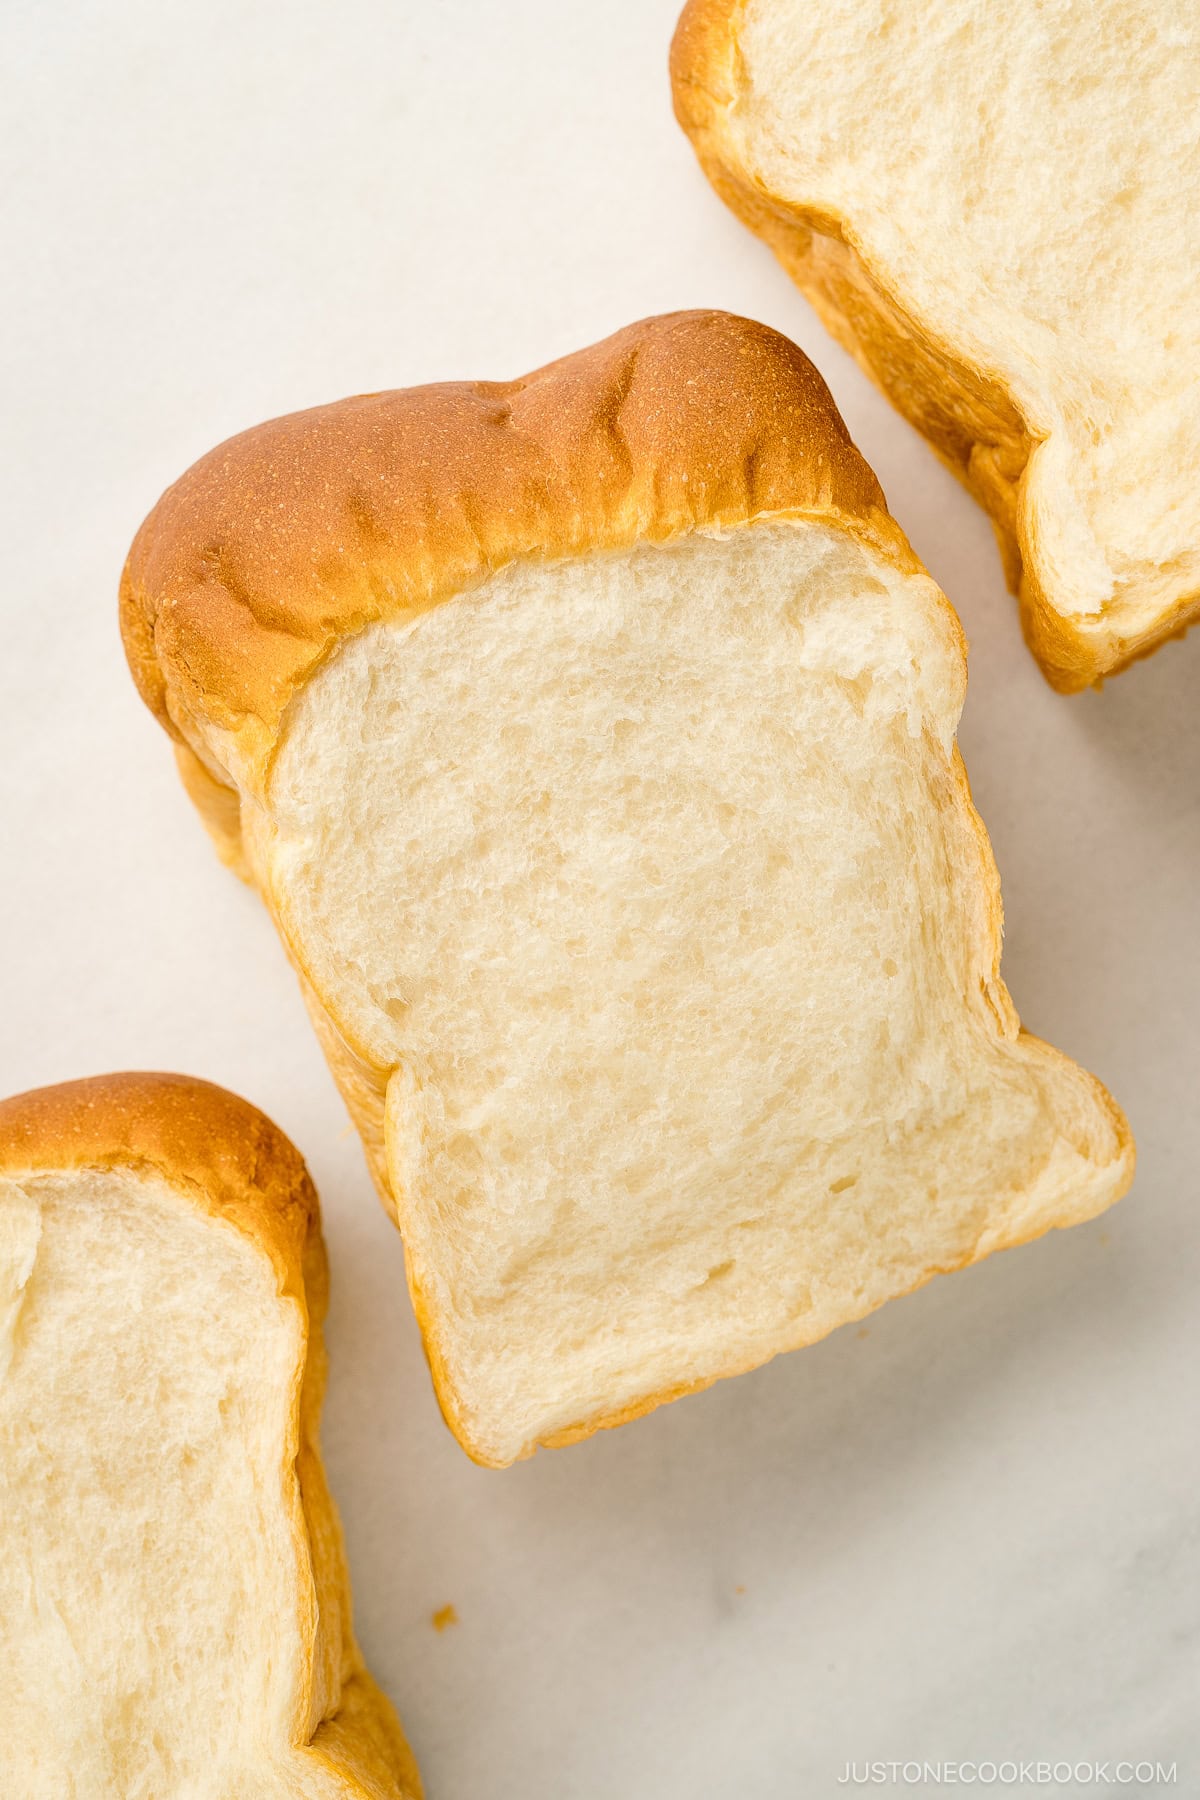
How to Slice Japanese Milk Bread
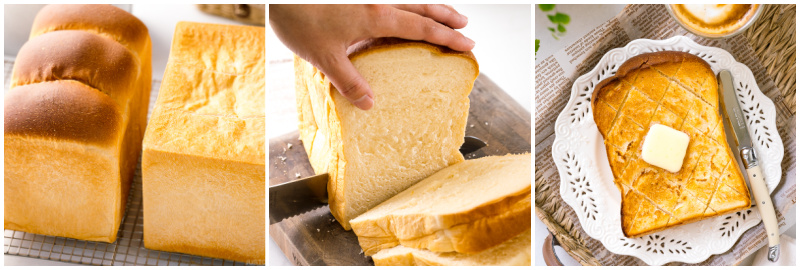
It’s essential to slice the loaf only once it is completely cool. Otherwise, the bread will be too soft and difficult to slice neatly. I use a bread knife, and it is incredible how easily I can slice bread without a struggle!
Following are the precise thicknesses of shokupan toast and sandwich slices in Japan, based on the standard square loaf size (1 kin). No, I don’t follow these rules exactly, and my slices are often uneven!
- 4 slices — 3 cm (for toast)
- 5 slices — 2.4 cm (for toast)
- 6 slices — 2 cm (for toast)
- 8 slices — 1.5 cm (for toast and sandwiches)
- 10 slices — 1.2 cm (for sandwiches)
- 12 slices — 1 cm (for sandwiches)
Nami’s Recipe Tips
- Weigh your ingredients – I cannot stress how important this is in baking. Precise measurement is vital for this recipe; therefore, please weigh your ingredients with a kitchen scale. I strongly discourage using a cup or volume measurement.
- Use the windowpane test – How do you know when to stop kneading? That’s where the windowpane test comes in handy as a helpful way to check the dough’s elasticity. Here’s how to do it: Pull off a small bit of dough. Gently stretch it into a square with your fingers until it becomes a thin film in the middle. If 1) it’s a super-thin membrane, 2) light can pass through, and 3) there’s no tearing, then the dough passes the windowpane test!
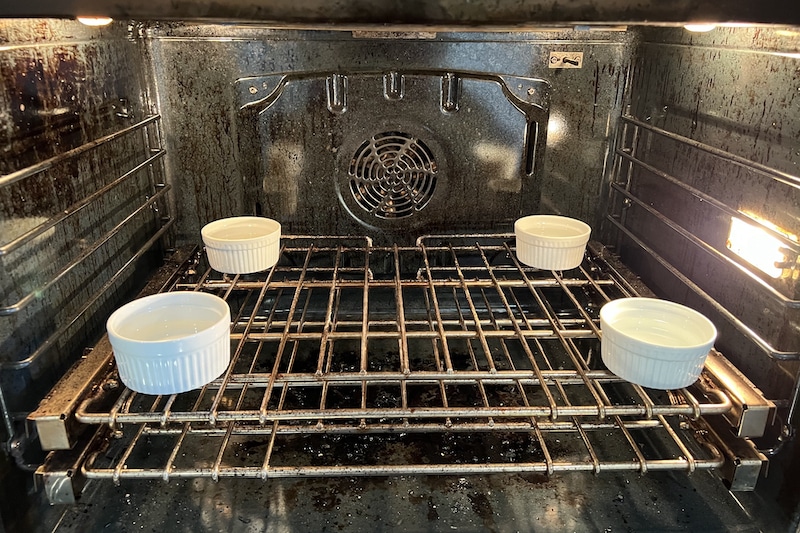
- Create a warm, humid environment for your dough – The optimal temperature for fermenting and proofing bread dough is 86–95°F (30–35°C). I live in a fairly cool climate, so proofing dough was challenging until I got an oven with a proof setting. You can proof dough successfully without a special oven setting, though. Simply place a baking pan or dish of boiling water on your oven’s lower rack, then place the dough bowl on the upper rack. With the door closed, the oven stays warm and humid to create an ideal environment.
- Avoid high/low proofing temperatures and direct sunlight – Dough proofed at temperatures lower than 86ºF (30°C) will take longer to ferment or simply go dormant. Higher temperatures will cause the yeast to expand faster than the gluten structure can handle, and the dough’s air bubbles will collapse. Even though it may seem like a warm location, avoid placing your dough in direct sunlight in the summertime as it gets too hot and develops a crust.
- Create a smooth and taut surface on the dough – When you roll and shape the dough ball, the skin you create on the outside will keep the carbon dioxide generated during fermentation from escaping. These air bubbles keep the bread plump and voluminous with a baked shape that’s beautifully finished. See the recipe card for the two methods you can use to make a smooth, taut surface.
- Handle the dough gently like it’s a baby! – Always handle the dough with slow, gentle movements. Be careful not to stress the dough. You will damage it if you pull or tear the dough while you divide, roll, and shape it. With your gentle care, your bread will be even more delicious.
Variations and Customizations
There are fun and delicious variations on shokupan that you can try and I suggest a few of them here.
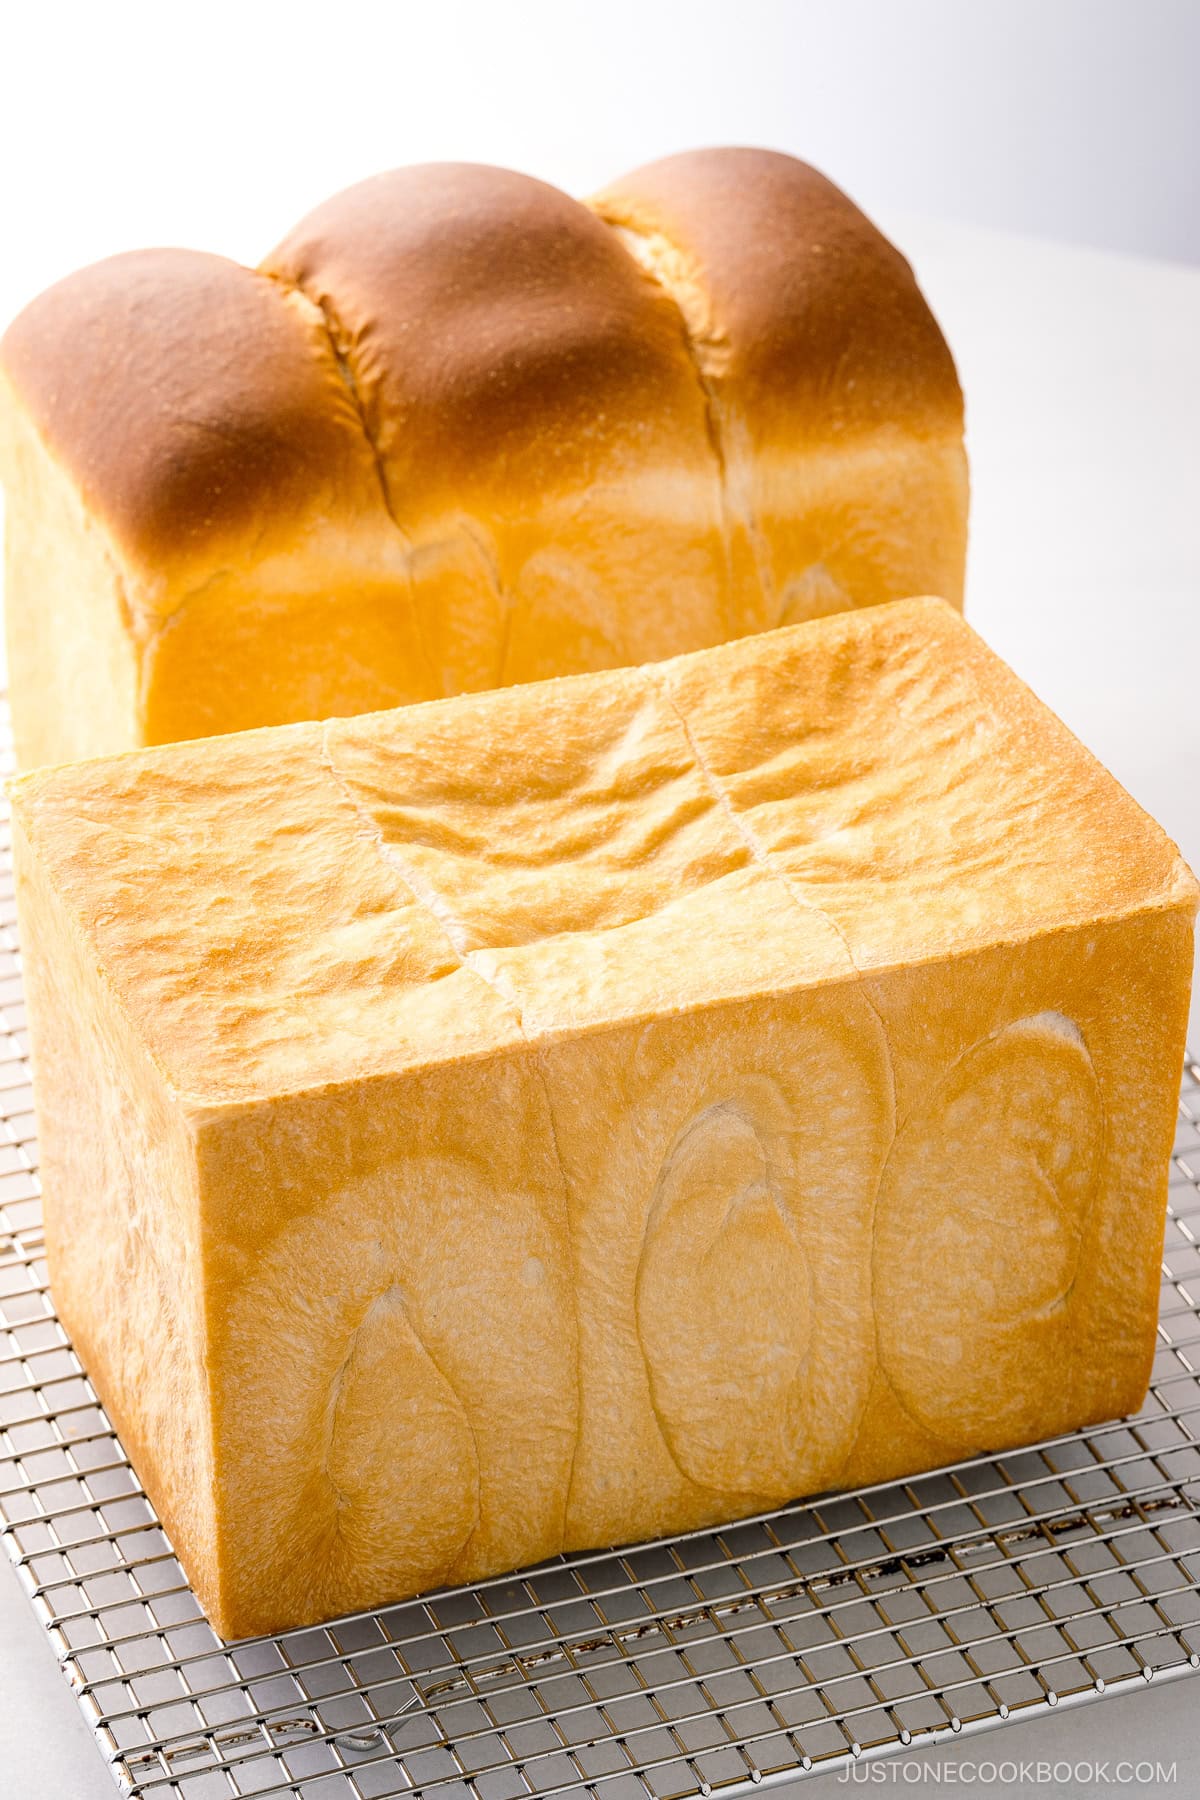
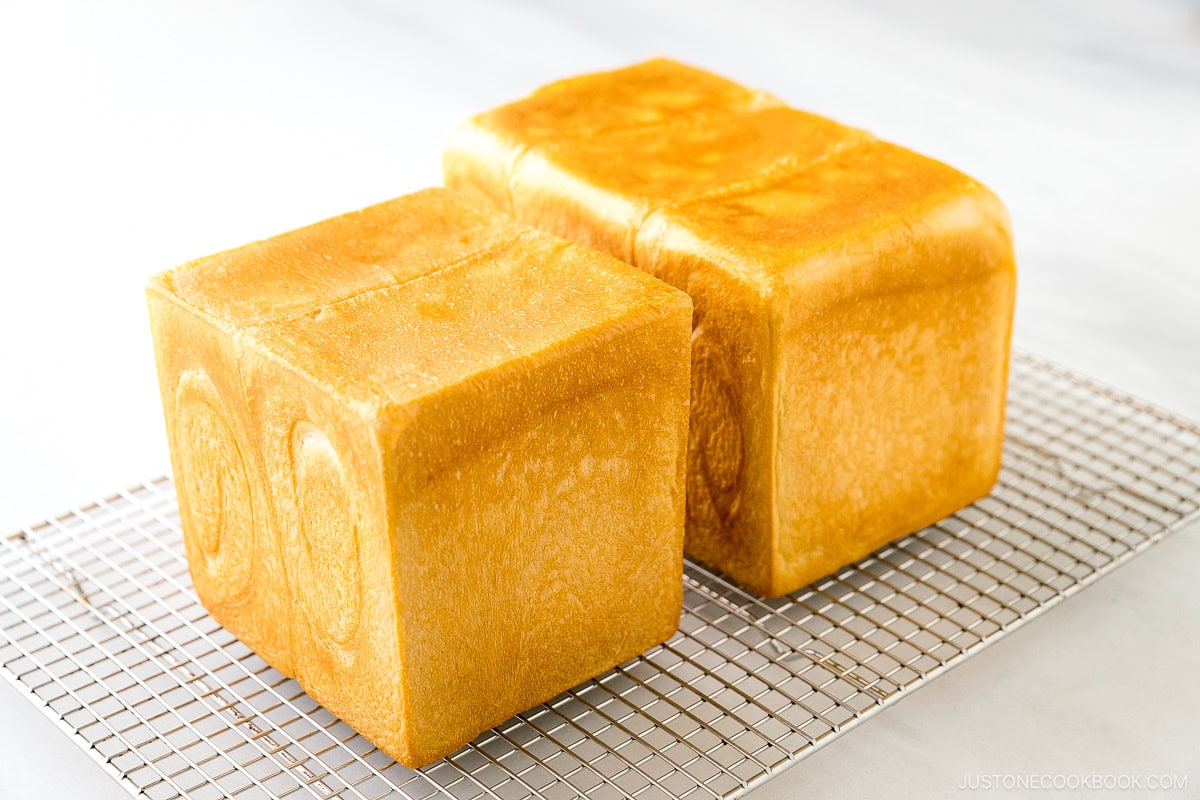
- Make the two traditional shapes of Japanese milk bread. I briefly mentioned above the two types. A flat-topped loaf is called kakugata shokupan (角型食パン), kaku shokupan (角食パン), or kaku shoku (角食; mainly in Hokkaido); and a round-topped loaf is called yamagata shokupan (山型食パン), yama shokupan (山食パン), or yama shoku (山食; in Hokkaido). The round-topped loaf is baked without a lid, which allows it to stretch upward and have a light and soft texture. On the other hand, the flat-topped loaf is baked with a lid, so the evaporation of water is minimal; it has a moist and chewy texture.
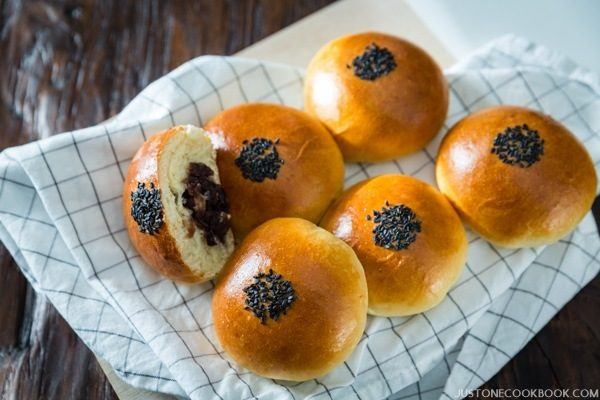
- Add black sesame seeds. Nutty and earthy Black Sesame Milk Bread is one of my favorite types of shokupan to use in Japanese sandwiches.
- Make raisin shokupan. Add raisins to your dough to sweeten your milk bread! I like using golden raisins and add them gently at the end of kneading.
- Make loaves in cute animal or heart shapes. You can use this dough in molds of different shapes. You’ll find bread pans in popular motifs like a bear, cat, bunny, heart, cylinder, small cubes, and more.
- Make it vegan/vegetarian. Substitute coconut milk powder and Miyoko’s unsalted vegan butter for a delicious plant-based version.
Different Ways to Enjoy Japanese Milk Bread
Japanese milk bread is so versatile! There are many ways to use shokupan for breakfast, lunch, snacks, dinner, and desserts. Here, I suggest some of my favorite ways to enjoy this sublime bread.
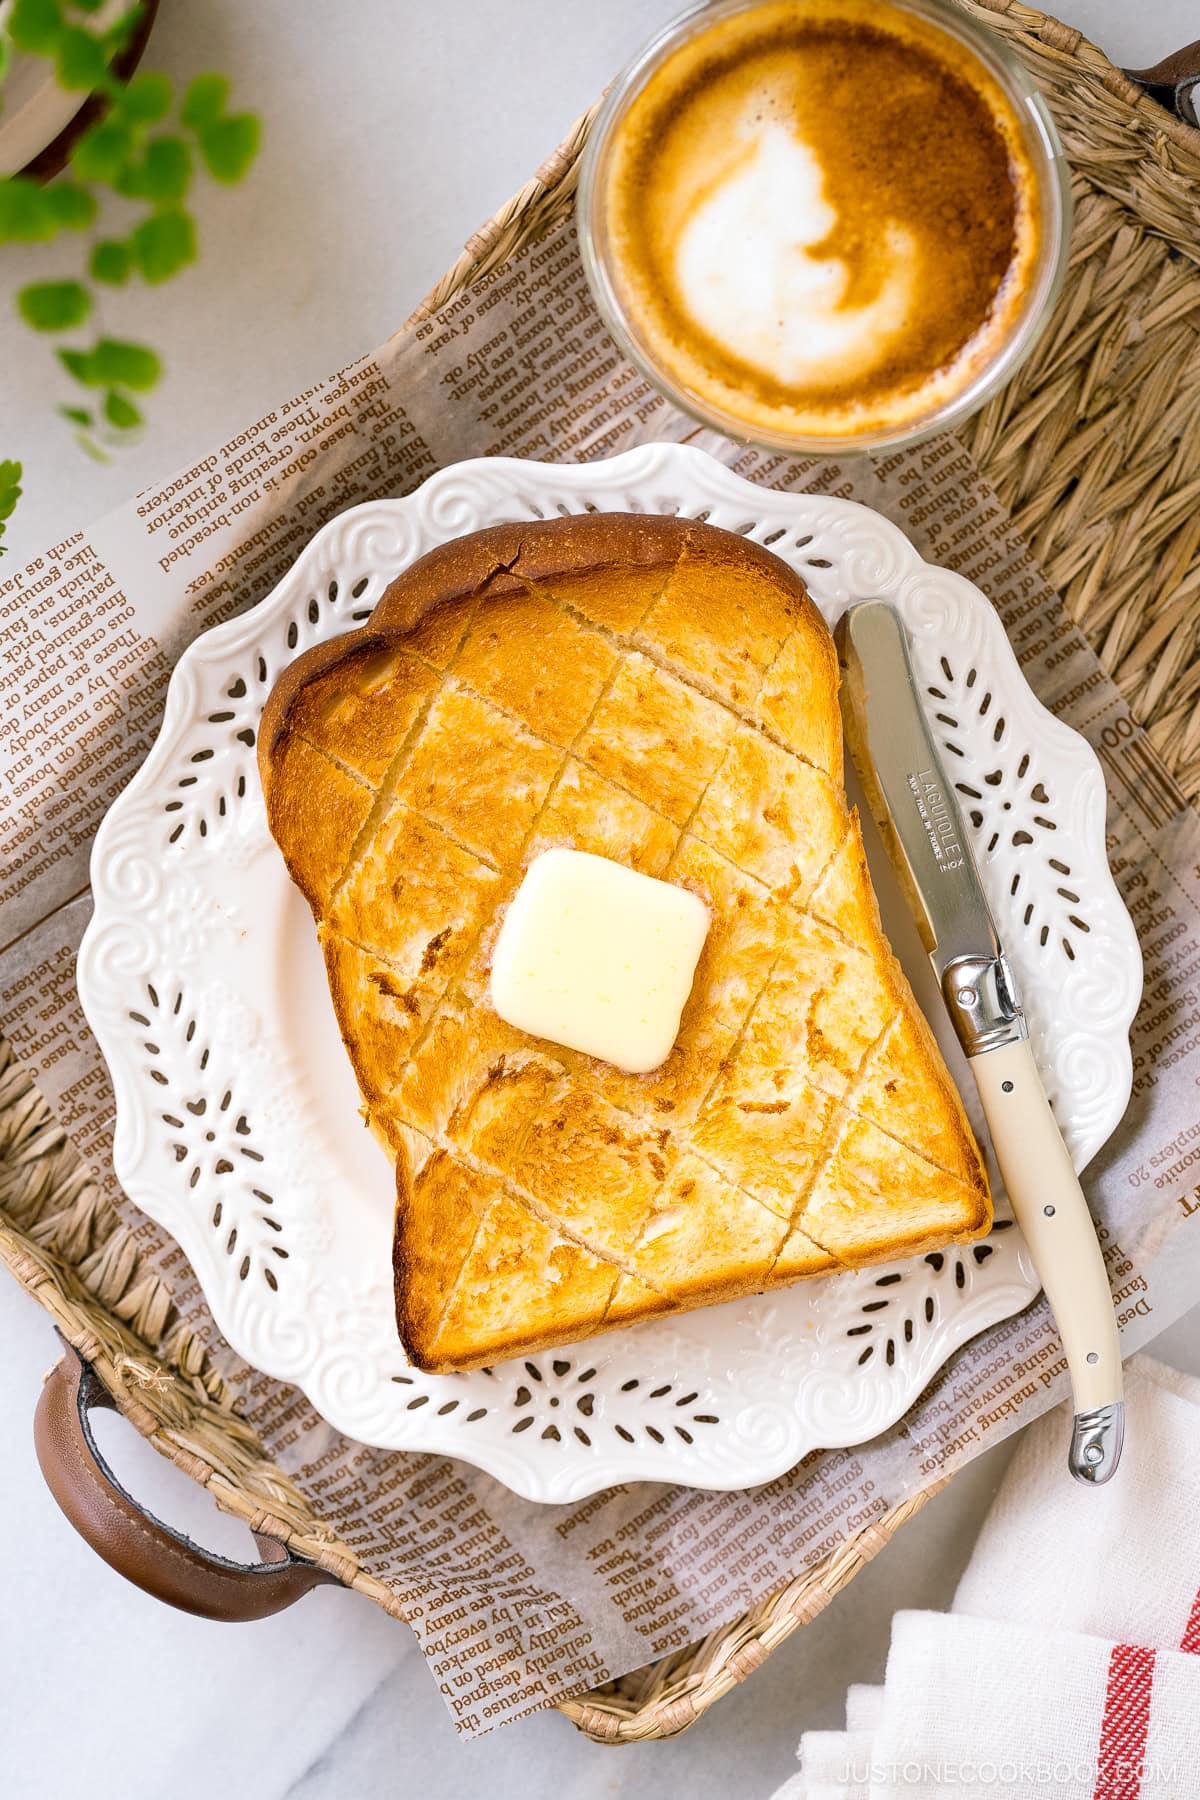
- As simple toast – Score the shokupan slice with a diamond pattern and toast it. Then, place a pat of butter on top. Add optional jam. Simple and delicious!
- As loaded breakfast toast – Ogura Toast is Nagoya’s specialty breakfast topped with butter, sweet red bean paste, and whipped cream. You can also try my 6 Japanese Twists on Avocado Toast.
- In pizza toast – Japanese Pizza Toast with homemade sauce, ham, and cheese was my son’s favorite after-school snack growing up!
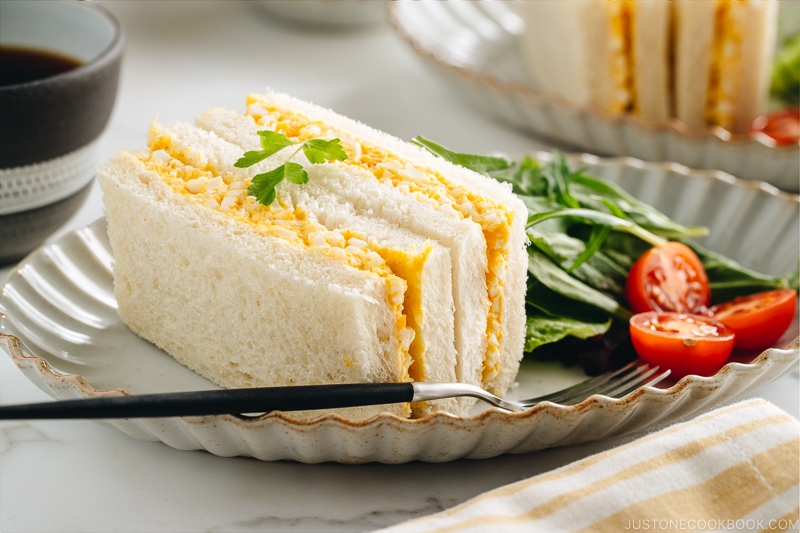
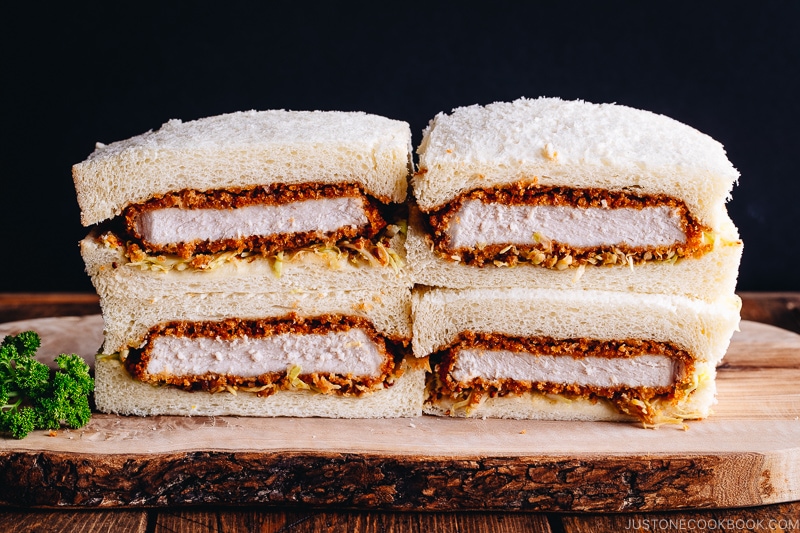
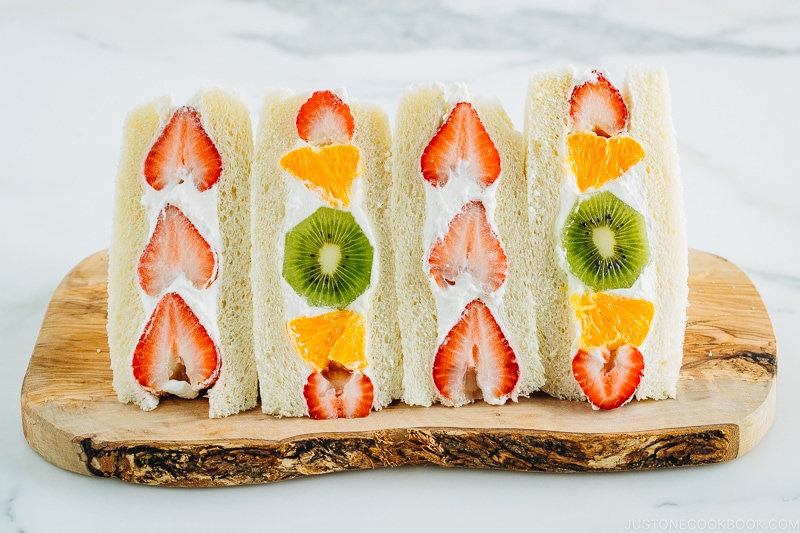
- In sandwiches – Shokupan is the signature ingredient in many delicious Japanese-style sandwiches like Japanese Egg Sandwich (Tamago Sando), Katsu Sando, and Japanese Fruit Sandwich (Fruit Sando).
- As a sweet treat – Don’t throw out the crusts that you trimmed off! Repurpose them to make crispy Shokupan Crust Rusks coated in butter and sugar.
- In desserts – Use your leftover shokupan to make sweet and custardy Pan Pudding (Japanese Milk Bread Pudding) with caramel sauce. It simply melts in your mouth.

Storage Tips
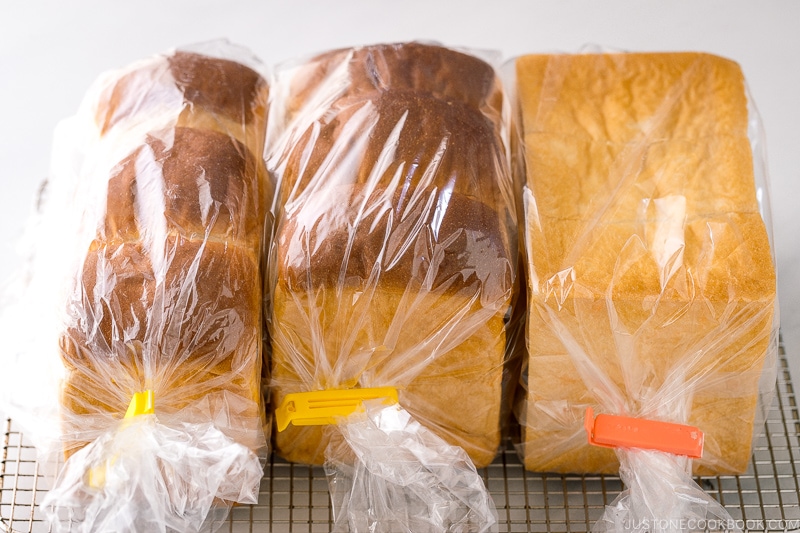
To store at room temperature: This is the best storage method if you consume the bread within 1–2 days. Put your loaf in a plastic bag and keep it in a cool place out of direct sunlight. I usually cut slices off the loaf as needed. On warm days, consume it within a day or store it in the freezer (make sure to slice first before freezing). Do not refrigerate the bread, as the cold air dries the bread.
To freeze: If you can’t finish your bread within a day or two, freezing is the best choice. Cut the loaf into slices before freezing. It’s typically recommended to wrap the individual slices in plastic wrap to avoid odor absorption and freezer burn. The bread can stay fresh for up to 2 weeks, but it’s best to consume it soon. To toast from frozen, mist some water on the slice and toast it in a preheated oven.
Frequently Asked Questions
General Questions:
I learned how to make shokupan through an online bread-making class taught by Mariko, a Japanese friend who resides in Austin, Texas. As an experienced bread-making teacher, Mariko provides detailed insight on how to improve your outcome. I’ve taken Mariko’s class twice so far, and I feel like I learned new things in each lesson.
Both yudane and tangzhong are methods of precooking a small portion of the dough by cooking or scalding. Cooking the flour causes the starch to gelatinize, making the bread’s texture chewy (we call it mochi-mochi texture) compared to regular shokupan. Furthermore, the bread stays fresher and moister for longer due to a higher moisture content. However, the dough is stickier and harder to knead, and it does not rise as high as in a regular shokupan recipe.
Most Japanese milk bread recipes in English use the yudane or tangzhong method, so it may seem like that’s how you have to make shokupan. However, it’s not a classic shokupan recipe used by bakeries and home bakers. It’s simply just another way of making shokupan.
To be 100% honest, I love how easy and perfect this recipe is. I don’t feel the need to use the yudane method to achieve the best results. With the recipe that I’m sharing here, I can be spontaneous and finish making a fantastic shokupan in 3.5 hours from start to finish. I love that part and make at least one to two shokupan weekly. The yudane or tangzhong method doesn’t fit my lifestyle as a busy working mom.
The dough for shokupan is very wet and sticky compared to regular bread dough. You may feel doubtful, but you must trust that it will work if you continue to knead more. Moreover, kneading this type of dough by hand requires a lot of armwork. For these reasons, shokupan dough is more suitable for kneading with a stand mixer. If you really wish to knead by hand, I shared the helpful link in the recipe card.
While shokupan and brioche are soft and buttery, they are different. Brioche is a much richer bread than Japanese milk bread. It uses a lot more butter than shokupan dough, giving brioche a sweeter and more buttery taste. Brioche is also made with eggs. This helps give brioche its signature golden color and a denser, chewier texture than shokupan.
Recipe Questions:
It depends. Different factors can affect the proofing time of your dough, such as the temperature and humidity of your kitchen, freshness of your yeast, and water temperature. In a warm kitchen, your dough may proof in 40–60 minutes, while it can take 2–3 hours in a cold kitchen. It’s essential to create a nice, toasty environment for your dough to rise.
Find a spot where it’s nice and warm but out of direct sunlight. Heat rises, so some people proof their dough on top of a running dryer machine or top of the refrigerator. My recommendation is to use an oven. Place a baking pan/dish of boiling water on a lower rack and place the bowl with dough on an upper rack. Sometimes, it gets warm even with just the light on. Likewise, you can also use a microwave and place a dish of boiling water inside.
The short answer is yes, you could. However, I highly discourage keeping your dough overnight (12–18 hours) in the refrigerator, especially if you are not an experienced bread maker. I consider myself a not-so-experienced bread maker, so I won’t be able to troubleshoot your situation if you have issues with overnight bulk fermentation.
If you are going to do overnight bulk fermentation (the first rise), here are some factors to consider:
The amount of yeast – You must reduce the amount, but it’s unclear by how much. I’ve seen a milk bread recipe or two suggest using one-third of the amount of yeast called for in the original recipe.
The initial bulk fermentation – How long do you leave your dough for the first rise before putting it in the refrigerator? It depends on the temperature, but it should be 20–30 minutes.
The refrigerator temperature – Ideally 39ºF (4ºC).
Experienced eyes – You need to monitor the progress of your dough and determine what to do based on the condition of the dough.
When you resume breadmaking, allow the dough to return to a temperature of 68ºF (20ºC) degrees or higher, which may take up to an hour. Deflate the dough and divide it to continue. You must use the dough within 24 hours of when you started making it.
Troubleshooting Questions:
The cause may possibly be one of these reasons:
1. Your yeast was old. (This has happened to me before!) Yeast is a microorganism, and it goes bad. Don’t waste the rest of your ingredients because of old yeast. Get brand-new yeast (and make sure it’s a good batch from the store!) Do not use yeast that’s more than 6 months old.
2. Hot water killed the yeast. Read the instructions on your yeast package. Generally, the warm water temperature should be between 105ºF (40ºC) and 115ºF (46ºC) degrees.
3. Too much salt/sugar/flour. Did you measure your ingredients with a kitchen scale?
4. The dough was too dry. Did you cover the dough with plastic wrap? If you used a damp towel, did it dry up? The dough should be moist and elastic during proofing. Be careful not to develop a crust on the dough’s surface to prevent it from rising further.
5. The dough was too cold. The yeast is most active at around 86–95°F (30–35°C) degrees. See my method above to create a warm environment for the dough.
When you bake in hot summer weather, you must ensure the dough will not over-proof. This can happen on a hot summer day if the desired dough temperature rises too high. The bread will have a good smell, taste, and texture when the dough rises properly. When the dough over-rises, it will not yield tasty bread.
Here are five strategies to keep the dough temperature in an acceptable range:
1. Reduce the room temperature using air conditioning.
2. Use cold water, and possibly use less water if humidity is high.
3. Refrigerate flour before using.
4. Refrigerate baking tools (stand mixer bowl, etc).
5. Reduce the amount of yeast just slightly.
If your bread has a coarse crumb, this means the interior texture is rough and looks like a kitchen sponge (see the image below). It may be dense and have a strong yeast smell. It may not have risen high during the final rise. If this sounds like your shokupan, chances are:
You over-proofed the dough during bulk fermentation (the first rise). It’s important to check your dough’s progress during this step. Sometimes, the kitchen is too warm for the dough (especially in the summertime), and it rises too fast before you realize it.
Your dough temperature was too high. The dough temperature increases as you knead aggressively for a period of time. This means you must put all factors into the calculation to keep the dough within an ideal temperature range. For example, using cooler water when baking bread in hot weather can make a big difference. If you use warm water to start, the dough temperature may exceed the ideal temperature during kneading. The high temperature could potentially kill or weaken the yeast. You can also refrigerate the flour, mixing bowls, and dough hook. Read below for more details about the desired dough temperature.
You over-kneaded the dough. This is tricky to assess as you are supposed to knead the dough aggressively to achieve a pillowy and soft crumb. When the dough starts to look smooth and shiny, do the windowpane test to check if it is firm enough to stretch to a super-thin membrane without tearing. When your dough passes the test, stop kneading. If you miss this stage, you will break the gluten strands as you continue kneading. The dough becomes gooey and taffy-like and will lose its strength and structure.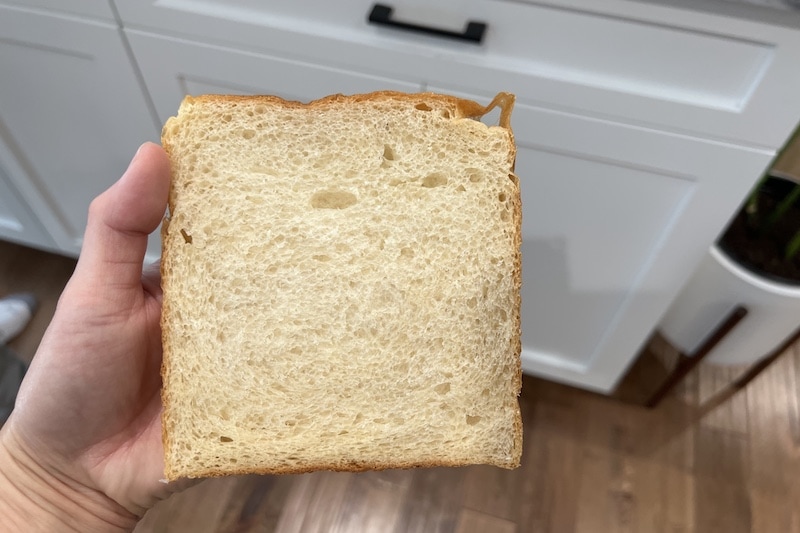
For shokupan, the DDT at the end of kneading is 79–82ºF (26-28ºC).
The dough’s temperature affects the fermentation rate and, in turn, the flavor and texture of the finished product. When the season changes, the temperature in your kitchen also changes. Even if you’re doing everything the same, the temperature difference could affect the result of your bread.
Therefore, the key to achieving consistently great results in your bread baking is to bring your dough to the desired dough temperature (DDT), no matter what season or kitchen condition you are in. At professional bakeries, measuring the temperature of the ingredients is as important as weighing the ingredients. The DDT varies depending on the type of bread.
Maintaining the temperature range will produce the best flavor and rise in your shokupan. The yeast activity slows at around 113ºF (45°C) and dies when the temperature rises above 140ºF (60°C).
Professional bakers use a simple mathematical formula to calculate the temperature of the one variable they can control—the water. Because water accounts for a large proportion of the ingredients in making shokupan, having the right water temperature to start is the most important factor in bringing the dough to the DDT. The formula is:
(DDT x 3*) – room temperature – flour temperature – friction factor** = water temperature
Examples at my kitchen in San Francisco:
Summer in ºF: (80 x 3*) – 72 – 70 – 14** = 84ºF (29ºC)
Winter in ºF: (80 x 3) – 65 – 70 – 14 = 91ºF (33ºC)
Summer in ºC: (27 x 3) – 22 – 21 – 8** = 30ºC (86ºF)
Winter in ºC: (27 x 3) – 18 – 21 – 8 = 34ºC (93ºF)
*The number of variable temperatures (room, flour, and friction) other than water temperature that affect dough temperature
**The friction factor in baking represents the heat transferred to bread dough during mixing and kneading. Friction can raise the temperature of your dough significantly, so it needs to be considered when making dough temperature calculations. The amount of heat generated by the specific mixing method varies.
– For stand mixer kneading, use a temperature between 11ºF and 18ºF (6°C-10°C) – I used 14ºF (8ºC) as the friction factor.
– Use a temperature between 0ºF and 9ºF (0°C-5°C) for hand kneading.
I used the professional bakers’ friction factor for shokupan, which I found on multiple Japanese resources. The range was given because it varies depending on the machine, the temperature of your palm, and the amount of time you knead. For a temperature difference conversion, you multiply ºC by 1.8 (9/5) to get ºF, or you multiply ºF by 0.55 (5/9) to get ºC. Thus, a mixer friction factor of 14°F is equivalent to 8°C, not -10°C.
If your dough temperature is lower than DDT: Let the dough rise for a little longer than the time specified in the recipe in a warm place.
If your dough temperature is higher than DDT: You can either let the dough rise in a cool place for a short time or lower the dough temperature by putting it in the refrigerator for about 1–2 minutes, then taking it out and re-rolling it so that the temperature of the dough is uniform. When the dough temperature is high, it is easy to over-proof, resulting in bad flavor and fast deterioration.
More Japanese Bread Recipes
If you love this Japanese milk bread, you’re in for a treat with these other irresistible Japanese bread recipes.
- Anpan
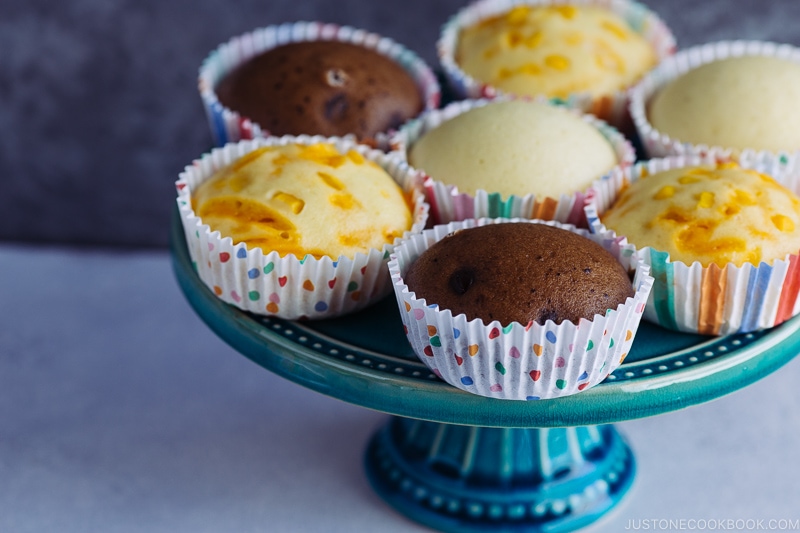
- Steamed Cake (Mushi-pan)
Japanese Milk Bread (Shokupan)
Ingredients
For 1 Rectangular Shokupan Loaf (1.5 kin size)
- 250 g warm water (104ºF, 40ºC; in the summertime when the kitchen is warm, use room temp or cold water; read about desired dough temperature in my blog post FAQs)
- 20 g sugar
- 7 g Diamond Crystal kosher salt
- 10 g honey
- 7 g instant yeast (I use 1 packet (7 g each) of Fleischmann’s® bread machine yeast; use every last granule; DO NOT use old yeast that‘s more than 6 months old; to substitute active dry yeast, use the same amount or up to 25% more and proof it first in some of the warm water from above)
- 350 g bread flour (I use King Arthur; conventional flour (not organic) has more consistent protein levels, which means better gluten development and rise)
- 20 g skim milk powder or nonfat dry milk powder (I use Bob’s Red Mill; for vegan, use coconut milk powder; avoid soy milk powder as the dough does not rise well)
- 25 g unsalted butter (at room temperature; for vegan, use Miyoko’s)
For Greasing
- ½ tsp neutral oil (for the bowl)
- 10 g unsalted butter (at room temperature; for the shokupan mold; or use cooking oil spray)
For 1 Square Shokupan Loaf (1 kin size)
- 167 g warm water
- 14 g sugar
- 4.5 g Diamond Crystal kosher salt
- 7 g honey
- 4.7 g instant yeast
- 235 g bread flour
- 14 g skim milk powder or nonfat dry milk powder
- 17 g unsalted butter
Instructions
Before You Start
- Shokupan Molds: The rectangular shokupan mold is 4.7 x 7.8 x 5.1 in. (12 x 20 x 13 cm), approx 2900 ml. The square shokupan mold is 4.7 x 5.3 x 5.1 in. (12 × 13.5 × 13 cm), approx 1900 ml. I have written an extensive post about Japanese shokupan molds and how to order them. If you don't go for an ideal shokupan size, a standard 1 lb loaf pan works too—follow the rectangular loaf recipe.
- Stand Mixer: My instructions are for a KitchenAid 5-QT Artisan Series (325 watts). KitchenAid Classic Series: Do not double the recipe — the 275-watt motor isn't strong enough. KitchenAid Professional Series with a spiral hook: You must double the rectangular loaf recipe, or there won't be enough dough to engage the hook. With twice the dough, knead 1.5 times longer at each step. Using a different brand? Follow my steps to achieve a dough that passes the windowpane test.Hand Kneading: Watch this video for hand kneading technique.
- Warning: KitchenAid does not recommend kneading above Speed 2, but we can't achieve the right texture without it. Hold the mixer down with both hands at Speed 6 and never walk away. Use at your own discretion.

- Warm Environment for Bulk Fermentation: Use your oven's Proof setting at 100ºF (38ºC). No Proof setting? Place small dishes of boiling water on the lower-middle rack at the four corners, set your dough bowl in the center, and close the door. An Instant Pot on Yogurt (Low) mode also works. In summer, you may not need any of this.
To Make the Dough
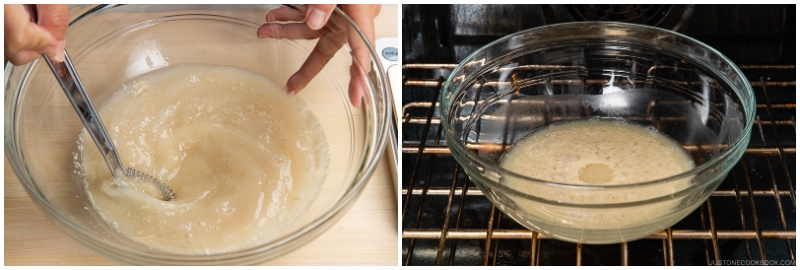
- Gather all the ingredients. Weigh your ingredients with a digital kitchen scale—precise measurement is critical, and volume measurements will affect results.Cut 25 g unsalted butter into small cubes.(For a square loaf: 17 g unsalted butter.)
- In a large bowl, combine 250 g warm water, 20 g sugar, 7 g Diamond Crystal kosher salt, 10 g honey, and 7 g instant yeast and whisk together. (For a square loaf: 167 g warm water, 14 g sugar, 4.5 g Diamond Crystal kosher salt, 7 g honey, and 4.7 g instant yeast.)Set aside in a warm place for 10 minutes. The surface should be covered in bubbly foam. Nami's Tip: If you don’t see any, maybe your yeast is old or the environment is not warm enough; wait another 5 minutes to see if any foamy bubbles develop.
- Meanwhile, combine 350 g bread flour and 20 g skim milk powder or nonfat dry milk powder in a stand mixer bowl and mix it together.(For a square loaf: 235 g bread flour and 14 g skim milk powder or nonfat dry milk powder.)Make a well in the middle of the flour mixture.
- Pour the foamy yeast mixture into the well, scraping out every bit of liquid with a silicone spatula. (Keep this bowl for later.) Mix until a shaggy dough forms.
To Knead the Dough in the Stand Mixer
- Set up the stand mixer with a dough hook attachment. Knead on Speed 2 for 2 minutes (or 3 minutes for double the rectangular loaf recipe). The dough should come together into a shaggy, rough mass with no dry flour remaining.
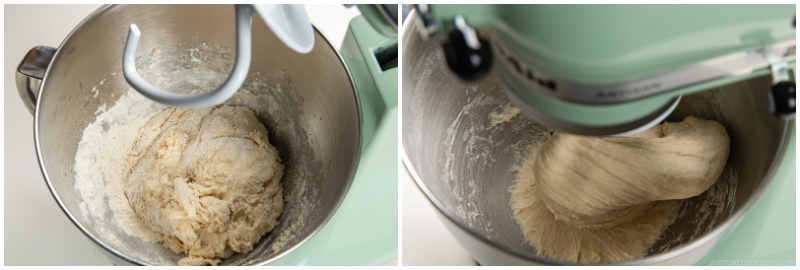
- knead on Speed 4 for 4 minutes (or 6 minutes for double). Stop the mixer to check the dough. It will be smoother than before, yet still a bit rough and bumpy.
- Add the butter cubes to the dough. Knead again on Speed 2 for 2 minutes (or 3 minutes for double), or until you no longer see any butter streaks.
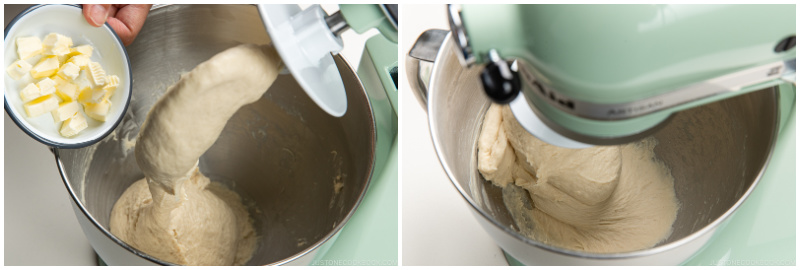
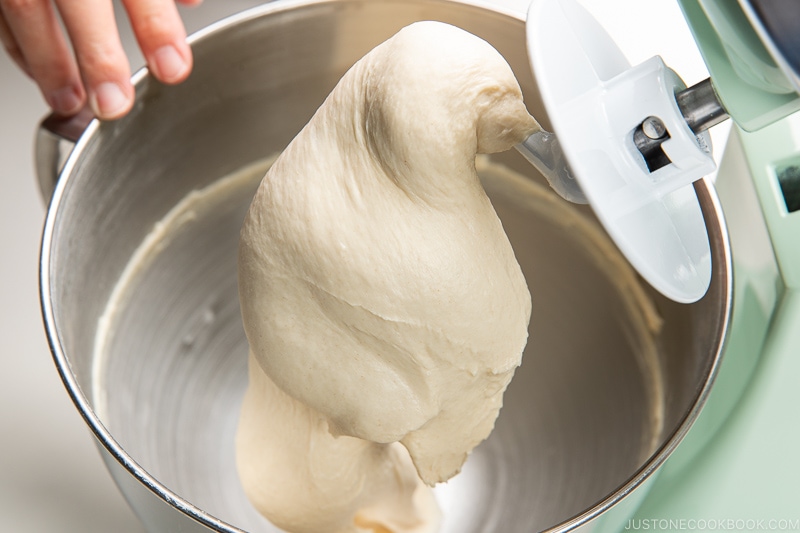
- Knead on Speed 4 for 4 minutes (or 6 minutes for double). While spinning, the dough will stretch and elongate (see the photo below).
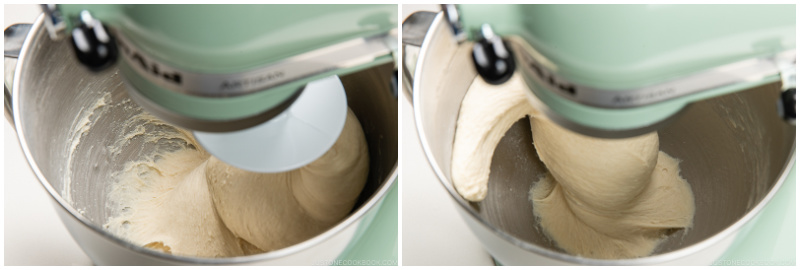
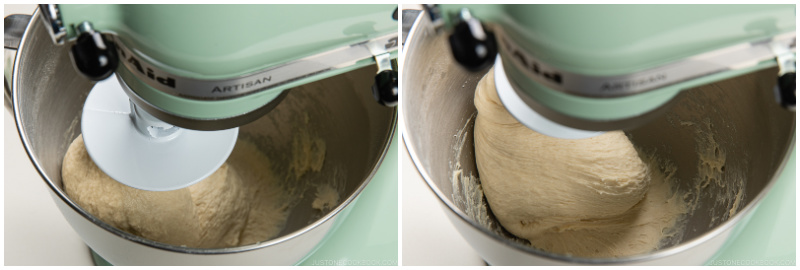
- Stop the mixer and check the dough's texture. It should be smoother, shinier, softer, and thinner when it’s stretched. At this stage, the dough is still attached to the bottom of the mixer bowl.
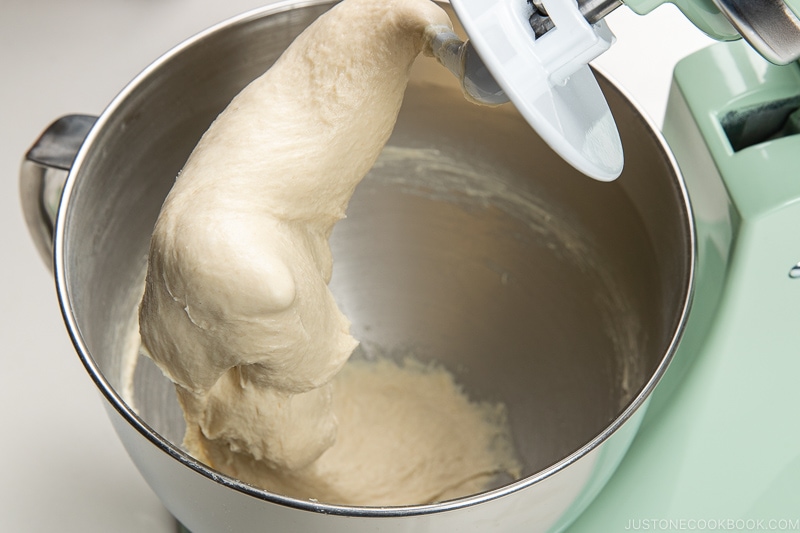
- Knead the dough on Speed 6 for 3 minutes (or 4½ minutes for double). Nami's Tip: From here, you MUST hold down your stand mixer with your hand(s) since the machine will shake and move and may possibly fall off the countertop.
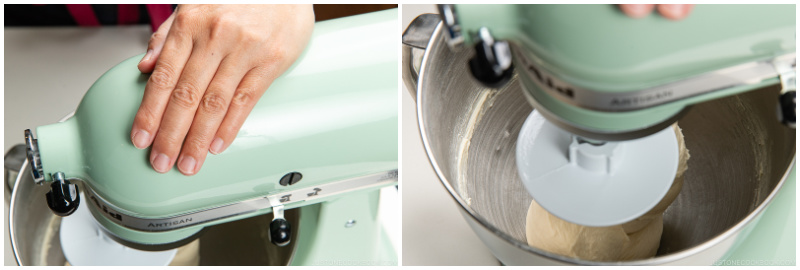
- Vigorous kneading develops the gluten (elasticity)—lengthening and stretching strands in the dough to give shokupan its soft, tender texture.
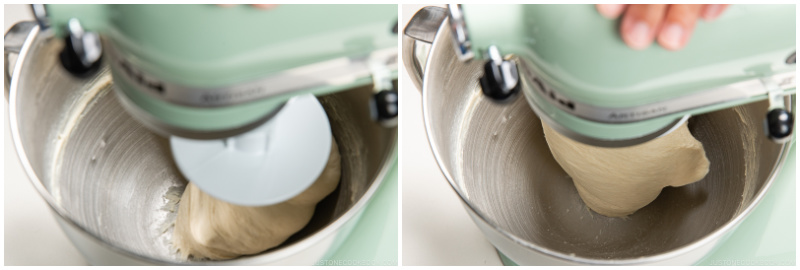
- The dough will start to pull away from the bottom of the bowl and eventually become a solid ball shape.
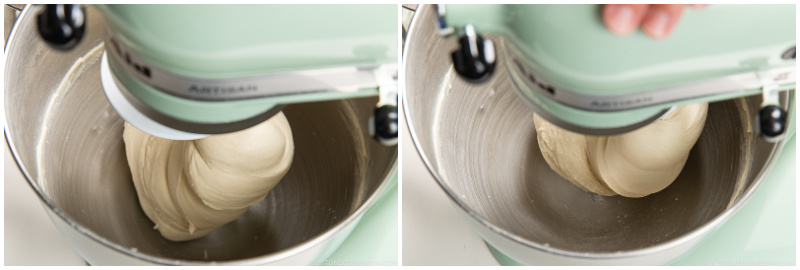
- Gradually reduce the speed, then stop the mixer. The dough should look shiny, silky, soft, and smooth (not sticky). When you lift the dough hook, it should pick up all the dough in one piece, separating easily from the bottom of the bowl. Nami's Tip: If the dough becomes slack and gooey, you‘ve kneaded the dough too long.
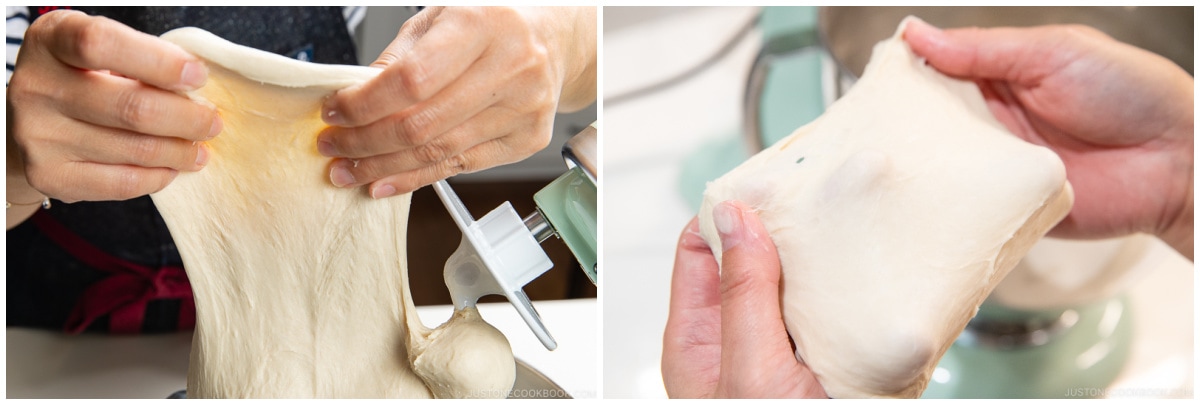
To Use the Windowpane Test
- Pull on a part of the dough or tear off a small piece for windowpane test. Hold it in both hands and gently stretch it into a square with your fingers.If it's elastic, smooth, and shiny—and stretches to a super-thin membrane without tearing so light passes through the center—your dough passes the test.If it tears too easily or won't stretch, knead again on Speed 6 for 1 minute and test again.
To Check the Dough Temperature (optional)
- Insert an instant-read thermometer into the center of the dough. The finished dough temperature should be 78–82ºF (25–28ºC).Nami's Tip: If your dough comes out warmer than target temp, a short 15-minute fridge rest can help, or let it slowly rise for the First Rise (Bulk Fermentation) without oven's Proof setting (100ºF / 38ºC). Yeast should be most active at 82–95ºF (28–35ºC) during the First Rise (Bulk Fermentation).
To Slam and Fold
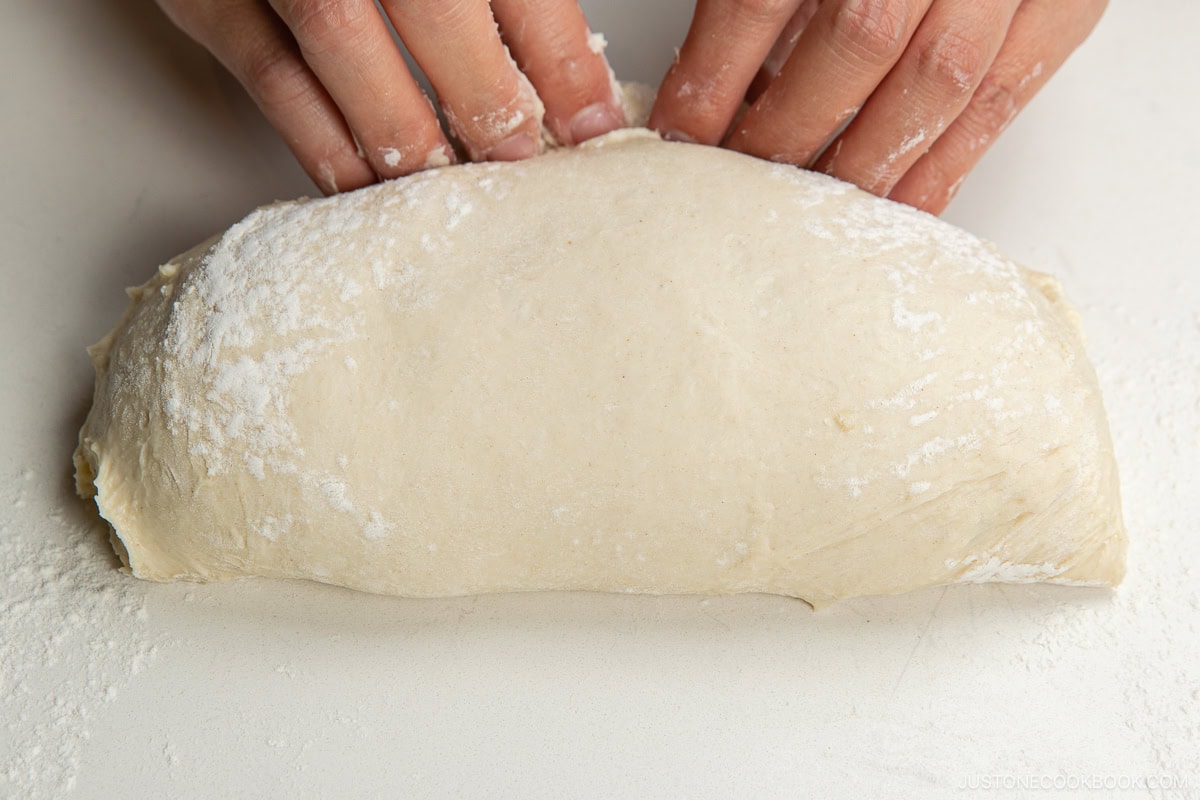
- Lightly dust the work surface and your hands with flour. Scrape the dough from the bowl onto the work surface with the dough scraper. From this point, make sure to keep one smooth surface on your dough ball at all times. My smooth surface is currently on the bottom of the dough.
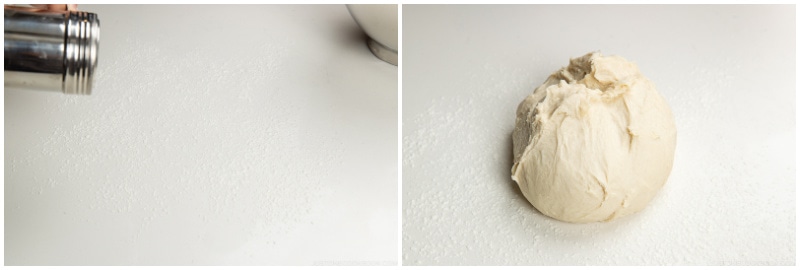
- Scoop up the dough ball, facing the smooth side up. Slam the smooth side onto the work surface. Bang!
- Hold the far edge of the dough and fold it toward you to the near edge, revealing the smooth surface. Pick up the dough with the smooth side up.
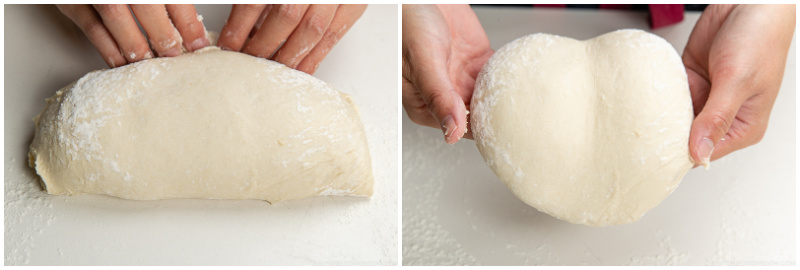
- Slam the smooth surface onto the work surface again. Bang! Hold the far edge of the dough and fold it over to the near edge, revealing the smooth surface.
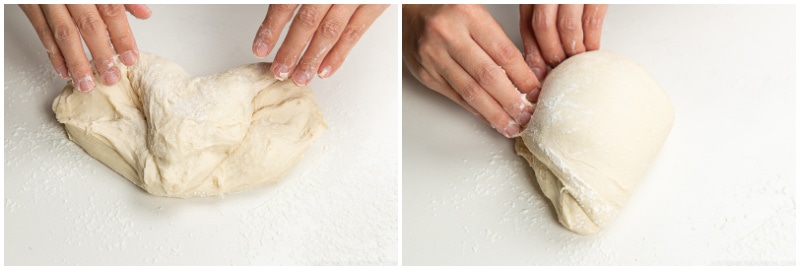
- Pick up the dough with the smooth side up. Repeat this “slam and fold“ process 5 times. After you slam the dough for the final time, leave the dough on the work surface temporarily, and don‘t fold it over yet.
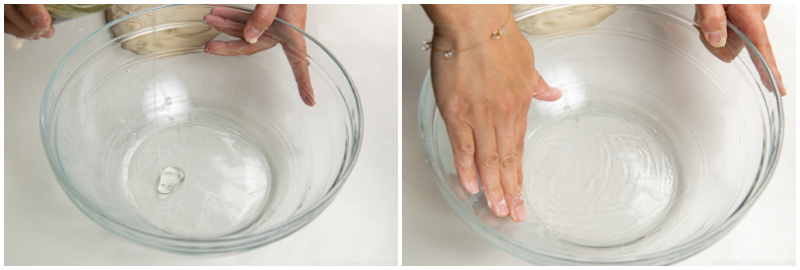
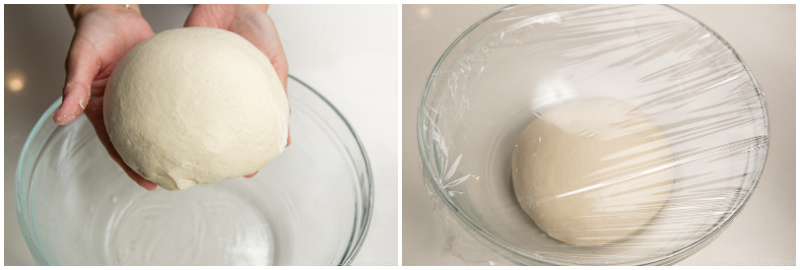
- Thinly coat the reserved bowl with ½ tsp neutral oil. Wipe off any excess oil from the bowl and your fingers with a paper towel.
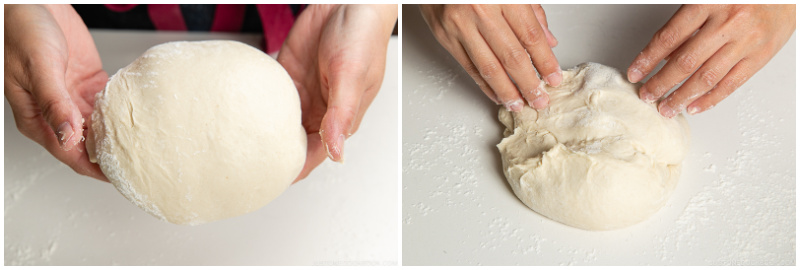
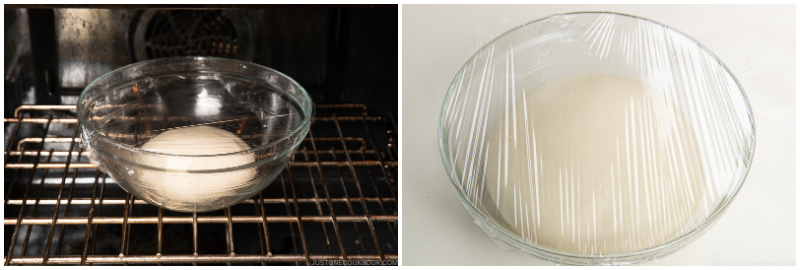
- Fold the dough over one last time. Pick it up and pull the edges from all sides to create a smooth, taut skin. Tuck and pinch the edges underneath to hide them at the bottom. Put the dough ball in the bowl and cover it with plastic.
The First Rise (Bulk Fermentation)
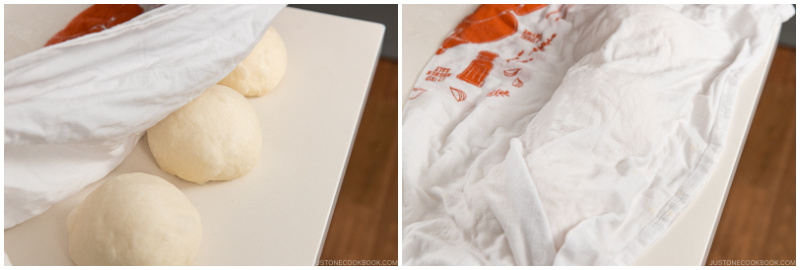
- Place the bowl in a warm environment and let the dough rise for 40–45 minutes or until it triples in size. If you live in a cool climate, it may take longer (1–1½ hours). I use the Proof setting on my oven at 100ºF (38ºC). Nami's Tip: If the top of your dough seems flat, you can gently reshape into a tall dome ball and return it to the warm place.
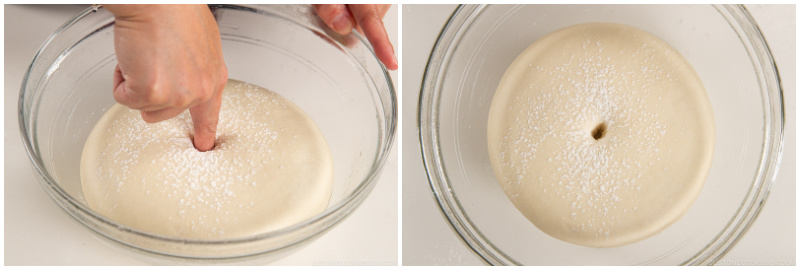
To Use the Finger Test
- Dust some flour on top of the dough and use your index finger to poke the middle of the dough. If the slight indentation remains visible, or indentation slowly springs back, it’s ready. If it springs back immediately, or the dough feels tight and elastic, proof the dough a little longer and test again.
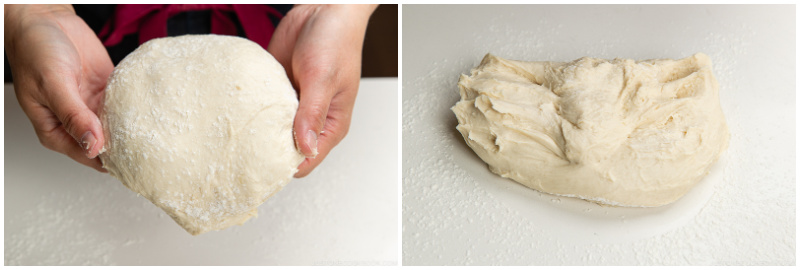
To Deflate the Dough
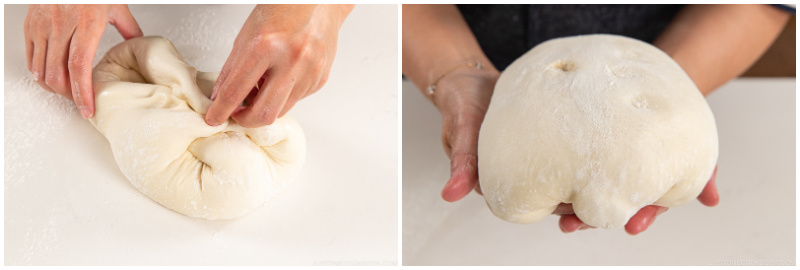
- Invert the bowl to release the dough onto your work surface. Gently press down and deflate the air bubbles in the dough. Nami's Tip: Remember to keep one smooth surface on your dough at all times. My smooth surface is currently on the bottom of the dough.
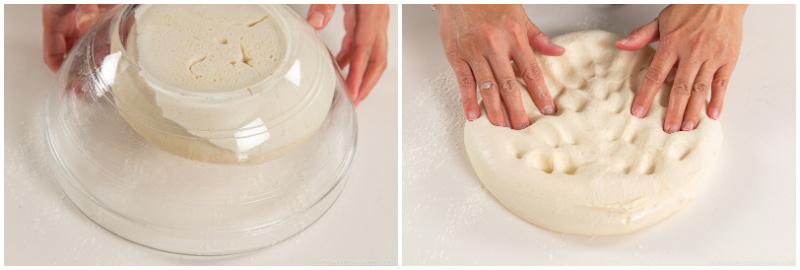
- Collect and press all the edges into the middle, flip the dough, and form a round shape, tucking any loose edges underneath.
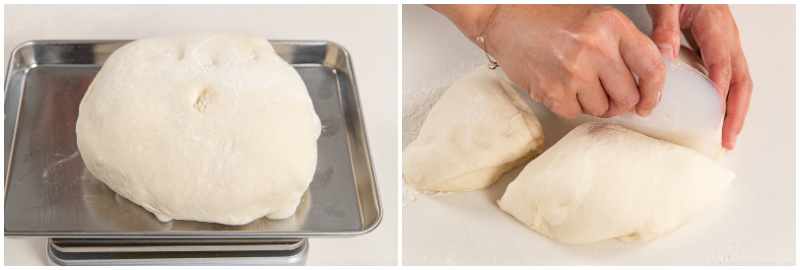
To Divide the Dough
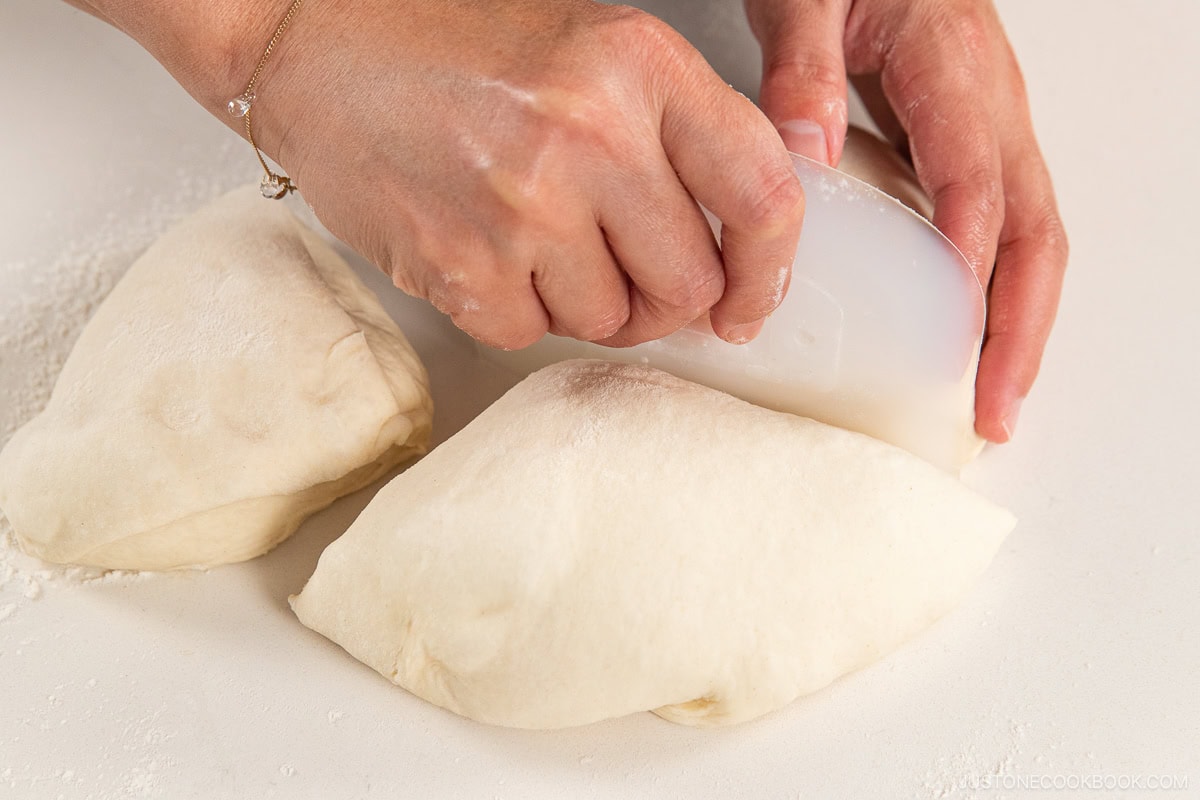
- Using a kitchen scale, weigh the dough. Divide it with the dough scraper into 3 equal pieces for a rectangular shokupan loaf (or 2 equal pieces for a square shokupan loaf).
- If you have a piece that‘s bigger, tear off some dough from the edge, keeping the smooth surface intact, and attach it to the edge of the smaller piece.
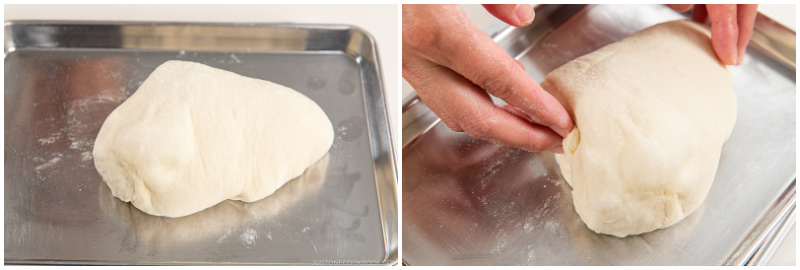
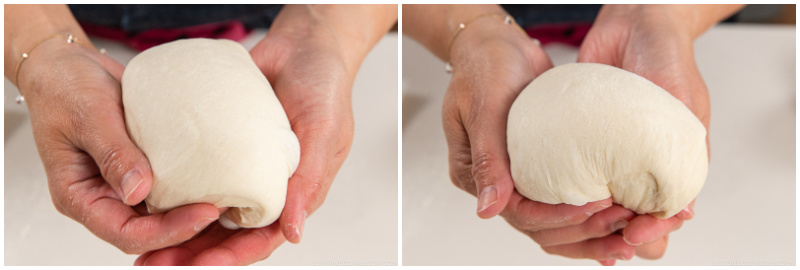
To Shape into Boule (Round Balls)
- Hold the dough with the smooth surface on top. Gently pull the dough down from 4 sides to create a round shape.Place the dough on a non-floured surface. Place both of your hands behind the dough and drag it along the work surface 2 inches (5 cm) toward you (see this video). Rotate the ball a quarter turn and perform another gentle drag toward your body, total 6 times from all sides, to form a ball with a smooth, taut skin. For an even rise, use roughly the same pulling action for each ball, or until the dough is sufficiently taut and uniformly round.Repeat this process for the other pieces. Nami's Tip: The bottom of the dough sticks to the dry surface, creating tension and tightening the ball.
The Bench Rest
- Cover the dough balls with a damp towel and rest them for 15 minutes. The dough will relax and puff slightly—it should feel softer and more pliable when you press it gently.
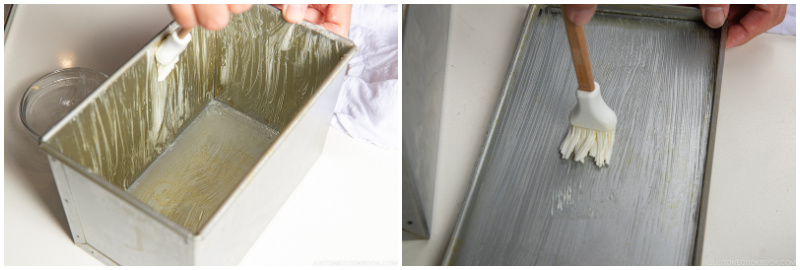
- Meanwhile, grease the shokupan mold and the lid (if you‘re making flat-topped shokupan) with a thin coating of 10 g unsalted butter. Nami's Tip: I like the taste of butter on the crust, but you can use cooking oil spray instead, if you prefer.
To Shape the Dough into a Rectangle
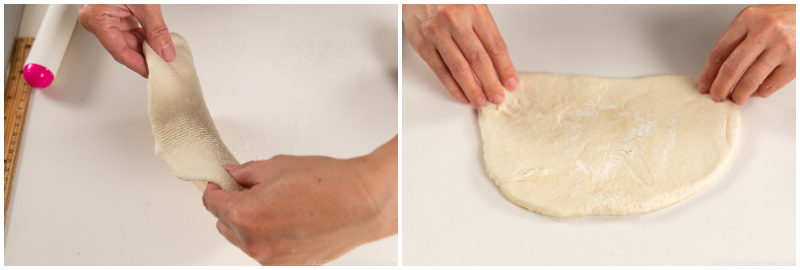
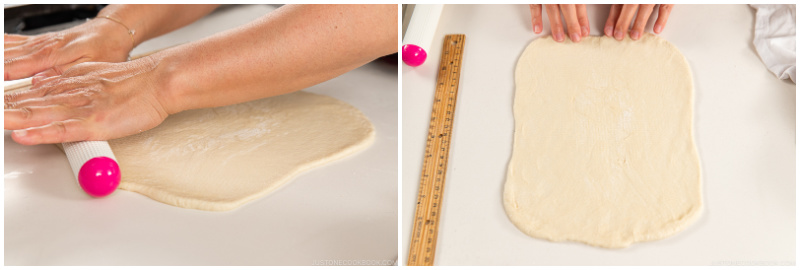
- Take out one dough ball, keeping the rest under the damp towel. Be careful not to pull or stretch the dough.Dust just enough flour so your dough does not stick to the work surface and rolling pin, but not so much that your dough slides around. As you practice, you will know how much flour is just enough. Place the rolling pin in the middle of the dough and press it down.
- Roll the dough away from you all the way to the top edge, releasing the gas inside. Roll back toward you all the way to the bottom edge. Use the heel of your hand to press down any thick edges and pop any air bubbles.Nami's Tip: If the dough slides around, you dusted too much flour. I love using a nonstick rolling pin; you can buy a similar one from Amazon.
- Pick up the dough. Rotate it 90 degrees and flip. It's laid out in front of you in a horizontal oval shape.
- Roll the four corners of the dough to shape the oval into a rectangle, placing the rolling pin in the middle.
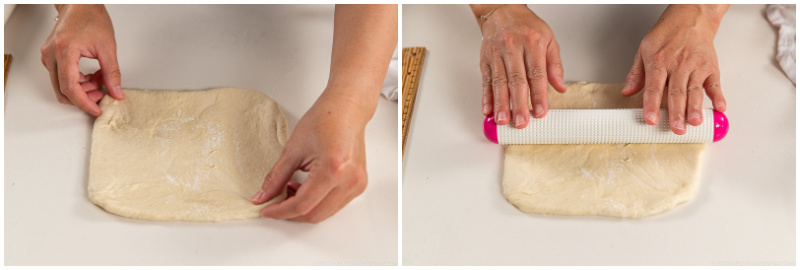
- Roll out the dough away from you and back toward you, pressing through all the edges. Lift the dough from the work surface and let it relax.
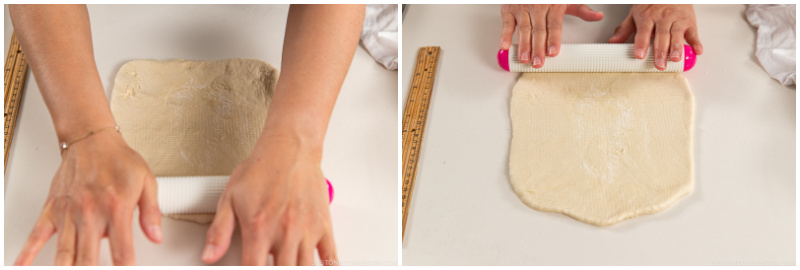
- Roll out the upper two corners so they're less rounded, then the lower two corners. The dough is now a vertical rectangle.
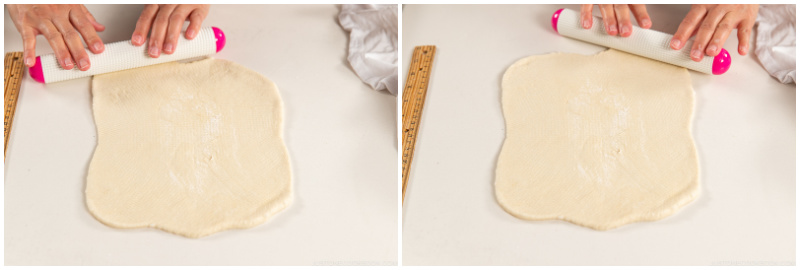
- Roll the dough to an even thickness from edge to center. Lift it from the work surface to release any tension and let it relax.The rectangle should measure roughly 8 x 10 in. (21 x 26 cm).
To Make the Dough Rolls
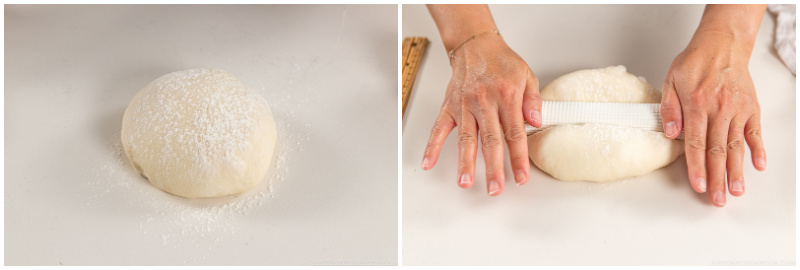
- Fold the dough in thirds lengthwise. Bring the right third of the dough to the left one-third line, lightly and gently pressing the edge down so it stays in place. Fold the left third of the dough, overlapping the right third by two-thirds. The edge of the left third should be slightly past the center line. Nami's Tip: If the dough sticks, detach it gently — do not pull it or the surface will tear.
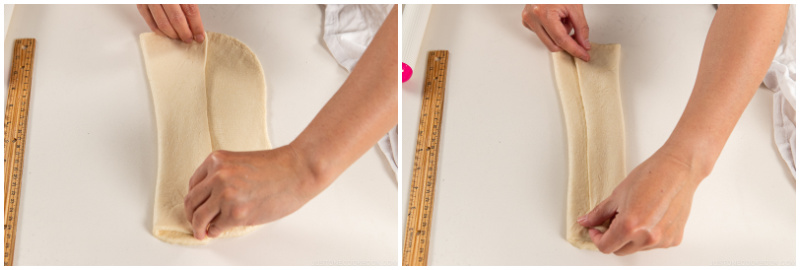
- Press down and seal this edge with your fingers to have an even thickness, from top to bottom. Both the right and left horizontal edges are thicker (puffed up), but the overlapped edges near the center even out the thickness of the dough.
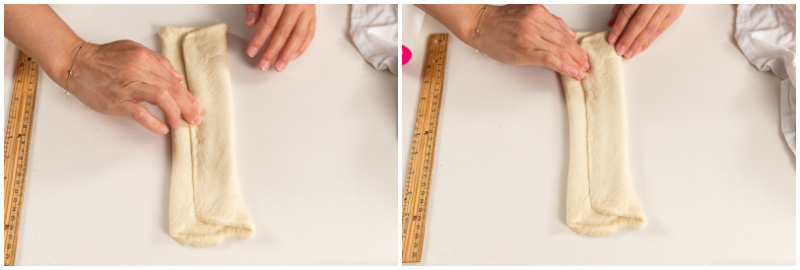
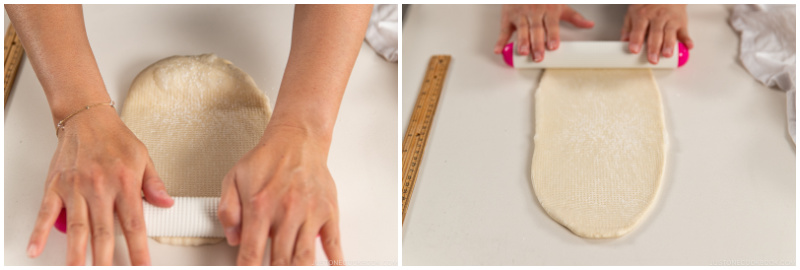
- Fold down the two upper corners toward the center line, so the top now looks like a triangle tip. Tuck the tip down toward you, making sure it is right in the middle.
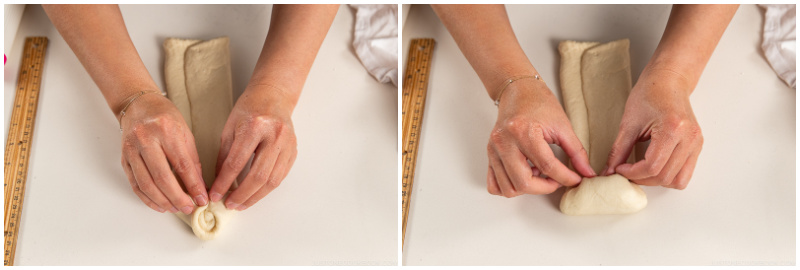
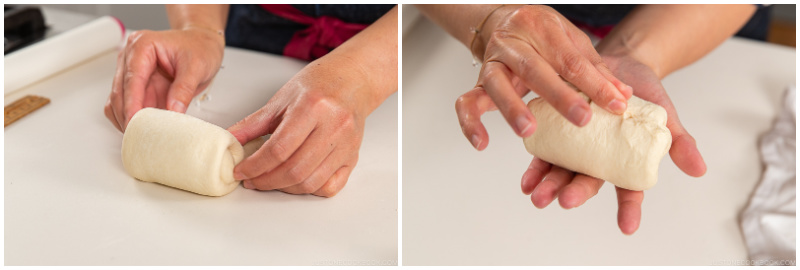
- Start rolling the dough slowly toward you, gently pulling the dough downward as you roll to create a smooth and taut skin, but don‘t roll too tightly. Nami's Tip: Use the same amount of tension when making all of your dough rolls. This helps them rise at the same rate during the final proof and for an ideal round-topped shokupan shape.
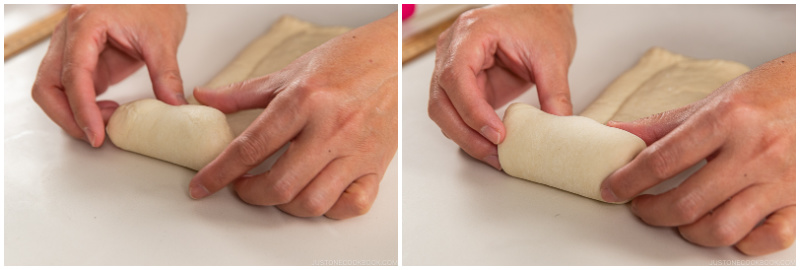
- Pinch the dough edge to seal. Place the rolled-up dough under the damp towel, seam side down, and repeat rolling up the rest of the dough balls.Nami's Tip: Remember which piece of dough you rolled last.
To Fill the Shokupan Mold
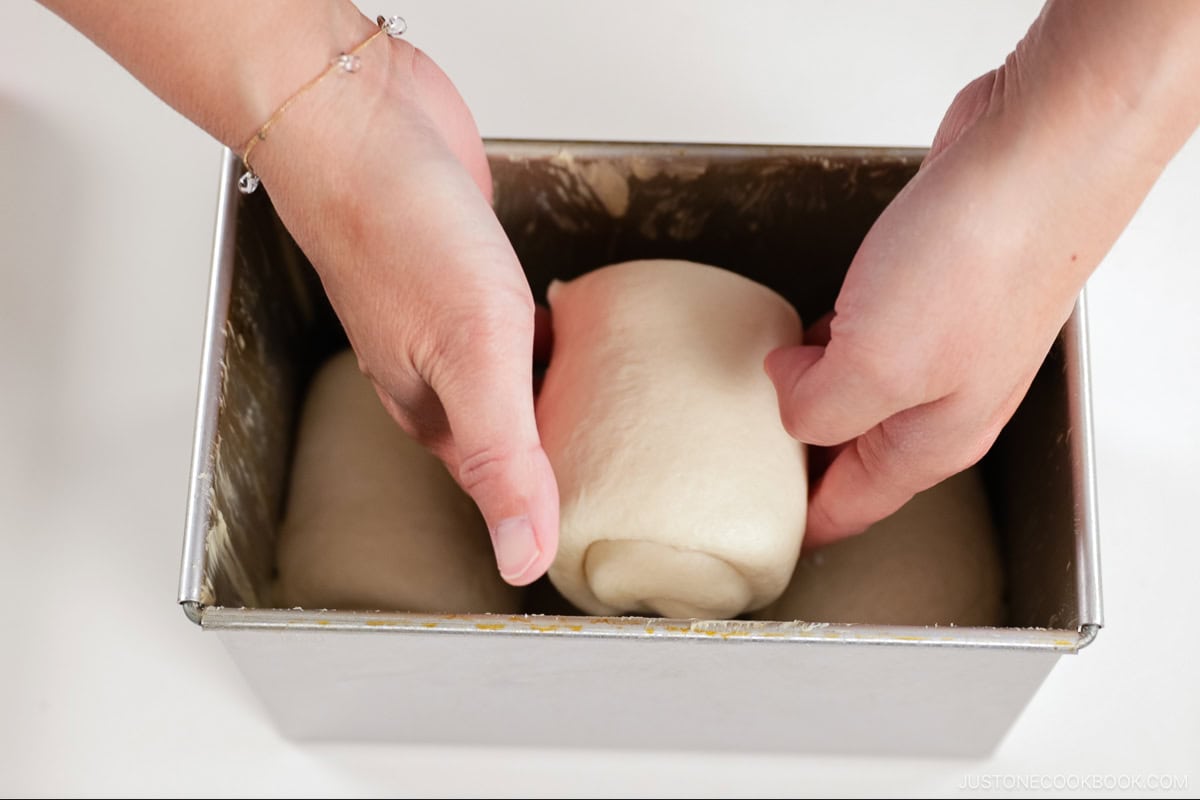
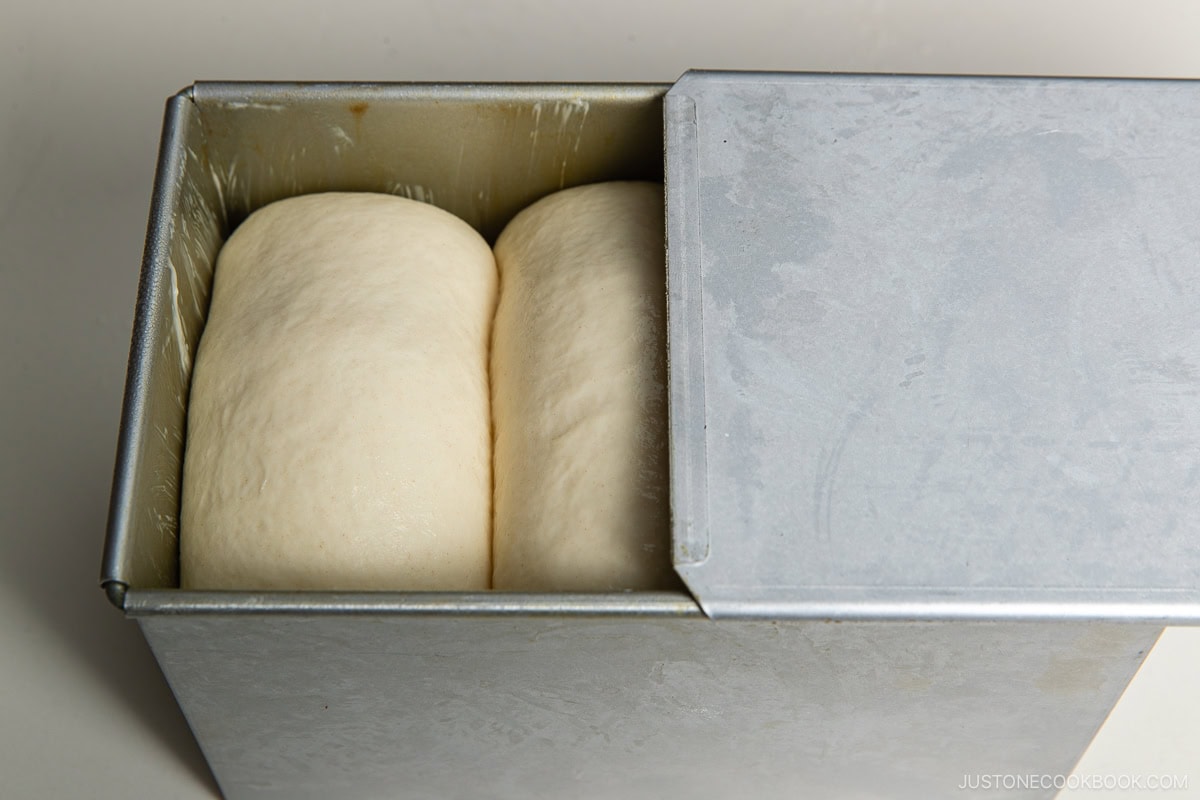
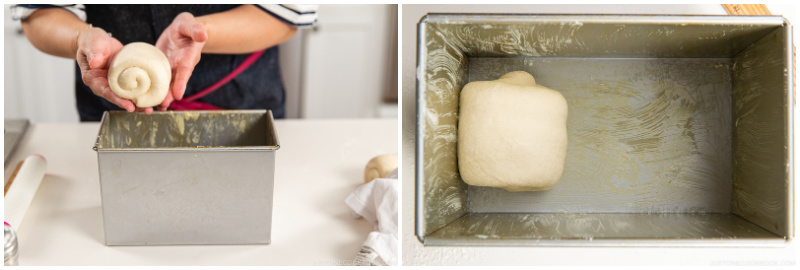
- For the rectangular shokupan mold, place the first dough roll on one side of the mold, seam side down, with the swirl facing toward the middle of the mold and the roll's side touching the mold's wall.
- Place the second dough roll on the opposite end of the shokupan mold, seam side down, with the swirl facing toward the middle of the mold and the roll's side touching the mold's wall.
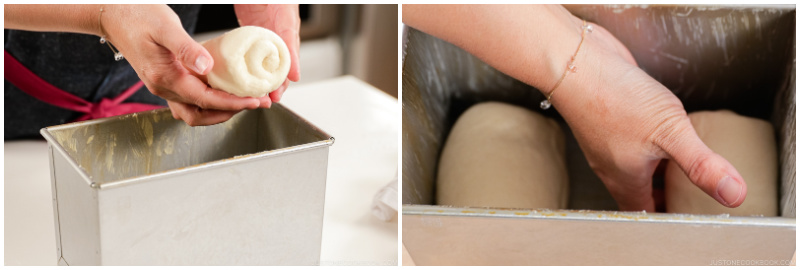
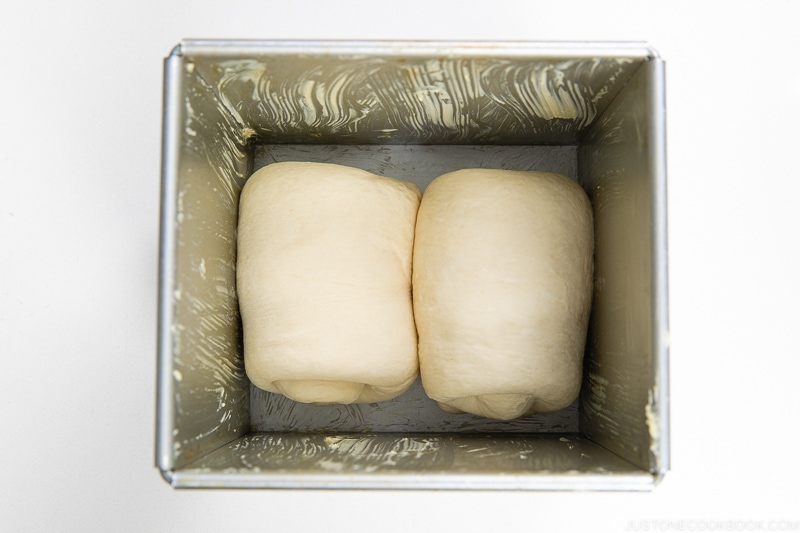
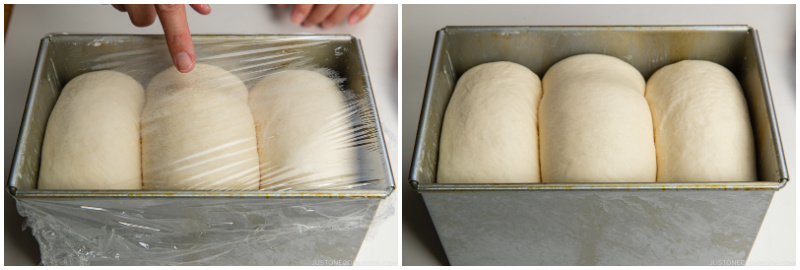
- Place the last piece of dough you rolled between the first two, seam side down. The direction of the swirl can go either way. Gently press the tops of the dough rolls to make them the same height so they rise evenly.
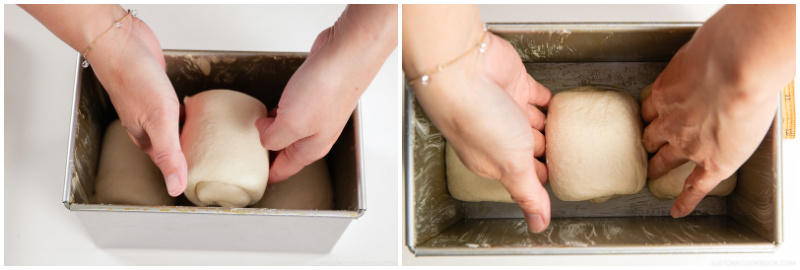
- For the square mold, the two rolls should go in just like the first two rolls for the rectangular mold, swirled toward the center.
The Final Rise (Proofing)
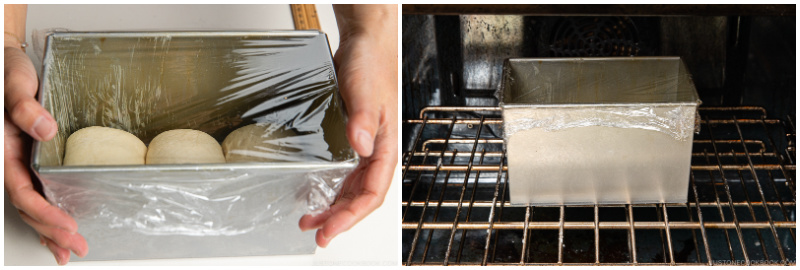
- Cover the shokupan mold with plastic and place in a warm environment for 1 hour or until the dough has risen to 80–90% of the height of the mold. Nami's Tip: I set the timer for 30 minutes. For the first half an hour, I use the Proof mode of my oven. For the rest of time, I transfer the shokupan mold to a warm area of my house while I preheat the oven for baking.
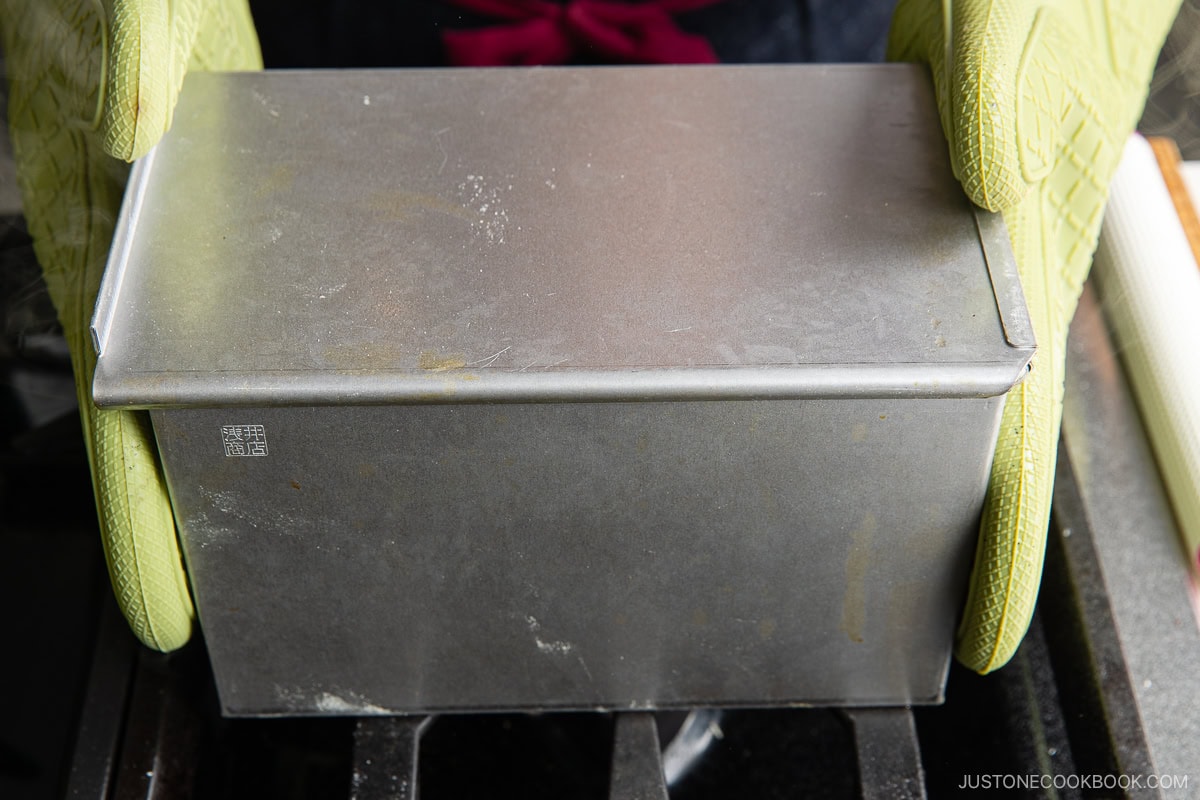
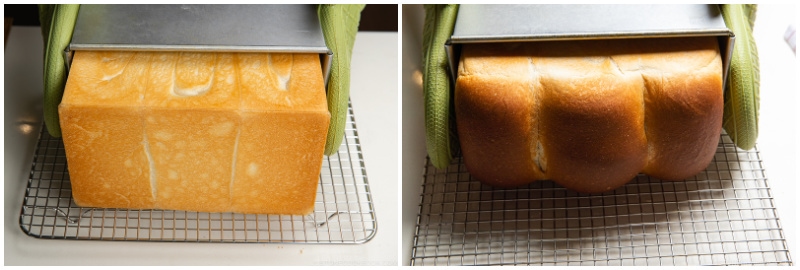
- To make a flat-topped shokupan (角型食パン), let the dough rise to 75–80% of the height of the mold. Remove the plastic and close the lid. If your proof was a bit too long and you exceed 80%, change to a round-topped shokupan. Nami's Tip: Don‘t force the lid closed over the dough. Even if the lid closes, the dough will continue to rise in the oven and the lid will get stuck.
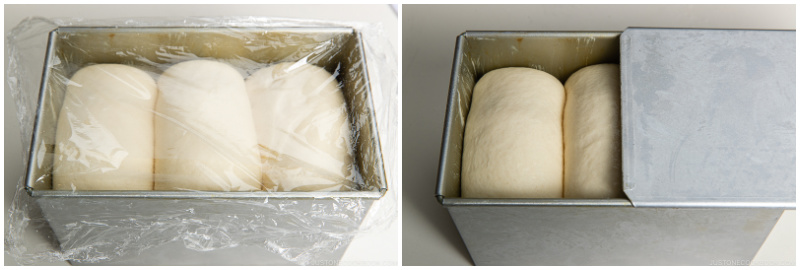
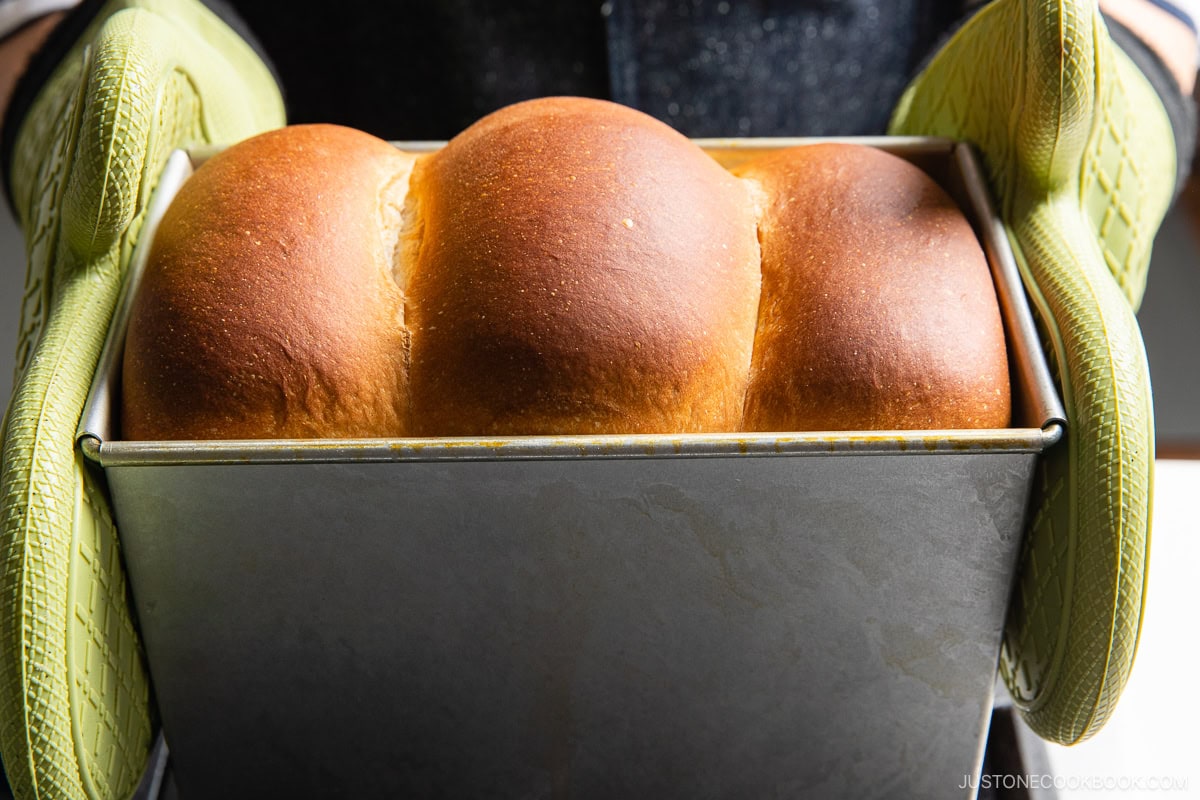
- To make a round-topped shokupan (山型食パン), let the dough rise to 85–90% of the height of the mold. When the highest point of the dough touches the plastic wrap, it’s ready to bake. Remove the plastic and spritz the surface of the dough with water. Note: The volume for each shokupan mold is very different. My 90% may not be the same as yours if we use a different mold.
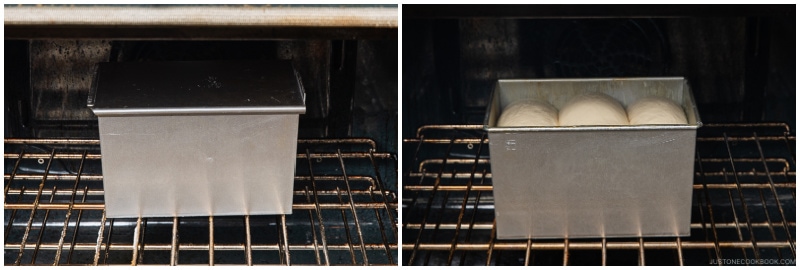
To Preheat the Oven
- Position the rack so the top edge of your shokupan mold sits 6–7 inches (15–18 cm) from the top heating element. Keep at least 6 inches of clearance—any less and the top browns too fast.Preheat the oven to 425ºF (220ºC). For a convection oven, reduce the baking temperature by 25ºF (15ºC).
To Bake the Shokupan
- For the flat-topped shokupan, lower the oven temperature to 410ºF (210ºC) and bake for 25–30 minutes (in my oven, it’s 28 minutes). For the round-topped shokupan, lower the oven temperature to 385ºF (195ºC) and bake for 30 minutes. For a convection oven, reduce the baking temperature by 25ºF (15ºC). For a square loaf, the baking temperature and time should be the same or slightly less.
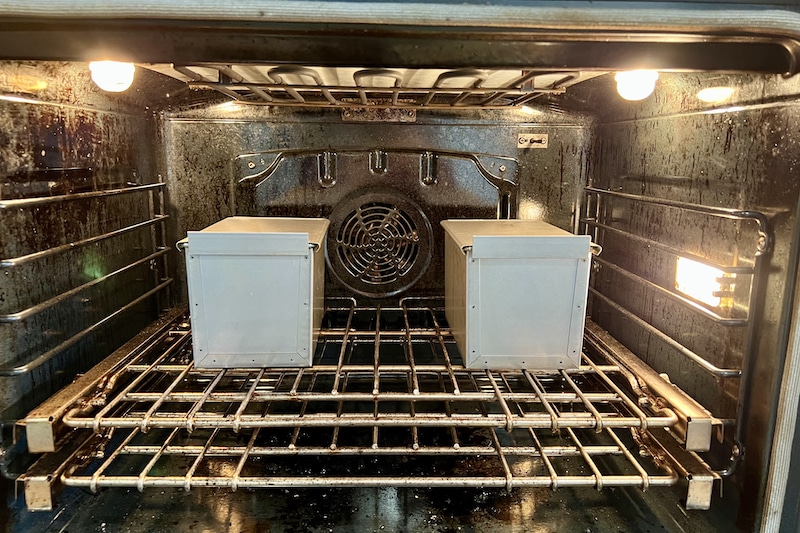
- If you bake two loaves at the same time, bake 1–2 minutes longer and make sure to have plenty of space between the molds so the heat can circulate. Nami's Tip: If the loaf comes out lighter in color, you may also want to increase the oven temperature by 5ºF (2–3ºC) next time. To bake both the flat-topped and the round-topped shokupan together, bake at 400ºF (200ºC).
- As soon as it's out of the oven, drop the mold firmly 1–2 times on the work surface (I use a stovetop grate) to release the steam and prevent the loaf from shrinking. Tip: If steam remains trapped inside, the bread's structure weakens and the sides will wilt and bend.
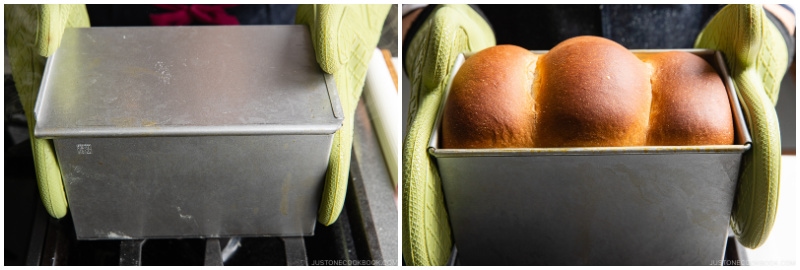
- For the flat-topped shokupan, open the lid carefully. If you struggle to remove the lid, close it and drop the shokupan mold on the work surface one more time. If you still can’t open it, note that you need to stop the second proof earlier next time. Maybe instead of 80%, try 75%.
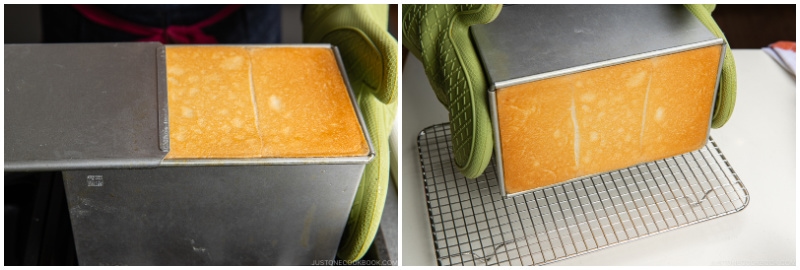
- Hold the mold on its side over the wire rack and thrust it forward firmly a few times until the loaf drops out. Let the shokupan cool completely on the wire rack; it may take 2–3 hours. Do not cut or open the loaf while it’s hot—the steam will escape and the bread will lose moisture. Nami's Tip: After baking, do not wash or soak your Japanese shokupan mold. Simply wipe it off with a paper towel and store it completely dry to prevent rust.
To Serve
- Slice the cooled bread and toast it to enjoy with butter and jam/honey or use untoasted slices for Japanese-style sandwiches.
To Store
- If you plan to eat the shokupan within 1 to 2 days, put the whole loaf, completely cooled, in a bag (I use clear plastic bags) and slice as needed. If you don‘t plan to eat the shokupan within 2 days, slice and freeze the rest. It's freshest within the first two weeks, but you can freeze it for up to a month.
Notes
-
Rectangular Japanese Loaf Pan or square Japanese Loaf Pan
- Wire rack
- KitchenAid Classic Series: Do not double the recipe—the 275-watt motor isn’t strong enough.
- KitchenAid Professional Series with a spiral hook: You must double the rectangular loaf recipe, or there won’t be enough dough to engage the hook. With twice the dough, knead 1.5 times longer at each step.
- Using a different brand? Follow my steps to achieve a dough that passes the windowpane test.
Nutrition
Did you make this recipe?
Tag @justonecookbook on Instagram so we can see your delicious creation!
Editor’s Note: This post was originally published on June 1, 2022. It was republished with more helpful information on December 20, 2024.