The reverse sear steak starts off slow and steady on the Traeger and finishes with a good sear on the grill. This technique yields an evenly cooked and tender piece of meat, a beautifully browned crust, and the most inviting smoky aroma!
For many years, I’ve been preparing steaks with different methods over the charcoal grill, gas grill, oven, stovetop, and even sous vide. But when I discovered the reverse sear steak on a Traeger smoker, its become my new favorite way of cooking steaks. The results are certainly one of the best steaks I’ve made and tasted of my life.
It’s not an exaggeration when I say it’s the most reliable way to get tender, flavorful, and perfectly cooked steak every single time. Curious to learn more? I’ll show you how to reverse sear steaks on a Traeger and the science behind how to craft an amazing piece of steak.
What is The Reverse Sear Method?
The reverse sear method of cooking meat and steak has been gaining popularity among steak lovers and food geeks in recent years. The concept is simple. Instead of searing the steak first in a hot grill or pan, the steak is cooked at a low temperature until the entire piece of the meat reaches the optimal doneness. Then, once it’s cooked through, the meat is seared at the very end to achieve a crisp crust.
As the name suggests, it basically changes the sequence of the traditional steak-cooking formula by searing the steak last.
For those of you who are familiar with sous vide which is all about precision cooking, you might be wondering the differences between the two. How is reverse searing better? Can it cook steaks evenly from edge to edge just as sous vide? Does it deliver steaks with the same desirable tender perfection? The answer is YES. That’s exactly what the reverse sear method does.

With reverse sear on the Traeger, and you can even cook each piece of meat to various degrees of doneness compared to sous vide. This is a great benefit when you’re cooking for a group of people who enjoy their steaks differently.
Benefits of Reverse Sear:
- Even cooking – By cooking the steaks at a lower temperature, it offers consistent control and prevents overcooking. No more gray bands on the outer edge. It is especially important for thick-cut steaks.
- Perfect browning – The method removes the moisture of the meat surface so you can achieve perfect browning at the final step.
- Tender & juicy meat – The low temperature and gradual heating help to break down any tough muscle protein and activates enzymes that tenderize the steak to the best effect.
It is an excellent technique for home cooks because you can work with the equipment you’re likely to have:
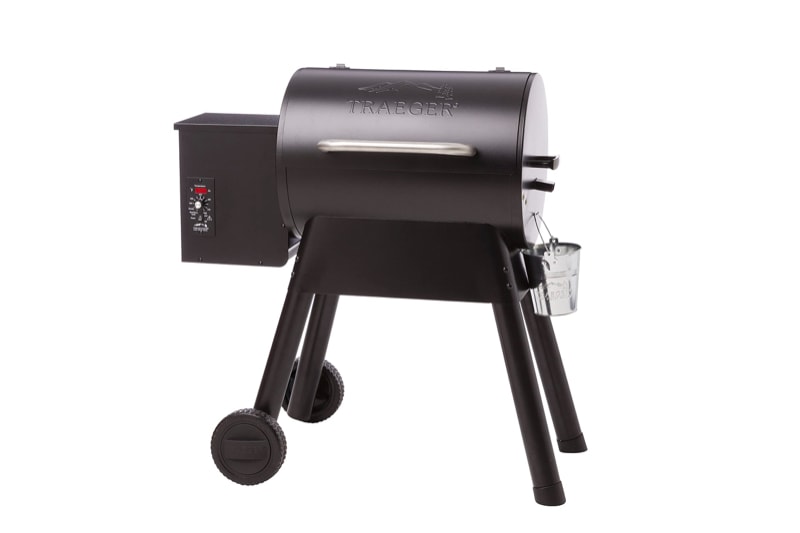
1. Traeger Smoker
When the weather permits, Traeger smoker is definitely our preferred method to cook reverse sear steaks. You can experiment with different wood pellets like oak, hickory, mesquite, or cherry to create unique flavors each time. While Traeger advertises itself as capable of searing, I find the results are much more attractive when you finish the steak off on a grill or stovetop (our Traeger Jr. model doesn’t get as hot as the high-end ones).
2. Oven
The oven is a popular and easy way to reverse sear your steak. Set it to 200 F and slowly bring the temperature of the steaks up to your desired doneness. Finally, give the meat a good sear in a hot cast-iron skillet. It doesn’t give you the delicious smoky flavor like a Traeger, but you can cook your meat with this method year-round.
3. Charcoal Grill
Reverse sear can be done over a charcoal grill, but it is a challenge to keep it at a consistent temperature of 200F. You’ll also need a longer time to get the fire started and close monitoring once the meat is on the grill. I’ll leave this to the experienced cook who doesn’t mind staying close to the grill the whole time.
Why Reverse Sear Steak on a Traeger
Here are a few reasons why I recommend reverse-searing steaks on a Traeger:
- The mouthwatering smoky aroma from the wood pellets is unparalleled
- Its ability to cook many steaks evenly at once, as many steaks as your Traeger can hold
- Easy cleanup
- More tolerance and less likely to under or overcook
Compared to traditional cooking methods, reverse searing does take some time, regardless of which equipment you use.
Recommended Books for Steak Lovers
Before we jump to the recipe, there are two cookbooks that I recommend:
First, Franklin Steak cookbook. Not so much a recipe book, but rather about the love affair with beef and steaks. Aaron Franklin not only teaches you how to buy steaks, but he goes through stories of beef, various cuts, different cooking methods, types of wood, and if you are up for it, how to fabricate his hybrid hibachi grill. A very interesting read for anyone who grills.
The second book is Kenji Lopez-alt’s The Food Lab. It’s one of my favorite books to read for fun and if you are curious about the science of cooking, you’ll be fascinated by the broad range of topics he covers. For each recipe, he backs them up with, you guessed it – science. In the steaks section, he covers when to season the steaks and why, the various tests he did for resting the steak after cooking, dry-age steak, and many recipes to go with various cuts of beef.
I love these books because they explain the whys and the madness the authors go about debunking steak prepping and cooking myths. Now onto the steak prep.
Tips on How to Reverse Sear a Steak on a Traeger
- Choosing and buying the right steak
- Seasoning the steak
- Cooking the steak on Traeger
- Temperature to pull the steak
- Resting the steak
- Searing and slicing
Choosing and Buying the Steak
I’ve tried both bone and boneless cuts in the Traeger and they both cook well. The boneless cuts cook more evenly but the bone-cut steak has more flavor, so you can’t go wrong either way. In the US, the grades of beef go from the most marbled is prime, choice, select, and standard. However, don’t buy beef just based on their grades. Ask your local butchers and trust their recommendations for the best steaks.
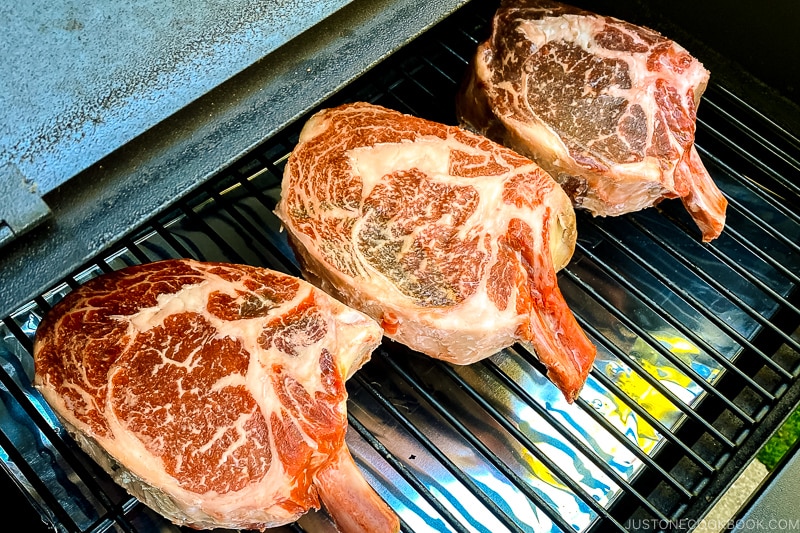
In our area, we are able to buy certain Australian or New Zealand beef that’s roughly the same price as USDA Prime and those are our preferred cut. Once again, it’s a personal choice.
If you are not able to find a good butcher nearby, we recommend Crowd Cow (save $25 at Crowd Cow with the link) and Creekstone Farm. We’ve purchased excellent steaks from these two online shops when it was inconvenient to go to the stores.
I do want to mention that reverse searing doesn’t work with Japanese wagyu steak. You’ll lose all the good fat. Please read this post on how to cook wagyu at home.
Seasoning the Steak
It is both an art and a science when it comes to seasoning steaks. Most of the time we only season the steak with salt. And that’s what some of the best steak houses would do. When you are cooking with quality meat, you’ll need nothing else but the simplest seasoning. Salt alone can bring out the sweetness and the amazing flavors within the meat itself.
When to Salt the Steak
For optimal flavor and texture, you want to salt the steak and let it season for at least 24 hours. This is called dry brining, and the goal is to retain as much moisture as possible and allow the salt enough time to penetrate the entire piece of meat. As a result, you get a well-seasoned steak with the juiciest interior.
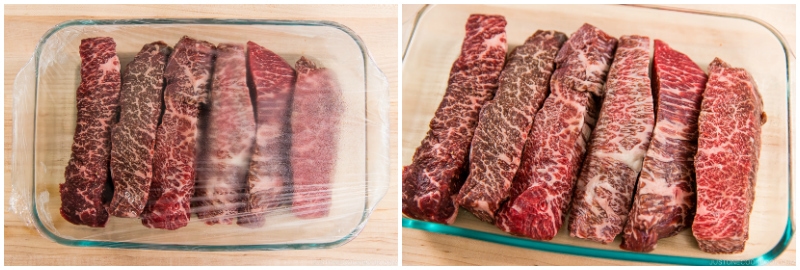
Sprinkle both sides of the steak generously with kosher salt and just let it sit in the fridge covered. We seasoned ours for 48 hours.
Should the Steak be at Room Temperature before cooking?
Short answer, no. It simply takes too long to warm a steak up to room temperature. Secondly, it doesn’t impact the cooking time straight from the fridge or at room temp.
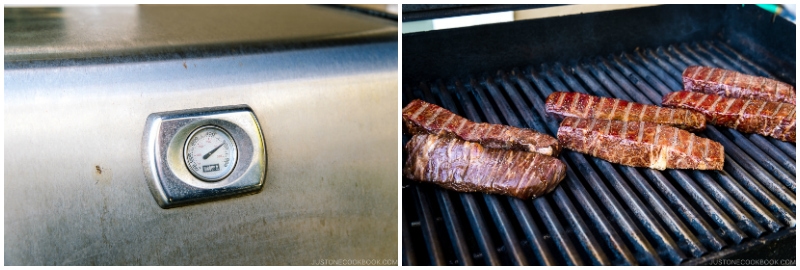
Cooking the Steak on the Traeger
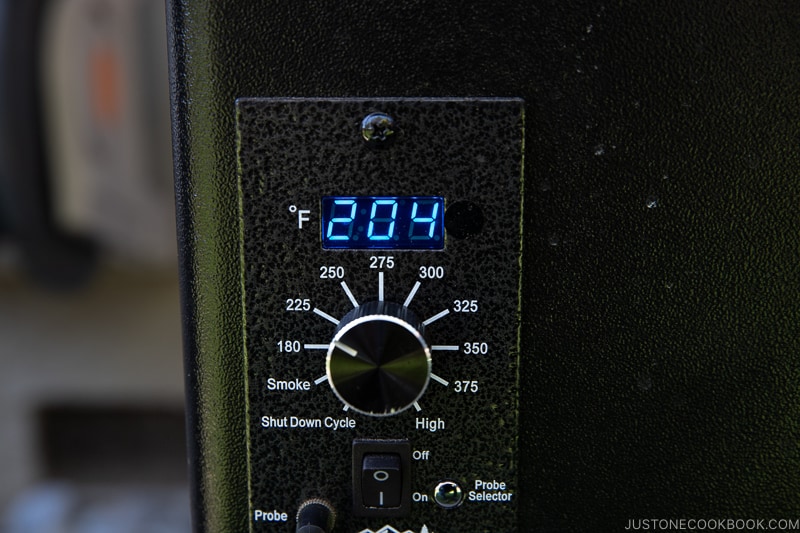
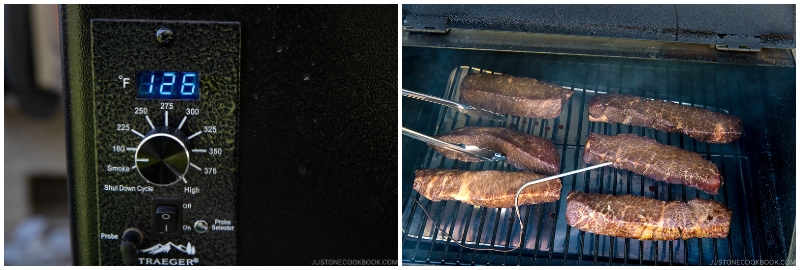
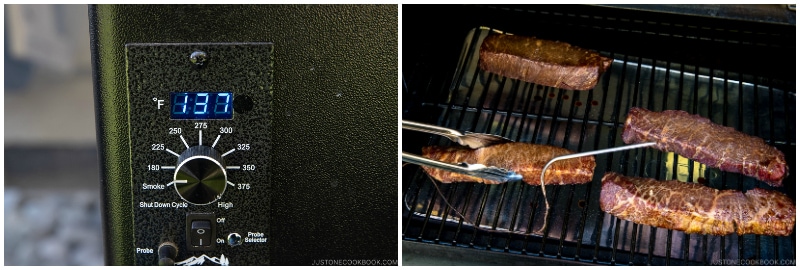
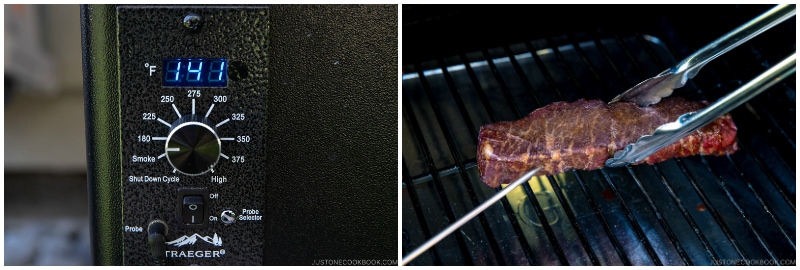
Preheat the Traeger to ~200F, and when it’s ready, place the steaks on the grate, and it’s pretty much hands-off after. Occasionally monitor the temperature probe and don’t let the Traeger get too hot. It’s better to cook longer at a lower temperature than too high. Anytime it goes above 210F, I’ll lower the temperature to make sure it’s not cooking too fast.
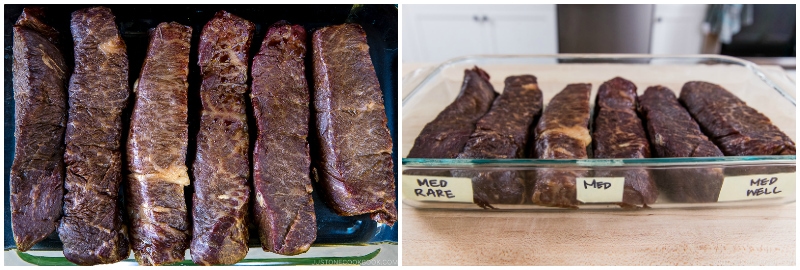
The steaks will continue to increase in temperature while it rests, so take them out of the Traeger 10 degrees shy of your target temperature. You want them to be slightly underdone as the steaks will be heated up again for the finishing sear.
Below are the suggested temperatures for different levels of doneness:
- Rare = 120F
- Medium Rare = 125F
- Medium = 135F
- Medium Well = 140F
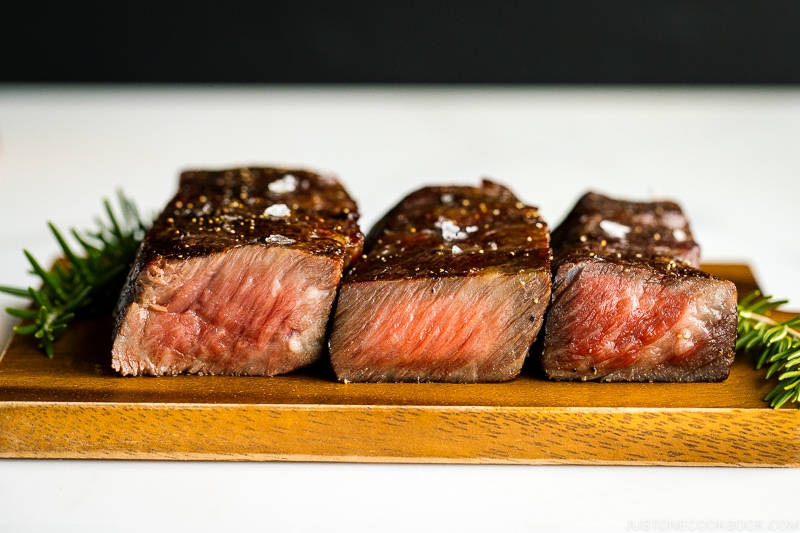
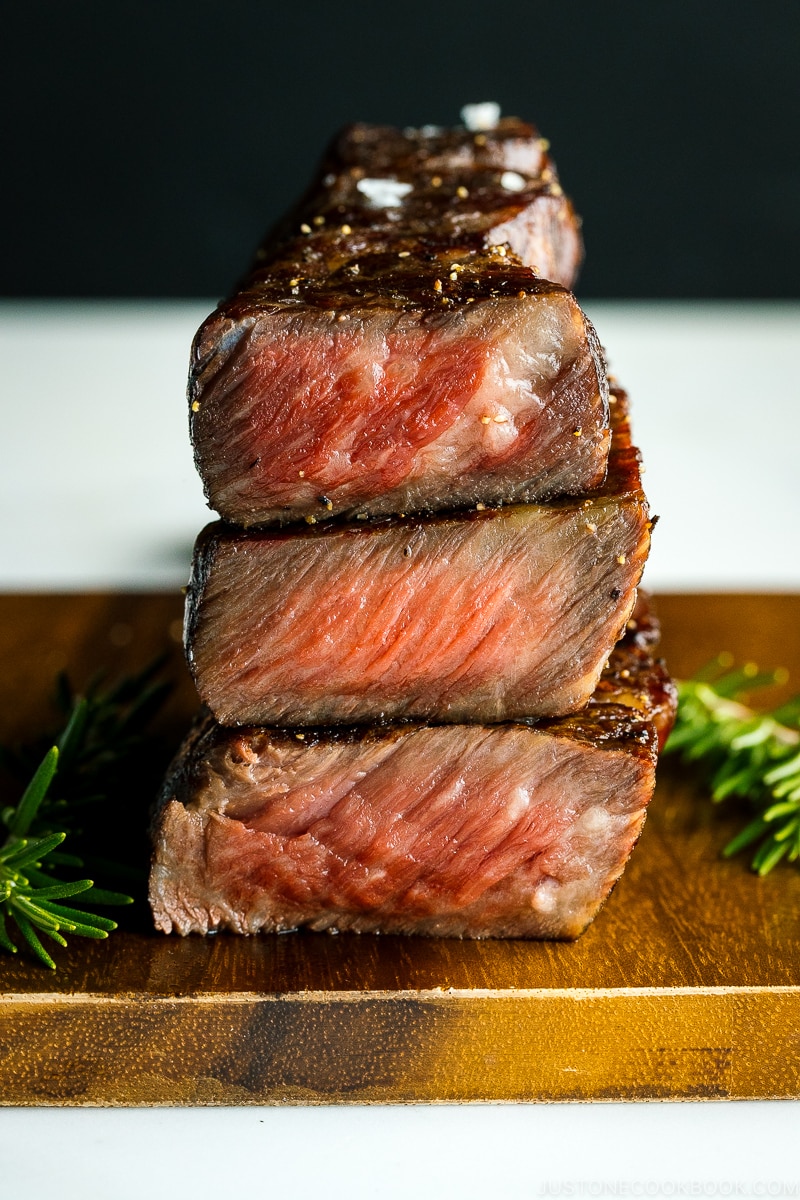
I like to pull our steaks around 130F as we prefer a finish somewhere between medium and medium-rare.
Resting the Steak
What does resting the steak do? It makes your steak juicier. When a steak is heated, the structure of the muscle changes and it expels liquid out.
When you allow the meat to rest, the muscle relaxes and sucks the liquid back in. Other solids and fat cooling down also help stops the juices from flowing out. If you cut a steak right after it is done grilling, it will lose most of its juice. It may also get too hot and overcook if you try to sear the steak immediately since it’s been grilling for at least 30 min.
Let the steaks rest for at least one hour or even a couple of hours. This is great when you are cooking for guests as you can pre-cook all the steaks ahead of time, and quickly finish them on the grill when it’s closer to mealtime.
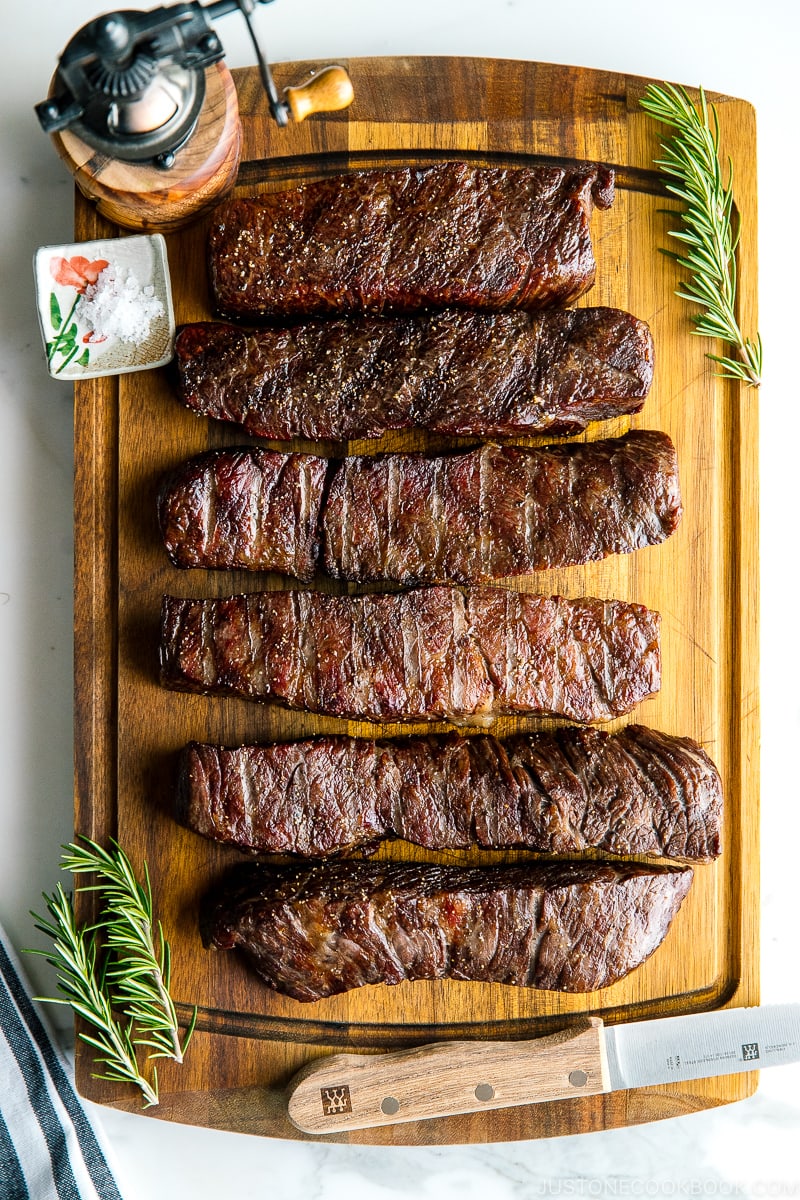
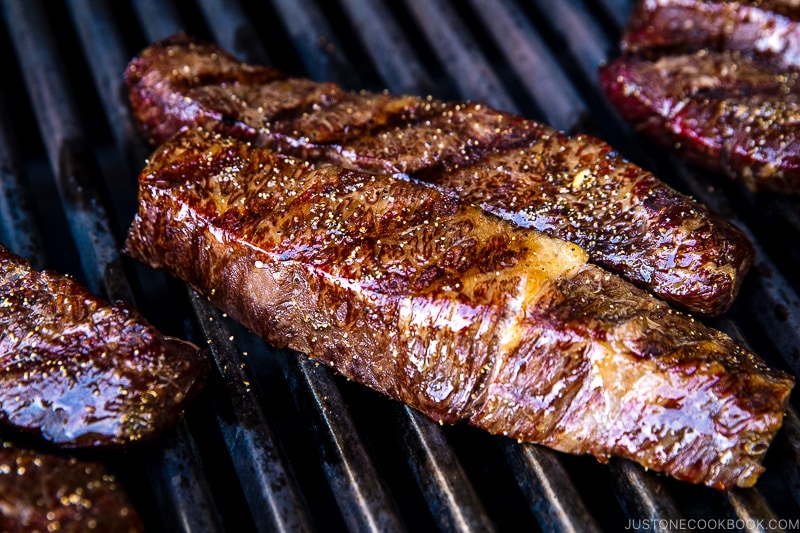
Searing the Steak
When you’re about to serve, sear each steak for 1-2 min per side on the grill at high heat or in a cast iron pan on the cooktop. The high temp warms the steaks up and creates a Maillard reaction, giving the meat a nice crust and maximizing its flavors.
Serving the Steak
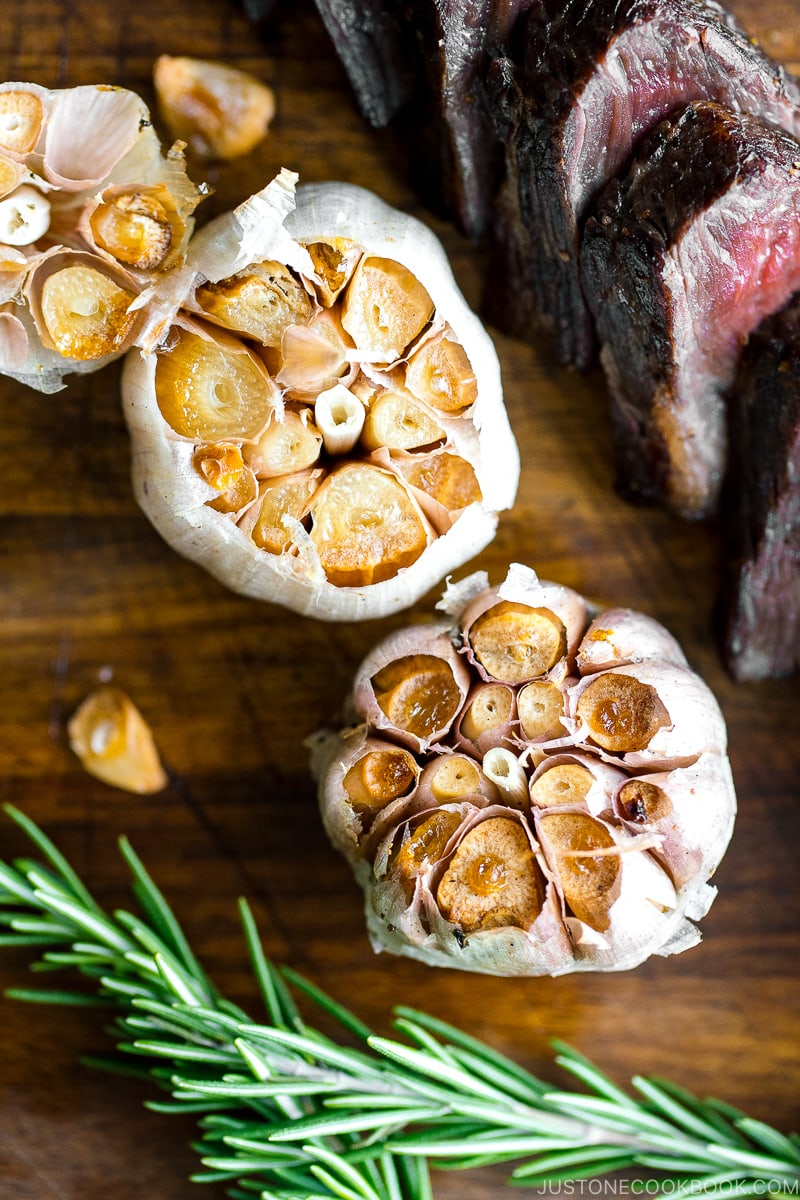
Slice against the grain and relish the amazing taste of steak. My family loves our steaks with just a bit of fresh cracked pepper and flaked salt, but from time to time we would enjoy it with various steak sauce or even the classic A1. For this recipe, I paired it with super easy smoked garlic and it was heavenly.
I hope you get to give reverse searing a try. If you love baby back ribs, don’t miss our very popular Traeger baby back recipe.
If you have any experience cooking with this method on a Traeger, I’d love to hear from you in the comments below!
Smoker Recipes on Just One Cookbook
- Traeger Baby Back Ribs Inspired by Franklin BBQ
- Smoked Miso Butter Turkey Breast on Traeger
- Smoked Wagyu Brisket
Wish to learn more about Japanese cooking? Sign up for our free newsletter to receive cooking tips & recipe updates! And stay in touch with me on Facebook,
Reverse Sear Steak on Traeger with Smoked Garlic
Ingredients
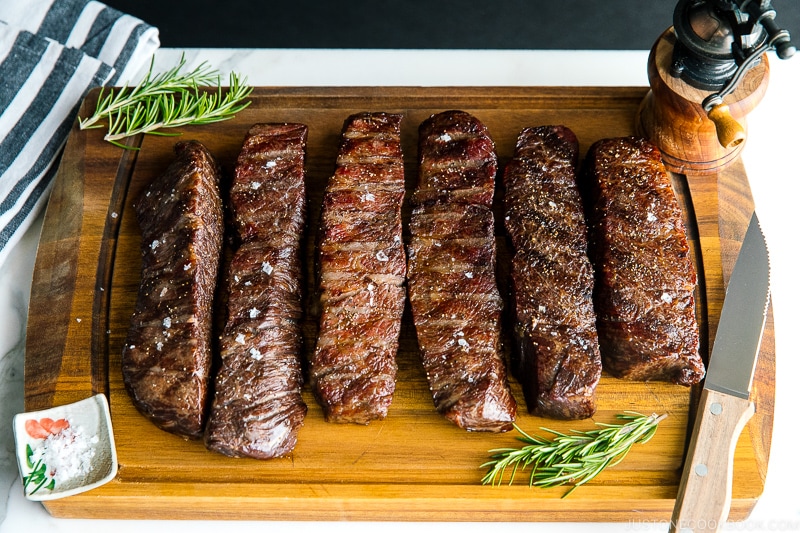
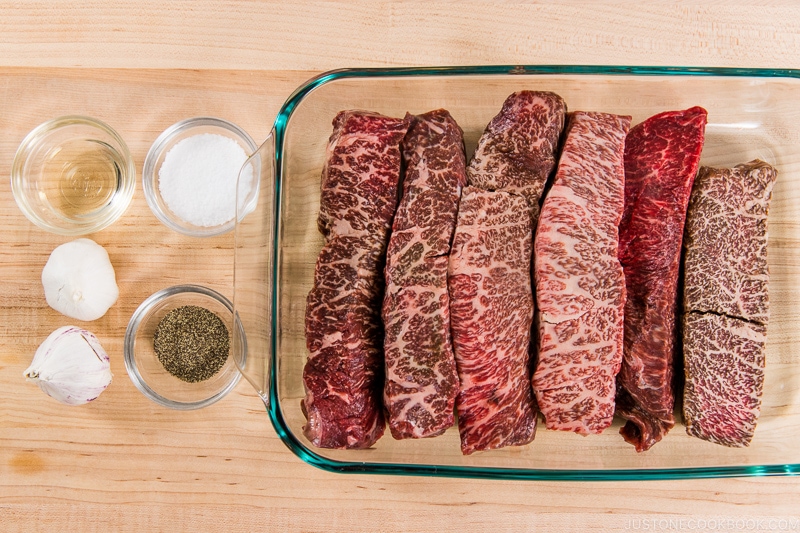
- 3 lb tenderloin steak (I used 6 boneless strips about 1¼ inches thick)
- 1 Tbsp Diamond Crystal kosher salt (use half for table salt)
- 1 tsp freshly ground black pepper (sprinkle right before smoking)
- 2 Tbsp neutral oil (plus more, as needed)
- 2 bulbs garlic
Instructions
- Before You Start: Please note that this recipe requires a dry brining time of at least 24 hours prior to cooking. I encourage you to brine your steaks up to 48 hours, if time permits.
To Dry Brine the Steaks (24–48 Hours Prior to Cooking)
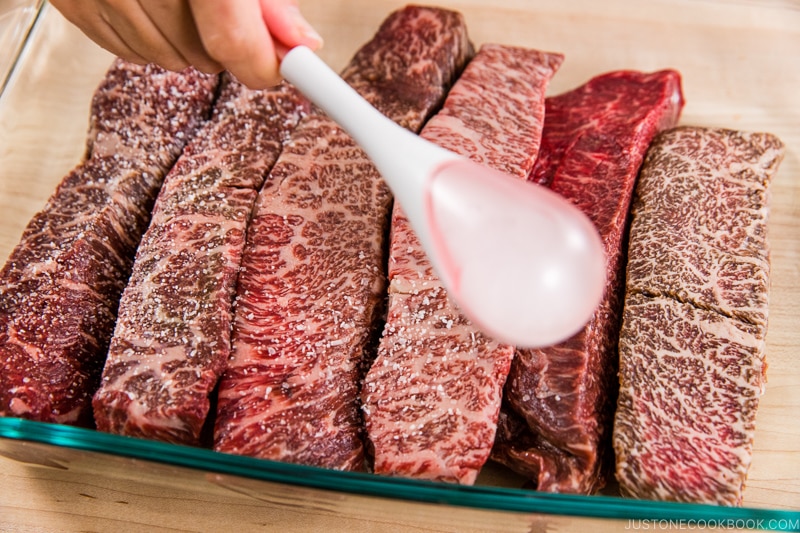
- Gather the ingredients. You will need just the steak and the kosher salt for this dry brine step.
- Place 3 lb tenderloin steak in a tray. Sprinkle 1 Tbsp Diamond Crystal kosher salt generously so it covers all sides of the steak. The steaks should be around the same size and thickness.
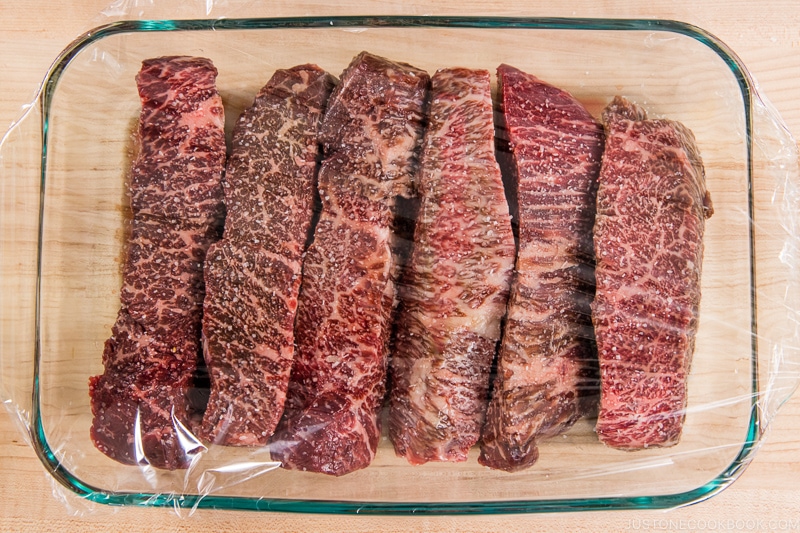
- Cover the steaks with plastic wrap and place in the refrigerator for at least 24 hours (and ideally 48 hours, if time allows).
To Cook the Steaks
- Preheat the Traeger or pellet grill to 200ºF (93ºC).
- Take the steaks out from the refrigerator and sprinkle 1 tsp freshly ground black pepper.
- Place the steaks directly in the Traeger. Insert a meat thermometer inside the thinnest piece of steak.
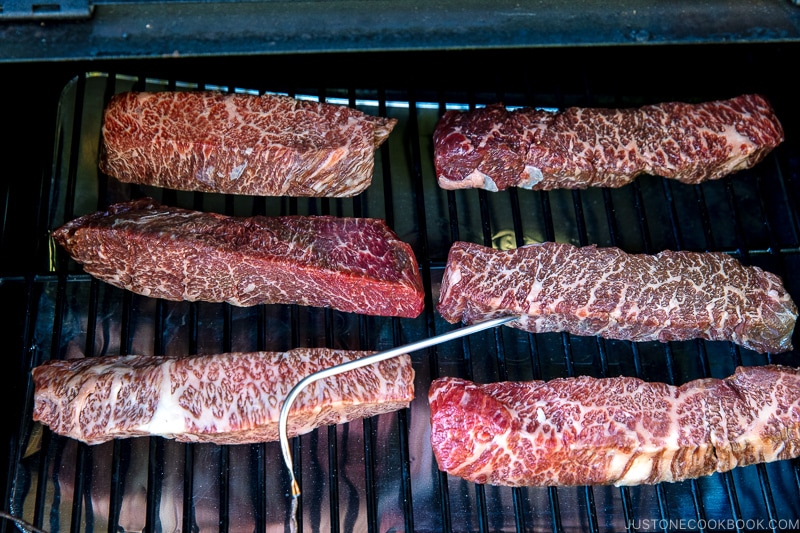
- If the thermometer is working correctly, the steak temperature should be around 50ºF (10ºC).
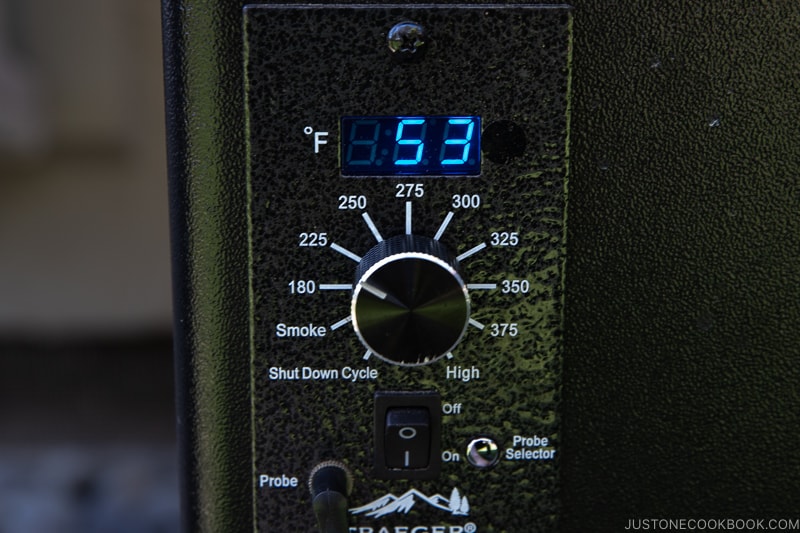
- When the thermometer reads 125ºF (52ºC), the steaks will be medium rare throughout, after about 1 hour.
- For medium steaks, remove them from the Traeger around 135ºF (57ºC).
- For medium-well steaks, remove them from the Traeger around 140ºF (60ºC).
- If you are cooking each steak to a different doneness, label them after you remove them. Now, rest the steaks for at least 1 hour before searing them. During this time, you can prepare the Smoked Garlic (see instructions below).
To Sear the Steaks
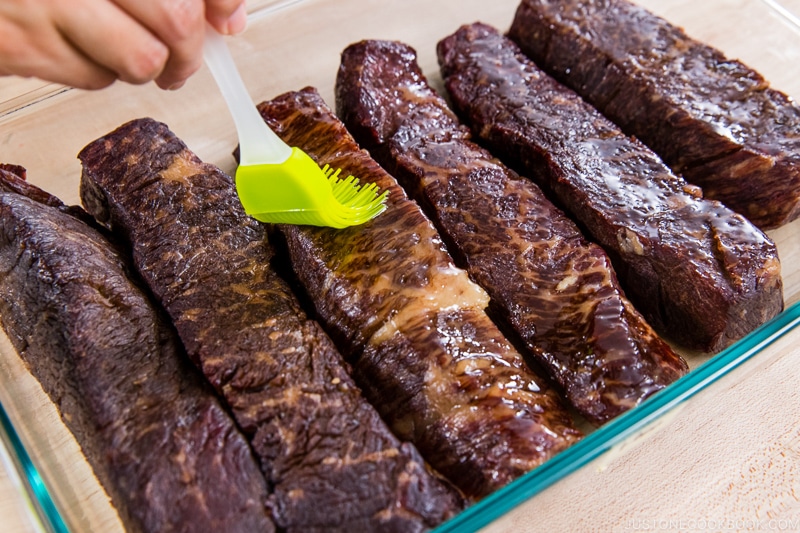
- Brush 1 Tbsp neutral oil on the steaks and coat all sides.
- Preheat a grill to 500ºF (260ºC). If you are using a cooktop, heat 2 Tbsp neutral oil in cast iron pan until the oil is smoking.
- Sear the steaks for 1–2 minutes per side and 3–4 minutes total until they’re to your liking. Remove from the grill. Slice against the grain and enjoy with Smoked Garlic.
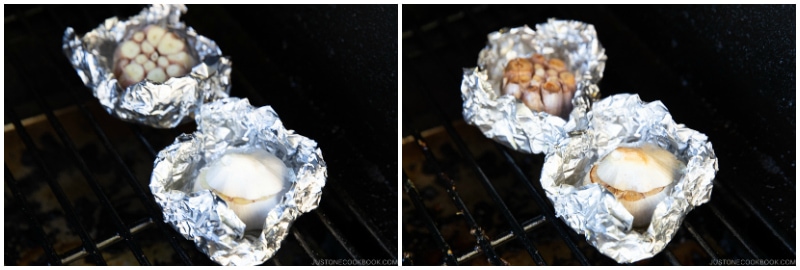
To Make the Smoked Garlic
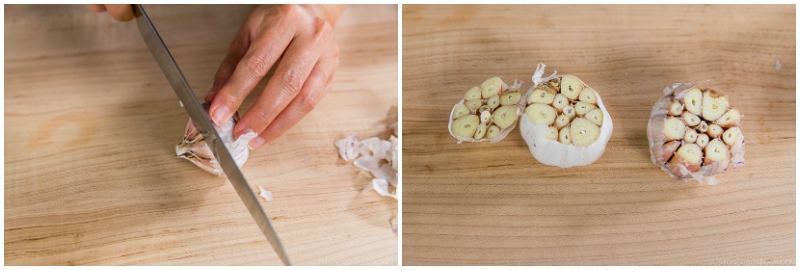
- Preheat the Traeger to 350ºF (177ºC). Cut off the tips of 2 bulbs garlic crosswise.
- Drizzle ½ Tbsp neutral oil per head of garlic and surround with aluminum foil. Do not wrap as you want the smoke flavor to infuse the garlic. You can put the cut tip of garlic back or leave it off. Garlic without the tip will appear darker but won’t dry out.
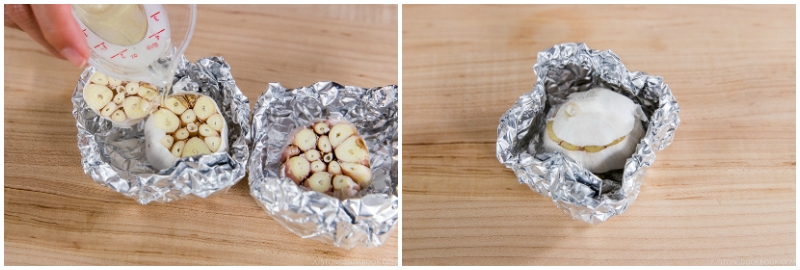
- Place the garlic in Traeger for 40 minutes. You can grill corn or other vegetables in the Traeger at the same time to go with the steak.
Equipment
- Pellet smoker (I used Traeger)


Simply mouth-watering looking! I love and will try the roasted garlic, that looks like a fantastic addition. I do reverse-sears on my charcoal grill and yes, temp management is certainly harder than I would imagine it is on the Traeger. One tip I picked up somewhere is to do the initial roasting of the steak with the steak all the way at the opposite side of the grate from the coals and to leave the gill lid slightly open right next to the steak.
I also love the beautiful mahogany color the steaks pick up from the wood smoke, in addition to the flavor of course!
Lastly, I hadn’t ever thought to separate the roasting from the searing. Thank you for that tip which will certainly make cooking dinner for guests more convenient.
Hope Nami continues to heal well and that the JOC family is loving Miso – so cute!
Hi Todd,
Thank you for stopping by and sharing your tip for how to reverse sear on a charcoal grill with the readers. Feel free to let the steak rest for 1-2 hours and suck the juices back in while resting.
Cheers