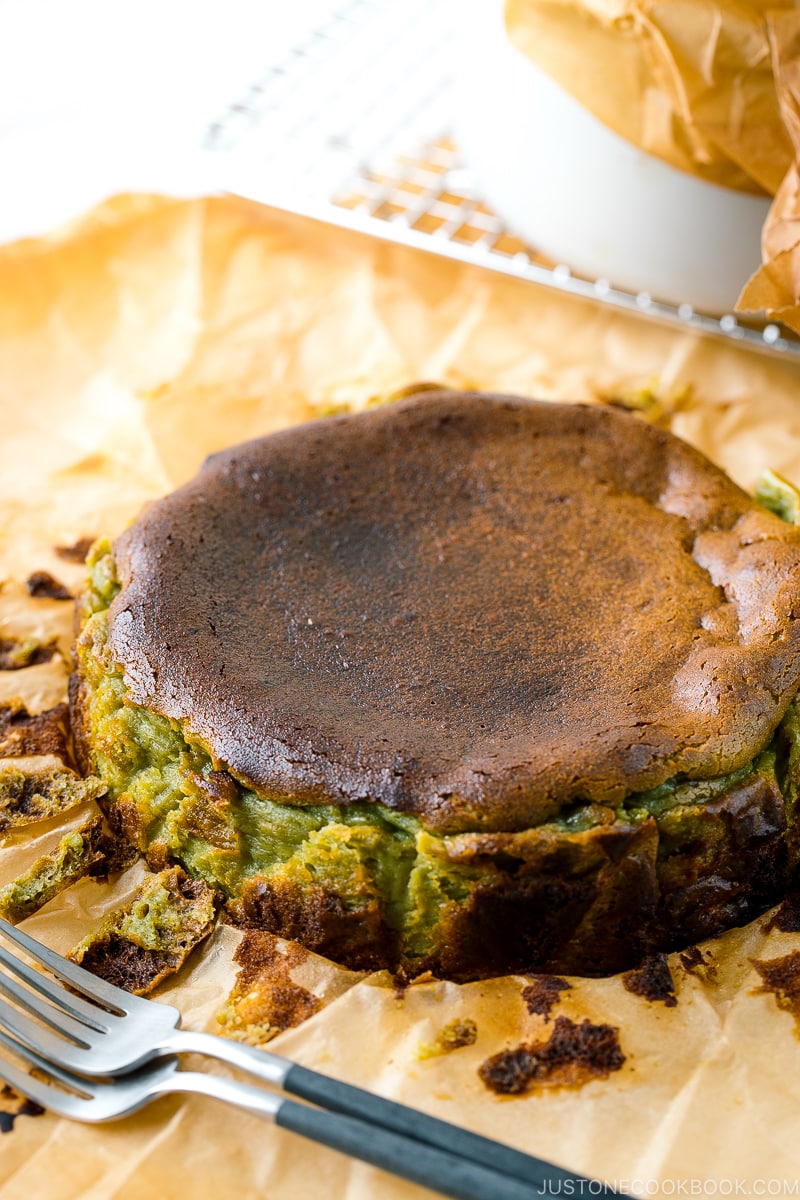
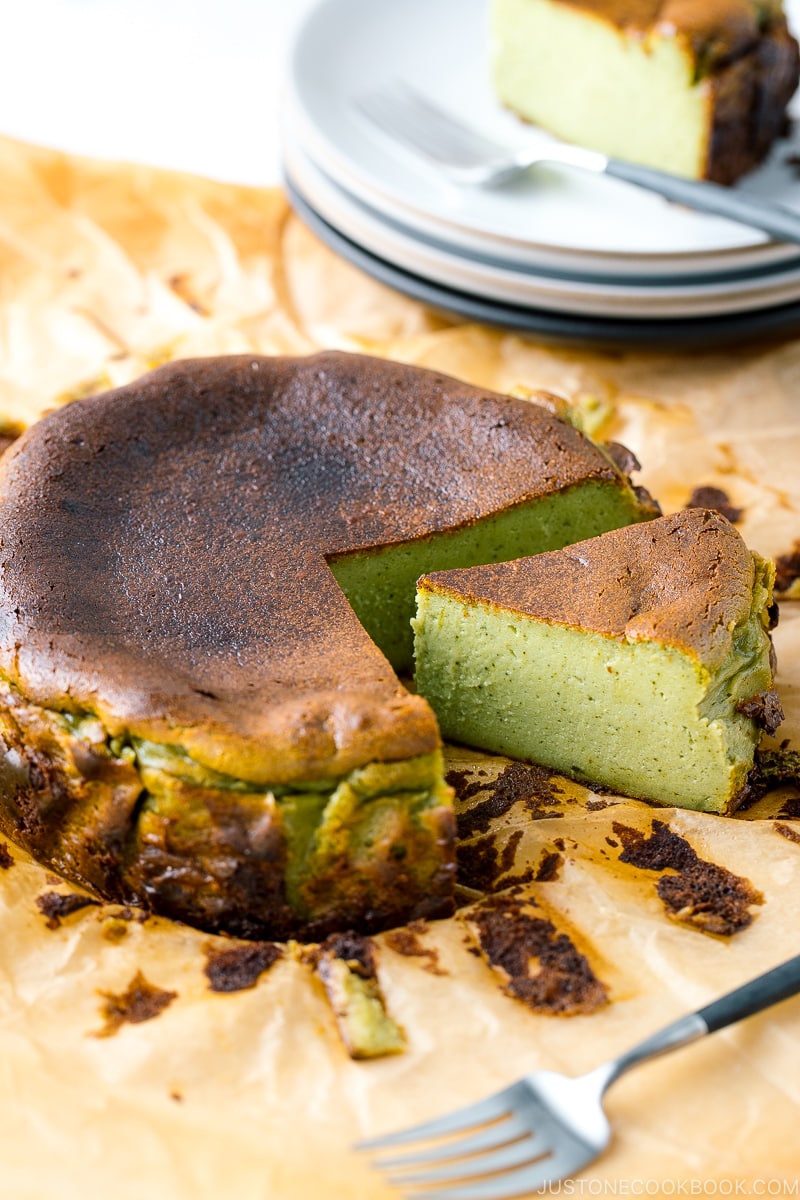
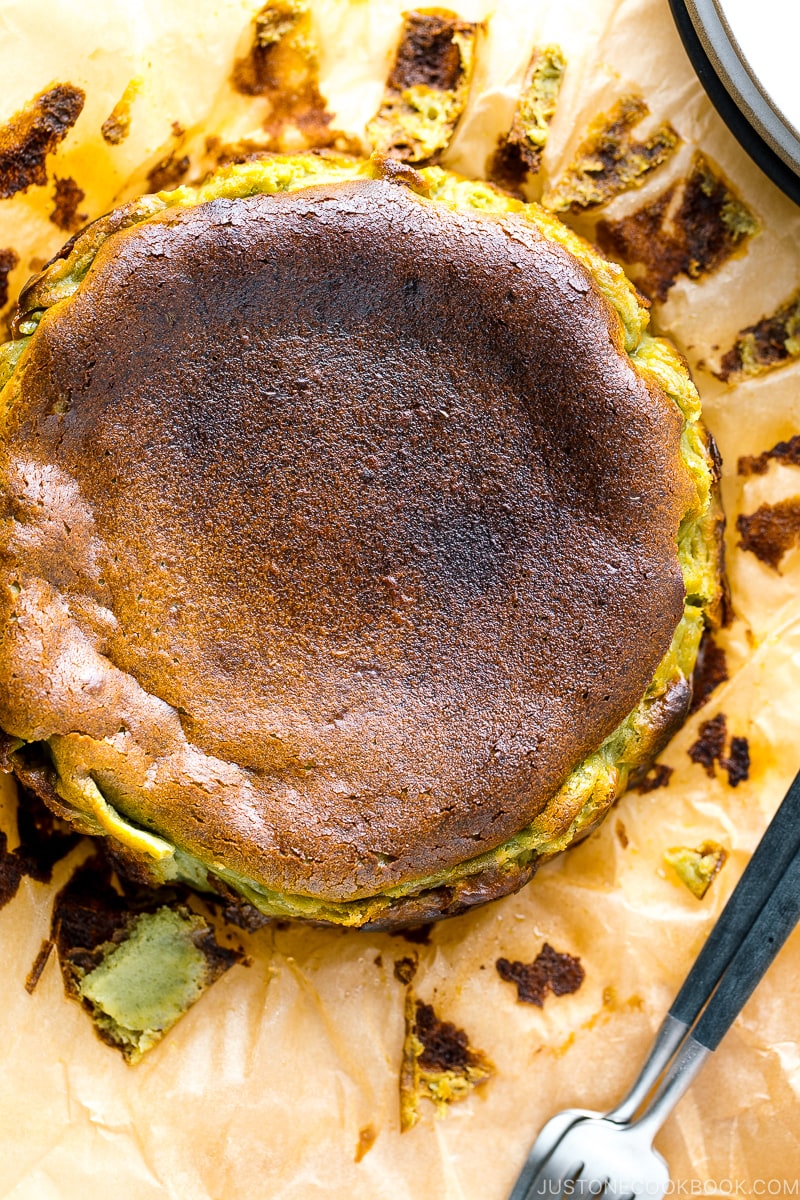
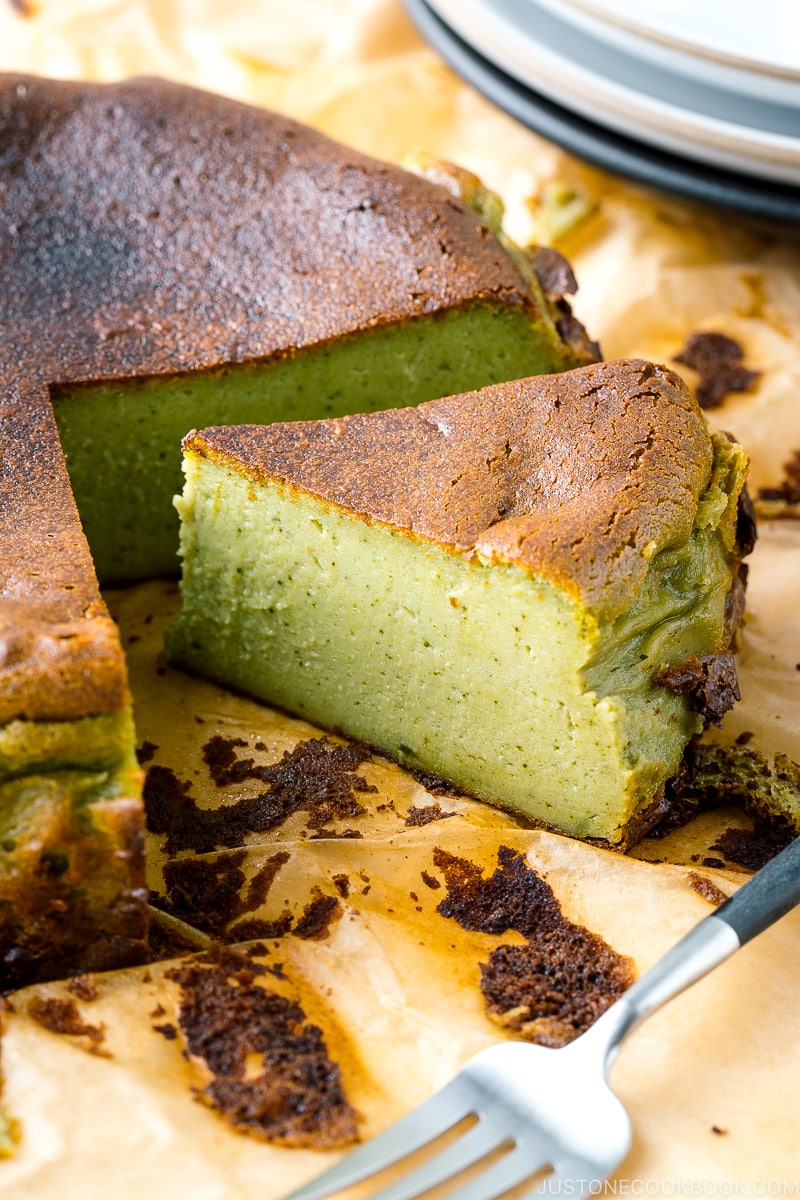
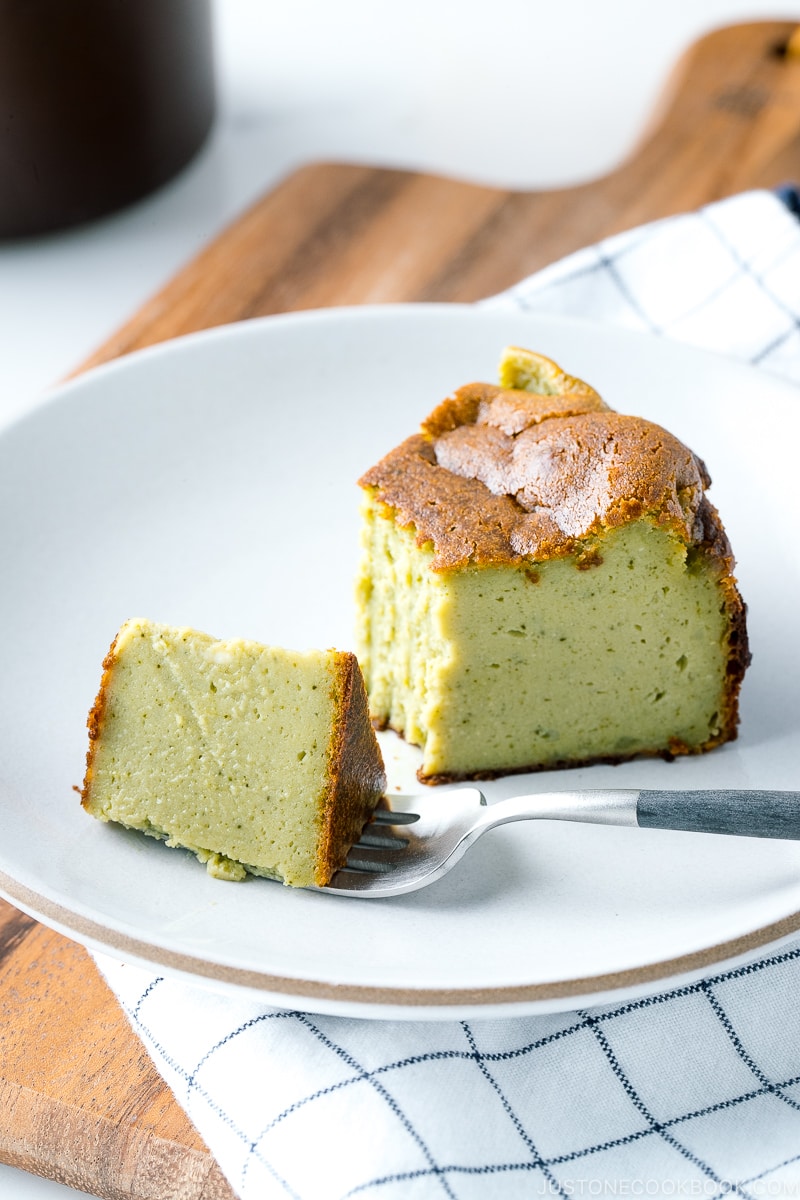
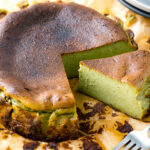
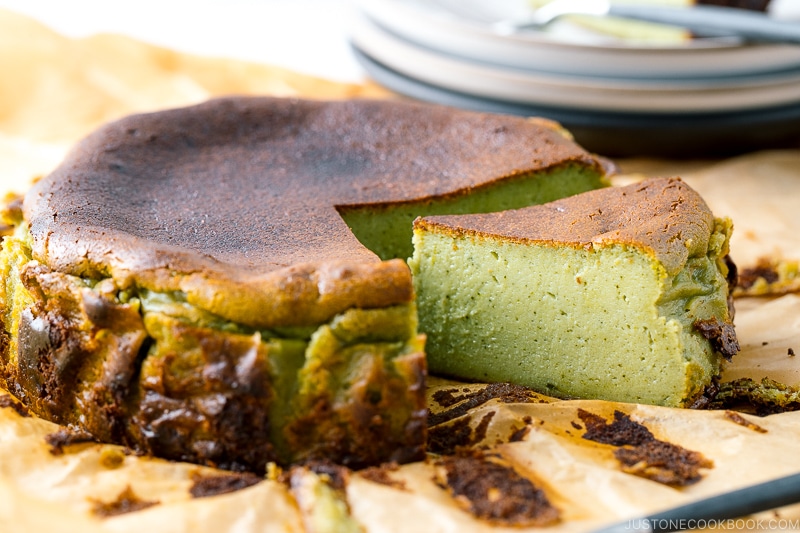
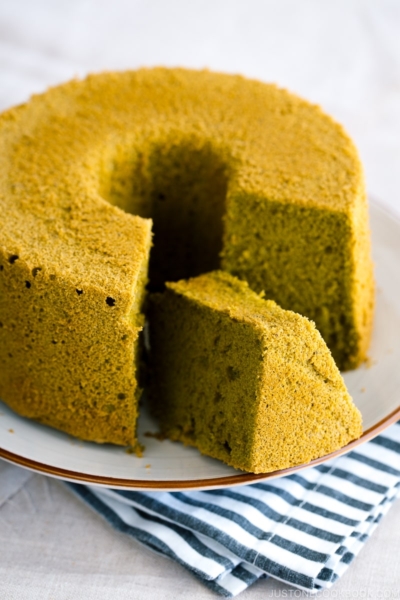
Matcha Basque Burnt Cheesecake is creamy and custardy with caramel notes and an earthy sweetness. Its iconic deep-brown top contrasts beautifully with the vibrant green tea color inside. This Japanese-style cheesecake is lighter than the standard version and is surprisingly easy to make.
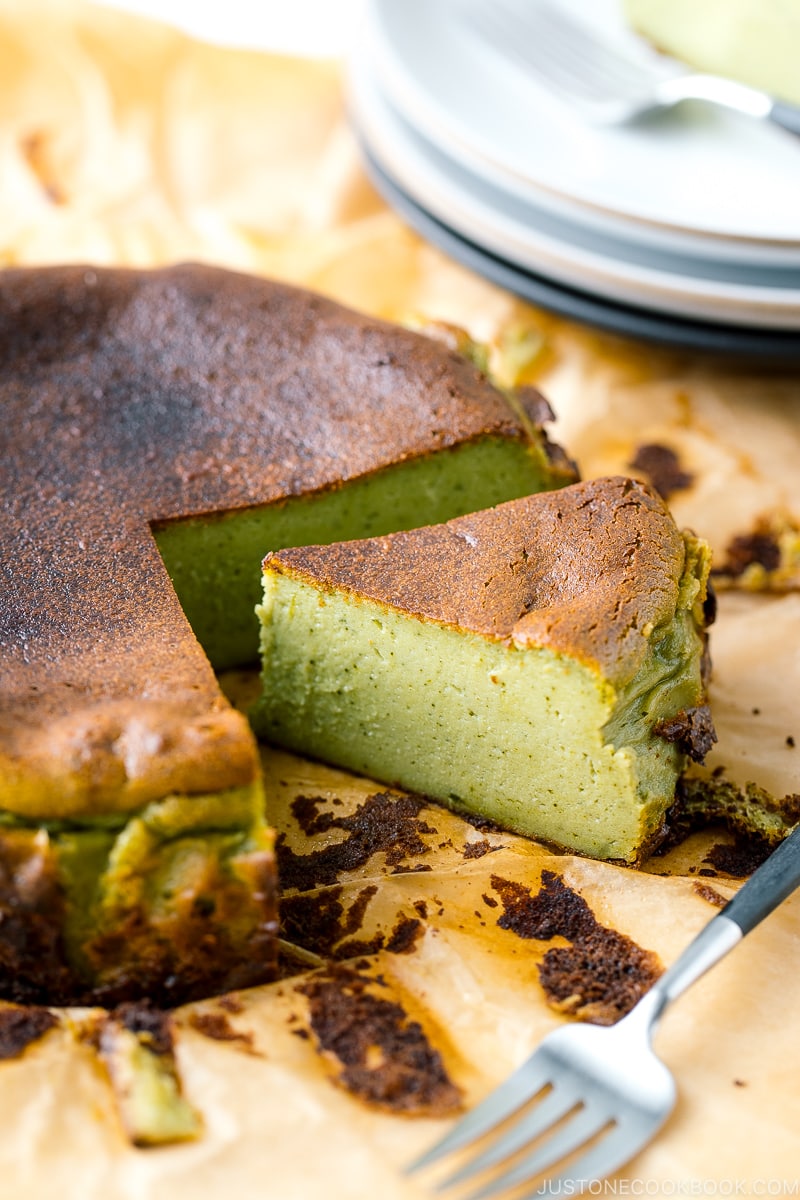
As promised in my Basque Burnt Cheesecake recipe, I’m here to share a Japanese-style Basque cheesecake with matcha flavor! This Matcha Basque Burnt Cheesecake (抹茶バスクチーズケーキ) is actually our family’s favorite, and for good reason. Read on to find out why, but I can assure you that both of these cheesecakes are equally outstanding and heavenly. I hope you try both versions!
Table of Contents
What is Basque Cheesecake?
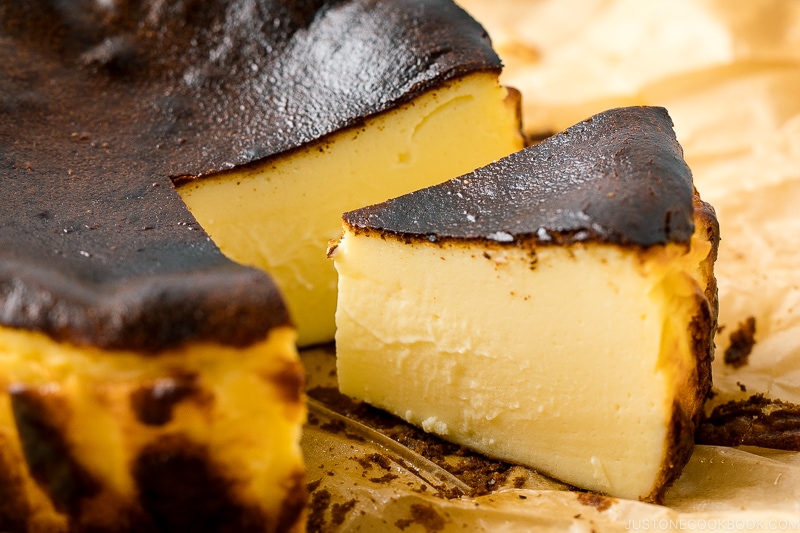
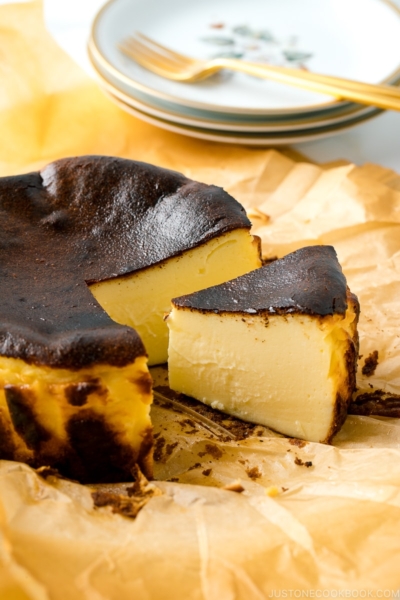
For those who are not familiar, Basque cheesecake has an iconic “burnt” caramelized top and it is very creamy on the inside. It tastes like a caramelized cheesecake in one bite. Some liken it to creme brûlée cheesecake!
Basque cheesecake is relatively new. It was created in 1990 by a chef named Santiago Rivera of a restaurant called La Viña in San Sebastian, Spain. If you’re interested, read this article or this article that explains how this cake was invented and became popular.
If you like to make my classic Basque burnt cheesecake, click here.
Japanese-Style Basque Cheesecake: Less Cream Cheese
So, what makes this Matcha Basque Cheesecake recipe uniquely Japanese? Besides the matcha flavor, it contains less cream cheese per cake compared to typical Basque cheesecake—half the amount, to be precise.
The matcha Basque cheesecake I made today is based on a recipe posted on a Japanese home cook and baker’s Instagram account. She mentioned in her post that her recipe was adapted from Rumi Kojima’s Basque cheesecake recipe (she’s a very renowned patissier in Tokyo). After researching Basque cheesecake recipes a bit more online, I can conclude that the majority of Japanese-written recipes have half the amount of cream cheese.
As a result, “Japanese-style” Basque cheesecake has a lighter, fluffier texture. With the higher egg ratio, the inside is even more custardy and creamy. You can say it’s similar to flan, and the matcha imparts a hint of sweet earthy vanilla note to it without adding vanilla extract.
The Easiest Cheesecake I’ve Ever Made
If you want to make classic Japanese-style Basque cheesecake without green tea flavor, you can simply replace matcha with lemon juice in this recipe.
Just like regular burnt Basque cheesecake, this is absolutely the easiest cheesecake I’ve ever made. All you need to do is to mix ingredients, bake for 30 minutes, and chill. Let me show you how!
How to Make Matcha Basque Cheesecake
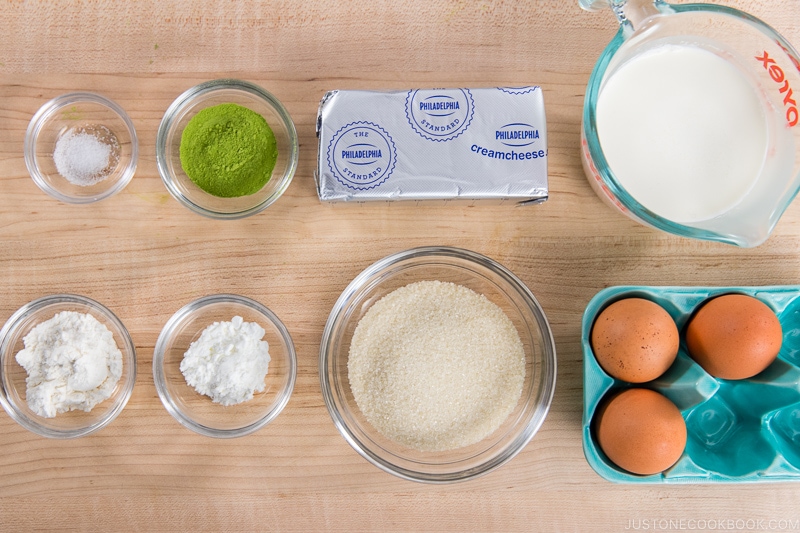
Ingredients You’ll Need
- cream cheese – Philadelphia, NOT whipped or reduced-fat cream cheese
- sugar – standard granulated sugar; I used organic cane sugar
- eggs – large eggs, 50 g each without shell
- heavy (whipping) cream – 36–38% fat
- flour – I used cake flour + cornstarch
- matcha – use high-quality, vivid green matcha powder
- salt – just a pinch of salt helps intensify the flavor
Overview: Cooking Steps
This is an excellent recipe for any beginner to try! See the recipe card below for the full printable instructions with step-by-step photos.
- Preheat the oven for at least 30 minutes. Bring the cream cheese, eggs, and heavy cream to room temperature.
- Gradually mix all the ingredients, one at a time, in a large bowl.
- Pour the batter into a cake pan and bake for 30 minutes.
- Cool completely to room temperature, about 2–3 hours.
- Chill in the fridge, and enjoy!
Recommended Tool: 6-Inch (15-cm) Round Cake Pan
As most Japanese-style Basque cheesecake recipes require a 6-inch (15-cm) pan, I happened to have a 3-inch deep, 6-inch round cake pan with a removable bottom to use for this recipe. It’s a perfect cake size for 6 people (or 4 if you want to eat a bigger portion).
You can definitely go with a 2-inch, maybe 2.5-inch deep, 6-inch cake tin (by folding the parchment paper up to sustain the rising batter), but if you plan to use a larger round pan, this recipe will create a short and shallow cheesecake. It will not produce the same rich and luscious texture.
You can multiply the recipe by 2 to accommodate for a 3-inch deep, 7-inch round pan. Or, you can multiply the recipe by 2.5 to accommodate for a 3-inch, deep 8-inch round pan.
10 Important Tips and Techniques
Tip #1: Preheat the oven for at least 30 minutes.
To achieve a nice brown top in a short time, the oven has to be very HOT. Here’s something you can do besides preheating for 30 minutes:
- Use the convection bake (oven with fan). This worked like a miracle. I had tested using a regular conventional oven (no fan), but I couldn’t achieve the ‘burnished’ top. Once I switched over to the oven with fan, bam, the perfect burnt top right away! Circulating air with a fan definitely helps to distribute hot air evenly inside the oven.
- Preheat the conventional oven at a higher temperature. I preheated the oven to 550ºF (290ºC) for 30-45 minutes! If you don’t have a fan to circulate the air, you can position the rack at a higher location as the heat rises and the top of the oven will be hotter. Be careful the parchment paper is not touching your heating element.
Tip #2: Use parchment paper.
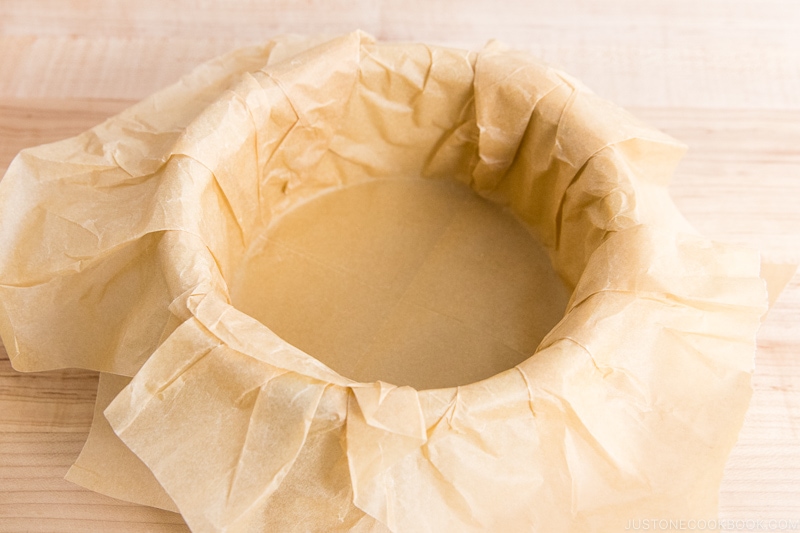
Don’t skip or substitute it. And double line it to ensure there aren’t any unlined parts. If your cake pan is not 3 inches deep, you may need to fold the parchment paper up to support the rising cake batter (but make sure the paper is not touching the heating element in the oven)
Tip #3: Bring the cream cheese, eggs, and heavy cream to room temperature.
Room temperature ingredients blend together very easily, creating a smooth batter. A smooth batter will yield a uniform textured baked good. Cold ingredients do not incorporate together as easily. You can microwave the cream cheese to warm up, and I share the instructions in the recipe.
Tip #4: Avoid lumps!
Lumps are so hard to get rid of. It’s easier to prevent creating lumps than get rid of them. There are two ways to avoid them:
- Mix the batter completely and thoroughly before adding the next ingredient.
- Frequently scrape off the chunks and clumps of cream cheese mixture from the spatula and mixing bowl. As you go further along each step, the batter gets more liquid, which means it’s harder to get rid of lumps. So if you see any lumps, get rid of them as soon as possible.
You can press the spatula down in a rubbing motion to remove the cream cheese lumps. You may still end up with clumping. Don’t worry too much as it will dissolve while baking. But in general, you don’t want to create lumps.
Tip #5: Mix the matcha with a small amount of batter first.
No one wants spotty green cheesecake. Matcha tends to clump together when the dry fine powder hits the liquid. Whenever you want to add matcha to liquid or batter, remember to take out a portion and create a “matcha paste” first. It’s easier to blend the paste into the liquid/batter.
Tip #6: Release the air bubbles before baking.
After making these cakes with different tools for fun (stand mixer, electric hand mixer, blender, whisk, and spatula), I learned that mixing the cheesecake batter with a silicone spatula creates fewer air bubbles and makes pretty consistent cheesecake. If you use a mixer and your batter has a lot of air bubbles, make sure to tap the cake pan on the countertop to release the air pockets. You can also run a skewer through the batter and pop the air bubbles. This will help create a smooth, glistening surface on the cake so you don’t have a bubbly top or a major collapse because the cake rose too high.
Tip #7: Open/close the oven door fast and don’t lose the hot air!
I know this may sound like common sense, but I was once a beginner baker who took my time to put the cake pan in the preheated oven, leaving the oven door open for a long time. Since you worked extra hard to preheat the oven for 30–45 minutes, don’t lose the heat by leaving open the oven door!
Tip #8: Use my bake time as a guide only.
Every oven is different when it comes to size and how it works. My relatively new oven is not perfect. It has hot spots, and the internal temperature doesn’t seem to be the same as what the display says. It can be a headache, but you and your oven will get to know each other through baking.
So you have to determine when to take the cheesecake out of the oven by looking at 2 things: 1) the color of the cheesecake surface and 2) the baking time. DO NOT keep baking just because you don’t get enough of a caramelized top. You do not want to eat overcooked cheesecake. The cake is done while it is still wobbly in the middle. So take it out even if the top doesn’t turn deep brown.
Tip #9: Control the doneness of the cheesecake to your liking.
You may not be able to achieve the perfect texture on your first try as you need to learn what you like (texture-wise) and how your oven works. However, as you figure out the details, it’s totally possible to customize the doneness of the cheesecake.
For a creamy texture:
- Bake the normal length of time in the oven.
- The cheesecake filling will firm up as it cools to create a creamy yet firm texture. You can serve once it’s at room temperature.
- If you chill it, take it out 30 minutes prior to serving.
For a firmer texture:
- Bake a bit longer time in the oven.
- Chill in the fridge for a longer time.
- Take out 10 minutes before serving or serve it cold.
For an oozy texture in the middle:
- Bake the cheesecake for a lesser amount of time.
- Chill overnight. To slice the cake nicely, refrigeration is necessary.
Tip #10: Be patient and let it cool completely.
Let the cheesecake rest and set as it sinks down. It will continue to slowly bake and solidify with the residual heat. Refrigerate only after the cake is at room temperature so that the hot/warm cake will not spoil other foods in the fridge.
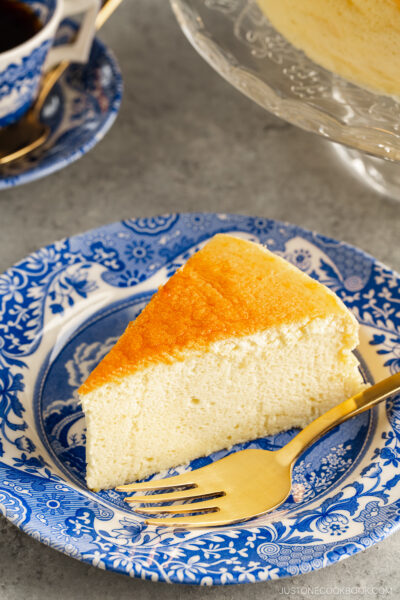
Serve it at room temperature for a softer, custardy filling, or take out the cheesecake from the fridge for 30 minutes before serving, or serve it cold for a firm filling. When you cut, warm your knife with hot water. I fill a tall mug cup with boiling water and dunk the knife in it before each slice. Bring a towel or paper towel to quickly wipe the knife. Cut in one slicing motion and pull out the knife so each slice of the cake has a clean cut.
If your cake is chilled/cold, may I suggest warming it up a little in the microwave? We thought it brings out the flavor of the cream cheese and it’s actually very delicious!
FAQs
I can’t get the top to burn nicely. What can I do?
I can relate, and I really struggled with my oven, too. Here’s what helped me:
- Use the convection oven.
- Preheat at a higher temperature. I’ve tried preheating my oven to the hottest 550ºF (290ºC) for a long time, and it seemed to help.
- Bake at a higher temperature.
- Bake at a higher rack as heat rises so the upper oven is supposed to be hotter. However, if your oven is top heating, make sure the parchment paper is not touching the heating element/ceiling.
Can I use a bigger cake pan size?
I mentioned earlier that you can multiply the recipe by 2 to accommodate a 3-inch deep, 7-inch round pan. Or, you can multiply the recipe by 2.5 to accommodate a 3-inch deep, 8-inch round pan. You will need to increase the baking time, but since I’ve never tried it, I am not sure how long it will take. As I mentioned in the post, I still recommend making two 6-inch cakes if you want to increase the serving size. It will take slightly longer to bake as you have multiple pans in the oven.
My cake has cracks on top. What can I do?
When I made my cake batter with a stand mixer or a handheld whisk, the cake batter rose higher and sometimes unevenly, but then collapsed and cracked. It seemed inevitable as more air bubbles were trapped inside. I’ve tried tapping the cake pan, popping the air bubbles, and resting the batter before baking, which helps a little. But don’t worry too much about the cracks from when the cheesecake settles, as cracks on the burnt top are not so visible like other cheesecakes.
Since I switched to using only the spatula, I had no issue with cracking at all. When I am mixing/blending the ingredients, I don’t see many air bubbles either, so you may want to try using a spatula if these cracks bother you.
How can I achieve a smooth, shiny surface? Mine looks bubbly.
I baked a few cheesecakes with tiny bubbles on the surface before. I’m sure the batter in your cake pan had tiny bubbles before baking it too, or they rose while baking. Follow the same method I shared in the previous Q&A.
Why does my cheesecake have a gooey, raw texture in the middle?
I assume your cake has a gooey texture even after you chill the cake. If so, then you have to bake the cake a little longer next time. My oven doesn’t work the same way as yours, and I can only provide suggested baking time or baking temperature using my own oven.
Oh, one last tip: have fun! This is important when comes to baking. My Matcha Basque Burnt Cheesecake recipe is going to win your heart on its way to your tummy.

Wish to learn more about Japanese cooking? Sign up for our free newsletter to receive cooking tips & recipe updates! And stay in touch with me on Facebook, Pinterest, YouTube, and Instagram.
Matcha Basque Burnt Cheesecake
Ingredients
- ½ lb cream cheese (1 block; I used Philadelphia brand; at room temperature)
- ½ cup sugar
- 2 large eggs (50 g each w/o shell) (at room temperature)
- 1 large egg yolk (at room temperature)
- 1 Tbsp matcha (to make a classic version without matcha, substitute with 1 Tbsp lemon juice instead)
- 4 tsp cake flour (or use all-purpose flour; use rice flour for gluten-free)
- 2 tsp cornstarch (or use all-purpose flour)
- 220 ml heavy (whipping) cream (1 cup minus 4 tsp; at room temperature)
- ⅛ tsp Diamond Crystal kosher salt
Instructions
Before You Start…
- Please note that this cake requires 2–3 hours of cooling time. You can serve it either at room temperature or chilled in the refrigerator for an additional 4 hours.
- Gather all the ingredients.
To Preheat the Oven
- Preheat a convection oven (with fan) to 450ºF (230ºC). If you don’t have an oven with a fan, preheat a conventional oven to 475ºF (245ºC). If your oven doesn’t heat up very well, you can preheat it for 30–60 minutes to the hottest oven temperature—mine is 550ºF (290ºC)—then turn it down to the target temperature. As for the oven rack, I used the middle position in my convection oven (the fan circulates the air, so the middle rack is ideal). If you use a conventional oven, move the rack slightly higher as heat rises and the temperature toward the top of the oven is higher. However, keep in mind that a 3-inch deep cake pan needs extra space for rising.
To Prepare the Cake Pan
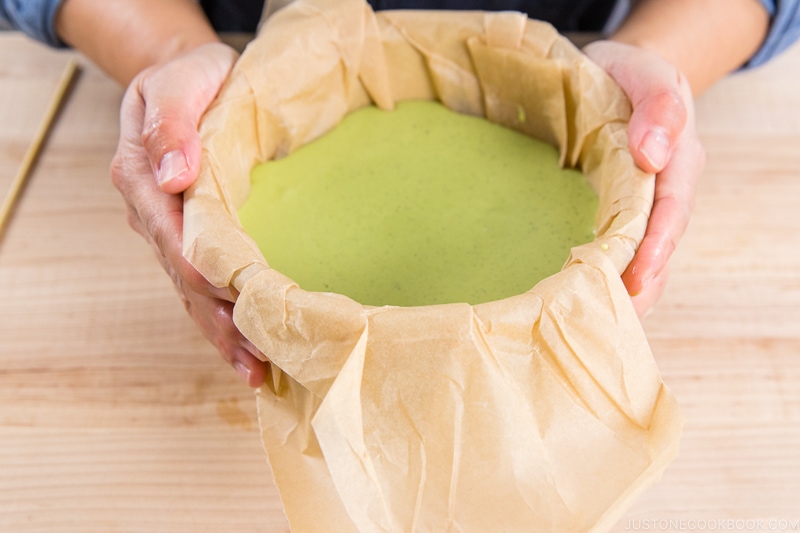
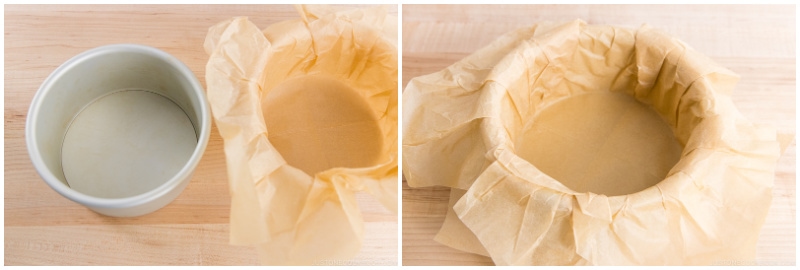
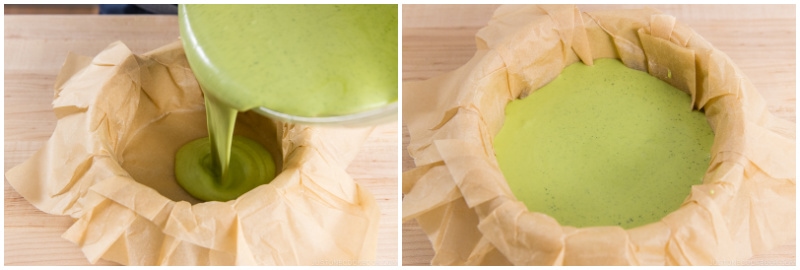
- For 1 6-inch (15-cm) round cake pan, prepare 2 rectangular sheets of parchment paper long enough to hang over the sides by 2 inches (5 cm). Place them crisscross to maximize the coverage on all sides. (You can use just one sheet instead of two if your parchment paper is extra wide.) Fold them twice into quarters, like a paper napkin.
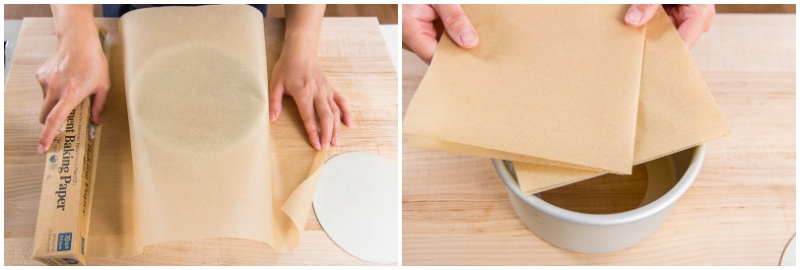
- Open the folded sheets and place them crisscross as before. Find the center point of the crisscrossed sheets. Where the creases intersect will also indicate the center of the cake pan. Center the parchment sheets over the cake pan ring, then center the removable bottom on top of the sheets.
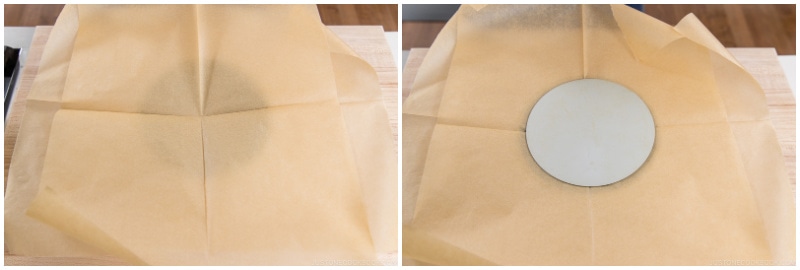
- Press down the removable bottom and the parchment sheets into the cake pan, creasing the paper against the bottom and inside of the pan to fit snugly. Press and crease the paper edges down around the outside of the cake pan, too.
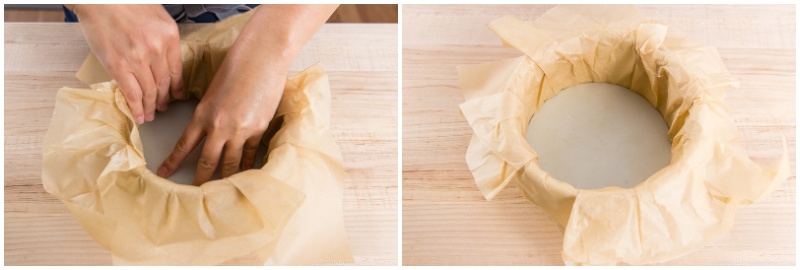
- Gently take out both the removable bottom and the parchment sheets, which are now molded into the shape of the pan. Place the removable bottom back into the cake pan (as it should be). Then, fit the molded parchment paper back into the cake pan on top of the removable bottom. Press the paper down to fit snugly.
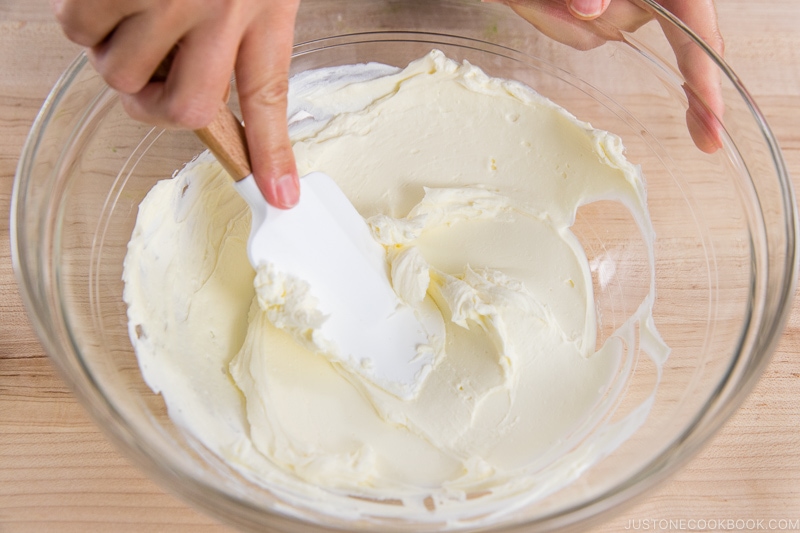
To Blend the Cream Cheese Mixture
- Place ½ lb cream cheese in a large bowl. Make sure the cream cheese is at room temperature. If not, microwave the cold cream cheese at half power (50%) for 45 seconds, or microwave it in 15-second increments until it's at room temperature.
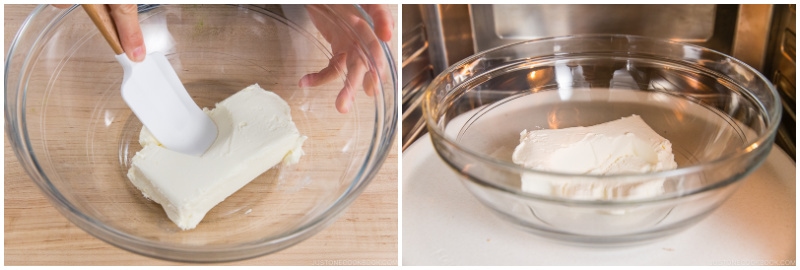
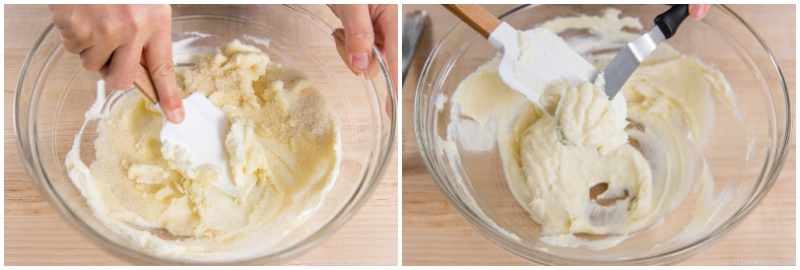
- Press down on the cream cheese with a spatula to soften it. Then, add ½ cup sugar.
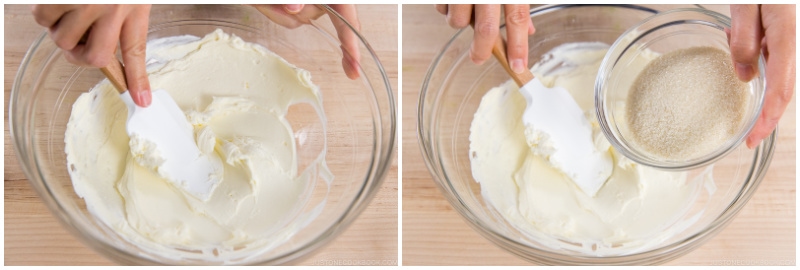
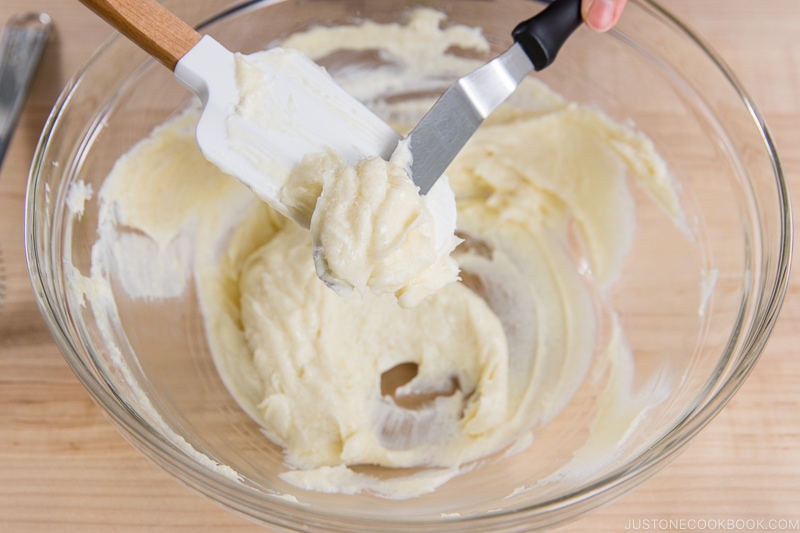
- Combine the cream cheese with the sugar by rubbing the mixture against the sides of the bowl with the spatula. The cream cheese will become fluffy and smooth as the sugar granules dissolve. Scrape both the bowl and spatula often to ensure that the ingredients are well incorporated and there are no lumps.
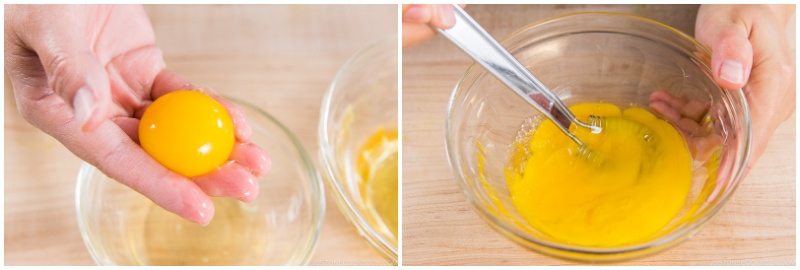
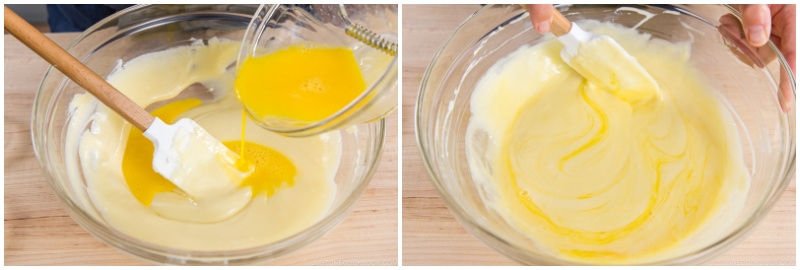
- In a separate bowl, whisk 2 large eggs (50 g each w/o shell) and 1 large egg yolk well.
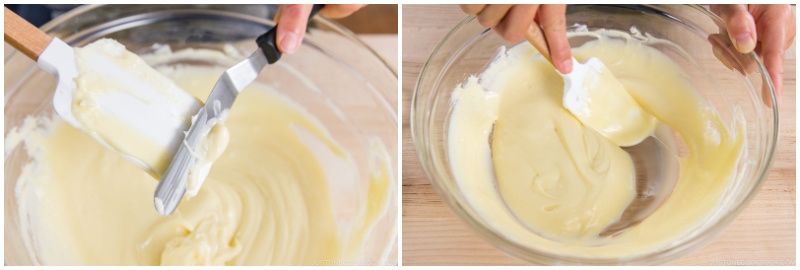
- Slowly and gradually add one-third of the beaten eggs to the cream cheese mixture. Blend completely and thoroughly, making sure the batter is smooth and without lumps before adding more egg.
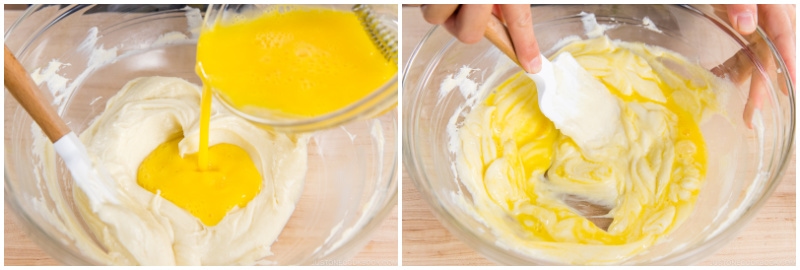
- Add another one-third of the eggs to the cream cheese mixture, blending completely.
- Add the remaining egg and blend well. Option: To make this cheesecake with a classic flavor instead of a matcha flavor, add the lemon juice now and blend well. Then, skip to the To Finish the Batter section.
To Incorporate the Matcha
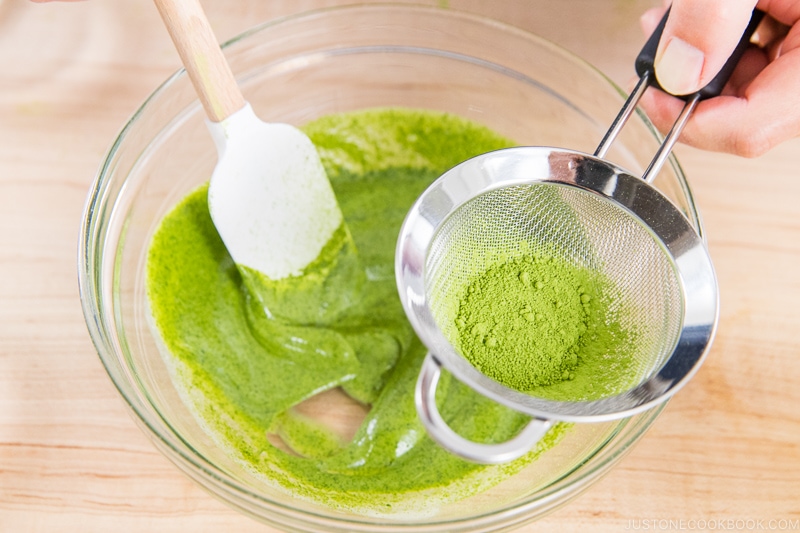
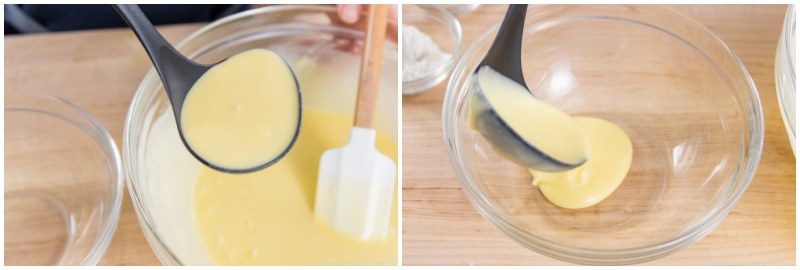
- With a ladle, transfer about two scoops of the batter to a clean, medium-sized bowl.
- Now, blend in the matcha. Use a small, fine-mesh sieve to sift 1 Tbsp matcha into the two scoops of batter, a little bit at a time. Stir as you go to blend the powder into the batter completely before adding more. Continue until you‘ve sifted and blended in all the matcha. Tip: Matcha is a fine powder that becomes lumpy if you add it to a large volume of liquid. Therefore, we have to make a paste with the matcha before adding it to the rest of the batter.
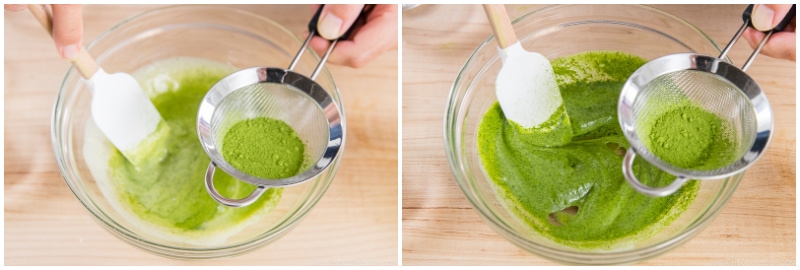
- Mix it all together, making sure there are no lumps and that the matcha is well incorporated into the liquid. Now, it is a thick batter.
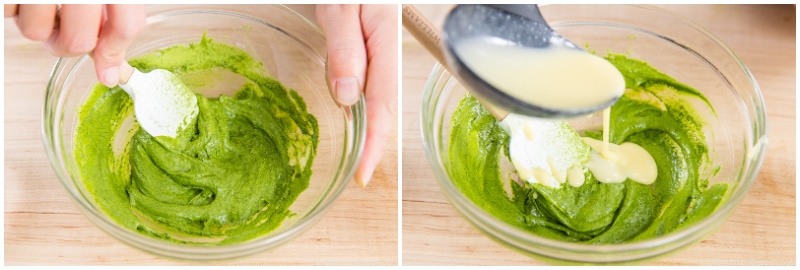
- Continue to blend until the matcha batter is completely smooth and without lumps. Then, add one more scoop of the main batter and blend well to loosen up the matcha batter further.
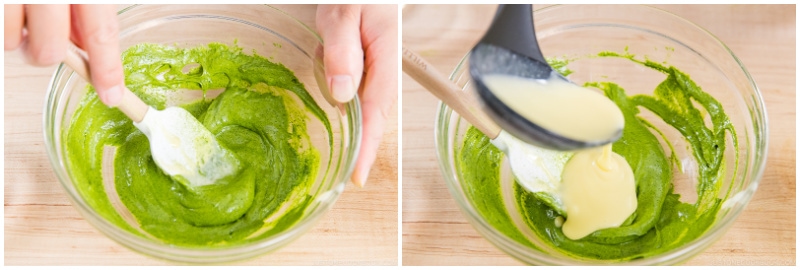
- Now transfer the matcha batter back into the main batter.
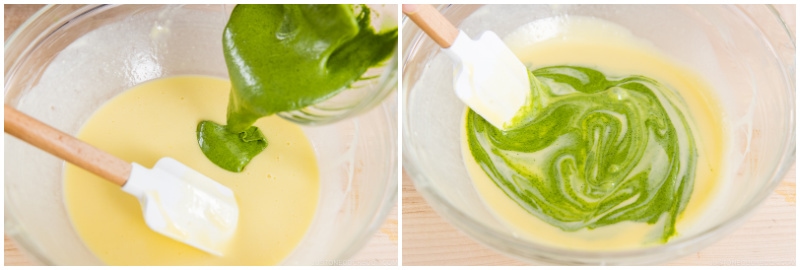
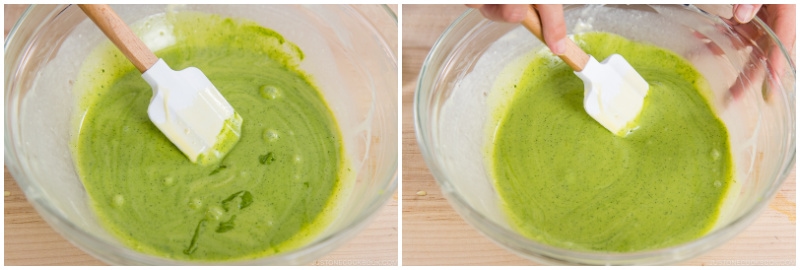
- Blend the two batters very well until you have a smooth consistency.
To Finish the Batter
- Next, add 4 tsp cake flour and 2 tsp cornstarch to a fine-mesh sieve. Holding the sieve in one hand, sift a little bit of the flour and cornstarch into the cream cheese mixture while you stir with a spatula. Incorporate the ingredients well before adding more. Keep sifting and blending until you‘ve added all the flour mixture. Take your time doing this. You don’t want any lumps.
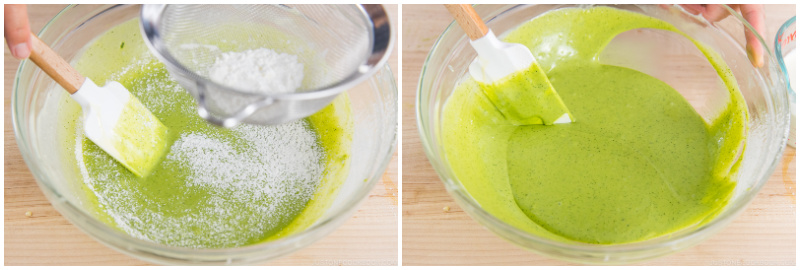
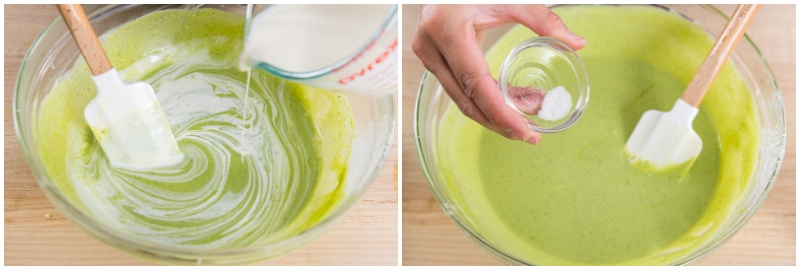
- Make sure at this stage that there are no lumps. Then, gradually add 220 ml heavy (whipping) cream (1 cup minus 4 tsp) while you stir. Mix until it’s all combined. Add ⅛ tsp Diamond Crystal kosher salt and blend it all together.
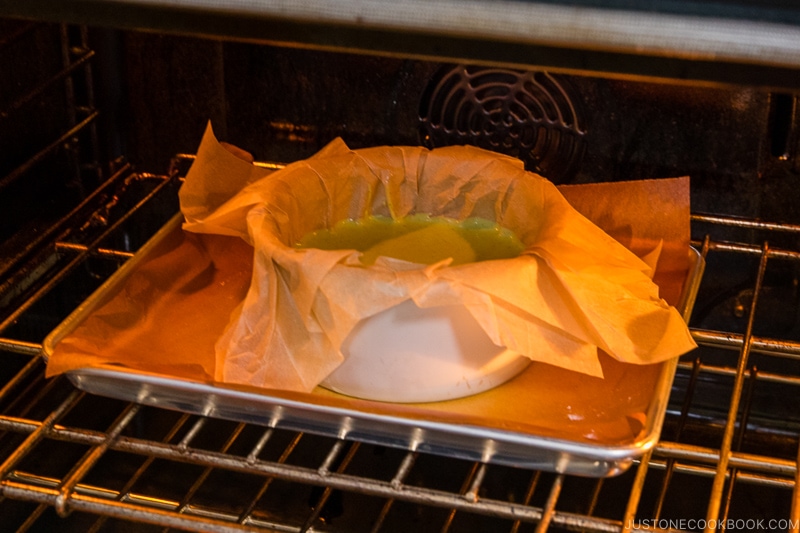
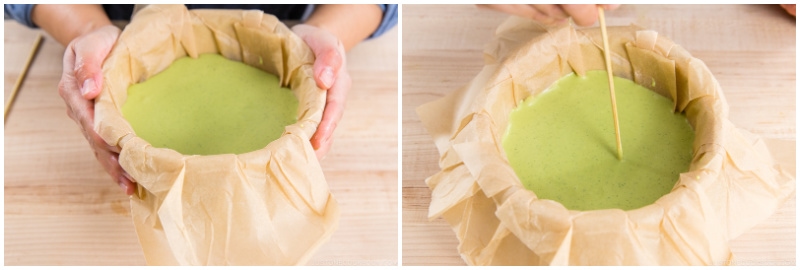
- Pour the cake batter into the prepared pan in one go (avoid stop-and-go) so you don't create any air pockets.
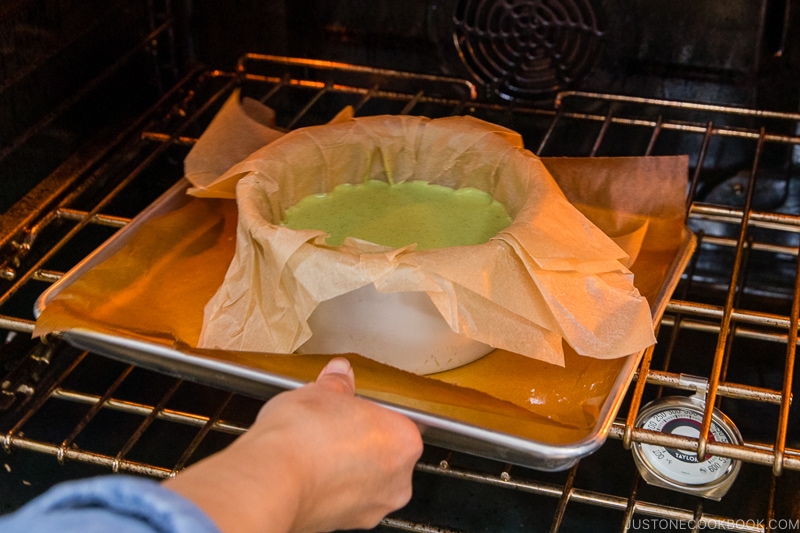
- Tap the cake pan on the countertop a few times to eliminate air pockets. With a bamboo skewer or toothpick, pop the air bubbles if there are any. Then, run the skewer through the batter to remove any bubbles.
To Bake
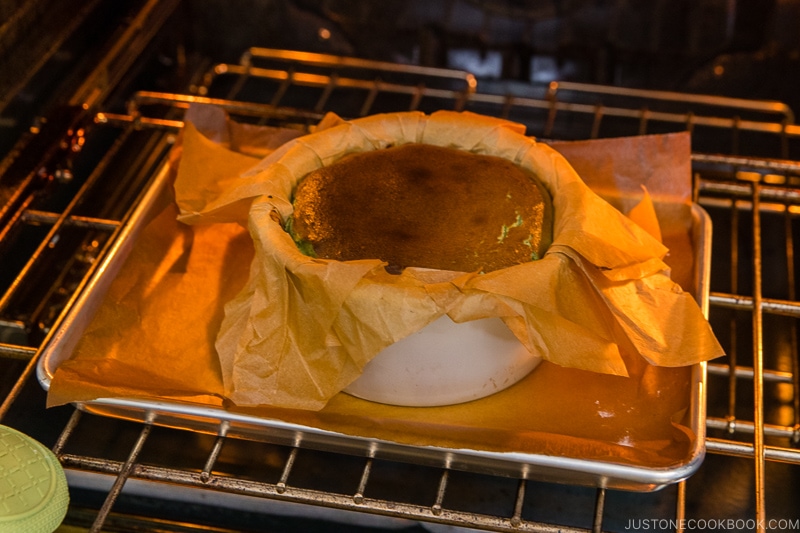
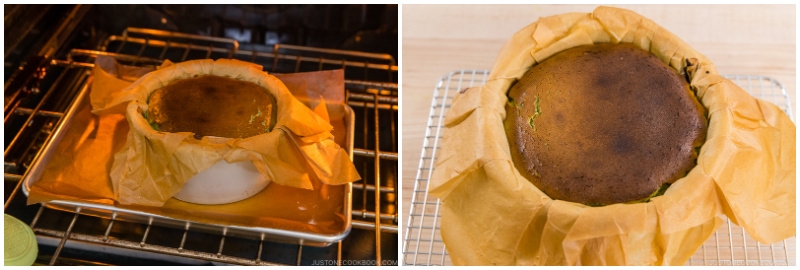
- Since the cheesecake may overflow during baking, place the cake pan on a baking sheet, just in case. Mine never did, but I still use a baking sheet as it helps to transfer the cake pan to and from the oven. Next, transfer the baking sheet with the cake pan to the oven. Bake at 450ºF (230ºC) for a convection oven or 475ºF (245ºC) for a conventional oven. Bake until the top is dark amber/brown and the center is still very jiggly, about 30 minutes; please keep an eye on your cheesecake because every oven is different. The top of my cheesecake starts becoming dark at the 30-minute mark, then gets dark brown within 5 minutes. If you love a “gooey“ or “oozy“ texture, then you may bake for less time than I suggested, but you must chill your cake well to firm it up before serving. NEVER extend the bake time and thus overcook the cake, even if the top hasn‘t turned dark. The filling will curdle and you can‘t fix it. If the top doesn‘t darken within 30–35 minutes, you will probably need to adjust the oven temperature (or oven rack or preheating time) the next time you make it.

To Cool
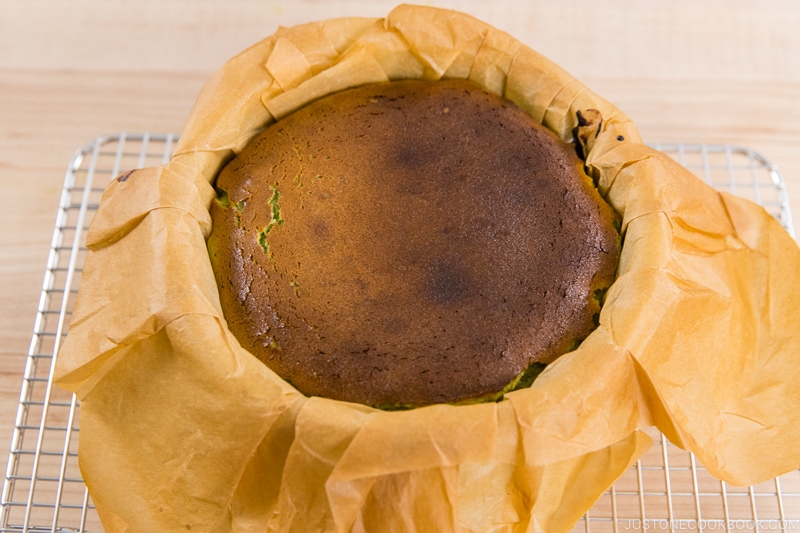
- Take out the cake when the surface is dark, burnt color. The cake should wobble when you gently shake the pan. Let the cheesecake cool in the pan on a wire rack until it reaches room temperature, about 2–3 hours. Tip: Don’t put it on the countertop directly and make sure the air can circulate under the cake pan. For example, you can place it on top of a burner grate of a gas range, if it‘s is not in use.
To Chill
- You can serve the cake either chilled or at room temperature (which we like, too). For a chilled or firmer cheesecake, cover the cake in the pan with a tea towel (don‘t use plastic, as condensation may drip onto the cake), and place in the refrigerator for 4 hours.
To Serve
- Remove the cheesecake from the cake pan and carefully peel back the parchment paper. If you have chilled the cake, let it stand at room temperature for at least 30 minutes or up to 2 hours before serving.
To Store
- You can store the cheesecake in the refrigerator for up to 3 days.


Hi. I have used your Matcha Basque cheesecake recipe to bake the last few times and everyone loved it!!! Thanks for it. BTW, I’m just wondering if you have tried making the black sesame basque cheesecake.
Hi Emma! Thank you for trying Nami’s recipe and for your kind feedback!
We haven’t made Black sesame flavor yet but it sounds delicious! If you tried it, please let us know how it goes! 🤩
Did the recipe change? I could have sworn the cream cheese amount used to be double for each recipe, and it looked very little compared to eggs when i tried it again.
Hello, Wei. Thank you for trying Nami’s recipe!
This recipe has not changed since it was published. Maybe it was Nami’s classic version?
https://www.justonecookbook.com/basque-burnt-cheesecake/
Hi Nami, this recipe is really great! I made it for my husband’s birthday yesterday and it came out great! I had to experiment a bit because my baking pn was slightly bigger (almost 8inch/20cm) so I dod 1.5 portion of the ingredients, it still came out great, slightly lower but fluffy and creamy as I expected and super easy to make. It’s definitey my new favourite recipe 🙌🏻
Hello Laura! Thank you so much for trying Nami’s recipe and sharing your experience with us!
Nami and all of us at JOC are happy to hear this has become your favorite recipe!🤗
Hi! What is a good size pan if you want to sale this for a cafe? What changes would I also need to make in the recipe based on the size if any? Thank you!
Hello, Queen! Thank you for trying Nami’s recipe.
Nami used a 6-inch cake pan, which is a suitable size for home bakers. Depending on the preferences of the coffee shop, they might use a slightly larger pan. Please refer to Nami’s post, where she explains how to adjust the pan size for this dish. We hope this information helps!
Hi! I was wondering if I don’t have cake flour, do I use 17 g of all purpose flour, or should I use 11 g all purpose flour and 6 g cornstarch? Thank you!
Hello, Hana! Thank you for trying Nami’s recipe.
If you’re replacing the cake flour, use 4 tsp of AP flour (10 g). The 6 g cornstarch listed in the ingredient list will also require it. 🤗
We hope this helps!
Hi, thank you for the lovely recipe! My colleagues really enjoyed it. Would it be possible to use those disposable aluminum foil pans instead of springform pan? I’m thinking of teaching a class at school and I don’t have the budget to buy new springform pans.
Hello, Nicole. Thank you very much for trying Nami’s recipe!
We’ve never tried it before, but it should work. Please feel free to adjust the baking time as necessary! Hope everything goes well in your class!
Would this recipe work using half and half instead of cream?
Hello, Bella. Thank you for trying Nami’s recipe.
We’ve never tried this recipe using half and half before. The cake will not be as creamy, but it should still work. Please let us know how it goes if you give it a try!
Thank you for the recipe!! The cheesecake was delicious and creamy.
I had leftover heavy whipping cream after making the cake. So I stored the leftover cream in the freezer. I was wondering if I can thaw the cream and use it to make another cheesecake. Would this affect the texture of the cheesecake?
Hi, Tiff! Thank you very much for trying Nami’s recipe.
We’ve never tested it before, but we believe it works. Please let us know how it goes if you give it a try!
Happy baking!
Hi Nami and thank you so much for this incredible recipe!
I just made this matcha Basque cheesecake myself following all your instructions. It rose a lot in the oven and started browning exactly at the 30’ mark. However, after I took it out, it quickly collapsed in on itself as it cooled, and the final thickness of my cheesecake is about half of that you have in the pictures. Did I do something wrong? How can I prevent this in the future?
Hello, Marilena. Thank you for trying Nami’s recipe.
It’s possible there was too much air in the batter. The air in the mixture expands while the cheesecake bakes. As the cheesecake cools, the air will shrink, possibly causing it to collapse. Try not to overmix or beat the batter too much the next time to see if it helps. 🙂
Hi! Thank you so much for this great recipe! I just made it for my girlfriend’s birthday and it was a hit!
I’m planning to make it again soon for a big party and am thinking of using a 9inch wide 3inch deep springform pan.
What would you suggest for adjusting the ingredient ratio? Would the temperature also have to adjust, or will the bake time just be longer (if so, about how much longer)?
Thank you again!
Hi, Sam! We’re so glad Nami’s recipe worked out so well for your girlfriend’s birthday! 🥰
For a 9-inch round pan, multiply the recipe by 3. For larger pans, we recommend increasing the oven temperature by 25 degrees Fahrenheit and reducing the bake time by one-quarter. However, each oven is slightly different, so please make any necessary adjustments. We hope this was useful.
Hi, thanks for the recipe! I cut into it after it cooled to room temperature, is it supposed to be a little watery, or did I overbake it? It wasn’t soggy or anything, just a tad damper than I expected. I baked a slightly smaller cake for 25 min, and it came out slightly jiggly but not super jiggly as stated in the recipe.
Hi, Laura! Thank you very much for trying Nami’s recipe.
This cake is creamy and custardy; if your cake pan is smaller than Nami’s, it may have been slightly overcooked.
Every oven is different; check the internal temperature display to ensure your oven’s accuracy, and try baking for a shorter duration.
We hope your next try is a success. 🤗
hi! We don’t really have kosher salt in Asia, can I use regular/table sea salt instead as an alternative? Or sea salt?
Hi, Janice! Thank you for trying Nami’s recipe.
You can use either salt for this recipe. However, the amount needs to be modified. Here is a post on how to substitute Kosher salt. We hope this helped!
https://www.justonecookbook.com/diamond-crystal-kosher-salt/
thank you so much for the recipe!! i used itoen sweet matcha packets and grinded it with a pestle which gave my cake a light and airy matcha texture rather than an earthy one. i made it to ask someone out and they said yes ^^ im looking forward to making it again!!
Hi there! Wow! We are glad to hear you enjoyed it!
Thank you for trying Nami’s recipe and sharing your experience with us!