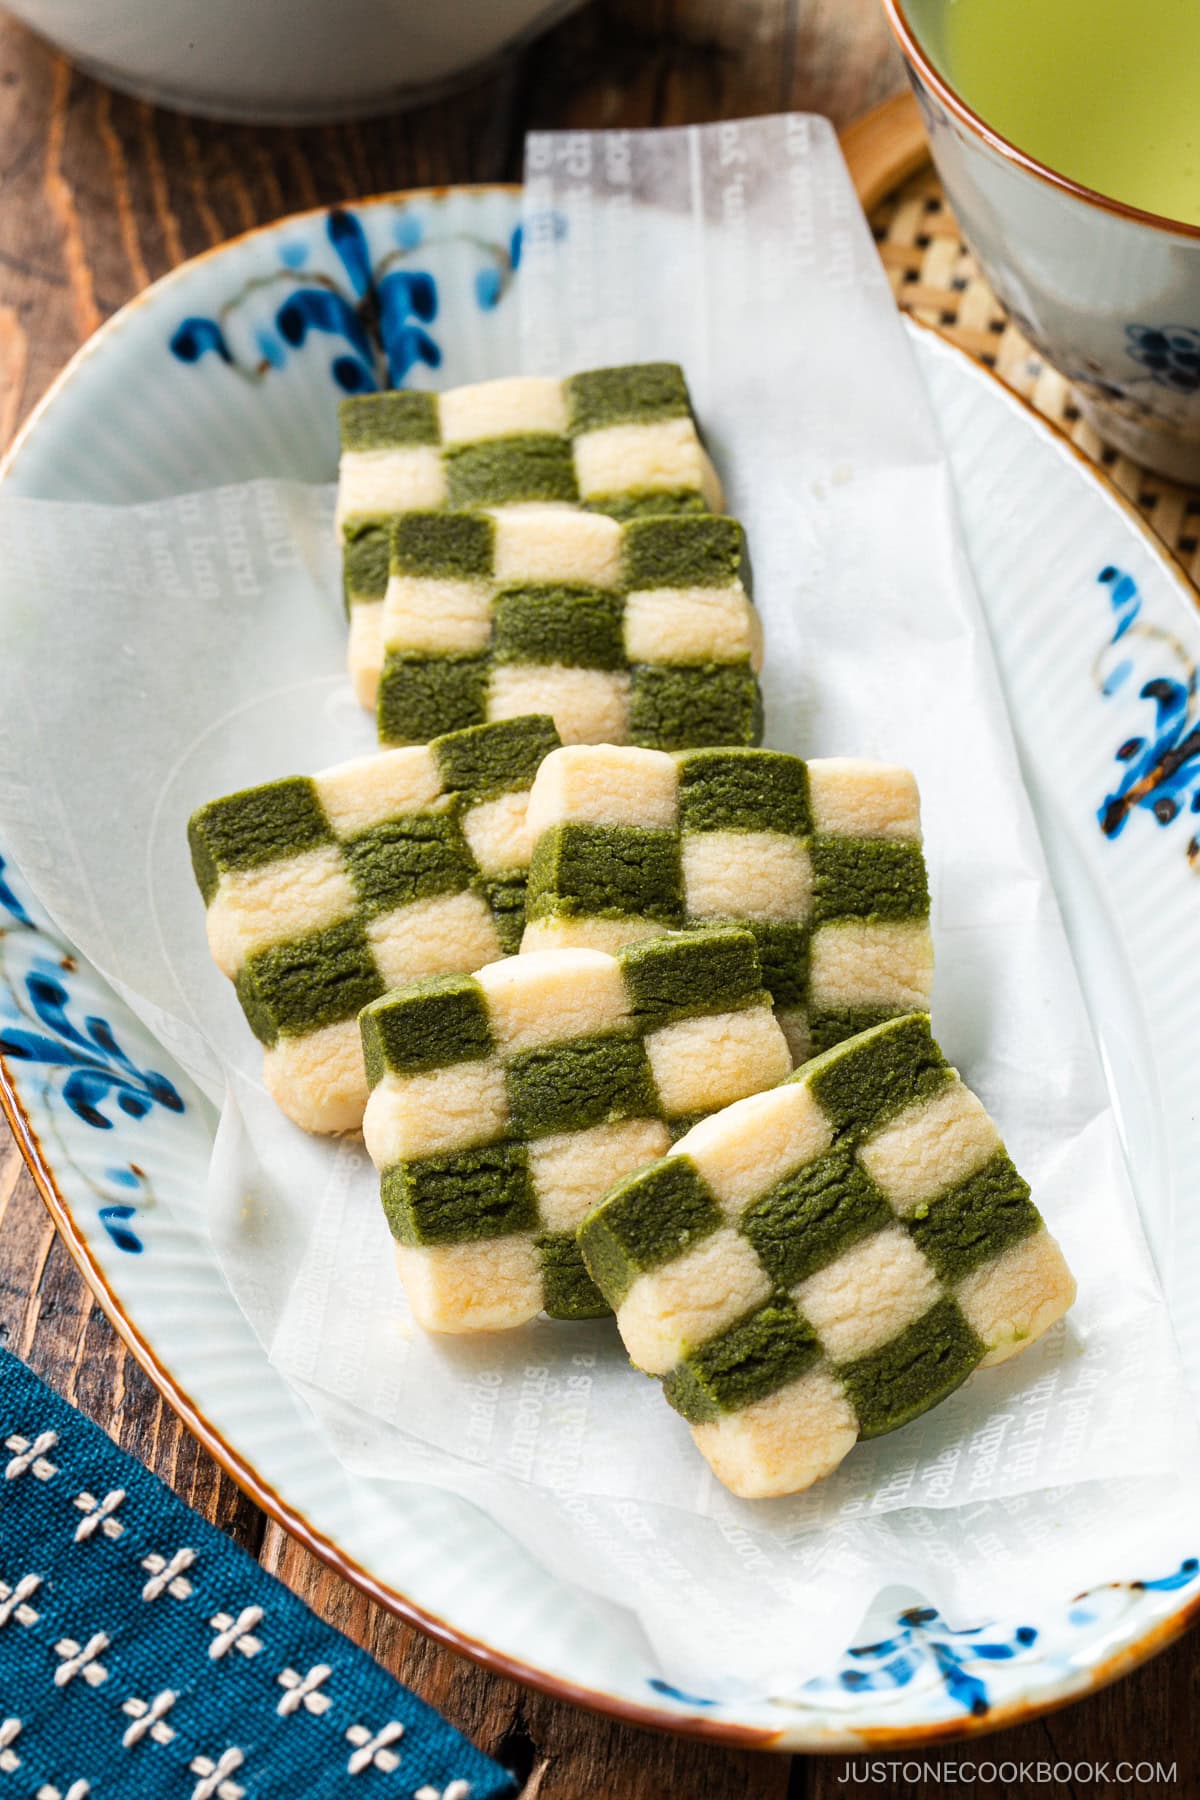
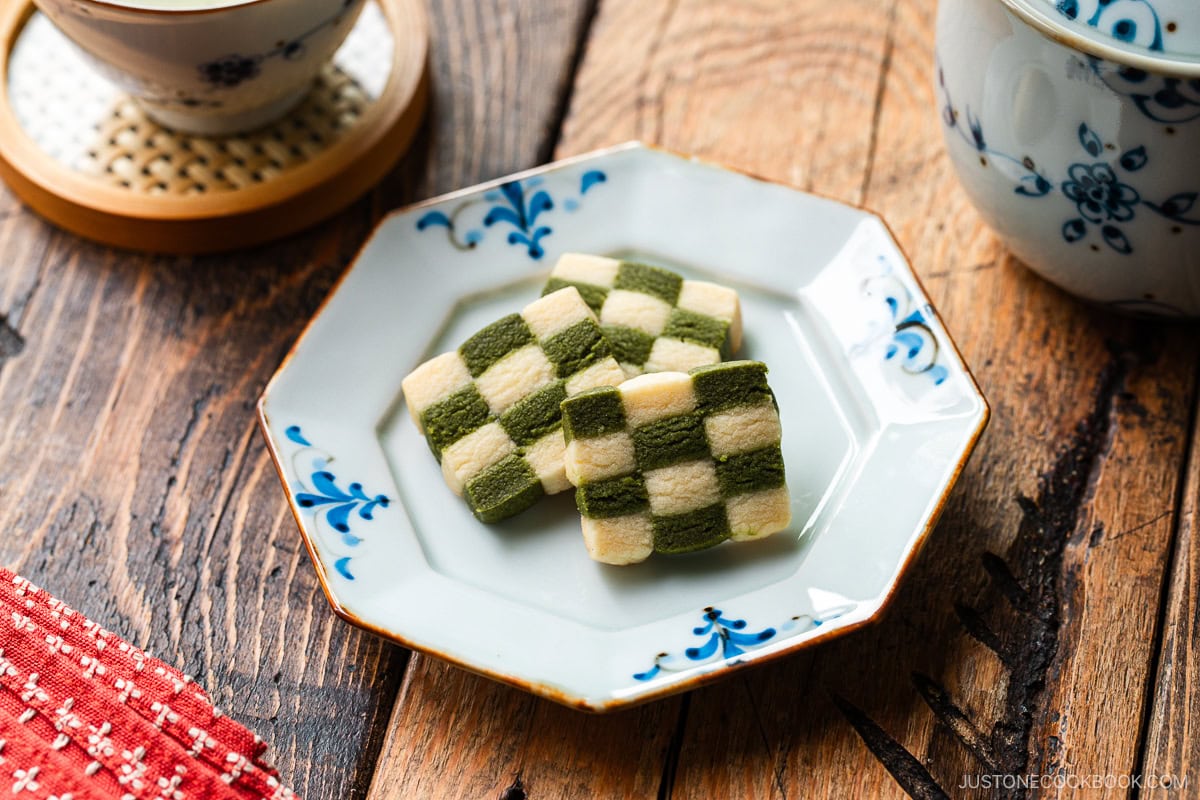
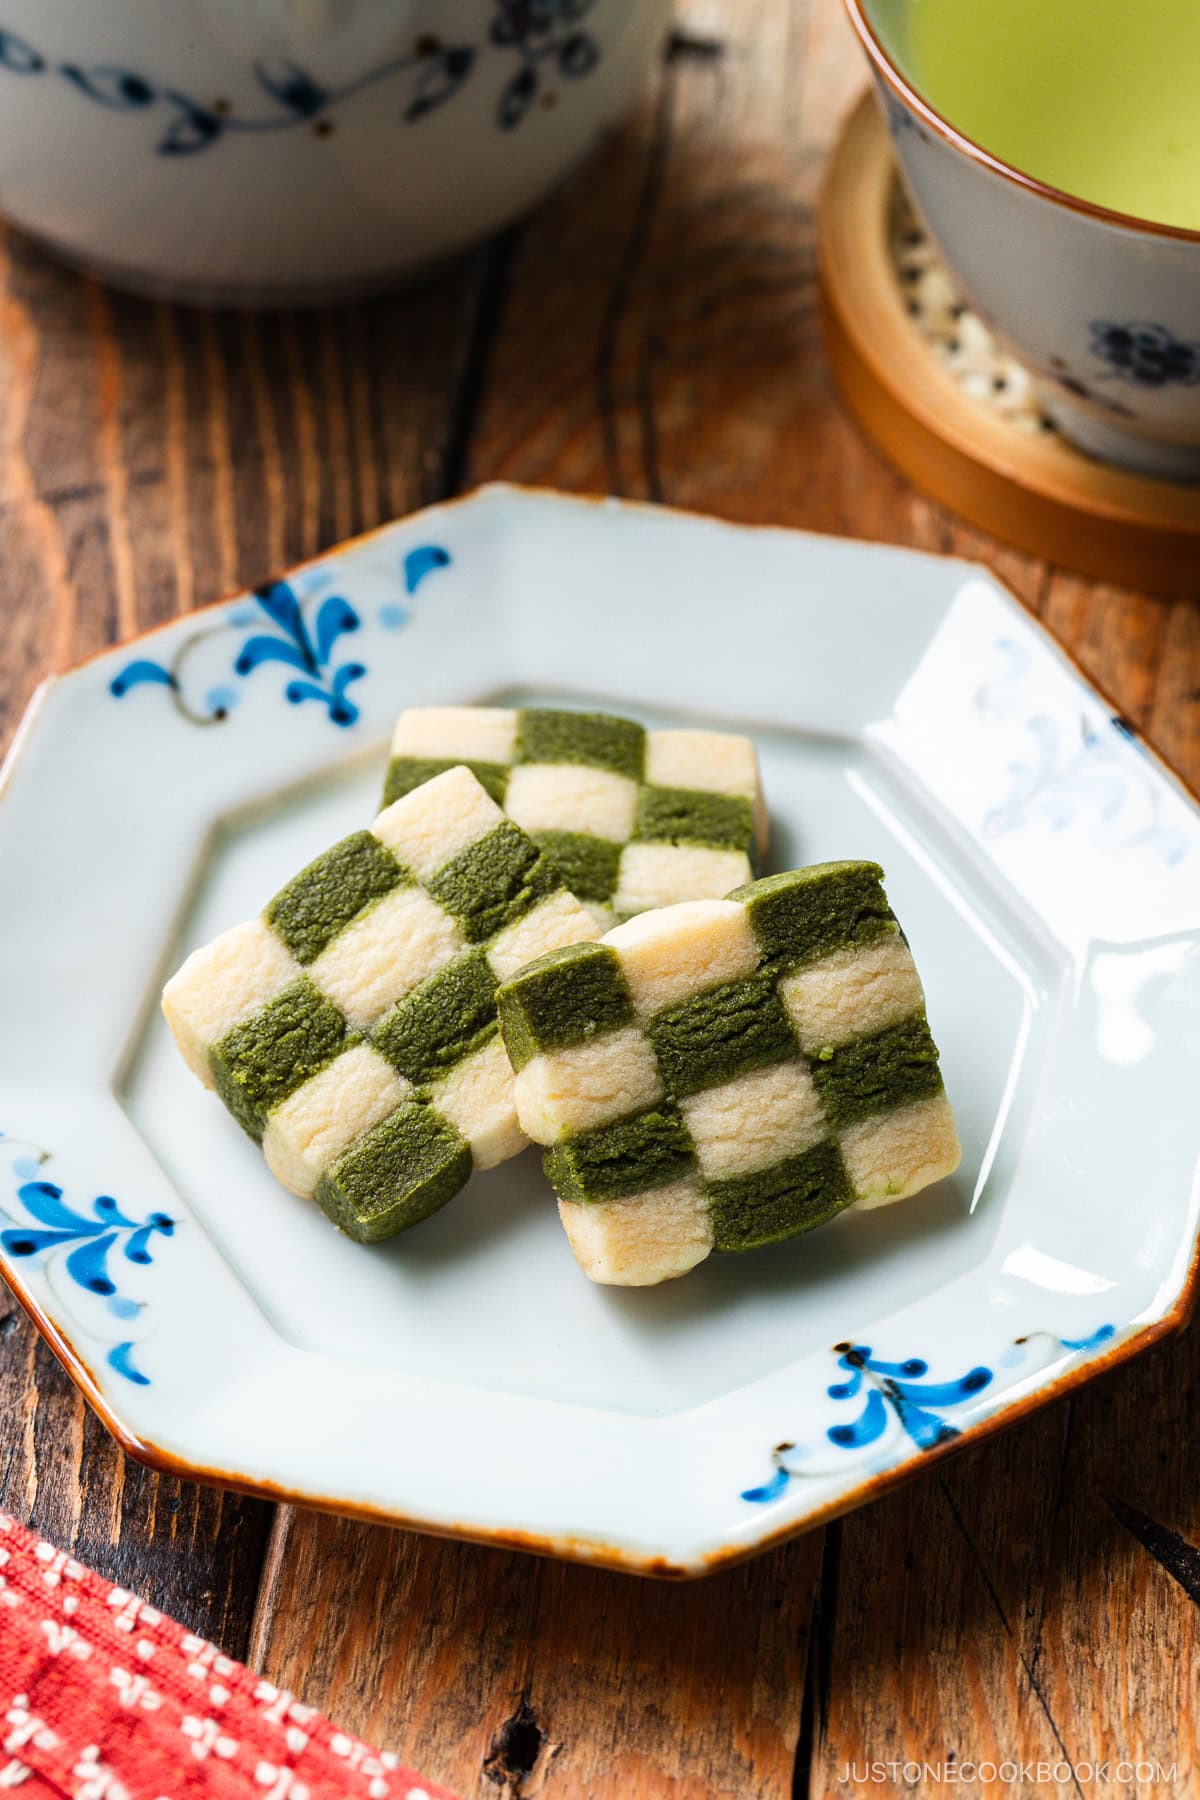
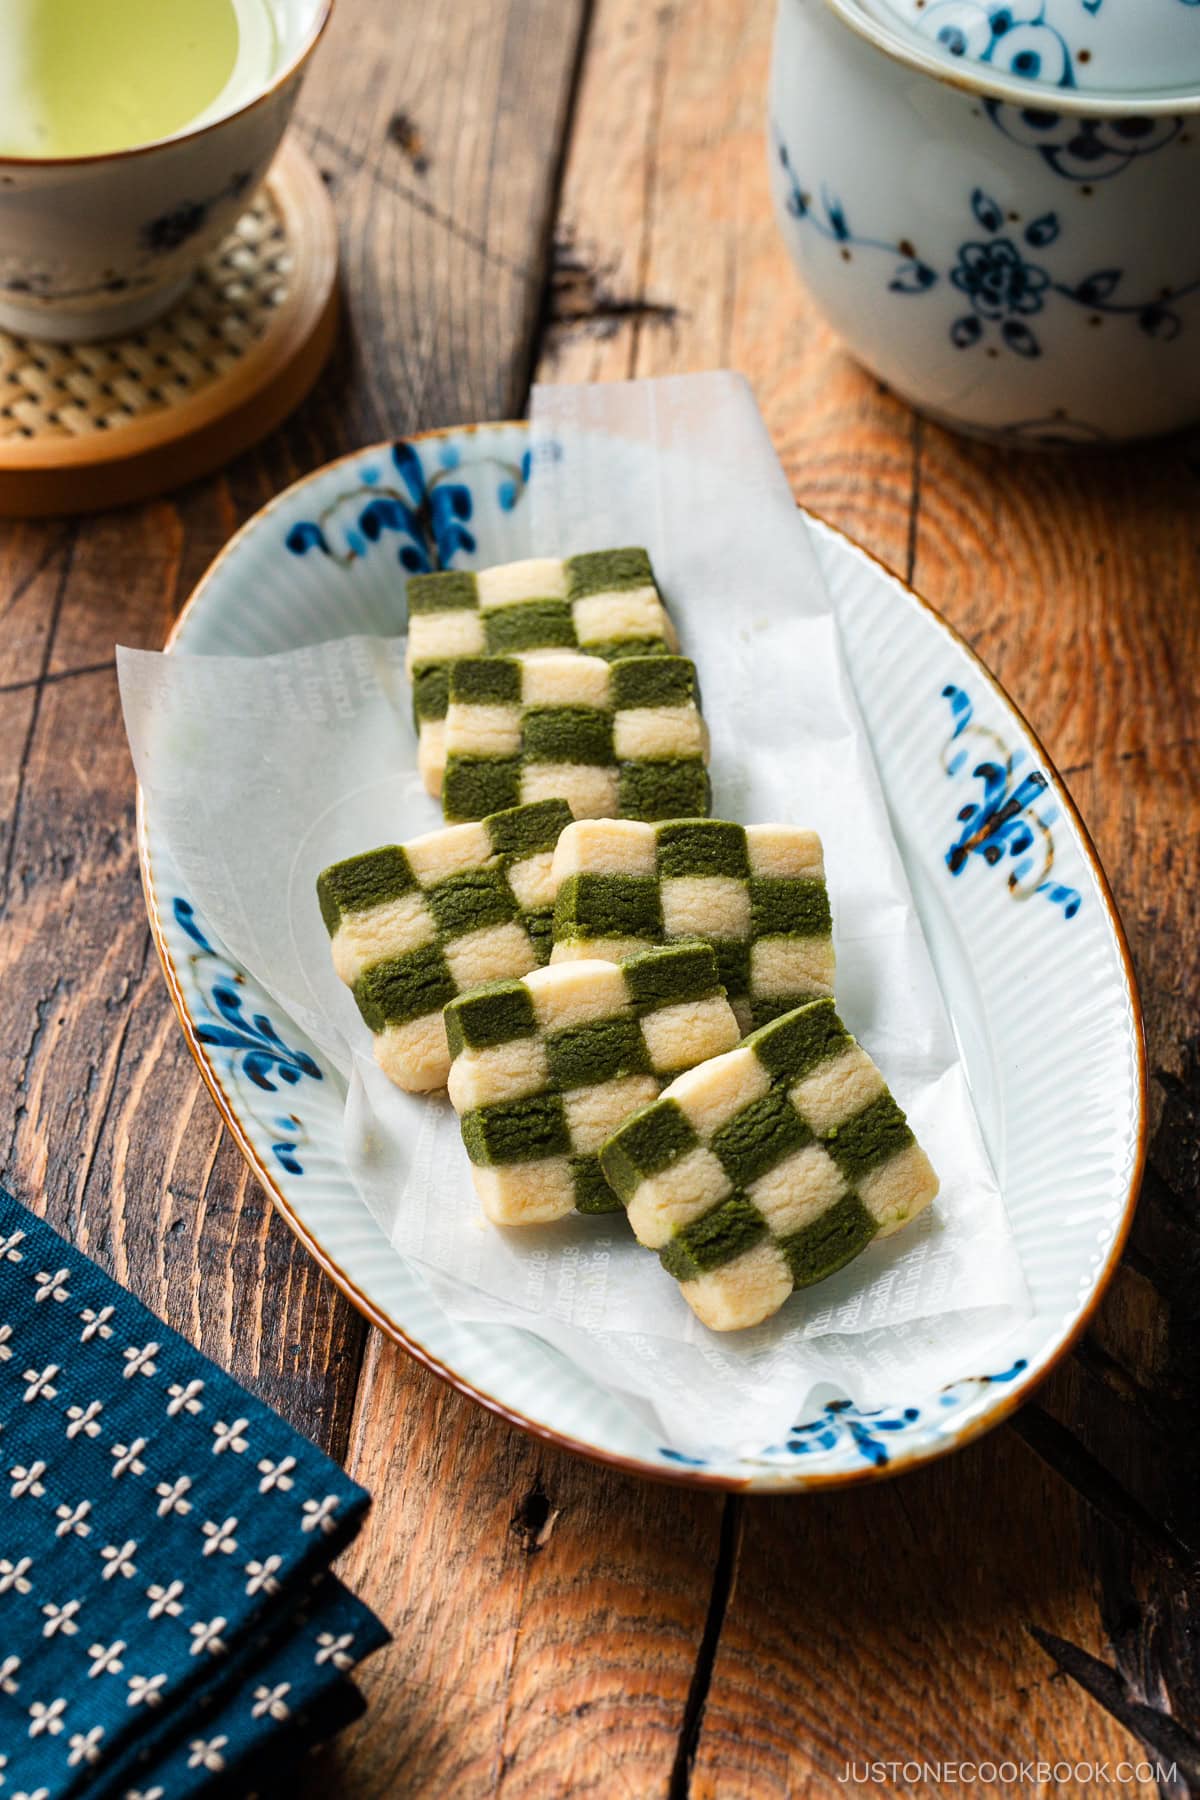
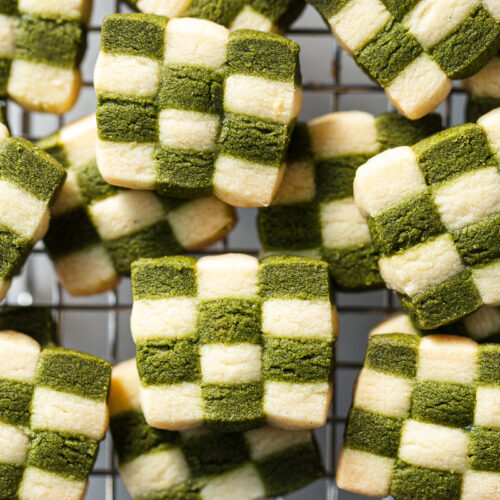
Get in a festive mood with these stunning Matcha Checkerboard Cookies. Crisp and light with a subtle green tea powder flavor, these beautiful shortbread cookies practically melt in your mouth. Anyone can make them! They’re perfect to share at a cookie swap or party.
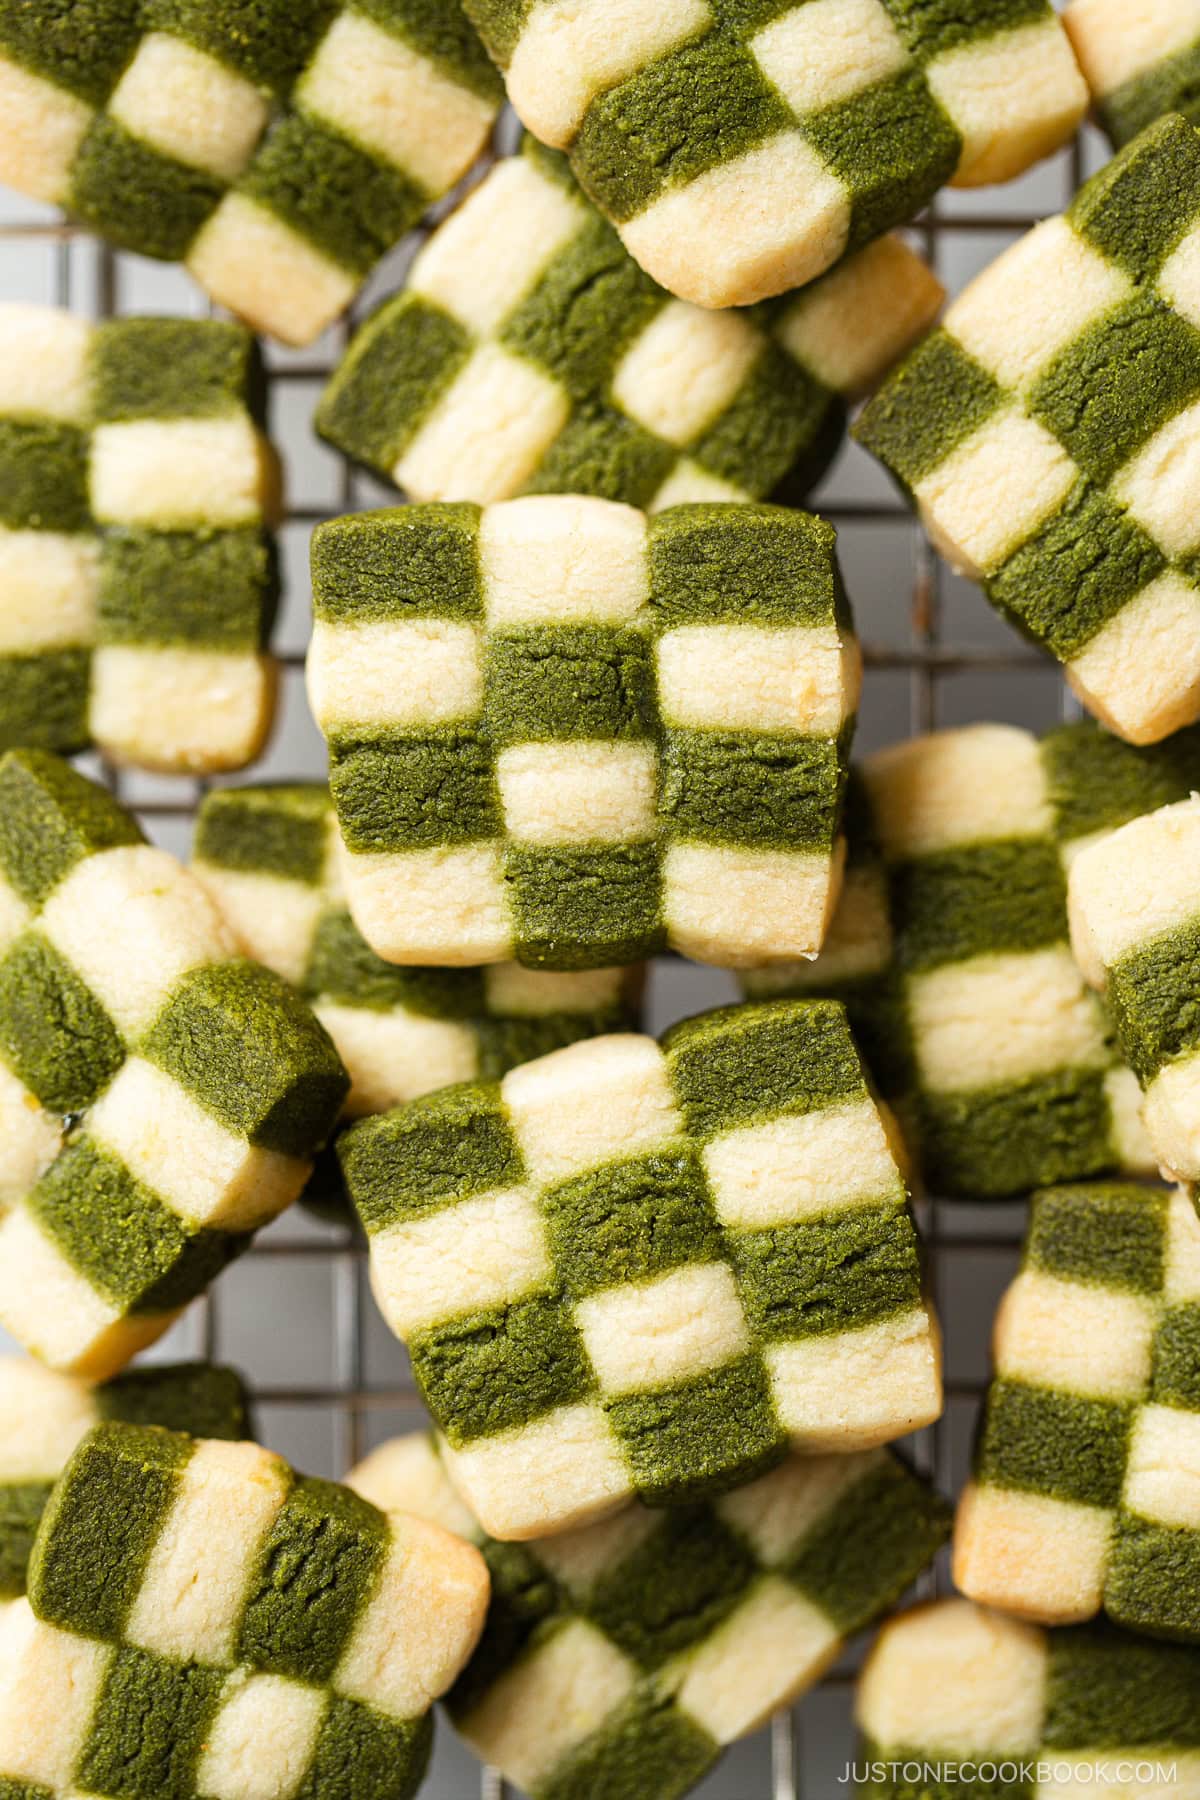
Today, I want to share my recipe for crisp and tender Matcha Checkerboard Cookies that anyone can make. I’ll show you how to elevate a buttery shortbread cookie into something special by rolling, stacking, and slicing the two different colors of dough. Whimsical and eye-catching with a lovely green tea flavor, they are perfect for a cookie swap, dessert tray, or holiday cookie box!
If you love treats with Japanese flavors, try my Black Sesame Cookies, Matcha Cookies with white chocolate chips, and Miso Butter Cookies recipes next!
What are Checkerboard Cookies?
Checkerboard cookies are a type of icebox cookie with a checkered block pattern in two (or more) contrasting dough colors. They often consist of 4 , 9, 12, or 16 blocks. Made with a sablé or shortbread dough, it’s a traditional snack in Sweden known as chessboard cookies or schackrutor. The pattern is similar to England’s Battenberg cake—with two yellow squares alternating with two pink squares—that was created in the 1880s as a royal wedding gift.
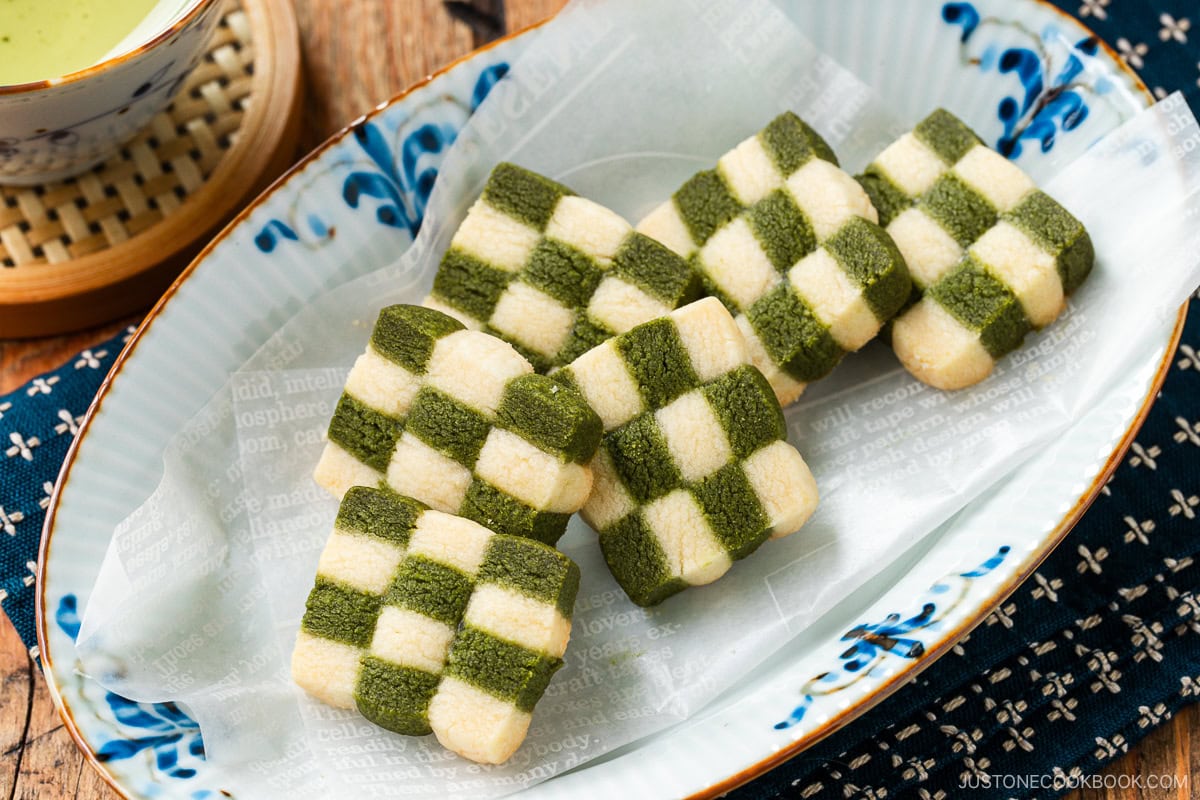
Table of Contents
Why I Love This Recipe
- Crispy, light, and tender – I’ll share my tips for handling the dough so these buttery sablé cookies stay tender yet crunchy. I love this crispy texture—we call it saku saku (サクサク) in Japanese!
- Just the right amount of sweetness – Like many Japanese desserts, this cookie is not overly sweet. I love them with tea or coffee for an afternoon snack.
- A subtle, unmistakable matcha flavor – Japanese green tea powder is my absolute favorite flavor for sweets! It has an earthy and slightly bitter taste, a hint of sweet aroma, and a vibrant green color that works so well in this recipe.
- An eye-catching pattern that’s easy to make – The checkerboard pattern may seem complicated to pull off, but it’s actually quite simple. Just follow my steps for how to roll, layer, slice, and stack the white and green cookie dough to get this polished look.
- Convenient, make-ahead dough – You can refrigerate or freeze the dough log in advance, then slice and bake the cookies later. It’s a huge time-saver during the busy holiday season or anytime I want a fresh-baked, homemade cookie but don’t have a lot of time.
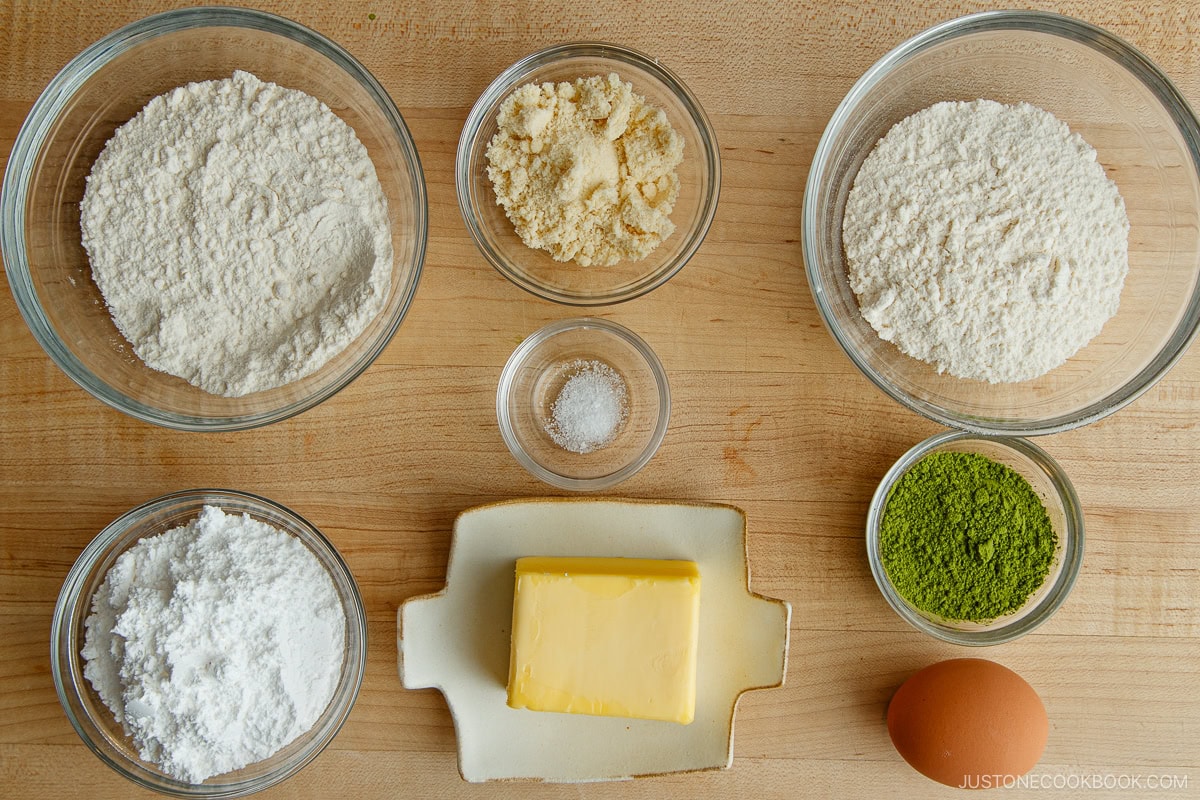
Ingredients for Matcha Checkerboard Cookies
- Matcha (green tea powder)
- Almond flour
- Cake flour
- Unsalted butter – at room temperature
- Confectioners’ sugar
- Large egg yolk – at room temperature
- Kosher salt
- Egg white – reserved from separating the egg yolk; for assembling the dough layers
Find the printable recipe with measurements below.
Jump to RecipeSubstitutions
- Cake flour – Cake flour has a lower protein content and less gluten than all-purpose flour, giving cookies and other pastries a fine crumb and tender structure. Please do not substitute it with all-purpose flour. If you don’t have it, you can make your own cake flour with all-purpose flour and cornstarch. See the recipe card below.
- Almond flour – For a fine texture, please do not substitute almond meal in this recipe. Almond flour is fine and powdery, while almond meal is coarse and heavy. Almond flour also has a lighter color and flavor than almond meal, too.
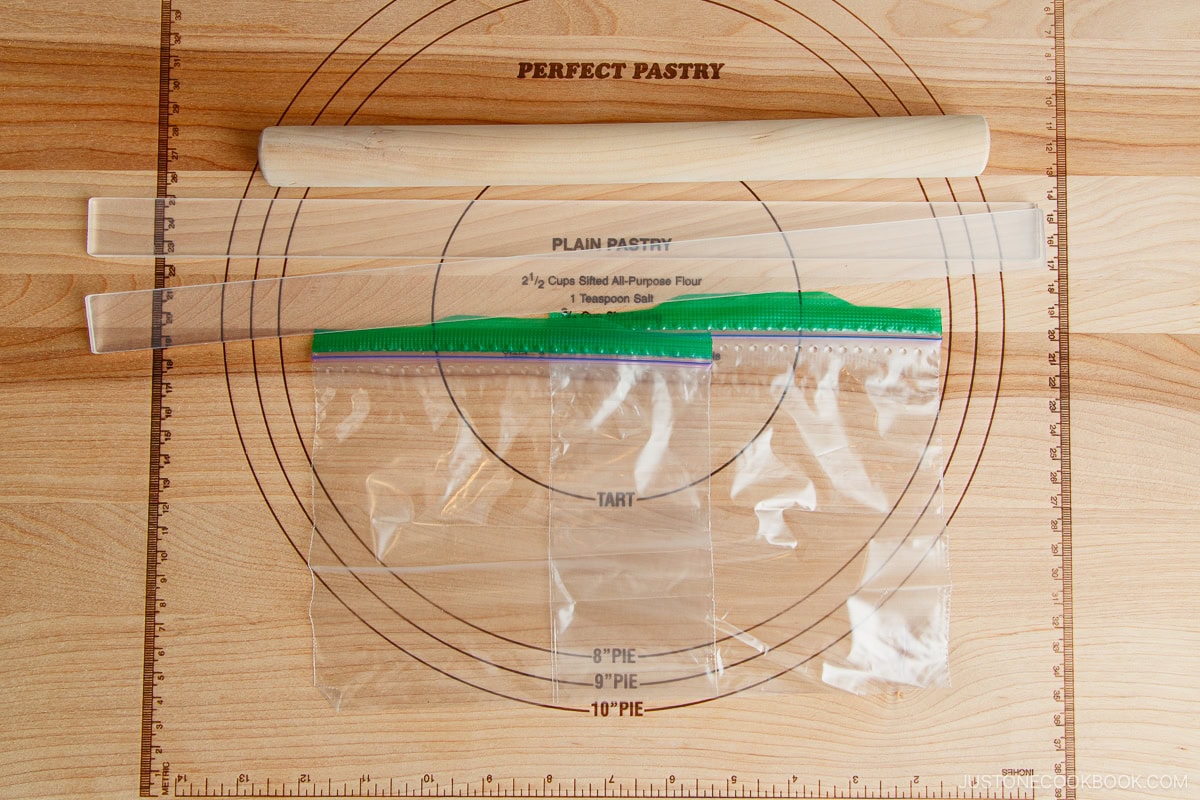
Key Kitchen Tools
- Hand or stand mixer with whisk (and paddle) attachments or food processor
- Aluminum baking sheet – please use a light-colored pan; see more about this below.
- 2 resealable (ziplock) plastic bags, sandwich size (about 6 x 6.5 inches, 15 x 16.5 cm)
- Rolling pin
- Rolling pin guides (optional)
How to Make Matcha Checkerboard Cookies
Preparation
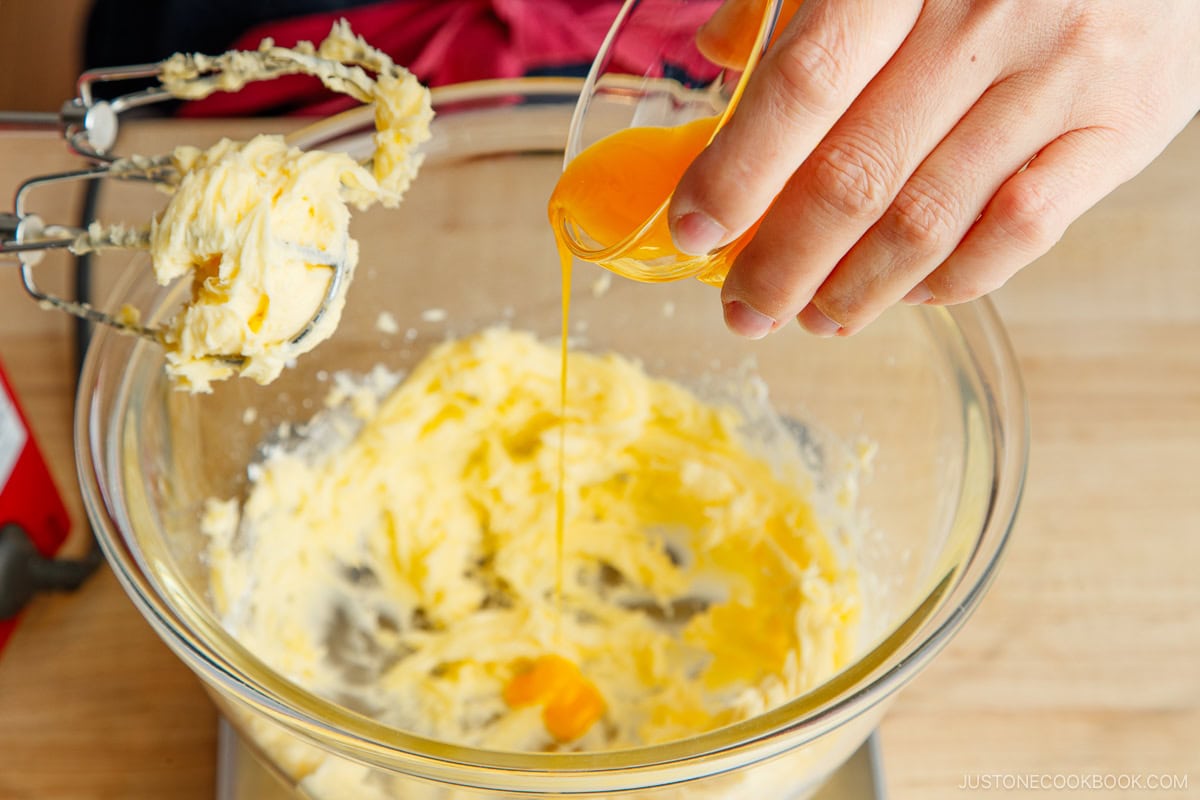
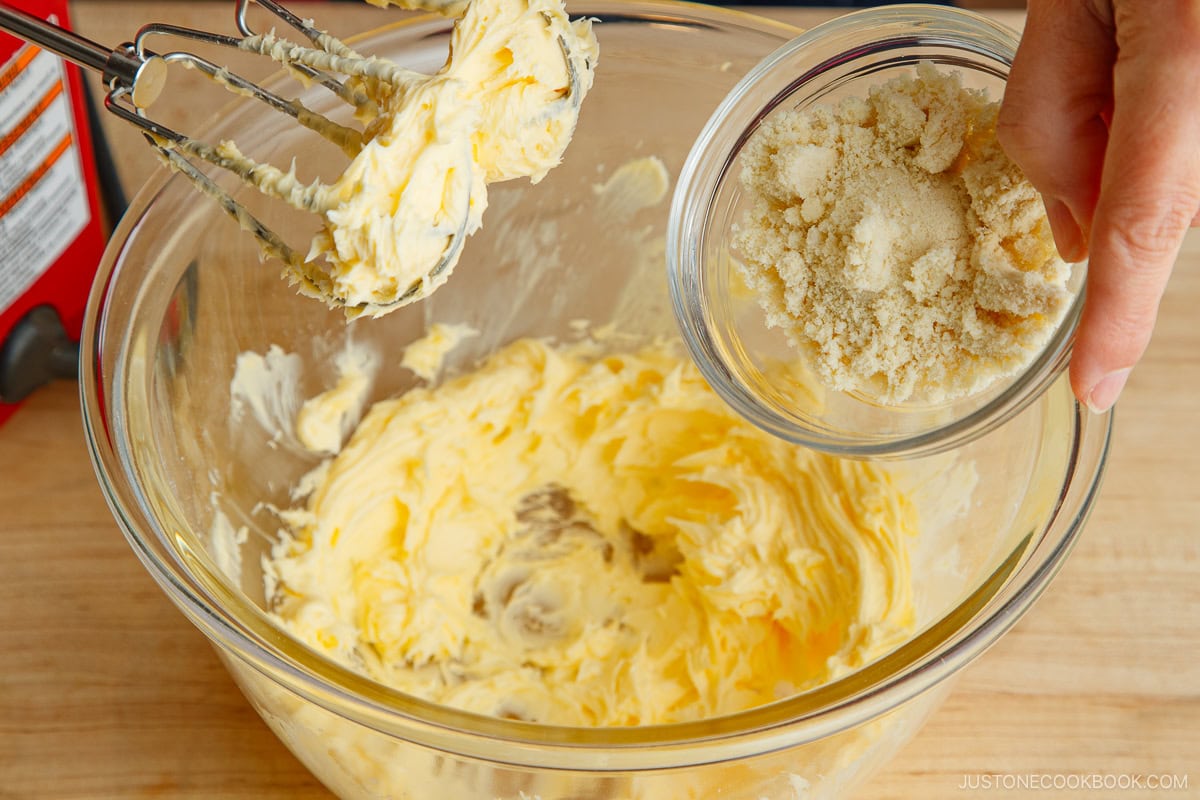
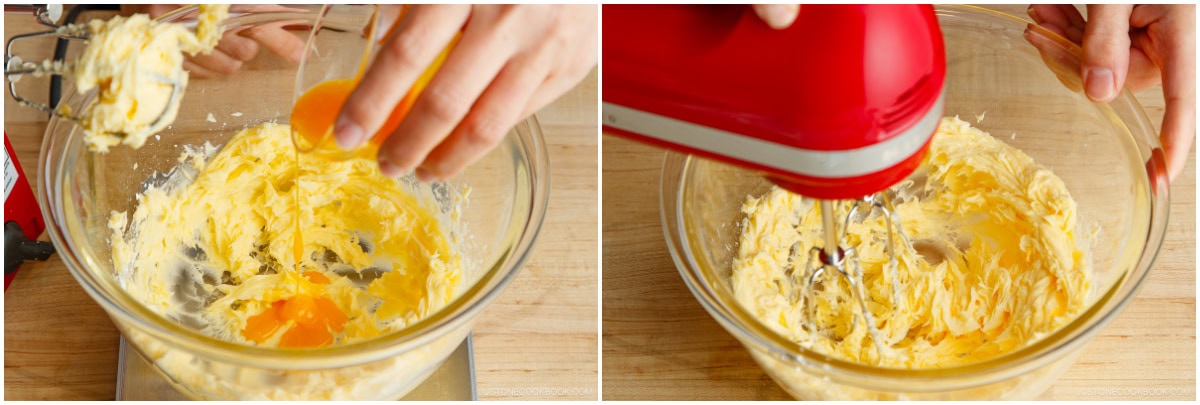
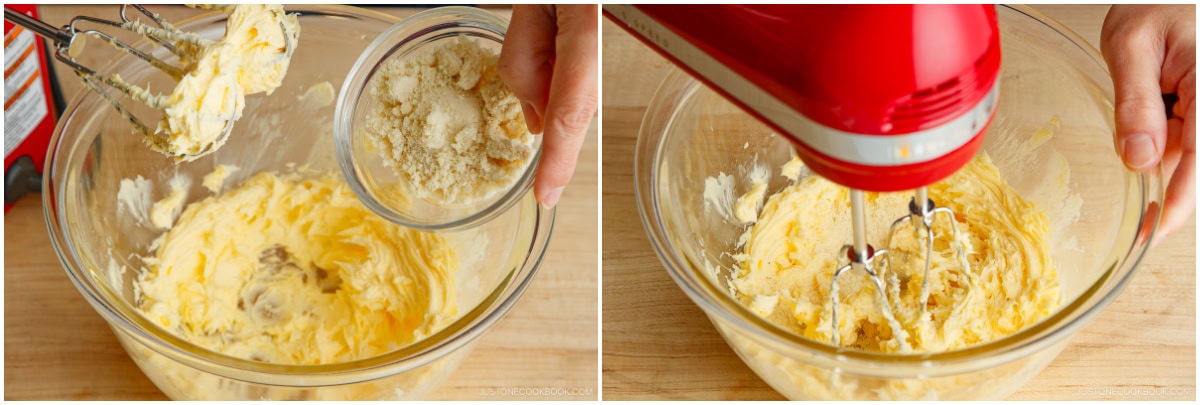
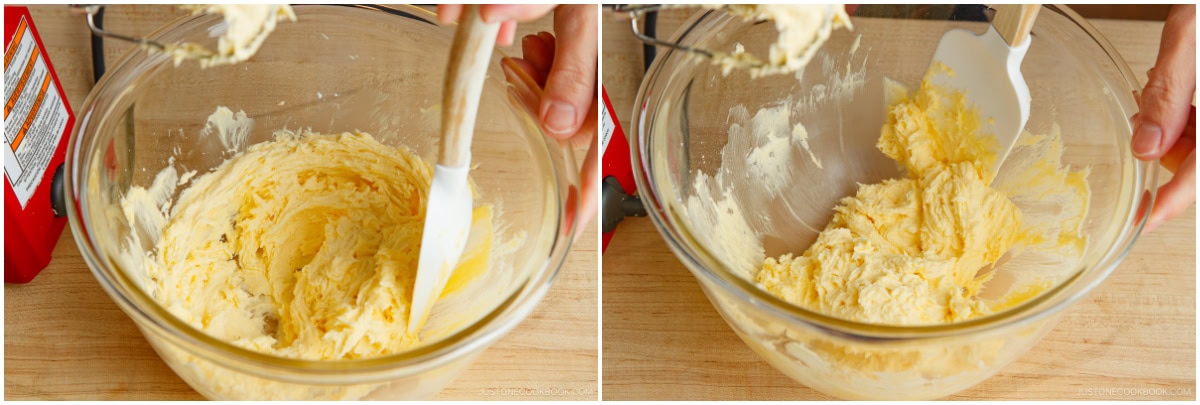
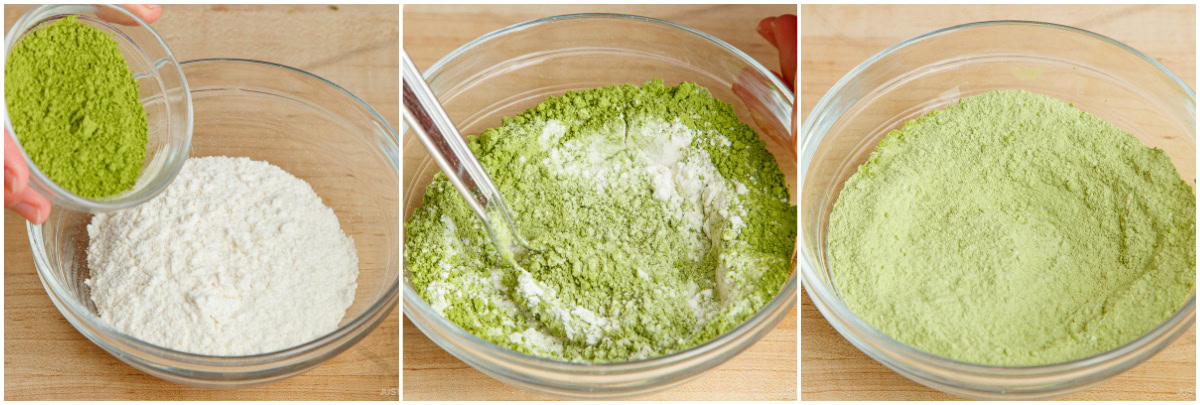
Step 1 – Mix the cookie dough. Smooth the softened butter with a silicone spatula, then use a stand mixer to cream the powdered sugar and butter together until the mixture turns airy and pale. Add the salt and egg yolk, then blend in the almond flour until smooth.
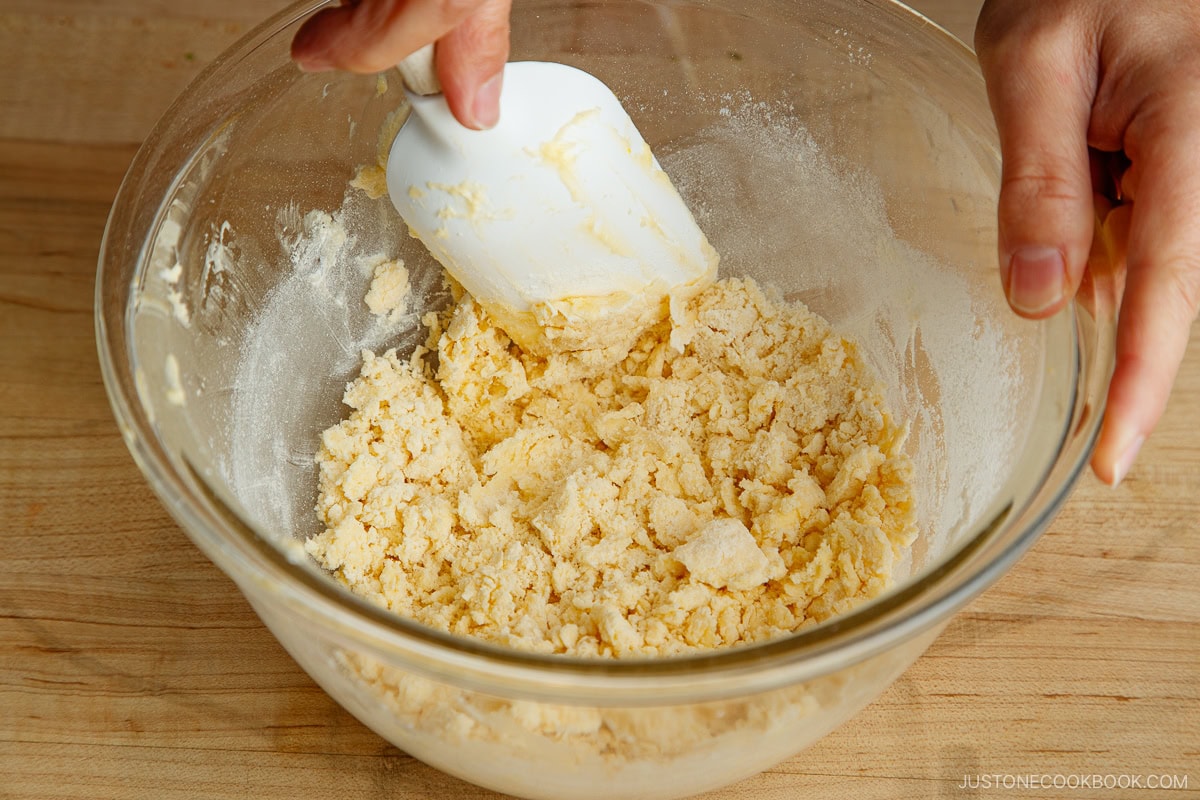
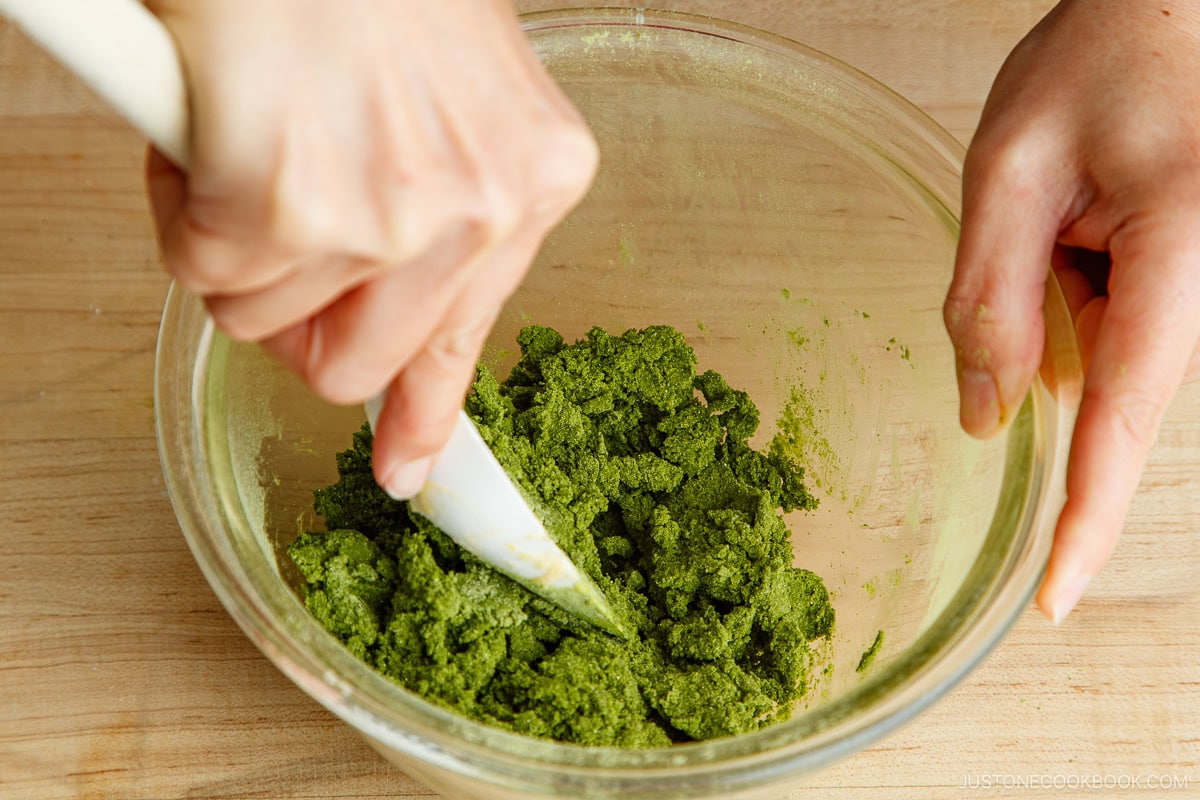
Step 2 – Make the plain dough and matcha dough. Weigh and divide the dough mixture into two bowls. For the light-colored dough, add cake flour and fold by hand with a spatula until just combined. Do not overmix. Repeat for the green-colored dough with cake flour plus matcha powder.
Step 3 – Roll out the dough. Gather each dough and place in its own sandwich bag. Roll flat using a rolling pin and chill for at least an hour.
Assemble
Step 4 – Layer the two cookie dough colors. Lightly brush the surface of one flattened dough with egg white. Place the other dough on top and gently press to adhere. Next, cut the layered dough in half, brush one half with egg white, and stack to create four layers of alternating colors.
Step 5 – Cut strips and make checkerboard logs. Slice the layered dough into long strips. Lay 3 strips flat, then flip over the middle strip to reverse the colors. Brush them with egg white and stack into a log with a checkered pattern. Chill to firm up.
Baking
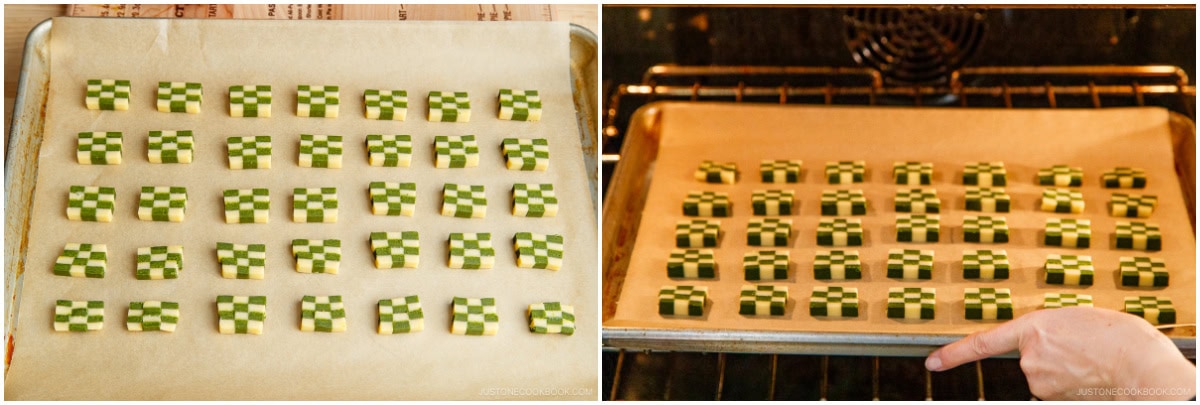
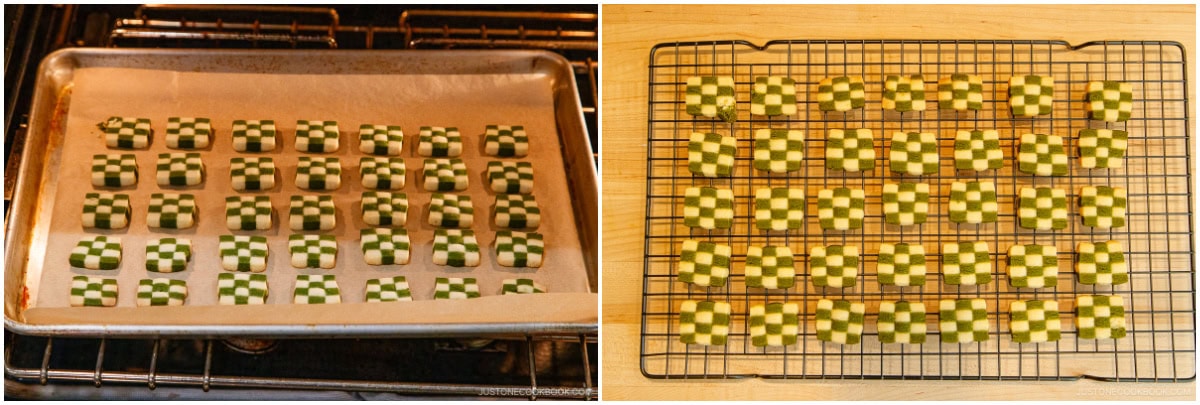
Step 6 – Slice and bake the cookies. Preheat the oven to 350°F (175°C). Cut the log into cookie slices ¼ inch (7 mm) thick. Place the cookies on an aluminum baking sheet lined with parchment paper and bake for 15 minutes, or until slightly browned on the bottom.
Step 7 – Cool on a wire rack and serve. Remove from the oven and let rest on the baking sheet for 5 minutes, then transfer to a wire rack to cool completely and crisp up. Enjoy!
Nami’s Recipe Tips
- Use room-temperature butter and egg. For the ingredients to blend evenly and cohesively, it’s crucial start with the butter and egg yolk at room temperature (70–72ºF or 22ºC). Leave them on the counter for 1 hour (or longer in colder environments) before mixing. If you forget to take them out of the fridge early, here are two quick tricks that I learned from my daughter, who is the home baker in our family: 1) For a cold egg, soak it in warm water for 10–15 minutes; and 2) for a stick of cold butter, microwave and turn for 5 seconds per long side for a total of 20 seconds (1000W).
- Don’t overmix the dough. When it’s time to mix in the cake flour, blend it only until it’s just combined. If you mix it too long, the gluten in the flour will develop and make the cookies tough.
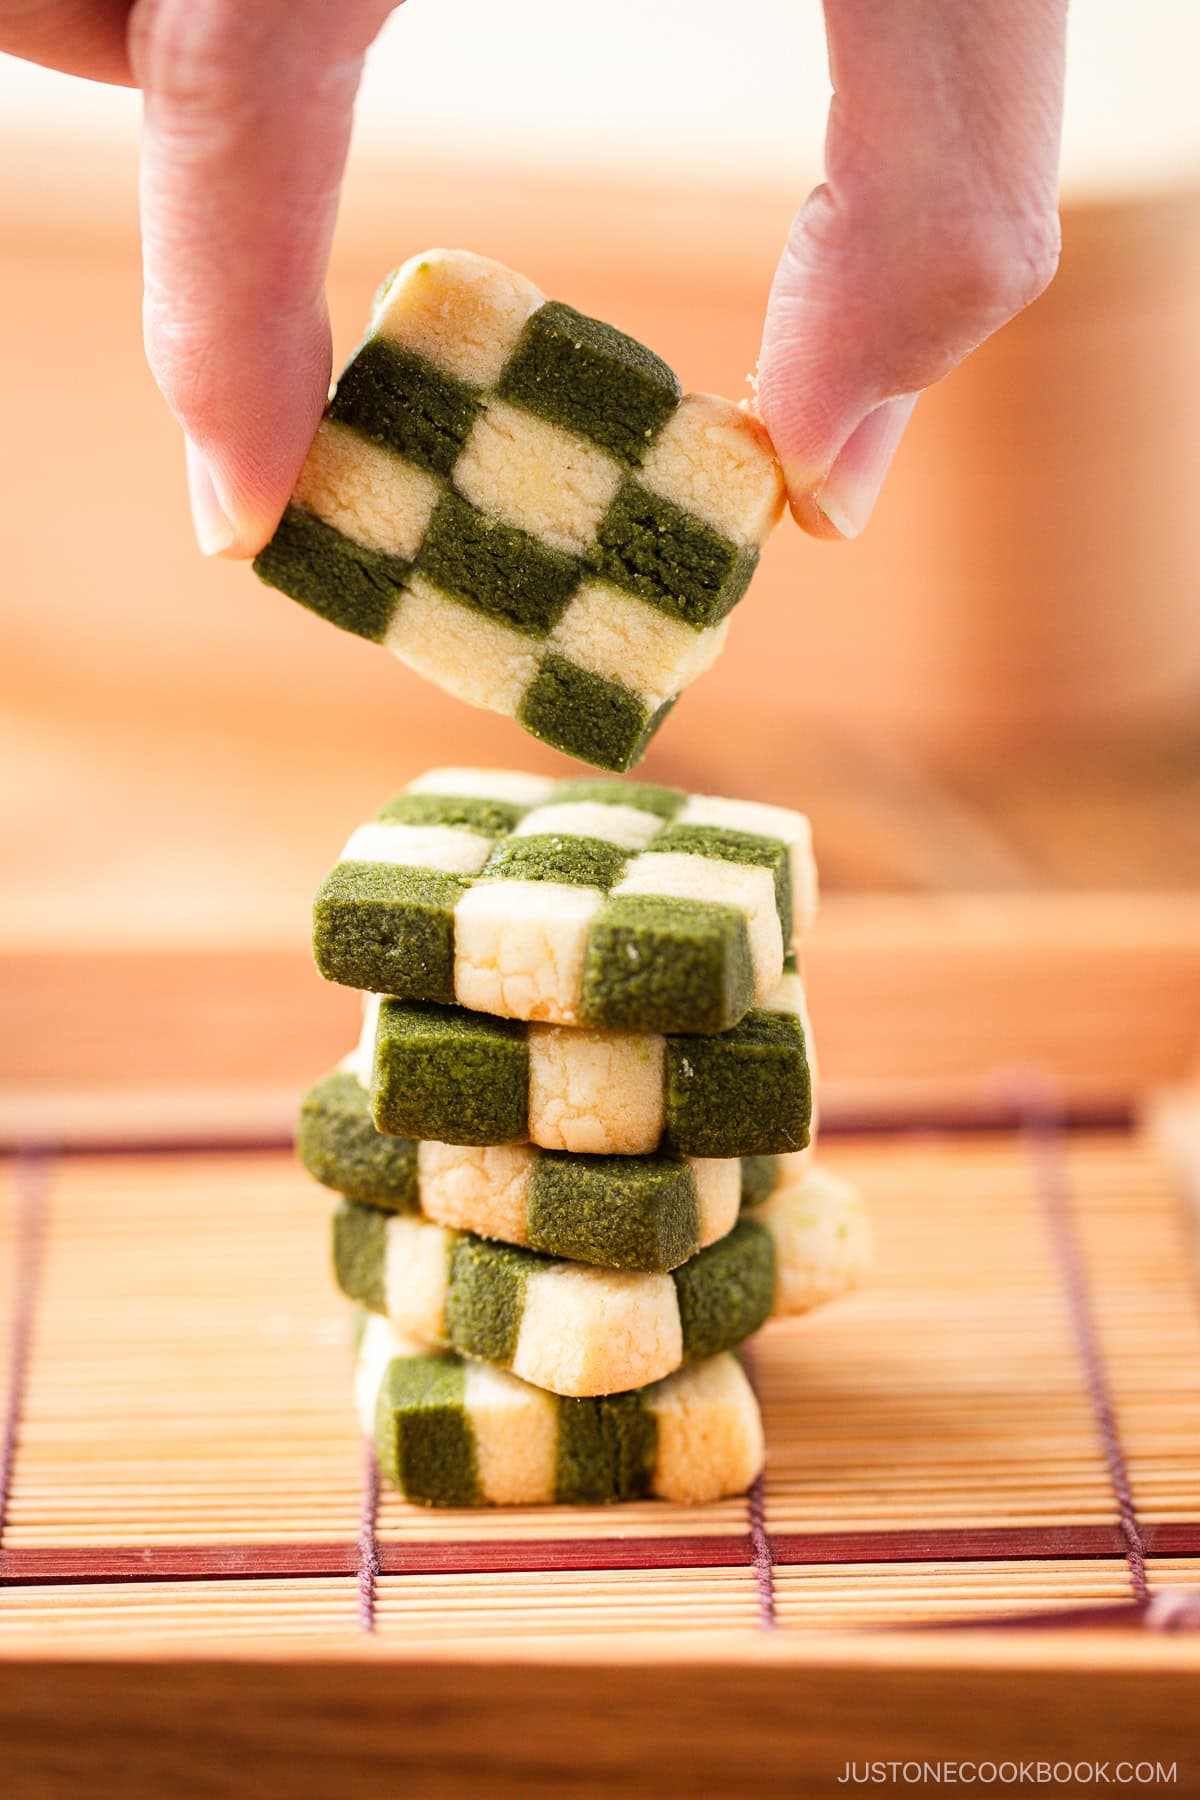
- Chill the dough twice. I know it may be tempting to skip it, but chilling the cookie dough until firm is essential. It intensifies the flavors and retains the cookies’ shape so they don’t spread in the oven. It helps keep the beautiful checkerboard edges sharp and neat. Chilling also keeps the cookies from burning easily in the oven.
- To roll the dough evenly, use Japanese disposable chopsticks and Ziplock sandwich bags as a guide. Before I had rolling guides, I put the dough ball in a bag and used square-sided Japanese disposable chopsticks or cooking chopsticks on either side of the dough ball. I would roll out the dough with a rolling pin to the same height of the chopsticks, about ¼ inch (5 mm) thick. I recommend this trick to make your dough an even thickness.
- Use a light-colored, aluminum baking sheet. I strongly encourage using light-colored pans because aluminum conducts heat uniformly so your cookies brown evenly. An aluminized steel baking sheet also works. In the past, I’ve burned the bottom of my baked goods on a dark-colored baking sheet. Therefore, I highly discourage using a carbon steel or dark-colored baking sheet.
- Check your oven’s actual temperature with an oven thermometer. The actual temperature inside may differ from the display setting. Every oven is different, so please adjust the setting to achieve the correct actual temperature. Keep in mind that your baked goods may cook faster if you use a countertop (or other small) oven. Closely monitor the condition of the cookies and adjust the bake time.
- Remove the cookies when just barely golden. The residual heat from the baking sheet will brown the cookies more, so remove them from the oven when they are just a tad brown. Cool for 5 minutes on the baking sheet, then transfer the cookies to a wire cooling rack.
- Cool completely on a wire rack. Transfer the cookies from the baking sheet to a wire cooling rack. This allows the steam to escape the hot cookies so they can crisp up. Bring the cookies to room temperature before storing them to maintain their crunch.
Variations and Customizations
This butter cookie recipe is easy to customize so you can achieve the look and taste you want. Try my suggestions below.
- Roll the cookies in sparkling sugar or sprinkles. For an extra festive look, you can roll the dough log in clear sparkling sugar or colored sanding sugar before you slice and bake the cookies. This will create a shimmery edge to the cookies. Colorful sprinkles also could make a cute decoration. The sparkling sugar and sprinkles will keep their shape and add more sweetness to the cookies, too.
- Change the flavors and colors. You can make this versatile plain dough almost any flavor and color you like to suit the occasion or season. For a classic springtime combo, I love pairing green matcha with pink-red strawberry. You can make pink dough by mixing a powder of pulverized, freeze-dried strawberries or salt-pickled cherry blossoms into the plain dough. For other colors and flavors, try swapping Dutch-process cocoa powder, Earl Grey tea powder, hojicha powder, or lemon zest.
- Add almond extract. While I kept this recipe pure to enhance the matcha flavor, you could add a small dash of almond extract to the dough if you’d like. Almond extract adds a sweet, bright taste and exquisite fragrance to baked goods. Be sure to use a light touch, though. I usually skip making an almond or vanilla dough because the flavor can overwhelm the subtle matcha taste.
Storage Tips
To store: Cool the cookies completely, then store them in an airtight container at room temperature for up to 1 week. To freeze, transfer the cooled cookies to an airtight container or resealable freezer bag and store in the freezer for up to 3 months. Thaw in the refrigerator overnight to enjoy.
To freeze the cookie dough: Tightly wrap the checkered dough logs in plastic wrap and put them in freezer bags. Freeze for up to 3 months. Thaw them in the refrigerator for 2 hours before slicing and baking.
Frequently Asked Questions
If you did not chill your cookie dough until firm, that may have caused your cookies to go flat during baking. Be sure to chill the dough twice—first after you make the two different doughs and roll them flat, then again after you assemble the checkerboard dough logs. Chill each time for at least 1 hour or until firm if your kitchen is warm. This will help your cookies hold their shape and keep sharp edges.
You may have overworked the cookie dough and caused too much gluten to develop in the flour. To avoid overmixing, gently fold in the cake flour by hand only until it’s just combined; stop mixing when there are no pockets of dry flour left. Also, try not to add flour to your work surface when you roll out the dough and assemble the checkerboard log. You shouldn’t need to dust flour if you use the sandwich bags.
Cold, firm butter is challenging to beat, and sugar will not fully blend and cream together with cold butter. This makes it difficult to incorporate air into the mixture, resulting in tougher cookies. You also risk overworking the dough since cold butter takes longer to mix with the other ingredients. For the best results, soften the butter to 70–72ºF (around 22ºC) before mixing. I usually leave the butter on the counter for about an hour. If you forget to take out the butter from the fridge, see my Recipe Tips above for my daughter’s trick to quickly soften it.
I definitely recommend using powdered sugar over granulated sugar in icebox cookies because its fine texture blends seamlessly into the dough, creating a smoother, more uniform consistency. It also dissolves quickly and evenly, resulting in tender, melt-in-your-mouth crumb, unlike granulated sugar, which can leave a grainy texture. Additionally, the cornstarch in powdered sugar helps reduce spread during baking, ensuring the cookies maintain their precise shape and clean edges. Due to all these reasons, I definitely use powdered sugar for my icebox cookies!
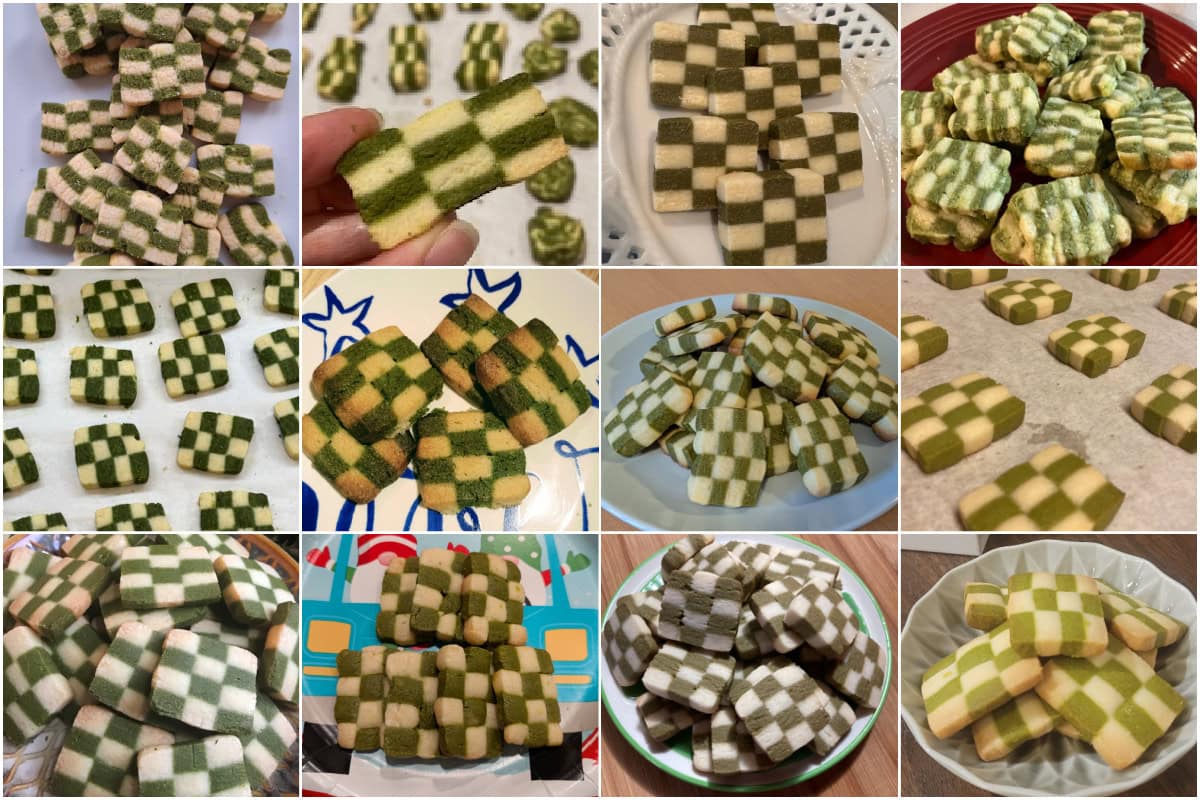
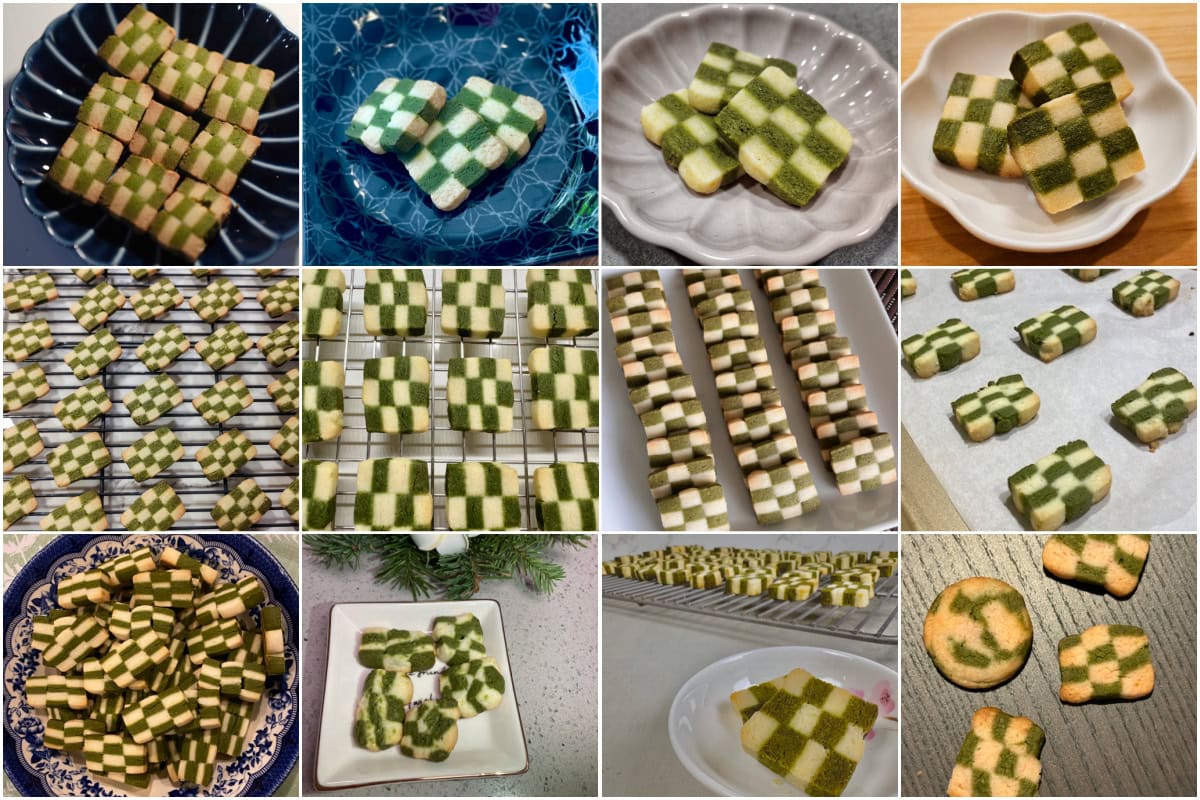
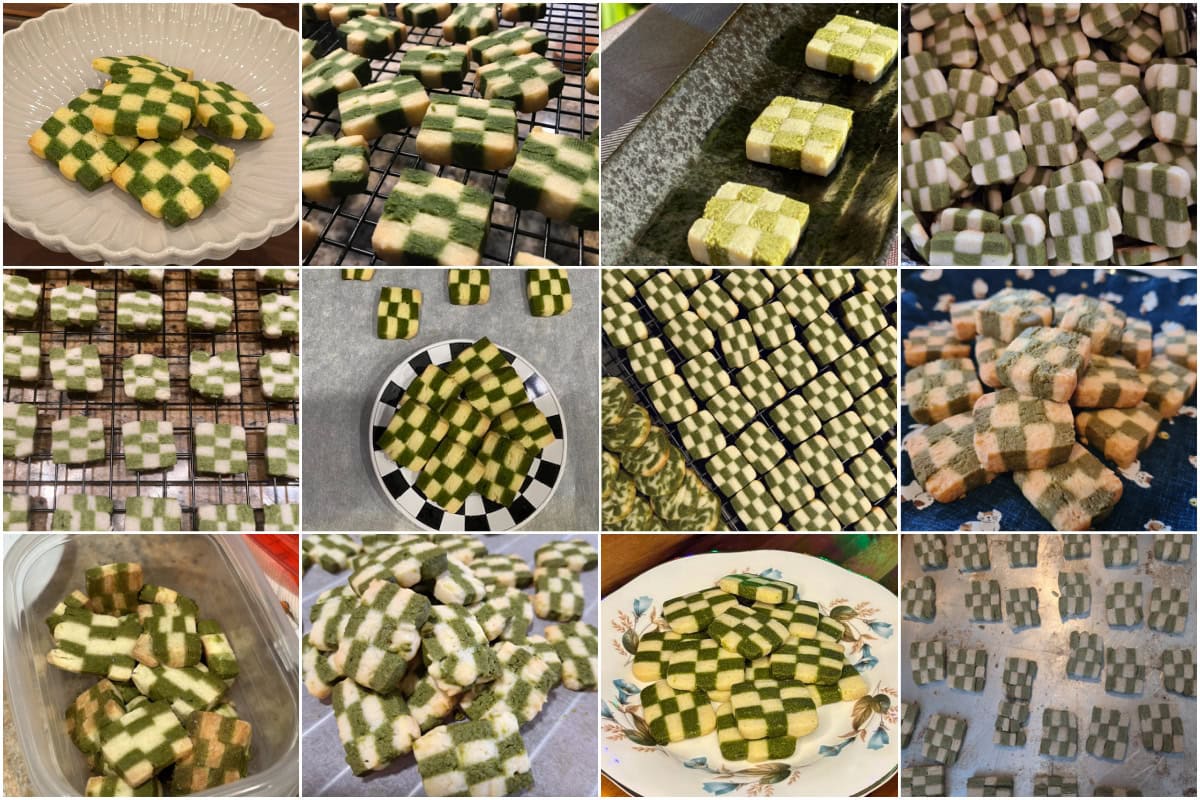
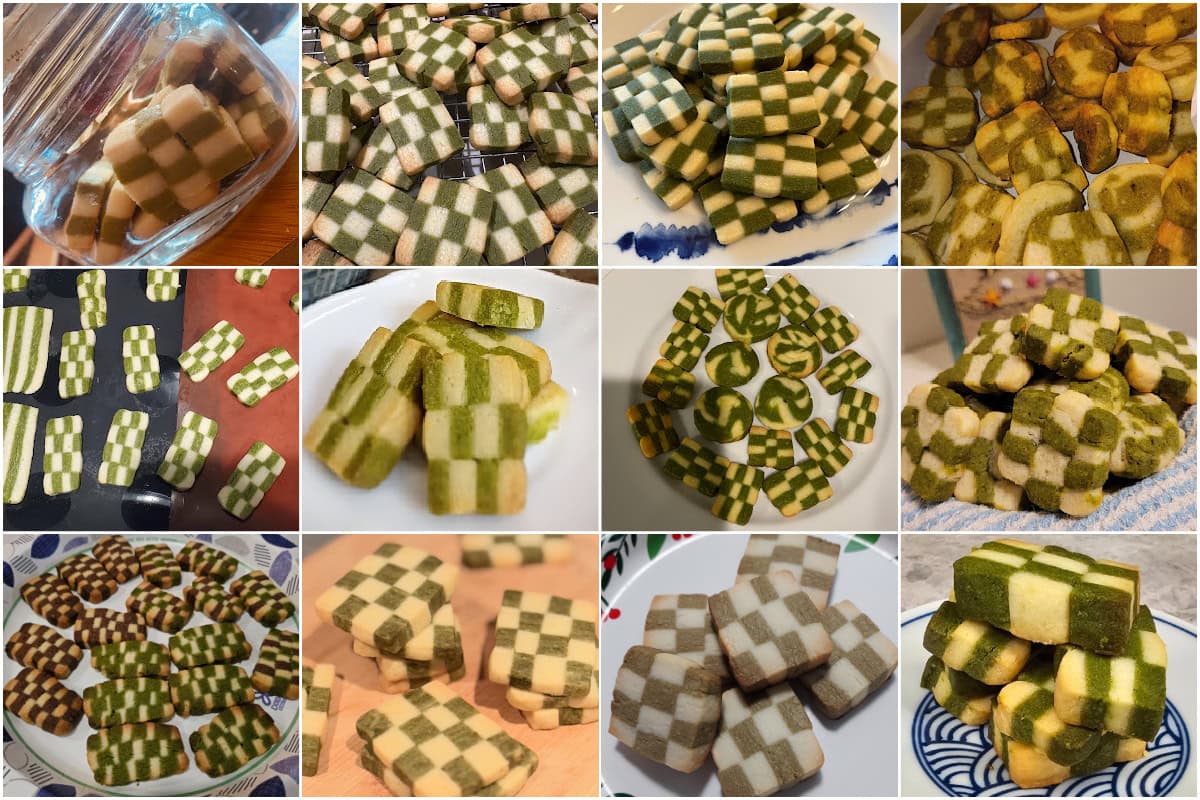
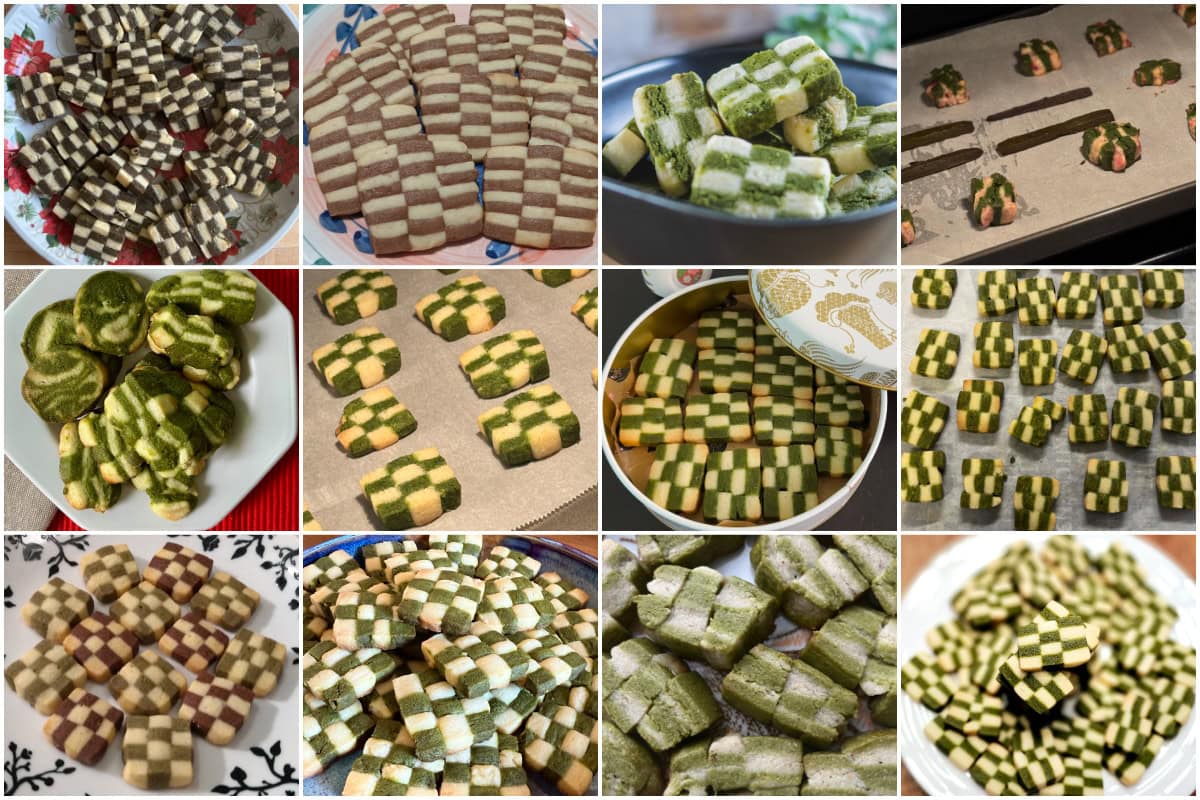
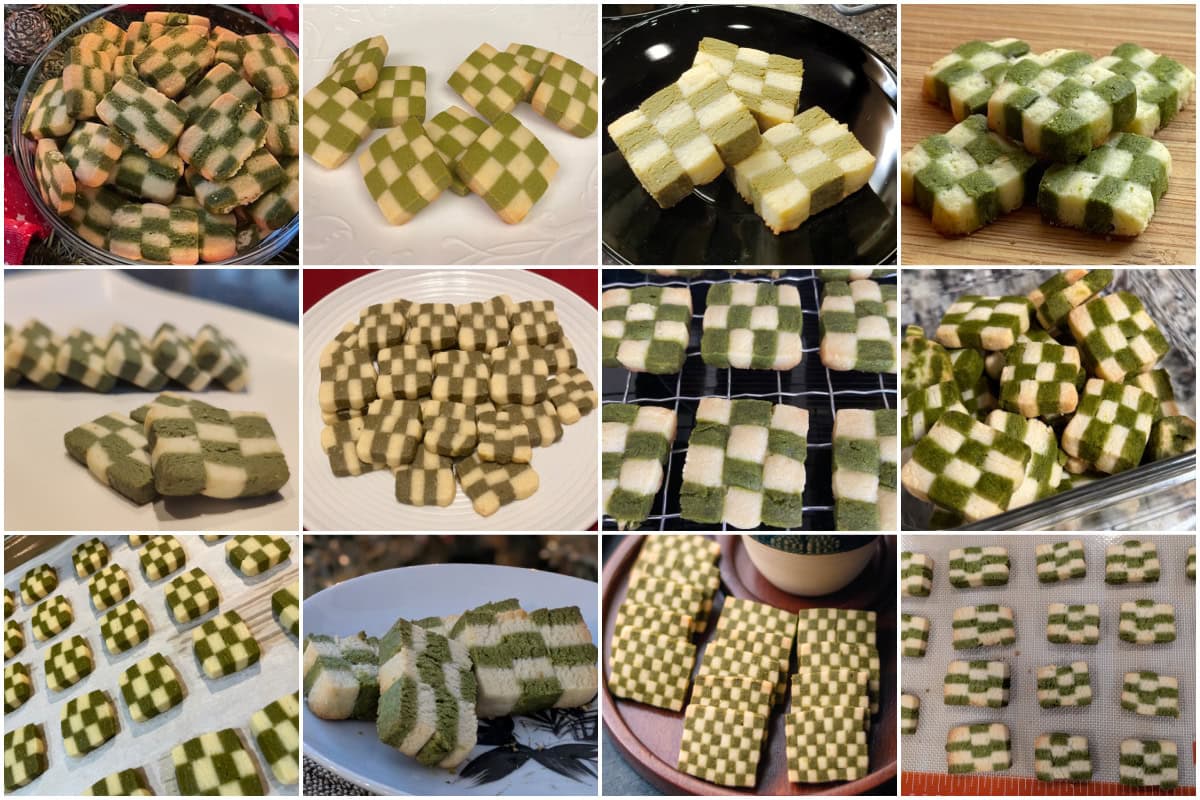
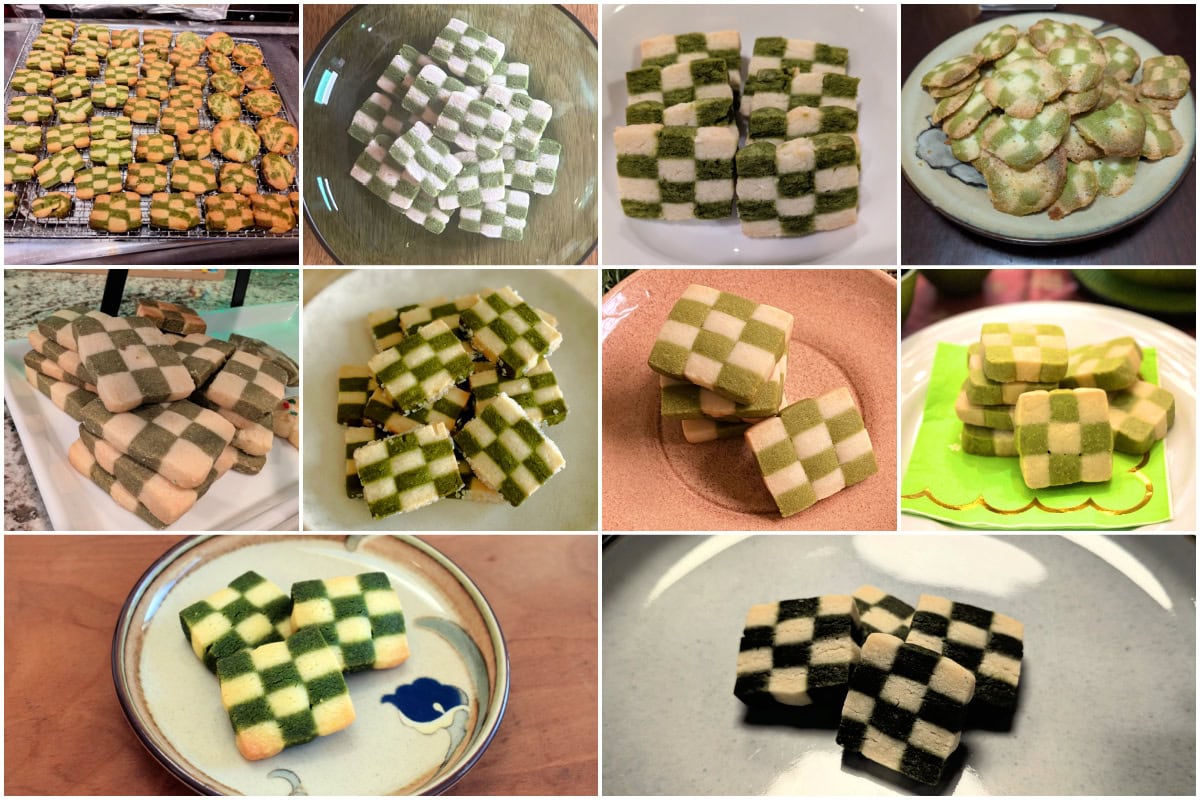
Readers’ Matcha Checkerboard Cookies
Matcha Checkerboard Cookies were the challenge recipe for the JOC Cooking Challenge in December 2024. Check out the delicious cookies created by JOC readers!

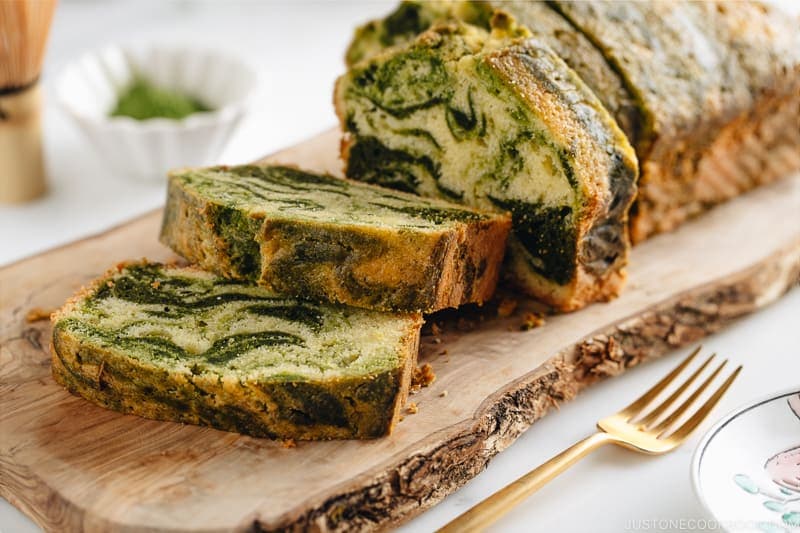
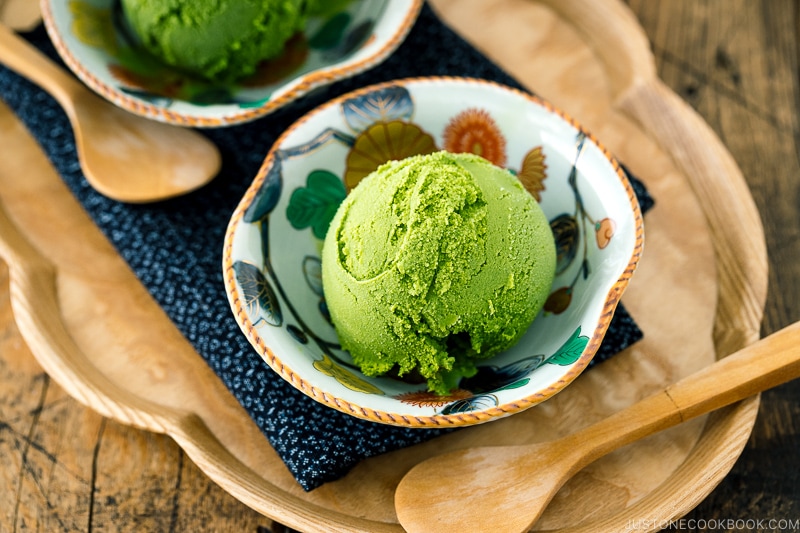
More Matcha Dessert Recipes
If you love these Matcha Checkerboard Cookies, you’re in for a treat with these other irresistible recipes for matcha sweets.
Matcha Checkerboard Cookies
Ingredients
- 7 Tbsp unsalted butter (at room temperature)
- ½ cup confectioners’ sugar
- ⅛ tsp Diamond Crystal kosher salt
- ½ large egg yolk (measure its weight, then divide in half; at room temperature)
- 2 Tbsp almond flour (I use King Arthur Almond Flour)
- ½ heaping cup cake flour (for the plain dough; please weigh your flour; click the Metric button for weights; or learn how to measure flour with a measuring cup; I use King Arthur Unbleached Cake Flour; click the ingredient link for how to make cake flour at home)
- 5 tsp matcha (green tea powder) (for the green dough)
- ½ cup cake flour (for the green dough; please weigh your flour)
- egg white (from separating the egg yolk)
Instructions
- Before We Start: Please remember that this recipe requires at least 2 hours of chilling time. I encourage dividing the baking process into morning and afternoon or two days (chilling overnight) to minimize the waiting periods. Gather all the ingredients. Allow the unsalted butter to soften to room temperature for 1 hour or longer. I highly encourage you to weigh your ingredients using a kitchen scale. For weights, click the “Metric“ button at the top of the recipe to convert the measurements. If you‘re using a cup measurement, please follow the “fluff and sprinkle“ method: Fluff your flour with a spoon, sprinkle the flour into your measuring cup, and level it off. Otherwise, you may scoop more flour than you need.
- You will also need a hand or stand mixer with whisk (and paddle) attachments or food processor, an aluminum baking sheet, 2 resealable (Ziplock) sandwich-size bags (about 6 x 6.5 inches, 15 x 16.5 cm), a rolling pin, and rolling pin guides (optional; I bought my acrylic rolling guides from Amazon).
To Mix the Cookie Dough
- Separate the egg yolk from the egg white.
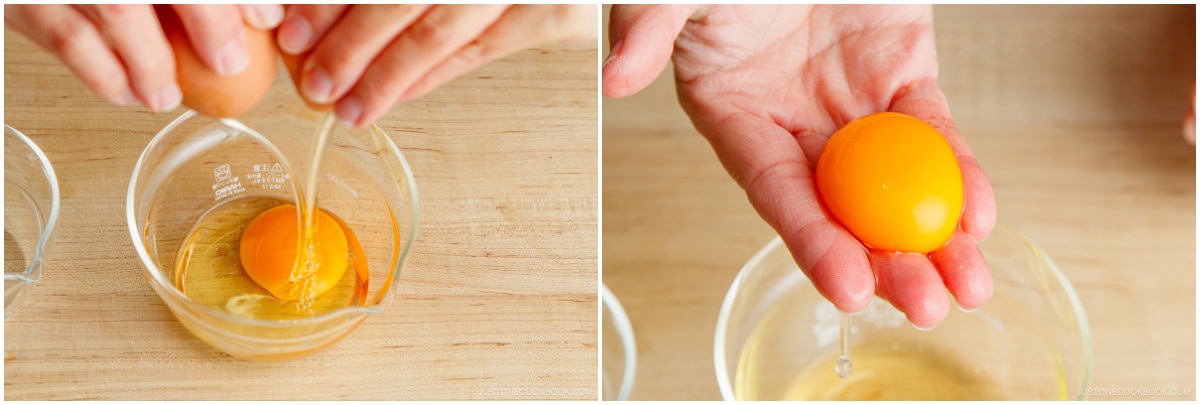
- Place the egg white in a small bowl, cover with plastic, and store it in the refrigerator. Place ½ large egg yolk in a small bowl and mix until smooth. Tip: To divide the yolk in half for one batch, I use a digital scale to weigh the egg yolk and calculate the precise weight of half.

- Place 7 Tbsp unsalted butter (at room temperature) in a bowl and press it with a silicone spatula until smooth. Add ½ cup confectioners’ sugar.
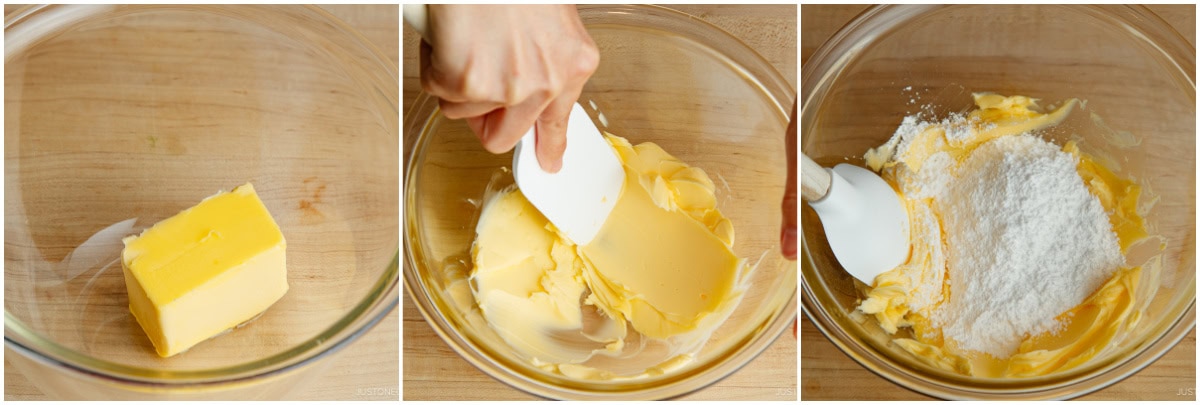
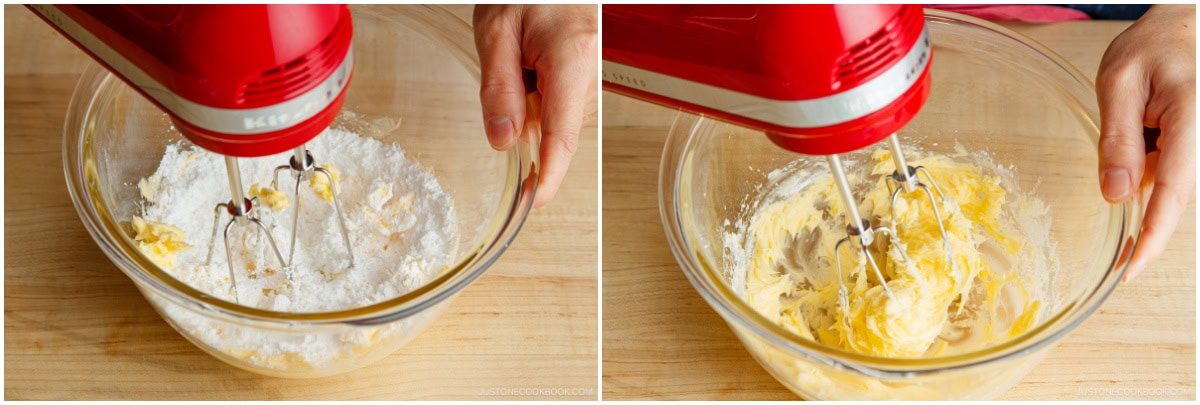
- Blend well with an electric mixer until the mixture turns fluffy and pale. Tip: Whipping the butter and sugar mixture adds air, and this makes the cookies crispier.
- Add ⅛ tsp Diamond Crystal kosher salt and blend until incorporated.
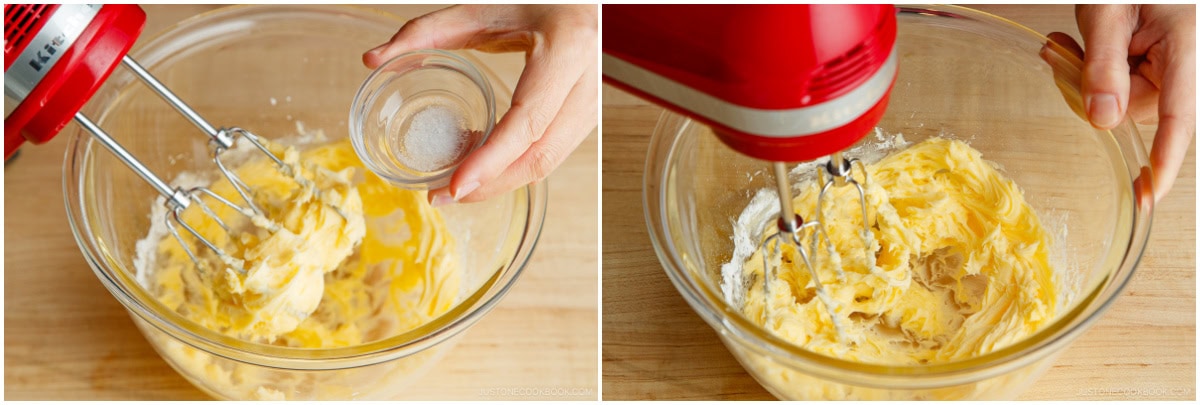
- Then, add ½ large egg yolk and continue mixing until smooth.
- Add 2 Tbsp almond flour and blend it until fully incorporated and smooth.
- With the silicone spatula, scrape down the bowl to collect the dough.
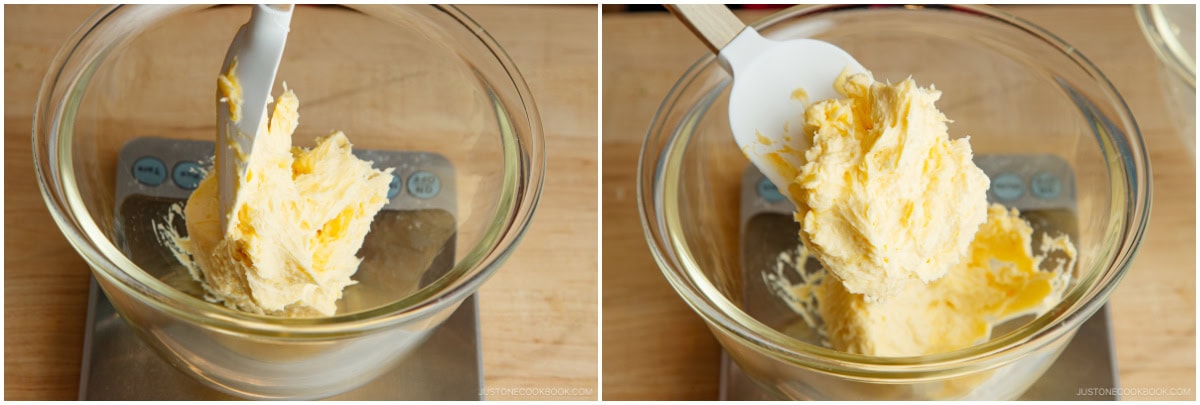
- Now, weigh the dough in a clean bowl over a kitchen scale (I use a digital kitchen scale). Weigh the total amount and divide it in half. My batch of dough is roughly 180 g, so each half weighed about 90 g. Place each half in separate bowls, one to make the plain dough and the other to make the green matcha dough.
To Make the Plain Dough
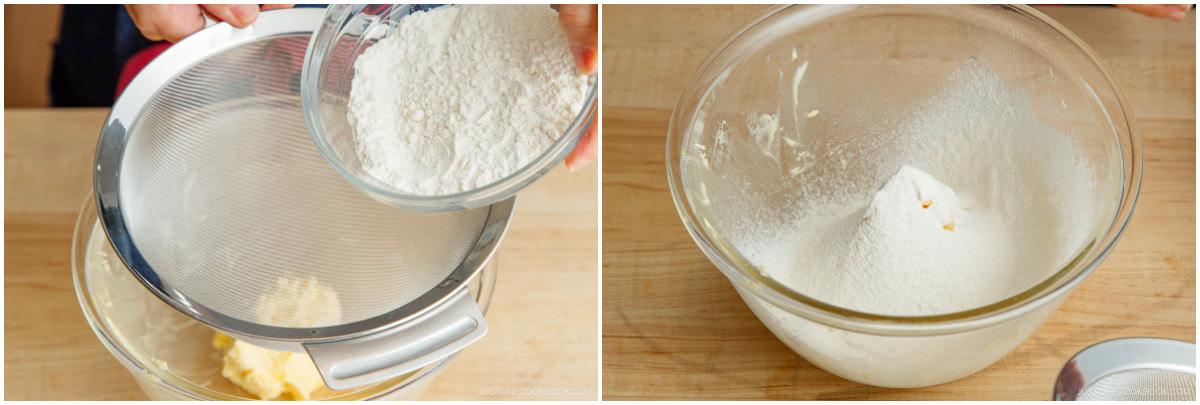
- Sift ½ heaping cup cake flour into the bowl for the plain dough.
- Lightly mix with the spatula, gently folding the flour into the dough until just incorporated. Do not overmix.
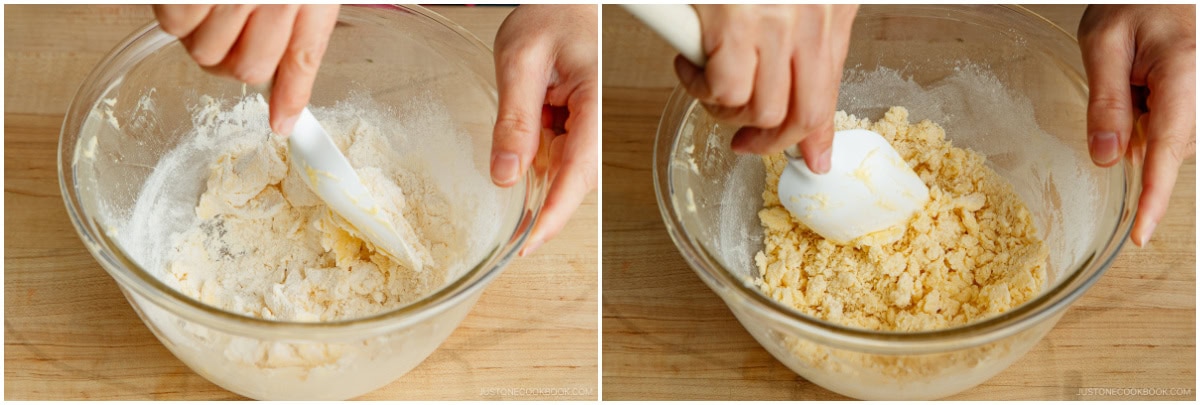
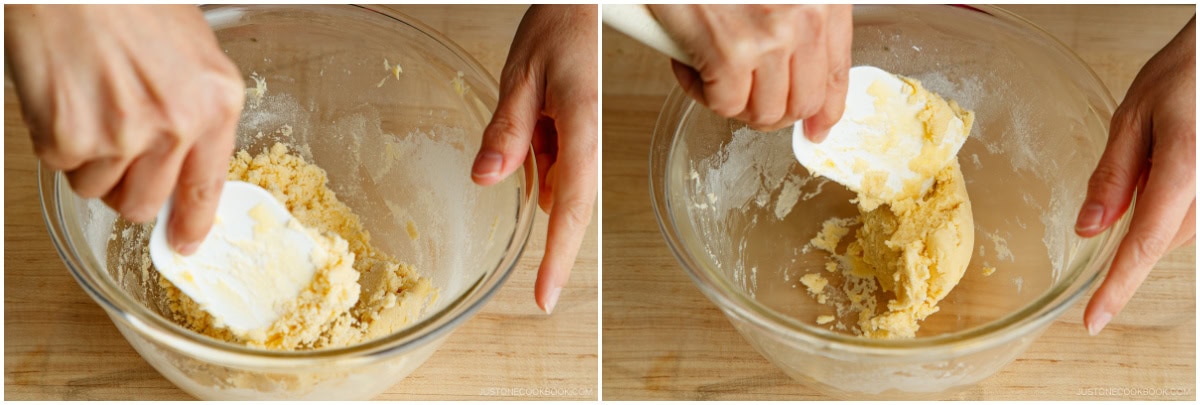
- Once crumbly, press the dough together, shaping it into a ball and scraping the sides.
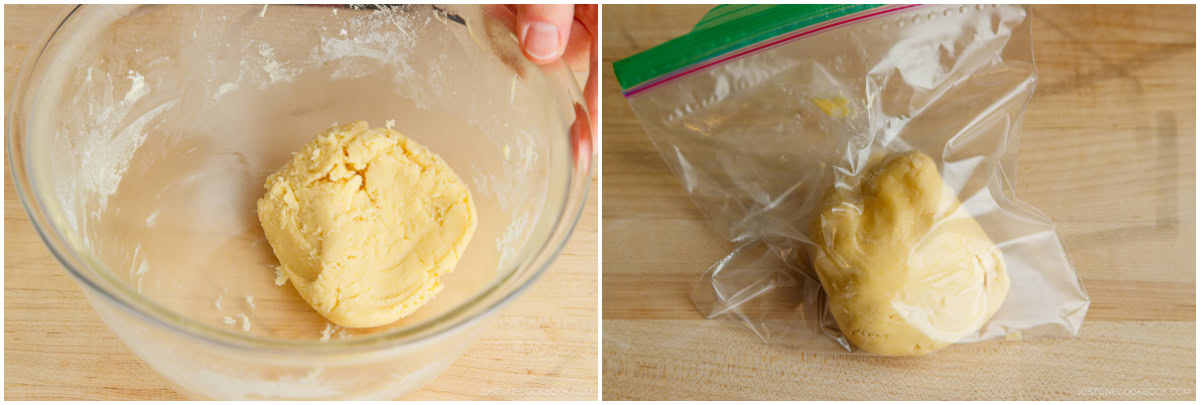
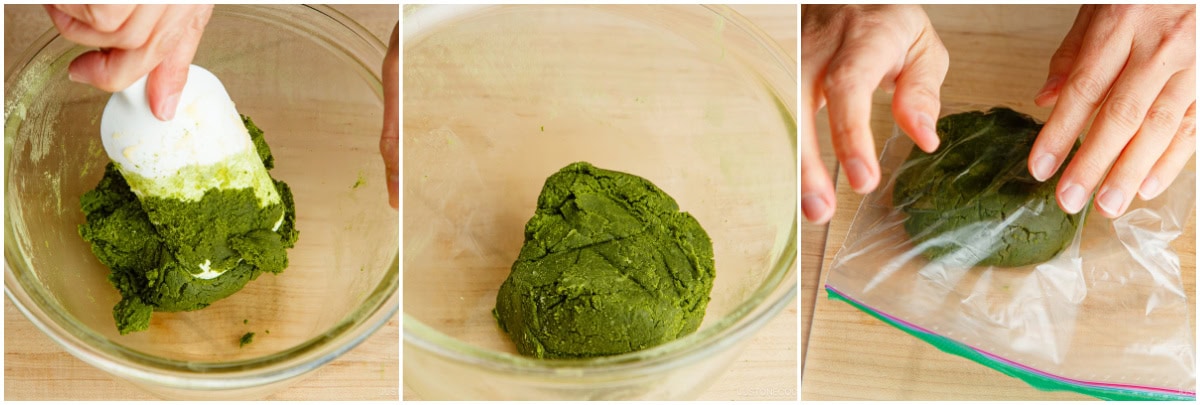
- Put the dough ball in a plastic resealable (ziplock) sandwich bag. Set aside.
To Make the Green Matcha Dough
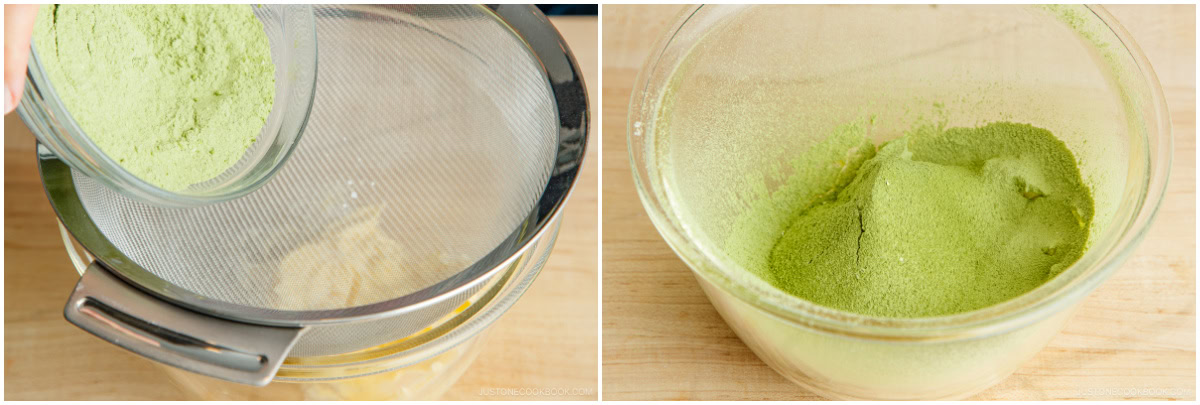
- Using a hand whisk, mix 5 tsp matcha (green tea powder) into ½ cup cake flour until well incorporated. Tip: Pre-mixing makes it easier to blend in.
- Sift the matcha-flour mixture into the bowl with the other half of the dough.
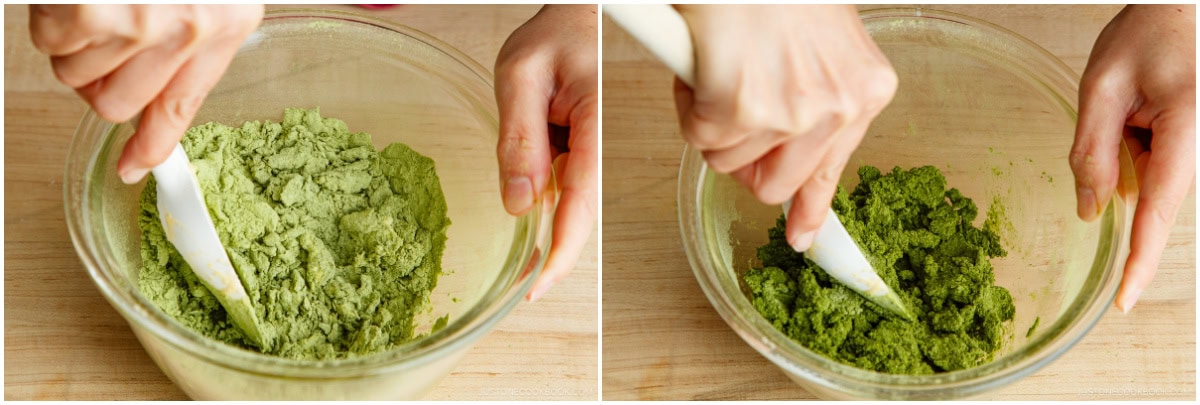
- Gently fold the flour mixture into the dough with the spatula until just incorporated. Do not overmix.
- When crumbly, press it into a cohesive dough ball and put it in a plastic resealable sandwich bag.
To Roll Out the Dough Balls
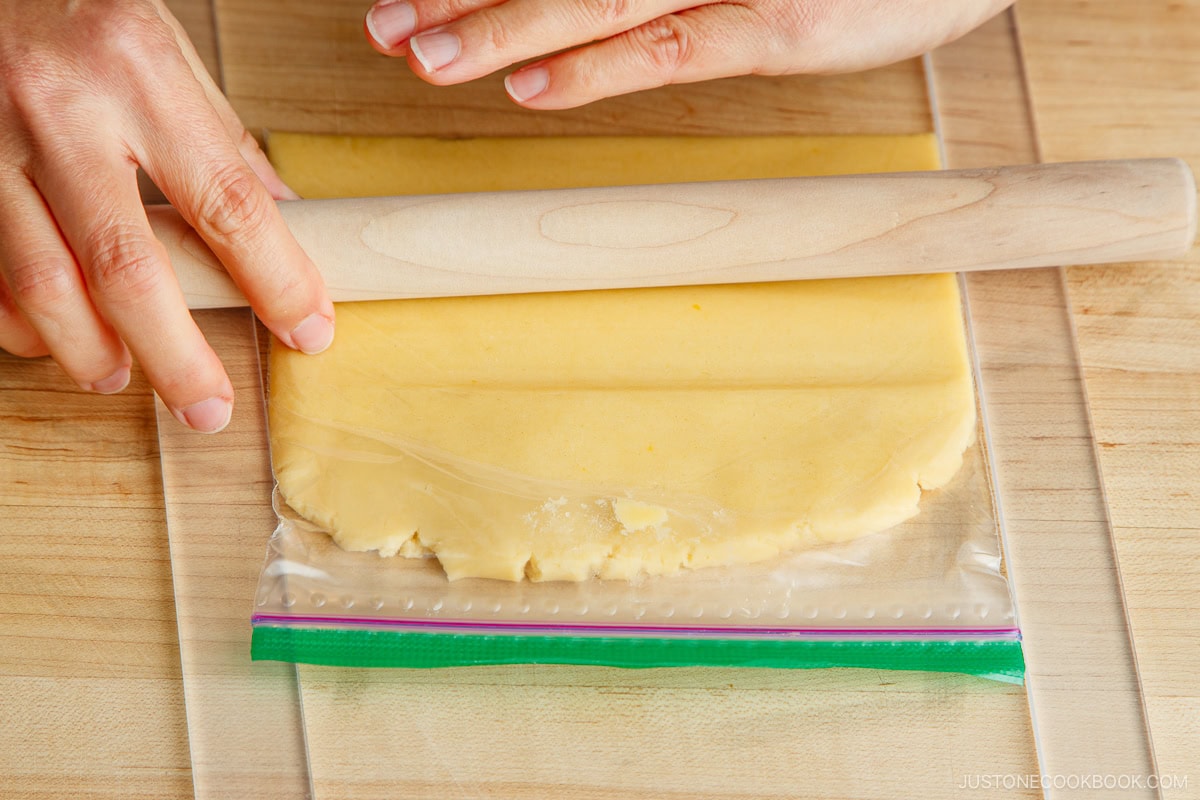
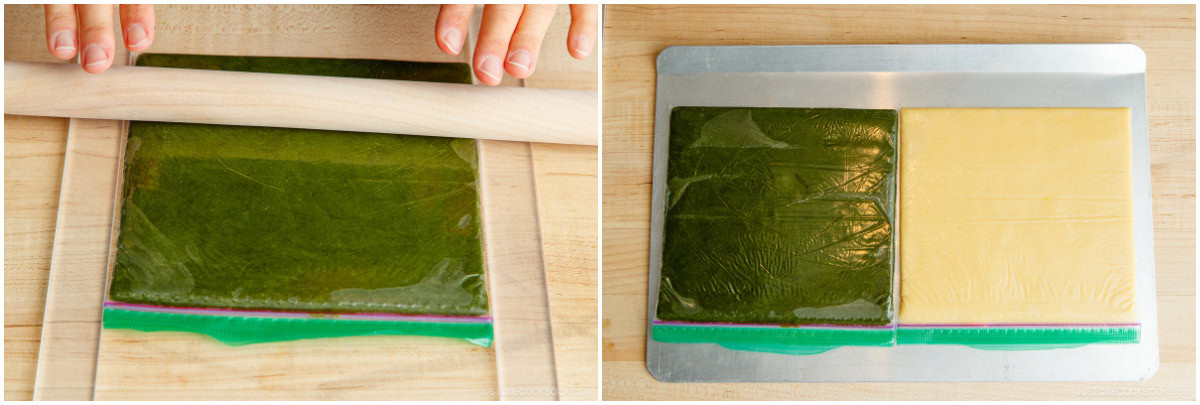
- Release the air from the sandwich bag, seal, and roll the dough ball flat with a rolling pin.
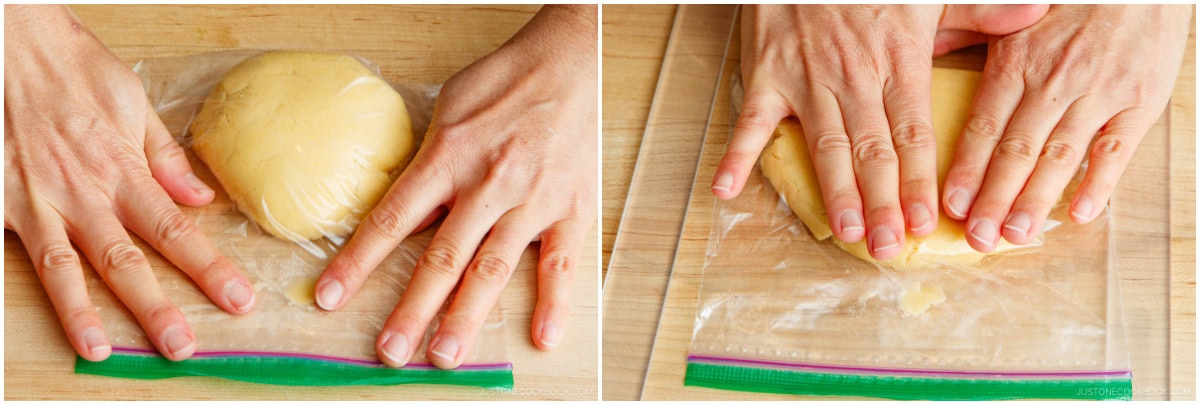
- If you're using the rolling guides, place them on either side of the bag and roll flat. You could stack two disposable chopsticks (or something similar) as rolling guides. However, my recipe should work perfectly to completely fill the sandwich bags with cookie dough to a 5-mm thickness without the use of rolling guides.
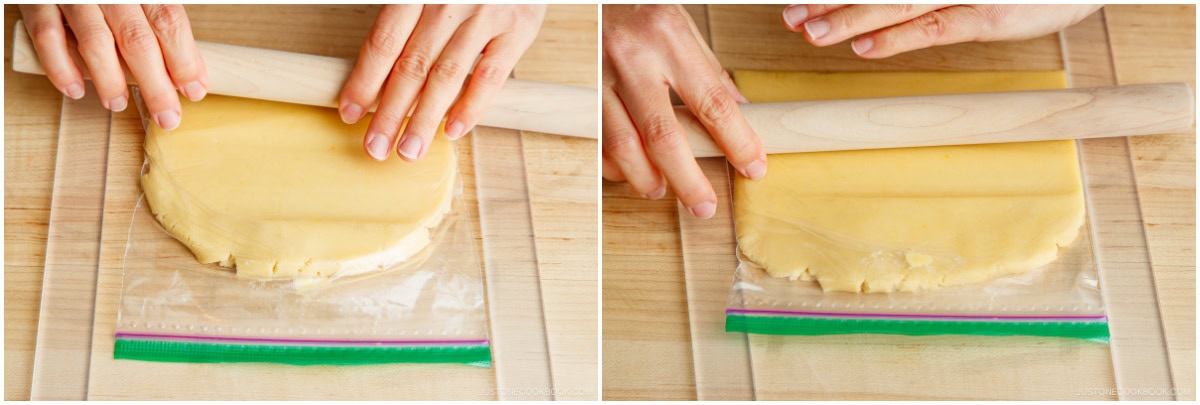
- Using the rolling pin, evenly flatten the dough to 5 mm thick and about 6 x 6½ inches (15 x 16.5 cm) in size.
- Repeat rolling out the matcha dough using the same method.
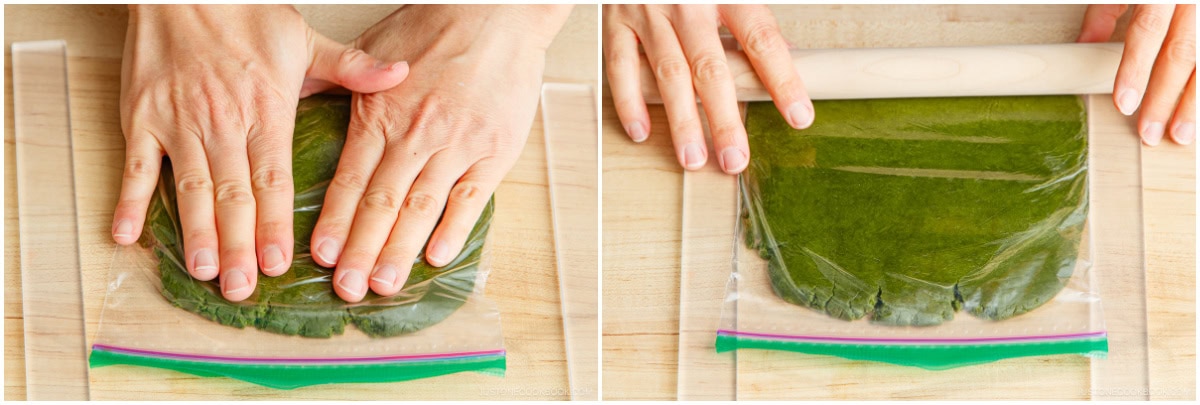
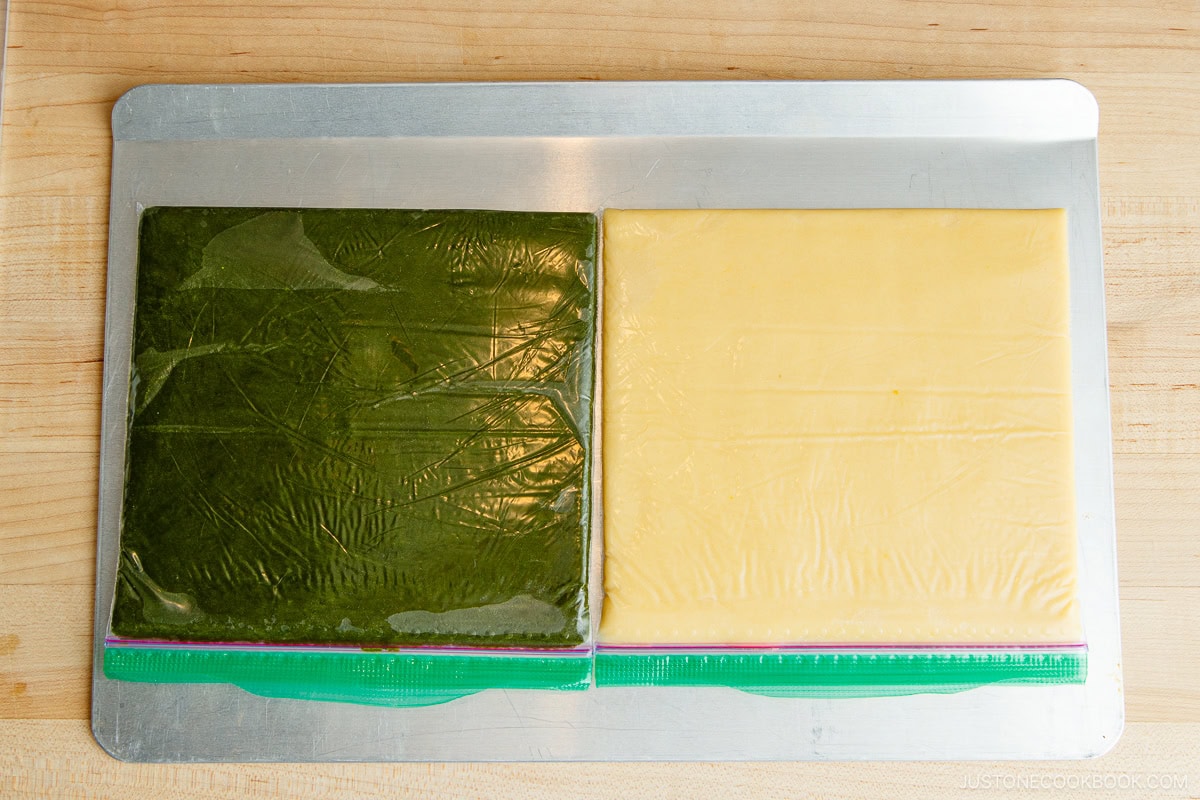
- Roll out gently so the dough doesn't come out of the sealed bag. Now, place the bags of flattened dough in the refrigerator and chill for at least 1 hour.
To Assemble the Checkered Logs
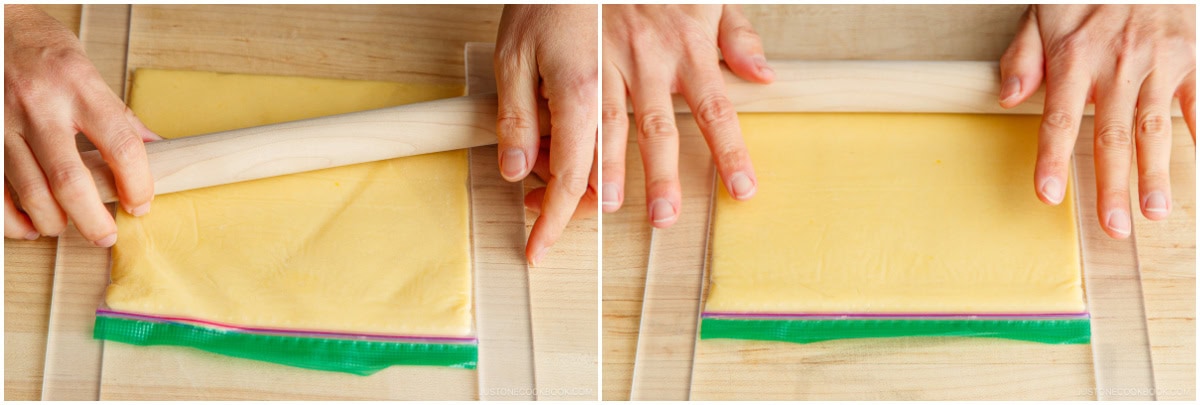
- Remove the chilled and firm dough from the fridge. Using a sharp knife, cut open the left and right sides of one sandwich bag. Repeat with the other bag. Tip: Make sure your chilled dough feels solid before you begin. As the dough warms, it will soften. If the dough becomes too soft to handle, wrap it in plastic and refrigerate until firm. Then, continue with the recipe.
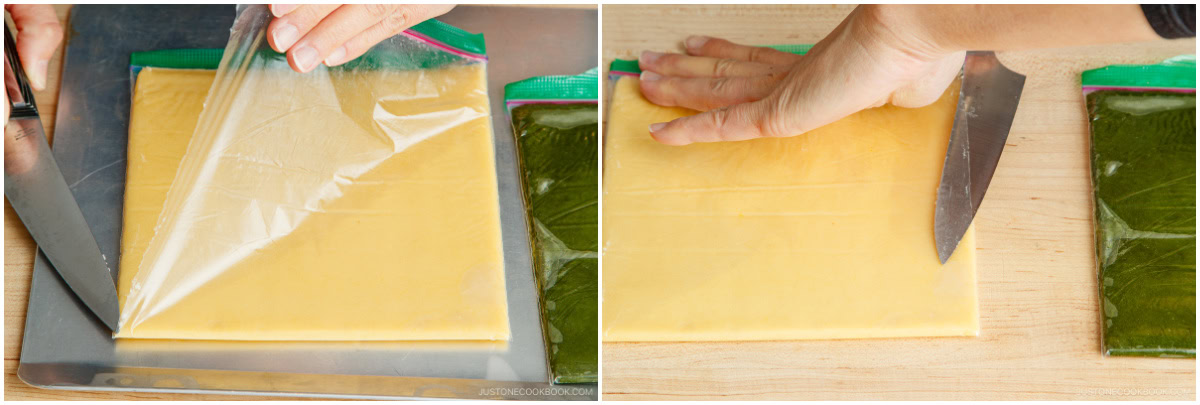
- Peel back the tops of the sandwich bags to uncover the dough, leaving the bags on the bottom as is.
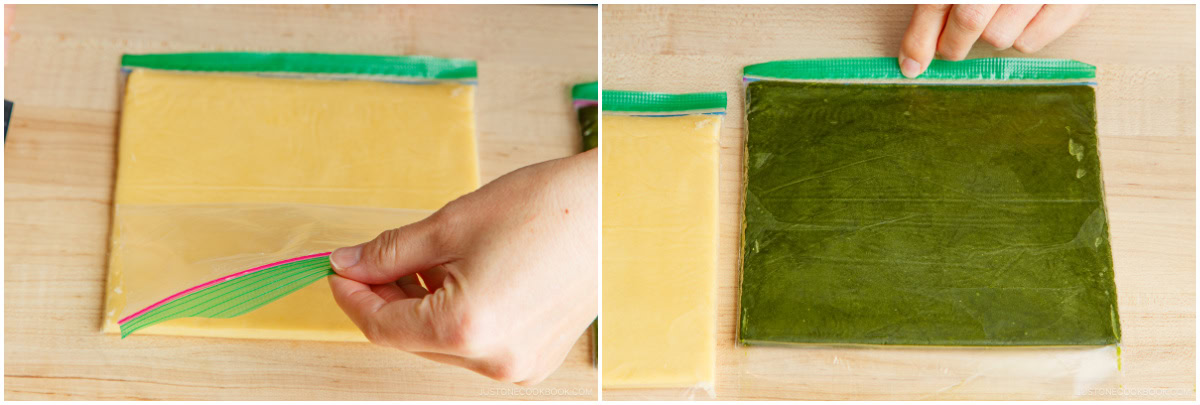
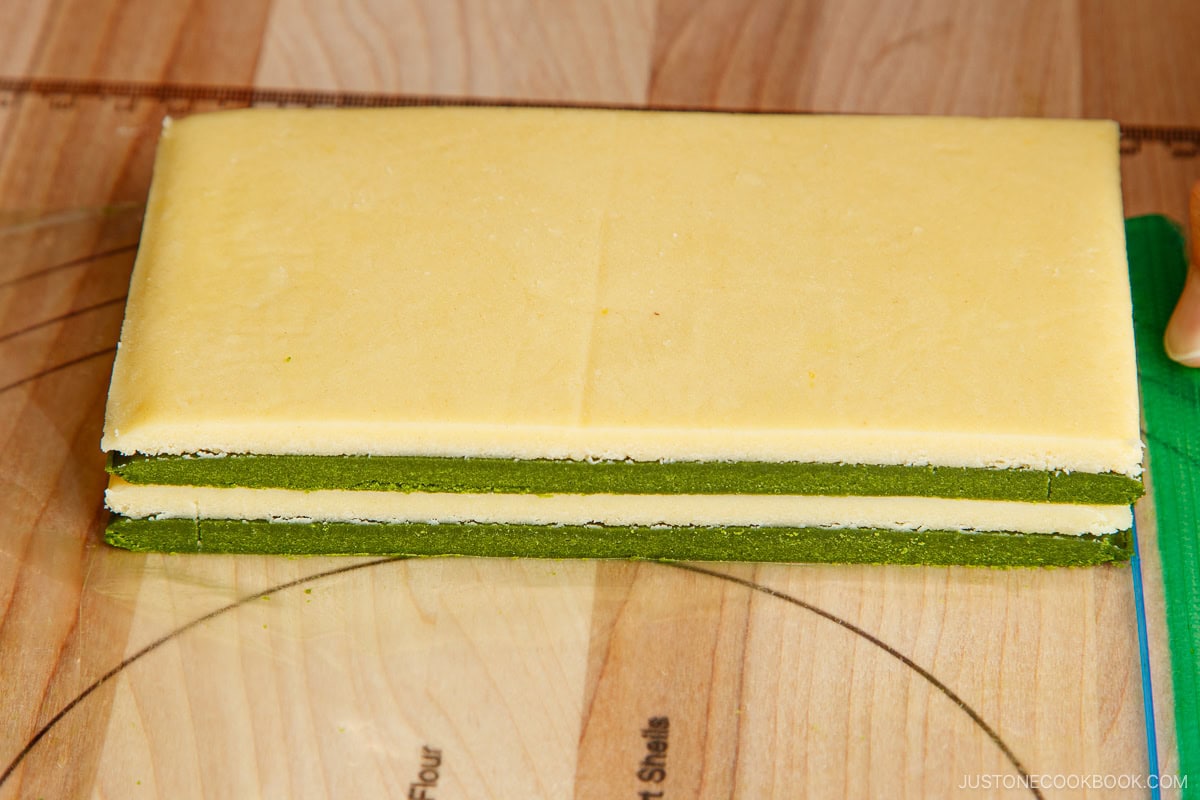
- Lightly brush the matcha dough surface with beaten egg white. Pick up the plain dough with its plastic bag, then flip the plain dough onto the matcha dough. Apply gentle pressure to adhere. Then, peel away the plastic bag from the plain dough.
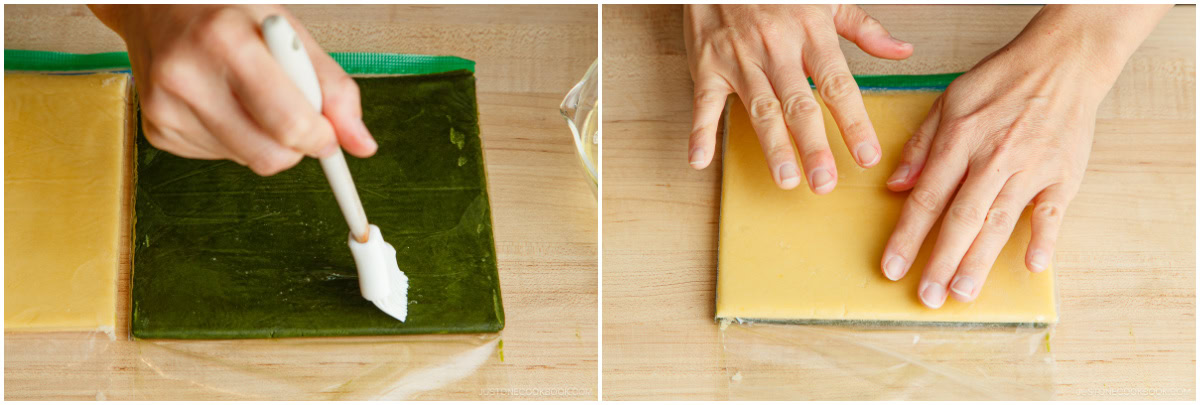
- Cut this layered dough in half. Brush one half with egg white.
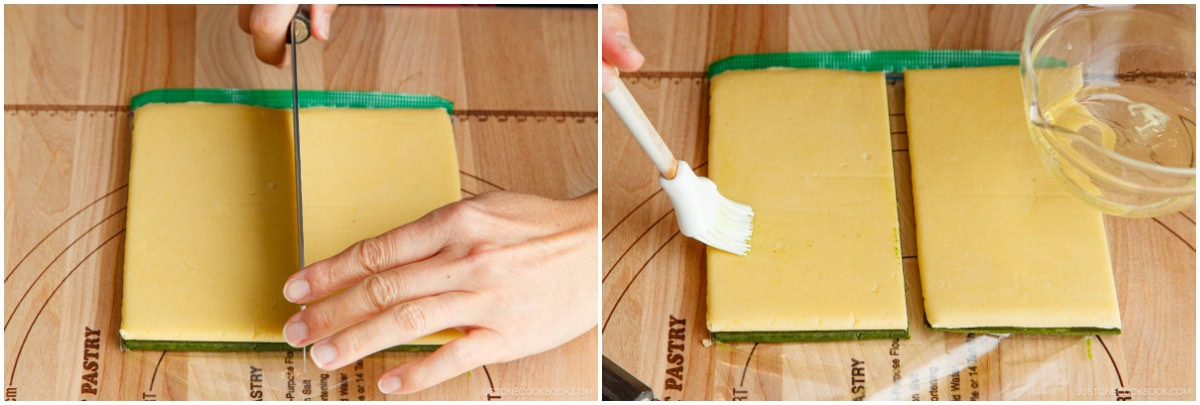
- Matching the clean-cut sides, stack the other half on top so you have four layers of alternating colors. Apply gentle pressure to adhere.
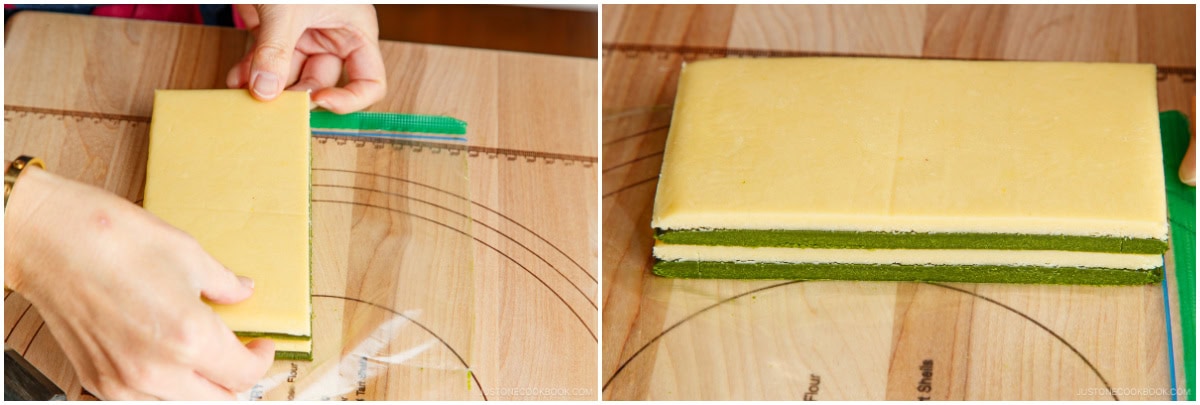
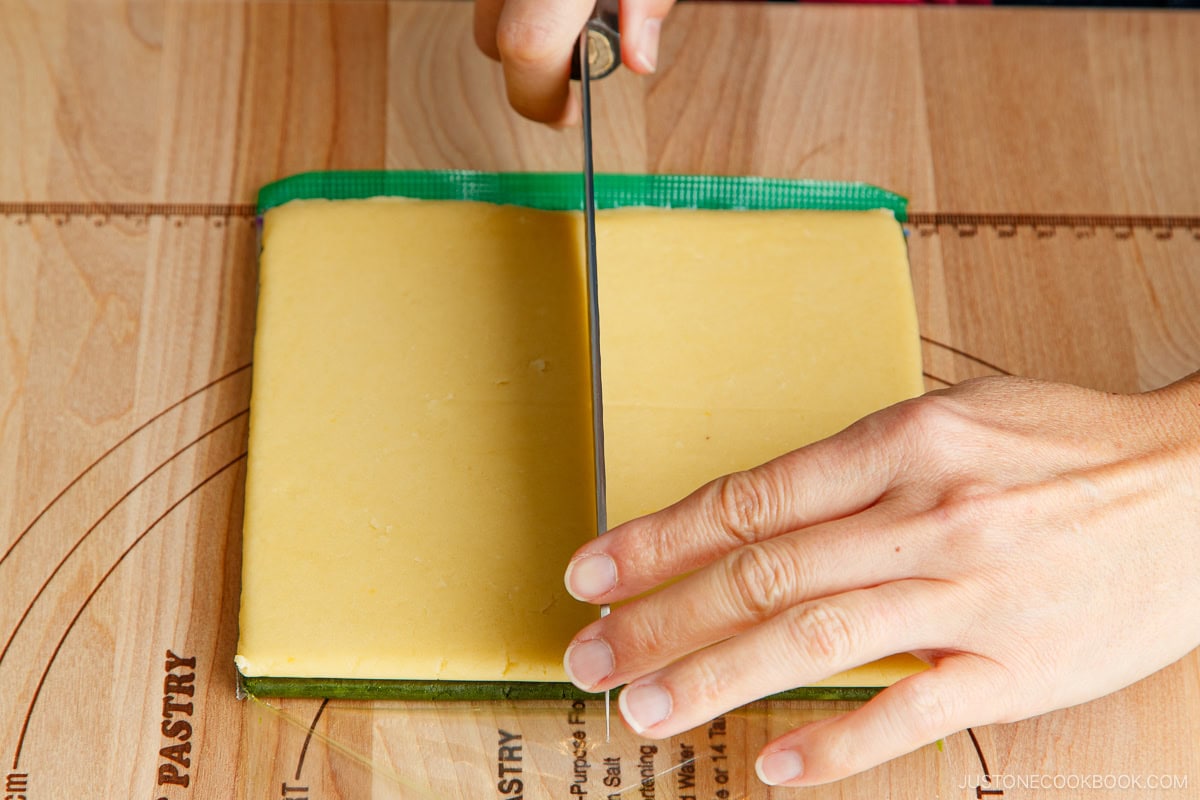
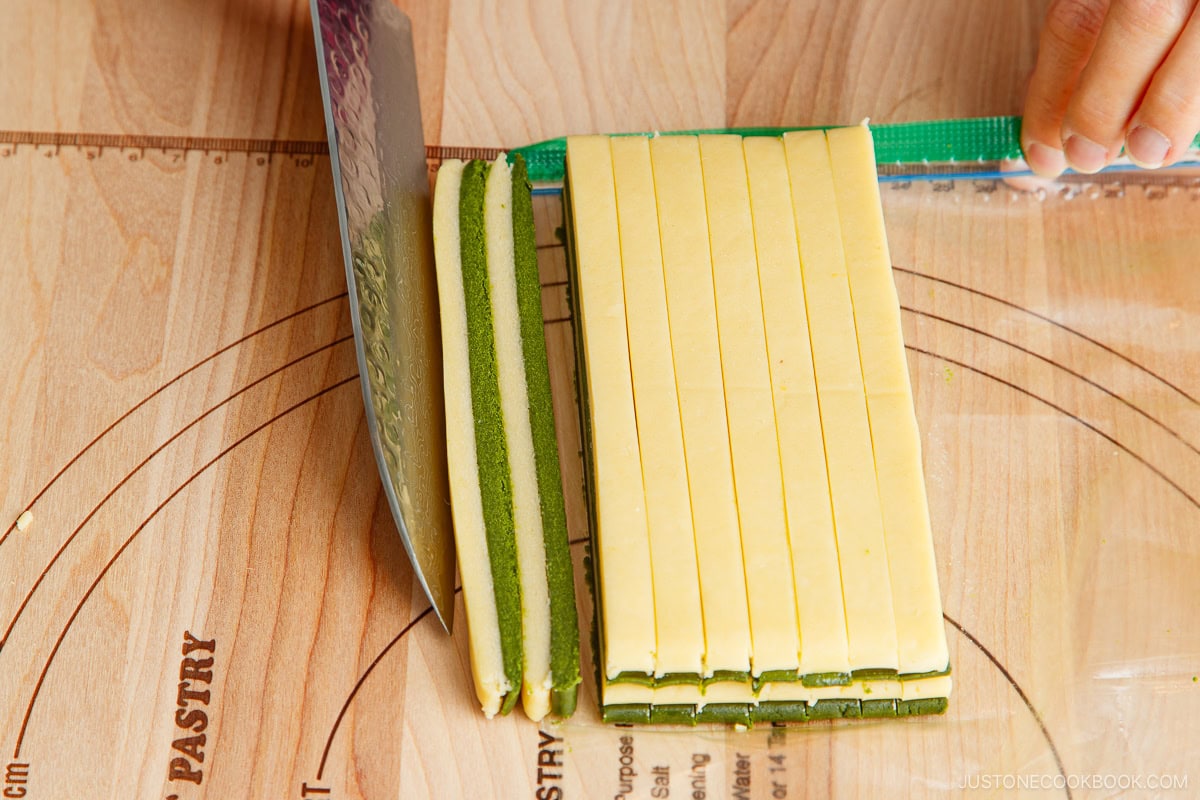
- Measure and mark 1-cm intervals (just over ⅜ inch) with the tip of your knife along the top and bottom edges of the dough stack. These are cutting marks that you will use in the next step. I use a pastry board with measurements, but I highly recommend using a ruler here.
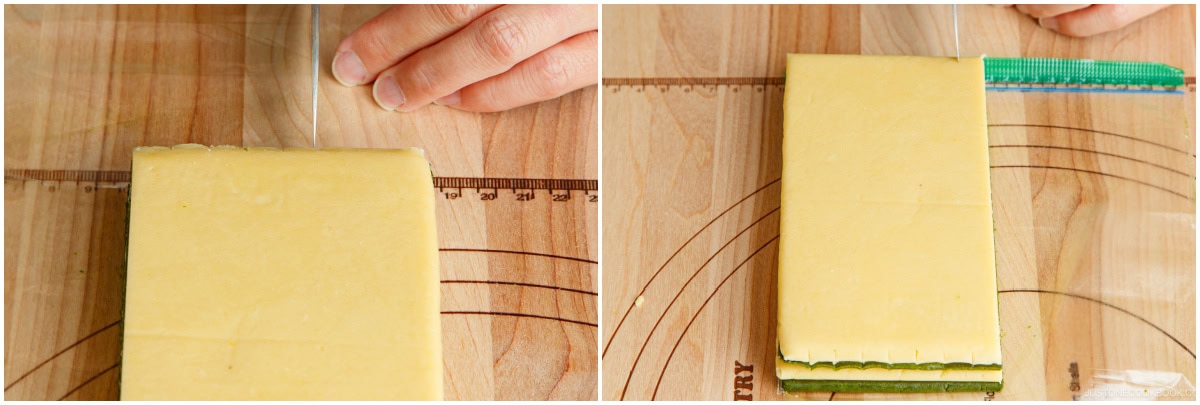
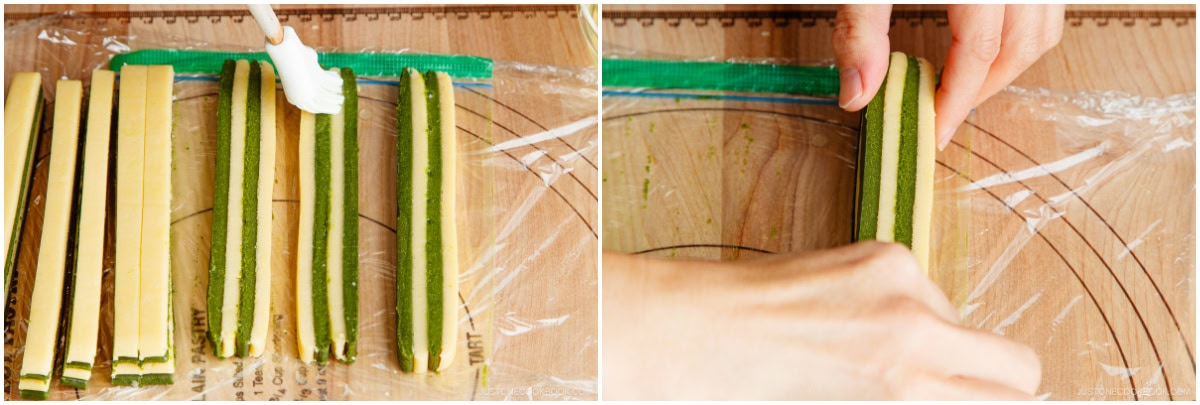
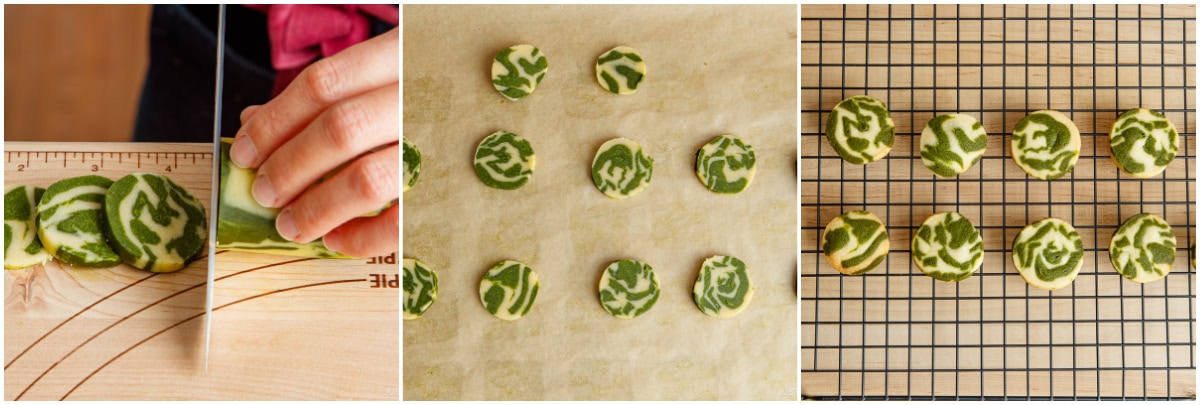
- Using the cutting marks as a guide, slice straight down with a knife to make long, layered strips that are each 1 cm thick. I was able to cut eight strips. Tip: Your dough strips might warm up and soften. If this happens, wrap them in plastic, place on a tray, and refrigerate until firm. Then, try again.
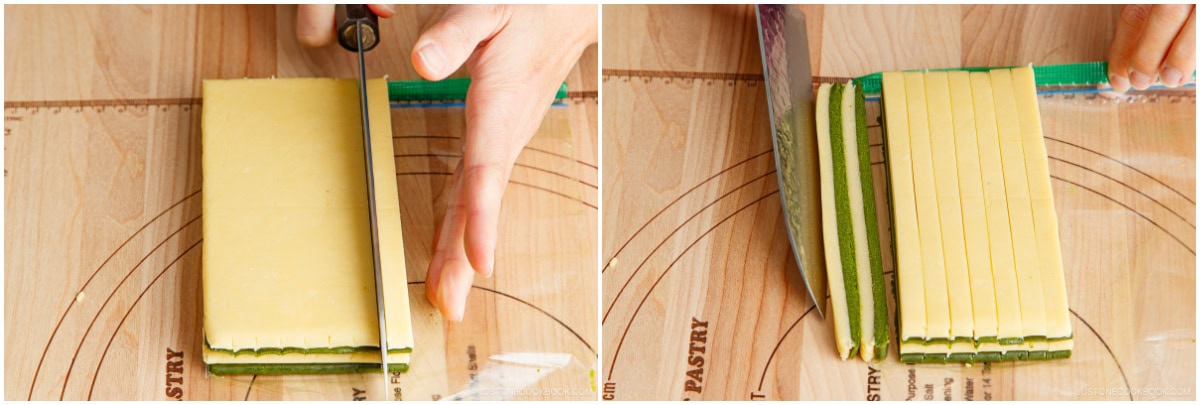
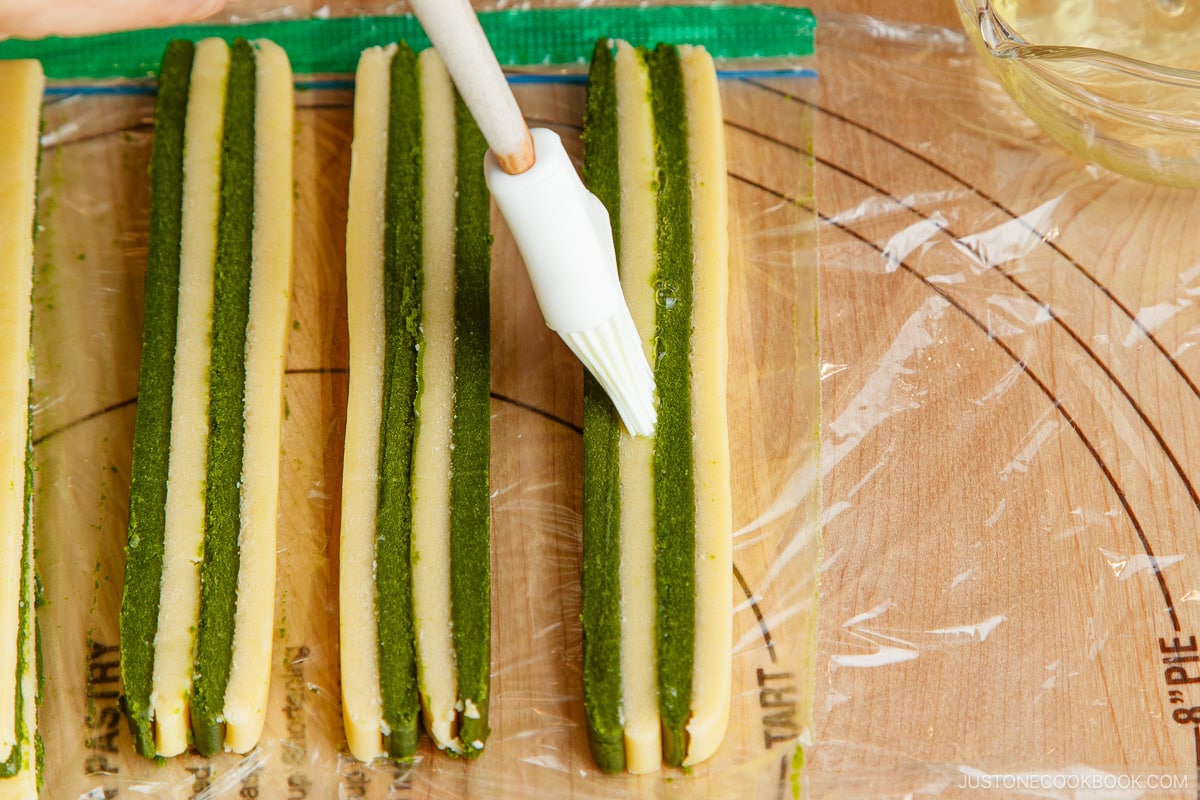
- Lay three strips flat on your work surface so you can see the colored layers of dough. Flip over the middle strip so the order of the colors is reversed from the left and right strips; see how it should look in the image below. Make a dough log with the three strips: First, brush egg white on the tops of the strips that will become the bottom and middle of your log (you don't have to brush the top strip). Then, stack the three strips to form a log. You can look at one end of the log to confirm you see a checkered pattern. Finally, press gently to adhere the strips without misshaping the log.
- Stack three more strips into a second log. Wrap the dough in plastic and chill in the fridge for at least 1 hour. Tip: If you want to freeze the dough logs to slice and bake at a later time, please see the To Store section for instructions.
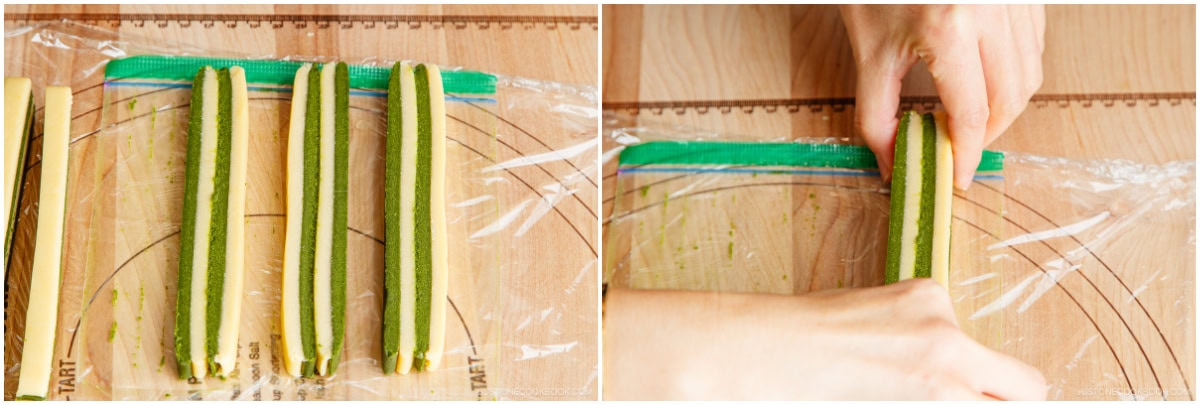
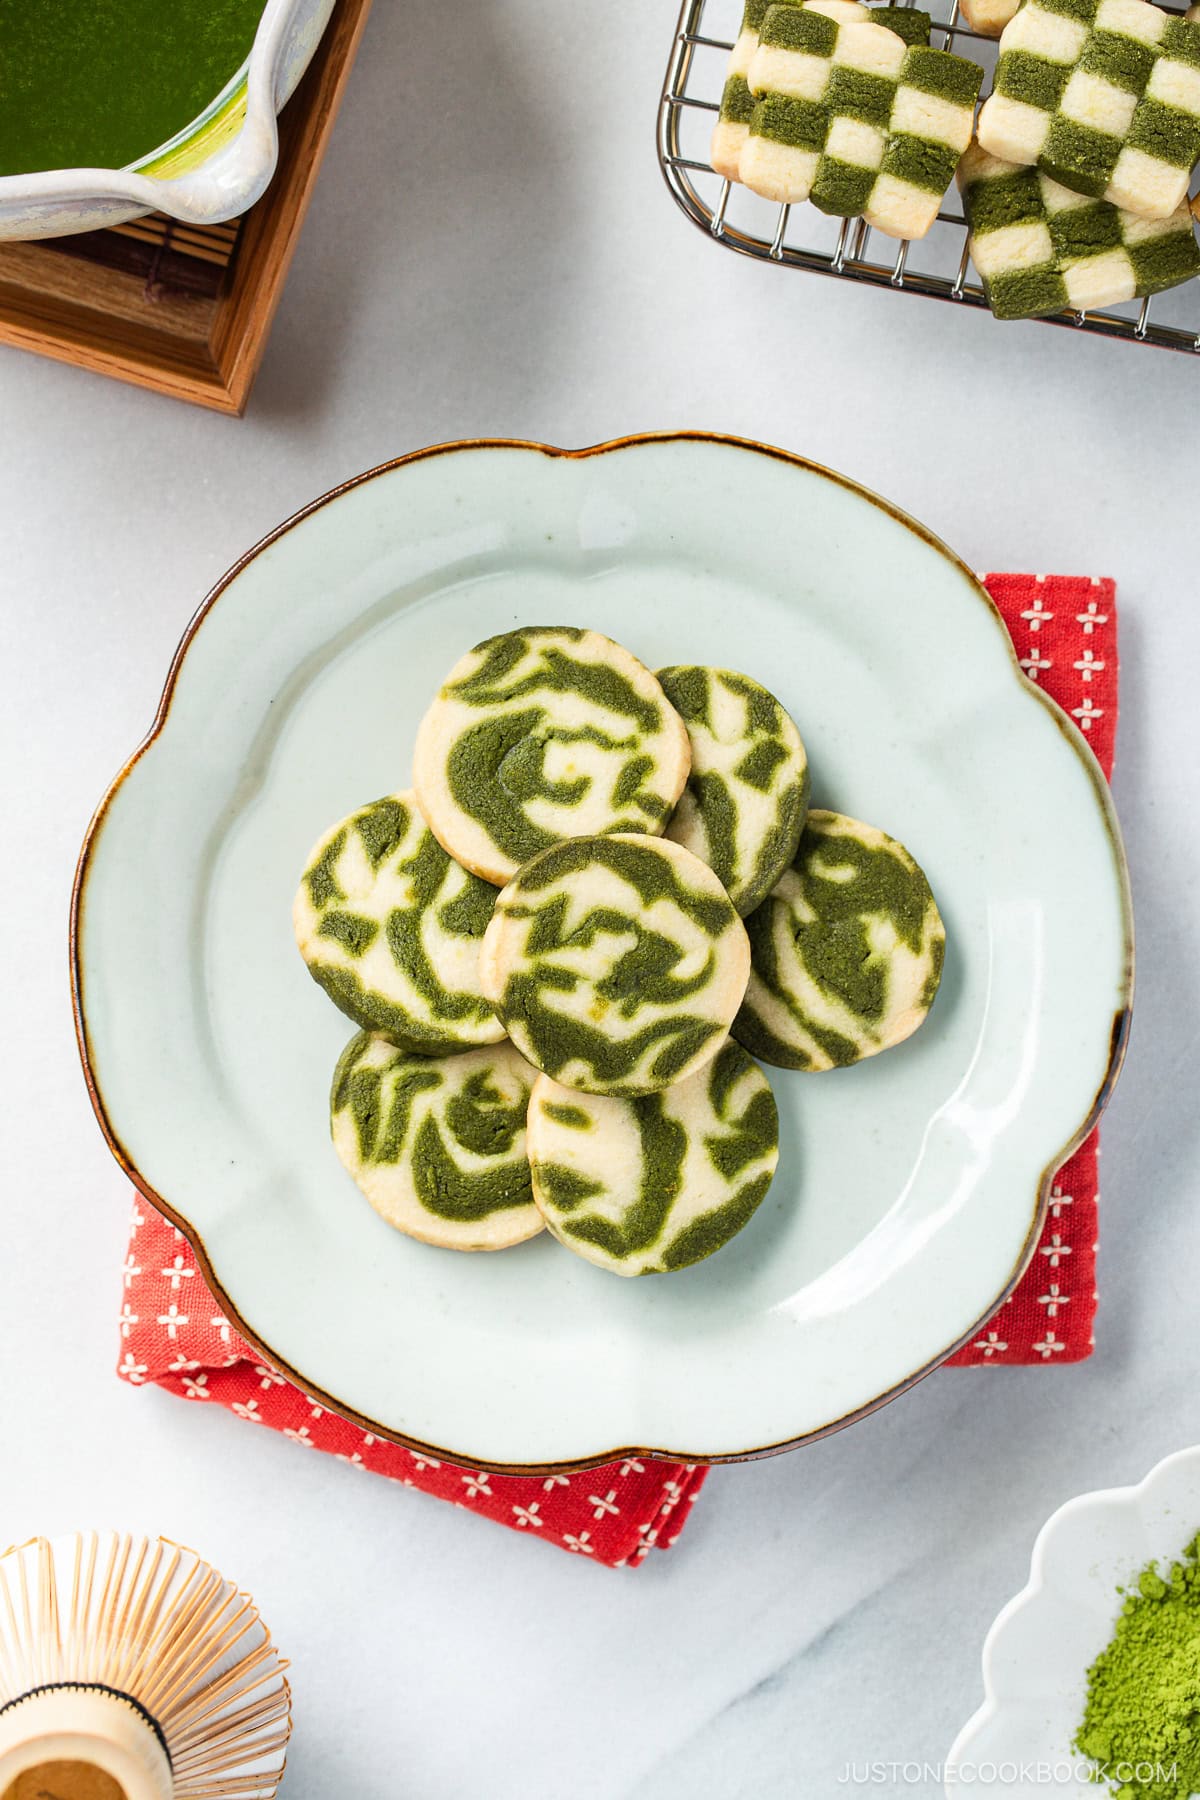
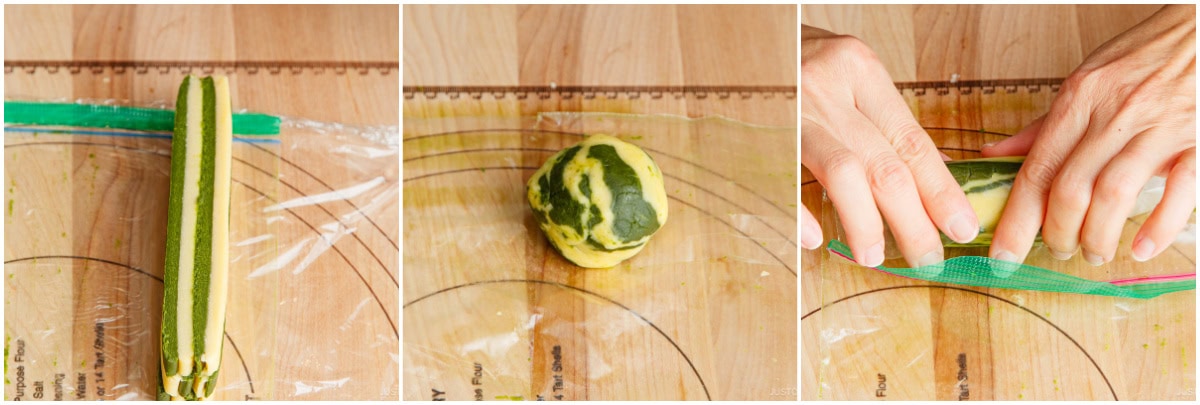
- For the leftover two strips, I simply roll them into a ball, then roll it into a log. Alternatively, you could cut the strips in half crosswise and stack them to make short checkered logs. Either way, wrap the leftover dough log in plastic and chill.
To Bake
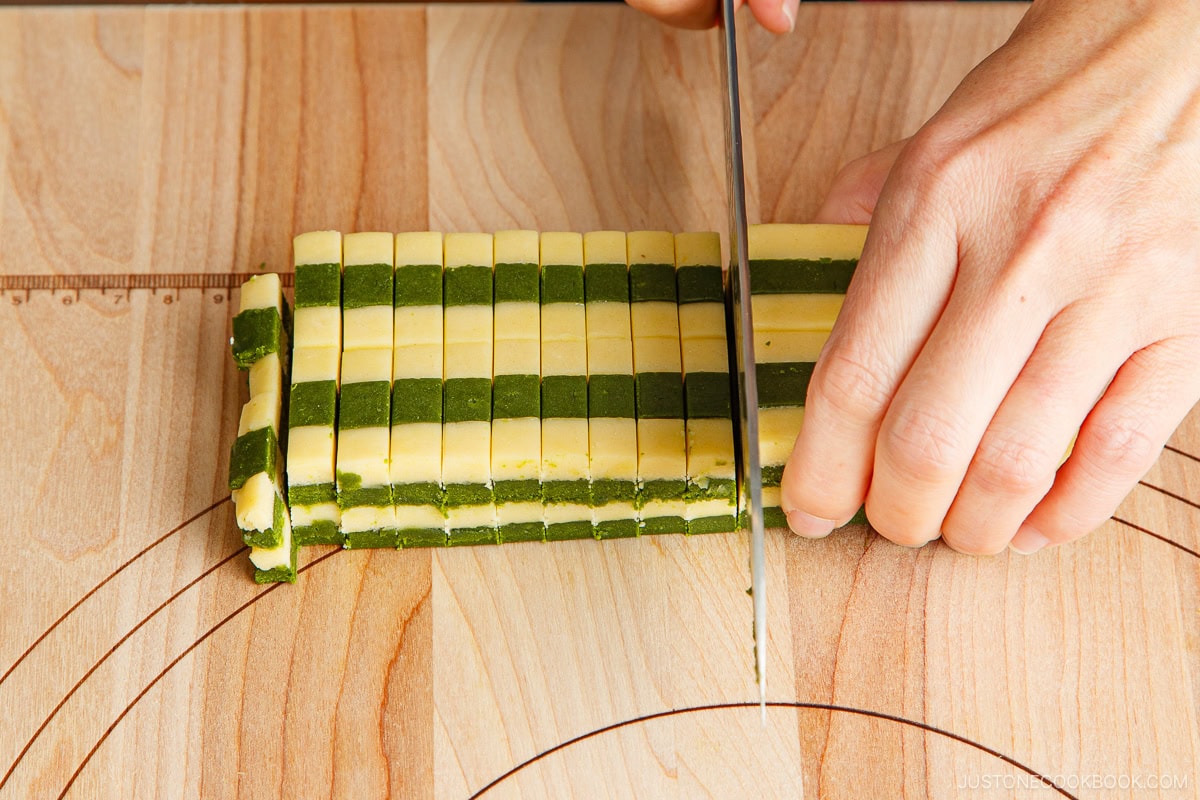
- Preheat the oven to 350°F (175°C). Slice the chilled dough logs into cookies ¼ inch (7 mm) thick.
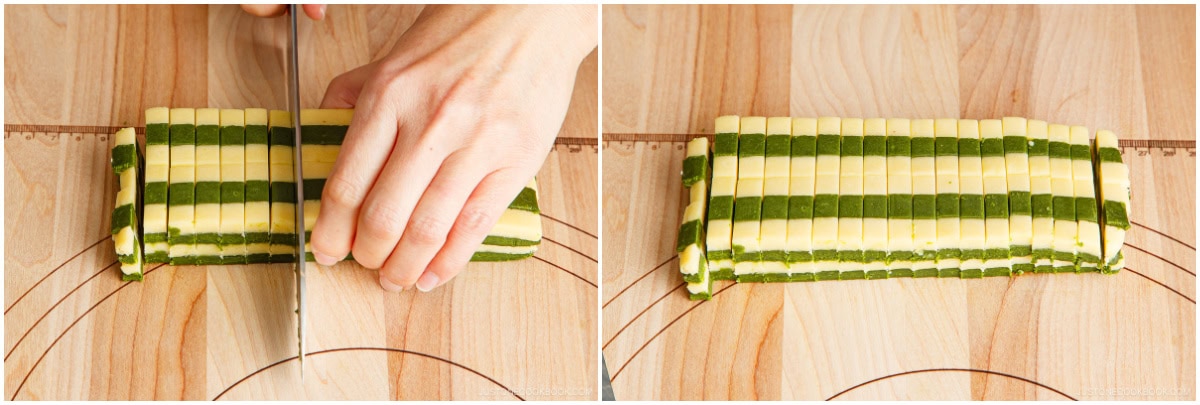
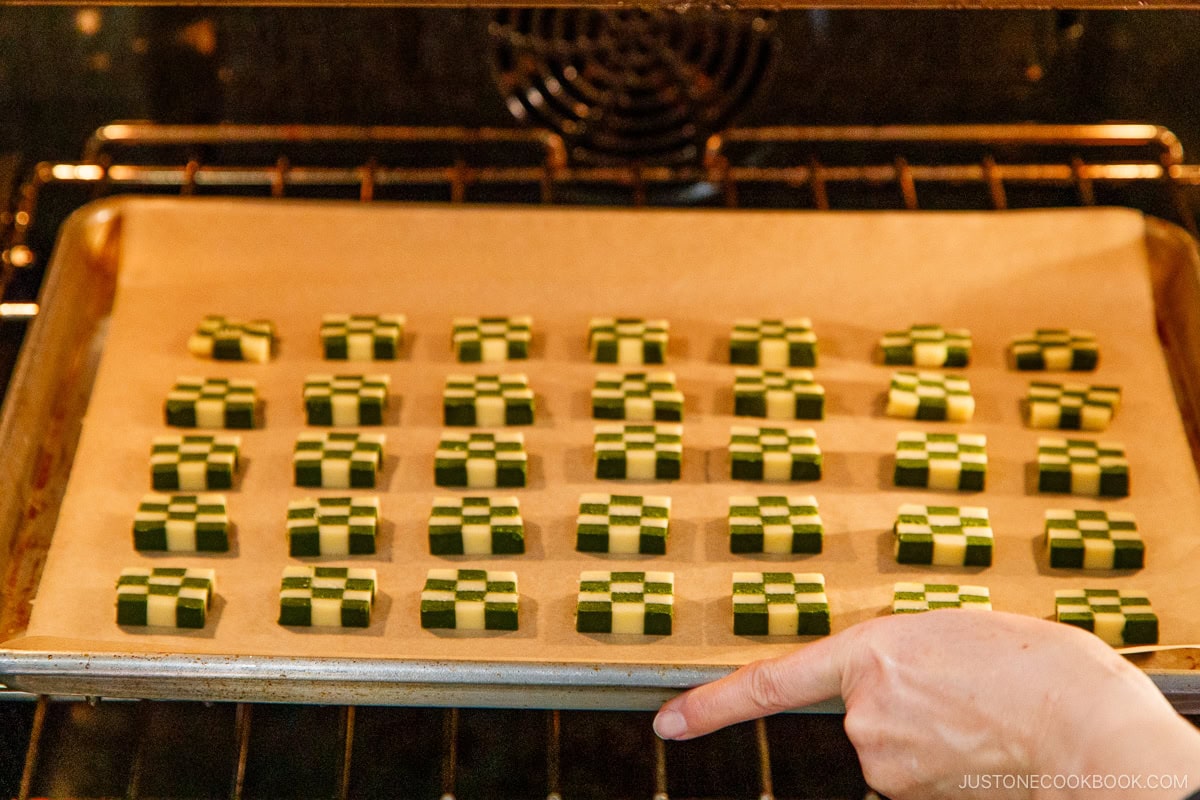
- Place on a baking sheet lined with parchment paper, and bake for 13–15 minutes, or until slightly browned on the bottom.
- The residual heat will brown the cookies more, so remove them from the oven when they are just a tad golden. Cool for 5-10 minutes on the baking sheet, then transfer the cookies to a wire cooling rack.
- Continue slicing and baking the leftover cookie dough. Tip: When you slice the dough log, rotate it to maintain the circle shape.
- Serve with your favorite beverage and enjoy!
To Store
- Once the matcha checkerboard cookies are completely cool, store them in an airtight container at room temperature for up to 1 week (I add a silica gel packet). To freeze, transfer the matcha checkerboard cookies to a freezer-safe airtight container or resealable freezer bag. Freeze them for up to 3 months. Thaw in the refrigerator overnight to enjoy. To freeze the cookie dough: Tightly wrap the checkered logs in plastic wrap and put them into freezer bags. Freeze for up to 3 months. Let them thaw in the refrigerator for 2 hours before slicing and baking.


Loved baking these! They were actually so simple to make and the finished product looks professional. I’m also not a huge fan of very sweet bakes so enjoyed the more delicate sweetness.
P.S Made this with gluten free multi purpose flour and they came out perfectly
Hi Limor! I’m so happy to hear these came out well with gluten-free flour. Thank you so much for sharing that info with us! I’ll share the picture of the beautiful cookies you baked with the gluten-free flour (that you entered for the JOC December Cookie Challenge) here. 🙂
I forgot to include the 5-star rating in my previous comment so here it is! 🙂
Hi Martina! Aww. Thank you very much! 🥰
Pretty good recipe. Looked very nice and pretty easy to make.
Hello Jonathan! Thank you for trying Nami’s recipe!
We are glad to hear you enjoy these cookies. Happy Baking!
Not too sweet, very good
Hello Laura! Thank you for trying Nami’s recipe and for your feedback! 🥰
I loved making this recipe. It was super easy to follow and turned out really nice! I love how crisp the edges came out and they have a perfect balance of short read and matcha flavor. It’s now one of our favorite cookies and was a hit at our holiday party! I’m excited to play with variations on the checkerboard flavors :).
Hello, there! We’re glad you enjoyed Nami’s recipe.
We hope you enjoy experimenting with different flavors and variations. Happy baking!
Thank you so much for your step-by-step instructions. The recipe is so easy to follow, especially with the picture for each step, it is really helpful. I love it. I love these matcha cookies. They taste so good.
Hello, Jan! Thank you for trying Nami’s recipe!
We’re delighted to hear that the step-by-step instructions were easy to follow. It was very important to Nami.
Thank you for your kind remarks.
Made this for the cooking challenge. Was easy to follow. I didn’t use a ruler so the shapes were a little wonky looking but overall a good cookie. Tastes and acts like a shortbread (on the dry side, melts in your mouth, doesn’t spread much when baking). I accidentally dumped in too much matcha so I added the rest of the egg yolk + a little bit of vegetable oil to pull the dough together. Still worked!
Hi, Ellie! We’re glad Nami’s instructions were easy to follow!
Thank you for trying her recipe and sharing your feedback with us. Happy baking!
Your step-by-step photos really helped me understand how to make the checkerboard design. I loved the marbled effect with the leftover dough too. If I were to do it again, I would double the recipe to avoid having to measure half an egg yolk. Also, I’d roll my dough in sugar to help hide any of the browned edges, haha😆
Hello Susan! Thank you for trying Nami’s recipe and for your kind feedback!
We hope you will continue to enjoy this recipe. Happy Baking!
These cookies are not only easy and fun to make, but they are also very tasty and pretty. Even my friend who normally doesn’t like matcha, liked the cookies and ate more than everyone else to whom I offered the cookies.
I followed the recipe and step-by-step instructions and the cookies turned out to be perfect in terms of sweetness and texture. I did have to bake the cookies for 2 extra minutes because my oven is not as strong. I will definitely make these cookies again, and will try a different size of the sandwich bag next time so that I can get the cookies to be square rather than rectangular in shape.
Hello, Martina! Thank you for trying Nami’s recipe.
We’re happy to hear friends liked the cookies.🥰 Thank you for your kind feedback.
Hello- when I saw this month’s cookie challenge I was really excited! I love the liok of this cookie and it makes a perfect gift for friends!
As I was making this I wasn’t sure I was doing it correctly as it seemed like so little dough was produced but after layering it understood. I used ceremonial grade matcha and would be curious to compare the taste using just culinary matcha the next time I make this. I love the flavor since I drink matcha every week but wondering if the high end matcha flavor might be too strong for friends that don’t drink it. I am also curious to try making this recipe with houjicha or even cocoa powder next time :).
Thank you for sharing this recipe- it was fun to make!
Hello Carrie! We’re glad you had fun baking these cookies! It looks wonderful!
Thank you for trying Nami’s recipe and sharing a photo of your cookies with us.
I made these cookies for the cooking challenge! I did not have any Matcha, but I figured that any kind of flavoring would be great here. I replaced the Matcha with houchija, and they tasted great! I also had to improvise with the Ziploc bags as I don’t tend to keep those on hand (I only have reusable), so I just used clingfilm. They didn’t all come out as perfectly even as nami’s, but I still think it was pretty good for the first try! Overall very easy recipe to follow, would definitely bake again with other color combos and flavors. I think my next one will be with ube powder!
Hello, Alexis! Thank you for participating in our cooking challenge and sharing your experiences with us!
We’re delighted to hear everything worked out well for you. Happy baking!
Made these cookies with my Mom during Christmas time. It was more involved than what she was used to, but after following the recipe step by step the cookies turned out perfect. I was a little nervous at first, since I wasn’t sure if my family would like the taste, but everyone ended up loving the subtle sweetness of the shortbread, and taste of the matcha. Definitely going to include this recipe with other cookie recipes I make during the holidays.
Hello Justin! Aww. We are happy to hear everyone enjoyed these cookies!
Thank you for trying Nami’s recipe and for your kind feedback. Happy Baking!
Thank you so much for this recipe!
I’ve always loved checkerboard cookies but never dared make them myself because they looked so difficult (and I’m very inexperienced when it comes to baking). Your explanations were really helpful.
Even then, I did some mistakes so mine didn’t get perfect to the eye. But they were delicious, and the round marbled ones look beautiful!
Hello Miyuki! Thank you for taking the time to try Nami’s recipe!🤗
We are glad to hear you enjoyed it. Happy Baking!
I made these for my family’s holiday cookie tin. The strawberries made the plain down a little soft with the added moisture but still came out great!
Hi, Irene! Wow! The strawberry flavor sounds amazing as well!
Thank you for selecting Nami’s recipe for your holiday cookies. Happy baking!
Made these over the holidays, tasted great, very buttery and nice matcha balance! Had a fun time assembling and would love to try with other flavors.
Hi, Athena! Aww. We are happy to hear you enjoyed creating these cookies!
Thank you for trying Nami’s recipe and providing such great reviews!
Really interesting to make! I’m a little clumsy so I had a little difficulty stacking everything once the dough got warm. Next time I’ll probably put it back in the fridge to chill when it gets difficult to work with. These are great to have with hot chocolate!
Hi, Fen! Thank you for trying Nami’s recipe.
Yes! The dough is easier to work with once it has been refrigerated. We hope your next attempt is much easier, and enjoy stacking the cookies! Happy baking!