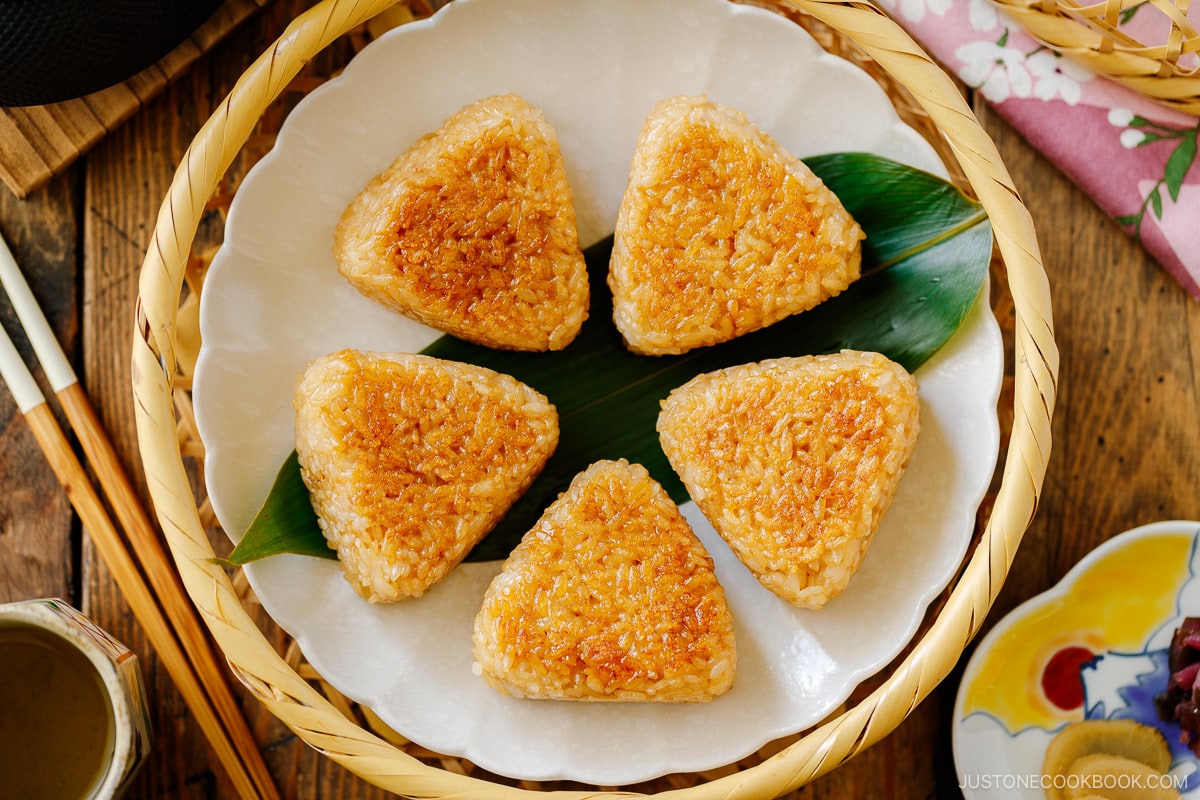
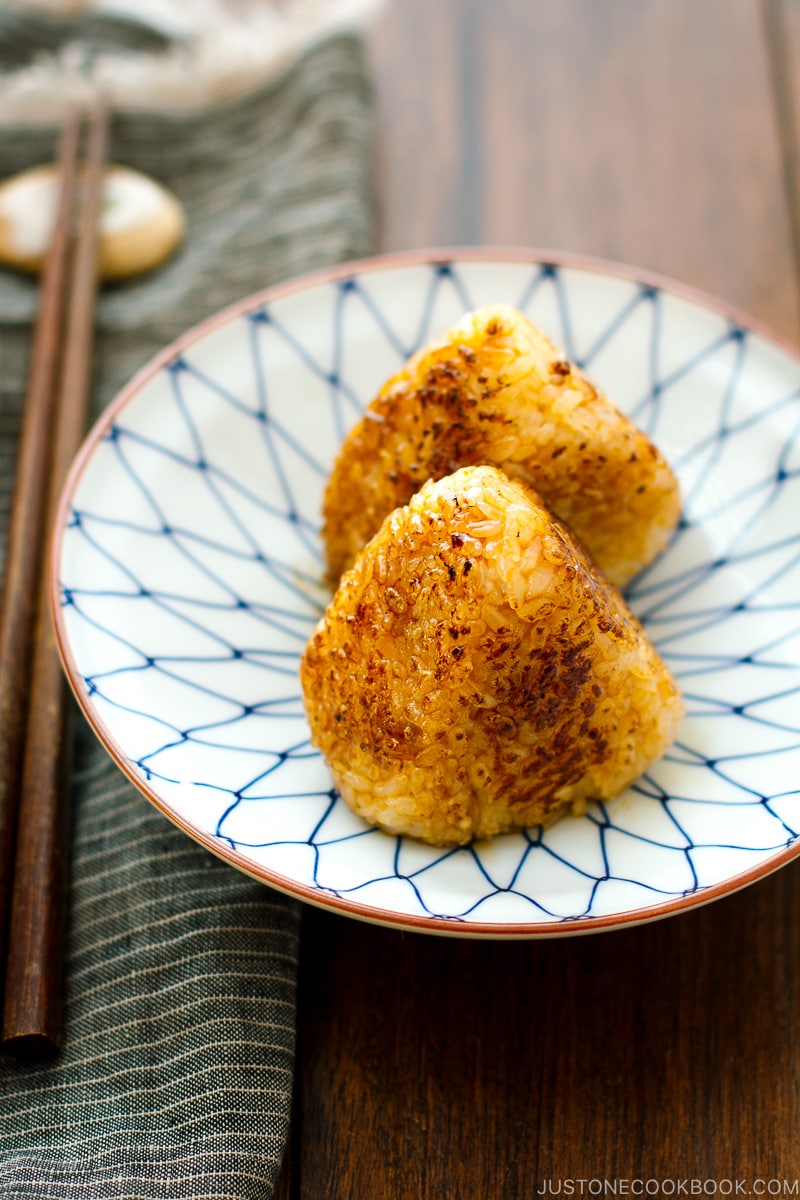
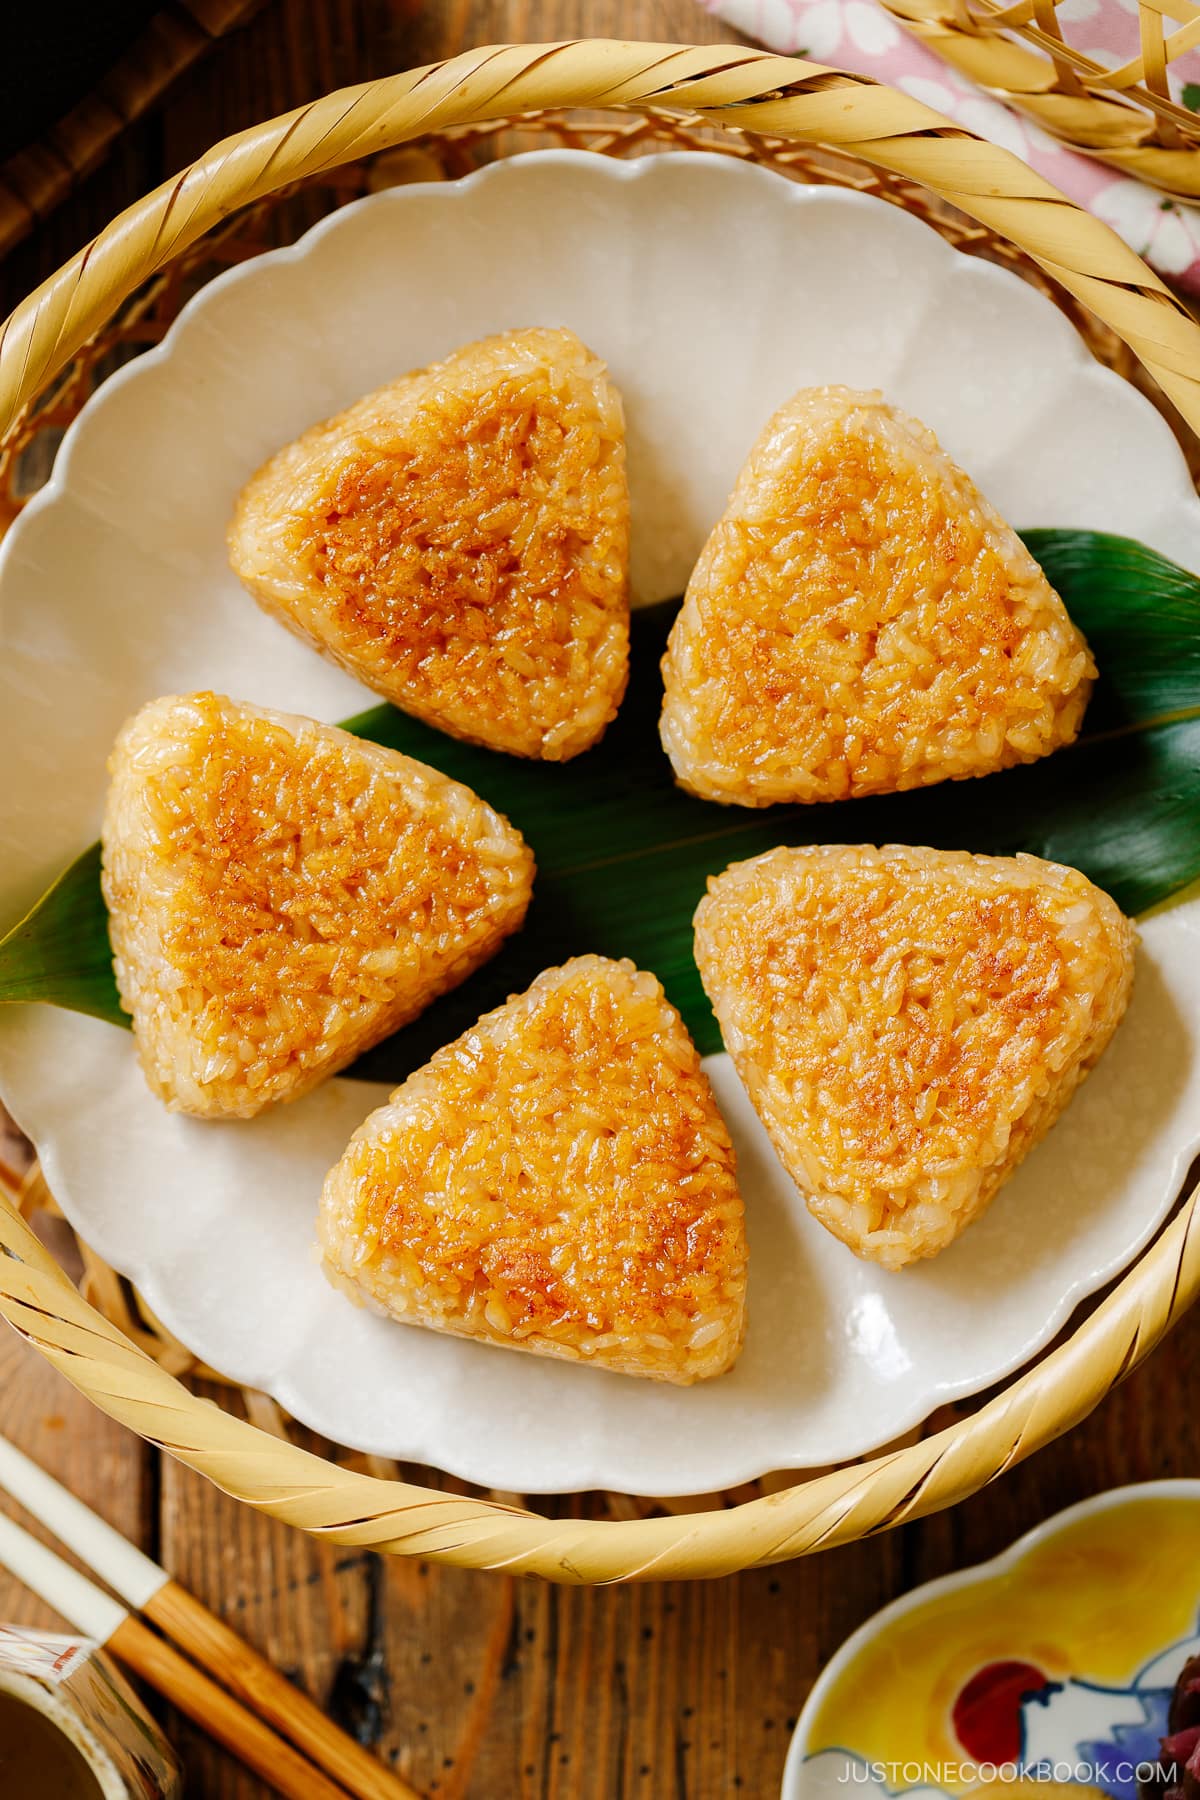
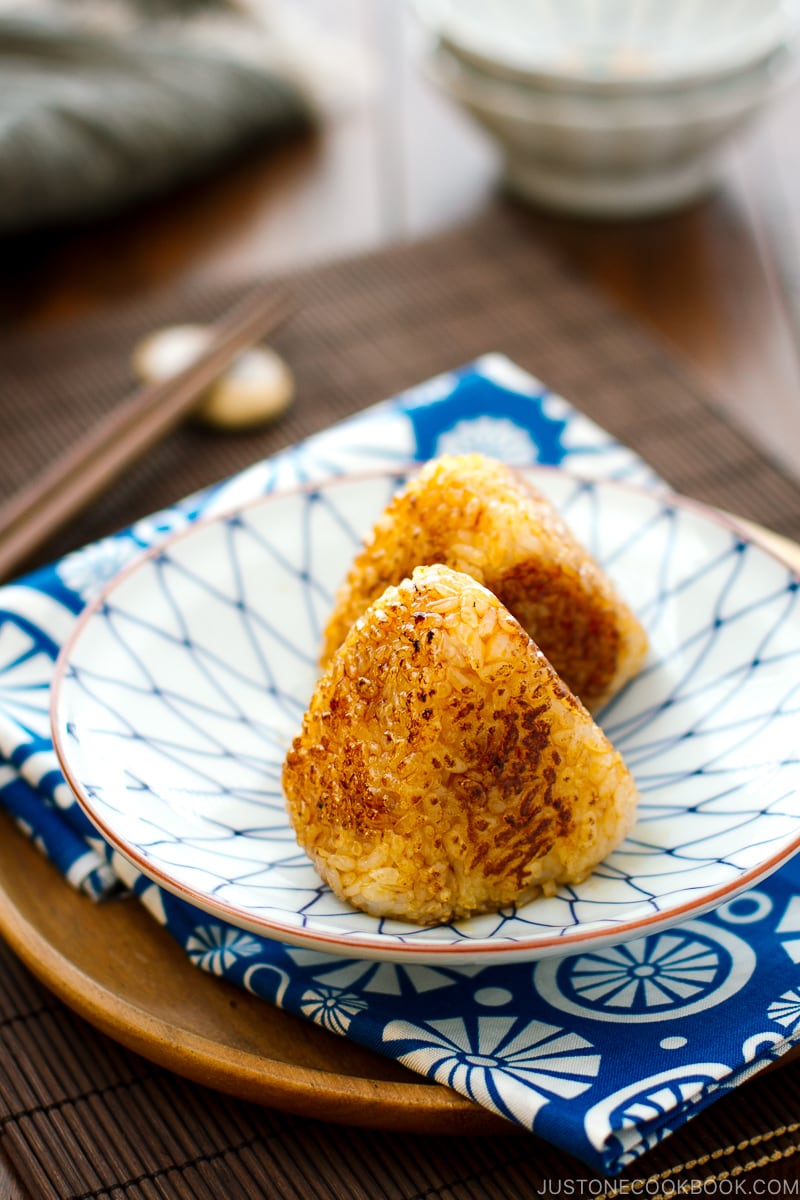
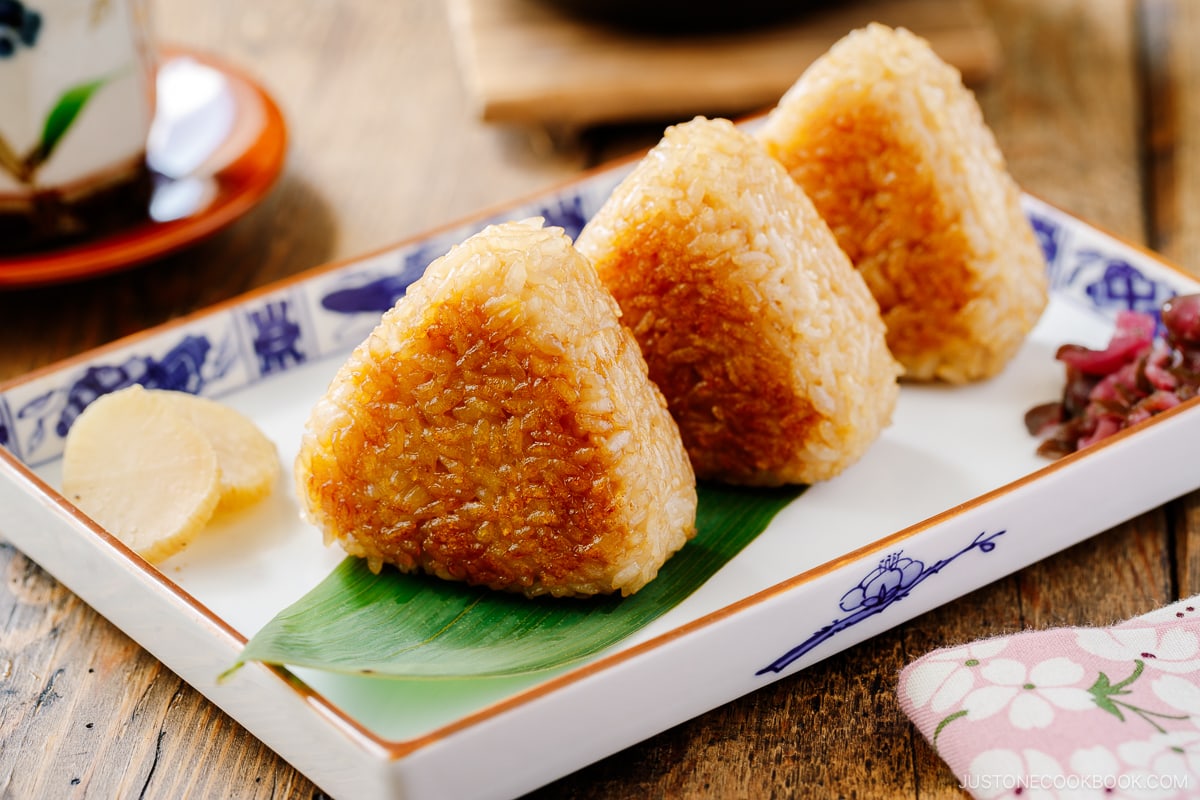
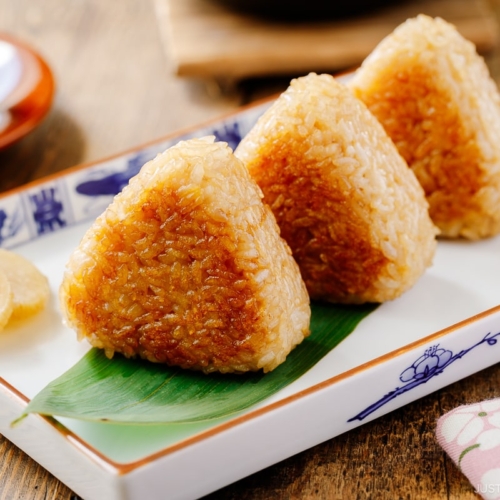
A favorite at izakaya restaurants, Yaki Onigiri are Japanese rice balls that are pan-grilled and glazed in savory soy sauce. With a crispy crust on the outside and tender rice on the inside, these rice balls are simply irresistible and easy to make at home!
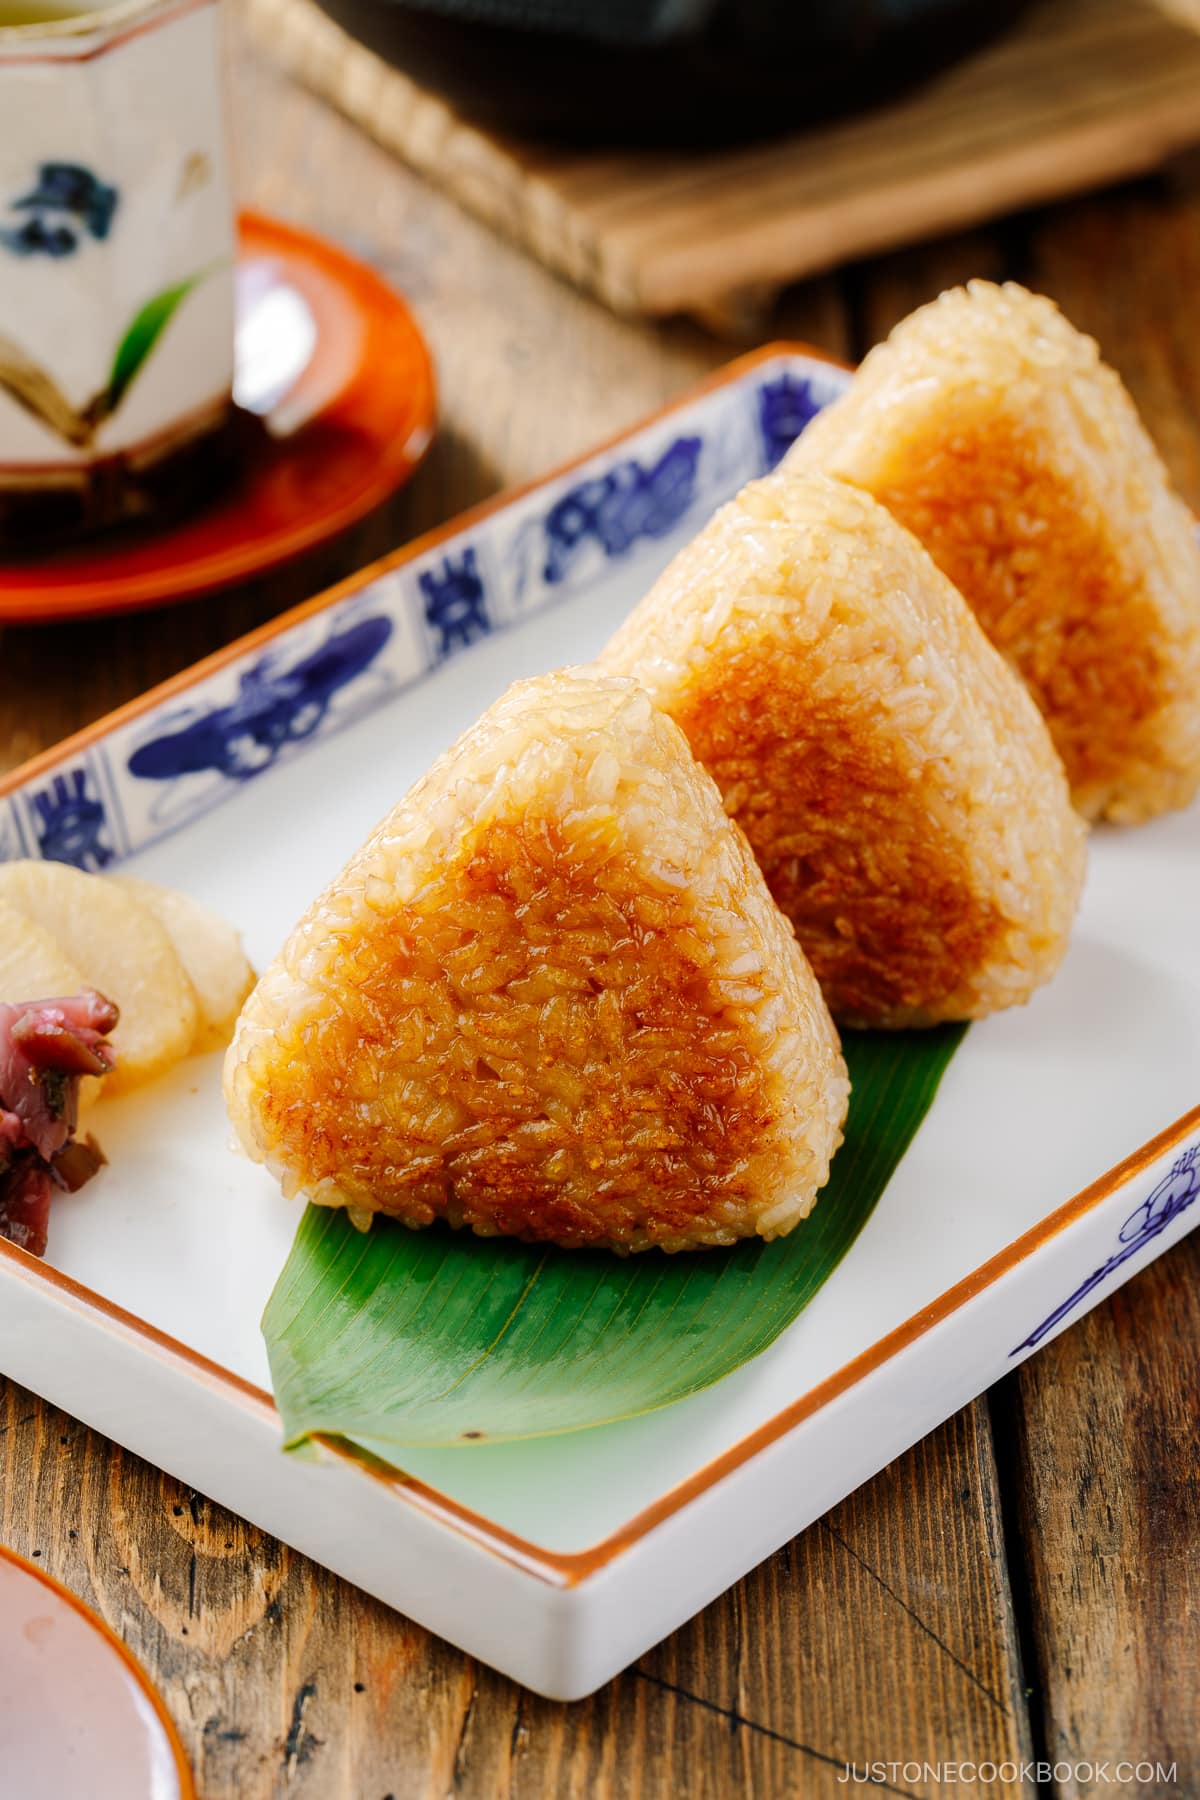
Have you ever tried Yaki Onigiri (焼きおにぎり)? These grilled rice balls are a beloved snack and lunchtime delight in Japan, frequently gracing the menus of BBQ parties and izakaya establishments.
If you have an affinity for rice and grilled food, you will enjoy yaki onigiri. Picture these delectable rice balls gently grilling, their exteriors crisping to a golden brown while the rice within remains warm, tender, and irresistibly soft. A light brush of a savory glaze elevates the flavors, making them a most delicious treat!
Table of Contents
What’s Yaki Onigiri?
The term “yaki” originates from the Japanese word for “grilled,” as seen in other popular dishes such as Teriyaki, Yakisoba, Yakiniku, and Yakitori. On the other hand, “onigiri” translates to “rice balls.” Therefore, yaki onigiri quite literally means grilled rice balls.
In the traditional preparation of yaki onigiri, rice balls are grilled over charcoal until the rice attains a desirable browned and crispy texture. Subsequently, they are brushed with either soy sauce or a miso glaze, allowing the seasoning to caramelize, creating a golden crust on the exterior.
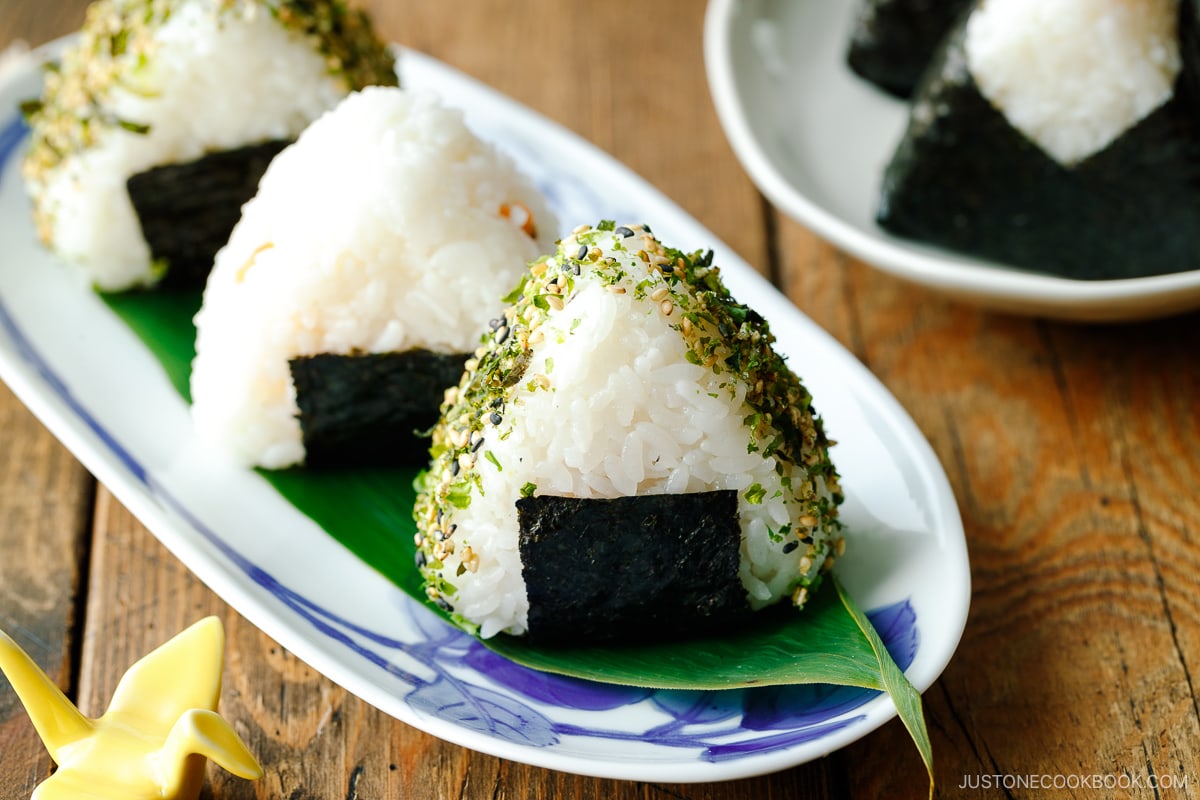
Most Japanese do not have charcoal or a grill in their homes, so yaki onigiri is grilled using a frying pan. You’d start by shaping cooked short-grain white rice into triangular or oval shapes, akin to regular onigiri (my recipe here), before pan-grilling them. It’s every bit as straightforward to make as it sounds!
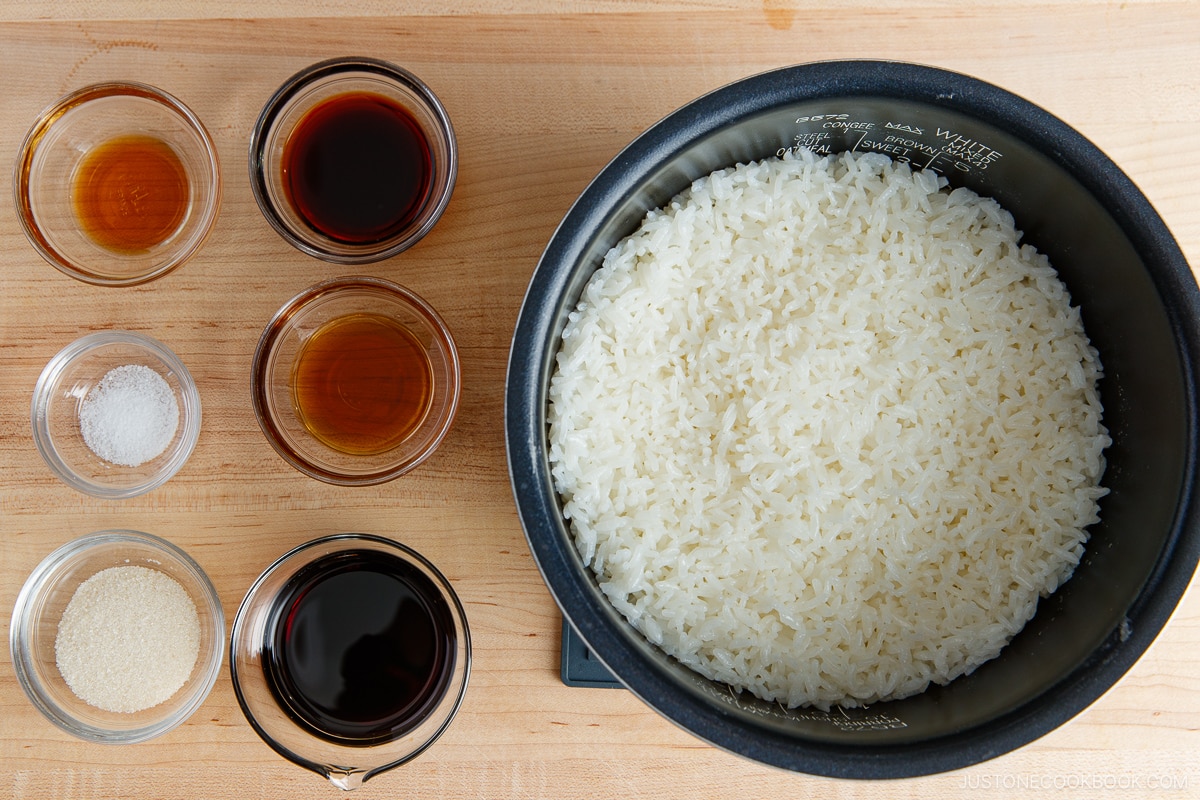
Ingredients for Yaki Onigiri
- Japanese short-grain rice (cooked)
- Seasonings: soy sauce, sugar, salt, and sesame oil
- Soy sauce glaze: soy sauce and sesame oil
How to Make Yaki Onigiri at Home
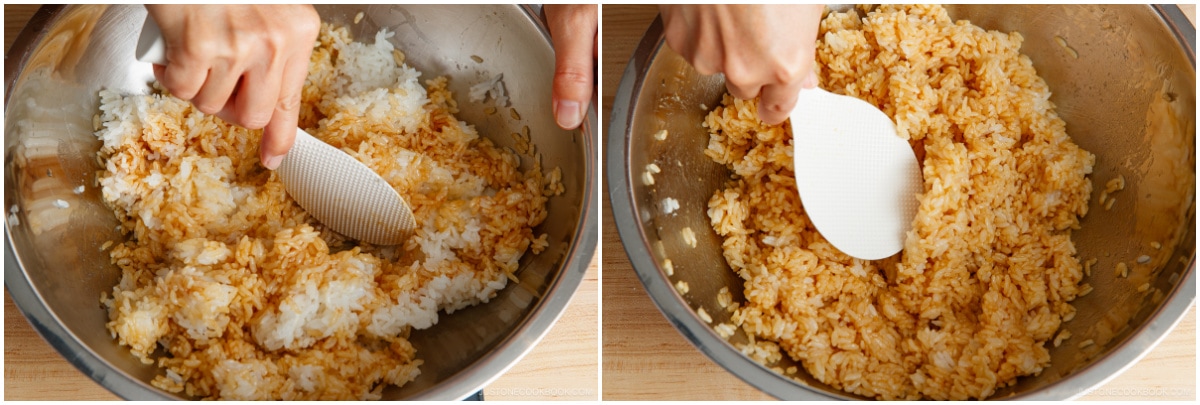
- Combine the cooked rice and the seasonings. Mix it all together without making it mushy.
- Make onigiri with seasoned rice. I’ll show you two ways in this recipe: using an onigiri mold and plastic wrap. You can choose either method.
- In a frying pan lined with parchment paper, place the rice balls and grill on all sides on medium-low heat until crispy and golden.
- Brush the soy sauce glaze on the rice balls and sear the brushed surface. Be careful not to burn.
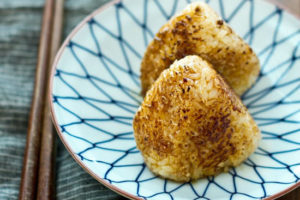
- Transfer to a plate and enjoy while hot!
Filling or No Filling in Yaki Onigiri
These grilled rice balls can be made with fillings, but typically, it is prepared with plain or seasoned rice. I prefer mine without filling as I find filling can sometimes distract the enjoyment. Then again, the choice is yours.
Because it’s all about simplicity, you want to start with quality Japanese short-grain rice. Forming the onigiri is not too challenging. In the recipe section below, I’ve shared step-by-step pictures and tips on how to form the rice balls, so you will master it in no time. Once you have the rice balls shaped, you just need to place them on the grill, brush them with the sauce, and leave them to crisp up.
The Glaze Variations
Although yaki onigiri is commonly glazed with soy sauce or miso (I have a Miso Yaki Onigiri recipe), you can be creative with different flavors. Here are my suggestions!
- Eel Sauce. I love my Homemade Unagi Sauce. The savory aroma and taste of this caramelized sweet soy sauce blend perfectly with white rice, especially if you like it sweeter.
- Teriyaki Sauce. Definitely make my Homemade Teriyaki Sauce for this!
- Negi Miso. My Homemade Negi Miso is so delicious. I may put it inside the onigiri, too, but you can definitely slather on the outside and sear a bit.
- All Purpose Miso Sauce. This Homemade All Purpose Miso Sauce goes well with everything.
What to Do with Leftover Yaki Onigiri
Make and freeze yaki onigiri ahead of time so you can enjoy this Yaki Onigiri Chazuke as a quick meal or midnight snack.
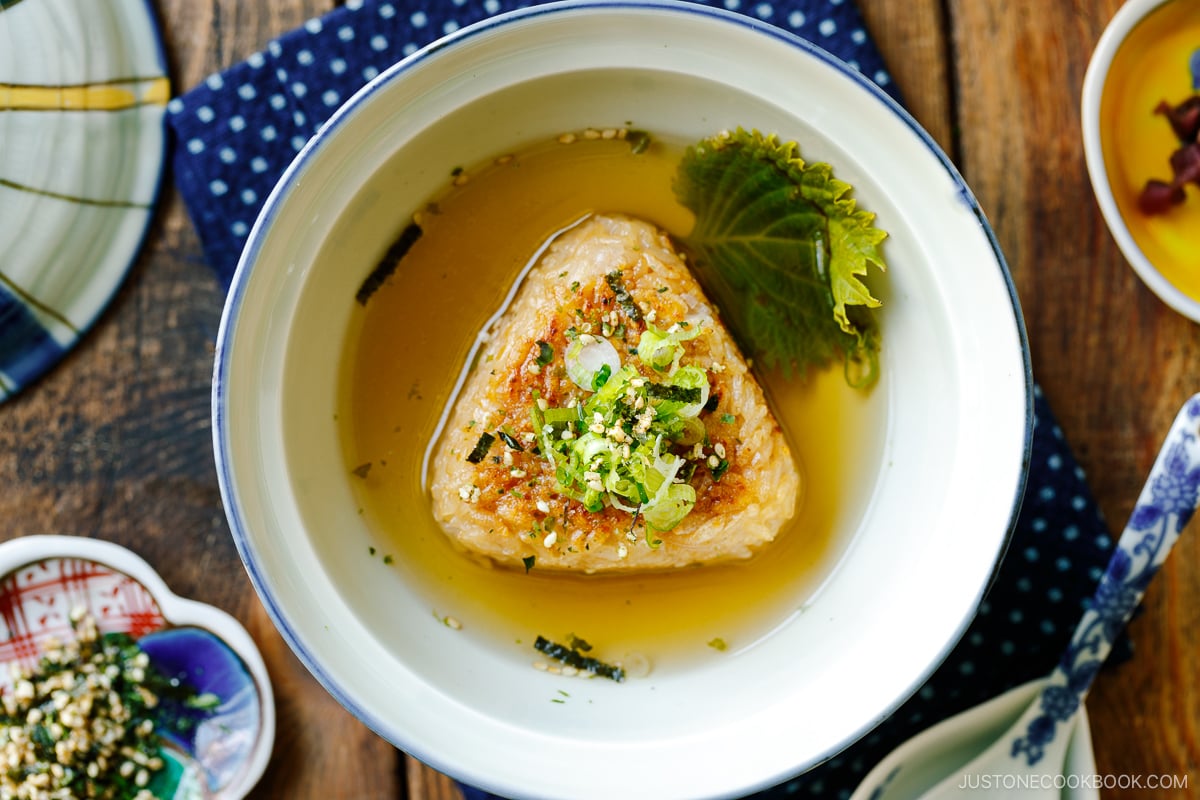
Yaki Onigiri Chazuke is a Japanese comfort dish. It consists of warm dashi soup poured over a crispy Yaki Onigiri and garnished with savory toppings.
What to Serve with Yaki Onigiri
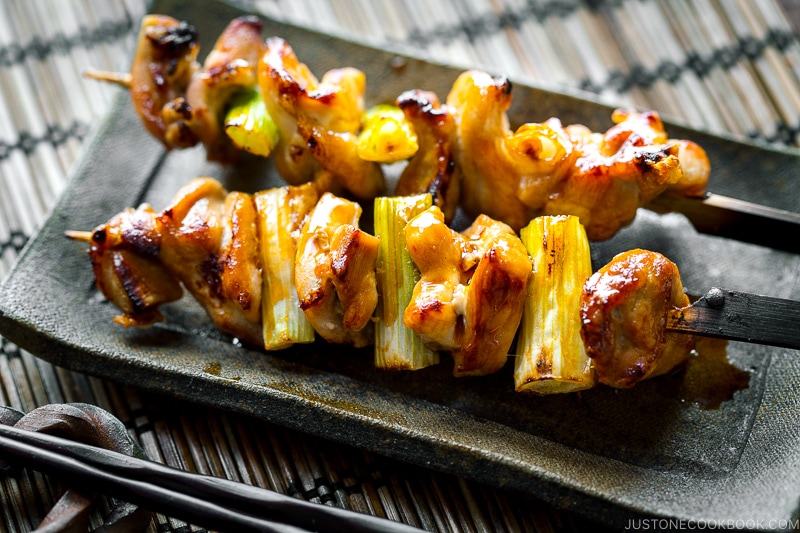
I can just devour yaki onigiri on their own, but for a balanced meal, you can pair them with:
- Yakitori
- Yakitori-Style Grilled Vegetables
- Karaage (Japanese Fried Chicken)
- Agedashi Tofu
- Spicy Edamame
- Hamachi Crudo
- Oden (Japanese Fish Cake Stew)
What is the Best Rice Cooker
To make the perfect rice for yaki onigiri, I like to use my Zojirushi NP-NWC10XB Rice Cooker. It makes fluffy rice every time and is the best Japanese rice cooker I’ve ever used! You can get it on Amazon for $458.29, and it’s well worth it if you cook a lot of rice.
Wish to learn more about Japanese cooking? Sign up for our free newsletter to receive cooking tips & recipe updates! And stay in touch with me on Facebook, Pinterest, YouTube, and Instagram.
Yaki Onigiri (Grilled Rice Ball)
Video
Ingredients
For the Steamed Rice
- 2¼ cups uncooked Japanese short-grain white rice (3 rice cooker cups, 540 ml; to cook 2 rice cooker cups of rice instead, see measurements below)
- 2½ cups water (for 2 rice cooker cups of rice, use 1⅔ cups (400 ml) water)
For Seasoning the Rice
- 3 Tbsp soy sauce (or use 2 Tbsp for 2 rice cooker cups of rice)
- 1 Tbsp sugar (or 2 tsp for 2 rice cooker cups)
- 1 Tbsp toasted sesame oil (or 2 tsp for 2 rice cooker cups)
- ¼ tsp Diamond Crystal kosher salt (or ⅛ tsp for 2 rice cooker cups)
For the Glaze
- 1 Tbsp soy sauce
- 1 tsp toasted sesame oil
Instructions
Before You Start…
- Japanese short-grain white rice requires a soaking time of 20–30 minutes. The rice-to-water ratio is 1 to 1.1 (or 1.2) for short-grain white rice. Please note that 2¼ cups (450 g, 3 rice cooker cups) of uncooked Japanese short-grain rice yield 6⅔ cups (990 g) of cooked white rice. This is enough for 9 onigiri rice balls (typically 110 g each). Optional: To make 5–6 rice balls, cook 1½ cups (300 g, 2 rice cooker cups) of uncooked Japanese short-grain rice in 1⅔ cups water (400 ml) to yield 4⅓ cups (660 g) of cooked white rice.
- Cook the rice; see how with a rice cooker, pot over the stove, Instant Pot, or donabe. To my rice cooker, I added 2½ cups water to 2¼ cups uncooked Japanese short-grain white rice. Once the rice is cooked, gather all the ingredients.

To Season the Rice
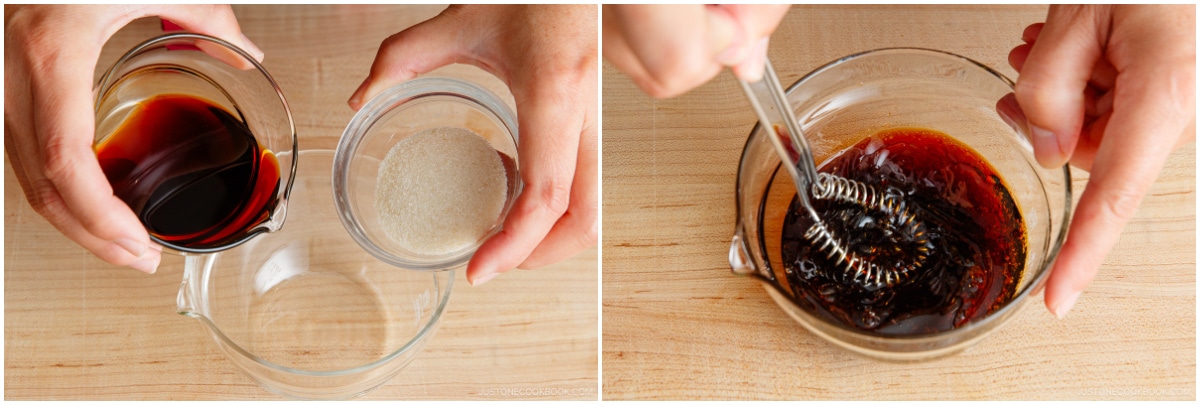
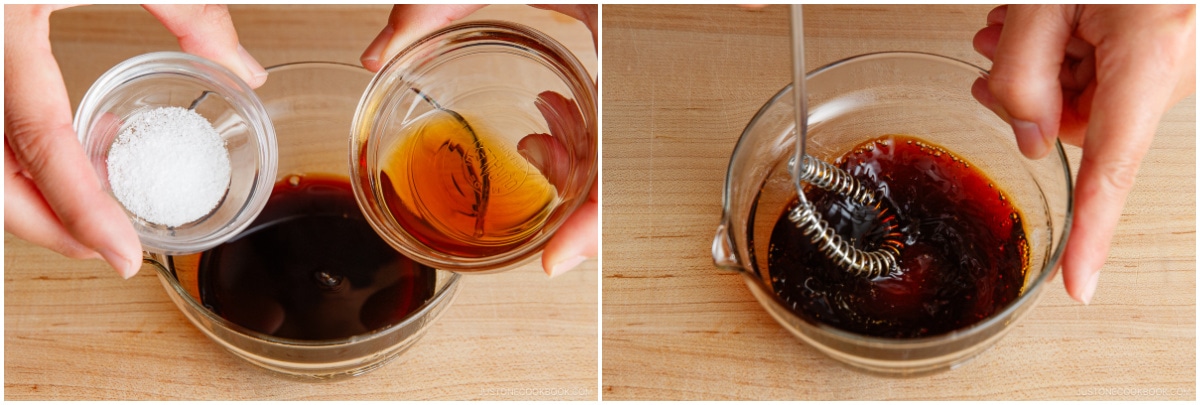
- Combine 3 Tbsp soy sauce and 1 Tbsp sugar in a small bowl and microwave until the mixture is hot, about 30–60 seconds. Whisk it all together until the sugar dissolves.

- Add 1 Tbsp toasted sesame oil and ¼ tsp Diamond Crystal kosher salt and mix it all together.
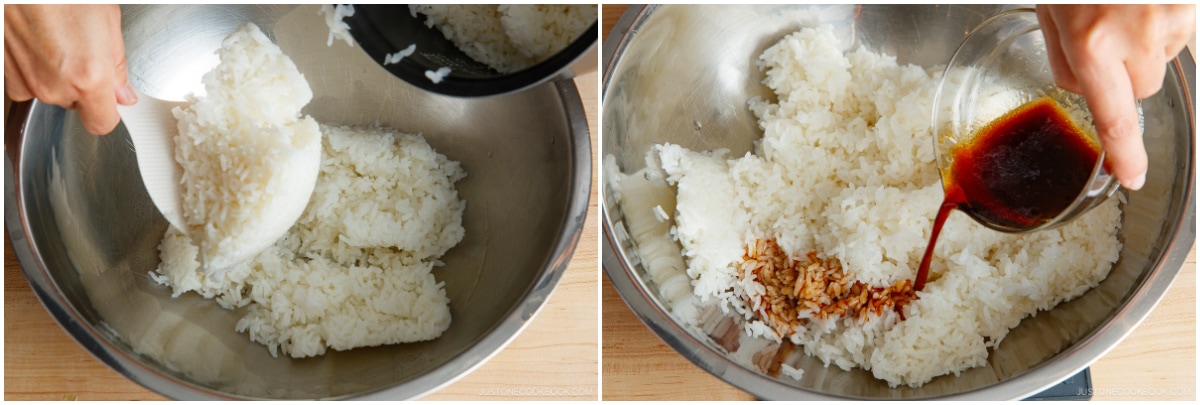
- Transfer the hot cooked rice to a large bowl and add the seasoning mixture.
- With a rice paddle, use a slicing motion to combine the seasoning and cooked rice well. Now, you‘re ready to shape the rice balls. Note: Be sure to let the cooked rice cool a little bit until you can hold it without burning your hands. Rice must be hot or warm when making onigiri in order to hold its shape.
To Shape the Rice Balls
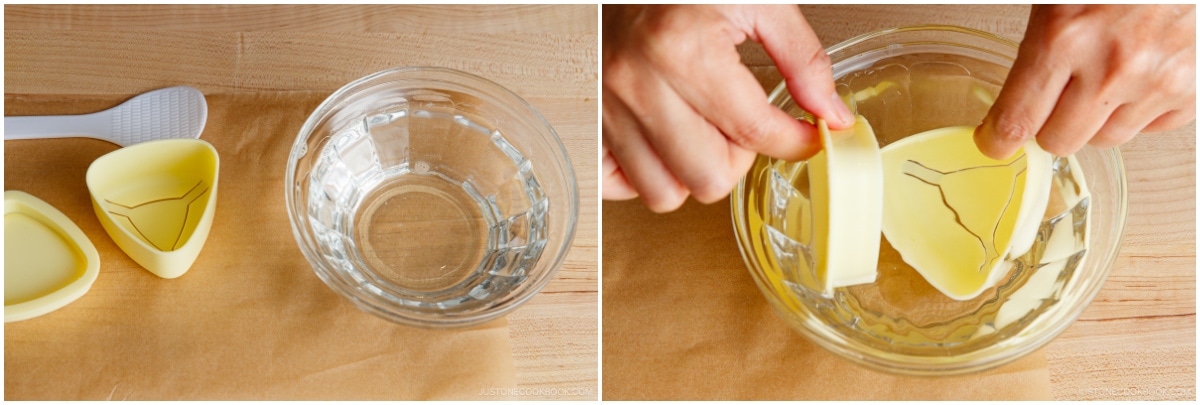
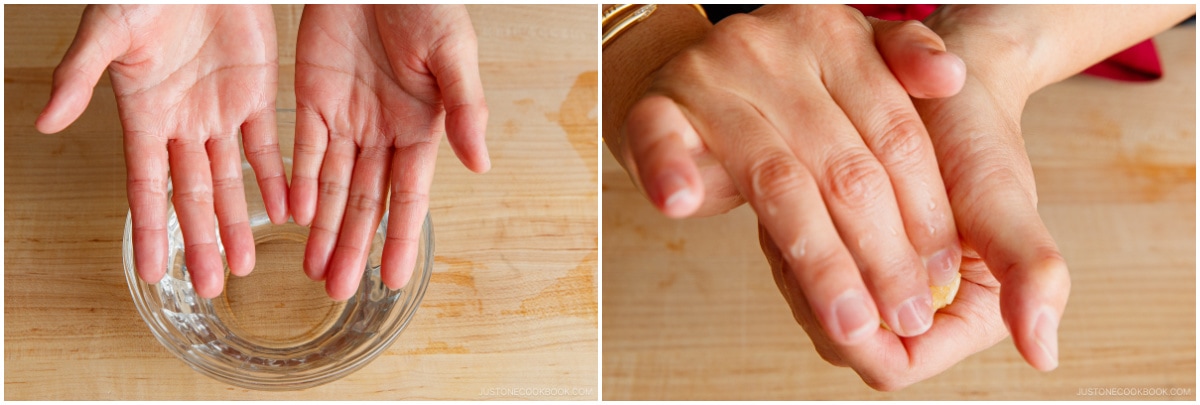
- With an Onigiri Mold: Prepare a small bowl filled with water. Soak the onigiri mold and lid in the water to moisten so the rice doesn‘t stick to it. Remove the mold and drain the excess water.
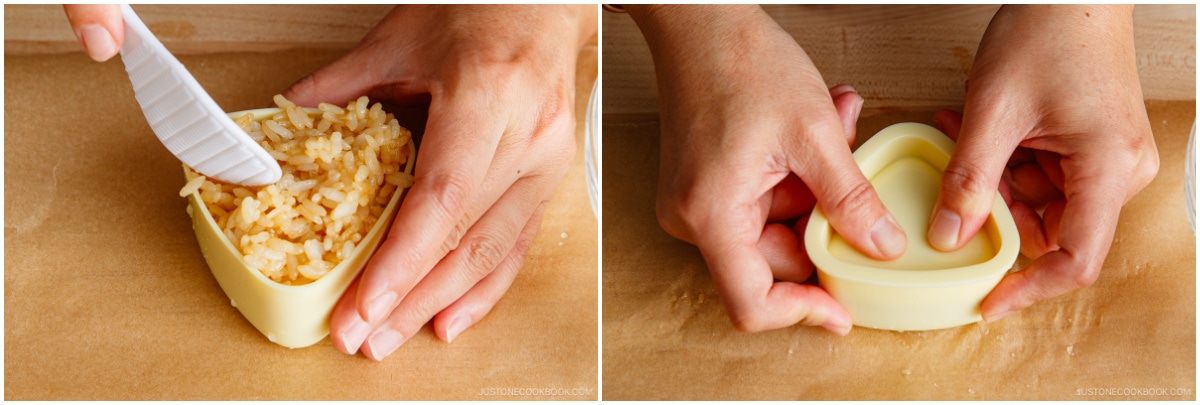
- Fill the onigiri mold with the hot seasoned rice all the way to the top edge, making sure to fill the corners. Cover with the lid and push down firmly. You should feel a slight resistance; if not, you may want to add a bit more rice.
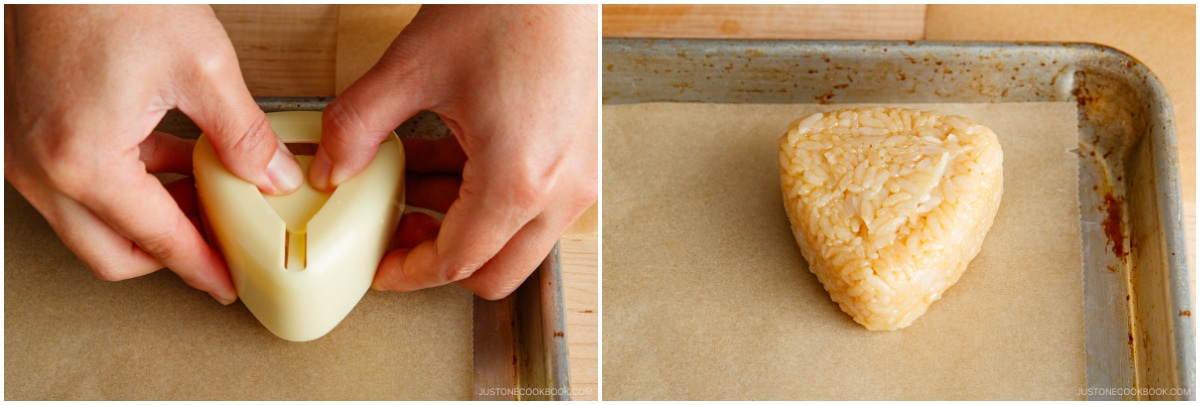
- Remove the lid. Flip over the mold onto a baking sheet or plate lined with parchment paper. Then, push the “button” on the mold‘s bottom to release your onigiri. Tip: Always dip your fingers in water before touching the onigiri to prevent the rice from sticking to them.
- Repeat with the remaining rice.
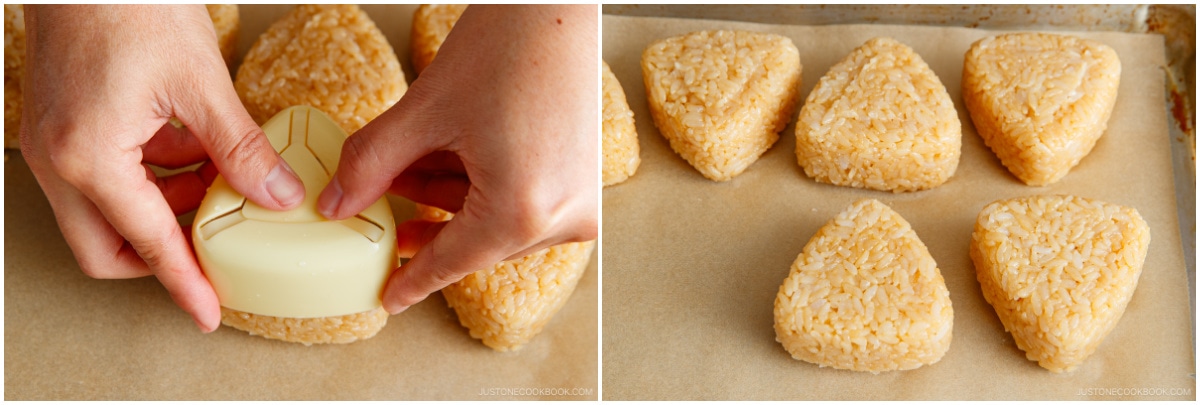
- Now, firmly hand-press the rice balls to keep them from falling apart while grilling. For Yaki Onigiri, you‘ll want to press the rice ball a bit more tightly than you would a regular onigiri. First, moisten both palms with a bit of water to prevent the rice from sticking. Then, pick up a rice ball in your left (non-dominant) hand. Place your right (dominant) hand on top of the rice in a “mountain" shape and gently press the triangle corner. At the same time, squeeze the fingers and heel of your bottom (left) hand to gently press the sides flat.Now, rotate the triangle corner you just pressed toward you (clockwise, if you‘re right-handed). The tip of the second corner will now be pointing up. Repeat the above “press and rotate” steps to hand press the second triangle corner and then the third, always keeping your left hand on the bottom and your right hand on top. Press and rotate a final 2–3 more times to finish.
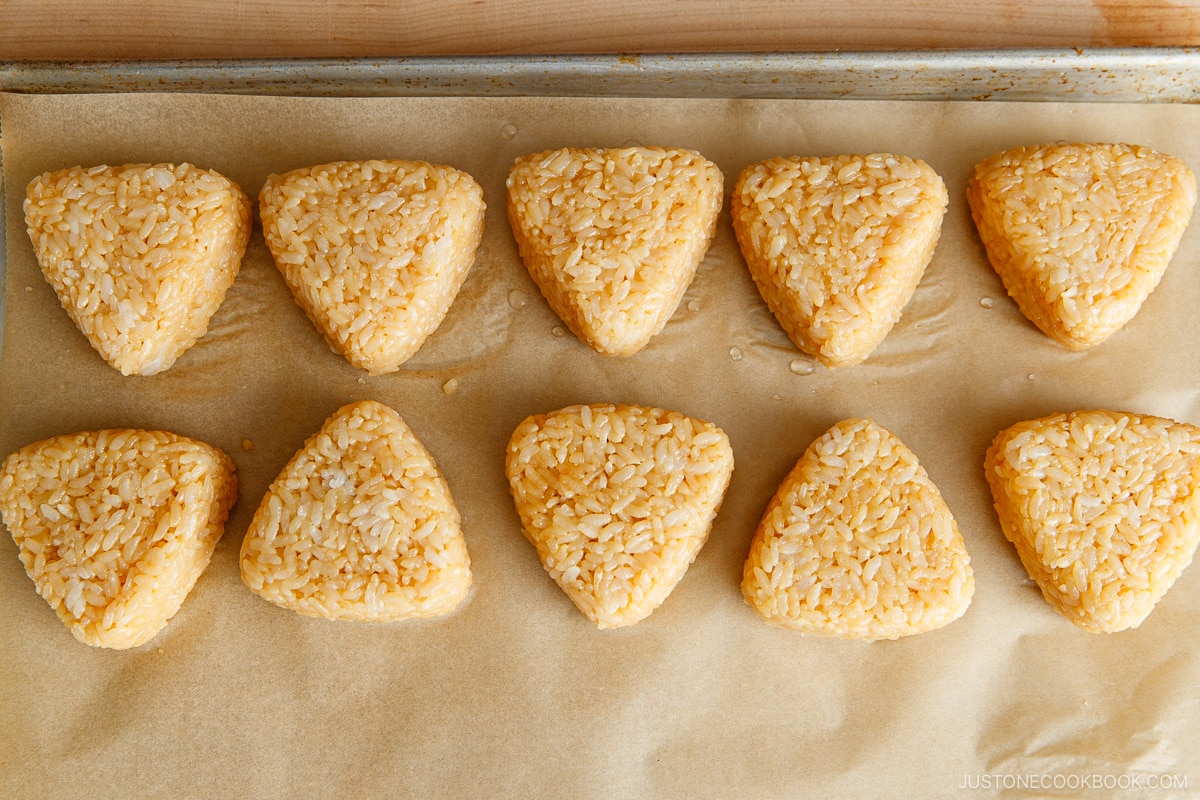
- In the image below, the top row is hand pressed while the bottom row is not.
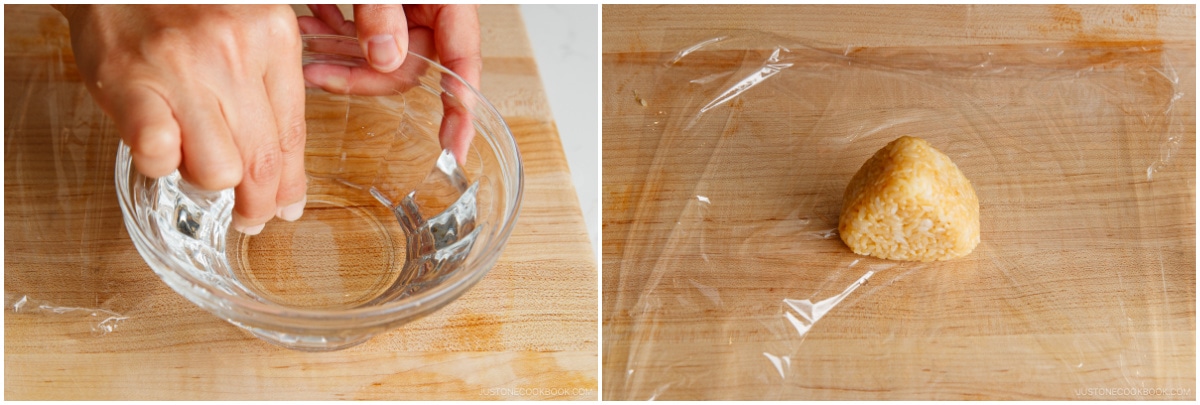
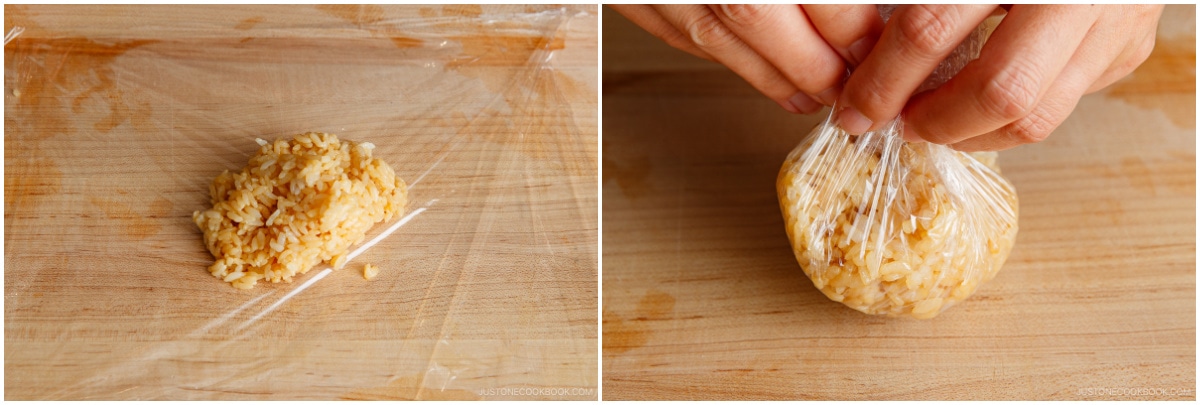
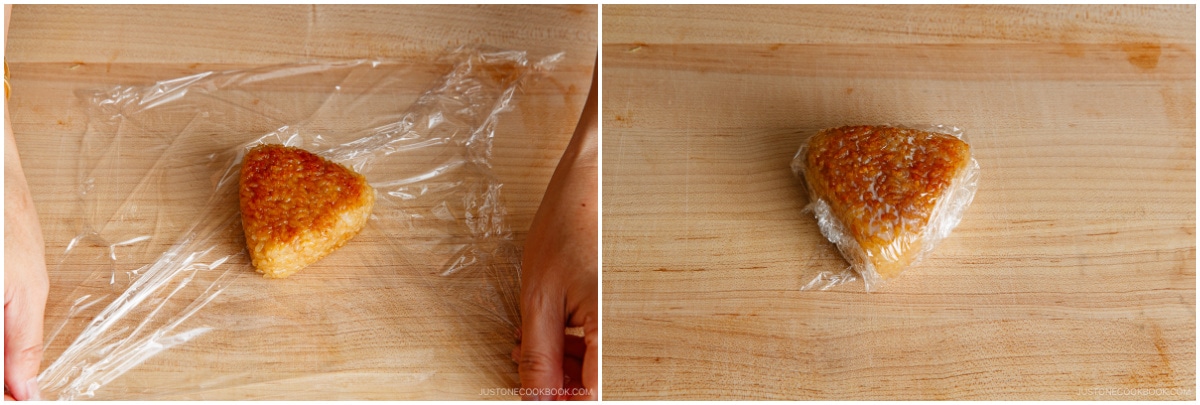
- If you don‘t want to touch the rice with your hands, you can press the onigiri with plastic wrap. Place a piece of plastic wrap on the working surface, wet your fingers, and place the onigiri in the middle.
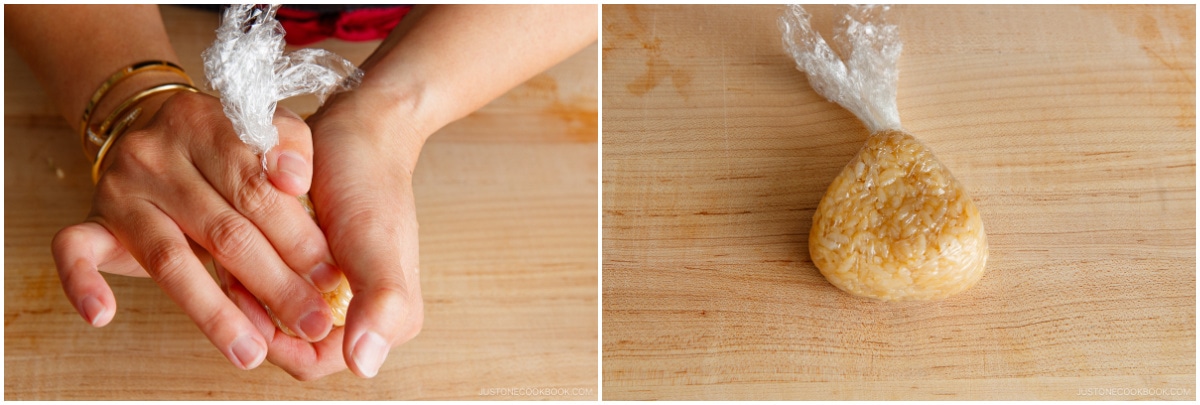
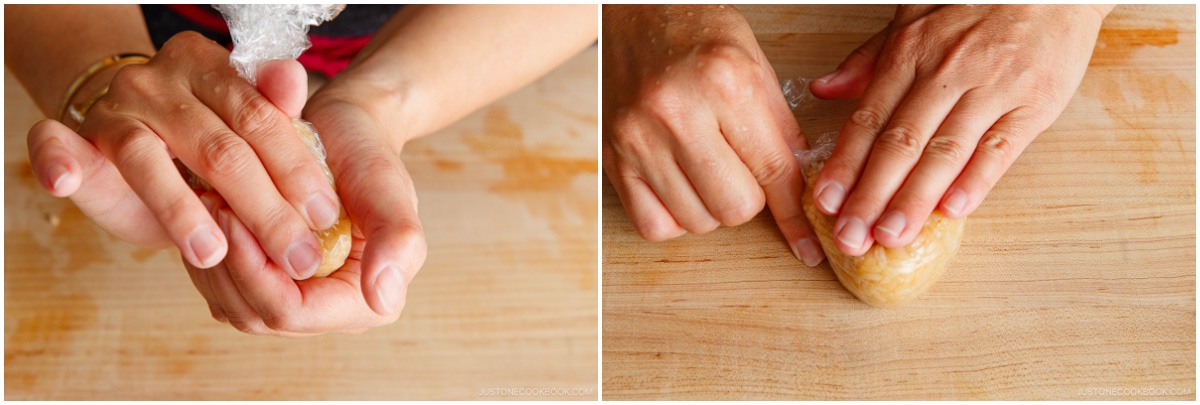
- Gather the corners of the plastic wrap and twist it a few times to tighten it around the rice. Form the rice into a triangle shape in the same manner that I described above.
- Without an Onigiri Mold: You also can use plastic wrap to shape the onigiri instead of using a mold. Place a piece of plastic film on the working surface, wet your fingers, and put the rice on top. Gather the corners of the plastic film and twist it a few times to tighten it around the rice.
- Form the rice into a triangle shape through the plastic in the same manner that I described above for hand-pressing the onigiri. Repeat with the remaining rice. Tip: To shape the onigiri with your hands the traditional way, see the step-by-step instructions and images in my Onigiri (Japanese Rice Balls) post.
To Pan-Grill the Onigiri
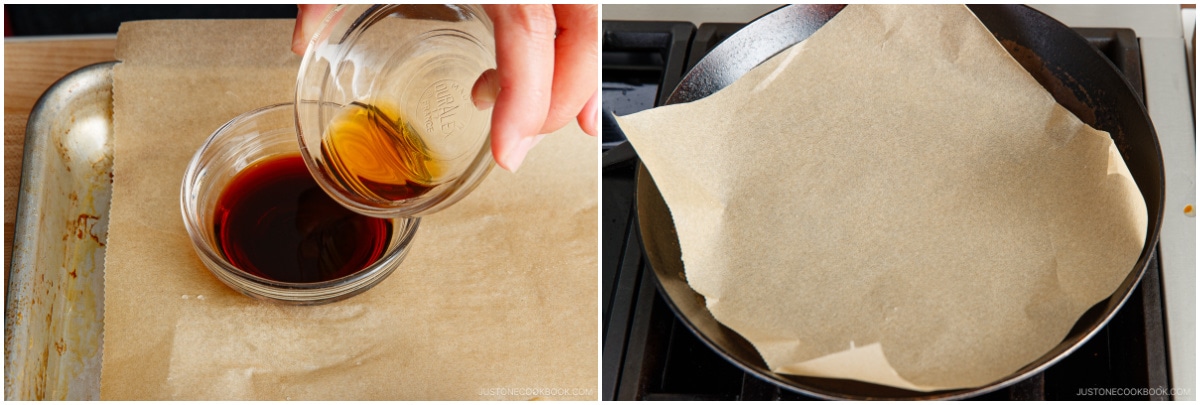
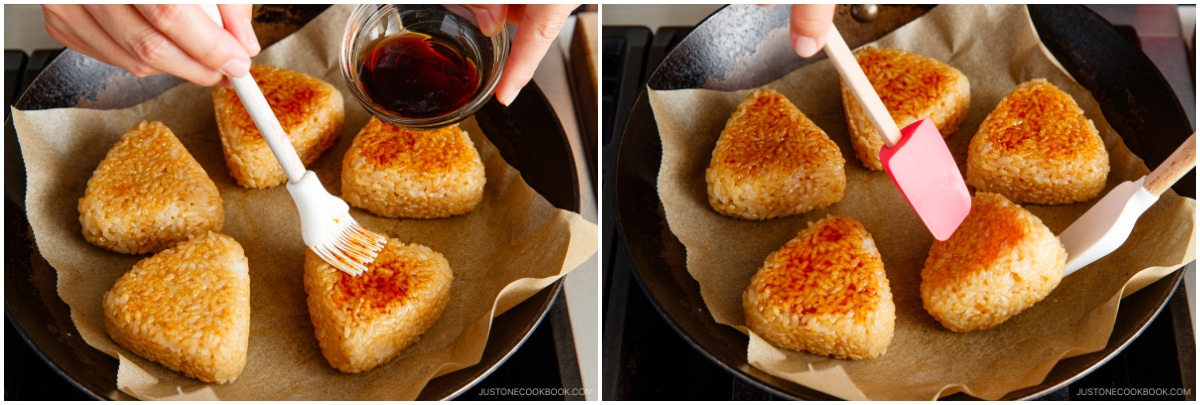
- Combine 1 Tbsp soy sauce and 1 tsp toasted sesame oil for the glaze. Place a sheet of parchment paper on a large frying pan.
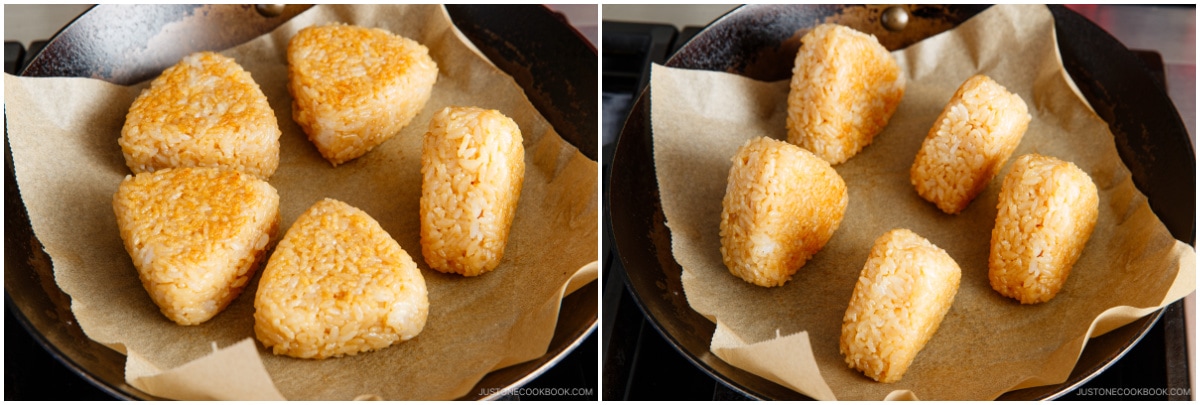
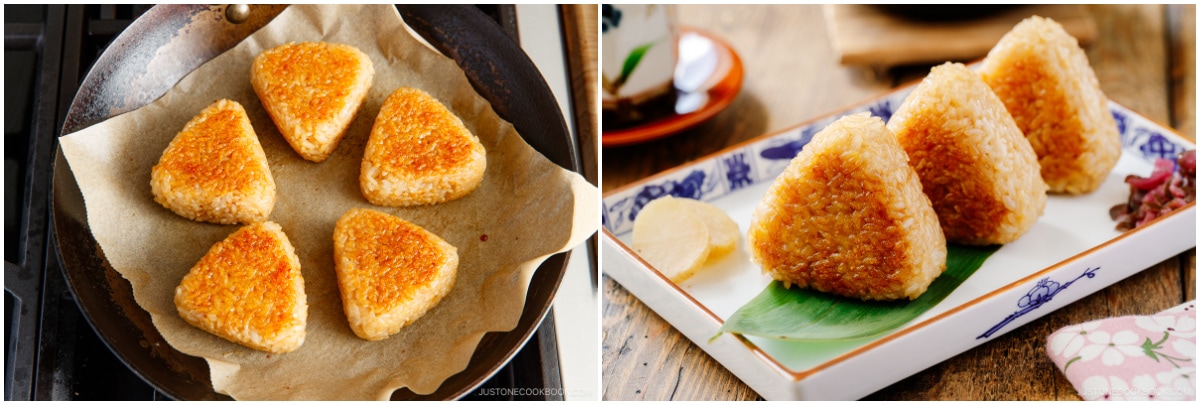
- Gently place the rice balls on the parchment paper and grill on medium-low heat. Grill the onigiri until all sides are crispy and lightly browned. Once browned on the bottom, turn them over (I use two silicone spatulas). Don’t flip them until browned; work on one side at a time and avoid handling them too much, which may cause the onigiri to break into pieces.
- Rotate the onigiri to grill all sides and make sure they become crispy.
- Once they are nicely toasted and lightly brown, turn the heat to low (or turn off the heat). Brush the onigiri sides with the soy sauce glaze, then turn over to grill on the sauce side. Then, brush on the other side.
- Be careful not to burn the onigiri after you brush it with the glaze. Optionally, you can brush them with my homemade unagi sauce and teriyaki sauce. Your Yaki Onigiri are now ready to enjoy.

To Store
- Rice gets hard when you refrigerate it. You can individually wrap the Yaki Onigiri in plastic wrap and cover them with a thick kitchen towel and store in the refrigerator for up to 2 days. The towel will prevent the rice from getting too cold and keep the food cool but not cold. You can also store the Yaki Onigiri that are individually plastic-wrapped in the freezer for up to a month. When you‘re ready to eat, bring it back to room temperature and reheat in a microwave or frying pan.
Nutrition
Editor’s Note: This post was originally published on June 25, 2012. It’s been republished with new images, more helpful content, and a revised recipe on September 18, 2023. A new video was added to the post on March 23, 2024.


Thank you for updating the recipe ! It’s so much easier than the previous one.
Hi Caroline! Thank you so much for your kind feedback!
We are so happy to hear you enjoyed Nami’s updated recipe! Happy Cooking!
Oh my god…I have been looking for a recipe for these for ages! My grandmother used to make these for me all the time, but she never showed me how to make them, and never wrote any of her recipes down, so I have literally not had these since I was a kid. One more thing to finally add to my list of Japanese foods from my childhood that I’ve finally learned how to make!
Also, thank you for the note in there about using still-warm rice to make onigiri…I’ve been trying to make them with completely cooled rice (room temperature, or even the day-old refrigerated rice we usually intend for fried rice), and wondering why they never held together like they should. Oops.
Hi Shelby! We are so happy to hear you found the recipe you have been looking for! 🥰
Thank you so much for trying Nami’s recipe and sharing your experience with us!
This looks very nice and easy. I bought just the same onigiri molds some years ago and use them often when making onigiri for my bento. I was wondering about the paper you place in the pan, what’s the purpose? Can’t you use a non-stick pan? Just curious. 🙂 Keep up the good work!
Hi Peter! That’s great! I find it easier to shape the onigiri using the mold. My frying pan is a carbon steel (I avoid non-stick pans) which is why I need to use a parchment paper. If you use a non-stick pan, you can add thin coat of oil to use it. You can still use parchment paper for a non stick pan and don’t use oil too. Hope you enjoy!
I just want to thank you for your recipe site. I have tried 3 of your recipes, including the yaki onigiri, and everything turned out great and was delicious! Your recipes are keepers! Thank you!
Hi Pamela! Aww. Nami and all of us at JOC are so happy to hear you enjoyed Nami’s recipes.
Thank you so much for your kind feedback! 🤗
This recipe came together beautifully for me!
Hi Christine! Thank you! Nami and all of us at JOC are so happy to hear you enjoyed it.
Happy Cooking!
My grandmother made this using miso. It was so good!!!
Hi Janice! Thank you very much for reading Nami’s post!
Nami has Miso Yaki Onigiri (Grilled Rice Balls) 味噌焼きおにぎり recipe too:https://www.justonecookbook.com/miso-yaki-onigiri/
We hope you give it a try! Happy Cooking!
I cannot wait to try all the deliciousness I’m seeing in front of me right now.
Hi Irene! Thank you very much for trying Nami’s recipe!
We hope you enjoy Yaki Onigiri.