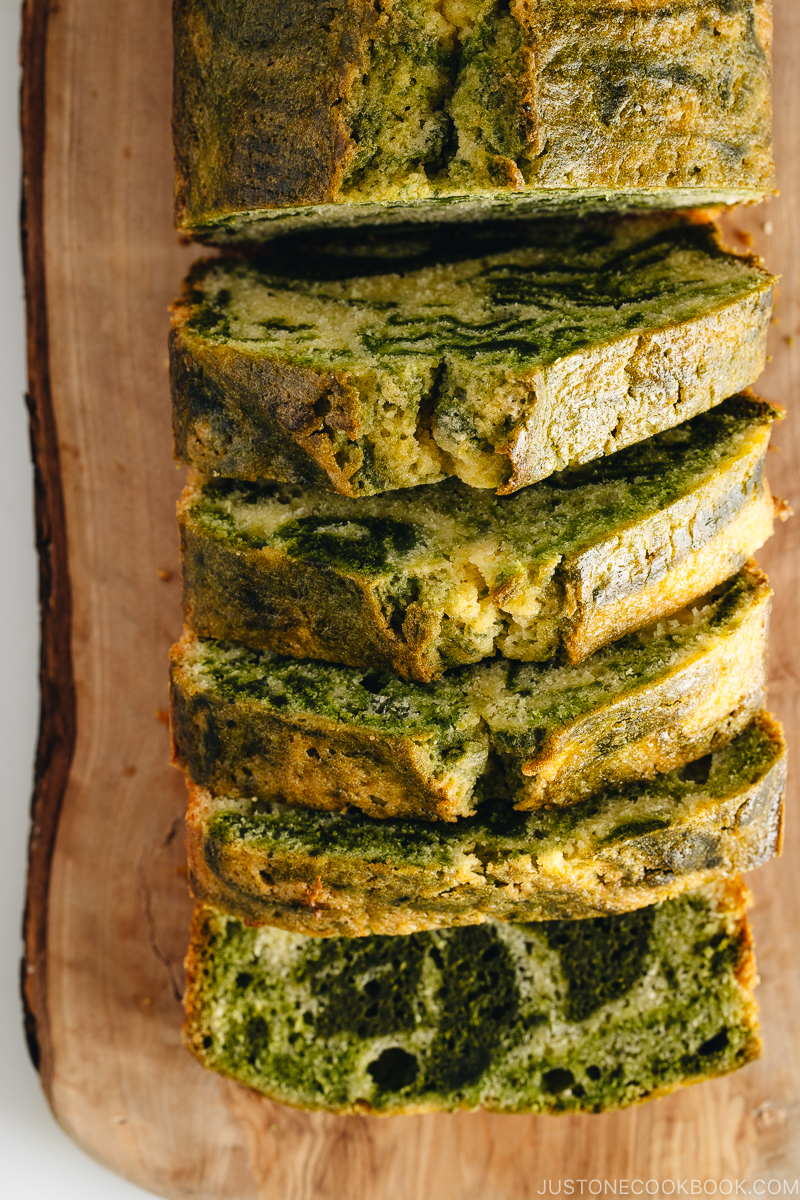
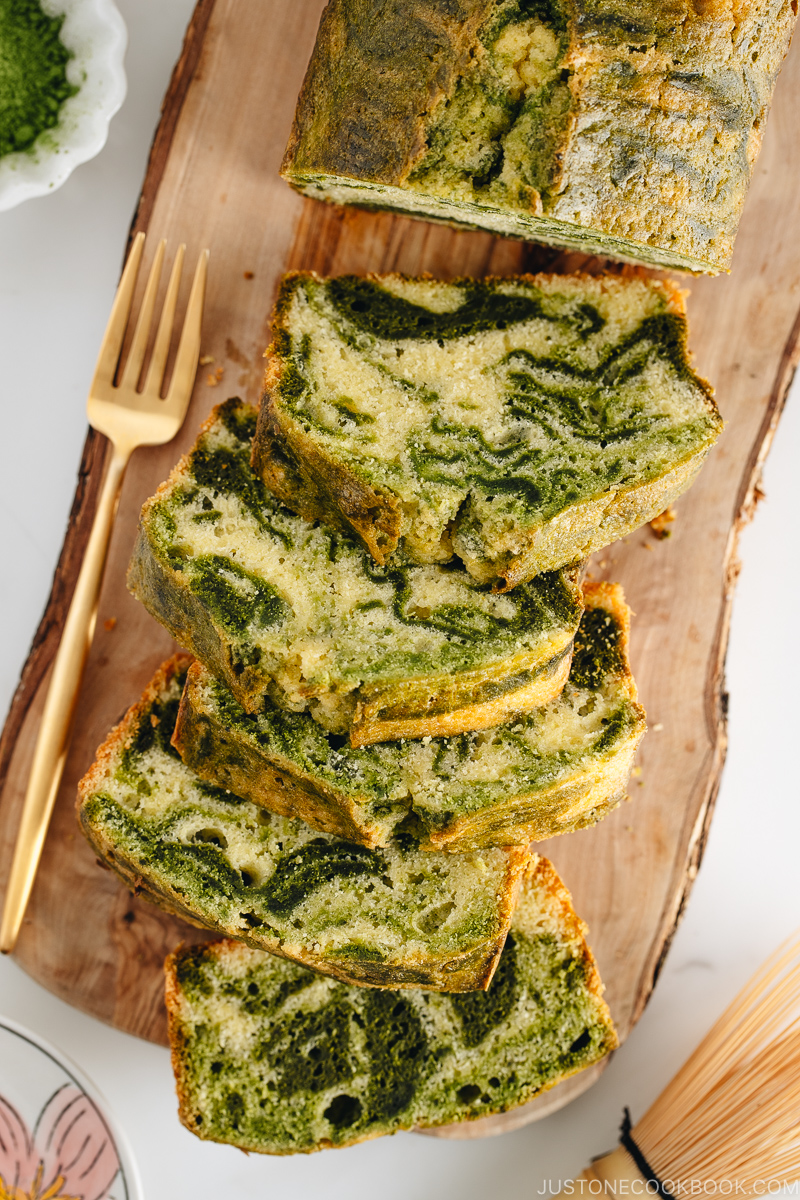
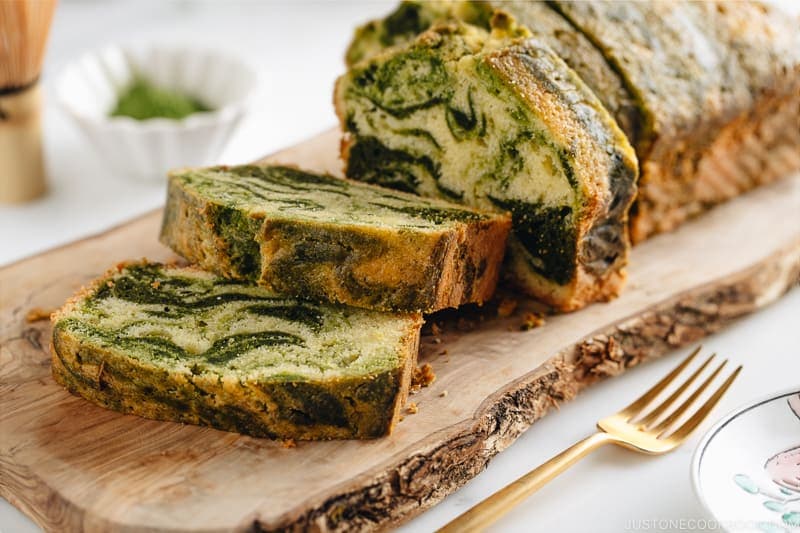
With rich green tea swirls, my light and tender Matcha Marble Pound Cake is a delectable snack that pairs perfectly with your afternoon coffee or tea. This Japanese-style pound cake tastes even better the next day, so it‘s an ideal make-ahead recipe.
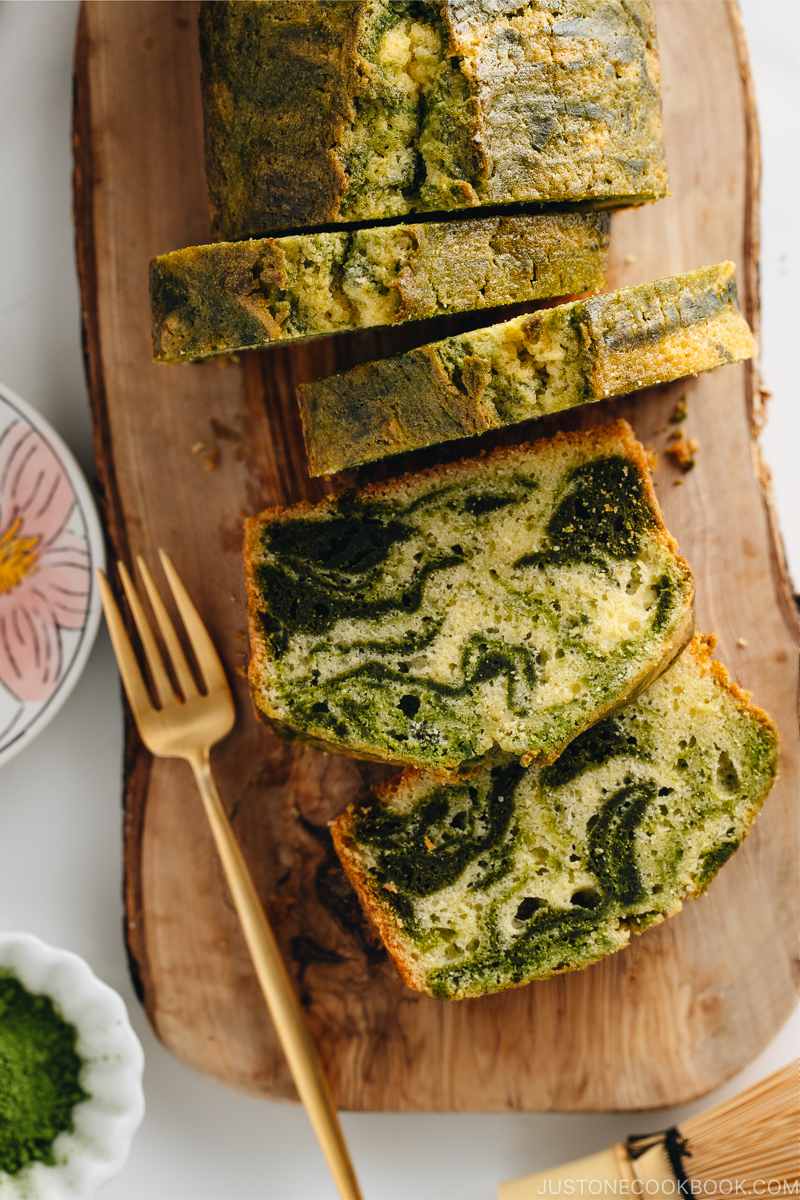
Do you have a good pound cake recipe in your baking repertoire? Today, I’ll show you how to make one of my favorites—Matcha Marble Pound Cake (抹茶マーブルパウンドケーキ).
This Japanese pound cake is buttery, tender, and bursting with a unique green tea flavor. Its striking emerald swirls make it feel like a luscious, special-occasion treat. Whether you’re making it for a Sunday afternoon treat or to take to a party, this Japanese-inspired pound cake will be a keeper!
Table of Contents

What is Japanese-style Pound Cake?
There are a few key differences between a Japanese-style pound cake and a typical pound cake found in the US.
- Japanese pound cake is lighter and less buttery than its heavier and richer American counterpart.
- It has a tighter crumb and firmer structure, whereas the American version has a softer crumb with a looser structure.
- It slices cleanly and holds its shape well, whereas an American pound cake is softer and tends to crumble and break apart more easily.
- It’s best eaten the day after baking. This gives the butter time to oxidize and blend into the cake for a moister texture. Waiting a day also allows the flavors to meld and improve for a stronger matcha taste.
What is Matcha?
Unlike regular green tea, matcha (抹茶) is made from shade-grown tea leaves to prevent direct sunlight. This slows down growth and stimulates an increase in chlorophyll level, which turns the leaves into a darker shade of green. Only the most delicate tea buds are hand-picked, removing the veins and stems. The buds are then stone-ground to the fine, bright green powder.
While green tea is an infusion of tea leaves, matcha powder incorporates the entire leaf, resulting in a more concentrated source of nutrients and caffeine. You can read more about matcha on my site.
Use Matcha for Baked Goods
With its earthy and slightly bitter undertone, matcha has been used as a mainstream key flavoring in making all kinds of sweets, pastries, and baked goods in Japan. I personally love the flavor of matcha. It’s especially great in baked goods as it keeps the flavor from tasting too sweet.
Another beauty of baking with matcha? The bright green hue lends to the final good that is sure to make an impression.
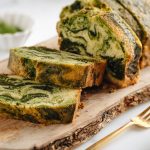
Ingredients for Matcha Marble Pound Cake
- unsalted butter – at room temperature
- sugar
- large eggs – at room temperature
- cake flour – weigh your ingredients using a kitchen scale
- baking powder
- Diamond Crystal kosher salt
- milk – at room temperature
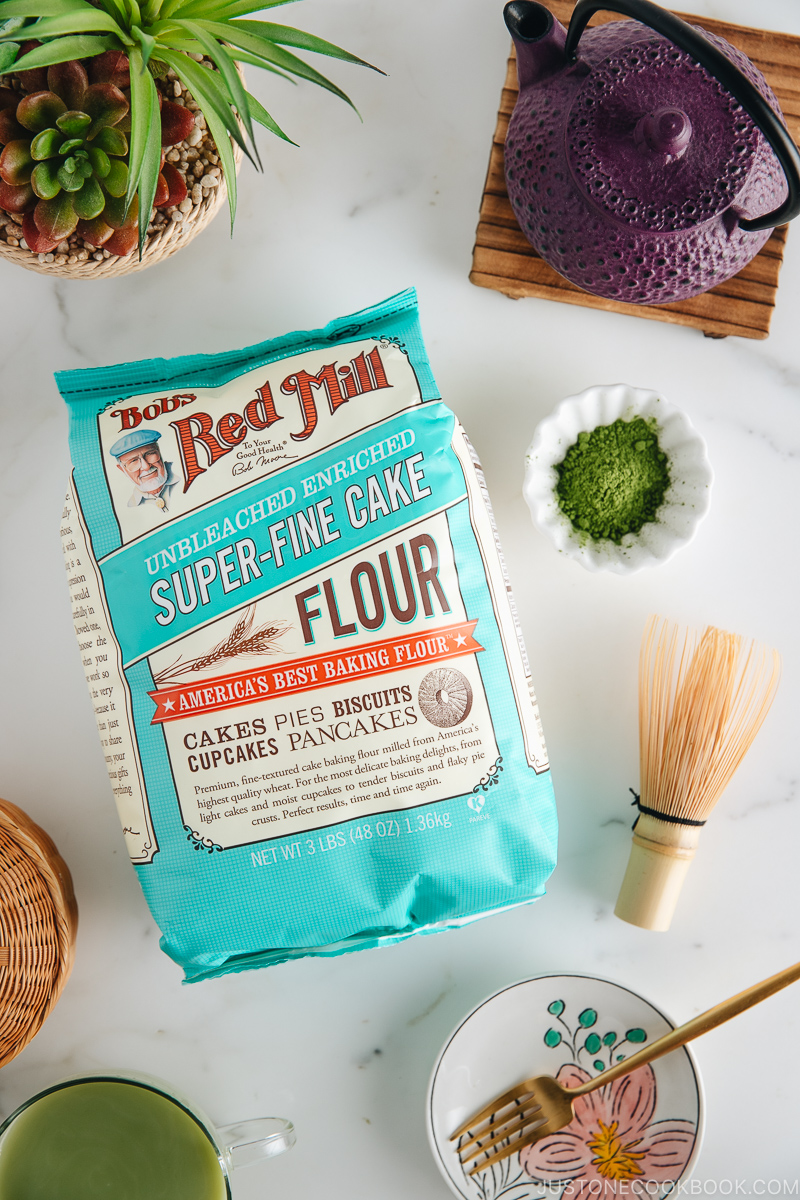
- matcha (green tea powder)
Substitution for Matcha (Green Tea Powder)
If you do not like matcha or do not want to use it, you can substitute it with pure cocoa powder in this recipe.
What To Look for When Buying Matcha
- Vibrant green color – It should not be yellowish or brownish green.
- No additives – Sugar and natural flavorings should not be included in the ingredients.
- Grown in Japan – Look for the country of origin for any matcha product.
- Check the expiration date
- Culinary vs. ceremonial grade – For making desserts and baking, you can use “culinary grade” but the color of green will not be as beautiful as “ceremonial grade.” They also have slightly different flavor profiles.
- Package size – Consume matcha within 2–3 weeks of opening. I recommend a package of 1 oz (30 g)—the standard size in Japan. Resist the urge to buy a large package even if it seems like a better deal as you probably won’t use it up before the quality degrades.
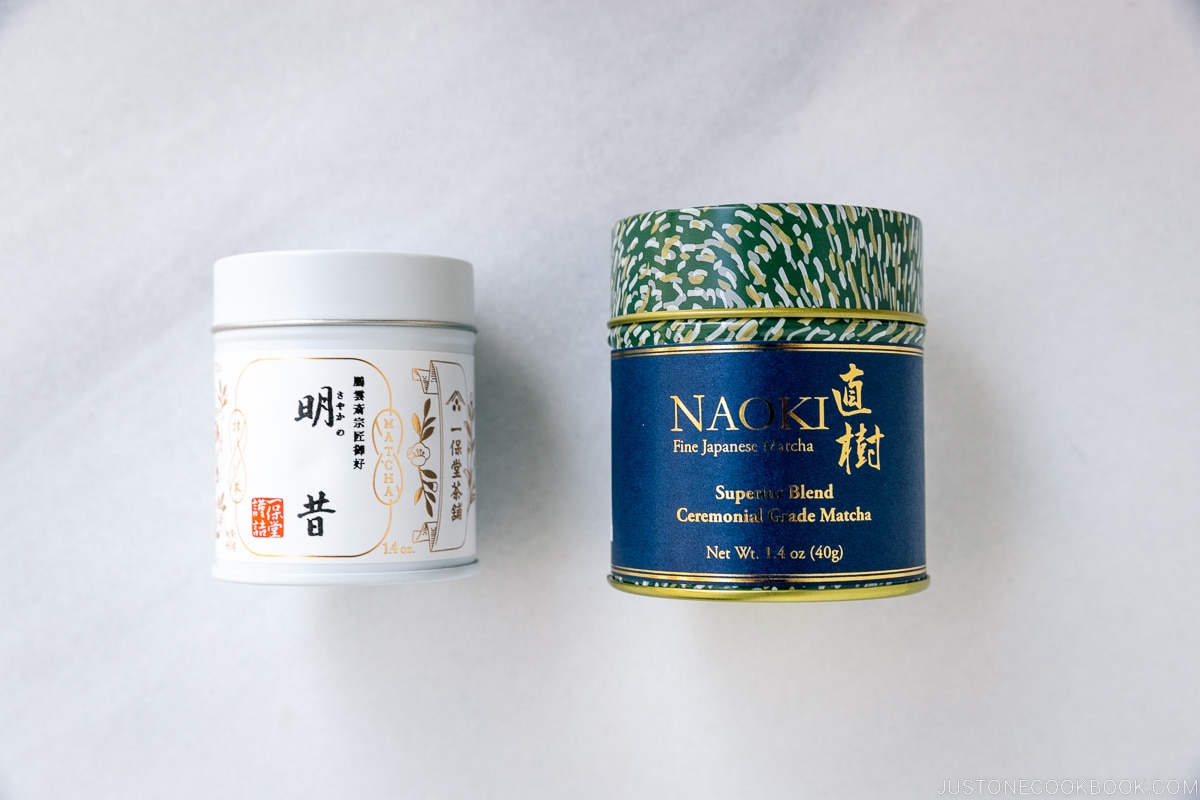
Where To Get Matcha
- Ippodo Tea ($35) – It’s my favorite!
- Naoki Matcha ($23) – I used it in this recipe. I previously collaborated with them for giveaways on the blog and I like their matcha.
- Maeda-en ($11) – It’s decent quality for this price range.
- Japanese grocery stores like Nijiya Market, Mitsuwa Market, and Marukai Market
Use Cake Flour for Japanese Pound Cake
Many American recipes ask for all-purpose flour when making pound cake, but in Japan, cake flour (薄力粉) is always used to make a pound cake. It makes the pound cake extra tender.
To achieve the perfect texture for the pound cake, I used Super-Fine Unbleached Cake Flour from Bob’s Red Mill®. Because it is sifted to a very fine texture, the cake flour is fantastic for all sorts of cakes. You should be able to find this cake flour at any major grocery store. Alternatively, you can also buy it on Amazon.
How To Make Matcha Pound Cake
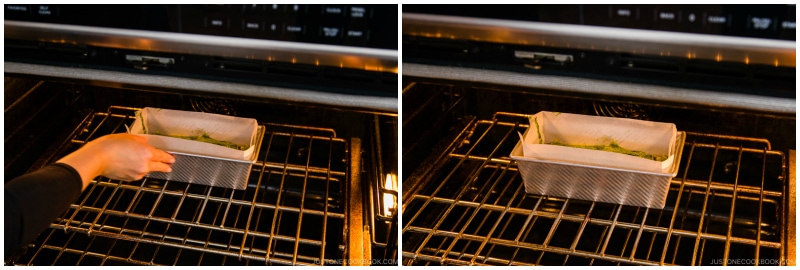
- Preheat the oven. Grease the loaf pan and line it with parchment paper.
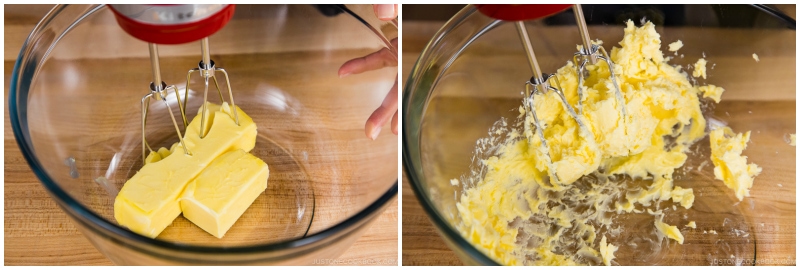
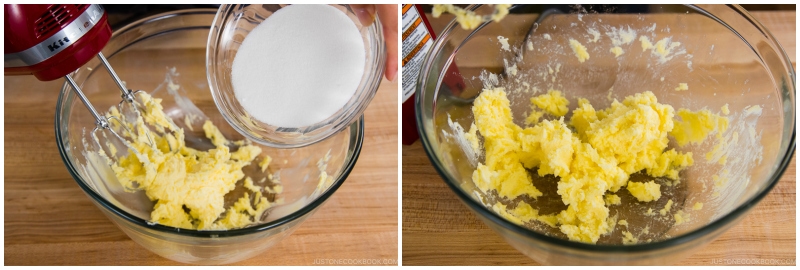
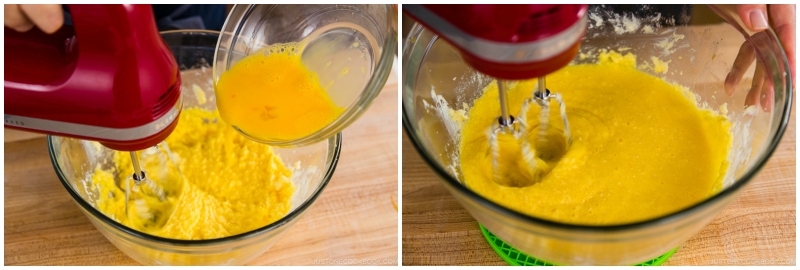
- Beat the butter in a large bowl with an electric hand mixer (or stand mixer) on medium speed, then add the sugar to the whipped butter and whisk well.
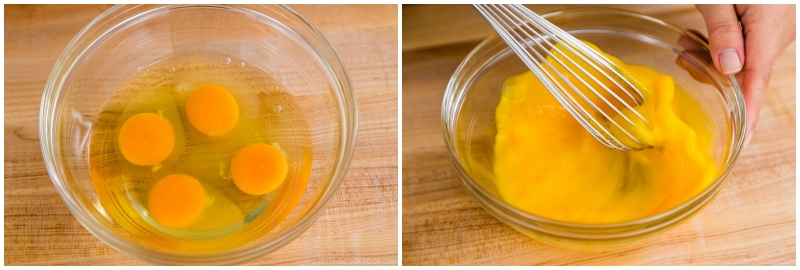
- Whisk the large eggs in a small bowl and add it 1 Tbsp at a time to the butter mixture, beating well after each addition.
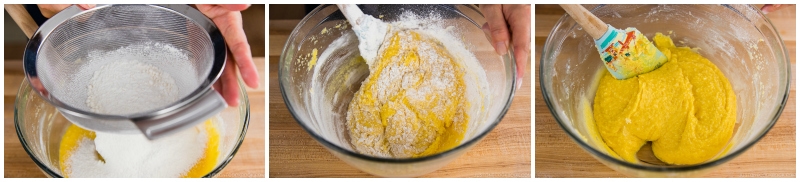
- Add the dry ingredients in three stages using a silicone spatula to fold the mixture by hand just until the batter is smooth.
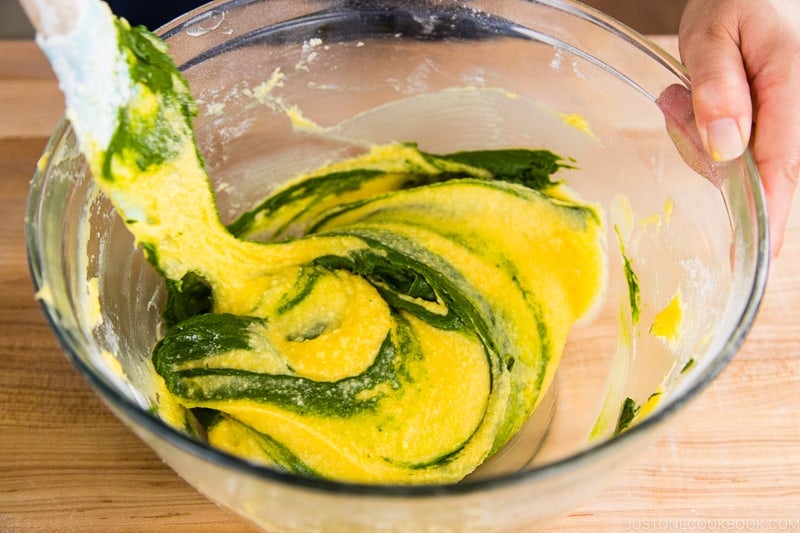
- Make a paste with the matcha and milk in a separate bowl. Add one-third of the batter to the bowl with the matcha paste and fold together just until you have a homogenous matcha batter. Do not overmix.
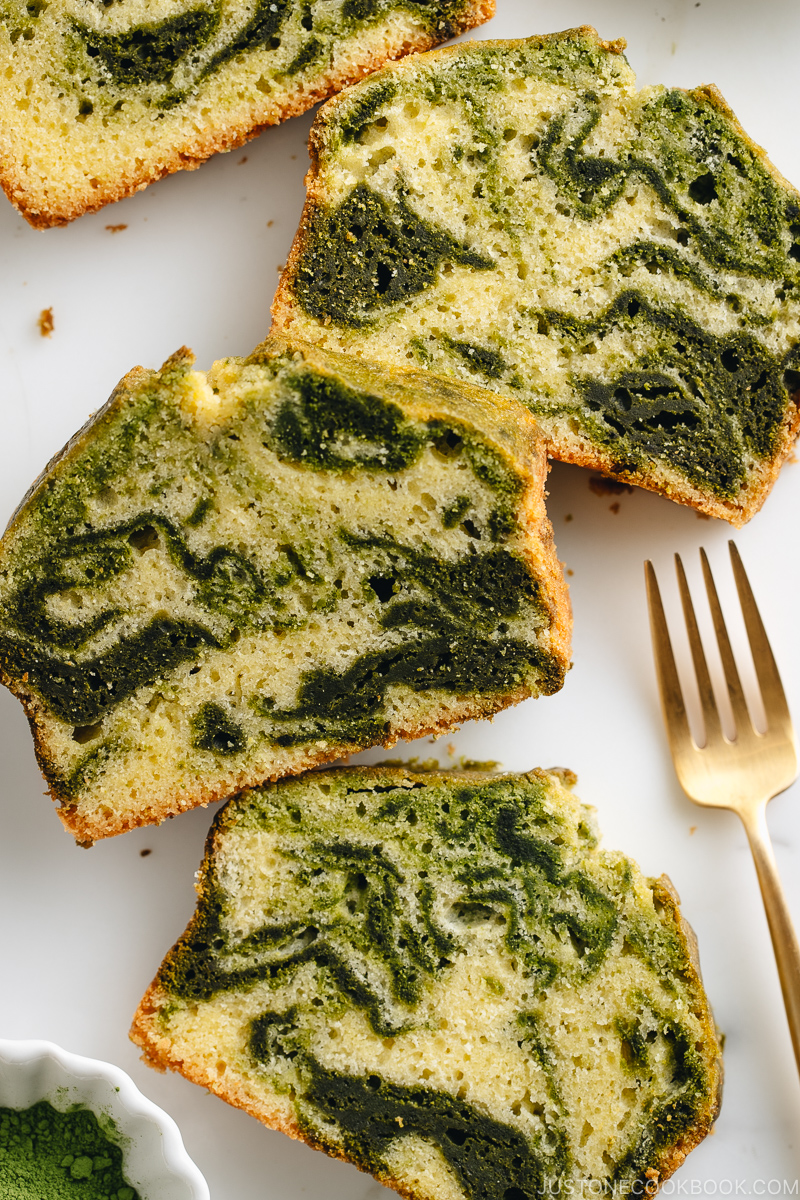
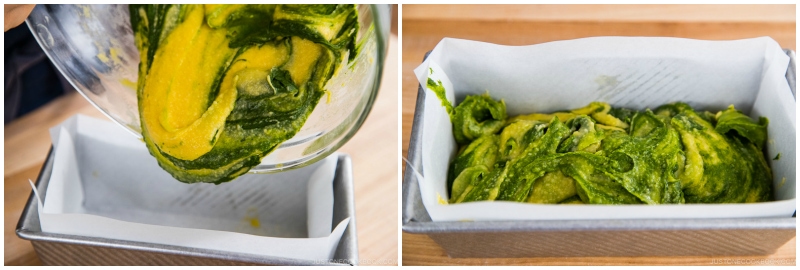
- Combine the green and yellow batters to and swirl together to create a marbled pattern.
- Pour the swirled batter into the pan without mixing the batter. Smooth out the surface of the batter with an offset spatula.
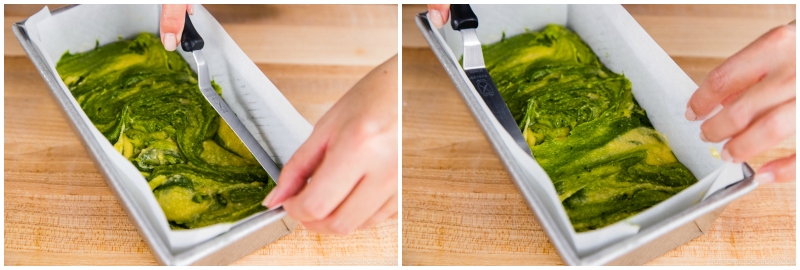
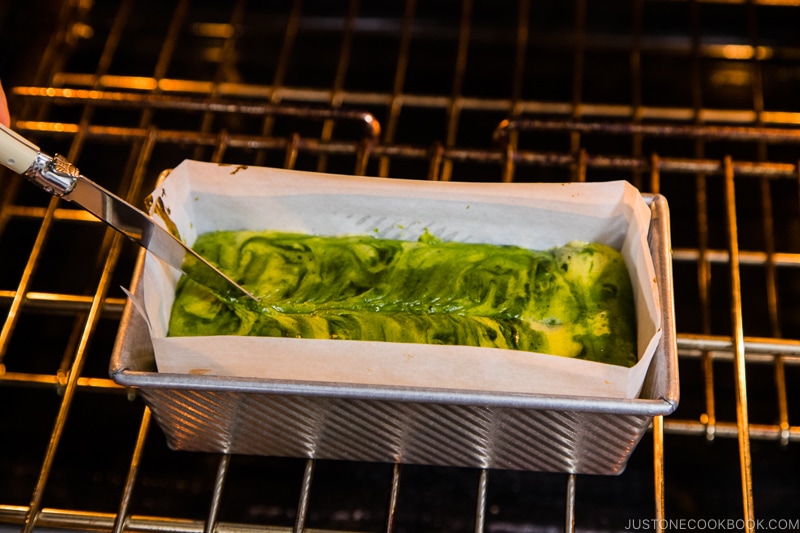
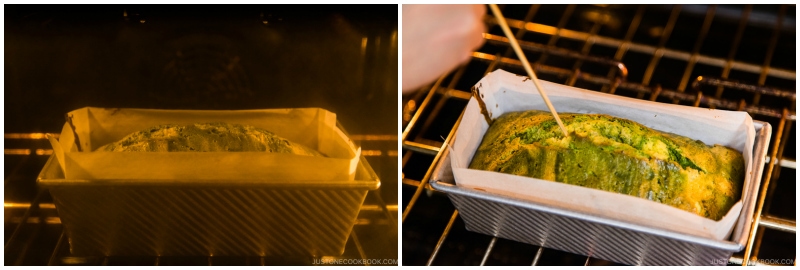
- Bake in the oven for 50–60 minutes. After 15 minutes of baking, open the oven and quickly score the top of the cake with a sharp knife.
- Test for doneness starting several minutes before the baking time is up. The cake is done when a wooden skewer inserted in the center of the cake comes out clean.
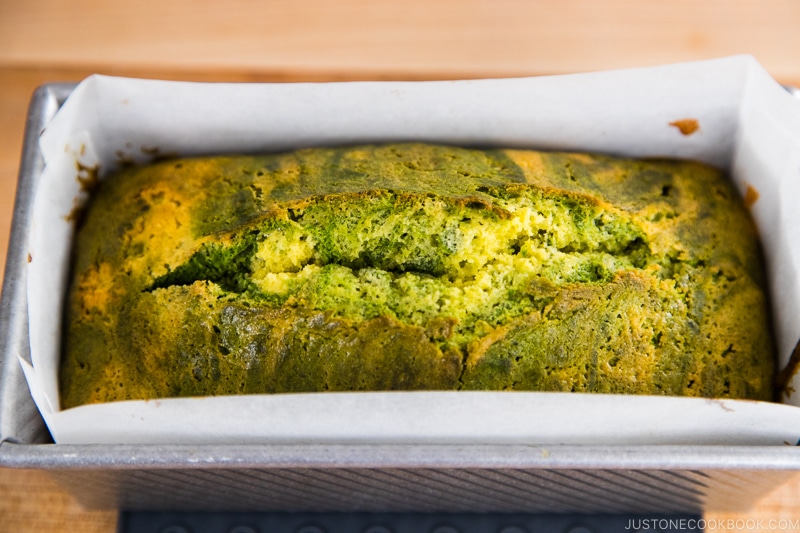
- Remove from the oven and allow the cake to rest in the pan for 15 minutes on a wire rack. Then, take the cake out of the pan to cool completely.
- Serve it the next day (and up to 3 days after baking) for the best taste and texture. Tightly wrap the cake and keep it in an airtight container at room temperature until ready to serve. Consume within 3–4 days.
5 Tips for Making the Cake Batter
Follow these tips to make sure that the pound cake rises properly and won’t end up with a tough texture.
- Use room-temperature butter and eggs to ensure maximum volume. Take the butter out of the fridge and let it sit out on the counter for about 1–2 hours before beginning your recipe. Cold ingredients do not emulsify together. Partially melted butter won’t cream properly. If you forget to take out the eggs from the refrigerator ahead of time, you can submerge the cold eggs in warm (body temperature) water for 10 minutes.
- Cream the butter and sugar mixture until very light and fluffy for a smooth velvety texture. Beat on medium-high to high-speed settings for anywhere from 3 to 7 minutes, depending on a mixer type or hand-held. The sharp sugar grains cut through the butter and create tiny air pockets that aerate the batter and cause leavening. The mixture should be creamy but grainy.
- To avoid a curdled mixture, gradually add a very small amount (1 tablespoon) of the beaten eggs to the creamed butter and beat well after each addition. The eggs contain water, and the yolks and butter are fats. Remember, oil and water will not mix without an emulsifier (in this case, the yolks), which suspends fat molecules in water making a smooth mixture. If there is a slightly curdled appearance to the batter after adding the eggs, don’t worry. The emulsification is usually complete enough that the batter will become smooth. The addition of flour helps as it absorb some of the excess water.
- Don’t overmix the batter once you’ve added in the flour. Once the flour has been added, gluten bonds will start to form and if you mix the batter too much your cake will end up dense, tough, or deflated.
- Fold the batter by hand with a large spatula. Folding is a way of mixing together two ingredients with different densities. Folding helps preserve the lightness and structure of the mixture.
How to Create the Marble Effect for Pound Cake
There are two ways to make a marble effect:
- Make the swirl with the green and yellow batter inside the cake pan.
- Make the swirl with the green and yellow batter in the bowl and then transfer it to the cake pan.
I personally prefer the second method because I can see how the two colors are combined before pouring into the pan. With this approach, I feel that the swirls look more dynamic and you can control the balance of the colors.
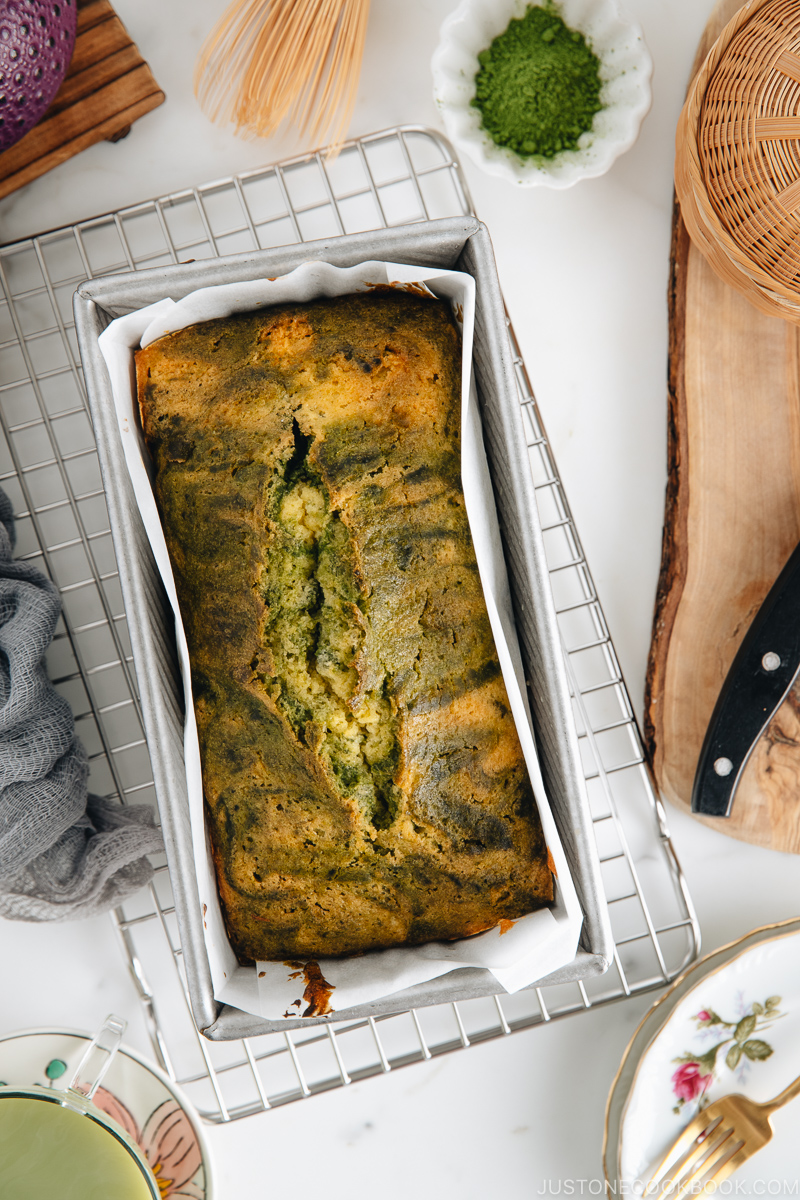
Create a Beautiful Crack on Matcha Marble Cake
Did you know the pound cake is supposed to crack on the top? Pound cakes are denser than most cakes, and the exterior starts to bake first. As the heat that is released from the still-baking batter reaches the center of the cake, it needs to expand through the top of the cake since all sides have set. That’s why a pound cake is defined by this rustic crack.
However, the crack doesn’t usually appear perfectly centered in the cake. If you wish to achieve a perfectly cracked pound cake where the rupture sets right in the middle, there are two tricks you can do:
- Trick 1: After 12–15 minutes of baking, insert a knife into the top of the cake batter in the pan and score a straight line. Do it quickly so you won’t lose the oven heat.
- Trick 2: Before putting the cake pan into the oven, cut a very thin strip of cold butter and lay it on top of the cake batter. Or put softened butter into a plastic bag and squeeze it out from a small tip to create a line on the cake batter.
See this image if you need a visual guide. I use Trick 1 as it’s easy to do, but both tricks work beautifully. Since pound cakes are supposed to crack, it’s nice to know how to control the cracking so you get the best-looking pound cake possible.
Other Matcha Recipes
I hope you enjoy this Matcha Marble Pound Cake recipe as much as my family does! It also makes the most gorgeous edible gift if you are thinking of making someone smile today.
- Matcha Latte and Iced Matcha Latte
- Matcha Cookies
- Matcha Basque Cheesecake
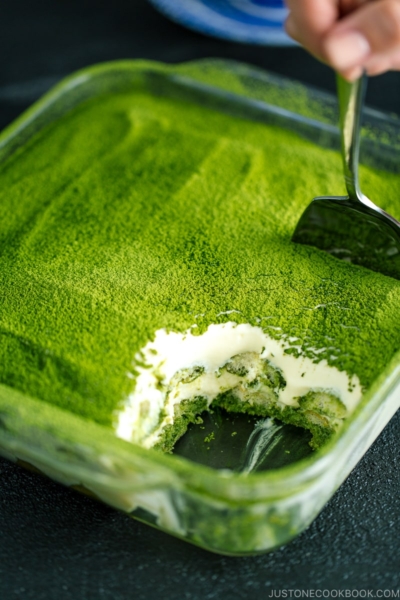
- Matcha Ice Cream
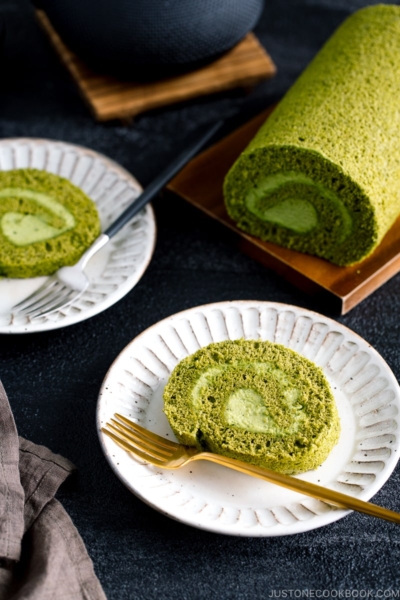
- Matcha Swiss Roll
- Matcha Gateau au Chocolat
Wish to learn more about Japanese cooking? Sign up for our free newsletter to receive cooking tips & recipe updates! And stay in touch with me on Facebook, Pinterest, YouTube, and Instagram.
Matcha Marble Pound Cake
Ingredients
- 5.6 oz unsalted butter (1½ sticks, 12 Tbsp; at room temperature)
- 160 g sugar (¾ cup + 2 tsp)
- 4 large eggs (50 g each w/o shell)
- 200 g cake flour (1⅔ cups; weigh your flour or use the “fluff and sprinkle“ method and level it off)
- 1 tsp baking powder
- ¼ tsp Diamond Crystal kosher salt
- ¼ cup milk
- 3 Tbsp matcha (green tea powder) (1 Tbsp matcha is 6 g)
Instructions
Before You Start…
- While you can serve this pound cake the same day you bake it, I strongly recommend that you serve it 1–3 days after baking. The cake will become moister and the flavors will improve. See To Serve below for details.
- Gather all the ingredients. It‘s important that the butter, eggs, and milk are all at room temperature. I highly encourage you to weigh your ingredients using a kitchen scale for this recipe. Click on the “Metric“ button at the top of the recipe to convert the ingredient measurements to metric. If you‘re using a cup measurement, please follow the “fluff and sprinkle“ method: Fluff your flour with a spoon, sprinkle the flour into your measuring cup, and level it off. Otherwise, you may scoop more flour than you need.
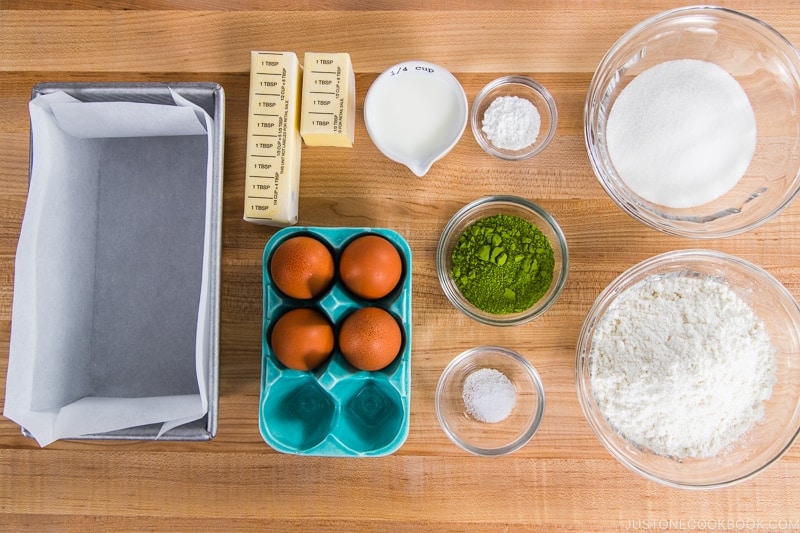
- Center a rack in the oven. Turn on the oven to 350ºF (180ºC) and preheat it well; when the cake pan goes in the oven later, you will lower the temperature to 340ºF (170ºC). For a convection oven, reduce the cooking temperature by 25ºF (15ºC). Tip: I strongly encourage you to check your oven‘s temperature with an oven thermometer, as the actual temperature inside may differ from the display setting.Use the residual butter on the butter wrapper to grease the pan (8½ x 4½ x 2¾ inches). Then, place the parchment paper inside the pan (the paper will stick to the butter). Tip: I recommend using a light-colored pan for this recipe; your cake may bake faster if you use a dark-colored pan.
To Make the Batter
- Put the 5.6 oz unsalted butter (12 Tbsp; at room temperature) in a large bowl. Use an electric hand mixer (or stand mixer) to beat it on medium speed until it is light and fluffy, about 1–2 minutes. The butter will be pale in color and have lots of little tails forming around the beaters. Tip: This process adds air to the mixture and is crucial for a light and delicate cake texture.
- Add 160 g sugar (¾ cup + 2 tsp) to the whipped butter. Cream the butter and sugar thoroughly on medium (not high) speed, about 5 minutes, until it is light and fluffy. The color is pale and the sugar is completely dissolved. Tip: The sharp sugar grains cut through the butter and create the tiny air pockets that aerate the batter and cause leavening. This process is very important for the light and delicate texture of the pound cake.
- Crack 4 large eggs (50 g each w/o shell) in a small bowl and whisk well.
- Add the beaten eggs, 1 Tbsp at a time, to the butter mixture and beat well after each addition. Repeat until all the egg is incorporated. IMPORTANT: You must add and blend only a very small amount of egg at a time to achieve a smooth mixture (not a curdled mixture). Tip: The eggs contain water, while the yolks and the butter contain fats. Remember, oil and water will not mix without an emulsifier (in this case, the yolks) that suspends fat molecules in water to make a smooth mixture.
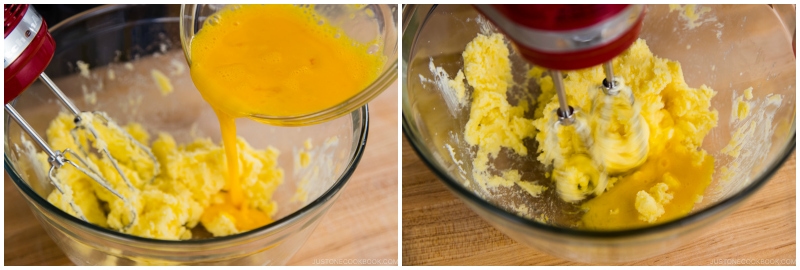
- If there is a slightly curdled appearance to the batter after adding the eggs, don’t worry. The emulsification is usually complete enough that the batter will become smooth when you add the flour. The flour helps to absorb some of the excess water, too.
- Next, add the dry ingredients in three stages. Put 200 g cake flour (1⅔ cups), 1 tsp baking powder, and ¼ tsp Diamond Crystal kosher salt in a fine-mesh sieve. Sift one-third of these dry ingredients into the bowl of the egg mixture. Switch to a silicone spatula (or use a mixer on the lowest speed) and fold the mixture by hand so you can scrape the bottom of the bowl to get any dry pockets of flour.
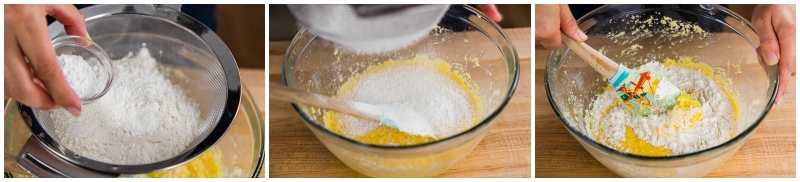
- Now, add another one-third of the dry ingredients and fold again.
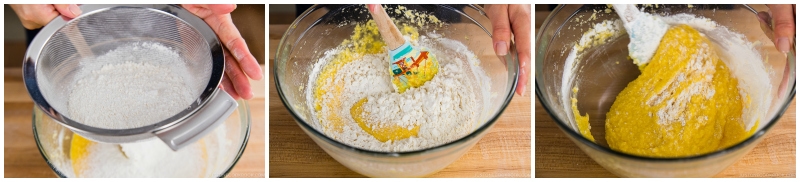
- Finally, stir in the remaining dry ingredients. Fold it just until the batter is smooth. Tip: Even though we are using a low-protein cake flour, excess mixing will develop the gluten and the cake will rise nicely in the oven, then sink as soon as you pull it out. A sunken cake has a tougher crumb with dense, moist, and gluey streaks.
To Incorporate the Matcha
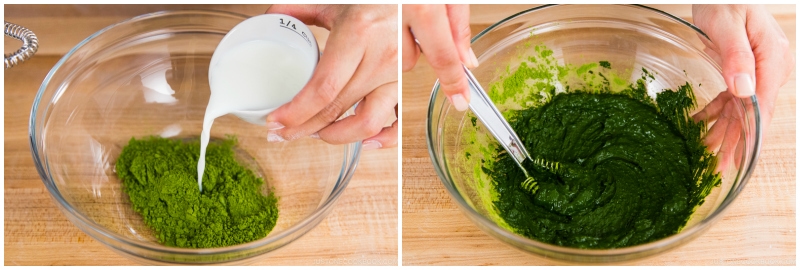
- Next, make a paste with the matcha: Heat ¼ cup milk in a microwave or saucepan until warm (roughly body temperature). Gradually add the milk, 1 Tbsp at a time, to 3 Tbsp matcha (green tea powder) in a medium bowl. Whisk well until combined. Optionally, you can sift the matcha in a fine-mesh sieve first before mixing with the warm milk. Tip: Warm liquid is easier to blend with matcha.
- Add one-third of the batter to the bowl with the matcha paste.
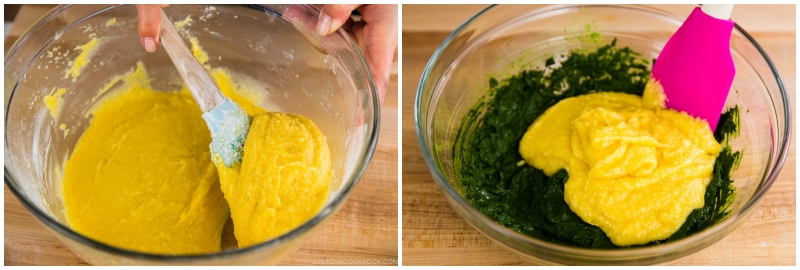
- Use a silicone spatula to fold the batter into the matcha paste just until the it's smooth and homogenous. Do not overmix.
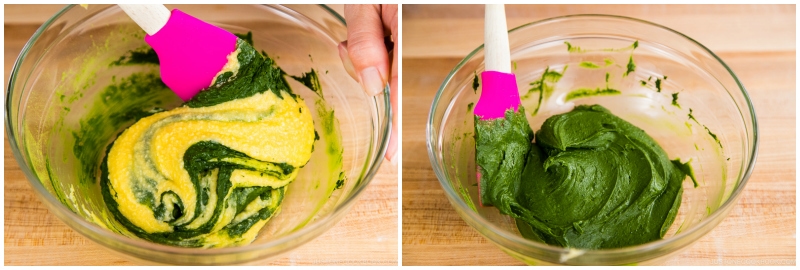
- Now, combine the green and yellow batters to create a marbled pattern. Add the matcha batter to the original yellow batter in 6–8 separate dollops scattered around the bowl. To swirl the two batters, use a silicone spatula to scoop the batter from the bottom of the bowl and fold it onto itself while rotating the bowl a quarter turn. Repeat this two more times only.
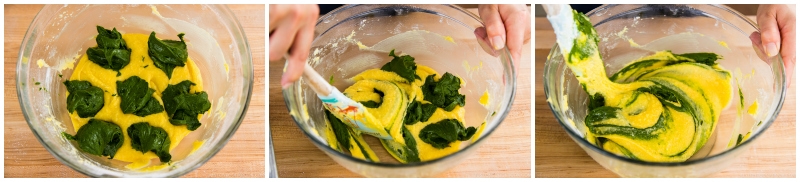
- Pour the batter into the cake pan without mixing to keep the swirl effect. Tap the pan on the countertop once to release any air pockets.
- Using an offset spatula, lightly smooth out the surface of the batter without mixing too much.
To Bake
- Put the cake pan in the oven. Lower the oven temperature to 340ºF (170ºC) and bake for 50–60 minutes. Tip: Every oven is different, and your cake may be done in less than 50 minutes, so I recommend that you start testing for doneness several minutes before the baking time is up. If you‘re using a dark-colored pan, the cake may bake faster and your baking time could be shorter by 5–10 minutes or more.
- After 15 minutes of baking, open the oven and quickly score the top of the cake with a sharp knife. (Please read the blog post about why we do this). Continue to bake, monitoring the oven to maintain a temperature of 340ºF (170ºC).
- The cake is done when a wooden skewer pulls out moist crumbs (not wet batter) when inserted near the center of the cake. Tip: To prevent overbaking, start checking for doneness several minutes before the baking time is complete.
- Remove from the oven and allow the cake to rest in the pan for 15 minutes on a wire rack. Then, take the cake out of the pan to cool completely.
To Serve
- Once it’s cool, you can slice and serve the Matcha Marble Pound Cake, if you wish. However, I strongly recommend serving it the next day (and up to 3 days after baking). This gives the butter time to oxidize and blend into the cake, resulting in a moister texture and allowing the flavors to meld and improve for a deeper matcha taste. Tightly wrap the cake and keep it in an airtight container at room temperature until ready to serve.
- You‘ll notice some differences between this Japanese-style pound cake and a typical American pound cake. The Japanese version is lighter and less buttery than its heavier and richer American counterpart. Also, a Japanese pound cake will have a tighter crumb and firmer structure. Finally, the Japanese version will slice cleanly and hold its shape well, whereas an American pound cake is softer and will crumble and break apart more easily.
To Store
- Store the pound cake at room temperature and consume it within 3–4 days. In a hot and humid environment, store it in the refrigerator for up to 1 week or in the freezer for 1 month.


So delicious. I am very happy with how this turned out. It’s tender and moist but not overly greasy or buttery like some other recipes. The taste is really exquisite. It has a subtle but deep flavor. I used ceremonial-grade matcha that’s sweet and not bitter, and I think the higher quality makes a huge difference in the outcome. Someone had commented that their cake was dry, so I watched my oven temperature like a hawk. My oven got hotter as time went on, so I turned it down so the thermometer inside the oven stayed at 340F. I weighed all my ingredients in metric. I also checked it early/often to see if it was done so I wouldn’t miss the window–I poked it at 45 minutes, then at 50 minutes, and finally took it out at 54 minutes. I can see how it would be easy to over-bake if you don’t keep an eye on things. The sides and bottom were on the verge of becoming dry. Next time, I will take it out of the oven a minute or two sooner so that it’s a little less baked on the sides and the same light brown color as yours. I wonder if this same recipe would work with cocoa or hojicha powder, so I will try that sometime, too. Thank you!
Hello Kumi! Your cake looks absolutely delicious! Thank you for trying out Nami’s recipe and sharing your photo and kind feedback.☺️
It’s important to keep a close eye on the baking time since every oven behaves differently. We’re glad you did so for this recipe!
As for different flavors, we haven’t tested them yet, but we believe that using cocoa and Hojicha powder would work well. If you decide to give it a try, please let us know how it turns out!
I made this pound cake with hojicha powder this time instead of matcha. It’s quite delicious and I love it. It has a subtle roasted flavor and the slightest pleasant bitterness. I also used 1 Tbsp extra butter and 1 Tbsp extra sugar in the batter for a little more richness. I will make this again!
Hello, Kumi. Aww. We’re delighted to hear that Hojicha powder made this cake delicious as well. 🤩
Thank you for trying it and sharing your baking results with us. This information will be useful to other readers who may want to attempt.
Happy baking!😃💞
hojicha marble pound cake
Wow! What a beautiful cake! Kumi, thank you for sharing the image with us!😍
Hi Nami,
I can’t seem to find the Bob’s Red Mill cake flour. 🙁 Do you have another brand that you recommend? Is there a specific store in SF that you get it at? Thanks in advance! Love your recipes!
Hi Connie! Sorry for my late response. Hmm I buy their flours from a local gourmet/small chain supermarket, not for example Safeway. You can use King Arthur brand too. I like either one. I live in the Peninsula, so I can’t give you a store in SF… sorry. 🙁
Hi! Newbie baker here, your blog has really inspired me to get back into baking. Can you explain what sugar I should use for this recipe ? Will brown sugar be ok? Or cane sugar? Thanks!
Hi Elza! Thank you for your kind words! I try to use white granulated sugar for my baking recipe as majority of my readers are accessible to that. I use organic cane sugar (beige color in my picture) for my savory recipes. I don’t think brown sugar works here as we don’t need molasses in this recipe. 🙂
Hi thanks for the guide to make the cake. However the cake I made is a quite dense, could it be overmix? I realised few things; my batter seemed to be more watery , could it be the size of egg chosen affect the texture of cake as I follow the recipe? Due to this, I couldn’t make the swirl effect and there’s matcha lumps everywhere, could it be me not whisking milk-matcha mixture enough? Thanks.
Hi Elsie! Maybe it might have been overmixed, but not too sure. Did you measure it by weight? The lumps of matcha is due to not mixing in perfectly beforehand… The batter is definitely not watery in this recipe.
Thanks Nami, And yes I did measure all by weight. Thanks for confirmation, I’ll try it again. Hopefully it will turn out better.
Let me know how it goes! 🙂
The recipes lists 1 Tbsp of matcha, but in your pictorial instructions, it mentions 3 Tbsp of matcha. Which is the correct amount to use?
Hi Jan! The recipe list 20 g (1 Tbsp matcha is 6 grams. Many people thinks 1 tbsp is 15 grams or so, but matcha is light and it’s 6 grams. So you will need 3 Tbsp matcha which is roughly 18 g). 🙂
I made the recipe with 2 Tbsp matcha before I read your reply and it was very moist with a subtle flavor. Also it didn’t have the intense green color as yours so I’m going to try it again. But my family really enjoyed it as they do with many of your recipes that I’ve tried. Thank you Nami!
Hi Jan! I’m so happy to hear that! The color of matcha doesn’t change much after you bake. If your final result didn’t have the intense color, then your matcha itself didn’t have that color to begin with. Try to get the higher quality matcha which has intense color. If it’s yellowish green, it’s low quality and doesn’t have good taste. I recommend getting a smaller matcha can (usually 30 g or 1 oz) instead of a big bag which is cheaper but low quality. 🙂
First and foremost; thank you for posting this recipe with all of the tips and tricks you have gathered in your bouquet of culinary know-how!
I found your instruction and the thoughtfulness of posting both forms of measurement (grams and cups) helped me understand and want to produce something that was both beautiful and heartfelt.
As an autistic person, I cannot thank you enough for your blog and feel really happy to have digitally stumbled upon your recipes.
I am looking forward to learning from you. :] Thanks!
Hi C. Kelsey! Thank you so much for your sweet comment. I’m really happy you enjoy reading my blog. When I write posts and recipes, I think of my readers. They help me to imporove my blog. So your feedback meant a lot to me. Thank you for your support! xoxo
Your recipes are wonderful – can’t wait to try this poundcake. I also love black sesame seeds. Would you consider developing a neri goma marble poundcake? I saw the comment about red bean paste and I am wondering if the neri goma could just be stirred into the batter portion without using the milk? Or would it need to be thinned a little?
Hi Darcy! I haven’t made it but that sounds delicious. I think you should just add the Neri Goma into the half of the batter to keep it the black color. Depends on the neri goma brand, but mine comes pretty runny if you mix well with oil (oil and solids are separated).
Thanks very much, Nami. I will give it a try.
Let me know how it goes! 🙂
Where did you buy the wooden serving board in the display picture? It’s beautiful! Also this recipe is wonderful. Thanks a bunch.
Hi Macie! Nami got it at Trader Joe’s. It’s one-time selling at the grocery store, and they don’t sell it anymore. Hope you enjoy the recipe!
Just tried this recipe today and it turned out great!
If my version is a bit dry, what should I do to make the cake more moist?
Wondering if I could put blueberries (frozen or fresh?) into the mix too?
Hi JT! Thank you for trying this recipe! Is it possible that you might have overbaked it? Maybe check the doneness of the cake a few minutes early (if the oven temperature is truly what the oven says… sometimes true temp can be different)? You can add blueberries but to me they overpower matcha taste. 🙂
My version turned out dry too, I probably over baked. I first checked it after 50 minutes, then put it back in for another 7 minutes, then checked a again, still seemed a bit too moist so put it in again for another 5 minutes. In hindsight I probably should have just left it in for 1hr altogether.
Thanks for the recipe!
Hi Jimmy, Thank you very much for trying this recipe and sharing your baking experience with us!
Hi Nami,
Hope you have a great Easter.
I like to know if this recipe can use muffin pan instead of loaf pan to bake.
Will the baking temperature be the same 340F ? How long will it take?
Thank you.
Hi Wendy! Thank you for asking, I had good Easter. 🙂
I think you can use a muffin pan but I have to tell you that I haven’t tried it before. In general, both muffin pan and loaf pan works. Hope this link is helpful: https://www.realsimple.com/static/pdfs/PanEquivalents_0508.pdf
Awesome recipe! Made it for my friend and she said it smelled so good! Wish I can post picture. I used cocoa instead of matcha as I ran out.
Hi Lizzy! I’m so happy to hear your friend liked it! Thank you for trying this recipe and for your kind feedback. You can post your picture on Instagram with hashtag #justonecookbook. Or feel free to send me an email as I love to see your photo! xoxo
This looks so wonderful. Can you tell me what size loaf pan is used in this recipe? Thank you!
Hi Jane! Thanks for bringing to my attention. I somehow left out the information from my recipe notebook. I now added to the recipe. It’s 9″x5″ top and 8″x4″ bottom. Thank you again!
This is awesome Nami and what a fun quick bread to make. Can’t wait to make it.
Thank you, MJ!
It’s great cake, I baked it today. I love matcha flavour so I had to try baking it immediately 😀 The flavour was a bit strong for me so next time less matcha will make it for me – I guess it’s because I have a new batch of tea.
Is there any other flavour then matcha and cocoa that could be tried?
Hi Petra! Thank you for trying this recipe already! Hmmm like a commenter above, you can use soy bean flour (“kinako” in Japanese). You can also try with tea flavor (earl grey) or citrus or red bean paste. It can be any flavor you enjoy. 🙂
Matcha is tea.
And earl grey is tea with citrus bergamia oil.
Earl Grey is black tea,
matcha is green
If I make earl grey flavour, do I just seep the tea with 60ml of milk and mix with the batter? Do I need to adjust any ingredients to achieve the same consideration as matcha flavour pound cake? Thank you.
Hi Wing! Ohh that sounds delicious! But I really don’t know how to convert to a delicious earl grey pound cake without testing it myself… not sure if that’s enough flavor, or color, or sweetness. it’s hard to tell. If you end up trying, keep us posted in case someone wants to do the same change. 🙂
This looks like a great recipe Nami! Anything matcha is wonderful!
Thank you Mai! Hope you enjoy!
Do you think substituting the matcha powder with kinako powder will work? I really love kinako and I’m wondering if a kinako pound cake would work.
By the way for dissolving matcha powder without any lumps, I find that it’s easier to start off with a tiny bit of liquid first, mixing until a thick matcha paste is formed. Then continue to thin the paste out with a little more liquid, eventually adding all the remaining liquid.
This idea came from watching cake videos where tempering of the batter (mixing a small amount of meringue with an egg yolk base batter to lighten the batter first before adding all the meringue) is done.
Hi Jessica! Yeah, you can definitely use kinako to sub, but remember the taste is subtle so you may want to add more than matcha. 🙂
Also, what you said about the matcha and liquid is correct. I didn’t make a video for this recipe, but I usually make into paste form to make sure no lumps and create a creamy texture. Matcha (the ground leaf) does not “dissolve” into liquid. So the only way is to blend really well.
Right, it’s always easier to “loosen up” the main batter by mixing with 1/3 of additions first. Thank you for mentioning this with us!
My oldest daughter’s boyfriend loves matcha, so I can’t wait to make this at our fourth of July weekend this summer. Thanks again, Nami!🍵
Hi Dani! I hope he’ll love this pound cake! 🙂
this looks great. could I substitute almond milk instead of the milk? thanks
Hi Esti! Sure, you can do that. 🙂
Hi Nami, Hi Esti,
thanks a lot for this wonderful recipe.
I tried it yesterday with almond milk and it tuned out great 😉
Thanks for your feedback, Linda! I’m happy to hear yours came out good! 🙂
Hi, I tried making this but it came out shorter than yours and I am using the regular loaf pan. It still tasted good just a bit dense. What do you think happened? Thank you for the recipe 🙂
Hi Lisa! Thank you for trying this recipe! First of all, let’s check your pan size. I use 1 lb pan, but some pound cake pan/molds are 1.25 lbs or 1.25 lbs (see this: https://www.surlatable.com/usa-pans-loaf-pan/PRO-2817104.html), so be careful as the bigger size means wider and if you use the same amount of batter as I did, your cake will shorter. I got my 1 lb loaf pan on Amazon (https://amzn.to/30wG4dv).
Now denser can be another reason. Is it possible that you overmix? Did it look like this? This post explains well: https://www.kingarthurbaking.com/blog/2014/07/15/how-to-prevent-dense-gluey-streaks-in-your-cake