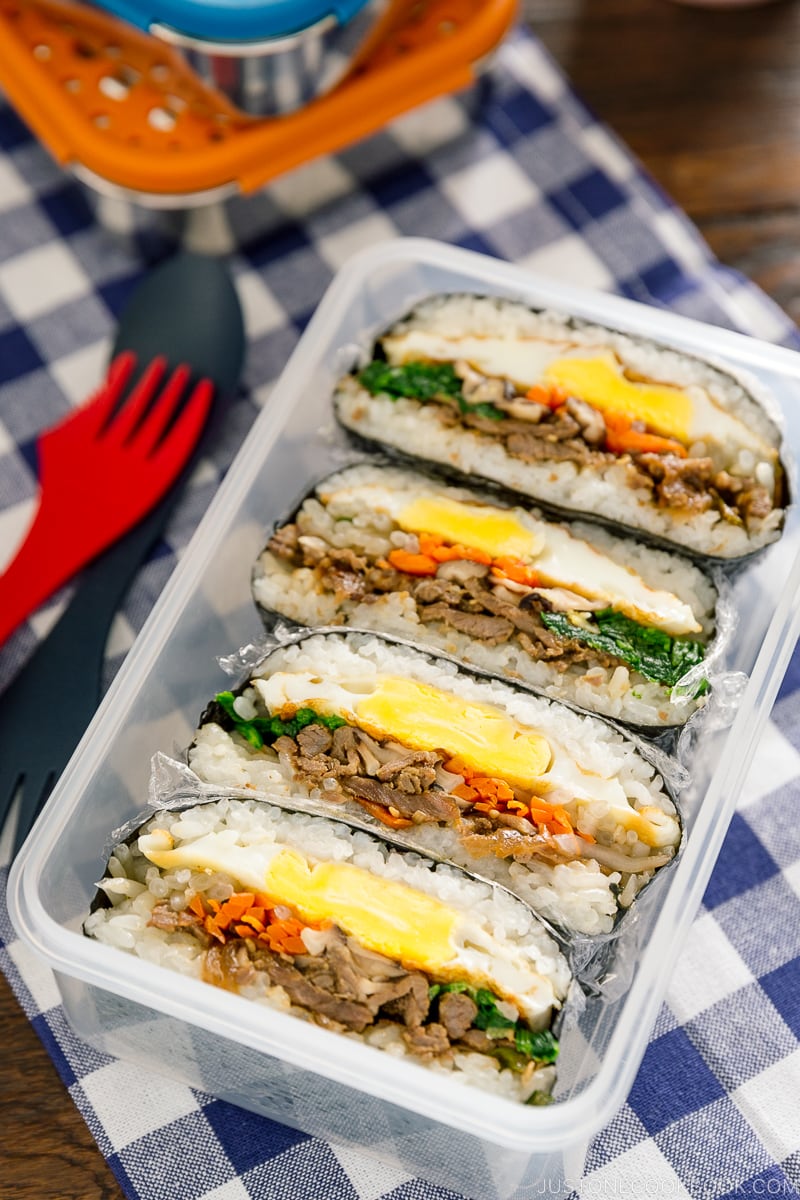
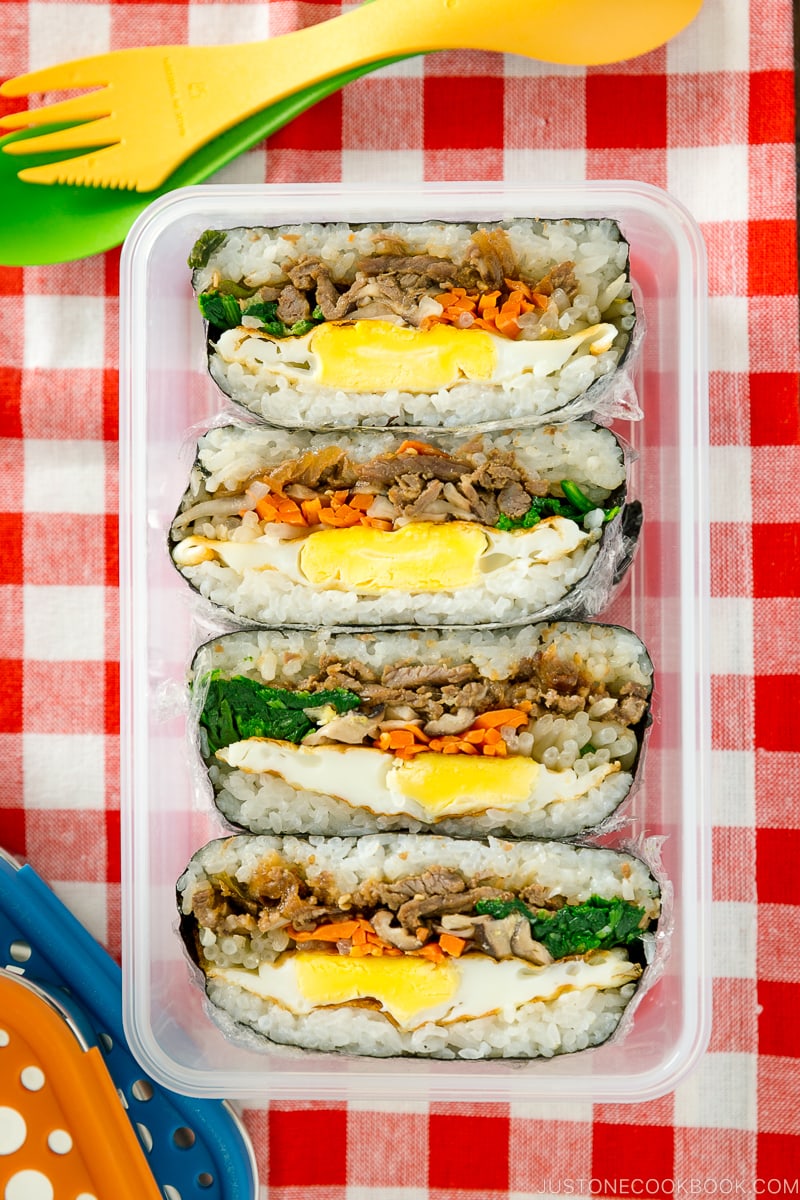
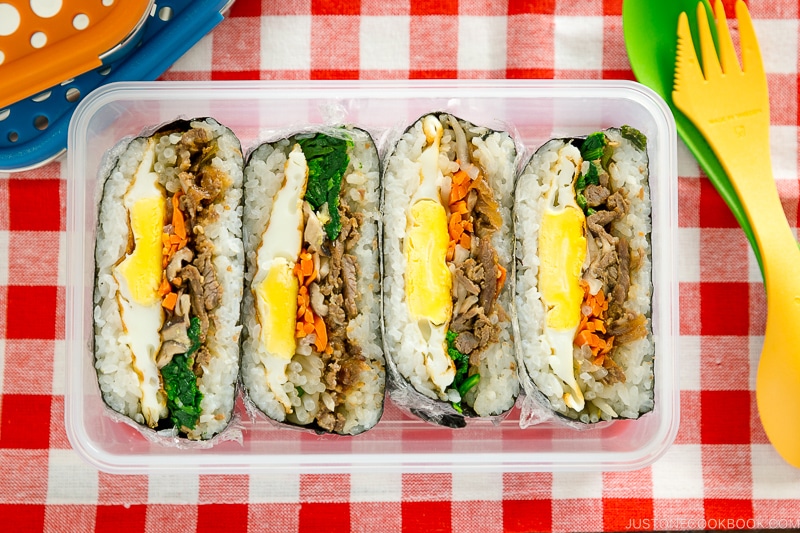
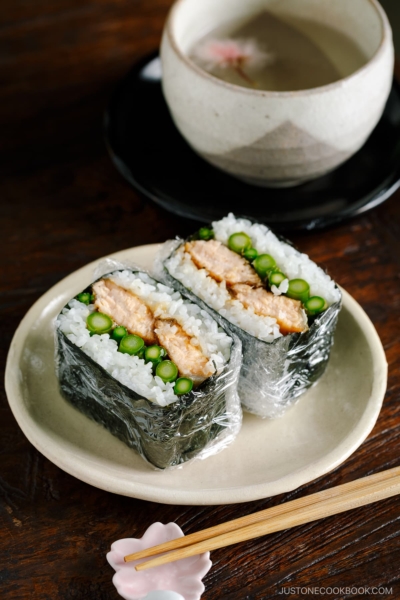
With savory Korean grilled beef and steamed rice wrapped in nori seaweed, this ultimate Bulgogi Onigirazu makes for a perfect summer lunch or picnic! For a more substantial wrap, add optional fried egg and vegetables like seasoned bean sprouts, spinach, carrots, and shiitake mushrooms.
If you are aware or have heard of Onigirazu (おにぎらず) – a type of Japanese rice ball, then you’re pretty current with the latest of Japanese food trends!
Onigirazu was in fact one of the most influential food trends in Japan last year (2015) and today I’m making Onigirazu with Bulgogi, Korean grilled beef!
Table of Contents
What is Onigirazu?
The name Onigirazu comes from the Japanese rice ball – Onigiri (おにぎり) or sometimes called Omusubi (おむすび).
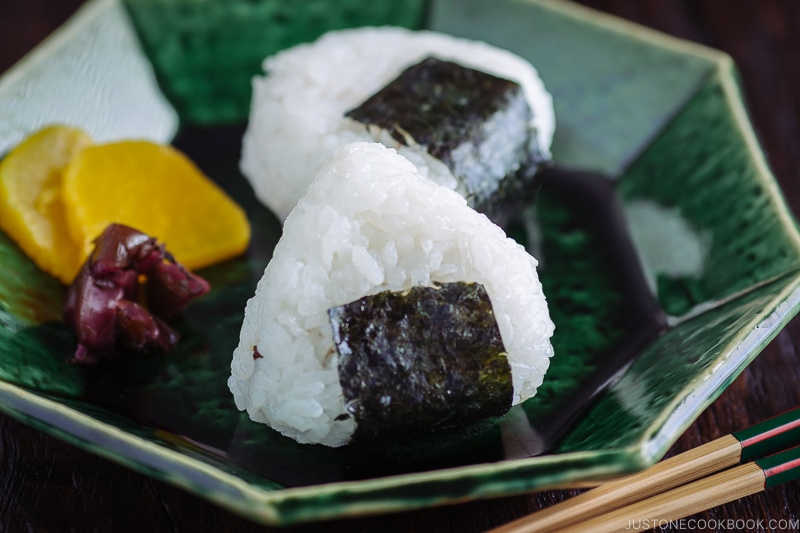
Onigiri is a great healthy choice for lunch or snacks. It is made of rice formed into the traditional triangle, round, or cylinder shape with hands. Usually, the rice ball is filled with pickled plum (umemboshi), soy sauce seasoned bonito flakes (okaka), or other kinds of fillings, and then wrapped with nori seaweed.
The word “Onigiri” comes from “Nigiru“, which means to squeeze or hold tightly in Japanese. When you do NOT squeeze tightly, we say “Nigiranai” or “Nigirazu“.
So Onigirazu is the rice ball (Onigiri) that is NOT squeezed tightly into the traditional shape (Nigirazu).

The Onigirazu History
Although Onigirazu became a huge trend last year, it had been introduced 25 years ago by manga artist Tochi Ueyama in his manga (Japanese comic books) “Cooking Papa“.
In his food manga, the main character, a dad and salary-man, likes to cook for his family. Ueyama named this dish “Onigirazu” and introduced it in his comic books when he saw his wife making a new style of Onigiri.
In fall 2014, the most popular Japanese recipe-sharing site, Cookpad, had a feature on Onigirazu recipes. Since then, this recipe was revived and it became a popular search word, especially among housewives who make their husband’s and children’s lunches.
3 Reasons Why You Should Make Onigirazu
It has 3 big appealing features that caught everyone’s attention and stayed popular.
1. More fillings; make it into a meal!
It can be stuffed with much more fillings than Onigiri.
Onigiri tends to include one kind of filing, but Onigirazu usually has more than 2-3 kinds of fillings! With a main dish filling like Bulgogi and Tonkatsu, you can get carb (rice), protein (meat), and veggies (lettuce) in one bite!
2. No more mess; easy to assemble!
When you make this delicious dish, you wrap the rice with nori sheet. Therefore, you don’t have to wet your hands and form rice into a rice ball. While Onigiri takes practice and some skill to make, Onigirazu is very simple to assemble, just like a sandwich!
3. Endless creative fillings!
Most people stick with traditional filling when it comes to Onigiri because of limited filling space. However, people are very creative and put unconventional fillings in Onigirazu like ham, cheese, egg, fried chicken, and grilled meat.
Onigirazu also uses various condiments like ketchup, Tonkatsu sauce, and mayonnaise for spreads which is not common for Onigiri.
5 Tips to Make Perfect Onigirazu
Tip 1. Spread the rice into a square shape
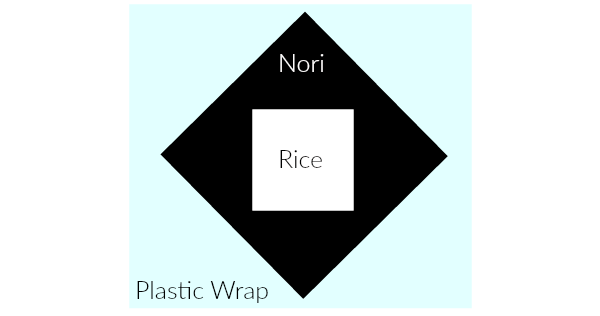
Place a nori sheet with a corner pointing up. Try to evenly spread the rice into a square shape in the center of nori. Don’t forget to leave some space around the rice for easy wrapping.
Tip 2. Put the rice and fillings in a thin layer

Make sure to place the fillings in single/thin layers and stack them on top of previous one, avoid empty spaces. When you place ingredients, think about the cross-section view after you cut in half. Work with small amount of fillings so that it’s easier to wrap.
Tip 3. Mark which side you would cut in half

If your fillings are placed in a single layer on top of another, you don’t need to worry about this tip (like lettuce, cheese, ham etc).
If you place multiple ingredients, it’s important to remember which side you’d need to cut in half before you finish wrapping with nori (and can’t see inside!).
In above diagram, we need to cut along the pink line so that all the fillings with different colors will be visible from cross-section. A trick to remember? Mark the cutting line with a piece of ingredient (I used a stick of carrot).
Tip 4. Flip and rest for 5 minutes
Fold each corner of nori sheet tightly around the layers of rice and fillings at the center. Wrap tightly with plastic wrap and flip over, seam side down. The steam from the rice will moisten nori sheet and bind all the ingredients well together.
Tip 5. Wet your sharp knife
Use a sharp knife to cut it in half. If you run water on your knife before cutting in half, the rice and nori won’t stick to your knife and the cross-section will be clean.

Our Family’s Favorite Bulgogi Recipe
My family loves this Bulgogi recipe that I had been cooking… but I had been using Japanese soy sauce. It tastes great, but I had never imagined it could taste even better with Korean soy sauce!
When I did this last collaboration video with Seonkyoung, she gave me a bottle of Korean soy sauce. I should have bought a bottle of Korean soy sauce years ago for Korean dishes! Korean dishes taste FANTASTIC with Korean soy sauce (duh?!). Keep your Japanese soy sauce for Japanese recipes, and I highly recommend using Korean soy sauce for this recipe!
To add more colors to this Bulgogi Onigirazu, I added vegetable side dishes that I use for my Bibimbap recipe. It definitely requires a bit of extra work, so you can totally skip these veggies. However, cross-section looks pretty when green and red colors pop out, and not to mention yellow fried egg!
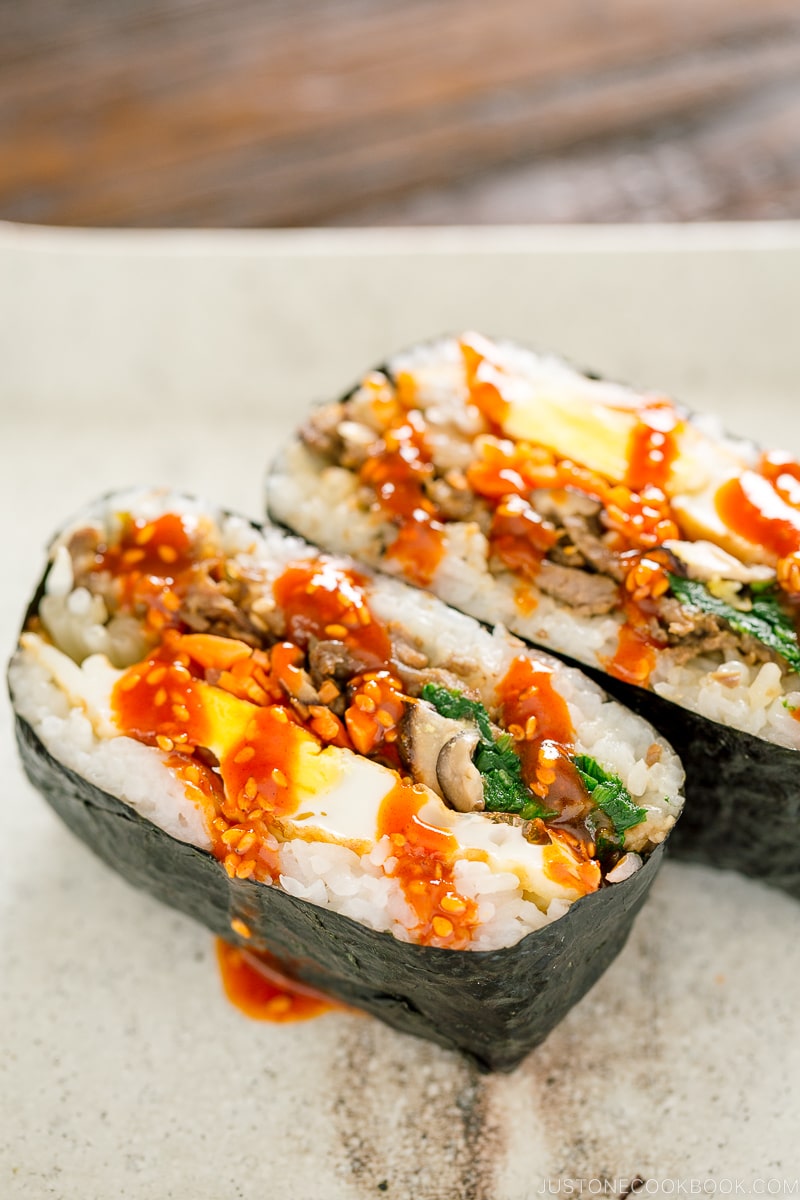
The gochujang sauce in the recipe is optional too, but we love this spicy and sweet savory sauce for my Bibimbap recipe…so again I use this sauce for this recipe. Bulgogi Onigirazu tastes perfect without the gochujang sauce.

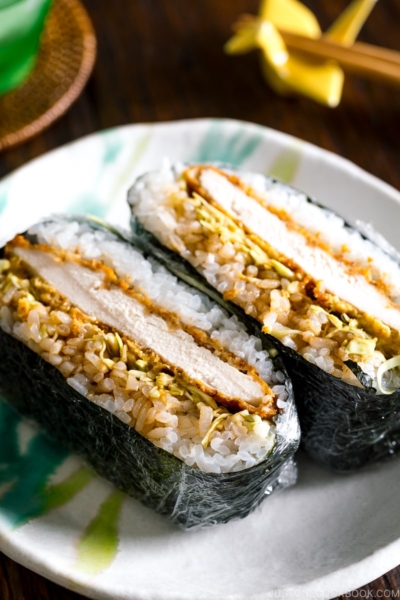
Onigirazu Variations: Tonkatsu Onigirazu
For today’s recipe, I collaborated with my YouTuber friends, Shinichi and Satoshi from Tabi Eats ! Check out their super delicious recipe and don’t forget to subscribe to their YouTube channel!
I hope you will enjoy making this Bulgogi Onigirazu recipe! If you try it, don’t forget to share your picture on Instagram, Facebook, or Twitter with #JustOneCookbook. Thank you so much for reading, and till next time!
Wish to learn more about Japanese cooking? Sign up for our free newsletter to receive cooking tips & recipe updates! And stay in touch with me on Facebook, Pinterest, YouTube, and Instagram.

Bulgogi Onigirazu
Video
Ingredients
For the Bulgogi Marinade
- 2 Tbsp Korean soy sauce
- 1 Tbsp toasted sesame oil
- 2 Tbsp brown sugar
- freshly ground black pepper
- ¼ Asian pear (grated; you‘ll need 2 Tbsp)
- 4 cloves garlic (minced; 2 tsp)
For the Bulgogi
- ½ onion
- ½ carrot
- 3 green onions/scallions
- 1 lb beef (tenderloin, ribeye, or top sirloin)
- 1 Tbsp toasted sesame oil (for cooking the meat)
- 1 Tbsp toasted white sesame seeds (for topping)
For the Bean Sprouts (optional)
- 1 Tbsp toasted sesame oil
- 1 clove garlic (½ tsp minced)
- ½ tsp Diamond Crystal kosher salt (for the dressing)
- 1 tsp Diamond Crystal kosher salt (for blanching)
- 6 oz bean sprouts (½ package)
- 1 green onion/scallion
For the Spinach (optional)
- 1 Tbsp toasted sesame oil
- 1 clove garlic (½ tsp minced)
- ½ tsp Diamond Crystal kosher salt
- ½ bunch spinach
For the Carrot (optional)
- ½ large carrot
- 1 tsp toasted sesame oil
- ⅛ tsp Diamond Crystal kosher salt
For the Shiitake Mushrooms (optional)
For the Eggs (optional)
- 1 Tbsp neutral oil
- 4 large eggs (50 g each w/o shell)
For Making the Onigirazu
- 4 servings cooked Japanese short-grain rice (4 cups, 600 g)
- 4 sheets nori (dried laver seaweed)
- Diamond Crystal kosher salt (for sprinkling on the rice)
For the Gochujang Sauce (optional)
- 2 Tbsp gochujang (Korean chili paste)
- 1 Tbsp toasted sesame oil
- 1 Tbsp sugar
- 1 Tbsp toasted white sesame seeds
- 1–2 Tbsp water (to dilute to your desired consistency)
Instructions
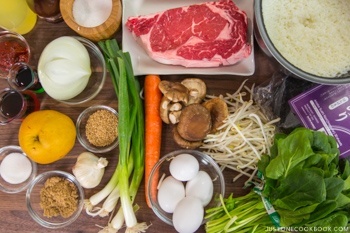
- Before You Start: Gather all the ingredients. For the steamed rice, please note that 1½ cups (300 g, 2 rice cooker cups) of uncooked Japanese short-grain rice yield 4⅓ cups (660 g) of cooked white rice. See how to cook short-grain rice with a rice cooker, pot over the stove, Instant Pot, or donabe.
To Make the Bulgogi Marinade
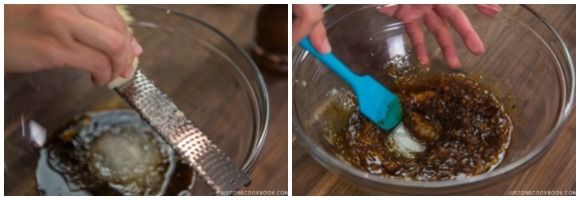
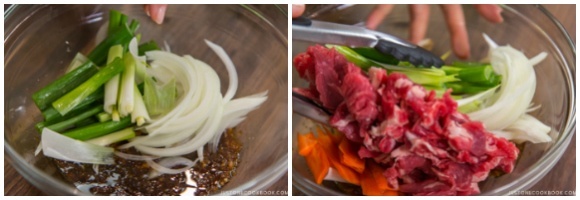
- In a large bowl, combine the ingredients for the bulgogi marinade: 1 Tbsp toasted sesame oil, 2 Tbsp Korean soy sauce, 2 Tbsp brown sugar, and freshly ground black pepper. Grate ¼ Asian pear, measure 2 Tbsp grated pear, and add to the bowl. Crush (or mince) 4 cloves garlic, measure 2 tsp minced garlic, and add to the bowl. Mix it all together.
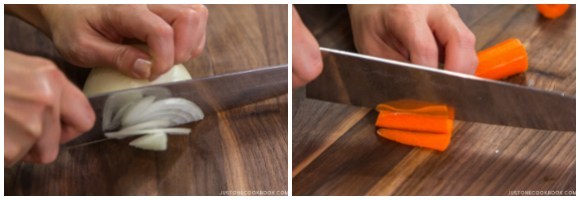
- Cut ½ onion into thin slices. Cut ½ carrot to 2-inch (5-cm) pieces, then cut into julienned pieces.
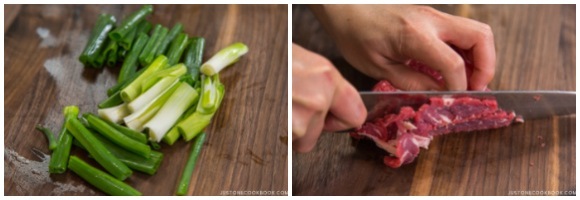
- Cut 3 green onions/scallions into 2-inch (5-cm) pieces. Cut 1 lb beef into thin 2-inch (5-cm) strips. Tip: I put the meat in the freezer for 2 hours (depending on the size and thickness) prior to cutting the meat into thin slices. See my tutorial on how I slice my meat.
- Add the vegetables and meat to the bowl and toss to coat with the marinade. Set aside for at least 20 minutes.
To Prepare the Bean Sprouts and Spinach (optional)
- Prepare 2 medium bowls. In each bowl, combine 1 Tbsp toasted sesame oil, ½ tsp minced garlic (from 1 clove garlic), and ½ tsp Diamond Crystal kosher salt and mix well.

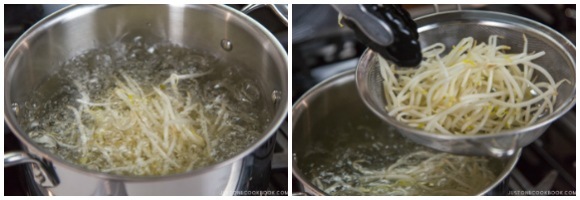
- Bring a medium pot of water to a boil and add 1 tsp Diamond Crystal kosher salt. Add 6 oz bean sprouts and cook for about 1 minute. We will need to reserve the boiling water for spinach, so scoop up the bean sprouts with a sieve or spider strainer. Run under cold tap water to stop the cooking further with remaining heat and drain well. Set aside.
- Prepare iced water in a large bowl. In the same boiling water, blanch ½ bunch spinach for 30 seconds. Transfer the spinach to the iced water to stop the cooking.
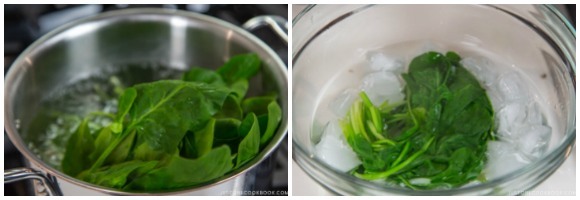
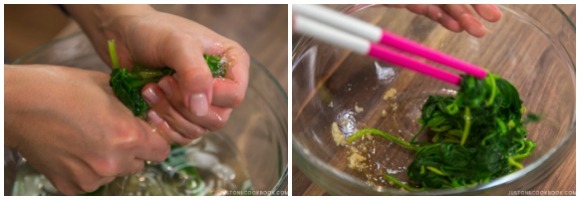
- Squeeze out the water from spinach as much as you can and add to one of the bowls with the seasonings. Toss well with the sauce.
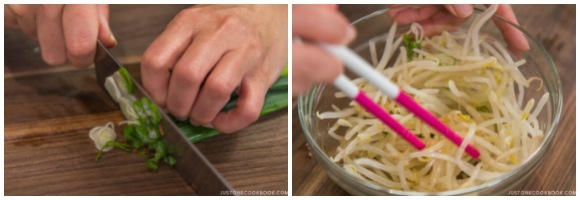
- Thinly cut 1 green onion/scallion. Add the bean sprouts and green onion to the other bowl and toss well with the sauce.
For the Carrot and Shiitake Mushrooms (optional)
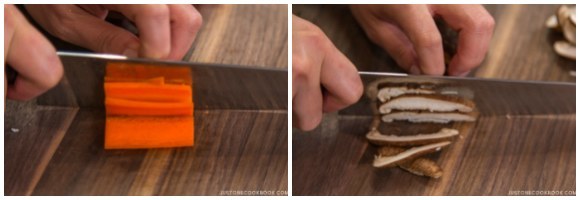
- Cut ½ large carrot in half widthwise, about 2 inches (5 cm) long. Cut each piece into thin slices, and julienne the carrots. Cut 6 shiitake mushrooms into thin slices.
- Heat 1 tsp toasted sesame oil in a large frying pan and add the carrot. Season with ⅛ tsp Diamond Crystal kosher salt and sauté until tender. If your pan is big enough to add the shiitake mushrooms, move the carrot to one side when it’s cooked halfway. Add 1 tsp toasted sesame oil in the open space and add the shiitake mushrooms. Season with ⅛ tsp Diamond Crystal kosher salt and sauté until tender. If your frying pan is small, cook one ingredient at a time; transfer the carrot to a plate and cook the shiitake mushrooms after. When the carrot and shiitake mushrooms are both tender (but not overcooked), transfer to a plate and set aside.

To Cook the Eggs (optional)
- Heat 1 Tbsp neutral oil in the large frying pan and make fried eggs with 4 large eggs (50 g each w/o shell). I cook the eggs “over hard” so the egg yolk won’t be runny and messy when the onigirazu is cut in half.

To Grill the Meat
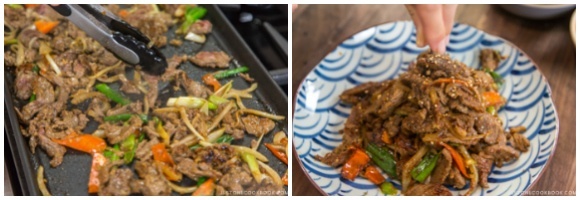
- In a large skillet (I use a griddle pan so I can grill the meat in a single layer), heat 1 Tbsp toasted sesame oil over medium-high heat and sauté the marinated beef until cooked, about 5 minutes. Transfer the meat to the plate and sprinkle with 1 Tbsp toasted white sesame seeds.
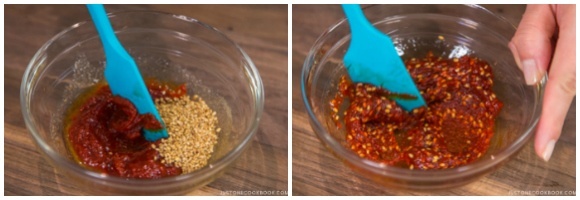
To Make the Gochujang Sauce (optional)
- In a small bowl, combine all of the sauce ingredients: 2 Tbsp gochujang (Korean chili paste), 1 Tbsp toasted sesame oil, 1 Tbsp sugar, and 1 Tbsp toasted white sesame seeds. Mix them all together. Add 1–2 Tbsp water until you achieve the consistency you like.
To Assemble the Onigirazu
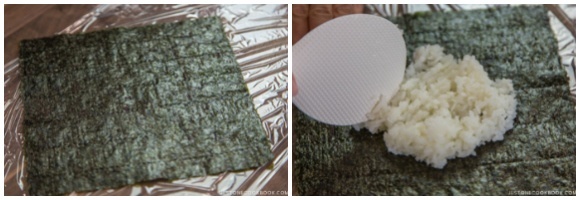
- Place a piece of plastic wrap on a working surface and put a sheet of nori seaweed on top (shiny side down), with a corner pointing up. Evenly spread ½ serving of the steamed rice in a thin layer and form into a square shape in the center of the nori sheet. If you make the onigirazu with different ingredients that have a milder taste, sprinkling Diamond Crystal kosher salt at this step is very important, especially if you plan on eating it at room temperature.
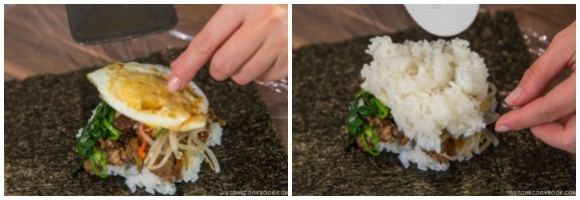
- Place one serving of bulgogi on top of the rice in a thin layer. Then, put one serving of spinach, bean sprouts, carrot, and shiitake in a thin layer on top of the meat.
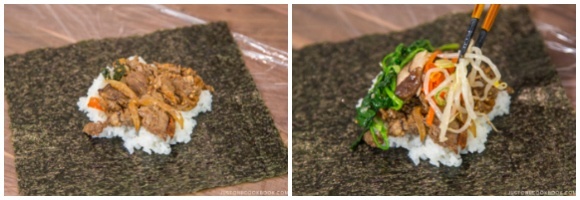
- Add the fried egg. Then, add another ½ serving of steamed rice on top. Try to keep the square shape as you spread the rice evenly in a thin layer.
- Bring the left and right corners of nori sheet towards the center. Fold gently but tightly to wrap around the layers at the center.
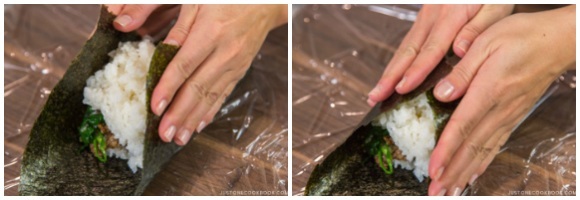
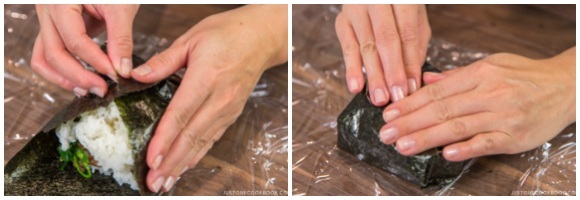
- Then, bring the bottom and top corners towards the center. Continue to fold gently but tightly around the layers. Make sure the rice is tucked in nicely. If you‘d like the onigirazu to showcase the ingredients after cutting it in half, mark it with a piece of carrot perpendicular to the ingredients (see video). Flip over and shape the onigirazu gently. Wrap tightly with the plastic wrap and set aside for 5 minutes. Repeat assembling the remaining onigirazu.
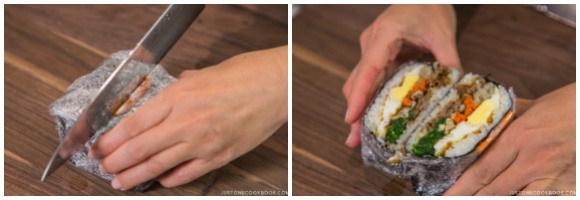
- Cut the onigirazu with a sharp knife (following your “carrot” mark). Run your knife in cold water before cutting so that the cross section will be clean. The Bulgogi Onigirazu is now ready to enjoy.
To Store
- If you plan to make it ahead of time, wrap the onigirazu with a kitchen towel and keep in the refrigerator overnight. The towel will prevent the rice from getting harder from cold air.


Is there any substitute for spinach?
Hi Jeanjel,
Any of your failover green leafy vegetables should work for this recipe.
Bok Choy, Swiss Chard, Kale, Arugula, etc., or Asparagus!
Hi Nami,
I have been following your blog for a few years and have accumulated a lot your recipes and I noticed that some when printed take up 3 pages ex: bulgogi onigirazu. I prefer reading my recipes to assemble my ingredients instead of watching video (and saving trees). I also like to plan my meals for the week and shop for all the ingredients at one time. So in this recipe I need to look at 3 separate pages to make sure I have all the ingredients. In the future, would it be possible to have an option just to print only the list of ingredients and to print it on 1 page. Thanks.
Hi D wong! I think in late 2018 we changed the look of the recipe card for printing. It used to be ingredients on top of the step-by-step instructions. We made changes because some people suggested that they prefer to see the ingredients side by side to save “empty white space” next to the ingredients to save trees from printing more pages.
Currently, for the long ingredient recipe like this one, the ingredients spread out into 3 pages long (on the left side column). I understand your concern about saving trees. Unfortunately, the recipe plugin doesn’t allow users to choose how you want to print out, so we can’t make both customers happy.
We feel, it makes sense to have side by side, so that ingredient lists in single layer won’t be so long when we make a list on top of the instructions. If we do this way, whole recipe card can be 6 pages for this recipe. :/ I have never seen a recipe plugin that allows you to print only recipe ingredient. If you have seen it, please let us know, so we can ask/suggest this option to the recipe plugin engineer. He may add it if it’s something everyone wants to do. 🙂
Made some but instead of carrots and bean sprout namul, I used some kimchee that I made a few days prior. It is sooo good. Thanks for the idea.
Hi Joan! I’m so glad to hear you enjoyed this recipe! Thank you for your kind feedback. 🙂
Hello Nami! I am new to your site and I want to try this recipe. I was wondering however, I try to avoid buying/using saran wrap. I use beeswax wrap instead. Do you think this would hold up if I wrapped it in the beeswax wrap and after like, 15 mins or something to give it time to meld, I unwrapped it, cut it in half, and then re-wrapped it again? What do you think? Thanks!
Hi Leah! There are two parts for the plastic wrap purpose. The first one is the wrapping part where you really need to pull the wrap tightly to secure the food. And the second part is the eating part as it can get messy without something holding up the shape while you bite into it. I think the eating part is do-able without wrap, especially after being wrapped for some time. It will probably hold everything. However, the wrapping part… whatever you wrap with has to be flexible enough and you have to make sure that it’s wrapped tightly and not loosely. The plastic wrap makes it a lot easier to hold things together but I understand, I also try to use less plastic these days. Hope it’ll work!
Just made a big batch of 8 of these tonight— wonderful!! About 3 years ago I learned how to make sushi from your website and I am the hero of my friends. They ask for it all the time! I was so excited to see you had another fantastic recipe for something I had never tried before. It was so easy to follow along and the assembly pictures were perfect. It tastes so good and used up all kinds of veggies from my fridge. Thank you so much, I love your blog and recipes!!
Hi Jenny! Awww I’m so happy to hear that you and your friends enjoyed the homemade sushi you made! 🙂 And thanks for trying out this recipe too! 😀
These look amazing! How long can they last, if I were to make them earlier in the week for packed lunches? Thanks! 🙂
Hi A! So… rice gets really hard when you place in the fridge (which is why we put in freezer to store: https://www.justonecookbook.com/how_to/how-to-freeze-rice/) or use that hard rice to make fried rice.
So onigiri or onigirazu, we don’t plan on making ahead in Japan. We know it’s something we have to eat in half day… If you really don’t have time the morning of, then I recommend making it at night time BUT wrap the onigirazu around with thick kitchen towel so onigirazu doesn’t get too cold but safe cool place. Chilled air in the fridge will definitely harden rice.
Hello!
How long is this good for and how should it be stored? If I wanted someone to eat this for lunch one day would I need to make it that morning or would it be okay to make it the night before?
Hi Diana! You should enjoy it within 24 hours. If I was eating, I’d make it in the morning of – you just have to prepare every ingredients ahead of time.
Then in the morning, make fresh steamed rice (or reheat the frozen rice in the microwave – https://www.justonecookbook.com/how_to/how-to-freeze-rice/). Reheat all the ingredients and make Onigirazu. You can’t make Onigirazu with cold ingredients as Nori has to become wilted to wrap properly. Hope that helps?
How long do you marinate the beef?
Hi Natalia! At least 20 mins. 🙂
Tried this recipie yesterday, didn’t have all the ingredients though, but it still turned out great! Thanks!
Hi Erika! I’m so glad to hear that. Thank you for your kind feedback! 🙂
I found this recipe after deciding I wanted beef and korean BBQ. I saw it was a bulgogi marinade and immediately cam to your site, hoping you’d have a good recipe, which you did! I didn’t make it the same way though. For the bulgogi, I let it marinate with the Korean BBQ, scallions, soy sauce, and rice vinegar overnight. I cooked the carrots in sesame oil and garlic. As I assembled it, I also added a few things slices of avocado with salt and pepper. The hardest part was assembling it but, that might be because I added too much rice. I enjoyed any way. Thank you!
Hi Yelissa! I’m glad you enjoyed this recipe and marinated overnight. Extra yum! You’ll get used to wrapping onigirazu. And yes, start from small amount of rice for easy wrapping. 🙂