
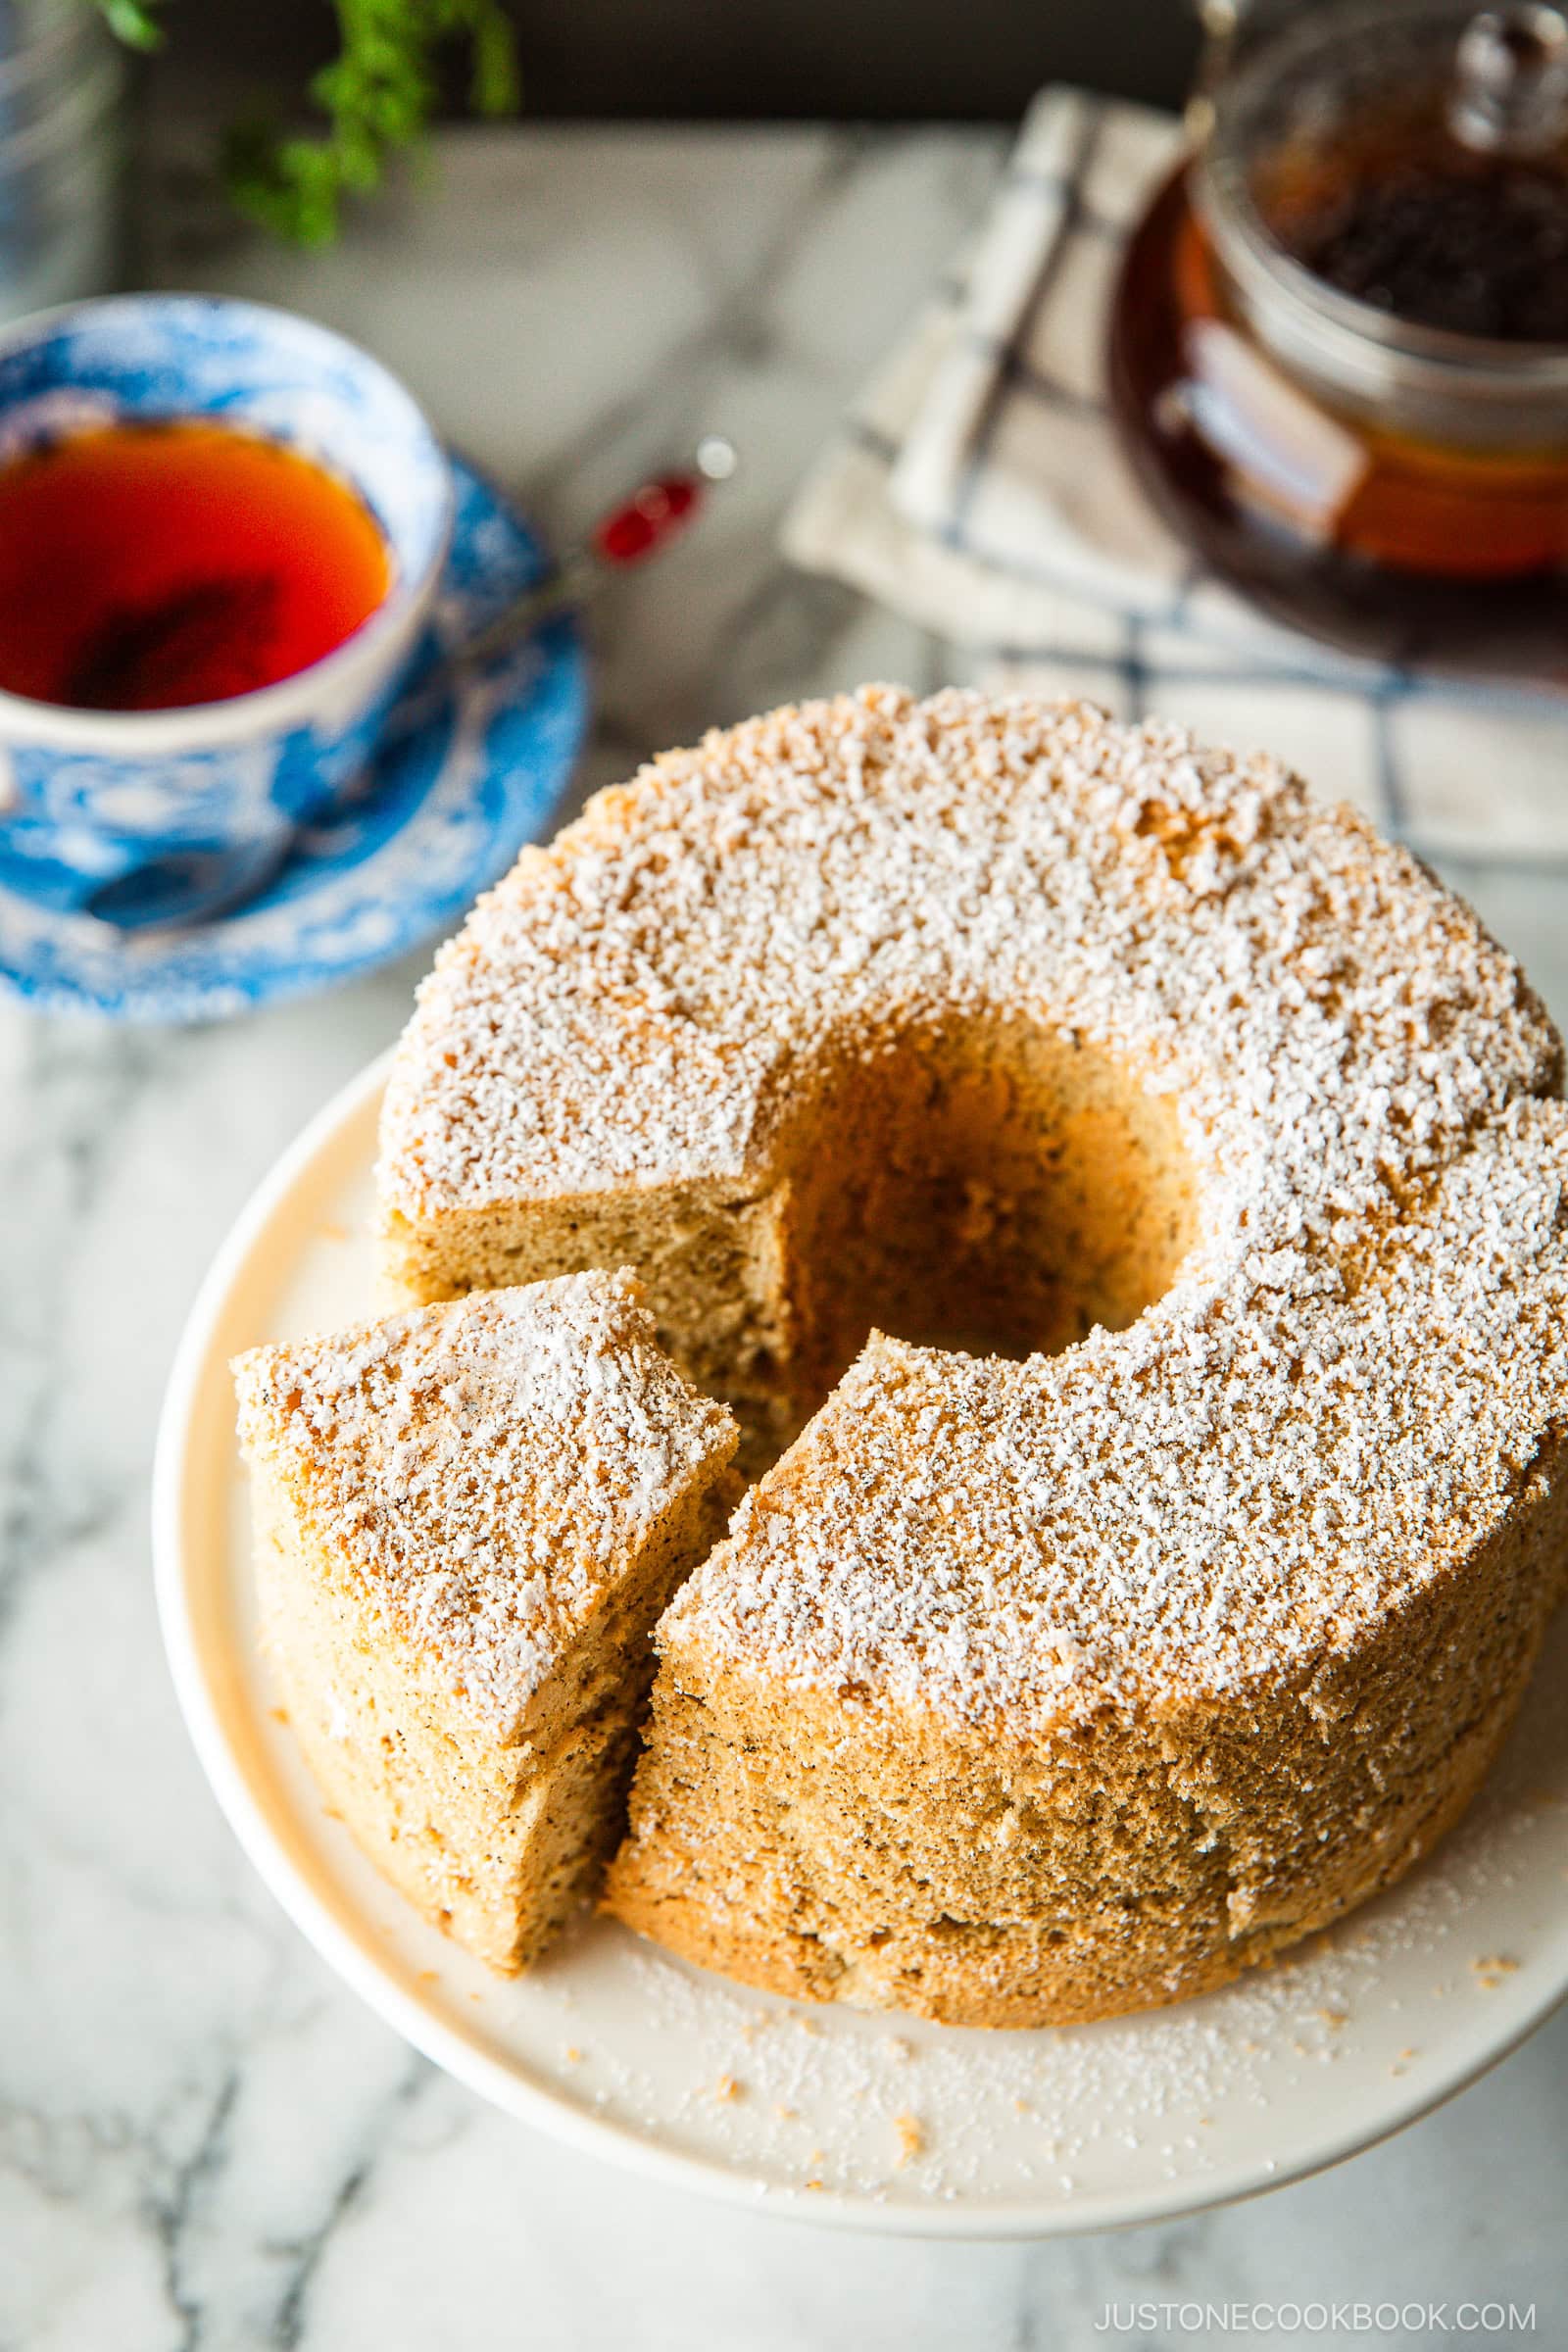
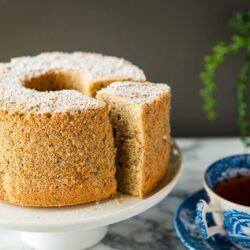
Have you tried Earl Grey flavored baked goods before? How about baking with tea leaves? If you haven’t, you must try this Earl Grey Chiffon Cake (紅茶のシフォンケーキ). Earl Grey is a tea blend with a delightful and calming citrus flavor. The citrus flavor comes from oil extracted from the rind of a bergamot orange.
As Earl Grey is my all-time favorite tea, all kinds of baked goods infused with Earl Grey tea are my top choices in bakeries. Given my love for sweets, I would even rank any Earl Grey flavored baked goods higher than chocolate. I am not kidding! From Earl Grey cookies, and Earl Grey pound cake to this Earl Grey chiffon, I can never resist any of them.
Tea-Infused Baked Goods
After living in the U.S., I realized tea-infused baked goods are not as popular compared to Japan. This actually motivated me to learn how to bake so that I can enjoy my favorite Earl Grey baked goods at home.
If you haven’t tried making a chiffon cake before, you will have to trust me when I say it’s one of the easiest cakes to bake. Not an experienced baker? Not to worry. I used to think it would be intimidating to bake chiffon cake as well, but it turned out to be less challenging than I had presumed. Once you understand the simple techniques, it will be one of your favorite cake recipes to bake at home.
Tips to Make Airy Chiffon Cake
The most crucial part to make a successful chiffon cake is to make perfect meringue and fold it into batter correctly.
Meringue
In Japan, the majority of recipes call for cold egg whites to make meringue (and we don’t use cream of tartar). If you already know how to make meringue with room-temperature egg whites and cream of tartar, please use your own method. Otherwise, you can follow my detailed instructions in the recipe.
Fold In
When you finish making meringue, make sure to fold in egg whites gently so the tiny bubbles don’t deflate. If you deflate the egg whites too much, the cake will not be fluffy.
How to Make the Perfect Chiffon Cake
- Have a question on chiffon cake making?
- Do you have a different size chiffon cake pan?
I answered your questions in this post.
More Chiffon Cake Recipes
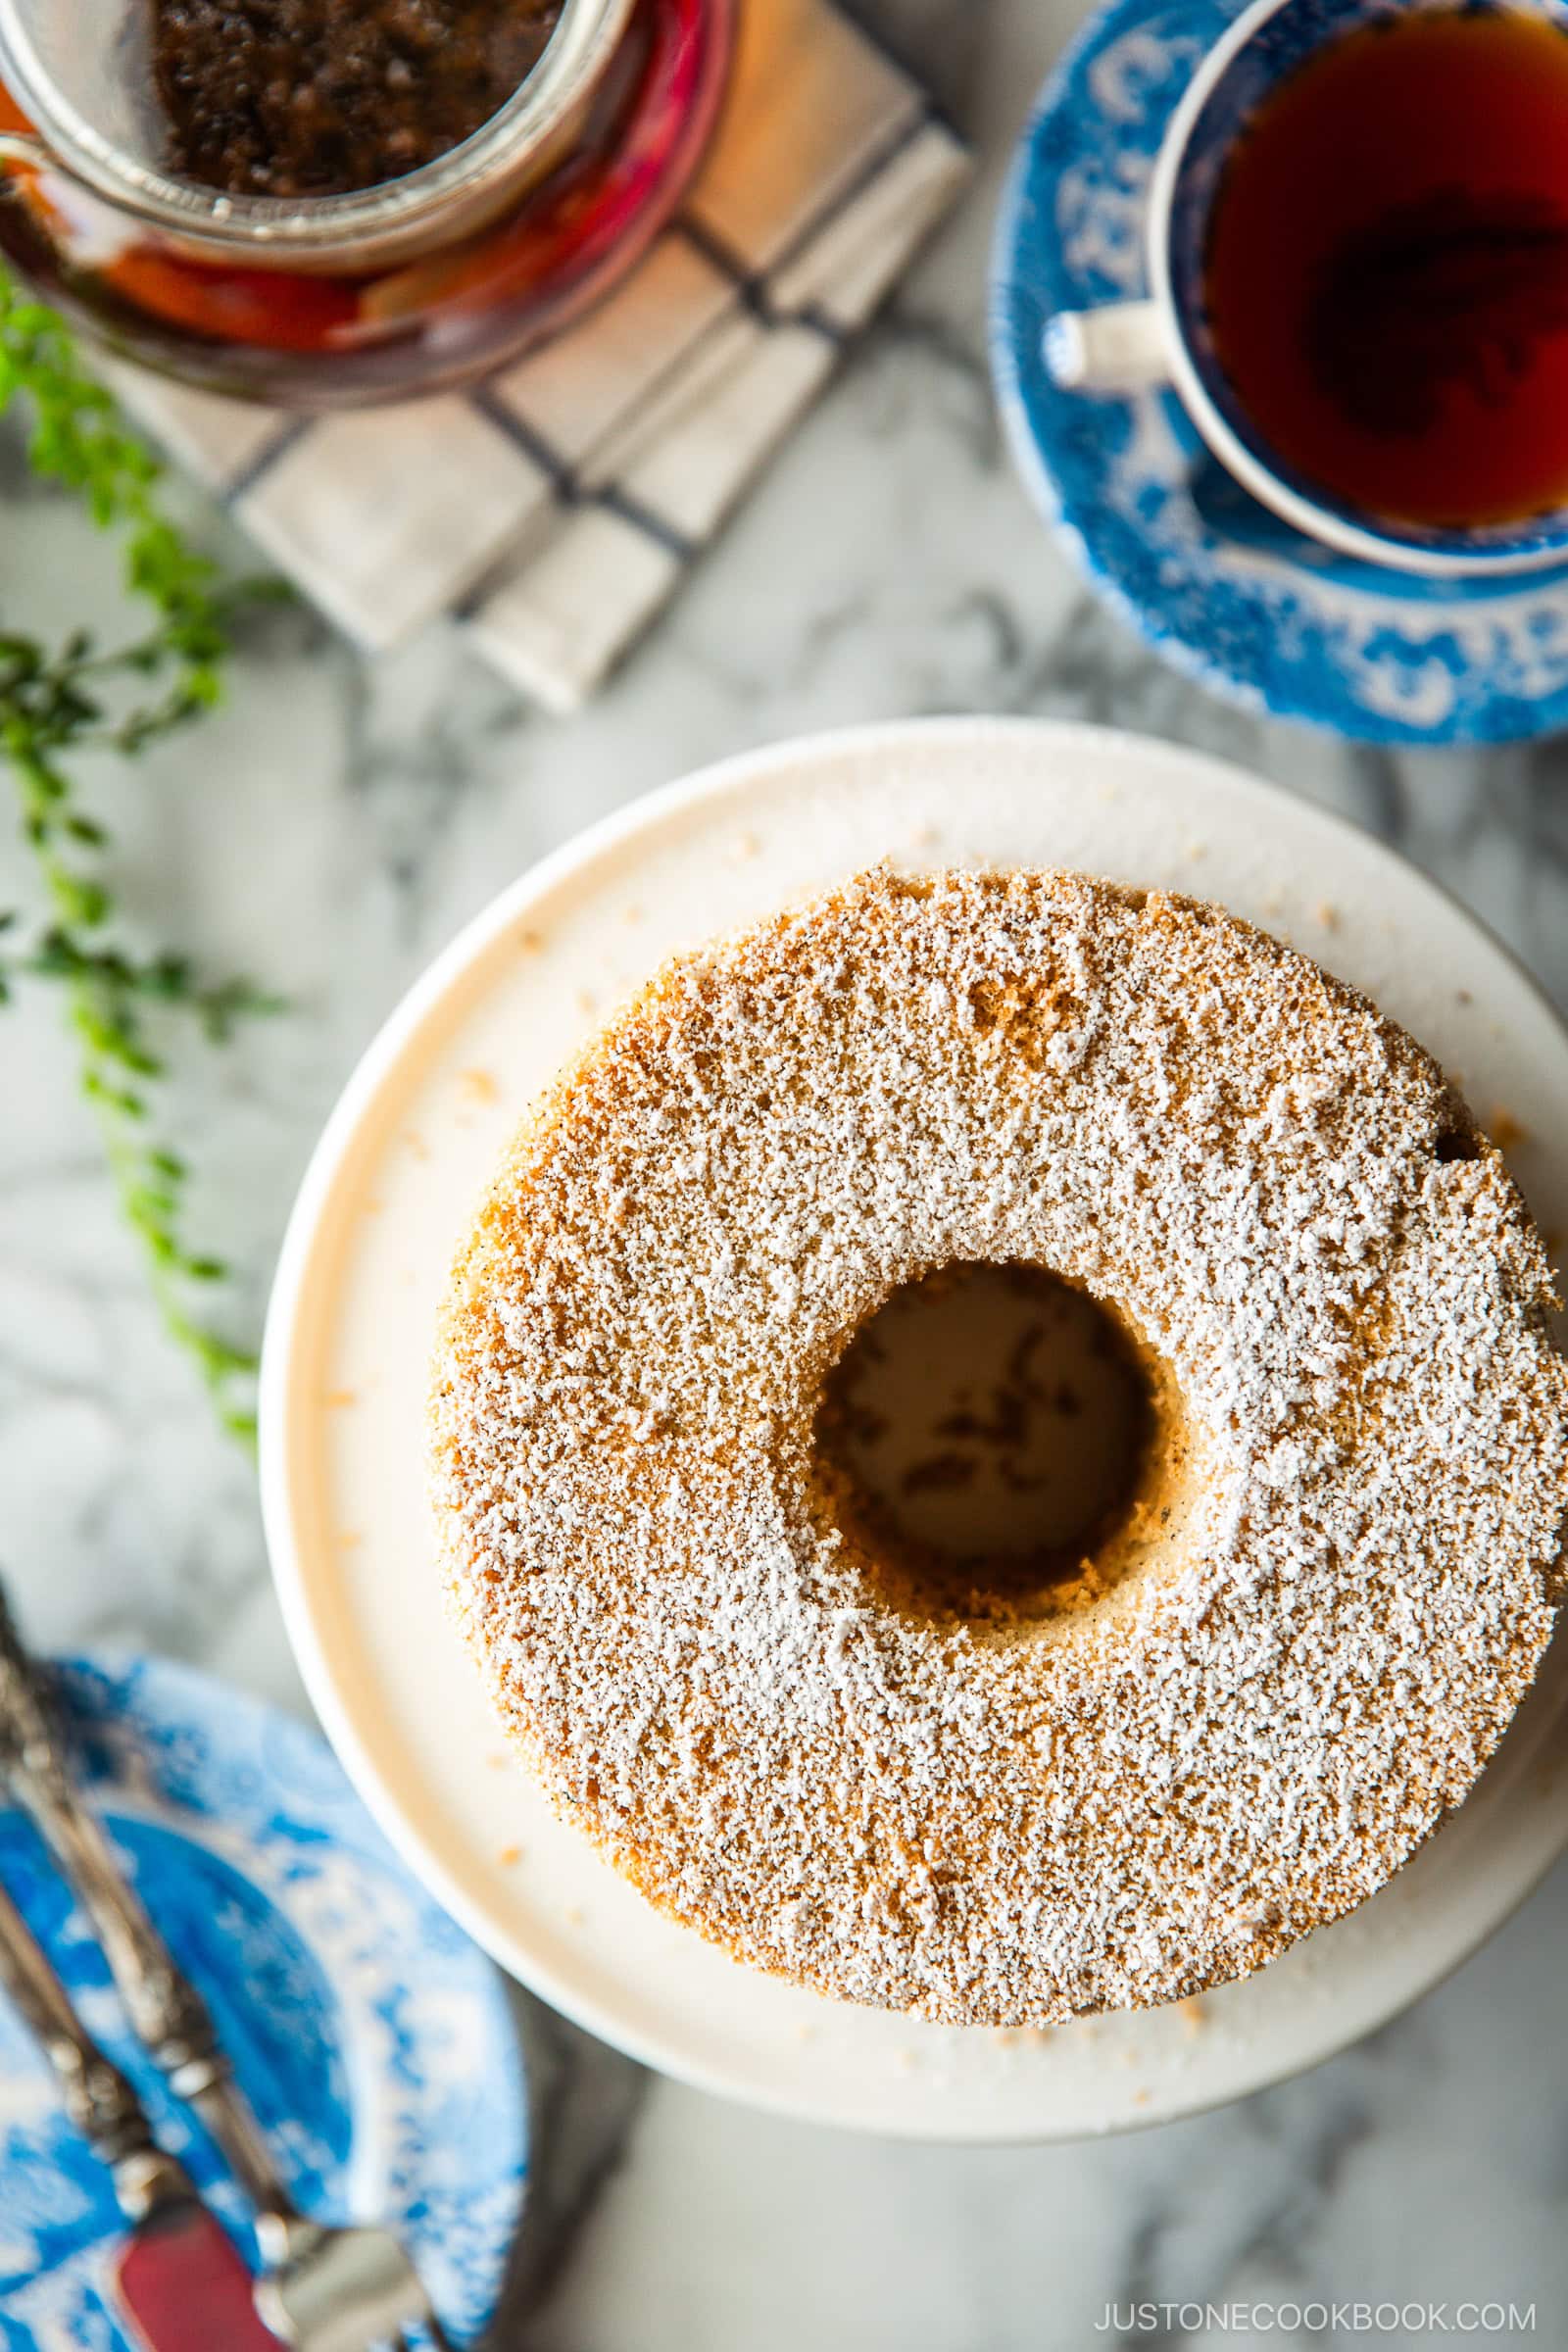
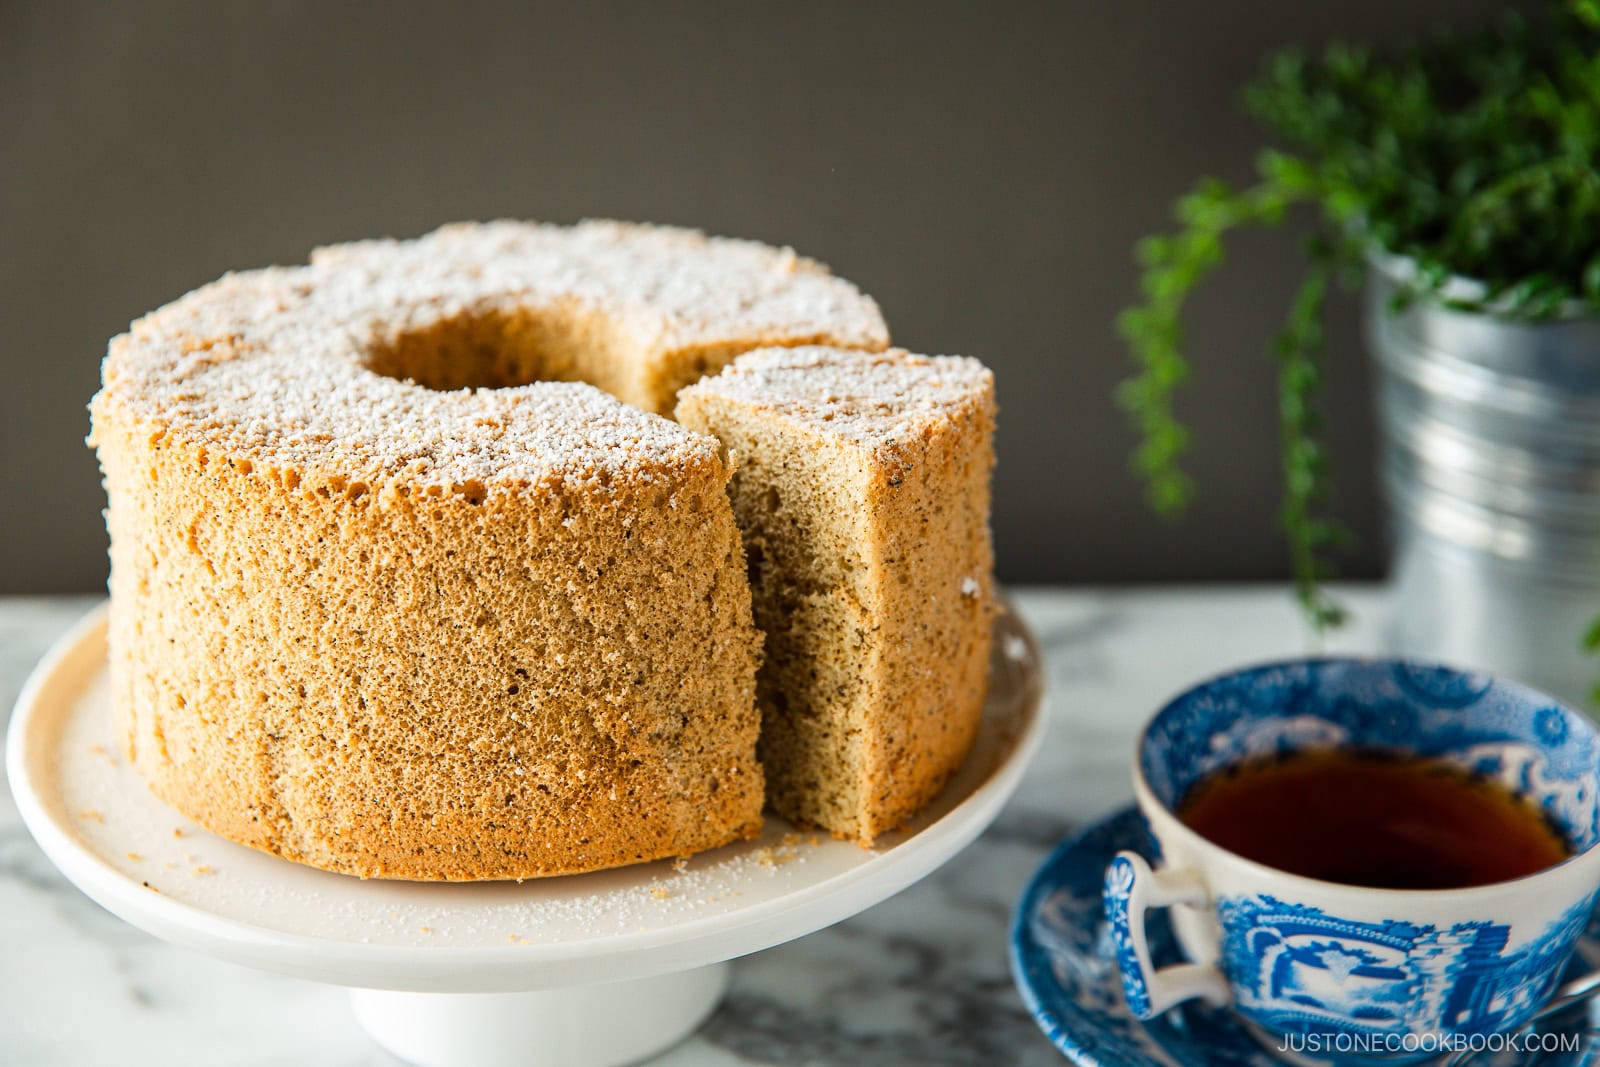
Chiffon cakes are my daughter’s favorite cake because she can help me make them and we enjoy making different types together. What I like best about chiffon cakes is they are so fluffy and bouncy, and not too sweet. The sponge-like texture is exceptionally light and airy and I feel like I can gobble up half of the cake myself.
It is also slightly healthier than other types of baked goods that use plenty of butter. This earl grey chiffon cake recipe uses just 3 Tbsp. of oil. With a faint citrus aroma, it makes the perfect cake to enjoy in an idyllic afternoon when you have some good friends over.
If you love to experiment with different flavors, check out other delicious variations below:
Earl Grey Chiffon Cake
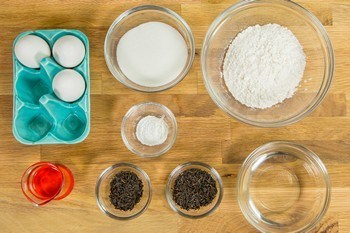
Ingredients
- 2 tsp Earl Grey loose tea leaves (for the tea powder)
- 1 Tbsp Earl Grey loose tea leaves (for the strong brewed tea)
- 6 Tbsp hot water (just boiled)
- 3 large eggs (50 g w/o shell) (yolks and whites separated)
- 85 g sugar (½ cup minus 1 Tbsp; 3 oz; divided into thirds)
- 40 ml neutral oil (3 Tbsp minus 1 tsp)
- 75 g cake flour (⅔ cup minus 2 tsp; weigh your flour or use the “fluff and sprinkle“ method and level it off; you can make Homemade Cake Flour)
- 1 tsp baking powder
For Serving
- confectioners’ sugar (for dusting; optional)
Instructions
- Before You Start: Gather all the ingredients. I highly encourage you to weigh your ingredients using a kitchen scale for this recipe. Click on the “Metric“ button at the top of the recipe to convert the ingredient measurements to metric. If you‘re using a cup measurement, please follow the “fluff and sprinkle“ method: Fluff your flour with a spoon, sprinkle the flour into your measuring cup, and level it off. Otherwise, you may scoop more flour than you need.
- Preheat the oven to 340ºF (170ºC). For a convection oven, reduce the cooking temperature by 25ºF (15ºC). You will need a 17-cm (7-inch) chiffon cake pan. If you have a different size pan, read this post to adjust the ingredient measurements. Make sure you use an aluminum pan with a removable base (read my blog post for more details). Please see my Notes at the end of this recipe for additional details on ingredients, equipment, and techniques.
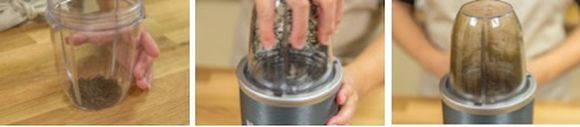
- To make tea powder, put 2 tsp Earl Grey loose tea leaves in a food processor (I used a Nutribullet here). Grind them to a fine powder. Alternatively, you can use a mortar and pestle to grind the tea leaves, or put tea leaves in a bag and crush them. Transfer to a small bowl and set it aside.
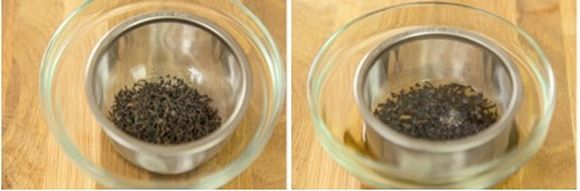
- To brew strong tea, put 1 Tbsp Earl Grey loose tea leaves in a fine sieve over a bowl. Next, pour 6 Tbsp hot water over the tea leaves to steep. Let it cool, then remove the tea leaves. Measure 4 Tbsp (60 ml) of this brewed tea and set it aside.
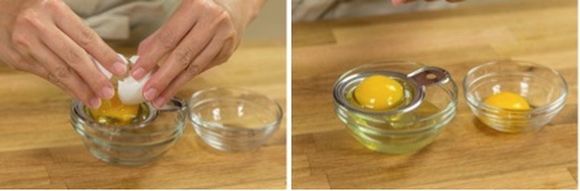
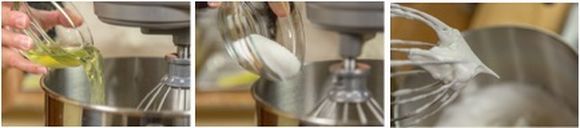
- Separate 3 large eggs (50 g w/o shell) into egg yolks and whites. Keep the eggs whites in a stand mixer bowl; refrigerate or freeze the bowl and egg whites for 15 minutes until cold. (It‘s okay if the egg whites are partially frozen). Tip: In Japan, we chill the egg whites to make smooth, fine-textured meringue and do not use cream of tartar.
To Mix the Batter
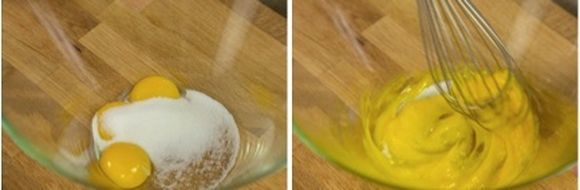
- Start mixing the batter. In a large bowl, beat the egg yolks and one-third of the 85 g sugar with a hand whisk. Whisk vigorously until it‘s a creamy pale yellow color.
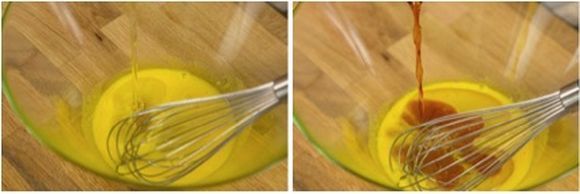
- Add 40 ml neutral oil and 4 Tbsp brewed tea to the egg mixture. Whisk all together until combined.
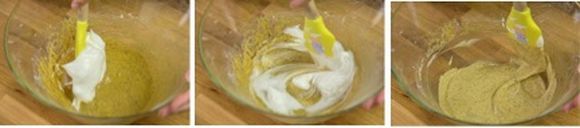
- Add the powdered Earl Grey tea to the egg mixture and mix well.

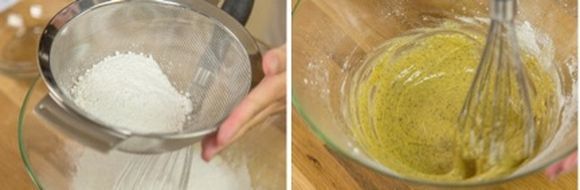
- To a flour sifter or fine-mesh sieve, add 75 g cake flour and 1 tsp baking powder. Sift one-third of this flour mixture into the egg yolk mixture. Whisk by hand to incorporate the dry ingredients well. Check that there are no lumps in the batter, then sift another one-third of the flour mixture into the bowl. Mix to incorporate. Then, sift in the rest of the flour mixture and whisk until just combined; do not overmix. Make sure there are no lumps in the batter. Set aside while you beat the meringue.
To Make the Meringue
- Take out the bowl of egg whites from the refrigerator or freezer. Set the bowl on the stand mixer with a whisk attachment (I used the KitchenAid Professional Series). Start whipping the egg whites on medium-low speed (Speed 4) until the egg whites are bubbly, opaque, and foamy.Add another one-third of the sugar and continue whisking for 30 seconds. Then, increase the mixer speed to high (Speed 10) and gradually add the remaining sugar in small increments. Beat vigorously until stiff peaks form. It takes about 2 minutes of beating at high speed to reach stiff peaks. Tip: I usually pause beating when the egg whites are almost done. Take off the whisk attachment from the mixer and use it to hand-mix the looser egg whites near the bowl‘s edge into the stiffer whites near the center until it‘s all homogenous in texture. Then, put the whisk back on and continue beating.To check for stiff peaks, pull up your whisk. The meringue in the bowl or on the whisk should be firm enough to hold a peak, pointing straight up (or maybe folding over a little bit just at the very tips). By this time, the meringue should have a glossy texture, too. Tip: If you overbeat the meringue, it will become very stiff and grainy and won‘t incorporate into the batter at all.
To Fold In the Meringue
- Using a spatula or hand whisk, add one-third of the meringue into the batter. Mix well by hand until it‘s homogeneous.
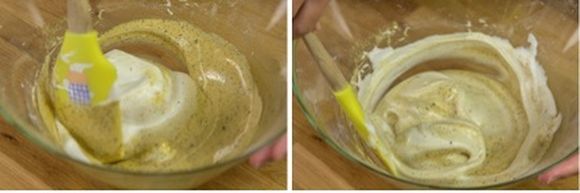
- Gently fold in the rest of the meringue in 2 or 3 increments. Take care not to deflate the air bubbles in the meringue and batter as you fold. Once it‘s well combined and homogenous, fold the batter one last time and scrape the sides and bottom of the bowl to make sure there is no tea powder accumulation. The final batter should fall in ribbons when you lift the spatula or whisk.
To Bake
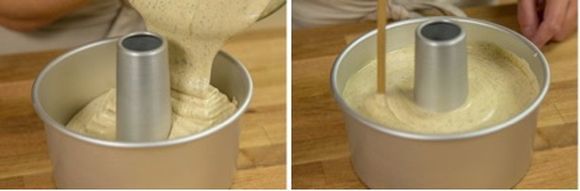
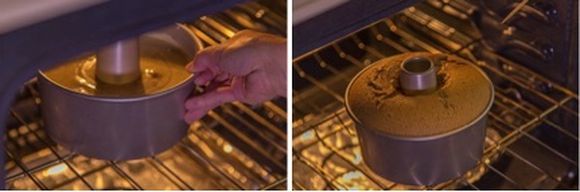
- Prepare an ungreased 17-cm (7-inch) chiffon cake pan. From 6–8 inches high, pour the batter into the pan at just one spot to prevent air pockets from forming. While holding the removable base in place, gently tap the pan a few times on the work surface to release any air pockets in the batter. Run a wooden skewer through the batter to release any remaining air pockets.
- Put the cake pan on the middle rack of the preheated oven. Bake at 340ºF (170ºC) for 30 minutes. To check if it‘s finished baking, insert a toothpick or wooden skewer into the middle of the cake. If it comes out clean and the top of the cake springs back when gently pressed, it‘s done. Tip: If the top of the cake gets dark too quickly, cover the top loosely with aluminum foil to prevent burning. (The cake may be too close to the heat source.)
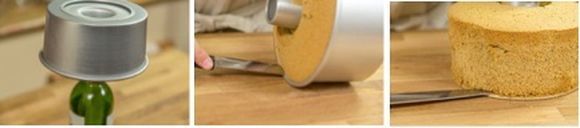
- Remove the cake pan from the oven and gently drop the pan onto the work surface to shock the cake. This stops the cake from shrinking. To cool the cake, prepare a tall, heavy bottle with a long neck, such as a glass wine bottle. Invert the center tube of the cake pan onto the bottle‘s neck and let the cake cool completely in its pan. Cooling the cake upside down helps it stretch downward and maintain its loft.Once the cake is completely cool, run a long offset spatula around the outer edge of the pan and a small offset spatula around the inner tube. Gently take out the removable base and cake from the outer pan. Then, run the offset spatula along the bottom of the cake to release it from the base. Tip: I used to use a knife for this step, but the tip of the knife tends to poke the cake while moving around, so I now recommend using offset spatulas.
To Serve
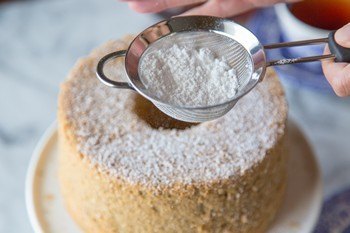
- Invert the cake with the removable base onto a plate or cake stand. The cake will slide off the inner tube. Chiffon cake is served “upside down” with the flat bottom on top. Dust confectioners’ sugar on top, if you‘d like. Slice and enjoy.
To Store
- I strongly recommend consuming the cake sooner for the best freshness. However, you can keep the cake covered on a plate or stand at room temperature in a cooler place for 1–2 days. To keep it longer, wrap individual slices in plastic wrap or put in an airtight container and store in the refrigerator for 3 days or in the freezer for 2 weeks.
Notes
- Make sure your beaters and mixing bowl are clean and dry. A speck of oil or egg yolk on either one can minimize the volume of the beaten egg whites.
- Avoid plastic bowls, as even clean ones may hold oily residue that can affect the beaten quality of the egg whites.
- Use a bowl that’s wide enough to keep the beaters from being buried in the egg whites.
- Do not overbeat or underbeat the egg whites or your cake may fall. Egg whites should have a stiff peak, pointing straight up (or maybe a little bit folding over just at the very tips).
Nutrition
Did you make this recipe?
Tag @justonecookbook on Instagram so we can see your delicious creation!
Editor’s Note: This post was originally published on June 7, 2015. The blog content has been updated with more information.
