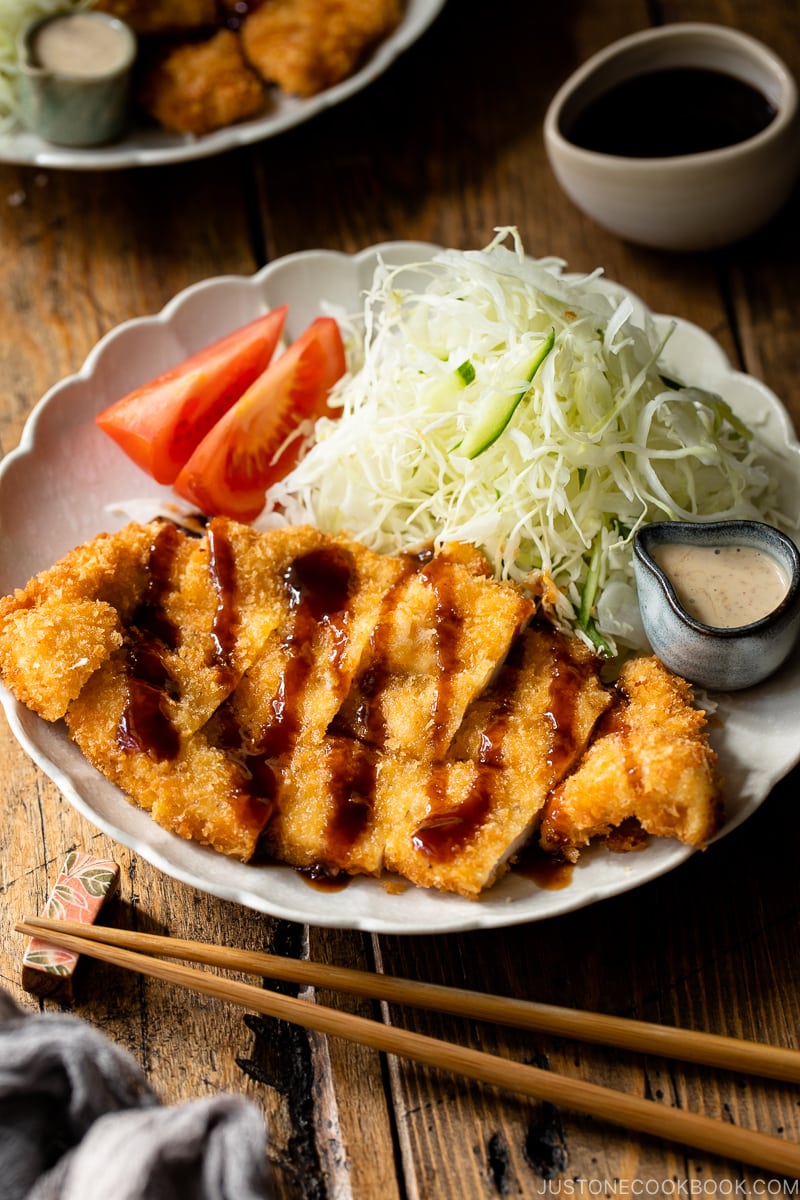
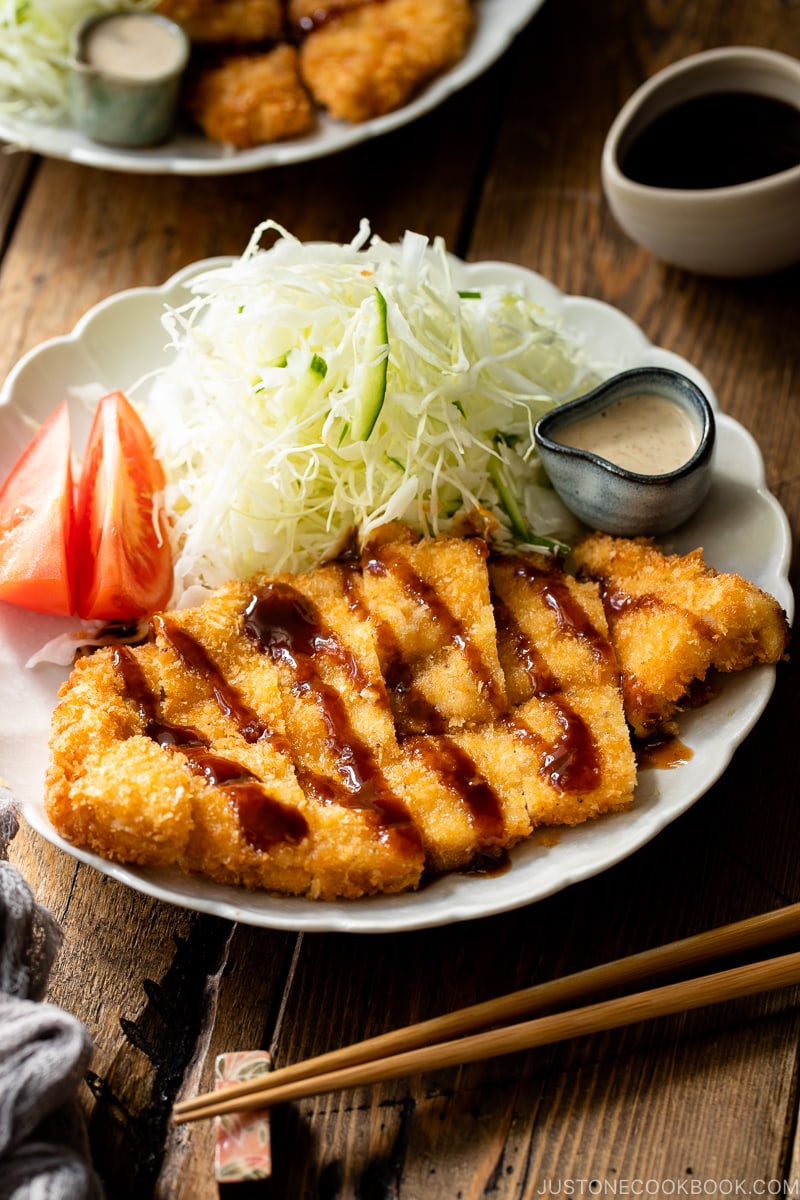
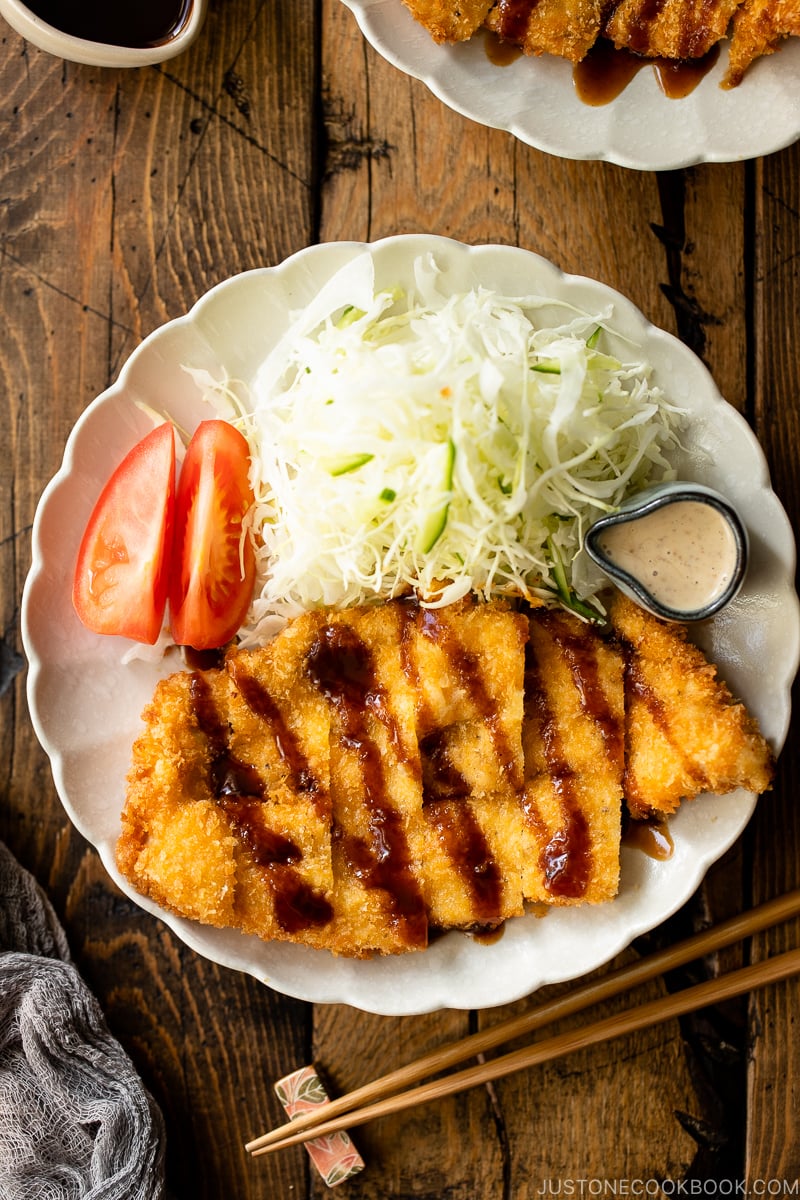
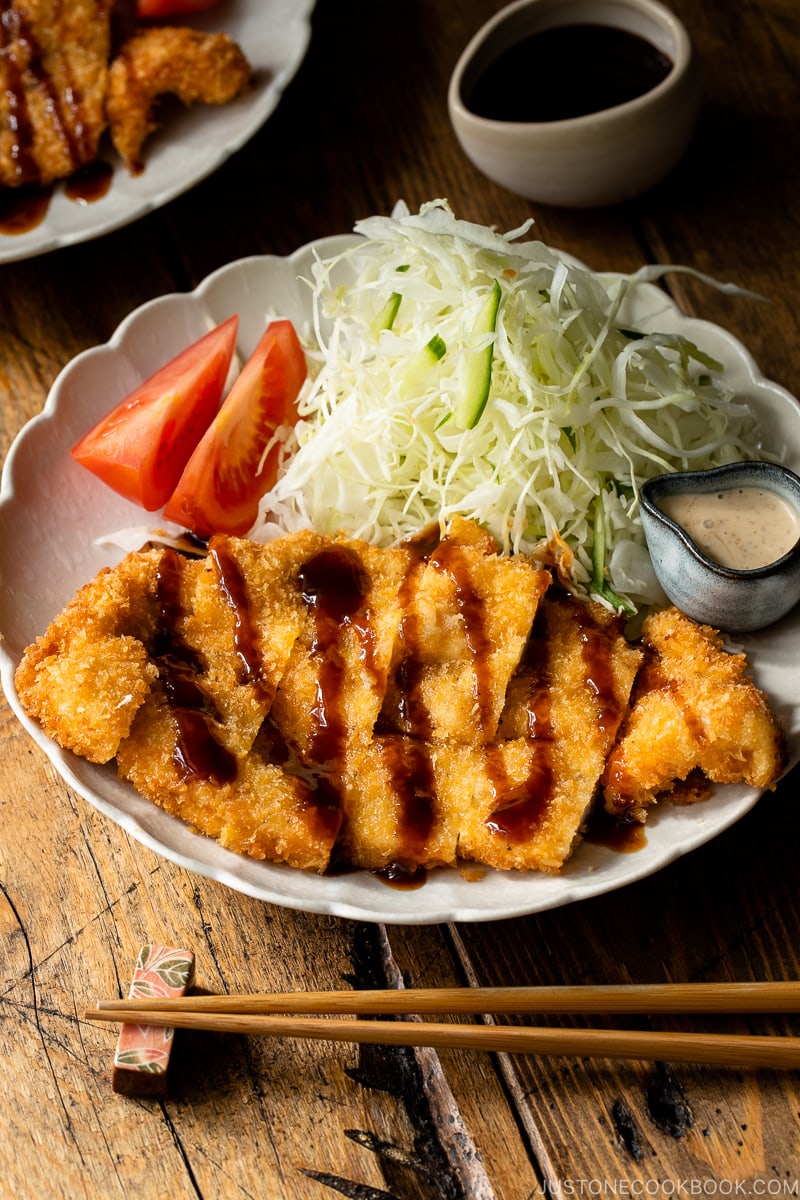
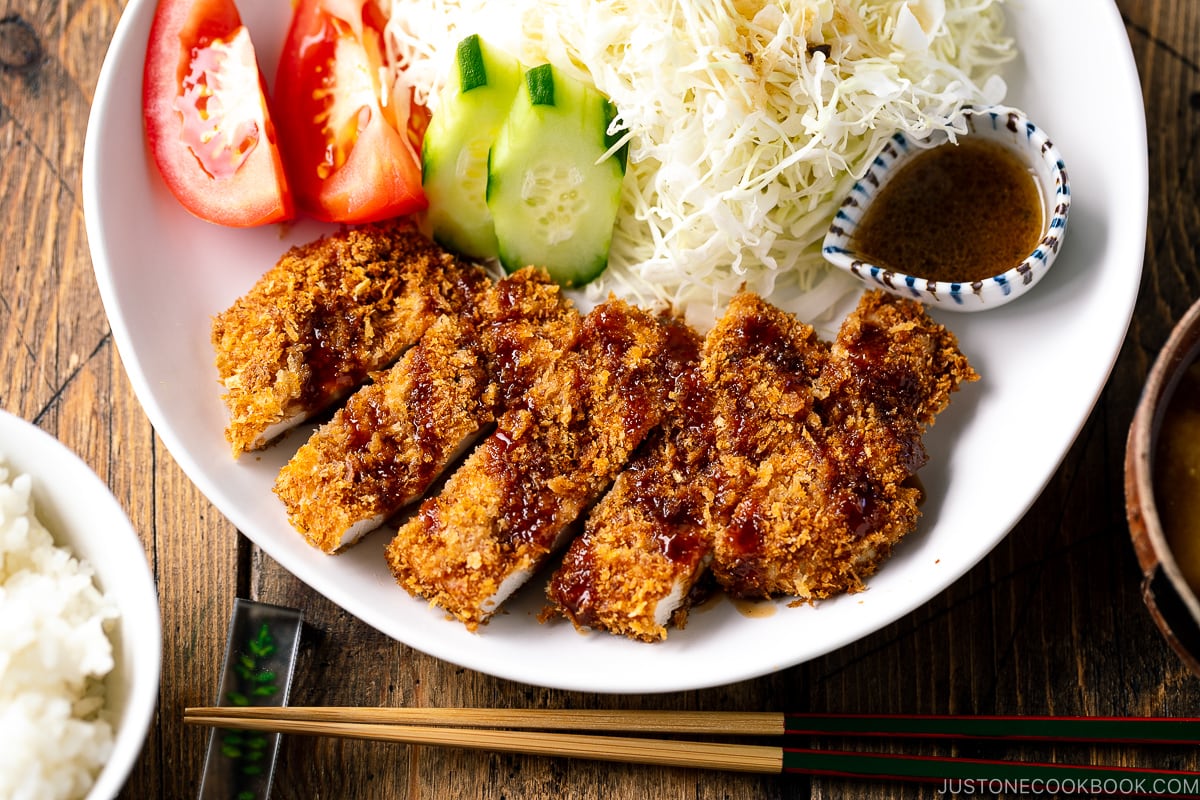
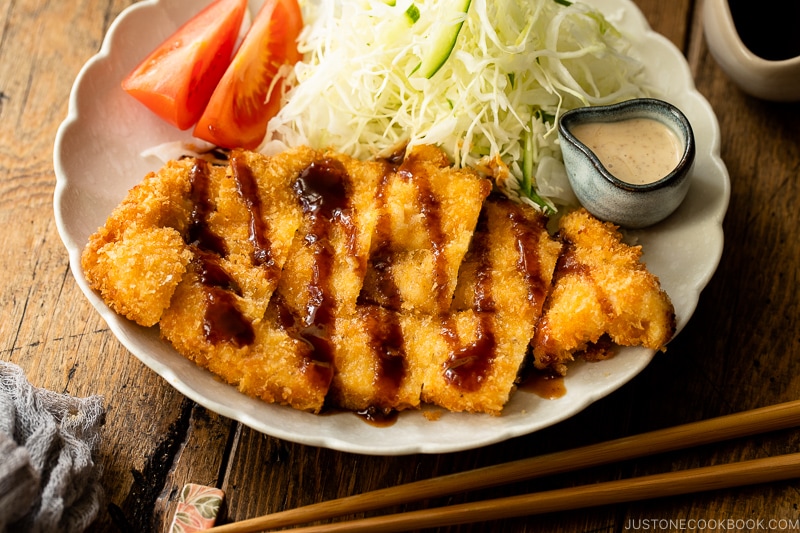
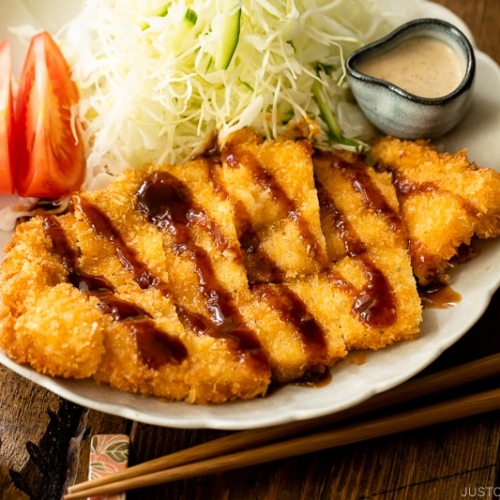
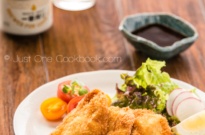
Chicken Katsu is a classic Japanese home-cooked dish served with tonkatsu sauce and a side of shredded cabbage salad. These tender and crispy panko-breaded cutlets are surprisingly easy to make, even on a busy weeknight! They also freeze well and make for a delicious meal-prep item.
Who can resist the great pleasure of eating crispy, juicy, fried chicken? Not me! Not when I can easily fry them up at home in just about 30 minutes. I’m talking about Chicken Katsu (チキンカツ), the Japanese version of chicken schnitzel or chicken tenders.
The crispy crust and flavorful, juicy meat deliver great satisfaction with every bite. Today, I’d like to show you how to make this beloved Japanese chicken cutlet right in your kitchen.
Table of Contents

What is Chicken Katsu?
Chicken katsu (チキンカツ) is made of chicken breast fillet breaded with flour, egg, and Japanese panko breadcrumbs, then deep-fried until golden brown. It’s the chicken counterpart of Tonkatsu or pork cutlet.
With just a few simple ingredients from your pantry, chicken katsu is something you can accomplish even on a weeknight meal!
If you’re curious, katsu is basically a shortened form of katsuretsu (カツレツ), meaning “cutlet” in Japanese. There are different versions of katsu depending on the type of meat you use. I’ve shared many katsu recipes on the blog which I think you’re going to enjoy.
How to Make Chicken Katsu
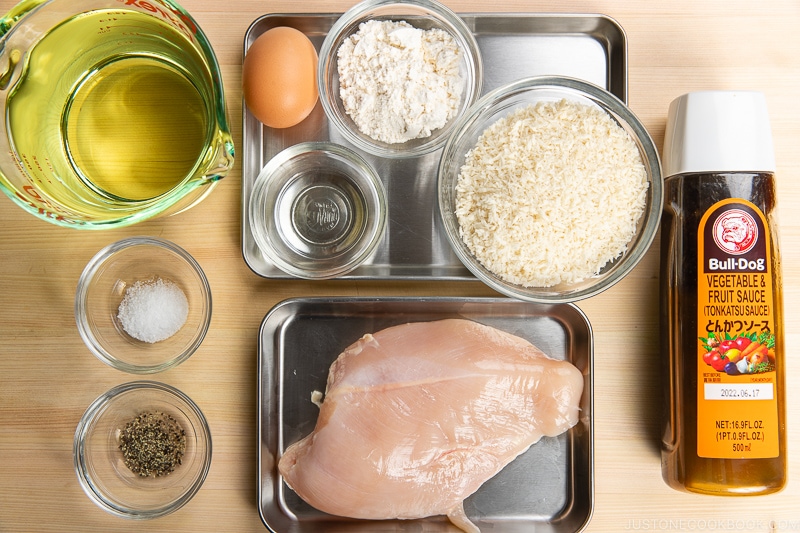
Ingredients You’ll Need
- Chicken breast – You can also use chicken thighs or tenders, but the popular choice is boneless skinless chicken breast. My mom often made it with chicken tender when I was small and I did the same when my kids were younger.
- Salt and pepper
- Flour
- Eggs
- Panko (Japanese breadcrumbs)
- Oil for deep frying
- Tonkatsu sauce or katsu sauce (homemade or store-bought)
As you can see, most of the ingredients for chicken katsu are common ingredients and you can access them fairly easily wherever you are.
Overview: Cooking Steps
- Butterfly chicken and season with salt and pepper.
- Coat the chicken with flour, egg, and panko.
- Deep fry until golden brown and serve with tonkatsu sauce.
Even with deep frying, it’s really an easy 3-step process! For those who are looking for oven-baked method, please scroll down for the link.
6 Important Tips for Making Chicken Katsu
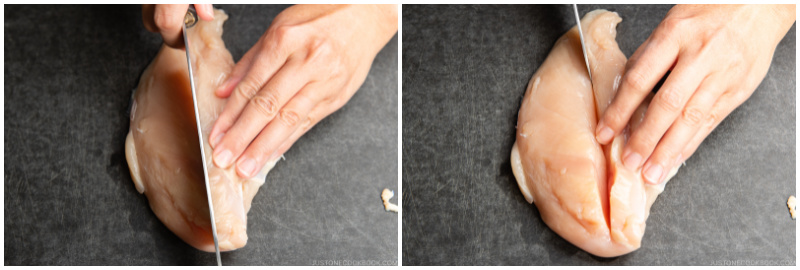
Tip #1: Butterfly the chicken
The thickest part of a chicken breast can be close to 1 inch (2.5 cm) thick and it is very hard to cook through.
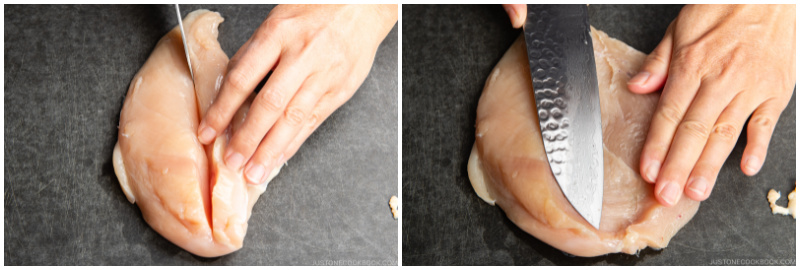
Therefore, we butterfly the chicken breast by splitting it horizontally, stopping before you cut all the way through it, and opening it like a book. When you open the breast, it has two matching sides, resembling a butterfly.
For Japanese cooking, we butterfly it to the left and right sides to make it even, similar to a French door. We call this cutting technique Kannon Biraki (観音開き).
If you have younger children, you can also cut the chicken into bite-size pieces. Interestingly, we do not cut the pork into small pieces, but many Japanese home cooks cut the chicken into bite-size pieces.
To cut into smaller pieces, we use another cutting technique called Sogigiri (そぎ切り) instead of butterflying. You would hold the knife in an angle, nearly parallel to the cutting board, and then slice the chicken. This method will flatten the piece and give the chicken more surface area so that it cooks faster and evenly.
Lastly, remember that we eat chicken katsu with chopsticks. Make sure you cut into smaller pieces either before or after frying so you don’t have to cut at the table.
Tip #2: Add oil to the egg
Adding a small amount of oil to the egg mixture helps adhere the meat to both flour and panko. Some people add water or milk to loosen the thick egg mixture, but a bit of oil also loosens the egg mixture while doing the trick.
Tip #3: Get Japanese panko breadcrumbs
Regular breadcrumbs are VERY different from panko, so I won’t recommend it.
Panko (パン粉) is Japanese breadcrumbs that are lighter and crispier. It is the secret to ultra-crunchy katsu and yields the kind of crust that you can actually hear when you take a bite into it. No regular breadcrumbs can beat that!
Tip #4: Remove excess flour and panko
Dust off excess flour when you coat the chicken breast with flour. The excess flour can be the reason why breading comes off easily from your meat.
You may like the panko texture and want to put more onto chicken katsu. I used to think that too when I was 10 years old while helping my mom. She told me all the excess panko would end up just falling off into the oil, and I didn’t believe it (as I wasn’t the one who did the deep-frying). But, cooking is science—more doesn’t necessary work. You would end up scooping up all those additional panko crumbs from the hot oil. It’s not worth it. Gently press the panko down with your hand, and if some panko falls off, let them go.
We’ll focus on deep frying tips later.
Tip #5: Use Tonkatsu sauce for Japanese katsu
The sauce that comes with Chicken Katsu and Tonkatsu is called So-su (ソース; “Sauce”). When we say So-su or “sauce” in Japan, it refers to Tonkatsu Sauce (とんかつソース), which is a thicker and sweeter version of Worcestershire sauce.
With a tangy and complex taste from the vegetables and fruits, Tonkatsu sauce makes it the best condiment to enjoy with Japanese deep-fried dishes. You’ll also find tonkatsu sauce being served with Korokke.
It’s not common to make this sauce from scratch at home since it requires many hours of cooking fruits and vegetables. We usually buy Tonkatsu sauce from the store, and the most popular brand is Bulldog brand Tonkatsu sauce.
For those of you who have no access to Tonkatsu Sauce, I tried my best to make Homemade Tonkatsu Sauce using available common condiments.
Tip #6: Prepare shredded cabbage salad
The majority of panko-breaded fried foods (Tonkatsu, Ebi Fry, Korokke, etc) in Japan are served with a side of thinly shredded cabbage. You can use a sharp knife to cut into thin slices, but my mom introduced me to this awesome cabbage slicer and it’s amazing how this mandoline slicer can create such a fluffy shredded cabbage!
You can drizzle tonkatsu sauce over the cabbage or use your favorite salad dressing. I almost always use Japanese sesame dressing as it’s mild and creamy, which counterbalances the tonkatsu sauce.
3 Tips for Deep Frying
First, let me say that deep-frying is not as intimidating as it seems. Once you get the technique down, you’d be frying up more delicious katsu meals that win the hearts of every picky eater. That’s why every Japanese home cook embraces deep-frying!
Here are the 3 tips you need to know about frying these crisp, juicy chicken cutlets at home.
- Use a medium-size pot (that fits the chicken) instead of a large pot or pan. The key is to have at least 1.5 inches (3.8 cm) of oil for frying. If you use a large pot/pan, you will need more oil to achieve 1 inch in depth. I use a 2.75-QT STAUB Cast Iron Round Cocotte (8 inches or 20 cm in diameter).
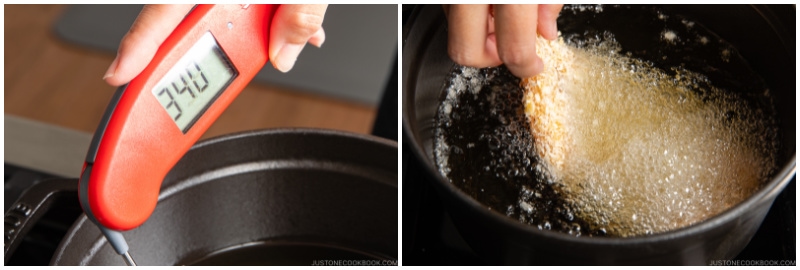
- Use a kitchen thermometer to check the oil temperature. I always recommend this instant-read thermometer. If you are new to deep-frying, it’s best to use a kitchen thermometer than doing the guesswork yourself which may not get an accurate result. The optimal oil temperature for chicken katsu is 340 ºF (170 ºC).
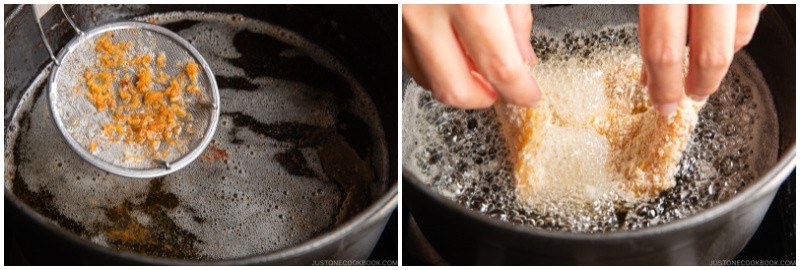
- Pick up crumbs frequently and I can’t stress enough how important this is. Fallen breadcrumbs in the oil will keep getting burned and turn your oil dark and dirty if you don’t pick them up.
If you want to learn more about deep-frying, such as how to throw away oil or what kind of tool is helpful, please read the How to Deep-Fry page where I explain in detail.
Deep-fried food can be tricky, but if you do it right the food actually tastes light and not greasy at all. It takes practice to become comfortable with deep frying, but it’s a good skill to have for broadening your cooking options.
Great Meal Prep Menu!
Did you know that chicken katsu is perfect for making ahead and freezing? Yes, that’s what I love about it. You can enjoy the cutlet as it is, but it is also a versatile dish that you can transfer into:
- Chicken Katsu Curry
- Katsudon
- Chicken Katsu Sando Sandwich
- Chicken Katsu Onigirazu
- Make fried rice with a few leftover pieces (my childhood favorite!)
- Put in a bento box
How long does chicken katsu keep?
Chicken katsu will keep in an airtight container in the refrigerator for 2-3 days. The only way to make the breaded chicken crispy again is to put it in the oven or toaster oven to reheat. Do not use the microwave to reheat.
Can you freeze chicken katsu?
I always double the recipe and freeze the extra for kids’ lunch or another meal. After deep-frying the chicken, let cool completely before storing it in the airtight container to freeze.
When you are ready to serve, reheat the frozen chicken katsu on a baking sheet at preheated 350 ºF (176 ºC) for 15-20 minutes, then serve with Tonkatsu sauce.
Can I Bake Chicken Katsu?
Yes! For those of you who still prefer to keep your kitchen oil-free, you can bake your chicken katsu in the oven.
My method for Baked Chicken Katsu recipe is to pre-toast the panko ahead of time. This way, the panko is nicely brown and crispy to start. Your baked chicken katsu will look like a deep-fried version, and the outer layer is light and crispy.
Many JOC readers have tried my Baked Tonkatsu, Baked Chicken Katsu, and Baked Croquette recipes, so do check them out if you prefer baking, instead of deep-frying.
Both deep-fried and baked versions are equally delicious, and I use both methods often.
Wish to learn more about Japanese cooking? Sign up for our free newsletter to receive cooking tips & recipe updates! And stay in touch with me on Facebook, Pinterest, YouTube, and Instagram.
Chicken Katsu
Video
Ingredients
- 1 piece boneless, skinless chicken breast (9.5 oz, 270 g; or use the same weight of chicken thighs or tenders)
- ½ tsp Diamond Crystal kosher salt
- ⅛ tsp freshly ground black pepper
- 3 cups neutral oil (for deep-frying; enough for 1½ inches (3.8 cm) of oil in the pot)
- 3 Tbsp all-purpose flour (plain flour)
- 1 cup panko (Japanese breadcrumbs)
- 1 large egg (50 g each w/o shell)
- ½ Tbsp neutral oil (for the egg)
For Serving
- tonkatsu sauce (or make my Homemade Tonkatsu Sauce)
- shredded green cabbage (optional)
- Japanese Sesame Dressing (optional)
- tomato (optional)
Instructions
Before You Start
- If you prefer not to deep-fry, see my recipe for Baked Chicken Katsu.

- Gather all the ingredients.

To Butterfly the Chicken
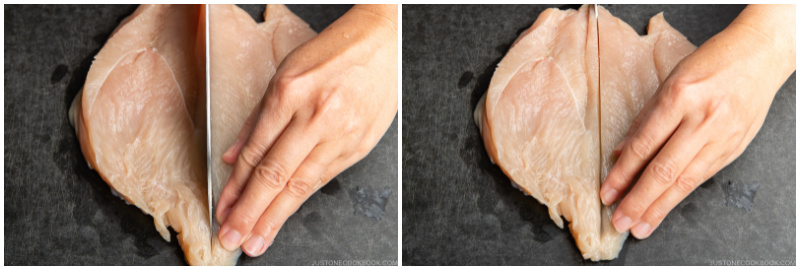
- Butterfly the chicken breast so the meat is thinner and cooks faster; read more details in my blog post. To butterfly the chicken breast, split it horizontally from the side (stopping before you cut all the way through it) and open it like a book. When you open the breast, the two sides will mirror each other, resembling a butterfly (see how in my video). Here, I‘d also like to demonstrate the Japanese cutting technique Kannon biraki (観音開き) to butterfly the chicken breast. With a sharp knife, score the middle of 1 piece boneless, skinless chicken breast from the top about halfway through the thickness of the breast; do not cut completely through.

- Then, turn the knife parallel to the cutting board and slice the chicken from the center toward the left side (or the right side, if you‘re left-handed) to make it evenly thin. Stop before you cut all the way through it, and open it like a book. Imagine we‘re creating a French door here.
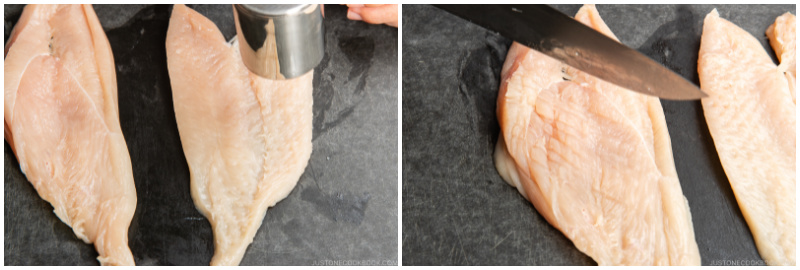
- Turn the chicken 180 degrees and butterfly the second side from the center toward the left, creating another “door.“
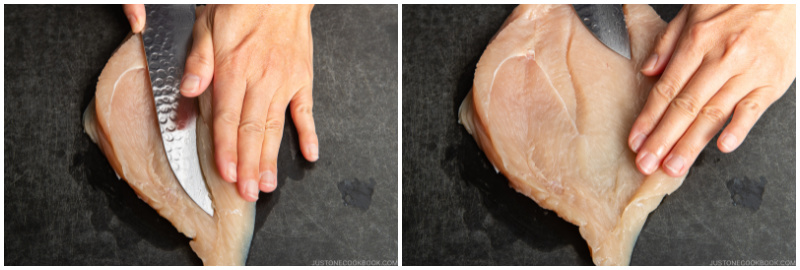
- Cut the chicken in half down the center. Now you have two pieces.
- With a meat mallet or the back of the knife, pound the chicken to an even thickness, about ¼ to ½ inch (6 mm to 1.3 cm).
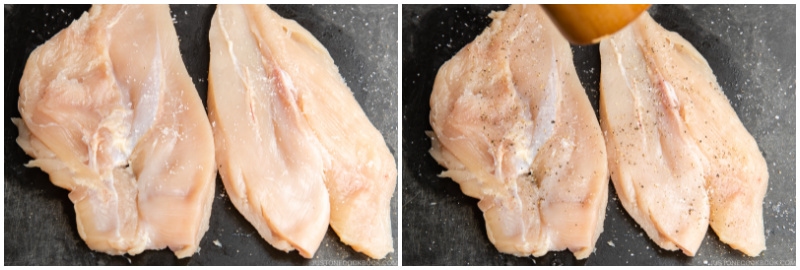
- Season both sides of the chicken with ½ tsp Diamond Crystal kosher salt and ⅛ tsp freshly ground black pepper.
To Heat the Oil and Bread the Chicken
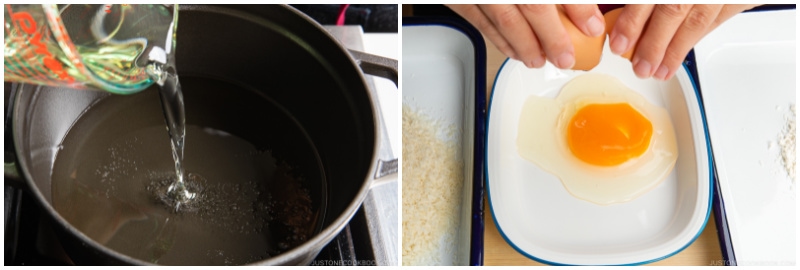
- Add 3 cups neutral oil to a medium-size, heavy-bottomed pot (I use a Staub 2.75 QT Dutch oven, 11 inches in diameter). Add enough oil so it is 1½ inches (3.8 cm) deep in the pot; dip a chopstick in the oil to measure. If you use a large pot, you will need to add more oil to get it 1½ inches deep. Start heating the oil to 340ºF (170ºC) over medium-low heat (or low heat, if you need more time to bread the chicken). For the breading, prepare three bowls or trays: One with 3 Tbsp all-purpose flour (plain flour), one with 1 cup panko (Japanese breadcrumbs), and one with 1 large egg (50 g each w/o shell).
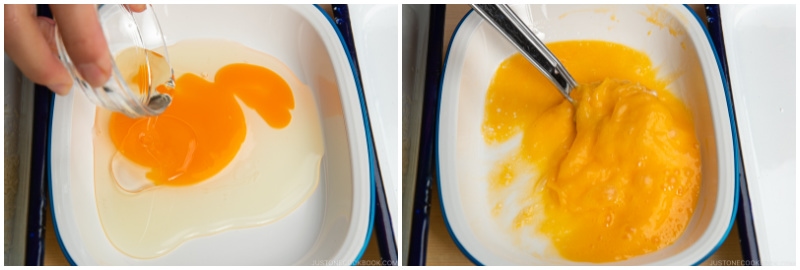
- Add ½ Tbsp neutral oil to the egg and whisk it together. Tip: By adding oil, the meat and breading won’t detach from each other while cooking and the juice and flavor from the meat will not escape easily.
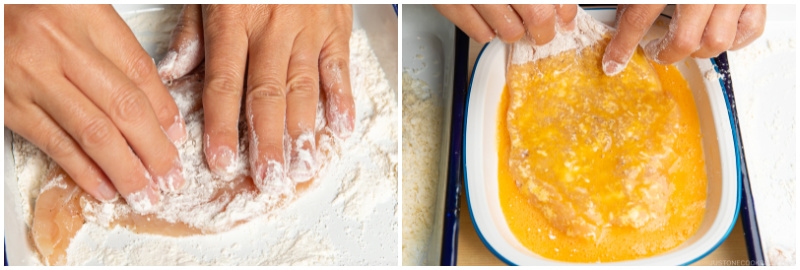
- Coat the chicken with the flour and shake off any excess. Then, coat it with the beaten egg.
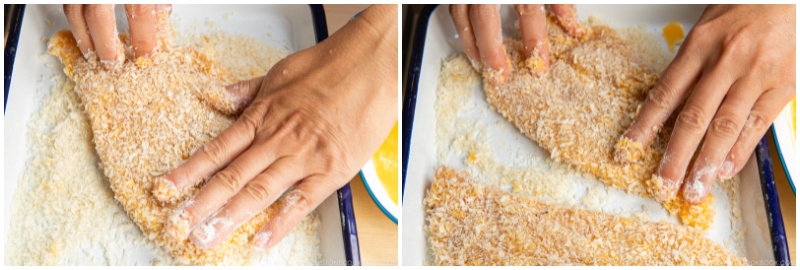
- Finally, coat the chicken with the panko, pressing the panko into the cutlet so that it adheres well. Remove any excess. Repeat with the remaining chicken piece.
To Deep-Fry
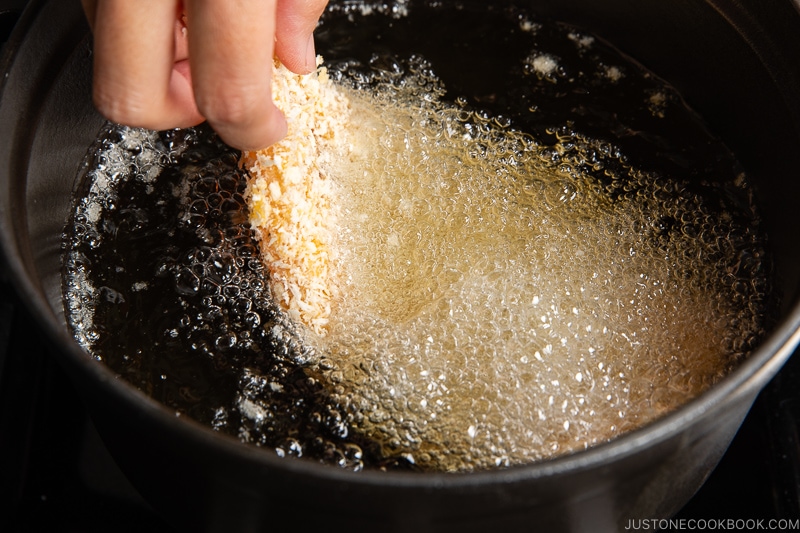
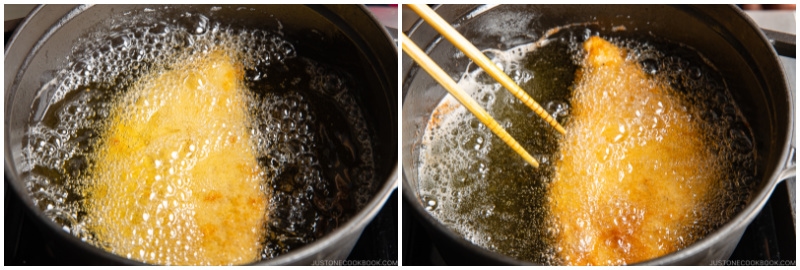
- If you are new to deep-frying, read my How to Deep Fry Food page and get an instant-read thermometer to check the oil temperature. Heat the oil to 340ºF (170ºC). I use medium heat throughout deep-frying, but please increase or decrease the heat to maintain the target oil temperature.
- When, the oil is at the correct temperature, add one piece of breaded chicken. Fry one piece at a time. Deep-fry for a total of 3 minutes, turning the chicken once at the halfway point. Tip: Do not overcrowd the pot. Remember, your ingredients should take up no more than about half of the oil surface area at any one time. If you add too much food at once, the temperature of the oil will drop quickly and the chicken will absorb too much oil.
- Deep-fry until both sides are golden brown. Remove the cutlet from the oil and hold it vertically over the pot for a few seconds to drain the excess oil. Then, transfer it to a wire rack or paper towel-lined tray. If possible, keep it on its side to drain the excess oil.
- Collect all the crumbs in the oil with a fine-mesh skimmer before you add the next piece of chicken. If you don’t clean up these crumbs, they will burn and the oil will get darker. Make sure to keep the oil clean throughout deep-frying.

To Serve
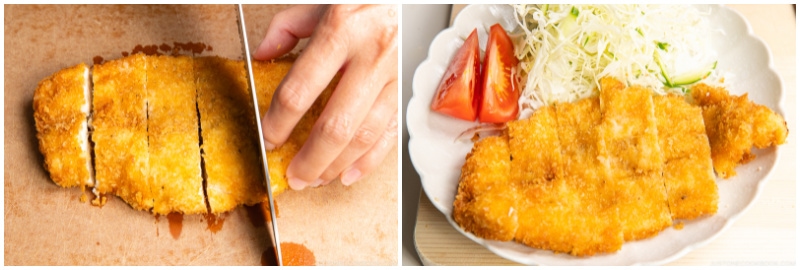
- Cut the chicken into 1-inch (2.5 cm) pieces and serve it with tonkatsu sauce. Typically, I serve Chicken Katsu with a side of shredded green cabbage and my Japanese Sesame Dressing. I also add a few wedges of tomato for color.
To Store
- You can store the leftovers in an airtight container and store them in the refrigerator for up to 2 days or in the freezer for up to a month. To reheat, bake at 350ºF (180ºC) for 15–20 minutes for chicken katsu that was thawed in the refrigerator overnight, or for 30 minutes if heating directly from frozen. Check that the inside is warm before serving.
Nutrition
Editor’s Note: The post was originally published on November 6, 2012. The post has been updated with new images, a new video, and a revised recipe in November 2021.


I really want to try making this, but one thing that often prevents me from making recipes like this (or tempura, or karaage) is being unsure what to do with the oil after. Do you save it and reuse? Use fresh oil every time?
I also struggle with how to dispose of used cooking oil!
Hello, Chelle! Thank you for reading Nami’s post and trying her recipe.🤗
This is the page where you’ll learn more about oil and deep-frying. We hope this helps!
https://www.justonecookbook.com/how-to-deep-fry-food/
Love this recipe and our family has been using it since we first found it a year ago! We’ve found that using that bit of oil in the eggs really does help! (Though, I’ve always wondered WHY the oil works so well.)
Hi, Camille! Thank you for trying Nami’s recipe and for your kind feedback!
Oil works well because it breaks down the protein in the yolk and mixes with the fat in the yolk, making it easier to blend with the white and making the egg mixture creamy! As a result, when you fry foods using this egg mixture, the coating will not peel off easily, allowing you to prepare beautiful fried food. We hope this helps!
Instead of deep fry, would a shallow fry in a skillet work?
Hi, Sandy! Yes. If the oil is enough to cover the meat piece, it will be OK.
Thank you very much for trying Nami’s recipe!😊
This recipe was amazing! I have never deep fried before, but this still turned out crispy and delicious. I also made the Tonkatsu sauce, which was equally great.
Hi, Seraphina! Thank you very much for trying Nami’s recipe!
We are delighted to hear that you loved your first deep-fried chicken Katsu!
You may have already checked out this link for deep-frying tips, but we’d like to share it in case you missed it. We hope you found this helpful.🤗
https://www.justonecookbook.com/how-to-deep-fry-food/
excellent recipe, my chicken katsu turned out super crispy! thanks Nami
Hi Irs! Awesome! Thank you so much for trying Nami’s recipe and for your kind feedback!
Nami and the rest of us are happy to see a five-star rating! 🥰 Thank you so much!
I love this recipe! When packing it for bento how do I prevent the breading from becoming soft and soggy?
Hello Shirley, Thank you so much for trying Nami’s recipe and for your kind feedback.
When packing it for a bento, it’s best to ensure that all the ingredients have cooled down so that the Katsu doesn’t become soggy.
However, it’s important to note that most fried or baked foods tend to become a bit soggy over time.😉
I made the chicken Katsu and homemade Tonkatsu Sauce tonight for dinner. It was so easy and absolutely delicious. I will definitely be making it again!
Hi Jennifer! Thank you so much for trying Nami’s recipes and for your kind feedback!
We are so happy to hear you enjoyed the Katsu with homemade sauce!! ☺️
I made chicken katsu with this recipe and it turned out wonderful! What I was wondering is is there a particular reason this recipe tells you to do the breading in an atypical order? Normally you put on flour that sticks to the chicken, then dip it into egg that sticks to the floured chicken (much better than to non-floured without need for oil) and then dunk it into breadcrumbs that stick to the egg. I checked a couple other chicken katsu recipes and they used the normal method, so I did the same (I was going to try the way described here, but my professional training didn’t let me in the end), but I got really curious if there’s a “proper explanation”.
Hi Alli, Thank you so much for trying Nami’s recipe. We are so happy to hear it turned out well and that you enjoyed it.
We dredge the chicken with flour to remove excess moisture and then dip it into an egg, which acts like glue with flour and helps the Panko stick better. We followed the same steps when making Korokke as well.
We hope this was helpful!
Excellent recipe! Homemade tonkatsu sauce is spot on. I made the mistake of (not following the recipe) blending the sesame dressing in a blender instead of whisking it together, so it was a bit thicker, but the flavor is nice.
Hi Danni! We are glad to hear that you enjoyed the Chicken Katsu with homemade tonkatsu sauce!
Thank you so much for trying Nami’s recipe and for your kind feedback. Happy Cooking!
At the end of the video there is a small jar of sauce (not the salad dressing) in the corner. What is that? I thought it was the tonkatsu sauce but you poor that directly out of bottle.
Hi Gees, Thank you for trying Nami’s recipe!
The bottled sauce is Tonkatsu sauce, as shown in the ingredient photo on the recipe card.
We hope this helps!
My wife would say that shredded cabbage is not optional, it’s required. I took a shot and made it for dinner to surprise her, but before she would eat it she went into the kitchen and shredded the white cabbage which is s staple in our house.
Hi Glenn! Hahahaha. She is right! In Japan, we always serve Katsu with shredded cabbage!
Thank you for trying Nami’s recipe and for your feedback!💞
Instead of oil I put mayonnaise in the eggs. About one Tbsp.
Hi holimakaru! Thank you for trying Nami’s recipe and sharing your experience with us!
Mayonnaise should work well too!🤩
Dear Nami,
Thanks so much for the Chicken Katsu. I made this and it is delicious, I used Chicken thighs.
Will make more next time and add in with my salad for protein.
Hi Eileen! Thank you very much for trying Nami’s recipe and sharing your cooking experience with us!
Nami and JOC team are so happy to hear you enjoyed Chicken Katsu!😊
Is it possible to air fry this?
Hi Virginie, Thank you for reading Nami’s post!
We have never used an air fryer with this recipe and are not sure how the outcome will be.
It might be successful using a baked chicken katsu for air frier: https://www.justonecookbook.com/crispy-baked-chicken/
Let us know how it goes!
Hi Naomi and Virginie,
After trying and loving this Chicken Katsu dish, we did an experiment where we tried Nami’s recipe for Baked Chicken Katsu. We baked half, and air fried half. Both came out lovely and actually couldn’t tell a difference between the two! We were also using gluten free panko. I hope this helps!
Hi Christina! Awesome! Thank you very much for experimenting and sharing your experience with us! 🤩
I like to make this – it is delicious. I use chicken thighs as I find chicken breast can sometimes be a bit dry. Also instead of deep frying I usually shallow fry in about 0.5 to 1 cm oil – as long as it is hot when the chicken goes in it doesn’t go soggy – I fry for about 5 min each side. Going to do a double batch next time and freeze some – didn’t realise you could freeze it.