My Chicken Katsudon (Chicken Cutlet Rice Bowl) is a comforting lunch enjoyed by all ages in Japan. In this easy recipe, I use chicken tenders to make the crispy breaded katsu (cutlets), then quickly simmer them with eggs in a savory and sweet sauce. Served over a bowl of hot Japanese rice, it‘s a satisfying and delicious meal that your family will love.
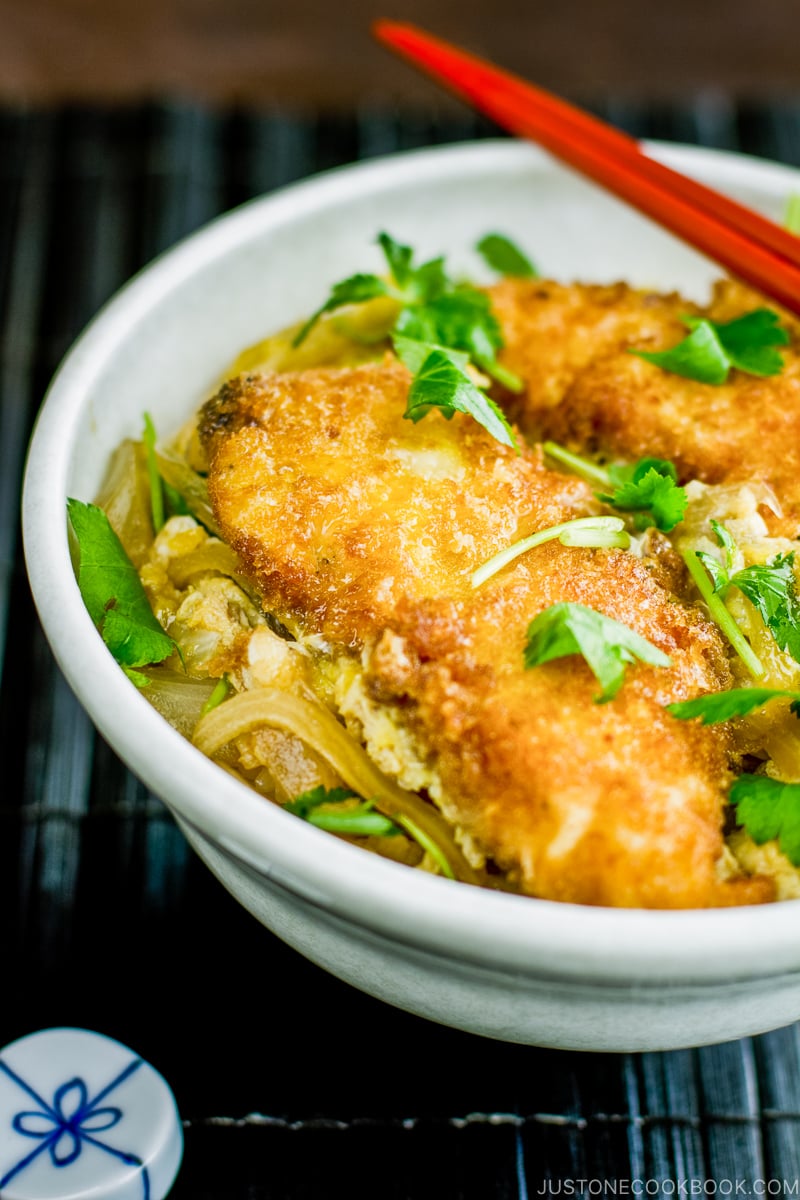
Today’s recipe Chicken Katsudon (チキンカツ丼) might “look” time-consuming but it’s actually not. It’s perfect for a busy day. I usually serve this dish with a bowl of miso soup and a small salad. Because it is served in a donburi (rice bowl) style, katsudon makes a balanced meal that is fulfilling.
A more typical Katsudon is served with Tonkatsu (deep-fried pork cutlet). Chicken Katsudon is also a favorite, especially with the children. It’s a popular lunch dish in Japan and you can find it on the menu at every corner of shops, cafeterias, and restaurants.
My mom always makes Chicken Katsu with chicken tenders so that’s how I make it, but you can use chicken breasts or thighs. If you use chicken breasts, make sure to cut each piece thin so it will cook faster (Here’s the basic cutting technique to cut breasts thin).
Shallow Fry instead of Deep Fry the Chicken Katsu
When it comes to home cooking, I know most of you try to avoid deep frying as much as possible. For this recipe, I apply the shallow frying technique instead of deep-frying to prepare the chicken katsu. It uses less oil and creates less mess on the kitchen counter. The chicken will brown beautifully with a crispy char on the surface and tender inside.
Alternatively, you can prepare the chicken using the oven with my Baked Chicken Katsu (揚げないチキンカツ) recipe.
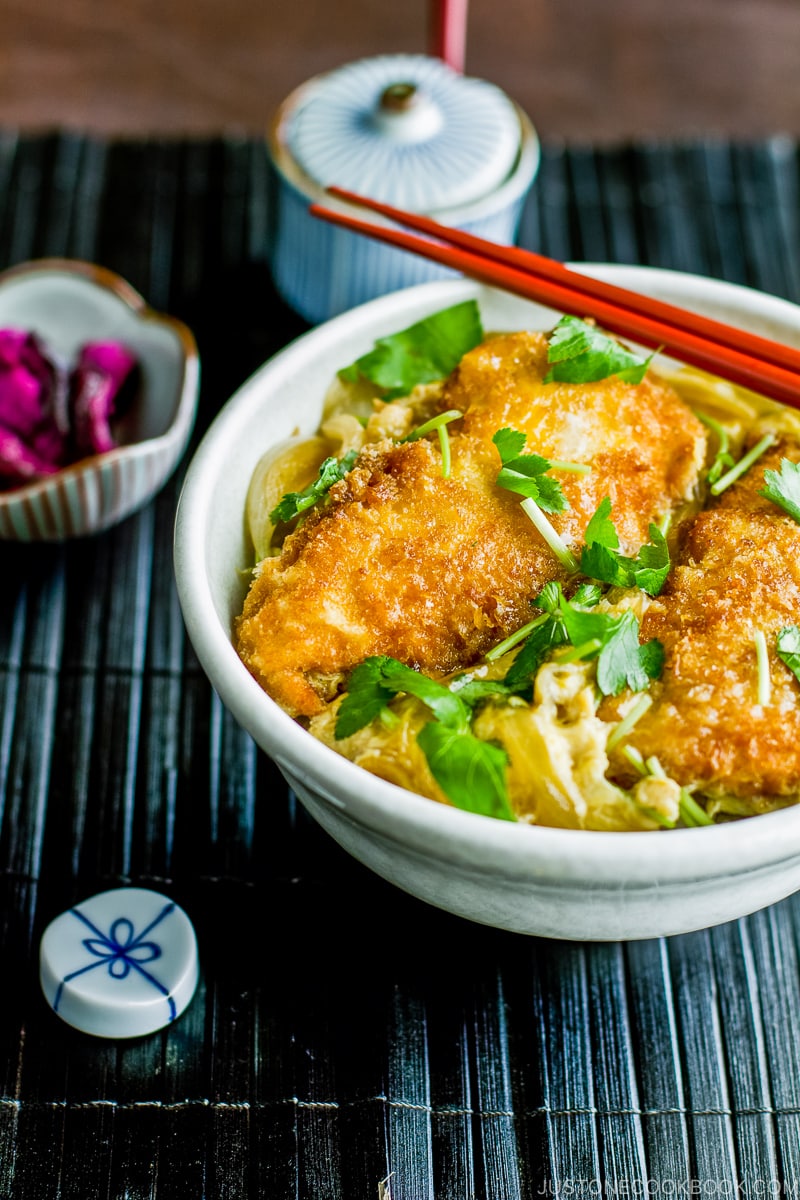
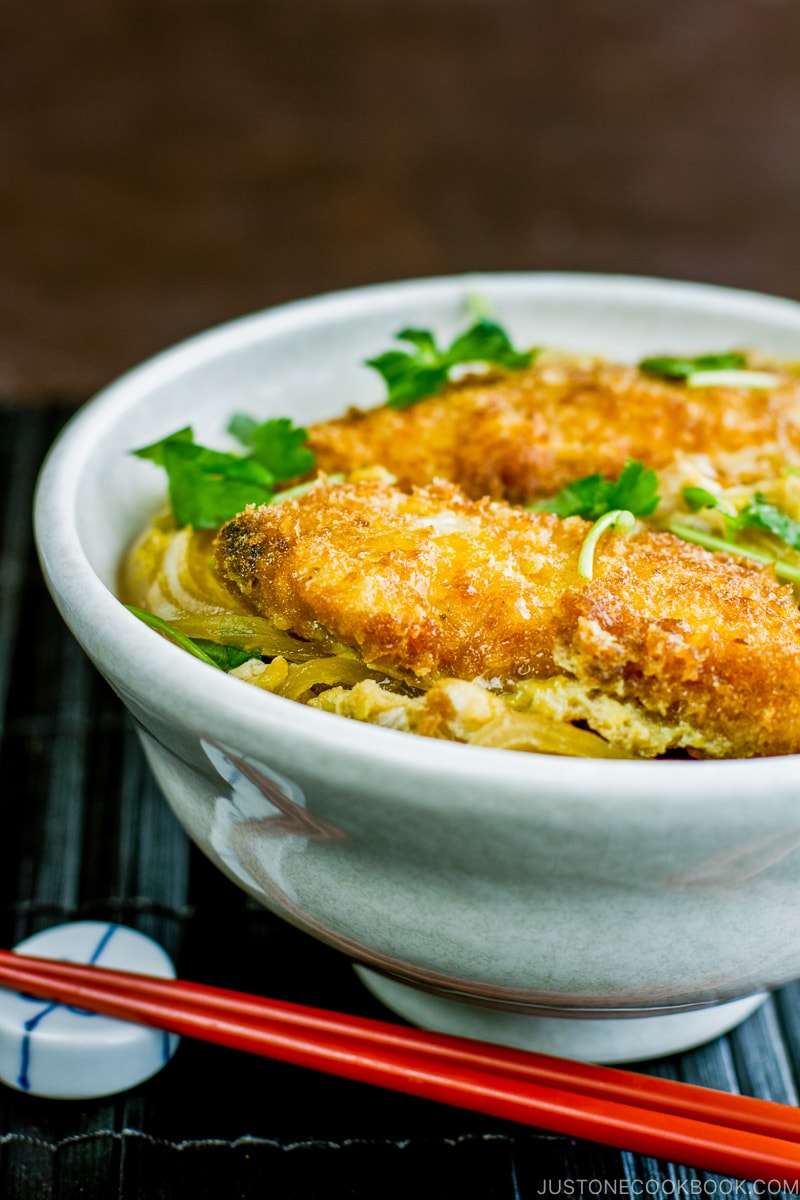
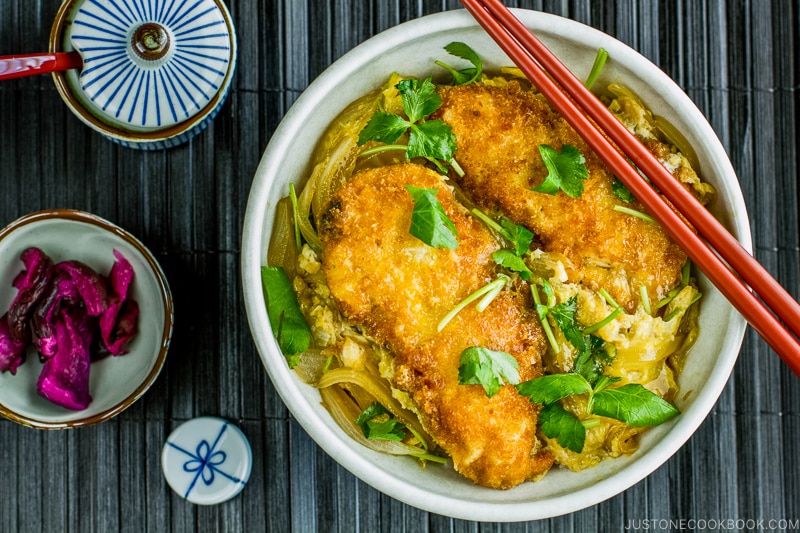
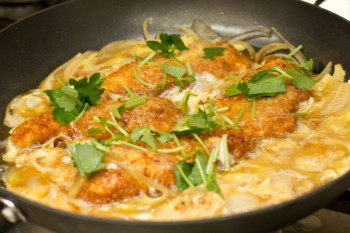
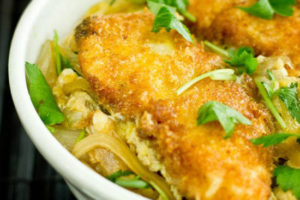
To enjoy Chicken Katsudon, serve the golden fried chicken cutlet with savory-sweet onions cooked in dashi and eggs over hot steamed rice in a bowl. Top it off with mitsuba (Japanese wild parsley), and you will have a satisfying meal for the family.
Wish to learn more about Japanese cooking? Sign up for our free newsletter to receive cooking tips & recipe updates! And stay in touch with me on Facebook, Pinterest, YouTube, and Instagram.

Chicken Katsudon
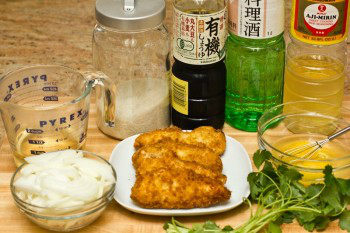
Ingredients
For the Chicken Katsu
- ¼ cup all-purpose flour (plain flour)
- 1 large egg (50 g each w/o shell) (beaten)
- 1 cup panko (Japanese breadcrumbs)
- 7 oz chicken tenders (4 tenders)
- Diamond Crystal kosher salt
- freshly ground black pepper
- 3 cups neutral oil (for frying)
For the Seasonings
- ⅔ cup dashi (Japanese soup stock) (use standard Awase Dashi, dashi packet or powder, or Vegan Dashi)
- 1½ Tbsp sake
- 1½ Tbsp mirin
- 1½ Tbsp soy sauce
- 1½ tsp sugar
For the Katsudon
- ½ onion (4 oz, 113 g; thinly sliced)
- 2 large eggs (50 g each w/o shell) (“cut“ the egg whites 5–6 times into smaller clumps so the yolks and whites are marbled; do not whisk or beat)
- 2 servings cooked Japanese short-grain rice (typically 1⅔ cups (250 g) per donburi serving)
- 4 sprigs mitsuba (Japanese parsley) (chopped; or substitute green onion)
- ichimi togarashi (Japanese chili pepper) (for a spicy kick)
Instructions
- Before You Start: Gather all the ingredients. For the steamed rice, please note that 1½ cups (300 g, 2 rice cooker cups) of uncooked Japanese short-grain rice yield 4⅓ cups (660 g) of cooked rice, enough for 2 donburi servings (3⅓ cups, 500 g). See how to cook short-grain rice with a rice cooker, pot over the stove, Instant Pot, or donabe.

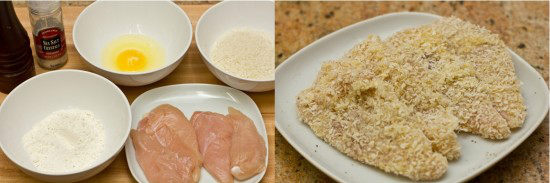
To Make the Chicken Katsu
- Place ¼ cup all-purpose flour (plain flour), 1 large egg (50 g each w/o shell) beaten, and 1 cup panko (Japanese breadcrumbs) in individual bowls or plates. Next, season 7 oz chicken tenders with Diamond Crystal kosher salt and freshly ground black pepper. To bread the chicken, dust each piece with the flour and shake off any excess. Then, dip it into the beaten egg to coat completely. Finally, coat the chicken with the panko, pressing the panko into the cutlet so that it adheres well. Remove any excess. Set the breaded cutlets on a plate.

- Heat 3 cups neutral oil in a frying pan. Shallow-fry the panko-coated chicken at 340ºF (170ºC) until golden brown. Remove the chicken and place it on a wire rack or plate lined with paper towels to drain the extra oil.

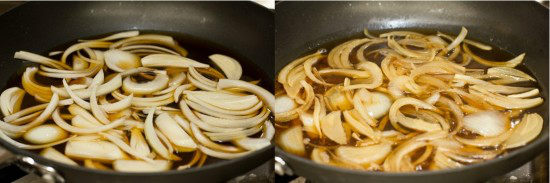
To Make the Katsudon
- In another (or a clean) frying pan, add thin slices of ½ onion and all the ingredients for the seasonings—⅔ cup dashi (Japanese soup stock), 1½ Tbsp sake, 1½ Tbsp mirin, 1½ Tbsp soy sauce, and 1½ tsp sugar. Cover and bring it to a boil over medium heat. Once boiling, lower the heat to medium low and cook the onion, covered, until wilted.
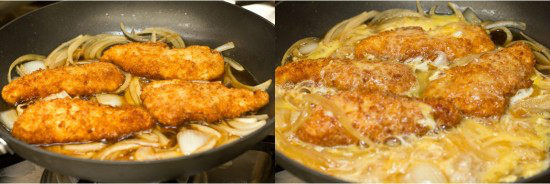
- Place the chicken katsu on top of the onion slices and turn the heat up to medium. While you‘re waiting for it to heat up, prepare the eggs by lightly “cutting“ the egg whites with chopsticks 5–6 times into smaller clumps so the yolks and whites are marbled (do not whisk or beat). Once the cooking liquid is simmering, evenly distribute 2 large eggs (50 g each w/o shell) over the chicken katsu and onion in a circular pattern, avoiding the edges of the pan where the egg can easily overcook. Cover to cook until the eggs are set to your liking, roughly 30 seconds. Tip: For more tips and tricks for "cutting" and cooking the eggs, see my Oyakodon recipe.

- Top with the chopped 4 sprigs mitsuba (Japanese parsley) and turn off the heat. Divide 2 servings cooked Japanese short-grain rice into individual bowls. Gently transfer the simmered katsu and eggs on top of the steamed rice. Sprinkle the top with ichimi togarashi (Japanese chili pepper) for a spicy kick. Enjoy!
To Store
- You can keep the leftovers in an airtight container and store in the refrigerator for up to 3 days or in the freezer for a month.


Hi, can this recipe work in an air fryer? Excited to try it!
Hello, S Jain. Thank you for taking the time to read Nami’s post and try her recipe!
We haven’t tried making the Chicken Katsu in an air fryer, but it should work if you follow the baked chicken Katsu recipe.
Otherwise, you may need to spray the panko liberally with oil before cooking it in an air fryer.
We hope this helps! Baked Chicken Katsu recipe: https://www.justonecookbook.com/gluten-free-baked-chicken-katsu/
I use a scale to weigh food I eat at restaurants. Of all the recipes I found online, yours most resembles what I saw at the restaurant. The problem is, I don’t know how big a “serving” is (by weight in grams). Do you think you could approximate the weight of a serving? Thank you very much.
Hi Jack! Thank you for reading Nami’s post!
Our nutrition information is by servings, and this recipe makes 2 servings.
If you use Metric measurement (Click the box “Metric” next to the ingredient list), you can see the ingredient weight by scale.
One serving of rice is about 150g, and adding the rest of the ingredient weight and dividing it by servings number (2) would be the approximate weight for serving!
We hope this helps!
Hi! You don’t need to saute the onion anymore? Just cook in the dashi broth? Thanj you! I’ll be trying this recipe soon.
Hi Maui, Thank you for trying Nami’s recipe!
Yes. For this recipe, you do not need to saute the onion.🙂 We hope you enjoy Chicken Katsudon!
Hi Nami!
I tried your Baked Tonkatsu recipe and it came out so good!! I was wondering if I can do the same for this chicken katsu, bake it instead of frying it?
Thank you!!
Hi Nini,
Nami has a Baked Chicken Katsu recipe!
https://www.justonecookbook.com/crispy-baked-chicken/
We hope this is helpful, and you can enjoy this Chicken Katsudon with baked version Katsu!
Delicious recipe, family loved it, will definately be making again although I think we will add chicken after the egg next time for a bit more crunch.
Hi Lesley,
Thank you so much for trying this recipe and for your kind feedback. We’re so glad to hear you and your family enjoyed the dish!
Thank you for sharing your cooking experience with us!
Thank you for this recipe! It was delicious. I think one area where it got confusing is the use of dashi. There is no explanation on how much for those using dashi powder. I think that’s why people commented that this recipe was salty because they thought they needed 2/3 cup of dashi powder rather than dilute it in water. I was using a dashi powder which came in packets of 5 g. I used half- 3/4 of one packet to make 2/3 cup of dashi as recipe asks for. I boiled it in a small pot. Hope this is helpful for those.
Hi Koreancook! I encourage people to make their own dashi either from scratch or with dashi packet, and to avoid dashi powder on my blog, hence I don’t provide the dashi powder info (but in the ingredient list, I mentioned to click “dashi” to get more info so I covered this topic there). I truely believe a dish like this one makes a huge difference in the final result when you use good dashi.
For 2/3 cup dashi, you will need a bit less than 1/2 tsp dashi or so but it also depends on dashi powder brand. (For the MSG-free one I used, I used 1/2 tsp (3 g) for 1 cup; https://www.justonecookbook.com/dashi-powder/)
I think the commenter who added 2/3 cup dashi powder is a rare case… I was a bit shocked…😅
I have make adjustments to to sauce as we cannot have alcohol. I used chicken with a fish sauce and a bit extra sugar.
My grandkids ate this for the first time and they loved it.
Hi Chez! Thank you so much for trying this recipe with your adjustment. I’m glad your grandchildren enjoyed the recipe! 🙂
I made this recipe for my family this morning. The kids and adults in my household enjoyed it. It was so darn yummy!
My husband and I have traveled to Japan and have had our share of katsudon. It’s also a dish we have tried at several of the best Japanese restaurants here in SD.
This is hands down the BEST katsudon we have ever had.
Hi Ana! I’m so happy to hear you enjoyed this recipe. Thank you for trying it and for your kind feedback! xo 🙂
I usually never leave comment, but I just had to thank you for this amazing recipe! The meat was super crispy and tender and the sauce had so much flavour even though it seemed so simple. I had it on the table in an instant and me and my family enjoyed it so much. I will never need another Katsudon recipe again!
Hi Tessa! Aww thank you so much for your kind feedback. I’m really happy to hear your family enjoyed this recipe! Thank you for trying my recipe. 🙂 xo
Made this last night – awesome!
Hi Mari! Thank you so much for trying this recipe! I’m glad you enjoyed it!
hi- i don’t have ichimi togarashi, but have shichimi. i was thinking of using that instead, here?
thanks,
mare
Hi Mari! That’s a good one to use! 🙂