Let’s make fresh and tender Gyoza Wrappers from scratch! All you need is salt, water, and flour. That’s it! Watch the video tutorial and enjoy the fun and rewarding process.
Gyoza wrappers are not something that I used to make from scratch. While everything homemade is best in an ideal world, who has the time when you can easily buy them from Asian grocery stores?
It wasn’t until I took upon the challenge of making homemade gyoza wrappers that I realized it wasn’t as daunting and difficult as I’d thought. You need only salt, water, and flour! The experience is so rewarding that I know you’ll enjoy learning how to make gyoza wrappers from scratch, too.
Table of Contents
What Are Gyoza Wrappers?
Gyoza wrappers are a thin and round flour pastry that wraps around the filling of gyoza or Japanese potstickers. The dough is made of wheat flour, water, and a pinch of salt. They get crispy when pan-fried or deep-fried and become soft and tender when boiled, just like wonton wrappers.
Japanese gyoza dumplings are very similar to Chinese potstickers. The main differences are in the size and thickness of the wrappers. Chinese potstickers are larger, so the skins are typically thicker than gyoza skins.
Ingredients You’ll Need
- all-purpose flour – or use half bread flour + half cake flour; be sure to weigh your flour for the best results, or use the “fluff and sprinkle“ method and level it off
- kosher salt
- hot water – use just-boiled water
- potato starch (cornstarch) – for rolling and dusting
How To Make Gyoza Wrappers
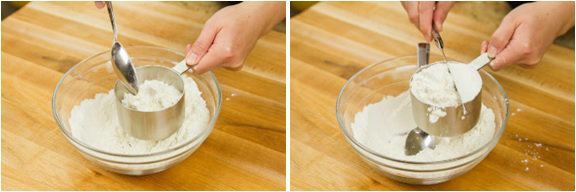
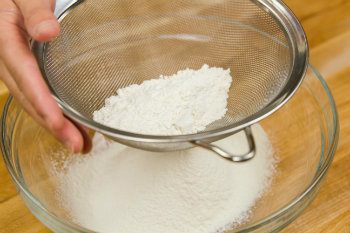
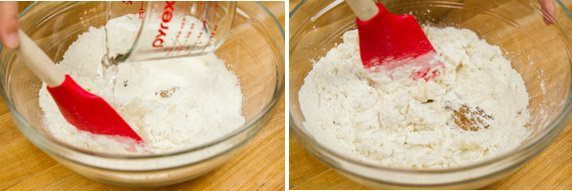
- Mix all the ingredients with a rubber spatula in a large bowl.
- Knead the dough for 10 minutes, shape it into logs, wrap in plastic wrap, and rest for 30 minutes on the counter.
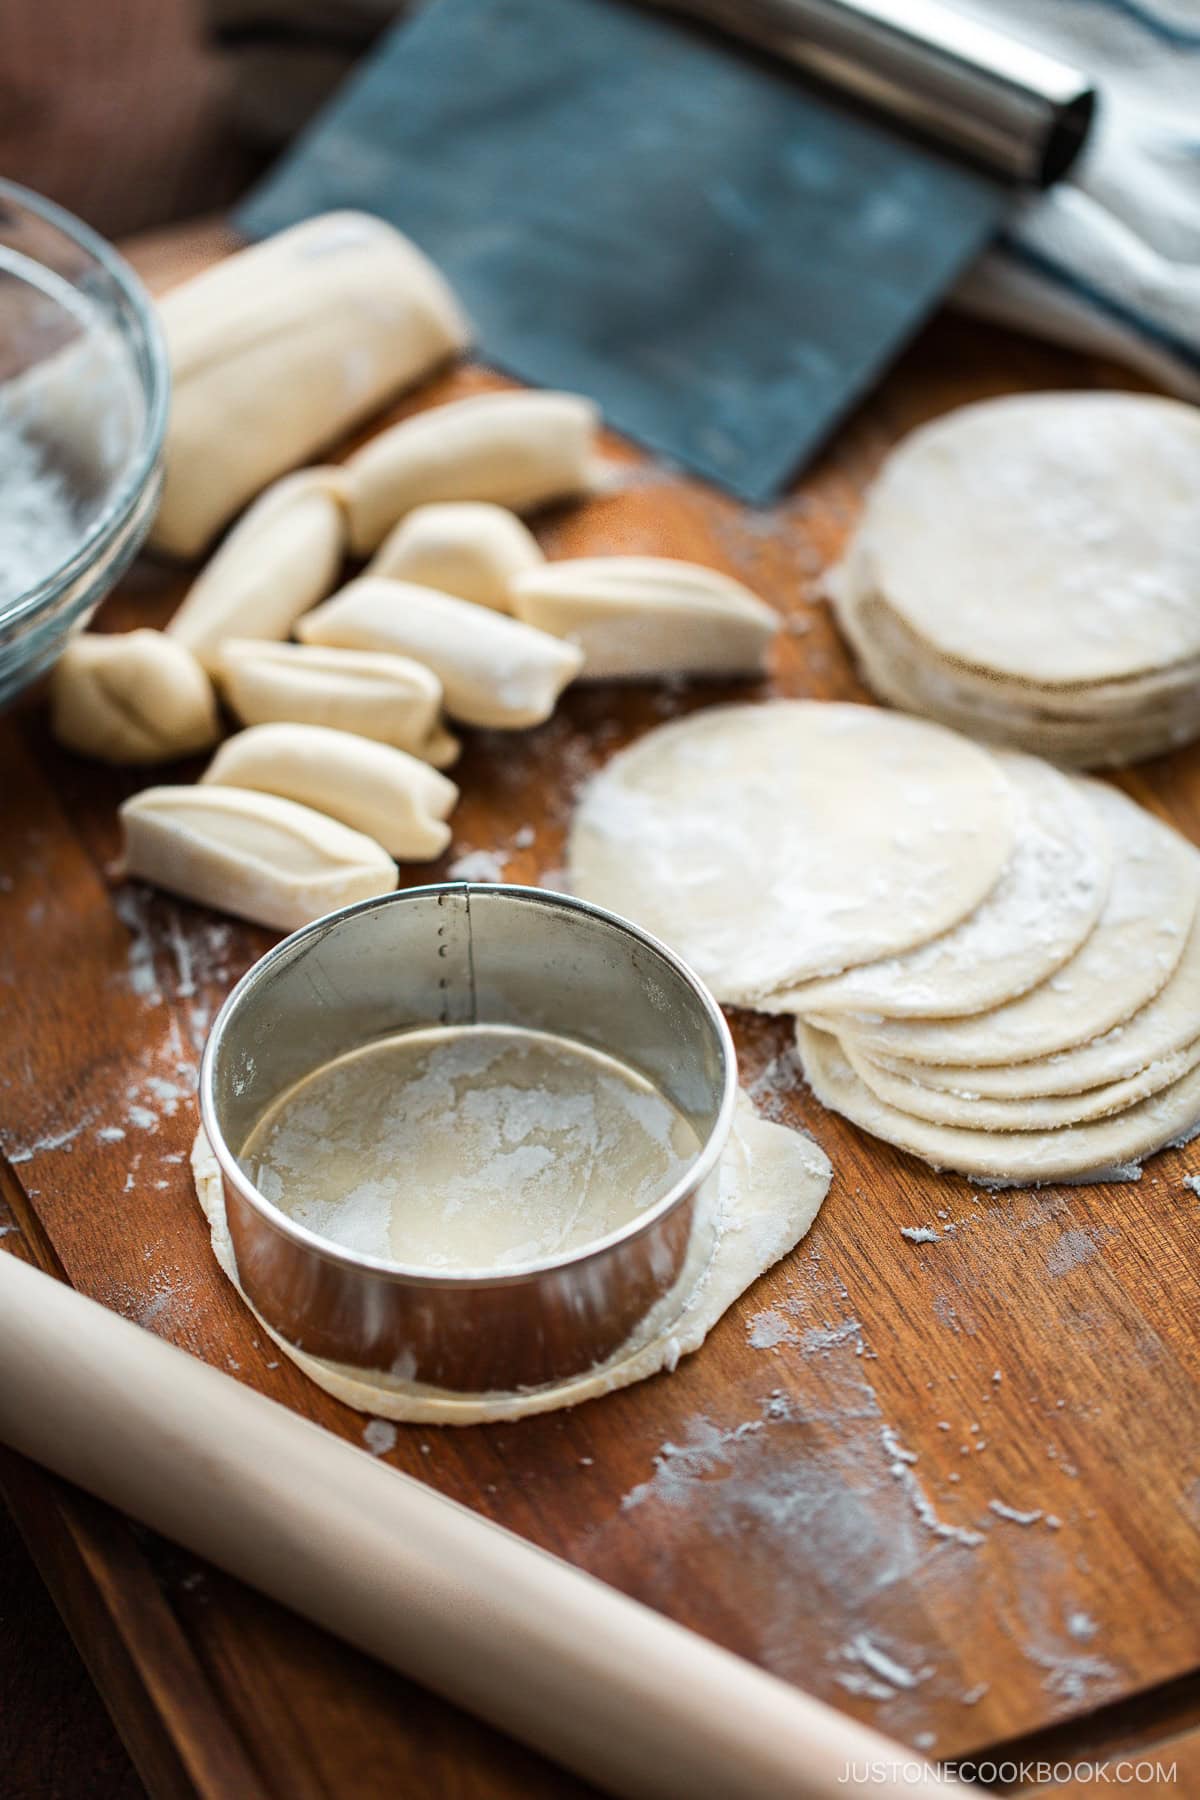
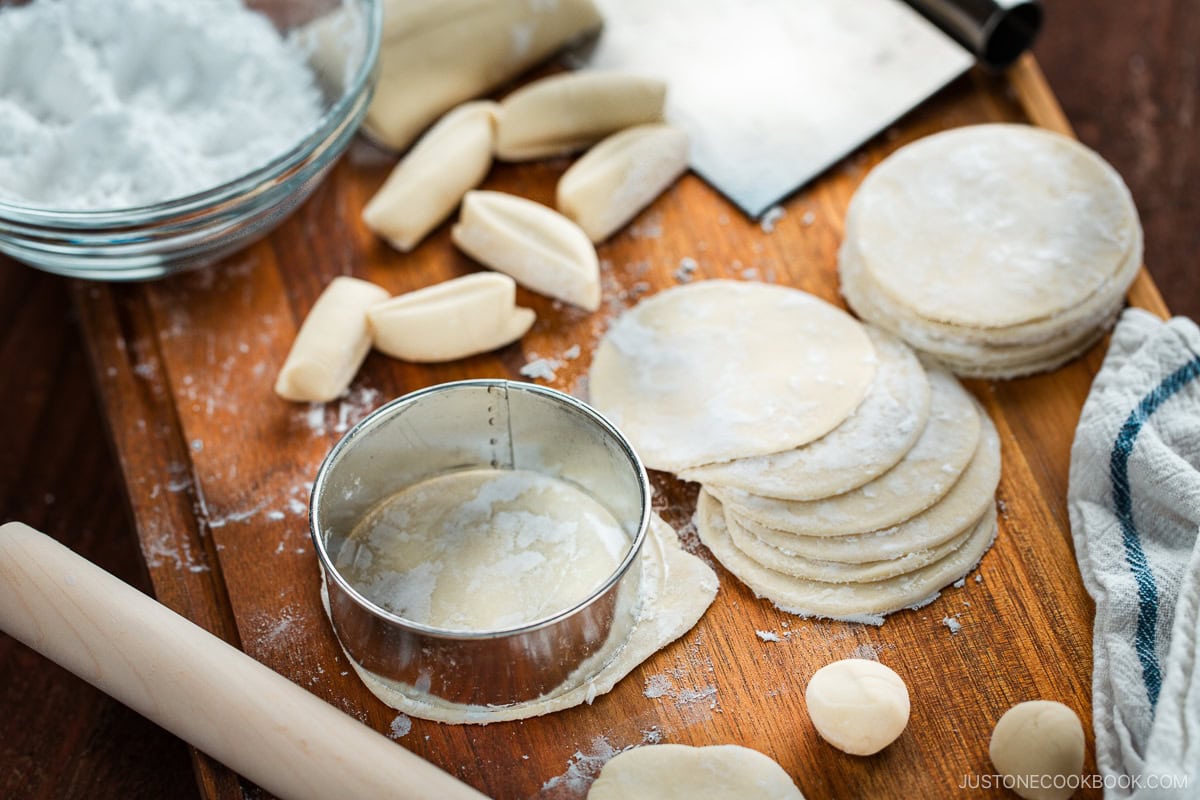
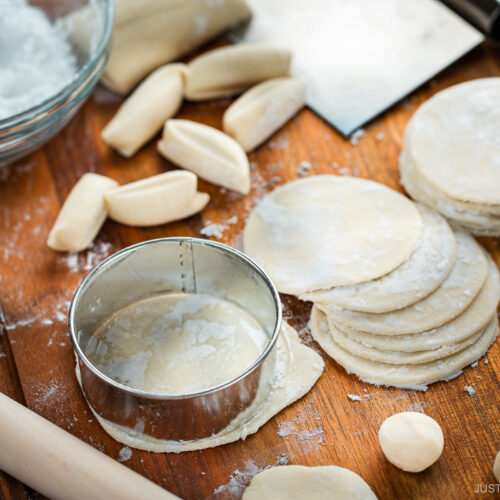
- Cut the dough into small pieces, flatten with a rolling pin, and cut out into a circle shape using a cookie cutter.
Homemade vs. Store-Bought Gyoza Wrappers
Homemade gyoza wrappers can be time-consuming, but I find the process extremely fulfilling and calming. Save it for the weekend or a quiet evening when you can enjoy the experience. Or, make it a fun activity to do with family or friends. Gyoza party, anyone?
Homemade gyoza skins taste fresh, and they are so tender and pliable for folding. Also, there are no preservatives to worry about. Seeing my family devour the from-scratch gyoza I made pleases me more than anything. The total time longer, but it’s worth it!
Ways To Use Gyoza Wrappers
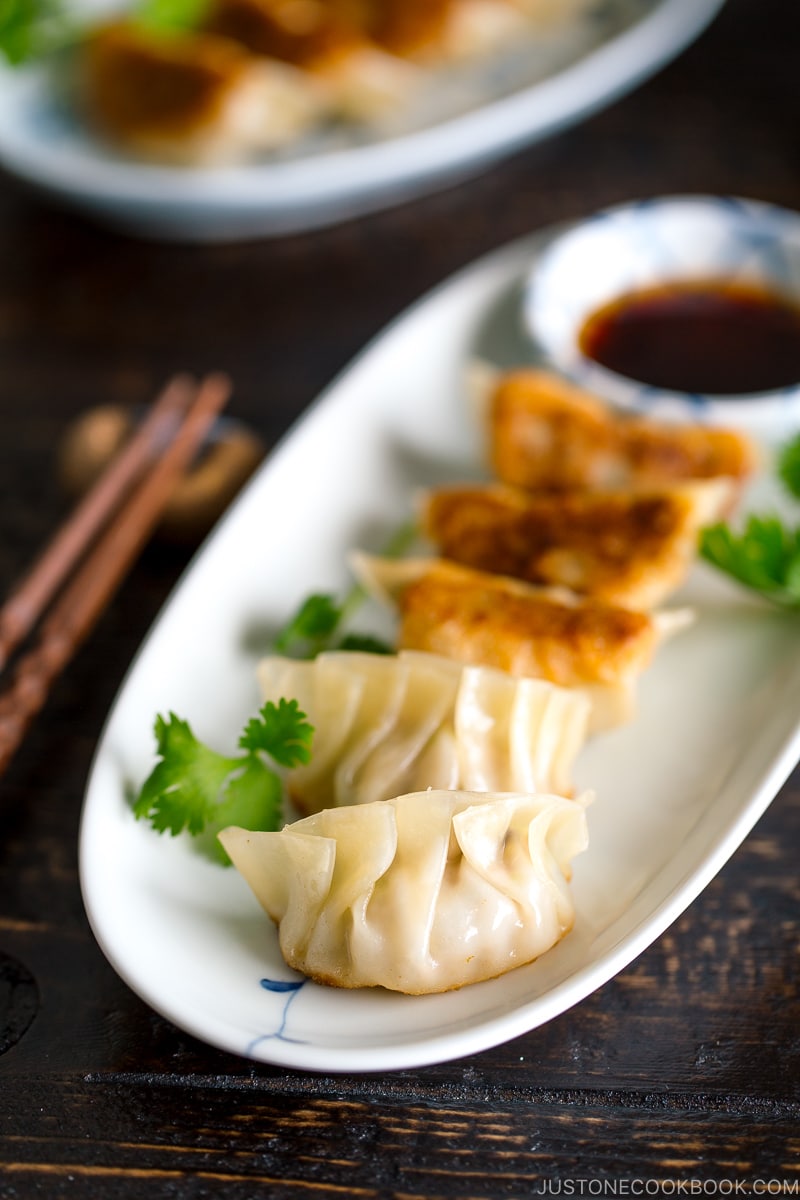
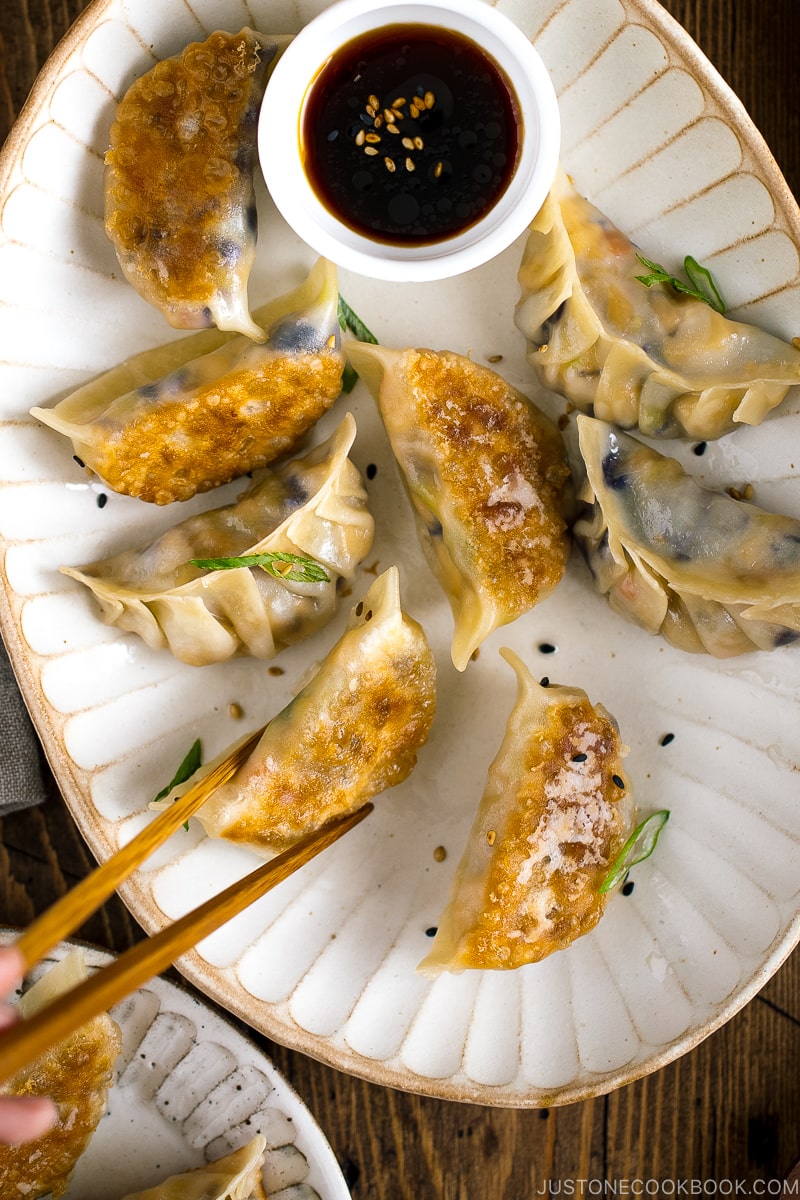
Try these other recipes to fill your homemade dumpling wrappers and pan-fry until golden brown!
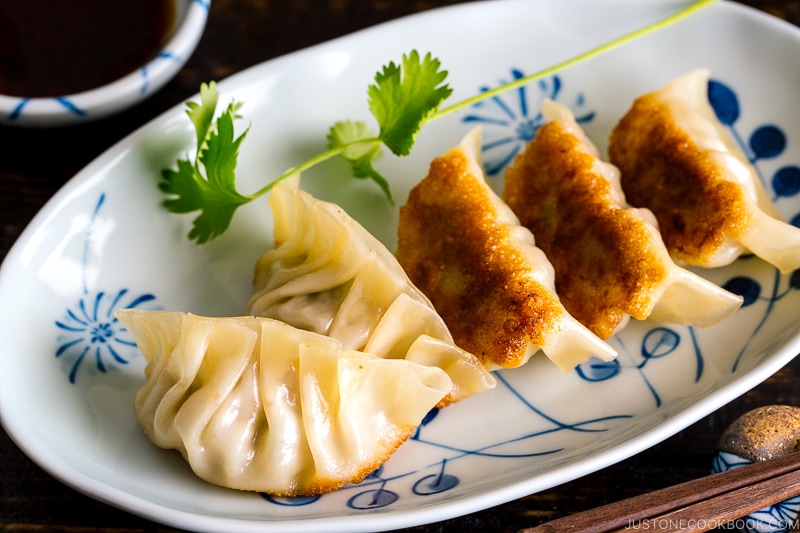
- Gyoza
- Vegetable Gyoza (vegetarian/vegan)
- Gyoza with Wings
- Chicken Shiso Gyoza
- Napa Cabbage Gyoza
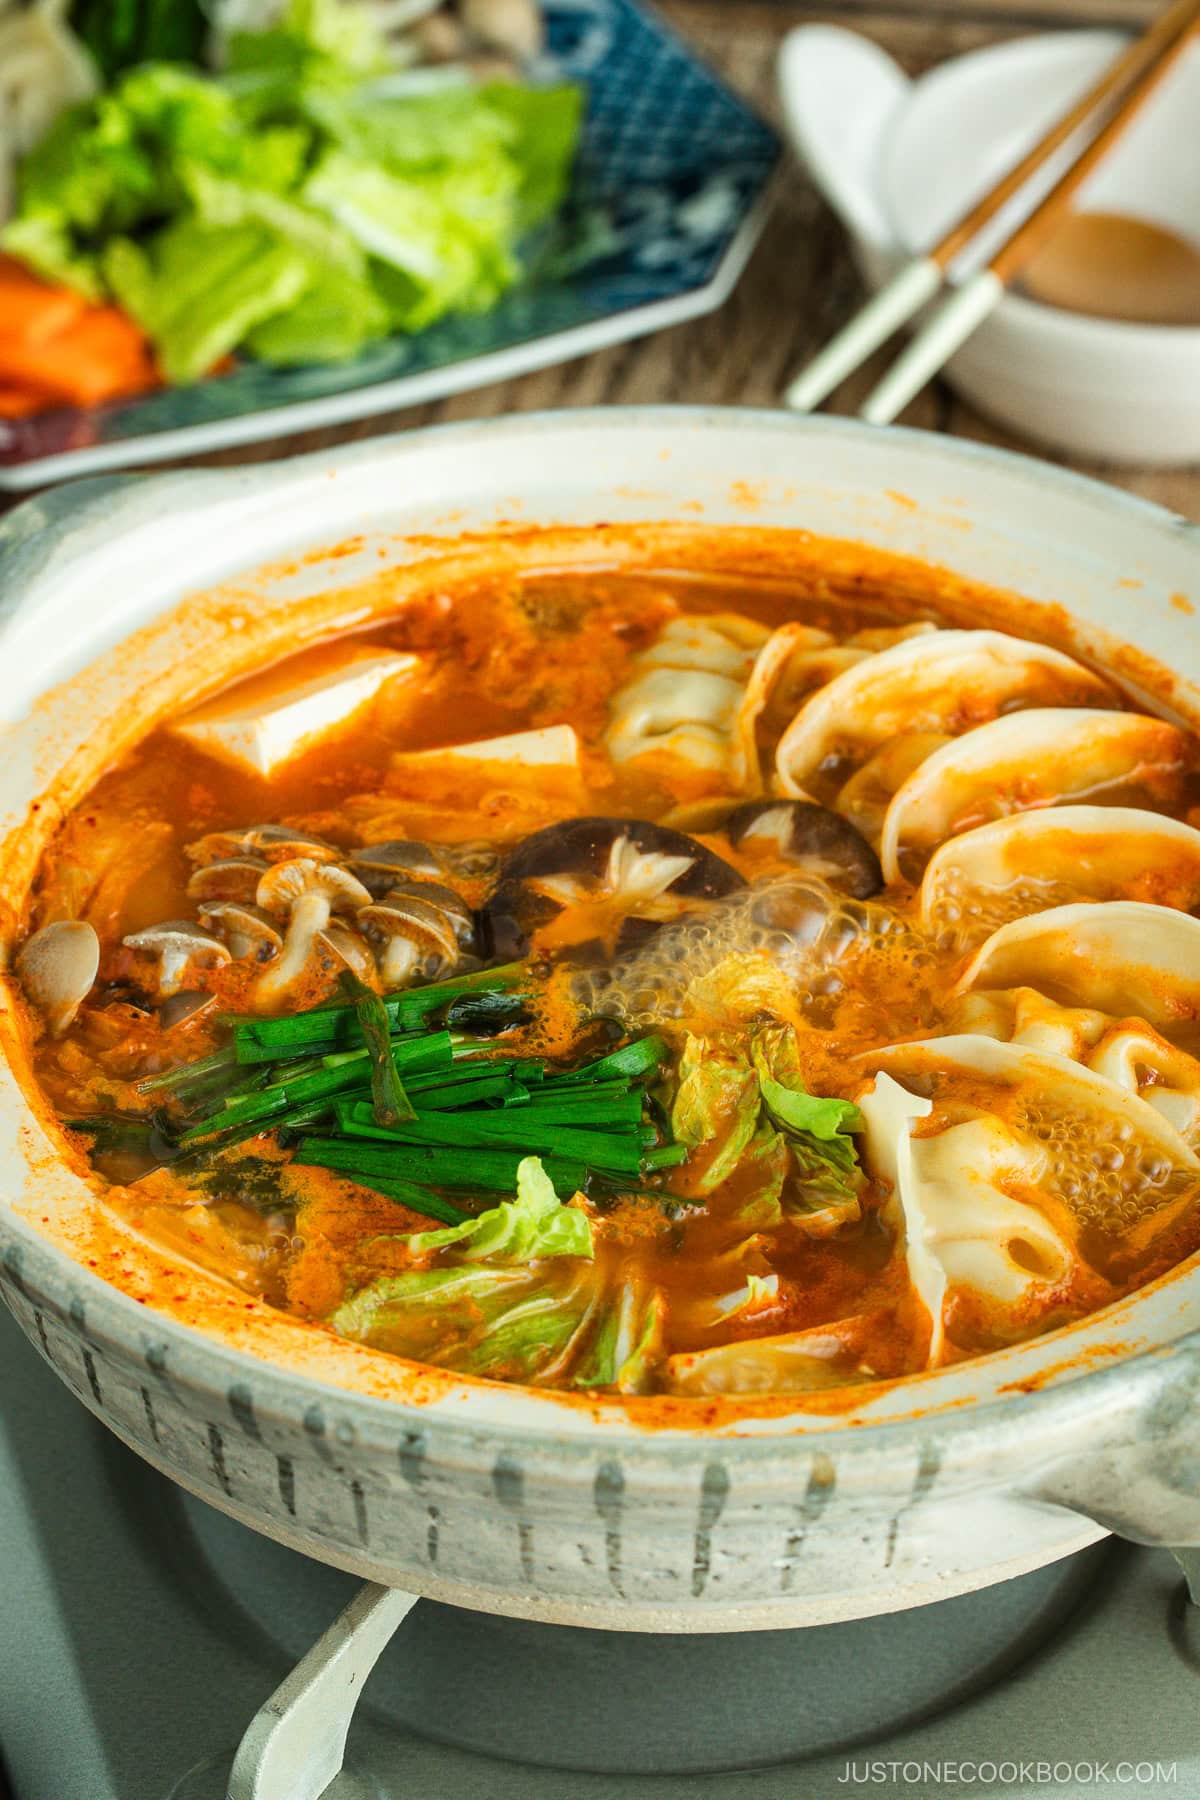
- Kimchi Gyoza Nabe
Gyoza (Japanese Potsticker) Wrappers
Video
Ingredients
- 2 cups all-purpose flour (plain flour) (weigh your flour; click the Metric button for weights; or learn how to measure flour with a measuring cup; you can substitute 1 cup, 120 g bread flour + 1 cup, 120 g cake flour)
- ½ tsp Diamond Crystal kosher salt
- ½ cup water (just-boiled hot water; plus more, as needed)
- potato starch or cornstarch (for rolling and dusting; or substitute regular flour if you‘re not freezing them)
Instructions
Before You Start
- I highly encourage you to weigh your ingredients using a kitchen scale. For weights, click the Metric button above to convert the measurements. If you don't have a scale, here's how to measure flour with a measuring cup: Fluff the flour with a spoon, sprinkle it into the measuring cup, and level it off. Otherwise, you may scoop more than you need. 1 US cup of flour weighs 4.25 oz (120 g).
- Gather all the ingredients.

To Make the Dough
- Sift 2 cups all-purpose flour (plain flour) into a large bowl.
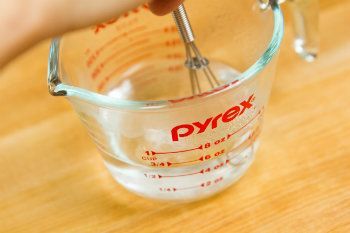
- Add ½ tsp Diamond Crystal kosher salt to the just-boiled hot water and stir until completely dissolved.
- Add ½ cup water (just-boiled and hot) to the flour, a little at a time, stirring with a rubber spatula. Mix until combined completely. If the flour is still not incorporated, add more hot water, ½ Tbsp at a time, until the mixture forms a ball. You will eventually need to use your hands to do this. Tip: Different brands of flour absorb water differently, so use more hot water as needed; I used about 120–150 ml for one batch.
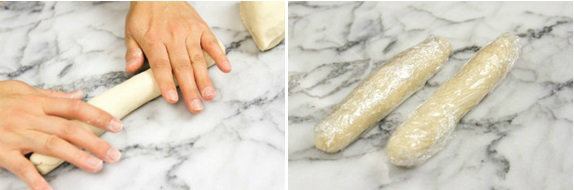
- Transfer the dough to a work surface and knead it for 10 minutes.
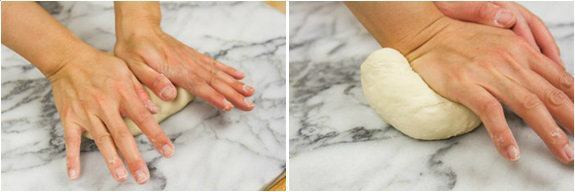
- After 10 minutes, the texture of the dough will be much smoother. Use a dough scraper to cut the ball of dough in half (it doesn‘t have to be exact).
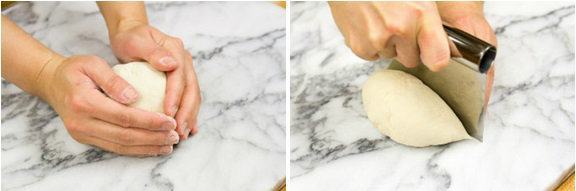
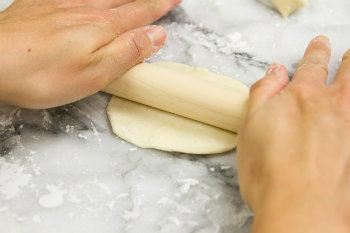
- Shape each half into a long log about 1½ inches (3.8 cm) in diameter, although it doesn‘t have to be perfect, especially if you use a cookie cutter later. Wrap each log with plastic wrap. Let it sit for 30 minutes.
To Roll the Wrappers
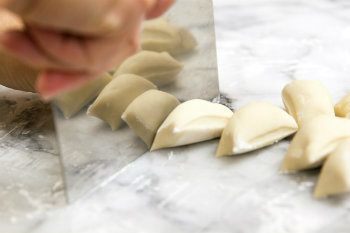
- Unwrap the dough. Sprinkle a little potato starch or cornstarch on the work surface. Cut each log crosswise into pieces about ¾ inch (2 cm) wide. Since we’ll be using a cookie cutter, don’t worry if each piece of dough is a slightly different size. One batch of this recipe can make about 38–42 wrappers. Tip: If you plan to freeze the wrappers, please use potato starch or cornstarch for dusting and rolling, as the wrappers tend to stick to each other if you use flour.
- Be sure to cover the dough with a damp kitchen towel at all times to prevent it from drying.

- Roll each piece of dough into a ball.
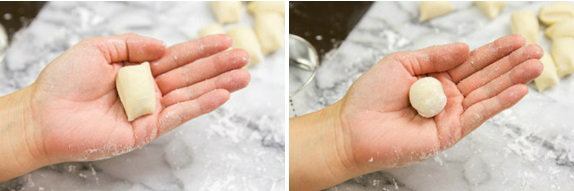
- Press the ball flat on the work surface.
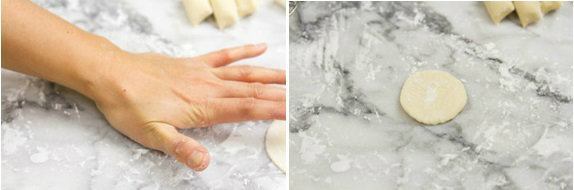
- Using a rolling pin, roll out the dough, but DO NOT flatten the TOP and BOTTOM edges. This is the trick to making a nice round shape.
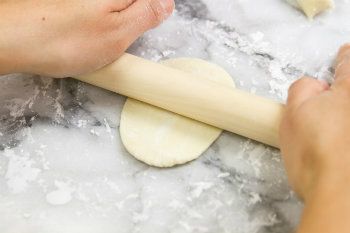
- Rotate the dough 90 degrees and roll again into a thin circle. If the dough is hard to roll out or shrinks back, let it rest a bit to relax the gluten and try again.
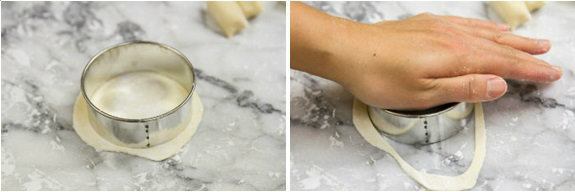
- Cooker cutter (optional): If you want a perfectly round shape for your wrappers, cut your rolled dough circle with a 3-inch (8 cm) cookie cutter. If the dough rolls back, leave it for a few seconds, then try again to cut the dough. Remove the excess dough scraps and cover them with a damp towel. Later, combine all the scraps (if they still squish together and haven’t dried out) and re-roll to make more wrappers.
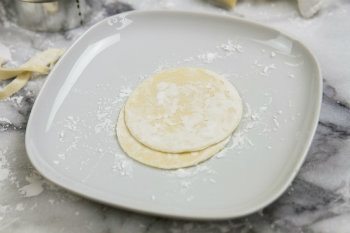
- Sprinkle each wrapper with potato starch and stack them. Make sure to cover them with a damp kitchen towel as you continue rolling the remaining dough. Once you‘ve rolled out all the wrappers, they are ready to use. You can also freeze or refrigerate them to use later (see below).
To Store for Later
- Wrap the stacked gyoza wrappers with plastic wrap and store in the refrigerator for 3–4 days or in the freezer for up to a month. To use, defrost in the refrigerator overnight or on the counter for 60 minutes (depending on the amount and room temperature). Do not defrost in the microwave.
To Make Gyoza
- You can use these Homemade Gyoza Wrappers to make Gyoza, vegetarian/vegan Vegetable Gyoza, Chicken Shiso Gyoza, Gyoza with Wings (Hanetsuki Gyoza) and Korean-style Kimchi Gyoza. If you‘re new to making Japanese potstickers, see my tutorial on How to Fold Gyoza.
Nutrition
Editor’s Note: The post was originally published on February 19, 2014. It’s been updated and republished in July 2020.


Could you use a tortilla press to shape the discs?
Hello there, Shauneen! It may turn out a little thicker, but you can use the tortilla press.🙂
Thank you for trying Nami’s recipe!
I’ve made this recipe replacing the flour for gluten free flour and it was fantastic, perfectly explained! Thank you for sharing 💜
Hi Anna! Thank you so much for trying Nami’s recipe and for your kind words about Nami’s instructions.
We are glad to hear you enjoyed it.
Happy Cooking!
I would love to know what gluten free flour and how it was made please
Hi Nami, I was wondering if this recipe could be used to make wonton wrappers for your wonton soup recipe?
Hi Constance, Thank you so much for taking the time to read Nami’s post and try her recipes.
Sure. This recipe can be used to make wonton wrappers. Please adjust the thickness of the wrappers as you would like.
We hope you enjoy them. Happy Cooking!
Fantastic recipe for gyoza wrappers. I like to avoid store-bought as they have some crazy preservatives in them. These turn out perfect every time I make my gyoza recipe my friend from Utsunomiya gave me! People having trouble with sticking or not enough water — dough recipes need a little extra flour or water sometimes depending on many factors: how humid it is when you’re cooking, the qualities of the flour, the hardness of your water. Have a little extra water or flour to add if needed. Watching Nami’s video is a helpful way to see how stiff the dough should be.
Hi Surin! Nami and JOC team are glad to hear you enjoyed this recipe. Thank you for trying her recipe and for chiming in.
We appreciate your love and support.🥰
Happy Cooking!
Hi Nami and team. Firstly, thank you. Although I followed steps in yours recipe, I find that the dough was too sticky to handle. It was kind of frustrating to just get it to the first smooth texture. IMHO, room temperature water is just perfect. (South East Asia kind of room temperature though). I would like to suggest improvising like I did combining your recipe and Souped Up recipe. However, your cutting the dough was definitely way better than rolling on every round sheet. OMG my palm!
Hi Jayee! Thank you very much for trying Nami’s recipe and sharing your cooking experience with us!
There is a science behind scalding flour with hot water. The hot water breaks down and inhibits gluten formation and gelatinizes starch. So the result will be much better than room temperature water for texture and flavor.
As Nami mentioned in the recipe, different brands of flour absorb water differently, so would you please use less hot water next time for your situation. Or add a bit more flour?
We hope this helps!🙂
Great recipe. I did use 3/4 cup of boiling water and then kneaded the dough ball in a ziplock plastic bag so that it kept all the moisture inside. I did take it out and had to dust the logs with cornstarch but the dough came out great! Your recipe was so easy to follow and this was my 6th time after other online recipes that caused my gyoza skins to come out wrong. I live in a country that doesn’t sell wrappers so I am forced to make my own. Thank you now I can satisfy my gyoza cravings!!!
Hi Jan! Aww.😍Thank you very much for trying Nami’s recipe and for sharing your cooking experience with us!
We are glad to hear you enjoyed homemade Gyoza wrappers!
Happy Cooking!
I tried this twice and it just doesn’t seem to be enough water….there’s still so much dry flour 😭 I did the 2 cups of flour and 1/2 cup water…what am I doing wrong 😭😭😭
Hi Priscilla, Thank you very much for trying Nami’s recipe!
Try measuring the flour using a kitchen scale if you have one. 2 cups are 240g.
When you use a cup, it’s not accurate as using scale and sometimes ends up with extra flour. If you only have a cup, check out this post: https://www.justonecookbook.com/how-to-measure-flour/
We hope this helps!
I used 2 cups all purpose flour and 3/4 boiling water. I also used a ziplock bag for the kneading and left it in there for 30 minutes. Keeps your hands cleaner and moisture inside.
I used a gluten-free flour mix and my tortilla press to quickly make perfectly round, delicious GF wrappers. Thank you for the recipe!
Hi Naamador! Thank you very much for trying Nami’s recipe and sharing your cooking experience with us!
A tortilla press is a great idea!🤩
I think this recipe would be very easy using my KitchenAid stand mixer. I use it all the time as I am an older person and do not have the strength to knead and roll out with much physical effort. This could easily be mixed in a stand mixer and rolled out with my pasta attachment. Sounds like a nice Sunday afternoon project
Hi Carolyn! Yes! Definitely! Nami made this without it, but you can easily make this in your KitchenAid stand mixer!
Thank you very much for reading Nami’s post. We hope you enjoy making Gyoza soon! 😊
Hello,
first of thank you for the great recipe. I have a question about the dough. When I made it the first time it was perfect. However, lately following the recipe the dough becomes very hard to roll out, to the point that it sometimes doesn’t stretch at all and feels leathery. What am I doing wrong? Does it need more water?
Hi Max! Thank you very much for trying Nami’s recipe!
Please add a bit of just-boiled water and see how it goes.
Different brands of flour will absorb water differently and need to adjust the amount of water if necessary. Have you used different brands of flour this time?
Room temperature or the day of the weather also causes a difference in the dough texture.
We hope this helps!
Hello and thank you for this great recipe. Here’s a crazy question: Can you make the wrappers with almond flour? I am trying hard to stick to low-carb, but I am also missing certain foods! Thank you!
Hi Susan, Thank you very much for reading Nami’s post and for your kind feedback.
We haven’t tried this recipe with Almond flour before, and not sure about the outcome. We think it needs some kind of stabilizer to prevent ingredients from separating if you use almond flour. We hope this helps!
Maybe a flax seed egg? One tablespoon ground flax seed mixed with 3 T water.
Hi Stephanie! That sounds like a good idea!
If you try it, let us know how it goes!🙂
Hi, thanks for the recipe. I am a little confused, the recipe says makes 38 but the dough is divided into 2 logs, each log makes 12 pieces. So would that make 24?
Hi Mat, Thank you very much for trying this recipe!
The 38 pieces are from using all the dough from this recipe.
Nami used a 3-inch (8 cm) cookie cutter to shape the wrappers, re-roll the scraps, and repeat the process. (Step 15) The extra pieces are from the scraps. We hope this helps!
I see, thanks!
You are welcome, Mat! We hope you enjoy homemade Goza soon.😀
Hi Nami! How many wrappers does this make? The recipe card says 38-42, but when reading the instructions in the recipe, the number seems more like 24? The recipe says that the dough is divided into two logs, and then each log is divided into 12 pieces (so 2×12=24).
I want to make your gyoza recipe (which makes 52 as stated in the recipe), so should I double this wrapper recipe? Thank you 🙂
Hi Olivia, Thank you very much for trying this recipe! As Nami mentioned in the recipe card, this servings number includes the pieces made from extra dough after you cut into the shape with a 3-inch (8 cm) cookie cutter. If you can make very thin wrappers, you may be able to make more wrappers too. Some readers prefer divided into even smaller pieces (15~19) and skip cutting the shape with the cookie cutter.
If you are making for 52 gyoza, we recommend using x1.5 of this recipe or double this recipe to ensure you have enough coverage. We hope this helps!
This Gyoza wrapper is a winner as well as your gyoza recipe. I used the Kitchenaid pasta roller, and it worked well. Thank you for sharing both recipes. I used the left over Gyoza wrapper to make your shrimp and wonton soup which is also a delicious recipe.
Hi Milotte, Thank you very much for trying Nami’s homemade Gyoza recipe! We are so glad to hear the pasta roller worked well for making this wrapper. Thank you for sharing your cooking experience with us.🙂
These gyoza have become a family favorite overnight!
Hi Patrick!
Thank you very much for trying this recipe and for your kind feedback!
We are glad to hear this has become your family’s favorite dish!😊