
You can always find fresh infusions of imagination in the art of Japanese sandwich-making. Sometimes it can be alarmingly attractive like wanpaku sandwich, and sometimes it can be down-home like this Katsu Sando recipe.
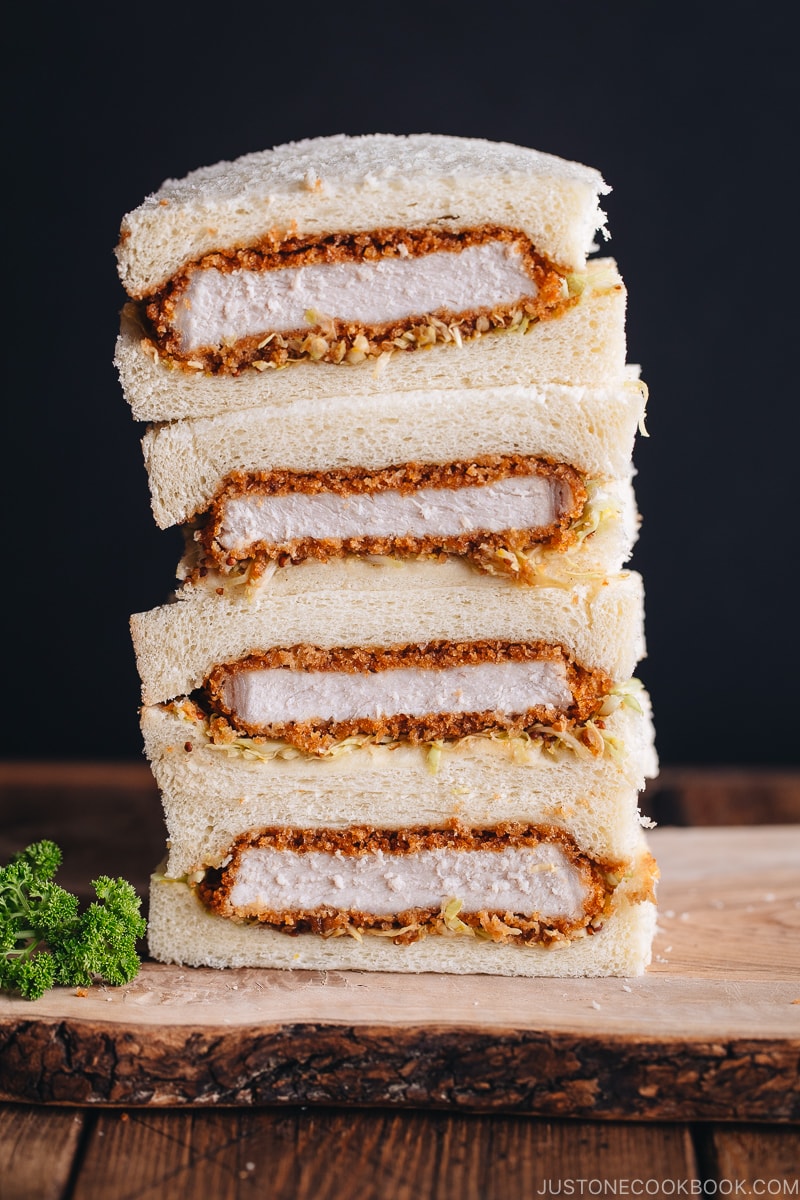
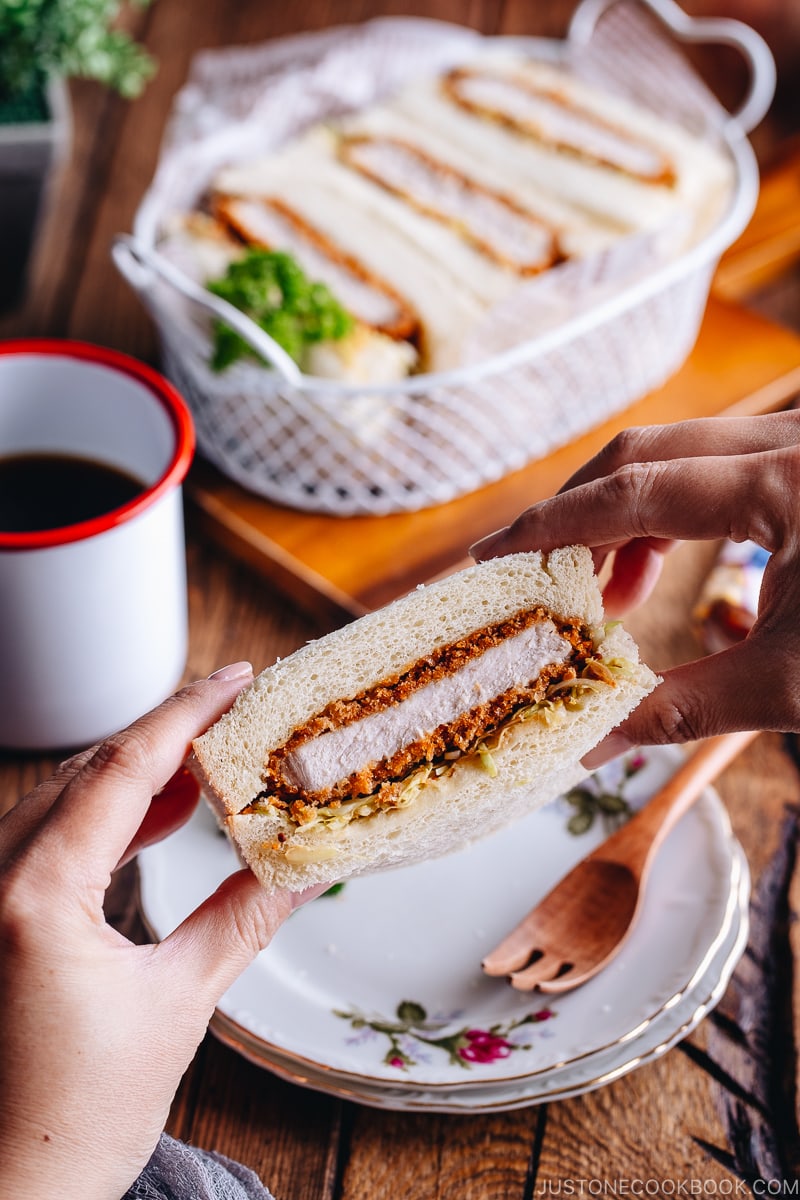
Katsu sando is a thing of comfort, with its crispy meat cutlet with savory sauce sandwiched between soft white bread. Think of it like a schnitzel sandwich. It’s my husband and son’s favorite lunch choice in Japan. They pick up katsu sando from different shops at the train stations and eat them during our long trips. According to them, katsu sando is the best meal on the go.
What is Katsu Sando?
Katsu sando (カツサンド) is short for katsu sandwich (カツサンドイッチ). Sandwiches are called sando in Japan, like tamago sando (egg sandwich). For the bread, the Japanese almost always use shokupan, Japanese milk bread. This tender pullman loaf bread has a milky-sweet taste and pillowy softness that you just can’t beat.
“Katsu” refers to Japanese-style pork or chicken cutlet coated with panko breadcrumbs and deep-fried till golden brown. The pork cutlet is called tonkatsu (トンカツ) and the chicken cutlet is chicken katsu (チキンカツ). They are a popular menu among yoshoku, the Western-influenced Japanese dishes.
Panko Breading Elevates Japanese Katsu
The difference from Western-style cutlets is that Japanese katsu uses panko (パン粉), the famous Japanese breadcrumbs, to coat the meat.
Panko is made from bread without crusts (although some brands include crusts). The light, airy, larger flakes tend to stay crispier longer than standard breadcrumbs because they don’t absorb as much grease. They make the cutlet so much better!
I know you can’t wait to bite into the crispy deep-fried katsu! But what if you don’t want to deep-fry at home? We’ll cover that next.
Baked Katsu for a Healthy Alternative
Typically, tonkatsu and chicken katsu are deep-fried to perfection. Considering the disposal of oil, a smelly and messy kitchen, and the fear of deep-frying, I know many of you wish you wouldn’t have to go through all that just to enjoy katsu. So today, I made my Katsu Sando with baked tonkatsu!
If you are a fan of 100% original katsu sando, please continue with the fried pork cutlet of your liking. I personally don’t mind deep-frying if I can eat a crispy and juicy tonkatsu. However, I want to encourage EVERYONE to try this great sandwich, including those of you who want to avoid the hassle of deep-frying.
Pre-Toast the Panko for Baked Tonkatsu
My method involves pre-toasting the panko before baking. You know the drill if you have tried my Baked Tonkatsu, Baked Chicken Katsu, Baked Korokke, and Baked Salmon Katsu recipes.
Toast the panko in a frying pan with a tiny bit of oil until golden brown. This will ensure you get the perfectly even-color, crispy, golden panko just like the deep-fried panko would look like. It’s easy and mess-free!
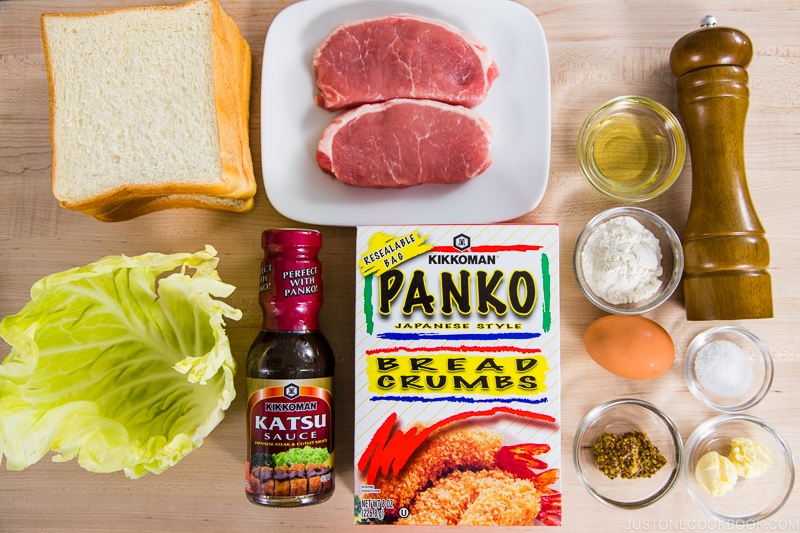
Ingredients for Katsu Sando
For the Cutlet
- pork loin chops – or use chicken breast/thigh/tender for chicken katsu
- kosher salt
- freshly ground black pepper
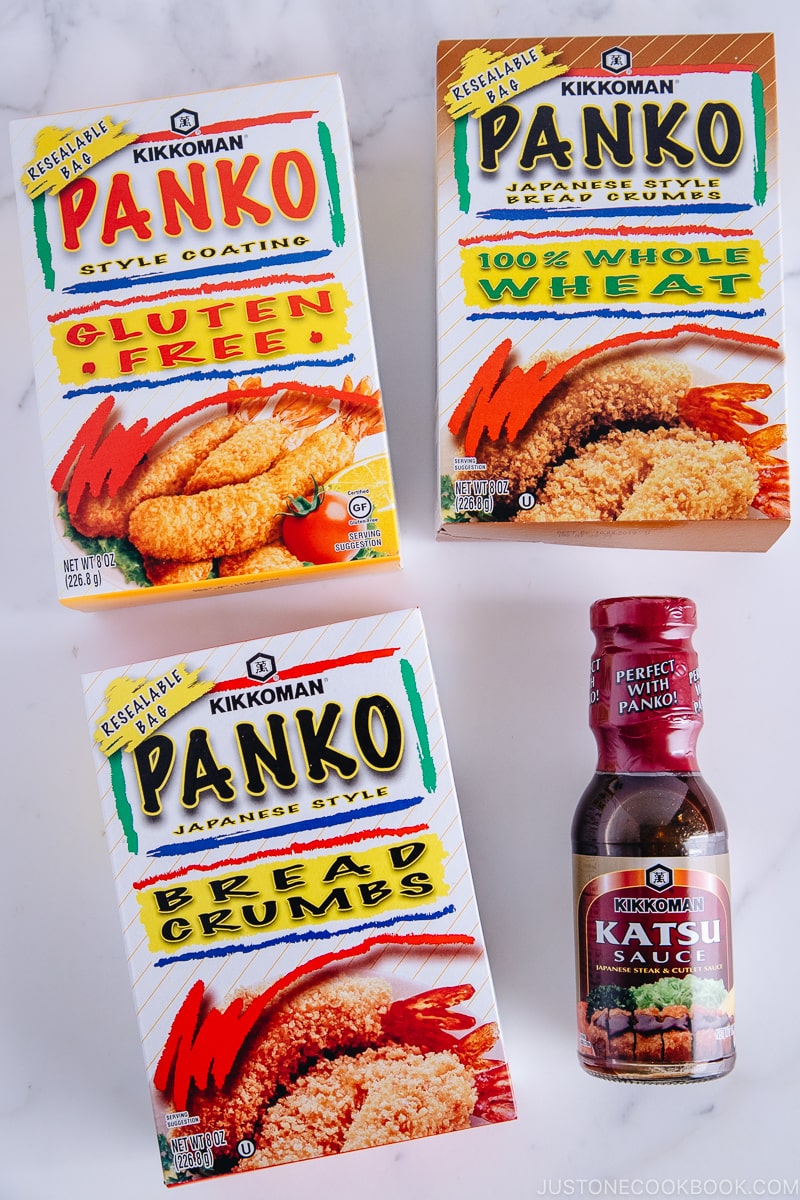
- panko – I used Kikkoman® Panko Japanese-style Breadcrumbs that you can find on Amazon
- neutral-flavored oil – for toasting the panko
- egg
- all-purpose flour
For the Sandwich
- shokupan (Japanese milk bread) – or any soft white bread
- butter
- Dijon mustard
- tonkatsu sauce – I used Kikkoman® Katsu Sauce that you can buy on Amazon; or make my Homemade Tonkatsu Sauce
- thinly shredded green cabbage – optional; not all katsu sando include it
How To Make Katsu Sando
- Toast the panko.
- Trim, pound, and season the pork.
- Bread the pork. Dredge in flour and shake off the excess. Whisk the egg in a bowl and dip the pork cutlet. Press the toasted panko into the pork so it adheres.
- Place on a baking sheet lined with an oven-safe wire rack.
- Bake until cooked through.
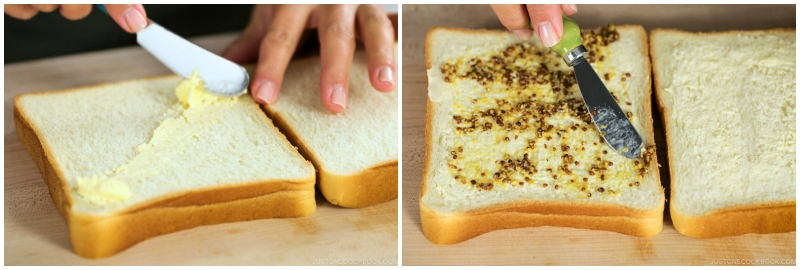
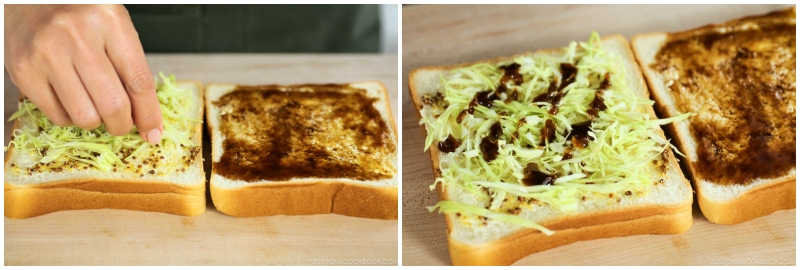
- Prep the bread. For each sandwich, spread both bread slices with butter and mustard. Add shredded cabbage to one of slice of bread. Drizzle tonkatsu sauce on both the cabbage the other bread slice.
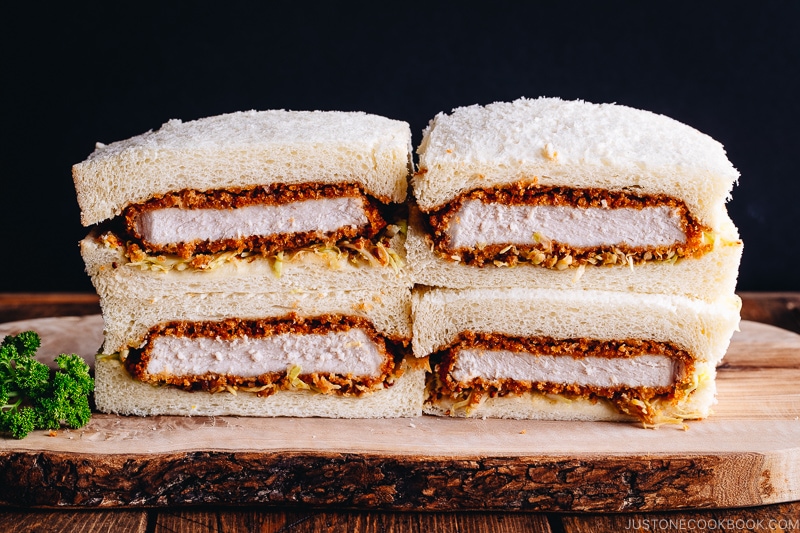
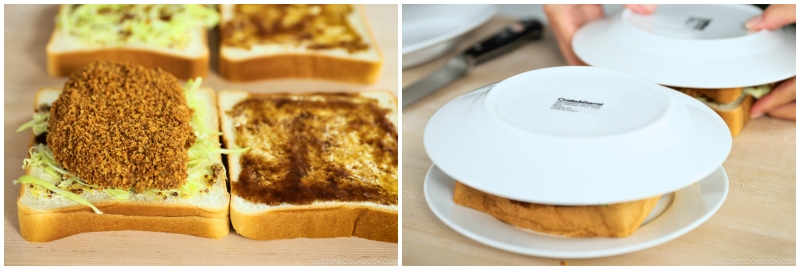
- Place the baked tonkatsu on top of the cabbage and top with the other slice. Gently press the sandwich between two plates for 5 minutes.
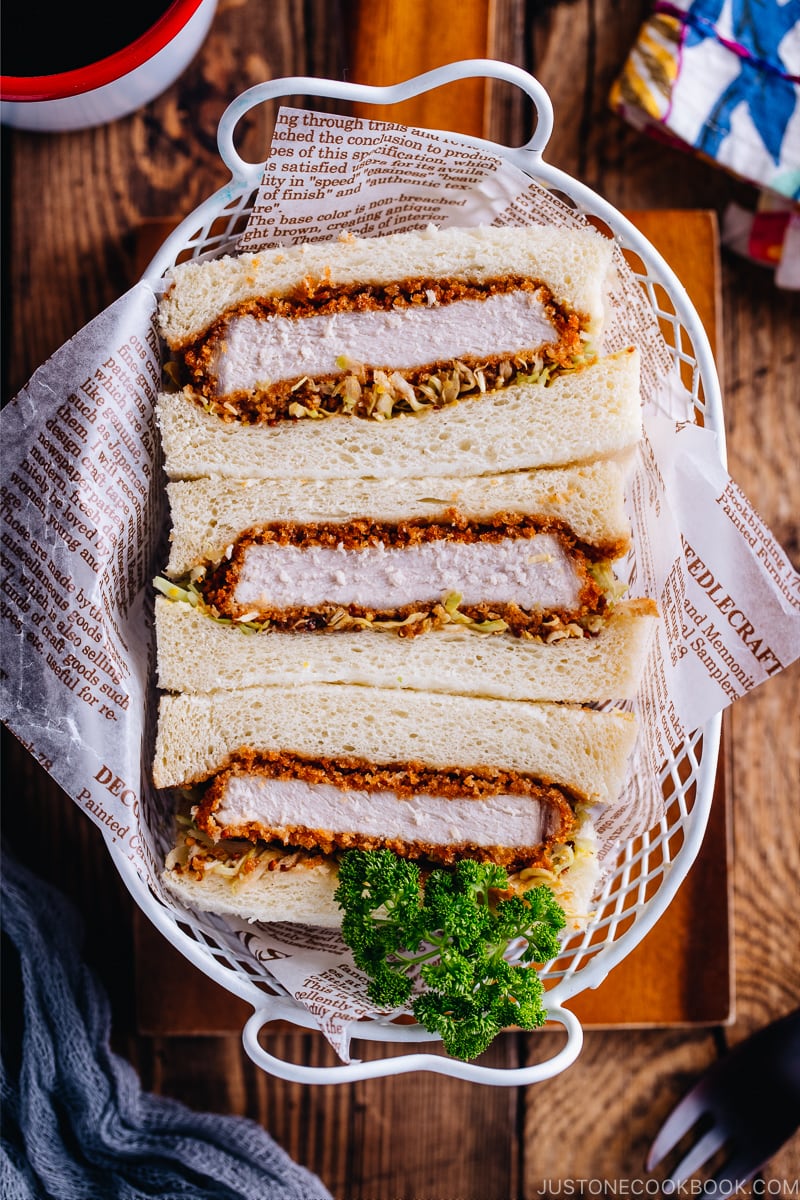
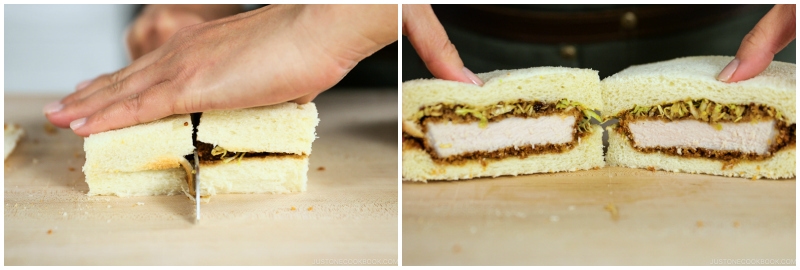
- Cut off the crusts on a cutting board with a sharp knife. Cut the sandwich in half and serve.
3 Useful Tips To Make Katsu Sando
1. Don’t skip the butter.
If you want to prevent the bread from becoming soggy, it’s a must to spread butter on both sides of the bread to act as a waterproof safeguard. It doesn’t have to be a lot; even a thin layer helps!
2. Don’t skimp on tonkatsu sauce.
Tonkatsu sauce is a key flavor in Katsu Sando. I used to just put the sauce on the cutlet alone, but I learned that spreading the tonkatsu sauce on the bread and shredded cabbage makes a huge difference.
3. Put weight on the sandwich.
Make sure the tonkatsu is snug between the slices of shokupan. In Japan, putting weight on a sandwich is a standard method prior to cutting in half. You don’t want the ingredients to fall off the sandwich, so I highly recommend doing this. Since the cutlet is situated in the center, I suggest using two plates on top and bottom to keep both shokupan and tonkatsu snug from both sides.
Other Japanese Sandwiches You’ll Love
Wish to learn more about Japanese cooking? Sign up for our free newsletter to receive cooking tips & recipe updates! And stay in touch with me on Facebook, Pinterest, YouTube, and Instagram.
Katsu Sando
Ingredients
For the Baked Tonkatsu
- 1 cup panko (Japanese breadcrumbs) (I use Kikkoman® Panko Bread Crumbs)
- 1½ Tbsp neutral oil (for the panko)
- 2 boneless pork loin chops (½-inch thick) (½ lb, 227 g each)
- ½ tsp Diamond Crystal kosher salt
- freshly ground black pepper
- 2 Tbsp all-purpose flour (plain flour)
- 1 large egg (50 g w/o shell)
- ½ Tbsp neutral oil (for the egg)
For the Katsu Sando
- 1 leaf green cabbage (1.4 oz, 40 g)
- 4 slices shokupan (Japanese milk bread) (the thickness of those from a square loaf cut into 8 slices; you can make my homemade Shokupan recipe)
- 2 tsp unsalted butter
- 2 tsp Dijon mustard
- 4 Tbsp tonkatsu sauce (I used Kikkoman® Katsu Sauce in this recipe; you can also make Homemade Tonkatsu Sauce)
Instructions
- Gather all the ingredients.
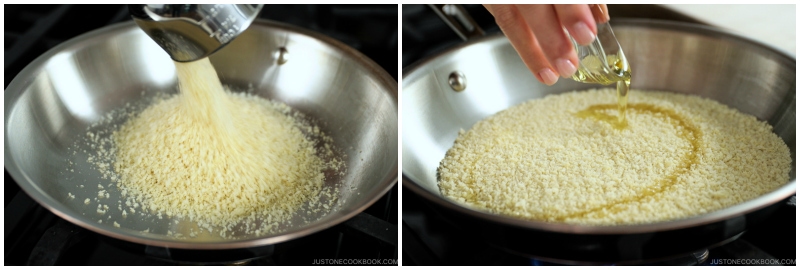
To Toast the Panko
- In a large frying pan, add 1 cup panko (Japanese breadcrumbs) and 1½ Tbsp neutral oil. Turn on the heat to medium or medium-high.
- Lift the pan and shake it occasionally to evenly toast the panko.
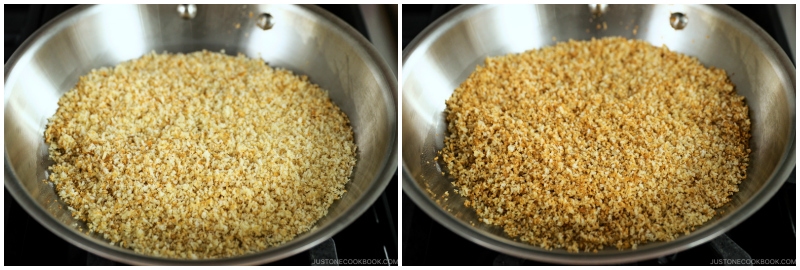
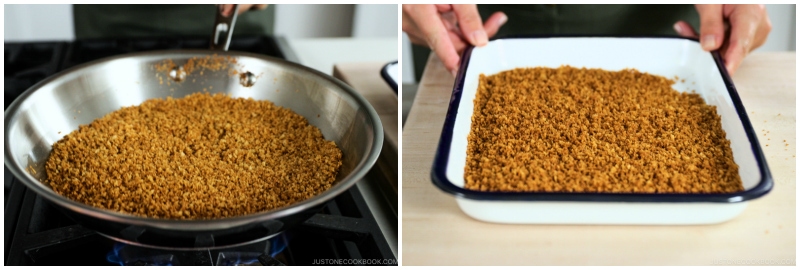
- Once the panko starts to get brown, shake the pan constantly to get an even color. Once the panko is nicely browned, transfer to a plate or tray.
To Prepare the Pork
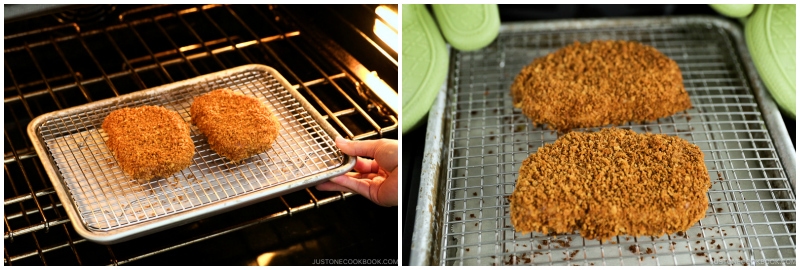
- Adjust the oven rack to the middle position and preheat the oven to 400ºF (200ºC). For a convection oven, reduce the cooking temperature by 25ºF (15ºC).
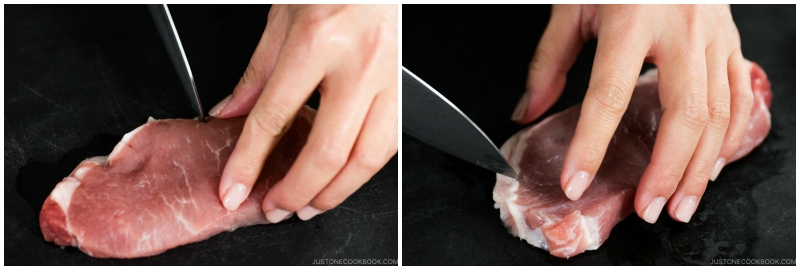
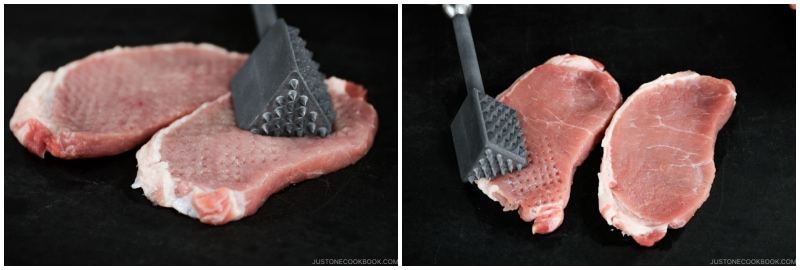
- Cut off the extra fat from 2 boneless pork loin chops (½-inch thick). Make a few slits on the connective tissue between the meat and fat. Since red meat and fat have different elasticities, they shrink and expand at different rates when cooked. Making slits will keep the tonkatsu flat when baking and prevent curling.
- Pound the meat with a meat pounder. If you don’t have one, use the back of a knife and pound in a crisscross pattern—top to bottom first, then left to right.
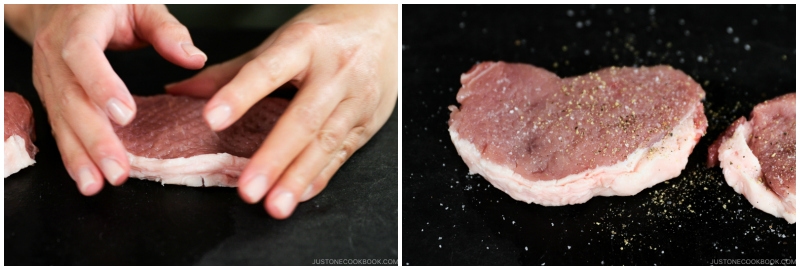
- Use your hands to mold the extended meat back into its original shape. Season both sides of the meat with ½ tsp Diamond Crystal kosher salt and freshly ground black pepper.
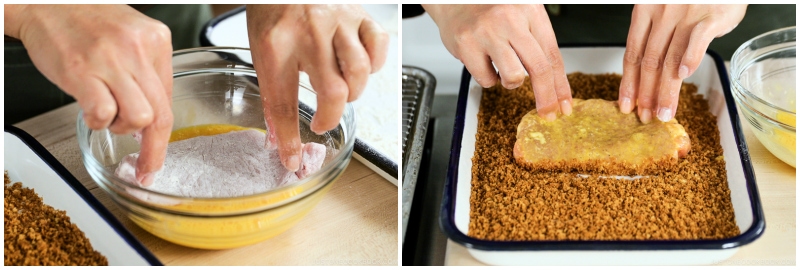
To Bread the Pork
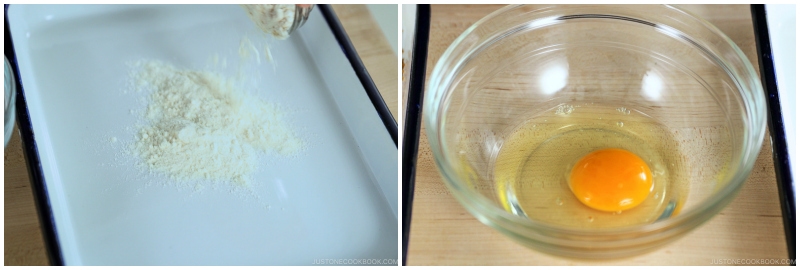
- Place 2 Tbsp all-purpose flour (plain flour) in a shallow dish. In another shallow dish, whisk together 1 large egg (50 g w/o shell) and ½ Tbsp neutral oil. Line up these two dishes with the tray of toasted panko. Tip: The oil in the egg will help the breading adhere to the meat and seal in its juices and flavor during cooking.
- First, dredge the meat in the flour. Remove the excess.
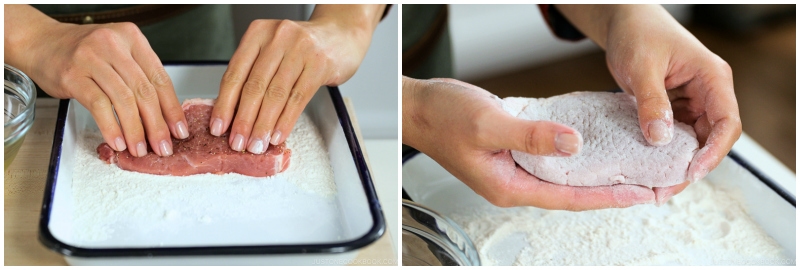
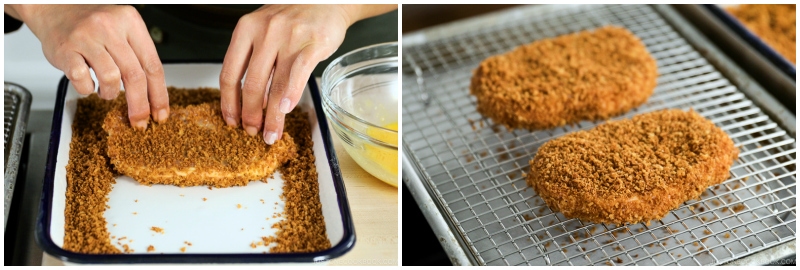
- Next, dip the meat in the egg mixture. Finally, dredge in the toasted panko.
- Press the panko onto the meat to help it adhere. Transfer the breaded cutlets to a baking sheet lined with parchment paper or (even better) an oven-safe wire rack, which allows the hot air to circulate underneath and keeps the panko from getting crushed on the bottom.
- Bake at 400ºF (200ºC) until the pork is cooked through, about 20 minutes. Remove the tonkatsu from the oven.
To Assemble the Katsu Sando
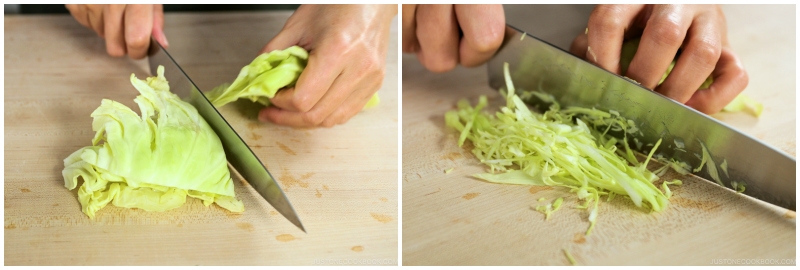
- Meanwhile, thinly shred 1 leaf green cabbage.
- Lay 4 slices shokupan (Japanese milk bread) on the work surface. Use 2 slices of shokupan (Japanese milk bread) per sandwich. For each sandwich, spread 1 tsp unsalted butter on one slice; the butter acts as a waterproof guard so the sandwich doesn’t get soggy. Next, spread 1 tsp Dijon mustard on top of the butter.
- Spread some of the tonkatsu sauce on the other slice of bread (reserve some sauce for the next step).
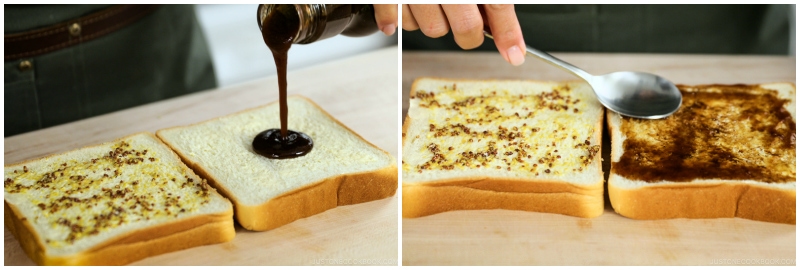
- On the side with the mustard and butter, add some of the thinly shredded cabbage. Then, drizzle some tonkatsu sauce over the cabbage.
- Place the baked tonkatsu on top of the cabbage. Top with the other slice of bread. Place the sandwich between two plates for 5 minutes.
- Cut off the bread crusts and cut the Katsu Sando in half. Tip: Save the crusts and repurpose them to make Shokupan Crust Rusks. These crunchy, buttery snacks are so delicious! You can make them now or freeze the crusts to make later.
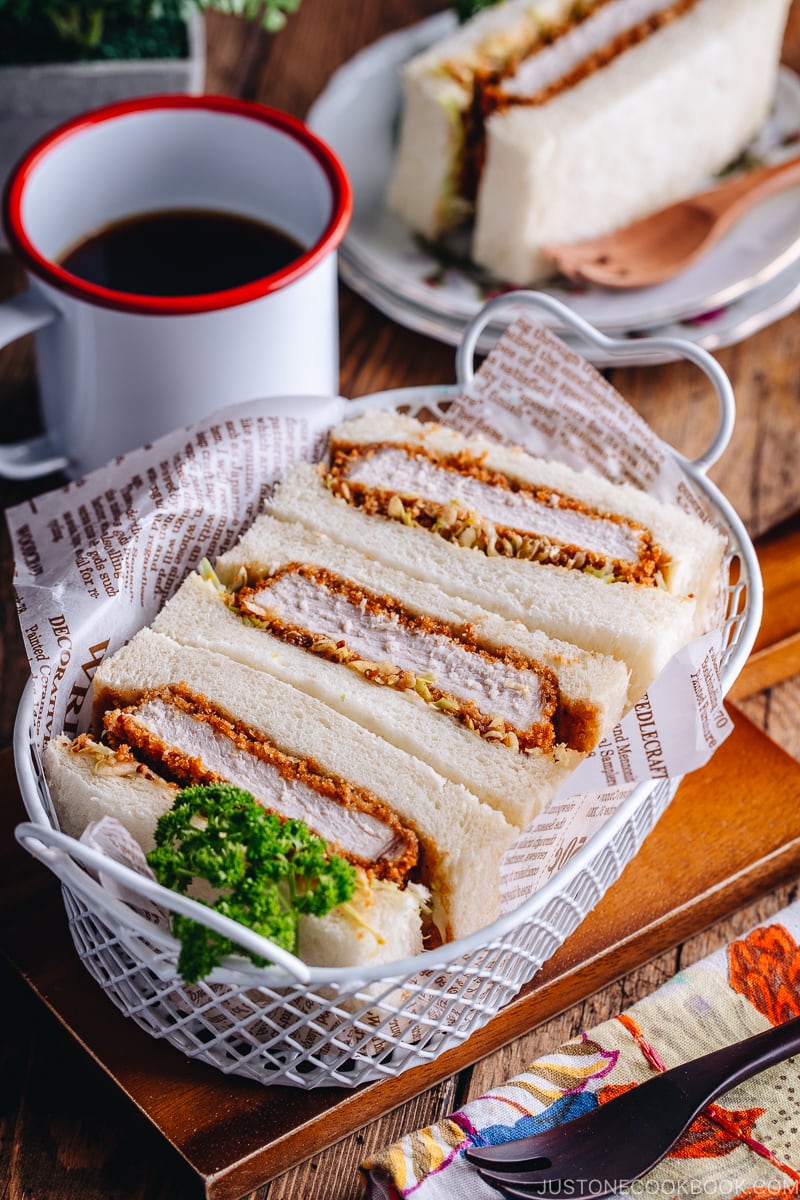
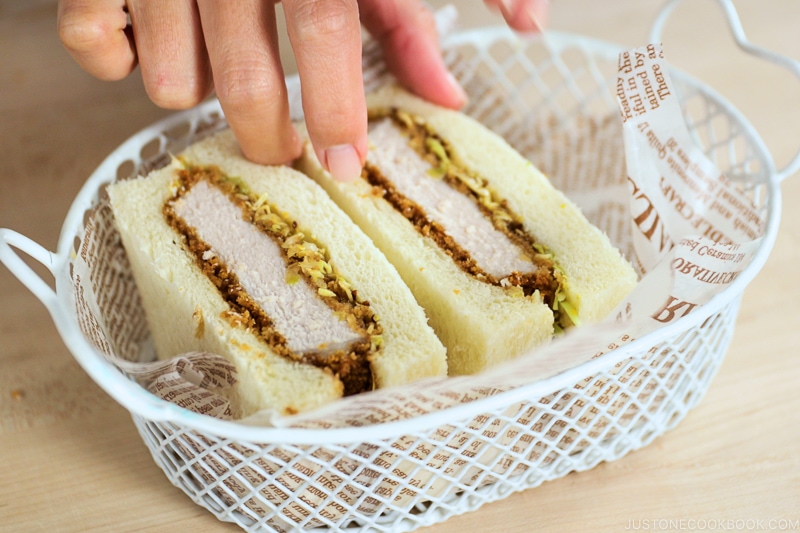
To Serve
- Serve the Katsu Sando on a plate or in a box. Enjoy!
Nutrition
Did you make this recipe?
Tag @justonecookbook on Instagram so we can see your delicious creation!