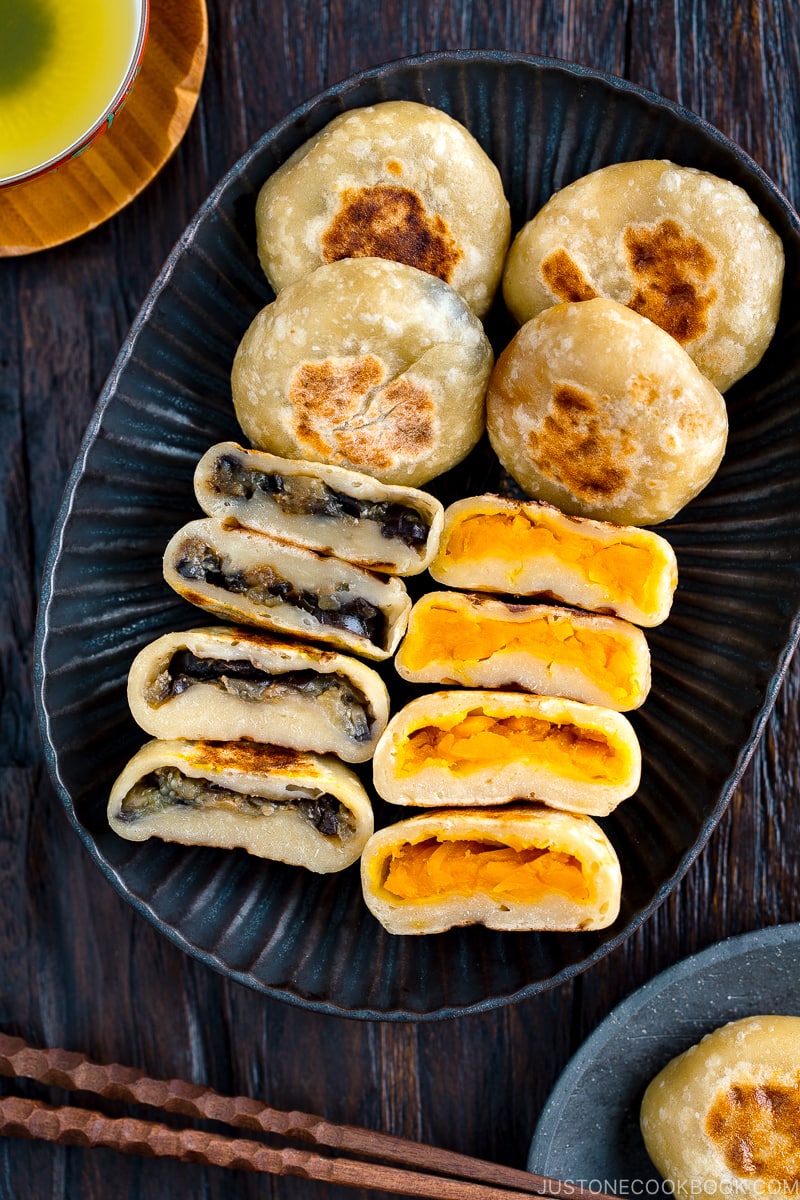
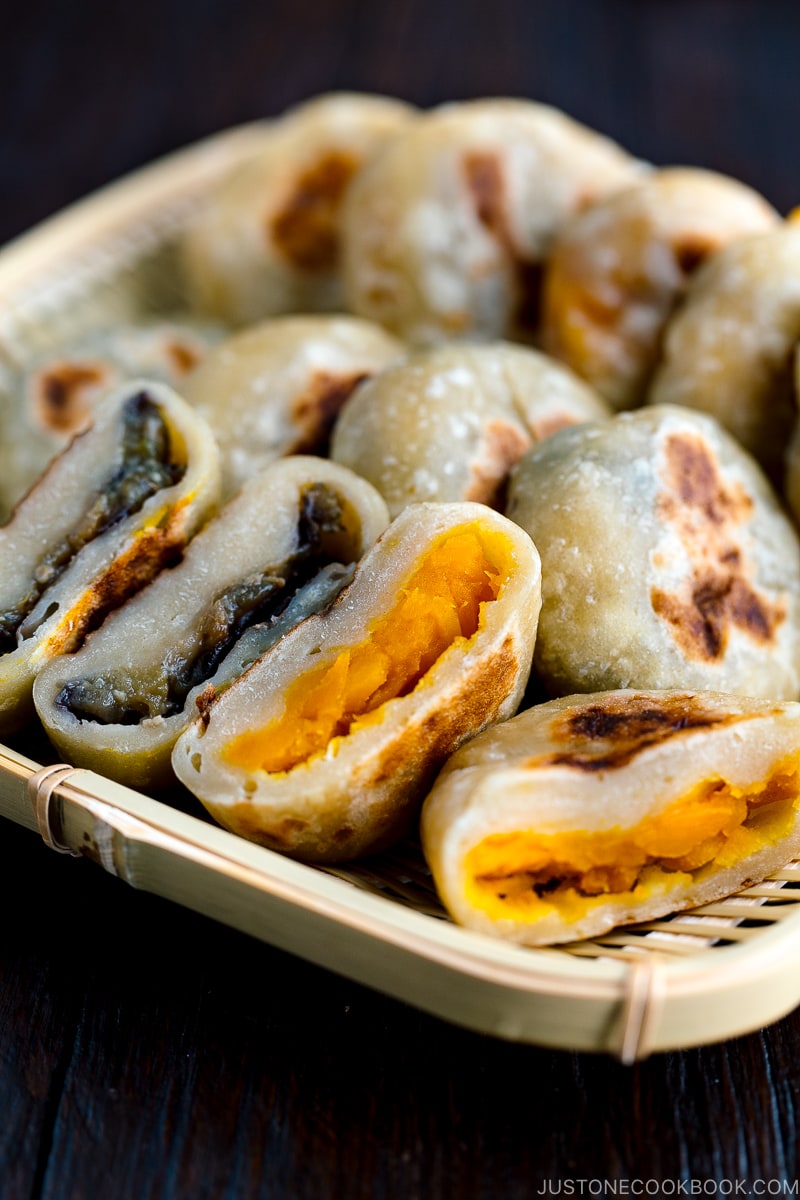
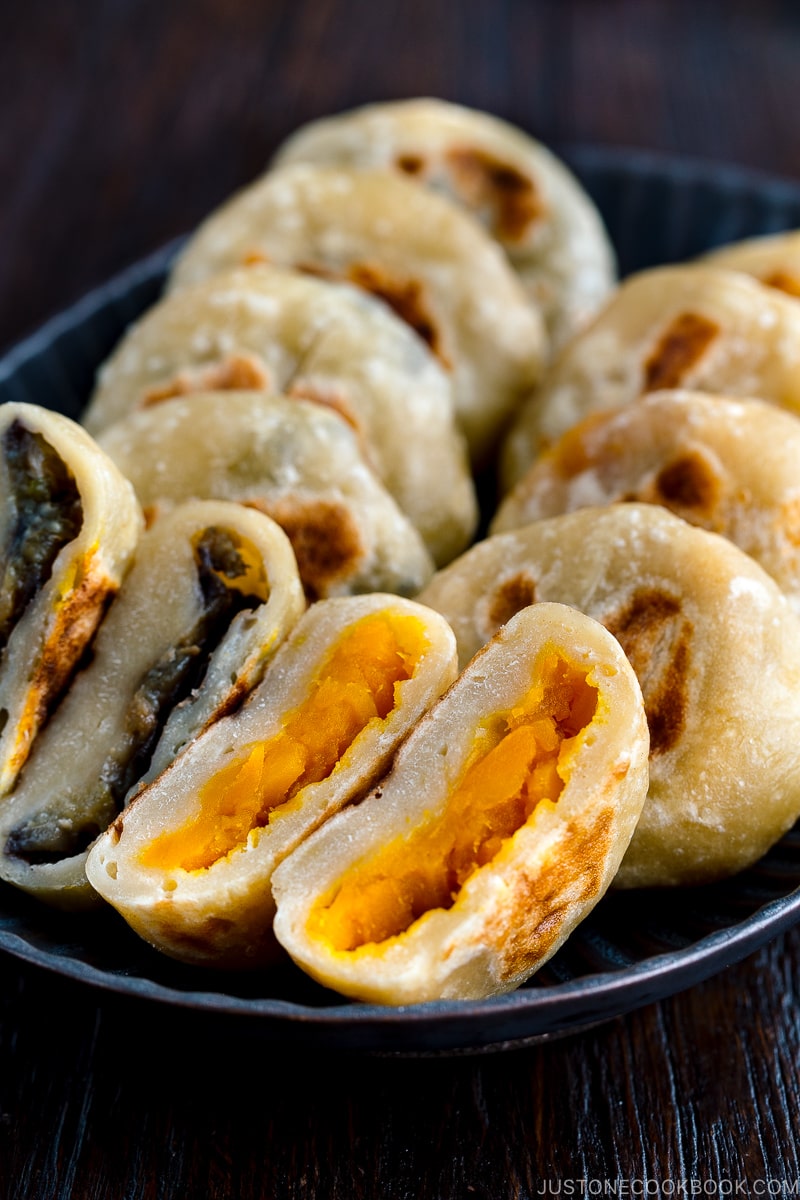
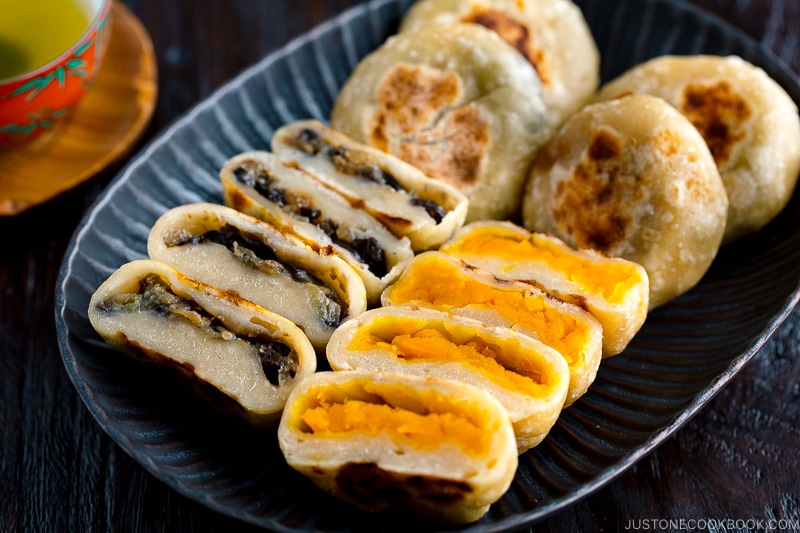
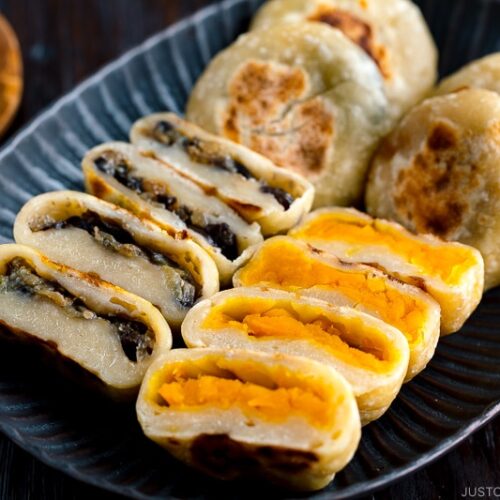
Stuffed with sweet kabocha squash and miso-glazed eggplant, these Oyaki Japanese dumplings are a popular snack in Nagano Prefecture in central Japan.
As the weather chills and you spend more time in the comfort of your home, I thought it would be nice to share a fun Japanese dumpling recipe that will keep you busy in the kitchen. You – and maybe your kids too – get to play with flour, making the dough from scratch, and stuffing the dumplings with your favorite fillings!
I love making Oyaki (おやき) – Japanese Stuffed Dumplings – this time of year. They are such delicious comfort food on cold days, so I just had to introduce them to you today.
What is Oyaki?
Oyaki (おやき) are stuffed dumplings that originated in Nagano Prefecture. The chewy oyaki dough is made from wheat flour or a mixture of wheat flour and buckwheat flour and stuffed with a variety of yummy fillings. The fillings are generally made from vegetarian ingredients such as fresh seasonal vegetables, mushrooms, beans, or pickles.
These rustic, homemade oyaki dumplings have played an important role in Nagano’s regional cuisine for generations. Located in central Japan, Nagano has steep mountains and a cold climate, so rice cultivation was very difficult. Instead, soba (buckwheat) became the main crop, with Nagano yielding the 2nd highest production by volume in Japan, only behind Hokkaido.
Oyaki may not be fancy food, but these humble treats from Nagano are a symbol of necessity, comfort, and sustainability.
How Oyaki is Cooked
Oyaki were traditionally cooked and charred in the ash of an open fire in an irori (囲炉裏) hearth. These days, oyaki at specialty stores are typically roasted on an iron pan, then either steamed or broiled before enjoying piping hot.
To cook oyaki at home, you can try one of these methods:
- Steamed
- Pan-fried then steamed
- Steamed and then pan-fried
- Deep-fried
Personally, I like to pan-fry oyaki first to give them a nice char, and then steam till they are cooked. But I encourage you to try a few methods to find your favorite way of preparing Japanese stuffed dumplings.
Popular Fillings for Oyaki
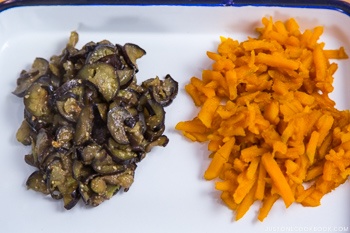
The type of fillings (or An 餡 in Japanese) for oyaki vary with region, with each area having its own local specialty. Today’s Oyaki recipe includes sweet and savory kabocha squash and miso-glazed eggplant fillings. They are very popular fillings for Japanese dumplings.
But there are endless choices of ingredients to stuff oyaki with. Here’s a list to give you some ideas to play with:
- Nozawana (a pickled leafy green famous in Nagano)
- Various mushrooms
- Kiriboshi Daikon (recipe coming soon!)
- Negimiso (leeks and miso)
- Walnut miso
- Hijiki seaweed dressed with walnut
- Sweet azuki read beans (anko)
- Sesame miso
- Potatoes
- Fukinoto (butterbur sprout)
- Fukinoto miso
- Warabi (bracken)
- Japanese sweet potatoes
- Gobo (burdock root)
- Kinpira Gobo
- Local Shinshu salmon
- Jidori chicken
- Apple
These ingredients are often seasoned with soy sauce or miso for savory dumplings and sweetened with sugar for sweet dumplings. The dough doesn’t have much taste, so make sure to add extra flavor to the fillings so the oyaki won’t taste bland.
There are so many creative fillings and seasonings to try. Have fun experimenting with new flavors!
How to Serve Oyaki
Oyaki is a great snack or side dish for a meal. Serve oyaki with a cold beer in the summer and hot tea in the winter. And when you have a chance to visit Nagano Prefecture, don’t forget to try these healthy and delicious snacks in specialty shops and food stalls!
Wish to learn more about Japanese cooking? Sign up for our free newsletter to receive cooking tips & recipe updates! And stay in touch with me on Facebook, Pinterest, YouTube, and Instagram.
Oyaki (Japanese Stuffed Dumplings)
Ingredients
For the Dough
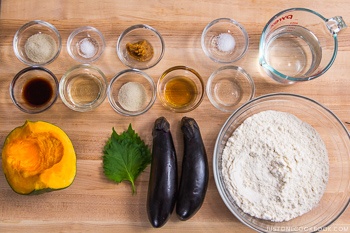
- 2½ cups all-purpose flour (plain flour)
- 200 ml boiling water (1 cup minus 2½ Tbsp)
- 1 tsp neutral oil
- ¼ tsp Diamond Crystal kosher salt
For the Eggplant Filling
- 2 Japanese or Chinese eggplants
- 1 Tbsp toasted sesame oil
- 1 Tbsp sugar (you can reduce if you‘d like; the dough tastes rather bland, so make sure the filling has a strong flavor)
- 1 Tbsp miso
- 2 shiso leaves (perilla/ooba) (julienned; optional)
For the Kabocha Filling
- 12 oz kabocha squash (¼ kabocha with seeds)
- 1 Tbsp neutral oil
- ¼ cup water
- 1 Tbsp sugar (you can reduce if you‘d like; if you prefer a more savory taste, you can increase the amount of soy sauce but you will need to add some sugar to balance out the salty flavor and can‘t omit it completely)
- 1 tsp soy sauce
- 1 pinch Diamond Crystal kosher salt
For Cooking
- 1 Tbsp neutral oil
Instructions
- Gather all the ingredients.

To Make Dough
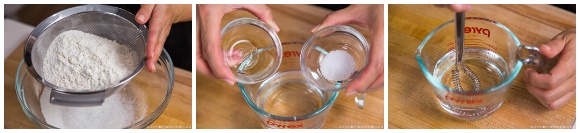
- Using a fine-mesh strainer, sift 2½ cups all-purpose flour (plain flour) into a large bowl. Combine 200 ml boiling water (1 cup minus 2½ Tbsp), 1 tsp neutral oil, and ¼ tsp Diamond Crystal kosher salt.

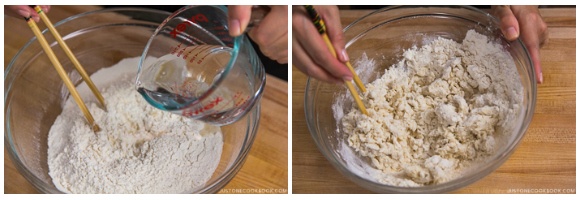
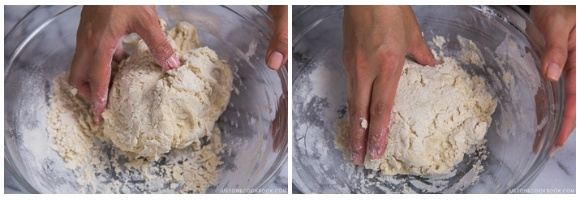
- Mix the dry ingredients and wet ingredients with chopsticks until you can pick up the dough with your hands.

- Use the dough to pick up the crumbs in the bowl.
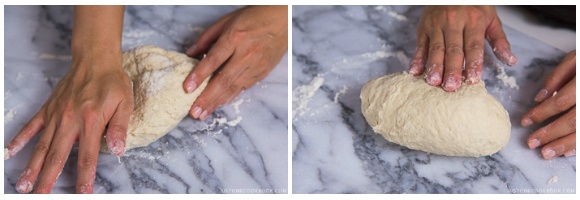
- Knead on a lightly floured surface for about 3 minutes, until a smooth dough forms. In Japan, we say “knead until the texture is like your earlobe.”
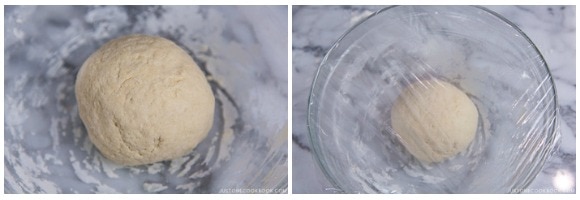
- Form the dough into a ball, put it back in the bowl, cover with plastic wrap, and let it rest at room temperature for at least 30 minutes or longer. Letting the dough rest increases its elasticity making it easier to work with later, so please don‘t skip.
To Make the Eggplant Filling
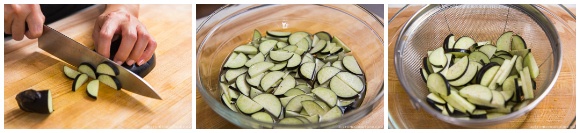
- While the dough rests, make the fillings. Remove the stems of 2 Japanese or Chinese eggplants and cut it half lengthwise. Then, slice into half circles. Soak in water for 5–10 minutes. (Meanwhile, you can cut the kabocha). Drain well and set aside.
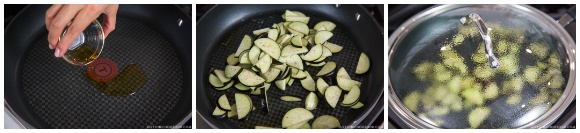
- Heat 1 Tbsp toasted sesame oil in a large frying pan and sauté the eggplant until it is coated with oil. Cover the lid and cook on low heat for 5 minutes.
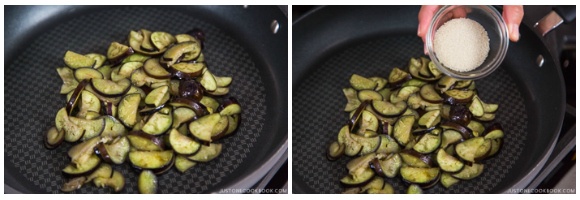
- When tender, add 1 Tbsp sugar and combine well.
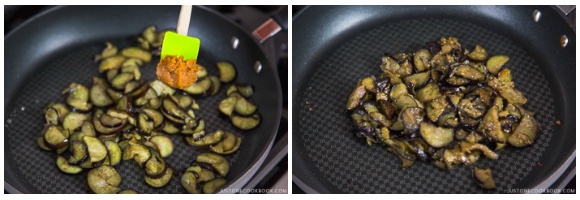
- Add 1 Tbsp miso. Add 2 shiso leaves (perilla/ooba) that you‘ve julienned into thin strips. Mix well together. Transfer to a dish to let cool.
To Make the Kabocha Filling
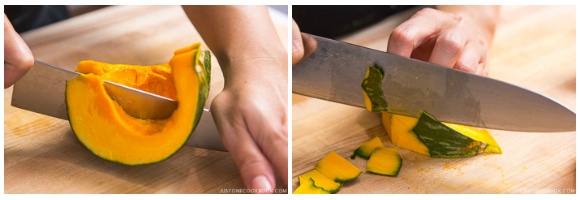
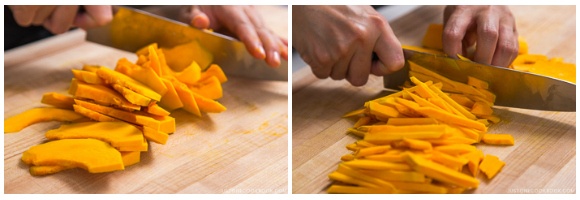
- Cut 12 oz kabocha squash into smaller wedges and remove the skin. (See my post on How To Cut a Kabocha Squash.)
- Cut each wedge into thin slices and then cut into thin strips.
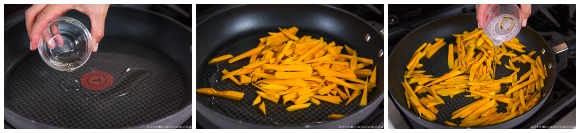
- Heat 1 Tbsp neutral oil in the frying pan and sauté the kabocha. When it’s coated with oil, add ¼ cup water and cook covered for 5 minutes on low heat.
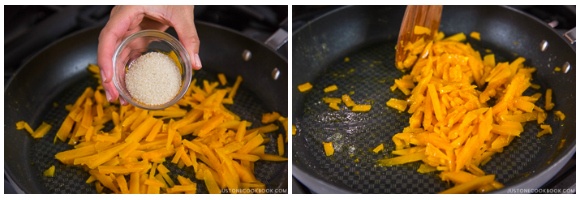
- Add 1 Tbsp sugar and combine well.
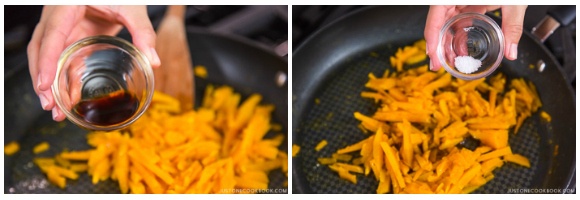
- Add 1 tsp soy sauce and 1 pinch Diamond Crystal kosher salt. Mix well together.
- Transfer to the dish to let cool.
To Shape into Oyaki
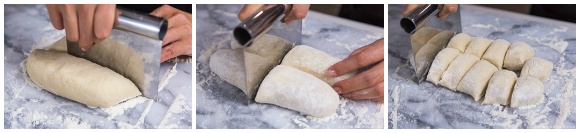
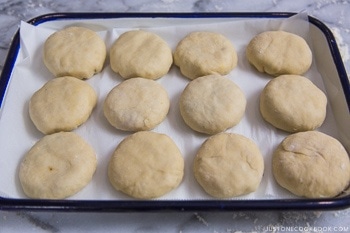
- Roll out the rested dough into a rectangular or circle shape and divide it into 12 pieces.
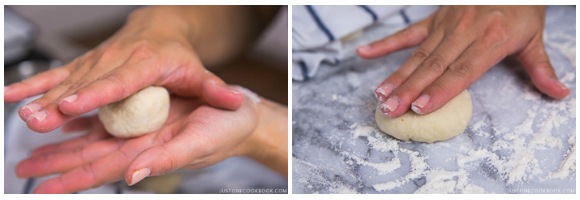
- Make each dough into a ball then press down with your hand.
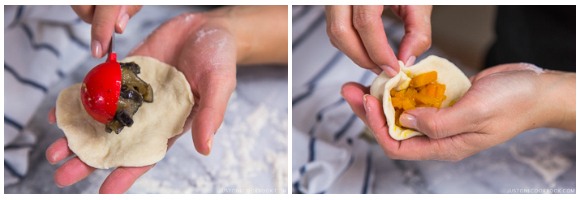
- Stretch the dough to 10 cm (4 inches) in diameter. The important trick is to keep the center thicker than the edges. Using your fingers, stretch the outer edges by rotating the dough. This way, when you pinch the dough to seal, the dough won’t be too thick/too much.
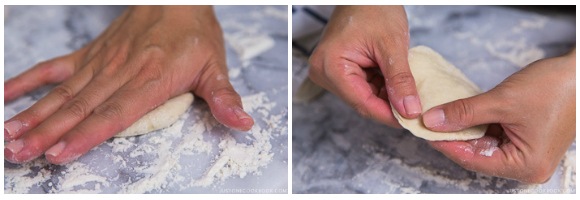
- Place about 1 Tbsp of the filling in the center of each piece of dough. Close the oyaki by bringing the dough up over the filling, pinching at the top to seal.
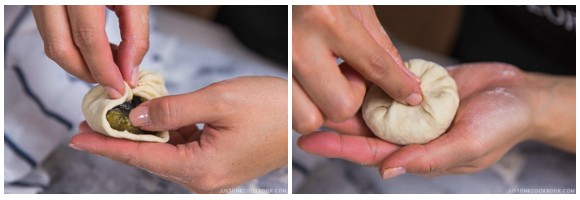
- I use the same pleating technique as my Nikuman recipe (see the video on how I close the dough and pinch).
- After pinching the dough, put the pinched-side down on a lightly floured surface and twist a few times. Then press the top of the oyaki a little bit into a slightly flat ball.
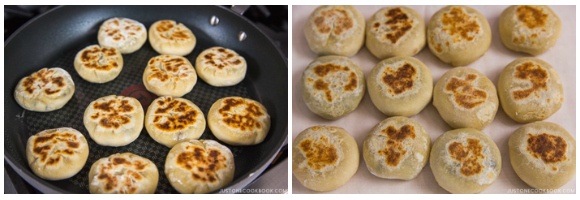
To Cook the Oyaki
- Set up a steamer by placing a steamer basket on top of a wok/pot filled with enough boiling water. Tip: If you don’t have a steamer, after cooking the oyaki in a frying pan, add ¼ cup water to the pan. Cover with a lid and steam it until the water evaporates.
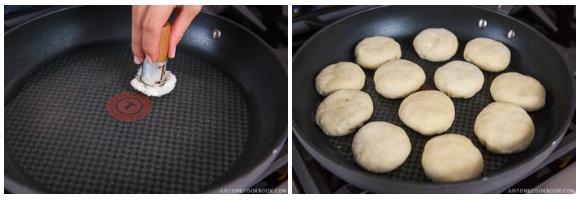
- Heat 1 Tbsp neutral oil in a frying pan (12 inch) and cook the oyaki, pinched-side down.
- Pan-fry for 3–4 minutes each side, or until golden brown.
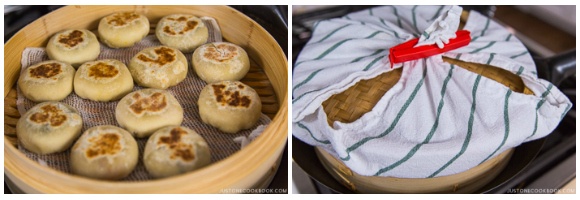
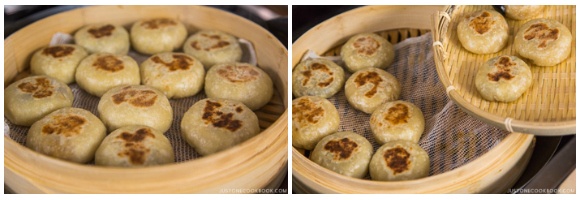
- Transfer the oyaki to a steamer basket and cover to cook on high heat for 15–20 minutes (depending on the size of the oyaki and filling—a small one should take about 10 minutes). Make sure the lid is covered with a kitchen towel so the condensation on the lid doesn’t fall onto the oyaki.
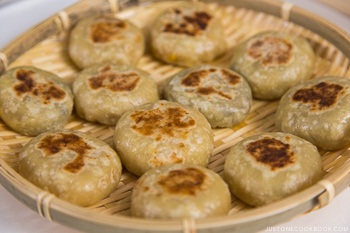
- When they are done steaming, transfer to a wire rack (I use a bamboo strainer) where the heat can escape from the bottom.
To Serve and Store
- Enjoy the Oyaki immediately. As soon as they become warm, not hot, cover the leftovers with plastic wrap (I wrap individually). Don’t wait until completely cooled down. You can freeze to store for up to a month, and re-steam to enjoy later.


Is there a way to make them with only buckwheat flour? We have a friend who can’t have any grains but buckwheat is safe for her. Or she can have other non-grain flours like cassava, chickpea, arrowroot, etc. I will try your version but want to figure out how to make them for her too.
Hi, 10ToesinSC. Thank you so much for taking the time to read Nami’s post and try her recipe!
We did not test this recipe with buckwheat flour, but Oyaki can be made with buckwheat flour.
Please adjust the hot water amount as needed to get the right texture.
What kind miso do you use? Any specific color? I’m not experienced with miso.
Hi SylF! Thank you for reading Nami’s post and trying her recipe!
Nami usually uses a product called Kodawattemasu by Hikari Miso. But you can use any kind of Miso you like.
Here is the post link about different types of Miso: https://www.justonecookbook.com/miso/
We hope this helps!
if using buckweed and wheat flour taste better or 100% buckweed?
How does buckweed oyaki taste like?
Hi EB Ong, Thank you for reading Nami’s post and trying her recipe.
We did not test this recipe with buckwheat flour, but you can make Oyaki either way. The buckwheat flour has a bitter and roasted flavor, and if you like the flavor, you can increase the amount of buckwheat flour.
We hope this helps!
My nasu are coming in… Can I freeze these prior to cooking, or is it best to cook them first? This’ll be a great way to use THE MOUNTAINS of shiso coming in as well haha…
Always down to make a tasty dumpling!
Hi Lesley! Thank you for trying Nami’s recipe!
We recommend cooking them first and freezing them. Please see the instruction at the end of the recipe.
We hope this helps!
Made these with a filling of collard greens, mushrooms and shallots (with miso). Whole family LOVED them. Thank you!
Hi Dorothy! Excellent! It sounds very yummy!
Thank you very much for trying Nami’s recipe and sharing your cooking experience with us.
Happy Cooking!🙂
Hi Nami! Thank you for this sccrumptious recipe. I’d love to try and I am curios about the buckwheat flour and regular flour you mentioned. Is it a 50/50 proportion? Thank you as usual for the great work!
Hi Francesca! Thank you very much for reading Nami’s post!
You can do 50% buckwheat flour with 50% all-purpose flour. 100% buckwheat with more boiling water would work as well.
We hope this helps!🙂
Made these today to eat throughout the week – are they okay cold? Or is my only option to reheat by steaming them and eating them cold? I froze them and read you can steam them to reheat, but if I could do that and eat it cooled during the day it would save me a lot!
Thank you!
Hi Paula, Thank you very much for trying Nami’s recipe!
We recommend reheat them and enjoying warm Oyaki. Unfortunately, Oyaki tends to get hard and chewy when it gets cold.
However, if you would like to eat them cold, you can put them in an air-tight container in a refrigerator for up to 2~3 days instead of freezing them.
We hope this helps!
You say in the post buckwheat is used but I don’t see it in your recipe. What’s the usual ratio of wheat flour to buckwheat?
Thanks
Hi Tori! Thank you very much for reading Nami’s post!
You can do 50% buckwheat flour with 50% all-purpose flour. Some do 100% buckwheat with more boiling water too.
We hope this helps!