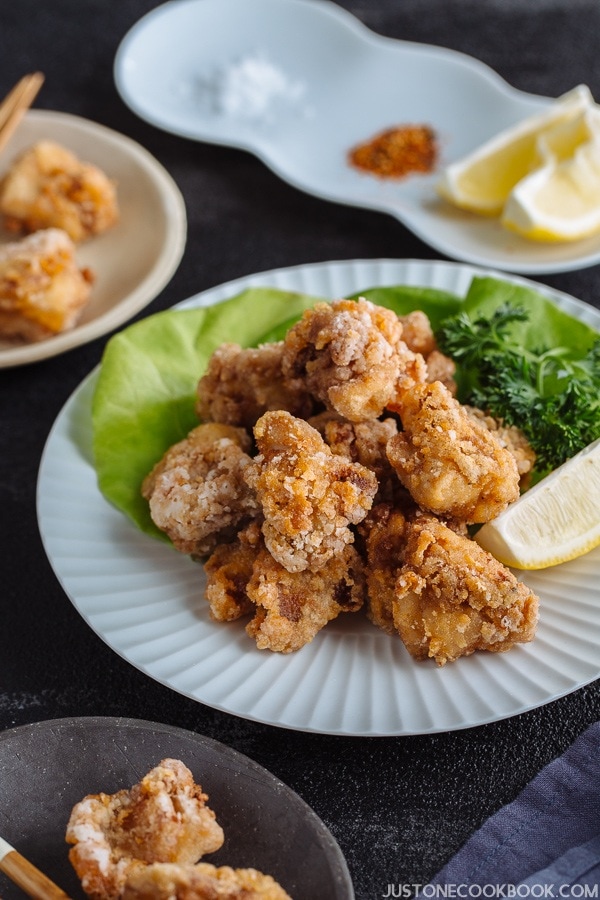
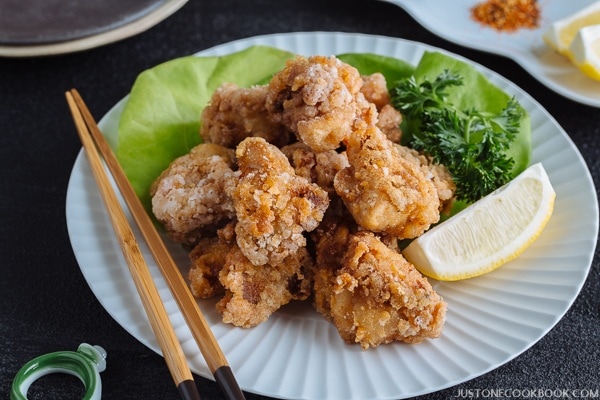
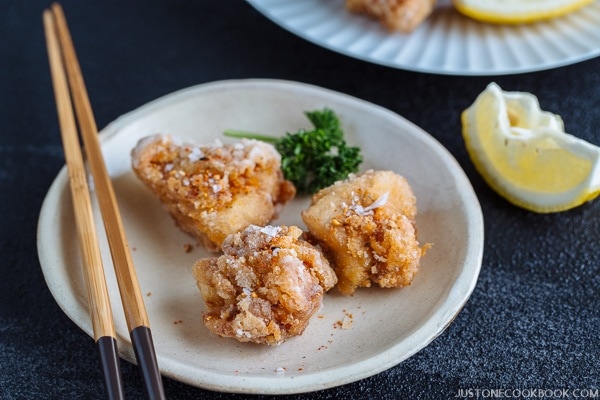
Crispy and crunchy on the outside and juicy and tender on the inside, this delicious Gluten-Free Karage is for everyone who loves Japanese fried chicken.
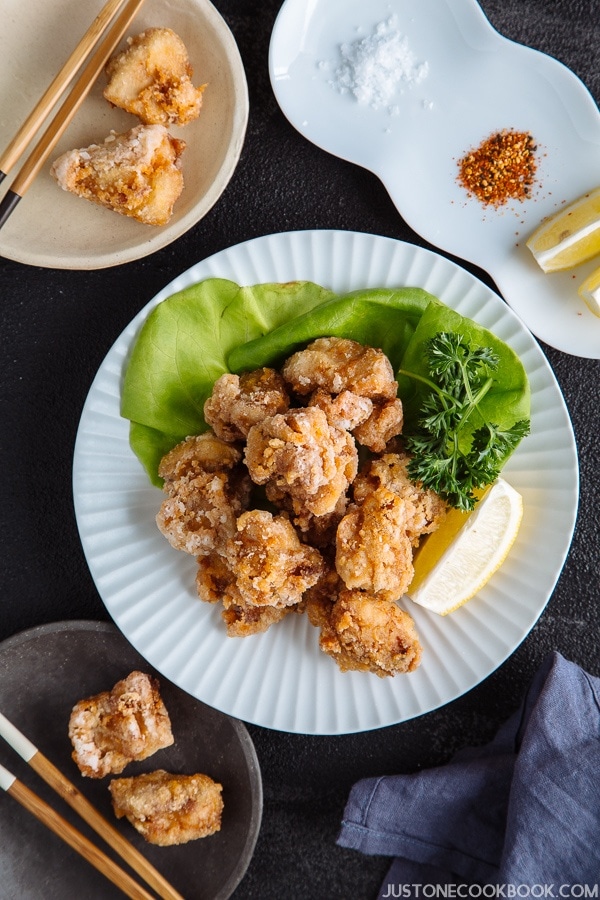
Karaage (唐揚げ) is a Japanese version of fried chicken, famous for its juicy meat and crispy shell. It’s one of the popular appetizers at Japanese restaurants and izakaya (tapas) style restaurants, but in Japan, it’s also enjoyed as a main meal at home or teishoku (Japanese set-meal) style restaurants.
Some dishes are harder to convert into gluten-free options, but not for today’s recipe. This Gluten Free Karaage (グルテンフリー唐揚げ) is so easy to make that I honestly feel this karaage is much better in texture than my regular karaage that uses soy sauce and flour.
So, if you were going to make karaage for everyone, including those who are gluten intolerant, don’t make two versions; just make this recipe!
3 Tips for the Best Gluten-Free Karaage
1. Use Skin-On Chicken Thigh
If you are looking for the authentic and ultimate experience to enjoy chicken karaage, you have to get skin-on chicken thighs. It is a necessity, not an option. Again, not skinless, not chicken breasts.
Although it’s higher in calories, chicken skin contains a good amount of heart-healthy unsaturated fat. Cooking the chicken with the skin on helps keep the meat moist and flavorful.
An American butcher sells skin-on chicken thighs with bones, so you can ask the butcher to remove the bones for you or do so easily at home.
2. Rice flour to Potato Starch ratio
For regular karaage, the chicken is marinated, and then coated with wheat flour, potato starch, or a combination of both. However, for gluten free version, we are using rice flour instead of wheat flour, just like Gluten Free Tempura recipe. I personally like the combination of rice flour and potato starch (ideally potato starch, not corn starch), and after I’ve played with the ratio, I like somewhere between 4 to 1 (4 parts potato starch, 1 part rice flour). You can try different ratios and see which ratio gives you the crispiest crust for chicken karaage.
3. Double Fry
Double frying is a must, and here’s why. After the chicken pieces have gone through the first fry and cooled, moisture inside the meat moves to the surface, and that’s when the crispy shells get soggy. Therefore, you deep fry them for the second time to make them extra crunchy again.
Also, while resting for the second fry, the chicken will continue to cook with the remaining heat. The chicken will get drier if you continue cooking with high heat, so double frying does the job for both inside and outside the chicken.
How to Enjoy Gluten-Free Karaage
Now that you have learned how to perfect gluten-free karaage, you want to know how to enjoy it in authentic Japanese style!
Here are some variations on how you can enjoy every piece of chicken karaage.
1. Classic style – lemon juice
Karaage is always served with lemon wedges so you can squeeze some lemon juice over the karaage. Lemon juice helps with digestion and gives a sour note that diminishes the fat sensation of fried food.
2. Everyone’s favorite – Japanese mayonnaise
Next to lemon wedges, there is always a generous squirt of Japanese mayo (homemade recipe here). The Japanese love (Japanese) mayonnaise. Deep-fried foods like karaage, calamari, and chicken katsu always go well with Japanese mayo.
3. Make it light (so we can eat more!) – ponzu sauce
The Japanese like fried foods, but to make it lighter, ponzu sauce (homemade recipe here) is often used as a dipping sauce for deep-fried foods. Often, grated daikon and green onions are added to the ponzu sauce.
A winning crowd pleaser, you want to serve this ultra-crunchy gluten-free karaage at your next party. And don’t forget to bring out the beer (or sake)!
What Makes It Gluten Free?
Usually, Karaage is marinated with soy sauce (not GF) and then dusted with flour (not GF) or potato starch (GF), or a combination of the two. Everyone has different methods and recipes for making a rather simple fried chicken recipe.
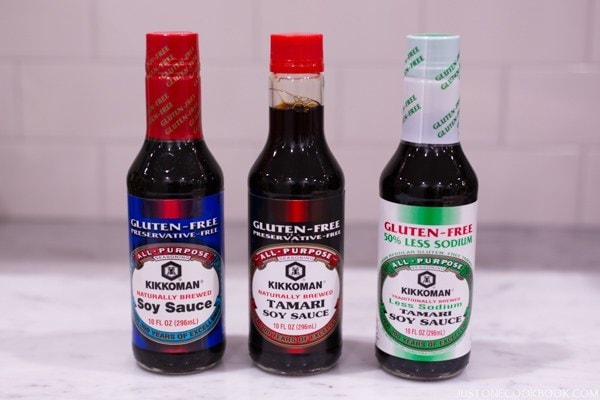
For the gluten-free version, I used Gluten-Free Soy Sauce and coated it with a combination of rice flour (GF) and potato starch (GF).
Potato starch gives crips texture, while rice flour creates an exceptional crunchy outer layer for the chicken. You are not missing anything from the regular version of karaage. In fact, I really think it yields a much superior texture.

Gluten Free Karaage
Video
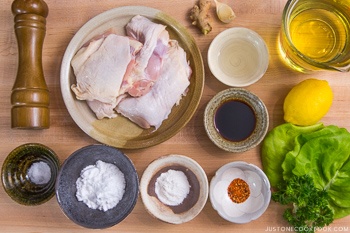
Ingredients
- 1.1 lb boneless, skin-on chicken thighs
- Diamond Crystal kosher salt
- freshly ground black pepper
- 4 Tbsp potato starch or cornstarch
- 1 Tbsp rice flour
- 2½ cups neutral oil
For the Marinade
- 1 knob ginger (1 inch, 2.5 cm)
- 1 clove garlic
- 2 Tbsp sake
- 2 Tbsp gluten-free soy sauce
For Serving
- lemon wedges
- parsley (optional)
- lettuce (optional; I used butter lettuce)
- shichimi togarashi (Japanese seven spice) (optional; for a spicy kick)
- Japanese Kewpie mayonnaise (optional; for dipping)
Instructions
- Before You Start…Please note that this recipe requires 30 minutes of marinating time.Gather all the ingredients.
To Marinate the Chicken
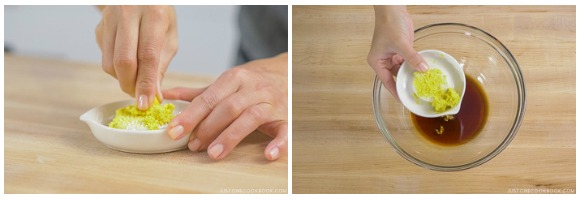
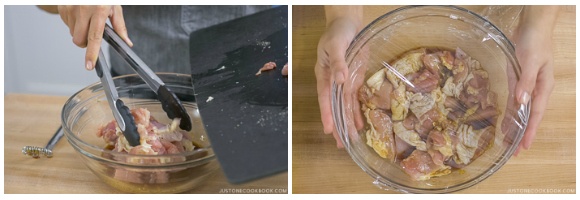
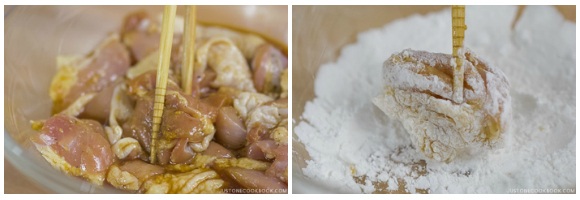
- Peel and grate 1 knob ginger and crush (or mince) 1 clove garlic. In a large bowl, whisk all the ingredients for the marinade: the grated ginger, the crushed garlic, 2 Tbsp sake, and 2 Tbsp gluten-free soy sauce.
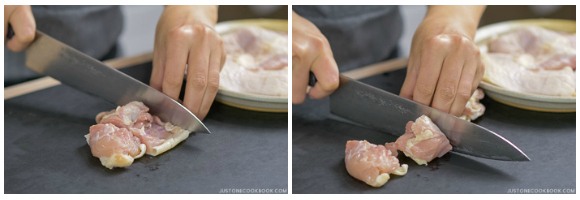
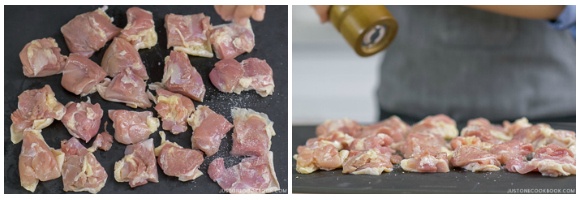
- Cut the 1.1 lb boneless, skin-on chicken thighs into 5 to 6 pieces per thigh, about 1½ inches (3.8 cm) each.
- Lightly season the chicken with Diamond Crystal kosher salt and freshly ground black pepper.
- Add the chicken to the marinade. Coat and rub the chicken with the marinade using your hands or tongs. Set aside for 30 to 60 minutes.
To Dredge the Chicken
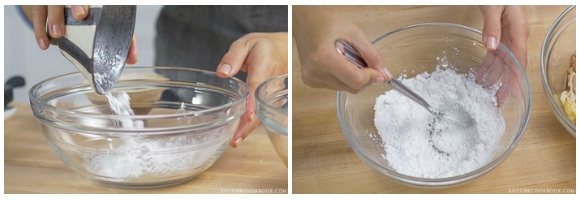
- In a medium bowl, combine 4 Tbsp potato starch or cornstarch and 1 Tbsp rice flour and whisk well.
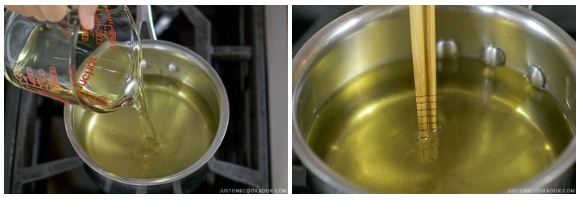
- In a pot, heat 2½ cups neutral oil to 340ºF (170ºC). I use a smaller 1½ QT pot, so that the oil is deep enough and I don‘t have to use much oil. Use a thermometer or wooden chopsticks to see if the oil is ready (for more details, see my post on How to Deep-Fry Foods).
- When the oil is hot, drain the chicken well from the marinade and coat each piece with the potato starch mixture.
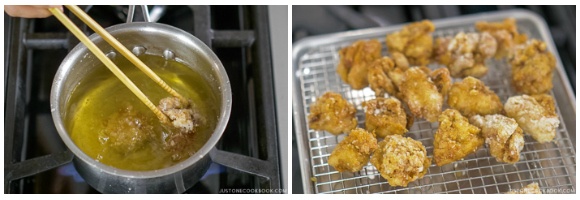
To Deep-Fry for the First Round
- Deep-fry for 90 seconds, or until the chicken is light golden color. Work with a few pieces at a time, so the oil temperature won’t drop quickly. I worked with 3 to 4 pieces at a time.
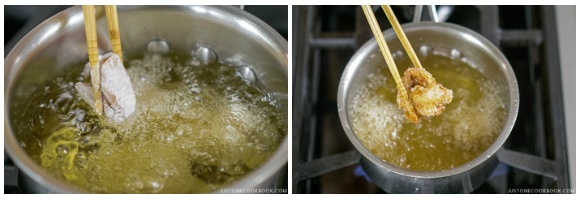
- Transfer the chicken to a wire rack to drain the excess oil. Let the chicken cook with the remaining heat while you work on the rest of the chicken.
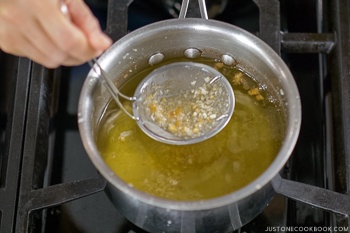
- Once the chicken is all deep-fried for the first round, use a fine-mesh sieve to pick up crumbs to keep the oil clean. If you don‘t do this step, the crumbs will get darker, which will make the oil darker.
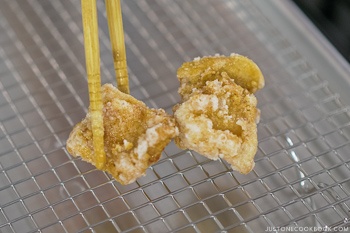
To Deep-Fry for the Second Round
- Increase the heat and bring the oil to 350ºF (180ºC). Deep-fry the chicken for the second time for 45 seconds or until crispy and golden brown. Transfer the chicken to a wire rack to drain excess oil.
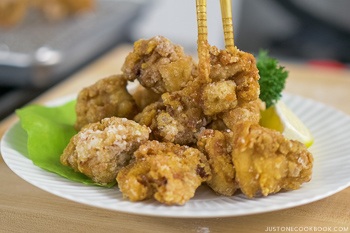
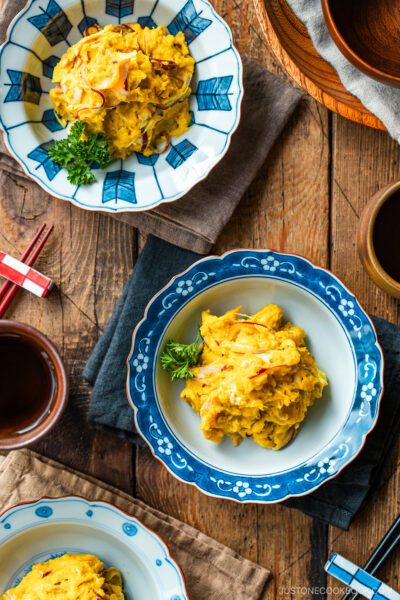
To Serve
- Serve the chicken immediately with lemon wedges, parsley, lettuce, shichimi togarashi (Japanese seven spice), and Japanese Kewpie mayonnaise. If you‘d like, squeeze with lemon before you eat and sprinkle shichimi togarashi for spice.
Nutrition
Full Disclosure: This post was sponsored by Kikkoman USA. Thoughts and opinions stated are my own.


Tasty. I didn’t salt the chicken and I am glad because it was a little too salty for me. I am not sure how crispy karaaage chicken is supposed to be. Mine came out not as crispy as I was hoping. I followed directions as written. Any suggestions as to how to make them crispier, or maybe they’re not supposed to be…? Id like to try this again since it was very tasty.
Hi, Amelia! Thank you for trying Nami’s recipe.
This Karaage is on the crispier side. If you’ve used cornstarch, try potato starch. It would be crispier.
Also, check the oil temperature; if it is too low, the Karaage batter will absorb more oil, resulting in a soggy texture.
We hope this helped!
HI:
Haven’t written for a long time, but enjoy your emails & site. My suggestion is:
why don’t you begin trying AirFryer recipes instead of deep fry in oil? We find
more of our cooking is using a wok & an Airfryer.
We think we are a bit more healthy!
Tom Champion
Hi Tom! Thank you for reading Nami’s newsletter and trying her recipes!
We are so happy to hear you enjoy them all, and we appreciate your kind feedback.🙂
Currently, Nami’s focus is to teach traditional cooking methods, and the majority of home cooks don’t have an Air fryer, so she is not planning to add air fryer recipes at this time. However, some JOC readers have successfully converted Nami’s recipes to an air fryer version.
For this recipe, you can try 390F for about 10 minutes. (You still have to spray some oil on the chicken to get the right texture.)
We hope this helps!
Hello! Due to a gluten and potato allergy, I tried it with corn starch and the texture really came out great. My friend said it tasted better than in an Izakaya, which made me very happy. Thank you a lot for adding the corn starch option to the recipe. It really makes me happy to be finally able to eat Karaage again. And to people who cannot use potato starch as well, don’t hesitate to try it with corn starch as well, as it also leads to a great outcome.
Hi Barb! Aww. Nami and JOC team are so happy to hear corn starch worked out well, and you and your friend could enjoy Karaage!
Thank you very much for trying Nami’s recipe and for your kind words.
Great recipe. Made in the air fryer and turned out well.
Hi Aemk! Thank you very much for trying Nami’s recipe and for your kind feedback!
We are glad to hear this recipe worked out well with the air fryer!🤩 Thank you for sharing your cooking experience with us!
How long did you air fry it for? Did you air fry it twice at 340° and 350° like in the recipe?
My girlfriend is both allergic to wheat and gluten intolerant, and this is her favorite recipe… since she wasn’t taught how to cook as a child I always have to make it for her! unfortunately last time we made it she had to go to the store as I was busy and she bought 4x the chicken we needed by “mistake” and I was frying for over two hours! Despite this, I would make it again. I prefer it to the wheat version as well, so she will get to enjoy it many more times 🙂
Hi Shehla! WOW! Two hours of frying! 🤩
Thank you very much for trying Nami’s recipe and sharing your story with us! You are amazing!
I made this recipe this evening. I added some sesame oil to the marinade, like you did in your regular karaage recipe. The amount of marinade in this recipe is rather generous, but not abundant. It is a simple recipe, but the taste and texture is wonderful. The combination of potato starch and rice flour indeed results in a superior coating. I will certainly make this excellent recipe many more times in the future. Thanks Nami!
Hi Fred! We are glad to hear you enjoyed the Karaage!
Thank you very much for trying Nami’s recipe and sharing your cooking experience with us! Happy Cooking!🤗
I love all the fried dishes but I now own an air fry and would like air fry recipe
Hi Maelene, Thank you for reading Nami’s post.
We currently don’t have the recipe on the site. We’ll consider adding the recipe to Nami’s list.🙂 Thanks for your request!
Hi Nami or Naomi,
Thank you for your recipe. I will certainly try it.
I noticed that you use a lot more liquid (2 Tbsp + 2 Tbsp) in this gluten-free karaage recipe than in your regular karaage recipe (1/2 Tbsp +1/2 Tbsp + 1 tsp), while using less chicken (1.1 lb versus 1.5 lb). Is there a special reason for this? From J. Kenji Lopez-Alt I learned that liquid plays an important role in making coatings crispy. The liquid vaporizes during deep-frying, creating airholes in the coating (= more surface area = extra crispness). Was that the reason?
Thank you.
Fred
Hi Fred! Thank you very much for reading Nami’s post!
Yes. We agree that liquid plays an important role in making coatings crispy.
However, Nami didn’t check the other Karaage recipe when she tested this recipe, so the marinade amount difference is not intentional. Moreover, She takes detailed notes while she tests recipes, and each recipe is the best result of her finalized work.🙂
We hope you can try both recipes and see if you like one over the other one.
Thank you so much for the gluten free version of this recipe. I made it yesterday and it was so good.
I used drumettes as that is what I had available at home. They were crunchy and the best I ever made.
I developed a contact wheat allergy about eight years ago and follow a strict avoidance of all wheat.
Hi Irene, We are so glad to hear you enjoyed the Gluten-Free version. Thank you very much for trying this recipe and for your kind feedback!
Hi Kazu,
Thank you very much for your kind feedback!
Muito obrigado!