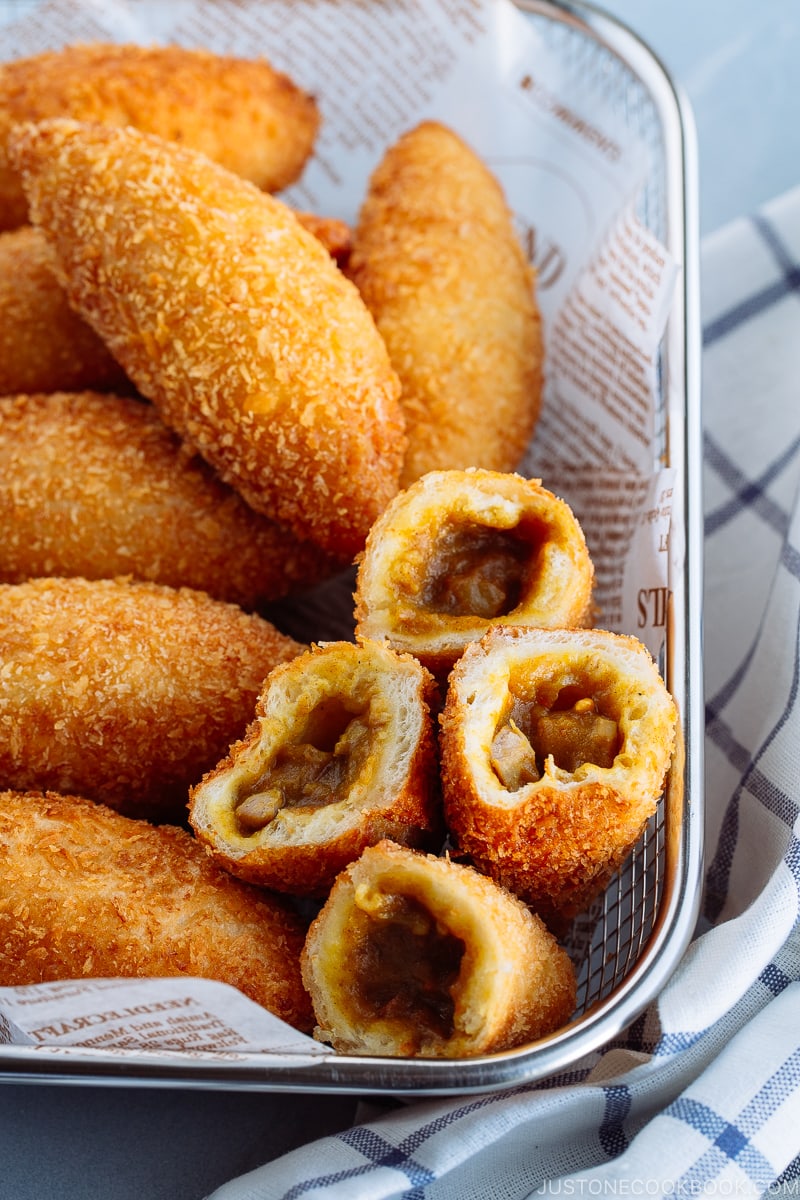
With its savory filling, chewy and springy bun, and crispy panko coating, Japanese Curry Bread—or Kare Pan—is the star of pastries at Japanese bakery shops. If you are a fan of Japanese curry rice, you have to make this insanely delicious bread bun recipe at home.

Kare Pan (カレーパン), or Japanese Curry Bread, is one of the most popular savory pastries at Japanese bakeries, along with Yakisoba Pan. There’s nothing more satisfactory than biting into a warm, crispy, and chewy bread that reveals mildly spiced Japanese curry inside, like a passageway to pure happiness. I know you’ll be obsessed with this homemade curry bread once you make it.
What is Curry Bread (Kare Pan)?
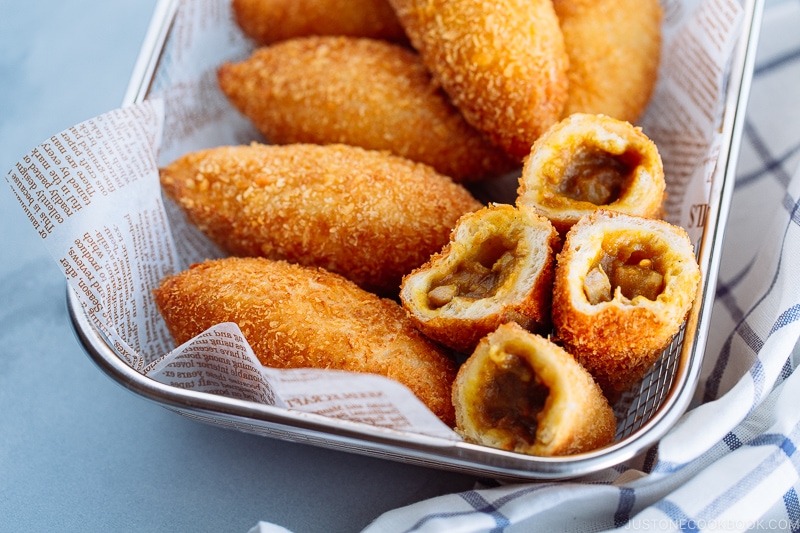
Curry bread (kare pan) is Japanese curry encased in bread dough, lightly covered in panko bread crumbs, and then deep-fried till golden brown. Justifiably qualified as comfort food, you can find these curry bread at bakeries and convenience stores throughout Japan. They are enjoyed for breakfast, lunch or snack, or any time of the day in my case.
Mr. JOC won’t leave a bakery shop in Japan without purchasing curry bread, and he’s always searching for the best one. I asked what is considered the best curry bread, and he said:
- The outside crust should be crispy when you bite into it.
- The bread should be chewy but not too thick.
- It shouldn’t be oily even though it’s been deep-fried.
- A good amount of curry should be filled throughout the bread.
As you can see, I have a tough customer at home. Since I welcomed a good challenge, I took it up as an encouragement to develop a good recipe!
There’s nothing fancy about the homemade curry bread. They are just downright tasty. Although it can be time-consuming, it’s totally worth the effort and time because you’d be rewarded with the tastiest bread. The triumph feeling is worth celebrating. I’d make this bread at least every quarter of the year!

The Japanese Curry Filling
The best part about making your own curry bread at home is that you can stuff the bread with your favorite, delicious curry! Plus it’s the perfect way to use up one big batch of Japanese curry. You will only need about 1 1/2 cup worth of leftover curry. It has to be chilled, so leftover curry from the previous night makes the most sense for this recipe.
You can make Japanese curry with any ingredients you like. I used my Japanese Chicken Curry recipe for my curry bread. You can use other types of meats as well.
The curry next day should be in a thick paste form as you will be bundling up the curry filling in bread dough. Soupy curry is a no-no. Once you refrigerate your curry, it will solidify and easier to handle. Just take out the curry when you start making the bread, so it reaches room temperature by the time you fold it up in the dough.
3 Important Cooking Tips
1. Thin out the dough only at the edge
I learned from my experience that I enjoy curry bread more when the dough has a chewy texture. Initially, I thought I prefer thinner bread because it has a nice crispy texture. But when I tasted the chewy and springy bread, I knew the whole curry bread experience got elevated.
To achieve this, it’s important not to roll out the dough too thin. The best way is to thin out only the edges of the round dough with fingers, keeping the center thicker. So when you fold and pinch the edges, the seam won’t be too thick and doughy, and the bread has even thickness throughout.
2. Do not overfill the curry paste
I’ve made this mistake and learned the hard way. When you place the curry filling on a round sheet of dough, make sure you have PLENTY of space around it so you can pinch the dough easily and tightly. You don’t want to overfill because if the curry touches the edge of the dough even a little bit, the pinched dough may pop open and the curry filling will fall out easily during the proofing and deep-frying stages.
If you accidentally made the mistake, here’s what you can do.
a) If the pinched dough is opened up before deep-frying, you can toast the panko first until golden brown, then bake the bread at 375 ºF (190 ºC). This is the same technique as my Baked Tonkatsu/Chicken Katsu recipes.
b) If the dough opened up during deep-frying, you want to immediately stop deep frying, instead gently remove the bread dough from the oil, pop them straight into the oven at 375 ºF (190 ºC) and bake until golden brown.
3. Flip the bread as soon as you place it in the oil
During the second proofing stage, the sealed side is on the bottom, and the dough is rising up. Now when you deep-fry, you will again place the sealed side down first. As deep-frying starts, the dough continues to rise from the bottom (seam side), and it tends to rise way too much, creating a cave inside the bread.
My high school friend Takafumi who used to work at a bakery in Japan shared a pro tip with me when I was struggling with this. He told me that you will need to flip the bread a couple of seconds after you place the dough in the oil, stopping the dough to rise in the same direction. This actually works magically! No more big cave in the bread!
Now that I’ve perfected my Kare Pan recipe, Mr. JOC no longer has to go out his way to hunt down the best curry bread because the best is always the homemade type. Are you ready for your Japanese curry bread mastery? Let’s get started!
More Fun and Delicious Snacks
Wish to learn more about Japanese cooking? Sign up for our free newsletter to receive cooking tips & recipe updates! And stay in touch with me on Facebook, Pinterest, YouTube, and Instagram.

Curry Bread
Ingredients
- 1¼ cups bread flour (weigh your flour; for weights, click the Metric button; or use the “fluff and sprinkle“ method and level it off)
- 50 g cake flour (⅓ cup + 1 Tbsp; you can make cake flour at home)
- 1 tsp Diamond Crystal kosher salt
- 15 g sugar (1 Tbsp + ½ tsp)
- 125 ml whole milk (½ cup + 1 tsp; I highly recommend whole milk instead of nonfat or reduced-fat milk)
- 1 tsp instant yeast (to use active dry yeast, see Notes at the end of the recipe)
- 10 g unsalted butter (a bit less than 1 Tbsp (14 g); at room temperature)
- 1½ cups Japanese curry of your choice (at room temperature; made the day before and refrigerated overnight; aim for a solid, pasty texture; you can make my Beef Curry, Chicken Curry, or Instant Pot Curry recipes)
- 1 large egg (50 g each w/o shell) (for coating the bread with panko)
- 1 cup panko (Japanese breadcrumbs)
- 4 cups neutral oil
Instructions
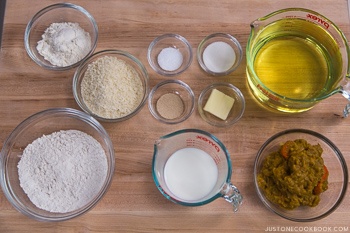
- Gather all the ingredients. Leave the unsalted butter and Japanese curry at room temperature. I highly encourage you to weigh your ingredients using a kitchen scale for this recipe. For weights, click the Metric button above to convert the measurements to grams. If you‘re using a cup measurement, please follow the “fluff and sprinkle“ method: Fluff your flour with a spoon, sprinkle the flour into your measuring cup, and level it off. Otherwise, you may scoop more flour than you need.
To Mix the Dough Ingredients
- In a large bowl, whisk together 1¼ cups bread flour, 50 g cake flour, 1 tsp Diamond Crystal kosher salt, and 15 g sugar.

- Microwave 125 ml whole milk until warm to the touch, about 95ºF (35ºC). Then, add in 1 tsp instant yeast to the warm milk.
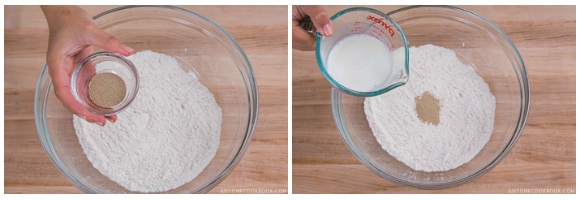
- Add the wet ingredients to the bowl with the flour mixture. Using a silicone spatula, combine together until it becomes a rough dough, about 1–2 minutes.

- Once the dough becomes a ball, add 10 g unsalted butter to the center of the dough and combine until the butter is well incorporated, about 2–3 minutes. At first, the dough will be sticky, wet, and oily and you might want to add more flour, but wait and try mixing it a little longer.

To Knead the Dough
- Once you don’t see any big chunks of butter, transfer the dough to a lightly floured surface. Knead the dough until it becomes smooth and pliable, about 5 minutes. Read the tip on kneading below.
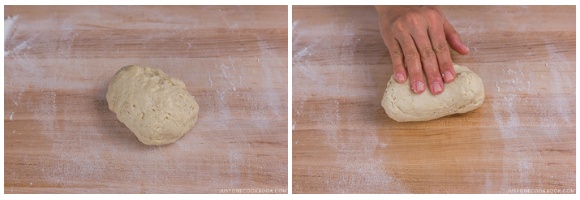
- Tip on kneading: Using the lower part of your palm, push out the dough. Then, roll back up as if you’re drawing the number “8” with your hand. Rotate the dough 90 degrees every time you finish drawing a figure 8.

- After drawing a figure 8 a few times, bang the dough onto the work surface and fold it over away from you. This helps develop the gluten (elasticity). Turn the dough 90 degrees and repeat drawing the number 8 again. Continue this process until the dough is smooth, supple, and silky.
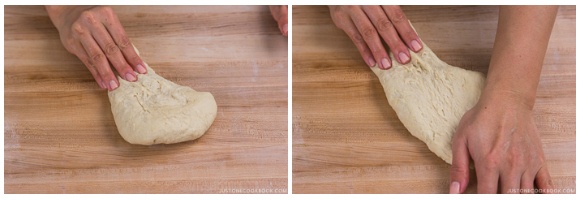
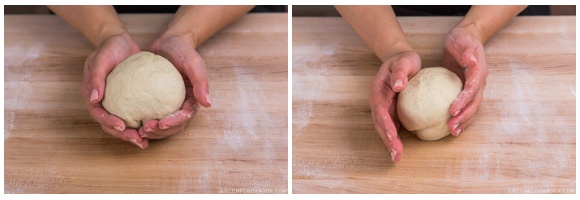
- When the dough is moist, smooth, and pliable, form it into a ball. Place the seam side down on the working surface and twist the ball a few times to close the seam.
The First Rise (Bulk Fermentation)
- Place the dough back in the bowl, seam side down. Cover with plastic wrap. Let it rise at 100ºF (38ºC) for 60 minutes, or until doubled in size. I used the proof setting in my oven. Tip: See my Shokupan post for tips on creating a warm environment for your dough.
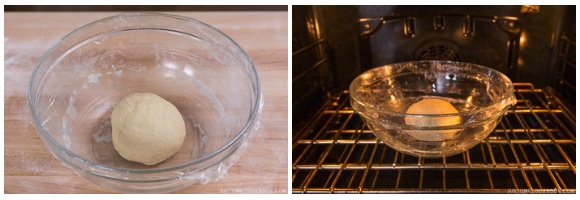
- To use the finger test, dust your finger with flour and poke the center of the dough. If the hole doesn’t close up, it’s ready to divide. If the dough closes up immediately, proof the dough a little longer and test again.

To Divide the Dough
- Transfer the dough to a lightly floured surface and gently punch/press it down.
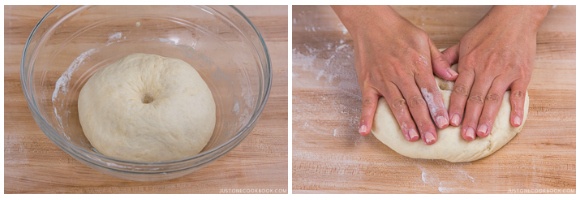
- Fold the dough into thirds widthwise.
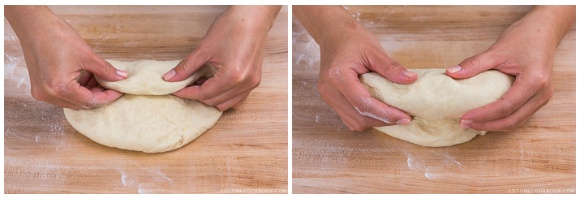
- Fold the dough into thirds lengthwise.
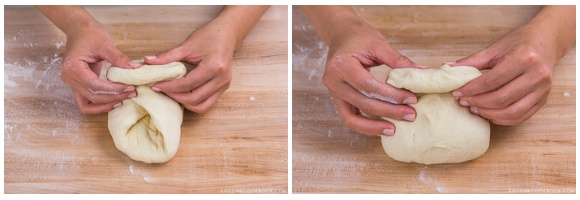
- Turn upside down so the seam is facing down. Twist the dough to form a nice ball shape.
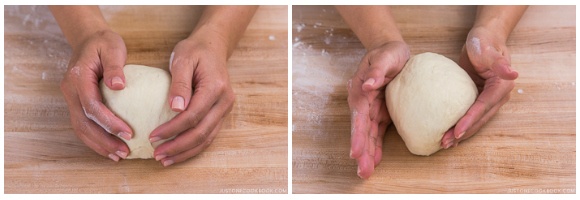
- Weigh the dough on a kitchen scale and divide the number by 8. Roughly cut the dough into 8 pieces.

- Weigh each piece of dough and cut off any extra if it weighs more than you calculated.

- Add the extra dough to the smaller dough piece(s). Hide the extra dough in the center of the ball by pulling down the dough from the sides.
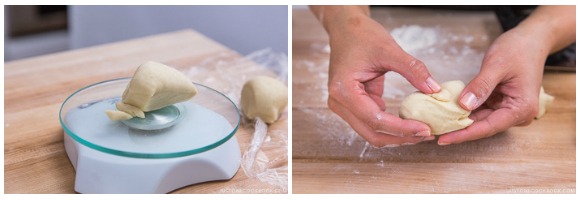
- Twist the dough to seal the seam on your hand. Place the dough balls on a baking sheet lined with a silicone baking mat or parchment paper. Cover with plastic wrap, and let rest for 15 minutes at room temperature.
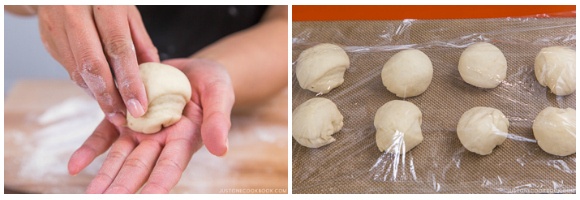
To Roll Out the Dough
- Working on one dough ball at a time, place the dough seam side up and flatten it with your hand. Fold in thirds widthwise.

- Fold in thirds lengthwise, and then turn it upside down so the seam side is on the bottom.

- Flatten again, and flip so the seam side is up.
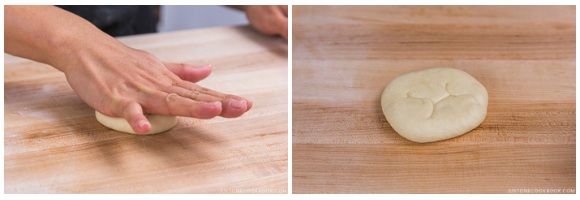
- With a rolling pin, roll it out into a 3½-inch (9-cm) circle. Repeat with the remaining dough balls.
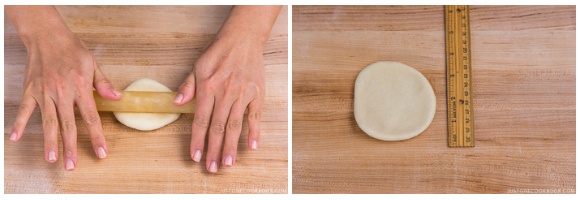
- Cover with plastic wrap and let rest for 10 minutes. One by one, pick up the dough circles. Pinch the edges with your fingers to thin them out while leaving the center thicker, to about 4 inches (10 cm) in diameter.
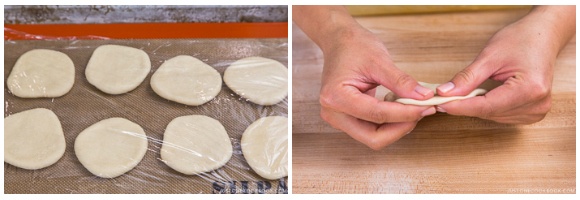
To Shape the Curry Bread
- Working on one dough circle at a time, place it seam side up. Gather 1½ cups Japanese curry of your choice. Add 1 to 1½ Tbsp curry sauce to the center of the circle. Do not overfill. Remember, KEEP THE CURRY AWAY from the edges! It’s the most crucial part. If you didn’t read my blog post, read tip #2 now in the post.
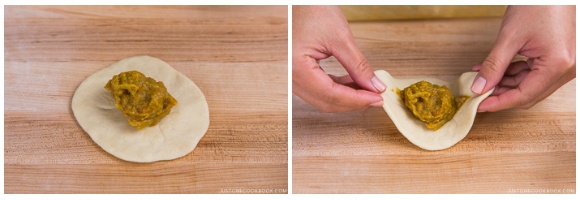
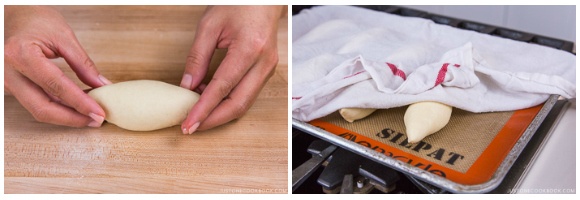
- Gather the opposing edges of the circle and fold the dough in half. Tightly pinch and press the edges to seal well so the seam does not open up during proofing and deep-frying.
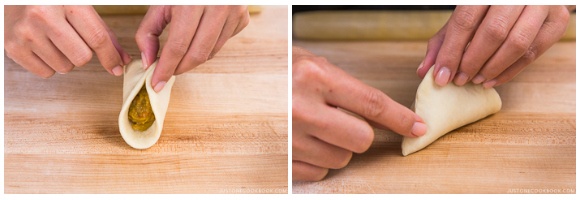
- Next, to double secure the seam, fold the edges over to one side at least once, like folding a brown paper lunch bag. Press the edges again to secure.
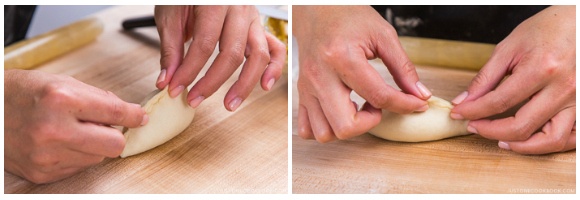
- Place the bread, seam side down, back onto the tray with the silicone mat. Cover with a damp towel while working on the rest of the dough.
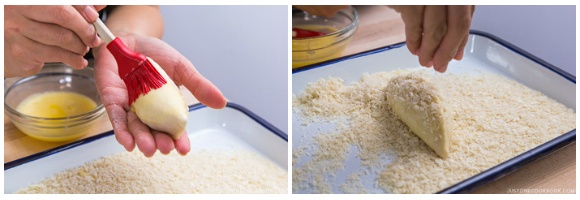
- Once you‘ve formed all the curry bread, crack 1 large egg (50 g each w/o shell) into a bowl and whisk well. Place 1 cup panko (Japanese breadcrumbs) in a shallow bowl/tray. Using a pastry brush, coat them with beaten egg and then panko.
The Final Rise (Proofing)
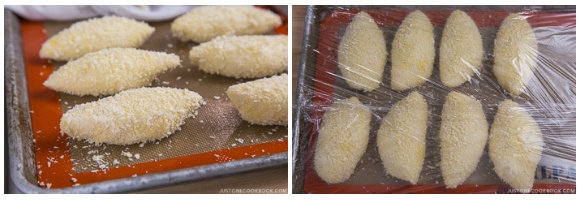
- Cover the bread with plastic wrap and let rise at 100ºF (38ºC) until 1½ times its size, for 45–60 minutes (I used the proof setting in my oven). If you touch the dough with your finger and the indentation remains, it‘s ready.
To Deep-Fry the Bread
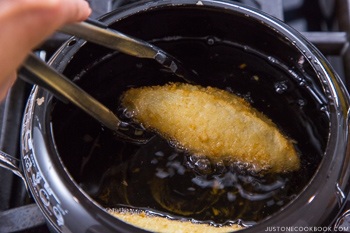
- If you‘re new to deep-frying, please read my post on how to deep-fry food at home for tips on safe and successful frying. In a deep-frying pot (I use a 2.75 QT Staub), heat 4 cups neutral oil to 320ºF (160ºC). Place 2–3 pieces of the curry bread into the oil, seam side down. After a few seconds, flip it over so the seam side is now up. You may need to hold it with a pair of tongs. Keep turning them while they deep-fry, until they cook to a golden brown, about 2–3 minutes. Drain the oil well and transfer to a wire rack or some paper towels to drain while it cools.
To Serve and Store
- Serve hot or at room temperature. Keep the leftovers in an airtight container and store in the refrigerator for 3 days or in the freezer for 3–4 weeks. To reheat, bake at 350ºF (177ºC) until warm inside.



Hi Nami,
The base recipe seems good, but unfortunately following your recommendations for proofing times and temperatures resulted in badly overproofed kare pan which couldn’t hold its shape for frying. Maybe Norwegian yeast is more active? Will try again with some adjustments.
Hi Sigve! Thanks for trying this recipe! Hmm… also room temperature too. My kitchen/SF is always cool, so my dough don’t overproof fast. It’s summer now and that might affect….
Hi Nami,
I made this recipe yesterday for my family. It turned out very delicious but I had a couple of questions. One is about the rolling. After separating into eight pieces and allowing the Delta rest even recommend doing a fold into thirds and another fold into thirds. After I did this it was very difficult to roll the dough into a circle. It was a square. Is the stuff really necessary? Also I felt that the bread needed more curry filling. Before you add a tablespoon and a half of curry do you chop up your veggies smaller? It just seems like it needed more curry in there to me. Also I was a little bit confused about the shaping. What do you mean when you say to fold the dough like you would a brown paper bag? My bread turned out a little bit lumpy and not perfect like yours. But it still tasted good! Last question… Would it be possible to farm these breads and freeze them so I could fry them in the morning on school days for my kids?
Hi Cristen! Thanks for trying my recipe and here are my answers.
1) Yes, you need to fold into thirds (it’s a very common method in bread making). I’m afraid you overknead the dough. The dough has developed too much gluten, causing the dough to be overly firm. When the gluten has been over developed due to too much kneading, it will be tight and have almost no give. So you have to probably let the dough sit and rest, untouched for a while. It should not be too difficult to fold into thirds.
2) You can add more curry filling. If the curry is more solid, it’s a lot easier too. And once you know how to seal the dough tightly, without the curry sauce touch the edges of the dough, you can put as much curry as you like. It’s easier to work with small amount of curry, because like I explained, it’s nightmare if the curry starts spreading and touch the edges of the dough. You won’t be able to close/seal the dough at all.
3) Folding like a brown lunch bag. American kids usually bring lunch in a brown paper bag, so that’s what I meant. It’s like a gift bag, and you fold the top of the bag (open side) 2-3 layers. That’s how you want to fold the edges of the dough. Not about shaping, but it’s more about the way you seal the edges.
Hope I answered your questions!
Hi,
Thank for your efforts to give us wonderful recipe. We had a good time having them this evening.
😀😀
Hi Sampath! Wonderful! I’m so happy to hear you enjoyed this recipe! Thanks for trying this. I miss eating this out of the fryer!
Can this be made in an air fryer?
Hi Kazuko! No, I don’t own an air fryer so I haven’t tried this with it. But I think you can. Inside the korokke is all cooked and you just have to fry the outer layer panko. 🙂
I found this recipe by chance and decided to give it a try since our beloved Curry House Restaurant closed without notice. The spicy curry pan was my son’s favorite thing to order. It was absolutely delicious. My son ate 4 without taking a breath and loved it. I made another batch to take to my mom’s house and she was really impressed! She’s originally from Kumamoto and is a great cook so that’s a real compliment. I made the miso butter cookies today (also delicious) and am going to try your other recipes as well. Thank you for the detailed instructions and pictures. Best of luck with your surgery and I wish you a speedy recovery!
Hi Dianne! I’m sorry to hear your favorite curry house restaurant closed. 🙁 But you made this (super time consuming) recipe!! I’m so excited and happy to hear your son enjoyed your homemade curry pan and your mom approved! 😀 Thank you for trying my recipes – glad to hear you liked miso butter cookies (I’ve been craving to eat this for some time now). And thank you for your well wishes! I finally can type with 2 hands! 😉
Hi Nami! Like all of your recipes, this one turned out great – it does take a long time (I just finished deep frying them and it’s 11pm haha) but they are so worth it!! This is one of my favorite things to eat as I am so glad I can make it at home now.
The oil temp of 320 was perfect to achieve a crisp and non oily exterior yet cook the bread at the same time too.
In case people are wondering if the dough can be done in a stand mixer, I made the dough completely in a stand mixer (just put the butter in once the dough starts to come together and the kneaded on med low for 5-6 more min).
I cannot stress enough how important it is to keep the edges clean. I only had one bread pop open during frying – so like you suggested, I let it get golden brown outside and then put it into an oven I had already heated to 375 just in case – which worked great. One suggestion would be to maybe include in the same step for heating the oil, for people to also preheat the oven to 375, just in case any break while frying – that way you can just pop the broken one on and keep going with the rest.
Hi Brenda! Hahaha I can feel your pain. It is such a time-consuming recipe! But it tastes so good!! Yes, thanks for mentioning that the dough can be made in the stand mixer. Thanks so much for sharing your detailed tip on “finishing up” in the oven for the bread that pops up! Very helpful!
Dear Namiko,
I am already a subscriber to your newsletter and I like your Japanese and other asian recipes.
I saw the link to the Japanese curry bread from a facebook post. I want to air fry the bread instead of deep frying it. Does the dough need to be modified for airfyng?
Thanks. I look forward to your reply.
Selena
Hi Selena! Thank you so much for your kind words. I don’t have an air fryer to test to see if it works or not… I “think” it should work considering that the curry filling is cooked and all things you need to do is to cook the bread/crust. You will need to try and test to see how long it takes and temperature… I wish I knew already so I could share the info but I am not sure. 🙁
Thank you for posting this recipe! I love kare pan so much. Can I freeze the unfried ones if I don’t want to make them all at once and want to save some for the future? Or should I just reduce the recipe and make only what I need each time?
Hi Jana! I think you can freeze fried ones, but don’t freeze the unfried ones. I haven’t tried it myself… I hope you enjoy this recipe!
can i make the bread dough in a breadmaker?
Hi darlyne! Yes, you can do that. 🙂
Quick question – can I make the dough and filling ahead of time or does it need to be made all at once? Thanks!
Hi Christine! I always make the filling ahead of time, but I make the dough when I make the recipe. You don’t want to over-proof the dough. 🙂
Hi, so excited to try this recipe but no matter how hard I pinched and fold and double fold, the bread keep opening at the seam on the last proof stage. What mistake do I make here ? I follow the recipe to the gram and size. Thank you.
Hi Tamara! I know why – the dough area gets oil from the curry and once the dough has oil on it, it doesn’t close. This is why I mentioned many times to be careful about keeping the edge clean.
2. Never ever overfill the curry paste
I’ve made this mistake and learned the hard way. When you place the curry filling on a round sheet of dough, make sure you have PLENTY of space around it so you can pinch the dough easily and tightly. You don’t want to overfill because if the curry touches the edge of the dough even a little bit, the pinched dough may pop open and the curry filling will fall out easily during the proofing and deep frying stages.
If you accidentally made the mistake, here’s what you can do.
a) If the pinched dough opened up before deep frying, you can toast the panko first until golden brown, then bake the bread at 375 ºF (190 ºC). This is the same technique as my Baked Tonkatsu/Chicken Katsu recipes.
b) If the dough opened up during deep frying, you want to immediately stop deep frying, instead gently remove the bread dough from the oil, pop them straight into the oven at 375 ºF (190 ºC) and bake until golden brown.
Thanks for the recipe! Tried it today, was super successful. . . Dough might be better w/a little more sweetness? All your recipes work great. love your website and recommend to many.
Hi Miky! I’m so glad your curry pan came out successfully! You can add more sweetness to the dough if you like. Thank you for recommending my site to your friends!
First time they turned out perfect and we so enjoyed. Can’t get them here and my mother in law was impressed- Tokiko. The second time the humidity was high in the house and I had trouble with them not wanting to close but another “squeeze” just as they went into the oil and they were fine. So very different in your other great recipes and a lot of fun to make and eat
Thanks
Hi Steve! Thank you for trying out this recipe twice already! I’m glad to hear you and your mother in law enjoyed it. 🙂 Thank you for your kind feedback. xo
320°F burned the heck out of my buns and only 4 of them were edible by the time I figured out a good temp. Also my oven only goes down to 175°F so I had to make lots of adjustments for letting the dough rise.
Hi Zoe! 320 ºF (160 ºC) is considered pretty low when it comes to deep frying. Maybe your oil kept going higher and higher. It’s hard to maintain the right oil temperature as it keeps rising. If your oven doesn’t have proof option, then you can place it at a warmer place of the house (it may take a bit longer time). If the temp is too high it may kill the yeast, so be careful. 🙂
Hi Nami! I’ve written you before and I love your recipes. Some we even eat on a weekly basis (like donburi w/ shiso-garlic soy – that soy is soooo good). I’ve been researching yeast to use, since I’ve made bread in the past with regular active yeast.
I found some info on instant yeast and am a little confused. The only instant I can find is Fleishman’s Rapid Rise Instant dry. Some sites have mentioned that this is not the same as regular instant yeast and will cause your dough to taste different. I try to get as close as I can (and I have to make adjustments for baking or soft-cooking things due to our altitude here in CO). Do you have a brand you use of instant yeast or is the one I got okay for this? Thanks!
Hi Emeraldkat! I use the same one. This one doesn’t require activation with warm liquid and go straight into dry ingredients. It’s much easier to use, and ones that I feel comfortable using for my recipes so far. Hope this helps!
And thank you so much for trying out my recipes! So happy you enjoy them. 🙂
I just wanted to update you as I was finally able to make this (I used a lactose-free version for dietary issues in my family). Your clarification was great and these turned out wonderful! I made a double-batch and with my teen daughter’s friends around, they were gone within 24 hours!
I’m so in love with these now, I’m interested in filling them with other things like bbq’ed meats or even simply ground fillings like pork + veggies (maybe using something like the filling for gyoza). They are wonderful to have around for the kids or hubby to just grab and take.
Hi Emeraldkat! I am SO happy to hear that. We were crazy for these when I was testing the recipe too (it didn’t look perfect then, but we don’t care). We ate too much bread that I had to stop making (who can resist these?! so goood!!). Yes, you can make with different filling, and I recommend ones that are “cooked” filling so you don’t have to worry about inside being uncooked. It’s easier that way since you just need to reheat the filling. Have fun making variations and thank you so much for your kind feedback. xoxo