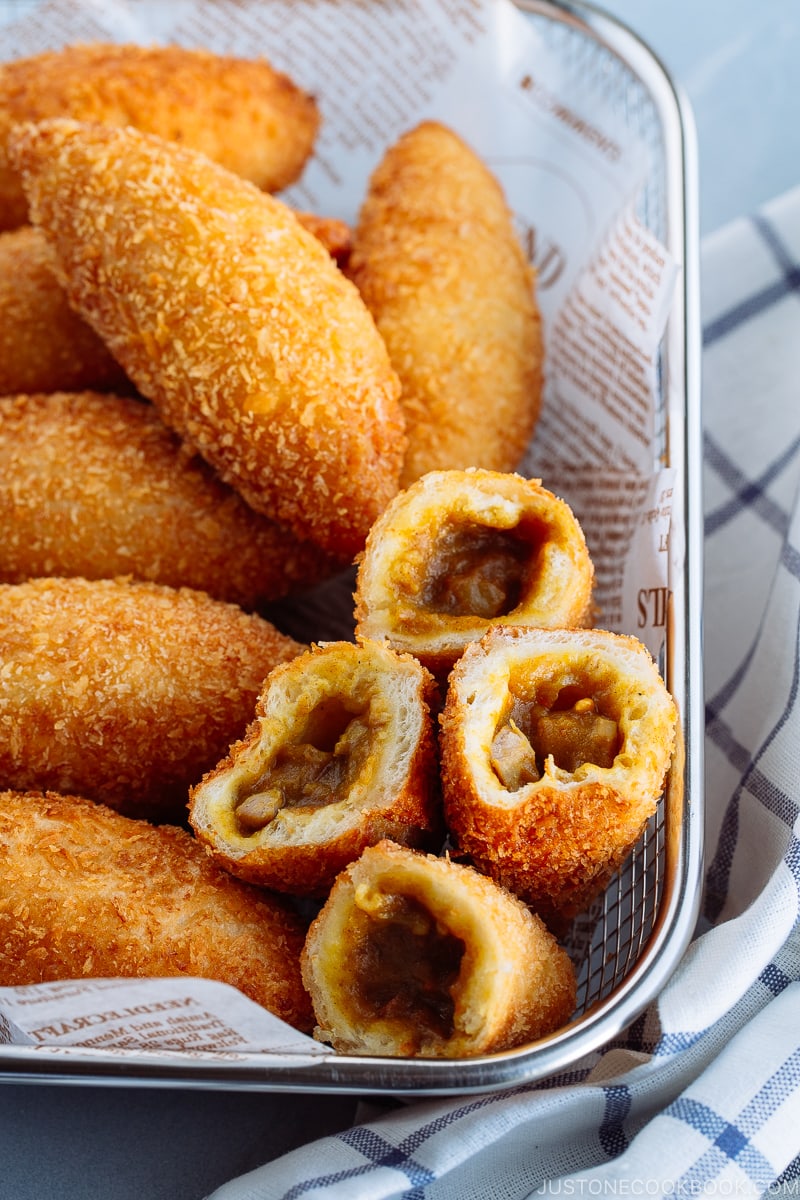
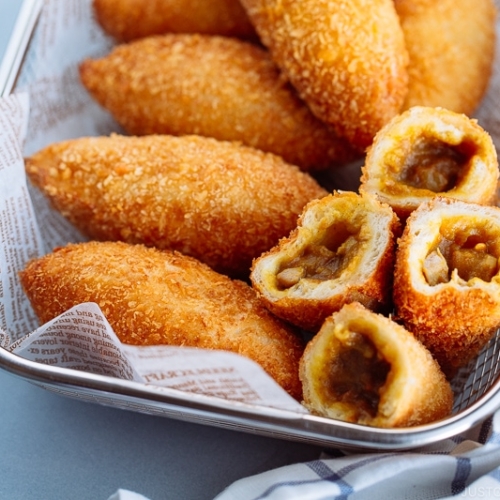
With its savory filling, chewy and springy bun, and crispy panko coating, Japanese Curry Bread—or Kare Pan—is the star of pastries at Japanese bakery shops. If you are a fan of Japanese curry rice, you have to make this insanely delicious bread bun recipe at home.

Kare Pan (カレーパン), or Japanese Curry Bread, is one of the most popular savory pastries at Japanese bakeries, along with Yakisoba Pan. There’s nothing more satisfactory than biting into a warm, crispy, and chewy bread that reveals mildly spiced Japanese curry inside, like a passageway to pure happiness. I know you’ll be obsessed with this homemade curry bread once you make it.
What is Curry Bread (Kare Pan)?
Curry bread (kare pan) is Japanese curry encased in bread dough, lightly covered in panko bread crumbs, and then deep-fried till golden brown. Justifiably qualified as comfort food, you can find these curry bread at bakeries and convenience stores throughout Japan. They are enjoyed for breakfast, lunch or snack, or any time of the day in my case.
Mr. JOC won’t leave a bakery shop in Japan without purchasing curry bread, and he’s always searching for the best one. I asked what is considered the best curry bread, and he said:
- The outside crust should be crispy when you bite into it.
- The bread should be chewy but not too thick.
- It shouldn’t be oily even though it’s been deep-fried.
- A good amount of curry should be filled throughout the bread.
As you can see, I have a tough customer at home. Since I welcomed a good challenge, I took it up as an encouragement to develop a good recipe!
There’s nothing fancy about the homemade curry bread. They are just downright tasty. Although it can be time-consuming, it’s totally worth the effort and time because you’d be rewarded with the tastiest bread. The triumph feeling is worth celebrating. I’d make this bread at least every quarter of the year!

The Japanese Curry Filling
The best part about making your own curry bread at home is that you can stuff the bread with your favorite, delicious curry! Plus it’s the perfect way to use up one big batch of Japanese curry. You will only need about 1 1/2 cup worth of leftover curry. It has to be chilled, so leftover curry from the previous night makes the most sense for this recipe.
You can make Japanese curry with any ingredients you like. I used my Japanese Chicken Curry recipe for my curry bread. You can use other types of meats as well.
The curry next day should be in a thick paste form as you will be bundling up the curry filling in bread dough. Soupy curry is a no-no. Once you refrigerate your curry, it will solidify and easier to handle. Just take out the curry when you start making the bread, so it reaches room temperature by the time you fold it up in the dough.
3 Important Cooking Tips
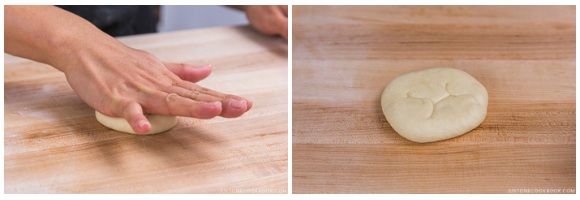
1. Thin out the dough only at the edge
I learned from my experience that I enjoy curry bread more when the dough has a chewy texture. Initially, I thought I prefer thinner bread because it has a nice crispy texture. But when I tasted the chewy and springy bread, I knew the whole curry bread experience got elevated.
To achieve this, it’s important not to roll out the dough too thin. The best way is to thin out only the edges of the round dough with fingers, keeping the center thicker. So when you fold and pinch the edges, the seam won’t be too thick and doughy, and the bread has even thickness throughout.
2. Do not overfill the curry paste
I’ve made this mistake and learned the hard way. When you place the curry filling on a round sheet of dough, make sure you have PLENTY of space around it so you can pinch the dough easily and tightly. You don’t want to overfill because if the curry touches the edge of the dough even a little bit, the pinched dough may pop open and the curry filling will fall out easily during the proofing and deep-frying stages.
If you accidentally made the mistake, here’s what you can do.
a) If the pinched dough is opened up before deep-frying, you can toast the panko first until golden brown, then bake the bread at 375 ºF (190 ºC). This is the same technique as my Baked Tonkatsu/Chicken Katsu recipes.
b) If the dough opened up during deep-frying, you want to immediately stop deep frying, instead gently remove the bread dough from the oil, pop them straight into the oven at 375 ºF (190 ºC) and bake until golden brown.
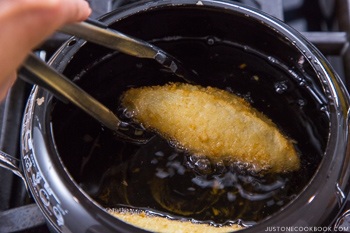
3. Flip the bread as soon as you place it in the oil
During the second proofing stage, the sealed side is on the bottom, and the dough is rising up. Now when you deep-fry, you will again place the sealed side down first. As deep-frying starts, the dough continues to rise from the bottom (seam side), and it tends to rise way too much, creating a cave inside the bread.
My high school friend Takafumi who used to work at a bakery in Japan shared a pro tip with me when I was struggling with this. He told me that you will need to flip the bread a couple of seconds after you place the dough in the oil, stopping the dough to rise in the same direction. This actually works magically! No more big cave in the bread!
Now that I’ve perfected my Kare Pan recipe, Mr. JOC no longer has to go out his way to hunt down the best curry bread because the best is always the homemade type. Are you ready for your Japanese curry bread mastery? Let’s get started!
More Fun and Delicious Snacks

Wish to learn more about Japanese cooking? Sign up for our free newsletter to receive cooking tips & recipe updates! And stay in touch with me on Facebook, Pinterest, YouTube, and Instagram.
Curry Bread
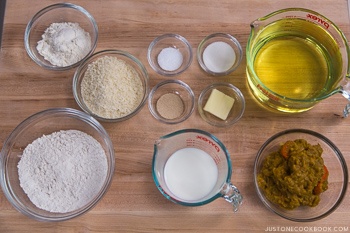
Ingredients
- 1¼ cups bread flour (weigh your flour; for weights, click the Metric button; or use the “fluff and sprinkle“ method and level it off)
- 50 g cake flour (⅓ cup + 1 Tbsp; you can make cake flour at home)
- 1 tsp Diamond Crystal kosher salt
- 15 g sugar (1 Tbsp + ½ tsp)
- 125 ml whole milk (½ cup + 1 tsp; I highly recommend whole milk instead of nonfat or reduced-fat milk)
- 1 tsp instant yeast (to use active dry yeast, see Notes at the end of the recipe)
- 10 g unsalted butter (a bit less than 1 Tbsp (14 g); at room temperature)
- 1½ cups Japanese curry of your choice (at room temperature; made the day before and refrigerated overnight; aim for a solid, pasty texture; you can make my Beef Curry, Chicken Curry, or Instant Pot Curry recipes)
- 1 large egg (50 g each w/o shell) (for coating the bread with panko)
- 1 cup panko (Japanese breadcrumbs)
- 4 cups neutral oil
Instructions
- Gather all the ingredients. Leave the unsalted butter and Japanese curry at room temperature. I highly encourage you to weigh your ingredients using a kitchen scale for this recipe. For weights, click the Metric button above to convert the measurements to grams. If you‘re using a cup measurement, please follow the “fluff and sprinkle“ method: Fluff your flour with a spoon, sprinkle the flour into your measuring cup, and level it off. Otherwise, you may scoop more flour than you need.

To Mix the Dough Ingredients
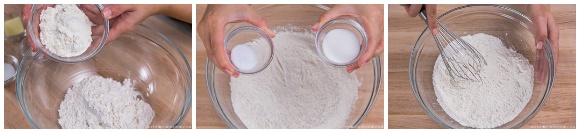
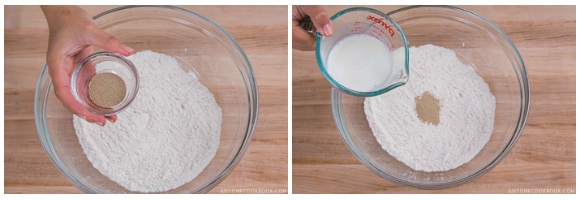
- In a large bowl, whisk together 1¼ cups bread flour, 50 g cake flour, 1 tsp Diamond Crystal kosher salt, and 15 g sugar.

- Microwave 125 ml whole milk until warm to the touch, about 95ºF (35ºC). Then, add in 1 tsp instant yeast to the warm milk.

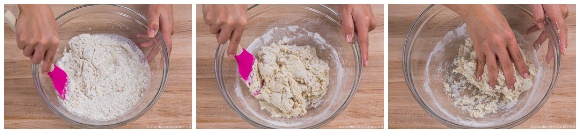
- Add the wet ingredients to the bowl with the flour mixture. Using a silicone spatula, combine together until it becomes a rough dough, about 1–2 minutes.
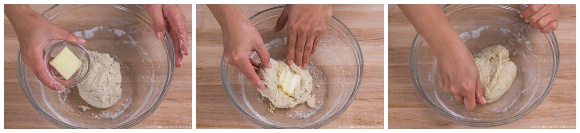
- Once the dough becomes a ball, add 10 g unsalted butter to the center of the dough and combine until the butter is well incorporated, about 2–3 minutes. At first, the dough will be sticky, wet, and oily and you might want to add more flour, but wait and try mixing it a little longer.
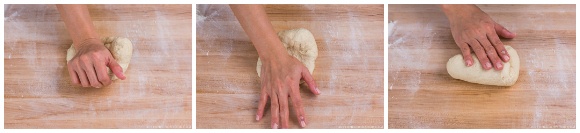
To Knead the Dough
- Once you don’t see any big chunks of butter, transfer the dough to a lightly floured surface. Knead the dough until it becomes smooth and pliable, about 5 minutes. Read the tip on kneading below.
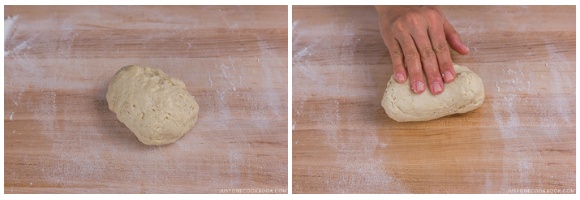
- Tip on kneading: Using the lower part of your palm, push out the dough. Then, roll back up as if you’re drawing the number “8” with your hand. Rotate the dough 90 degrees every time you finish drawing a figure 8.
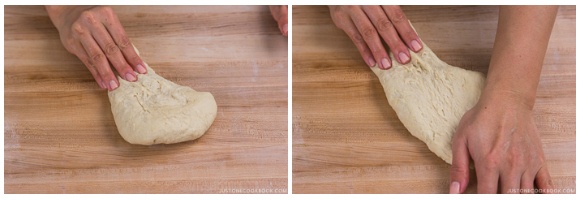
- After drawing a figure 8 a few times, bang the dough onto the work surface and fold it over away from you. This helps develop the gluten (elasticity). Turn the dough 90 degrees and repeat drawing the number 8 again. Continue this process until the dough is smooth, supple, and silky.
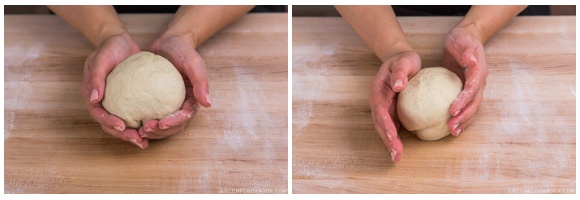
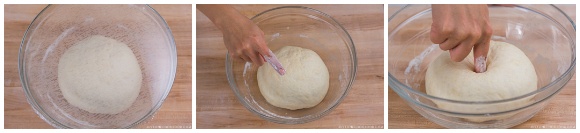
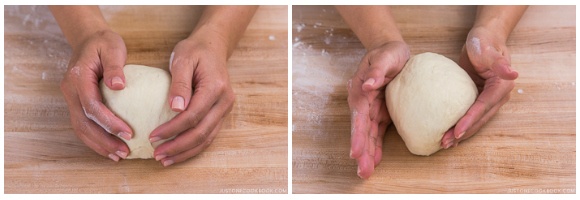
- When the dough is moist, smooth, and pliable, form it into a ball. Place the seam side down on the working surface and twist the ball a few times to close the seam.
The First Rise (Bulk Fermentation)
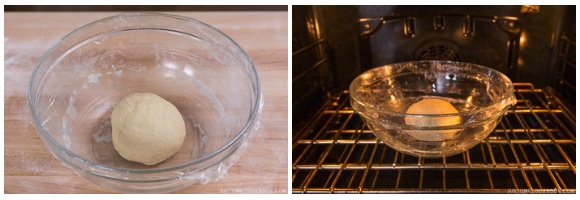
- Place the dough back in the bowl, seam side down. Cover with plastic wrap. Let it rise at 100ºF (38ºC) for 60 minutes, or until doubled in size. I used the proof setting in my oven. Tip: See my Shokupan post for tips on creating a warm environment for your dough.
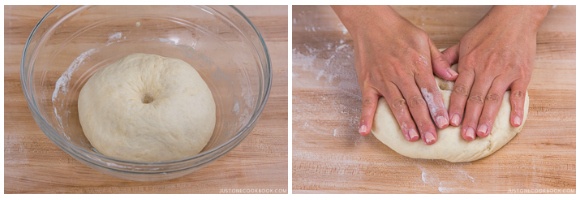
- To use the finger test, dust your finger with flour and poke the center of the dough. If the hole doesn’t close up, it’s ready to divide. If the dough closes up immediately, proof the dough a little longer and test again.
To Divide the Dough
- Transfer the dough to a lightly floured surface and gently punch/press it down.
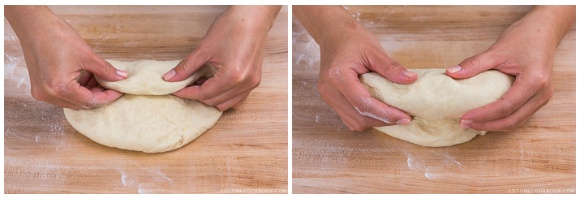
- Fold the dough into thirds widthwise.
- Fold the dough into thirds lengthwise.
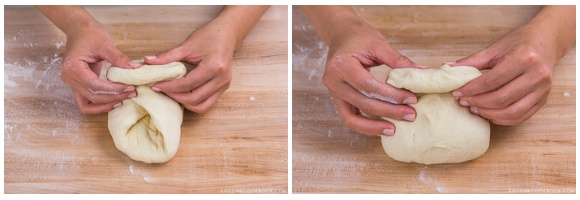
- Turn upside down so the seam is facing down. Twist the dough to form a nice ball shape.
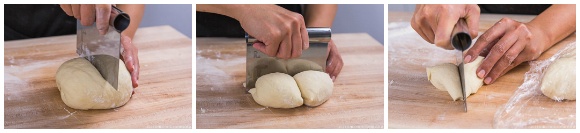
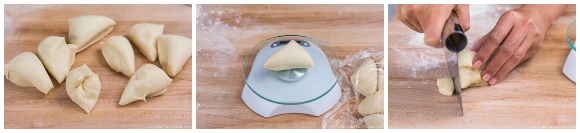
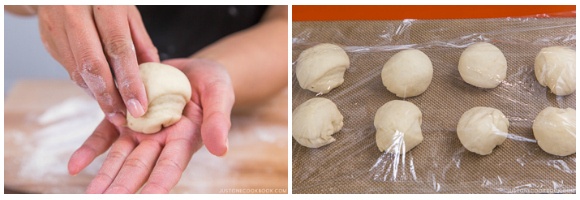
- Weigh the dough on a kitchen scale and divide the number by 8. Roughly cut the dough into 8 pieces.
- Weigh each piece of dough and cut off any extra if it weighs more than you calculated.
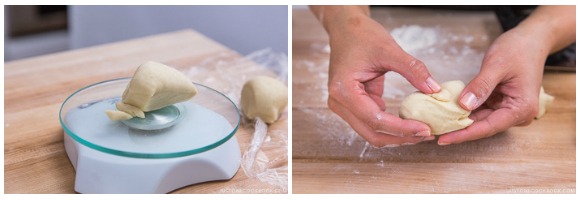
- Add the extra dough to the smaller dough piece(s). Hide the extra dough in the center of the ball by pulling down the dough from the sides.
- Twist the dough to seal the seam on your hand. Place the dough balls on a baking sheet lined with a silicone baking mat or parchment paper. Cover with plastic wrap, and let rest for 15 minutes at room temperature.
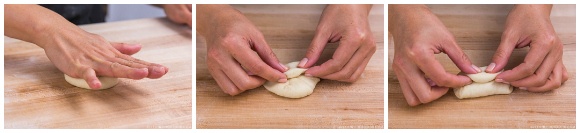
To Roll Out the Dough
- Working on one dough ball at a time, place the dough seam side up and flatten it with your hand. Fold in thirds widthwise.
- Fold in thirds lengthwise, and then turn it upside down so the seam side is on the bottom.
- Flatten again, and flip so the seam side is up.
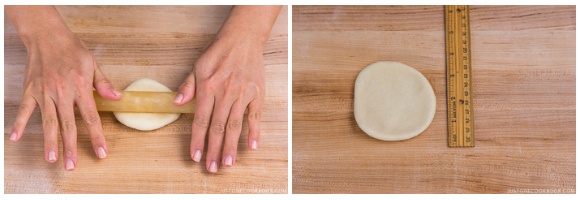
- With a rolling pin, roll it out into a 3½-inch (9-cm) circle. Repeat with the remaining dough balls.
- Cover with plastic wrap and let rest for 10 minutes. One by one, pick up the dough circles. Pinch the edges with your fingers to thin them out while leaving the center thicker, to about 4 inches (10 cm) in diameter.
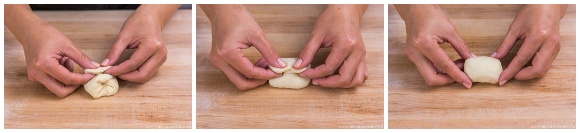

To Shape the Curry Bread
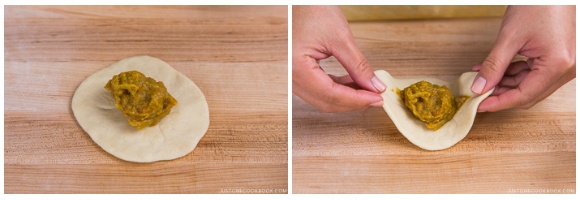
- Working on one dough circle at a time, place it seam side up. Gather 1½ cups Japanese curry of your choice. Add 1 to 1½ Tbsp curry sauce to the center of the circle. Do not overfill. Remember, KEEP THE CURRY AWAY from the edges! It’s the most crucial part. If you didn’t read my blog post, read tip #2 now in the post.
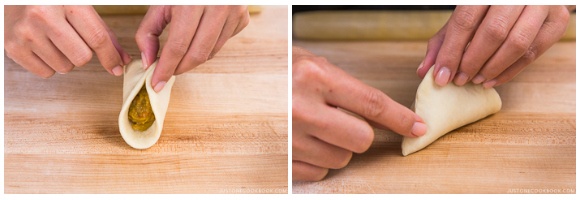
- Gather the opposing edges of the circle and fold the dough in half. Tightly pinch and press the edges to seal well so the seam does not open up during proofing and deep-frying.
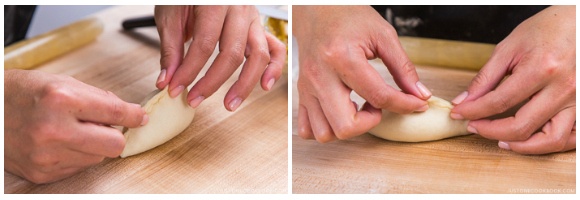
- Next, to double secure the seam, fold the edges over to one side at least once, like folding a brown paper lunch bag. Press the edges again to secure.
- Place the bread, seam side down, back onto the tray with the silicone mat. Cover with a damp towel while working on the rest of the dough.
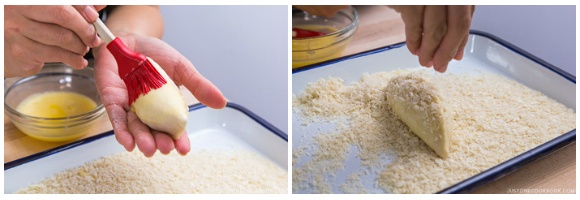
- Once you‘ve formed all the curry bread, crack 1 large egg (50 g each w/o shell) into a bowl and whisk well. Place 1 cup panko (Japanese breadcrumbs) in a shallow bowl/tray. Using a pastry brush, coat them with beaten egg and then panko.
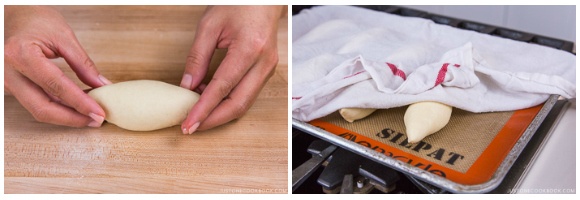
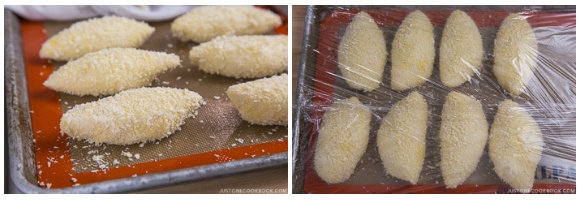
The Final Rise (Proofing)
- Cover the bread with plastic wrap and let rise at 100ºF (38ºC) until 1½ times its size, for 45–60 minutes (I used the proof setting in my oven). If you touch the dough with your finger and the indentation remains, it‘s ready.
To Deep-Fry the Bread
- If you‘re new to deep-frying, please read my post on how to deep-fry food at home for tips on safe and successful frying. In a deep-frying pot (I use a 2.75 QT Staub), heat 4 cups neutral oil to 320ºF (160ºC). Place 2–3 pieces of the curry bread into the oil, seam side down. After a few seconds, flip it over so the seam side is now up. You may need to hold it with a pair of tongs. Keep turning them while they deep-fry, until they cook to a golden brown, about 2–3 minutes. Drain the oil well and transfer to a wire rack or some paper towels to drain while it cools.
To Serve and Store
- Serve hot or at room temperature. Keep the leftovers in an airtight container and store in the refrigerator for 3 days or in the freezer for 3–4 weeks. To reheat, bake at 350ºF (177ºC) until warm inside.


I didn’t see you had to proof them again after they were finished. Is it really that bad? I just deep fried them.
Hi Michelle! Thank you very much for trying Nami’s recipe!
We recommend proofing twice to get the fine best texture and flavor of the bread.
We hope this helps!
I generally hate working with dough but I followed the directions exactly and it came out perfectly! Thank you for the recipe!
For the future, is there any way to make this ahead of time? Could I just leave it breaded and fry the next day?
Hi Diana! Thank you very much for trying Nami’s recipe!
We are glad to hear Nami’s recipe worked perfectly for you.☺️
Nami usually makes Curry ahead of time, but she had never left the dough overnight before. We think the dough will be over-proofed if you leave it too long.
The technique doesn’t seem to work. I’ve never made curry thick enough to stand on its own, and that’s the ONLY way this could work. Wasted my ingredients.
Hi Ryan! We are sorry to hear your curry is not thick enough to make Curry Bread.
They are a few ways to make the curry thicker.
You can mash potatoes inside your curry, or add grated potato and cook a bit.
Or add a small amount of mix of water and flour (1:1 ratio) into a curry and cook. You can also use starch instead of flour.
We hope this is helpful and you don’t waste your ingredients!
My qualms with this recipe is that it calls for 1.5 cups of curry, which divided, is 3 tablespoons per ball, while the recipe suggests 1-1.5 tbs curry per pan. Why all the extra curry when 1/2-3/4 cup is all that’s called for to stuff the pan?
Hi Min, Thank you very much for trying Nami’s recipe!
There is extra curry in the recipe because sometimes the leftover curry includes big chunks of potatoes or carrots, and you may not use the big chunks. So it’s always safer to keep the extra otherwise, it is disappointing if you didn’t save enough leftover for the filling.
We hope this helps!
Living in Denmark, me and my family haven’t been to Japan since 2018. I had some leftover kare raisu in the freezer. We were craving kare pan, so made these today. They were really delicious!
Hi Chiho! We are glad to hear you enjoyed Kare Pan! Thank you very much for trying Nami’s recipe!
Hi there,
If i do the bake method, how long do I need to bake it for?
Crystal
Hi Crystal!
You probably need to bake the bread at 375 ºF (190 ºC) for about 15 minutes.
We suggest using pre-toasted panko that Nami uses for the Baked Tonkatsu recipe. https://www.justonecookbook.com/baked-tonkatsu/ (This is the same technique as Nami’s Baked Tonkatsu/Chicken Katsu recipes.)
We hope this helps!
I just made your chicken curry recipe last night so today I used the leftover curry for this recipe. I used all-purpose flour instead of bread flour and the all-purpose flour/cornstarch instead of cake flour. I fried half and baked half (used your pre-toasted panko trick). Both versions came out more half-moon shaped but were delicious. Thanks for the recipe!
Hi Tammy! Excellent! Thank you very much for trying Nami’s recipe and sharing your baking experience with us!
We are glad to hear you enjoyed the Curry bread!🤗
I made this recipe with my family’s recipe Indian curry, and it was so delicious! Highly recommend!
Hi Rashmi! Awesome! Thank you very much for trying Nami’s recipe with Indian curry and sharing your feedback.
We are glad to hear you enjoyed it! Happy Cooking!
Hi Nami, my leftover curry is on the watery side…are there any tips to make it more paste-like to fill the curry bread?
Hi Vivian, Thank you very much for trying Nami’s recipe!
Have you tried storing the curry in the refrigerator overnight? It usually comes out more thick the next day. If it’s not, you can add potato and cook the curry or add just a bit more curry roux.
We hope this helps!
Hi! I’ve never tried making these but I’ve made both Japanese curry and nikuman before (both your recipes!) So I don’t think it’ll be too hard. I want to make these for Thanksgiving, but there’s a lot of other food to prepare too and I was wondering if you think I’d be able to make the dough and shape the buns the day before, then keep them in the fridge or freezer until the next day so I could just fry and serve. What do you think?
-Cana
Hi Cana, Thank you very much for trying Nami’s recipe!
We have never deep-fried it the next day and are not sure how the outcome will be. If you are planning to serve the next day, you can fry it and freeze it as well. Please see Nami’s note “To store” at the end of the recipe card for more detail.
We hope this helps!
Hi Nami!
I’m Indian and grew up in America, so when I was a teenager, I made these with aloo masala dosa filling after watching Black Butler because I didn’t know to use Japanese curry! They tasted great, but I’m 23 now and thought I would give it a try with the proper filling. I think both ways tasted nice!
Hi Shehla! Thank you very much for reading Nami’s post and trying her recipe!
We hope you enjoy the Japanese curry version too. Let us know how it goes!😊
Hi Nami!
Like all your recipes I’ve tried so far this was lovely! I was really intimidated at first and was worried I didn’t deal the breads well enough but all seems to have gone ok after frying! My dad even commented how nice and soft the bread was inside and crispy on the outside Thanks for all that you do, you’ve really helped me expand on my knowledge of Japanese cuisine and I look forward to exploring more!
Hi Cassidy! Nami and JOC team are so happy to hear you and your family enjoyed Kare Pan!
Thank you very much for trying Nami’s recipe and for your kind feedback.🥰
this tastes amazing! really brings me back to japan!
although i have a bit of a hiccup every time i make this. it seems that i can never get my dough soft and “pliable” like yours in the picture. its tough, hard, and not at all smooth! it also never passes the windowpane test so my filling always would spill due to my bread opening up midway proofing. is there any way why this is happening? i copy the exact same measurements in your recipe but it always make my dough hard, despite a whole hour of kneading (never reaching the well kneaded space too).
Hi Stella! Thank you very much for trying Nami’s recipe!
It depends on the day of the weather, bread making can be a little tricky. If you are in a very warm room, the bread dough might need to be moister.
When you are at step 4, the dough should be sticky, wet, and oily, and you might want to add more flour, but please wait and try kneading a little longer. This takes about 2-3 minutes for the dough to come together. If you use/add too much flour during this time, it will end with too much flour in the dough, and it will become a hard dough. Then at step 5, kneading shouldn’t take more than 10 minutes.
Another note is to make sure to use bread flour that gluten-forming protein contains 12-14%.😉
We hope this is helpful!
I was thinking of trying to make this with my gluten free flour here in Japan.
Do you think it will still work?
Hi Tania! Thank you very much for reading Nami’s post!
Because gluten is key to the structure of yeast bread, and without it, this recipe will be different texture bread.
Hello
Would it be possble to shallow fry these, instead of deep frying them? I am not confident with deep frying and I also don’t have a deep frying pot, so I am looking at alternative ways of doing them.
Also, is it possible to put a sweet filling (like pureed fruit) in them instead? And toss them in cinnamon sugar after cooking.
Hi Lauren! Thank you very much for trying Nami’s recipe!
Yes, it’s possible to shallow fry. You can use a medium, heavy-bottomed pan, heat about 2-3 inches of oil to fry the bread.
As for the sweet filling, Sure, you can add pureed fruit. Ensure that the bread is covering the pureed completely so that the oil would not splash on you. We hope this helps!