
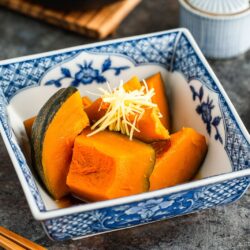
Japanese Simmered Kabocha, or kabocha no nimono (かぼちゃの煮物), is one of the most popular simmered dishes in Japanese cooking. You’ll spot it in bento boxes, teishoku lunch sets, or even breakfast buffets at ryokan inns. With just a few ingredients, you can easily make this hearty and comforting dish at home.
If you enjoy Japanese simmered dishes, try my Chikuzenni (Nishime), Nikujaga (Japanese Meat and Potatoes Stew), or Simmered Fried Tofu and Greens next!
What is Japanese Simmered Kabocha?
Japanese simmered kabocha (kabocha no nimono, かぼちゃの煮物) belongs to the family of Japanese simmered dishes. They are known for their gentle cooking method, which allows the ingredients to soak up savory broth while keeping their natural sweetness and texture. With kabocha, the result is soft, velvety squash that balances umami and subtle sweetness—a perfect example of Japanese comfort food.

Why I Love This Recipe
- Sweet and tender – Smooth and velvety Japanese pumpkin has a natural sweetness that balances the savory seasonings.
- A comforting classic – This iconic dish is the true taste of Japanese home cooking!
- Simple and versatile – Made with a handful of pantry seasonings, it pairs well with just about any Japanese menu.
Ingredients for Japanese Simmered Kabocha
- Kabocha squash
- Dashi (Japanese soup stock) – I show you how to make it with dried bonito flakes, but you could also use Awase Dashi, Kombu Dashi, or Vegan Dashi
- Sake
- Sugar
- Soy sauce
- Salt
Find the printable recipe with measurements below.
Jump to RecipeKey Equipment
- drop lid (otoshibuta) – Learn how to make it at home or find it on JOC Goods.
How to Make Japanese Simmered Kabocha
Preparation
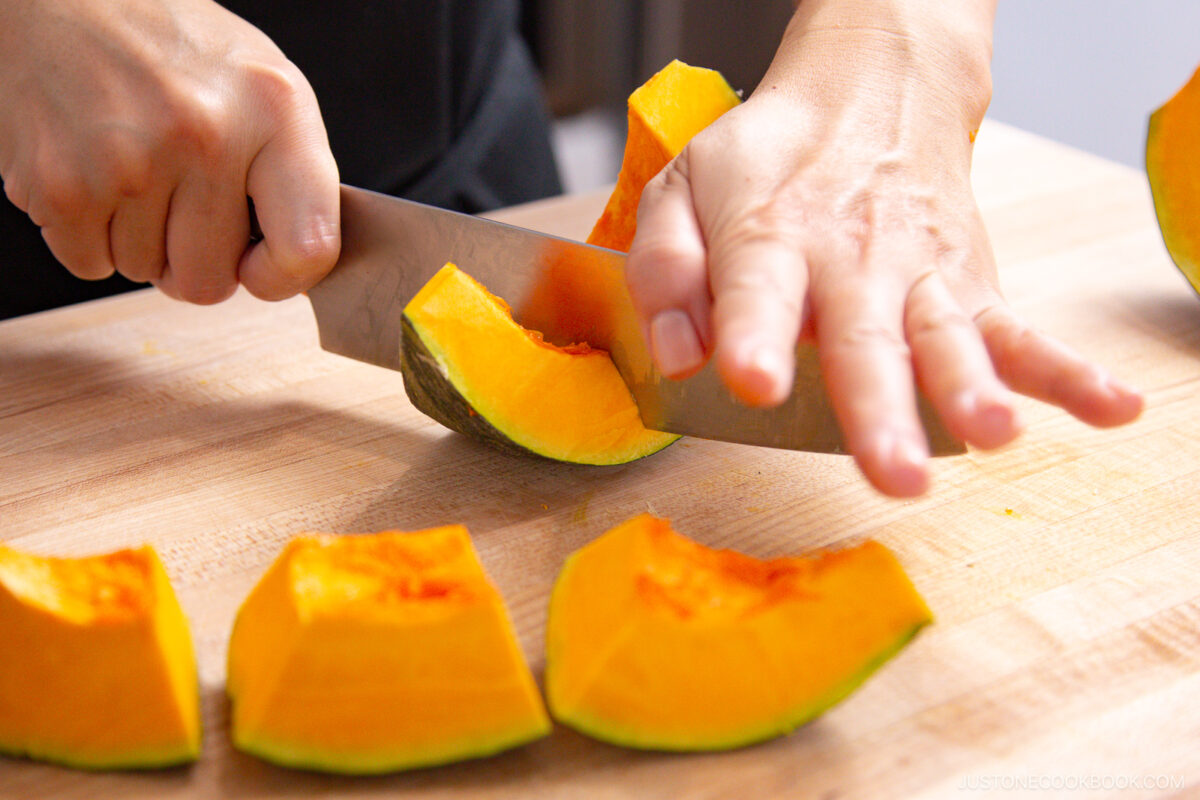
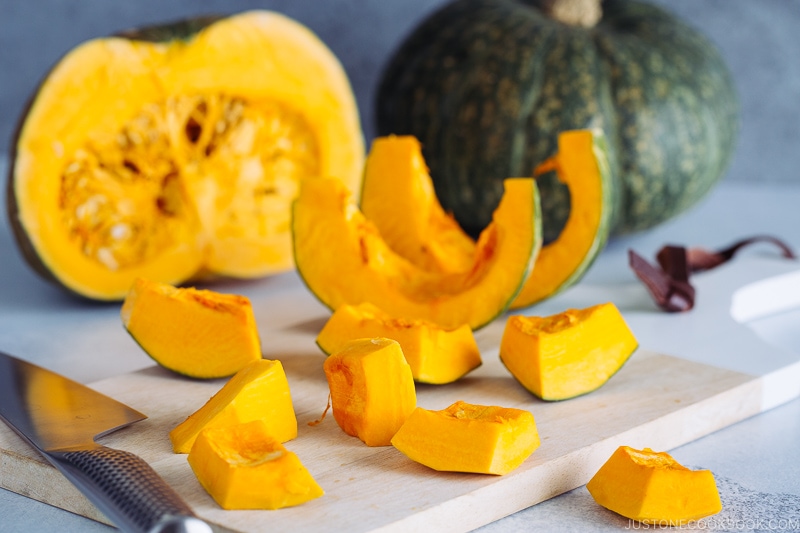
- Cut the kabocha into equal chunks with a sharp knife.
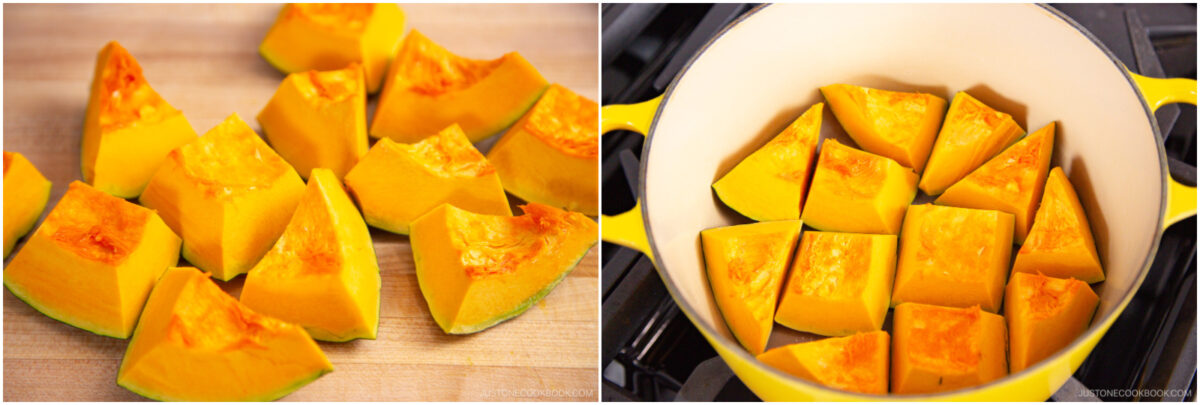
- Arrange the pieces in a single layer in a pot, skin side down.
Cooking
- Season. Add dashi, soy sauce, and sake and swirl the pot gently to mix the seasonings.
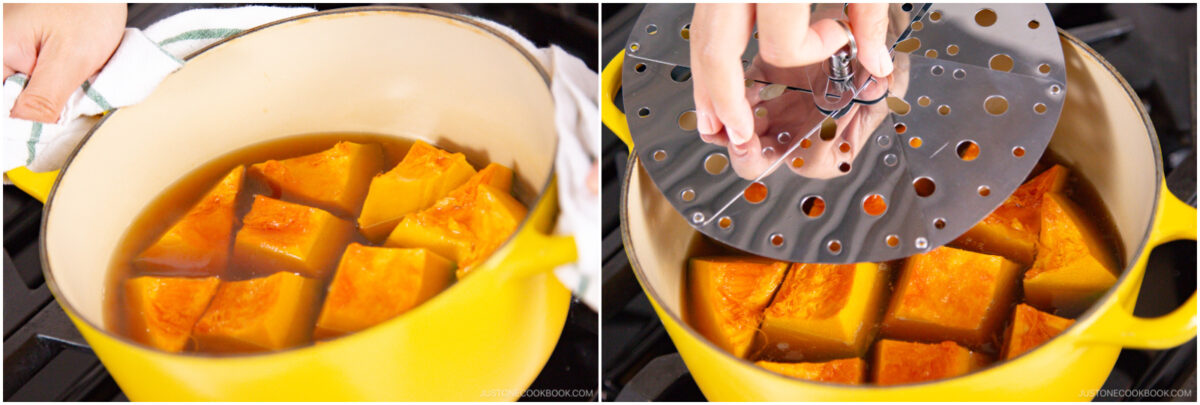
- Simmer. Bring to a boil, then lower to medium-low heat. Place an otoshibuta (drop lid) on top and simmer 20–30 minutes until tender.
Assemble
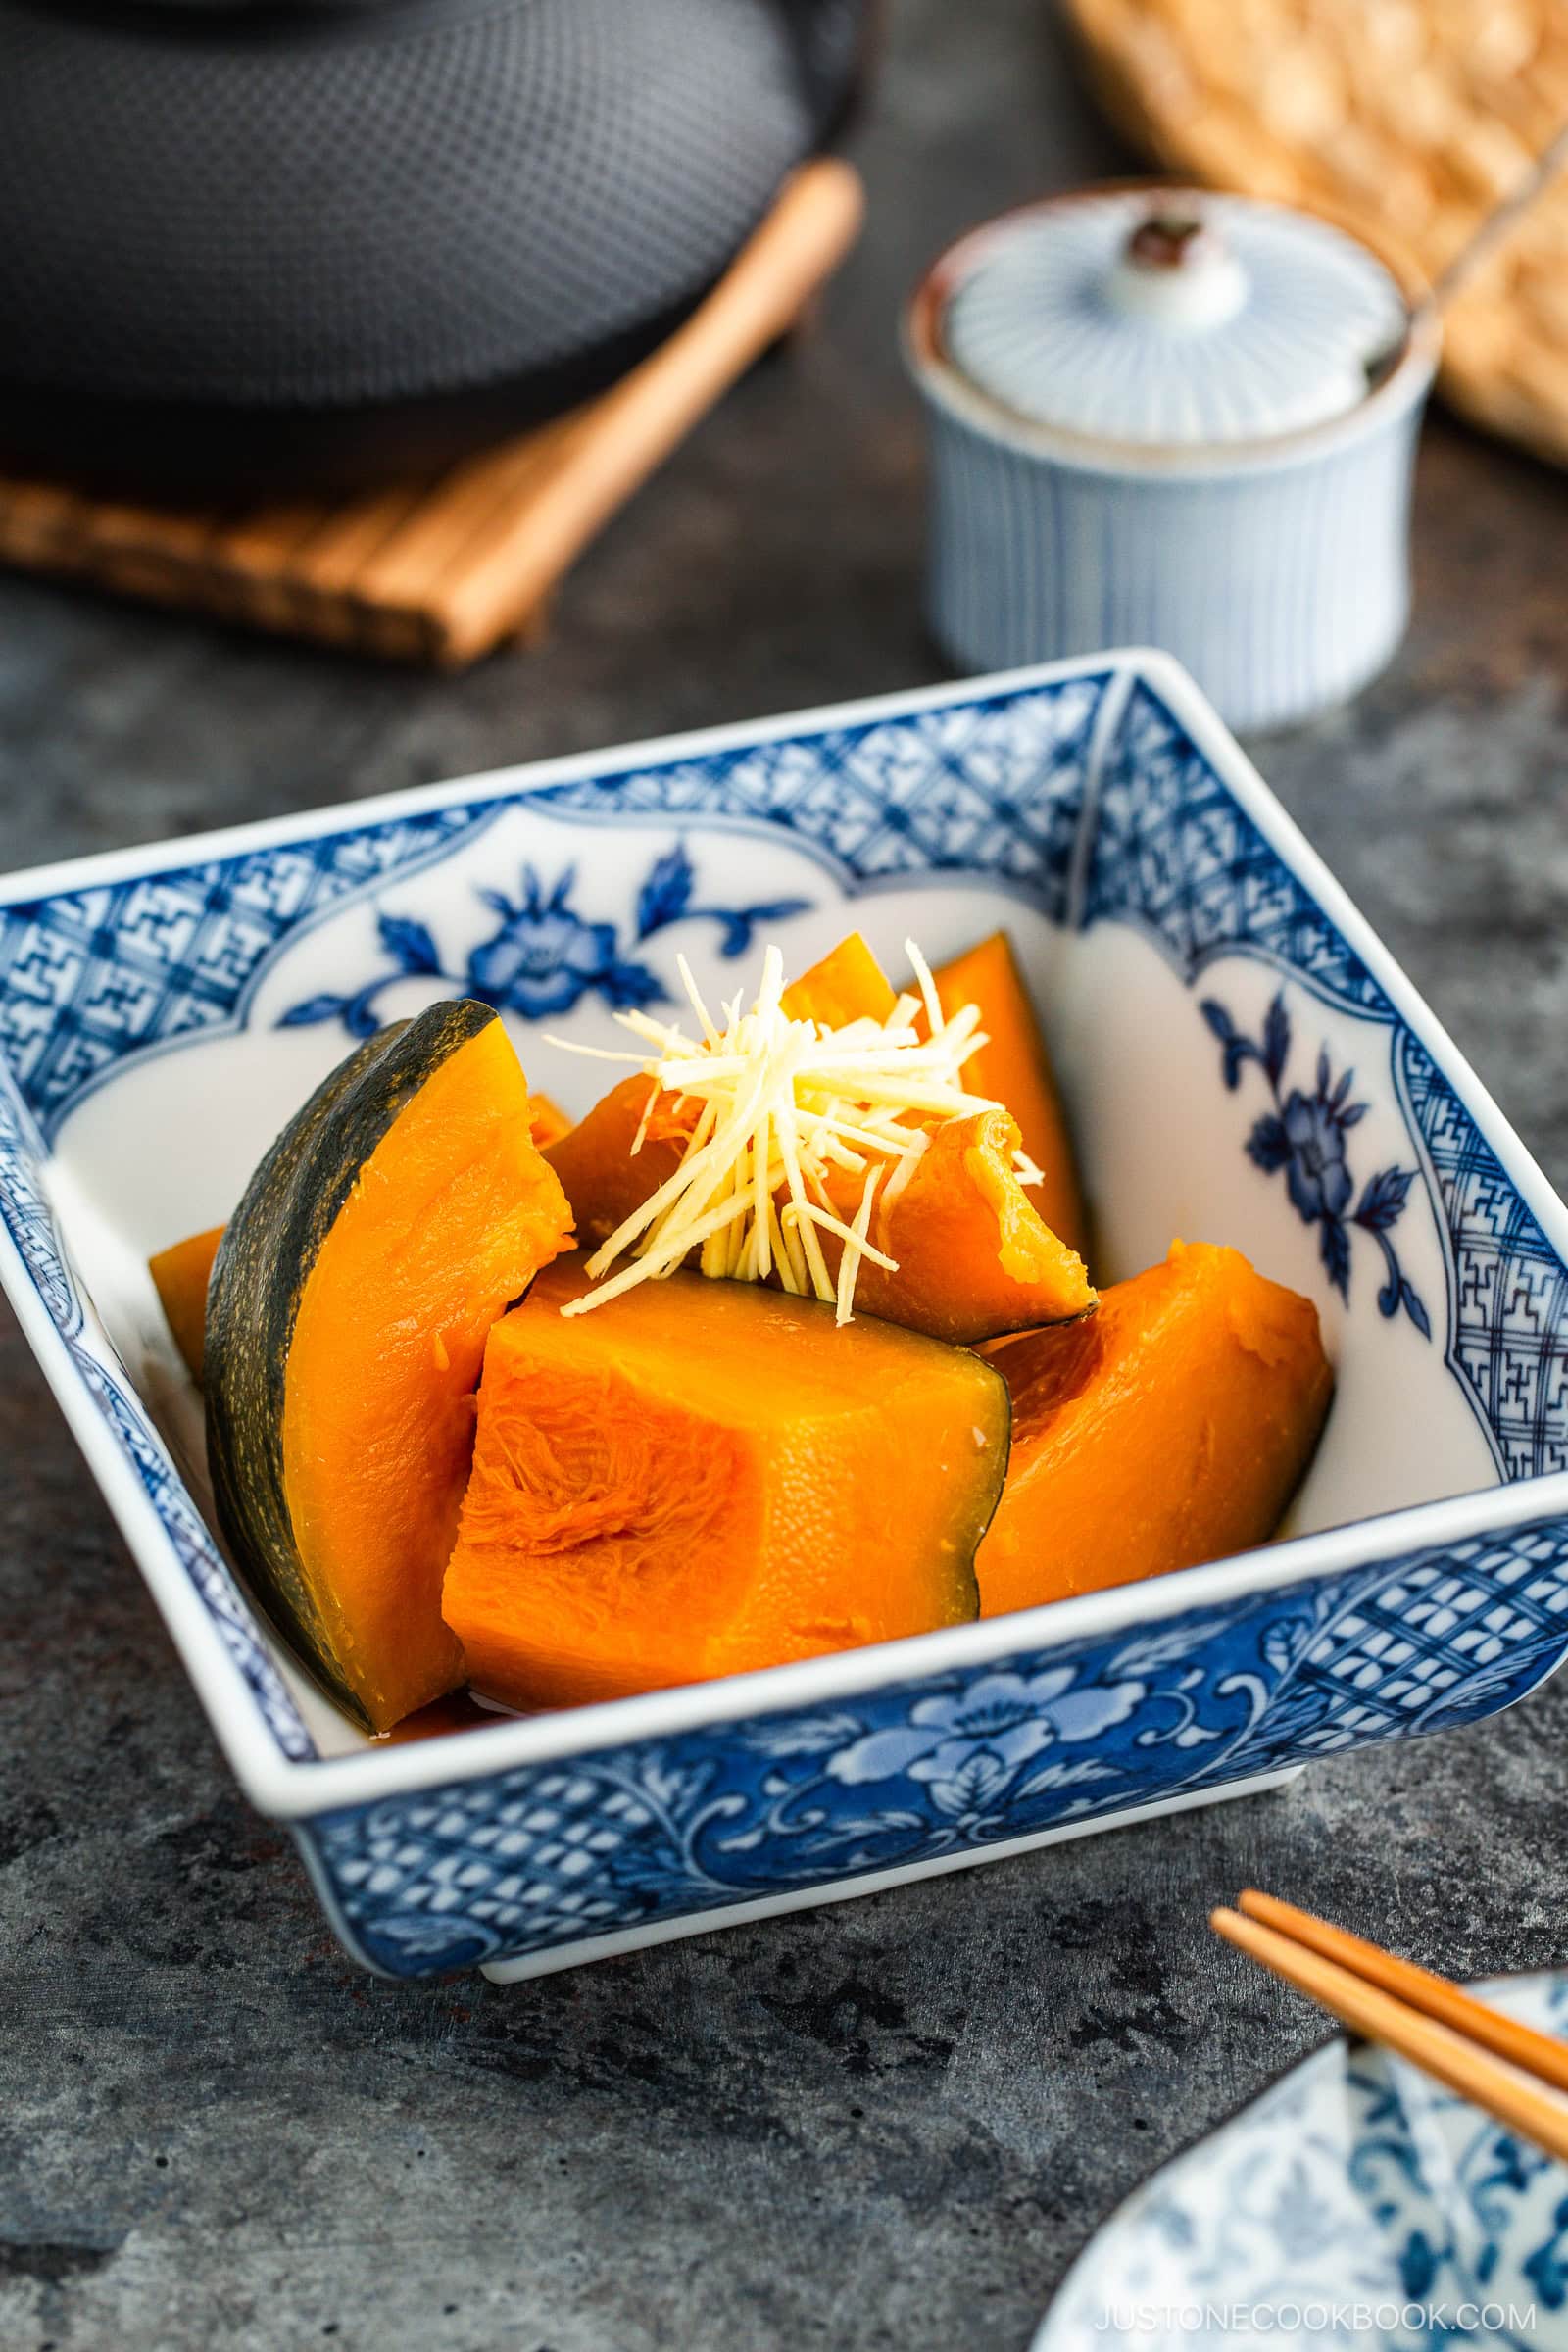
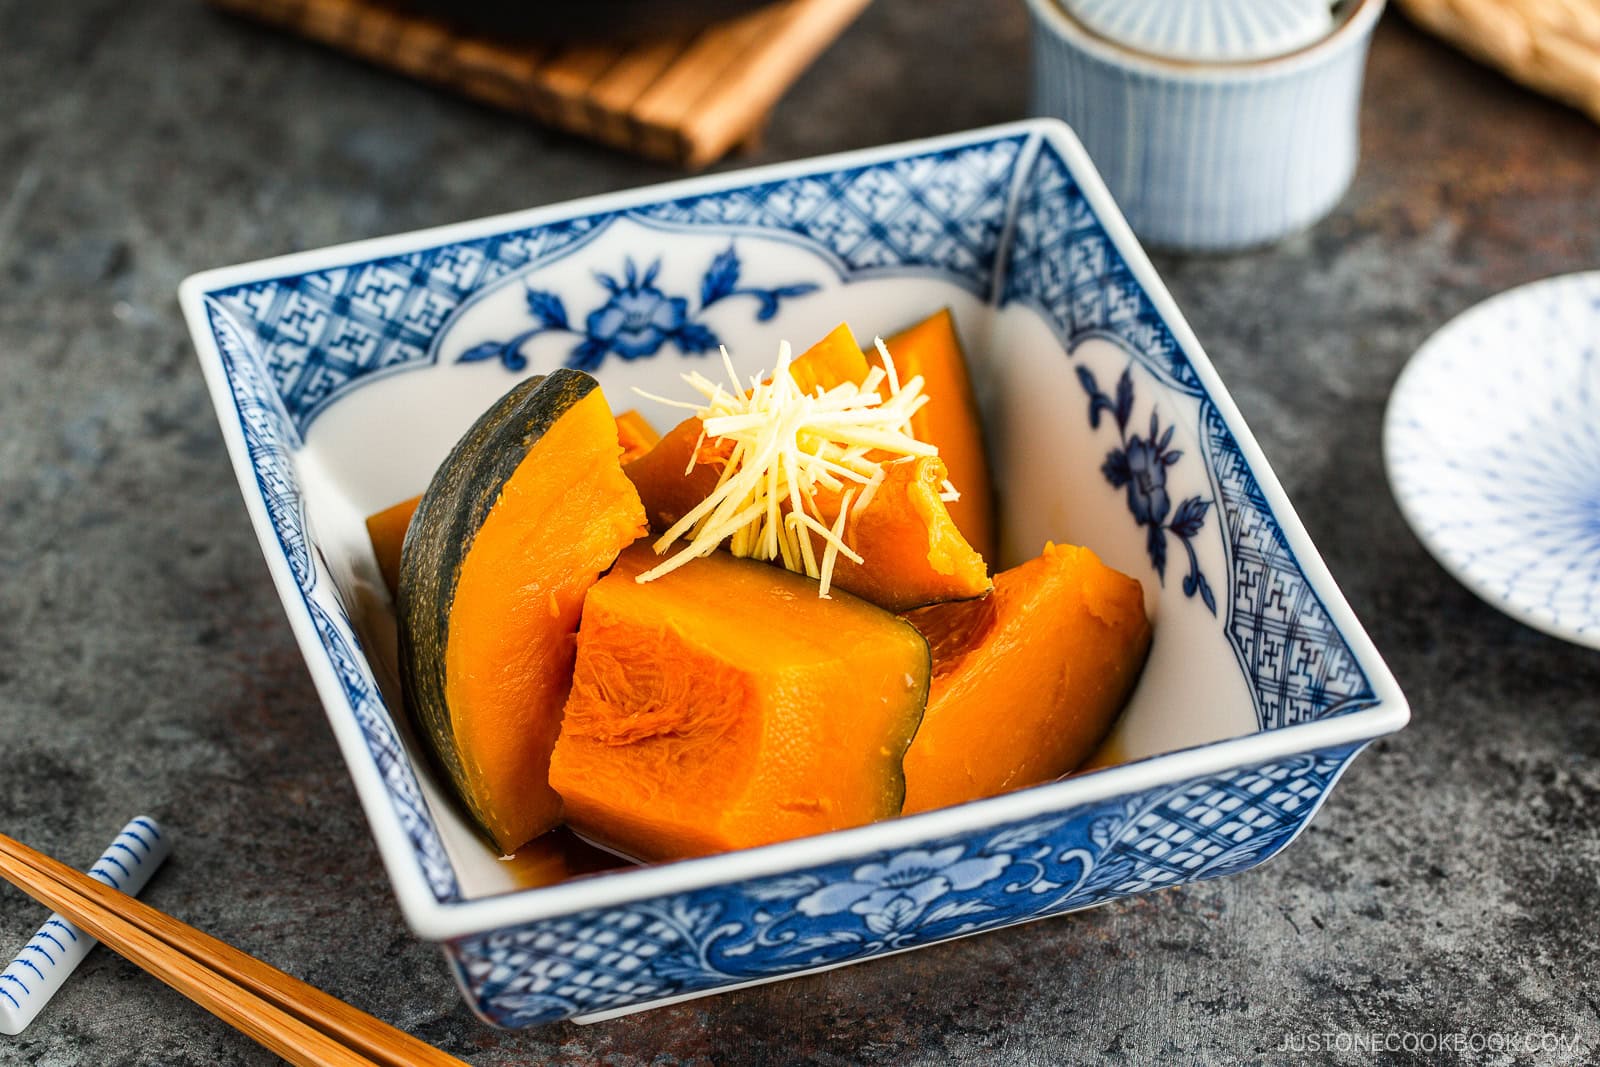
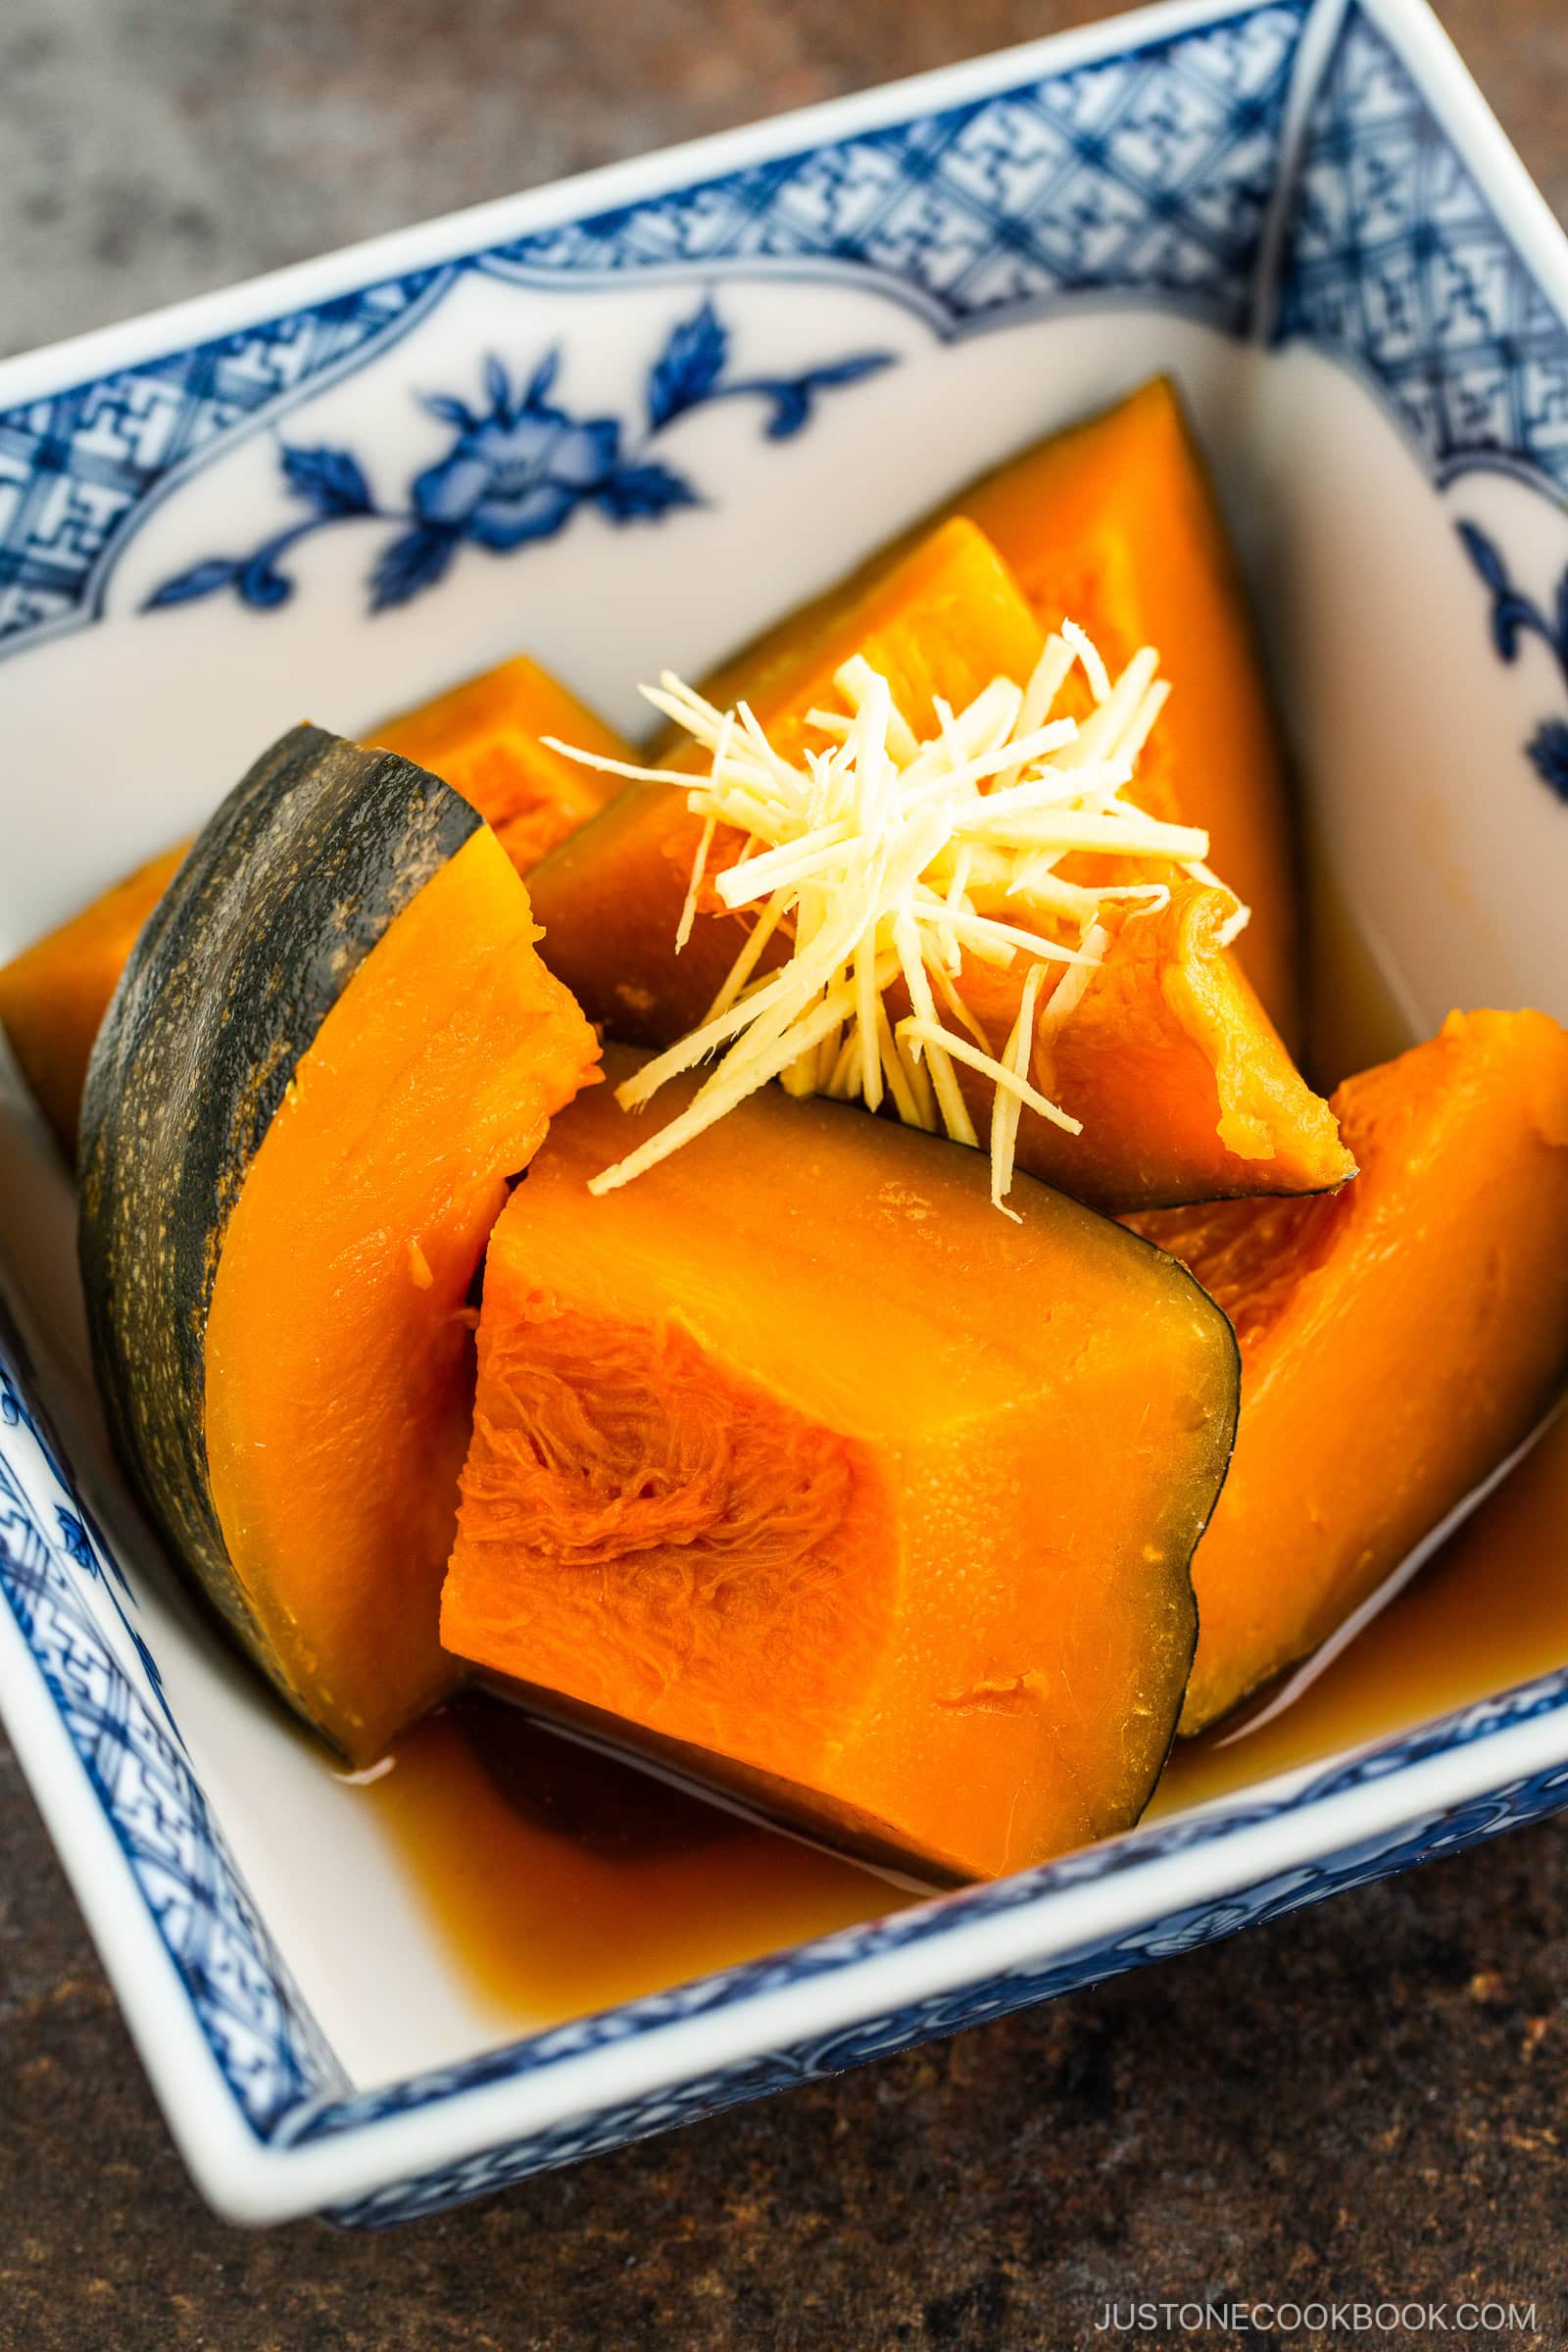
- Cool and serve. Remove from the heat, cover with a lid, and let sit about 30 minutes until cool. Serve warm or at room temperature. Add the optional ginger garnish.
Nami’s Recipe Tips
- Cut into equal pieces – A uniform size helps the squash cook evenly. See How to Cut a Kabocha Squash for my tips.
- Arrange in a single layer in a pot that’s just the right size for even cooking and a flat surface for the drop lid.
- Add just enough liquid – The cooking liquid should come three-quarters up the sides of the kabocha pieces.
- Swirl, don’t stir – Gently swirl the pot instead of stirring with utensils. Kabocha flesh is delicate and can break apart easily.
- Place a drop lid – A drop lid (otoshibuta) sits directly on top of the ingredients to keep the liquid circulating, promote even cooking, and ensure the flavors soak in quickly. It also keeps the squash from moving in the pot and breaking apart.
- Use gentle heat – Maintain a simmer over medium-low heat to cook the squash gently and evenly.
- Let it cool in the simmering liquid for 30 minutes to absorb the delicious seasonings.
Variations and Customizations
- Garnish with ginger. Top it with julienned ginger briefly soaked in cold water to remove some of the spiciness.
- With ground chicken sauce (ankake). Simmer kabocha with ground chicken and finish with a thickened sauce. Adds umami and makes it extra hearty with rice.
- Make it vegetarian/vegan. Use Vegan Dashi or Kombu Dashi for a plant-based version.
- Make it spicy. Add shichimi togarashi or Japanese chili oil (La-yu).
- Itoko-ni (kabocha with azuki beans). A traditional dish simmering kabocha with adzuki beans. Comforting, subtly sweet, and perfect for winter.
- Deep-fry kabocha, then simmer. Lightly deep-fry the kabocha before simmering to keep its shape and allow the flavors to soak in more deeply.
What to Serve with Japanese Simmered Kabocha
This cozy side dish pairs beautifully with many Japanese meals. Here are my favorites:
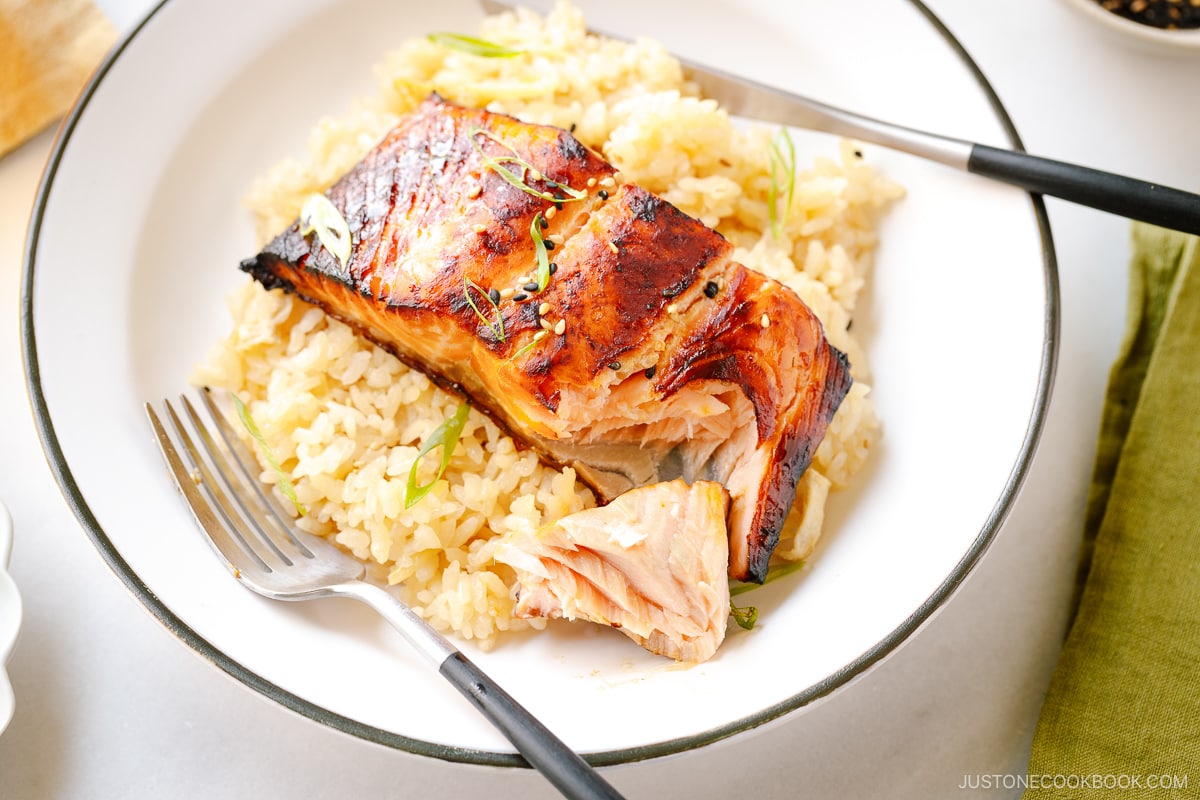
- With a main course – Serve it alongside Miso Salmon or Chicken Teriyaki.
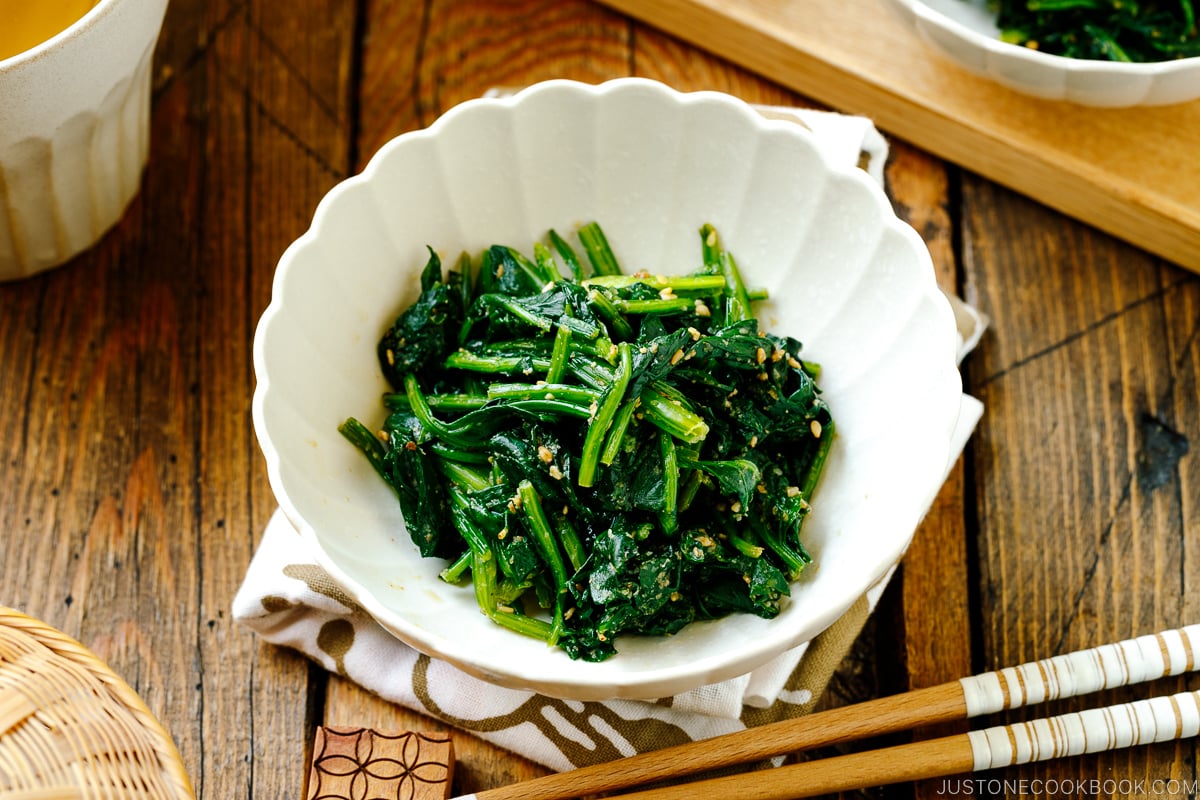
- With leafy vegetables – Pair it with Japanese Spinach Salad with Sesame Dressing (gomaae).
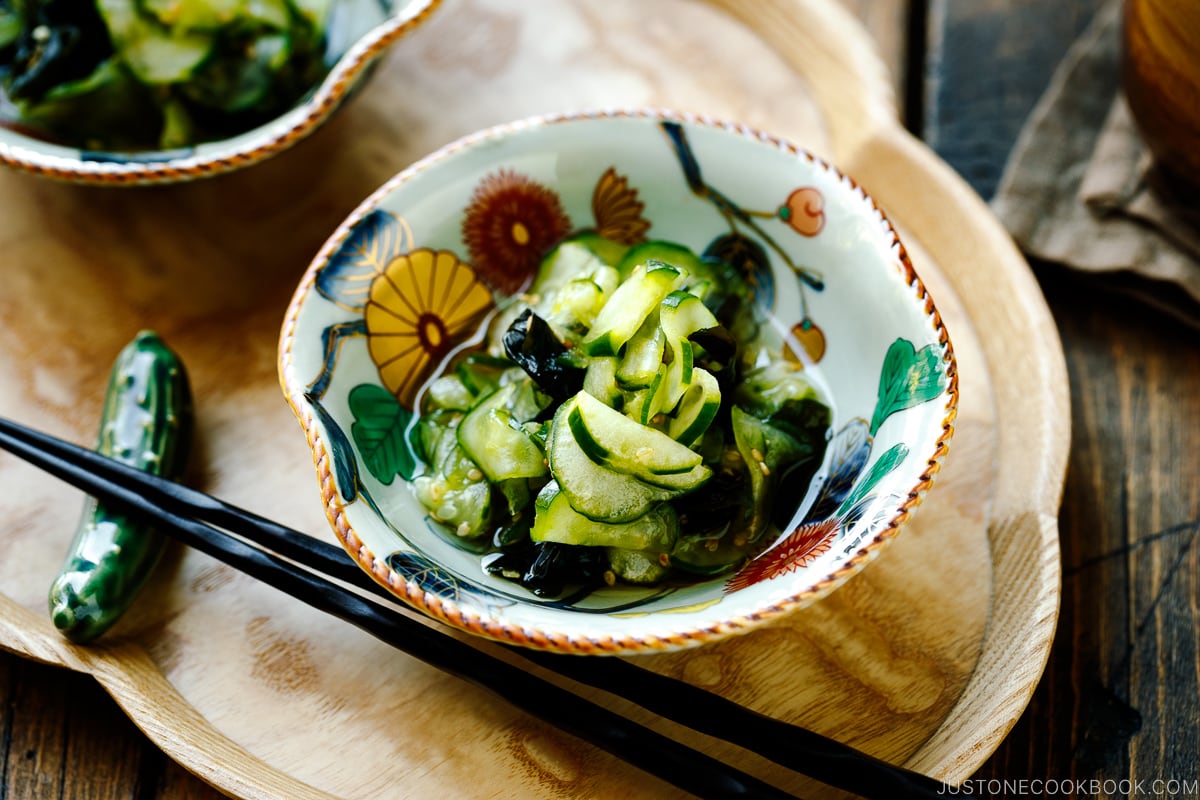
- With quick pickles – Japanese Pickled Cucumbers are refreshing and easy to make.
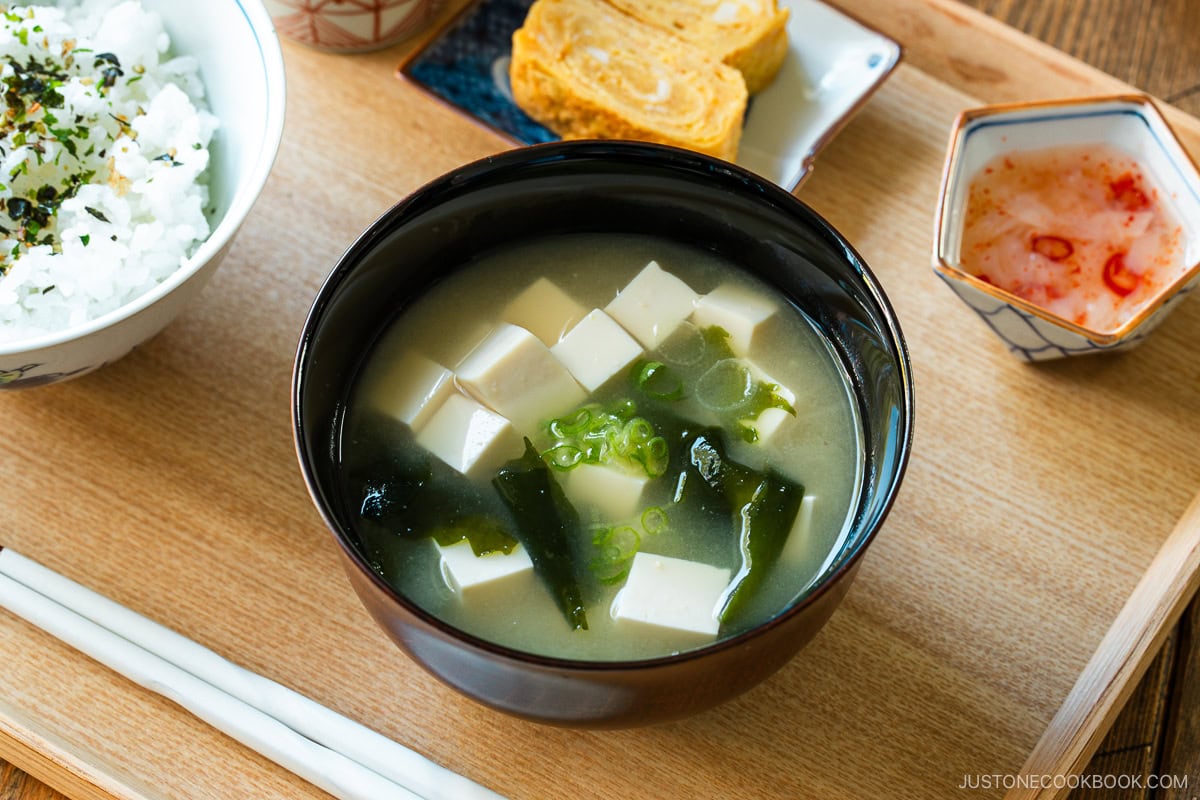
- As part of a set meal – Add it to a tray with steamed rice and Easy Miso Soup for a comforting ichiju sansai (one soup, three dishes) meal.
Storage and Reheating Tips
To store: Keep leftovers with simmering liquid in an airtight container in the refrigerator for 2–3 days or in the freezer for 2–3 weeks. However, kabocha can turn a bit mushy once frozen.
To reheat: You can serve the simmered kabocha at room temperature or gently reheat on the stovetop over low heat. Avoid stirring, as the kabocha can break apart easily.
Frequently Asked Questions
Yes! Simmered dish actually tastes better the next day as flavors meld. Store it in the fridge and reheat gently before serving.
Absolutely. Kombu dashi or vegan dashi are great vegan options and bring out kabocha’s natural sweetness.
If you use butternut, cut them to the same size as in this recipe, but simmer them for a little less time. Please check for doneness and modify the time as needed.
Double or triple the ingredients, but keep the kabocha pieces in a single layer in the pot. Use a wide, shallow pan, such as a braiser, to cook the squash evenly without breaking apart.
I’d love to hear how yours turned out! 💛 Please leave a star rating and comment below to share your experience. Your feedback not only supports Just One Cookbook but also helps other home cooks discover recipes they can trust.
Japanese Simmered Kabocha
Ingredients
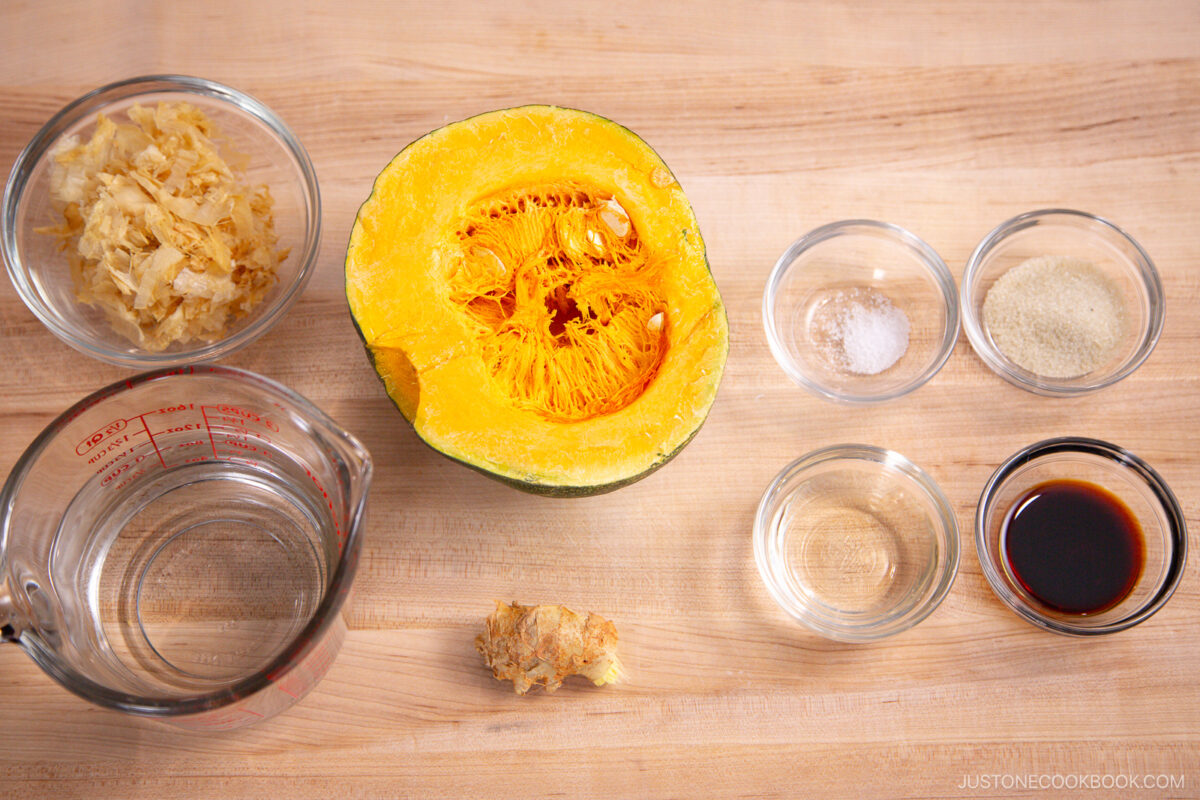
- 1 lb kabocha squash (½ small kabocha)
For Katsuo Dashi
- 1¾ cups water
- ½ cup katsuobushi (dried bonito flakes) (alternatively, you can make Awase Dashi; for vegan/vegetarian, make Vegan Dashi or Kombu Dashi)
For the Seasonings
- 2 Tbsp sake
- 1 Tbsp sugar
- 2 tsp soy sauce
- ⅛ tsp Diamond Crystal kosher salt
For the Garnish (optional)
- ginger (julienned; from a 1-inch, 2.5-cm knob)
Instructions
- Before You Start…Please note that this recipe requires 30 minutes of chilling time.Gather all the ingredients.
To Make the Katsuo Dashi
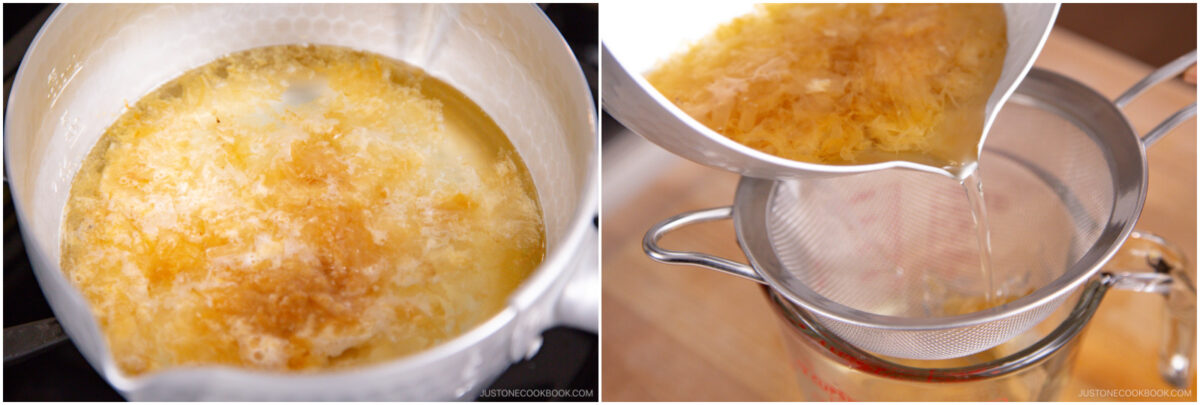
- In a small saucepan, boil 1¾ cups water for the dashi. Once boiling, add ½ cup katsuobushi (dried bonito flakes).
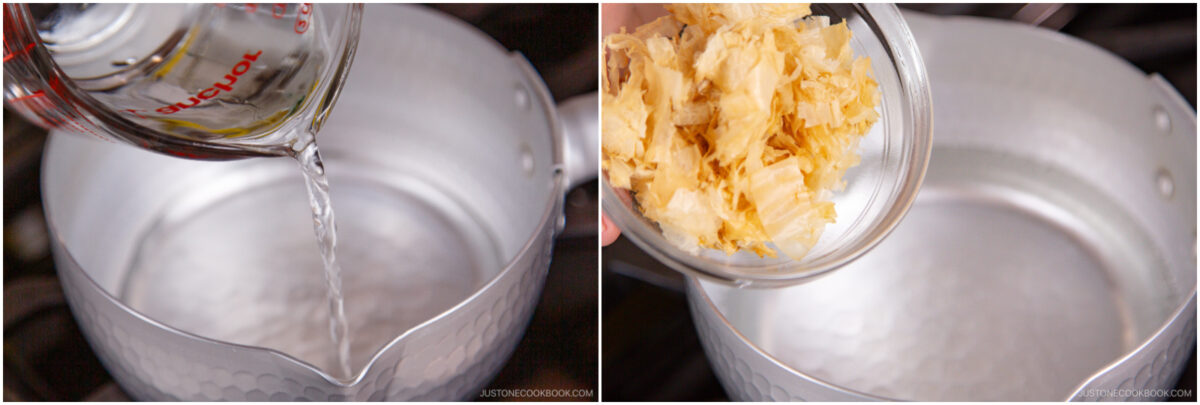
- Stir and turn off the heat. Set aside for 15 minutes to steep. Then, strain out the katsuobushi with a fine-mesh sieve. Now you have Katsuo Dashi. Set it aside. Nami's tip: Reserve the spent katsuobushi to make furikake (rice seasonings).
To Cut the Kabocha
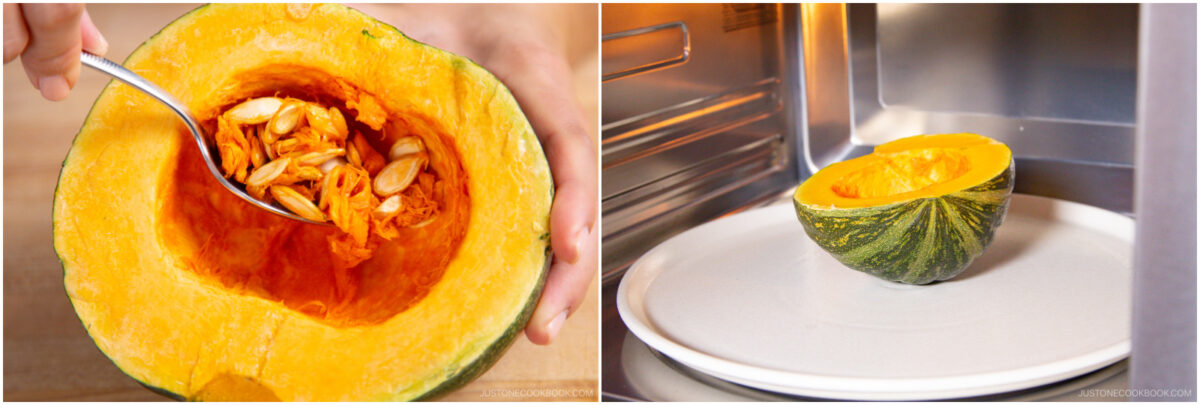
- Scoop out the seeds and membrane from 1 lb kabocha squash. Microwave it for 2 minutes to soften the outer skin. You can skip microwaving if you have a sharp knife and the strength to cut through the hard kabocha.
- Nami's tip: See my tutorial and video on How to Cut a Kabocha Squash for more detailed instructions and techniques.
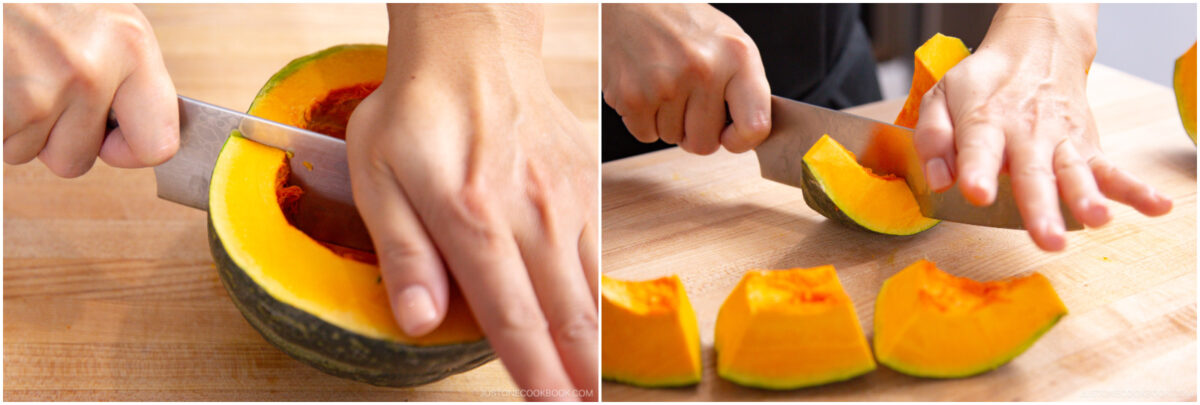
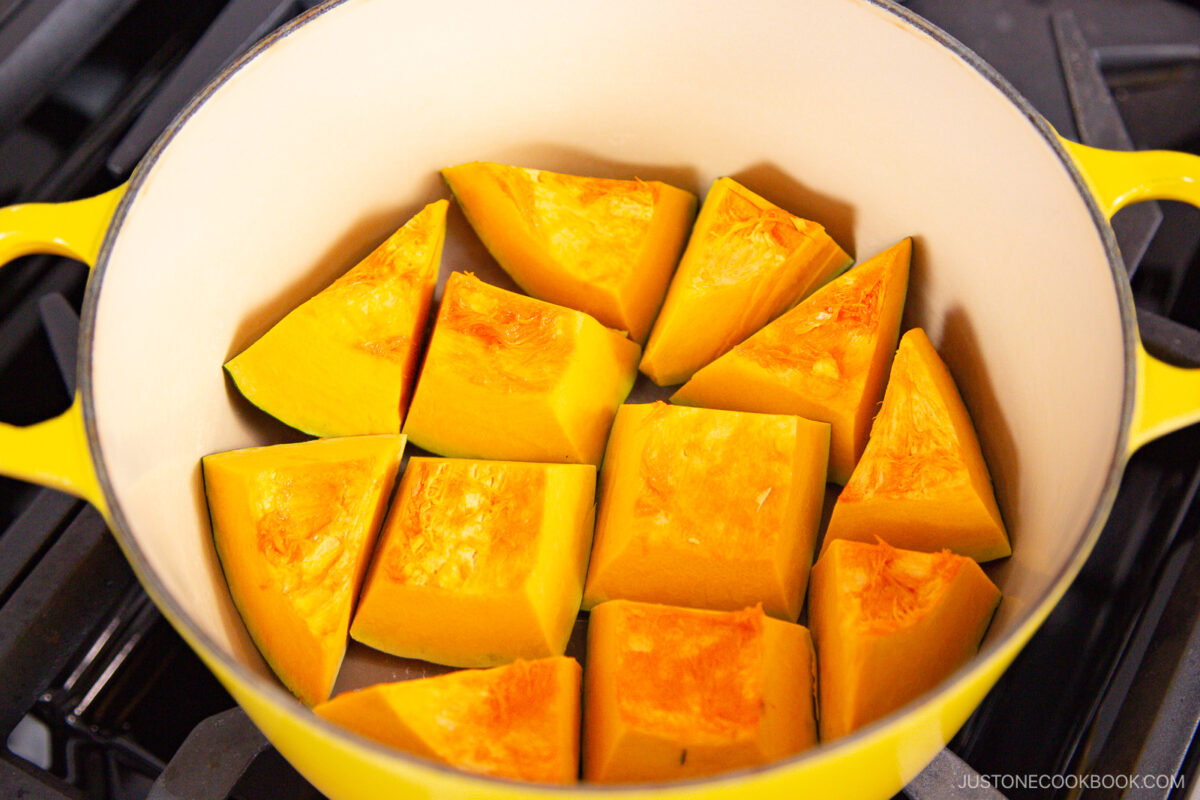
- Carefully cut the kabocha into wedges, then 2-inch (5 cm) pieces. Place the kabocha pieces in a single layer, skin side down, in a large pot.Nami's tip: Remember, we leave the skin on because it is edible and nutritious.
To Cook
- Add the dashi, 2 Tbsp sake, and 1 Tbsp sugar.
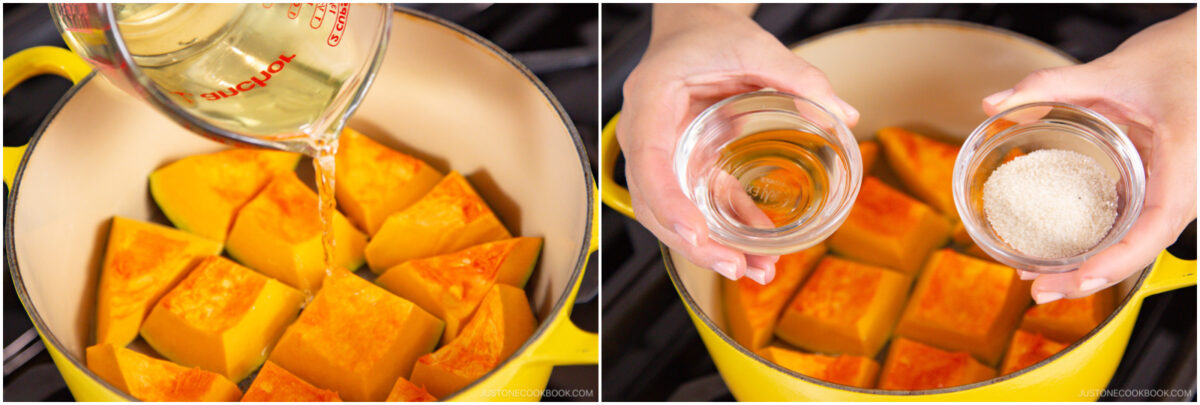
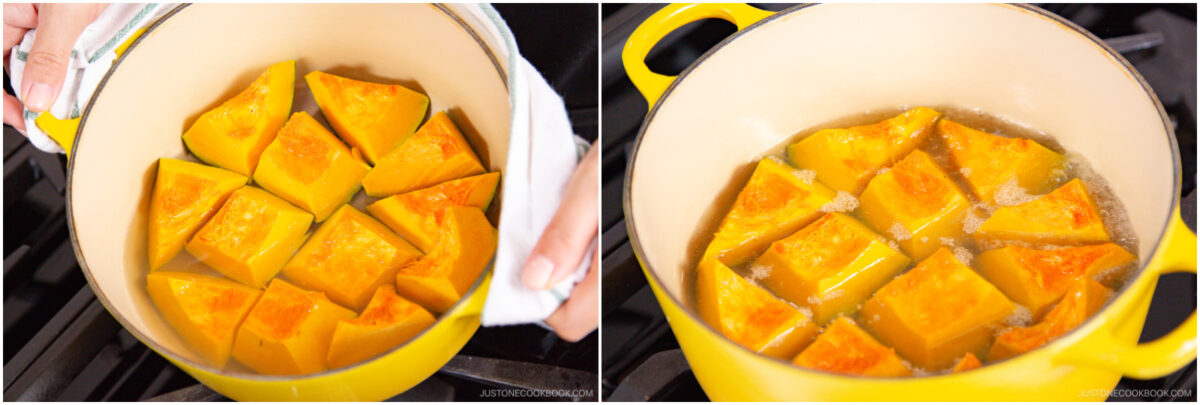
- Swirl the pot to mix the seasonings so you don‘t break the kabocha pieces by stirring. Turn on the stove to medium high and bring it to a boil.
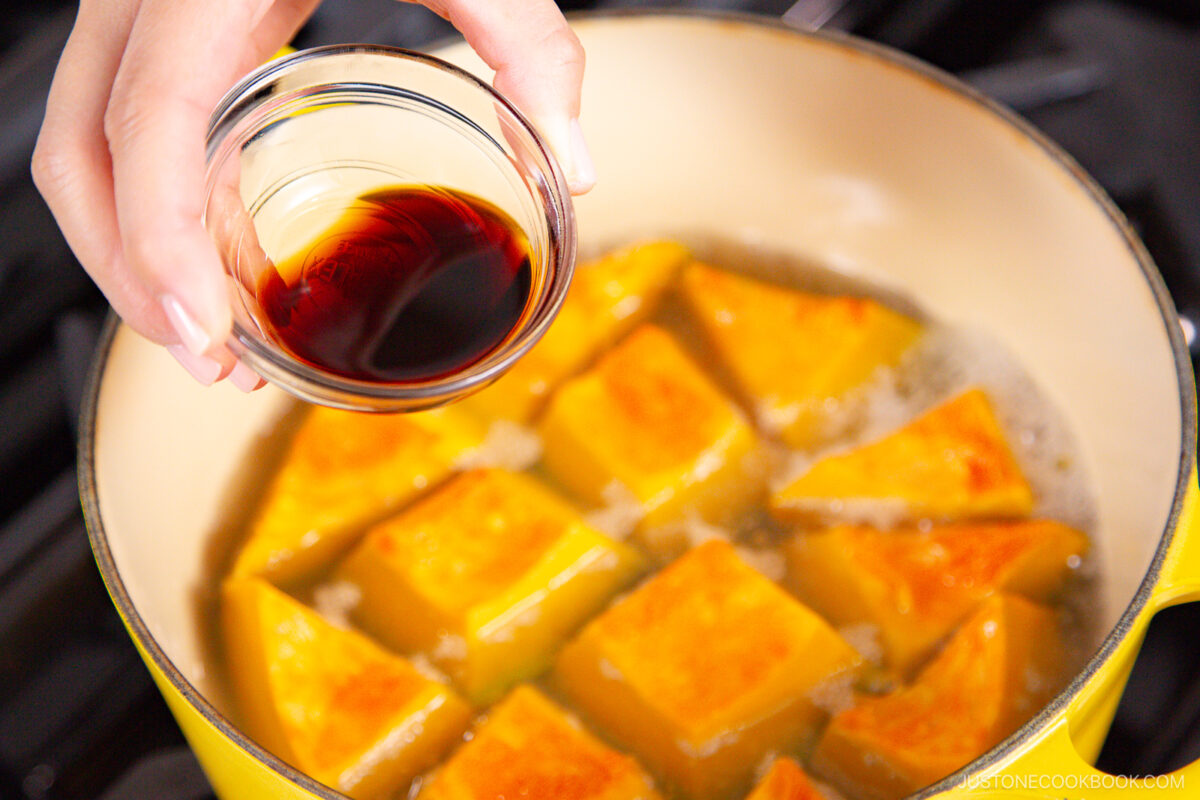
- Add 2 tsp soy sauce and ⅛ tsp Diamond Crystal kosher salt.
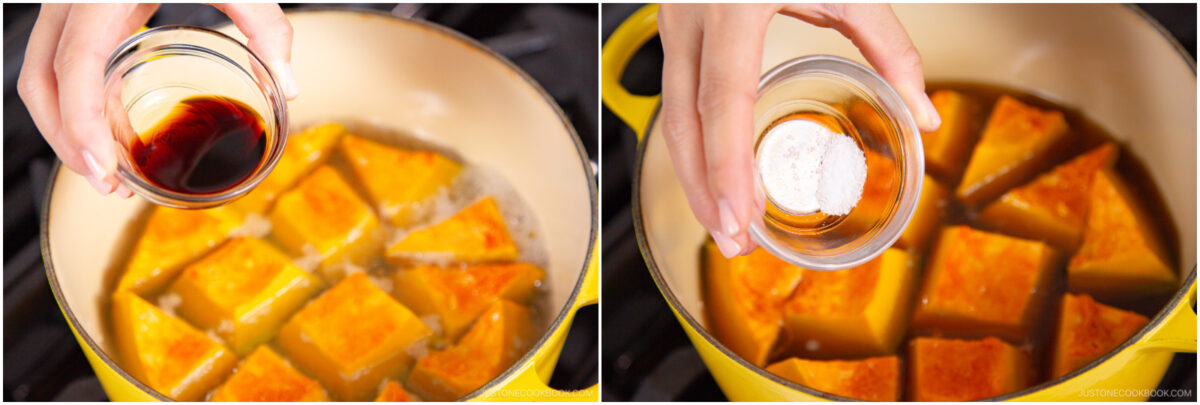
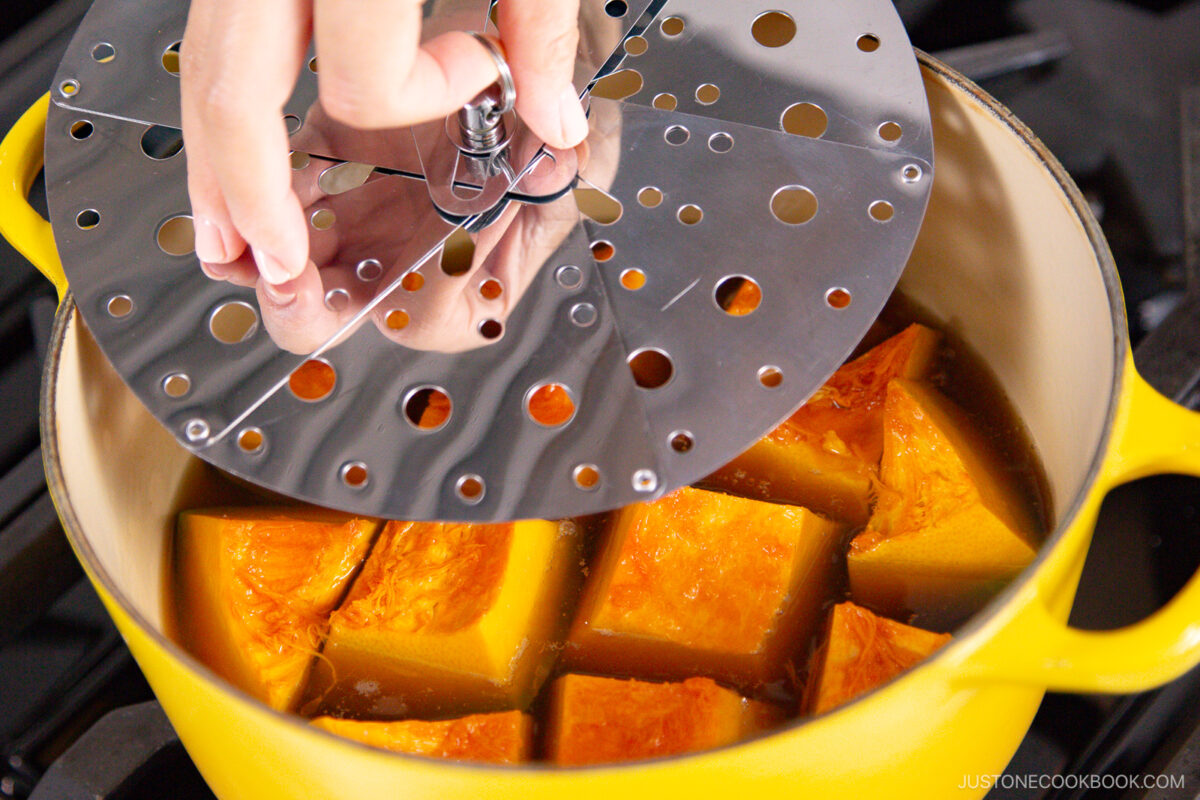
- Swirl the pot again to mix the seasonings. The cooking liquid should cover about three-quarters of the kabocha; add water if needed. Bring to a boil, then reduce to a simmer on medium low. Place an otoshibuta (drop lid) directly on top (you can find it on JOC Goods) and cook for 20–30 minutes, until the flesh shows fine cracks near the skin or a skewer pierces the flesh easily. If the liquid evaporates too quickly, cover with the pot lid (while keeping the otoshibuta still in place).Remove from the heat. Cover with the pot lid and let sit for 30 minutes to help the kabocha soak up more flavor.
To Serve
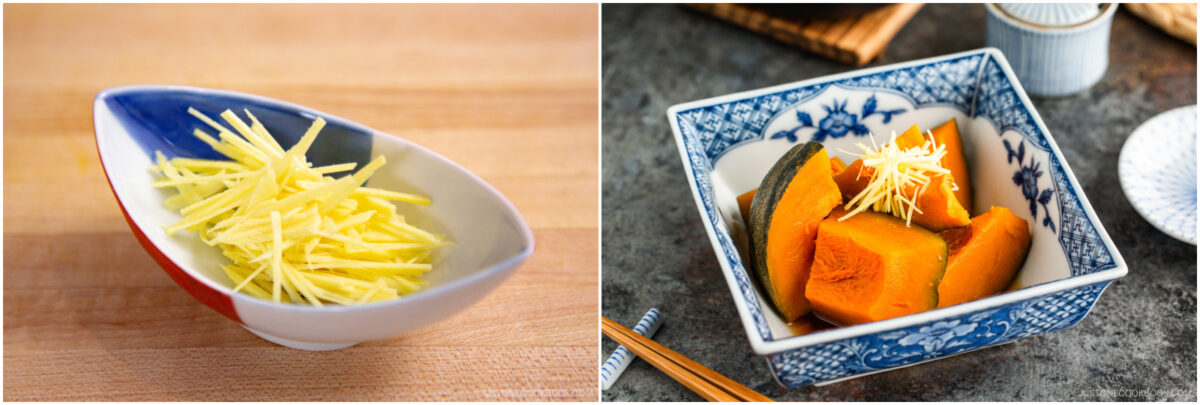
- You can serve the simmered kabocha at room temperature or reheat it before serving. To garnish with ginger (optional), cut it into thin slices and then thin julienne strips. Soak in cold water for 1 minute to remove some of the spiciness.
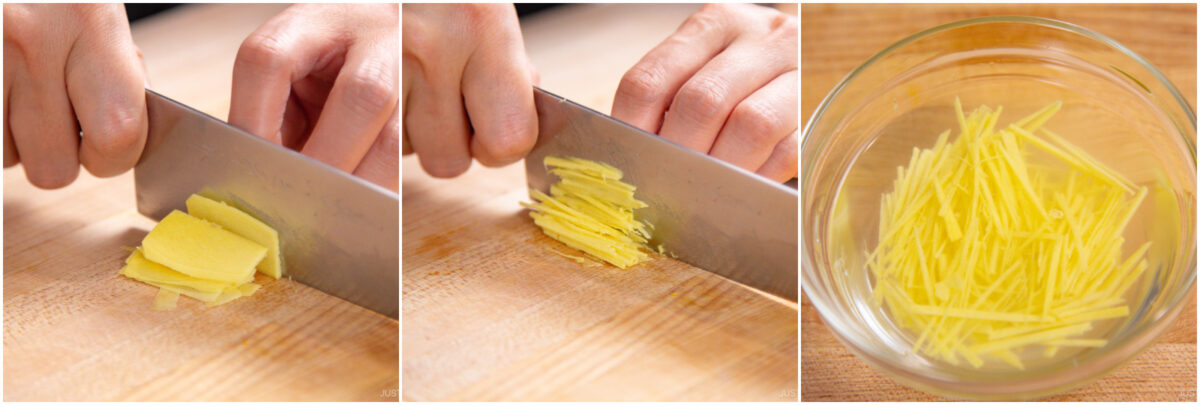
- Drain well and set aside. Sprinkle the ginger on top of the kabocha. Serve and enjoy!
To Store
- You can keep the leftovers in an airtight container and store in the refrigerator for 2–3 days or in the freezer for a month.
Nutrition
Did you make this recipe?
Tag @justonecookbook on Instagram so we can see your delicious creation!
Editor’s Note: The post was originally published on December 14, 2017. It was republished on October 2, 2025,
