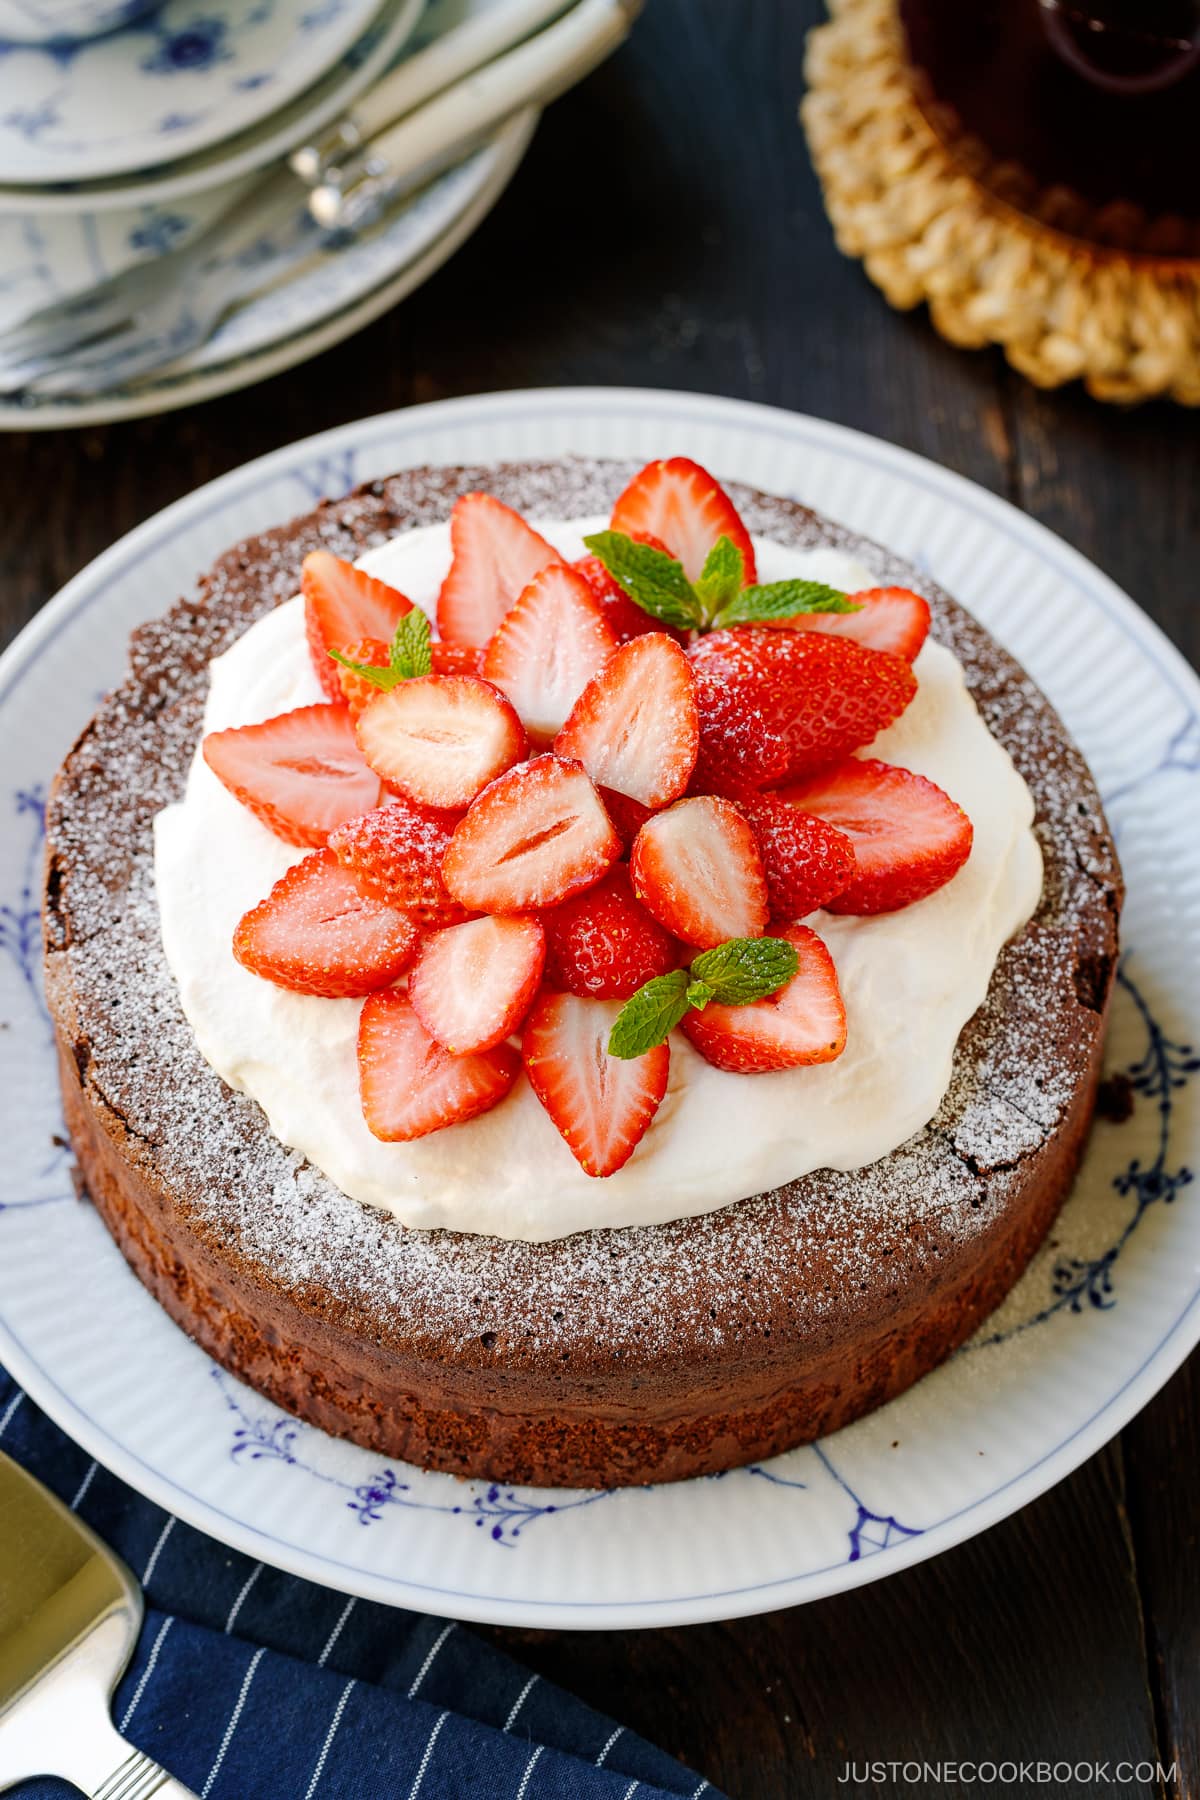
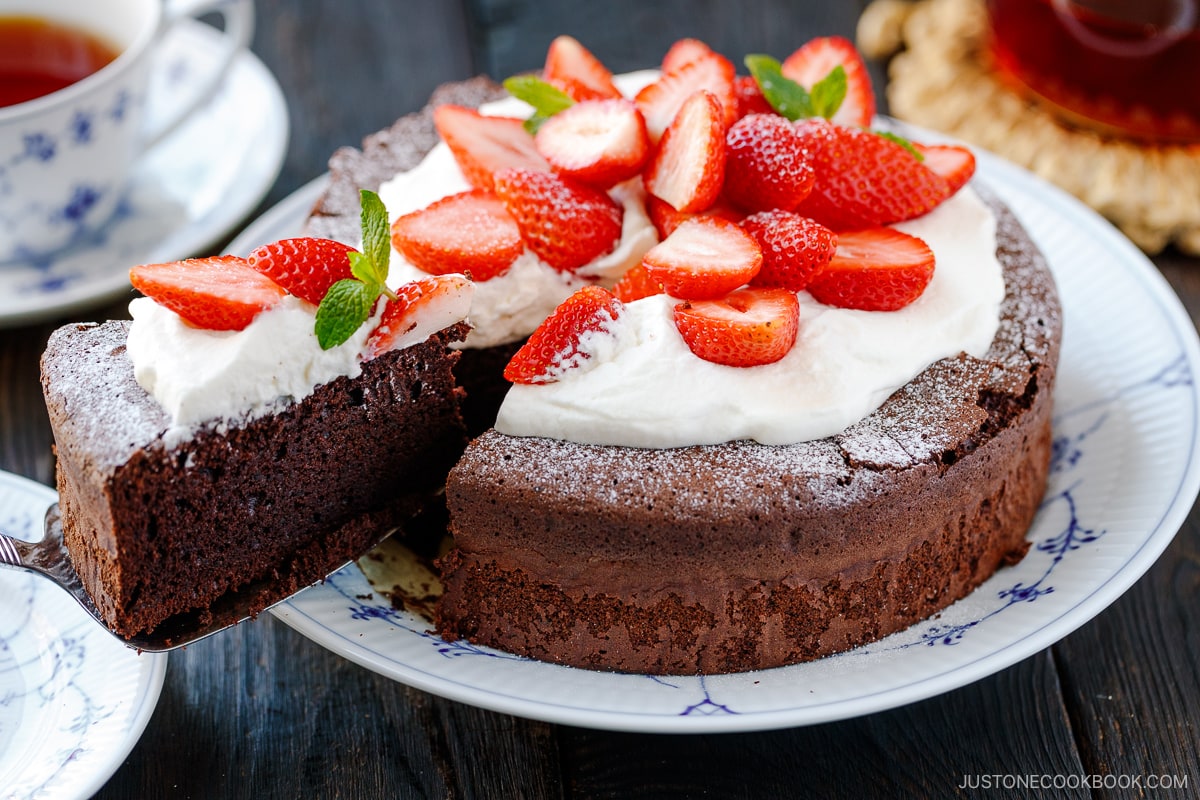
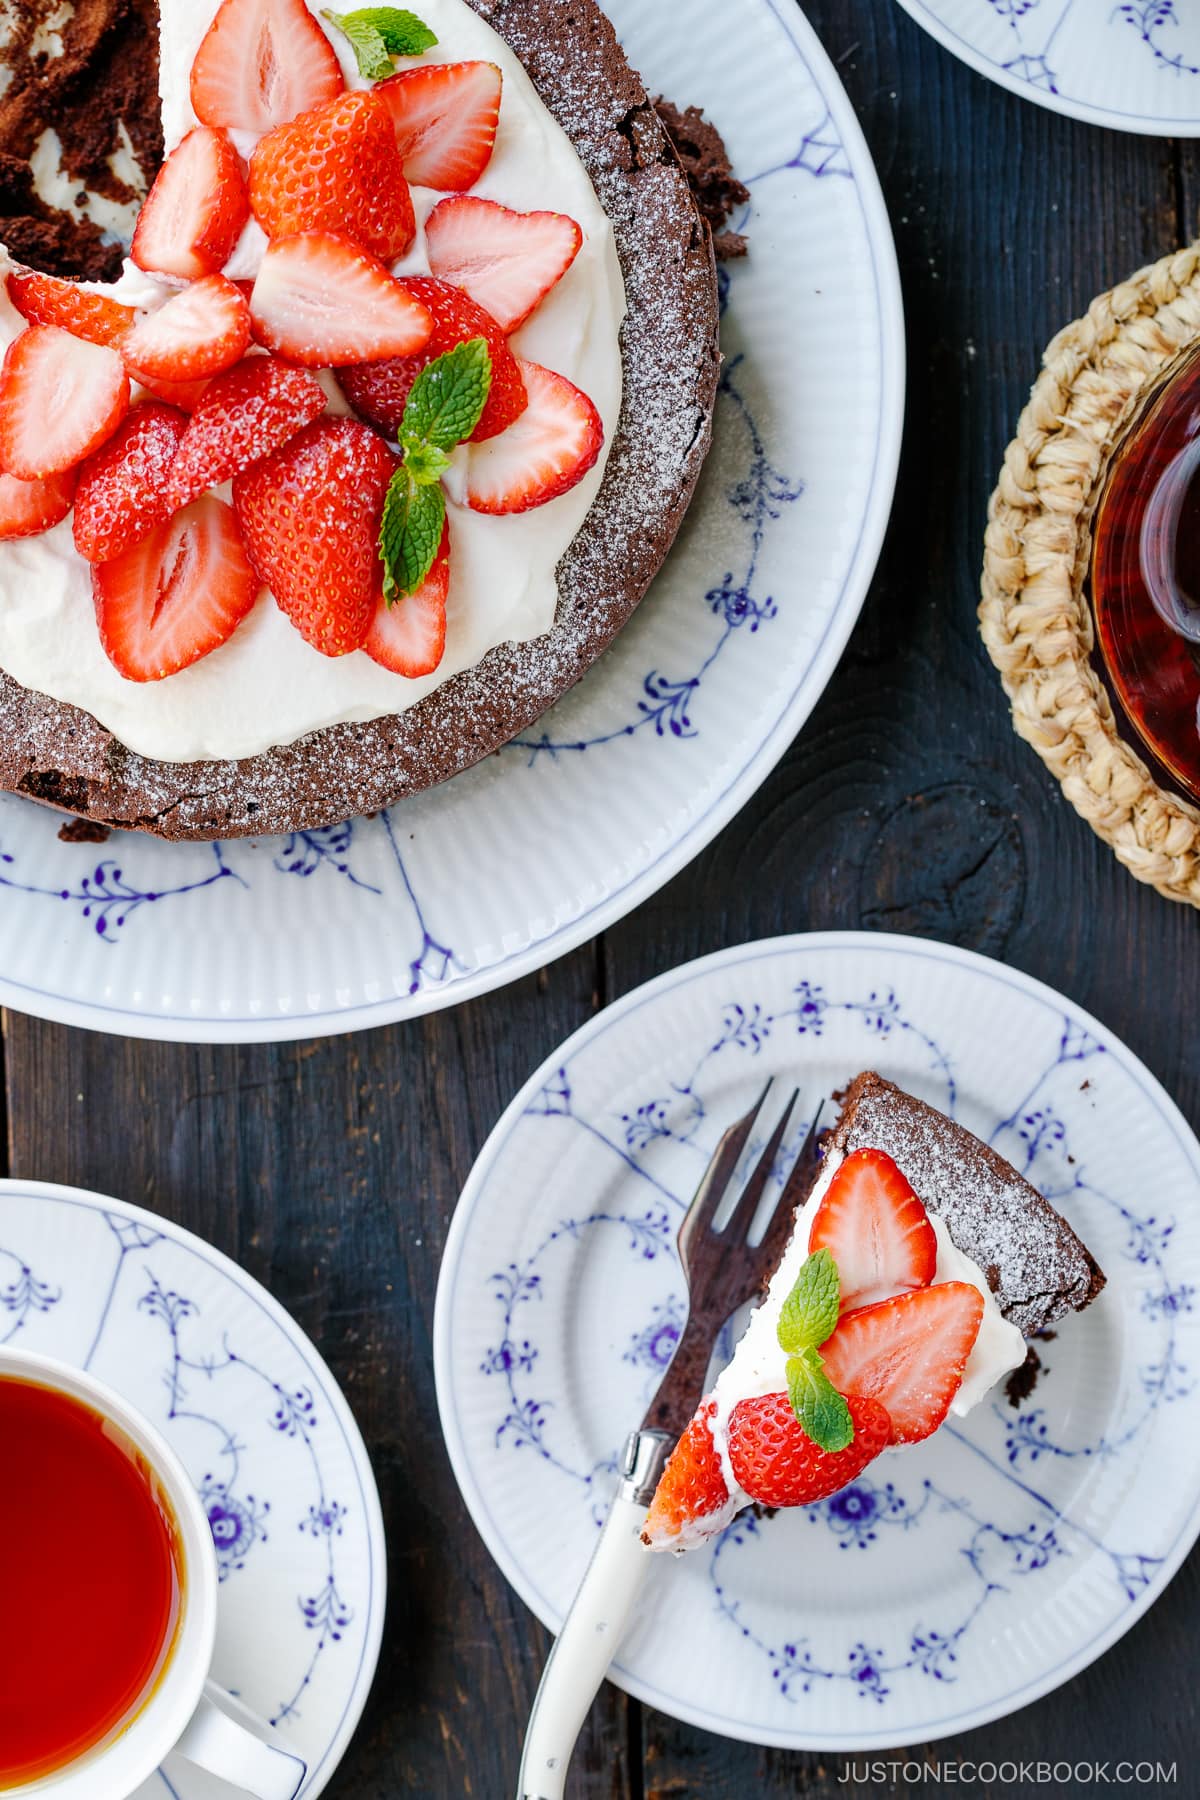
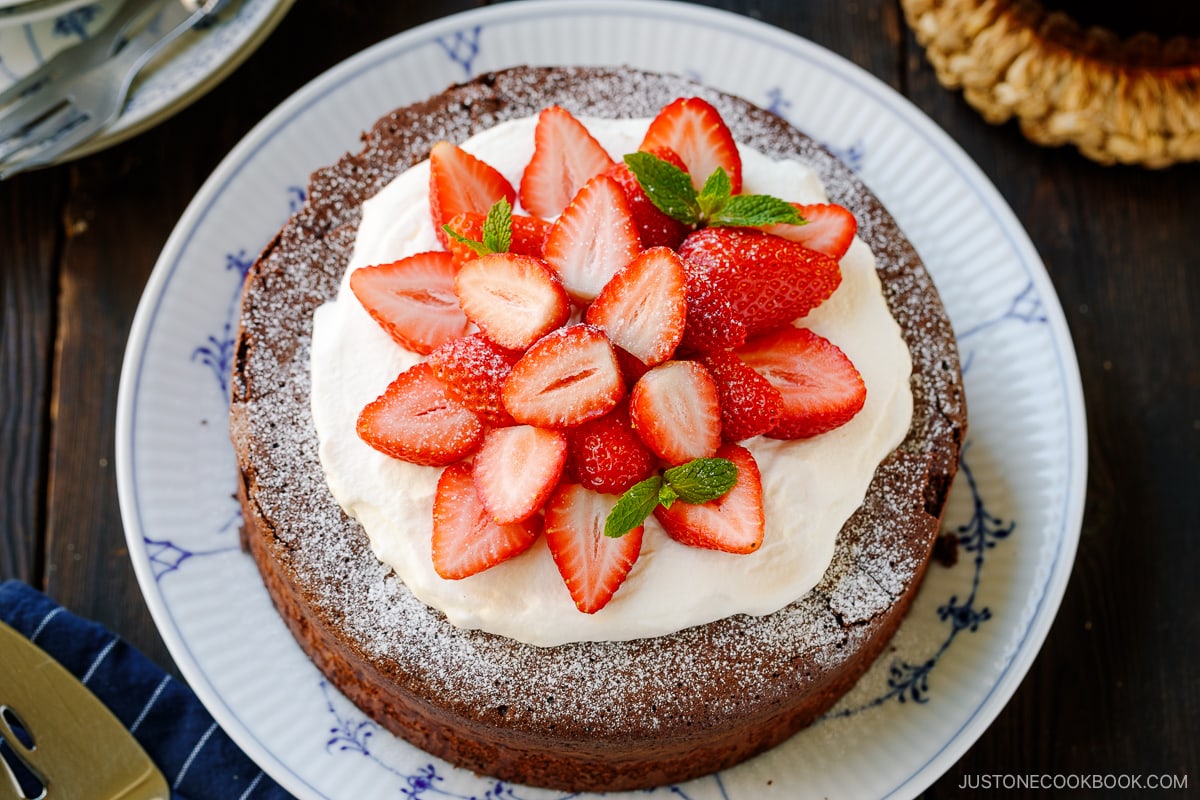
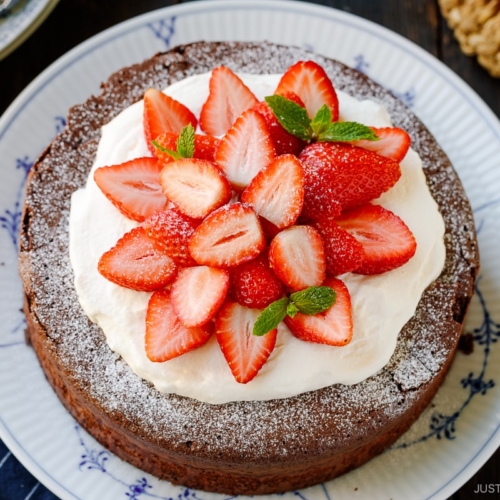
Moist and rich Chocolate Gateau recipe is a classic dessert found in cafes and pastry shops across Japan. Topped with strawberries and fresh whipped cream, this decadent cake is a beautiful and elegant sweet treat to make at home for any festive occasion.
It has always been my goal to expand our recipes for Japanese sweets and pastries on Just One Cookbook. However, baking is not my strong suit, so I brought in a Japanese pastry assistant, Haruka, to the team so that we could share authentic treats with our readers.
Today’s recipe, Chocolate Gateau or gâteau au chocolat (ガトーショコラ), is one of the first recipes we worked on together. With the holidays fast approaching, we wanted to share something you can bring to family gatherings or make ahead for a party that you’re hosting. And this chocolate cake recipe is THE ONE you need!
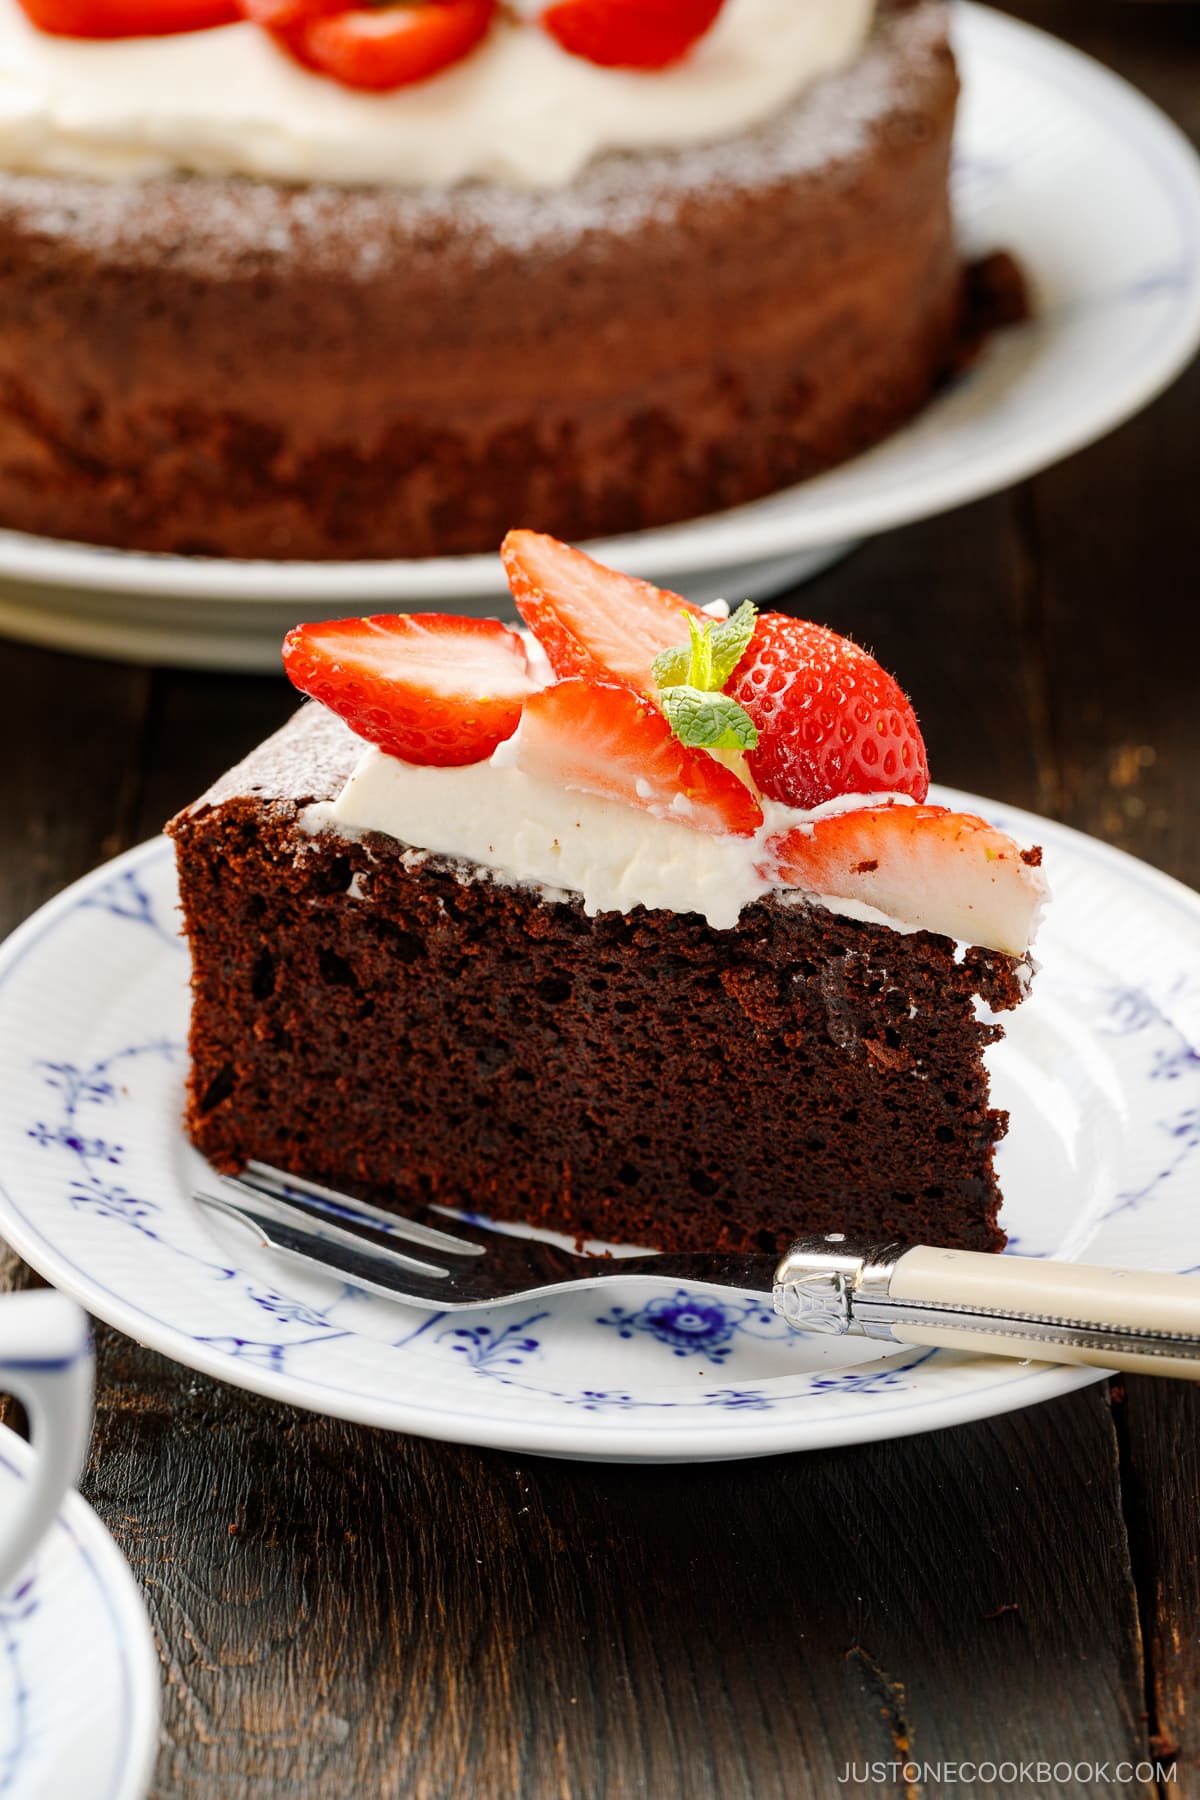
Firstly, the cake itself is impossibly rich and moist, with a well-rounded, truffle-like flavor. Next, it strikes the perfect balance of sweetness—sweet but not overly so. Finally, the topping! The whipped cream and strawberries truly take this cake to the next level, offering a fresh contrast to the overall enjoyment. ‘Kanpeki 完璧,’ as we would describe it in Japanese!
Table of contents
- What is Chocolate Gateau?
- Ingredients for Gateau Chocolat
- How to Make Chocolate Gateau
- Tips for Preparing the Ingredients
- How to Melt the Chocolate in a Double Boiler
- Tips for Making the Batter
- Baking Tips
- Serving Tips
- Cake Decoration Tips
- How to Line the Round Baking Pan
- How to Adjust to Different Pan Sizes
- FAQs
- Baking Tools You Need
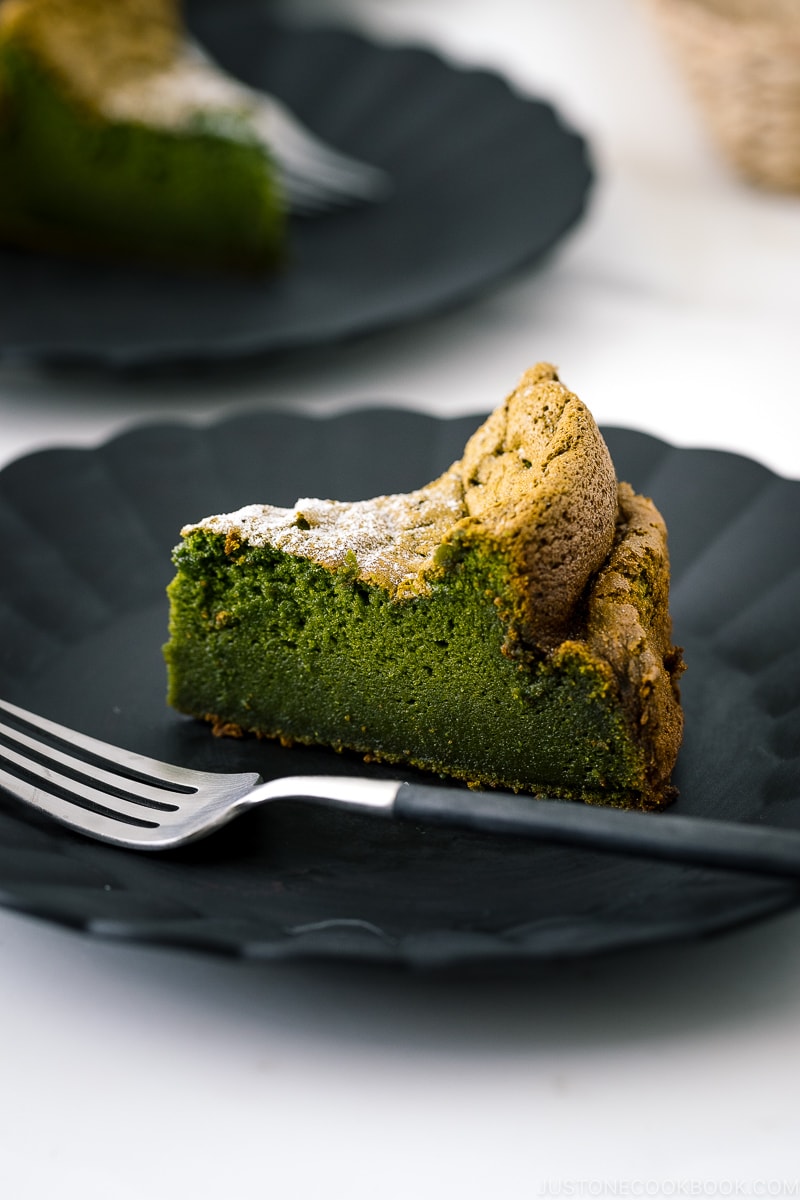
What is Chocolate Gateau?
A chocolate gâteau, also known as gâteau au chocolat (ガトーショコラ), is a classic French cake made with eggs, butter, sugar, chocolate, cocoa powder, and flour. This luscious dessert is rich, moist, dense, and intensely flavorful. It can be found everywhere, from cafes and pastry shops in Japan.
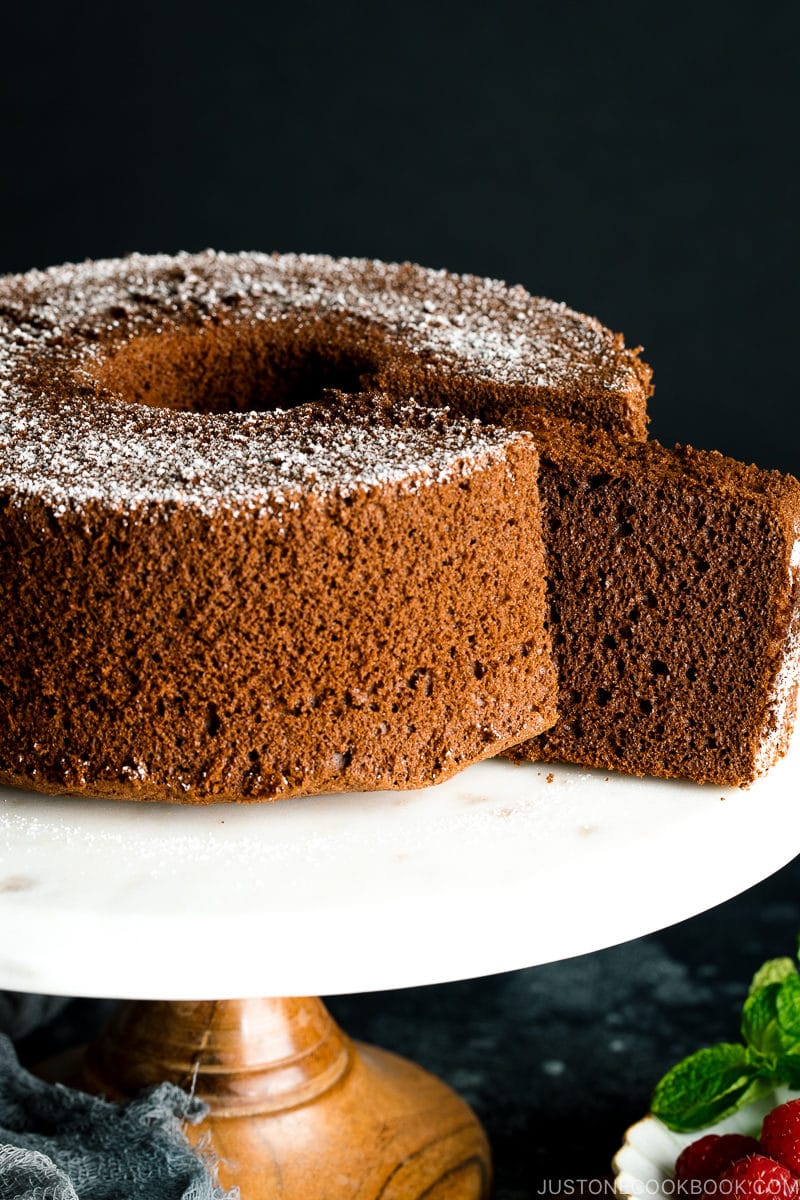
Some people say that the chocolate gâteau tastes like a chocolate brownie. It’s true that they both have an intensely deep and concentrated chocolate flavor. However, there are some key differences.
While brownies are rich and heavy, the gâteau is rich without the heaviness. The chocolate gâteau has a uniform cake crumb that’s structured yet tender. It‘s somewhat dense yet lighter and more airy than a brownie, which is fudgy and extremely dense.
Western sweets in Japan are heavily influenced by European (typically French) sweets rather than American sweets, and they are not as sweet as American desserts.
The recipe requires simple but high-quality ingredients, including chocolate chips (for baking purposes) and cocoa powder, to make a gateau in which the chocolate flavors shine. The overall flavor is indulgent enough that you don’t even need any chocolate frosting on top.
Ingredients for Gateau Chocolat
- Cake flour – You can use all-purpose flour, but cake flour (less gluten) is preferred.
- Dutch-process cocoa powder
- Salt
- Eggs
- Unsalted butter
- Chocolate chips – Use good-quality baking chips! I like using 2 parts semi-sweet chocolate (46% cacao) and 1 part extra dark chocolate (63% cacao) for our preference.
- Granulated sugar
- Milk – You also can use heavy cream for a richer taste.
- Cake decoration – Strawberries or raspberries, confectioners’ sugar, heavy whipping cream, and sugar.
How to Make Chocolate Gateau
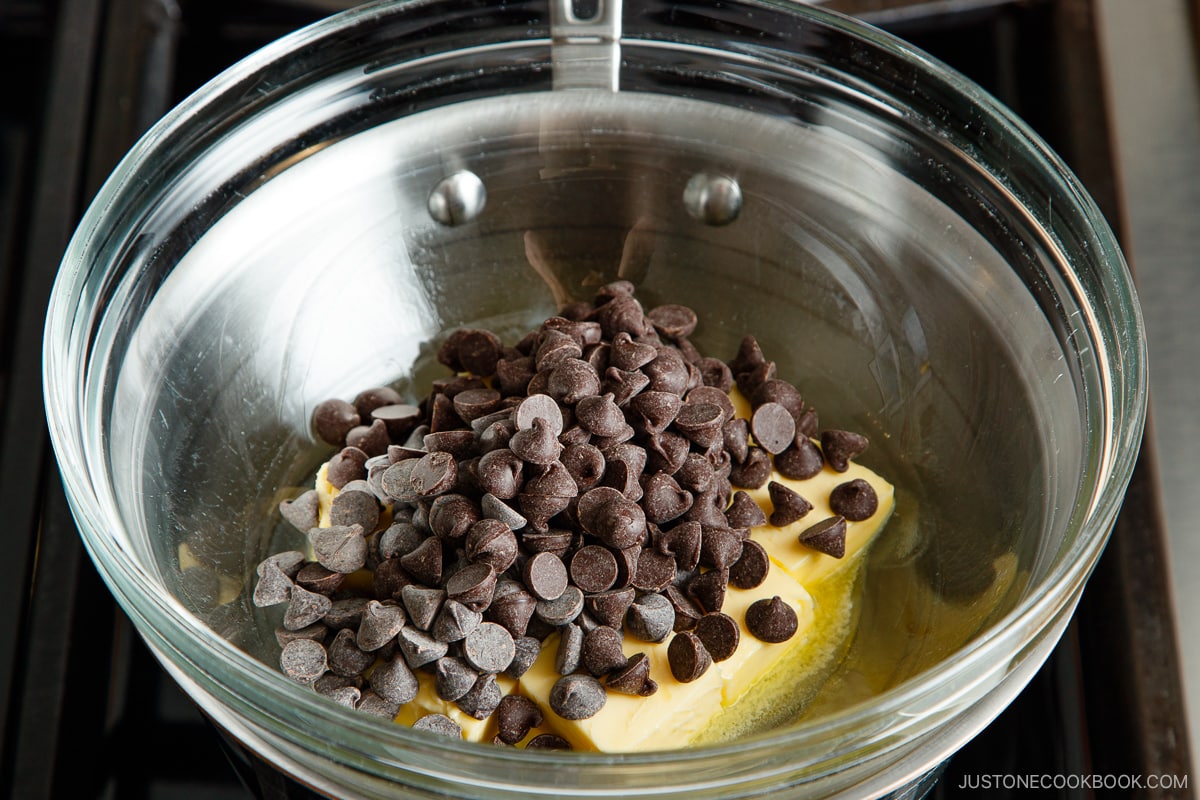
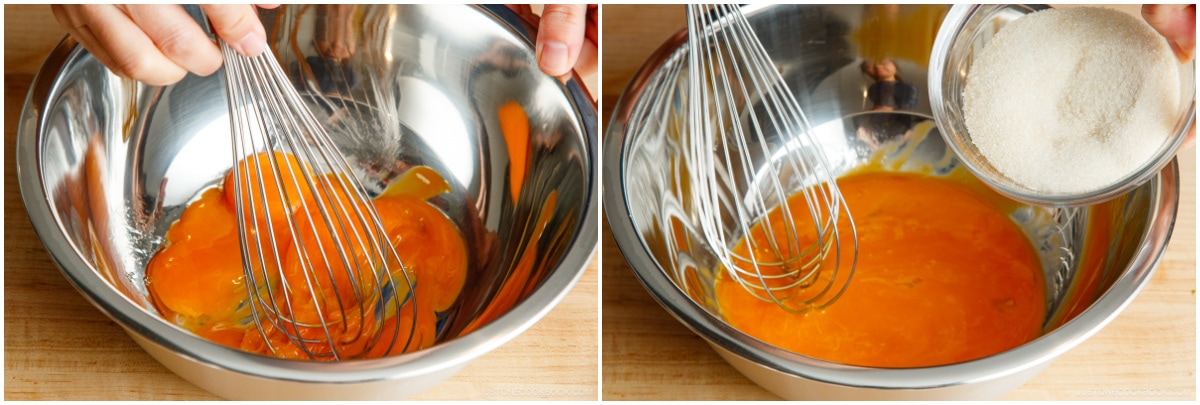
- Prepare the chocolate mixture. Melt the chocolate chips and butter in a double boiler.
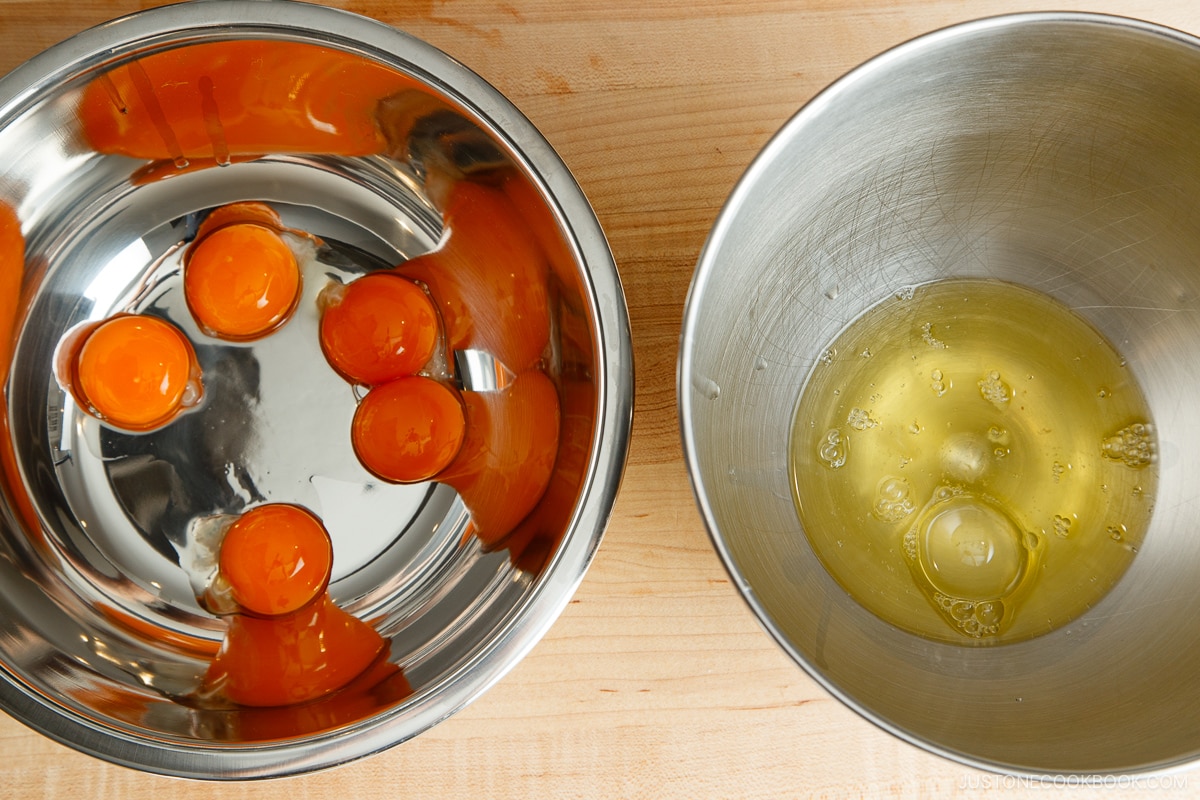
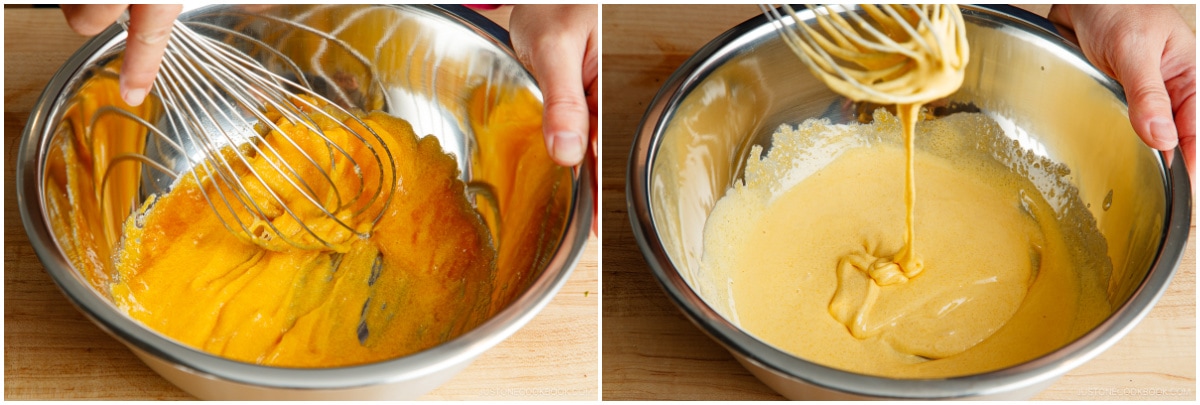
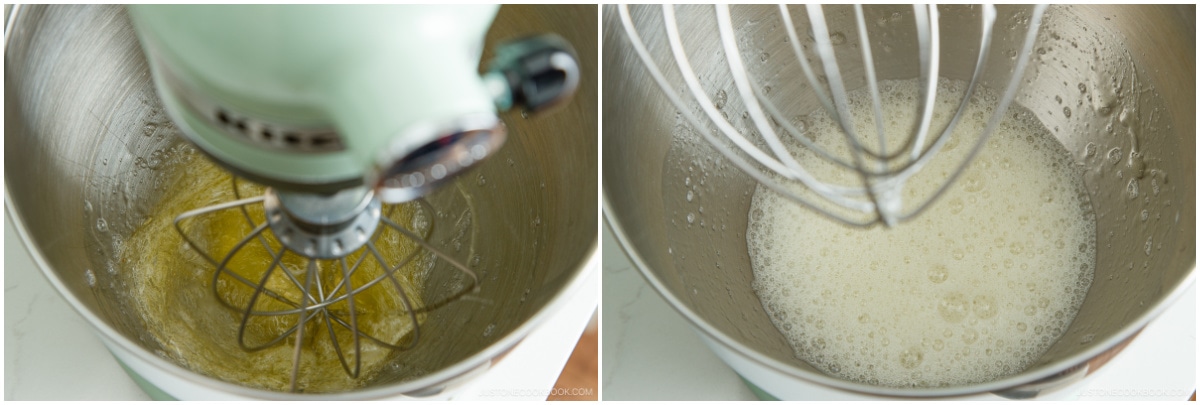
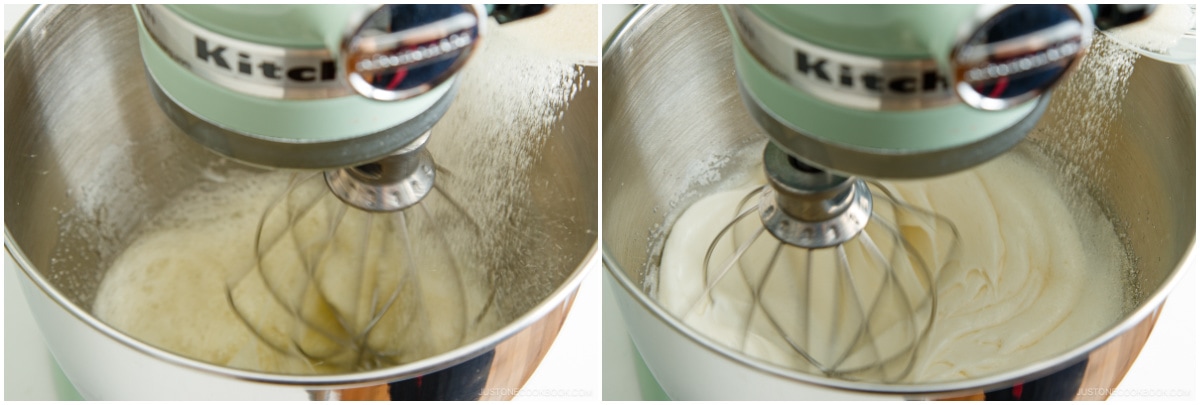
- Prepare the yolk mixture. Whisk egg yolks and sugar until it becomes a thick texture and pale in color.
- Combine the chocolate and yolk mixture.
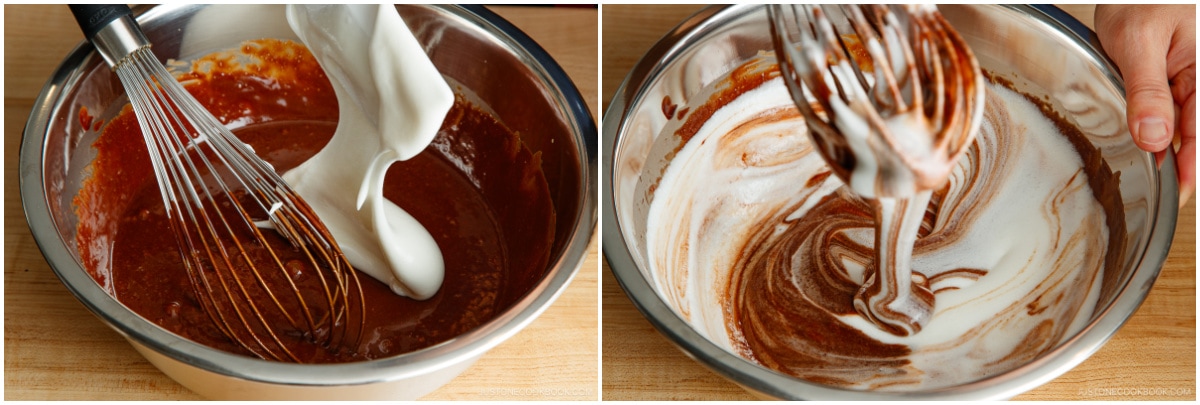
- Beat the egg whites. Fold the egg whites and dry ingredients into the chocolate mixture.
- Pour the batter and bake. Let cool completely and refrigerate overnight.
- Invert the cake and decorate the cake before serving.

Tips for Preparing the Ingredients
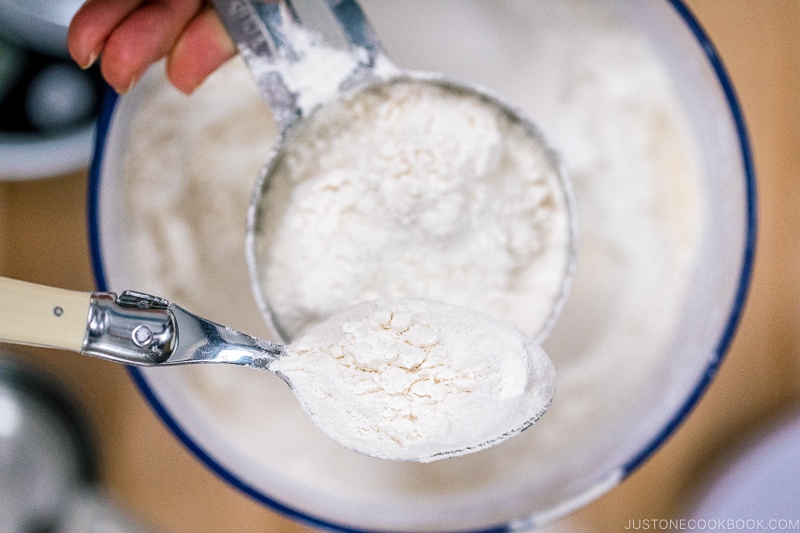
- Measure the ingredients with a kitchen scale. I highly recommend using a kitchen scale to measure the ingredients, as we did for this recipe. However, I wanted to ensure that this recipe is easy to measure by volume for those who prefer using cups. If you choose to use cups, measure your flour and cocoa powder by “fluffing and sprinkling.” Otherwise, you will scoop and compact too much flour or cocoa powder into the measuring cup and end up with a dry, dense cake. Once you get used to using a kitchen scale, you’ll appreciate its convenience. No more washing multiple measuring cups!
- Keep your eggs at room temperature. This is a small yet important step. Set a reminder to take out the eggs from the fridge 30–60 minutes before you start prepping so they come to room temperature naturally.
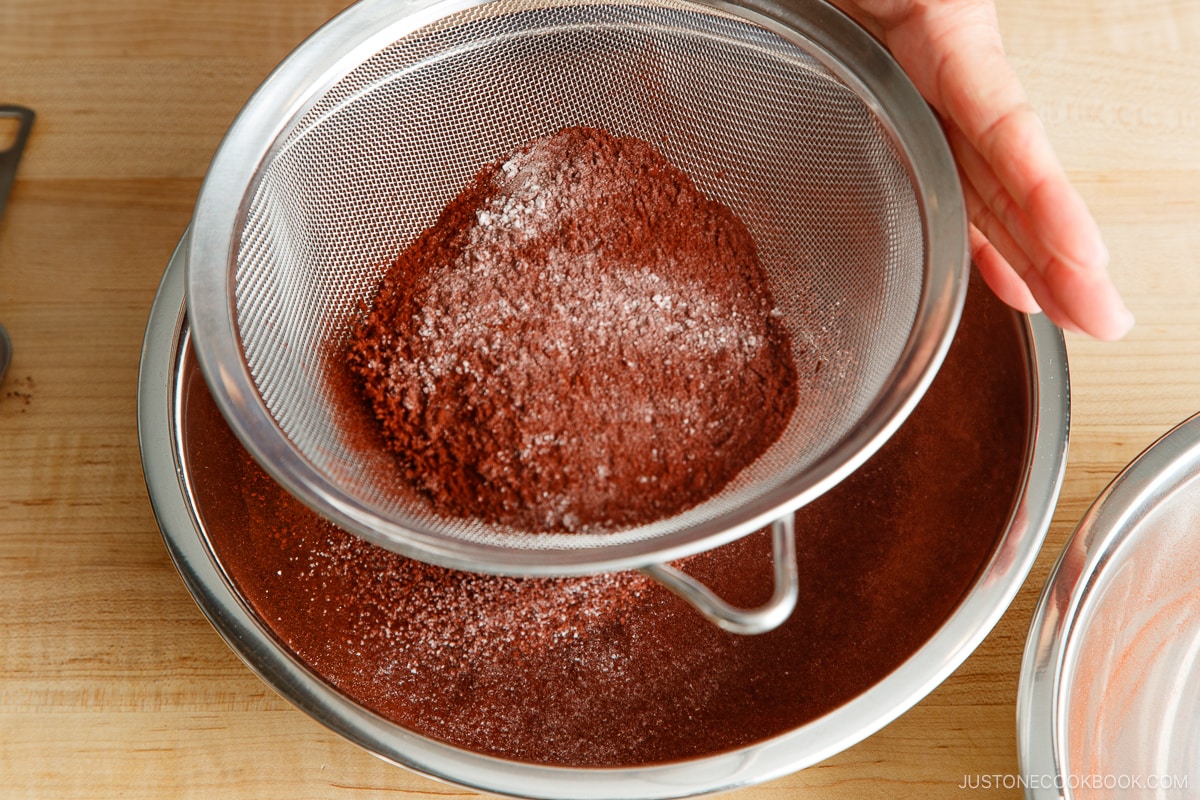
- Sift the flour and cocoa powder. Don’t take shortcuts. Sifting dry ingredients ahead of time helps incorporate them into the wet ingredients and avoid lumps in the batter.
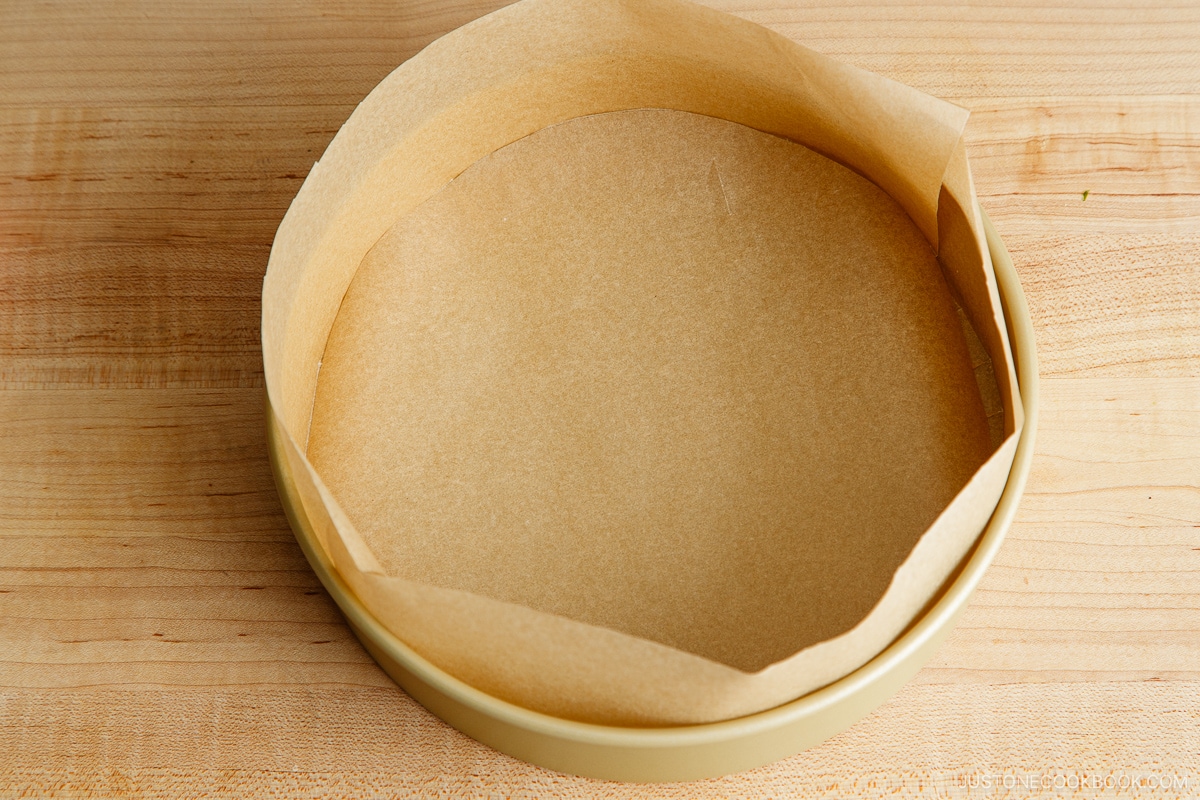
- Line the 8-inch (20-cm) round cake pan with parchment paper. I’ll show you my trick later in the post. Also, use a light-colored cake pan for the best outcome. Avoid using a dark-colored pan because it will absorb heat faster and more intensely and your cake will bake more quickly, possibly overbake, and may even burn. If you must use a dark pan, reduce the oven temperature by 25°F (15°C) and check for doneness 10 minutes sooner than the instructions indicate.
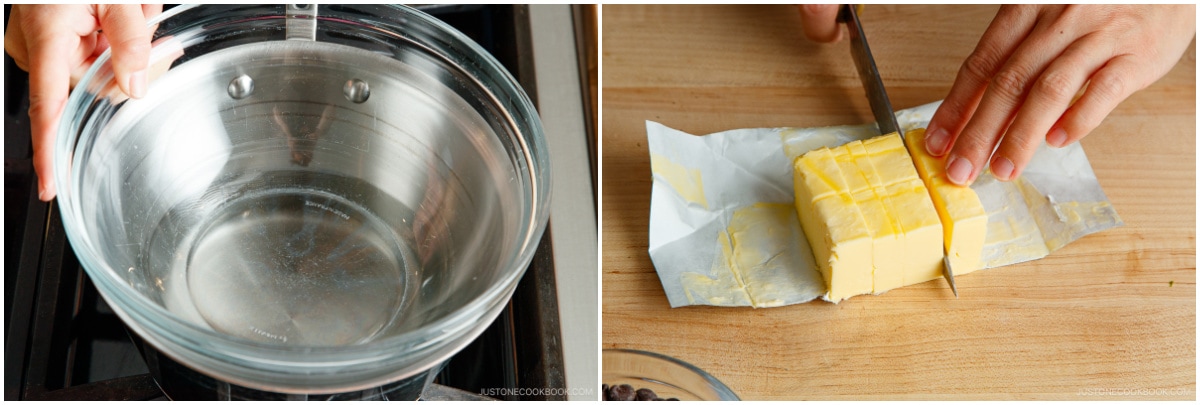
How to Melt the Chocolate in a Double Boiler
A double boiler is a heat-proof bowl set over a larger saucepan filled with 2 inches (5 cm) of barely simmering water. It allows for indirect, gentle heat when warming up temperature-sensitive ingredients, like chocolate, that require a delicate touch.
- Never expose melted chocolate to water! Any water will cause the chocolate to seize. Make sure the bowl fits tightly on top of the saucepan because escaping steam could cause your melted chocolate to seize up.
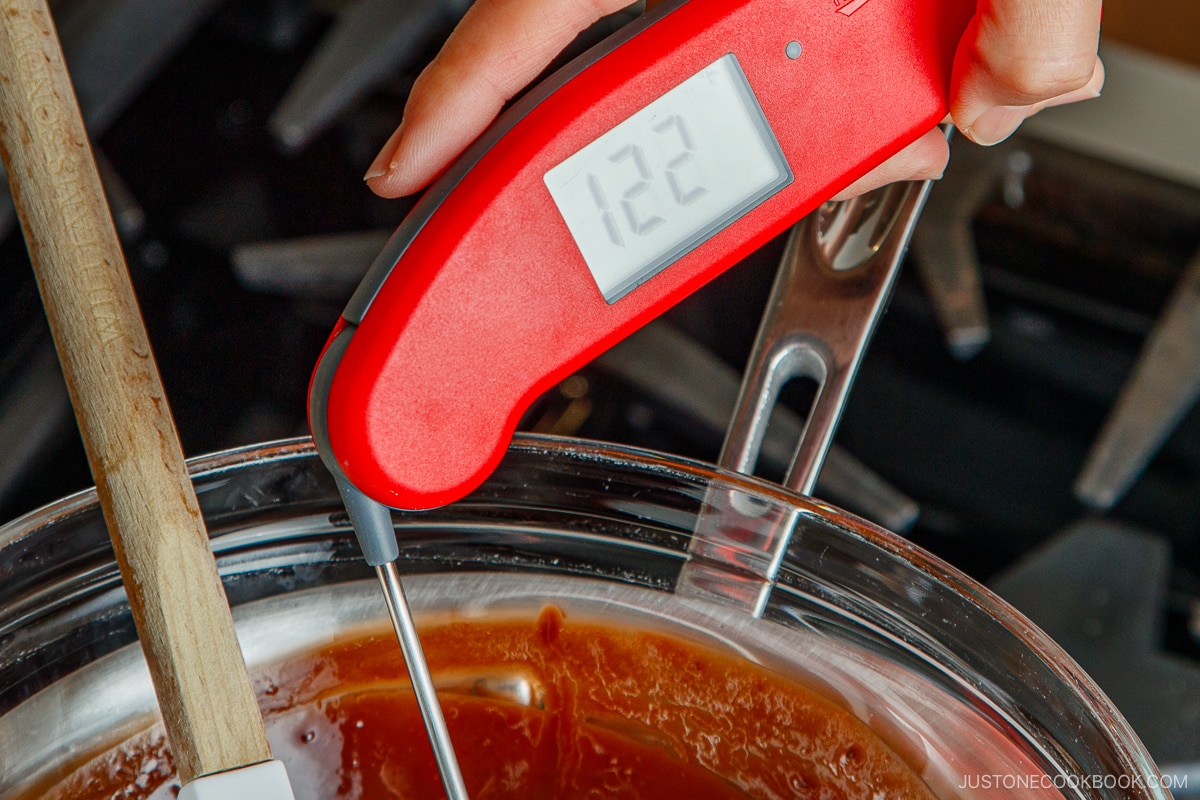
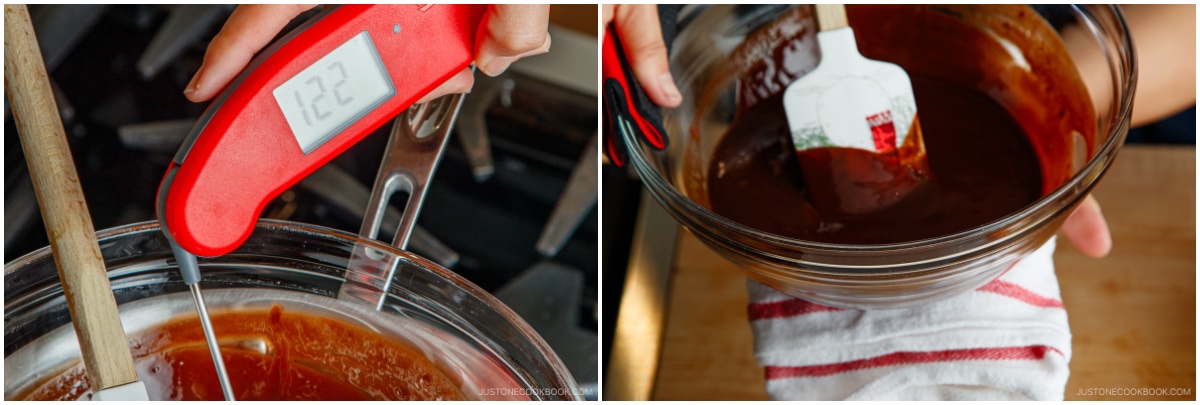
- For bittersweet or semisweet chocolate, remove from the heat when the chocolate mixture reaches 122°F (50°C) and keep it at 104ºF–122ºF (40–50ºC) to prevent the chocolate from hardening. DO NOT let your chocolate mixture cool because it will become extremely difficult to combine with other ingredients.
Tips for Making the Batter
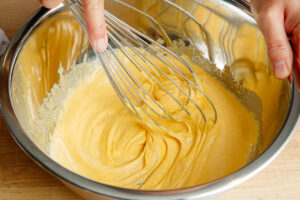
- Make sure to use room-temperature egg yolks so that they don’t harden the chocolate mixture when combined. Whisk the yolks and sugar until the mixture becomes thick and pale in color.
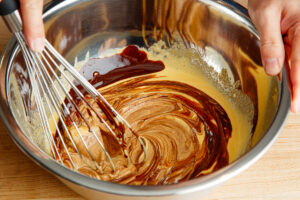
- Gradually incorporate all the warm chocolate mixture into the egg yolk mixture.
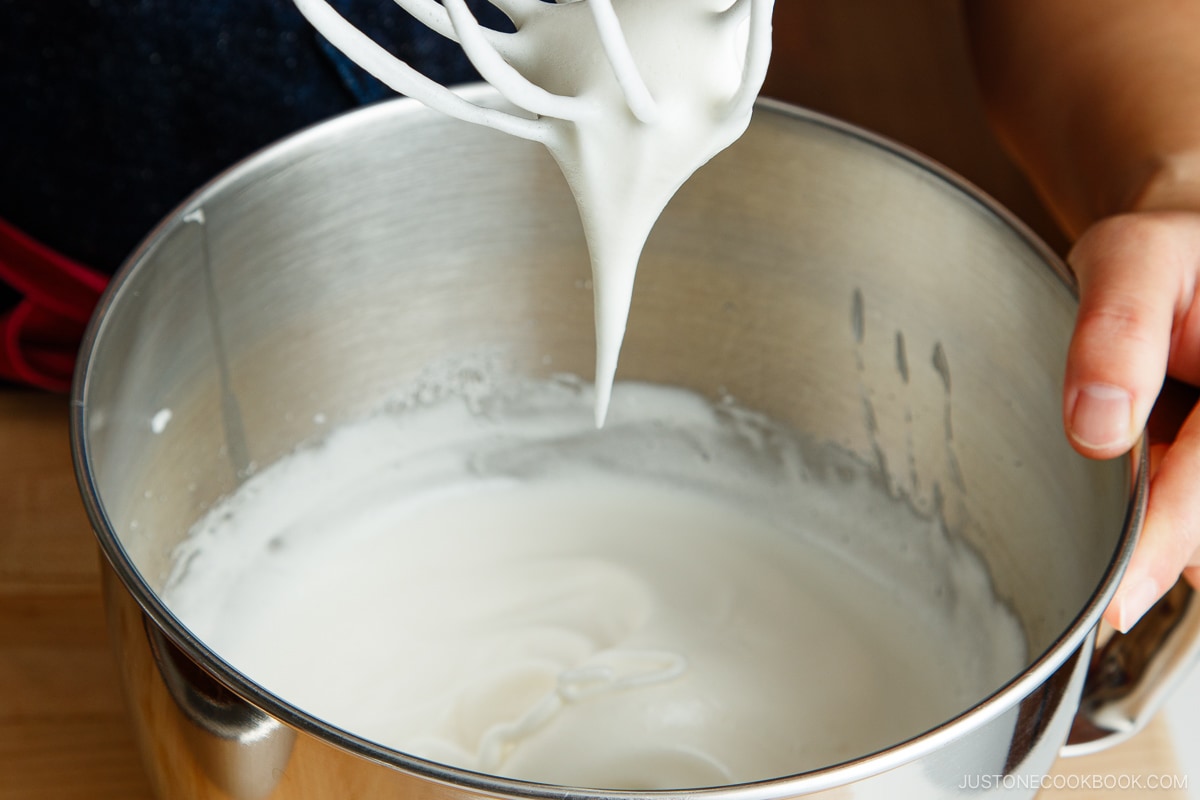
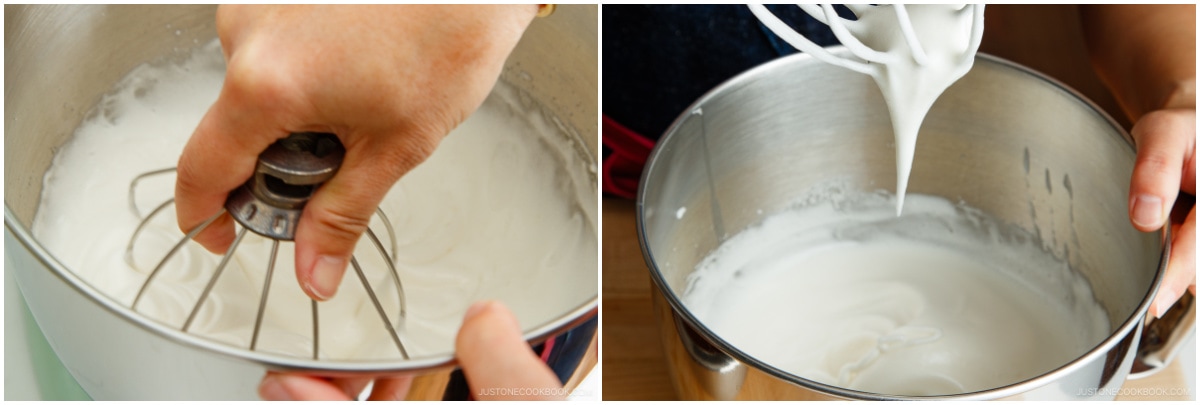
- Beat the egg whites until they form very soft peaks. When lifting the beaten egg whites with the whisk, they should be soft enough to drop a few times and then stop; they should not be runny. This process is a bit different from making Chiffon Cake and Japanese Cheesecake, so be careful not to overbeat the egg whites.
- Use a scooping motion with your whisk when adding the egg whites and dry ingredients to the batter.
- Add all the dry ingredients when you see “a nice marble effect.” Stop mixing when you notice a little bit of dry ingredients are still left.
- When using a silicone spatula, fold in the mixture from the bottom of the bowl.
Baking Tips
- Check your oven’s actual temperature. I know my oven doesn’t reach the desired temperature even though it beeps and says it’s done preheating. Know your oven’s characteristics! Some ovens heat up too quickly, while others struggle to reach the optimal temperature. I put a thermometer inside the oven to determine the actual temperature.
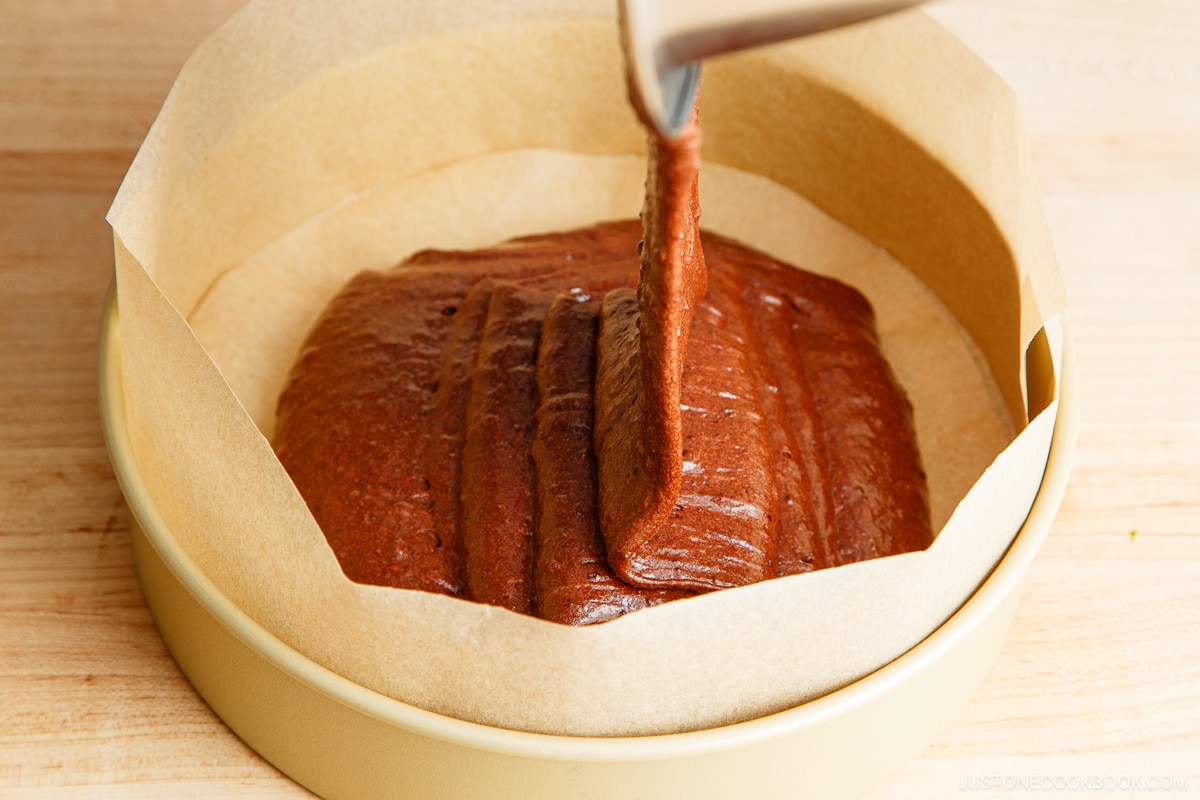
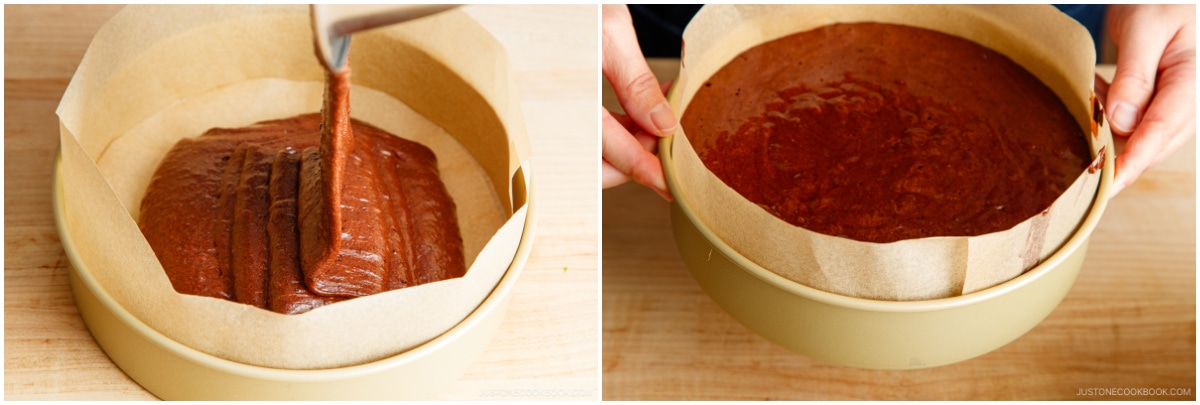
- Pour the batter into the pan all at once and in one spot to both minimize air pockets and smooth the top of the batter.
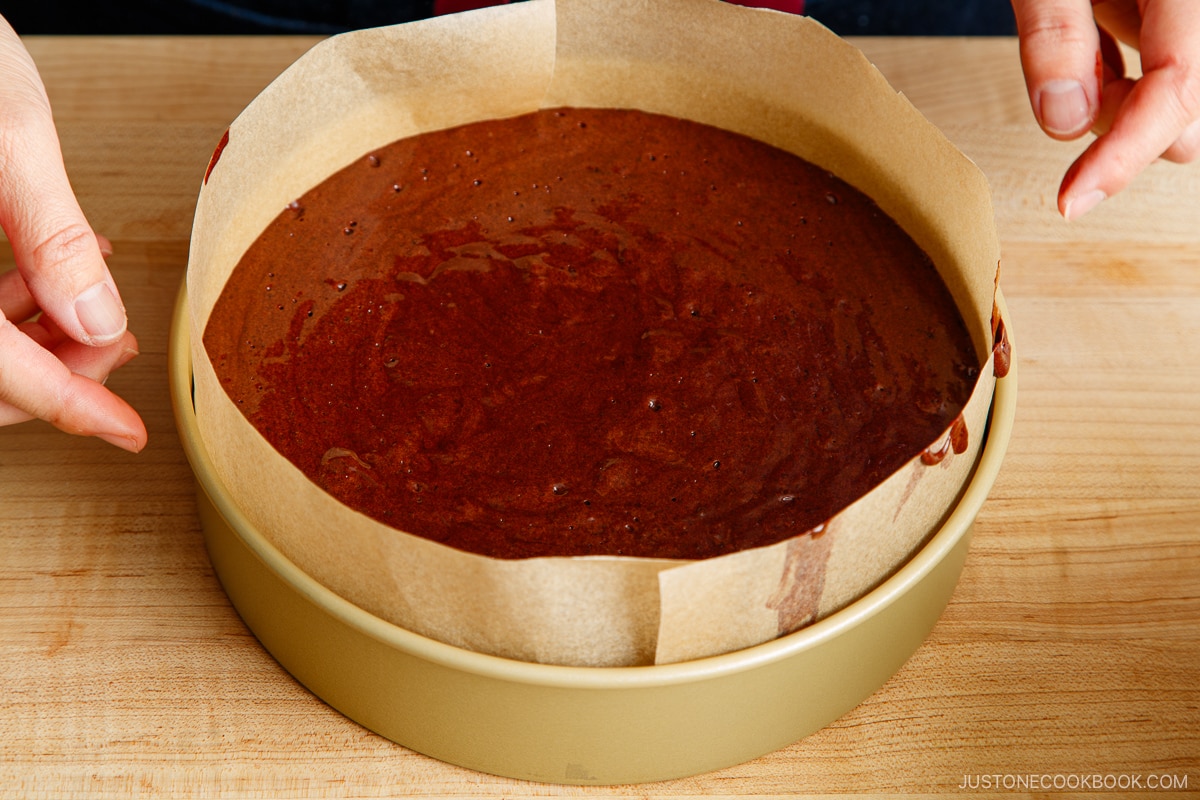
- Drop the cake pan a few times on the countertop before putting it into the oven. This releases the air bubbles trapped in the cake batter.
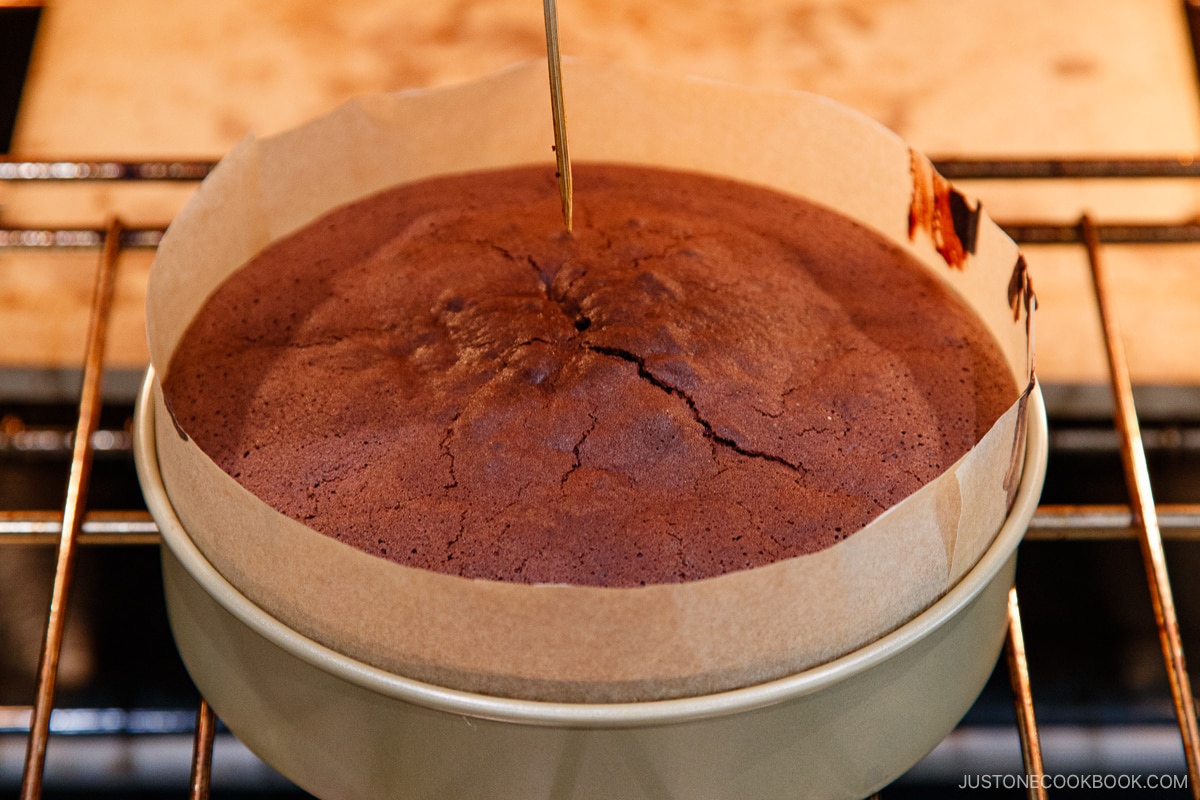
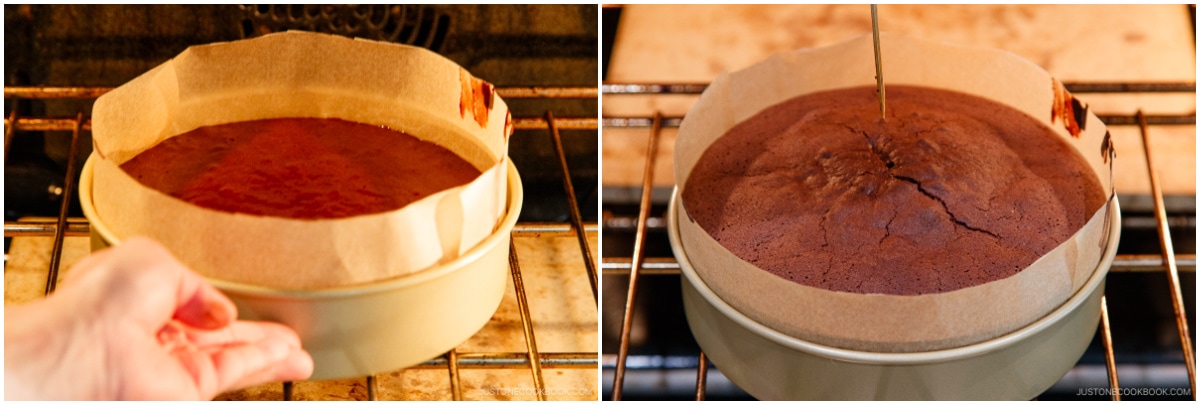
- Use a skewer to check the cake’s doneness. Don’t assume that your cake is done just because the timer is up. If you change the size of your cake pan, it‘s especially important to check with a skewer.
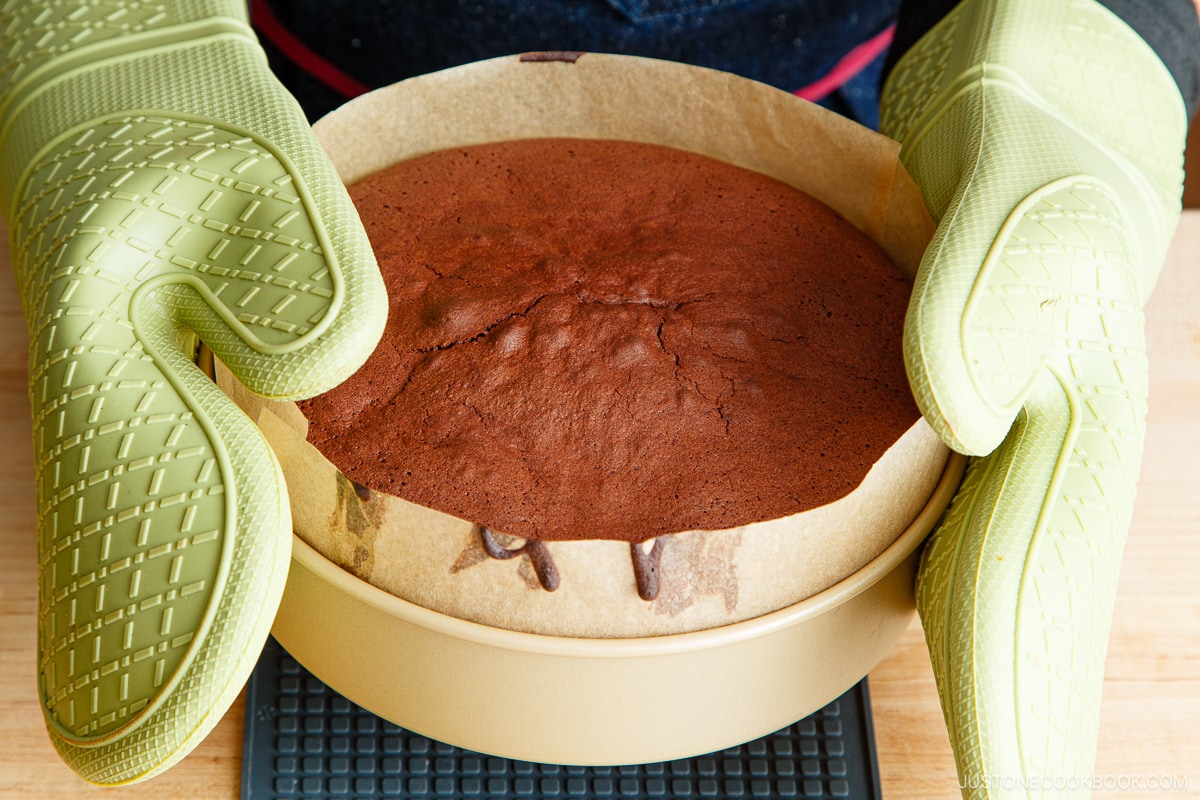
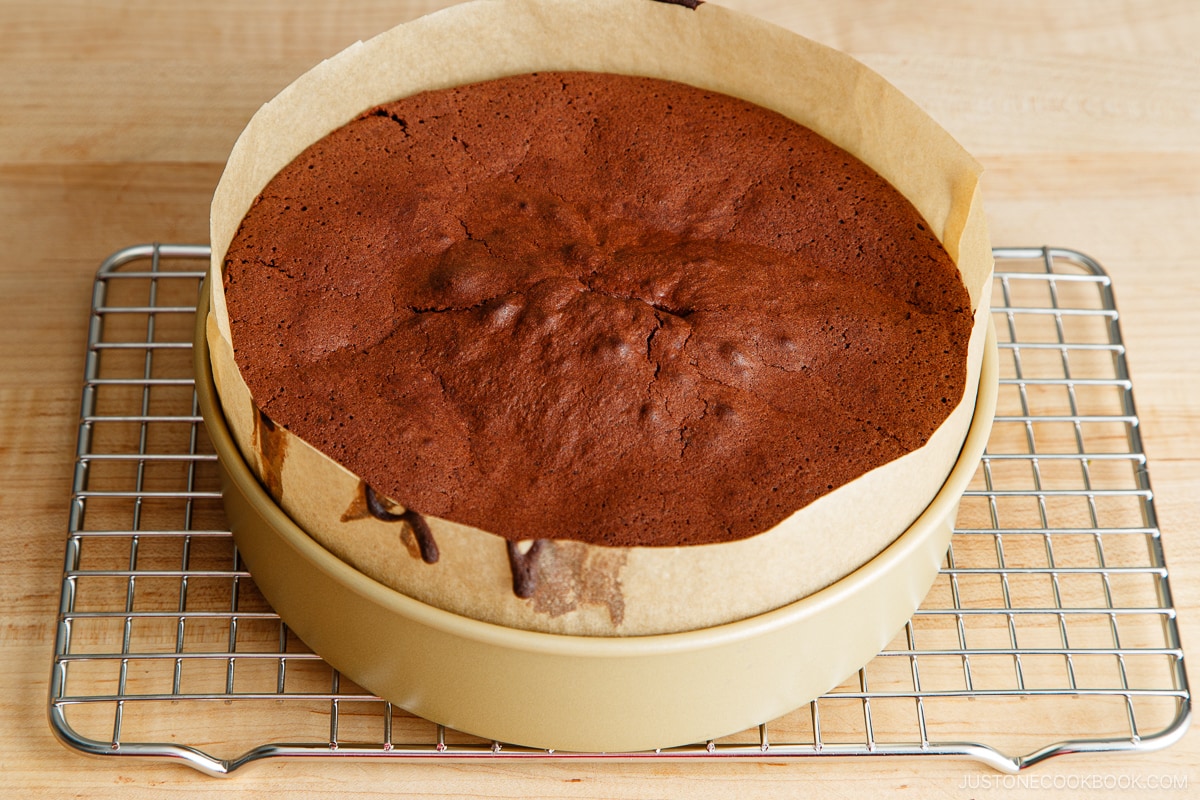
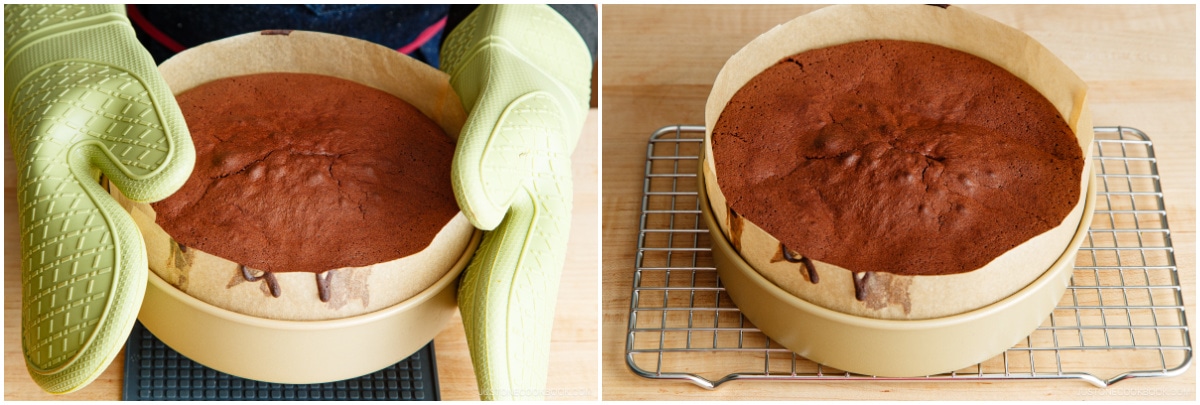
- After baking, drop the cake pan once on the countertop to release hot air trapped inside the cake. This prevents the cake from shrinking.
- Let the cake cool in the pan completely. We highly recommend leaving it in the cake pan overnight in the refrigerator for better texture and flavor.
Serving Tips
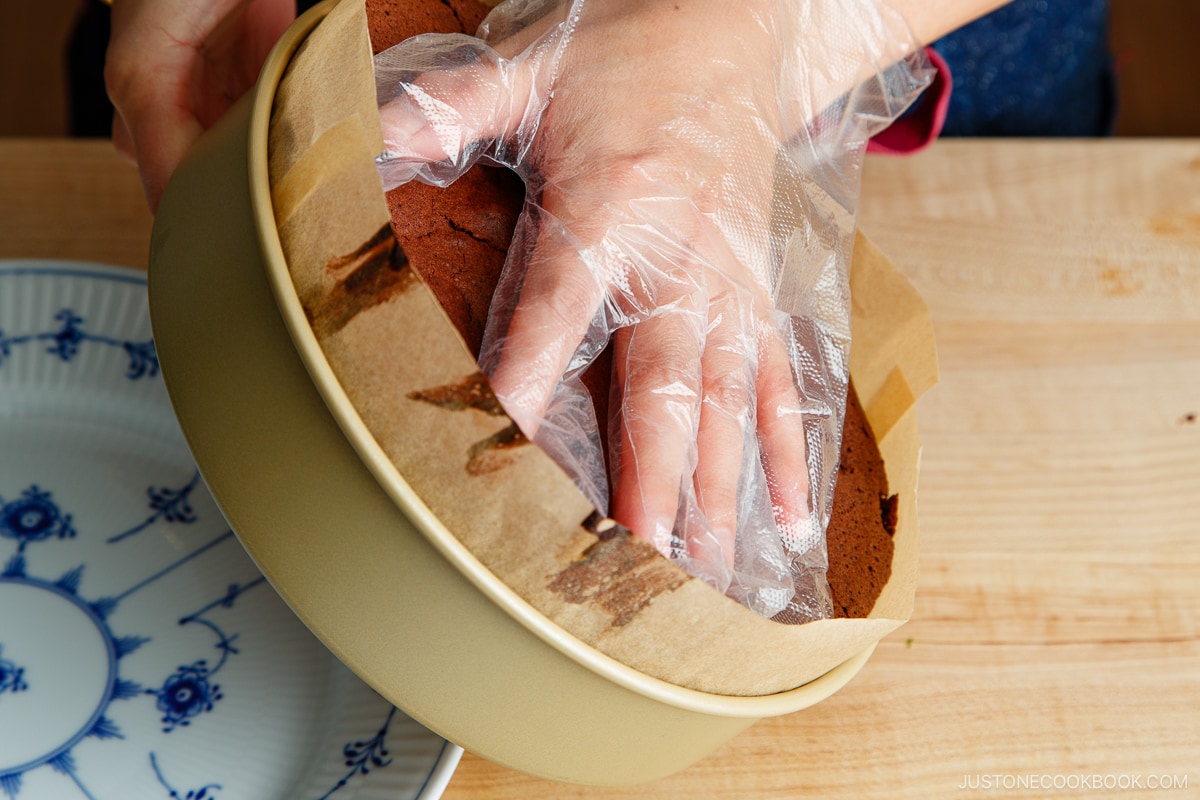
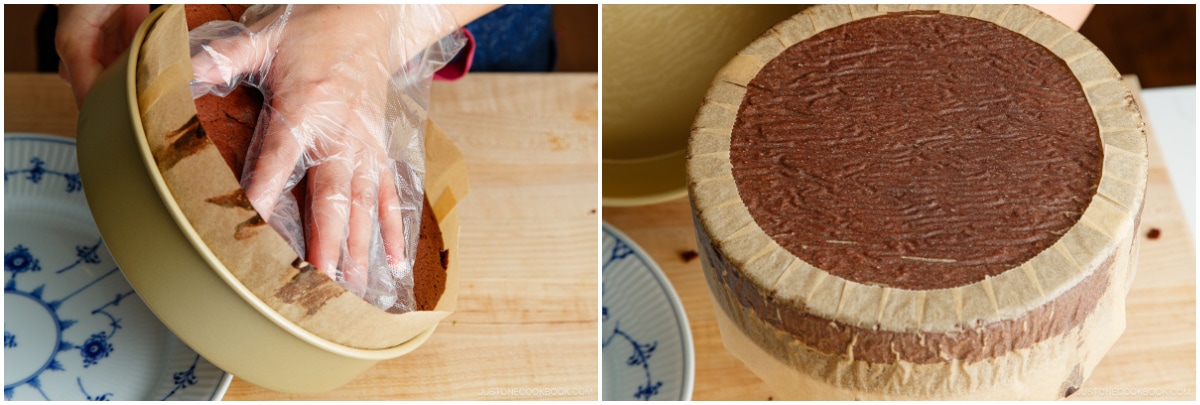
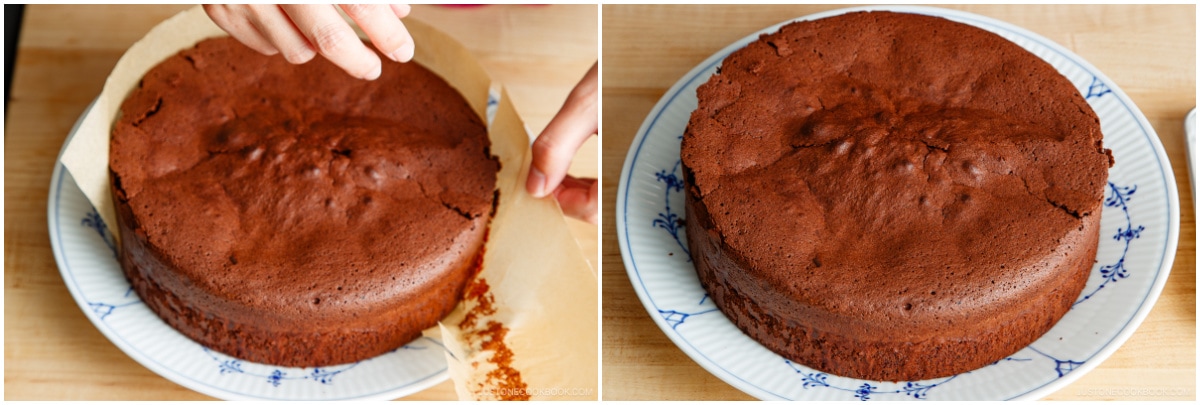
- Invert the cake onto the palm of your hand to release it from the pan, then quickly flip it back over onto a plate or cake stand.
- I recommend keeping the cake at room temperature for 10–15 minutes before serving. The cake will not be as dense after leaving it out for some time. You can also warm it up if that’s what you prefer.
Cake Decoration Tips
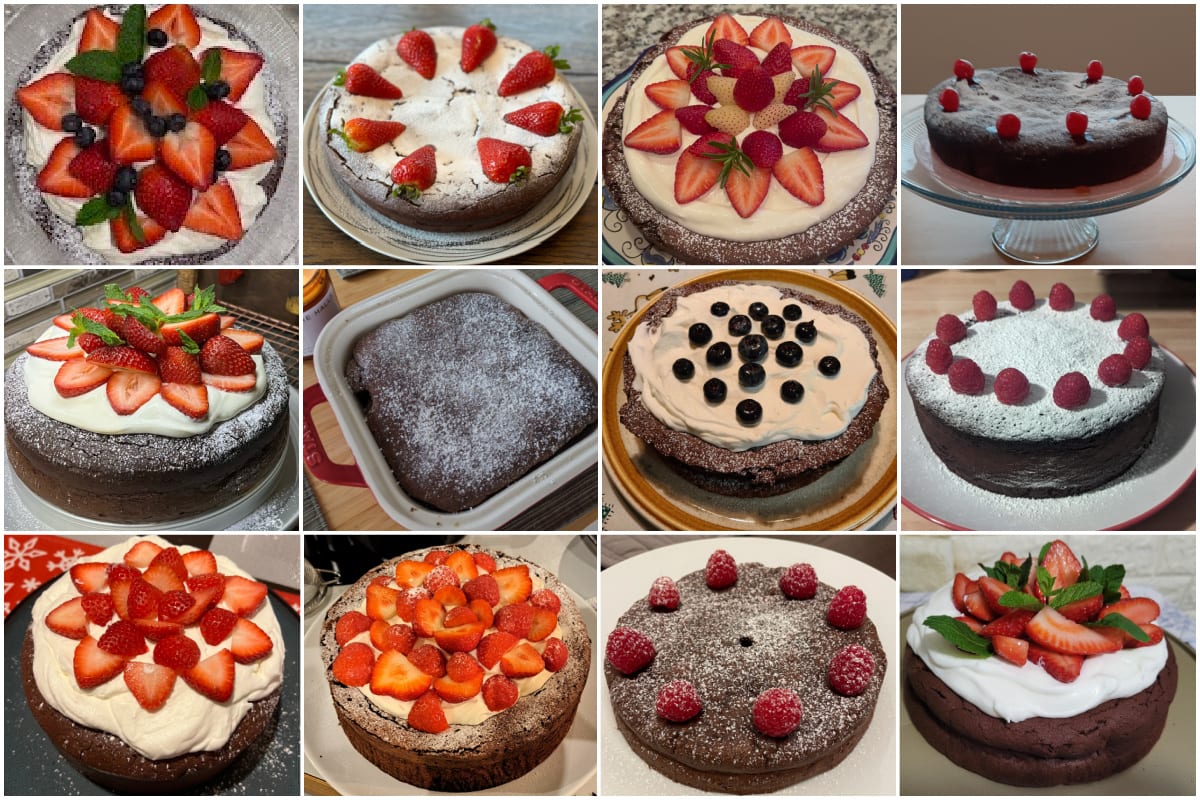
Because the Chocolate Gateau is rich and focuses on quality chocolate flavor, I prefer not to add too much decoration to the cake. Here, I give two simple decoration options.

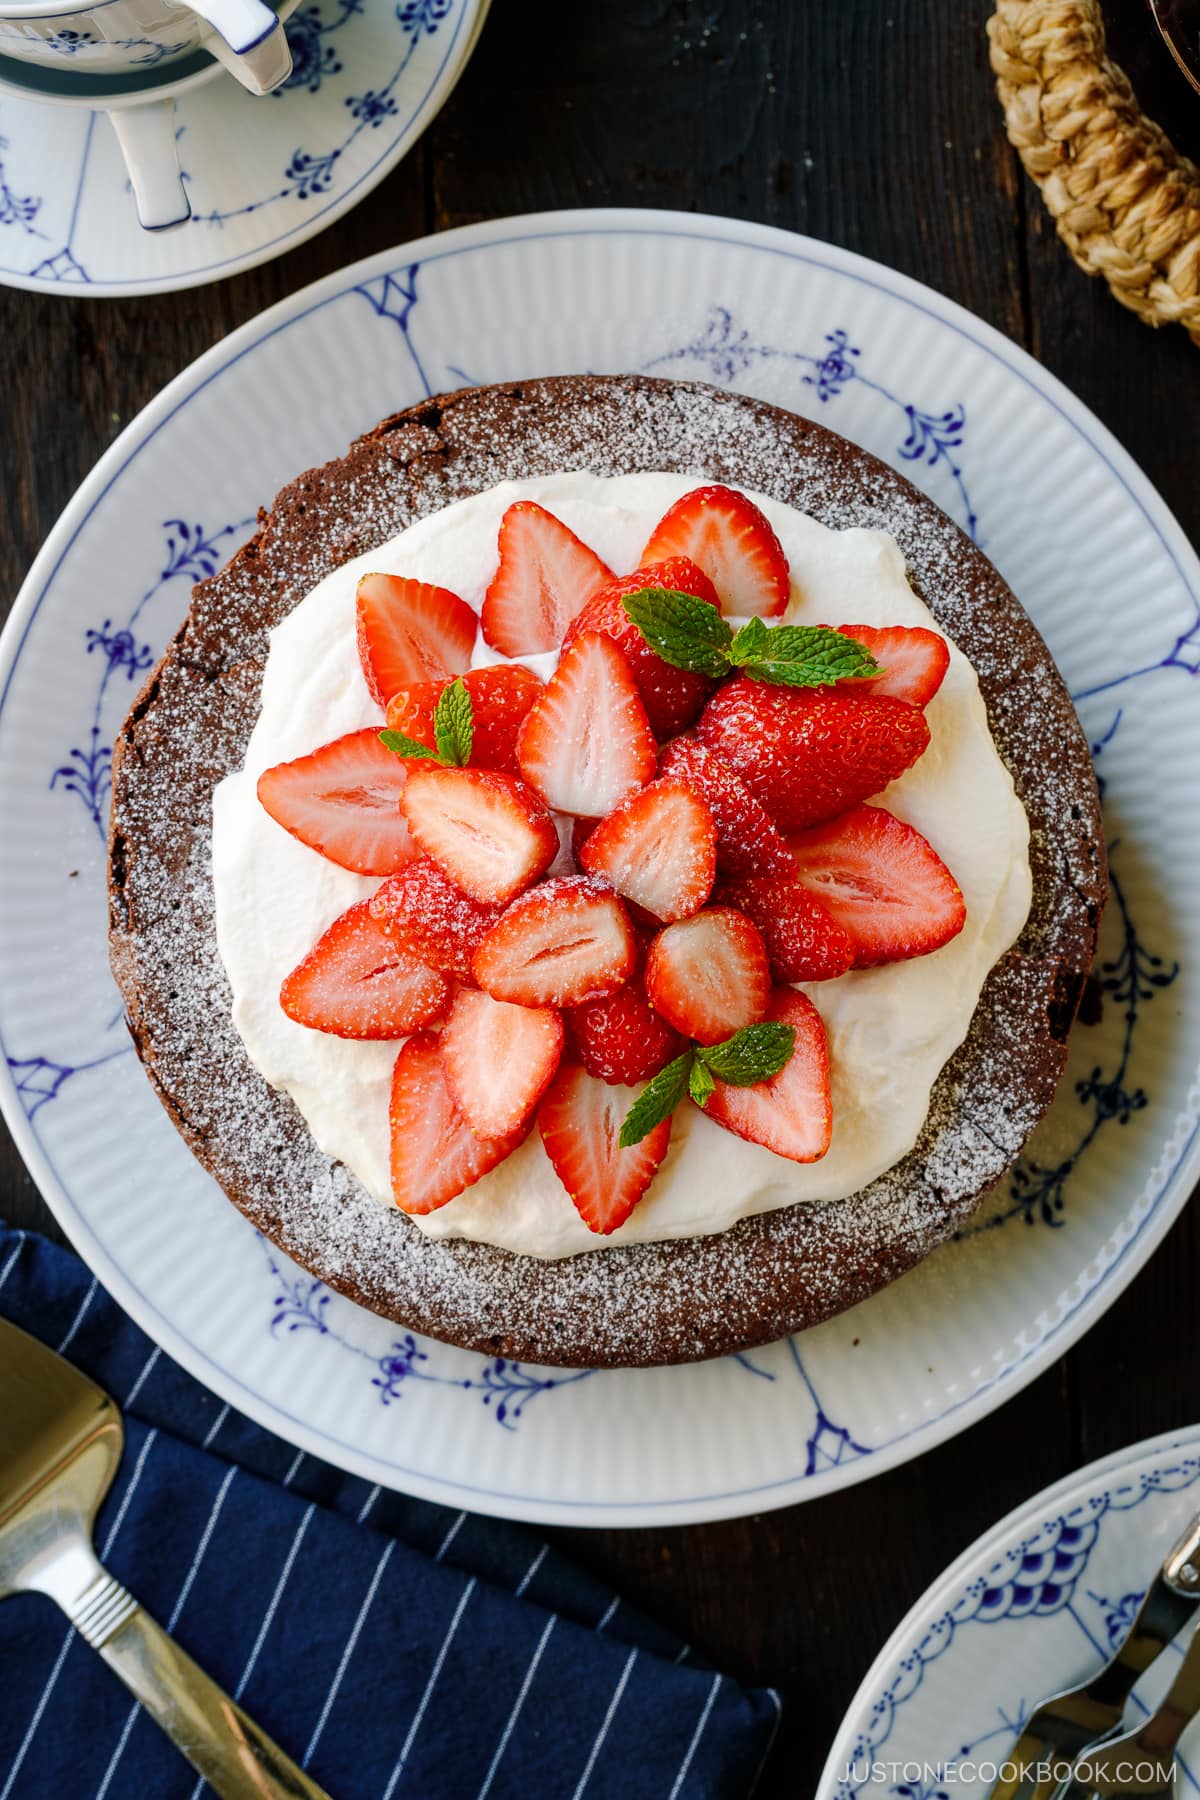
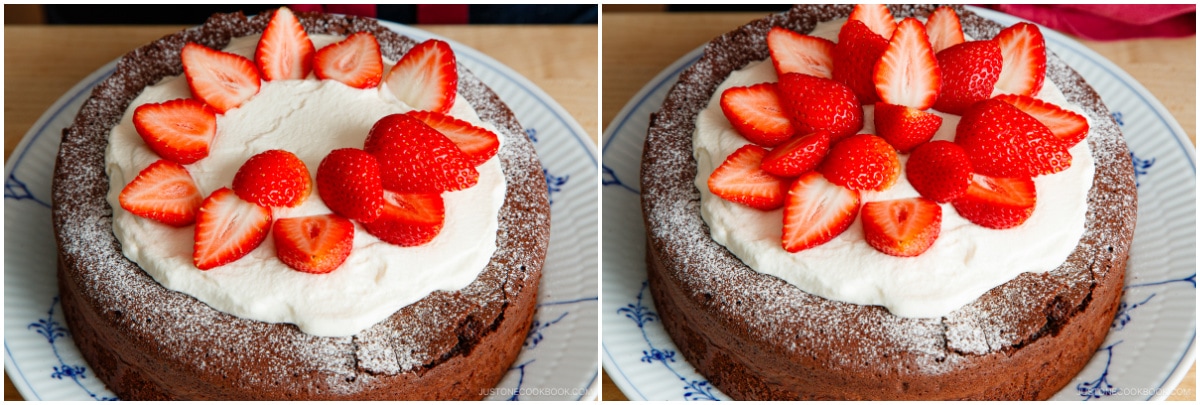
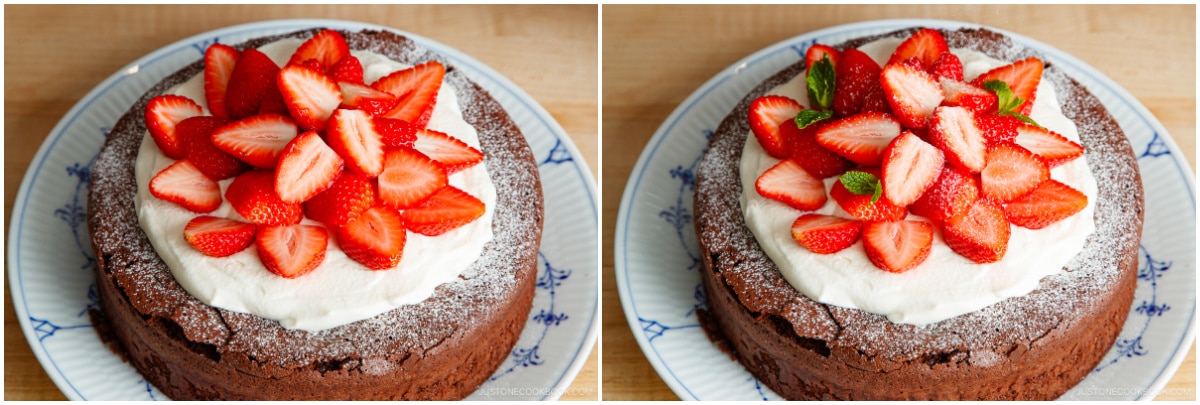
- Whipped Cream + Strawberries – This has a wow factor, yet it’s simple to decorate. Make whipped cream with heavy whipping cream and sugar until it’s a spreadable consistency. Then, decorate with sliced strawberries in the shape of a flower. My quick tip is to create irregular patterns for a natural look.
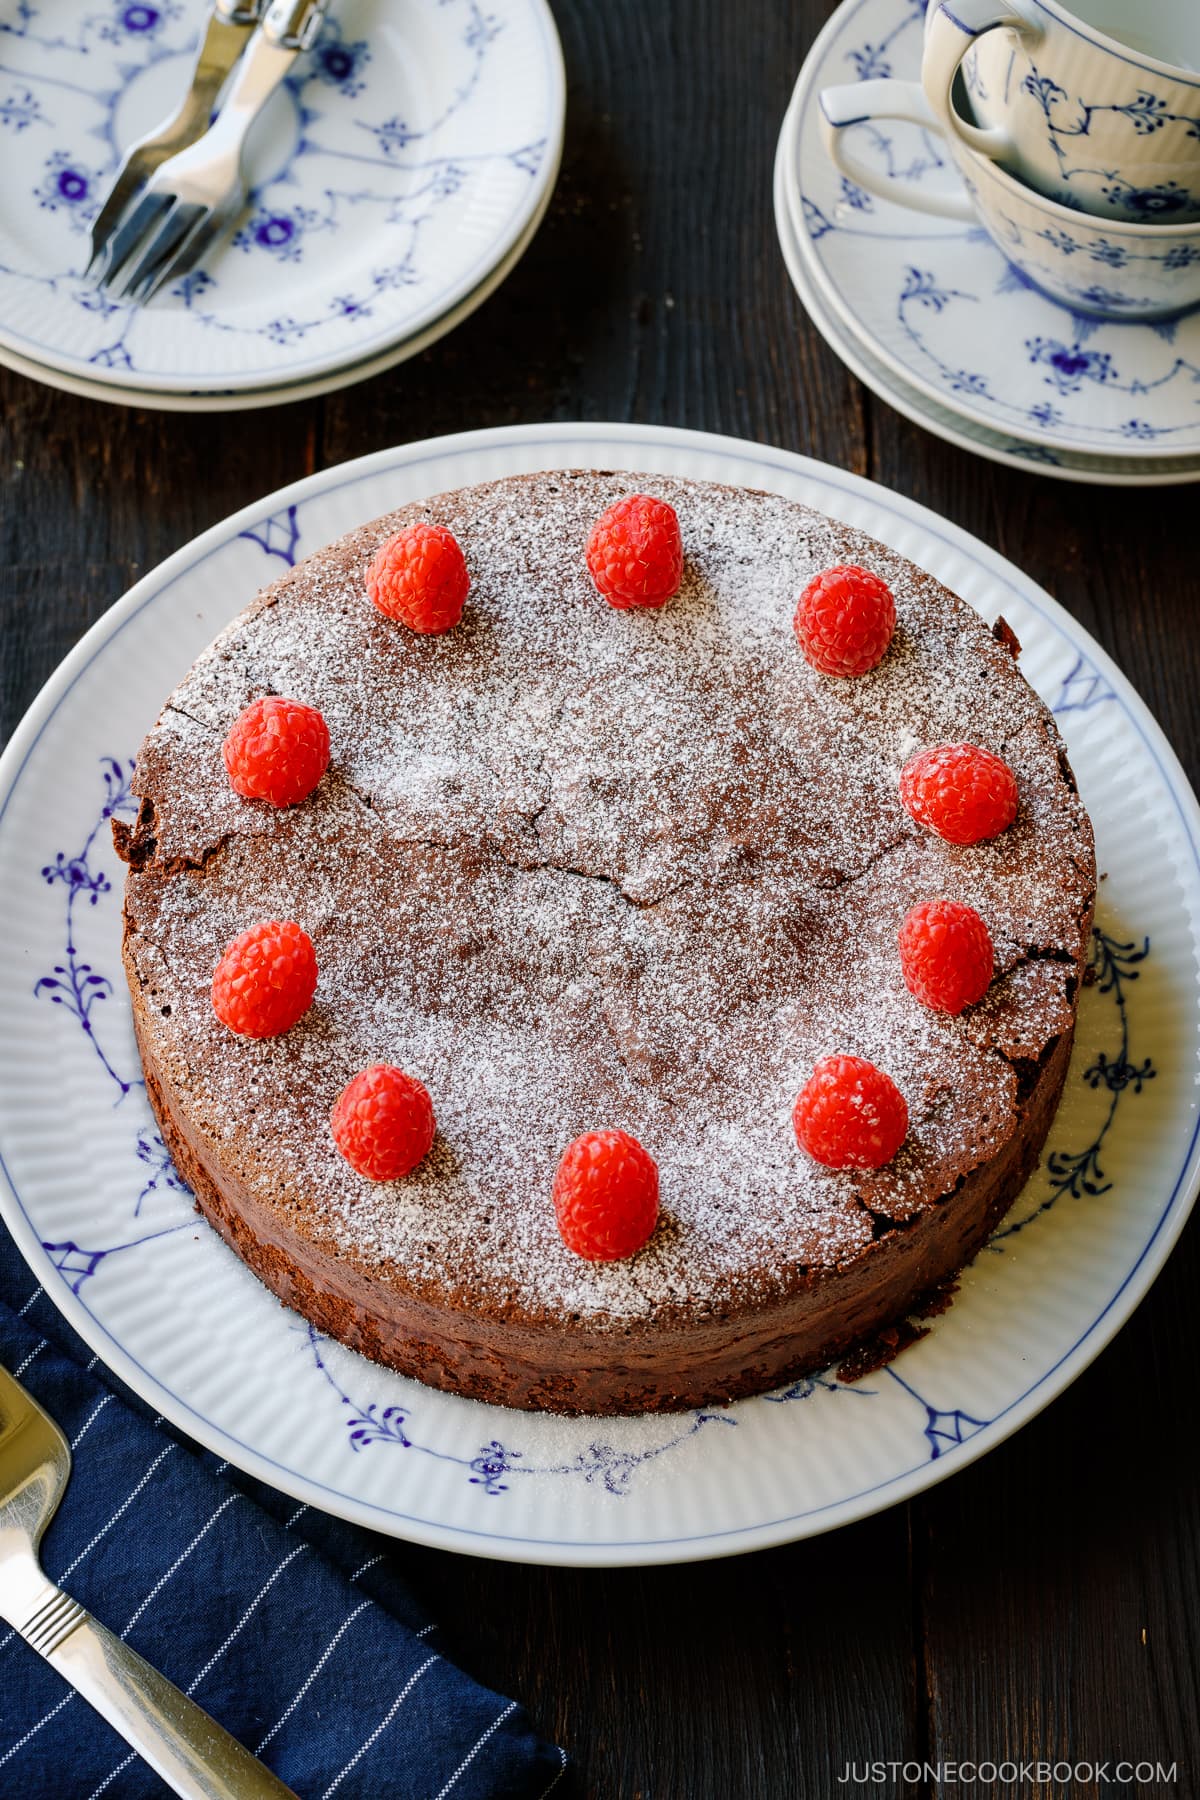
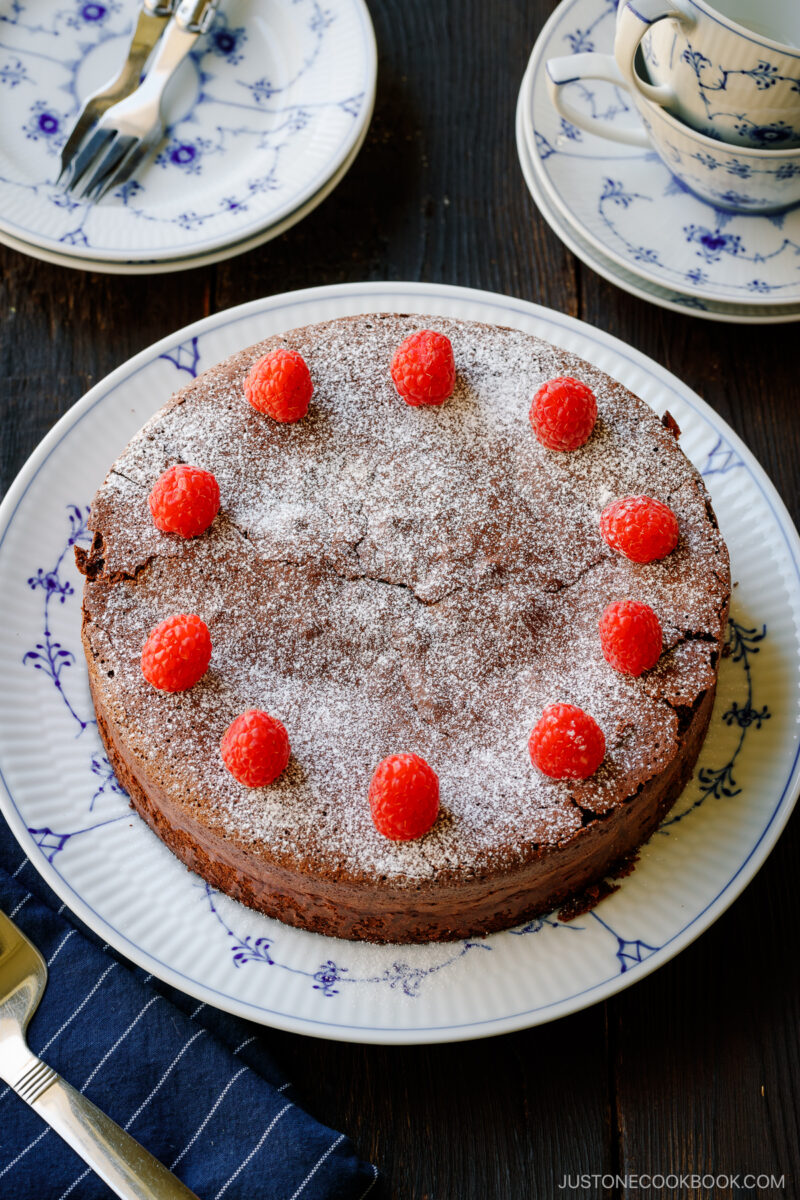
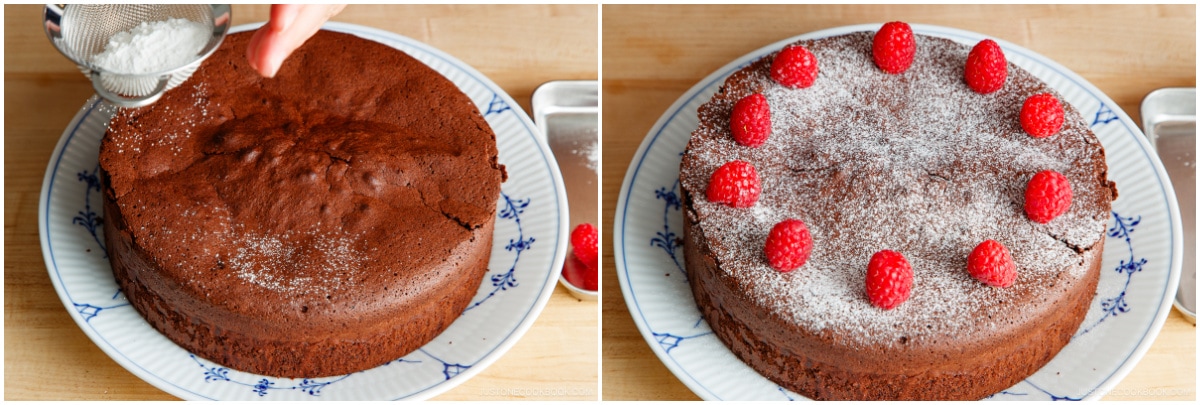
- Confectioners’ Sugar + Raspberries – Simply dust the confectioners’ sugar on top of the cake and decorate it with raspberries.
How to Line the Round Baking Pan
I used to find lining the baking pan with parchment paper a daunting process. Plus, I didn’t want to buy precut sheets of parchment circles for a cake pan that I don’t frequently use.
Then, I learned this lining technique from my friend, which I thought was super smart. It does take some time, but I appreciate the fact that I can use the entire sheet of precut parchment paper without wasting any parts of it. Thinking that you might be like me, I wanted to share this technique here.
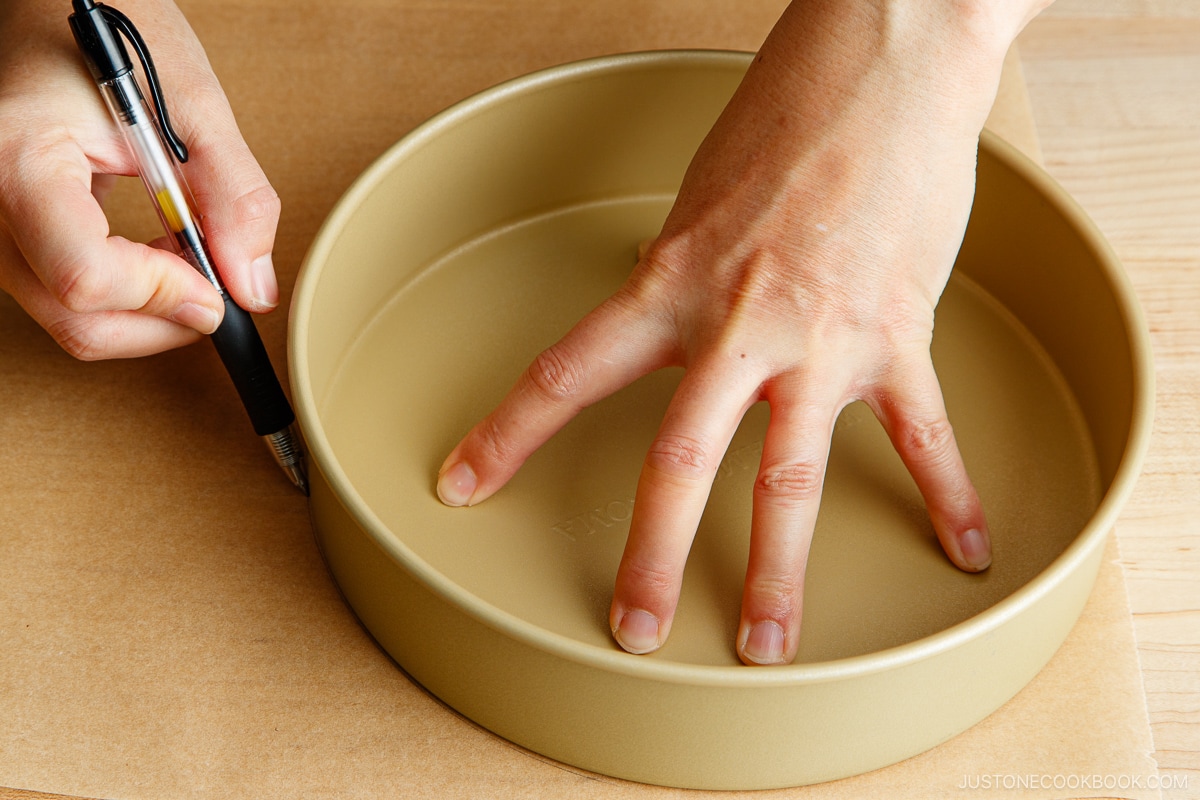
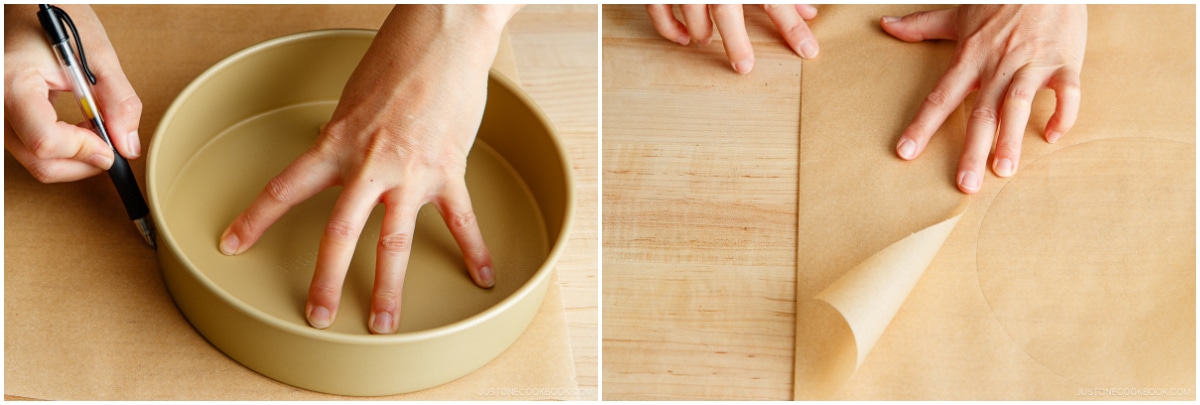
- To measure the pan’s bottom, place an 8-inch (20-cm) round cake pan on a sheet of parchment paper and trace around the outside with a pen.
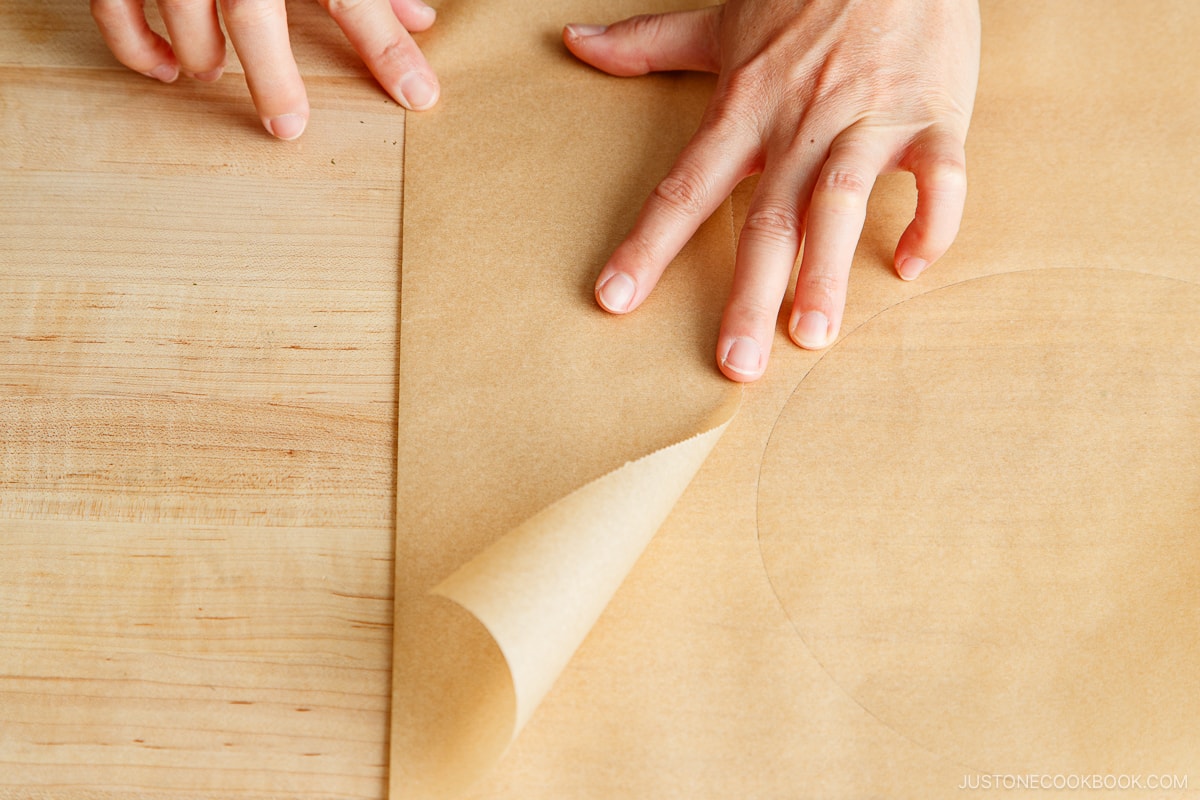
- For the pan’s sides, use the extra paper next to the circle you traced. Fold it in half lengthwise and make a sharp crease to mark the center line.
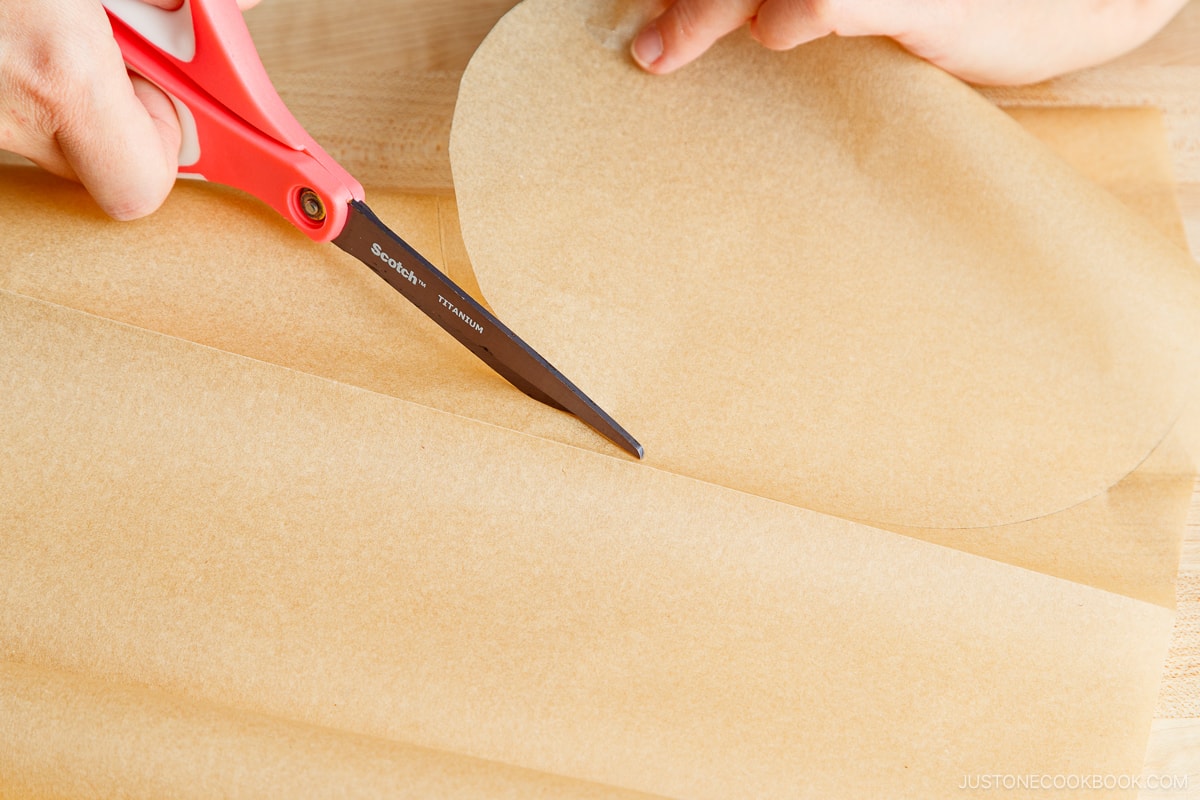
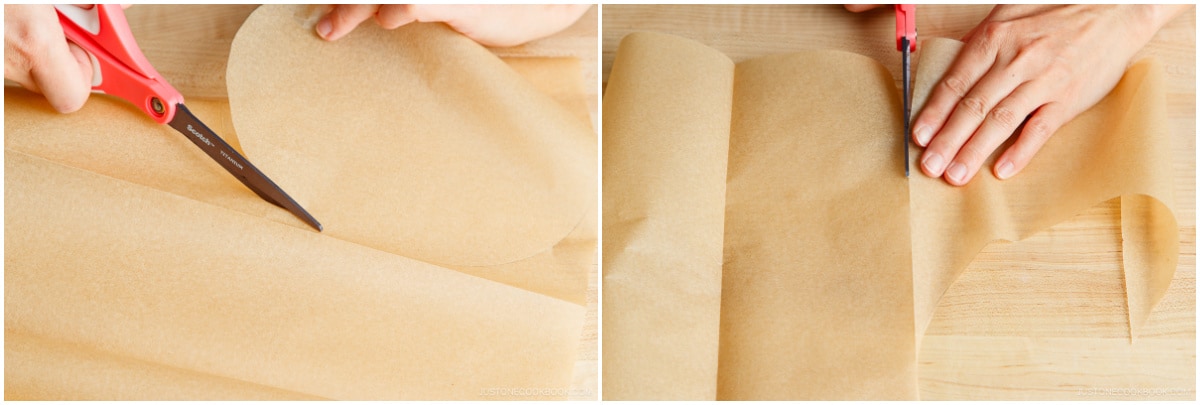
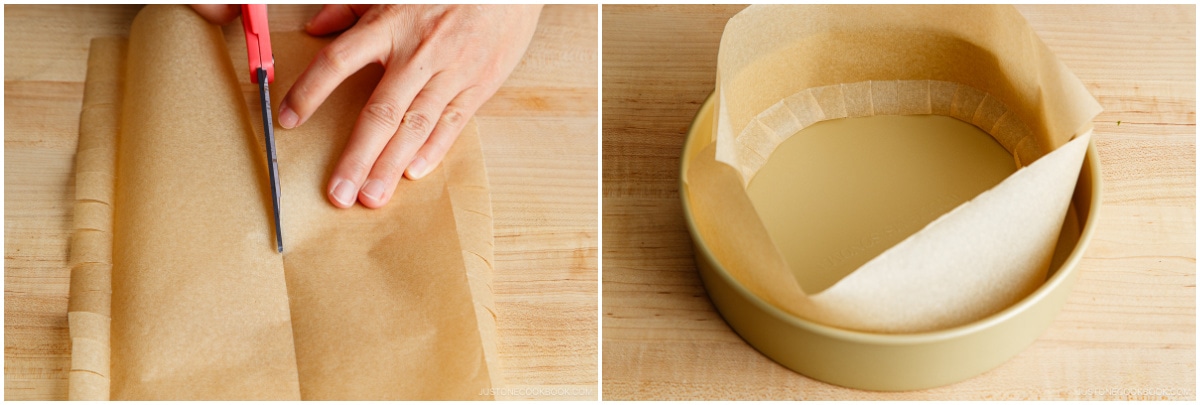
- With a pair of scissors, cut out the circle along the traced line. I like to cut just inside the line so the circle is the right size. Set it aside.
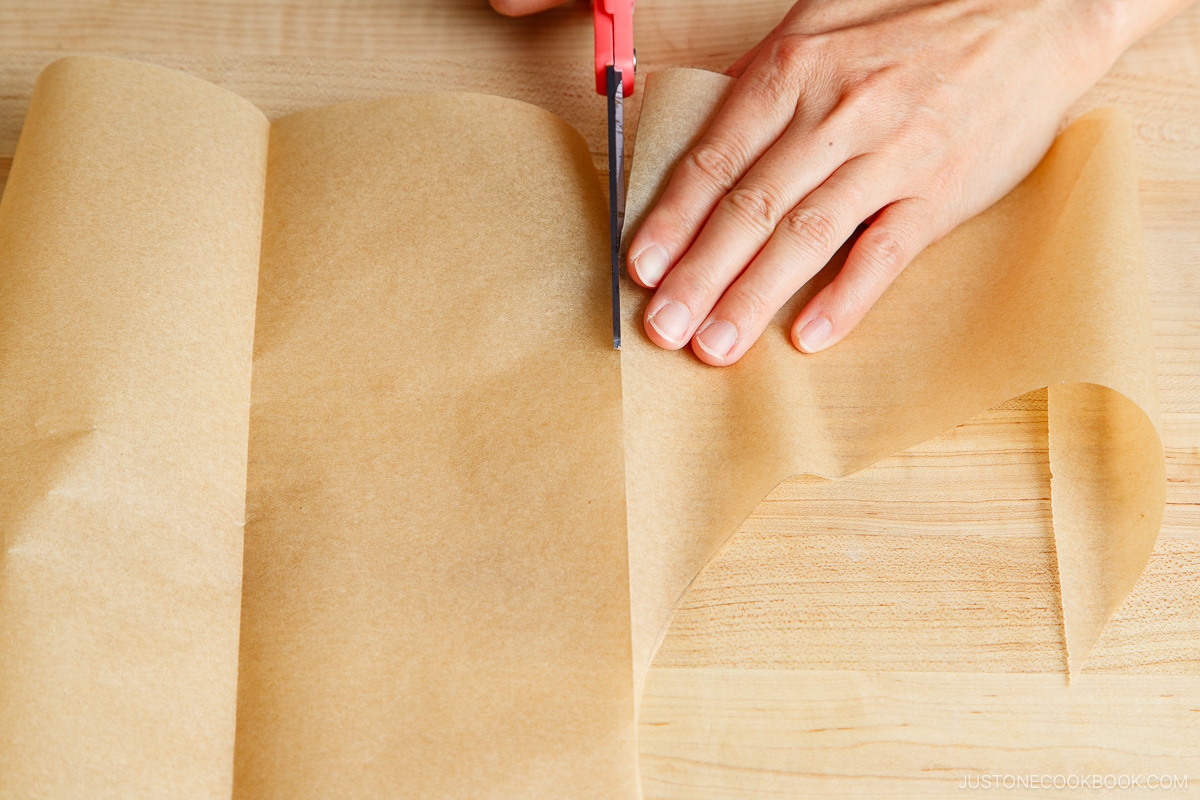
- Next, cut off the rectangular sheet from the paper if it’s still attached, as I did here.
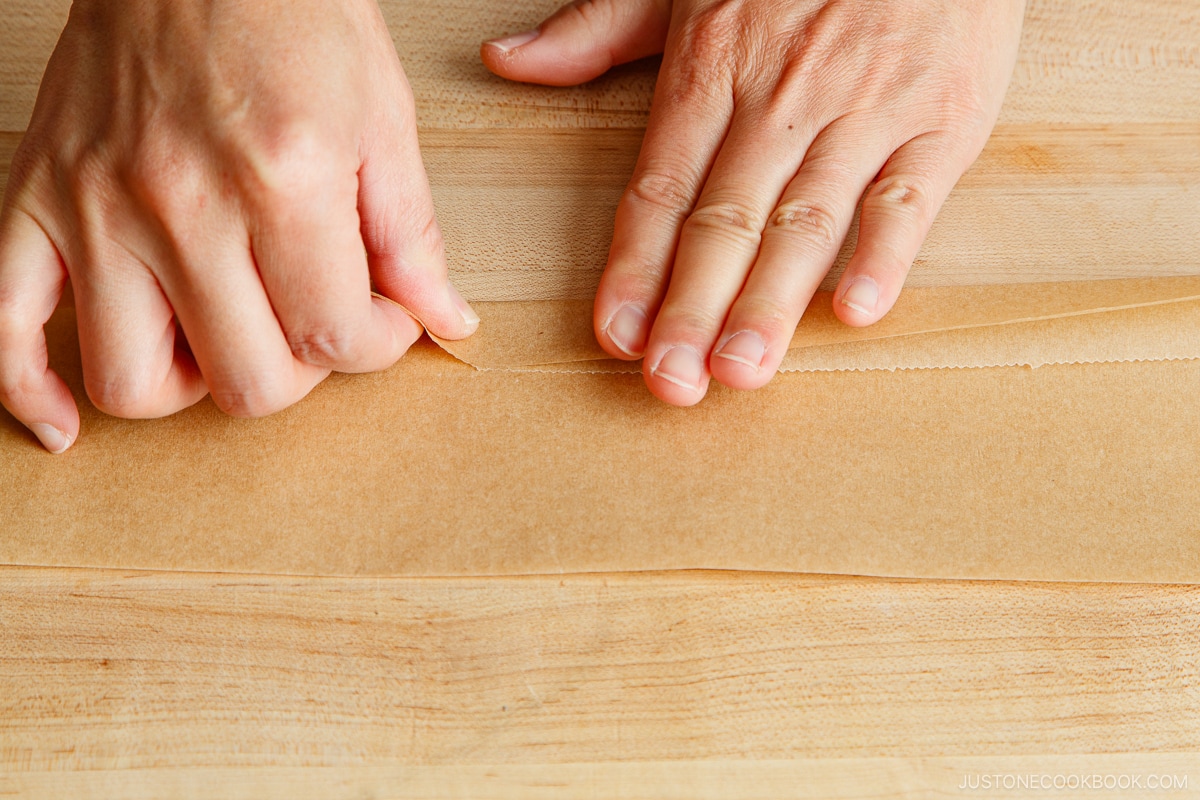
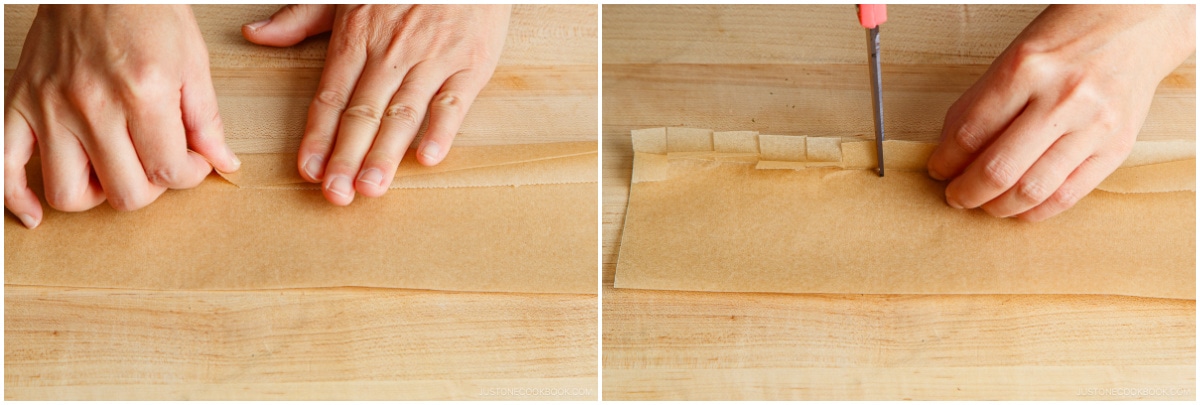
- With the rectangular sheet folded in half lengthwise, fold up the long edges together to form a flap about ½ inch (1.3 cm) wide. Make a sharp crease to mark the flap, then unfold it.
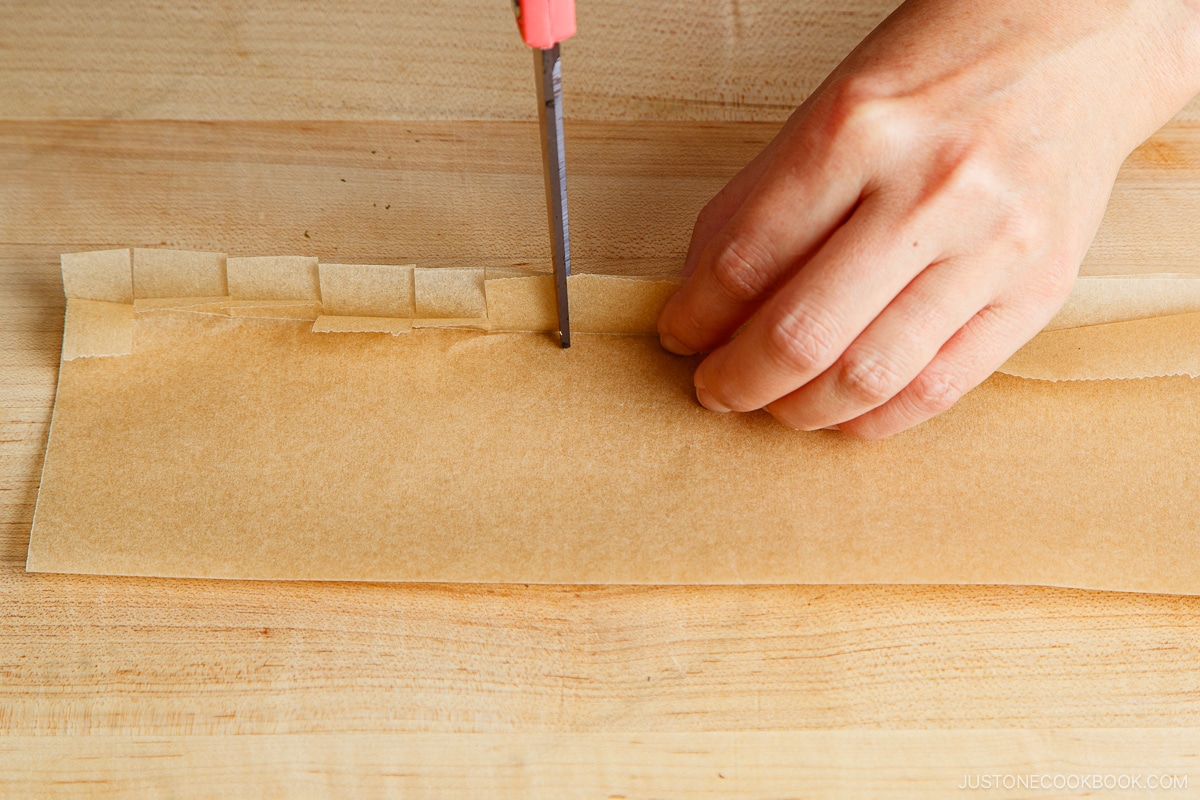
- While holding the edges together, cut straight notches up to the crease mark every ½ inch (1.3 cm) across the entire length of the flaps.
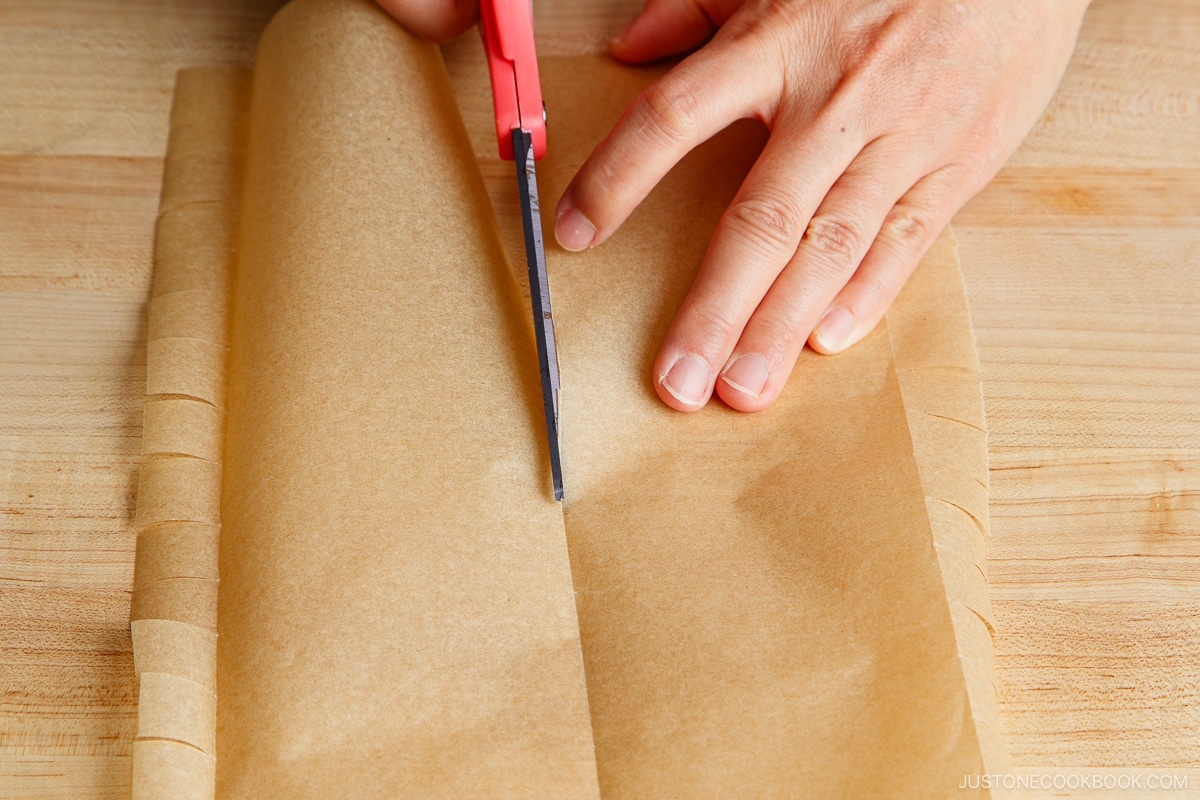
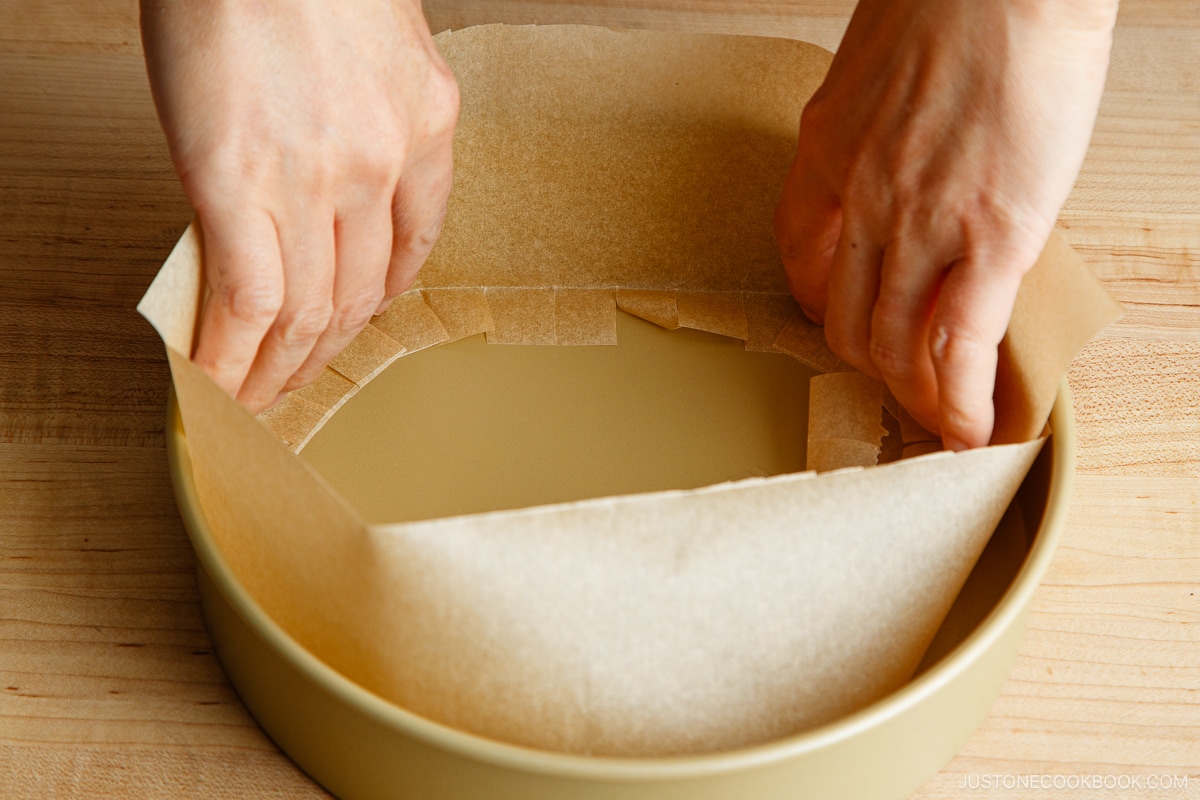
- Unfold the rectangular sheet and cut it in half along the center line crease. Now, you have two strips, each with a notched flap along one long edge.
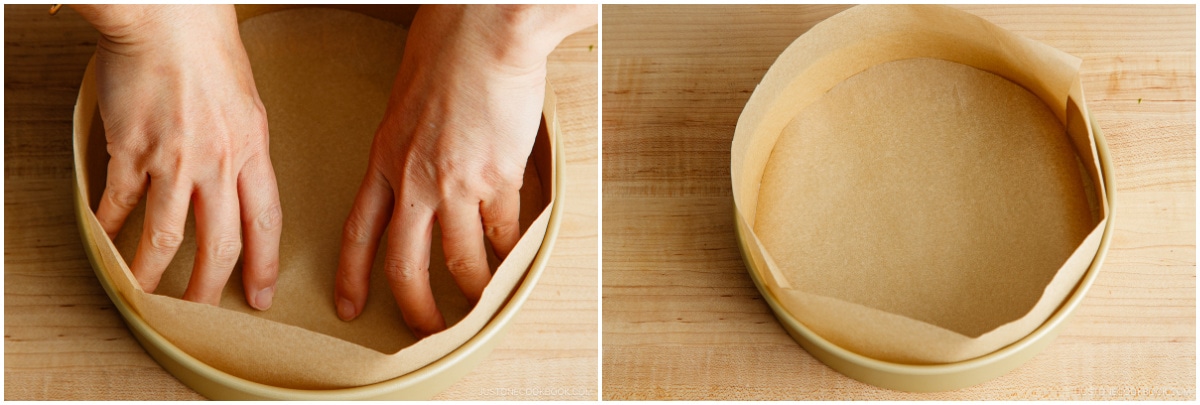
- Line the side of the pan with the strips, placing the flap sides down with the notches lying flat on the pan’s bottom. The folded part should fit neatly where the pan’s side meets the bottom. Overlap the short edges of the strips.
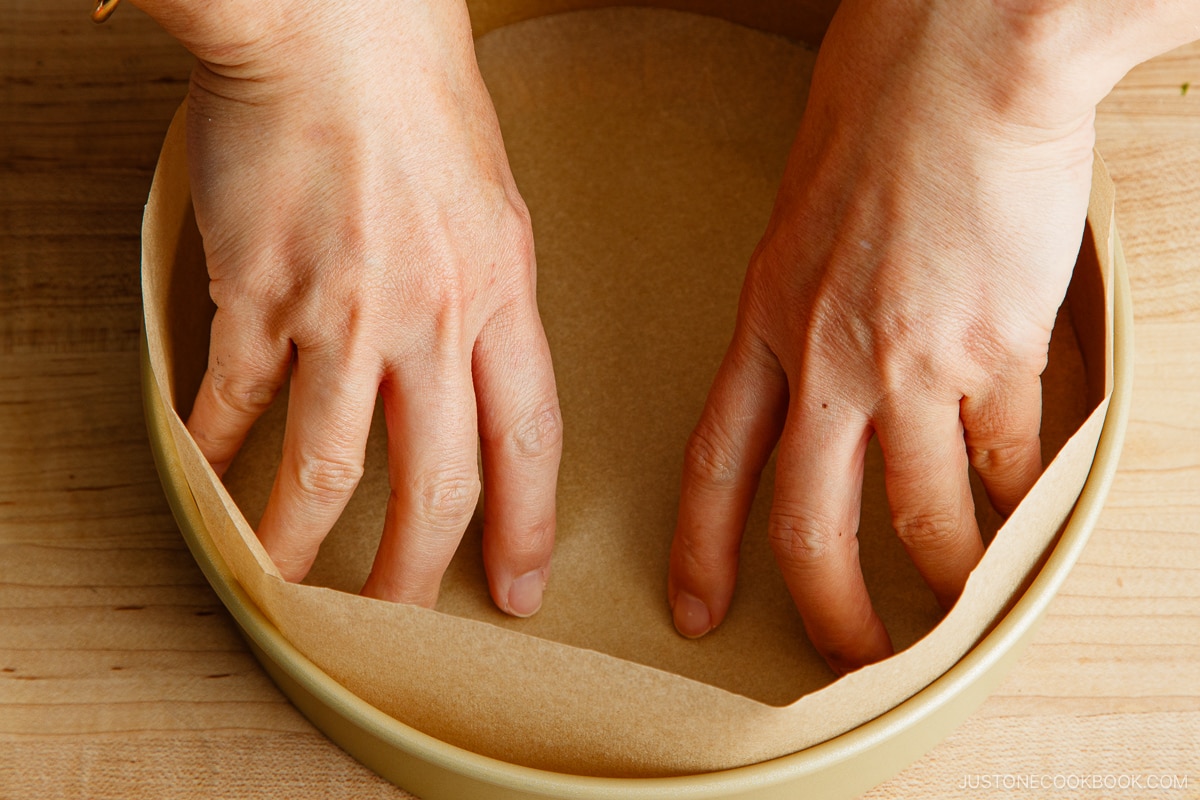
- Line the bottom of the pan with the parchment paper circle, placing it on top of the notched flaps.
- There’s no need to grease the pan or parchment paper.
How to Adjust to Different Pan Sizes
I use an 8-inch (20-cm) round cake pan in my recipe. However, you can adapt my recipe if you want to use a larger or smaller cake pan.
For a 9-inch (23-cm) round cake pan:
- use 6 large eggs;
- use 120% (6/5) of the other ingredients; and
- bake for a longer time (check with a skewer).
For a 6-inch (15-cm) round cake pan:
- use 3 large eggs;
- use 60% (3/5) of the other ingredients; and
- bake for a shorter time (check with a skewer).
FAQs
What kind of chocolate is best?
We can’t make the best chocolate cake without using the highest quality chocolate you can. I recommend getting confectionery chocolate, combining semi-sweet (46% cacao) and extra dark (63% cacao) in this recipe. For a chocolate gateau, it’s best to use chocolate with 55–70% cacao.
Can I substitute Dutch-process cocoa powder with natural cocoa powder?
Your cake will be lighter in color since natural cocoa is inherently lighter than Dutch-process. Due to the acidity of natural cocoa, you may notice a subtle tanginess or a slightly bitter taste.
You can find Dutch-process cocoa powder at many gourmet food stores, like Whole Foods and Williams-Sonoma. You can also buy the same one I use on Amazon.
How can I add espresso powder to this recipe?
Espresso powder can be added to the recipe for an intensified, complex, and deep chocolate flavor. Since it’s very concentrated, you only need half to one teaspoon (otherwise, too much coffee flavor) while the chocolate is melting.
Baking Tools You Need
- My favorite kitchen scale
- 8-inch round cake pan from William Sonoma
- Pre-cut parchment paper sheet
- Thermapen (instant-read thermometer)
- Fine-mesh sieve
- Balloon whisk
- KitchenAid Artisan Series 5 Quart
- Glass bowls
- Metal bowls
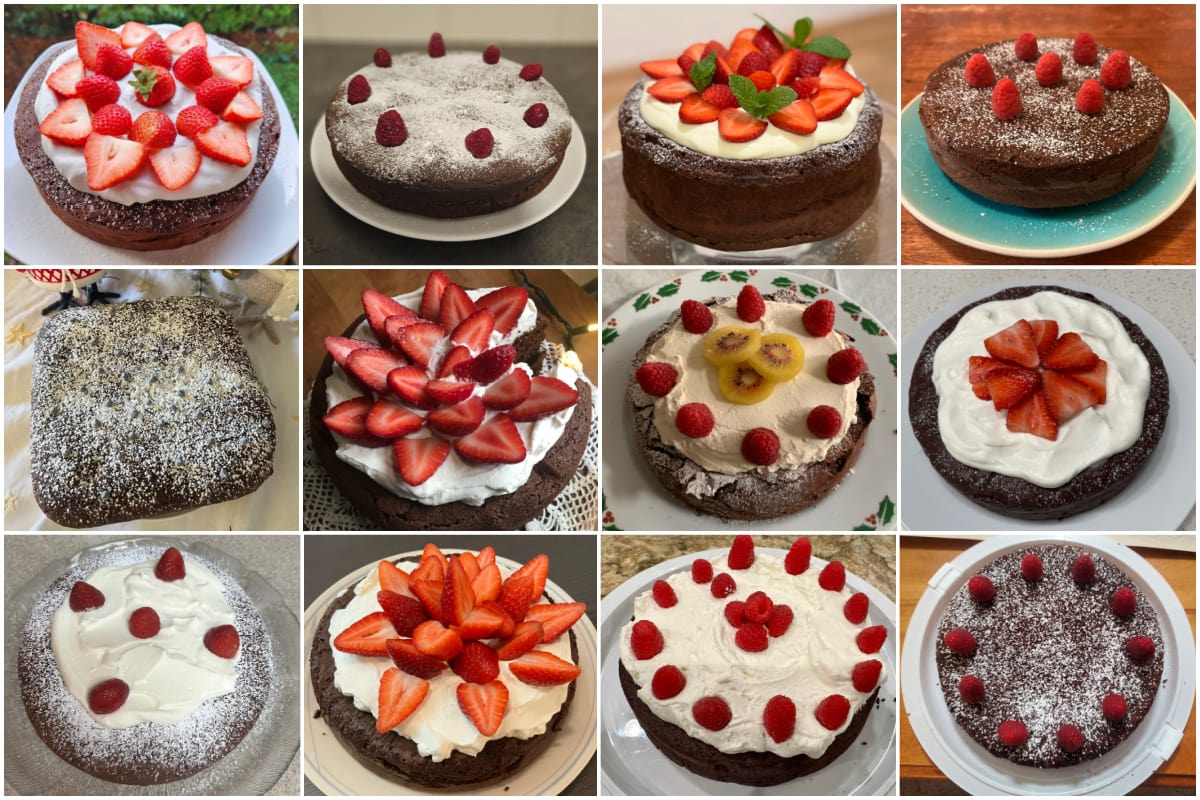
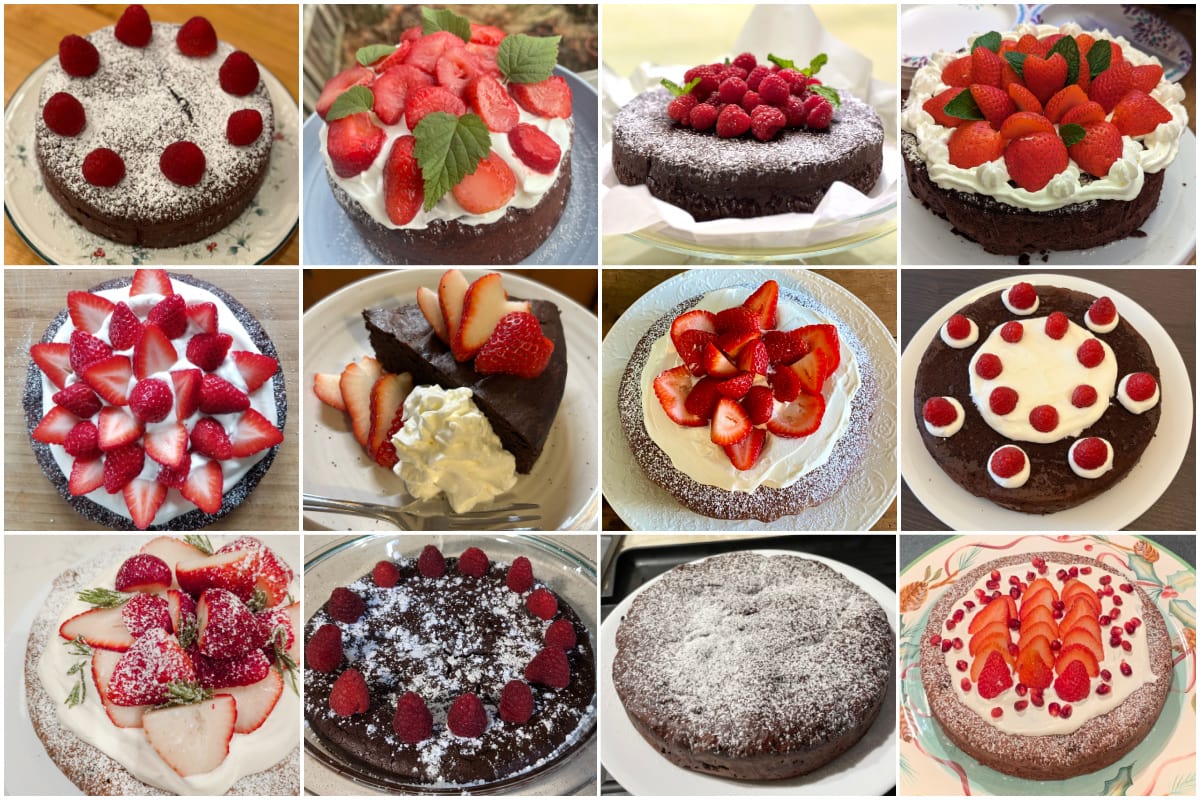
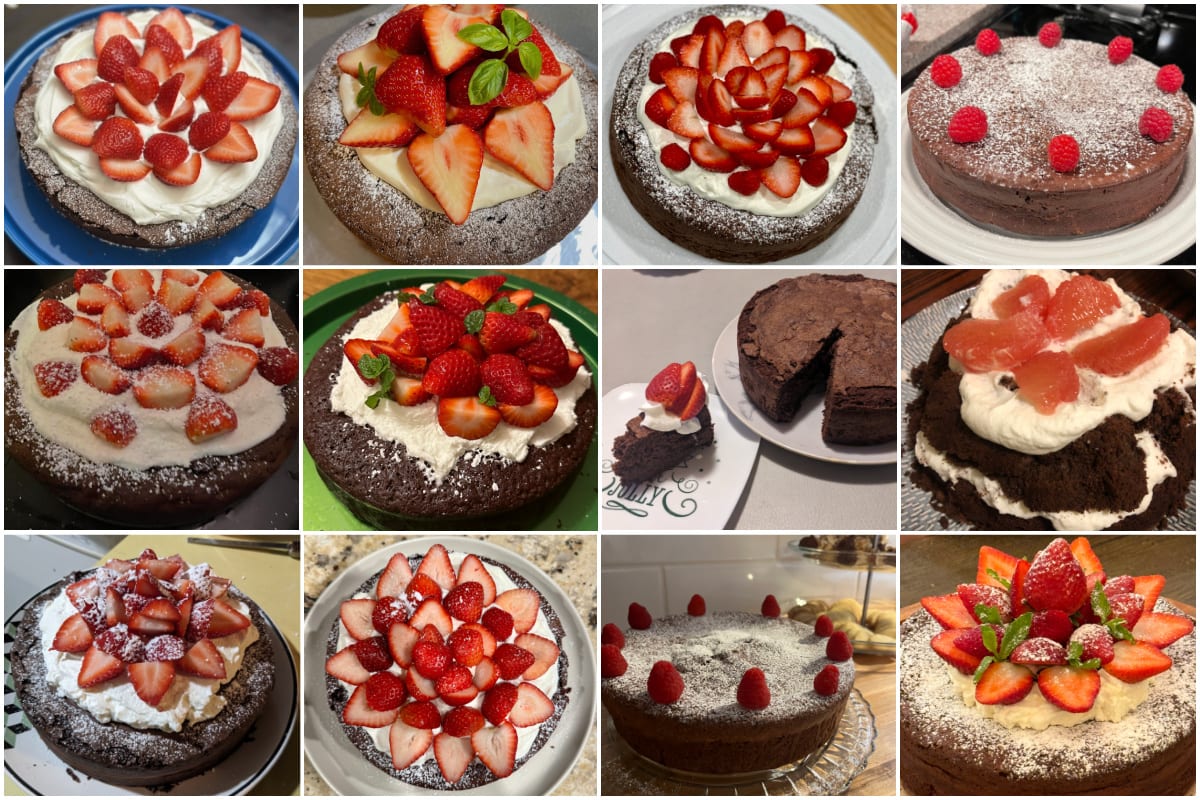
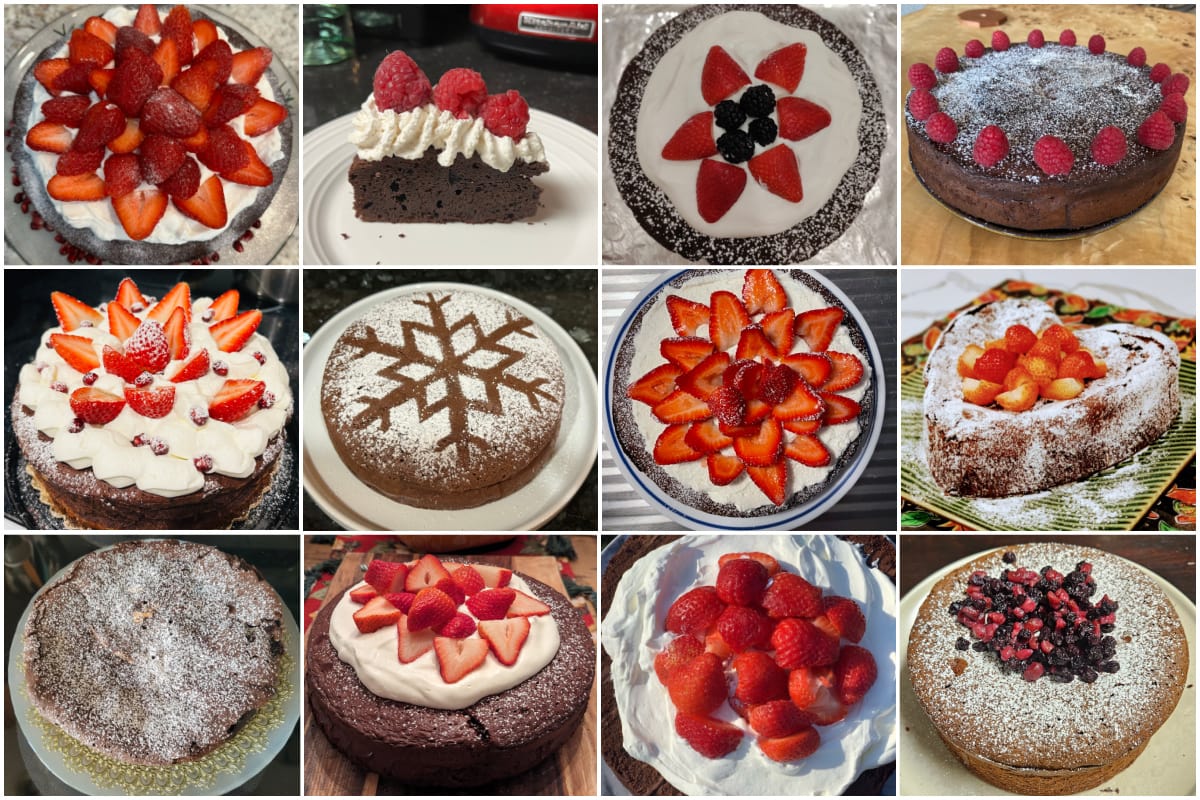
Readers’ Chocolate Gateau Recipes
Chocolate Gateau was the challenge recipe for the JOC Cooking Challenge December 2023. Check out the beautiful chocolate gateau created by JOC readers!

Try Other Delicious Cakes
Wish to learn more about Japanese cooking? Sign up for our free newsletter to receive cooking tips & recipe updates! And stay in touch with me on Facebook, Pinterest, YouTube, and Instagram.
Chocolate Gateau (Chocolate Cake)
Ingredients
- ¼ cup cake flour (weigh your flour; for weights, click the Metric button above; or use the “fluff and sprinkle“ method and level it off; you can make homemade cake flour)
- ¾ cup Dutch-process cocoa powder (for weights, click the Metric button and weigh your cocoa powder; or use the same “fluff and sprinkle“ method and level it off; I use Guittard cocoa powder)
- ⅛ tsp Diamond Crystal kosher salt
- 5 large eggs (50 g each w/o shell) (at room temperature)
- 9 Tbsp unsalted butter (at room temperature; 1 stick plus 1 Tbsp)
- ¾ cup chocolate chips (I recommend combining ½ cup (100 g) of semi-sweet (46% cacao) and ¼ cup (50 g) of extra dark (63% cacao); use good-quality baking chips)
- ½ cup sugar (for the egg yolks)
- 2 Tbsp milk (at room temperature; you can use heavy (whipping) cream for a richer taste)
- ½ cup sugar (for the egg whites)
For the Strawberry and Whipped Cream Decoration (option 1)
- ⅔ cup heavy (whipping) cream (keep it cold)
- 4 tsp sugar (10% weight of the heavy cream)
- confectioners’ sugar (for dusting)
- ½ lb strawberries (tops removed)
- fresh mint leaves
For the Quick Raspberry Decoration (option 2)
- 10 raspberries
- confectioners’ sugar (for dusting; I used non-melting snow sugar available at King Arthur or Amazon)
Instructions
- Before You Start: I highly encourage you to weigh your ingredients using a kitchen scale for this recipe. For weights, click the Metric button at the top of the recipe to convert the measurements to metric. If you‘re using a cup measurement, please follow the “fluff and sprinkle“ method: Fluff your flour with a spoon, sprinkle the flour into your measuring cup, and level it off. Otherwise, you may scoop more flour than you need.
- Gather all the ingredients. This recipe uses an 8-inch (20-cm) round cake pan. For a larger or smaller pan, see how to adjust the ingredient measurements in the blog post. Use a light-colored pan for the best outcome; see the baking tips section of my blog post for more details.


To Preheat the Oven
- Center a rack in the oven and preheat the oven to 350ºF (175ºC). For a convection oven, reduce the cooking temperature by 25ºF (15ºC).
To Line the Baking Pan
- Line the bottom and sides of an 8-inch (20-cm) round cake pan with parchment paper. Here, I use a pre-cut parchment paper sheet. To measure the pan’s bottom, place it on a sheet of parchment paper and trace around the outside with a pen. For the pan’s sides, use the extra paper next to the circle you traced. This paper should be a rectangle that‘s roughly 8 x 12½ inches (20 x 32 cm). Fold it in half lengthwise and make a sharp crease to mark the center line.

- With a pair of scissors, cut out the circle you traced. I like to cut just inside the line so the circle is the right size. Set it aside. Next, cut off the rectangular sheet from the paper if it’s still attached, as I did here.
- With the rectangular sheet folded in half lengthwise, fold up the long edges together to form a flap about ½ inch (1.3 cm) wide. Make a sharp crease to mark the flap, then unfold it. Holding the edges together, cut straight notches up to the crease mark every ½ inch (1.3 cm) across the entire length of the flaps.
- Then, unfold the rectangular sheet and cut it in half along the center line crease. Now, you have two strips each with a notched flap along one long edge. Line the sides of the pan with the strips, flap sides down with the notches lying flat on the pan’s bottom. The folded part should fit neatly where the pan’s side meets the bottom. Overlap the short edges of the strips.
- Finally, line the bottom of the pan with the parchment paper circle, placing it on top of the notched flaps.
To Prepare the Ingredients
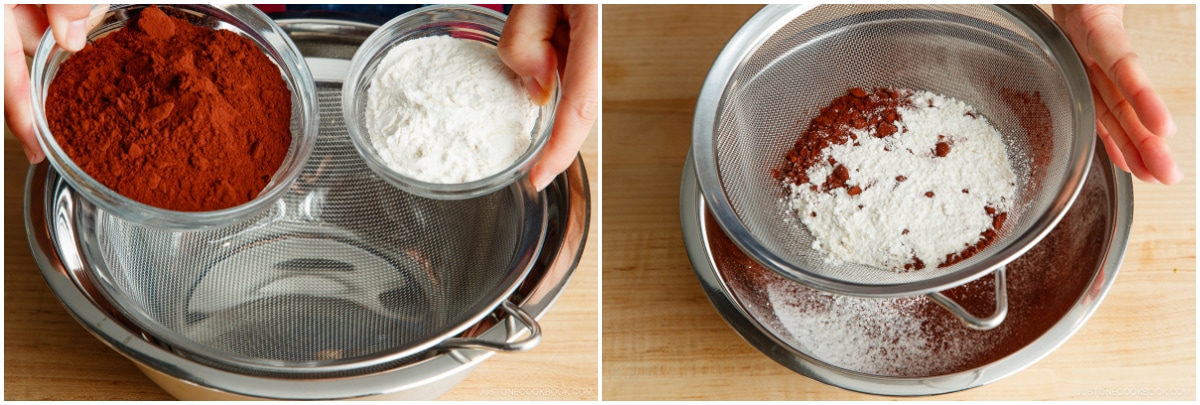
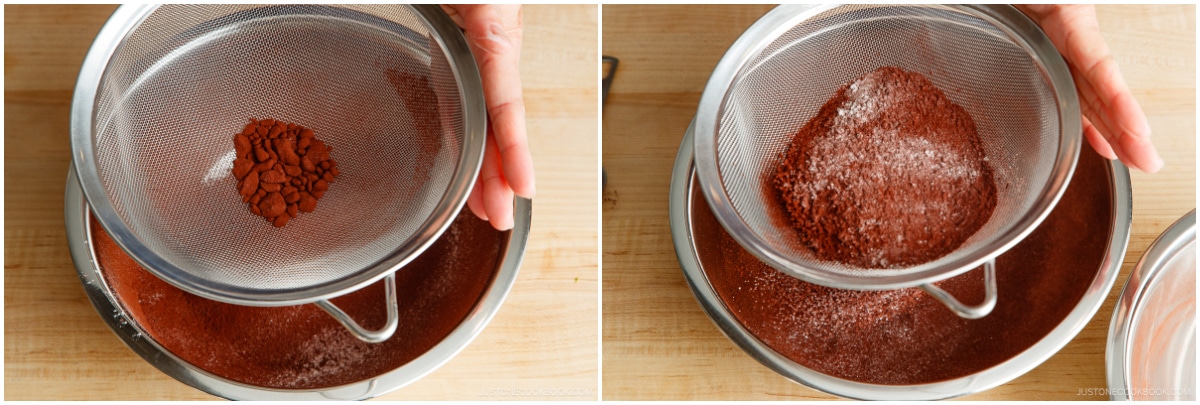
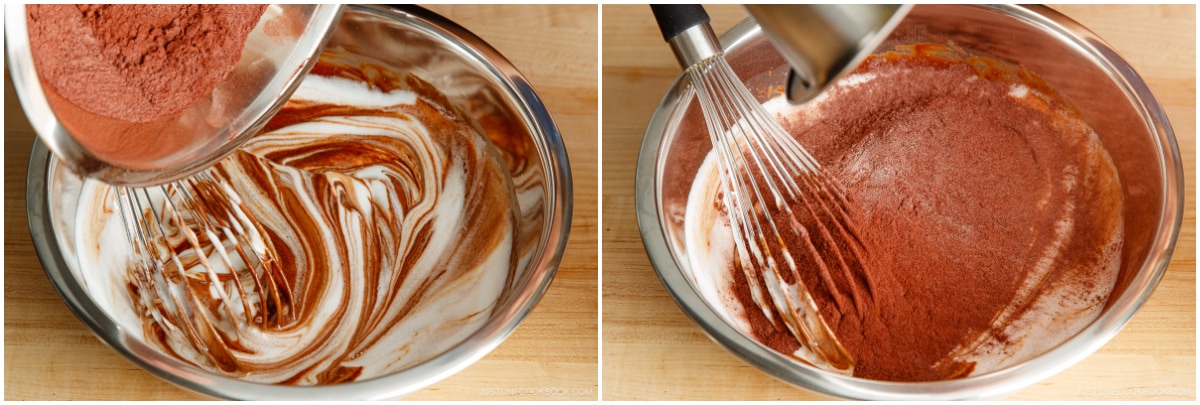
- Combine ¼ cup cake flour, ¾ cup Dutch-process cocoa powder, and ⅛ tsp Diamond Crystal kosher salt and sift using a fine-mesh sieve.
- It‘s important to sift as cocoa powder may have clumps (see photo). Press them down with a spoon so the cocoa passes through the mesh. Repeat sifting 2–3 times and set aside.
- Wipe a stand mixer bowl (or a large mixing bowl) with a clean towel. This ensures that there is no moisture or grease in order to properly whip the egg whites. Separate 5 large eggs (50 g each w/o shell), putting the whites in the mixer bowl and the yolks in a separate large bowl. Keep the egg whites at room temperature. If they are cold, the chocolate mixture may solidify.
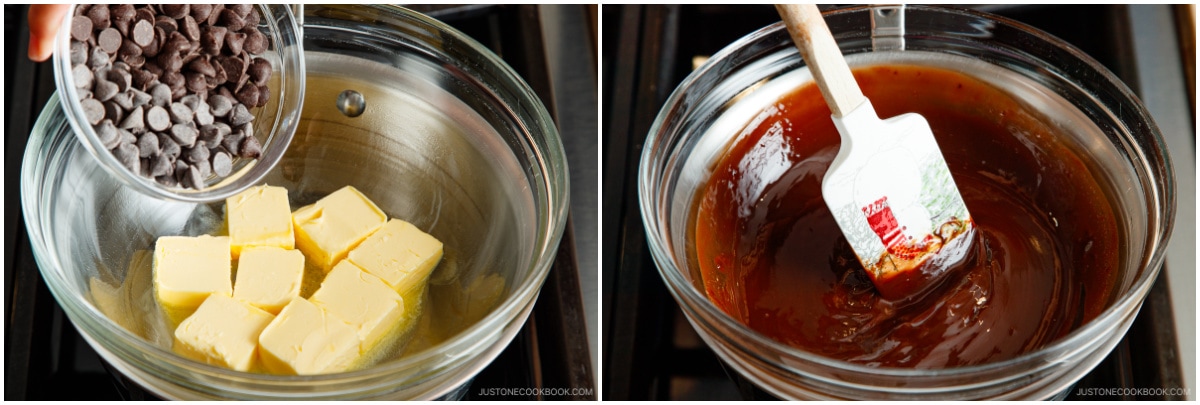
- Set up a double boiler by placing a heatproof glass bowl over a saucepan of barely simmering water on the lowest heat. Cut 9 Tbsp unsalted butter into smaller chunks or cubes.

To Prepare the Chocolate Mixture
- Add the butter and ¾ cup chocolate chips to the glass bowl. Stir occasionally until the chocolate is melted. Meanwhile, prepare the egg yolk mixture in the next step. Tip: Make sure not to introduce any moisture to the bowl; otherwise, the chocolate will seize.
To Prepare the Egg Yolk Mixture
- Add ½ cup sugar to the egg yolks.
- Beat the yolk mixture with a hand whisk until it becomes a thick texture and pale in color.
To Combine the Yolk and Chocolate Mixtures
- The chocolate mixture should be 122ºF (50ºC). I recommend getting an instant-read thermometer to check the temperature (it‘s useful for steak, fish, and custard, too). Pick up the bowl from the double boiler and wipe off the moisture/steam on the bottom of the bowl. We do not want to drop any moisture into the batter while pouring the chocolate mixture.
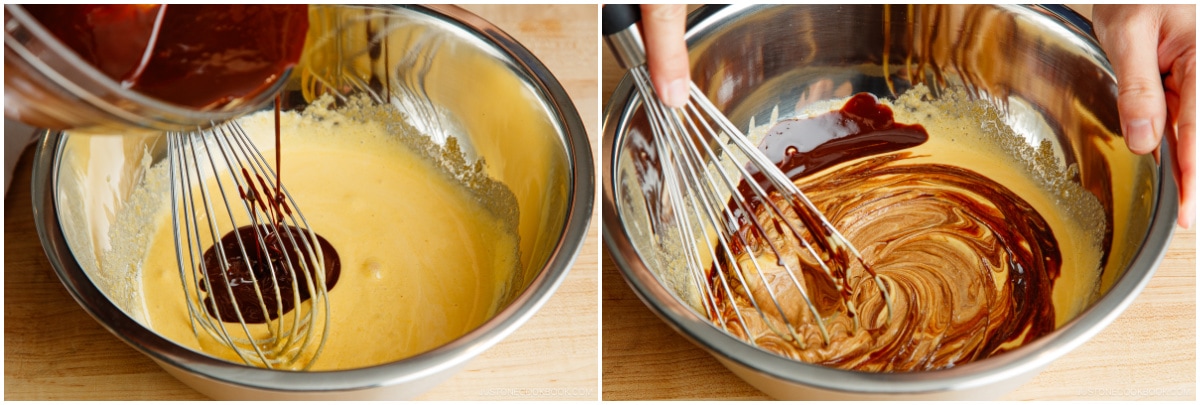
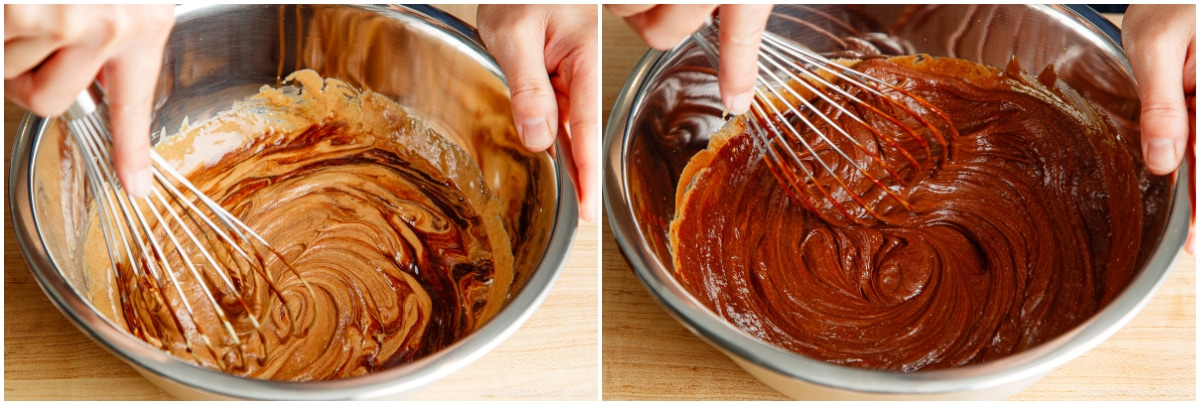
- Add the chocolate mixture to the yolk mixture, one-quarter portion at a time. Using a hand whisk, combine well before adding the next portion.
- Continue adding the chocolate mixture, one-quarter portion at a time. Blend well after each addition so the mixture is homogeneous. Chocolate will solidify if the chocolate mixture is not warm enough or the yolk mixture is too cold. This is why it‘s important to use room-temperature eggs.
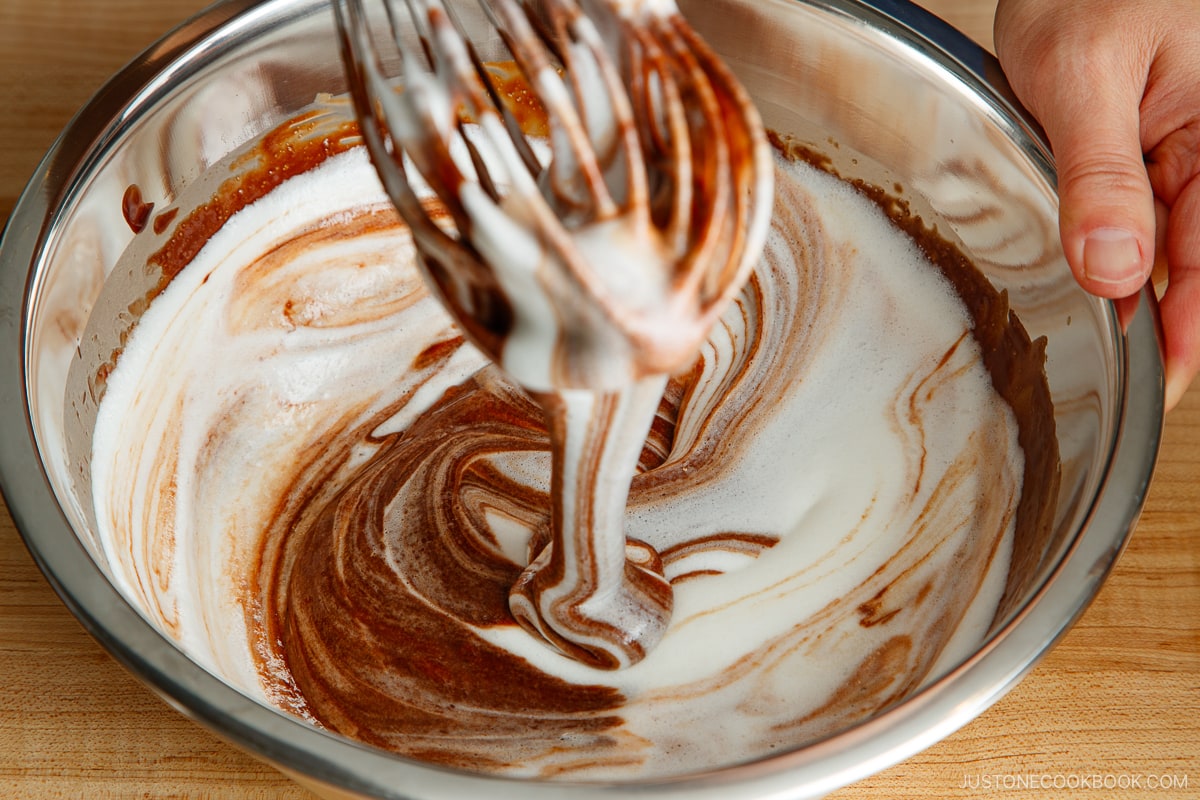
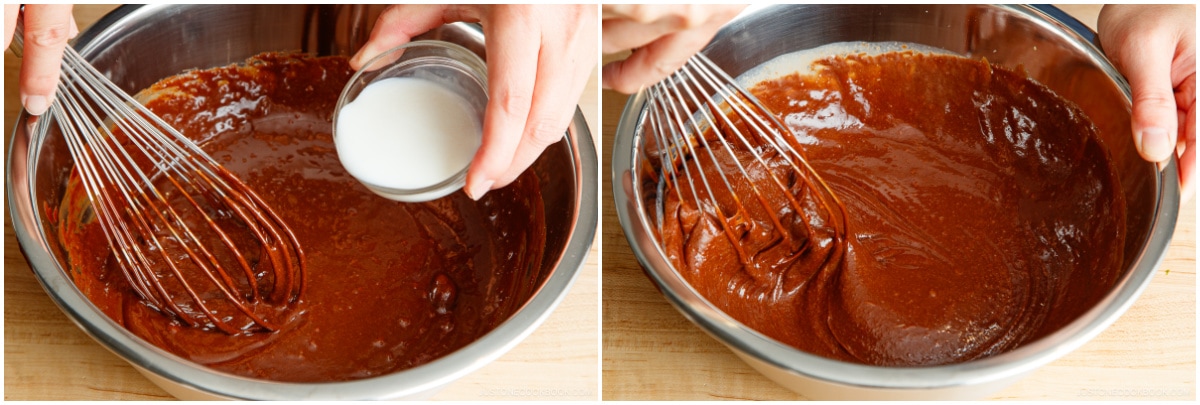
- Microwave 2 Tbsp milk for 10 seconds incrementally, until it‘s steaming. Add it to the batter and whisk to combine. Tip: The milk will help warm up the batter, preventing the chocolate from hardening.
To Beat the Egg Whites
- Working with the whisk attachment of the mixer, beat the room-temperature egg whites at Medium speed until they are foamy.
- Start adding ½ cup sugar in 3 separate additions while beating.
- Then, increase the speed to High and continue beating until very soft peaks form.
- To test for very soft peaks, do the following: Remove the whisk attachment from the mixer. With the whisk attachment, hand mix the egg whites one more time, scraping from the bottom and lift it up. The egg whites should not be runny, yet soft enough that they drop a few times and stop. Do not overbeat the egg whites.

To Add the Egg Whites and Dry Ingredients
- Add one-third of the whipped egg whites to the batter. With the whisk, stir the mixture with a scooping motion. Stop mixing when you see a nice marble effect (see next step) in the mixture.
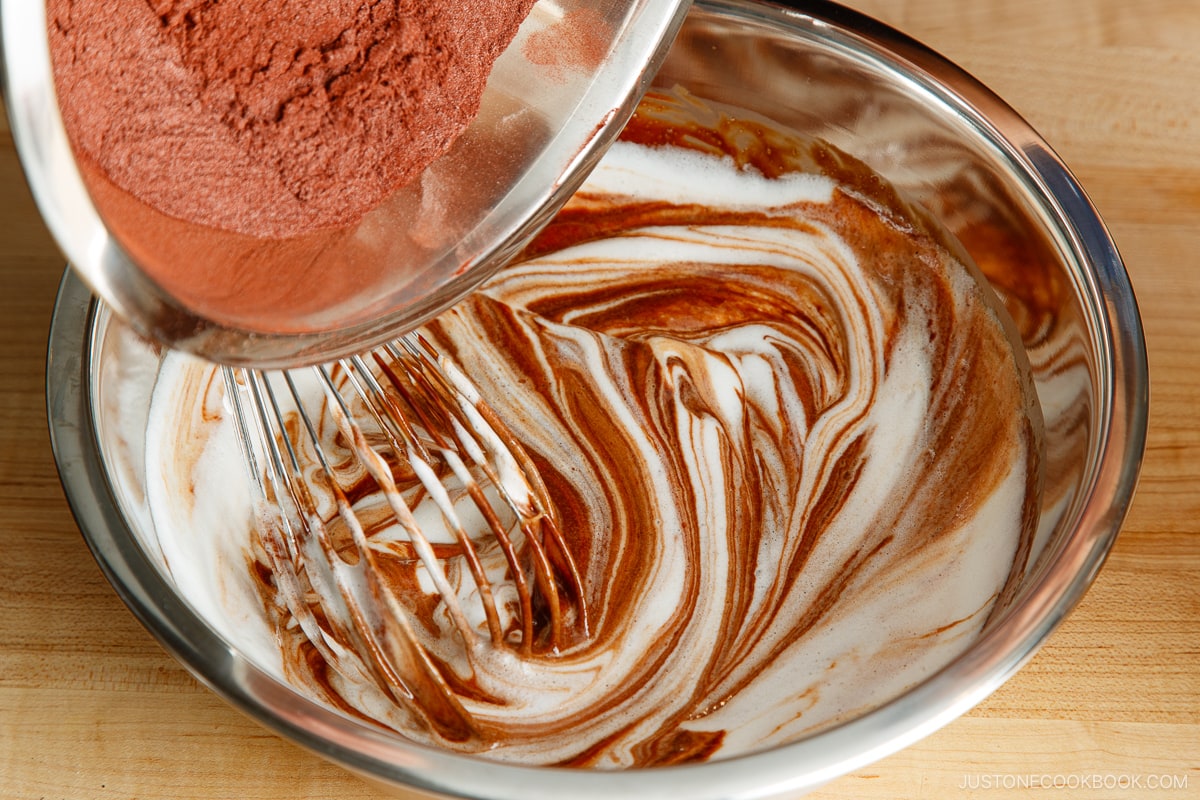
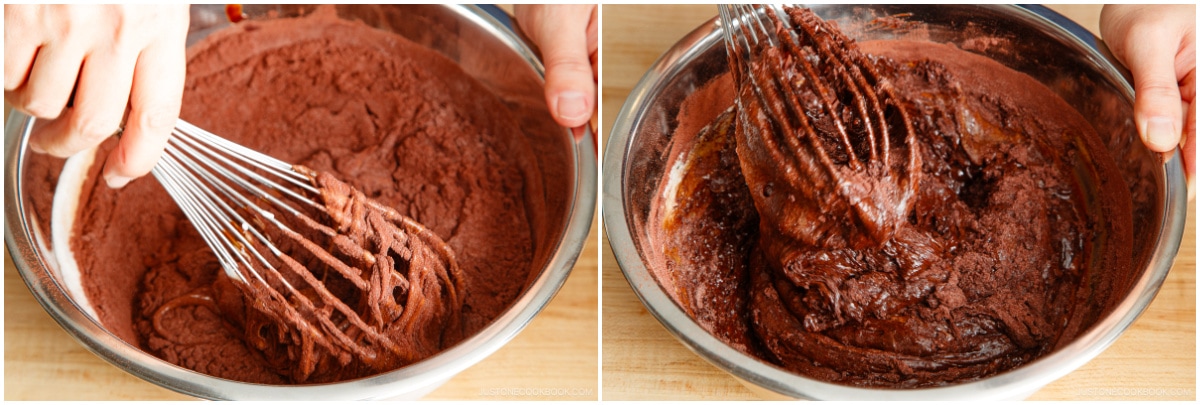
- Add the dry ingredients to the batter all at once.
- Continue using a scooping motion with the whisk to combine the mixture until the majority of the dry ingredients are incorporated but a little bit of dry ingredients are still left.
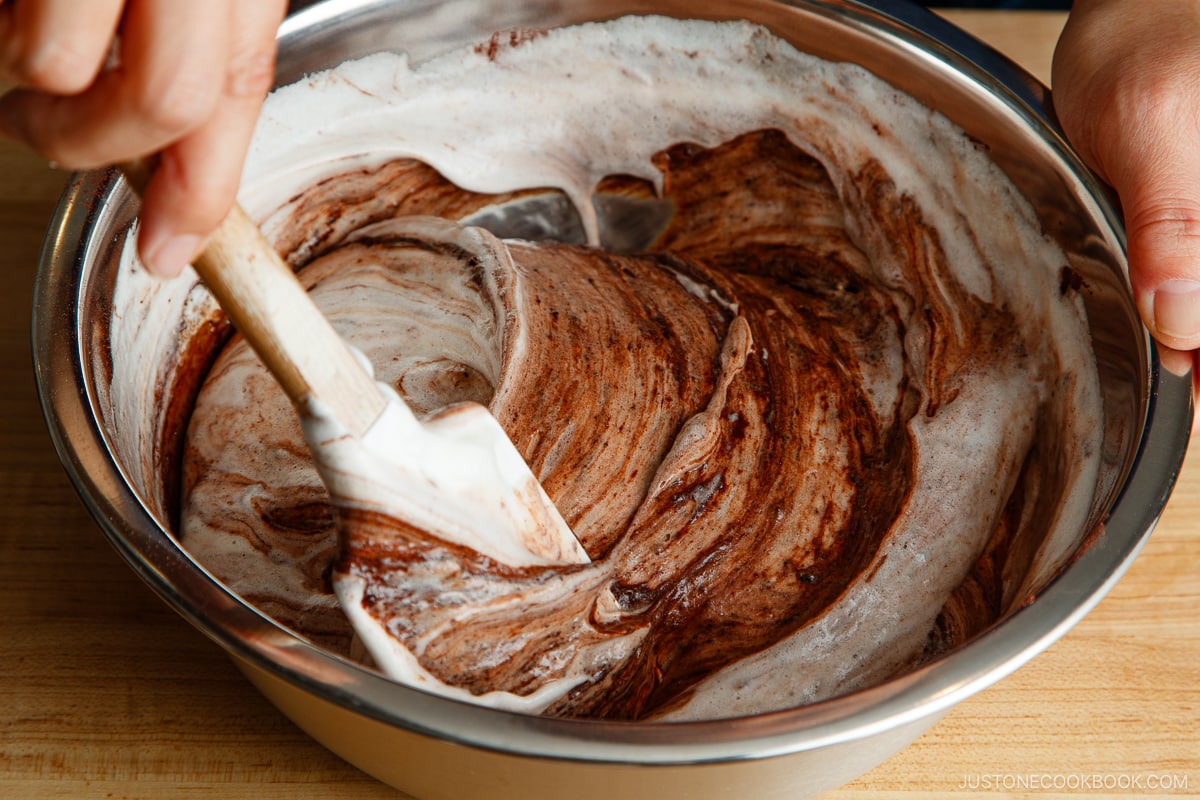
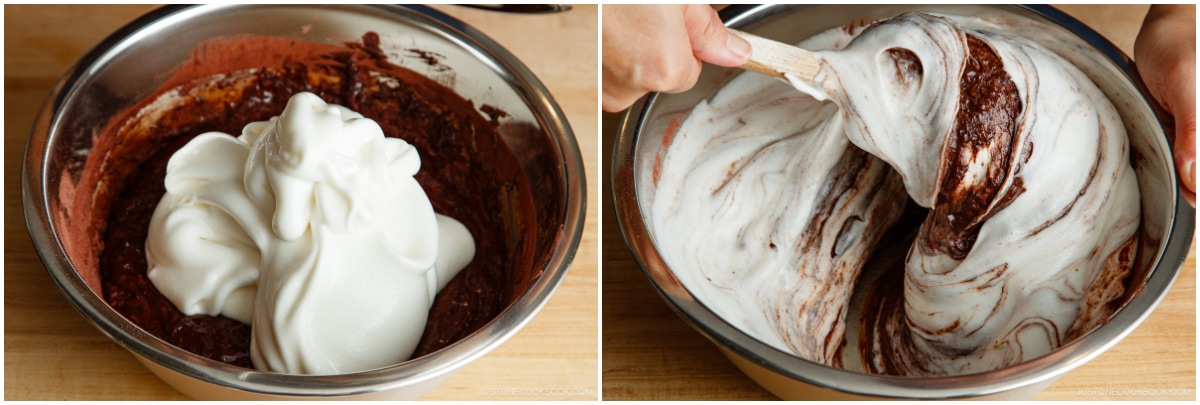
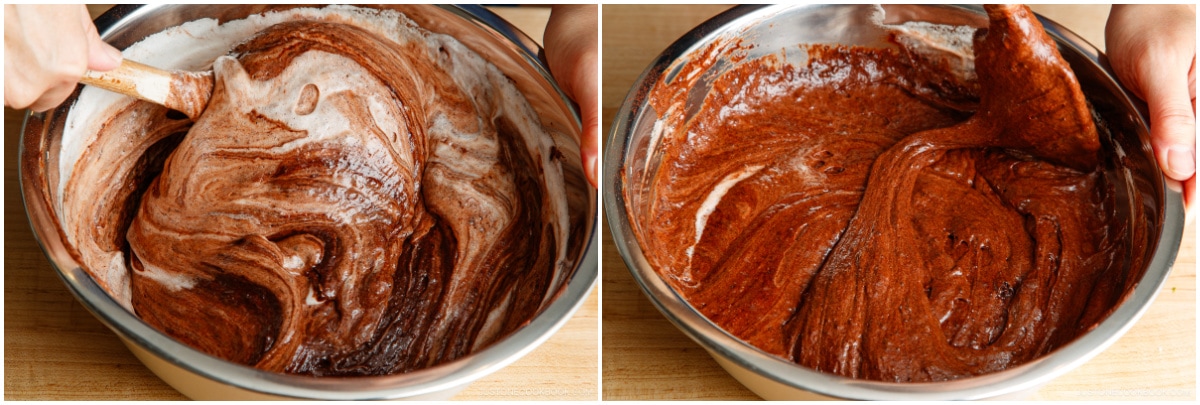
- Add the rest of the egg whites to the batter. Switch to a silicone spatula and gently fold in the egg whites, scraping the bottom of the bowl. It‘s important to fold the batter without deflating the air.
- Continue to fold just until the color is uniform and no white streaks or dry ingredients remain. Do not overmix, but at the same time, you can‘t undermix as the cake may form a hollow spot inside.
- Pour the batter into the pan all at once and in one spot to both minimize air pockets and smooth the top of the batter. Drop the pan onto the counter two times to bring up any air bubbles trapped in the batter.
To Bake
- Bake the cake at 350ºF (175ºC) for 55–60 minutes until a toothpick pulls out moist crumbs (not wet batter) when inserted near the center of the cake. Tip: If you‘re using a dark-colored cake pan, your cake may bake faster than mine did. I recommend reducing the oven temperature by 25ºF (15ºC) and checking for doneness 10 minutes earlier, starting at about the 45-minute mark.
- When the cake is done, remove it from the oven and firmly drop the cake pan on the countertop to allow the water vapors to escape. Place the pan on a cooling rack and let the cake cool completely in the pan. As the cake cools, it may deflate a bit. For the best flavor and texture, wrap the cake (still in the pan) well so the moisture doesn‘t escape, then store it in the refrigerator overnight.
To Unmold the Cake and Serve
- About 15 minutes before serving the cake, take it out from the refrigerator. Run a knife along the edges of the cake. Then, carefully turn the cake over onto your hand and remove the pan.
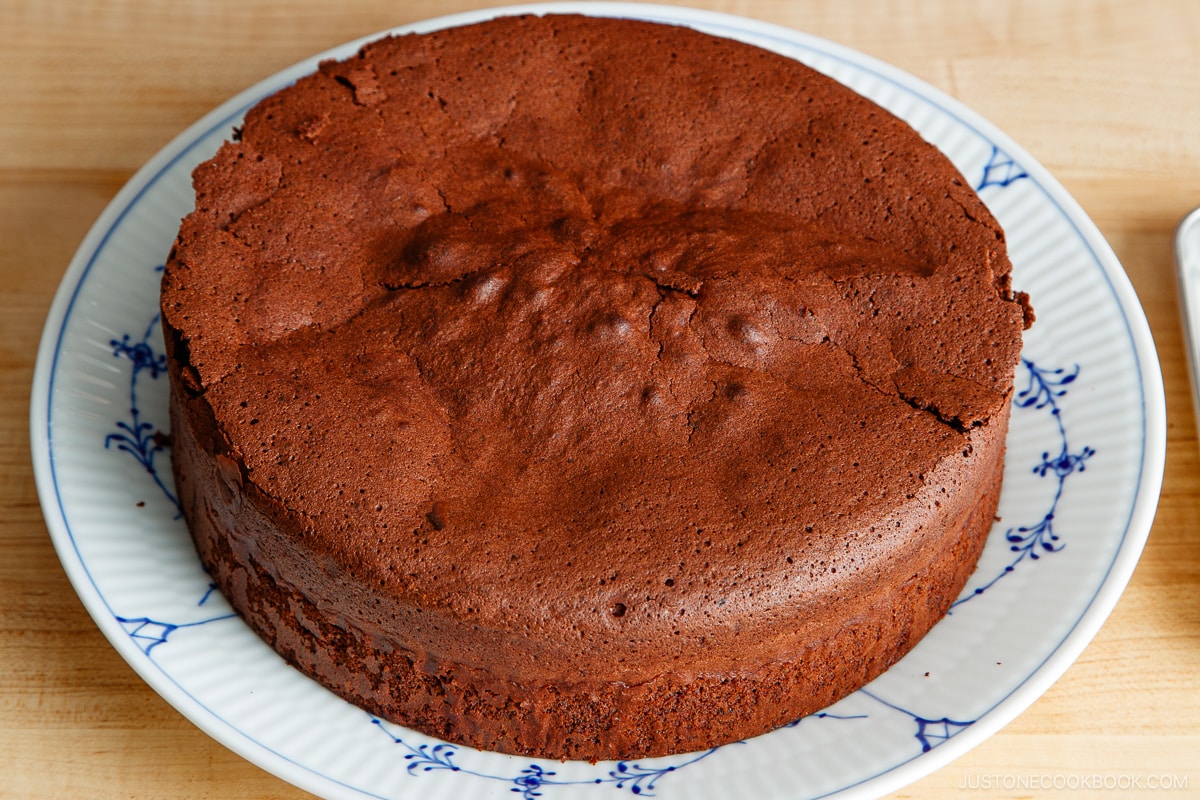
- Invert the cake again onto a cake plate or stand so it is right side up. Remove the parchment paper from the sides of the cake. Leave the parchment paper on the bottom in place.
To Decorate with Strawberries and Whipped Cream (option 1)
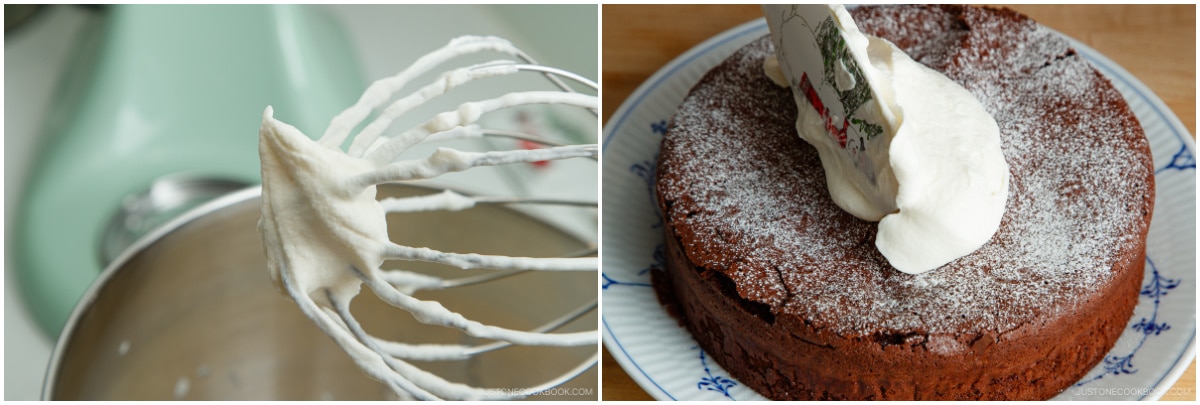
- In a stand mixer, whip ⅔ cup heavy (whipping) cream (should be very cold) and 4 tsp sugar until medium peaks form. If you‘re hand-whisking, you can whip while cooling the bottom of the bowl with ice water.
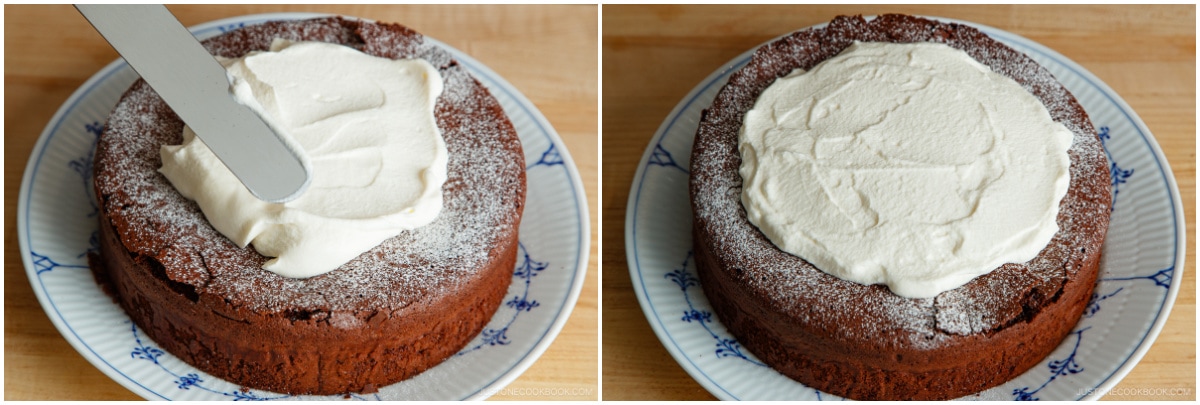
- Medium peaks mean when you lift the whisk, the cream will hold its shape, but the tip of the peak will fold back on itself. To decorate the cake, use a fine-mesh sieve to dust the top with a fine layer of confectioners’ sugar. Next, top the cake with whipped cream; you can either pipe it as you like or follow the easy method I show here. First, transfer the whipped cream to the center of the cake‘s top.
- Spread a circle of whipped cream with an offset spatula to about 1 inch (2.5 cm) of the cake‘s edge.
- Cut ½ lb strawberries in half lengthwise. Place the first layer of strawberries, cut side up and tips pointing outward, on the whipped cream to form a ring near the edge of the whipped cream circle. Then, place a second ring of strawberries, cut side down this time, inside the ring of the first strawberry layer. Tip: For a natural look, create some irregular patterns.
- Put the third and final layer of strawberries around the center. Decorate with small fresh mint leaves on top and lightly dust the strawberries with confectioners’ sugar. Enjoy!

To Decorate with Raspberries (option 2)
- Dust with confectioners’ sugar and decorate the cake with 10 raspberries.
To Store
- You can keep the leftovers in an airtight container and store in the refrigerator for up to 3–4 days or in the freezer for 2 weeks.


We made the cake this weekend, it was a success with our guests! I added the leftover chocolate chips on top too, didn’t have a lot of mint leaves left in the garden 😉
Hi Sofia! Thank you so much for trying Nami’s recipe!🤗
We are so happy to hear everyone enjoyed it. The chocolate chips look cute on the cake as well! Thank you for including a photo of your cake!
Great recipe! It was a hit at our Christmas party, even for ones who typically stray away from decadent sweets. Everyone packed up the remainders to take home with them!
Hello, Tina! Aww.🥰 We are overjoyed to hear that everyone enjoyed this cake!
Thank you for trying Nami’s recipe and sharing your delicious cake photo. Merry Christmas!
I didn’t have an 8inch cake pan, so I cut down the recipe for a 6inch pan. Not sure if my calculations were correct. The cake turned out dense more like a brownie. It tasted very chocolatey and enjoyed making it.
Hello, Catherine. Thank you for trying Nami’s recipe!
As Nami explained in this post, this cake is lighter than a brownie but somewhat dense. Make sure not to overmix the dough on your next attempt, and she will notice a difference.
We hope this was helpful!
Wonderful recipe and extremely helpful instructions! Mine came out a little on the dense side. It may be that I didn’t beat the egg whites enough and/or over mixed it with the chocolate batter. I plan to try it again and again to improve my baking skills. Thank you for this wonderful recipe!
Hello there, Julie! Thank you so much for your compliments on Nami’s instructions. It meant so much to her.
We hope your next attempt results in the perfect cake!
Thank you for trying Nami’s recipe!
The detailed instructions + photos were great. The baking paper cut/fold technique worked perfectly and I will be using that again on other recipes!
Hi Grace! Thank you so much for trying Nami’s recipe and for sharing your cake photo!
It looks so delicious!☺️
We are glad to hear you enjoyed the detailed instructions and photos. Happy Baking!
I am about to make the recipe but I find no weight amounts for the flour and cocoa even though the recipe says to weigh these ingredients.
I had this same problem, just above the recipe if you click the “Metric” box you’ll get the weights 😀
🤗 Thank you!
Had a blast making this for the challenge. Will definitely be making it again!
Hello, Chelle! Yay!🤗 Thank you so much for trying Nami’s recipe and sharing the photo. It looks delicious!
Thank you for the detailed instructions!
Hi Paula! Aww.🥰 Thank you so much for your kind words. It means a lot to us. Happy Baking!
I’ve always been intimidated by French patisserie, but this recipe was fairly simple and the in-depth instructions easy to follow. It came out beautifully and is so delicious! I highly recommend the cream and strawberry topping.
Hi Ashton! Thank you so much for sharing your cake photo! It looks delicious!
We are glad to hear you enjoyed Nami’s recipe.
This was fantastic and easy to follow! The cake has such a rich, satisfying taste, it satisfied my chocolate-lover’s soul. I served this at my friend’s D&D session, and they all loved it!
Couldn’t get the image the first time, here it is:
Hello, Rhiannon! Aww.🥰 Thank you so much for trying Nami’s recipe and sharing your beautiful cake result!
It looks fantastic!
We are overjoyed to hear that everyone enjoyed it. Happy Baking!
I enjoyed making this cake for my mother. Her grandmother was from France and used to make something similar. Very nice.
Hello, Kathryn! Thank you for trying Nami’s recipe and sharing your photos! It’s fantastic!😍
We’re glad you had fun making this cake.
Happy Holidays!
We had a great time making this rich and delicious chocolate cake! We may have overwhipped the egg whites a bit, because it came out almost like a brownie. Still we thought it was beautiful and everyone loved it.
Hello, John! Wow! Thank you for sharing your Chocolate Gateau photo! It looks delicious!
Yes. Overwhipping the egg results in a different texture. We hope that your next attempt has more Gateau texture.
Thank you for trying Nami’s recipe!
Hi Nami, any recommendations for modifying this for high-altitude? Thanks!
Hello, Steph. Thank you so much for taking the time to read Nami’s post!
We’ve never baked this at high altitude before and aren’t sure how to tweak it for the best results, but we found some useful information here: https://www.kingarthurbaking.com/learn/resources/high-altitude-baking
We hope this was helpful!🙂
Would substituting table salt and another brand of cocoa powder be acceptable for the contest?
Hi Nancy! Yes, make sure to use HALF portion of salt, if you are using table salt (I use kosher salt, so I need x2 portion of table salt). You can use any brand of cocoa powder, but I recommend high quality one for the best result. Good luck!
I can’t wait to try this. As a tip for any other bakers out there: If you like dusting things with icing sugar I recommend getting snow sugar. I originally bought it to make stollen, but it’s a game changer for dusting as well. Because it is made from dextrose it doesn’t melt like regular icing sugar does, so your confectionery will stay looking great until you eat it.
Hi Lili! Great point! Thanks for reminding me! I actually use snow sugar, too. But I bought mine for food photography purpose so I don’t have to keep sprinkling for recipes that use powdered sugar. LOL. I just added the links to the ingredient list. For those who use snow sugar, keep in mind that snow sugar is less sweet than regular powdered sugar. 🙂
That is such a useful resource, thanks! We’ll report back after we get the results.