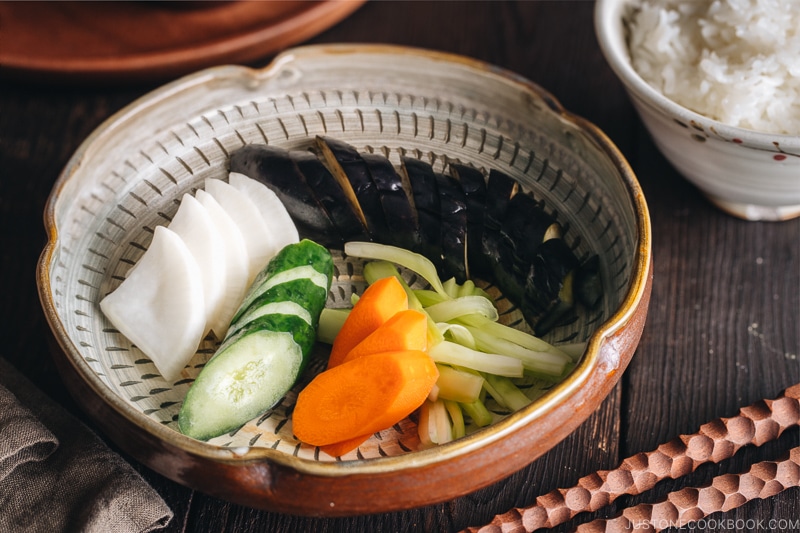
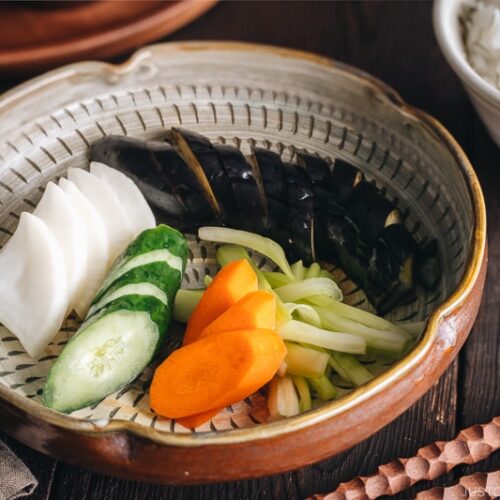
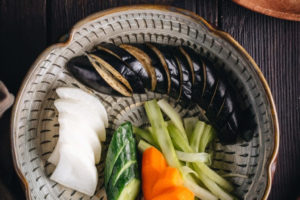
Shiozuke is the simplest Japanese pickle – Tsukemono. All you need is salt, water, and fresh seasonal vegetables. Try this pickle today to serve with your Japanese steamed rice and miso soup!
Shiozuke (塩漬け), literally salt (shio) pickling (zuke), is the most basic type of Japanese pickles known collectively as tsukemono (漬物). Salt pickles were first produced in ancient times as a means of preserving food, and over the years became an important part of the basic Japanese meal. If you’re interested in learning more about different types of tsukemono, read Tsukemono: A Guide to Japanese Pickles on my blog.
Tsukemono has several types based on the pickling agent:
- Shiozuke (塩漬け) – salt
- Suzuke (酢漬け) – vinegar
- Amazuzuke (甘酢漬け) – sugar and vinegar
- Misozuke (味噌漬け) – miso
- Shoyuzuke (醤油漬け) – soy sauce
- Kasuzuke (粕漬け) – sake kasu (lees)
- Shiokojizuke (塩麹) – rice koji/mold-cultured rice
- Nukazuke (糠漬け) – nuka (rice bran)
- Karashizuke (からし漬け) – Japanese hot mustard karashi
- Satozuke (砂糖漬け) – sugar
I will try to go over one by one at a different time, but today let’s talk about Shiozuke.
What is Shiozuke?
Shiozuke (塩漬け) is tsukemono made with just salt and vegetables. Therefore, the amount of salt used for the brine and the pickling time make the difference in the final dish. When it’s done right, tsukemono is simply delicious.
Shiozuke not only prevents the food from going bad, but also helps break down the fibers, keeps the vibrant color, and tenderizes any tough vegetables that could be hard to eat raw. It also adds umami to the vegetables.
Shiozuke Basic Brine
The basic brine that I learned from a Tsukemono book, Honkaku Tsukemono written by a culinary & tsukemono expert Takako Yokoyama, is 10%. That means 100 grams of sea salt in 1000 ml (gram) of water.
For those of you who don’t use metric, it means 6 tablespoons of sea salt (16 g per tbsp) for every 4 cups of water.
In general, the ratio of salt to water for Shiozuke is 2 to 10%. It’s quite a large range, but as I mentioned earlier, the amount of salt and pickle time is up to one’s preference.
When you pickle vegetables in the light brine for a short period of time, this method is called Asazuke (浅漬け), literally “shallow pickling.” Asazuke doesn’t develop deep flavors that fermented pickles do, yet the result tastes wonderfully refreshing. Since it is easy to make, Asazuke frequently appears in our daily dinner table.
- Shiozuke: 5 to 10% brine, pickle for 6 to 12 hours, enjoy in 3 to 4 days.
- Asazuke (quick pickling): 2 to 5% brine, pickle for 2 to 3 hours, and enjoy in 1 to 2 days.
Today I make my Shiozuke with 5% brine and pickle for 8 hours.
2 Simple Ingredients You Need to Make Shiozuke
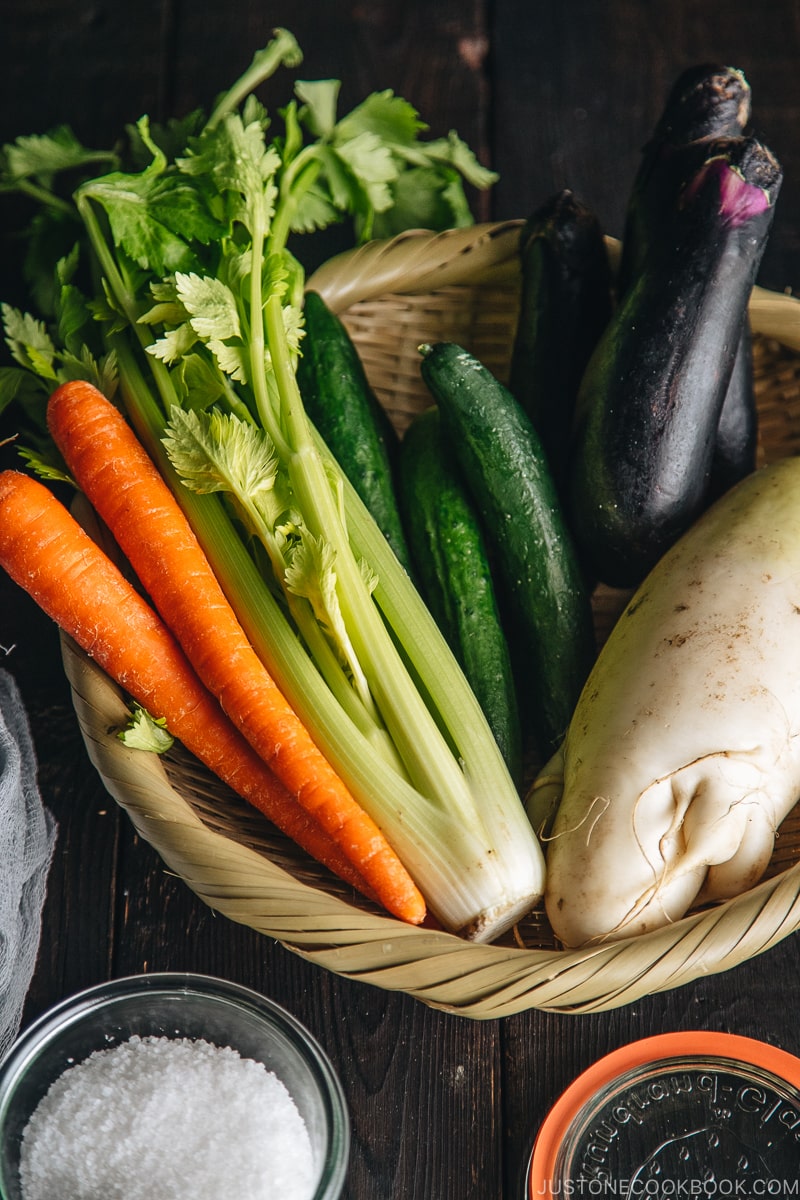
1. Vegetables to pickle
The best choice is seasonal vegetables because they are fresh, easy to get, and at an affordable price. You can taste the freshness through the pickling process when you use fresh vegetables. The common vegetables include:
- Eggplant – longer, thinner, and smaller Japanese/Chinese/Italian kind
- Cucumber – short, skinny, and smaller Japanese/Persian kind
- Daikon radish – green-top, long, thick Japanese/Korean kind
- Carrot
- Celery
You can make Shiozuke with a wide variety of vegetables. In this recipe, I made a colorful batch of Shiozuke with above 5 different vegetables. You can, of course, choose to make with less or more vegetables. For first-timers, I’d recommend following my pickling time indicated in the recipe, which is 8 hours, then you could adjust the brine and timing in your next batch.
If you want to pickle leafy vegetables (napa cabbage, cabbage, greens, etc), I recommend Asazuke (quick pickling) with 2-5% brine.
2. Salt
I like to go with the traditional method; use natural sea salt when you make tsukemono, and not table salt.
Sea salt is produced through evaporation of ocean water or water from saltwater lakes, usually with little processing. This leaves behind certain trace minerals and elements, which add flavor and color to sea salt.
On the other hand, table salt is typically mined from underground salt deposits, is more heavily processed to eliminate minerals, and usually contains an additive to prevent clumping. If you’re interested in the different types of salt, read this article.
Additional mix-ins (optional)
In this recipe, I decided to keep it basic; however, we can make different variations of Shiozuke with the additional ingredients. You can include:
- Garlic
- Ginger
- Kombu
- Red chili pepper
- Yuzu zest (you can use other types of citrus)

3 Tools You Need to Make Shiozuke
1. Kitchen Scale
I understand that it’s not common to have a kitchen scale in the American household, but now that you want to make tsukemono, it’s very important to measure 1) the total weight of the vegetables you’re going to pickle, 2) the weight of sea salt, and 3) the heavy object you put on top of the vegetables.
This kitchen scale that I use in my recipes is from Amazon and I have it for a long time. I usually use the gram measurement for my baking and other traditional Japanese recipes; therefore, I highly recommend getting one now if you like to follow recipes precisely.
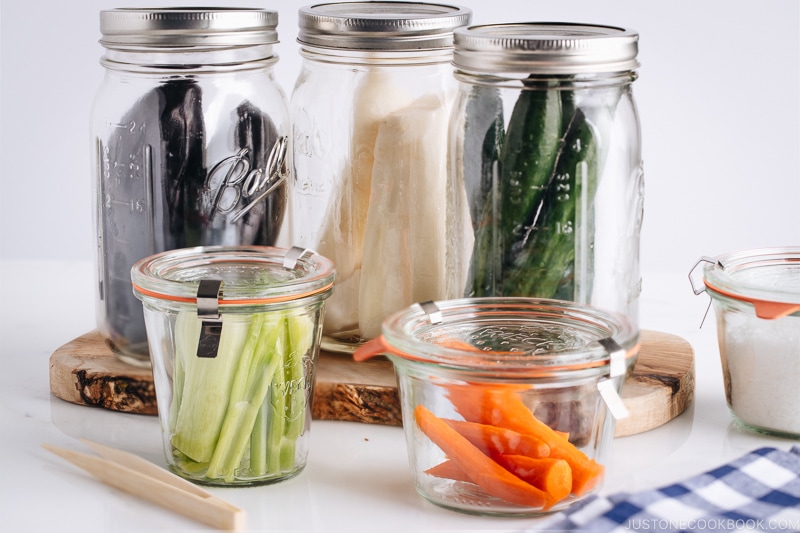
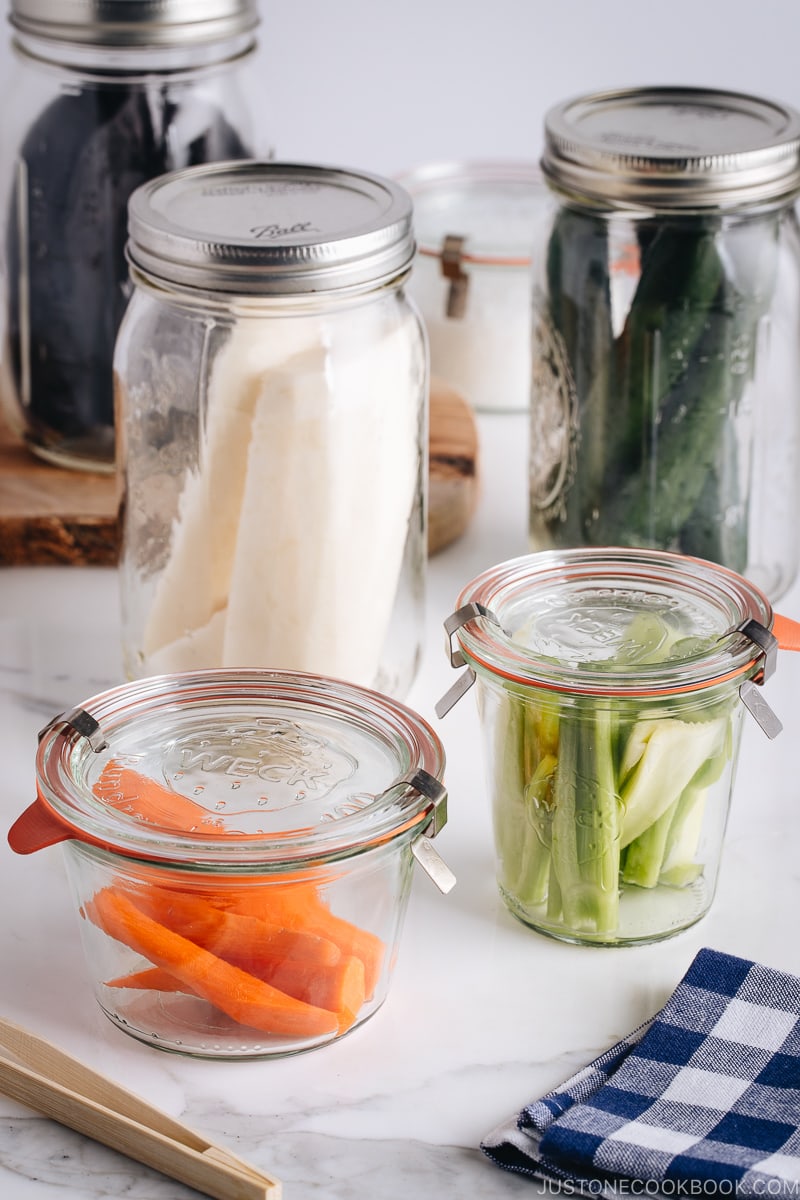
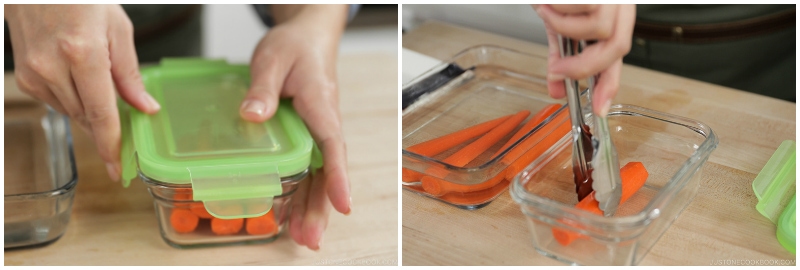
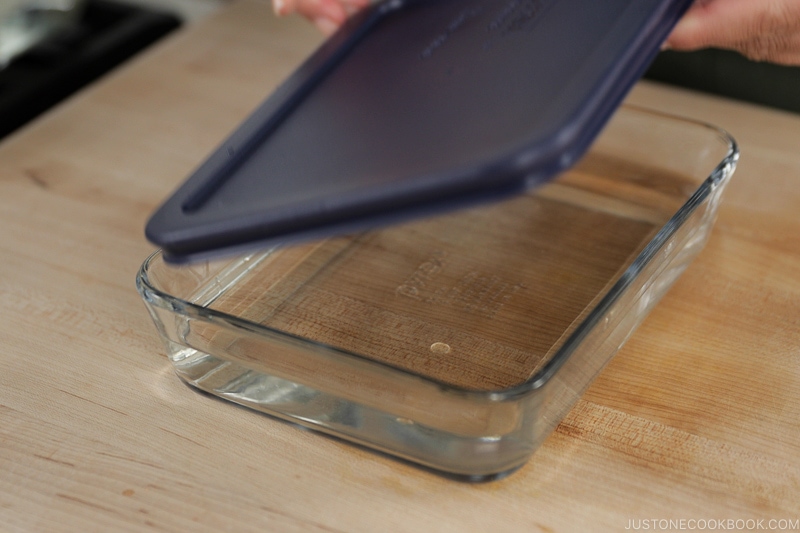
2. Containers
You will need slightly deeper containers with lids so you can put the vegetables, brine, plates, and weights. I like to use glass containers than plastic ones so the smell doesn’t retain. I do not have a special pickle press for tsukemono (tsukemono-ki 漬物器), but you can use it if you have one.
3. Weights (Stone Weights)
You will need something heavy to apply downward pressure on top of the pickles. You can use several plates, pie weights in a plastic bag, clean rocks, etc. Traditionally, the pressure is generated by heavy stones called tsukemono-ishi (stone) (漬物石) with a weight of 1-2 kg.
The ideal weight to put on the vegetable is between 1.5 and 2 times the weight of the pre-pickled vegetable. So make sure to weigh the vegetables before you soak them in the brine.
Lastly, don’t forget to prepare a plate that you would place under the heavy object inside the container in order to distribute the weight equally among the vegetables.
My Recommendations and Some Tips
- My favorite Shiozuke: 5% brine, pickle for 8 hours, enjoy in 3-4 days; and 10% brine, pickle for 5 hours, enjoy for 5 days.
- If you are going to serve tsukemono for tonight’s dinner, consider making Asazuke (quick pickling).
- Again, get a kitchen scale.
- Decide to pickle whole or cut pieces. The way you cut vegetables affects the finishing time and texture of tsukemono. If you cut the vegetables to create more surface, pickling is done faster than pickling as a whole or cut in half or quarters.
- Re-use the leftover brine for your next pickling. Once in a while, it’s good to let the brine boil again and add more salt as needed.
- Make the brine the previous day. The brine has to be at room temperature. When I first made shiozuke, I was impatient as my brine didn’t cool fast enough. In winter (like now), you can keep the pot of your brine outside to cool faster. In summer, make the brine ahead of time, so you don’t have to sit around and wait for it to cool.
- Set a timer for removing vegetables from the brine. I sometimes forget and end up with salty vegetables!
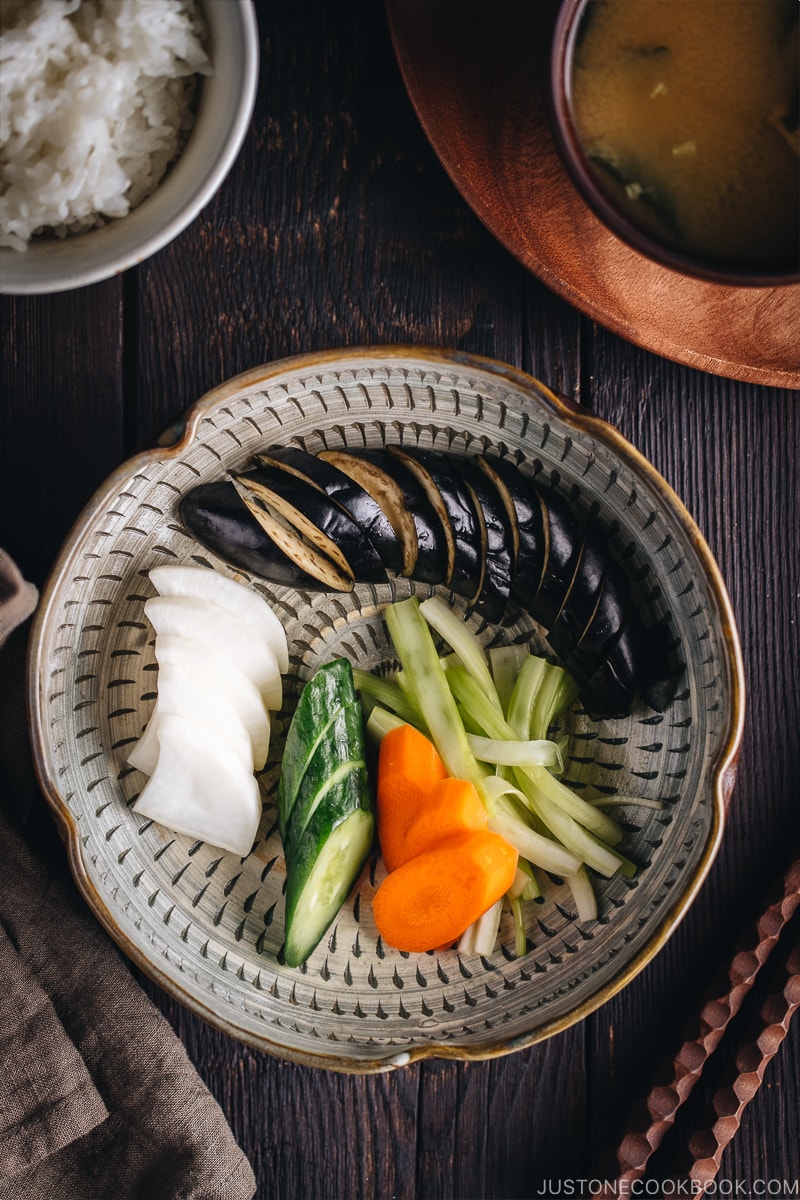
What to Serve with Shiozuke
With a crunchy texture and refreshing flavor, Shiozuke is definitely one of the easiest ways to enjoy vegetables. For a quick dinner, I often serve these pickled vegetables as a side with steamed rice and miso soup and I’d add along with a protein dish like Miso Butter Salmon or Ginger Pork. On a cold day, you can serve pickled vegetables with okayu (rice porridge). It could not be any simpler, healthy, and full of flavor.
Wish to learn more about Japanese cooking? Sign up for our free newsletter to receive cooking tips & recipe updates! And stay in touch with me on Facebook, Pinterest, YouTube, and Instagram.
Tsukemono – Shiozuke (Salt Pickling)
Video
Ingredients
For the Vegetables to Pickle
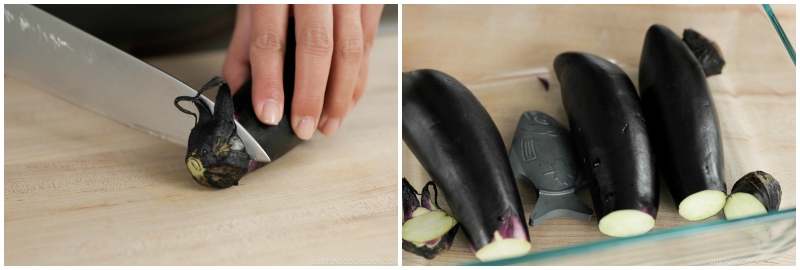
- 3 Japanese or Chinese eggplants (use Lucky Iron Fish to retain the color; see Notes)
- 5 Japanese or Persian cucumbers
- 1 daikon radish
- 5 ribs celery
- 2 carrots
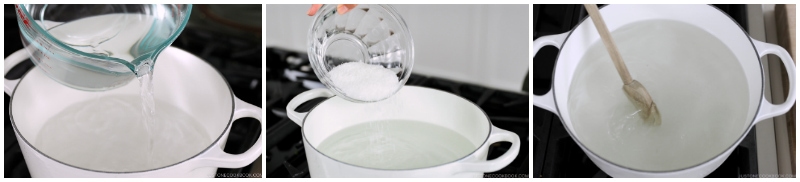
For the Brine
- 1000 ml water
- 20–100 g sea salt (for 2% to 10% brine)
Instructions
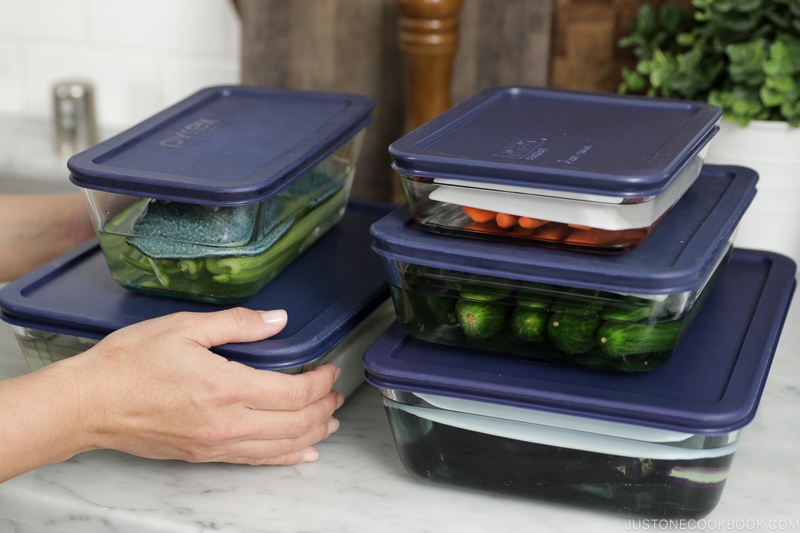
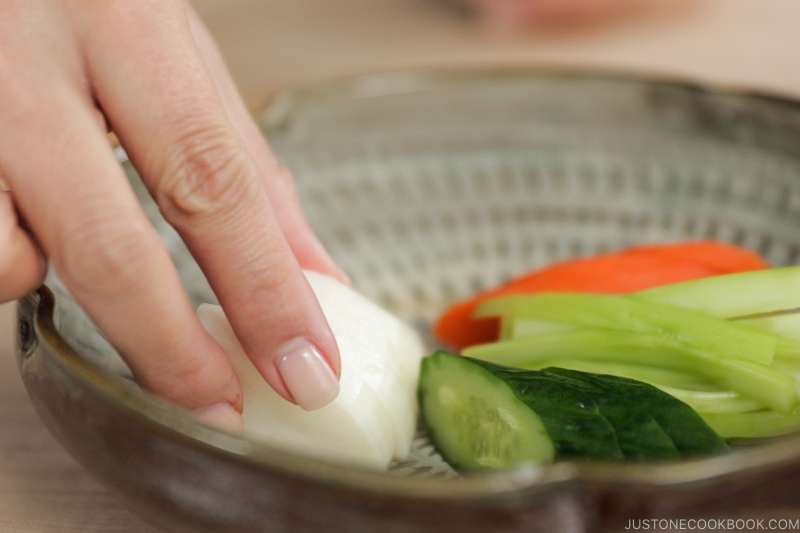
- Gather all the ingredients. Also, prepare a clean container with a lid for each vegetable. You can also put all vegetables (except for the eggplants) in one big container.


To Measure the Weight (Important!)
- Decide the amount of salt you want to use and weigh the salt. (Please read the blog post). This recipe is 5% brine (50 grams of sea salt in 1000 ml of water) and I made a double batch (100 grams of sea salt in 2000 ml of water) as I used a lot of vegetables to demonstrate.
- Weigh each vegetable you’re pickling and write down the weights. At the next step, you‘ll need to find out the weight of the heavy objects to put on the vegetables.
- Figure out which heavy object to use. Make sure to include the plate that goes under the heavy object. The total weight (object + plate) needs to be 1.5 to 2 times of the total vegetable weight. You can use several plates, pie weights in a plastic bag, etc.
To Prepare the Brine
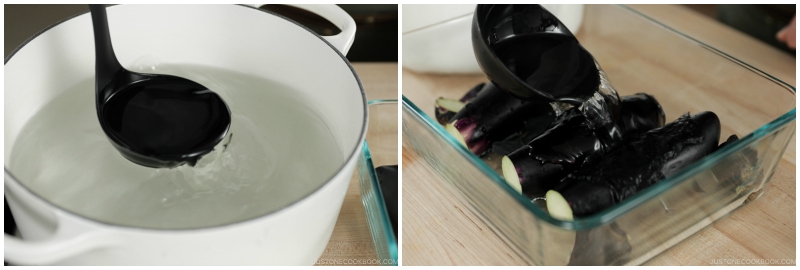
- Put 1000 ml water and 20–100 g sea salt in the pot. Let the salt dissolved completely over medium heat. You do not need to let it boil. You can turn off the heat once it’s warm and the salt is completely dissolved. Let cool. Tip: In winter, it’s fast if you put the pot outside (leaving the lid slightly ajar). In summer, make the brine the previous day.

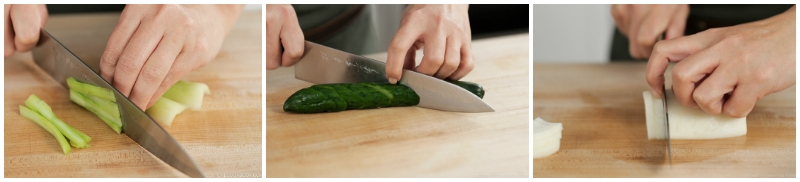
To Cut the Vegetables (If Necessary)
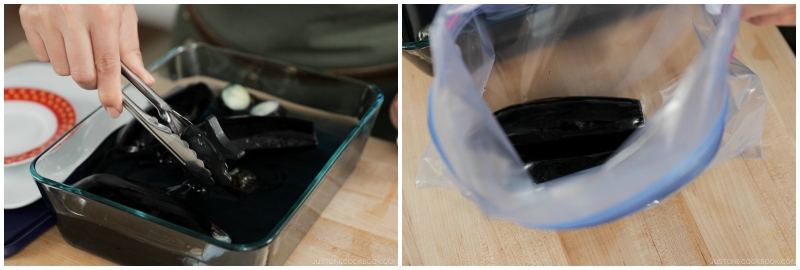
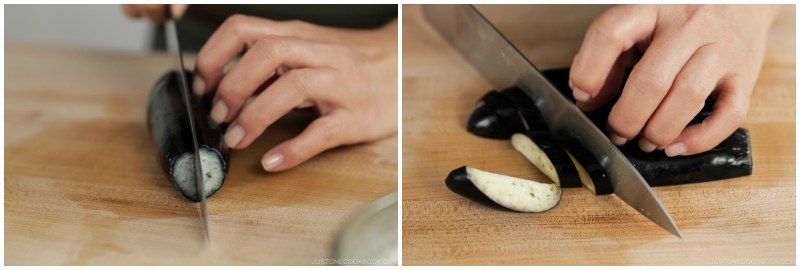
- Eggplants: Cut off the end of 3 Japanese or Chinese eggplants. When you are making asazuke (quick pickles), cut the eggplant in half or cut a slit vertically about half the length in the eggplant to let the salt brine absorb. Otherwise, you don’t need to cut the eggplants. Place them in the container. Tip: To prevent the beautiful eggplants from discoloring, I used ‘Lucky Iron Fish‘ – a cooking tool that retains colors and adds iron to foods. It is optional but worth investing in, especially if you need more iron in your diet. You can purchase it on Amazon. I also use ‘Lucky Iron Fish‘ when I make Kuromame.

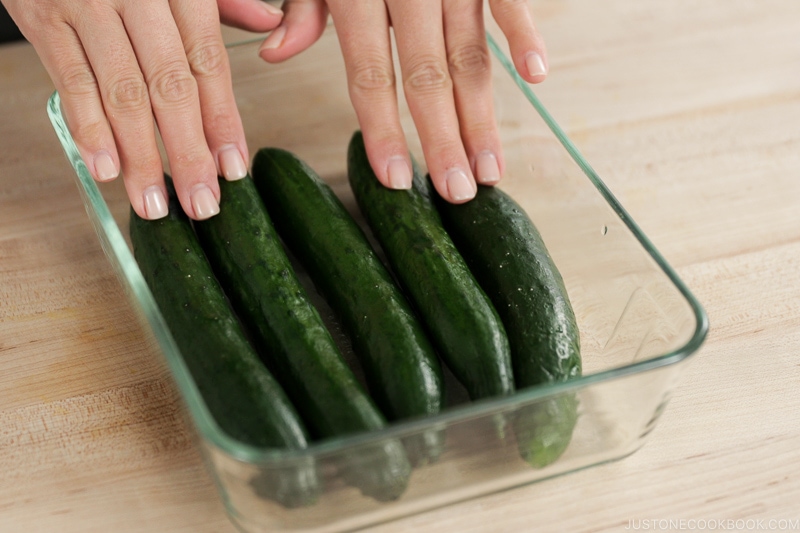
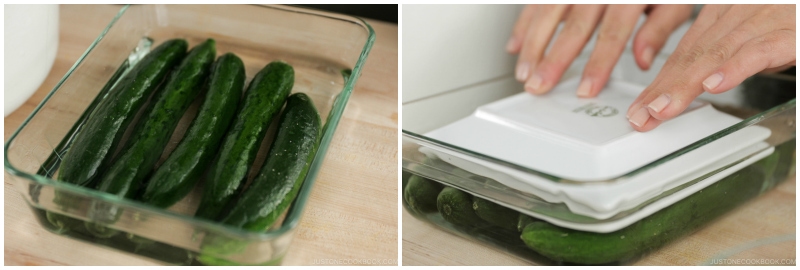
- Cucumbers: You don’t need to cut the 5 Japanese or Persian cucumbers. Place them in the container.
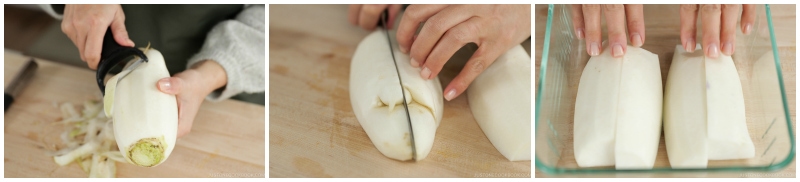
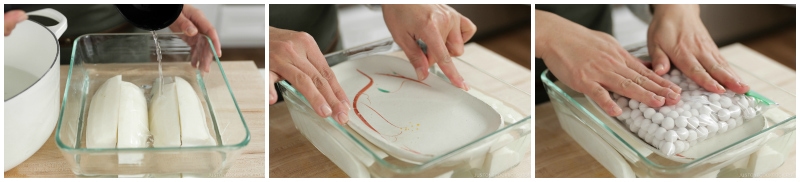
- Daikon radish: Peel and cut 1 daikon radish in half or quarters lengthwise depending on its size. Place them in the container.
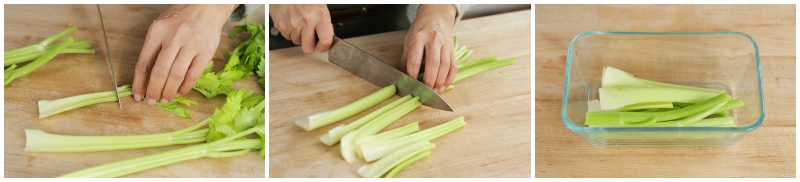
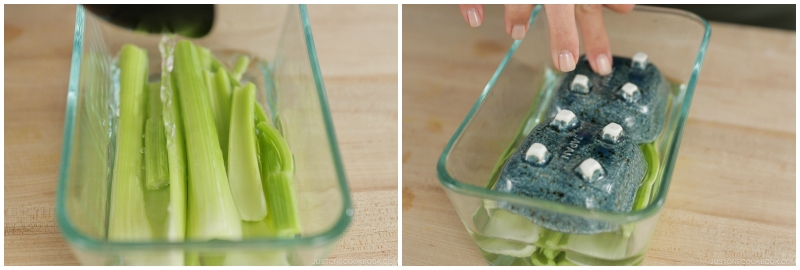
- Celery: Remove the leafy parts of 5 ribs celery and cut into the length that will fit in the container. Place them in the container.
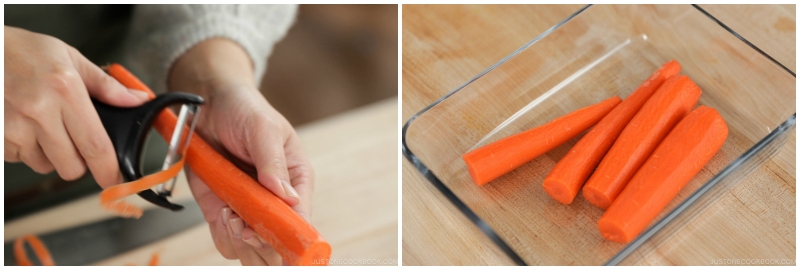
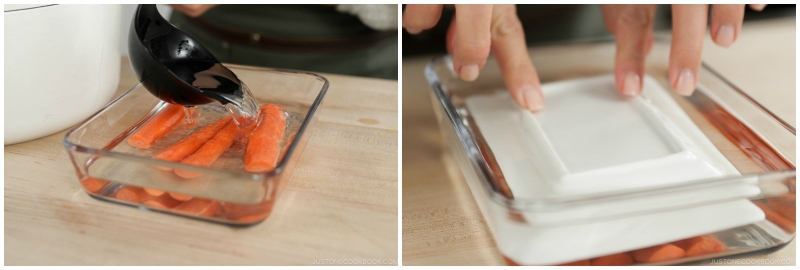
- Carrots: Peel and cut 2 carrots into the length that would fit in the container. Place them in the container.
To Pickle the Vegetables
- Eggplants: Pour the brine until they are submerged.
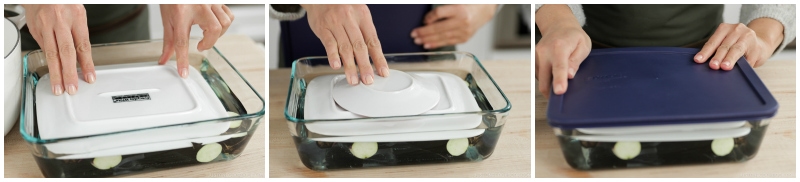
- Place a plate on top of the vegetable, and then put a weight on the plate. You can use plates and pie weights. Make sure the vegetables are completely submerged. Place a lid on and close tightly.
- Cucumbers: Pour the brine until they are submerged.
- Daikon radish: Pour the brine until they are submerged.
- Celeries: Pour the brine until they are submerged.
- Carrots: Pour the brine until they are submerged.
To Pickle
- Keep the tsukemono at room temperature for the best pickling. For my 5% brine, the best pickling time is 8 hours. Tip: You can adjust the pickling time according to your preference. Dense vegetable takes longer time to pickle than less dense vegetables. Please read the blog post.
To Remove and Serve
- Remove the eggplants and Lucky Iron Fish from the brine and transfer to a clean airtight container or resealable plastic bag.
- Remove other vegetables from the brine and transfer to a clean airtight container.
To Serve
- Cut the tsukemono into slices when you are ready to serve.
- Serve on a plate and enjoy!
To Store
- With 5% brine, you can keep the shiozuke in the refrigerator for up to 4 days. Do not cut the tsukemono into slices until you are ready to serve.
To Reuse of the Leftover Brine
- You can reuse the brine for up to a month. You may need to add more salt as the brine will become less salty. Also, it‘s good to boil the brine to keep it germ-free.


Hi Rick! Thanks, I removed “grams” because I see why you were confused. I should have written 2000 grams or ml.
Hi Nami, I’ve finally tried to make pickle eggplant (Shiozuke 10% salt for 5 hours).
I’ve never had it before so I’m not sure if it came out correctly.
Should it look different? The eggplant I’ve made isn’t change much in the appearance and consistency, I’ve tried a tiny bit and it taste slightly salty.
Thank you very much, I love your recipes!!!
Hi Antonio! I apologize for my late response (due to the traveling and flu I have).
First of all, thank you for trying this recipe! What type of eggplant did you use? Did you use a big (American) regular one or Chinese/Japanese kind? I just wonder if your eggplant got pickled properly. The saltiness can be only outside and maybe not all the way inside?
Is there a reason why you pickle the vegetables separately? I understand the eggplant might discolor the others, but would it be a bad idea to pickle the carrots and daikon together?
Hi Brian! You can, if the container fits. But remember that each vegetable has different tenderness, so you have to remove the vegetables at different times. 🙂
Hi Rick! I suggested 8 hours, but it really depends on how salty you want your pickles to be. Also if you decide to use different vegetables, it’s not necessarily 8 hours. It’s easier if you have different containers so you can drain and keep the finished pickles in the container. I hope I answered your questions.
[…] 12. Tsukemono – Shiozuke (Salt Pickling) […]
[…] Shiozuke (塩漬け) – salt […]
Aloha, Nami,
I am so glad to find you first on YouTube and then here. Our mother was from Japan but she has been gone for 45 years now. I miss her so much. She was from Ishinomaki and we still have cousins there and a sister by Mt. Fuji. Thank you for sharing such nice, basic Japanese recipes. Really touches my heart. ♥
Aloha Rosy! Thank you for finding me on YouTube! 🙂 Your mom is from Ishinomaki? I support ladies in Ishinomaki who makes jewelry with broken pottery (ochawan etc). Take a look here: https://www.justonecookbook.com/beauty-out-of-broken-pieces-nozomi-project/
I hope you enjoy cooking Japanese home cooked meals at home! xo
[…] Shiozuke (塩漬け) – salt […]
I made those a couple of days ago, using cucumber and daikon. I don’t have much to compare it with, as I haven’t had those types of pickles before. The daikon turned out much saltier than cucumber, which tasted pretty much like a fresh one, with a slight tint to the flavor and almost imperceptible change of texture to a little softer – but not salty. I thought it might have had something to do with the presence of skin and perhaps I should’ve washed the cucumber better to allow it for an easier absorption of the liquid. I intend to learn more about Japanese style pickles and try more of your recipes. One thing I would recommend improving is getting the info about boiling the salt water somewhere where it’s hard to miss before proceeding. I didn’t know about it and ended up just mixing salt with cold water, because I didn’t have the time to do otherwise. Thank you very much for a recipe! I have enjoyed learning something new! The daikon is very yummy now, soft and not just saltier but also sweeter.
Hi Malgorzata! Daikon varies in sizes, so depending on its size, adjust the pickling time. 🙂 And I do recommend peeling the skin so it gets pickled nicely. Sorry, you missed the part we have to heat the brine to let the salt dissolved. Was the salt in your brine completely dissolved? Thank you so much for trying my recipe! Hope you enjoy cooking more Japanese food at home!
[…] Shiozuke (塩漬け) – salt […]
[…] I recommend getting a kitchen scale (I’ve been using this kitchen scale which cost me $15 on Amazon years ago) and measure correctly when you make miso. I usually use the gram measurement for my baking and other traditional Japanese recipes like Tsukemono. […]
[…] I recommend getting a kitchen scale (I’ve been using this kitchen scale which cost me $15 on Amazon years ago) and measure correctly when you make miso. I usually use the gram measurement for my baking and other traditional Japanese recipes like Tsukemono. […]
Thank you for sharing! These tips and tricks are so helpful. I can’t wait to try it out!!!
Hi Kaitlin! Thank you so much for your kind words. Hope you enjoy the recipe!
Thank you very, very much. I realized all the mistakes I was making when I tried to pickle my vegetables. I julienned all vegetables before pickling and got mixed results. Liked the carrots, hated the eggplant and was ambivalent about the cucumbers. Now I know why. You also cleared up my questions about the pickling solution. Thanks again. I will certainly try out your recipe once my back gets better.
Hi Vic! I’m glad this post was helpful. Thank you for your kind feedback. 🙂 Just to be clear, for Asazuke (only pickle for short time), cutting vegetables into julienne pieces is okay (speeding up process). However, when you pickle for longer than a few hours, more open surface can be too much with a stronger brine and/or longer pickling time. 🙂
Everyone has a different preference when it comes to saltiness and texture of the vegetables, so play around with the % of brine and pickling time for each vegetable. Have fun!
Hi Nami,
I want to try pickling the vegetables, however I am a bit confused how to store them for 4 days?
Lets say I pickle them in the 5% brine for 8 hours and then I remove them. Can I keep them in a container without the brine? I think if I leave it too long it will get too salty?
Hi Tamas! I’m so sorry for my late response. Yes, that’s correct. You have to remove from the brine (actual pickling time is finished after 8 hours). Then you can keep for 4 days in the fridge. 🙂
Your recipe is always great. Thank you for sharing. I am in Kyoto now. I am trying all the Kyoto cuisines. Too beautiful to eat. Too delicious to touch.
Hi Jean! Thank you for the kind words! Hope you enjoy(ed) your trip to Kyoto! It must be so cold! 🙂