Who can resist delicious crispy homemade vegetable tempura? When making tempura at home, the goal is a crispy yet airy coating that doesn’t absorb oil when deep-fried. I’ll teach you how to achieve excellent results in this recipe.
Alongside sushi and ramen, tempura is another mandatory menu item for Japanese restaurants. Encased in a crunchy, crispy yet light batter, these perfectly deep-fried seafood, and vegetable are seriously addicting.
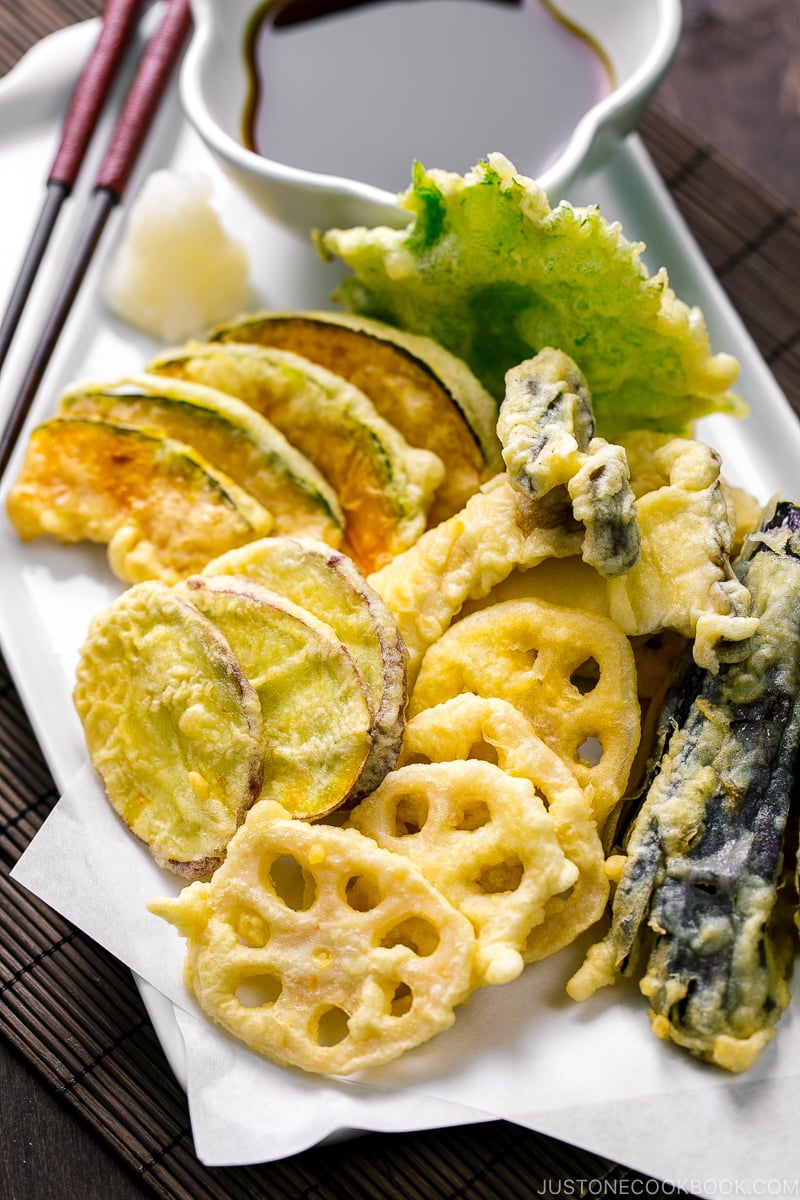
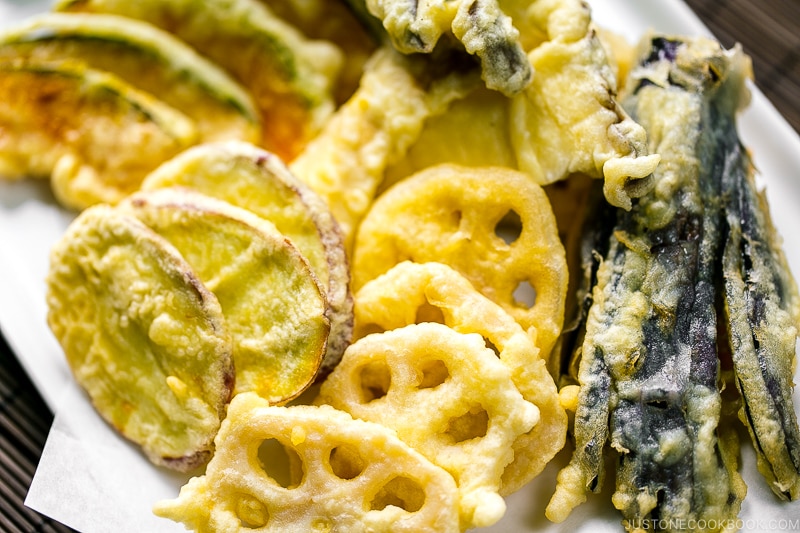
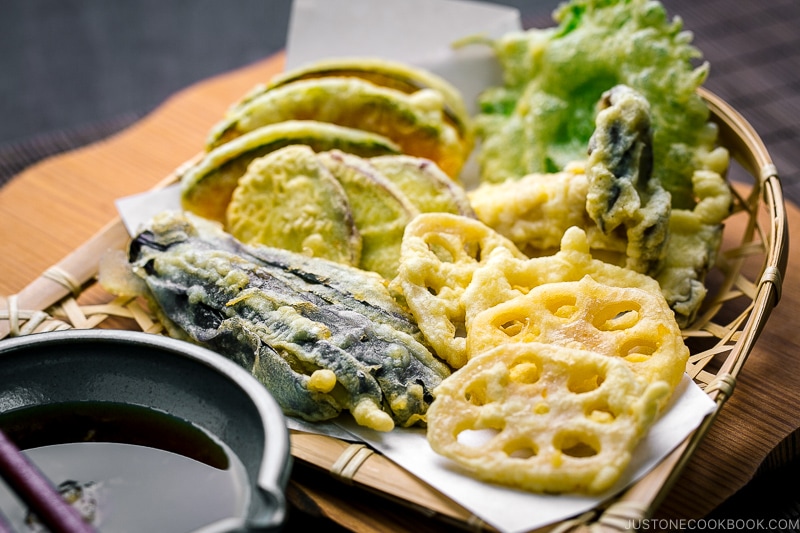
After sharing my Shrimp Tempura recipe, I am excited to share today’s recipe on Vegetable Tempura (野菜の天ぷら) since many of you have requested it. Dipped in batter and deep-fried, each vegetable gets cooked perfectly on the inside, while the natural sweetness and flavor are enhanced. You would enjoy them piping hot with a delicate dipping sauce with grated daikon.
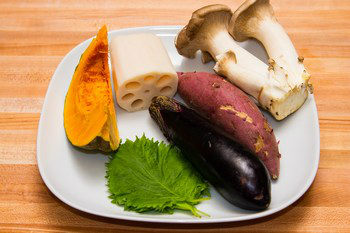
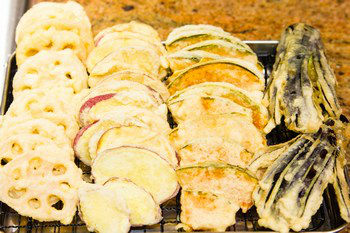
Some of the common vegetables used for Tempura include Japanese sweet potatoes, mushrooms (shiitake or king oysters are delicious), Kabocha squash, bell peppers, lotus roots, and eggplant. When I make vegetable tempura at home, I also like to include shiso leaves as well.
Table of Contents
The Key for Perfect Vegetable Tempura
Before I start talking about how to make Tempura, please understand that even for the Japanese, making perfect Tempura is not easy. It requires a lot of skills and practice so don’t be discouraged if your first tempura does not look like ones from restaurants. But how do you get that crispy texture without the food being too oily?
The key to perfect tempura is the batter and the temperature of the oil. I created a few steps below to go over the tips for making tempura.
Vegetable Tempura Cooking Tips
How to Make Tempura Batter
Most of Tempura chefs recommend that flour to water ratio should be 1:1. Some recipe requires an egg (or two depending on the amount of flour and water), and some don’t. It’s up to you. When the batter is too thin, the ingredients won’t have much of batter around it and there is no fluffy and crisp texture to it. When the batter is too thick, you feel like you are eating the chewy exterior.
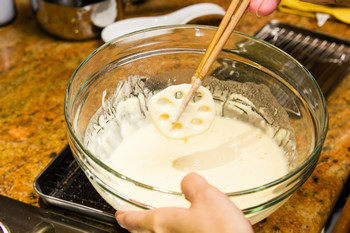
Please remember a few tips about the batter. Always mix the batter using chopsticks for only a few seconds to at most 1 minute, leaving lumps in the mixture on purpose. Overmixing the batter will result in the activation of wheat gluten, which causes the flour mixture to become chewy and dough-like when fried.
The cold batter is absolutely necessary for the unique fluffy and crisp tempura. All the ingredients (water, egg, and flour) must be cold prior to making the batter, and it has to be made RIGHT BEFORE you deep fry and has to be kept cold at all times to avoid activation of wheat gluten.
What Oil To Use for Tempura
The Tempura specialty restaurant uses untoasted sesame oil (clear) or a special blend of oil that is a combination of many kinds of oil. Each restaurant has its own secret recipe and blends that they perfected over the years. At home, you can simply enhance the flavor by adding sesame oil into the vegetable oil.
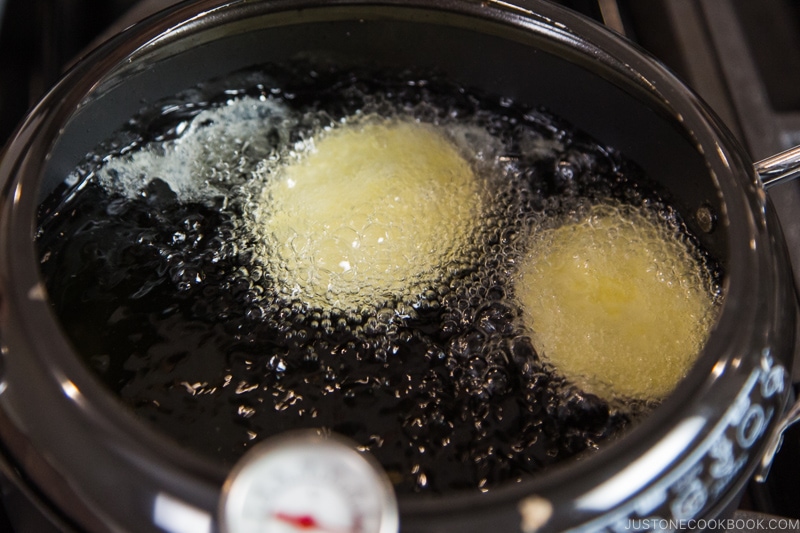
The temperature has to be between 320-356°F (160°C – 180°C) depending on how long it takes to cook through the ingredients. If it takes a long time to cook, then deep fry at a lower temperature because high temperature will cook the batter too fast and inside won’t be cooked thoroughly. And remember, cold battered ingredients will lower the oil temperature quickly; therefore, if you need to deep fry vegetables at 338°F (170°C), you need to bring the oil to 356-365°F (180-185°C) first.
How to Deep Fry Tempura
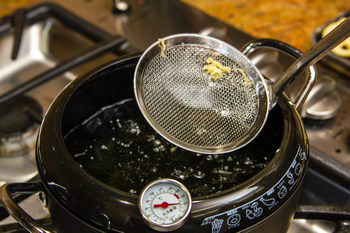
If you ask me what’s the most difficult part of making Tempura, I’d say it’s to keep the right temperature at all times while deep frying. It cannot be too high or too low. Most of the time I do not require a thermometer, but if you are not used to deep frying, I highly recommend you get a thermometer to precisely know at what temperature you are deep frying. The right sound of tempura being deep-fried is like a light sound. Like cider just being opened. That kind of light bubbly sound.
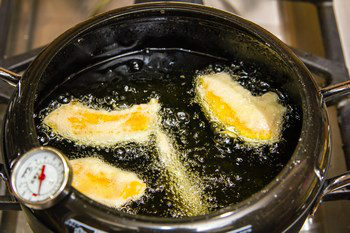
In order to maintain the correct temperature, do not overcrowd with ingredients when deep frying. As guidance remember just half of the oil surface should be covered with ingredients. When you put too many ingredients in at once, the oil temperature will drop too quickly.
What if the oil gets too hot? The quick solution to this is to add a bit of extra oil or add more cold-battered ingredients. As I said, it is all about temperature control when deep frying.
Lastly, please pick up crumbs in the oil between batches. The burnt crumb will attach to your new tempura if you don’t pick them up, and oil will get darker once the crumbs become burnt and it leaves a bad flavor in the oil.
Other Tempura Recipes
Wish to learn more about Japanese cooking? Sign up for our free newsletter to receive cooking tips & recipe updates! And stay in touch with me on Facebook, Pinterest, YouTube, and Instagram.

Vegetable Tempura
Ingredients
- 1 Japanese sweet potato (Satsumaimo) (unpeeled)
- ⅛ kabocha squash (unpeeled and seeded)
- 2 inches lotus root (renkon) (peeled and precooked; I used boiled lotus root (renkon no mizuni) from a Japanese grocery store)
- 2 king oyster mushrooms (eringi)
- 1 Japanese or Chinese eggplant
- 4 shiso leaves (perilla/ooba)
For the Batter
- 1 cup all-purpose flour (plain flour) (chilled; please weigh your flour; click the Metric button for weights; or learn how to measure flour with a measuring cup)
- 200 ml iced water (¾ cup + 4 tsp)
- 1 large egg (50 g each w/o shell) (chilled)
For the Dipping Sauce (Tentsuyu)
- ¾ cup dashi (Japanese soup stock) (use standard Awase Dashi, dashi packet or powder, or Vegan Dashi)
- 3 Tbsp soy sauce
- 2 Tbsp mirin
- 2 tsp sugar
For Deep-Frying
- 4 cups neutral oil (or enough for 1½ inches (3 cm) of oil in the pot; you can substitute a 10-to-1 ratio of neutral oil to sesame oil)
- all-purpose flour (plain flour) (for dusting the shiso leaves)
For Serving
- 2 inches daikon radish (grated)
Instructions
Before You Start…
- I highly encourage you to weigh your ingredients using a kitchen scale. For weights, click the Metric button above to convert the measurements to metric. If you don't have a scale, here's how to measure flour with a measuring cup: Fluff the flour with a spoon, sprinkle it into the measuring cup, and level it off. Otherwise, you may scoop more than you need.
To Make the Dipping Sauce (Tentsuyu)
- Gather the sauce ingredients.
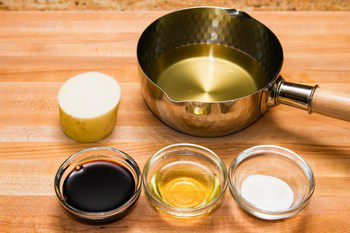
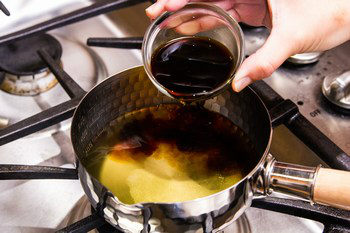
- Combine ¾ cup dashi (Japanese soup stock), 3 Tbsp soy sauce, 2 Tbsp mirin, and 2 tsp sugar in a small saucepan and bring it to a boil. Then, lower the heat and let it simmer until the sugar dissolves. Remove from the heat and set aside.
To Prepare the Vegetables
- Gather the vegetables for the tempura.
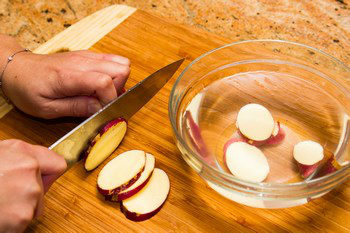
- Slice 1 Japanese sweet potato (Satsumaimo) into ¼-inch (6 mm) rounds and soak in water for 15–30 minutes to remove the excess starch. Then, pat dry with paper towels. Tip: For crispy tempura, make sure the vegetables are completely dry. Excess moisture will make the tempura soggy.
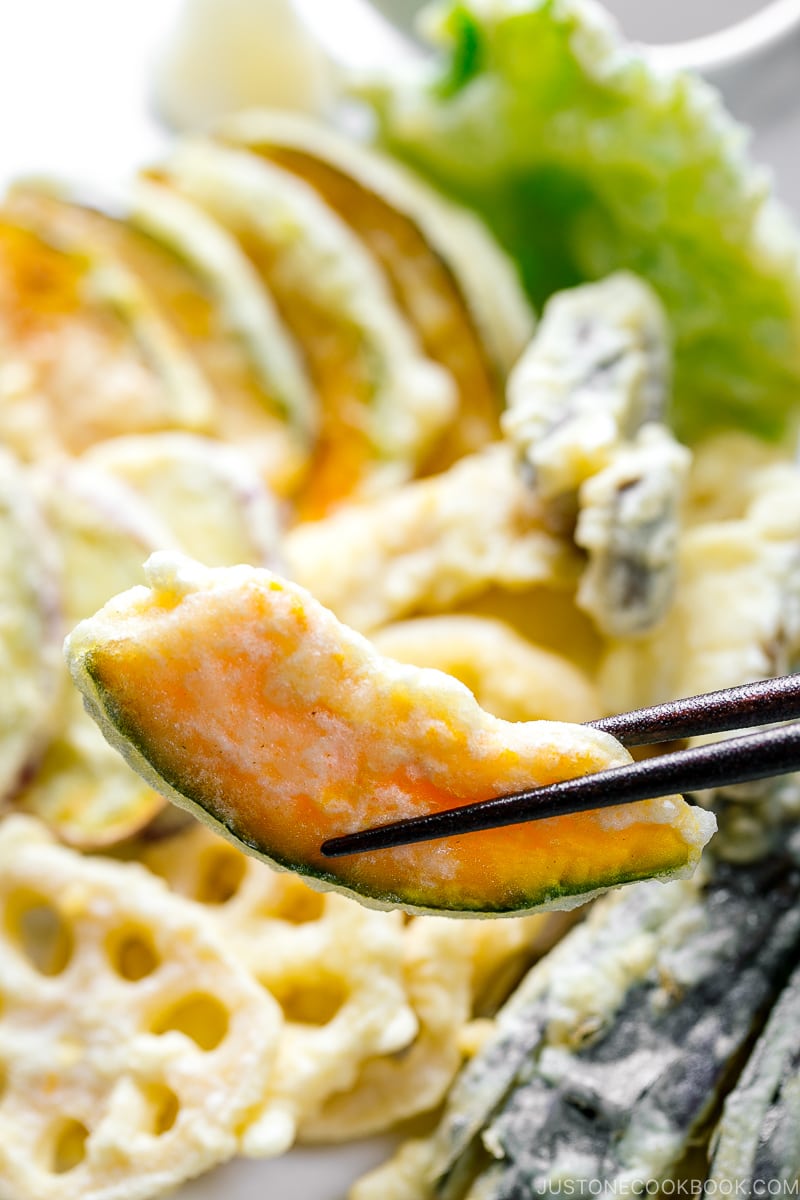
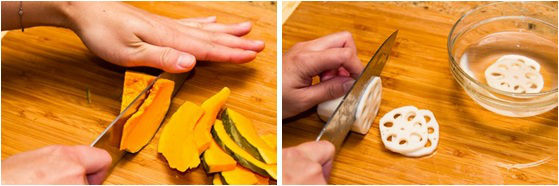
- Cut ⅛ kabocha squash and 2 inches lotus root (renkon) into slices ¼ inch (6 mm) thick. Soak the lotus root in vinegared water (2 cups water + 1 tsp vinegar) for 5 minutes. Pat them dry with paper towels.
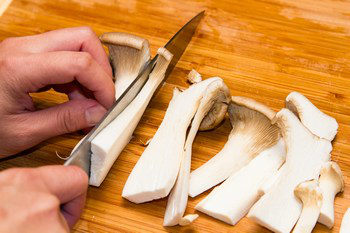
- Cut 2 king oyster mushrooms (eringi) lengthwise into thin slices.
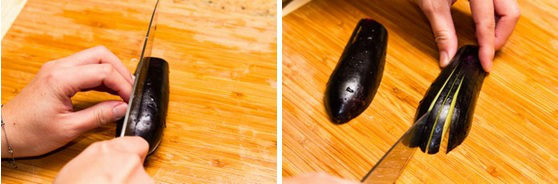
- Set aside 1 Japanese or Chinese eggplant for now; prepare it immediately before you deep-fry it. When ready, cut off the stem and calyx, then cut in half lengthwise. Place them cut side down on the cutting board. Leave the top 1 inch (2.5 cm) of the stem end intact so the eggplant stays attached, and cut the rest of it lengthwise into thin slices about ⅛ inch (3 mm) thick. Then, gently press down on the slices to fan them out. Keep the 4 shiso leaves (perilla/ooba) whole.
To Heat the Oil
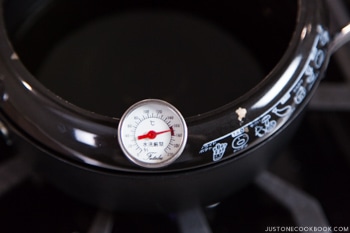
- Once you've prepared the ingredients, add about 4 cups neutral oil to a depth of 1½ inches (3 cm) to a deep fryer or pot and preheat it to 320°F (160°C). Use an instant-read thermometer for precise temperature control. To check with wooden chopsticks, dip them in the oil; when small bubbles form around the tips, the oil is ready. Tip: For enhanced aroma and taste, I like to add 1 part sesame oil for every 10 parts neutral oil.
To Make the Batter
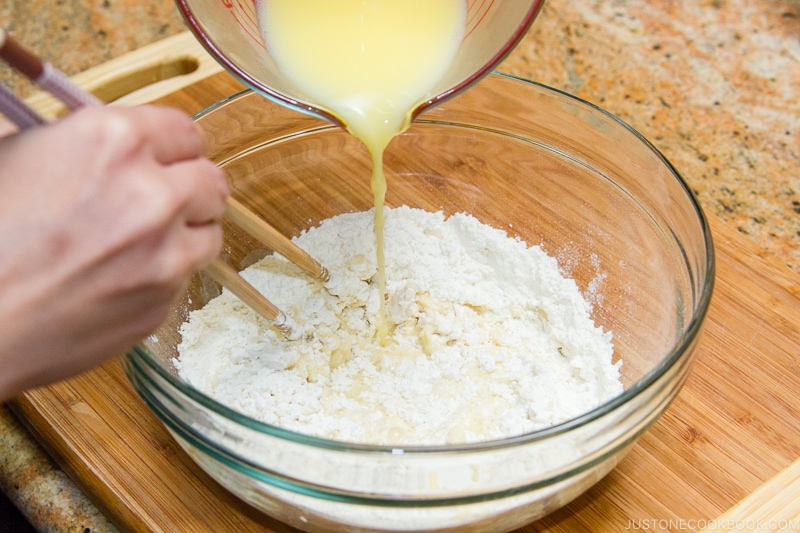
- While the oil is heating up, prepare the tempura batter. We‘ll use a 1-to-1 ratio (by volume) of flour to egg + water. Gather all the ingredients.
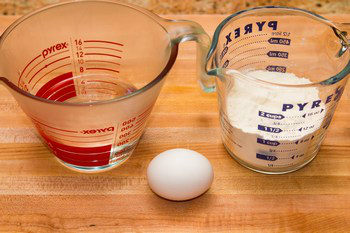
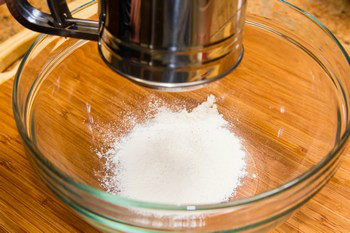
- Sift 1 cup all-purpose flour (plain flour) into a large bowl.
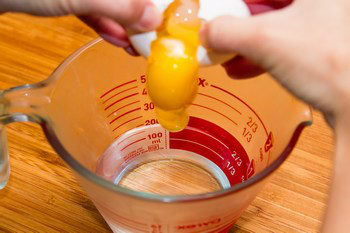
- Add 200 ml iced water to a measuring cup or bowl. Then, add 1 large egg (50 g each w/o shell).
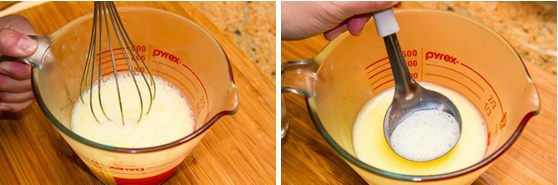
- Whisk the egg and water mixture vigorously and discard the foam on the surface.
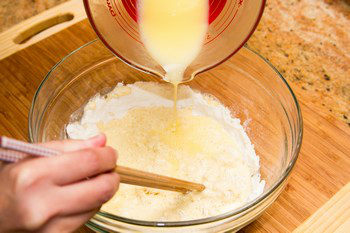
- Slowly pour the egg mixture into the flour while mixing with chopsticks in a figure 8 pattern for about 15–20 seconds. Do not overmix to avoid activating the wheat gluten; it‘s fine to leave some lumps in the batter. Keep the batter cold at all times by adding 1–2 ice cubes to the batter or by setting the batter bowl in a larger bowl of iced water.
To Deep-Fry
- When the oil is heated, deep-fry the sweet potato and lotus root (the root vegetables) at 320°F (160°C) for 3–4 minutes until lightly golden. Dip one piece in the batter, let the excess drip off for 1–2 seconds, and gently place it into the hot oil. Fry in batches and do not crowd the pot. Clean the oil of fried crumbs between batches. Maintain the right temperature at all times. Tip: Your ingredients should take up no more than half of the oil's surface area because the temperature will drop quickly if you add too much food at once. For more helpful hints, read my post on how to deep-fry food.
- Between batches, use a fine-mesh skimmer to remove the tempura crumbs from the oil, which will burn and turn the oil darker. Continue frying until you‘ve cooked all the ingredients.
- Next, raise the oil temperature to 338–356°F (170–180°C) and deep-fry the kabocha, eggplant, and mushrooms for 1–2 minutes. Dip and add one piece at a time. Fry in batches and maintain the target oil temperature.Finally, deep-fry the shiso leaves for 15–20 seconds. To batter them, sprinkle a bit of sifted all-purpose flour (plain flour) on the back of the leaves and dip only the back of the leaf into the batter. Tip: The extra flour acts as a glue that helps the batter adhere to the shiso leaf.
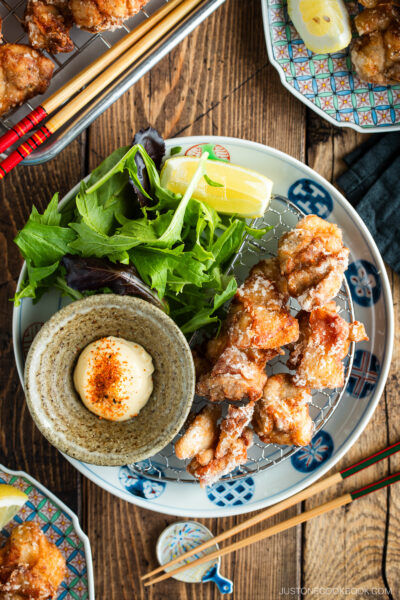
- Deep-fry until lightly golden. Transfer to a wire rack or paper towel to remove the excess oil.
To Serve
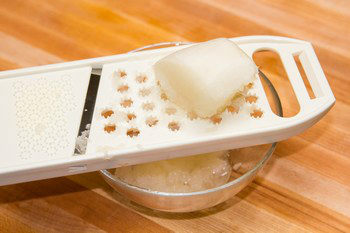
- Peel and grate 2 inches daikon radish and gently squeeze out some of the liquid.
- Prepare 3–4 Tbsp of warm tentsuyu in each individual dipping bowl with 1 Tbsp grated daikon per serving on the side. Serve immediately. Mix some grated daikon into the dipping sauce for a refreshing taste and dip the tempura pieces to enjoy.
To Store
- Place the leftover tempura in a single layer between paper towels and store in an airtight container or a resealable plastic bag. Freeze up to 2 weeks. To reheat, place on a wire rack in a 400ºF (200ºC) oven or toaster oven for 5 minutes or until crisp on the outside and heated through. If you have unused dipping sauce, you can store it in the refrigerator for up to 1–2 weeks.
Nutrition
Editor’s Note: The post was originally published on Jan 20, 2013.


Do you blanch the sliced lotus, pat dry before deep frying? Thanks…
Hi Judy! Thank you for trying Nami’s recipe!
You do not need to blanch fresh lotus roots. You can peel and slice them, then follow the recipe.
We hope this helps!
Great recipe! I made this for our vegan friends, so I omitted the egg in the tempura batter. I was reading around the internet and saw a number of recipes call for soda water – since my batter was egg-less I thought I’d give it a try. It worked well!
For those who did not read Nami’s preamble, a dash of toasted sesame oil in the frying oil was a wonderful addition.
Hi Eric! Thank you very much for reading Nami’s post and sharing your cooking experience and tip with us!
We are glad to hear the soda water trick worked very well!😀
Hi, Nami , we recently did tempura vegetables , we used cauliflower florets , white mushrooms and sweet potato slices . I didn’t use your recipe , we used Obento flour with water only and it came out very similar to your guidance . Thanks for your tips on techniques though.
Hi Adrian! Thank you very much for reading Nami’s post!
We are glad to hear Nami’s tips and cooking techniques helped make delicious Tempura!
The premixed Tempura flour usually contains corn starch, and the result might be slightly different from just using the all-purpose flour (plain flour).
We hope you give this recipe a try one day.🙂
How do I cook tempura in my air fryer?
Hi Louise! Thank you very much for checking Nami’s recipe!
The Tempura batter is very watery, so we don’t think this recipe will work well with an air fryer.
You may try thickening the batter, but the texture of the tempura will be different. If you try it, let us know how it goes!
Greetings Nami! Have to say I love all the recipes. I have a question about using Lotus Root for tempura, the only way I could get it was fresh, do I need to slice and boil it before using it for tempura or can I just peel and slice then use flour and the batter straight into the fryer?
Hi Jason! Thank you very much for trying Nami’s recipe and for your kind feedback!
Nami and JOC team are glad to hear you love all the recipes from our site!🥰
To use fresh Lotus Root, please peel and slice them. And soak lotus root in vinegar water (2 cups water + 1 tsp vinegar) for 3~4 minutes. Please make sure to dry them with paper towels before putting them in the tempura batter.
We hope this helps!
Hi Nami. Can you please post an air fryer version of the tempura ? Thanks 🙏🏼!!
Hi Gina! Thank you very much for reading Nami’s post!
Tempura batter uses a wet batter, so it’s impossible to use an oven or air fryer to solidify the wet batter instantly.😞
We hope we can find a better trick.
I love tempura.
And I like experiments in the kitchen, so I tried celery – stalks in 0,5 cm stripes and also leaves. And it came out great! It’s worth trying.
Hi Anna, Thank you very much for sharing your cooking experience with us! We have never tried making tempura with Celery before, so this is something new to us.😀
Hi Nami,
I love Tempura (and your recipes), but I am very uncomfortable with a vat full of boiling oil (frying not really a thing in my family). I am guessing an air frier is not a possible replacement?
Kind regards
Helen
Hi Helen, The Tempura batter is very watery, so we don’t think it will work well with an air fryer. You may try thickening the batter, but the texture of the tempura will be different. If you try it, let us know how it goes!
I tried this tonight. Loved it. Thank you
Hi Kristine,
Thank you very much for trying this recipe and for your kind feedback!
We are so happy to hear you loved it!☺️
Hey girl hope you and your family are doing well. I was wondering about making tempura wakame?
Hi, 渓愛中村
You may use Wakame for this recipe as well.
Please make sure to dry them with a paper towel before dredging in the batter.😉
Can I use dried wakame or do I need to reconstitute it before hand?
Hi, 渓愛
If it’s dried Wakame, you need to reconstitute first. You may also use fresh Wakame. ☺️
Great recipe with awesome results on the first try. I used lotus root, pumpkin, zucchini, zucchini blossoms, and oyster mushrooms. The zucchini blossoms were definitely a highlight, both visually and taste-wise. Extra compliment for the batter recipe adapted to grams and the very useful note to use the same *volume* of water and flour. Otherwise I would have used the same weight with undoubtedly interesting yet inedible results. In case you ever re-work this recipe again, I would like to suggest including a printable table for all usual tempura suspects with notes on how thick to cut them, and how long to deep-fry at which temperature.
Hi Olesya! Thank you so much for your kind and detailed feedback and I always want to make a pdf of tips etc… something to think about for the future update. Thanks for the idea!
want to make yellow squash in tempura should i bake the squash for about 5 to 7 minutes first
Hi Brian! No, you do not need to do that. Thinly slice it (about 7 mm) and deep fry. 🙂
I bought raw lotus root, because I want to make Renkon chips. To prepare the lotus root for Tempura how long should it be boiled for? Thank you.
Hi Wesley! Until the skewer goes through. That way, you can just deep fry it quickly to cook the batter, but not the lotus root. 🙂
Dear Nami
Thank you so much for this recipe. I have made tempura before and never really thought it matched what I had in top rated restaurants but this came out perfectly first time. Your clear instructions and tips made it very easy.
I would like to make this for friends but one who especially loves Japanese food is celiac and I was wondering if I could substitute rice flour (or another flour) for the wheat flour and would the proportions be the same?
Thanks again for the great website I will be returning for more inspiration.
Hi Graham! I’m so happy to hear your tempura came out well! AWESOME!!! Thanks for your kind feedback. It made me happy!
Oh please make this Gluten-Free Tempura! We love it as much as regular tempura. I hope your friend will enjoy it too!
https://www.justonecookbook.com/gluten-free-tempura/
Can the soaking of the vegetables be done in advance? Thank you!
Hi Mar! Yes, you can do that. 🙂