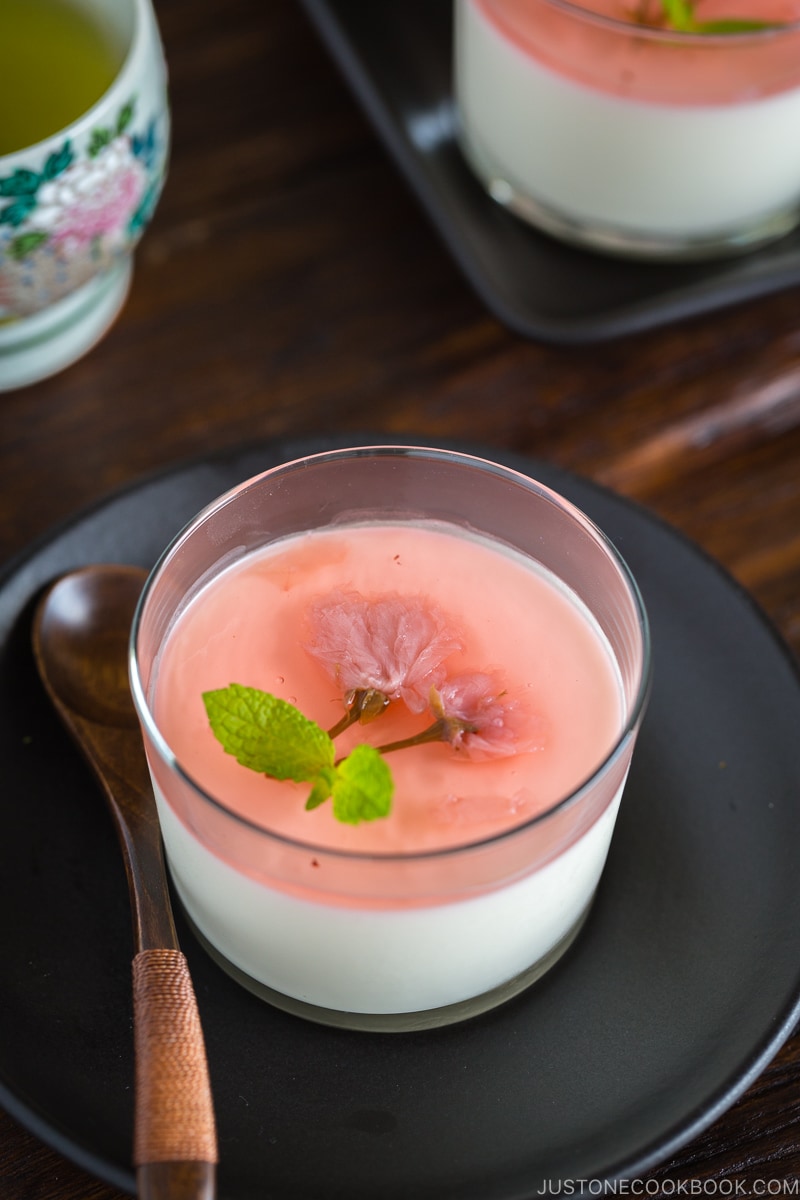
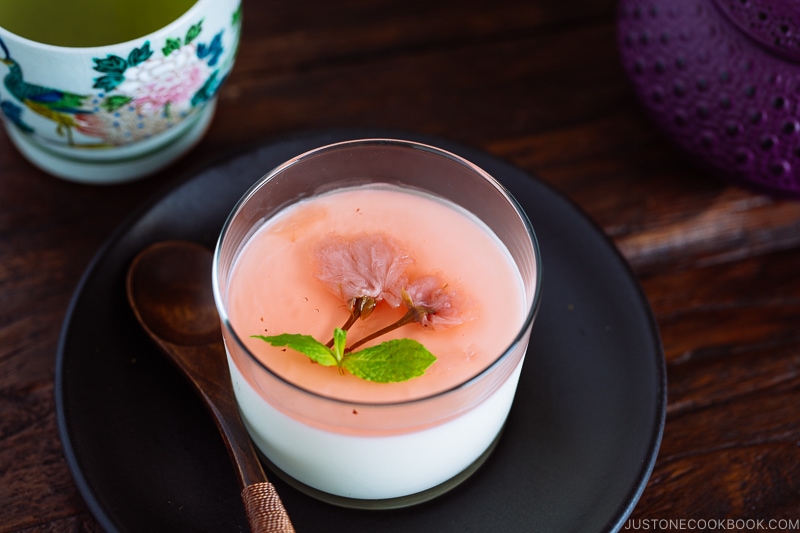
Celebrate Japan‘s sakura season with this delectable Cherry Blossom Milk Pudding. Topped with a delicate pink layer of cherry blossom jelly, this soft and silky pudding simply melts in your mouth.
It’s the cherry blossom season! According to the cherry blossom forecast, Tokyo is having cherry blossom in full bloom today! I made a cherry blossom milk pudding (桜ミルクプリン) to celebrate spring and to enjoy the short cherry blossom season, which usually lasts only 1-2 weeks.
If you plan on visiting Japan, I highly recommend visiting during the cherry blossom season between the end of March to the beginning of April (it’s hard to predict when it’ll exactly happen each year) or fall. The weather is nice and it’s just a beautiful time to sightsee.

Silky, Light and Not-So-Sweet Cherry Blossom Milk Pudding
My family loves this milk pudding that I make with fruit jelly (or Americans would say jello) on top. I sometimes make plain milk pudding and serve with seasonal fruit compote.
“Milk” pudding is made with just a few simple ingredients, milk, heavy cream, and yogurt. I highly recommend getting full-fat milk, heavy cream, and full-fat yogurt for the ultimate milk pudding. I used low-fat yogurt this time and the result also turned out really well. I’ve been using this ratio of milk/heavy cream/yogurt for a long time since we really love it, but you’re welcome to experiment and play around with ratio to your liking.
My Favorite Gelatine Sheet
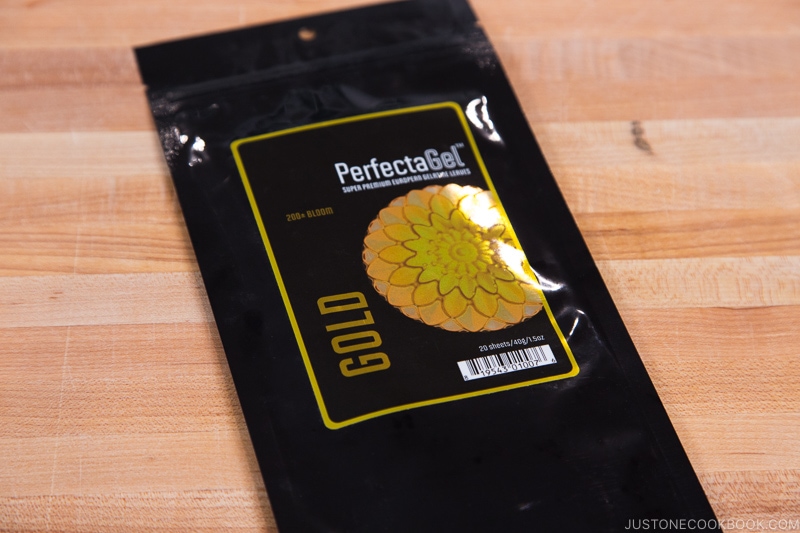
Ever since I discovered gelatin sheet/leaf (read this post), I haven’t used the stinky gelatin powder. This German brand from Amazon works amazingly. No smell at all (maybe a tiny bit if you’re super sensitive) and it is much more pleasant to make gelatin desserts these days. I highly recommend!
Edible Salt Pickled Cherry Blossoms
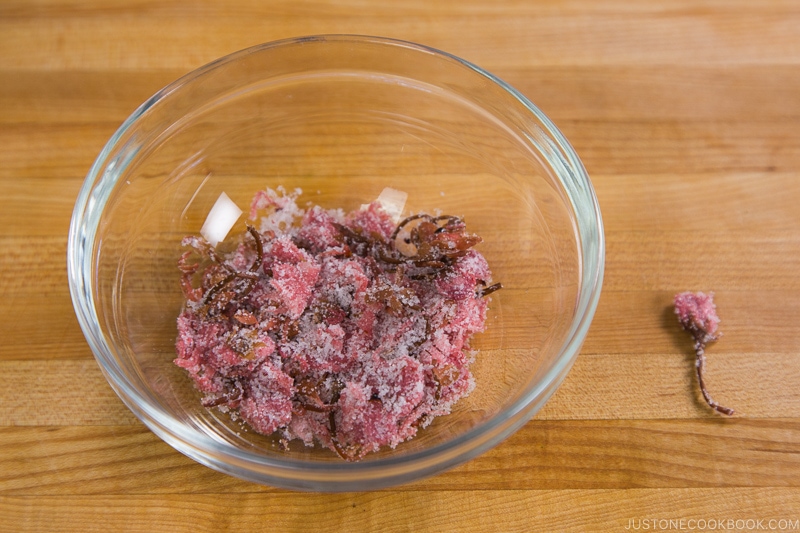
Last summer when I was in Japan, my high school friend gave me a care package of Japanese ingredients that she thought I would enjoy. She loves cooking too, so the box has a lot of cool ingredients that I can’t easily get in the U.S. One of them was salt-pickled cherry blossoms.
I actually forgot about them until a few weeks ago! The cherry trees in our backyard had bloomed already in warm California back in February, but it’s a good thing I found them before everywhere else has a cherry blossom season. 🙂
How To Make Them?
Salt Pickled Cherry Blossoms are made with Yaezakura (八重桜). You’ll need to carefully handpick tender young buds, washed, drained/dried, sprinkle salt over the flowers (about 1 cup salt for 10 cups of flowers), and put weight on top. Next day, you will squeeze out and discard brine, and submerge the flowers in ume plum vinegar (梅酢) and let them sit for about 3 days. Finally, let them dry in a single layer for 3 days in the shade or until they are completely dry. To preserve, pack them in a jar with salt (about 1:1 ratio). This way, they can keep for one year.
Where To Buy Them?
Too much work to make salt pickled cherry blossoms from scratch? Or there are no cherry blossoms around you? Don’t worry, you can purchase these salt-pickled cherry blossoms from this Japanese online store that ships internationally (this company also sells them on Amazon), or another brand on Amazon. You might be able to find it at Japanese grocery stores when in season. You can also purchase it from Weee!
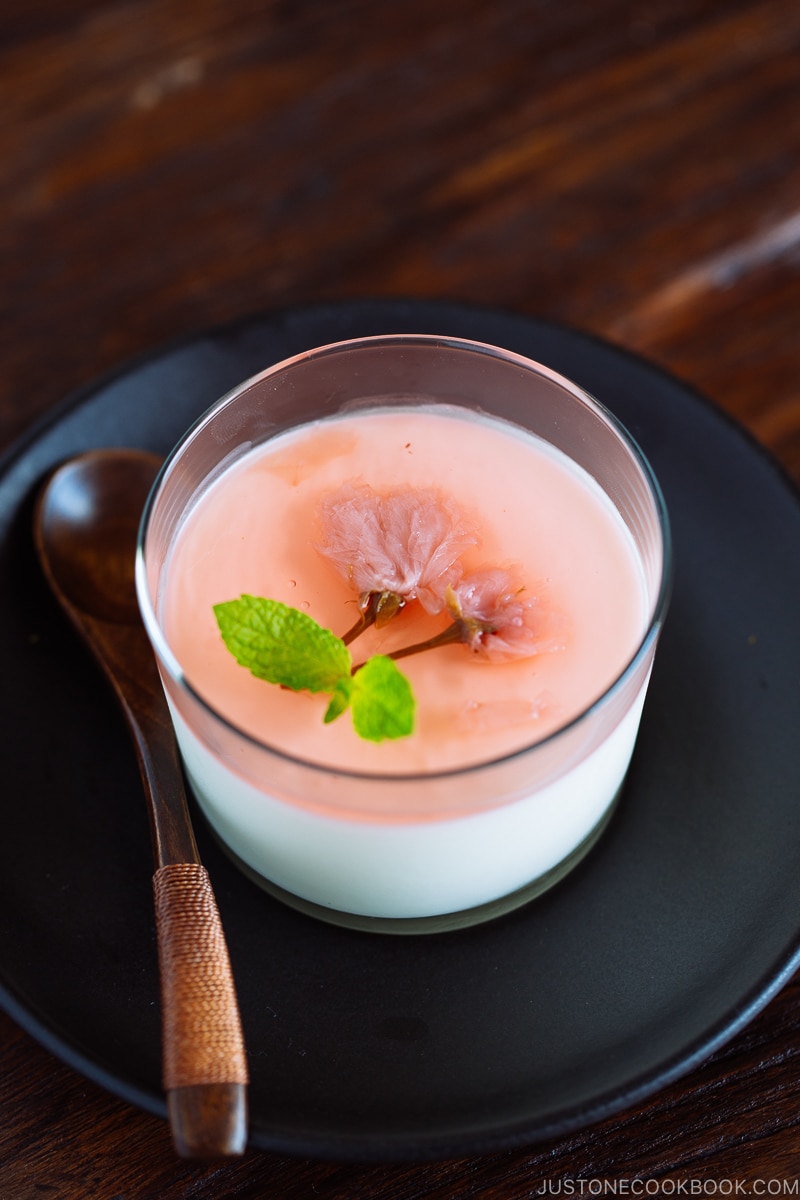
Creamy Cherry Blossom Milk Pudding with Sakura Jello on Top
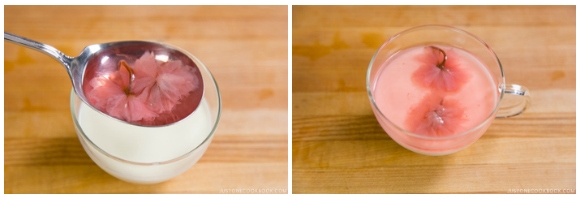
I am usually not very proud of my desserts, but I would say this is probably one of the most beautiful desserts I make at home. So what does this pretty dessert taste like, you might wonder? The bottom milk pudding part is very similar in texture and flavor to panna cotta. To celebrate cherry blossom season, I made pink cherry blossom jelly to go on top.
The top layer is both sweet and a bit salty from the salt pickled cherry blossom, and the combination of salty cherry blossom jelly, creamy and gently sweet milk pudding is a match made in heaven! You can definitely try making different flavors to go on top of the milk pudding base, let me know what you made and what combinations taste good.
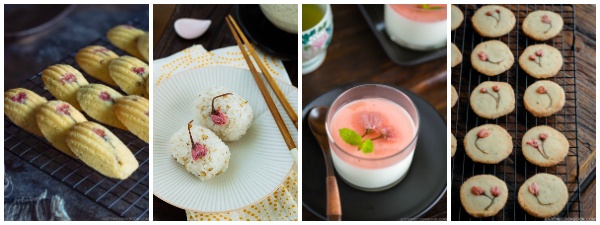
Recipes Using Salt Pickled Cherry Blossoms
Use salt pickled cherry blossoms this spring to make these delicious and pretty recipes! Happy spring!
Wish to learn more about Japanese cooking? Sign up for our free newsletter to receive cooking tips & recipe updates! And stay in touch with me on Facebook, Pinterest, YouTube, and Instagram.

Cherry Blossom Milk Pudding
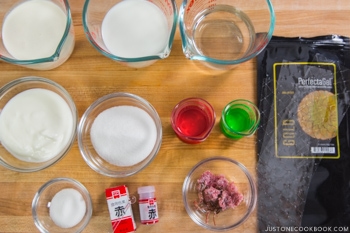
Ingredients
For the Milk Pudding
- 2 gelatin sheets (5 g)
- 3 Tbsp hot water
- ⅔ cup whole milk
- ⅓ cup sugar
- ½ cup plain yogurt (I used lowfat)
- ¾ cup heavy (whipping) cream
For the Cherry Blossom Jelly/Jello
- 8 salt-pickled cherry blossoms (you can buy them from this online store, which ships internationally)
- 1 gelatin sheet (2.5 g; to set 1 cup (240 ml) of liquid, you will need 2 gelatin sheets; this pudding is softer in texture, not hard set)
- 1½ Tbsp hot water
- ½ cup water
- 2 tsp sugar
- red food coloring (optional)
Instructions
- Gather all the ingredients.

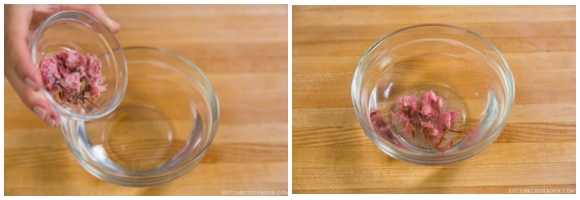
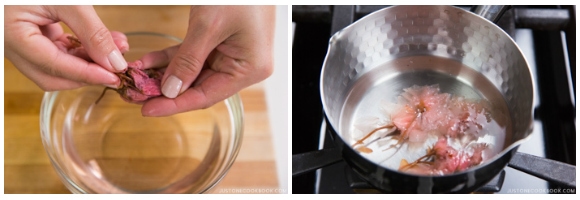
- Put 8 salt-pickled cherry blossoms in a small bowl and add water to cover the flowers. Let them soak for at least 30 minutes to remove the saltiness from the flowers.

To Make the Milk Pudding
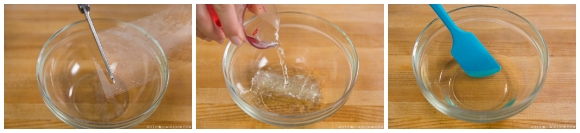
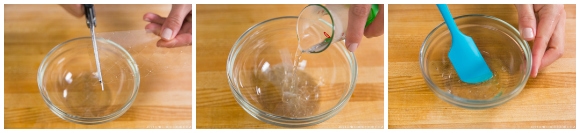
- Cut 2 gelatin sheets into thin strips and put in a small bowl. Pour 3 Tbsp hot water into the bowl and stir until the gelatin has dissolved completely. If it’s not completely dissolved, microwave for 30 seconds and mix.

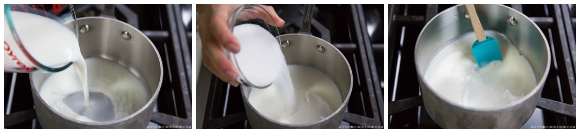
- In a small saucepan, heat ⅔ cup whole milk and ⅓ cup sugar over medium heat. Stir continuously until the sugar has dissolved.
- When the milk is about to boil, turn off the heat (don’t let it boil!) and add the gelatin. Mix well and set aside.
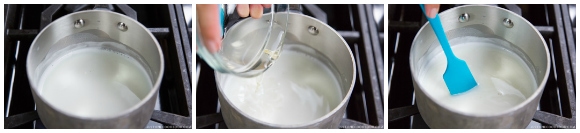
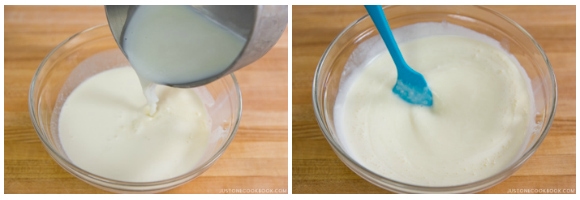
- In a medium bowl, combine ½ cup plain yogurt and ¾ cup heavy (whipping) cream. Mix well to combine.
- Slowly add the milk mixture to the yogurt mixture while you stir.
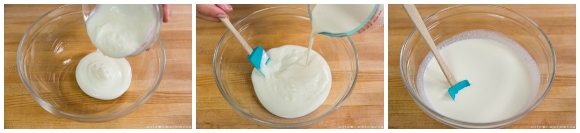
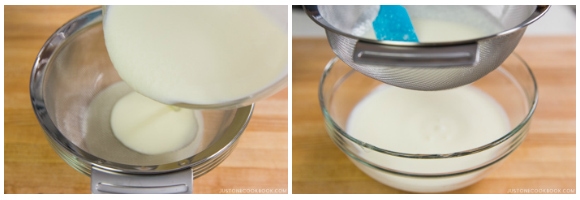
- Strain the mixture through a fine-mesh sieve to achieve silky smooth texture.
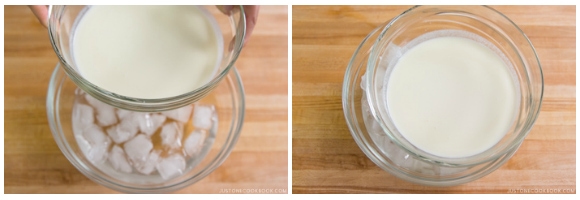
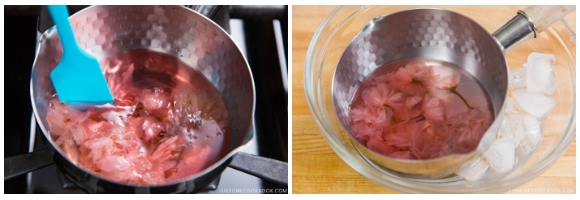
- To speed up the process for solidifying the milk pudding, fill up half of a large bowl with iced water. Place the bowl with mixture in the ice bath. It will take at least 30 minutes until the mixture becomes thicker and syrupy.
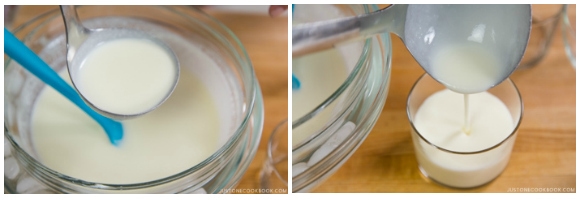
- Once the mixture gets thicker, pour into individual serving cups. Keep them in the refrigerator until the milk pudding sets, about 30–60 minutes.
To Make the Cherry Blossom Jelly/Jello
- Start this process only after your milk pudding has set. Cut 1 gelatin sheet into thin strips and put in a small bowl. Pour 1½ Tbsp hot water and stir until the gelatin is dissolved completely. If it doesn’t get dissolved, microwave it for 20 seconds and mix.
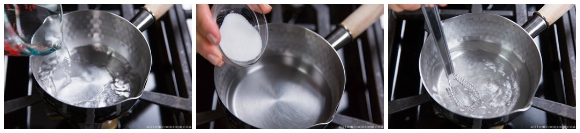
- In a small saucepan, heat ½ cup water and 2 tsp sugar over medium heat and whisk until the sugar has dissolved completely.
- Gently squeeze out the water from the salt-pickled cherry blossoms and add them to the saucepan. Turn off the heat.
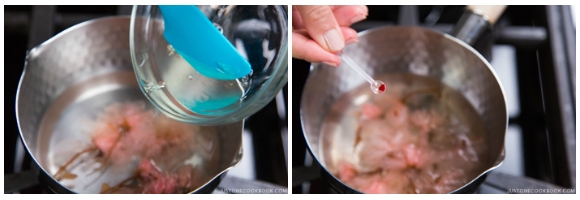
- Add the gelatin and give a quick mix. Then, add a tiny bit of red food coloring. If you want nice light pink color, add only tiny bit. You can always add a little more if you want it to be a darker red.
- Mix well so that the color is evenly distributed. Place the saucepan in an ice bath and let the mixture cool. This will make the mixture syrupy and thick.
To Assemble
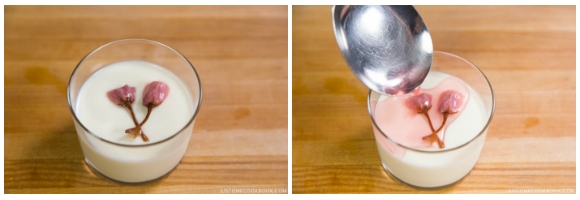
- Once the jelly mixture is slightly thicker, pick up the cherry blossoms by the stems and gently place them on top of the milk pudding in the cups. Pour the jelly mixture on top of the milk pudding to cover the cherry blossoms.
- If you want the cherry blossoms to look bloomed, scoop the flower with the liquid mixture in a big spoon and pour onto the top of the milk pudding.
- Keep in the refrigerator until the top layer is set (about an hour). Garnish the milk pudding with mint leaves and serve it chilled.
Notes
- 1 sheet gelatin = 2-3 g powdered gelatin, or approx 1 tsp
- 3 ½ sheets = approx 1 envelope Knox gelatin
- 4 sheets = approx 1 Tbsp powdered gelatin
- 1 tsp gelatin powder = ½ tsp kanten powder
- 1 tsp gelatin powder = 1 tsp agar powder
Nutrition
Editor’s Note: The post was originally published on March 30, 2016.


Great recipe! Much better than our classical italian panna cotta ❤️
Hello there, Martina! Wow! 😍 You prepared the pudding so beautifully!
Thank you very much for trying Nami’s recipe and sharing your experience and Pudding photos with us.
Question: do you know if this would turn out OK using lactose free whole milk and cream?
Hi Trish, We think it would work. Thank you for trying this recipe!
Is there a specific reason why do you need to wait until the milk pudding mixture gets thicker before pouring it to individual serving cup? Thanks a lot.. tried this and it’s definitely a winner!!
Hi Natalie! It’s faster to chill in the iced bath than putting into the individual containers and let cool and chill in the fridge. You can bring down the temperature of the pudding faster by placing the bowl in the iced bath.