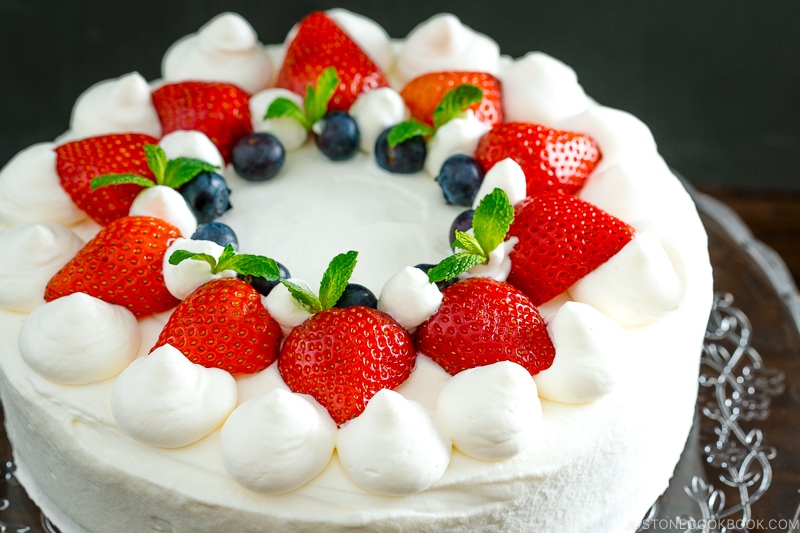
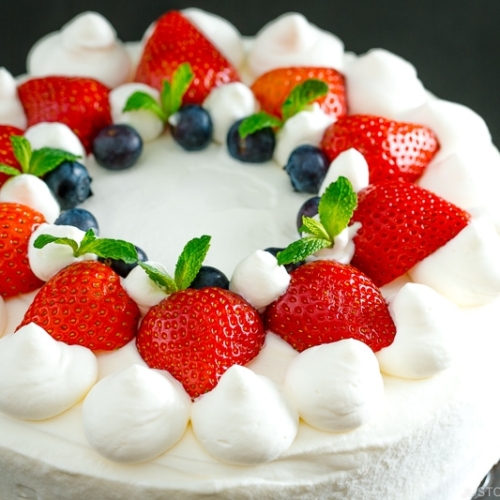
Moist, airy, and light, Japanese Strawberry Shortcake is among the most popular cakes in Japan. This elegant and classic dessert is perfect for any celebration. Here, I share how to keep the sponge cake moist and decorate it with berries and fresh whipped cream.
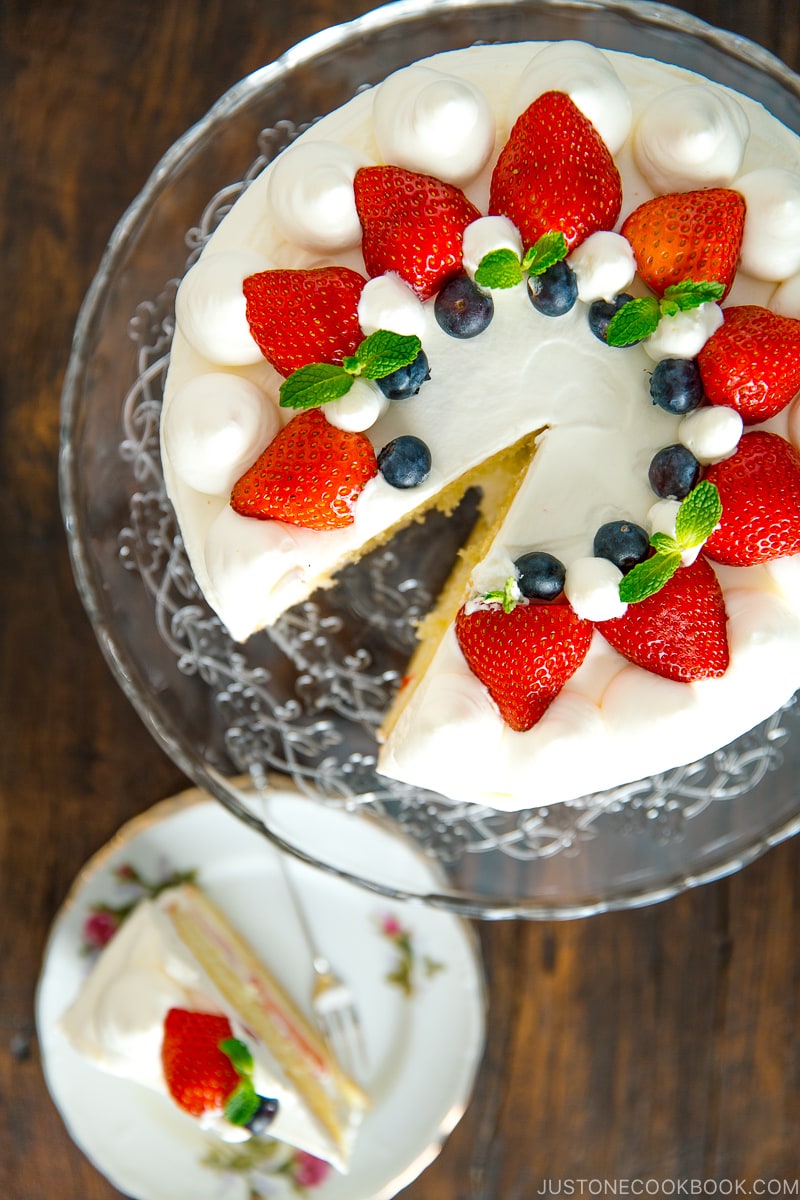
Strawberry Shortcake is probably one of the most popular and classic cakes in Japan. Whether it’s for birthdays, Christmas (did you know this cake is also sold as “Christmas Cake”?) or any type of celebration, we enjoy Strawberry Shortcake all year round. Cakes have such a special place in Japanese culture that we even bring them when we visit friends and family.
If you need a classy dessert to serve at your dinner party or something special for a bridal shower, a beautiful homemade Japanese Strawberry Cake fits the bill for the most special occasions. With some basics from the pantry, this simple yet elegant cake is one to remember when celebration season hits. Or when the strawberry is in season in your area, you have good enough reason to whip up this sweet treat to celebrate. I promise, your guests will fall hard for it!
What is the Japanese Strawberry Shortcake?
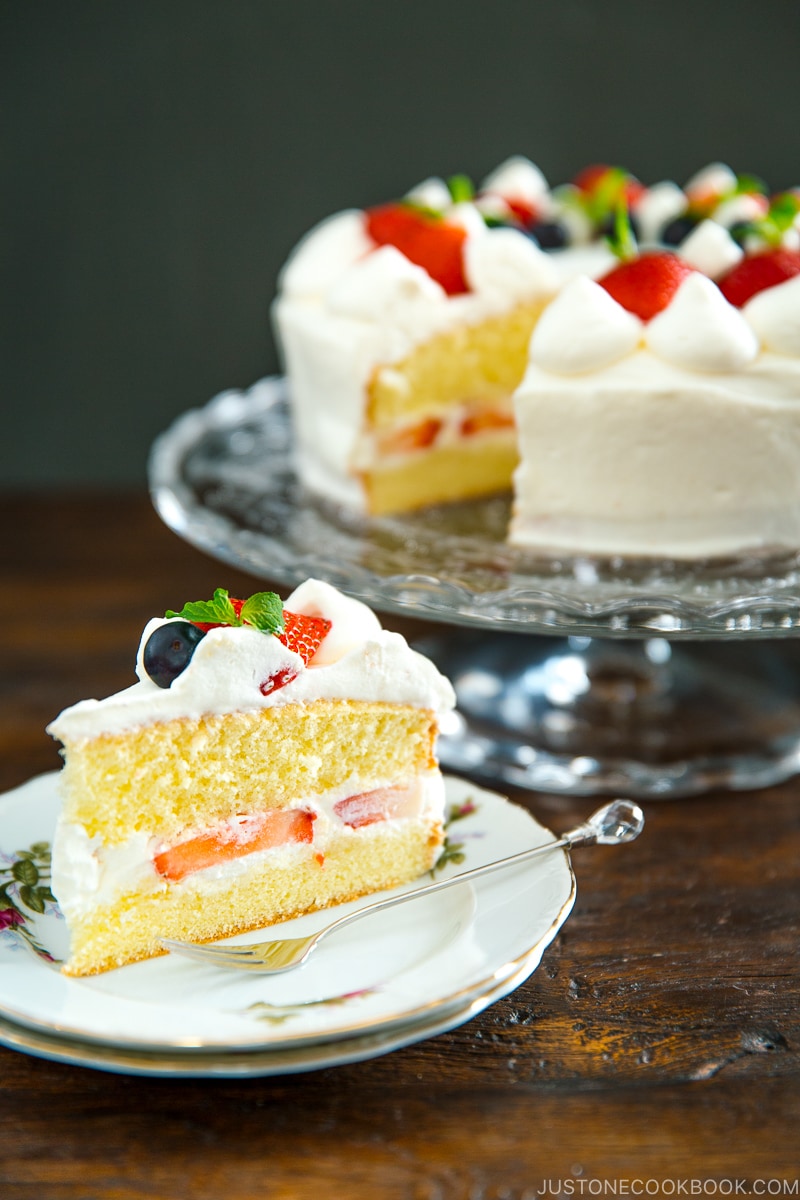
The concept of the Japanese Strawberry Shortcake may have originated in the US with some adaptation. Instead of sweet biscuits, a Japanese strawberry shortcake is made of 2-3 layers of sponge cake, with fresh strawberry slices, whipped cream filling, and whipped cream frosting.
This cake might seem rather simple, yet when all the components are prepared perfectly, it comes together as an amazing dessert.
The majority of recipes for Japanese strawberry shortcakes are very similar, so what makes them different? It all comes down to the various techniques you use when making it. I want to thank my dear friend Naomi for spending hours in my kitchen testing different variations of strawberry shortcake recipes with me. We spent days testing and making so many cakes, and we decided this is by far the best one.
Because this recipe requires detailed explanations, it was impossible for Mr. JOC to take step-by-step pictures AND film the video at the same time. Therefore, we decided to focus on the step-by-step pictures this time because I can’t explain everything in our short video. We’ll add a video for this recipe in the future.
Components of Japanese Strawberry Shortcake
This recipe is probably one of the longest recipes on my blog, with close to 50 steps. I know it’s a bit of an overkill but I really think these step-by-step pictures are helpful and I can explain the step a little more in detail along the way.
Japanese strawberry shortcake consists of 3 components: sponge cake, whipped cream, and strawberries. It’s simple as that. However, creating the perfect sponge cake and whipped cream involves many techniques.
And to make a really good shortcake, precise measurement (please use a kitchen scale and thermometer!) really helps, especially if you don’t bake often.
Sponge Cake
Japanese sponge cake is very moist, airy, light, and it’s not overly sweet. Personally, I think this is the most important part of the cake.
The sponge cake is a genoise cake. It‘s made by beating air into the eggs to make it rise. This replaces a chemical leavening agent like baking soda or baking powder.
The dimensions of the sponge cake we need to consider include sweetness, elasticity, and texture.
The sponge cake cannot be too sweet or else it overpowers the whipped cream and the tartness of the strawberry. The sweetness has to be perfectly balanced with the rest of the cake.
When you bite into the sponge cake, it needs to have some elasticity and firmness of bite. Once again, if it’s too hard or too soft, it ruins the cake.
Lastly and probably the most critical is the texture of the sponge cake. The size of the bubbles within the sponge needs to be consistent. It should not be too rough on the tongue yet it does need some structure so you can feel them. This is probably the part I tested the most to achieve the perfect result.
By the way, if you want to bake a flat cake (my cake is a little curve on the top), I found a great article to solve this problem!
Freshly Whipped Cream
To make fresh whipped cream is not too difficult. Before you begin whipping cream, make sure to chill your bowl and the heavy cream. This allows the cream to stay cold longer during the whipping process. Basically, cream whips better when it’s cold. The temperature affects how long it requires to whip, how light and fluffy it will get, and how long it is likely to stay that way (more science here).
My friend and I have tested the different amounts of sugar and we concluded that 8% of sugar to heavy whipping cream ratio gives perfect sweetness for the cake.
Fresh Strawberries
Fresh strawberries might not be the easiest ingredient to purchase depends on where you live. I know I’m spoiled in California where we literally have strawberries all year round. When you select the strawberries, make sure they are equal in size and not too large so they’ll be more visually appealing.
Last note, since we do not wash the strawberries but clean them with a damp cloth (to prevent them from going bad and adding moisture to the cream.), I do recommend buying organic ones.
Japanese Strawberry Shortcake for the Holidays
After several recipe testings, I am really happy with my results. My friends and family who enjoyed the cake agreed as well. Since then, I’ve served the Japanese strawberry shortcake several times over the holidays and it’s been a huge hit.
The flavor and texture of strawberry shortcake get even better if you let it rest overnight, so it is also a great make-ahead treat.
Wish to learn more about Japanese cooking? Sign up for our free newsletter to receive cooking tips & recipe updates! And stay in touch with me on Facebook, Pinterest, YouTube, and Instagram.
Japanese Strawberry Shortcake
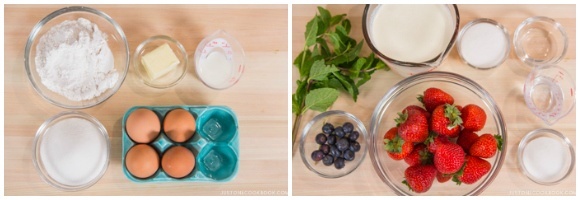
Ingredients
- 1 Tbsp butter (for greasing the pan; or use shortening or cooking spray)
For the Sponge Cake
- 3 Tbsp unsalted butter
- 2 Tbsp whole milk (use whole milk for the best results)
- 4 large eggs (50 g each w/o shell)
- ½ cup sugar (½ cup + 2 Tbsp, to be precise)
- 1 cup cake flour (weigh your flour or use the “fluff and sprinkle“ method and level it off; see Notes for how to make your own cake flour)
For the Syrup
- 2 Tbsp water
- 3 Tbsp sugar
- 1 Tbsp liquor of your choice (optional; I like orange liqueurs like Grand Marnier or Cointreau)
For the Fresh Whipped Cream
- 2 cups heavy (whipping) cream (36% fat; must be at least 30–35% fat)
- 3 Tbsp sugar
For the Decoration
- 1 lb strawberries (for filling and decoration; look for similar-sized strawberries to decorate the cake; buy an extra pack to increase your chances of finding berries of the same size)
- 10 blueberries
- 2 sprigs mint leaves
Instructions
Before You Start…
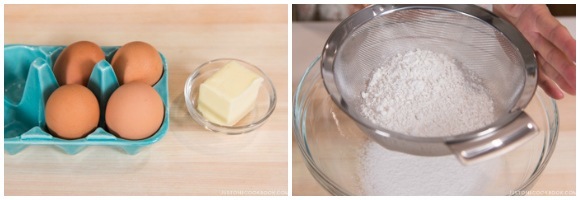
- Gather all the ingredients. I highly encourage you to weigh your ingredients using a kitchen scale for this recipe. Click on the “Metric“ button at the top of the recipe to convert the ingredient measurements to metric. If you‘re using a cup measurement, please follow the “fluff and sprinkle“ method: Fluff your flour with a spoon, sprinkle the flour into your measuring cup, and level it off. Otherwise, you may scoop more flour than you need.

- Make sure the eggs and butter are at room temperature. Sift the cake flour at least twice.
To Prepare the Pan, Oven, and Double Boiler
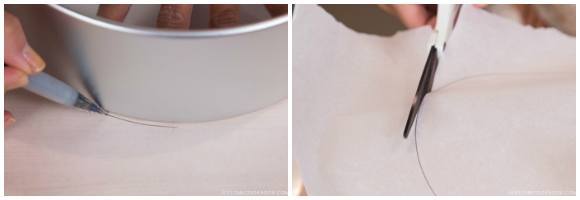
- Place an 8-inch (20-cm) cake pan on top of parchment paper, trace around the pan, and cut out 1 circle. Grease one side of the parchment paper and both the bottom and sides of 1 cake pan with 1 Tbsp butter. Then fit the parchment paper in the cake pan, greased side up. I avoid parchment paper on the sides because sometimes it pulls the batter and affects the final result of the cake.
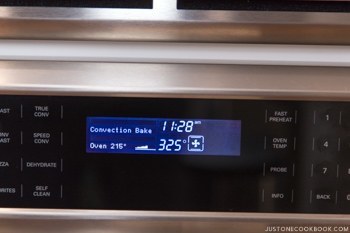
- Preheat your oven to 350ºF (180ºC). For a convection oven, reduce cooking temperature by 25ºF (15ºC). It’s always better to preheat longer, preferably 15–20 minutes extra. Tip: You preheat the oven so that all the surfaces inside your oven (walls, floor, door, and racks) are the desired cooking temperature. This makes for an even temperature throughout the oven and you won’t lose as much heat when you open the door for a few seconds. Depending on your oven, preheating might take 10 to 20 minutes.

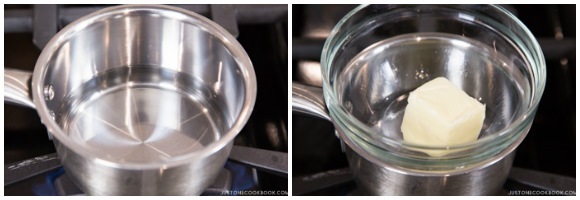
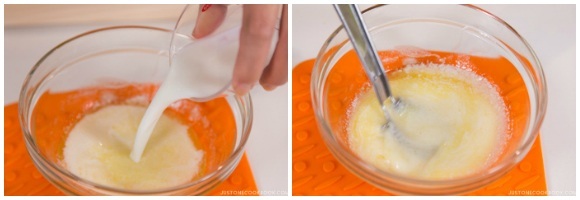
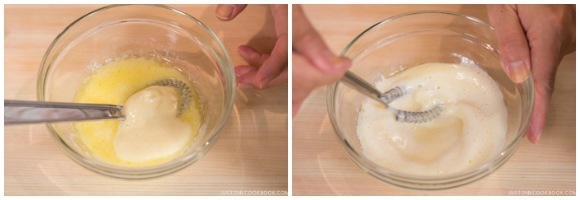
- Prepare a double boiler. If you have never done this before, please see the Notes section below. Turn on the stove’s heat to high and bring the water in the saucepan (Pot A) to a rapid boil. Once boiling, reduce the heat to maintain a steady simmer. Put 3 Tbsp unsalted butter in the small bowl (Bowl #1) and set over the saucepan. Let the butter melt gently.
- Once the butter is melted, remove the bowl from the saucepan. Then add 2 Tbsp whole milk and whisk to combine. Set aside to keep it around 104ºF (40ºC). Tip: I highly recommend using whole milk instead of reduced-fat milk. I’ve tried using both and concluded that whole-fat milk makes a difference in the final result.
To Make the Sponge Cake (can make a day ahead)
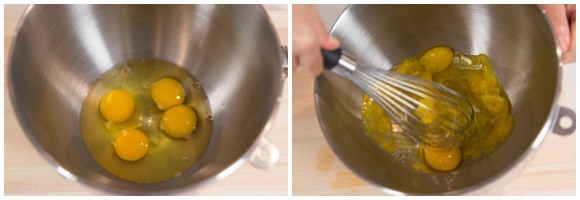
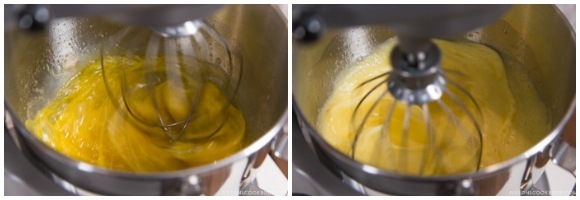
- In a stand mixer bowl (Bowl #2), add 4 large eggs (50 g each w/o shell) and break the egg yolks and whites with your whisk.
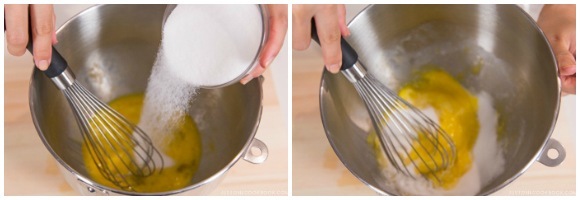
- Add ½ cup sugar (½ cup + 2 Tbsp, to be precise) and whisk to combine.
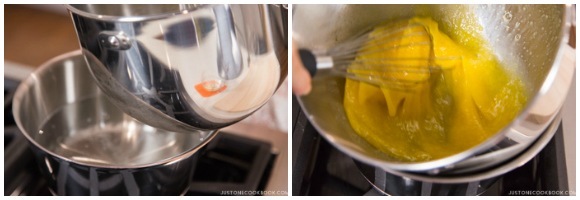
- In a large pot (Pot B), bring about 2 inches of water to 140ºF (60ºC) and maintain the temperature. Then, set the stand mixer bowl (Bowl #2) directly over the pot and whisk constantly so the eggs don’t scramble. This is called a bain-marie or water bath, where you set the bowl of food directly over a larger container of simmering water to temper the heat for gentle, even cooking. You can also use the double boiler method, where you set the egg mixture bowl (Bowl #2) over Pot B. The bowl doesn’t touch the simmering water of the pot.
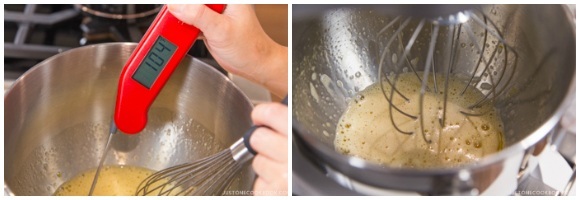
- Whisk until the temperature of the egg mixture reaches 104ºF (40ºC). Remove Bowl #2 from Pot B and set it up on the stand mixer with the whisk attachment.
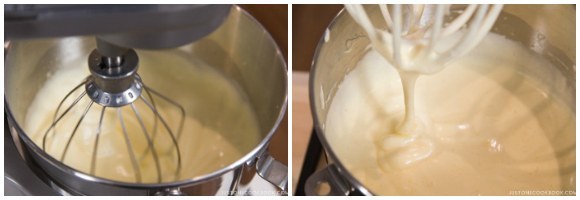
- Whisk on high speed (Speed 10) until the mixture is fluffy, for about 2 minutes. The batter should be loose yet thick and glossy.
- When the batter is pale, fluffy, and tripled in volume, reduce the speed to low (Speed 4) for several seconds. Stop the mixer and lift some of the batter with the whisk to check the consistency. If the batter falls off your whisk in a solid line or ribbon on top of the mixture, you’ve reached the “ribbon stage” (see Notes). Remove the bowl from the stand mixer.
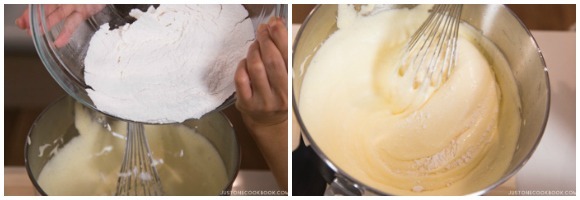
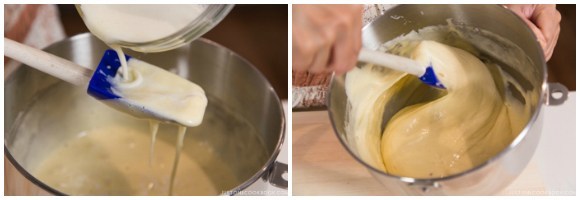
- Add half of the 1 cup cake flour to the bowl. Using the whisk, fold gently but thoroughly. Do this by rotating your bowl slowly while simultaneously moving your whisk in a down-and-over motion.
- Add the rest of the flour and fold gently to make sure all the flour is incorporated quickly so your mixture doesn’t deflate.
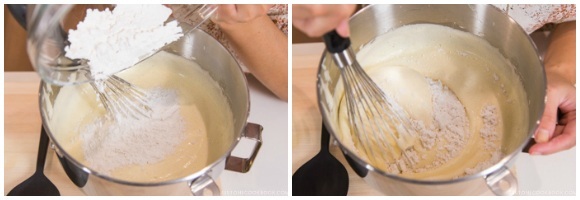
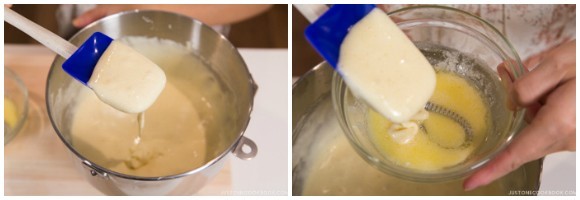
- With your spatula, take out one scoop of the batter from the bowl and add it to the butter and milk mixture. Tip: If we add the butter and milk mixture into the entire cake batter, the fat in the butter will deflate the batter.
- Incorporate the butter and milk mixture into a small amount of the batter first before adding it to the entire cake batter.
- Add the mixture back into the cake batter by pouring it over a silicone spatula. This prevents the mixture from deflating the batter and helps disperse the mixture. Gently fold until incorporated. When you lift the spatula, the batter should fall like a ribbon.
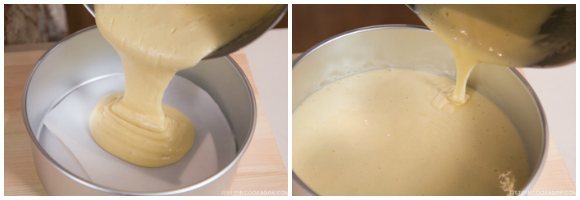
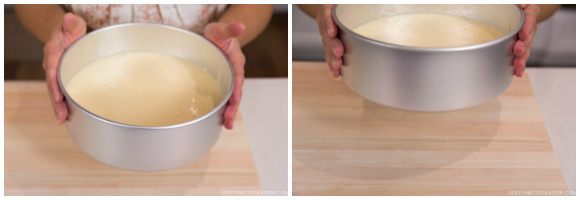
- Pour the batter into the center of the cake pan, from right above the cake pan. You want to avoid introducing extra air into the batter at this point. Collect the leftover batter in the bowl and pour it around the edges of the cake pan, not the center.
- Firmly tap the cake pan on the counter to release air bubbles in the batter.
To Bake
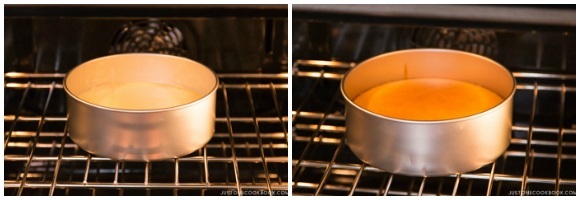
- In the preheated oven, bake at 350ºF (180ºC) for 20–25 minutes. Check if the sponge cake is done by inserting a skewer in the middle; if it comes out clean, the cake is ready. While the cake is baking, start preparations for the cake assembly (see below).
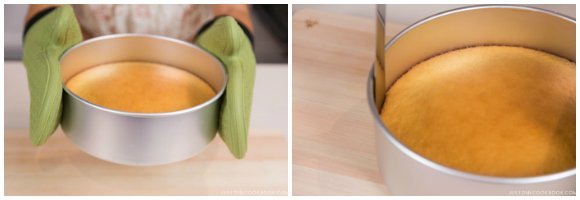
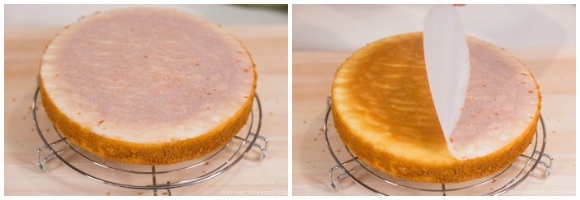
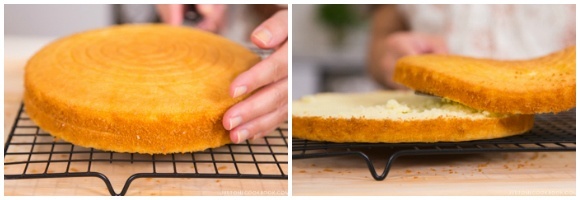
- As soon as you take out the cake pan from the oven, drop it on the counter to “shock” the cake so it stops shrinking. Separate the cake from the pan by running a sharp knife or offset spatula around the sides.
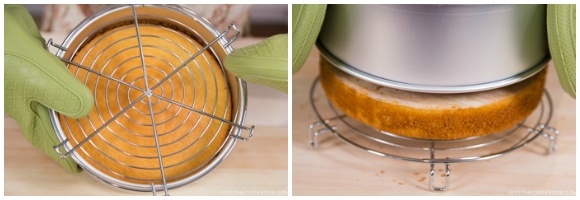
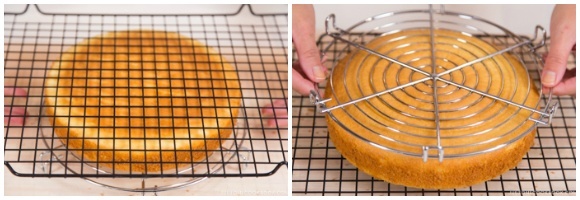
- Take the cake out of the pan by placing the wire rack on top and flipping the cake over onto the rack.
- Immediately remove the parchment paper.
- Place another wire rack on top and flip it back over. The top of the cake is now facing up.
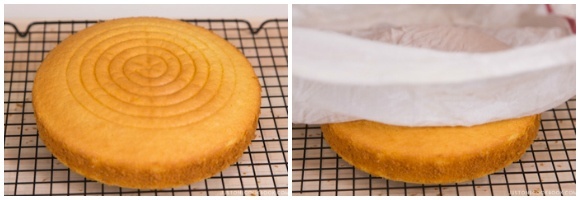
- Cover the cake with a damp towel until cooled to keep moisture in the cake. Make sure the towel is thin (not heavy) and wring the water out well so that the towel is damp, not wet. I use IKEA’s thin dish towel. If you keep the sponge cake for later use, wrap it with plastic wrap after it‘s completely cooled and keep it in the fridge (see Notes). Tip: You can make the sponge cake the day before. It actually tastes better and it's easier to slice the cake in half.
To Prepare the Strawberries and Syrup (While the Cake is Baking)
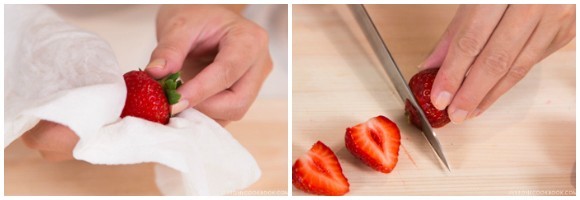
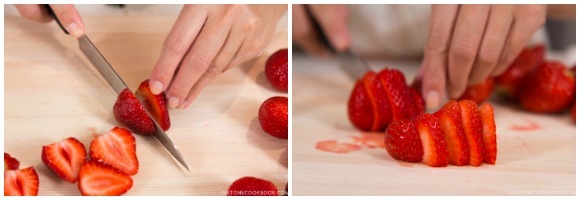
- While the cake is baking, divide 1 lb strawberries into 2 groups, one for the decoration and the other for the filling. Keep the beautiful, same-sized strawberries for the decoration. Remove the husk and clean the strawberries with a damp paper towel (do not wash, as we don’t want the strawberries to be moist and become moldy). Slice off the core for all the strawberries.
- For the strawberries that we will use for the decoration, cut them in half lengthwise. For the strawberries that we will use for filling, slice them lengthwise into ¼-inch (5 mm) slices.
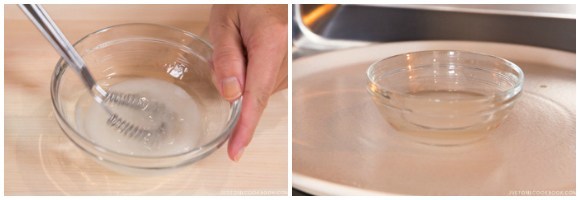
- To make the syrup, combine 2 Tbsp water, 3 Tbsp sugar, and 1 Tbsp liquor of your choice (optional) in a small bowl (Bowl #3). Microwave for 1 minute to dissolve the sugar.
To Make the Fresh Whipped Cream (While the Cake is Cooling)
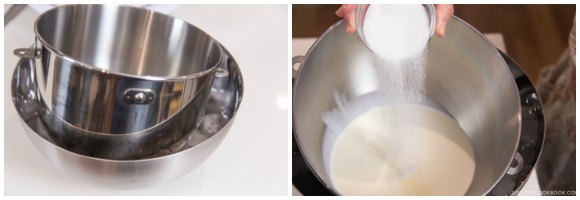
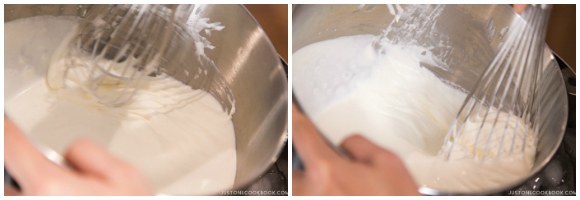
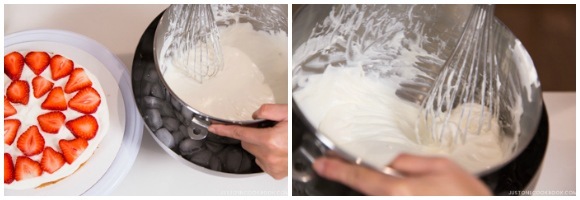
- While the cake is cooling, prepare an ice bath by placing ice cubes and water in a large bowl (Bowl #4). Place a clean and dry mixing bowl (Bowl #2) in the ice bath and add 2 cups heavy (whipping) cream and 3 Tbsp sugar to keep it cold. Tip: For the perfect sweetness, the sugar should be 8% of the heavy cream weight.
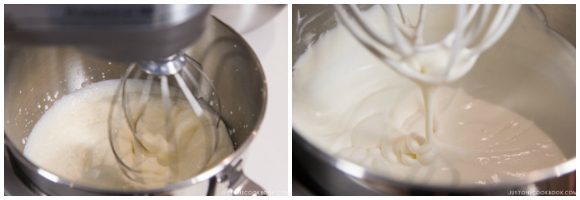
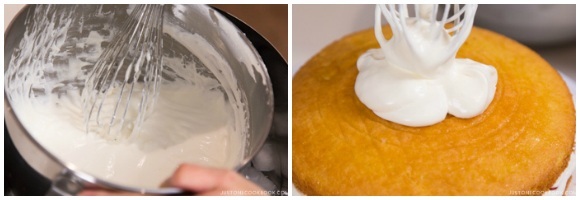
- Transfer the mixing bowl to the stand mixer and whisk on high speed. The cream will become thicker and smooth. When you lift the whisk out of the cream while it’s still liquid, and the cream holds its shape as it drops, it’s ready. Remove the bowl from the stand mixer and put it back in the ice bath.
To Assemble the Cake
- With a serrated knife, slice the cooled cake horizontally into half to make 2 layers (top and bottom).
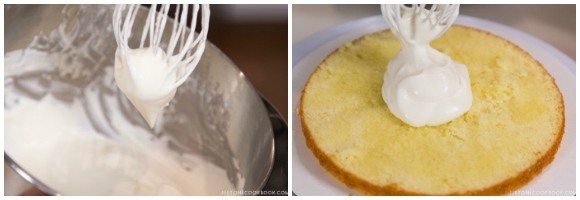
- Place the bottom of the cake on the cake circle. Brush the syrup on the top and sides of the bottom layer. This will help the sponge cake stay moist.
- Using a hand whisk, whisk only the cream at one spot by the edge of the bowl instead of whisking the entire bowl of cream. We will make the whipped cream as we need it. With this approach, we can also control the stiffness of the whipped cream.
- When the cream at the edge of the bowl reaches medium peaks, transfer it to the top of the bottom cake layer. Medium peaks mean when you lift the whisk, the cream will hold its shape, but the tip of the peaks will fold back on itself.
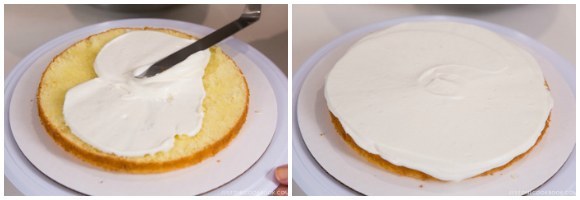
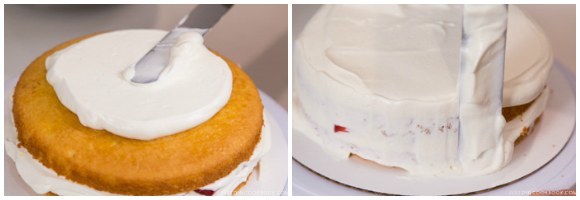
- Spread the whipped cream evenly. If you don’t have enough whipped cream, whip more and add it onto the cake.
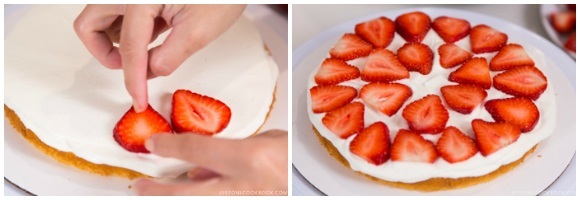
- Place the sliced strawberries on top of the whipped cream as you see in the pictures. Keep the center area open by not covering it with strawberries. This will make it easier to cut the cake into slices.
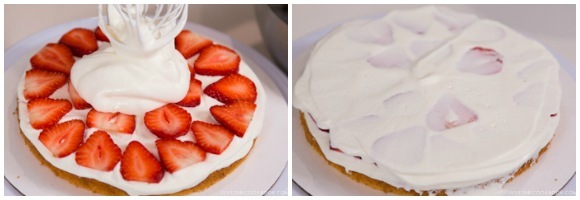
- Whip the cream again at the edge of the bowl.
- Transfer the whipped cream to the top of the strawberry layer. Spread just enough cream to cover the strawberries; do not add too much.
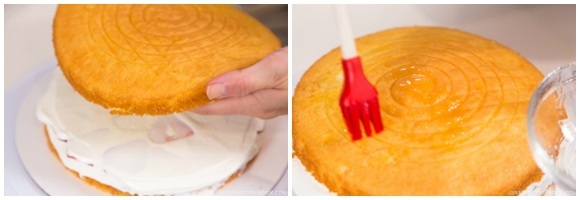
- Place the top layer of the sponge cake over the bottom layer. Brush the syrup on the top and sides of the sponge cake.
- Whip more cream and place it on top of the cake.
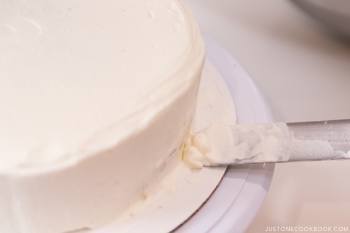
- Place the tip of the offset spatula in the center of the cake at a 30-degree angle and turn the cake turntable toward you to create a smooth top. Lightly coat the sides of the cake with a thin layer of whipped cream.
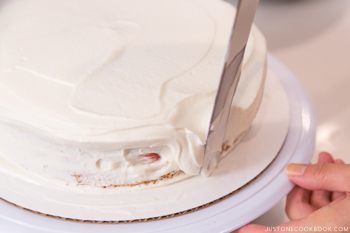
- Now add more cream to the sides, little by little. Place the offset spatula at a 90-degree angle and push the turntable away from you.
- Remove the excess cream from the cake and put it back into the bowl.

To Decorate the Cake
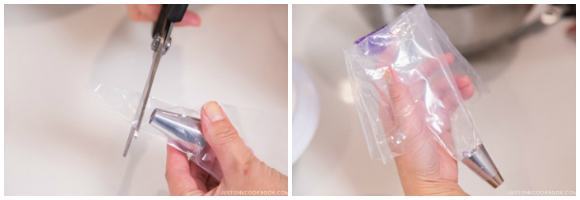
- For a basic decoration, I use a Wilton 2A decorating tip. Put the tip in the piping bag and cut off the tip so the metal will show from the bag. Fold the top half of the bag outward as you see in the picture (over your hands).
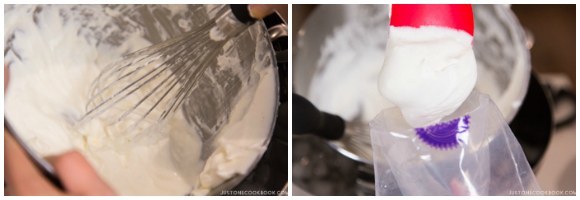
- Whip the cream to stiff peaks. When you lift the whisk, the peaks will hold firm. Put the cream into the piping bag. Once you fill the bag halfway, lift up the top half of the bag and push the cream down toward the tip.
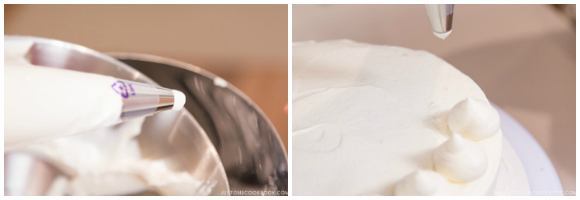
- Squeeze the piping bag to test to make sure the cream comes out smoothly. When you’re ready, hold the piping bag at a 90-degree angle and squeeze about a 1-inch-wide ring of whipped cream around the top edge of the cake. This will be the base for the strawberries.
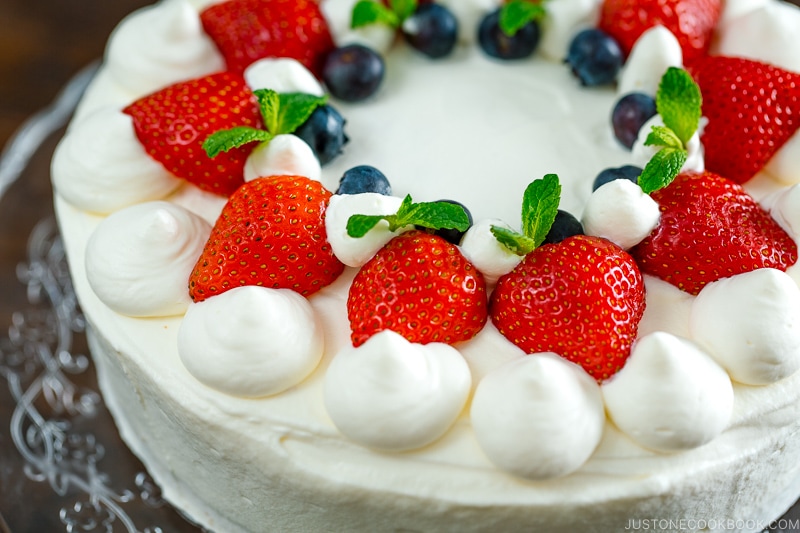
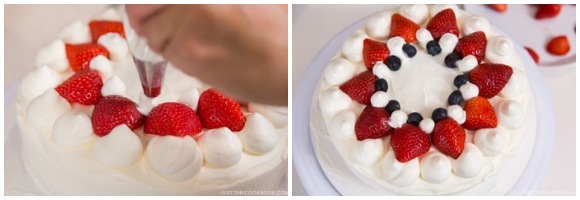
- Decorate and place the strawberries cut-side down on top of the whipped cream. Then squeeze small dollops of whipped cream between and around all the strawberries. Place 10 blueberries between the whipped cream dollops. Place 2 sprigs mint leaves as desired to add color.
To Store
- I recommend putting the cake on a cake stand with a dome or in a cake box to keep the cake shape while preventing it from drying. Keep the cake in the refrigerator and enjoy it within 2 days.
Notes
- For 1 cup cake flour, measure 1 cup all-purpose flour, then take away 2 Tbsp all-purpose flour and add 2 Tbsp cornstarch. Be sure to sift the flour to distribute the cornstarch well before using it in your cake batter.
- small heat-resistant bowl (Bowl #1)
- small saucepan that fits Bowl #1 for the double boiler (Pot A)
- stand mixer bowl or large mixing bowl (Bowl #2)
- large pot that fits Bowl #2 for the bain-marie (Pot B)
- small bowl (Bowl #3)
- large bowl that fits Bowl #2 for the ice bath (Bowl #4)
- parchment paper
- cake pan (8 inches/20 cm)
- balloon whisk
- silicone spatula
- 2 wire racks
- offset spatula
- cake decorating tip Wilton 2A and plastic bag
- thermometer
- serrated knife
- cake circle (10″/25 cm)
- cake turntable
- cake stand with dome or cake box
Nutrition
Editor’s Note: The post was originally published on December 14, 2015


Hi Namiko, I followed your recipe and my cake rised up very nicely! Thanks for your recipe 🙂
Hi Rina! AWESOME! I’m so happy to hear that. Thank you for your kind feedback. 🙂
Can I split the batter into two shallow cake pans and then just stack them?
I probably should also bake them for a shorter time
Hi Ai! I apologize for my late response. Yes you can. Please reduce the bake time so it won’t be dry. 🙂
Hi, can I ask why is there a dense rubbery bottom in the cake? Thank you!
Hi Yuan! From your description, it sounds like the bottom part is not cooked through. Possibly 1) the batter wasn’t combined well before pouring into the cake pan, hence the heavy contents went to the bottom, 2) maybe your oven temperature is not optimal (it’s good to check/know your oven as each oven has hot spots and sometimes temperature is not accurate as the display says), 3) Maybe you didn’t measure the ingredients correctly (did you use a measuring cup or scale? if cup, I highly recommend the method I provided here (https://www.justonecookbook.com/faqs/#Measurements).
Made this cake tonight and it’s so good, tastes just like the one my favorite Asian bakery makes! I’m not a skilled baker but this was really easy to follow and is definitely one of the best things I’ve ever cooked.
Hi Luna! Aww your kind feedback made me happy! Thank you for trying this recipe. I’m glad you didn’t get intimidated by my long step by step recipe…. LOL. Thank you for writing nice compliment. 🙂
On the part that says break the egg yolks and white. And add sugar, do we still use the white? The picture looks like the white is also with the egg with you combine the sugar? I’m just confused.
Hi Michaela! Sorry for the confusion. I meant that we need to beat the eggs (both yolks and whites).
hello nami-san, ^^
i really really love to read your recipe and the progress so detaillll…. thanks before, for sharing the recipe and put the pic on every step… ^0^ you really take so much time and effort to explain the step.
i’m a newbie, in baking cake, and sometime its hard for me to practice it. but now i’ll try on your recipe… yeay… ^^ i hope i’ll success to bake it.. hahahah
but this a little question, because its hard to find cake Flour in my town, lolz
may i ask you, 1cup AP flour is how much in g?
or may u converse it into gram for me?
“1 cup AP flour – 2 Tbsp. AP flour + 2 Tbsp. cornstarch = 1 cup cake flour”
thank you so much Nami-san ^^
Cant wait for your new recipes… ^^
Ganbatte Kudasai
“sorry my english so bad, hope u can understand what i say lolz”
Hi Liexiah! A properly measured cup of all purpose flour weighs 4.25 oz (120 g). 🙂
Thank you for your kind feedback. I’m so happy you enjoy my recipes! Arigato for your support. xoxo
Hi Nami!
Just tried this recipe yesterday, unfortunately my sponge fell flat (I’m not a good baker :/)
I was wondering if I could ask you about it to help troubleshoot 🙂
My whipped eggs had more bubbles than your picture, I wasn’t sure if I had under- or over-beaten them
Once I put the flour in and started folding, the mixture started sinking, so it was unbeaten, then 3 times, then maybe down to 2 times.
Do you think you know where I went wrong?
Thank you!
Hi Ming! I apologize for my late response and wish that I could write you back sooner. It’s hard to say what exactly went wrong (plus I’m not a specialist when it comes to baking). It could be under-beaten, if the batter deflate so fast when adding in flour. So your mixture didn’t look like mine at step 11? Kinda like airy and fluffy? Did you properly heat the egg mixture at step 4? That step (step 3-4) is important. It seems like it didn’t have enough air in the sponge. Hope this helps a bit…
Due to time contrainsts I am planning to make the sponge cake layers a couple of days in advance and was wondering if I can freeze it? Will then put the cake together with the cream and decorations the day before the celebration.
Hi Jules! I’m sorry for my late response. I haven’t frozen this sponge cake before, but I know that you can freeze it for up to a month. One day before you use, defrost in the refrigerator. I recommend putting into a largest ziploc bag to make sure it’s airtight and keep the moisture in the spongecake. 🙂
Nami San,
What brand of cake flour are you using? I’ve read that unbleached cake flour can affect the cake rise in fluffier cakes. I wonder if you are using a bleached or unbleached cake flour and maybe you can share how this has affected your cakes.
Thanks!
Hi Craig! I use King Arthur brand’s unbleached cake flour (blue box). I’ve only used this one so I can’t tell the difference… sorry….
When leaving it overnight for the flavors to develop, would it be more ideal to frost and decorate right before serving or just complete everything first?
I’m currently assuming that the change is in the syrup absorbing into the cake, and nothing to do with the cream.
Hi Cassie! I agree, in terms of flavors. The cream firms up (and hold the shape) more after keeping in the fridge, compared to when you make the cream and serve for example. I guess you can do either way, but make sure the spongecake will not be dry. The cream helps keeping the moist. As long as you can control the moisture in the sponge, you can make the rest next day. 🙂
How about i want make it more bigger cake? So i just double it all the ingredients?
Hi Evelyn! I’d suggest to double/triple it based on your cake size, because it’s harder to calculate how many % you need more…
Thanks for posting this recipe!! If I were to use a 7 inch pan would I need to adjust the baking temp or duration? Please advise! Thank you!
Hi Amanda! Your cake will be slightly taller but should be okay! Baking temp is same, but please look out for the baking time. Each oven is different too, so it’s best to set your timer earlier and keep an eye on it. 🙂
Thank you so much Nami for your great recipes ! I’m from France, I’m learning Japanese, and I made this strawberry cake for a party with my Japanese teacher and classmates. For me, the difficult point of the recipe was to slice the cake in half, a real desaster because I think I took a too large cakepan and the cake wasn’t high enough. Happily the desaster disappeared under the coat of cream, It was nice and delicious, and my friends and teacher told me it was exactly the taste of the Japanese cake. Thank you so much again,
Marie
Hi Marie! I think, next time if you want to make this cake again, you can make 2 sponge cakes. Then you don’t need to cut in half. If your cake pan is larger than mine, the height must be thinner too. So it should be okay if you have 2 sponge cakes. 🙂 Hope this helps!
Hello! I made this recipe today and I have 1 question.
“Grease one side of the parchment paper […] Then fit the parchment paper in the cake pan.”
But which side of the parchment paper should face upwards? The greased side? c:
Hi Karolina! I hope your cake came out well! The greased side will be touching the cake batter. 🙂
Thank you SO much for this extremely detailed recipe! I grew up in Japan and I have always wanted to recreate what for many years was my birthday cake. Not only have I never baked this type of cake before, I’ve never baked before at all. However, thanks to your detailed instructions (and thank you so much for your little glossary at the end, too, I had no idea what many of those terms were before now) my cake turned out better than I could ever have hoped. I think the tradition of this cake for bithdays will be coming back in my family.
Hi Madeline! Thank you for your kind feedback. I’m truly happy to hear you tried this recipe and your cake came out well! Glad to hear my recipe was helpful for you to bake this cake. Thank you for trying this recipe!