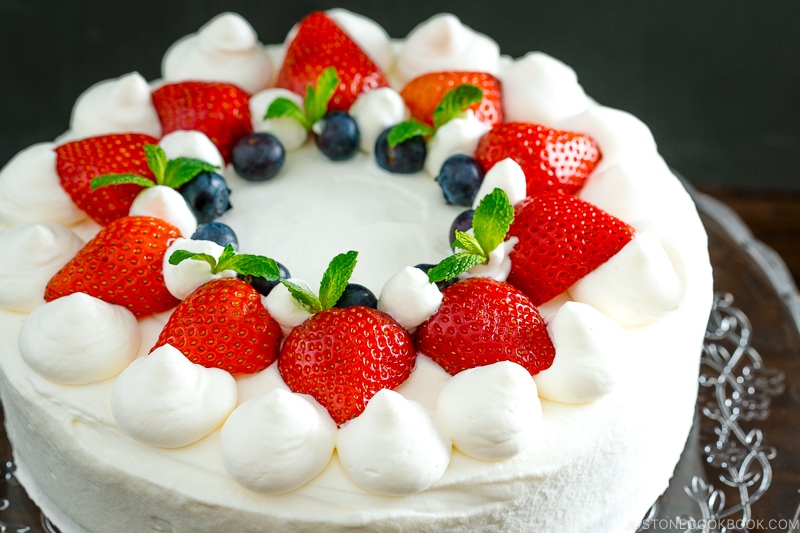
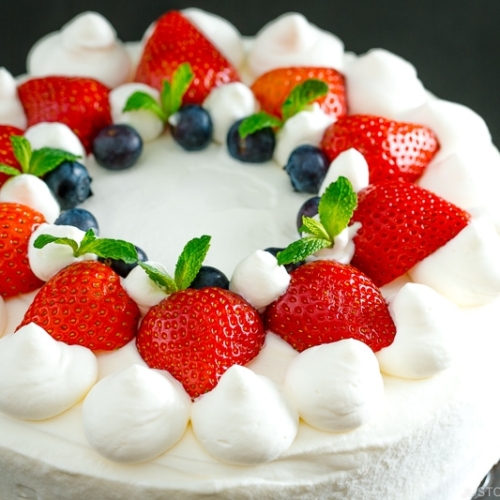
Moist, airy, and light, Japanese Strawberry Shortcake is among the most popular cakes in Japan. This elegant and classic dessert is perfect for any celebration. Here, I share how to keep the sponge cake moist and decorate it with berries and fresh whipped cream.
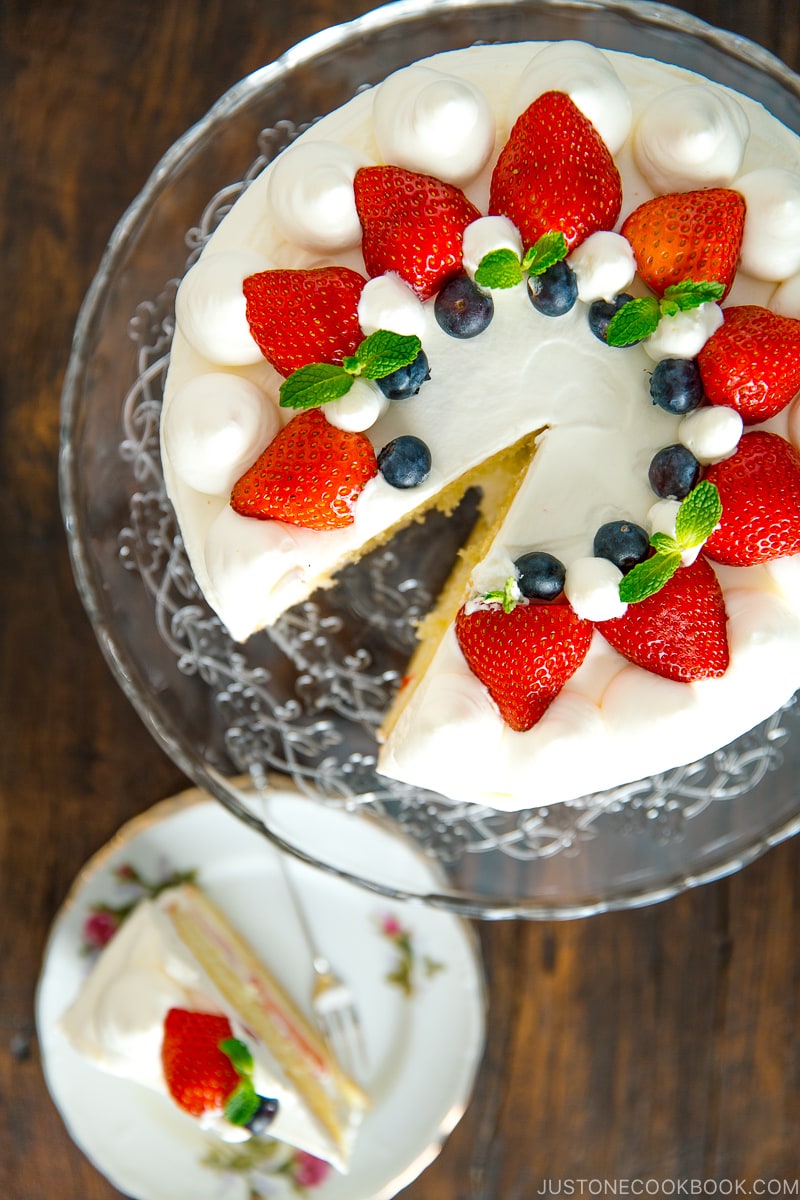
Strawberry Shortcake is probably one of the most popular and classic cakes in Japan. Whether it’s for birthdays, Christmas (did you know this cake is also sold as “Christmas Cake”?) or any type of celebration, we enjoy Strawberry Shortcake all year round. Cakes have such a special place in Japanese culture that we even bring them when we visit friends and family.
If you need a classy dessert to serve at your dinner party or something special for a bridal shower, a beautiful homemade Japanese Strawberry Cake fits the bill for the most special occasions. With some basics from the pantry, this simple yet elegant cake is one to remember when celebration season hits. Or when the strawberry is in season in your area, you have good enough reason to whip up this sweet treat to celebrate. I promise, your guests will fall hard for it!
What is the Japanese Strawberry Shortcake?
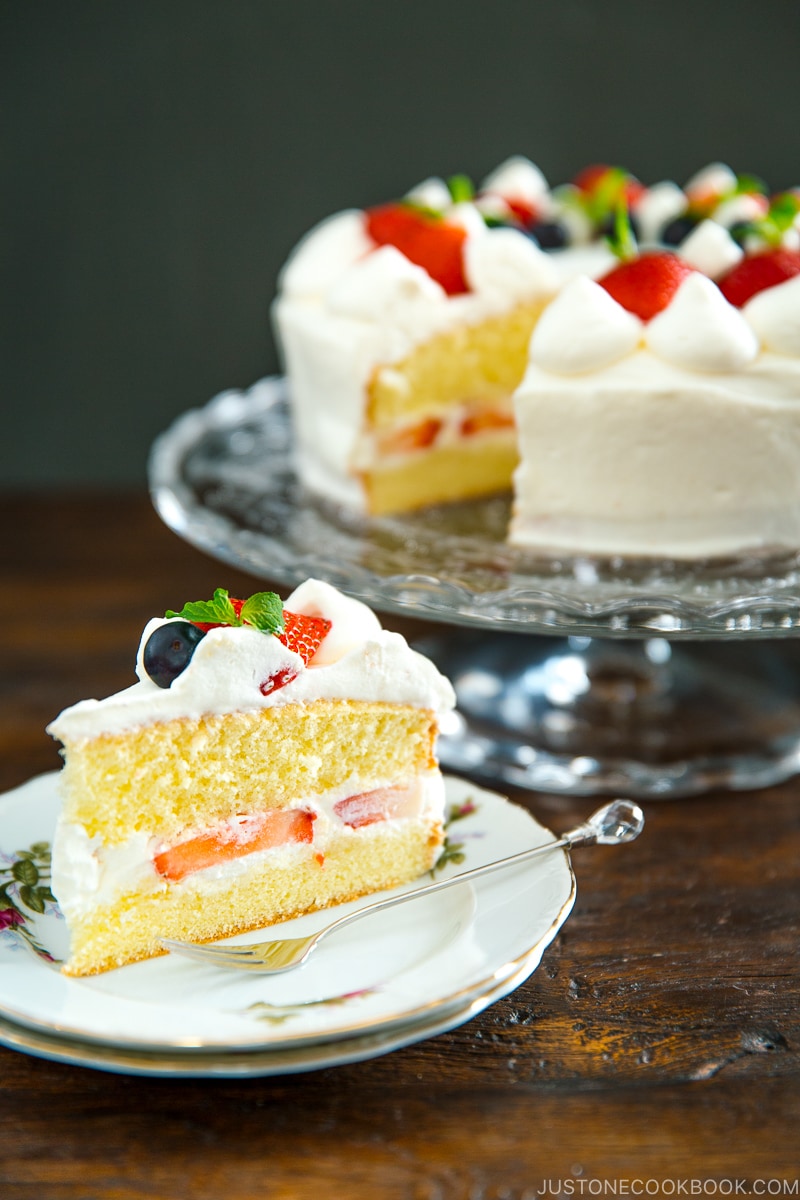
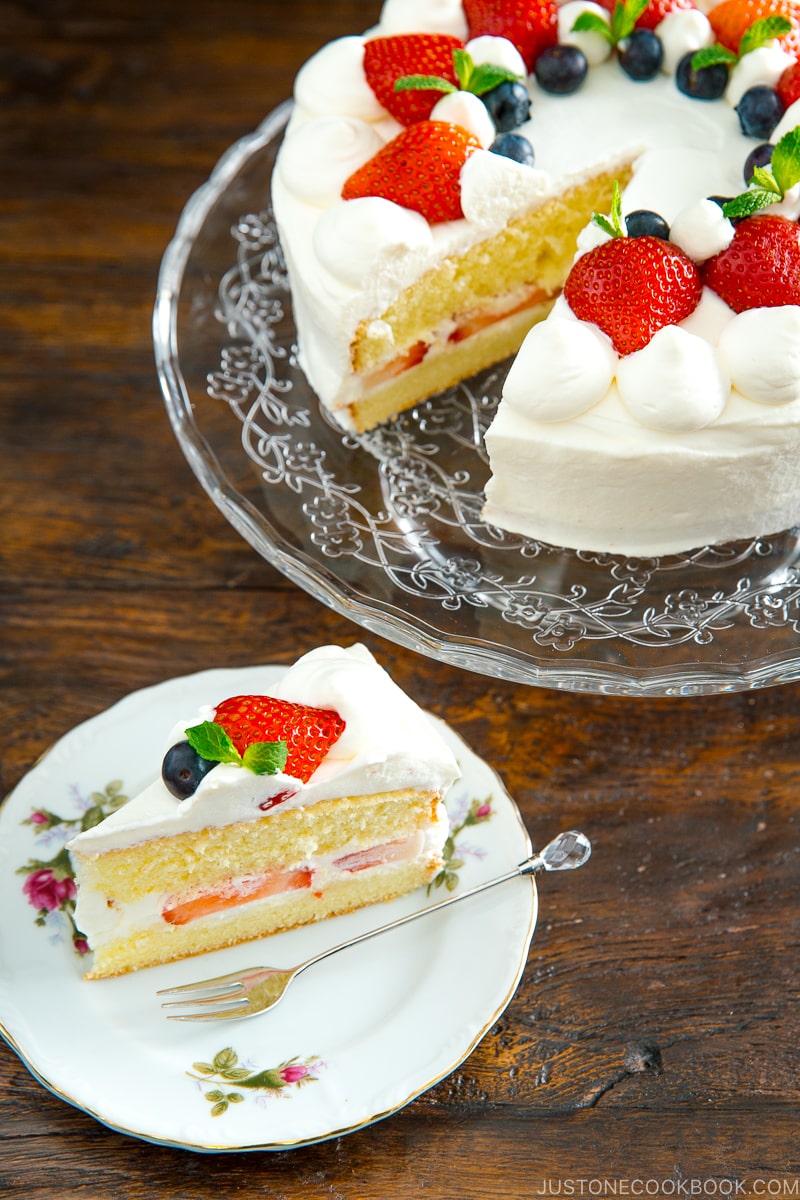
The concept of the Japanese Strawberry Shortcake may have originated in the US with some adaptation. Instead of sweet biscuits, a Japanese strawberry shortcake is made of 2-3 layers of sponge cake, with fresh strawberry slices, whipped cream filling, and whipped cream frosting.
This cake might seem rather simple, yet when all the components are prepared perfectly, it comes together as an amazing dessert.
The majority of recipes for Japanese strawberry shortcakes are very similar, so what makes them different? It all comes down to the various techniques you use when making it. I want to thank my dear friend Naomi for spending hours in my kitchen testing different variations of strawberry shortcake recipes with me. We spent days testing and making so many cakes, and we decided this is by far the best one.
Because this recipe requires detailed explanations, it was impossible for Mr. JOC to take step-by-step pictures AND film the video at the same time. Therefore, we decided to focus on the step-by-step pictures this time because I can’t explain everything in our short video. We’ll add a video for this recipe in the future.
Components of Japanese Strawberry Shortcake
This recipe is probably one of the longest recipes on my blog, with close to 50 steps. I know it’s a bit of an overkill but I really think these step-by-step pictures are helpful and I can explain the step a little more in detail along the way.
Japanese strawberry shortcake consists of 3 components: sponge cake, whipped cream, and strawberries. It’s simple as that. However, creating the perfect sponge cake and whipped cream involves many techniques.
And to make a really good shortcake, precise measurement (please use a kitchen scale and thermometer!) really helps, especially if you don’t bake often.
Sponge Cake
Japanese sponge cake is very moist, airy, light, and it’s not overly sweet. Personally, I think this is the most important part of the cake.
The sponge cake is a genoise cake. It‘s made by beating air into the eggs to make it rise. This replaces a chemical leavening agent like baking soda or baking powder.
The dimensions of the sponge cake we need to consider include sweetness, elasticity, and texture.
The sponge cake cannot be too sweet or else it overpowers the whipped cream and the tartness of the strawberry. The sweetness has to be perfectly balanced with the rest of the cake.
When you bite into the sponge cake, it needs to have some elasticity and firmness of bite. Once again, if it’s too hard or too soft, it ruins the cake.
Lastly and probably the most critical is the texture of the sponge cake. The size of the bubbles within the sponge needs to be consistent. It should not be too rough on the tongue yet it does need some structure so you can feel them. This is probably the part I tested the most to achieve the perfect result.
By the way, if you want to bake a flat cake (my cake is a little curve on the top), I found a great article to solve this problem!
Freshly Whipped Cream
To make fresh whipped cream is not too difficult. Before you begin whipping cream, make sure to chill your bowl and the heavy cream. This allows the cream to stay cold longer during the whipping process. Basically, cream whips better when it’s cold. The temperature affects how long it requires to whip, how light and fluffy it will get, and how long it is likely to stay that way (more science here).
My friend and I have tested the different amounts of sugar and we concluded that 8% of sugar to heavy whipping cream ratio gives perfect sweetness for the cake.
Fresh Strawberries
Fresh strawberries might not be the easiest ingredient to purchase depends on where you live. I know I’m spoiled in California where we literally have strawberries all year round. When you select the strawberries, make sure they are equal in size and not too large so they’ll be more visually appealing.
Last note, since we do not wash the strawberries but clean them with a damp cloth (to prevent them from going bad and adding moisture to the cream.), I do recommend buying organic ones.
Japanese Strawberry Shortcake for the Holidays
After several recipe testings, I am really happy with my results. My friends and family who enjoyed the cake agreed as well. Since then, I’ve served the Japanese strawberry shortcake several times over the holidays and it’s been a huge hit.
The flavor and texture of strawberry shortcake get even better if you let it rest overnight, so it is also a great make-ahead treat.
Wish to learn more about Japanese cooking? Sign up for our free newsletter to receive cooking tips & recipe updates! And stay in touch with me on Facebook, Pinterest, YouTube, and Instagram.
Japanese Strawberry Shortcake
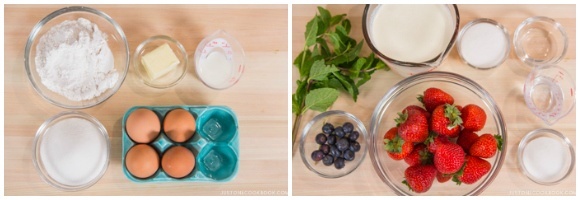
Ingredients
- 1 Tbsp butter (for greasing the pan; or use shortening or cooking spray)
For the Sponge Cake
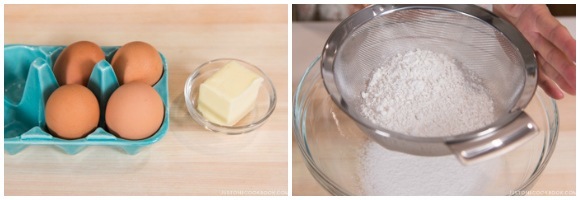
- 3 Tbsp unsalted butter
- 2 Tbsp whole milk (use whole milk for the best results)
- 4 large eggs (50 g each w/o shell)
- ½ cup sugar (½ cup + 2 Tbsp, to be precise)
- 1 cup cake flour (weigh your flour or use the “fluff and sprinkle“ method and level it off; see Notes for how to make your own cake flour)
For the Syrup
- 2 Tbsp water
- 3 Tbsp sugar
- 1 Tbsp liquor of your choice (optional; I like orange liqueurs like Grand Marnier or Cointreau)
For the Fresh Whipped Cream
- 2 cups heavy (whipping) cream (36% fat; must be at least 30–35% fat)
- 3 Tbsp sugar
For the Decoration
- 1 lb strawberries (for filling and decoration; look for similar-sized strawberries to decorate the cake; buy an extra pack to increase your chances of finding berries of the same size)
- 10 blueberries
- 2 sprigs mint leaves
Instructions
Before You Start…
- Gather all the ingredients. I highly encourage you to weigh your ingredients using a kitchen scale for this recipe. Click on the “Metric“ button at the top of the recipe to convert the ingredient measurements to metric. If you‘re using a cup measurement, please follow the “fluff and sprinkle“ method: Fluff your flour with a spoon, sprinkle the flour into your measuring cup, and level it off. Otherwise, you may scoop more flour than you need.

- Make sure the eggs and butter are at room temperature. Sift the cake flour at least twice.
To Prepare the Pan, Oven, and Double Boiler
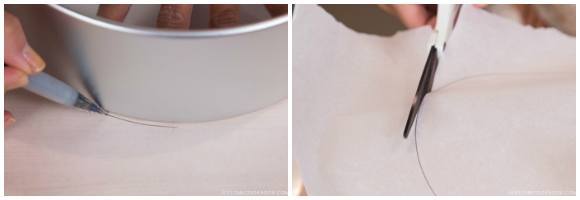
- Place an 8-inch (20-cm) cake pan on top of parchment paper, trace around the pan, and cut out 1 circle. Grease one side of the parchment paper and both the bottom and sides of 1 cake pan with 1 Tbsp butter. Then fit the parchment paper in the cake pan, greased side up. I avoid parchment paper on the sides because sometimes it pulls the batter and affects the final result of the cake.
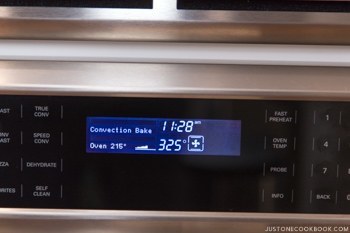
- Preheat your oven to 350ºF (180ºC). For a convection oven, reduce cooking temperature by 25ºF (15ºC). It’s always better to preheat longer, preferably 15–20 minutes extra. Tip: You preheat the oven so that all the surfaces inside your oven (walls, floor, door, and racks) are the desired cooking temperature. This makes for an even temperature throughout the oven and you won’t lose as much heat when you open the door for a few seconds. Depending on your oven, preheating might take 10 to 20 minutes.

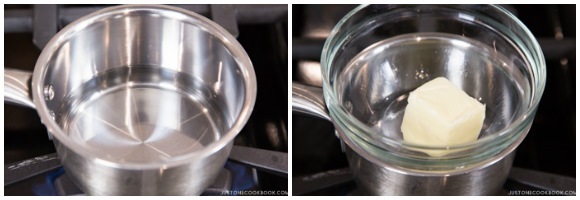
- Prepare a double boiler. If you have never done this before, please see the Notes section below. Turn on the stove’s heat to high and bring the water in the saucepan (Pot A) to a rapid boil. Once boiling, reduce the heat to maintain a steady simmer. Put 3 Tbsp unsalted butter in the small bowl (Bowl #1) and set over the saucepan. Let the butter melt gently.
- Once the butter is melted, remove the bowl from the saucepan. Then add 2 Tbsp whole milk and whisk to combine. Set aside to keep it around 104ºF (40ºC). Tip: I highly recommend using whole milk instead of reduced-fat milk. I’ve tried using both and concluded that whole-fat milk makes a difference in the final result.
To Make the Sponge Cake (can make a day ahead)
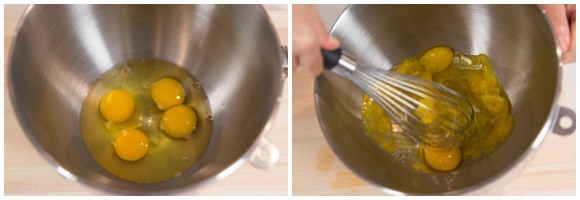
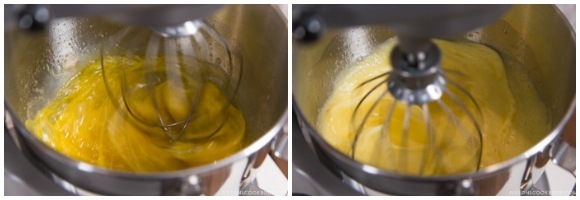
- In a stand mixer bowl (Bowl #2), add 4 large eggs (50 g each w/o shell) and break the egg yolks and whites with your whisk.
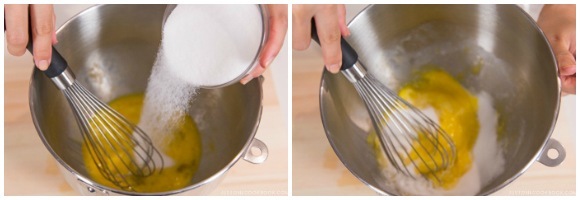
- Add ½ cup sugar (½ cup + 2 Tbsp, to be precise) and whisk to combine.
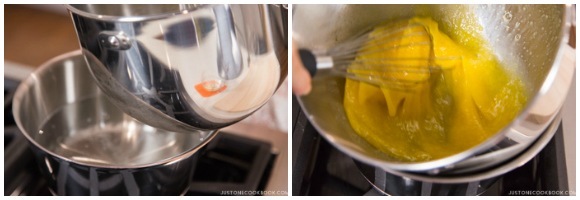
- In a large pot (Pot B), bring about 2 inches of water to 140ºF (60ºC) and maintain the temperature. Then, set the stand mixer bowl (Bowl #2) directly over the pot and whisk constantly so the eggs don’t scramble. This is called a bain-marie or water bath, where you set the bowl of food directly over a larger container of simmering water to temper the heat for gentle, even cooking. You can also use the double boiler method, where you set the egg mixture bowl (Bowl #2) over Pot B. The bowl doesn’t touch the simmering water of the pot.
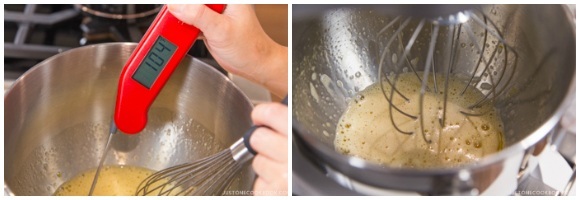
- Whisk until the temperature of the egg mixture reaches 104ºF (40ºC). Remove Bowl #2 from Pot B and set it up on the stand mixer with the whisk attachment.
- Whisk on high speed (Speed 10) until the mixture is fluffy, for about 2 minutes. The batter should be loose yet thick and glossy.
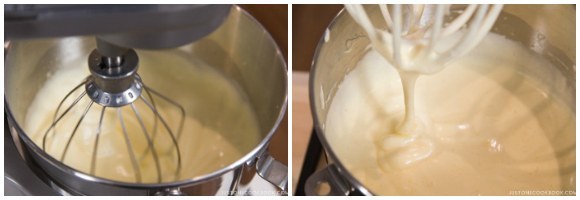
- When the batter is pale, fluffy, and tripled in volume, reduce the speed to low (Speed 4) for several seconds. Stop the mixer and lift some of the batter with the whisk to check the consistency. If the batter falls off your whisk in a solid line or ribbon on top of the mixture, you’ve reached the “ribbon stage” (see Notes). Remove the bowl from the stand mixer.
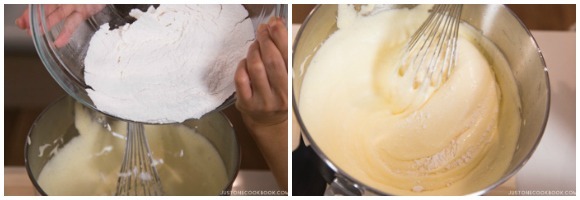
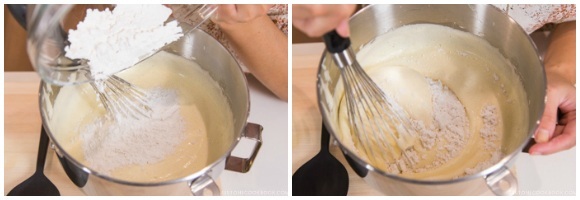
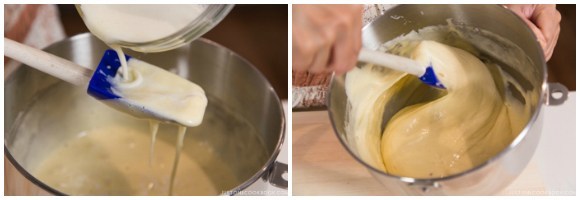
- Add half of the 1 cup cake flour to the bowl. Using the whisk, fold gently but thoroughly. Do this by rotating your bowl slowly while simultaneously moving your whisk in a down-and-over motion.
- Add the rest of the flour and fold gently to make sure all the flour is incorporated quickly so your mixture doesn’t deflate.
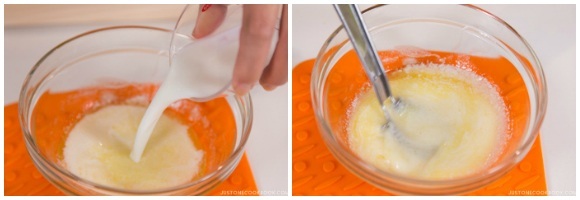
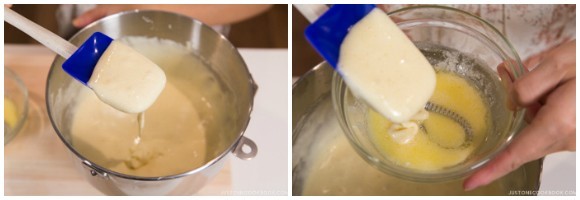
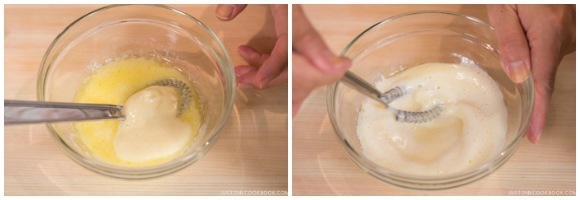
- With your spatula, take out one scoop of the batter from the bowl and add it to the butter and milk mixture. Tip: If we add the butter and milk mixture into the entire cake batter, the fat in the butter will deflate the batter.
- Incorporate the butter and milk mixture into a small amount of the batter first before adding it to the entire cake batter.
- Add the mixture back into the cake batter by pouring it over a silicone spatula. This prevents the mixture from deflating the batter and helps disperse the mixture. Gently fold until incorporated. When you lift the spatula, the batter should fall like a ribbon.
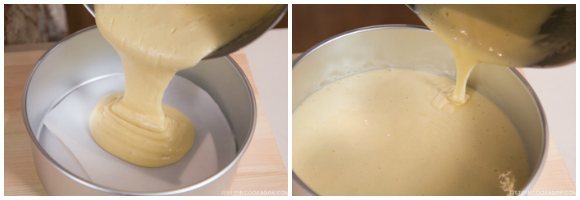
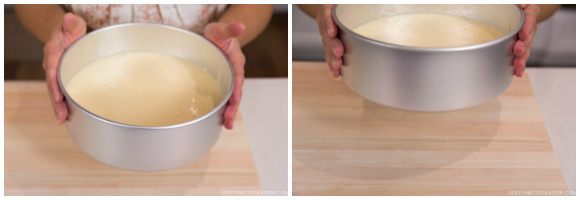
- Pour the batter into the center of the cake pan, from right above the cake pan. You want to avoid introducing extra air into the batter at this point. Collect the leftover batter in the bowl and pour it around the edges of the cake pan, not the center.
- Firmly tap the cake pan on the counter to release air bubbles in the batter.
To Bake
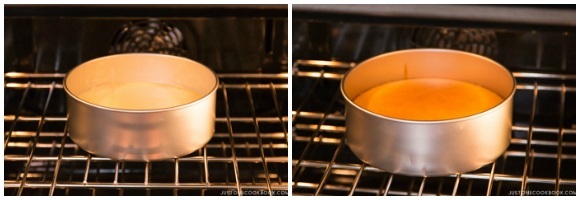
- In the preheated oven, bake at 350ºF (180ºC) for 20–25 minutes. Check if the sponge cake is done by inserting a skewer in the middle; if it comes out clean, the cake is ready. While the cake is baking, start preparations for the cake assembly (see below).
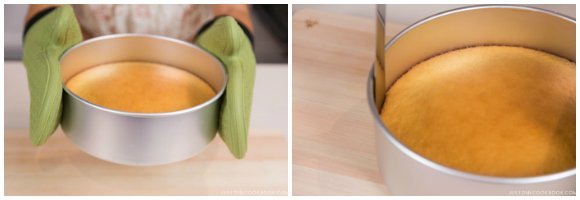
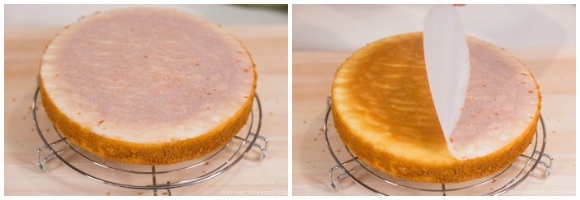
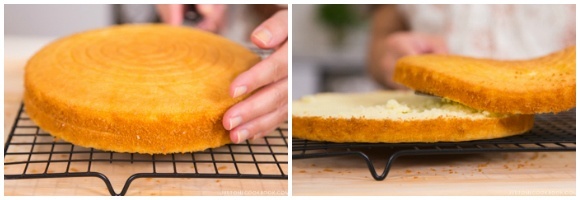
- As soon as you take out the cake pan from the oven, drop it on the counter to “shock” the cake so it stops shrinking. Separate the cake from the pan by running a sharp knife or offset spatula around the sides.
- Take the cake out of the pan by placing the wire rack on top and flipping the cake over onto the rack.
- Immediately remove the parchment paper.
- Place another wire rack on top and flip it back over. The top of the cake is now facing up.
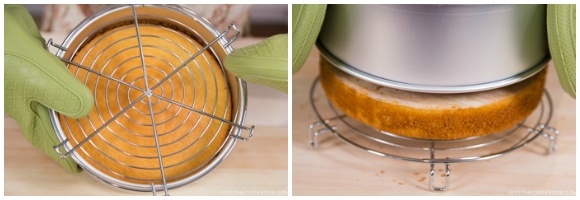
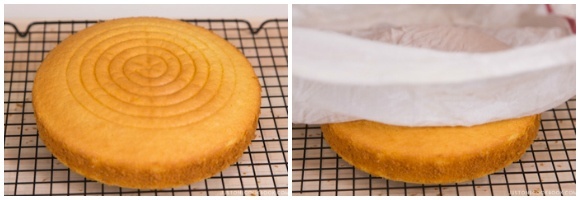
- Cover the cake with a damp towel until cooled to keep moisture in the cake. Make sure the towel is thin (not heavy) and wring the water out well so that the towel is damp, not wet. I use IKEA’s thin dish towel. If you keep the sponge cake for later use, wrap it with plastic wrap after it‘s completely cooled and keep it in the fridge (see Notes). Tip: You can make the sponge cake the day before. It actually tastes better and it's easier to slice the cake in half.
To Prepare the Strawberries and Syrup (While the Cake is Baking)
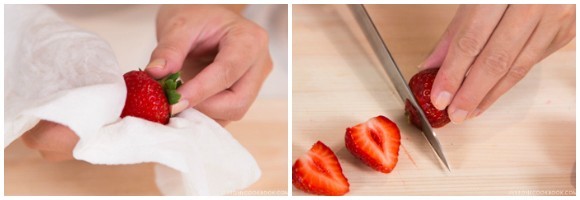
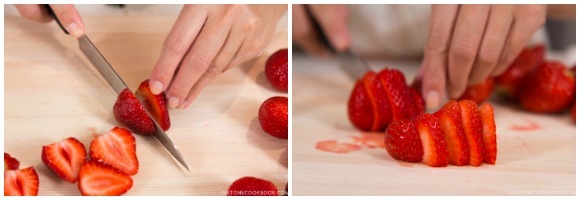
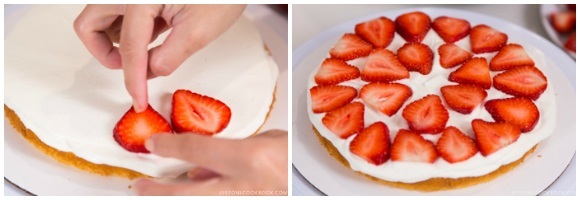
- While the cake is baking, divide 1 lb strawberries into 2 groups, one for the decoration and the other for the filling. Keep the beautiful, same-sized strawberries for the decoration. Remove the husk and clean the strawberries with a damp paper towel (do not wash, as we don’t want the strawberries to be moist and become moldy). Slice off the core for all the strawberries.
- For the strawberries that we will use for the decoration, cut them in half lengthwise. For the strawberries that we will use for filling, slice them lengthwise into ¼-inch (5 mm) slices.
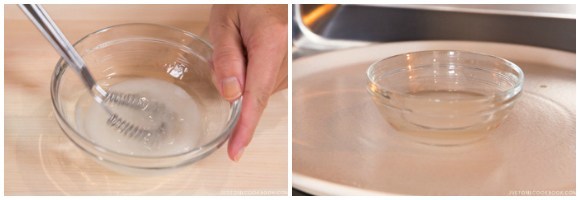
- To make the syrup, combine 2 Tbsp water, 3 Tbsp sugar, and 1 Tbsp liquor of your choice (optional) in a small bowl (Bowl #3). Microwave for 1 minute to dissolve the sugar.
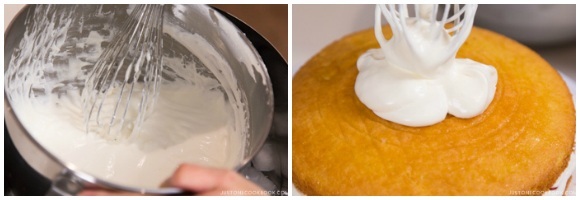
To Make the Fresh Whipped Cream (While the Cake is Cooling)
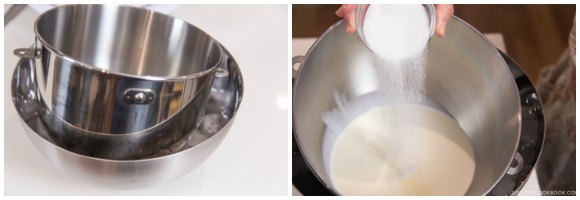
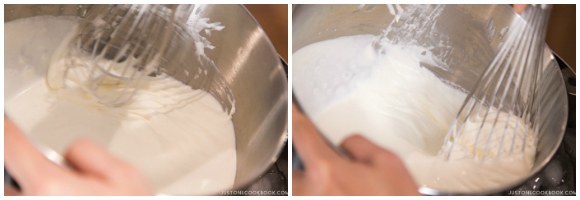
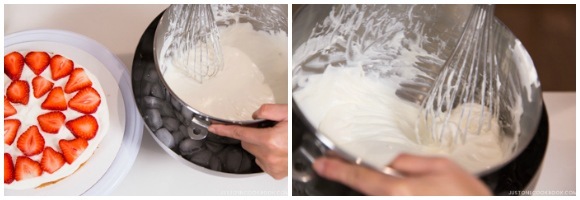
- While the cake is cooling, prepare an ice bath by placing ice cubes and water in a large bowl (Bowl #4). Place a clean and dry mixing bowl (Bowl #2) in the ice bath and add 2 cups heavy (whipping) cream and 3 Tbsp sugar to keep it cold. Tip: For the perfect sweetness, the sugar should be 8% of the heavy cream weight.
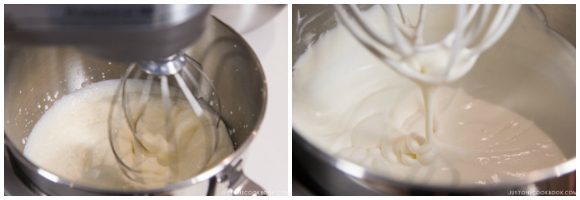
- Transfer the mixing bowl to the stand mixer and whisk on high speed. The cream will become thicker and smooth. When you lift the whisk out of the cream while it’s still liquid, and the cream holds its shape as it drops, it’s ready. Remove the bowl from the stand mixer and put it back in the ice bath.
To Assemble the Cake
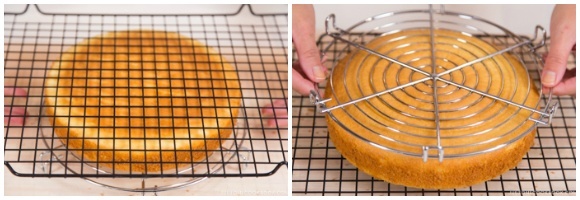
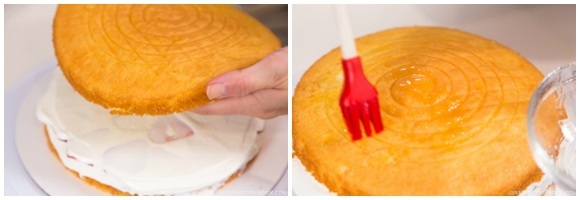
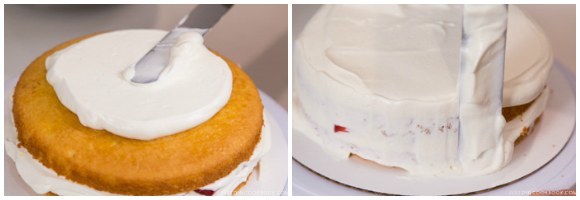
- With a serrated knife, slice the cooled cake horizontally into half to make 2 layers (top and bottom).
- Place the bottom of the cake on the cake circle. Brush the syrup on the top and sides of the bottom layer. This will help the sponge cake stay moist.
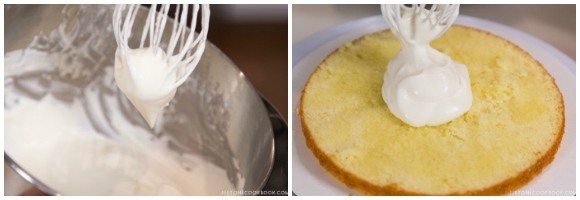
- Using a hand whisk, whisk only the cream at one spot by the edge of the bowl instead of whisking the entire bowl of cream. We will make the whipped cream as we need it. With this approach, we can also control the stiffness of the whipped cream.
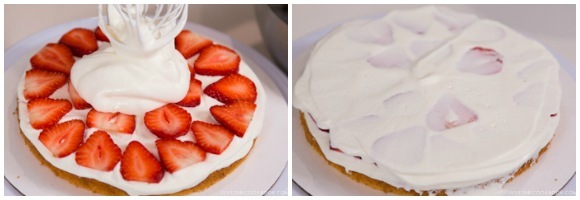
- When the cream at the edge of the bowl reaches medium peaks, transfer it to the top of the bottom cake layer. Medium peaks mean when you lift the whisk, the cream will hold its shape, but the tip of the peaks will fold back on itself.
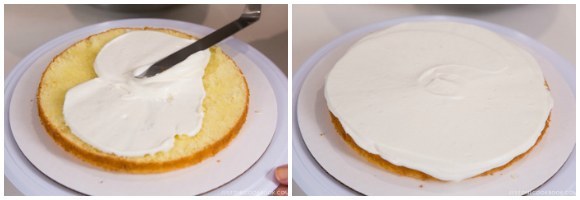
- Spread the whipped cream evenly. If you don’t have enough whipped cream, whip more and add it onto the cake.
- Place the sliced strawberries on top of the whipped cream as you see in the pictures. Keep the center area open by not covering it with strawberries. This will make it easier to cut the cake into slices.
- Whip the cream again at the edge of the bowl.
- Transfer the whipped cream to the top of the strawberry layer. Spread just enough cream to cover the strawberries; do not add too much.
- Place the top layer of the sponge cake over the bottom layer. Brush the syrup on the top and sides of the sponge cake.
- Whip more cream and place it on top of the cake.
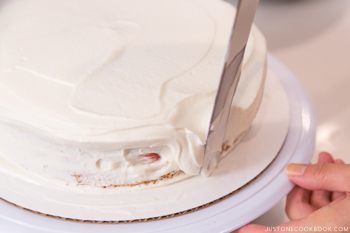
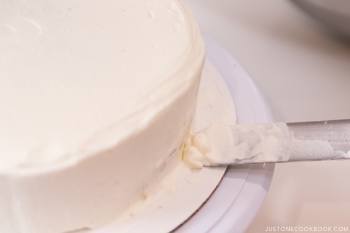
- Place the tip of the offset spatula in the center of the cake at a 30-degree angle and turn the cake turntable toward you to create a smooth top. Lightly coat the sides of the cake with a thin layer of whipped cream.
- Now add more cream to the sides, little by little. Place the offset spatula at a 90-degree angle and push the turntable away from you.
- Remove the excess cream from the cake and put it back into the bowl.

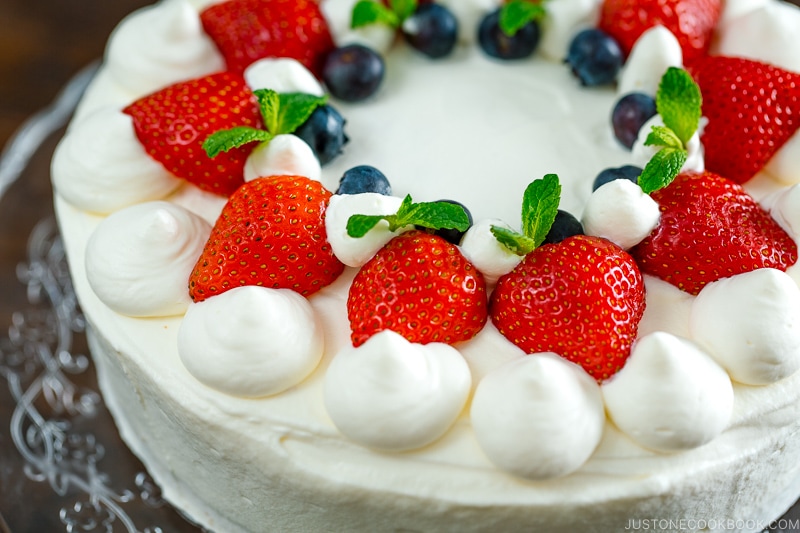
To Decorate the Cake
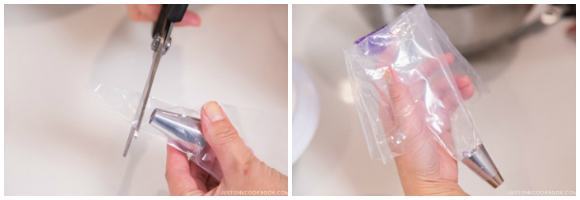
- For a basic decoration, I use a Wilton 2A decorating tip. Put the tip in the piping bag and cut off the tip so the metal will show from the bag. Fold the top half of the bag outward as you see in the picture (over your hands).
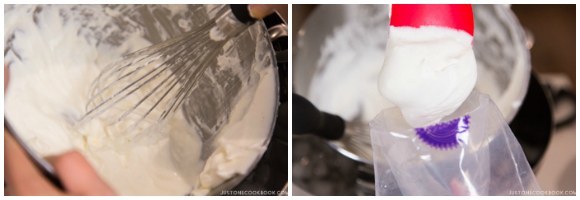
- Whip the cream to stiff peaks. When you lift the whisk, the peaks will hold firm. Put the cream into the piping bag. Once you fill the bag halfway, lift up the top half of the bag and push the cream down toward the tip.
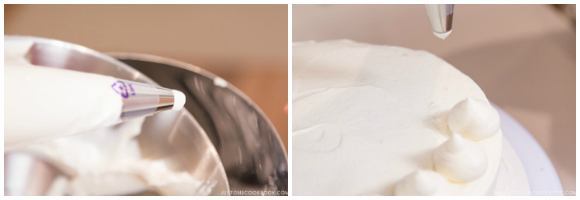
- Squeeze the piping bag to test to make sure the cream comes out smoothly. When you’re ready, hold the piping bag at a 90-degree angle and squeeze about a 1-inch-wide ring of whipped cream around the top edge of the cake. This will be the base for the strawberries.
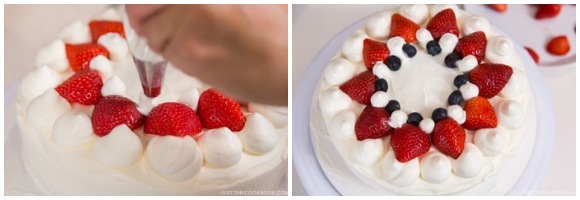
- Decorate and place the strawberries cut-side down on top of the whipped cream. Then squeeze small dollops of whipped cream between and around all the strawberries. Place 10 blueberries between the whipped cream dollops. Place 2 sprigs mint leaves as desired to add color.
To Store
- I recommend putting the cake on a cake stand with a dome or in a cake box to keep the cake shape while preventing it from drying. Keep the cake in the refrigerator and enjoy it within 2 days.
Notes
- For 1 cup cake flour, measure 1 cup all-purpose flour, then take away 2 Tbsp all-purpose flour and add 2 Tbsp cornstarch. Be sure to sift the flour to distribute the cornstarch well before using it in your cake batter.
- small heat-resistant bowl (Bowl #1)
- small saucepan that fits Bowl #1 for the double boiler (Pot A)
- stand mixer bowl or large mixing bowl (Bowl #2)
- large pot that fits Bowl #2 for the bain-marie (Pot B)
- small bowl (Bowl #3)
- large bowl that fits Bowl #2 for the ice bath (Bowl #4)
- parchment paper
- cake pan (8 inches/20 cm)
- balloon whisk
- silicone spatula
- 2 wire racks
- offset spatula
- cake decorating tip Wilton 2A and plastic bag
- thermometer
- serrated knife
- cake circle (10″/25 cm)
- cake turntable
- cake stand with dome or cake box
Nutrition
Editor’s Note: The post was originally published on December 14, 2015


Hi, I just want to ask how should I adjust the measurements for this recipe if I want to use a smaller cake tin (2/4inch) for a smaller serving size?
Hi Baek, We have never tried this recipe baking in the smaller pan size before. How about making a few cakes with one batch of cake batter?
Hi! I was wondering if I could flavour the sponge cake with some matcha powder? If I do, how would this affect the other ingredient quantities for the cake? Thank you! 🙂 excited to make this!
Hi Marissa, We have never tried it, but you can replace 1~2 Tbsp of Matcha with the same amount of Cake four and add 1/2 Tbsp of milk. We hope this works! Let us know how it goes!🙂
Hi Nami! I tried this recipe last weekend. It was good although the cake itself is a little too dry for me, I don’t know what I did wrong. I usually don’t mind it but it gives a rough, kinda like a grainy feeling in the mouth which is kinda bothering me. What do you think I did wrong? Great recipe btw!
Hi Kristina, Hum…. grainy feeling. They are no ingredient that has a grainy texture. Do you think when you add cracked egg, accidentally the eggshell got in? Or your flour wasn’t Cake flour?
I have never had a sponge cake fail so spectacularly which is a bit of a disappointment. I had a real hard time getting the thrice sifted cake flour to incorporate and I feared the sponge would not rise, and indeed that is what happened. I’ll be following my own sponge recipe the next time I try this. At least strawberries and cream are delicious on their own!
Hi Jennifer! Thanks for trying this recipe and I’m sorry yours didn’t come out well. From your comment, you might have over mixed the batter, maybe? You mentioned you had a hard time incorporating the flour. I’m certain that this recipe works, as it’s one of the popular cakes JOC fans make and I see the cakes all the time on IG/FB or in their email… Thank you for trying this recipe, and I hope your sponge cake can be the base of a delicious strawberry shortcake.
Thanks for the reply, Namiko. Yes, the problem I encountered with the recipe was that I only mixed the flour until it was just incorporated, but this took longer than I expected. At this point in the recipe I could tell the cake would fail either because (1) mixing was taking too long, or had stopped mixing, (2) because the flour would not end up being properly incorporated. I used the weighted measurements listed in the recipe because I find these to be more precise than volume when baking, so I don’t think measurement was the culprit. I suspect the issue is that the Canadian cake flour I used was simply too high in protein (10%) compared to the typical US brand of cake flour (5%-8%) for this particular recipe to work unfortunately.
Hi Jennifer! Thanks for your response and for further explanation. This is helpful for other Canadian readers who want to try this recipe. I’m not sure how we can adjust the recipe to make it successful, but I now learned that Canadian cake flour is not quite same as American ones. Thanks for sharing the info with us! I’m sorry again it didn’t come out well.
Thanks for this recipe. Very inspiring and easy to understand.
Hi Diana, Thank you very much for your feedback!
Hi Nami,
I only have a 6 inch or 9 inch pan. Which one do you recommend? Also do I need to adjust the ingredient amounts and the baking time? If so, what do you recommend?
Hi Crystal,
The sponge cake will be flatter if you use a 9-inch pan because it’s a bigger cake pan than Nami’s 8-inch pan. If you see the cake assembly photo, you may see the thickness, and it’s just enough to cut in half widthwise.
We recommend making a double batch and bake the cake twice with a 6-inch pan and 9-inch pan or make one batch with a 6″ pan and make cupcake size with leftover batter, etc.
We hope this helps!
Thanks Nami, fabulous recipe. As you mentioned, quite a few steps. However, you provided so much detail that this was a no fail recipe. After making once, the cake was easy to make again. Made for my daughter’s 21st birthday. Made 2 cakes, each 1.5 original recipe to feed 16 people. As I needed to adjust the cooking time through trial and error, my second one came out a little better than the first. Regardless, the texture of the cake (not that I have had a Japanese strawberry shortcake before) was perfect – especially for layering. The cake had 3 layers of strawberries and cream and 4 layers of cake. I assembled the day before and did not skip the use of a liquor (a nice cherry blossom one). For the final layer of cream, around the outside, I blended some freeze-dried strawberry powder with the cream to give a delicate strawberry flavour and pretty pink hue. The end result was both delicious and visually gorgeous. Perfect for my Japan and Japanese loving daughter. Wish I could post a pic. Will keep this recipe and make again and again.
Hi Lenny,
Wow! Thank you very much for trying this recipe, and read and follow Nami’s instructions carefully!
We are so happy to hear you made this cake for your daughter’s 21st birthday! Happy Birthday!
Will this recipe be ok to make a day in advance?
Hi Cassandra,
Yes. You may refrigerate it overnight. We recommend covering the cake. 🙂
Hello! I’m a newbie baker and I was unable to get the cake to rise much. I am sure I did not mix it properly. One issue I had is my mixer only went up to 6 (instead of 10) and it took forever to get to the ribbon stage (like maybe 8 minutes or more…I just kept going). Another is, when I added flour, I had to mix a lot to get the flour to mix properly, which probably deflated the mixture. I also accidentally mixed in the butter mixture with the whisk instead of folding it with a spatula.
Also, the top of the cake did not have as deep a color as yours but the sides were hard/burnt. My oven had already been preheated to 350F for 20 minutes. I wonder if it’s my pan? I am using a pan with the release valve (the ones for cheesecake).
This is my first time making a cake and I realized I didn’t have a way to store it in the fridge (store bought cakes come with a box…). Any suggestions on some make-shift container? Does the cake need to be stored airtight?
Thanks for the recipe!
Hi Mox,
Thank you very much for trying this recipe!
For storing the cake overnight, it does not need to be airtight. The paper box should be fine as well. Something like this will be a great tool too. https://www.amazon.com/dp/B01FSID5C8/?ref=exp_justonecookbook_dp_vv_d
As for the cake color, we recommend checking your oven’s internal temperature and make sure you are not baking with higher heat.
A tip for beating eggs is to check the egg temperature. The eggs will foam easily when at the right temperature, 104 ºF (40 ºC).
And Mixing the cake batter from the bottom to up to incorporate more air in the batter is the best way to mix.
We hope this is helpful.🙂
My husband has been dreaming about a strawberry shortcake so I gave it a go. Your recipe is so detailed and precise – really appreciate it! My cake came out near perfect except that I did the stupidest thing after assembling it. I left it uncovered in the fridge overnight 🙁 🙁
Next morning the cake had dried out a fair bit. At room temperature it tasted great but nothing close to the juicy cake it was the night before.
Will definitely make it again and will NOT forget to cover it.
Hi Aditi!
Thank you very much for trying this recipe!
We are sorry to hear that your cake got dried in the refrigerator. We recommend using something like this to cover the cake next time. https://www.amazon.com/dp/B01FSID5C8/?ref=exp_justonecookbook_dp_vv_d
We hope you enjoy this cake more when you bake next time!🙂
Hi!
I made this cane twice but didnt succeed. A couple things happen:
– the cake is flat, and doesnt curve up in the middle
– the side is very rough and dry, the cake is also a little dry
– the bottom is a little rubbery
– my cake wont brown on the side and top and bottom like your photo, it’s very pale all around (But its cooked)
– the top and sides of the cake have visible holes
– when I put the damp towel on top, it makes the cake top sticky
A lot of things seemed to go wrong for me there… any tips are appreciated 🙂 i use a weigh and a thermometer so mayb it’s my folding? Thank you!!
Hi Zoe,
First of all, Thank you very much for trying this recipe!
-curve up, visible hole;
When you see visible holes in the cake, it’s possible that the egg’s temperature got too high during your beating.
Eggs foam well when the temperature rises, but care must be taken as the bubbles tend to grow accordingly.
Large bubbles swell in the oven at once, causing the surface to crack, leave holes or curve up in the middle.
-little dry, pale all around, sticky top;
Even you use the thermometer inside the oven, your oven may have a hot spot, and the temperature is not evenly distributed.
Adjust the baking rack position and baking time for your oven.
-Rubbery bottom;
Most likely due to over mixing cake batter or too much grease at the bottom when you bake.
Did you use parchment paper in the bottom of the cake pan? We recommend using parchment paper and lightly grease one side of the parchment paper. (not too much grease)
Melted butter should be at room tempurecher when you add it to the cake batter to be mixed in evenly.
And lastly, do not over mix the batter so that the gluten in the flour doesn’t act too much and casing the rubbery bottom. Mixing the cake batter from the bottom to up to incorporate more air in the batter is the best way to mix.
If all of this doesn’t make it better, it could be the flour itself. Try a different brand to see if it has a better gluten amount in it. (8% is best) https://www.justonecookbook.com/cake-flour/
We hope this helps, and your next baking will be successful! Good Luck! 😊
Hello, I followed the recipe but the batter didn’t rise. Any tips on how to fix this issue?
Hi Jarrin!
Thank you very much for trying this recipe!
We are sorry to hear your cake did not rise.
This sponge cake is a genoise cake, made by beating air into the eggs to make it rise rather than using a chemical leavening agent like baking soda or baking powder. Make sure to incorporate more air into the batter and keep it fluffy (For the sponge cake: Step 3-11).
We hope this helps!
Hello! I am wondering if I can use icing sugar and add mascarpone into the cream to stabilise it because I live in a country with a really hot weather but I am going to bake this in an airconditioned kitchen. Any tips on how much mascarpone to add or do I not add it at all? Thankyou! I can’t wait to bake this cake tomorrow.
Hi Amelia!
Hum… If you live in hot weather, how about making “Buttercream” with icing sugar and butter instead of mascarpone in the cream?
Hello, I made the strawberry shortcake and its the best I have ever made. However my sponge is on the rough and hard side, may I know what could have caused that? Thank you~
Hi Jasper!
Thank you very much for trying this recipe!
These are possible reason;
1) The egg foam did not reach the “ribbon stage.”
2) Your oven temperature is not optimal (it’s good to check/know your oven as each oven has hot spots, and sometimes the temperature is not accurate as the display says).
3) Maybe you didn’t measure the ingredients correctly (did you use a measuring cup or scale? If cup, We highly recommend the method Nami provided here (https://www.justonecookbook.com/faqs/#Measurements).
We hope this helps!🙂
Hi Nami! I’ve tried this recipe three times now and it always comes out flat and dense. I think it’s a problem with beating the eggs and sugar? I make sure that my eggs start at room temp and that the egg/sugar mixture gets up to 104. When I beat the eggs I get a lot of big bubbles on top, but not that nice, pale, homogenous mixture you have in your pics, no matter how much I whisk. Is it because I’m using a hand mixer? Do you have any other ideas?
Hi Frankie!
First of all, thank you for trying this recipe!
When using a handheld mixer, make sure you circulate it through the mixture as though it were a whisk. Also please note that it usually takes a longer time than a stand mixer. The egg foam passes through various stages during the beating and a lot of big bubbles on top are normal at the beginning. As you whip them they reach different stages. Hence your case, probably need to whisk more longer.
We hope this helps!😊