Learn how to make my recipe for a beautiful Japanese Sweet Rolled Omelet from thin layers of fried egg seasoned with dashi, soy sauce, and sugar. Enjoy this delicious and versatile tamagoyaki side dish for breakfast, bento lunch, or a standalone snack!
Whenever I feel there is a missing component in my meal, I often turn to Tamagoyaki. This classic Japanese side is colorful, and protein-rich, and my family loves it.
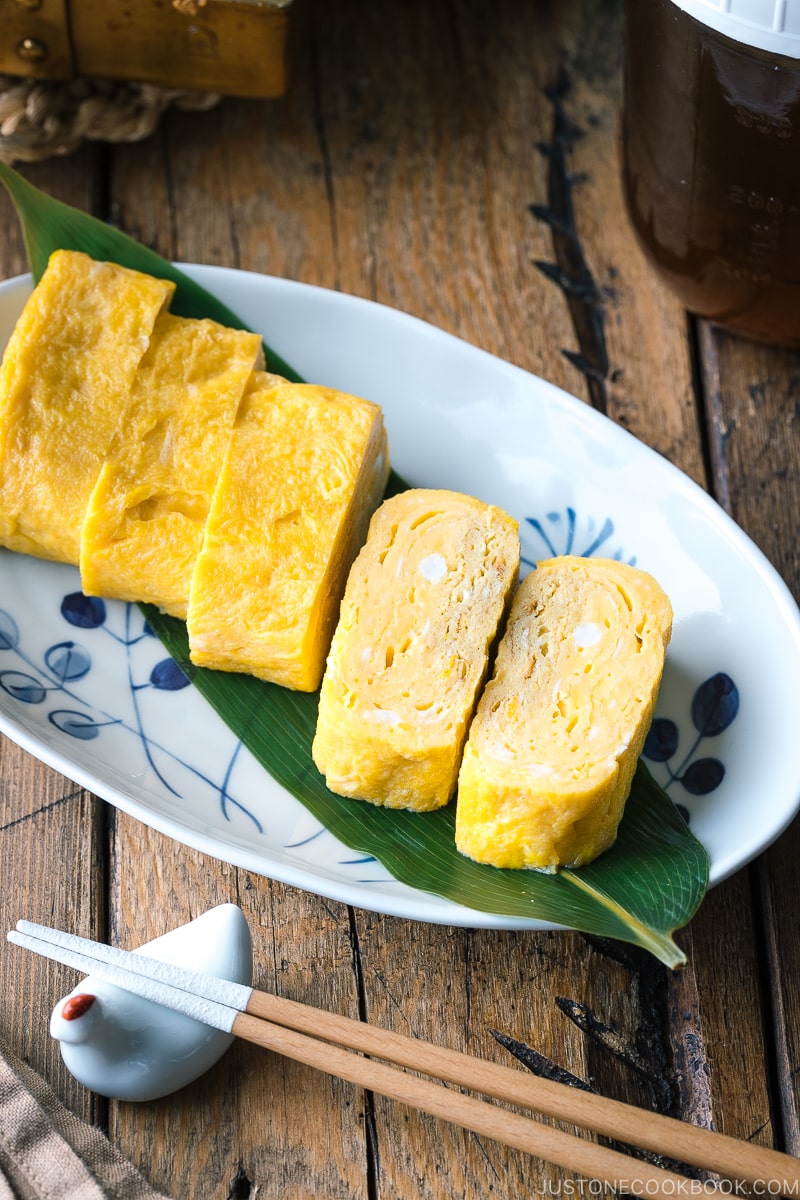
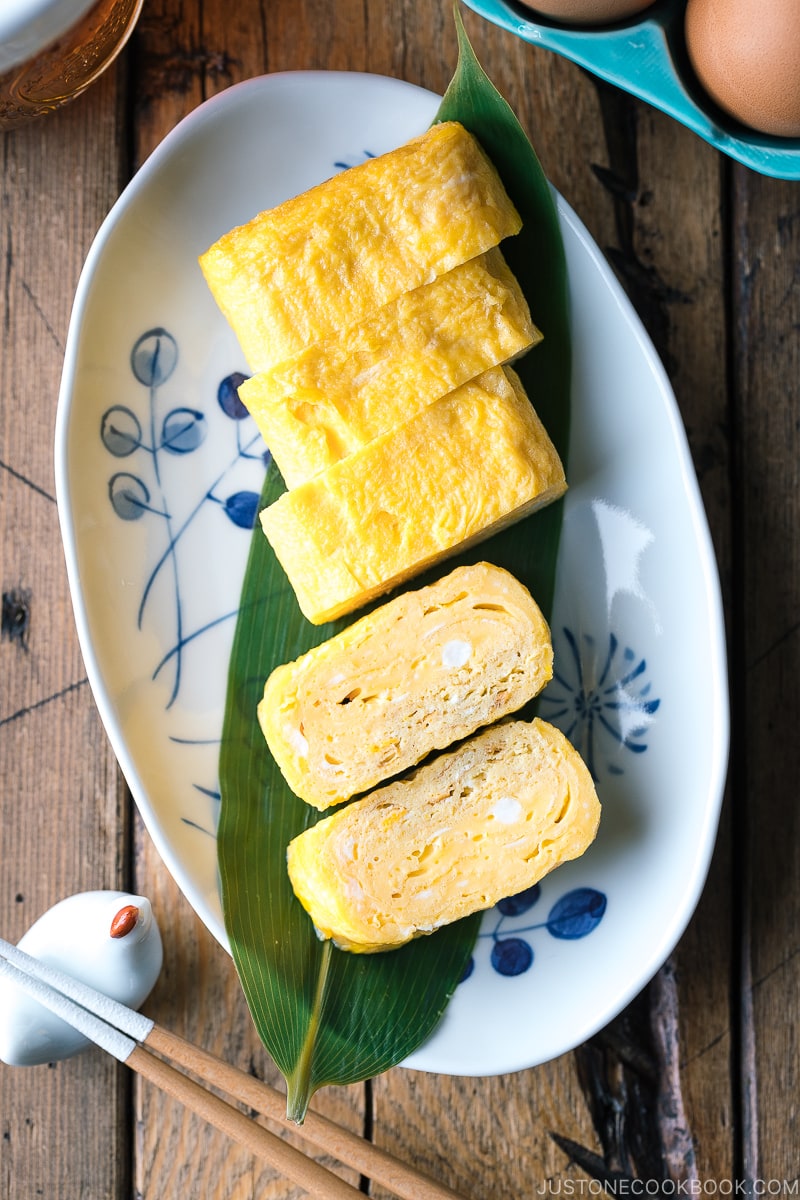
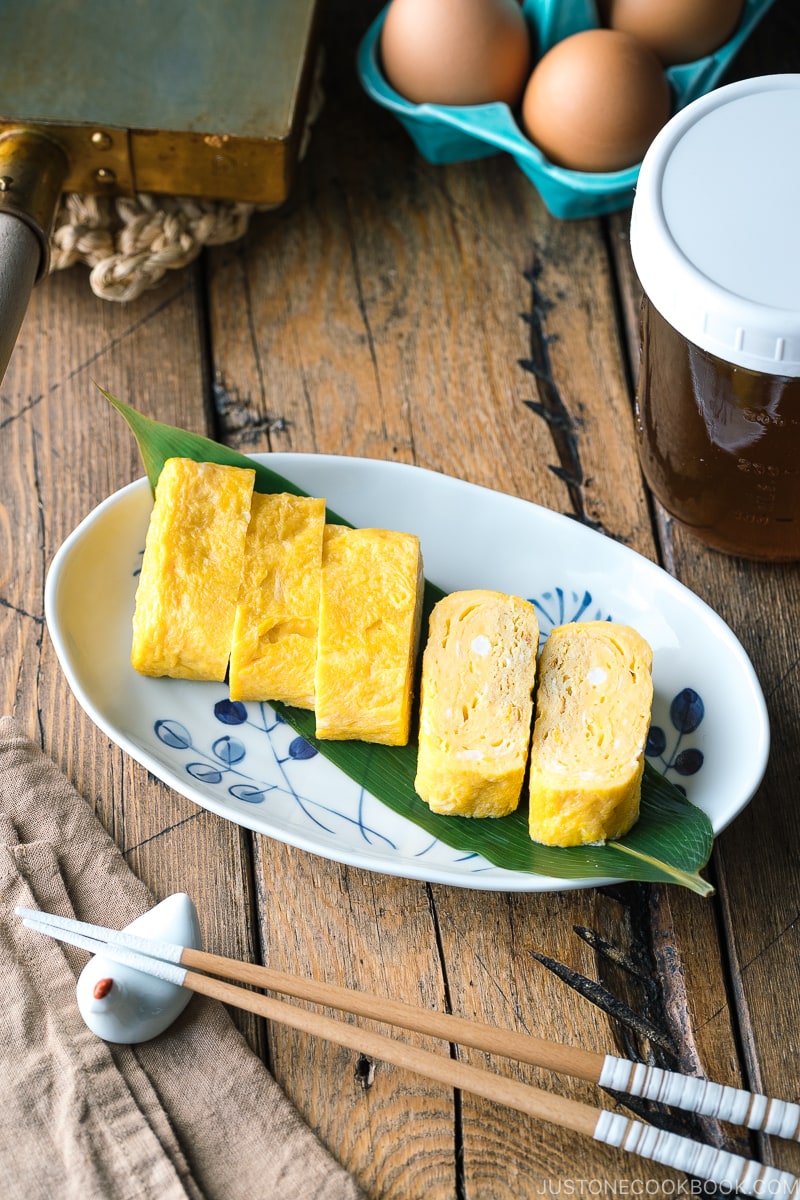
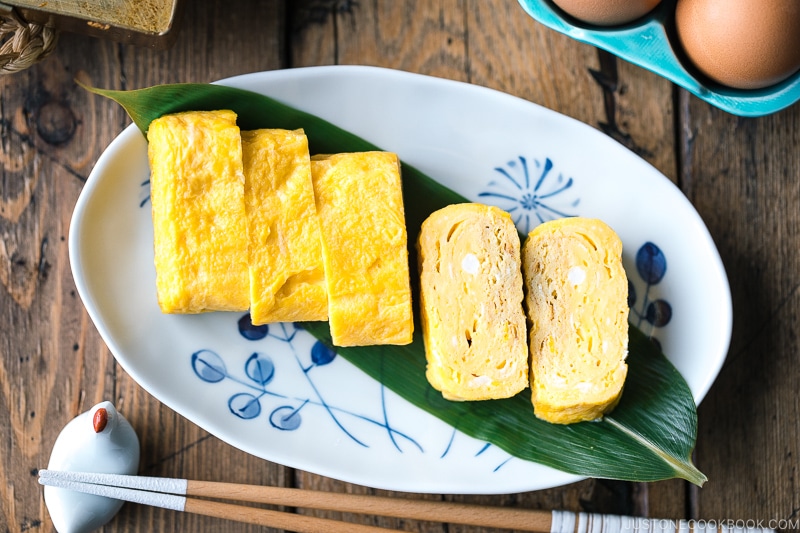
Today, I’m sharing a Tokyo-style Japanese Sweet Rolled Omelet (Omelette) or Atsuyaki Tamago (厚焼き玉子).
You might have seen this omelet made by Master in Netflix® show – Midnight Diner: Tokyo Stories.

You can find a version of Sweet Rolled Omelet featured in Season 2, Episode 9.
Please note: In this post, both ‘omelet’ and ‘omelette’ are interchangeably used for SEO purposes. Tamago (egg) is also written in both 卵 and 玉子.
What is a Japanese Rolled Omelet (Omelette)?
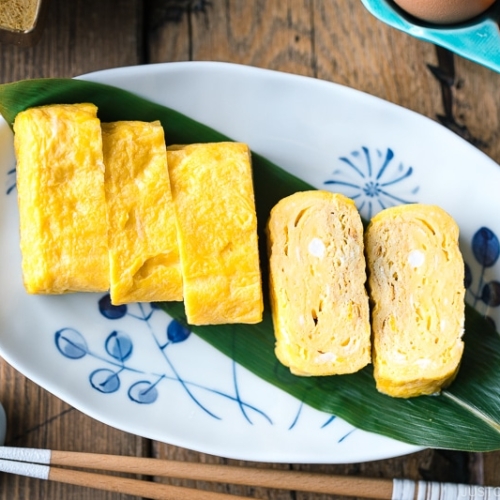
Tamagoyaki literally means ‘fried/grilled egg’, and it is made by rolling thin layers of seasoned egg mixture in a frying pan, on top of each other, and then shaped into a distinctive log. It is then cut into smaller slices that resemble gold bars.
You can serve it as a Japanese-style breakfast, as a side for your bento box, or as a topping for sushi, or eat it as a snack!
In Japan, not every tamogoyaki is created equally though. Different regions have their own versions, and they go by different names too. The biggest difference is tamagoyaki made in the Kanto (Tokyo) region is sweet and the ones in the Kansai (Osaka) region are barely sweet at all.
- Tamagoyaki (玉子焼き, 卵焼き) is a general umbrella term for various types of Japanese rolled omelettes. When I mention “tamagoyaki,” I refer to the simplest form of a rolled omelette without extra sugar or dashi (Japanese soup stock).
- Dashimaki Tamago (出汁巻き玉子) – Primarily enjoyed in the Kansai (Osaka) region, this rolled omelette features a dashi-forward, salty flavor due to a large amount of dashi used in the egg mixture. Among all the types of tamagoyaki, this is the most challenging to make as the egg mixture is very watery. As a result, dashimaki is very silky and tender and must be eaten immediately.
- Atsuyaki Tamago (厚焼き玉子) – Known for its sweetness, it is enjoyed in the Kanto (Tokyo) region and north of Kanto regions. With less dashi in the egg mixture, it’s much easier to make, but the sugar content makes it prone to burning. I prepare a golden sweet dashi called Kanro Dashi (甘露だし) ahead of time, making it easier to frequently enjoy atsuyaki tamago.
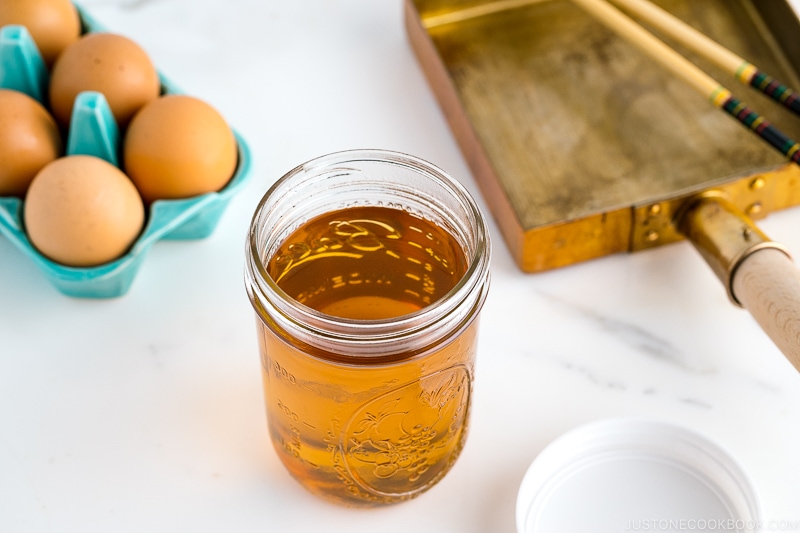
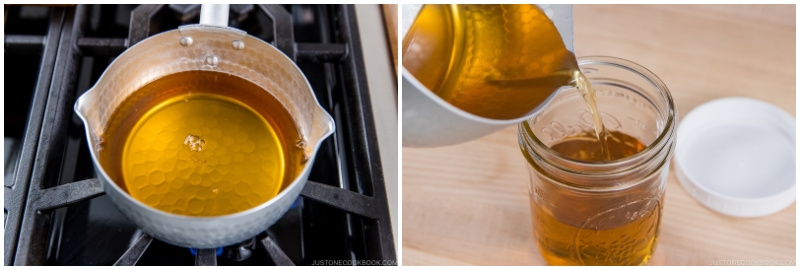
Kanro Dashi – Sweet Dashi

This golden liquid is called Kanro Dashi (甘露だし) in Japanese, but let’s just call it Sweet Dashi. The soup stock is a simple mixture of dashi, sugar, soy sauce, and salt, which is used to make the Tokyo-style Sweet Rolled Omelet (Atsuyaki Tamago) that I’m sharing here.
I usually make one batch (recipe below) and use the sweet dashi throughout the week. Any leftover can be used as a base in simmered foods or braised vegetables.
If you make tamagoyaki regularly, having this sweet dashi stashed away in the pantry will get you quicker to your meal prep.
3 Helpful Cooking Tools
1. Tamagoyaki Pan
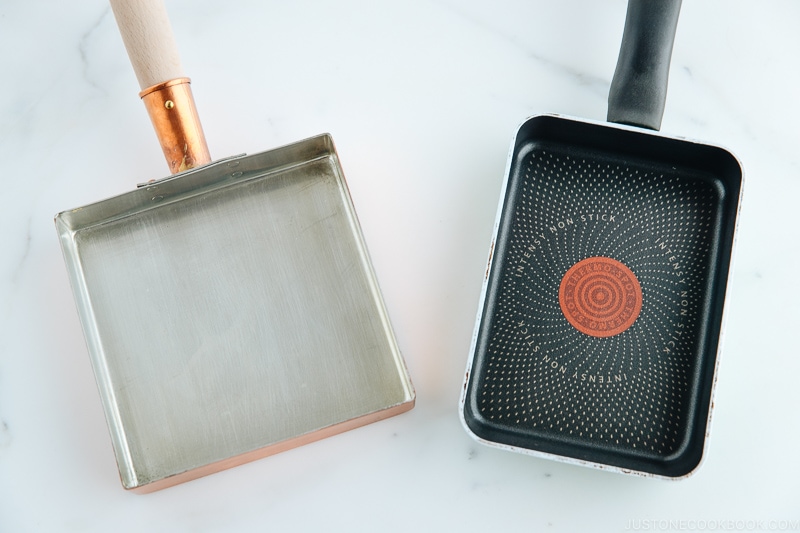
Kanto-style Tamagoyaki is made in a square tamagoyaki pan. Meanwhile, Kansai style is made in a rectangular pan, which makes it easy to roll up tamagoyaki made with more liquid (dashi).
No tamagoyaki pan?
No worries! I’ve made the rolled omelet with a round frying pan many times and it works just fine. The drawbacks are mainly appearance:
- It would be flatter – A round pan is typically wider and bigger than a Tamagoyaki pan so it will require more egg mixture to make each layer. If you use the same recipe, you will end up with a flatter rolled egg.
- It would be uneven – Because each layer of egg is rolled from a round shape, it’s natural that both ends don’t have complete layers of egg. The center of the tamagoyaki will still look nice.
- It would be looser – The curved edges of a round frying pan less ideal to “tighten up” the egg rolls.
Check out this picture below.
As you see, it’s all related to the “look” of the tamagoyaki. Even with a regular frying pan, you can still make pretty good tamagoyaki! The trick is to increase the egg mixture to create a complete look.
2. Long Cooking Chopsticks

Once you get used to making tamagoyaki, you will learn how to make it with chopsticks. Till then, there is absolutely no shame to use a spatula.
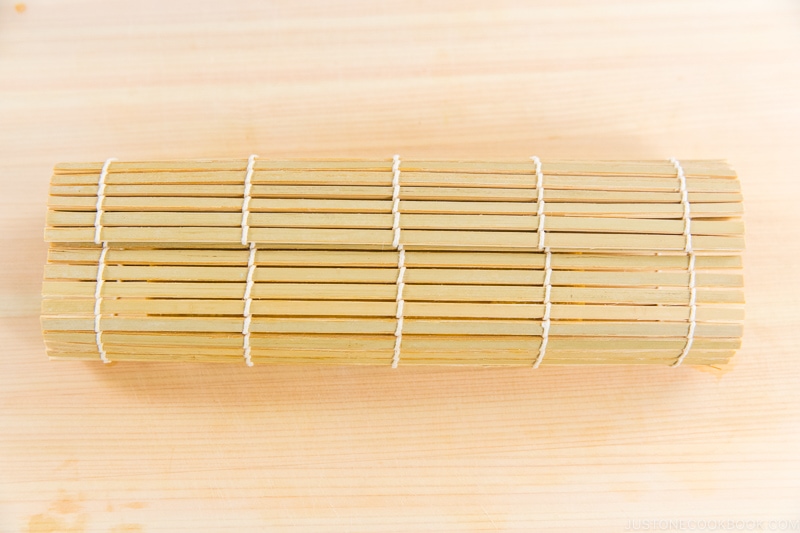
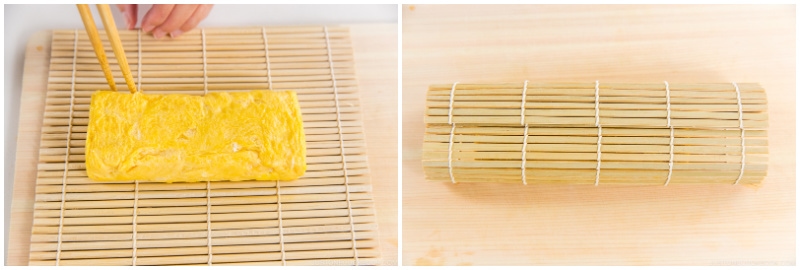
3. Bamboo Sushi Mat (Makisu)
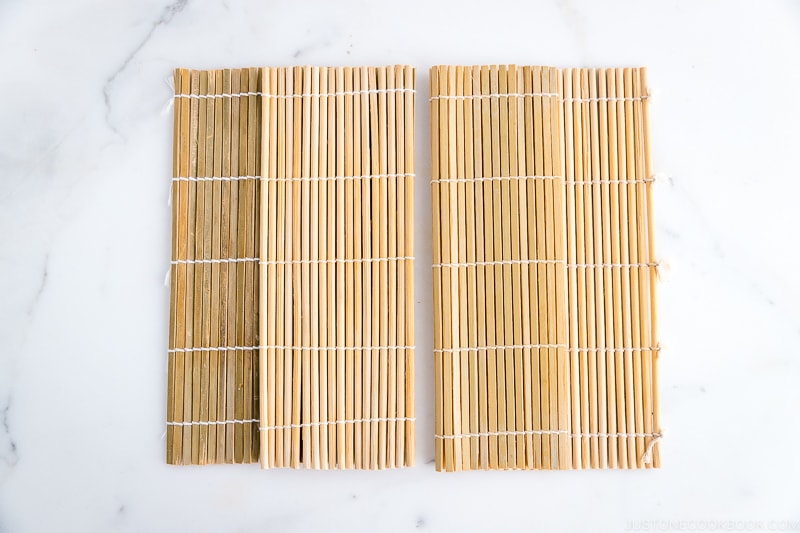
To give your rolled omelet the final touch up, a bamboo sushi mat called makisu comes in handy.
While your tamagoyaki is still hot, place it on the bamboo mat and gently roll up to perfect the shaping.
How to Make Sweet Rolled Omelet
1. Make sweet dashi
Make good dashi first, and mix with sugar, soy sauce, and a bit of salt.
The key is to make this Sweet Dashi ahead of time in a big batch. The sugar is completely dissolved, so it will distribute nicely into the egg mixture.
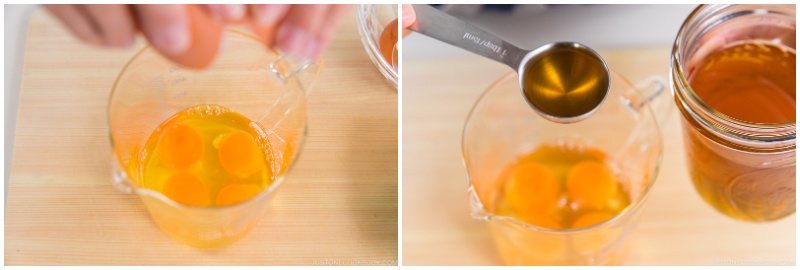
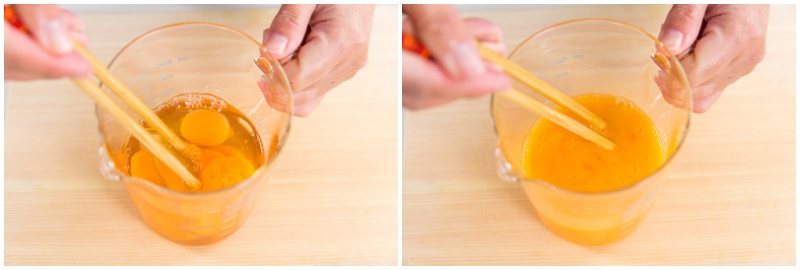
2. Prepare egg mixture
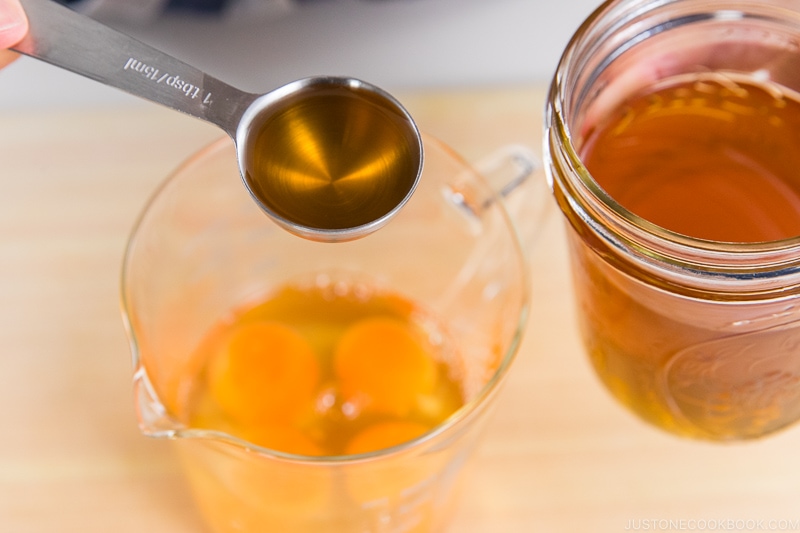
I made the 1:1 ratio so you will need 1 tablespoon of sweet dashi for 1 large egg. Don’t over mix the egg yolks and egg whites.
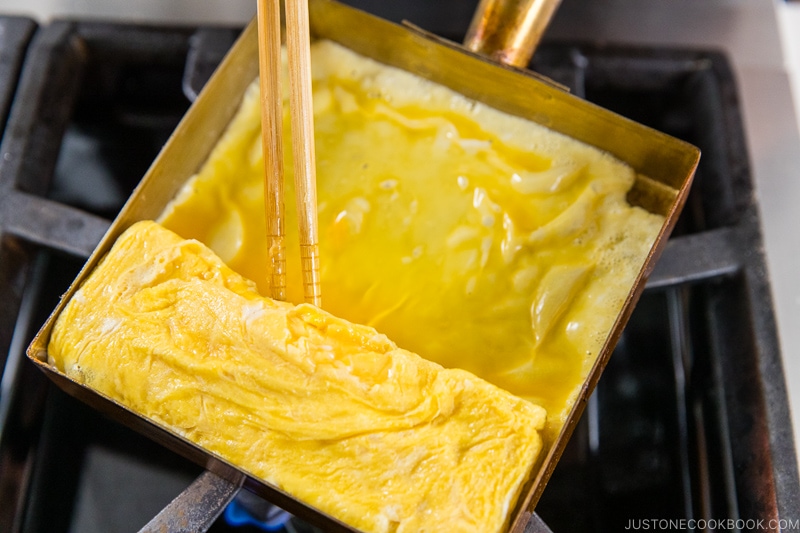
3. Start rolling!
Detailed step-by-step instructions are provided in the recipe card below.
4. Wrap Tamagoyaki with the sushi mat.
Wrap the hot tamagoyaki in the bamboo sushi mat to mold into a proper shape.
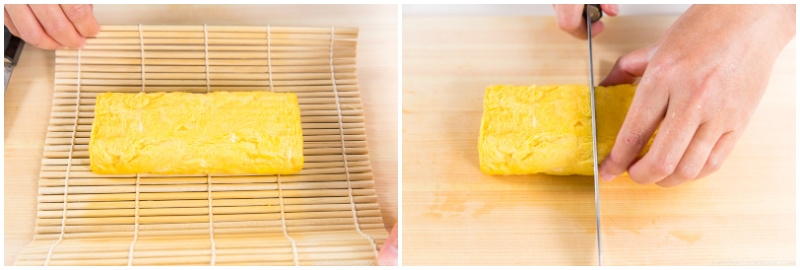
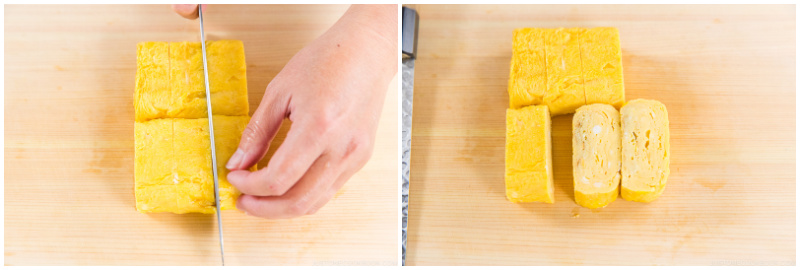
5. Cut into thick slices.
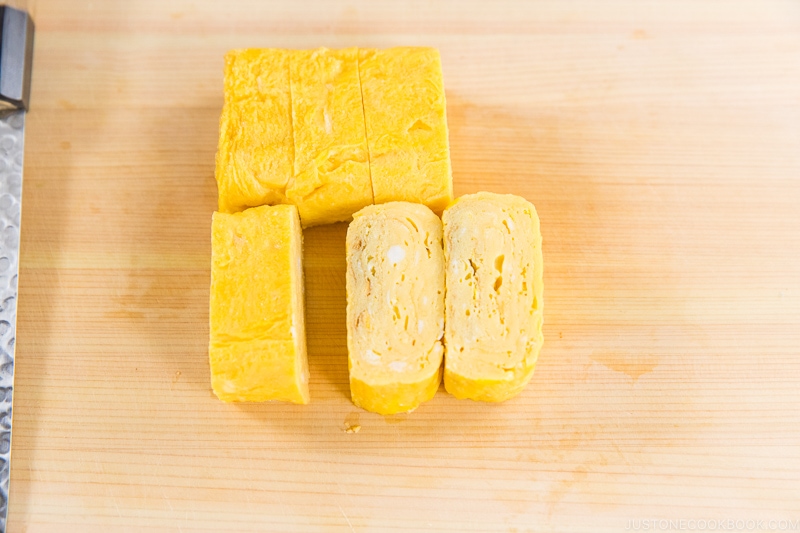
My tamagoyaki pan is 6 x 6 inches (15 x 15 cm), so I cut into 1 inch thickness. Feel free to adjust the thickness.
Final Cooking Tips
- Practice, practice, practice – I can’t tell you enough. I started making tamagoyaki since middle school. Yet, when I take a long break, my rolling skill gets rusty. After making more tamagoyaki (on consecutive days), I get the cooking rhythm back. Don’t get discouraged even after trying a couple of times. You just need a little more practice.
- Figure out what works for you – Despite my tutorial and tips, the result comes down to your own pan, heating element, and skill. Each plays a role, so pay attention to the details. Be flexible and adapt my technique to what you have.
What to Serve with Tamagoyaki
Tamagoyaki is really a versatile side, but I think it is extra special when enjoyed in a traditional Japanese-style breakfast. If you’re up for a hearty Japanese breakfast, try it on a weekend! Here are some ideas to serve tamogoyaki with:
- Steamed Rice
- Salted Salmon
- Spinach gomaae or Green Bean Shiraae
- Tsukemono (Japanese Pickles)
- Miso Soup
Of course, all these dishes can be prepared ahead of time, so you’re not spending the whole morning cooking everything at once.
Wish to learn more about Japanese cooking? Sign up for our free newsletter to receive cooking tips & recipe updates! And stay in touch with me on Facebook, Pinterest, YouTube, and Instagram.
Japanese Sweet Rolled Omelet (Tamagoyaki)
Ingredients
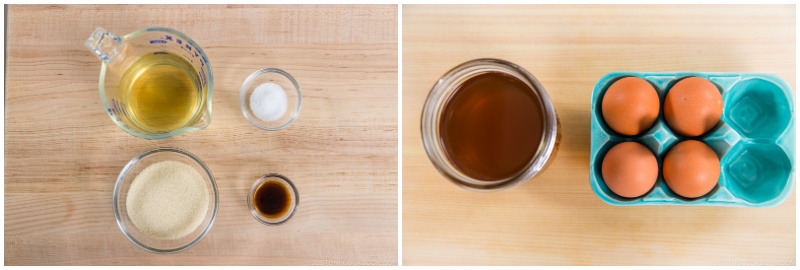
- 4 large eggs (50 g each w/o shell)
- 4 Tbsp sweet dashi (recipe follows)
- 2 Tbsp neutral oil (to cook the egg)
For the Sweet Dashi (makes 1¾ cups)
- 1¼ cups dashi (Japanese soup stock) (use standard Awase Dashi, dashi packet or powder, or Vegan Dashi)
- ½ cup sugar
- 1½ tsp soy sauce
- 2 tsp Diamond Crystal kosher salt
Instructions
- Gather all the ingredients for the sweet dashi and rolled omelet.

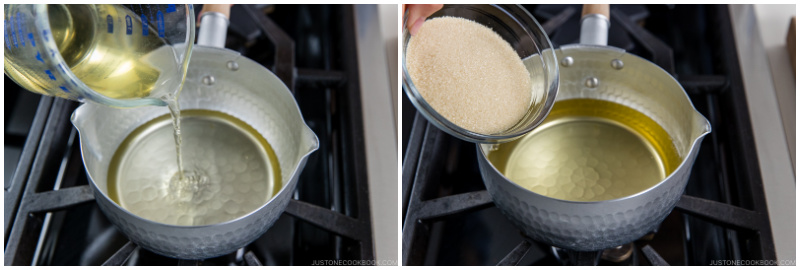
To Make the Sweet Dashi
- In a small saucepan, combine 1¼ cups dashi (Japanese soup stock) and ½ cup sugar.
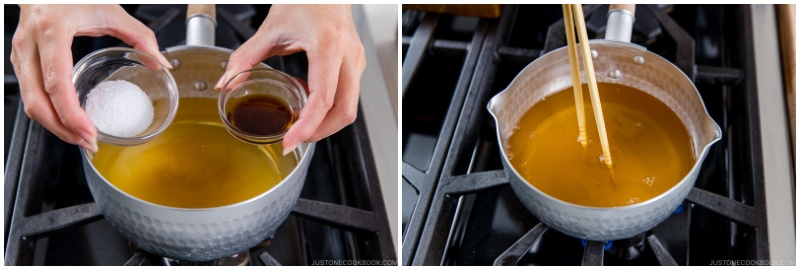
- Add 1½ tsp soy sauce and 2 tsp Diamond Crystal kosher salt. Turn the heat to medium and mix well together.
- When the sugar is dissolved, turn off the heat and transfer into a mason jar. Let cool completely before closing the lid. Store in the refrigerator for up to a week or freeze it in batches. For example, my tamagoyaki pan requires 4 eggs and 4 Tbsp sweet dashi, so I‘d freeze 4 Tbsp portions of sweet dashi. You can also use an ice cube tray to freeze it.
To Make the Egg Mixture
- In a bowl or a liquid measuring cup with a handle, combine 4 large eggs (50 g each w/o shell) and 4 Tbsp sweet dashi (1 Tbsp of sweet dashi per large egg). Depending on the size of your tamagoyaki pan (or frying pan), adjust the number of eggs.
- Using chopsticks, break the egg yolks and whisk to combine with the whites, but do not overbeat. It should have a thick and elastic consistency.
Final Tips Before You Start
- Please remember: 1) The pan must be hot when you add the egg mixture; otherwise, it will stick. 2) To adjust the heat, lift and move the pan away from or toward the heat source. 3) Use your arms and shoulders to move the pan toward you and roll the egg, instead of using just your wrist. It gives you better control and momentum. 4) Only the final layer matters for the look. Don’t worry about small tears and holes until the final layer. Make sure to maintain a good shape throughout cooking, as the final layer can’t hide an irregular shape. 5) Make 4–6 layers for a rectangular tamagoyaki pan and 2–3 layers for a round pan.
To Cook the Tamagoyaki
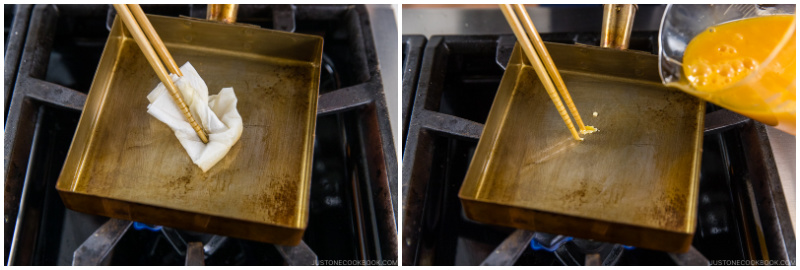
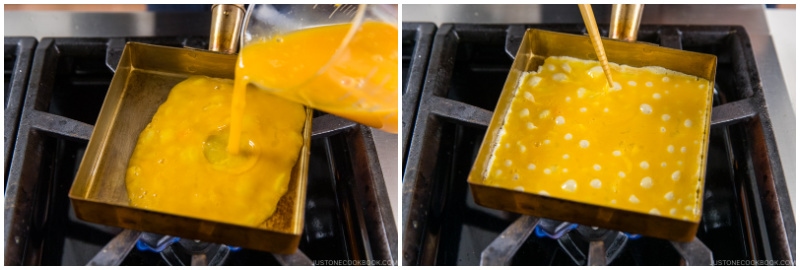
- Heat the tamagoyaki pan over medium heat. Add 2 Tbsp neutral oil to a small bowl. Grease the bottom and sides of the pan with a folded paper towel soaked in the oil. Make sure to wipe off any excess oil. Test the pan to see if it‘s hot enough: Dip chopsticks in the egg mixture and touch the tips to the frying pan. If the egg sizzles, the pan is ready. Note: I once tried to use a silicone brush instead of a paper towel, but it left excess oil that created an unpleasant look on the omelet with lots of small holes/bubbles.
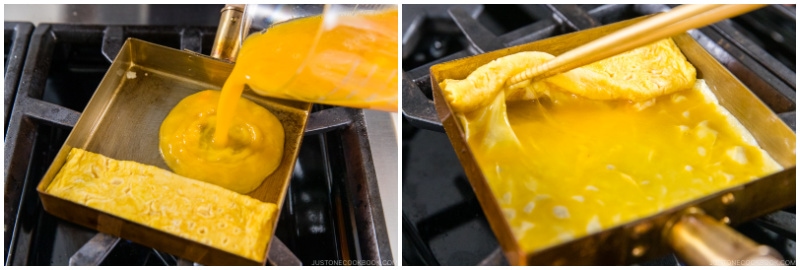
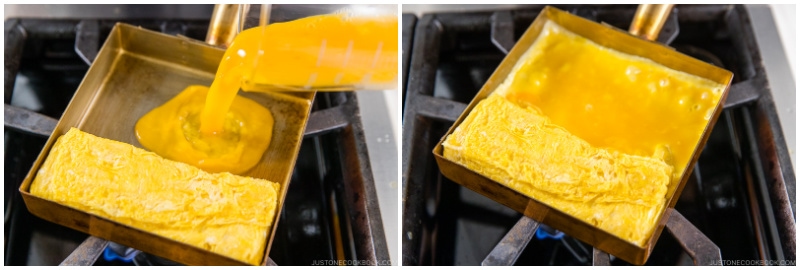
- The 1st layer: Pour in just enough egg mixture to cover the cooking surface. Pop the air bubbles with chopsticks and tilt the pan to fill the holes with excess egg mixture.
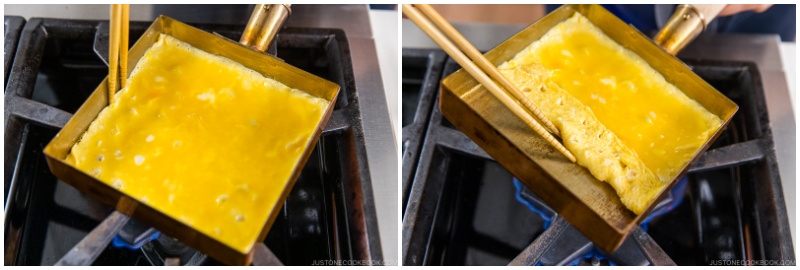
- When the egg is just set (the mixture is not runny but not cooked through), run your chopsticks along the edges to detach the egg from the pan‘s sides. Then, roll the egg toward you, starting from the far edge. If you use chopsticks, lift the frying pan toward you in a rolling motion to create momentum that will help you roll the egg. If you use a spatula, you may need to occasionally remove the pan from the heat so the bottom doesn’t get too hot.
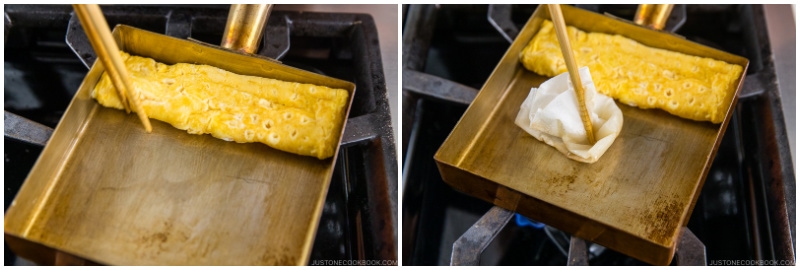
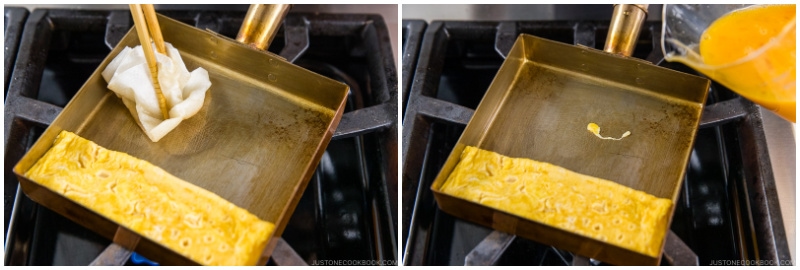
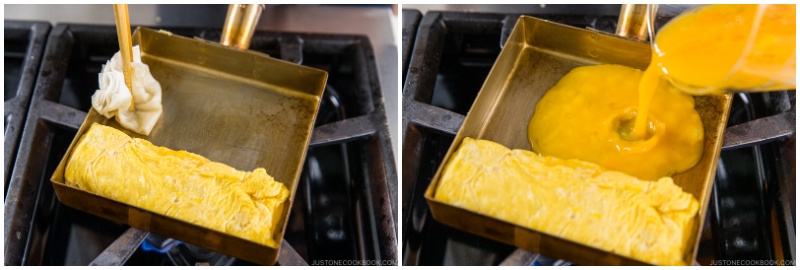
- Once you‘ve finished rolling up the omelet to the side closest to you, grease the bottom and sides of the pan with the paper towel soaked in oil (remember to remove any excess).
- Move the omelet to the far edge and grease the bottom and sides that you just uncovered. Test the pan again with a bit of the egg mixture. If it sizzles, the pan is hot enough.
- The 2nd layer: When the pan is ready, pour in just enough egg mixture to cover the cooking surface. Tilt the pan and lift the rolled omelet so some of the egg mixture goes underneath it.
- Pop the air bubbles with chopsticks and tilt the pan to fill up the holes with excess egg. When the egg is just set, run your chopsticks along the edges to detach to egg.
- Roll the omelet toward you again. Once you've finished, grease the bottom and sides again. Move the omelet to the far edge. Grease the pan again and test to see if it‘s hot enough.
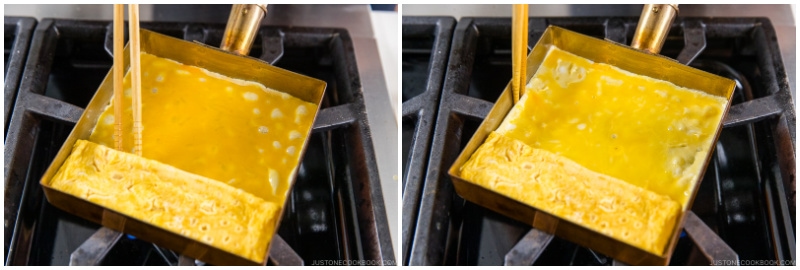
- The 3rd layer: Repeat cooking another layer of the egg mixture. You can create momentum with the pan using your arm and shoulder to roll the egg as it gets heavier.
- The 4th layer: Repeat cooking another layer of egg. When the pan is hot, pour in the egg mixture and tilt some of it underneath the rolled egg. Pop the air bubbles, detach from the edges, and start rolling.
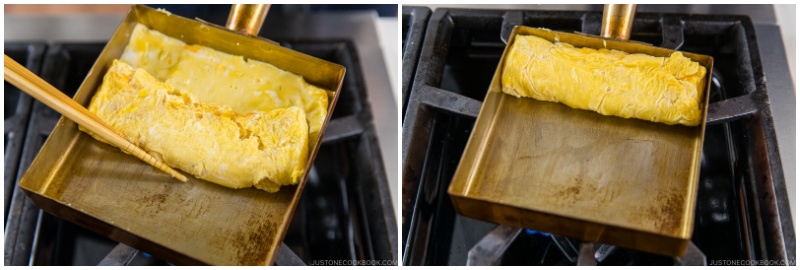
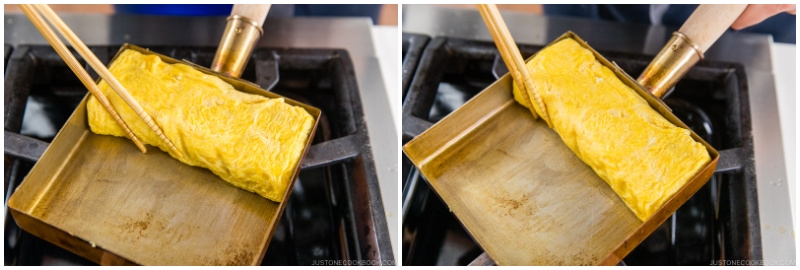
- The final/outer layer: Grease the bottom and sides again. Add the remaining egg mixture, lift up the rolled omelet, and pop the air bubbles. Carefully roll the final layer. This is the outer layer, so make sure not to break it.
- Shape the rolled egg, pushing it against the edges and corners of the tamagoyaki pan.

To Mold the Omelet in a Sushi Mat
- Wrap the rolled omelet in a bamboo sushi mat for 5 minutes.
- Open the sushi mat and cut the rolled omelet in half.
- Then cut each half into 3 equal pieces. Serve immediately or at room temperature. Optionally, you can serve with grated daikon drizzled with soy sauce.
To Store
- You can keep the leftovers in an airtight container and store them in the refrigerator for up to 2–3 days and in the freezer for 2 weeks.


Great instructions! Loved it. Rolling it up in the mat was a game-changer!
Hi Louise, Thank you very much for trying Nami’s recipe!
We are glad to hear Nami’s instruction was helpful. Thank you for your kind feedback!
I just made Tamagoyaki for the first time tonight and served it with rice and miso soup. I have to say I am extremely happy with how it turned out. We are not use to our eggs being on the sweet side so I think my next try I will cut down on the sweet dashi form a tablespoon to a teaspoon per egg to see if that is better for the family. but it was so good. I would also try to serve it with a salmon filet as well next time. this was so good.
Hi Chrissie! Thank you very much for trying Nami’s recipe and sharing your experience with us!
We are glad to hear you enjoyed Tamagoyaki!😊
Christmas Day 2021. I was craving miso soup. Started with Iriko dashi (anchovy). 6 hours later, still making food from your recipes. The tamagoyaki came out great! I had all the ingredients in my pantry, I am just missing the skills. I used a silicon spatula to run under the edge, then chopsticks to roll. I used a larger 9×9 square frying pan, so it came out thinner & longer. I am definitely going to buy a specific tamagoyaki pan.
1) The tip to use a paper towel for oil is no joke – it is essential!
2) Compressing after cooking makes a big difference
Your instructions are the BEST!
I can’t really articulate why, but the way you explain how to make something just works!
I’m in Huntington Beach, CA.
We have Tokyo Central (Marukai), Mitsuwa, 99 Ranch Market, etc. nearby
I used to buy tamagoyaki, but after following your instructions, I can now make it. Yay!
Just ordered your OSECHI book tonight. Just in time to start 2022.
Hi Mariah! Thank you very much for trying Nami’s recipes and purchasing Nami’s cookbook! We hope you enjoy making Osechi for the new year!
Happy Holiday!💞
Disaster haha
Not sure what happened, end up putting the entire sweet dashi to the egg mixture…
It’s like cooking salty egg soup
Wish you can have the sweet dashi amount just for one time use
Hi Joanie! Thanks for trying this recipe and sorry yours ended up with egg soup…
I don’t know how I can make it even more clear as I wrote specifically “4 Tbsp Sweet Dashi” in the ingredient list and “combine 4 eggs and 4 Tbsp sweet dashi” in the instruction. 😅 I can and will make it bold, but that’s pretty much I can do to make it more obvious.
Depending on a tamagoyaki pan size, some people may need just 3 eggs and 3 Tbsp Sweet Dashi. And it’s so much more work to make one portion of sweet dashi (whether it’s 3Tbsp or 4 Tbsp) and it makes sense to make a big batch and keep it in the fridge or freezer. Hope this helps!
Is your tamagoyaki pan cooper? Looking for one.
Hi JCMeyer! Thank you for trying Nami’s recipe!
Nami used this Yamagoyaki pan: https://www.amazon.com/dp/B001U07R6Y?ref=exp_justonecookbook_dp_vv_d
We hope this helps!
we make this time and time again! so easy and delicious!
Hi Ash! We are so happy to hear you enjoyed Tamagoyaki!
Thank you very much for trying Nami’s recipe and for your kind feedback!
Thank you for all the wonderful recipes Nami!
If I want to make a big patch beforehand and freeze it how long you reckon it’ll stay good in the freezer?
Hi Jenny! Thank you very much for trying Nami’s recipe and for your kind feedback!
You can keep this in an air-tight container and store them in the freezer for up to 2 weeks.
We hope this helps!
Hi Namiko, thank you so much for this recipe. I even bought the exact pan you showed to try to make this. I haven’t tried it yet, but I’m sure it will satisfy my craving. Love the detailed instructions. My printer leaves spaces where I can make hand written tips as I go (on the hard copies I print out.
Love it. Thank you again.
Hi Terry! Thank you very much for reading Nami’s post and trying her recipe!
We are so happy to hear you enjoyed many recipes from our site.
We hope your Tamagoyaki turns out beautifully with the new pan. Good Luck!
Hi Nami! I enjoy everything you post on Facebook and Instagram. My mother was Japanese from Kagoshima and following you brings back wonderful (and delicious) memories. I get excited when you post a recipe/dish that I remember her making but I never learned how to make it. So glad to connect with you & JOC!!! 😍🤗🥰
Hi Linda, We couldn’t be happier to hear how much joy and excitement Nami’s recipe has brought you!
Thank you very much for your kind feedback and for trying many recipes!
From the time I was 13-14 YO until I was in my mid-30’s, my mother’s best friend was a lady of Japanese descent. She taught us many things about Japanese cooking. When I was around 24-25 YO, she and my mother and I happened to be shopping at some Japanese markets in the Miami area. When she learned it was my birthday, she bought me a set of sushi plates, sauce dishes, rice/soup bowls and chopstick rests in an exquisite pattern of blue on white bamboo/leaves. They are so precious to me that I scarcely ever use them, but I am now 62 and she and my mother are both gone many years, but I still have the entire set intact. Anyway, She taught us how to make these omelettes. The differences in hers were that they were mixed in a blender with soy, mirin, sugar and chopped pieces of white fleshed fish. We always used turbot. It was inexpensive then. Now I never see it. I haven’t made them n awhile, but I suppose the next time I do, I’ll substitute cod or orange roughy for the turbot. I have a rectangular tamagoyaki pan, but I like the square in in your photos better because it makes a larger roll. I may look for one.
Hi LORRAINE, Aww,☺️ What a lovely story! Thank you very much for sharing it and your cooking experience with us.
The Omelet you mentioned sounds like a Datemaki (Japanese Sweet Rolled Omelette) 伊達巻. We hope you enjoy this post too: https://www.justonecookbook.com/datemaki-sweet-rolled-omelette/.
Happy Cooking!
Thank you so much for your wonderful recipes and videos. I made this recipe exactly as you described and it turned out perfectly. It was delicious!
Hi Linda! We are glad to hear you enjoyed the Japanese sweet rolled omelet!
Thank you very much for trying Nami’s recipe and for your kind feedback.
Hi Nami, thanks for sharing this recipe! Going to try it out today 🙂 I wonder if the previous tamagoyaki recipe which you shared (https://www.justonecookbook.com/tamagoyaki-japanese-rolled-omelette/) is also a Atsuyaki tamago? I’m curious too, what vegetables can be used for simmering with the leftover sweet dashi?
Hi Ryphez, Thank you very much for reading Nami’s post and for your kind feedback!
The recipe you linked in your comment is Dashimaki Tamago, and it’s a fluffy and moist egg roll that less sweet than this Atsuyaki Tamago. We hope you will give both a try. 😃
Leftover Kanro Dashi (Sweet Dashi) can be used to simmer any vegetables. Carrot, Potato, Kabocha, Shiitake mushroom, Snow pea, etc. It’s a basic Japanese condiment, so you can adjust the saltiness or sweetness for your liking by adding extra soy sauce or sugar to the simmered dish to enjoy.
We hope this helps!
Thanks much for the detailed reply! Will share my pic of the Atsuyaki Tamago on Instagram soon.😁
Hi Ryphez! You are welcome! We can’t wait to see your Atsuyaki Tamago on Instagram. So excited!
I used to make his more often than I do lately because now I cook only for myself. I used to make it with the nori layer most of the time and my husband told people it was spinach. I never did tell him the difference. 😀
Hi Babara,😄Thank you very much for sharing your story!
Japanese rolled omelet has so much variety. Have you tried adding a slice of cheese in the middle? It’s also good too.☺️
Hello
I enjoy your recipes for Japanese food. Thank you.
A suggestion (if not already implemented) is to have the ability to download the recipe in .pdf format for easy printing.
Thanks, Iain
Hi Iain, if you hit print, most browsers allow for you to pick “Save as PDF” and it will just save it into PDF form for you. Maybe you are looking for a “Print Recipe” button and formatting?
Very good. Thank you Nancy, Iain😁
Hi Nami! I’m enjoying your recipes very much! I was wondering if it’s possible to add some basic nutritional information to your yummy recipes, such as calories, salt grams, etc? Thank you so much!
Hi Susan! My team has been working on nutritional information (you may notice some of the recipes already have one) and will add one to this recipe, too! Thank you for trying my recipes!