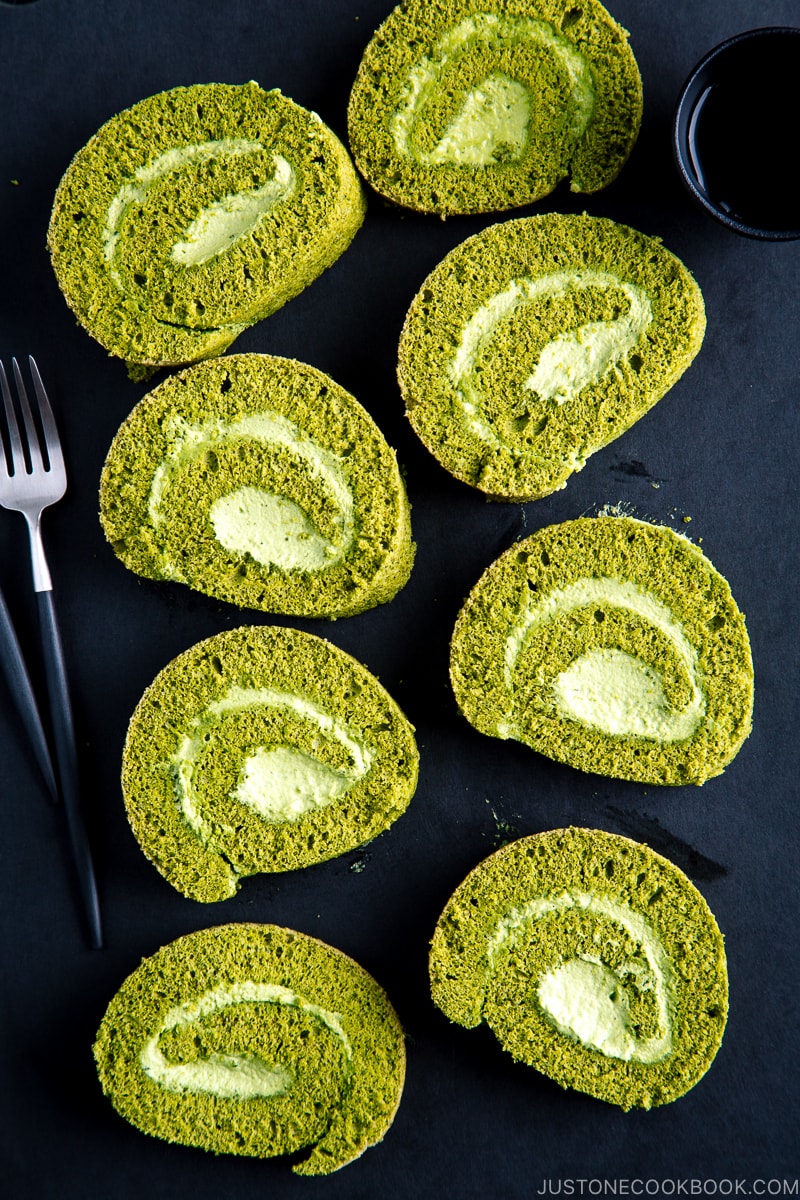
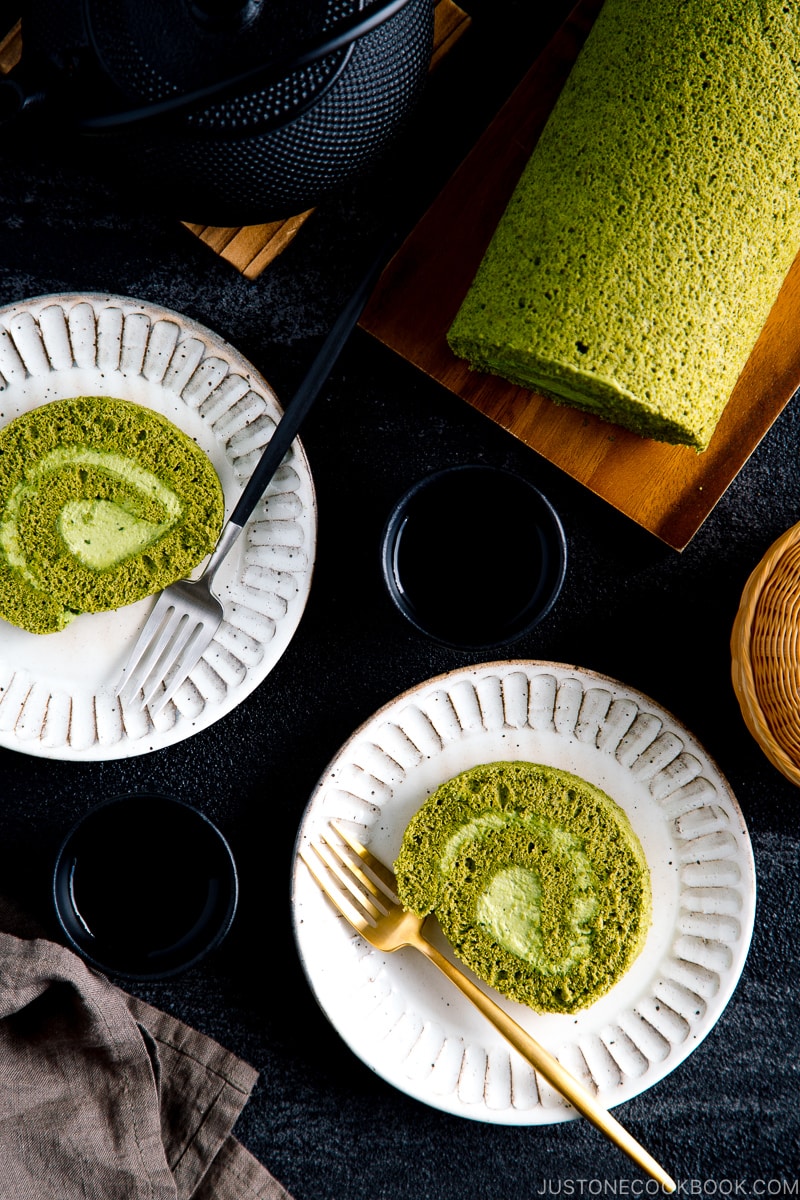
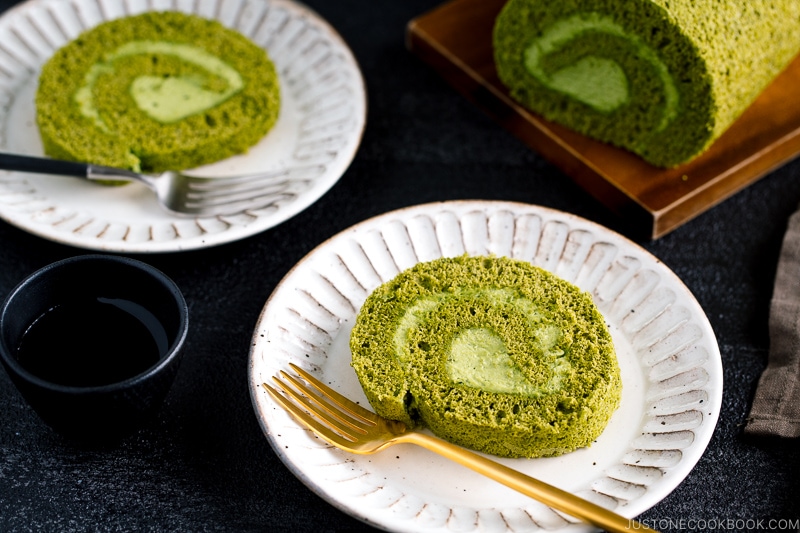
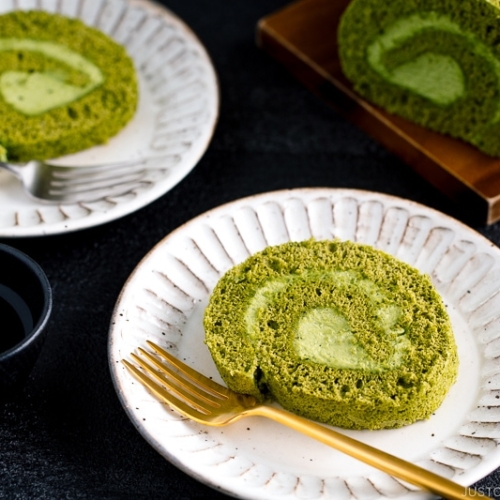
Matcha Swiss Roll is a fluffy sponge cake with a swirl of fresh matcha cream filling. Light, creamy, and mildly sweet, it‘s a delicious afternoon snack or post-dinner dessert to enjoy with coffee or tea. With its festive vibrant color from the green tea powder, this roll cake will be an instant favorite for any celebration, too.
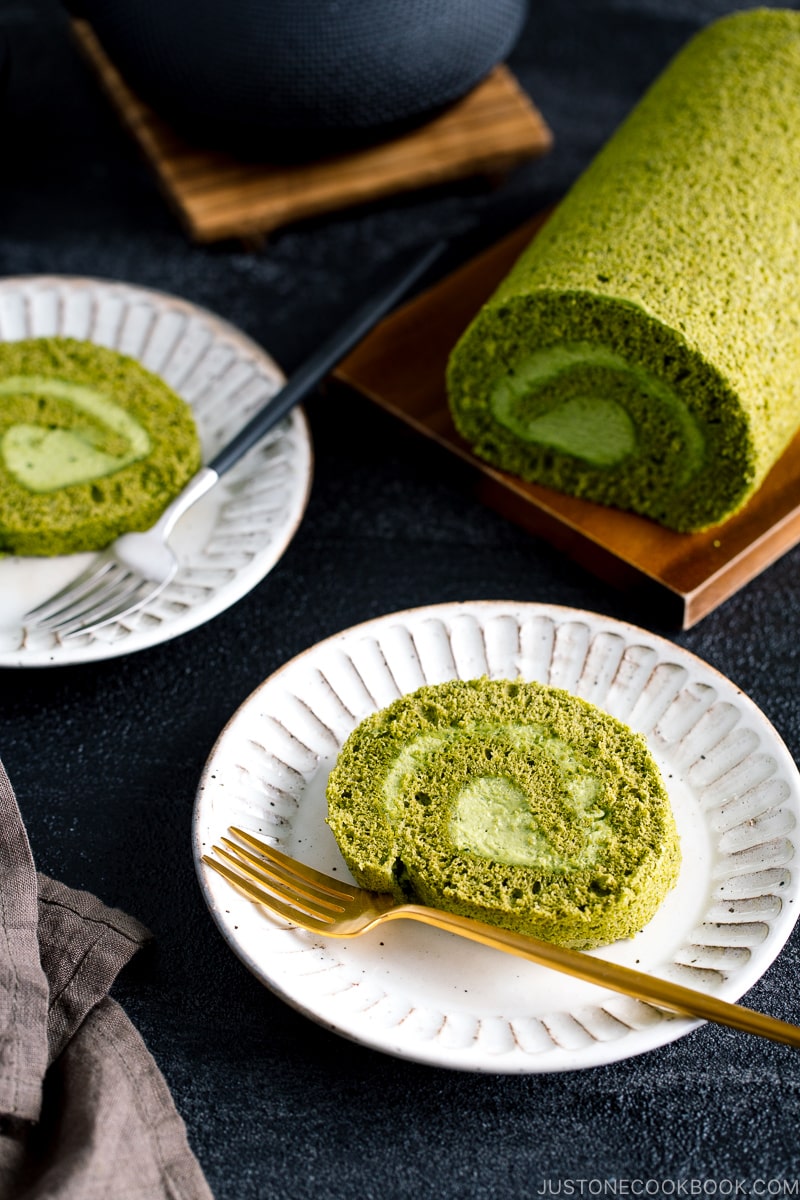
Swiss Rolls, or Roll Cakes (ロールケーキ) which we call in Japan, are a type of sponge cake filled with whipped cream, buttercream, and custard cream, and sometimes include fruits like strawberries.
Just like any other dessert, we do have Matcha Swiss Roll (抹茶ロールケーキ) and it’s always a popular choice in Japan. If you have a soft spot for anything matcha (green tea), I am pretty sure you’re going to be as obsessed with this cake as I am.
What Differentiate Japanese Roll Cake from Swiss Roll
1. Not so sweet
When it comes to Asian sweets, you have to know one more expression to complement the dessert, and that is “oh, this dessert is not so sweet.” What it really means is the sweetness is just right.
Swiss rolls are of western origin, but I want to emphasize that the Asian version of Swiss rolls is guaranteed not so sweet. If you enjoy not-so-sweet desserts, this one is for you.
2. Light and fluffy
The fluffiness and light texture of the sponge cake come from the egg whites that are beaten to stiff peaks, like in a chiffon cake recipe. Besides fresh whipped cream for the filling, there is no butter or oil added to the recipe. I know this makes us all feel less guilty about eating more than one slice!
3. Unique flavors
Classic Japanese roll cakes are very similar to western Swiss rolls. You can find flavors such as vanilla, cocoa, chocolate, tiramisu, coffee, strawberry, lemon, raspberry, and so on. Japanese (and some other Asian) varieties include matcha, black sesame, chestnut, purin (crème caramel), and interesting flavors like almond jelly, and mitarashi dango (see below).
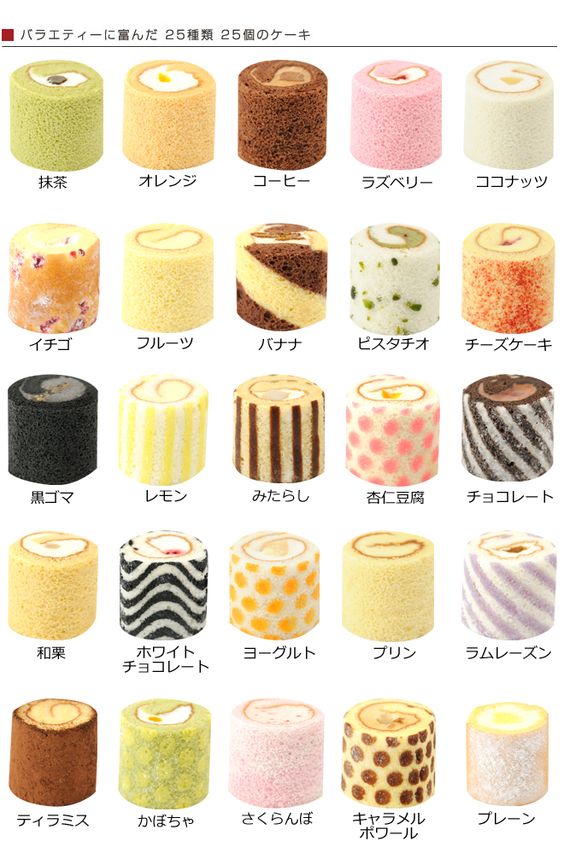
Endless choices of roll cakes! (image source)
5 Tips to Remember When Making Matcha Swiss Roll
1. Egg yolks at room temp & egg whites in the fridge
You can make the sponge cake two ways: The Genoise Method (The whole eggs are combined with sugar and gently heated over simmering water, then whipped) or the Biscuit (bees-kwee) Method (the whites and yolks are whipped separately and then folded back together). The Genoise method creates a more moist texture but the Biscuit creates a lighter texture.
I chose the Biscuit method this time. When you separate the eggs, keep egg yolks at room temperature and egg whites in the fridge. As you may know, already most Japanese recipes tell you to beat cold egg whites without cream of tartar to make meringues.
2. Remember to “fold in”
Folding is a very gentle way of mixing additional ingredients into a batter to prevent entrapped air from escaping. The way to do this is to first run the spatula (or whisk) around the side, then along the base of the bowl. Now fold the mixture over onto itself. Rotate the bowl to 90º and repeat until combined.
3. Don’t overbake
Because it’s a thin cake, it’s best to avoid baking slowly; otherwise, the cake will be dry. Therefore, bake around 375ºF (190ºC) for 10-12 minutes, until the sponge springs back. The bottom of the cake pan will become the surface of the cake, so we’ll make sure it doesn’t get burnt on the bottom.
4. Remove the parchment paper immediately
You will need to remove the cake immediately from the pan after baking, in order to prevent the cake from drying. But, what do you do with the parchment paper?
There is a whole discussion on when to remove parchment paper – right after baking OR after cooling down. I remove it while it’s warm and it comes off beautifully. I don’t like the parchment paper become too moist while cooling down, but it’s up to you. I think either way works.
5. Pre-roll the cake while warm
It’s easier to roll up the cake when it’s still warm and flexible, so I roll up the cake first and let it cool down. The cake has muscle memory so it’s easier to roll up again with fillings. Some people don’t pre-roll but score on top of the cake before rolling so it’s easier to roll. Some don’t do either one but still make the beautiful roll. Again, it’s also up to you.
Delicious Matcha Whipped Cream Filling
Some matcha roll cakes include anko, sweet red bean paste, inside the whipped cream filling. The red bean gives some texture to the soft sponge and creamy whipped cream. Even though I love sweet red bean paste, I prefer keeping it out of my cake to keep the fluffy texture in my mouth. When I brought this matcha roll cake to my friend’s house, she served the cake with red bean ice cream and it was wonderful!
For the whipped cream filling, I like mine to enhance more matcha flavor, so I included matcha powder in my whipped cream, but that’s optional. Simple white-color whipped cream will give a nice contrast to the matcha cake, and it looks pretty and delicious too!
If you visit Japan, you will find them all over the country – from fancy versions at bakeries and pastry shops to more affordable ones at grocery stores or convenience stores. But don’t be fooled by the “grocery store” or “convenience store” label. The quality is still reasonably good.
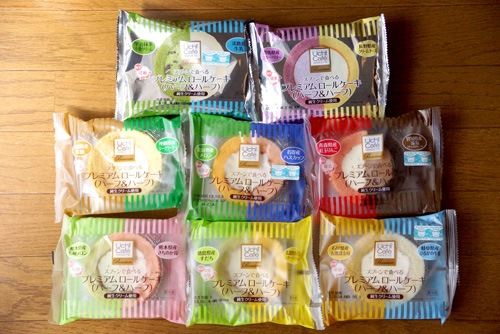
Roll cakes sold at a convenience store
I feel this rolled-up cake has a lot more casual look than a classic round cake, yet it’s still elegant enough that you can bring it to a potluck or serve it at your dinner party to wow your guests. For more matcha dessert recipes, click here.
I hope this Matcha Swiss Roll recipe will inspire you to try making it at home. You will need to apply a few techniques but it’s really not as difficult as you may think.
Other Delicious Matcha Recipes
Wish to learn more about Japanese cooking? Sign up for our free newsletter to receive cooking tips & recipe updates! And stay in touch with me on Facebook, Pinterest, YouTube, and Instagram.
Matcha Swiss Roll (Roll Cake)
Video
Ingredients
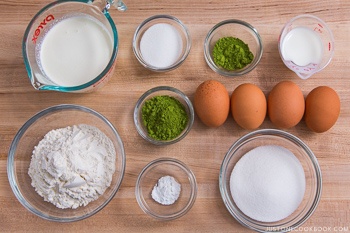
- 4 large eggs (50 g each w/o shell)
- ¾ cup cake flour (weigh your flour or use the “fluff and sprinkle“ method and level it off; you can make homemade cake flour)
- ½ tsp baking powder
- 2 Tbsp matcha (green tea powder) (1 Tbsp matcha is 6 g)
- ½ cup sugar (divided)
- 3 Tbsp whole milk (microwave until warm to the touch)
For the Matcha Cream Filling
- ¾ cup heavy (whipping) cream (chilled)
- 1½ Tbsp sugar
- 2 tsp matcha (green tea powder)
Instructions
- Before You Start: Please note that this recipe requires 30 minutes of resting time and 2 hours of chilling time.
- Gather all the ingredients. I highly encourage you to weigh your ingredients using a kitchen scale for this recipe. Click on the “Metric“ button at the top of the recipe to convert the ingredient measurements to metric. If you‘re using a cup measurement, please follow the “fluff and sprinkle“ method: Fluff your flour with a spoon, sprinkle the flour into your measuring cup, and level it off. Otherwise, you may scoop more flour than you need.

- Preheat the oven to 375ºF (190ºC). For a convection oven, reduce the cooking temperature by 25ºF (15ºC). Line a 15- x 10-inch (38- x 25-cm) jelly roll pan with parchment paper.
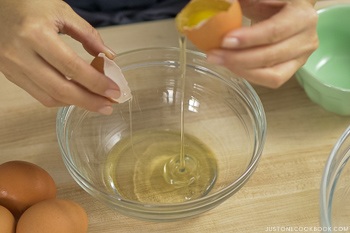
- Separate 4 large eggs (50 g each w/o shell) into egg yolks in one bowl and egg whites in another. Keep the whites in the refrigerator and the egg yolks at room temperature.
To Make the Cake Batter
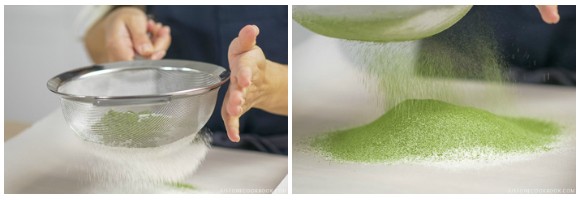
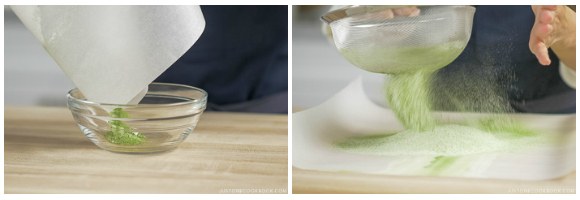
- Prepare a work surface with a sheet of parchment paper. To a fine-mesh sieve, add ¾ cup cake flour, ½ tsp baking powder, and 2 Tbsp matcha (green tea powder). Sift these dry ingredients onto the parchment paper.

- Use the parchment paper to transfer the dry ingredients to a bowl. Repeat sifting and transferring the dry ingredients two more times (for a total of three times). Set aside. Tip: Matcha is a very fine powder that’s difficult to blend into a batter without clumping. Sifting the dry ingredients three times ensures that the matcha and flour are well blended with no lumps and that air is incorporated into the mixture so it making it easier to blend into the batter.
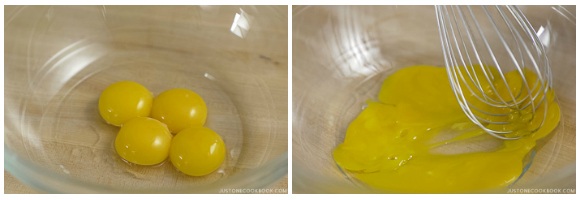
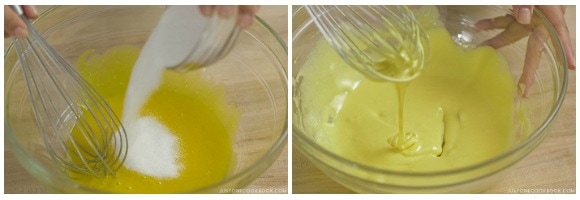
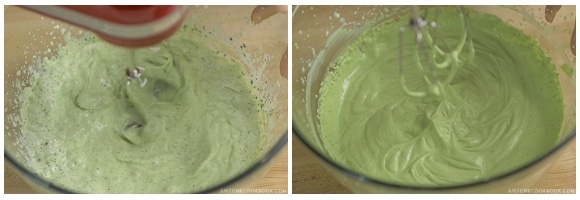
- In a large bowl, add the egg yolks and break them with a hand whisk.
- Add half of the ½ cup sugar and whisk until the egg mixture doubles in volume. When you lift the whisk into the air with some of the mixture on it, the mixture should fall back into the bowl in ribbons, which slowly disappear back into the mixture.
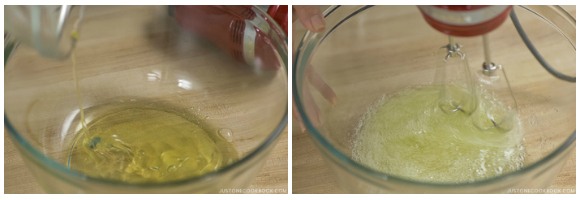
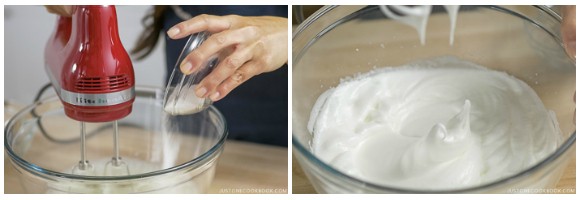
- Next, add the cold egg whites to a large, dry bowl. With an electric hand mixer (or stand mixer), beat the egg whites until foamy.
- Gradually add the remaining half of the sugar, one-third at a time, and beat until stiff peaks form and the egg whites are glossy.
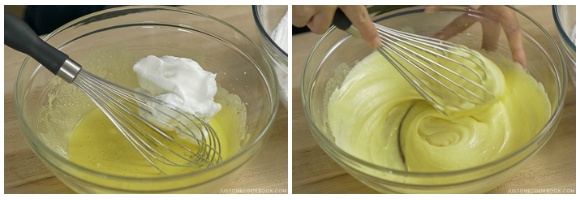
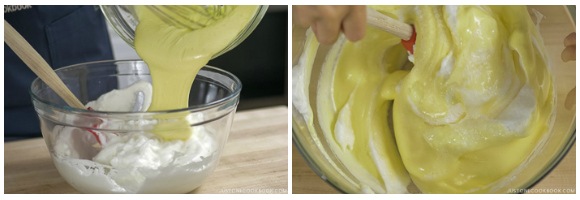
- Using a hand whisk, gently fold about one-third of the egg whites into the egg yolk mixture until well incorporated.
- Then, add the egg yolk mixture back into the bowl with remaining the egg whites. Gently fold in the egg whites with a silicone spatula until just incorporated. Tip: Rotate the bowl a quarter turn counterclockwise while you scoop up and fold the mixture onto itself clockwise.
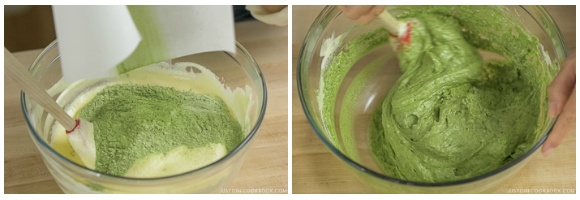
- Next, add the dry ingredients to the egg mixture. Using the silicone spatula, fold in gently until just incorporated. Do not overmix. Tip: Adding the dry ingredients last avoids overmixing, which results in a dense (not fluffy) sponge.
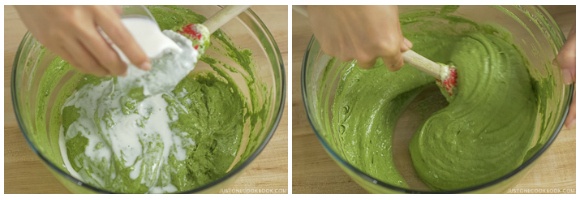
- Add 3 Tbsp whole milk (warmed) to the batter and fold it in until incorporated.
To Bake
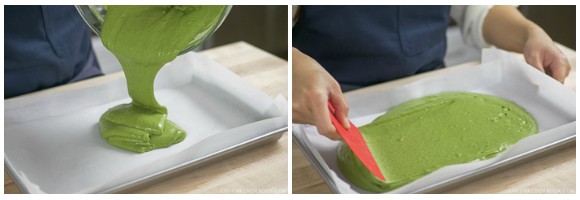
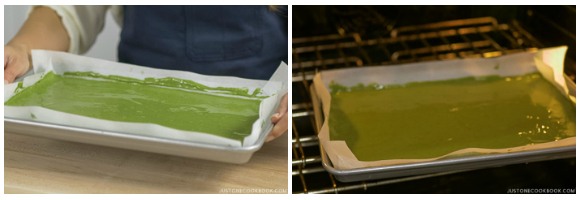
- Pour the batter into the prepared pan. Spread the batter evenly using an offset spatula or silicone pastry scraper.
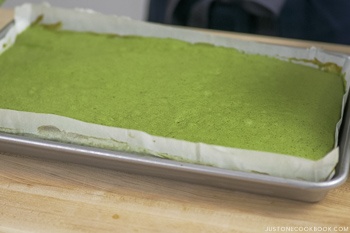
- Tap the jelly roll pan a few times on your working surface to remove any air pockets in the batter. Transfer the pan to the preheated oven and bake for 10–12 minutes, or until an inserted toothpick comes out clean and the top of cake springs back when touched. Tip: Do not overbake it or the cake will be too dry and break when you roll it.
- Remove the pan from the oven and drop the pan on your working surface once to prevent the cake from shrinking.
To Remove the Cake from the Pan
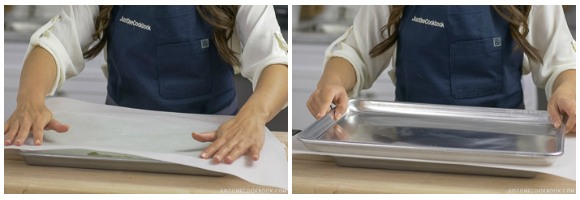
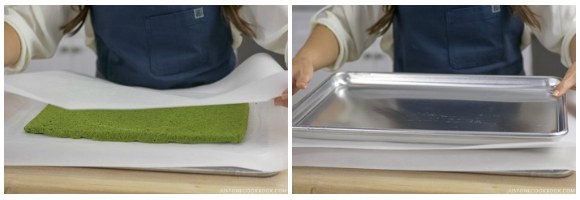
- While the pan is still hot, place a sheet of parchment paper across the surface of the cake. Place a baking sheet (or a cutting board) on top with the bottom of the pan against the paper.
- Wearing oven mitts, hold the two baking sheets together with the cake sandwiched in between and flip them over. Using a knife or spatula, lift the jelly roll pan to reveal the cake.
- Gently peel off the parchment paper attached to the cake. This side will be the exterior of the Swiss roll, so be gentle!
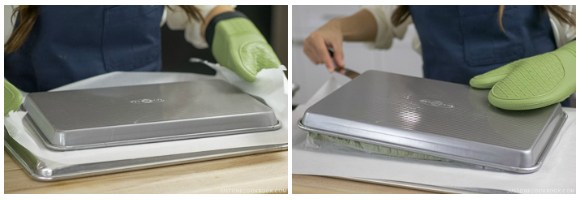
- Now, flip over the cake one more time: Place another “protective” sheet of parchment paper across the cake surface, then place a baking sheet on top with the bottom of the pan against the paper.
- Hold both baking sheets together and flip them over so the brown side of the cake is now facing up. Remove the top pan and parchment paper.
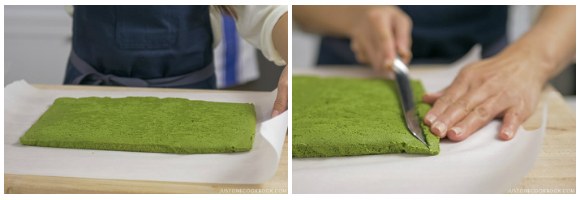
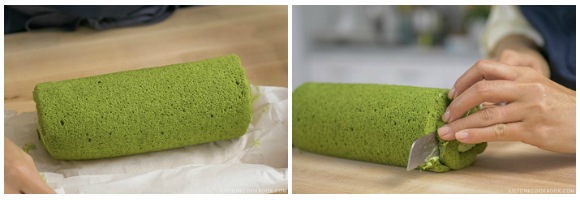
- Remove the bottom baking sheet and place the cake with its parchment paper on a work surface. Slicing at an angle, cut off ½ inch (1.3 cm) of the cake from one of the short ends. This will help stabilize the Swiss roll when rolled up.
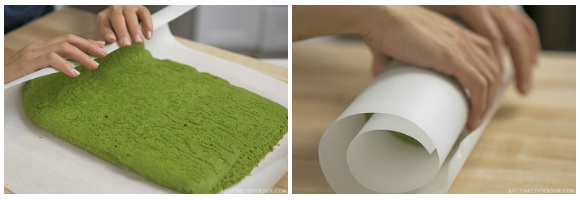
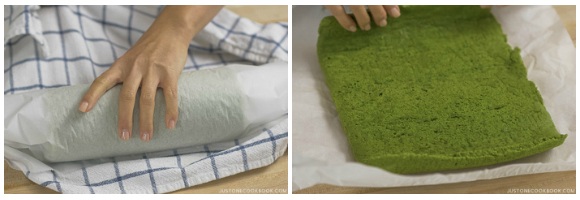
- While it‘s still warm, roll the cake: Start at the other short end and use your hands to slowly roll up the cake together with its parchment paper, finishing at the angled end that you just sliced. Once the cake and paper are rolled up, transfer to a wire rack with the seam side down.
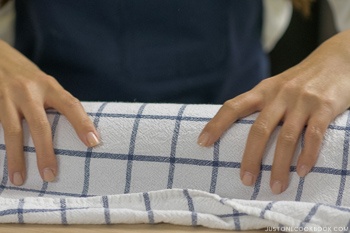
- Cover with a kitchen towel to keep it secure and let it cool completely until it reaches room temperature, about 30 minutes.

To Prepare the Matcha Cream Filling
- When the cake is completely cool, combine ¾ cup heavy (whipping) cream, 1½ Tbsp sugar, and 2 tsp matcha (green tea powder) in a large bowl.
- Beat with an electric hand mixer (or stand mixer) until firm and spreadable, so it won’t ooze out of the cake when you’re rolling it up.

To Assemble the Swiss Cake
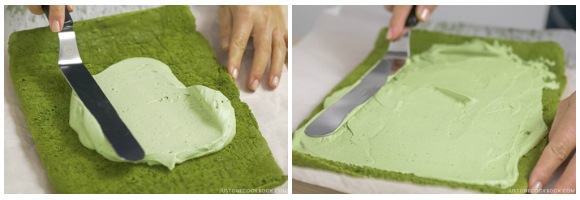
- Transfer the Swiss roll to a flat surface and unroll the cake. It’s okay if the ends curl up a bit.
- Using an offset spatula, spread the matcha cream filling evenly over the cake, leaving a ½-inch (1.3 cm) border on all sides. Tip: Spread slightly less filling toward the last one-third of the cake, as the cream will pile up toward the end when rolling up.
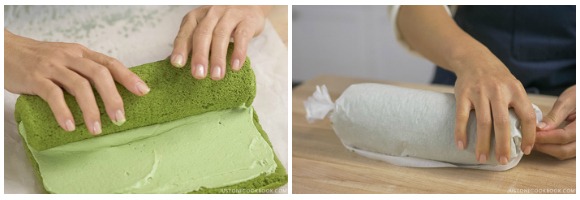
- Carefully but tightly reroll the cake with the filling inside. End with the seam side on the bottom. Secure the cake by rolling it in the parchment paper and twisting it at both ends, like a candy wrapper. Refrigerate for at least 2 hours to firm up the cream.
- Remove and unwrap the Swiss roll. Slice off about ½ inch (1.3 cm) of the cake on both ends to show off the beautiful swirls. Transfer it to your serving dish. Slice and serve.
To Store
- If you have leftovers, just rewrap the Swiss roll in plastic wrap and store in the refrigerator for up to 3 days.


Great recipe! I was able to make it quickly and easily. I added strawberries to the filling and yum! The only thing I’d add next time is some simple syrup to the cake before filling, as I felt it was a little dry and could be sweeter. (Simple syrup is 1:1 sugar water)
Thanks for sharing! I look forward to making it again.
Hi Sophie! Thank you very much for trying Nami’s recipe and sharing your baking experience with us!
Thanks for the recipe🤩👍
Hi Sally! WOW🤩 Great job!
Thank you very much for trying Nami’s recipe and sharing your photo with us!
It’s beautiful!😍
Sorry!!!!!Why my whipping cream always
too watery ya??Thank U NAMI♥️♥️♥️♥️
Hi KONG YOKE YING, Thank you very much for trying Nami’s recipe!
Make sure your whipping cream contains a good amount of milk fat, and it’s heavy whipping cream. And chill the heavy whipping cream well before whipping.
We hope this helps!🙂
BiG tHanks to U.Much Appreciated.
Will let u know the result when I
try it again ya!!!Love💟💟💟💟💟💟
My pleasure! Happy Cooking!🤗
Love this recipe! I’ve used it multiple times to make swiss rolls of different flavours by replacing the matcha and turns out so delicious every time. It took some practice to get the roll neat, but the tips and photos really helped so thanks so much for all the detail you always put in!
Hi Nara! WOW! So gorgeous! We love your Matcha Swiss Roll!
Thank you very much for trying Nami’s recipe and sharing your photo and baking experience with us.
Happy Baking!😊
What brand and type of matcha did you use for baking particularly this cake? I looked into Ippodo tea but confused with too many types.
Hi Pdy! Thank you very much for reading Nami’s post!
Nami loves this Sayaka-no-mukashi from Ippodo for baking. https://www.amazon.com/dp/B016ZK4UQ8?ref=exp_justonecookbook_dp_vv_d
We hope this helps!
I was always scared of making swiss rolls (largely due to a very cracked attempt years ago), but this recipe turned out fantastic! Pretty much followed the instructions exactly, except I made a red bean cream instead to conserve my matcha powder supply. Also tweaked this recipe a couple other times with different flavor combinations (coffee, hojicha/black sesame) — all turned out beautifully. Thanks so much for the recipe! Would love to try the genoise method one day to see how it differs.
Hi Kat! WOW!🤩 Excellent!
Thank you very much for trying Nami’s recipe and sharing your baking experience with us!
We are so happy to hear you enjoyed this recipe! Happy Baking!
Wow!!! This recipe turned out delicious! I’m not an experienced cook and I literally whisked the egg yolks/whites with a FORK and will power. Speaks to how good the recipe is that this was the result.
Had some difficulty adding the photo
Hi Ian! WOW!🤩 You baked gorgeous cake!
Thank you very much for trying Nami’s recipe and sharing your baking experience with us.
We are so happy to see your great result! Happy Baking!💞
Great recipe, thank you!
Hi Eugenia! Awesome! The cake looks so good!
Thank you very much for trying Nami’s recipe and sharing your cake photo with us! Happy Baking!
It’s soft but not as poofed
Hi Connie! WOW! The color and shapes are beautiful!
Thank you very much for trying Nami’s recipe and sharing your yummy Matcha Swiss Roll photo!
I finally made this and am very happy with the taste. I added more whip cream . I baked it at 10 mins but I think it’s a bit underbaked?
Hi Connie! Thank you very much for trying Nami’s recipe and sharing the photo!
It is hard to tell from this picture, but if you bake it until an inserted toothpick comes out clean and the top of the cake springs back when touched, it is done!🙂 We hope this helps!
I appreciate how professional and attractive your site is, and the care you take to make sure home cooks can make your recipes successfully. The dedication and effort behind everything on this site shines through – thank you!! : )
Hi Ellen! You have no idea how much your kind words meant to Nami and JOC team!
Thank you very much for your kind feedback and support!❤️
delish!! i actually didn’t add in the matcha (instead i substituted the same amount of cake flour in the batter) because my family aren’t particularly fans, but it was still a hit! the sponge rolled really well and it maintained its delicate texture 🙂 if i had to say anything it’d be that the sponge itself was a bit too sweet (probably because there was no matcha) so next time i’ll alter it. thanks!
Hi Sarah! Thank you very much for trying Nami’s recipe and sharing your baking experience with us!
We are so happy to hear that this recipe worked well without Matcha for you, and your family enjoyed it. 😊
This was the first time I tried making a roll cake. I followed the instructions to the dot. It came out beautifully AND was delicious. I can see why the side with the parchment paper should be the exterior of the cake … because it’s smoother and more aesthetic! I omitted matcha from the cream and just added some vanilla extract instead. Thank you for this recipe!
Hi Yuri! We are so happy to hear this recipe worked very well for you!
Thank you very much for trying Nami’s recipe and for sharing your baking experience with us!
The sponge was good but I had to double the whip cream and use confection sugar to make it thicker so it would hold up. Also, I found it unnecessary to do the whole song and dance around releasing the cake using another pan. I just waited for it to cool down slightly and rolled it up in its paper while warm. It came off easily afterwards when cooled. I also left the matcha out of the whipped cream and added strawberries which I also decorated the top with.
Hi Masha, Thank you very much for trying this recipe and sharing your baking experience with us!
Is it possible to turn this cake recipe into a regular matcha sponge cake? Like pouring it into a regular cake pan instead
Hi Annie, Sure, you can do that. Please adjust the baking time for your cake pan if it needs.🙂