Soft on the inside and crunchy on the outside, Japanese Croquettes called Korokke are my absolute favorite Japanese food. This is my mother’s best recipe, and I’ll share her secrets with you in this recipe.

If there’s one food that I must have when I visit Japan, it would be my mom’s Japanese Croquettes or Korokke (コロッケ). With a crispy panko shell and soft interior of potato and ground beef, my mother’s korokke is the most delicious and comforting reminder of home. Today, I’m going to share her recipe with you.
If you love Japanese panko-breaded foods, try my Tonkatsu, Chicken Katsu, and Baked Chicken Katsu recipes next!
Table of Contents
What is Korokke?
French croquettes were introduced to Japan in the late 1800s. Japan lacked dairy products at that time, so they used potatoes instead of cream to recreate the soft texture. By the early 1900s, potato-based korokke (コロッケ) was a top 3 yoshoku (Western-influenced cuisine) dish along with beef steak and breaded pork cutlets. Today, Japanese potato croquettes are a very popular home-cooked dish that’s also available at street food stalls, butcher shops, family restaurants, markets, and convenience stores.
Why I Love This Recipe
- More meat for extra flavor and protein – My mother’s hearty and savory recipe includes more meat than store-bought ones or other recipes.
- Irresistible contrast of textures – They have a crunchy shell on the outside and a creamy yet slightly chunky texture inside. It’s hard to eat just one.
- Great to make ahead – Make extra to keep in the freezer for future meals. They’re so easy to reheat.
- Perfect for bento – Korokke pack well in a lunch box. I like to make mini-sized ones for this!
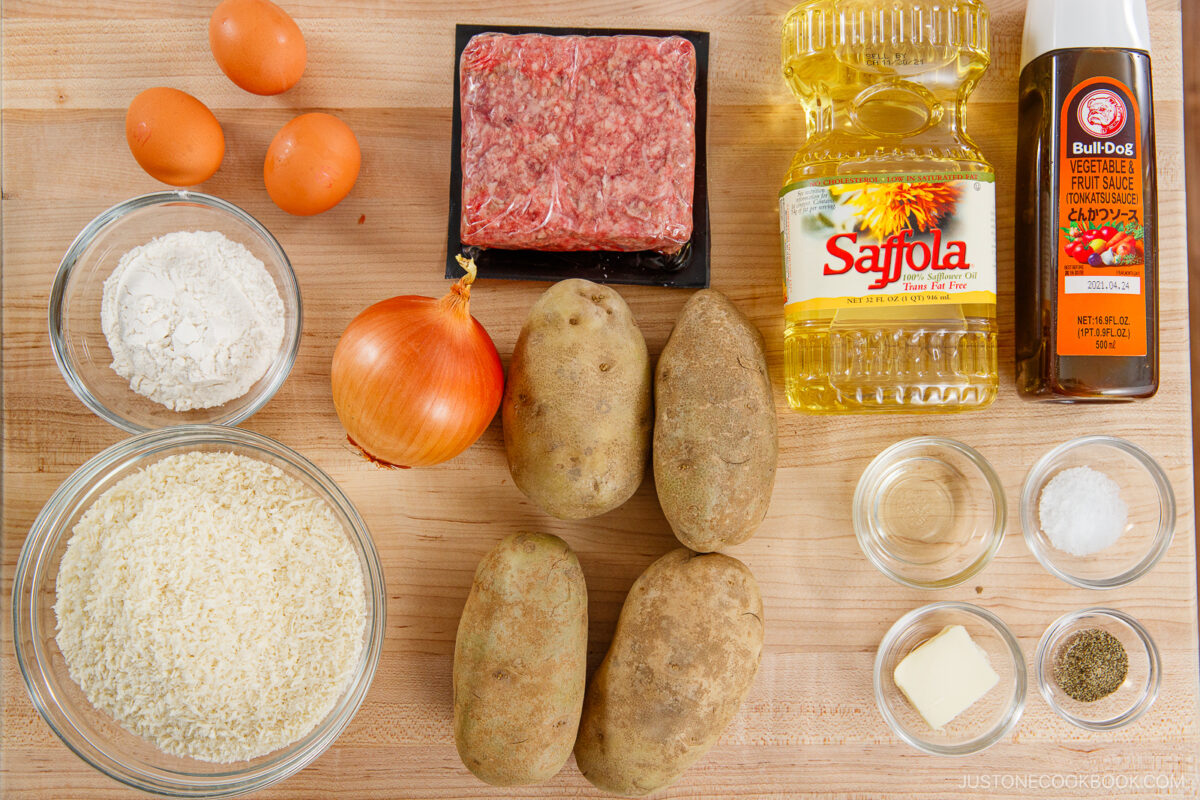
Ingredients for Japanese Croquettes
- Russet potatoes
- Ground beef – 85% lean
- Onion – I use yellow onion
- Unsalted butter – for the potatoes
- Kosher salt and black pepper – for the beef and potatoes
- All-purpose flour (plain flour)
- Panko (Japanese breadcrumbs)
- Large eggs
- Neutral oil – for deep-frying
- Tonkatsu sauce – store bought or make my Homemade Tonkatsu Sauce
Find the printable recipe with measurements below.
Jump to RecipeSubstitutions
- Russet potatoes – These are ideal for korokke for their starchy, fluffy, and light texture. They are the best at soaking up the juice and flavor from the meat and onion. In Japan, my mom uses a combo of 85–90% danshaku (男爵) potatoes and 10–15% May queen (メークイン). She boils them with their skins on and peels them while they’re still hot to retain their full flavor. I personally don’t follow this method, as handling hot potatoes may not be safe for everyone.
- Ground beef – I use high-quality, 85% lean ground beef from the butcher shop for better flavor. You could substitute ground pork, if you wish. You can use ground turkey or chicken, but I think they lack flavor. For vegan/vegetarian, substitute finely chopped shiitake mushrooms, other mushrooms, or dense vegetables like corn and carrot.
- Panko – Try finding Japanese-brand panko breadcrumbs. The light, airy, larger flakes tend to stay crispier longer because they don’t absorb as much grease as non-Japanese panko or standard breadcrumbs.
How to Make Japanese Croquettes (Korokke)
Preparation
Step 1 – Cook the potatoes. Add the potato chunks to cold water in a large pot and bring to a boil over medium heat. Gently simmer until cooked. Drain off the water and let the moisture evaporate.

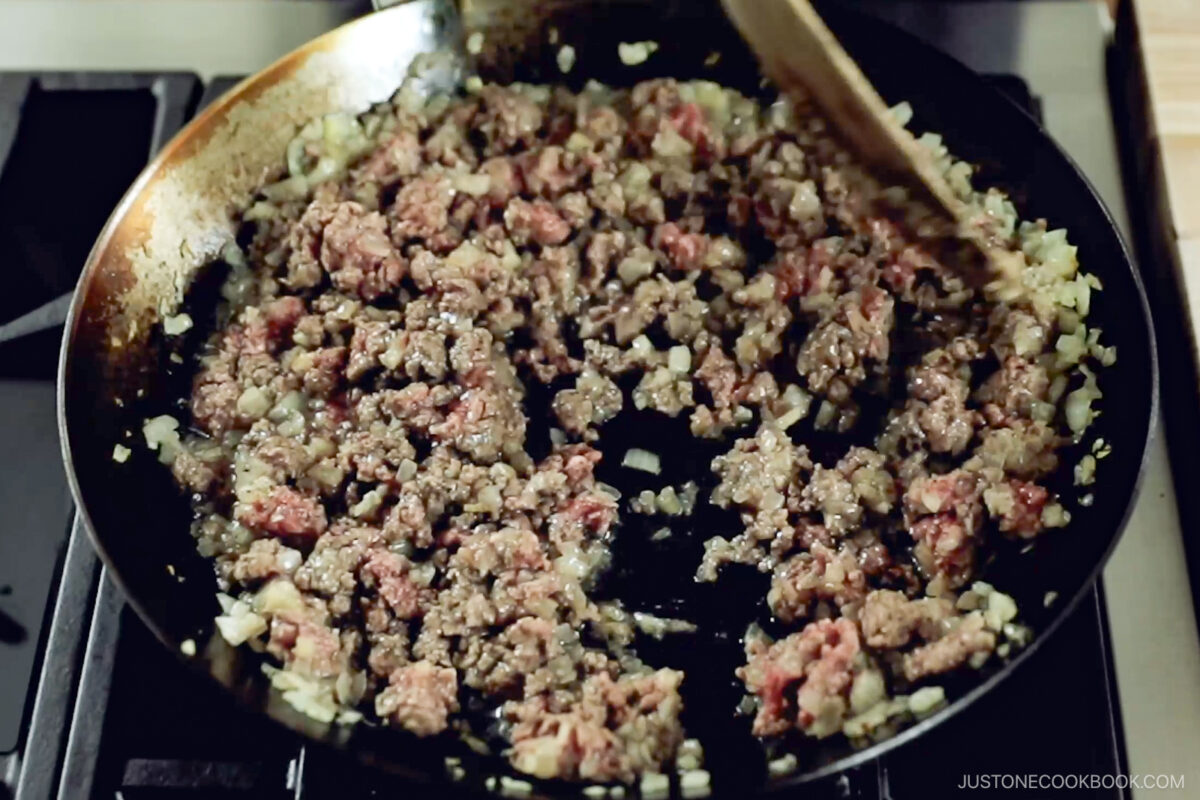
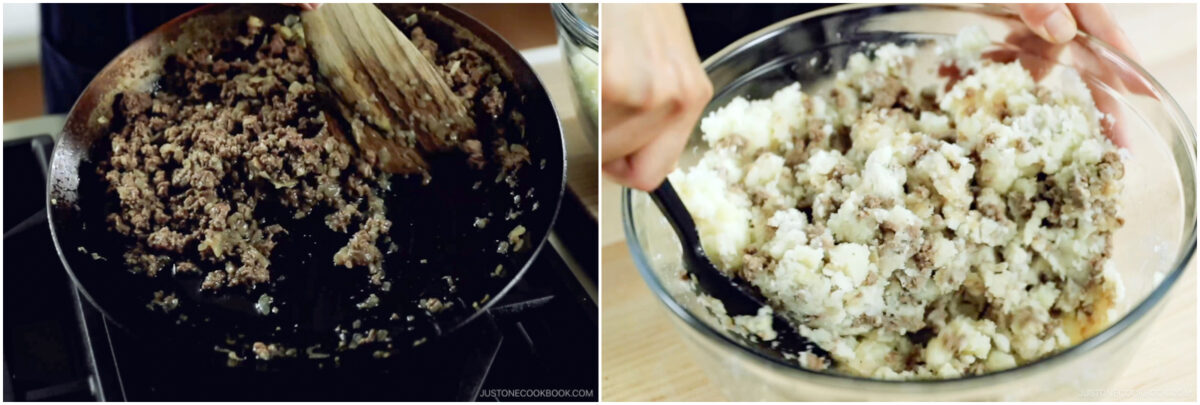
Step 2 – Sauté the onions and beef. Meanwhile, mince the onions and cook in a large skillet until translucent and tender. Add the beef and cook it with a wooden spatula. Cool slightly.
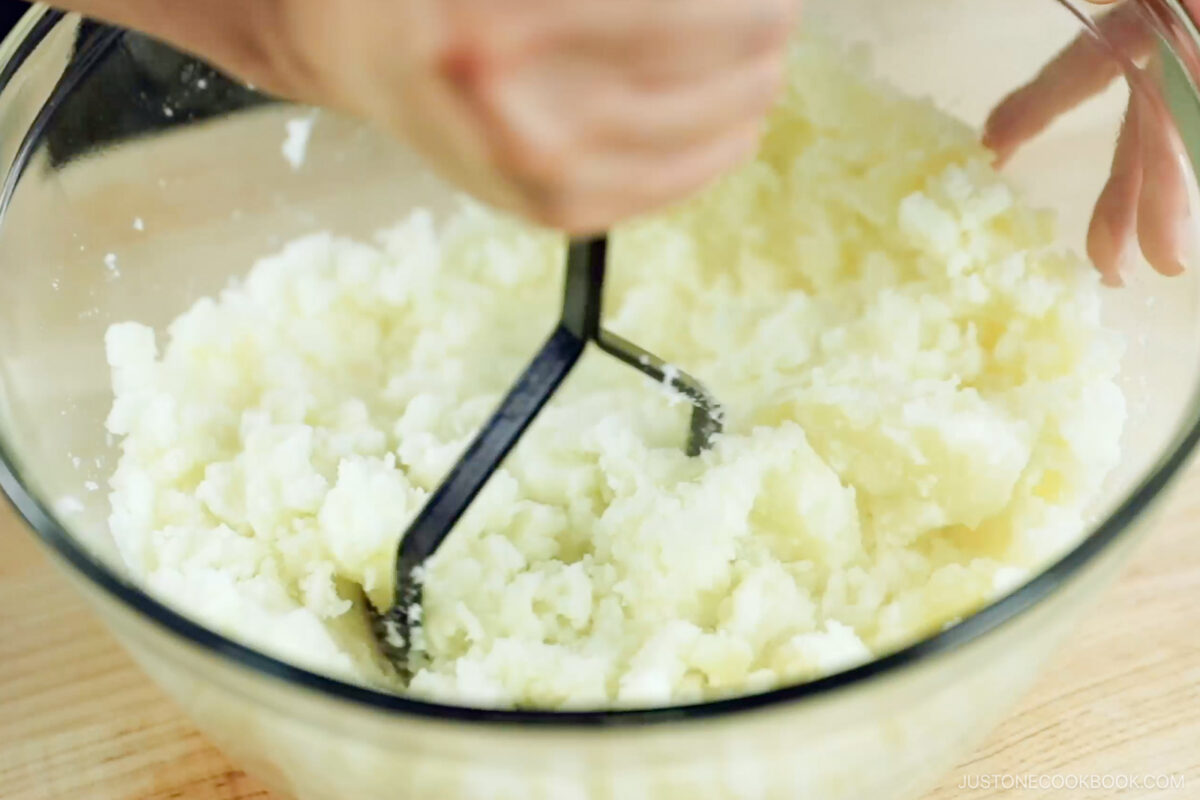
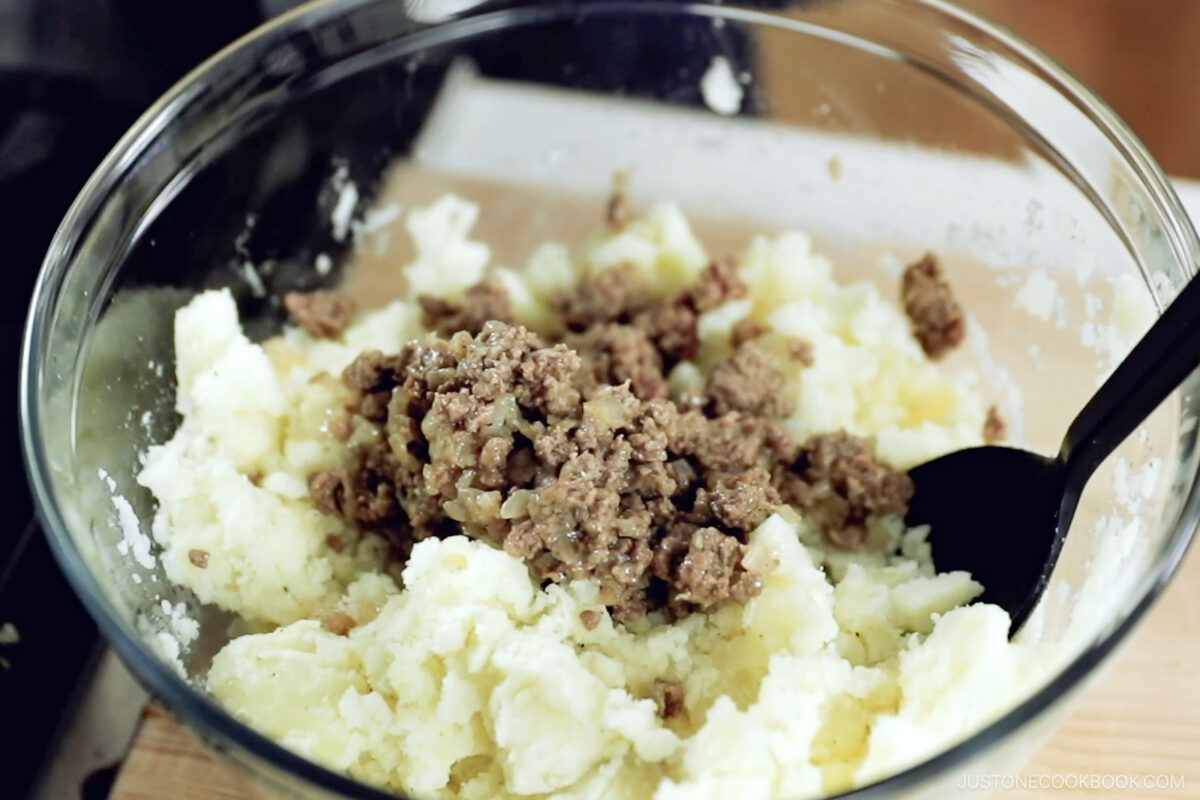
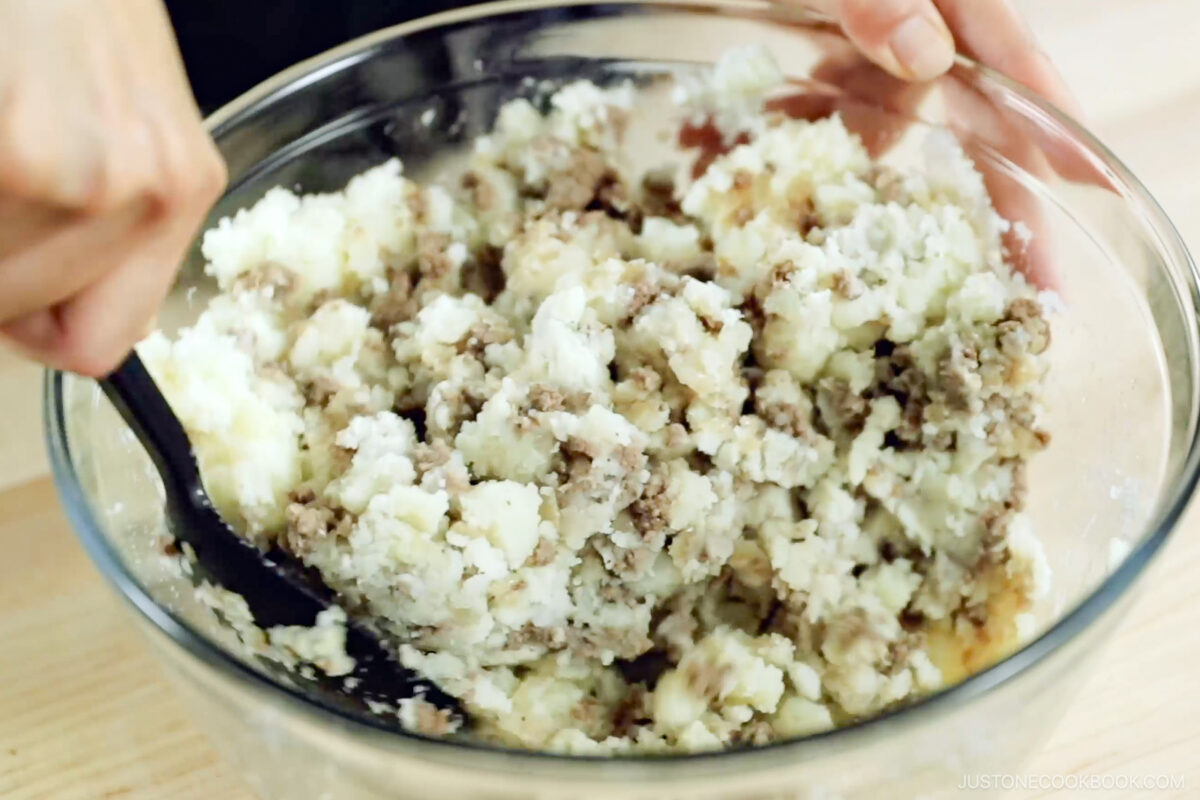
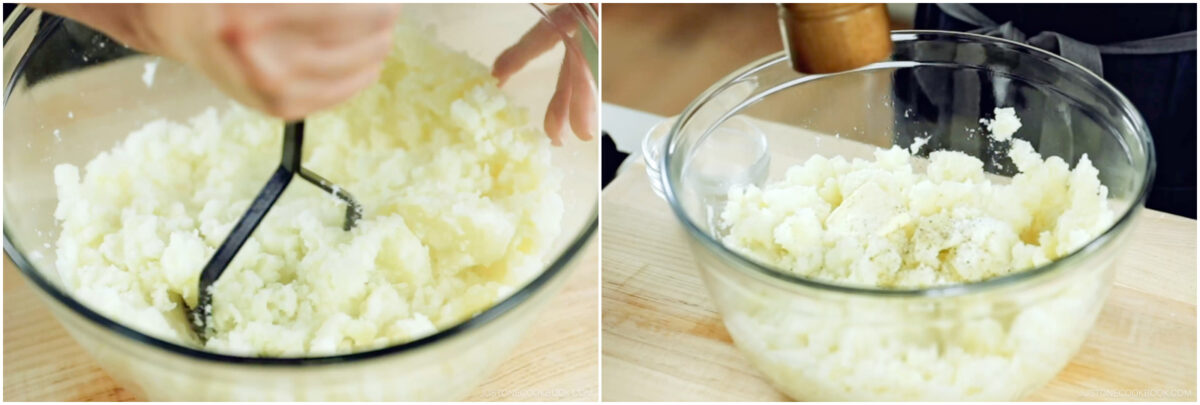
Step 3 – Mash and combine. Let the steam escape as you mash the hot potatoes, leaving some chunks for texture. Add the butter and season. Then, gently stir in the meat.
Assemble
Step 4 – Make patties and chill. Portion the mixture and form it into an oval shape while warm, then cover and cool in the fridge for 15–30 minutes.
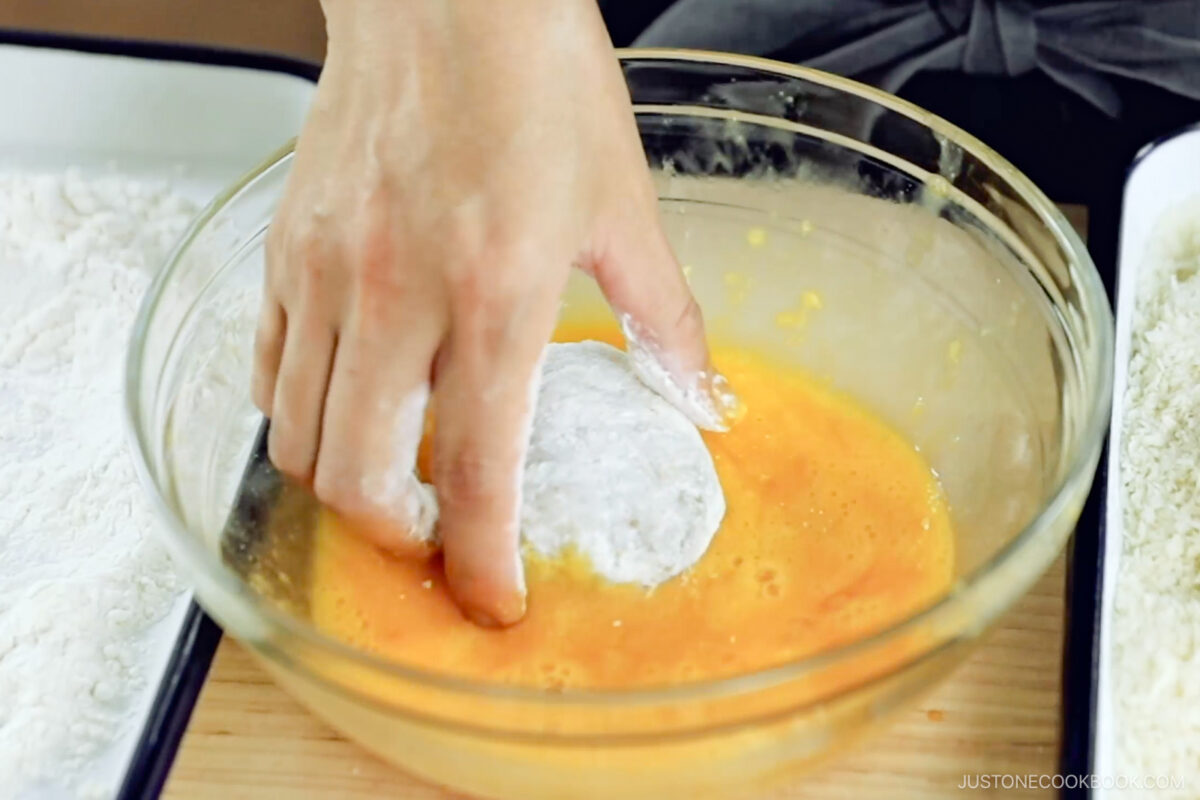
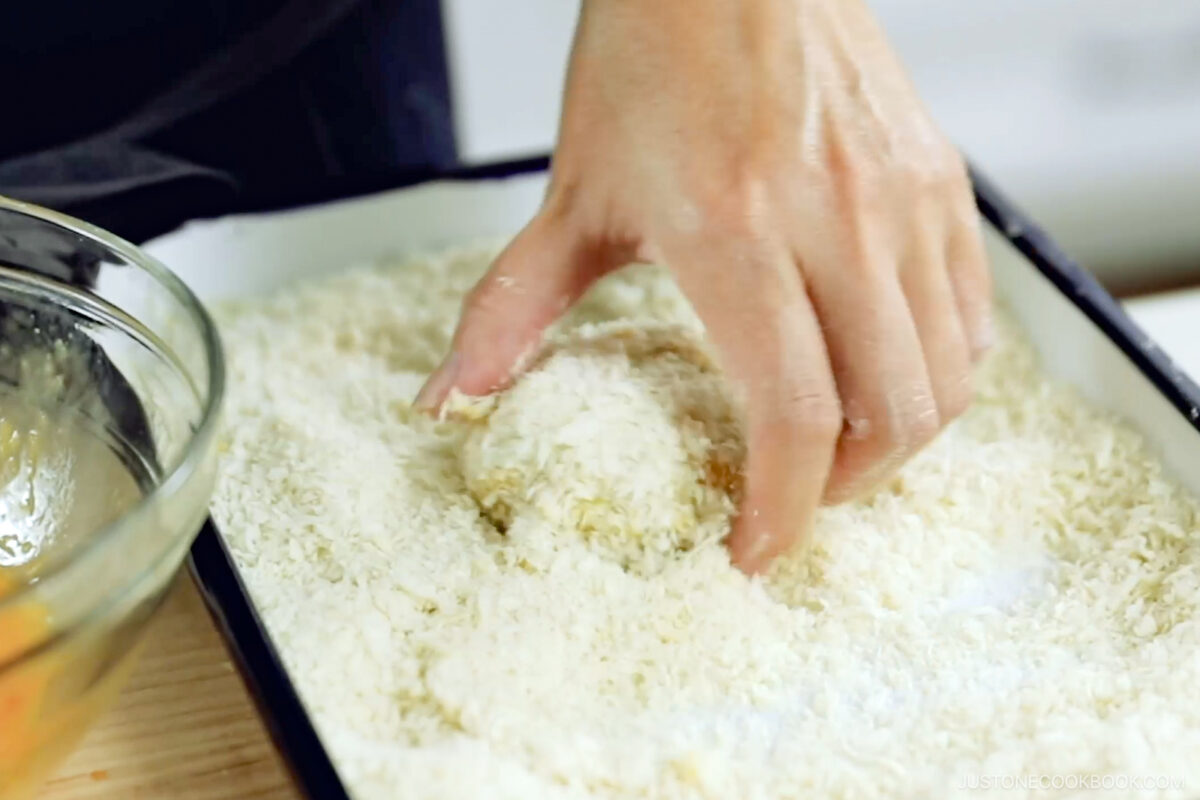
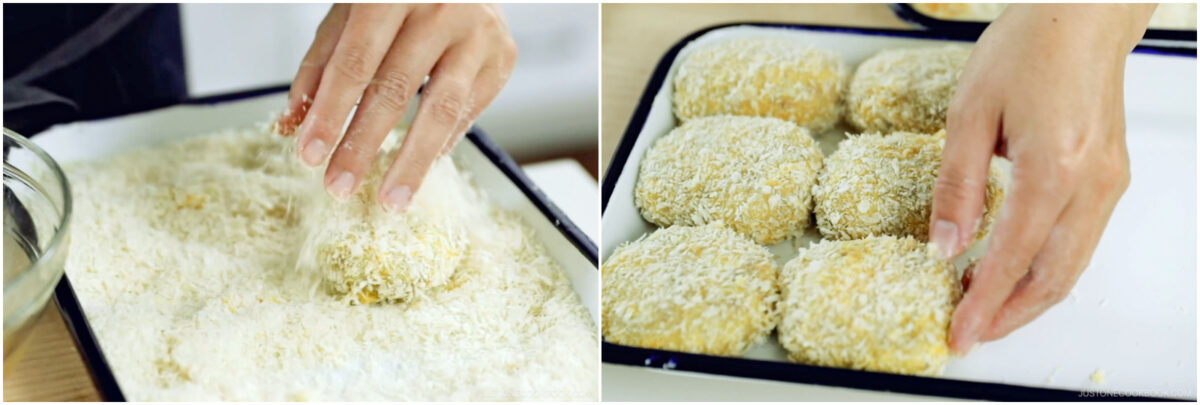
Step 5 – Bread with panko. Dredge each oval patty in flour, dip it in beaten egg, and coat it with panko breadcrumbs.
Cooking
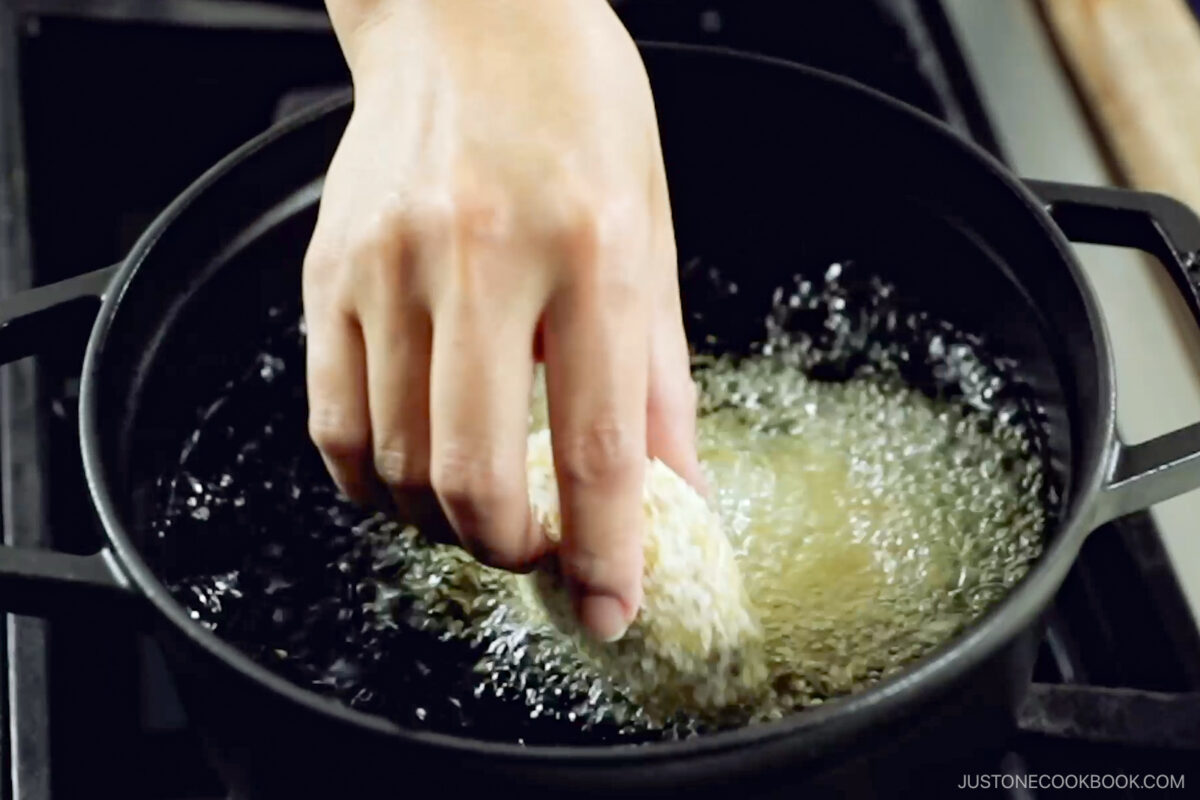
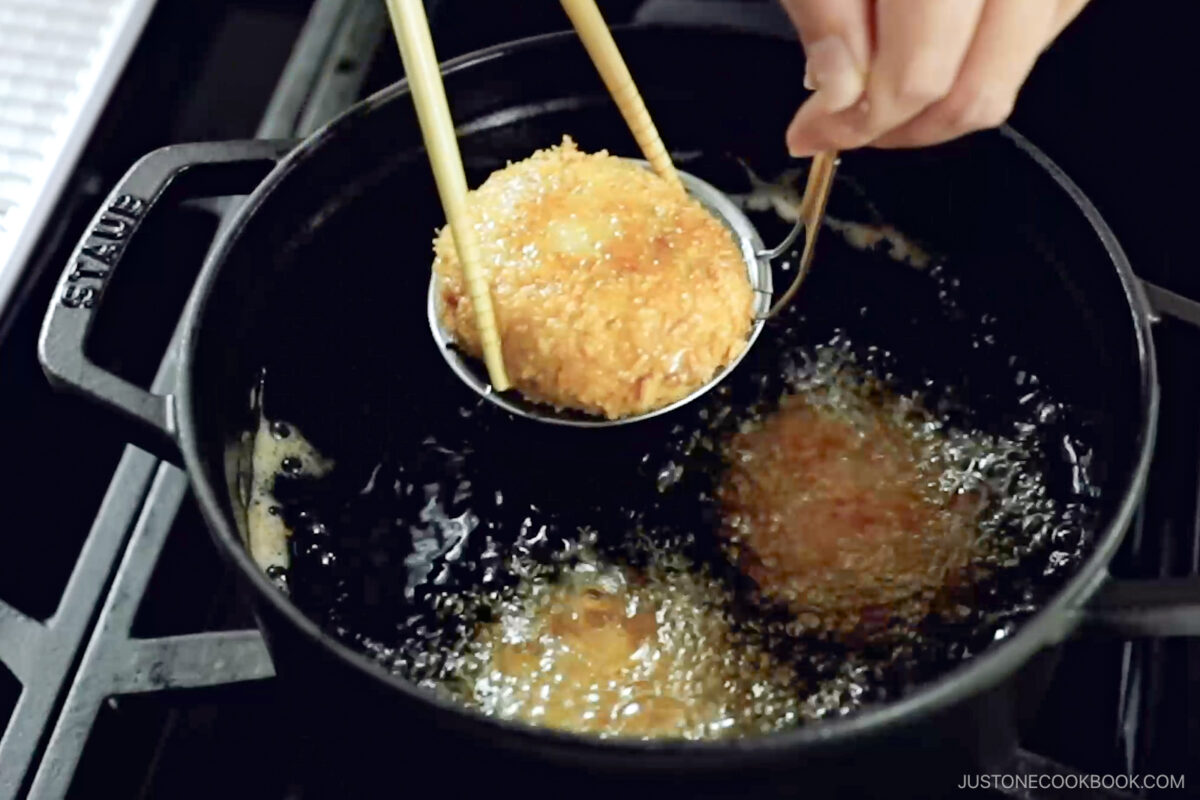
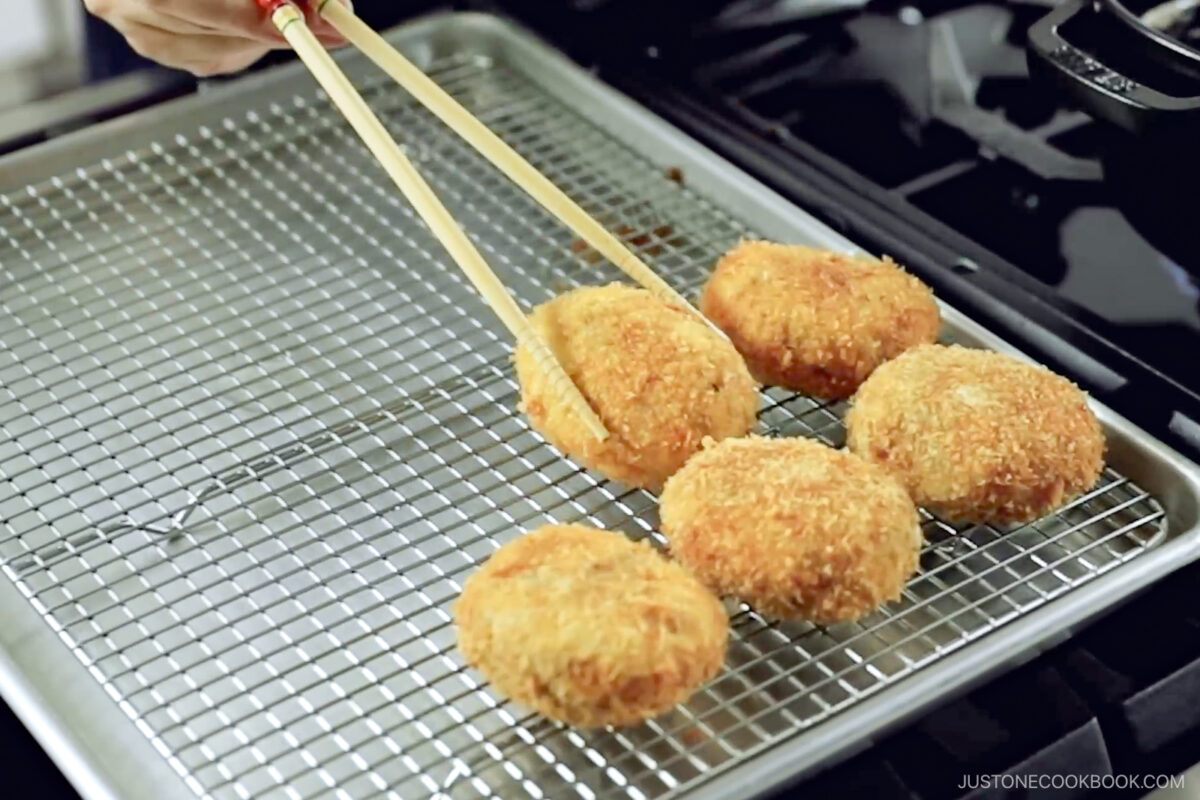
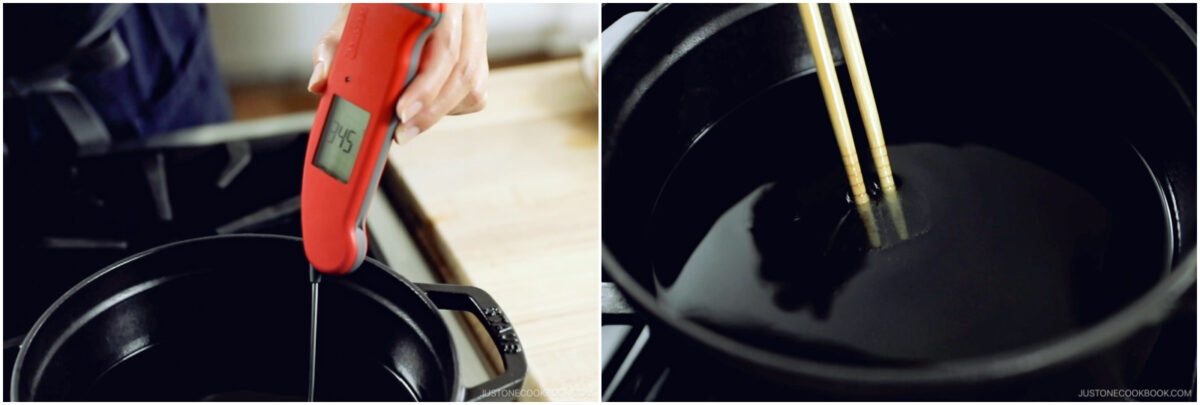
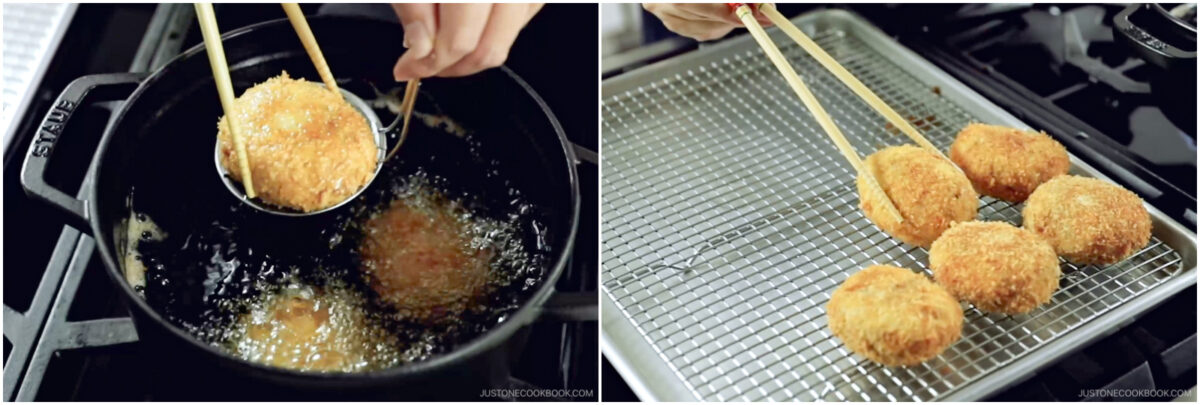
Step 6 – Deep-fry. Preheat 2 inches of neutral oil to 340–350ºF (170–180ºC) over medium heat. Fry 2–3 croquettes at a time until golden brown, and then drain on a wire rack.
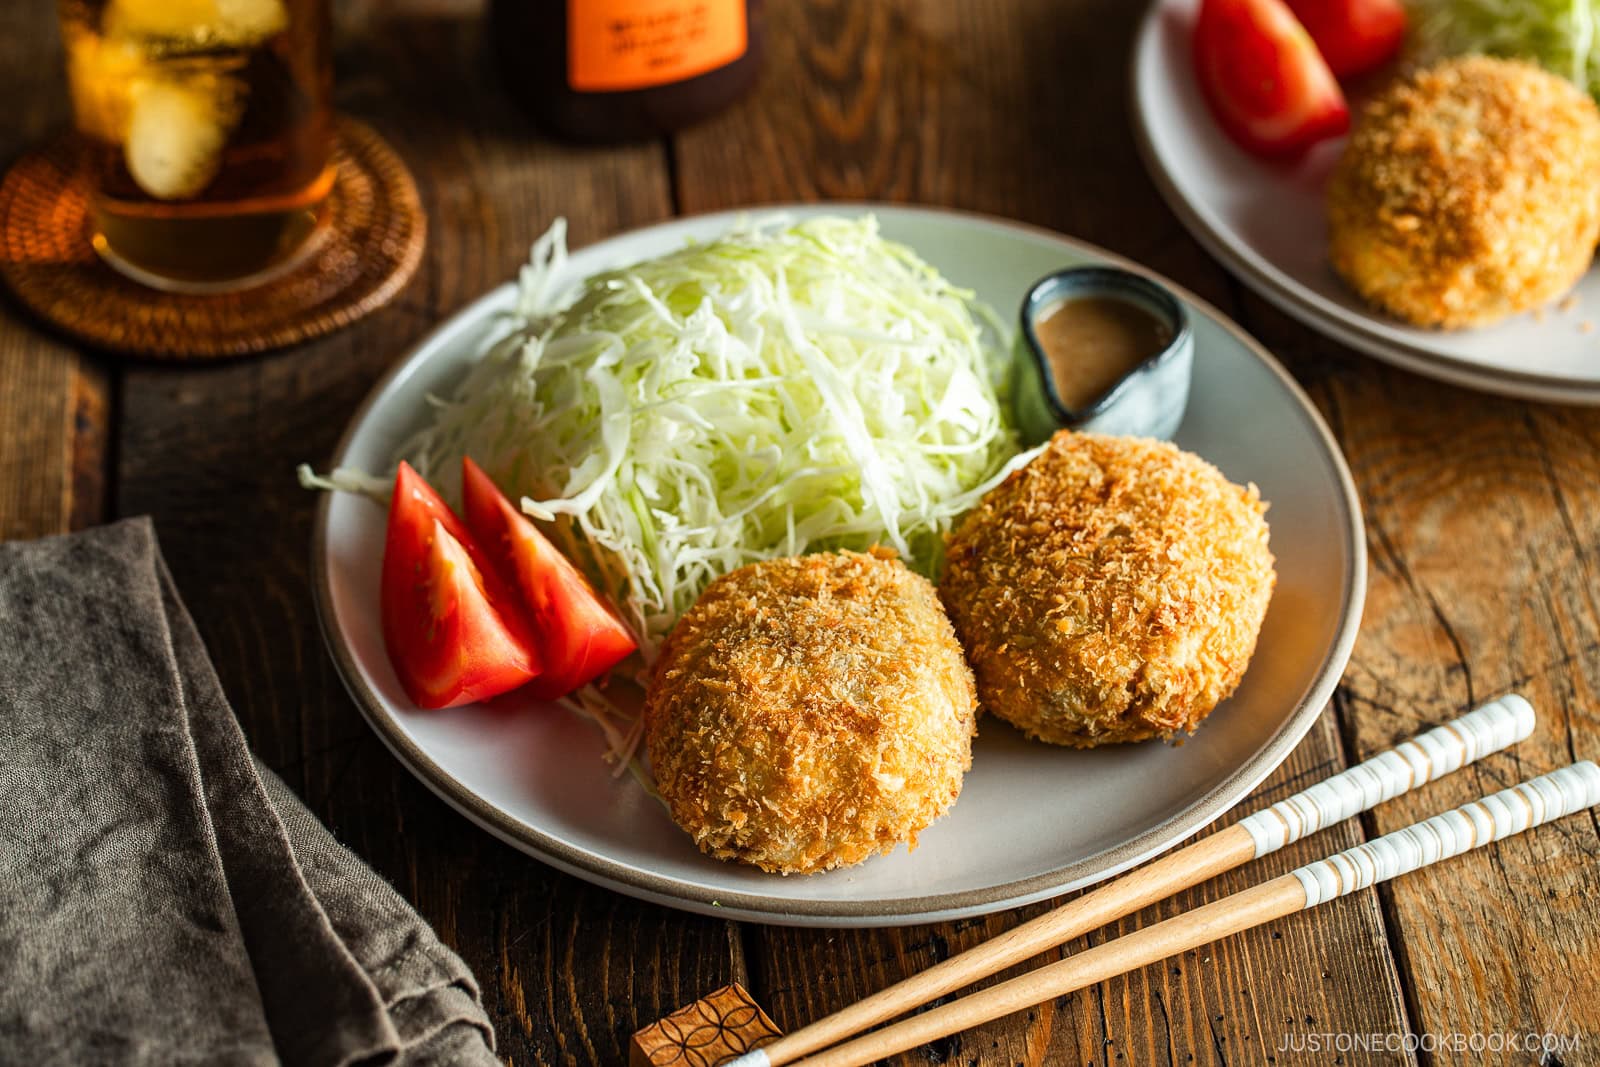
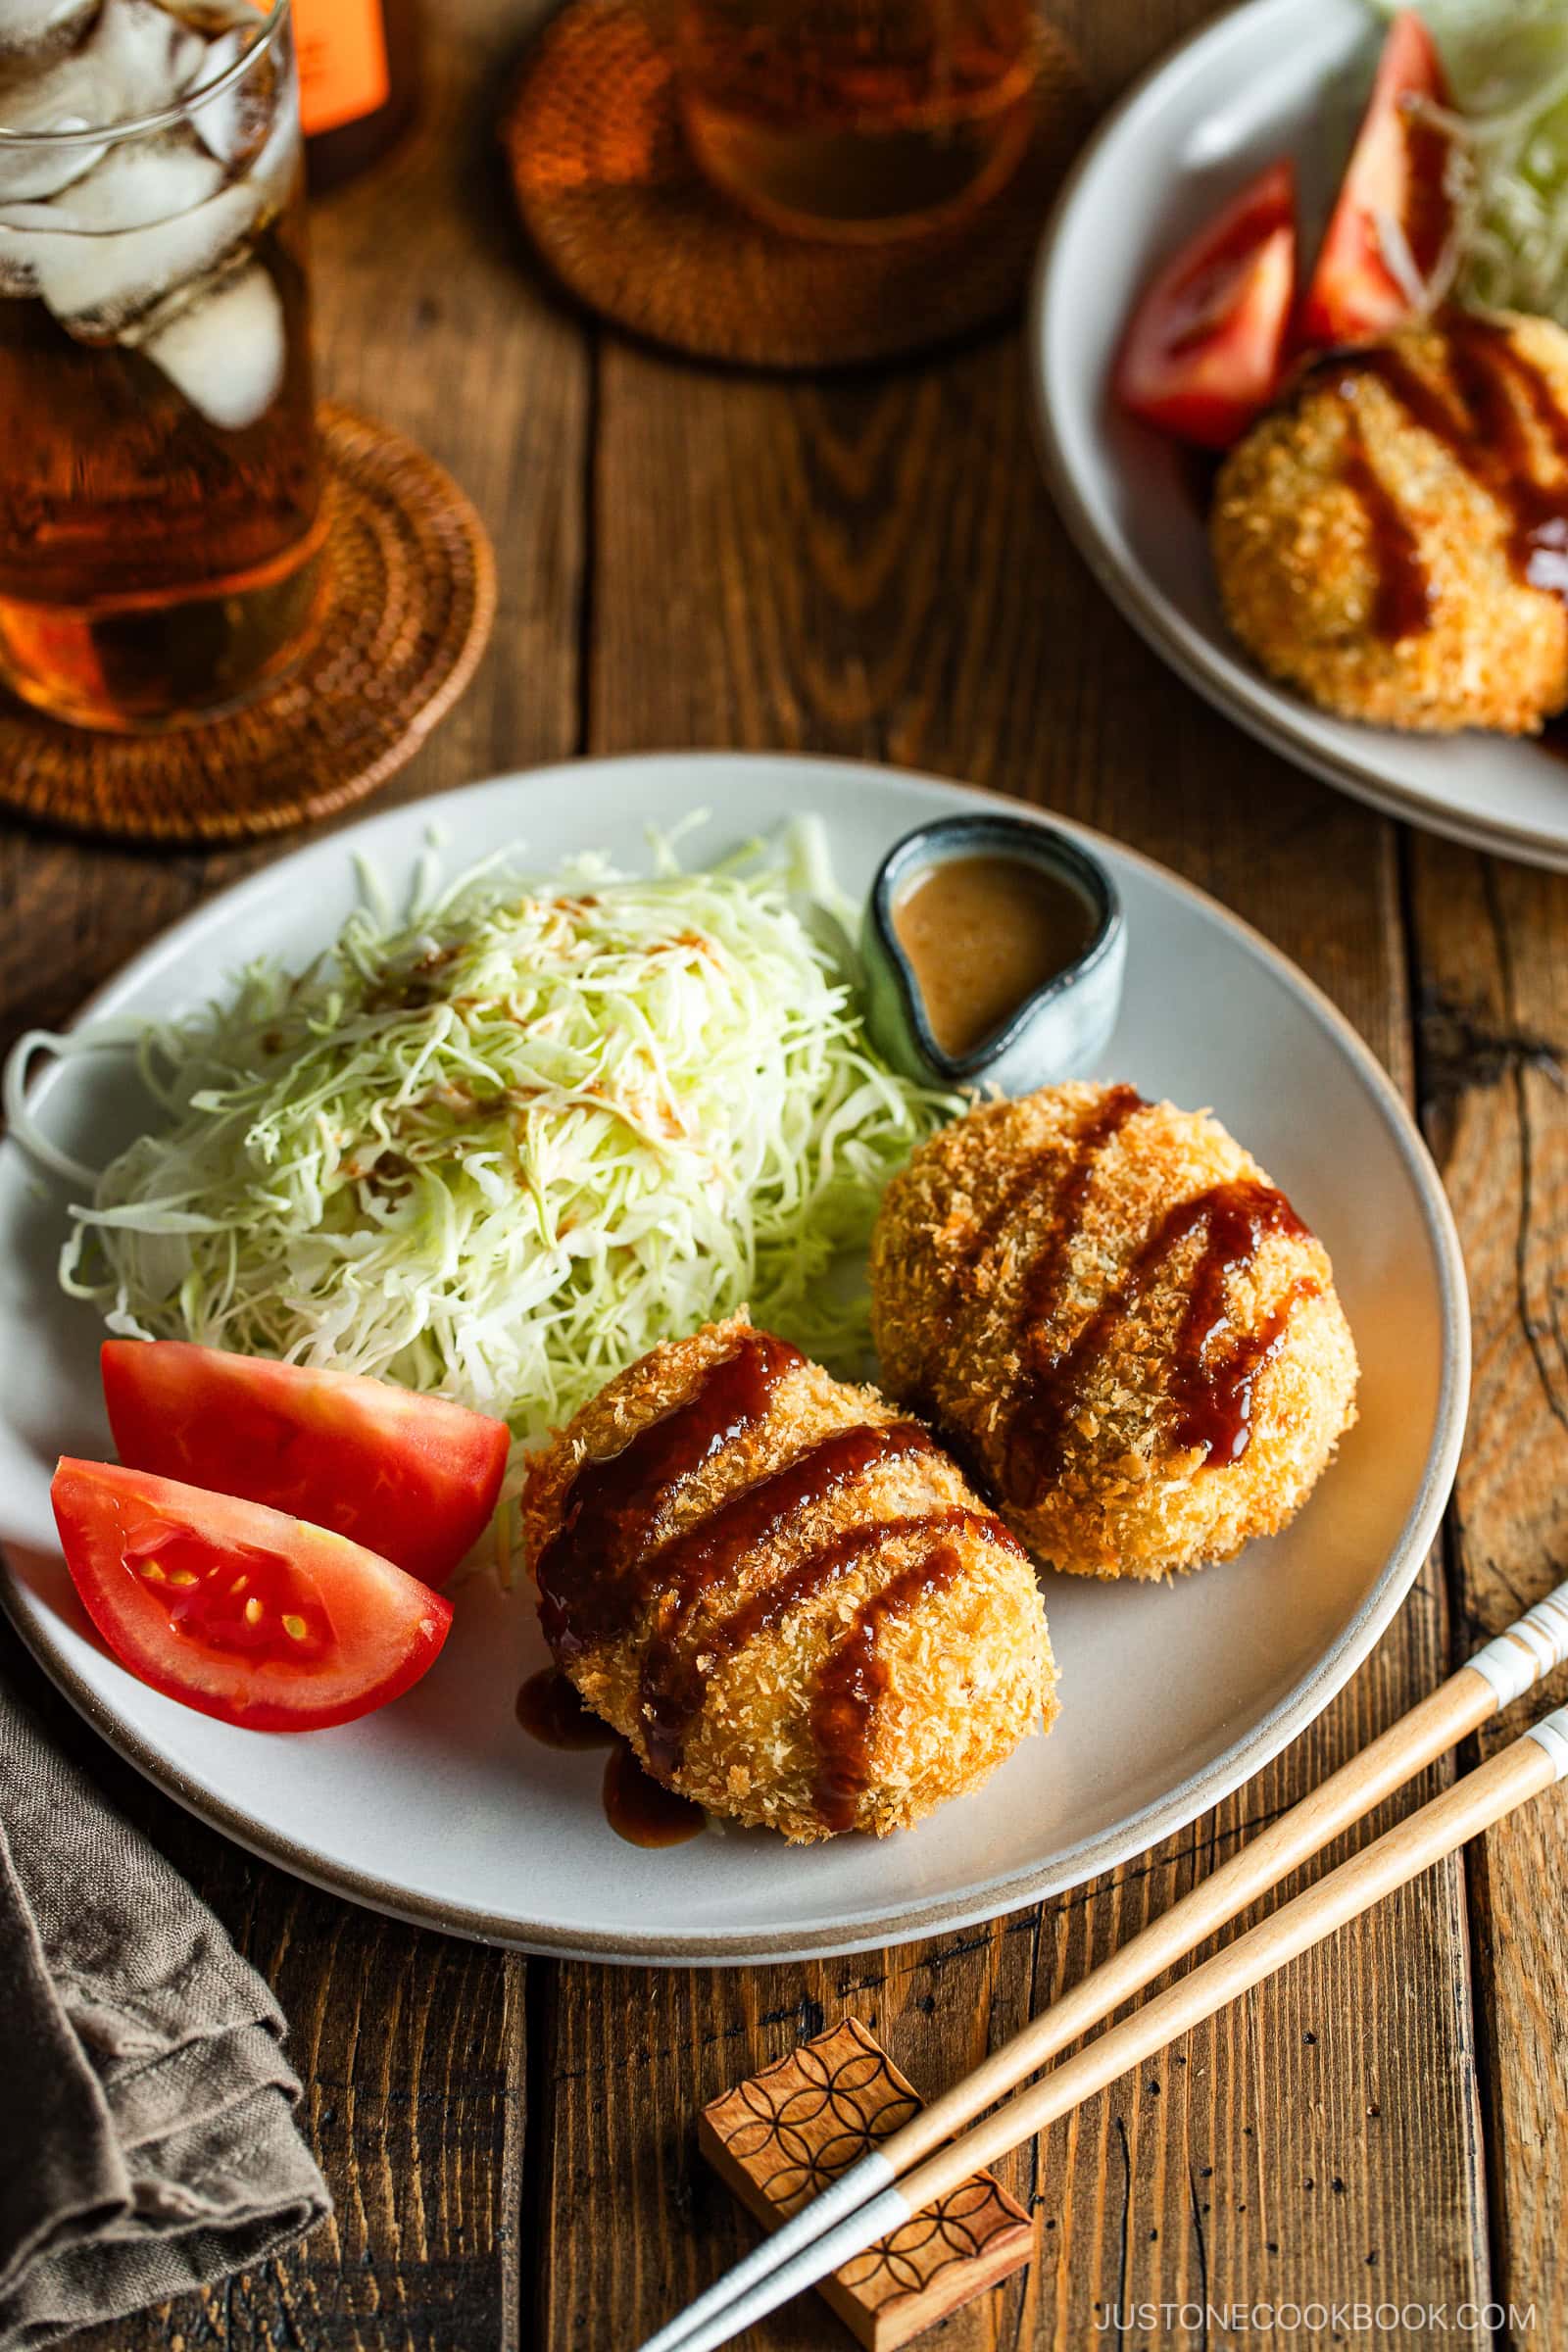
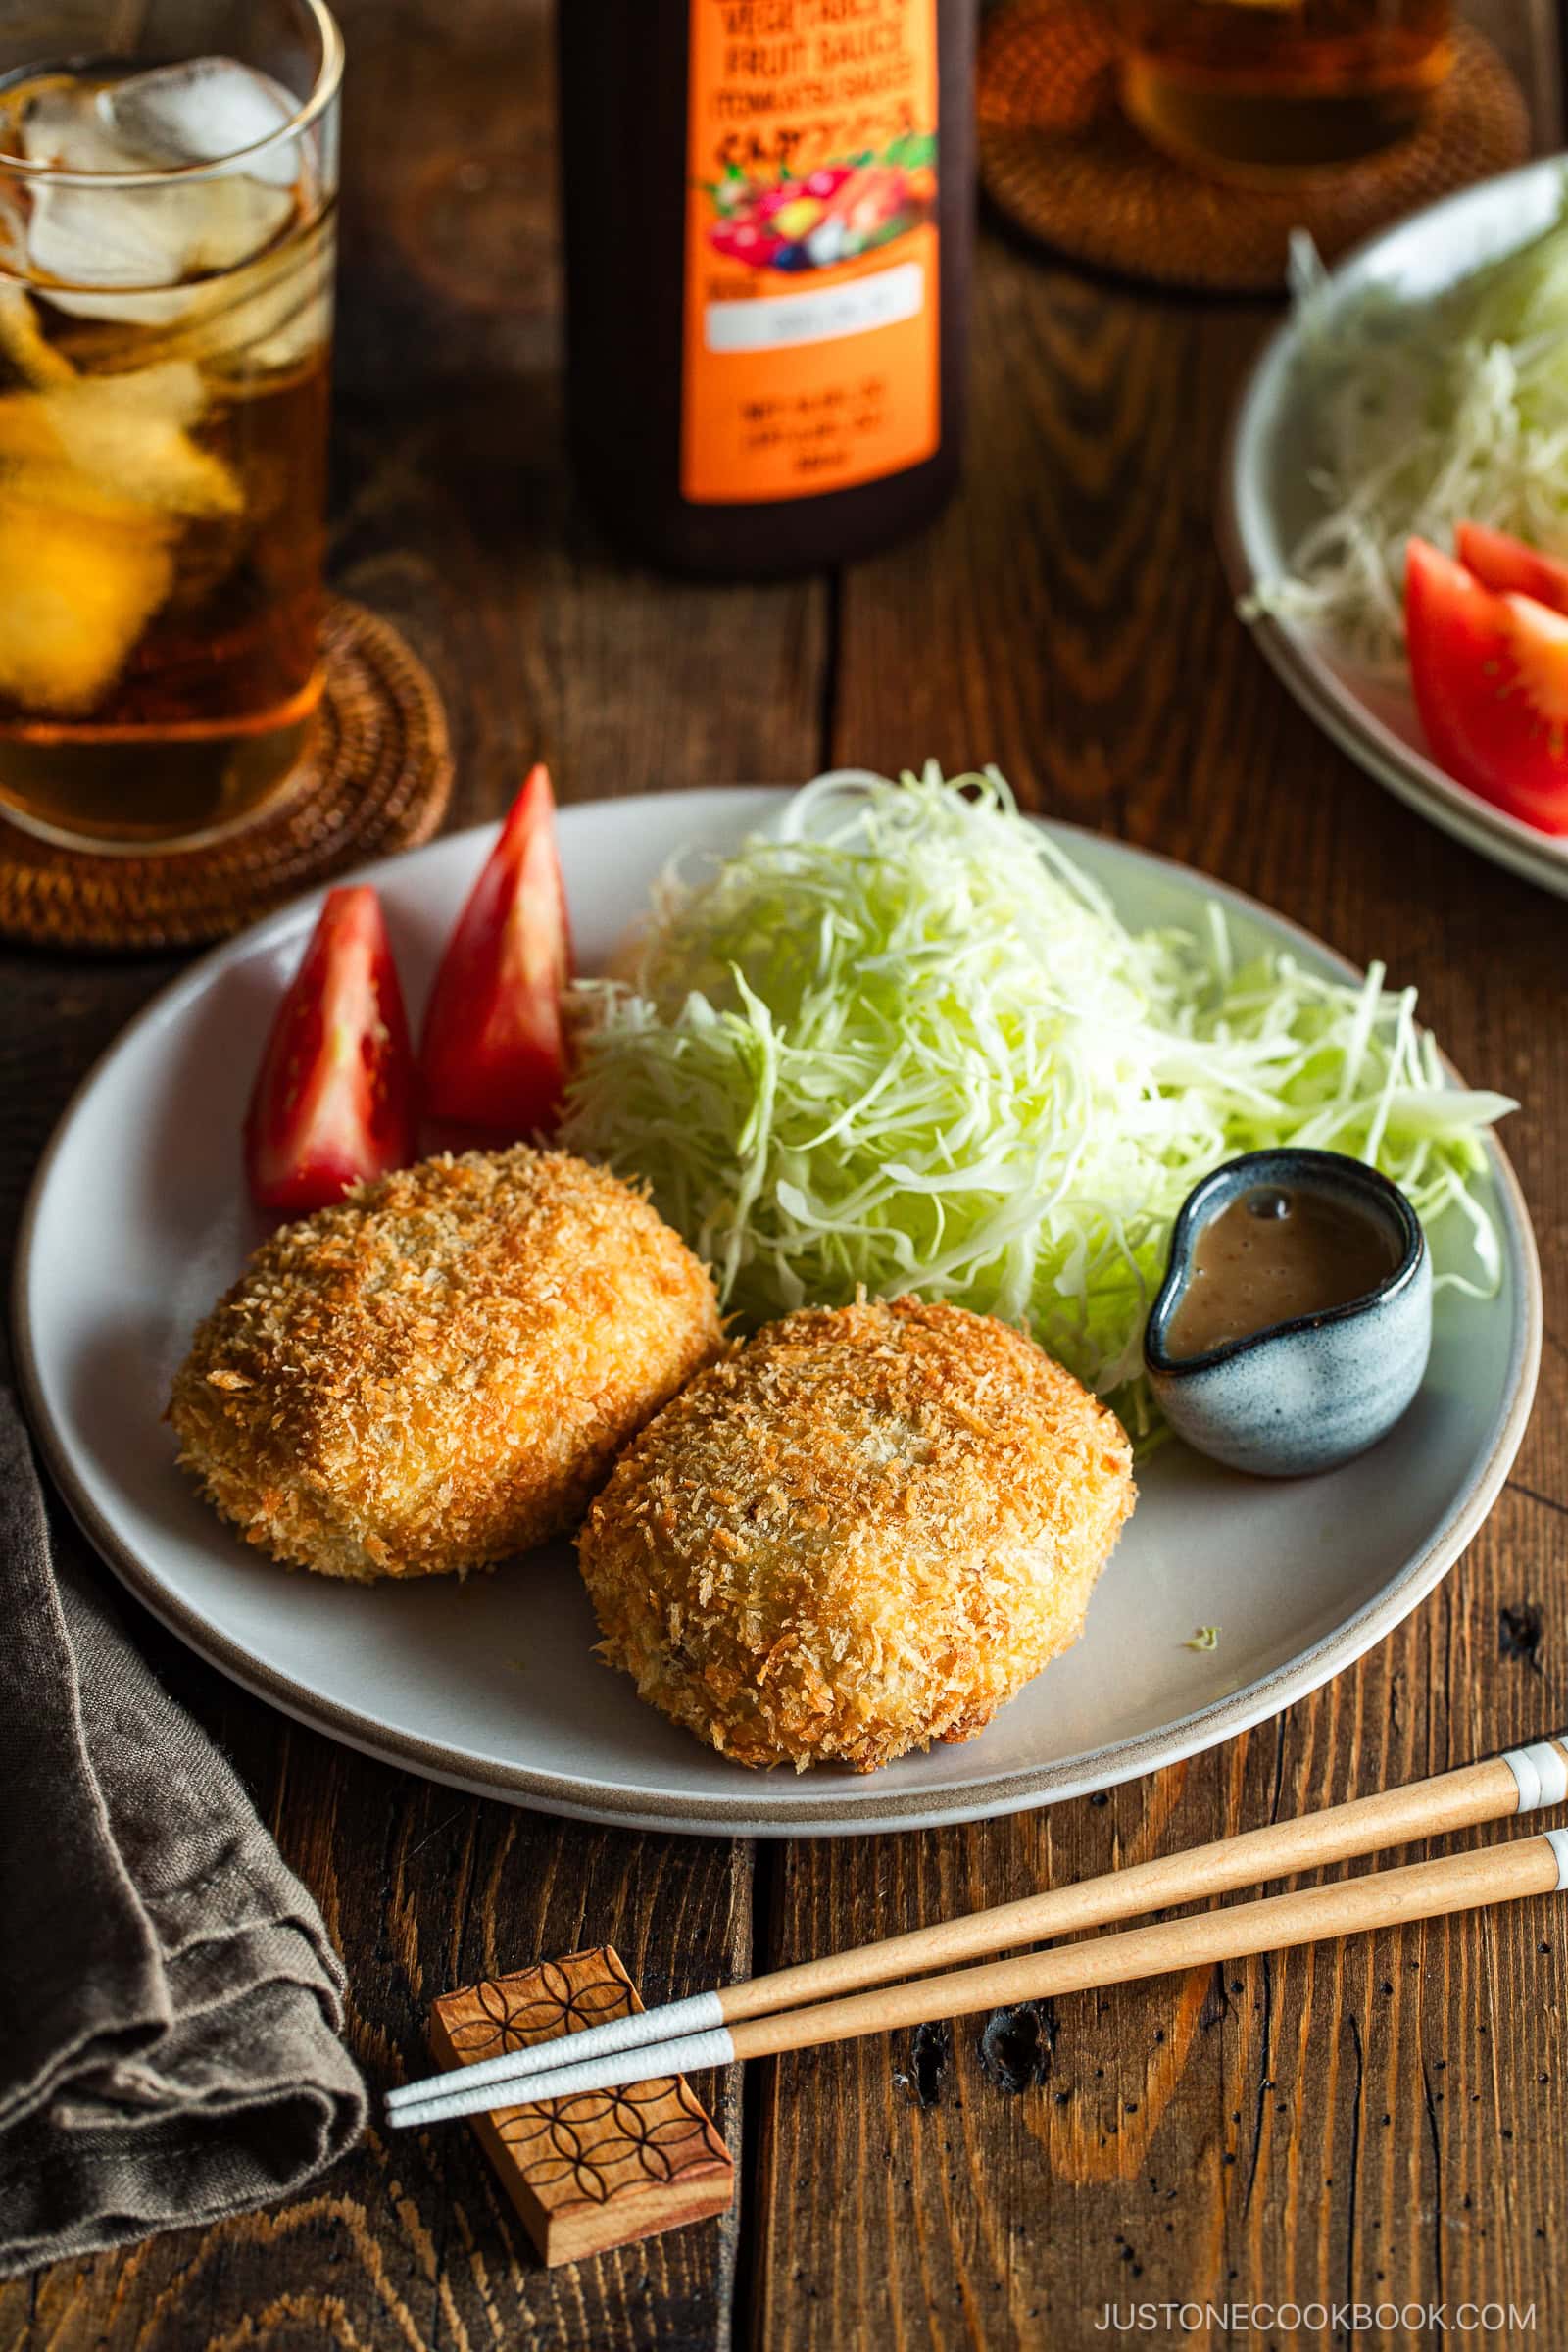
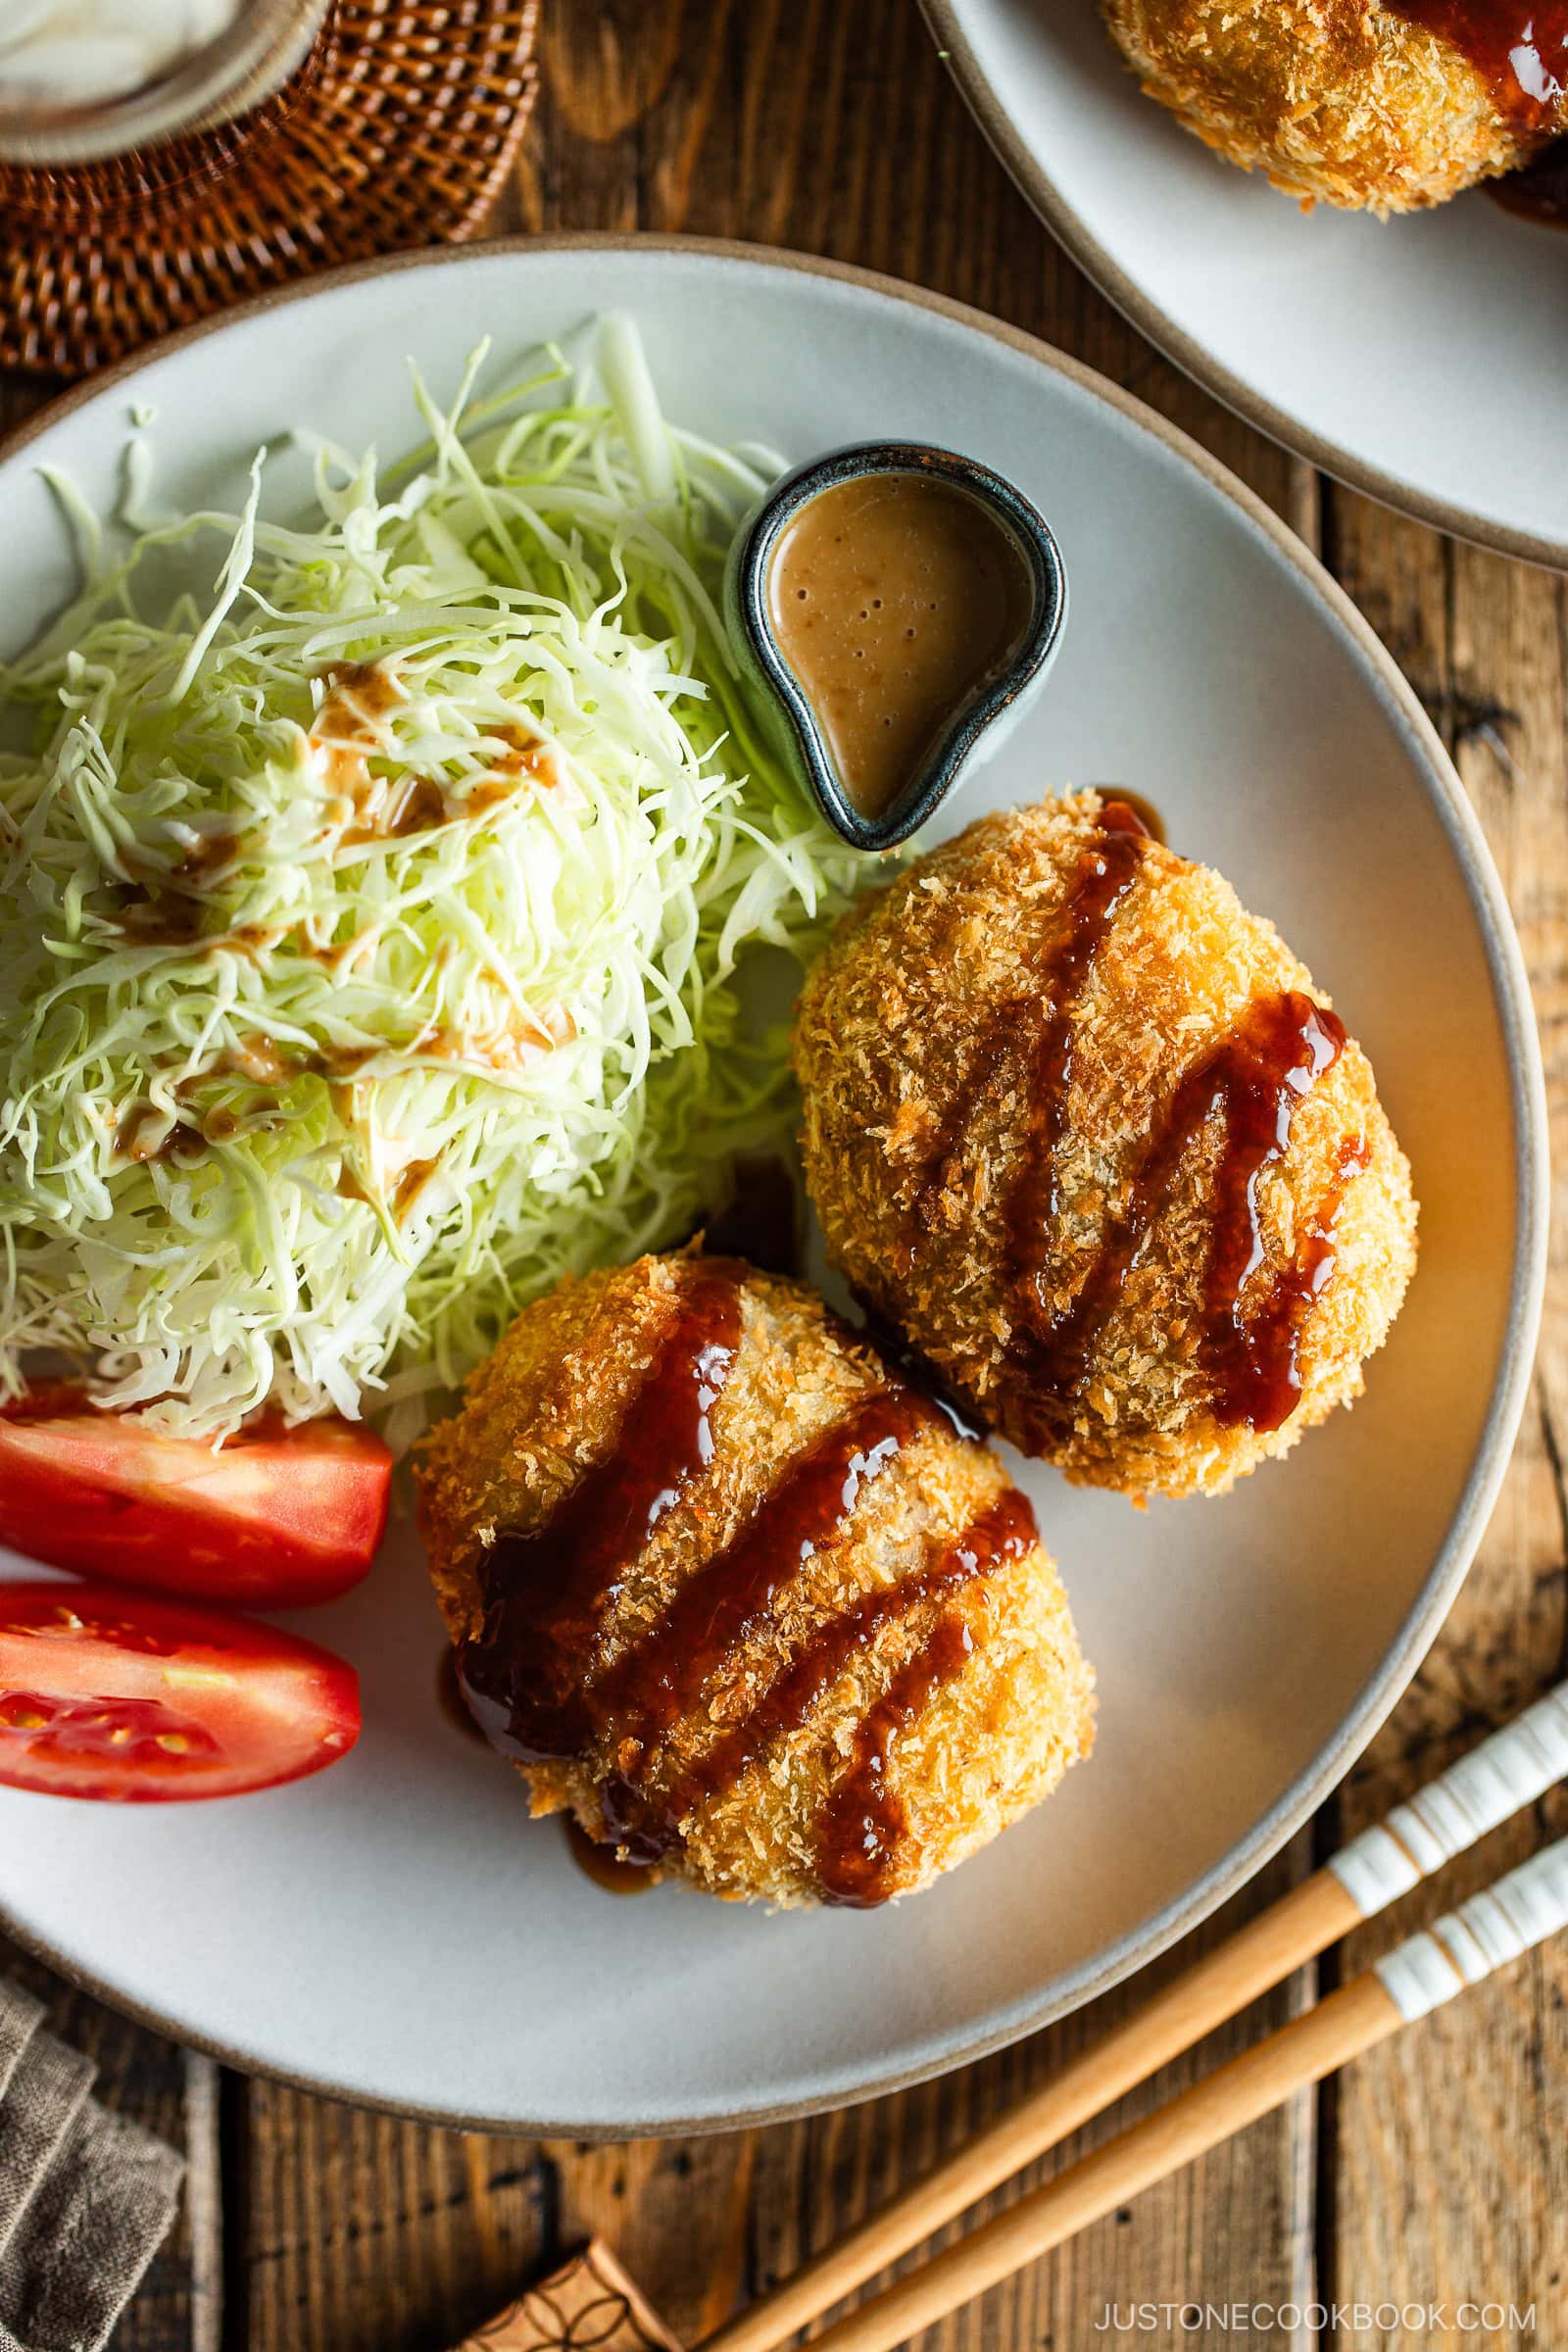
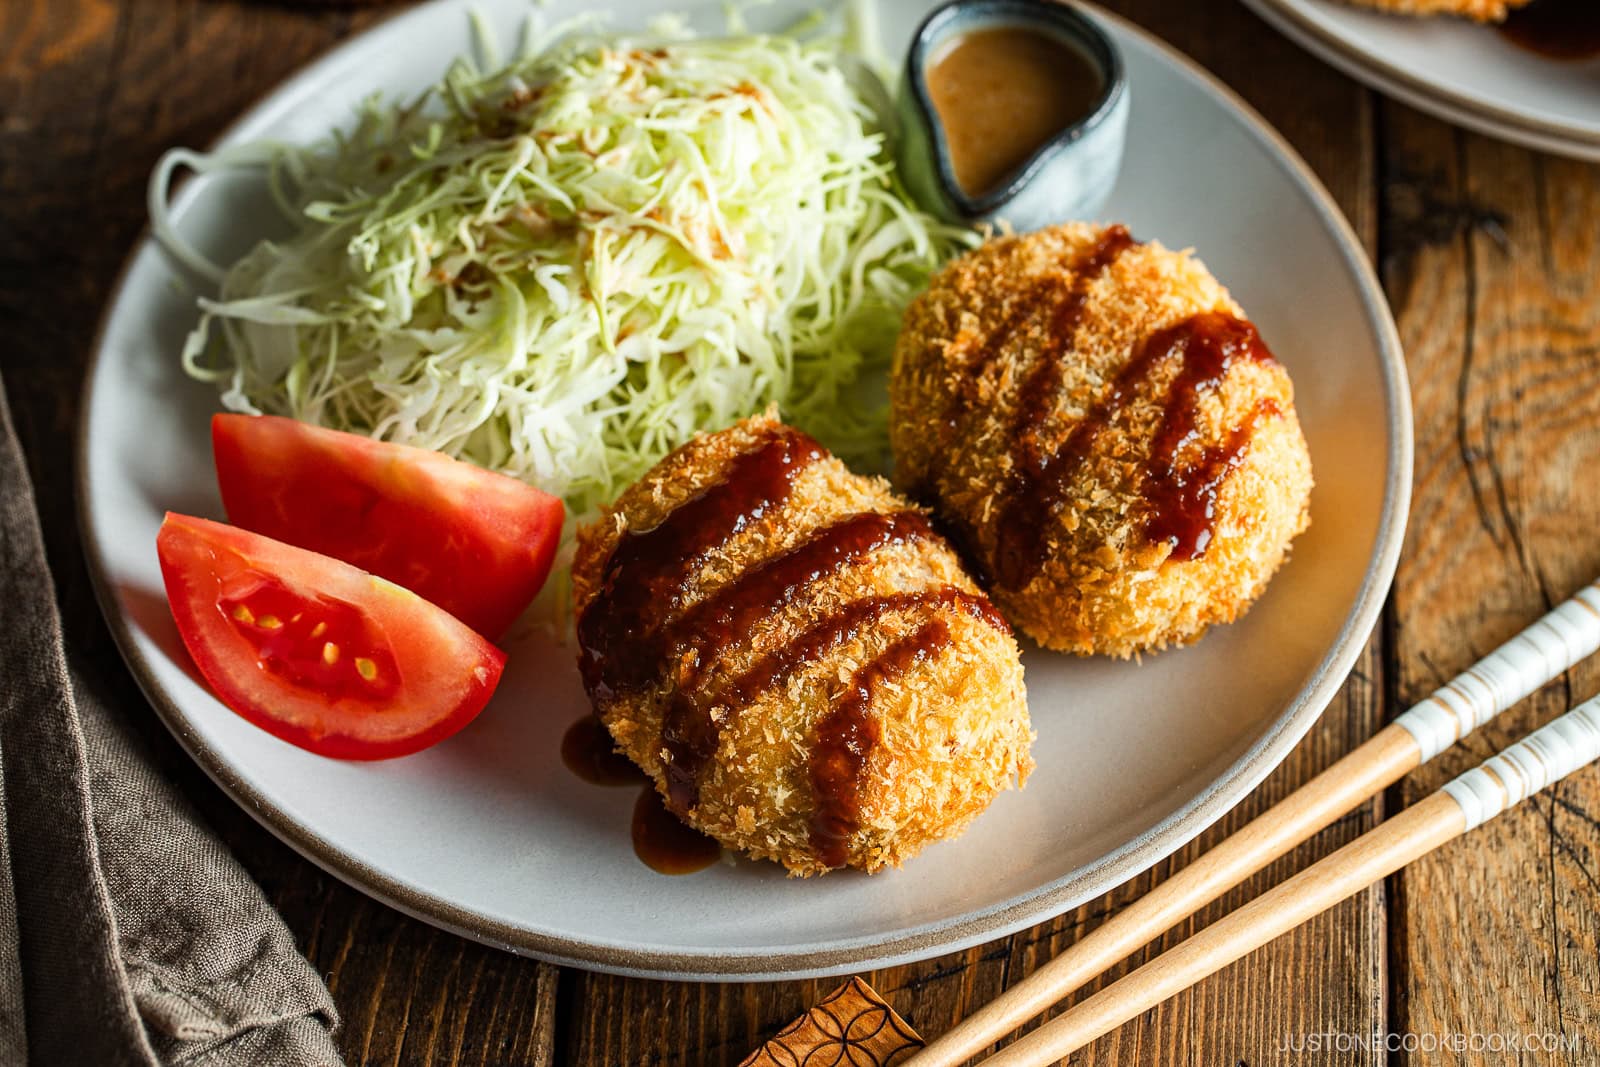
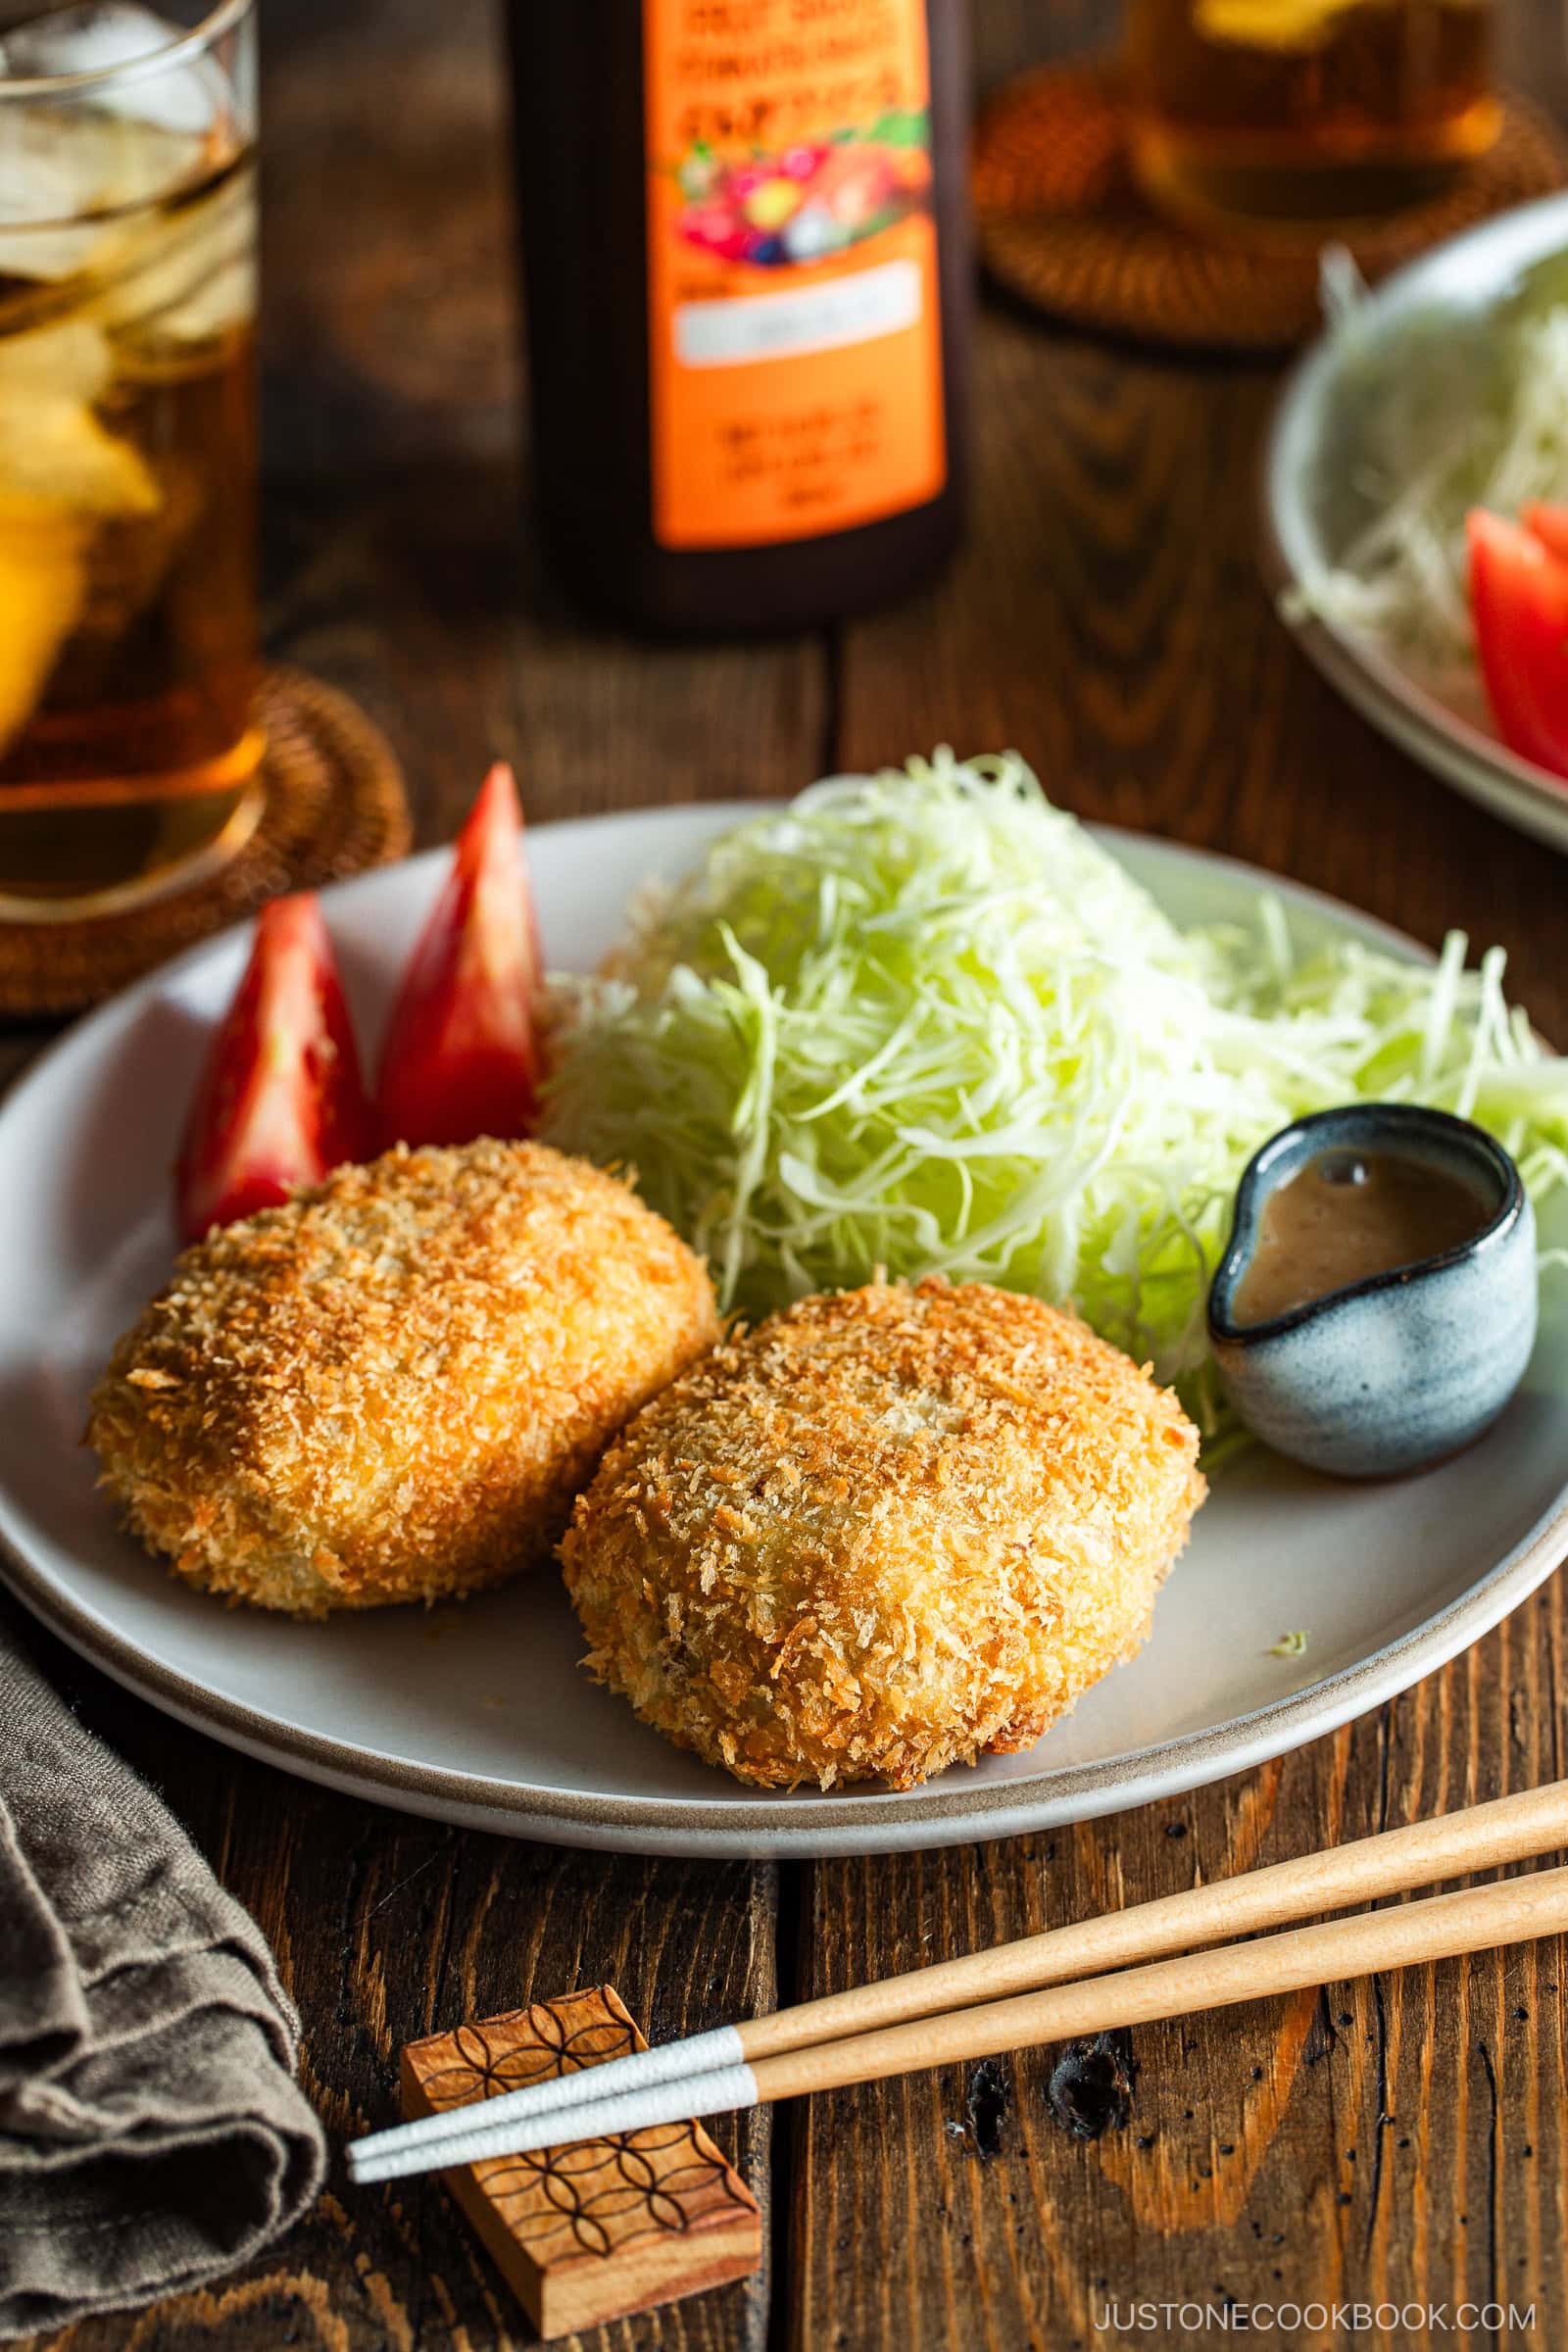
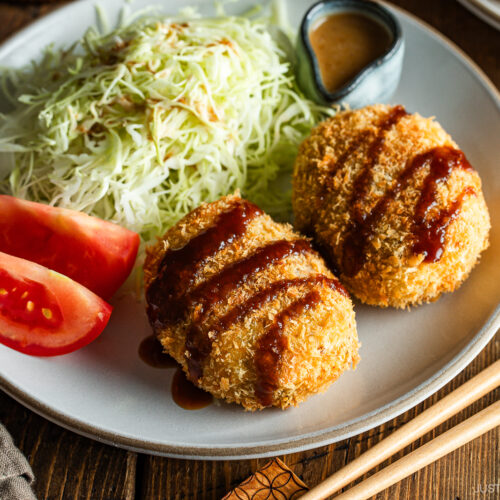
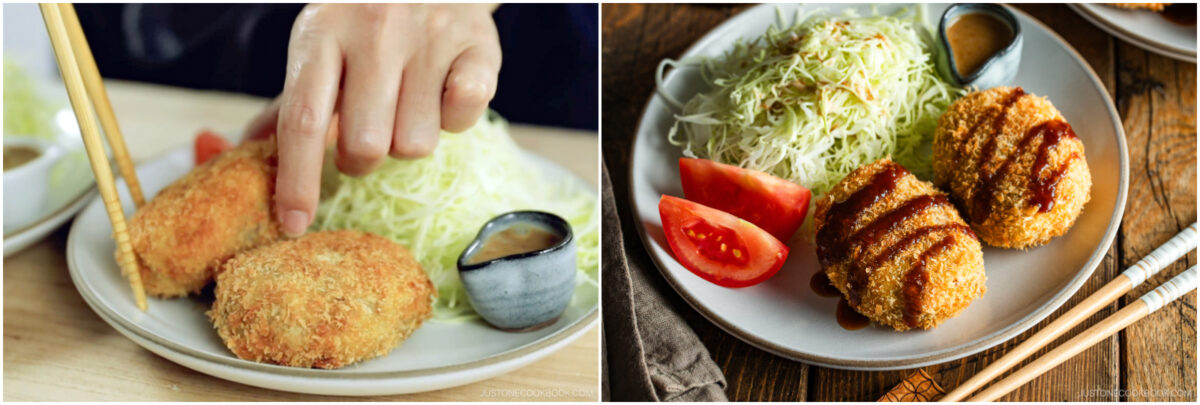
Step 7 – Serve. Drizzle tonkatsu sauce on top and enjoy.
Nami’s Recipe Tips
- Start the potatoes in cold water – It takes a long time for the center of the dense potatoes to heat up. Therefore, I put the potatoes in cold water and heat them at the same time so the outer layer doesn’t disintegrate before the inside cooks.
- Avoid excess moisture – There are three ways I do this: 1) Sauté the onion until golden brown and to evaporate the moisture. 2) Drain the pan juices from the cooked meat before you mix it with the mashed potato. 3) Shake the drained boiled potatoes in the pot over low heat until they look dry and powdery.
- Mash and season while hot – This allows the steam to escape the hot boiled potatoes. They will absorb the seasoning and the meat flavor better when they’re hot.
- Don’t add air to the patties – Air pockets might create steam during deep-frying and cause the croquette to explode.
- Cool before breading – Resting the patties in the fridge keeps them from releasing steam and exploding while deep-frying.
- Don’t overcrowd the pot – Deep fry 2–3 pieces at a time. The oil temperature will drop too quickly if you add too much food at once and the korokke will absorb too much oil.
- Maintain the oil temperature at all times – Use an instant-read thermometer so there’s no guessing.
Variations and Customizations
- Add minced vegetables. You can incorporate carrot and shiitake mushrooms into the potato and meat mixture.
- Add spices and flavorings. Feel free to add a dash of curry powder or miso to the potato and meat mixture.
- Use kabocha or crab. Swap the potato and/or meat to make Kabocha Croquettes and Creamy Crab Croquettes.
- Bake it. I’ve got you covered with my recipe for Baked Croquette.
What to Serve with Japanese Croquettes
- With a vegetable side: Serve up a side of refreshing Japanese Cucumber Salad.
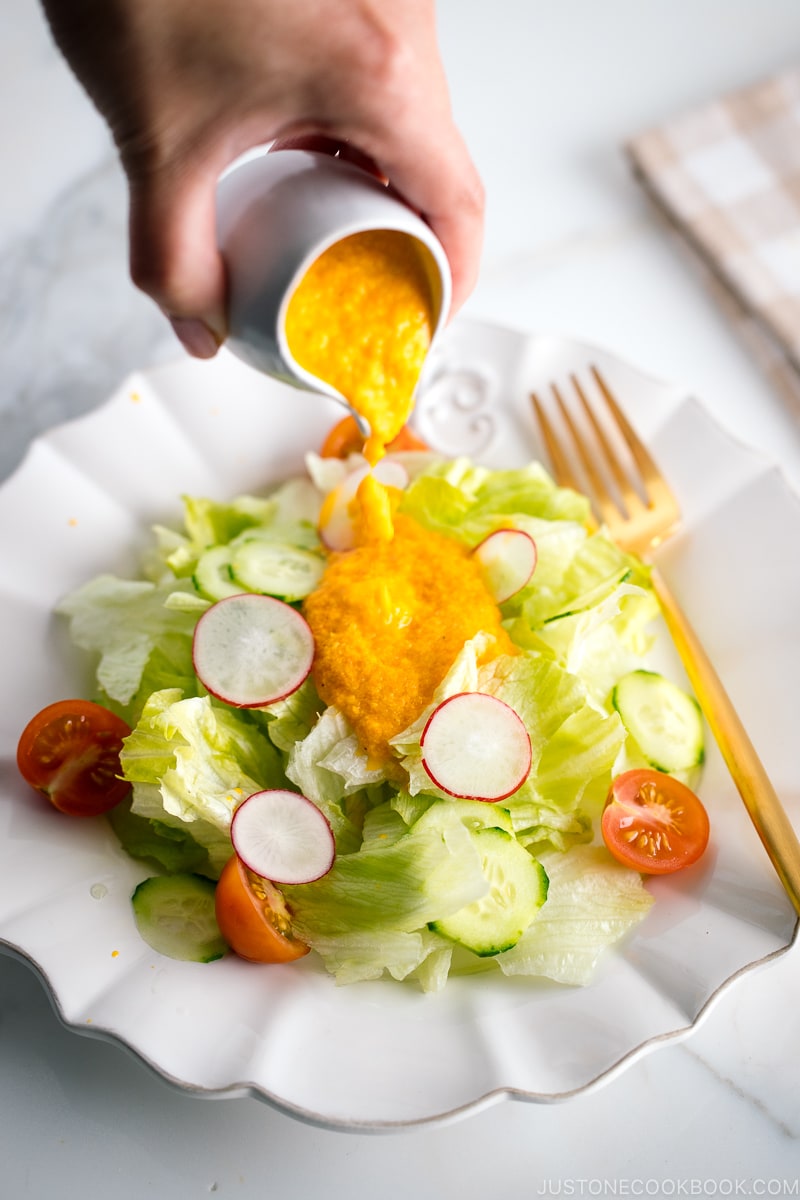
- With a green salad: Drizzle it with Carrot Ginger Dressing for a Japanese twist.
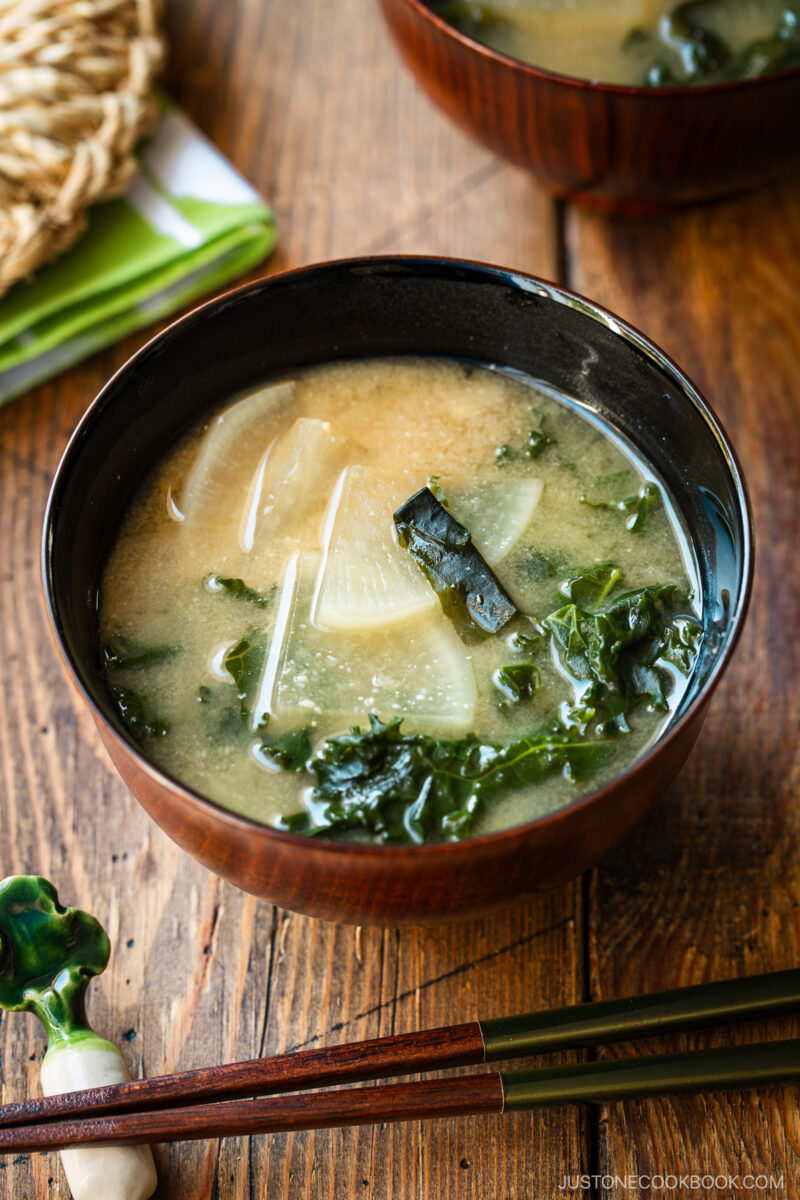
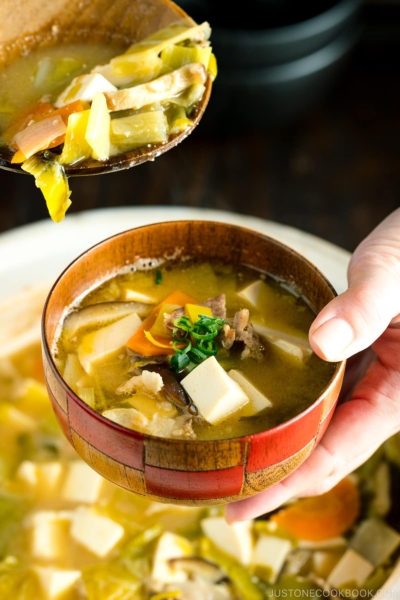
- With soup: Kale and Daikon Miso Soup is always a good idea!
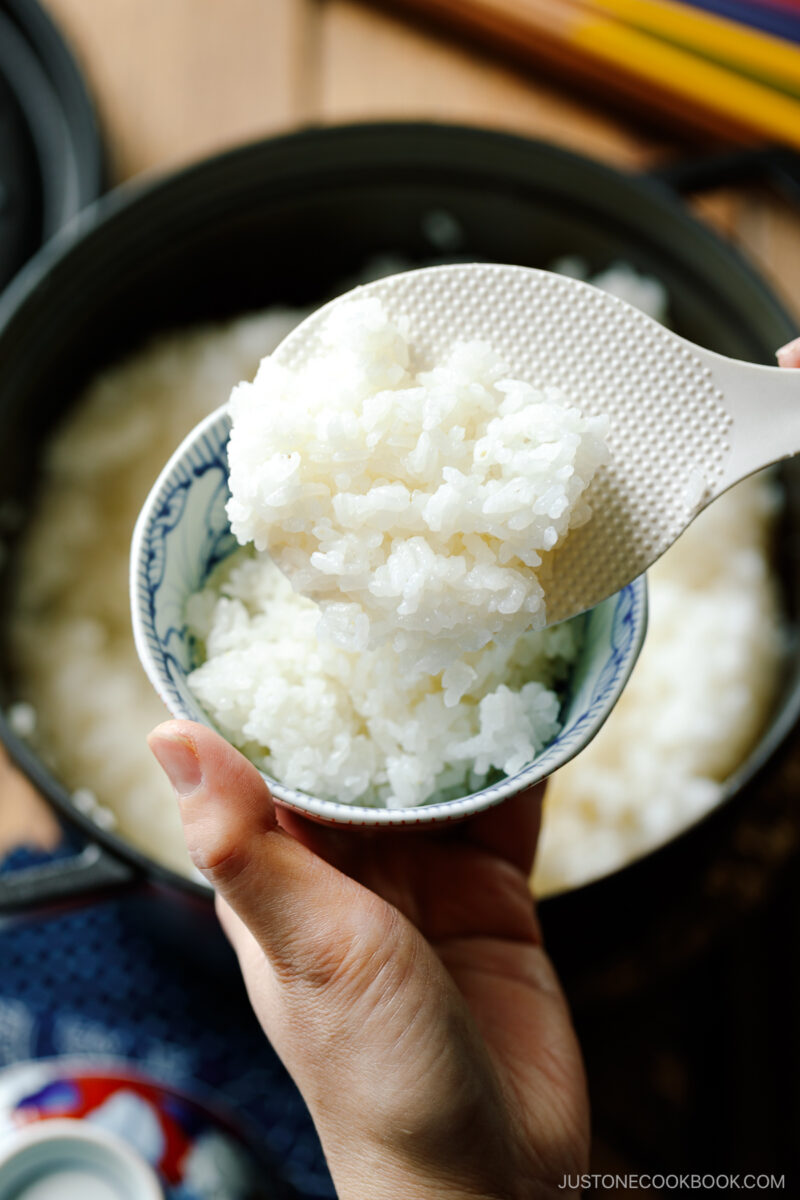
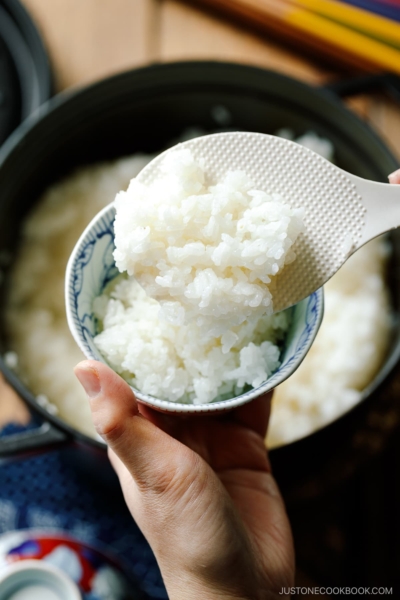
- With rice: Learn How to Cook Rice in a Pot on the Stove.

Storage and Reheating Tips
To store: You can store the leftovers in an airtight container and freeze up to a month.
To reheat: Place the defrosted or frozen croquettes on a baking sheet lined with aluminum foil or parchment paper. Bake at 350ºF (180ºC) for 15–20 minutes if defrosted or 45 minutes if frozen. Check that the inside is warm before serving.
Frequently Asked Questions
Definitely! Croquettes keep well in the freezer for up to a month and are easy to reheat.
Japanese Croquettes (Mom‘s Korokke)
Ingredients
For the Potato and Meat Mixture
- 2 lb russet potatoes (about 4 potatoes)
- 1 onion (9.6 oz, 272 g)
- 1 Tbsp neutral oil
- 1 lb ground beef (85% lean)
- ½ tsp Diamond Crystal kosher salt (for the meat)
- ¼ tsp freshly ground black pepper (for the meat)
- 1 Tbsp unsalted butter (for the potatoes)
- ½ tsp Diamond Crystal kosher salt (for the potatoes)
- ¼ tsp freshly ground black pepper (for the potatoes)
For the Panko Breading
- ½ cup all-purpose flour (plain flour)
- 2 cups panko (Japanese breadcrumbs)
- 3 large eggs (50 g each w/o shell)
For Deep-Frying
- 4 cups neutral oil (or enough for 2 inches (5 cm) of oil in the pot)
For Serving
- tonkatsu sauce (store bought or make my Homemade Tonkatsu Sauce)
Instructions
To Boil the Potatoes
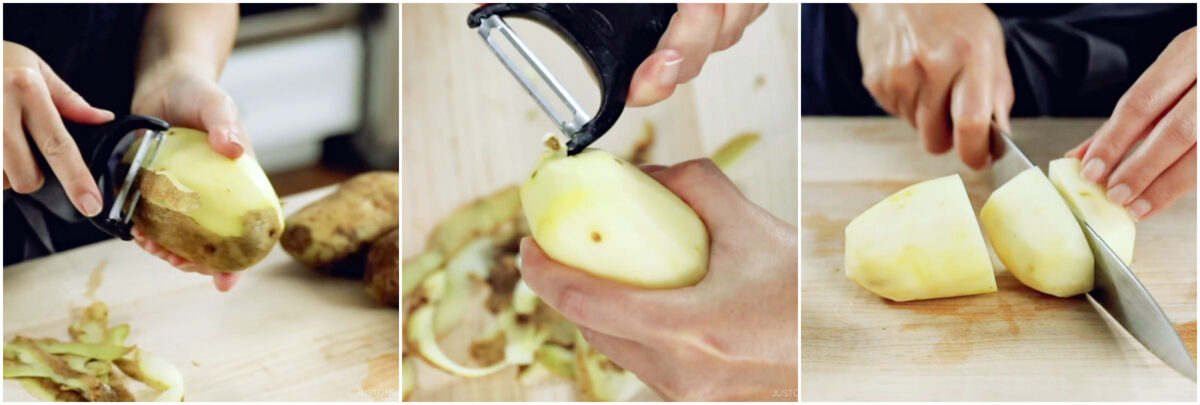
- Wash 2 lb russet potatoes under cold running water. Peel them and remove the eyes. Cut each potato into 4 equal pieces so they cook evenly. Nami's Tip: I use russets for their starchy, fluffy, and light texture. They are the best variety for soaking up the juices and flavor from the meat and onion.
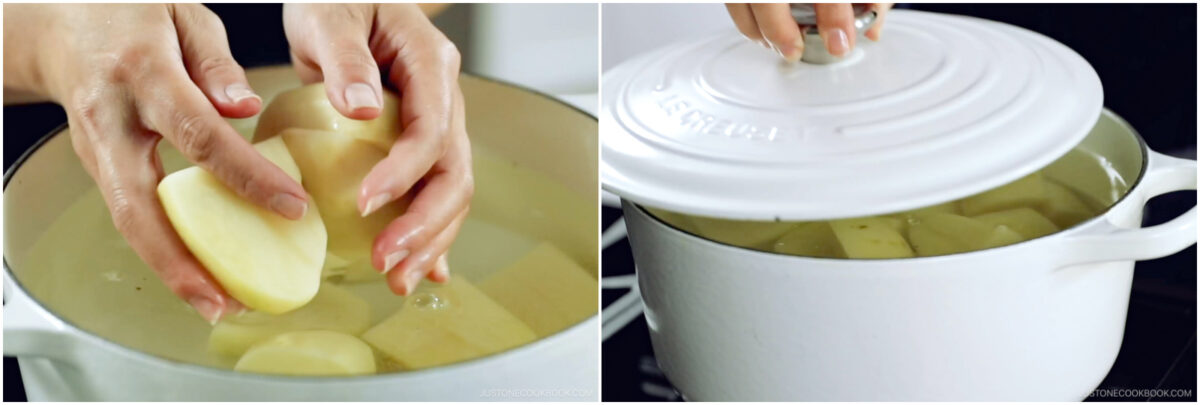
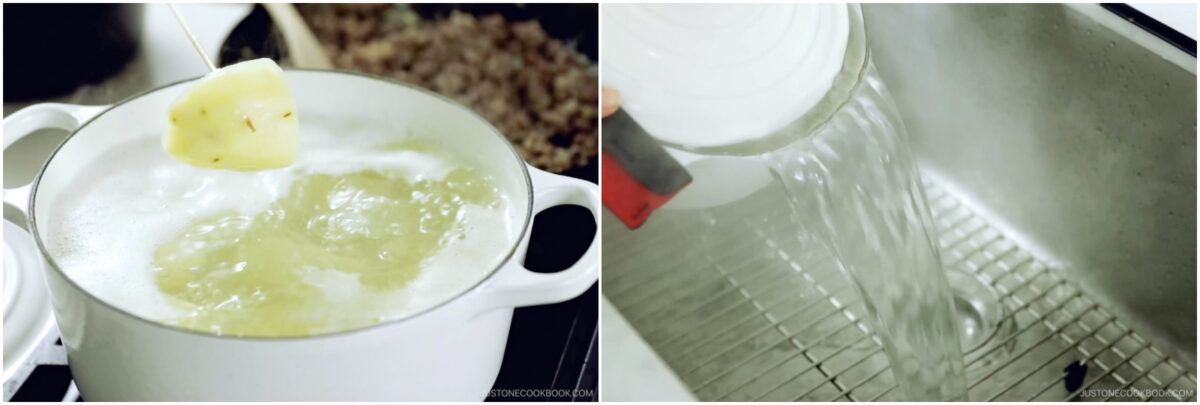
- Put the cold running water and potatoes in a large pot and cover with a lid slightly ajar to prevent boiling over. Turn on the heat to medium and bring it to a boil; this will take about 15 minutes. Once boiling, reduce the heat to maintain a gentle boil and cook until done, about 15–20 minutes. You have 30 minutes to complete the next step!
To Cook the Onions and Meat
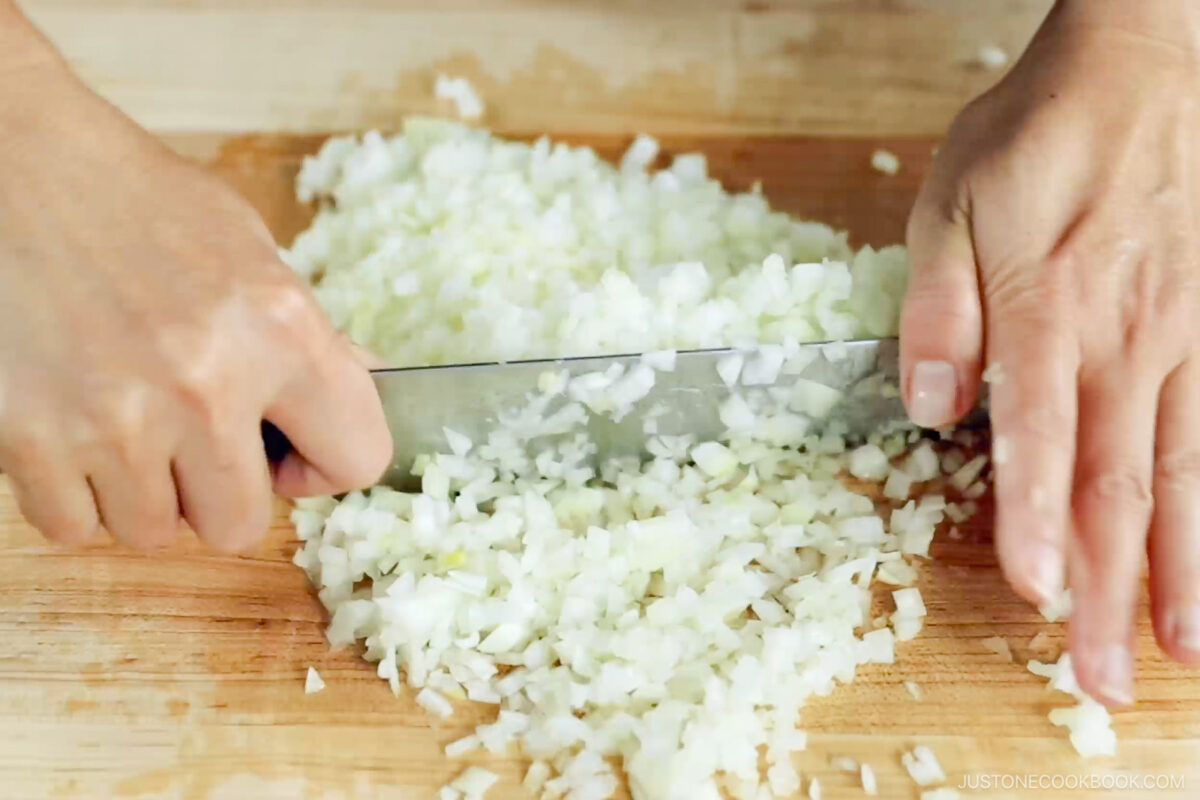
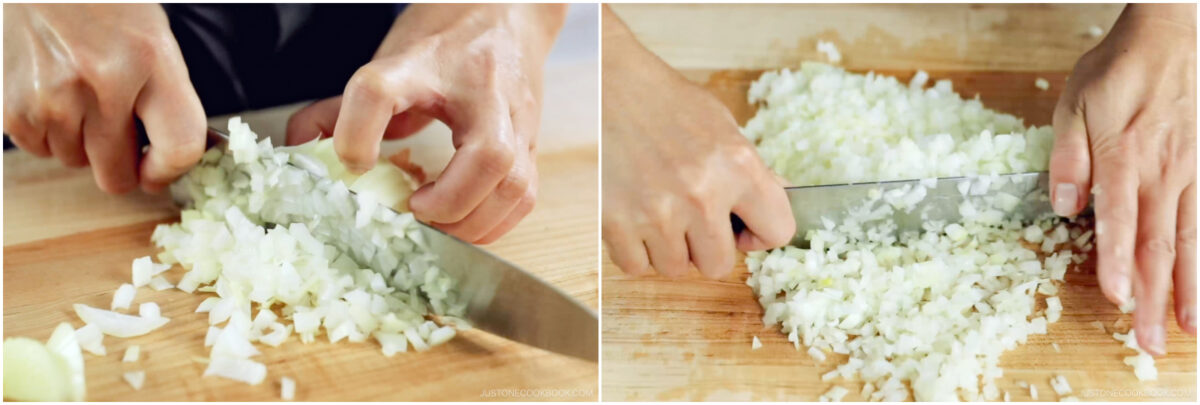
- Meanwhile, prepare the onion and ground beef. Mince 1 onion finely (called mijingiri in Japanese). Lay an onion half on the cutting board, flat side down. Make ¼-inch vertical slices to within ½ inch of the root end. Then, make ¼-inch horizontal slices, again keeping the root intact.

- Make perpendicular cuts down through the vertical slices. If you need to chop the onions finer, run your knife through them using a rocking motion while holding down the tip of the knife.
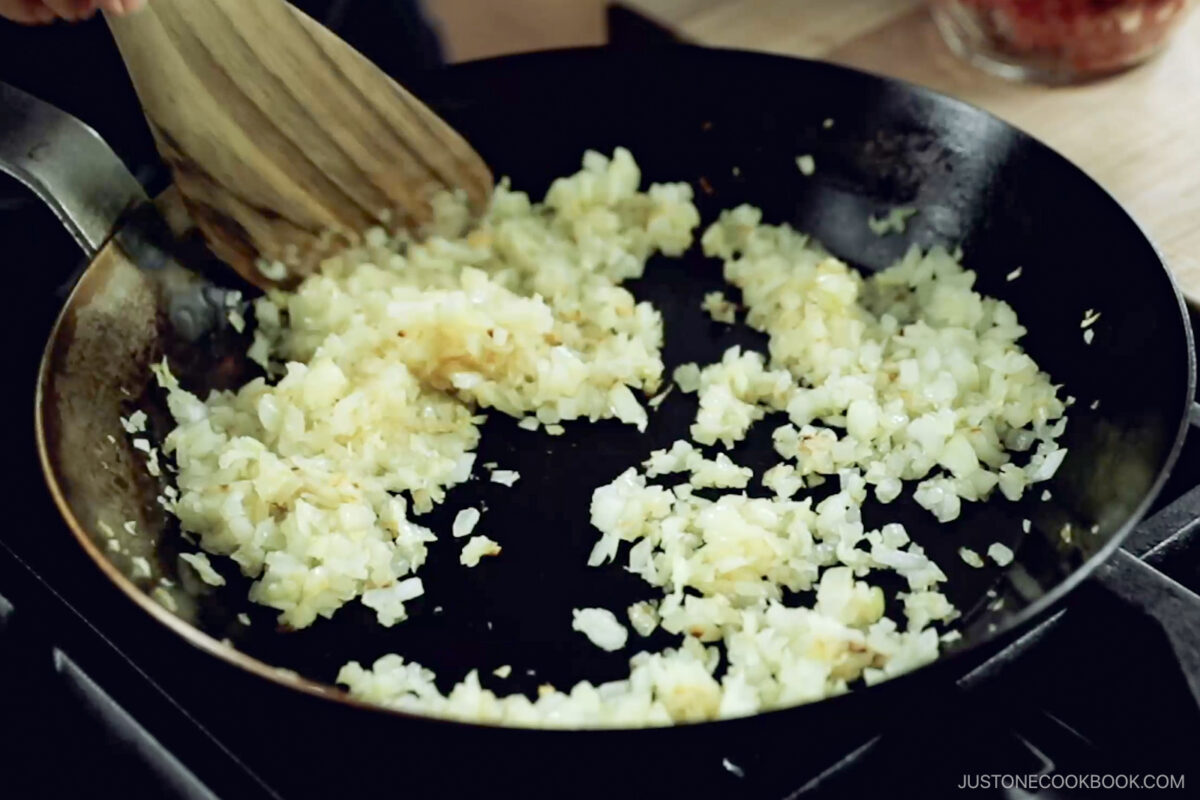
- Preheat a large skillet on medium heat. Once it's hot, add 1 Tbsp neutral oil and the minced onions. Spread the onions and let them cook undisturbed for a while to develop a nice char—just be careful not to burn them.
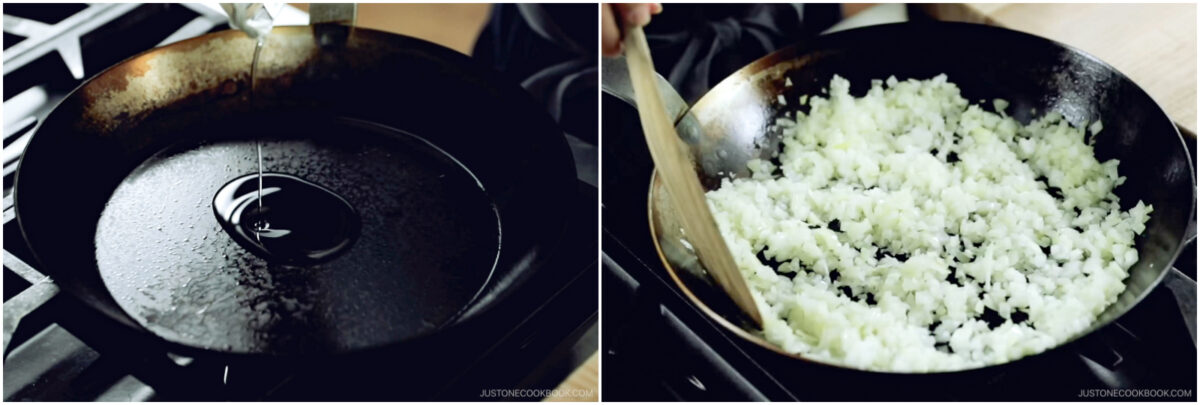
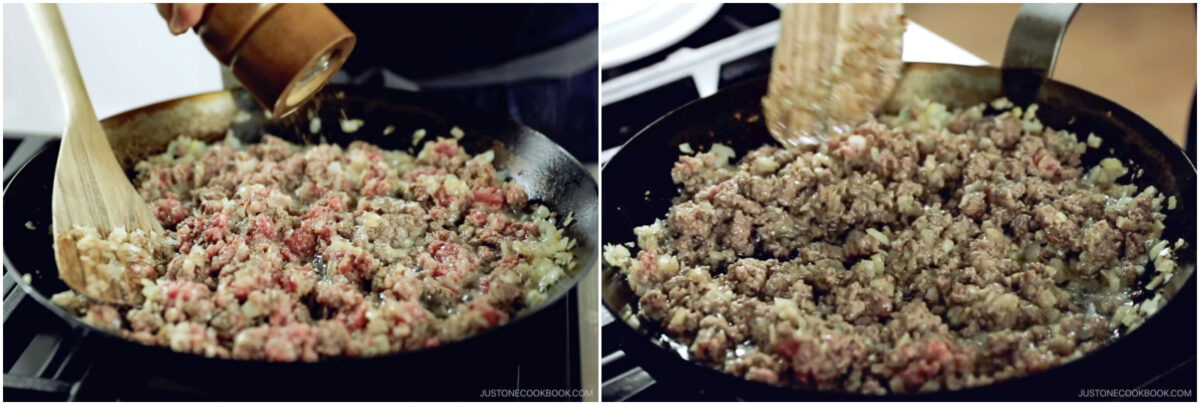
- Sauté until translucent and tender, about 12–15 minutes. Add 1 lb ground beef to the pan and break it up with a wooden spoon. Nami's Tip: Be sure to evaporate any moisture from the onions; excess liquid can make the croquettes soggy.
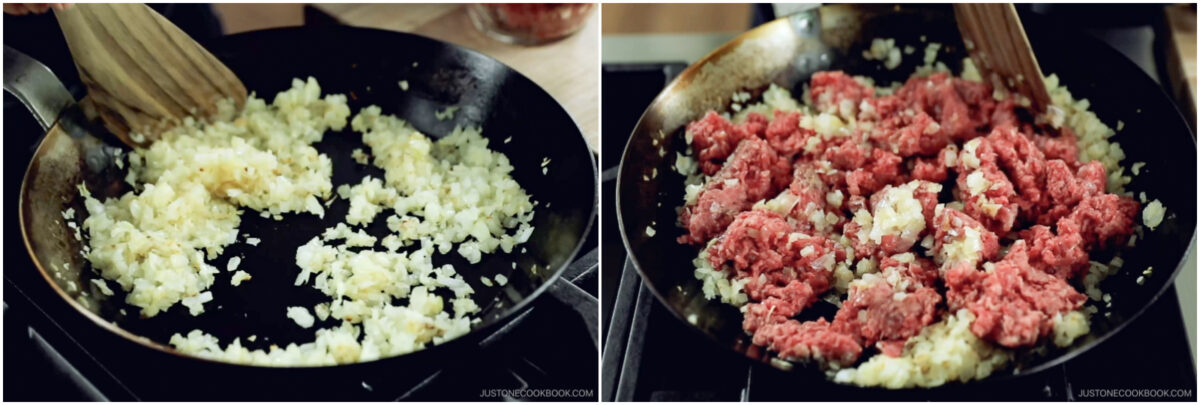
- Season with ½ tsp Diamond Crystal kosher salt and ¼ tsp freshly ground black pepper. Stir and cook until the meat is no longer pink. Turn off the heat and set aside until the potatoes are done cooking.
To Combine the Potatoes and Meat
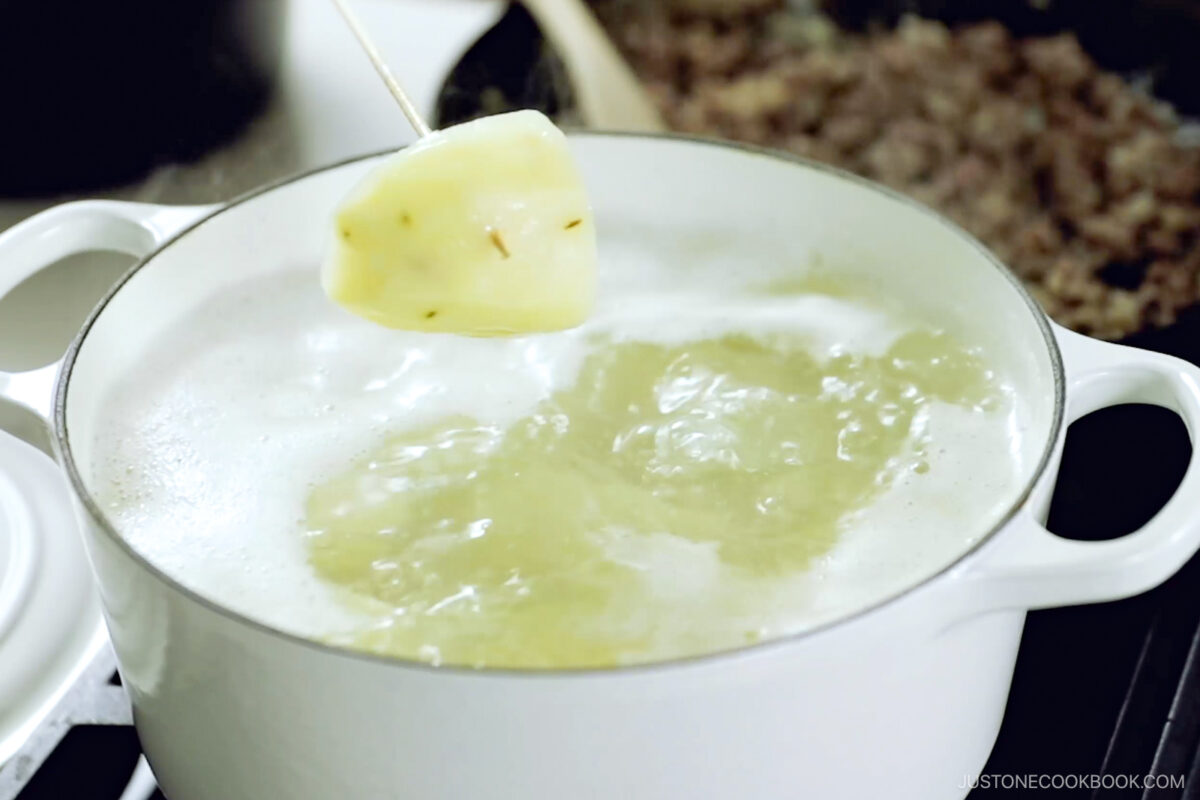
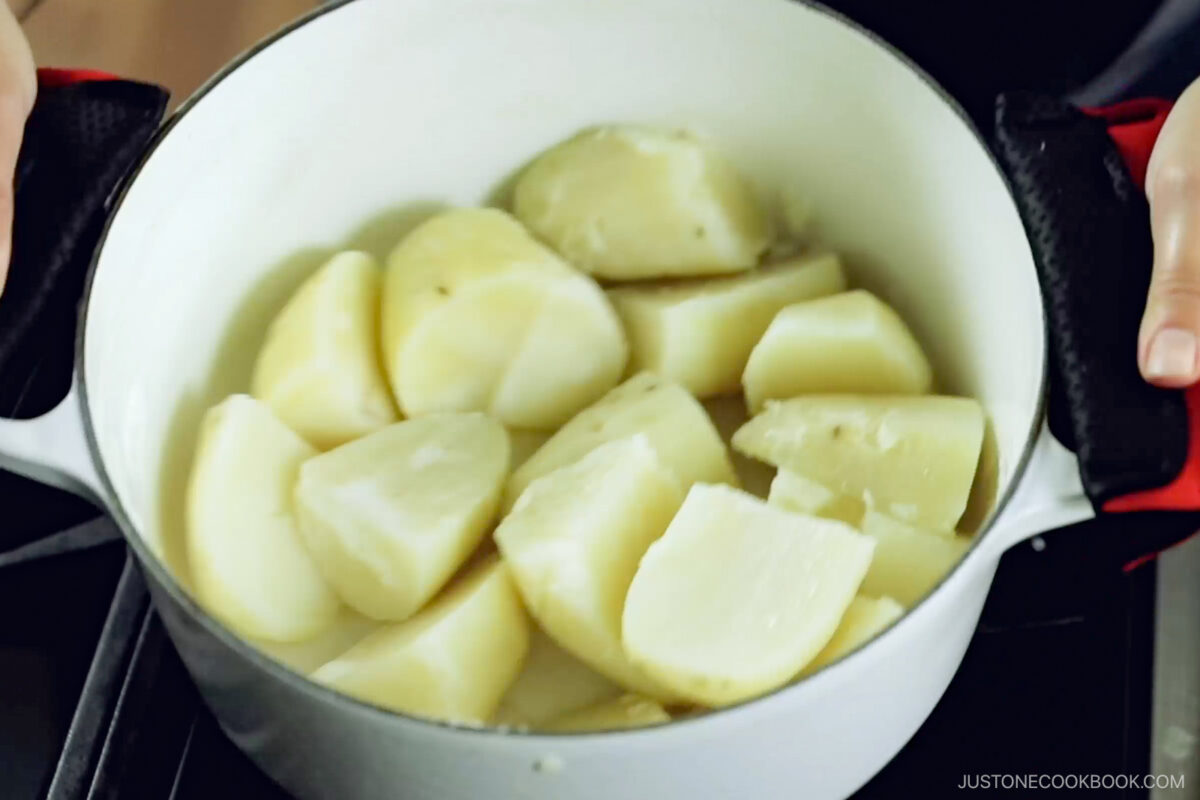
- To check if the potatoes are cooked, insert a skewer into a bigger piece; it's done if it pierces easily. Remove from the heat. Hold the lid slightly ajar to keep the potatoes in, and carefully drain off all the water.
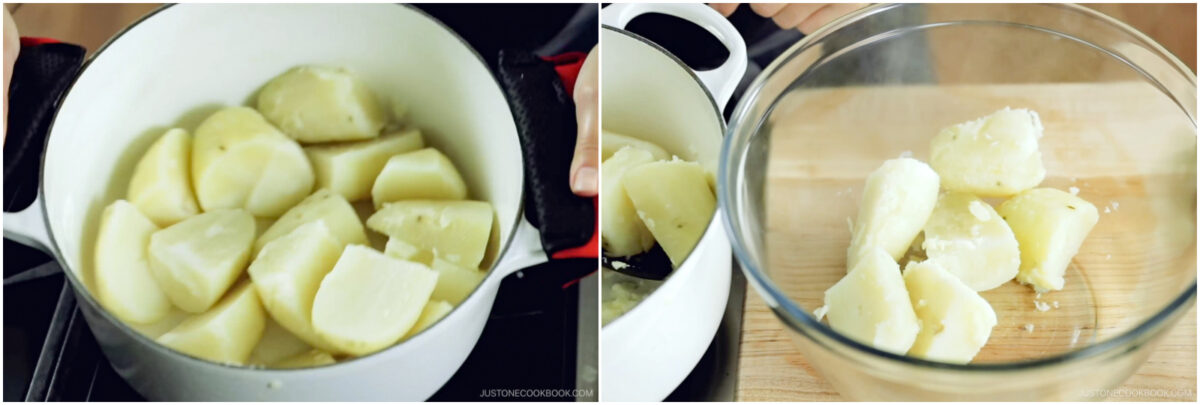
- Move the pot back to the stove over low heat. Continuously shake the pot to evaporate the remaining moisture from the potatoes, about 1–2 minutes. The potatoes should look powdery and dry. Transfer them to a large bowl.
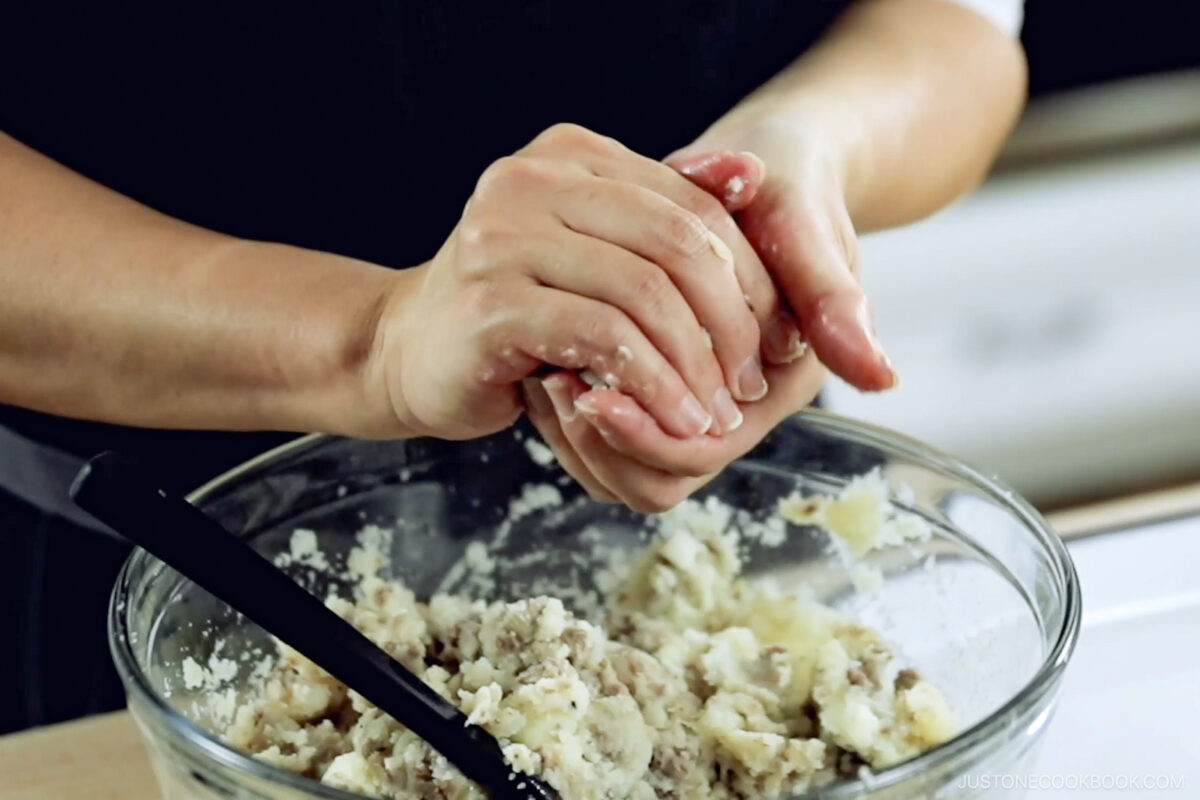
- Mash the potatoes with a potato masher while they are still hot, allowing the steam to escape. Keep some potato chunks for texture. Then, add 1 Tbsp unsalted butter, ½ tsp Diamond Crystal kosher salt, and ¼ tsp freshly ground black pepper and combine gently.
- If the meat mixture has released excess liquid, tilt the pan to collect it on one side and avoid adding it to the potatoes. Add the drained meat to the bowl of potatoes and gently mix to combine.
To Make the Patties
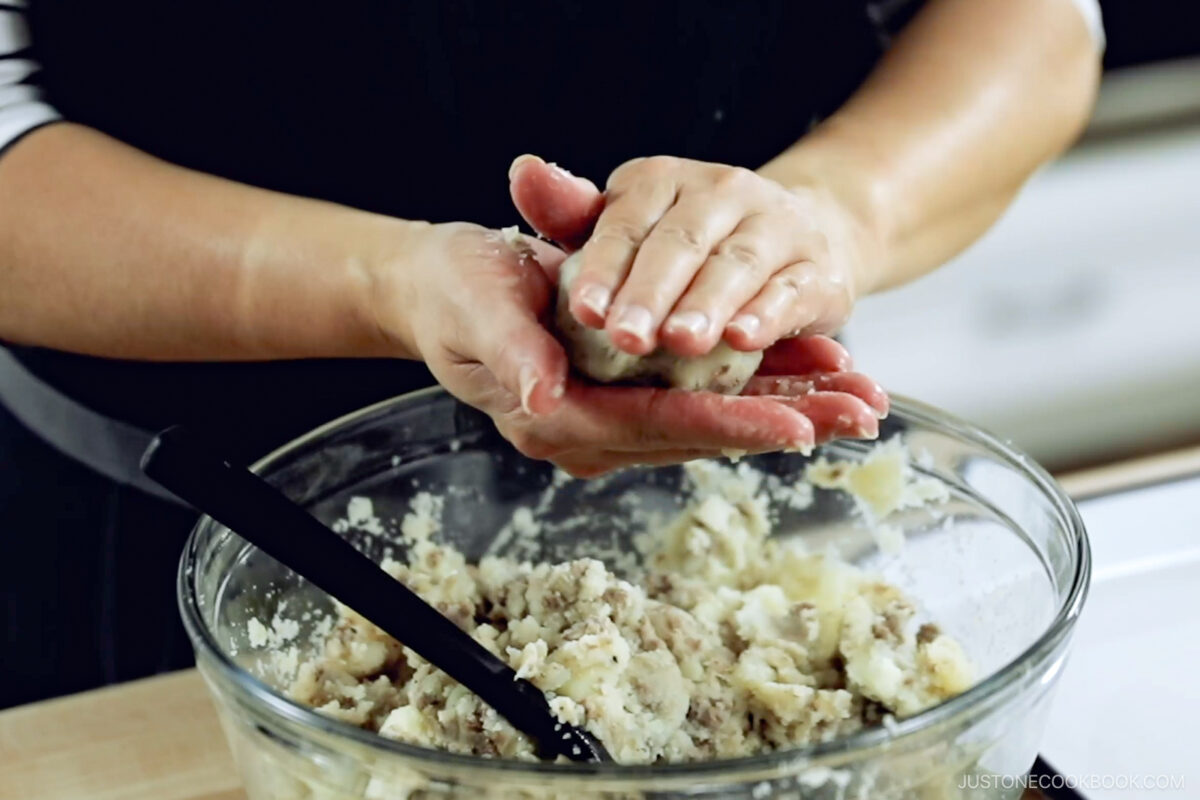
- While the mixture is still warm (but not hot), form oval-shaped patties 3 inches (7.5 cm) in length. Try not to create air pockets that can make the patties explode while deep-frying.
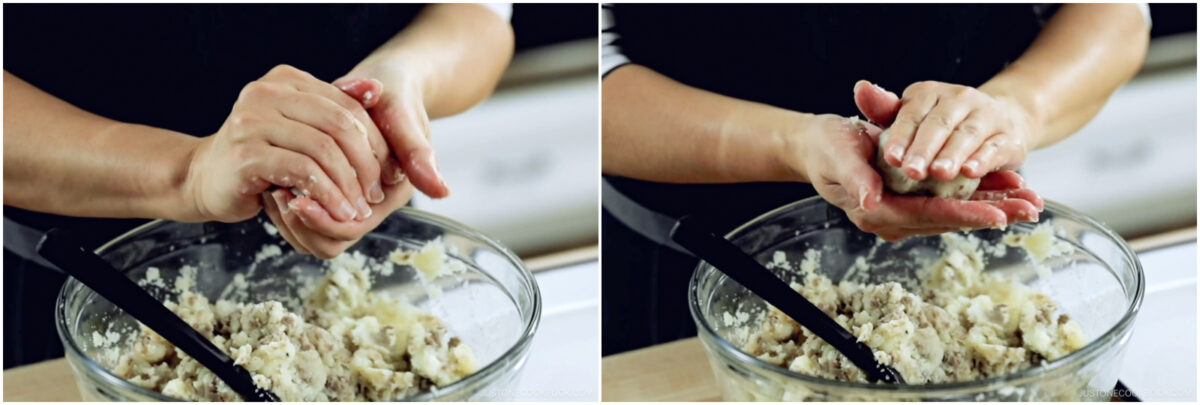
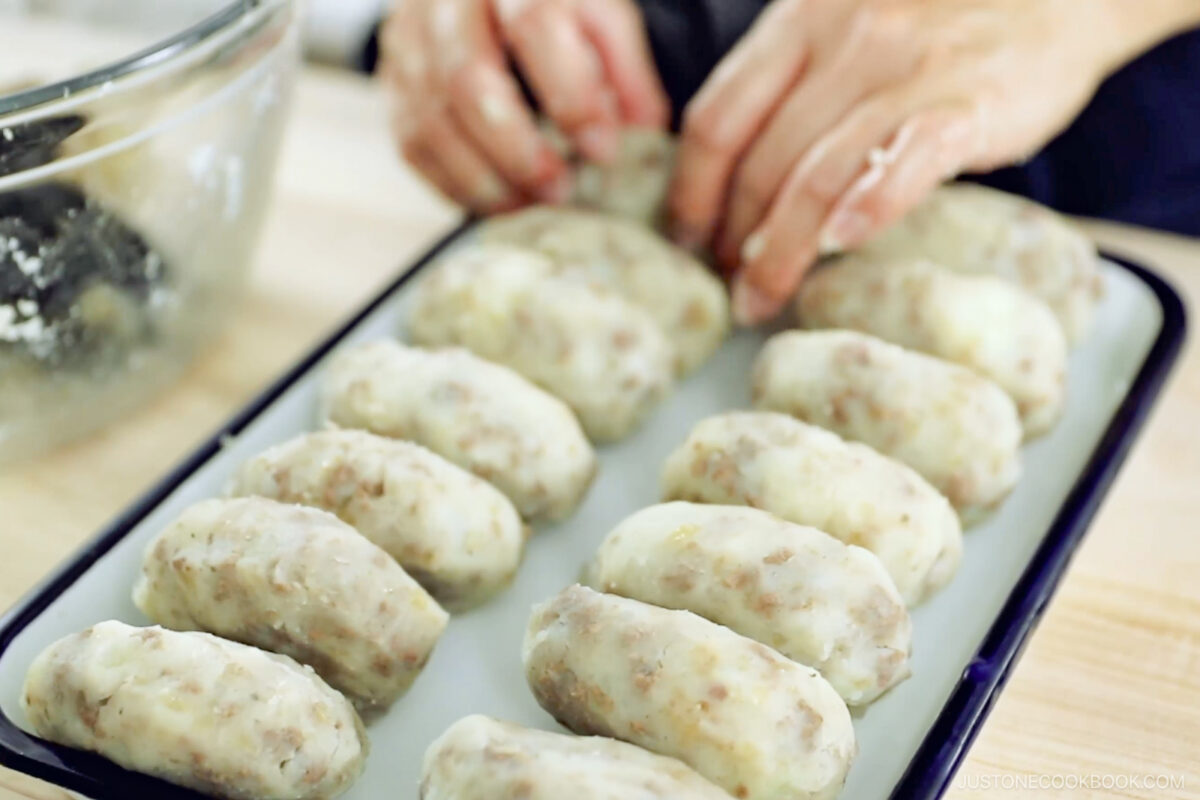
- Place the patties on a tray or plate to let cool completely. Once cool to room temperature, cover and rest them in the refrigerator for 15–30 minutes. Do not skip this step! Nami's Tip: Chilling the patties helps the ingredients meld and prevents the croquettes from bursting during frying. Warm patties generate steam as they heat up, which can rupture the panko coating and cause them to explode. Cold patties, on the other hand, minimize steam and stay intact.

To Bread the Croquettes
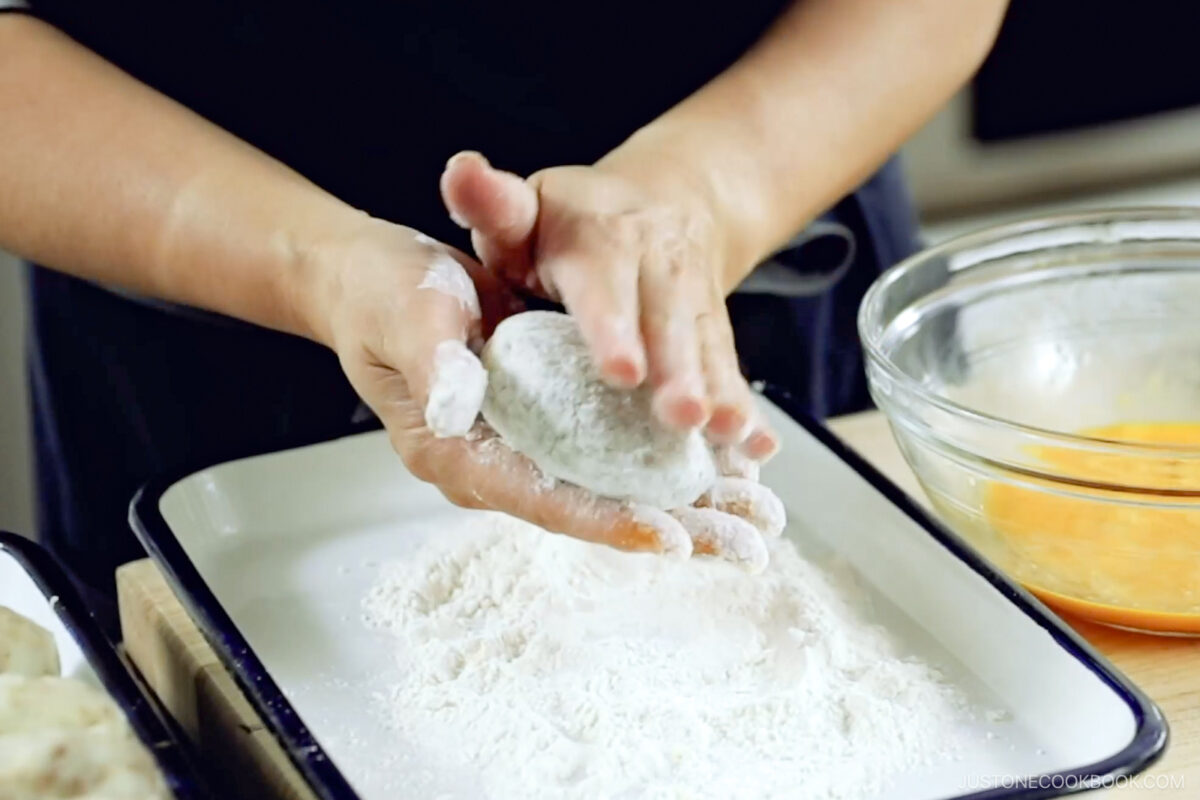
- Prepare separate trays for ½ cup all-purpose flour (plain flour) and 2 cups panko (Japanese breadcrumbs). Crack 3 large eggs (50 g each w/o shell) into a small bowl and beat with a whisk.
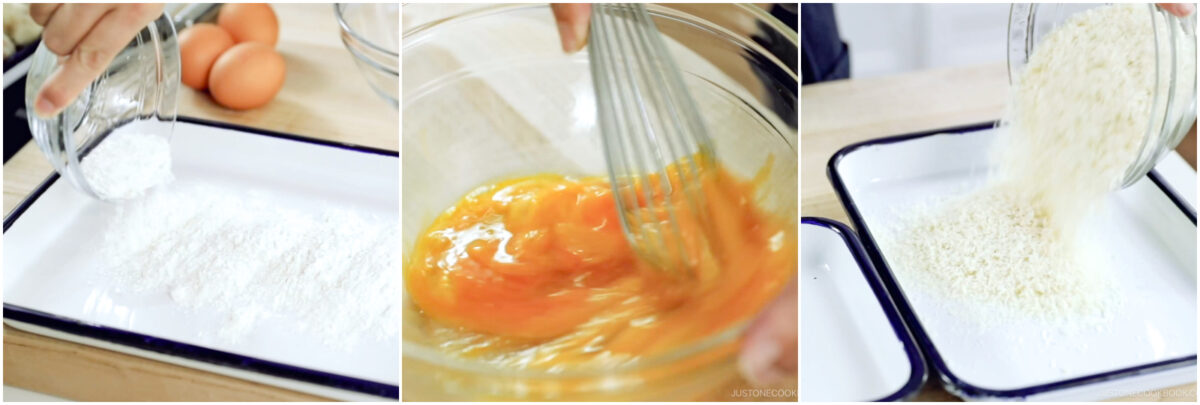
- Dredge each patty in flour and shake off the excess. Dip in the beaten egg, then coat with the panko. , pressing to adhere the breadcrumbs.
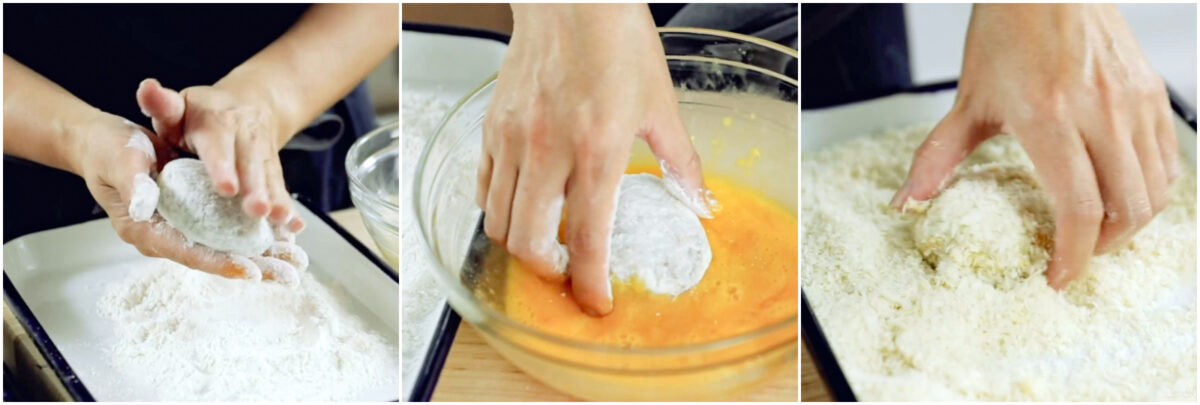
- Gently press the croquettes to help the breadcrumbs adhere and adjust the shape as needed.
To Deep-Fry
- Add 4 cups neutral oil to a medium pot and bring it to 340–350ºF (170–180ºC) over medium heat. Use a cooking thermometer to check the oil temperature so there‘s no guessing. Nami's Tip: Make sure there‘s at least 2 inches (5 cm) of oil in the pot so the croquettes are completely submerged while cooking. Once you get used to deep-frying, you can use the chopstick or panko tricks to determine if the oil is ready.
- Deep-fry 2–3 croquettes at a time until golden brown, about 2–3 minutes. Do not touch or flip the croquettes until one side is golden brown. The inside is already cooked, so you just need to fry the breading. Nami's Tip: Do not crowd the pot as the oil temperature will drop quickly and cause the food to absorb more oil.
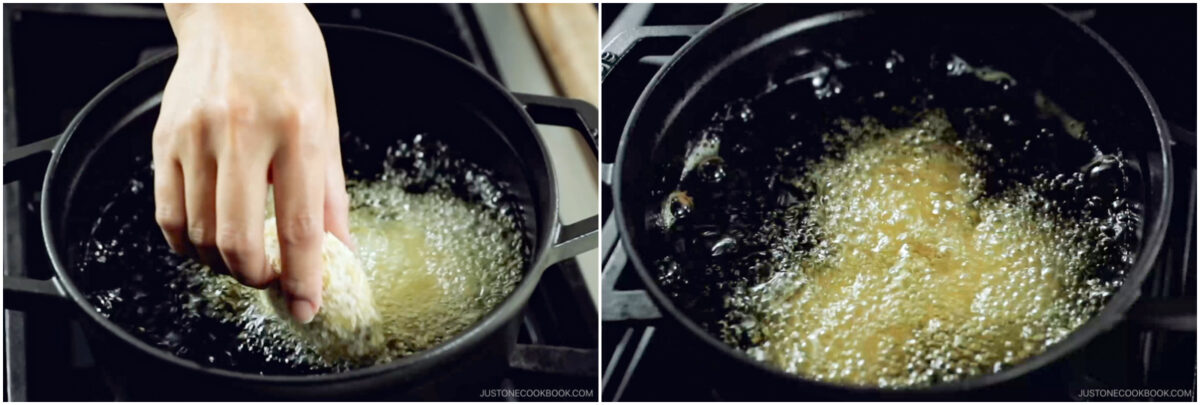
- Transfer to a wire rack or a plate lined with paper towels to drain the excess oil. Continue deep-frying the rest of the patties.
To Serve
- Serve with tonkatsu sauce (bottled or Homemade Tonkatsu Sauce). In Japan, we typically serve deep-fried foods with shredded green cabbage. I shred it with a julienne slicer or stainless steel cabbage slicer and serve it with Japanese Sesame Dressing. I also add a few wedges of tomato for color.
To Store
- Store the leftovers in an airtight container and freeze up to a month. To reheat, put the defrosted or frozen croquettes on a baking sheet lined with aluminum foil or parchment paper. Bake at 350ºF (180ºC) for 15–20 minutes if defrosted or 45 minutes if frozen. Check if the inside is warm before serving.
Nutrition
Editor’s Note: This post was originally published on March 26, 2012 and was updated with a video and new images in July 2020. It was republished on April 23, 2025 with additional helpful content.


I noticed that your other Korokke recipe you put egg in the mixture, while this has no egg as a binder.. Would it make any difference?
Have you tried putting this on an oven?
Ahh..just read the other replies to use the Baked Tonkatsu technique..
Yes, you probably saw the comment above. I haven’t tried it yet but I’ll test it next time I make Korokke. Theoretically it should work as everything is already cooked inside. 🙂
Hi Onio! It’s up to you. My mom never puts an egg in it (which is this recipe) and it still tastes amazing. Some recipes use an egg, some don’t. Not a big difference, I’d say. It adds more flavor and keep it moist.
I guess I’m stuck not really having a favourite food from growing up that I can eat now… My parents weren’t especially good cooks (I have been cooking for myself for a long time) but my grandmother was. But she’s passed, and none of her recipes were handed down… :/
Oh well, I make pretty good foods, and your site helps me to make more. XD
These look amazing. Do you think it would work if one skipped the frying and put them into the oven? It wouldn’t be quite the same, I know, but fried foods upset my digestive system.
Hi Kai! Make sure to document your recipes! 🙂
I haven’t tried, but I’m pretty sure we can do this with the same technique as Baked Tonkatsu and Baked Chicken Katsu recipe.
https://www.justonecookbook.com/recipes/baked-tonkatsu/
Hope you enjoy! 🙂
Hello! This recipe looks fantastic and I can’t wait to try it! By any chance, is it possible to bake or toast them rather than frying them? Thank you an I love your recipes! (⌒▽⌒)
Hi Connie! I haven’t done it, but it’s possible if you use my method on Baked Crispy Chicken or Baked Tonkatsu recipes.
https://www.justonecookbook.com/recipes/baked-tonkatsu/
Hope you enjoy! 🙂
Mecha umai!! 🙂
These were so great! Thank you for sharing! Everyone loves them!
(^-^) mmmm!
Hi Theresa! So happy you tried this recipe! It’s my #1 recipe that I love from my mom’s cooking… Thanks for trying this recipe and writing feedback. xo 🙂
Hi thank you Nami for lots of wonderful Japanese cuisine that I have not tried before. Love the tonkatsu, ebi fry, korokke recipes and will be trying it pretty soon. Just want to know can I bake all these recipes mentioned above instead of frying? As the family is on low Carb and low fat diet. In the past I have cooked yakitori, tamagoyaki, they were a lovely addition in me cooking a be to box meal..thanks to my hubby for introducing me 2nd time to Japanese food which was a be to box meal in a food court…Since then I loved it and even tried okonomiyaki in a restaurant only think I disliked was the bonito flakes…planning to make it but can you suggest a not fishy substitute? Thanks once again looking forward to read your reply in this site.
Hi Anju! First of all, please understand that “traditional/authentic” recipes ALWAYS use deep frying for those recipes with the right deep frying technique. The result is simply amazing that sometimes you don’t even feel oily.
Yet, at home, we try to eat healthy and there are some “baked” version available. I have baked chicken katsu recipe (it’s called “Crispy Baked Chicken”) and the same method can be used for pork, shrimp, and korokke.
The result is pretty close to deep frying and I’m very happy with this recipe. 🙂
https://www.justonecookbook.com/recipes/crispy-baked-chicken/
Now for Okonomiyaki, you can simply omit katsuobushi for topping. No need to substitute, because that is unique ingredient that is hard to replace. But you will need “dashi” for okonomiyaki recipe, which contains bonito flakes. If you really don’t like the bonito flakes, you can use “kombu dashi” instead of regular dashi. Hope this helps!
What a coincidence! My son just told me to make this last week!
Can you please teach us how to make cream korokke, I haven’t tried and seems difficult?!
Hi Sandy! I do have Creamy Crab Croquette recipe on my blog. I have to say it’s a bit difficult as it’s hard to shape the creamy filling… it’s not as solid as Korokke. But that’s how you make it creamy and soft inside…. Hope you give it a try someday!
https://www.justonecookbook.com/recipes/creamy-crab-croquette/
Wow! These were wonderful, simple ingredients but still delicious. Thank you and your mom for this tasty dish 🙂
Hi Dalila! Thank you for reading my post. 🙂
I forgot to ask, can I prepare these a day ahead ( without egg, flour and panko) and deep- fry them the next day?
Hi Dalia! I’ve never tried prepping the day before, so I did some research. I found some good suggestions a lot of people talk about.
Option A
1) Finish until Step 11 (until putting panko).
2) Then pack in air tight container and freeze.
3) Next day in the morning you move it to refrigerator (to defrost)
4) Dredge in panko again
5) Deep fry
Option B
1) Finish until Step 11 (until putting panko).
2) Place korokke in single layer on a plate and lightly wrap with plastic wrap (to keep it dry, instead of moist – Korokke may get soggy a little bit).
3) Dredge in panko again
4) Deep fry
Option C
1) Finish making korokke.
2) Refrigerate or freeze korokke in an air tight container.
3) Use toaster oven (or oven) to re-heat. Do not use microwave because it’s not going to be crispy outside.
Actually I always enjoy eating leftover next day… .and use Option C (use freezer method). It’s still tasty! 🙂 Hope this helps!
My mom makes these identically! And she is the same way about deep fried food; always perfect tempura, french fries, korokke, shrimp balls…honestly I do not even try because it can never compare to Mom’s!
oh and we never made korokke sandwiches with leftovers, what a great idea.
Hi Julie! I’m so happy to hear your mom make korokke same way! These are so delicious! And yes, do make sandwich next day. I look forward to it every time I make it. 🙂
Hi Nami, I’m fairly new to your website stumbling upon it by chance and I couldn’t resist making these delicious looking treats! I cooked them for lunch today and my family and I weren’t disappointed, they were delicious 🙂 I haven’t had much Japanese food before, but I’ll definitely try cooking it more often now with the help of your recipes. Keep up the great work with the blog!
Hi Jeana! Thank you for trying out my recipe and I’m so glad you liked Korokke (my favorite food!). Thanks so much for your kind words. 🙂
A great way to use up left over mashed potatoes. Thank you 🙂
Hi Mark! That’s true! Maybe I should promote this recipe before Thanksgiving. 😀
Hi Nami,
Thank you so much for sharing this.
I cooked this the other day and they are awesome. My family loves it very much.
From now on this dish will appear on our dinning table very often. 😀
I have just post my korokke in my blog too 🙂
Thanks again.
mui
Hi Doreen! Thank you so much for trying this recipe. I just saw your post – they look so delicious! Now it’ll be my turn to make this. It’s hard to just look at them and not being able to eat. 😉 Thank you for your feedback!
Hi Nami,
These look soooo good! I had one question though: if I make these over night can I eat them in my bento the next day (no reheat)?
Also, is it possible to store these after making them? Like, refrigerating and then reheating later?
Thanks in advance, and great recipes as always!
Hi Tom! I love these korokke and thanks for your interest in making these. 🙂
When I make korokke for dinner and try to pack next day for kids’ lunch, I usually use a toaster oven to reheat (for food safety reason) and make the panko crunchy for better texture.
Then I cool it down on wire rack completely (so bottom side don’t get soggy) before packing into bento so that condensation won’t make the korokke soggy..
It looks complicated, but it’s not that hard or time consuming. I usually reheat before kids wake up and then let cool while they are eating breakfast. 🙂
For storing, I keep (already fried) korooke in air tight container and freeze it (even if you are eating that same week – taste better). Then defrost and bake in toaster oven.
Hope that helps!
I’ve only been able to make these once because they take time and I have a toddler who doesn’t like when I focus on anything other than her lol. I unfortunately made mine a little too thick ^^; . But they were yummy anyway!! I can’t wait to be able to make them again! (Maybe during a daddy daughter trip day lol)
Thank you so much for sharing this recipe 🙂 love!
Hi Tarin! I went through the similar stage too, and that time it was very hard for me to deep fry… I just couldn’t focus. Now that the kids are older, I got busier and have less time to make this, but my kids and I love love love korokke… I actually bought a bag of potatoes thinking of making this. 🙂 Thank you so much for trying this recipe!!
I cooked this recipe perfectly for the first time and it was so good! I will cook it again. Thanks for sharing!
Hi Rosemarie! Yay I’m so glad you liked this recipe! Thank you so much for your feedback. 🙂
Hi Nami,
For the Croquette recipe, can i replace potato with pumpkin and can i omit the meat? Without the meat, how much more of potato (or pumpkin) should i add? Thanks.
Cheers,
Esther
Hi Esther! Sure, there is Kabocha Korokke (pumpkin korokke) in Japan too. 🙂 I make Kabocha Korokke but haven’t written up a recipe. I usually add meat and 1/4 or 1/2 kabocha for my family.
Hope this helps!