
The menu for Osechi Ryori (Japanese New Year cuisine) is all about preserving traditional recipes and celebrating the auspicious occasion. Every dish plays a role in wishing for prosperity and good health in the new year, with the simmered stew called nishime (煮しめ) or Chikuzenni (筑前煮) served for its auspicious significance.
While I’ve shared my stovetop Chikuzenni recipe before, I decided to speed things up this year with this Instant Pot Nishime recipe. The pressure cooker function makes a big batch in a short time—perfect for entertaining family and friends!
What is Nishime?
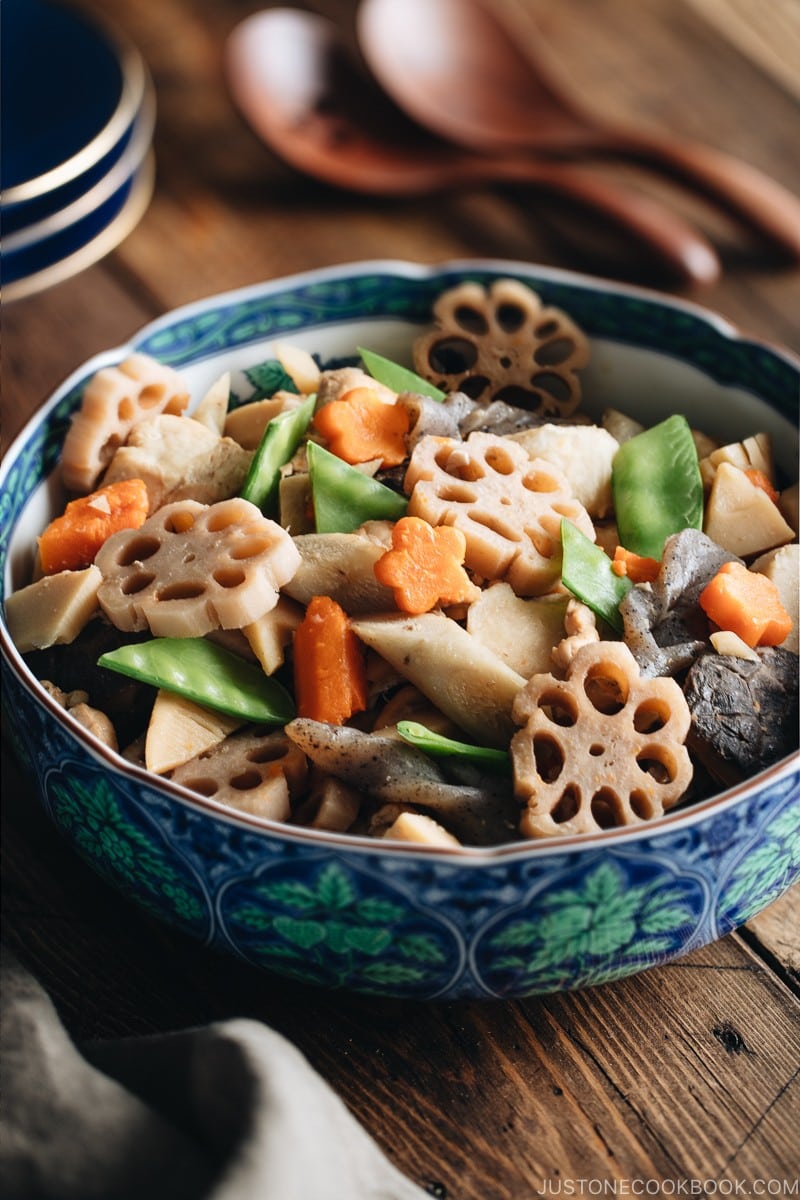
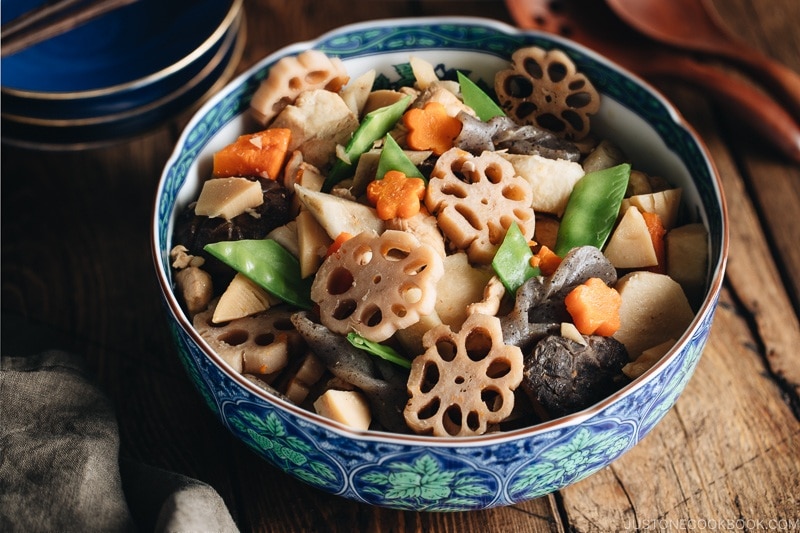
Nishime (煮しめ) is a traditional Japanese one-pot stew of root vegetables and chicken simmered in dashi broth seasoned with soy sauce, sake, and mirin. It’s the most popular nimono (煮物, simmered dish) and a classic Japanese home-cooked meal. It’s also served on special celebratory occasions like Japanese New Year because the ingredients have different meanings to symbolize joy, happiness, prosperity, and cleansing.
The traditional Japanese vegetable stew commonly includes root vegetables, starchy potatoes, konnyaku (konjac), kombu, deep-fried tofu, sometimes chicken, fish cake (chikuwa and kamaboko), and occasionally fish depending on the region.
What’s The Difference Between Nishime and Chikuzenni?
The cooking method where you simmer ingredients for a long time to reduce the cooking liquid is called nishimeru (煮しめる), and shortened to nishime (煮しめ). Why is nishime also called Chikuzenni? It was named after the old Chikuzen Province in Northern Kyushu that’s part of modern-day Fukuoka Prefecture. This dish originated there; however, it’s now enjoyed throughout Japan under both names.
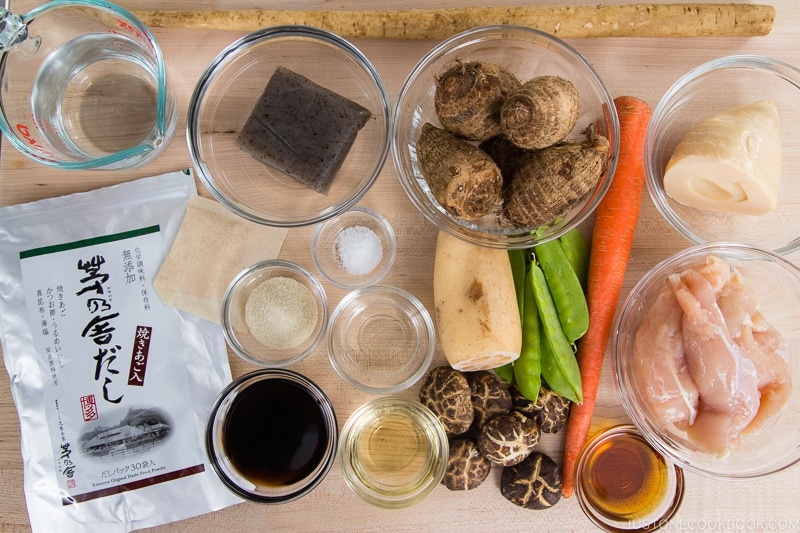
Ingredients You’ll Need for Nishime
- water – for the dashi; or use Awase Dashi or Vegan Dashi and skip the dashi packet
- dashi packet
- dried shiitake mushrooms – for the dashi and the stew
- snow peas
- konnyaku (konjac)
- bamboo shoot
- lotus root (renkon)
- carrot
- Japanese taro (satoimo)
- gobo (burdock root)
- boneless, skinless chicken thigh – I used chicken tender today; you can also mix different cuts; use plant-based meat or mushrooms for vegan/vegetarian
- toasted sesame oil – for frying
- sugar, mirin, sake, kosher salt, and usukuchi (light-colored) soy sauce – for the seasonings; use regular soy sauce
Auspicious Japanese Vegetables
We include the following vegetables in nishime for auspicious reasons:
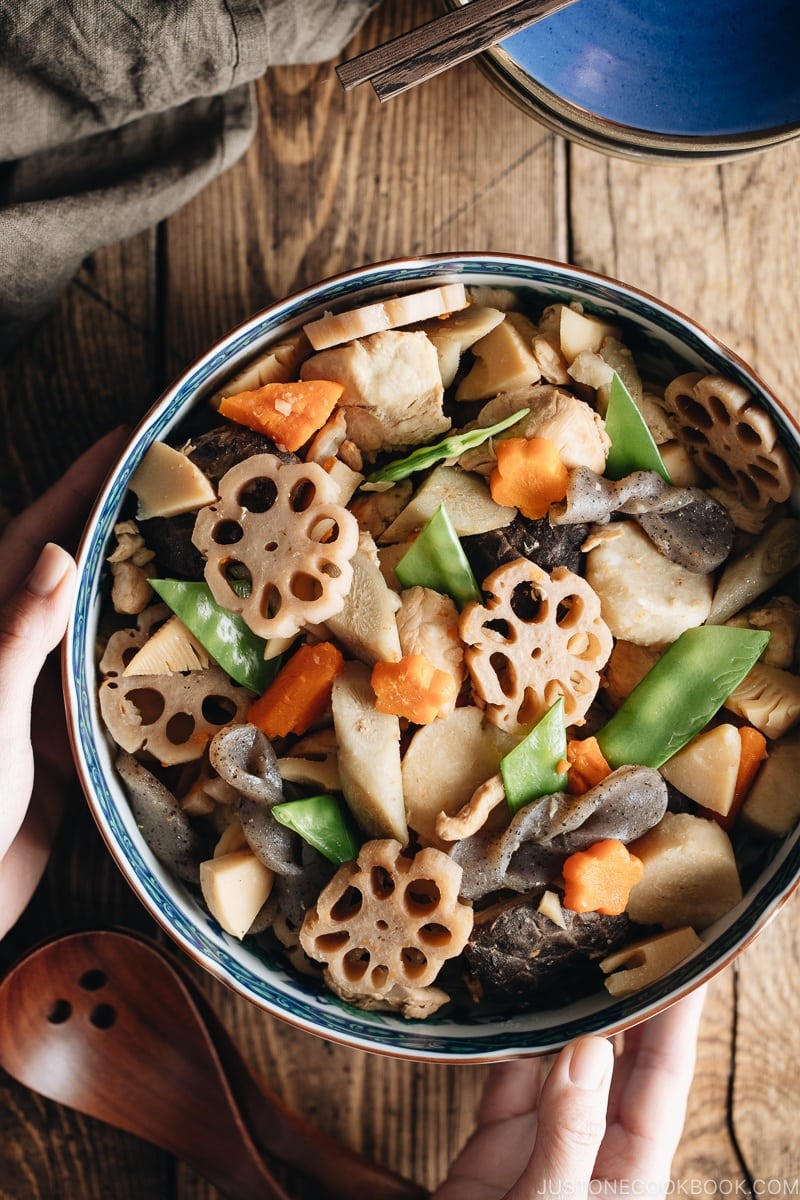
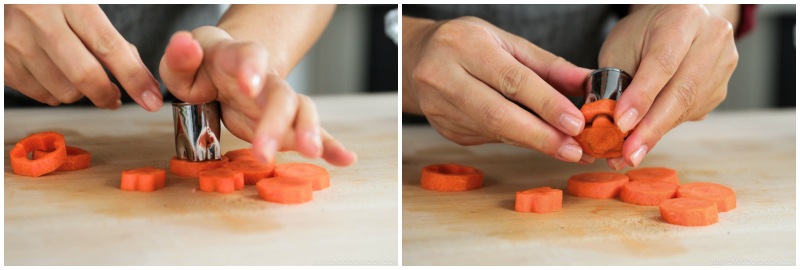
- carrot – Welcome spring by cutting carrot slices into a plum (ume) flower.
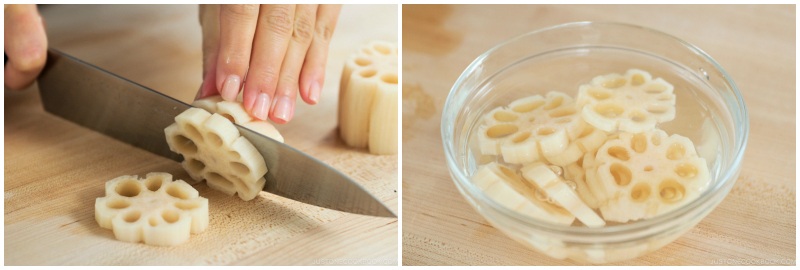
- lotus root – The holes of the lotus root present a clear and unobstructed future; you can cut it into a flower shape called hana renkon.
- burdock root (gobo) – A skinny, long root vegetable that grows straight down into the ground; it symbolizes stability for the house and family.
- shiitake mushroom – It represents longevity when you cut the edges of the mushroom into a hexagon to resemble a turtle shape.
- taro – It symbolizes fertility or descendants’ prosperity as you can find a lot of baby taro on one root.
Why Make Decorative Cuts on Nishime Ingredients?
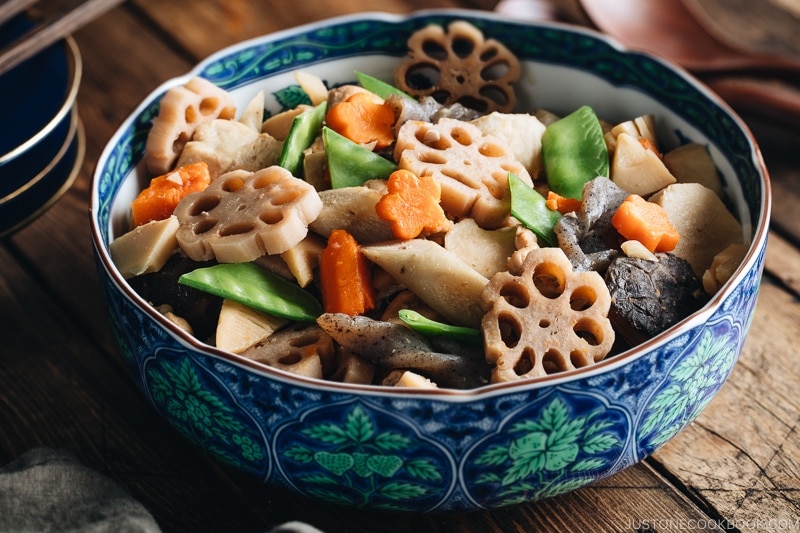
We often cut the ingredients into fancy shapes when making this vegetable stew for the Osechi Ryori meal on Japanese New Year and other celebratory occasions. Whether you want to use decorative cuts or not is entirely up to you. I have two reasons why it can be a nice thing:
- Dresses up a new year’s dish. This is a special time when we put on fancy clothing and decorate our homes, so why not do it for the Osechi, too?
- Adds a “wow” factor to this humble dish of common Japanese root vegetables and other low-key ingredients.
Too much work? I agree, especially when you have to make so many other dishes for the New Year. But hey, that’s why I’m introducing this Instant Pot version!
How To Make Instant Pot Nishime
If you will include this dish in your Osechi meal, I recommend cooking it 2 days before you plan to serve.
- Make the dashi.
- Prepare/cut the ingredients.
- Sauté the chicken in the Instant Pot in sesame oil.
- Add the vegetables, dashi, and seasonings.
- Pressure cook for 3 minutes under High pressure. Let the pressure release naturally.
Substitutions for Japanese Ingredients
Vegetables: You can find many nishime ingredients in Chinese and/or Korean grocery stores and sometimes Southeast Asian markets. Some major grocery stores like Whole Foods or local co-ops may carry these unique vegetables, too.
Konnyaku (Konjac): Konnyaku, on the other hand, may be difficult to find. But, you can skip it as konjac is included more for the texture and auspicious symbolism.
Dashi Packet: I used a dashi packet in this recipe to show how quickly you can make dashi. You can buy dashi packets on Amazon from my favorite brand Kayanoya (or use a less-expensive option). I really want to encourage you to ditch the dashi powder and start using dashi packets instead for a delicious flavor that’s important for nishime and other dishes in Japanese cooking.
Dashi from Scratch: Of course, it’s best to make dashi from scratch. It is so simple and takes only 30 minutes or less to make. You can’t make authentic Japanese food without dashi, so please try your best to make dashi instead of using another type of stock (unless I mention it).
May the New Year bring you and your family lots of happiness and new inspiration as you enjoy this Instant Pot Nishime together.
Wish to learn more about Japanese cooking? Sign up for our free newsletter to receive cooking tips & recipe updates! And stay in touch with me on Facebook, Pinterest, YouTube, and Instagram.
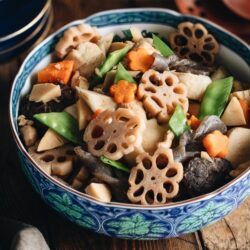
Instant Pot Nishime
Ingredients
For the Dashi (Japanese Soup Stock)
- 1 cup water (or use Awase Dashi or Vegan Dashi and skip the dashi packet)
- 1 dashi packet (or use dashi powder in a pinch)
- 5 dried shiitake mushrooms
For the Nishime Ingredients
- 10 snow peas (1 oz, 30 g)
- ½ block konnyaku (konjac) (4.5 oz, 130 g)
- 1 bamboo shoot (6 oz, 170 g)
- 1 lotus root (renkon) (6 oz, 170 g)
- 1 carrot (6 oz, 170 g)
- 5 taro (satoimo) (9 oz, 250 g)
- 1 gobo (burdock root) (8 oz, 220 g)
- ¾ lb boneless, skinless chicken thigh (I used chicken tenders here; you can also combine different cuts; use plant-based meat or mushrooms for vegan/vegetarian)
- 1½ Tbsp toasted sesame oil
For the Seasonings
- 1 Tbsp sugar
- 2½ Tbsp mirin
- 1 Tbsp sake
- 3 Tbsp usukuchi (light-colored) soy sauce (or use regular soy sauce)
- ½ tsp Diamond Crystal kosher salt
Instructions
Before You Start…
- If you will include this dish in your Osechi meal, I recommend cooking it 2 days before you plan to serve. For more helpful tips on planning your Japanese New Year feast, please read my A 5-Day Osechi Cooking Timeline blog post.
- Gather all the ingredients.
To Make the Dashi
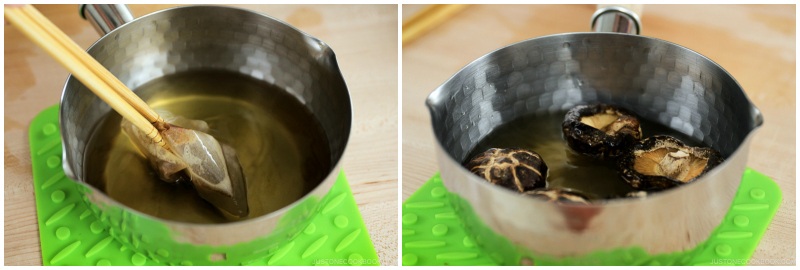
- In a small saucepan, add 1 cup water and 1 dashi packet. Slowly bring it to a boil on medium-low heat, while gently shaking the bag a few times to release more flavor. Once boiling, lower the heat and cook for 1 minute. Then, turn off the heat. Tip: You can also make dashi using dashi powder.
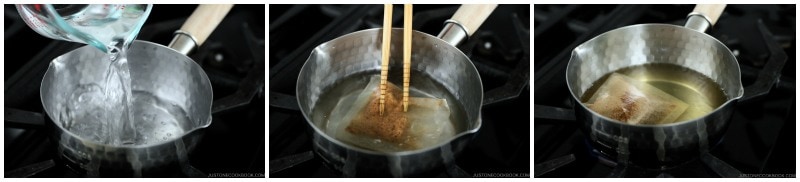
- Remove the pot from the heat. Squeeze out the liquid and discard the dashi packet. Add 5 dried shiitake mushrooms to the dashi to rehydrate for 15 minutes.
To Prepare the Ingredients
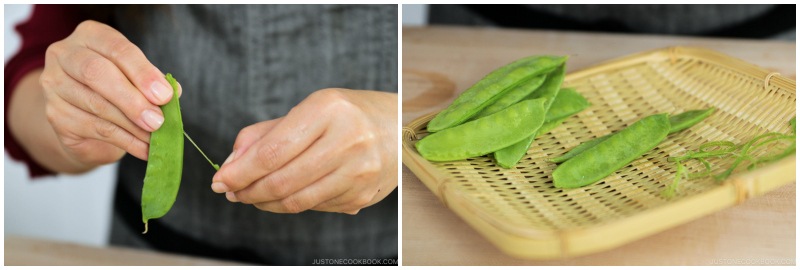
- Remove the stem ends and tough strings of 10 snow peas.
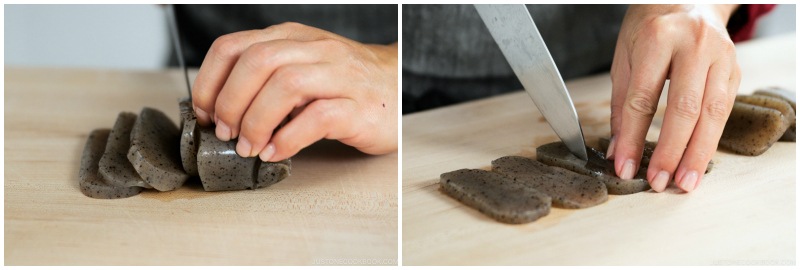
- Cut ½ block konnyaku (konjac) crosswise into slices about ⅛ to ¼ inch (3 to 6 mm) thick. To make the tazuna konnyaku (optional), cut a lengthwise slit 1½ inches (3.8 cm) long in the center of each slice.
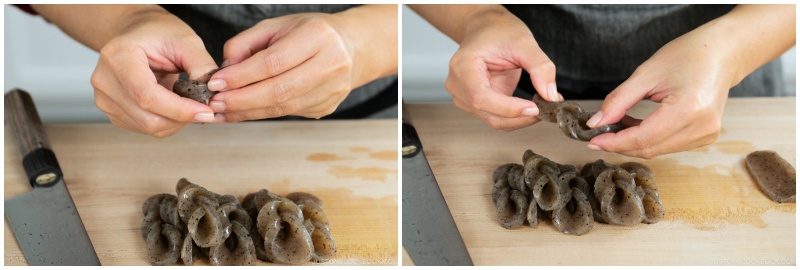
- Then, tuck one end of the slice through the slit. Push it in; then, pull out the end from the other side. The konnyaku will now be twisted on either side of the slit to resemble horse reins. Pull gently on both ends so the slice lays flat. Repeat with the remaining slices.
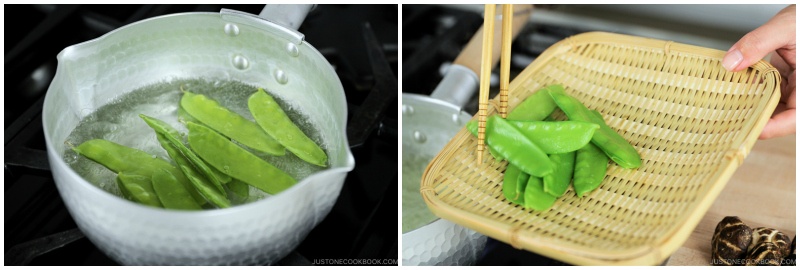
- Boil water in a saucepan over medium-high heat. Add a pinch of salt and blanch the snow peas for 30–60 seconds, until crisp but tender. Scoop them out of the boiling water and drain them in a sieve or transfer to a bowl of ice water to stop the cooking and set aside. Keep the water boiling.
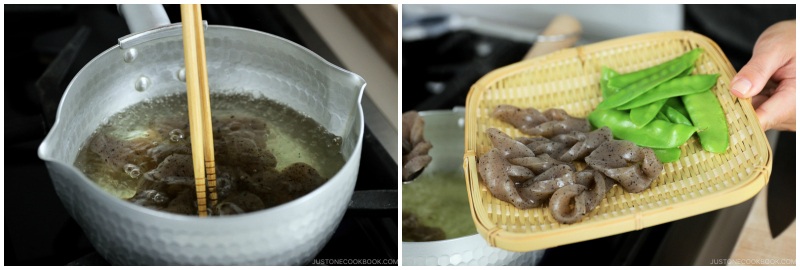
- In the same boiling water, add the konnyaku and cook for 2–3 minutes to remove the odor (which is why you cook them after, and not before, the snow peas). Drain and set aside.
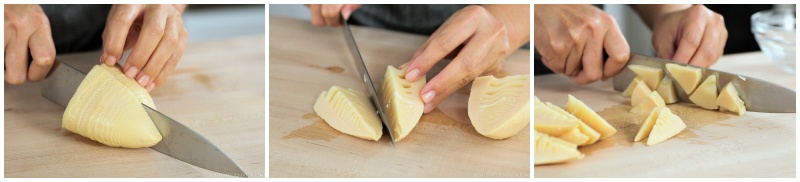
- Cut 1 bamboo shoot lengthwise into quarters. Then, cut each quarter in half crosswise so the tip end is about 1½ inches (3.8 cm) long. Slice the tip end lengthwise into slices ¼ inch (6 mm) thick. Finally, slice the bottom end into ¼-inch (6-mm) slices.
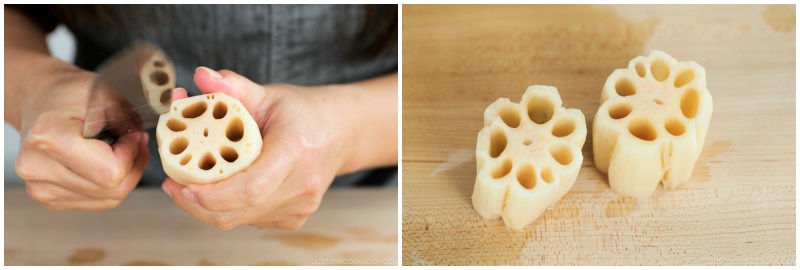
- Peel off the skin of 1 lotus root (renkon) with a vegetable peeler or knife. Then, cut the root in half crosswise.

- (Optional) If you want to make hana renkon (lotus root flowers), you can use my tutorial.
- Slice the lotus root crosswise about ¼ inch (6 mm) thick. Soak the slices in a bowl of water (or 2 cups water + 1 tsp vinegar to make the lotus root whiter).
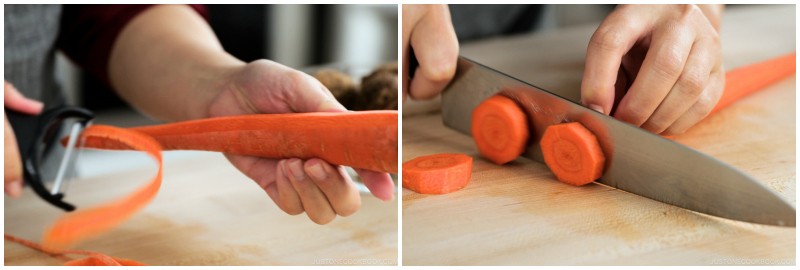
- Peel 1 carrot. If you want to make flower-shaped carrot slices (optional), first slice the top 2 inches (5 cm) of the carrot into ¼-inch (6-mm) rounds and set aside until the next step. Then, cut the rest of the carrot using the rangiri Japanese cutting technique: Slice diagonally while rotating the carrot a quarter turn between cuts.
- (Optional) For the flower-shaped carrots, use a vegetable cutter to punch out a plum flower shape from the carrot rounds. Tip: Repurpose the carrot remnants by mincing them and using in fried rice or soup.
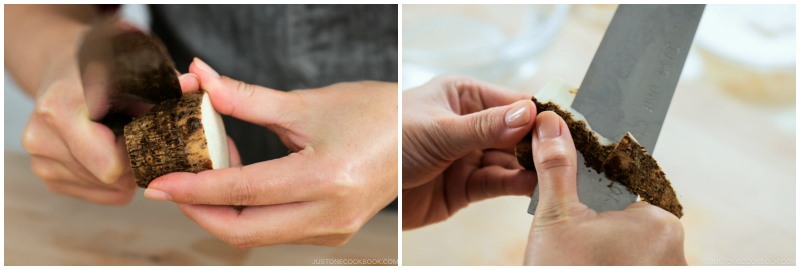
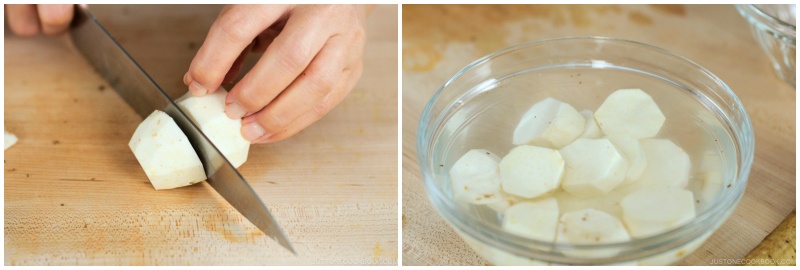
- To remove the skin of 5 taro (satoimo), slowly peel the tough skin with a sharp knife. It’s very tough, so I don’t recommend using a vegetable peeler. Tip: For taro, it’s recommended to peel the skin thick. It’s not considered wasteful to remove the skin with more flesh attached.
- Cut each peeled taro in half crosswise and soak in a bowl of water to get rid of the starch and astringent taste. Ideally, the taro should resemble a hexagon (with six sides) from the top view.
- Next, lightly scrape off the skin of 1 gobo (burdock root) with the back of your knife. (Unlike taro, you want to preserve the flesh as much as possible as the flavor of the gobo is right under the skin.) Cut the gobo using the rangiri Japanese cutting technique. Soak the pieces in a bowl of water to get rid of the starch and astringent taste.

- By now, the dried shiitake mushrooms should be soft and hydrated. Squeeze the liquid from the shiitake mushrooms into the soaking liquid. Next, strain this shiitake dashi in a fine-mesh sieve over a measuring cup. You will need 200 ml (about 1 cup minus 2 Tbsp).

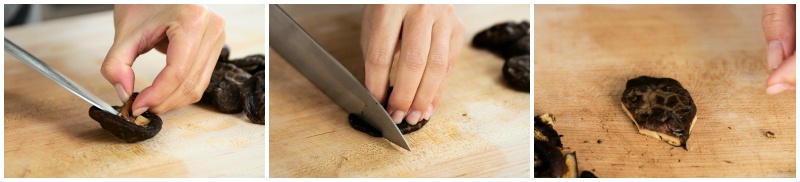
- Discard the stems of the shiitake mushrooms. (Optional) Cut the edges of the shiitake caps to form a hexagon, which resembles a turtle shape and symbolizes longevity.
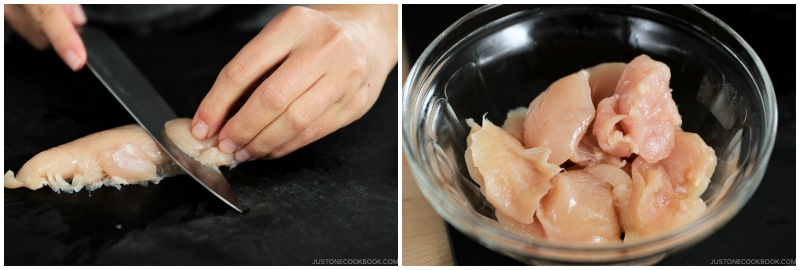
- Cut ¾ lb boneless, skinless chicken thigh into slanted pieces using the sogigiri Japanese cutting technique: Angle your knife back and diagonally (nearly parallel to the cutting board), and then slice the chicken. This method creates pieces of equal thickness and increased surface area, which allows the chicken to cook faster and absorb more flavors.
To Cook in an Instant Pot
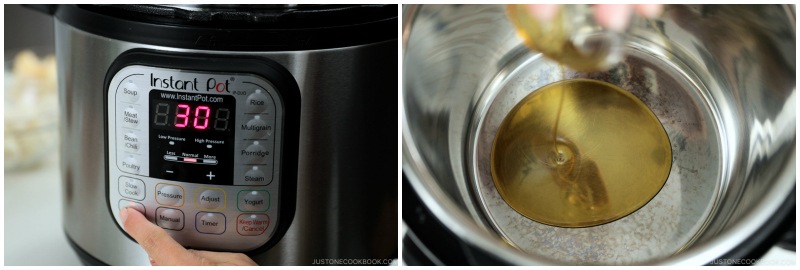
- Press the Sauté button on your Instant Pot. When the inner pot is hot, add 1½ Tbsp toasted sesame oil.
- Next, add the chicken and stir to coat with the oil.
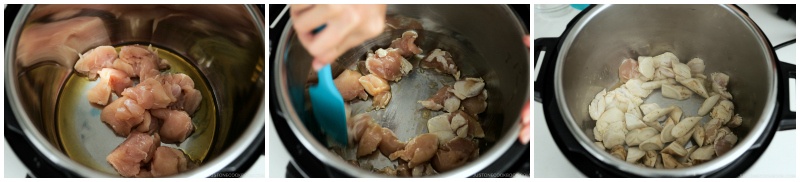
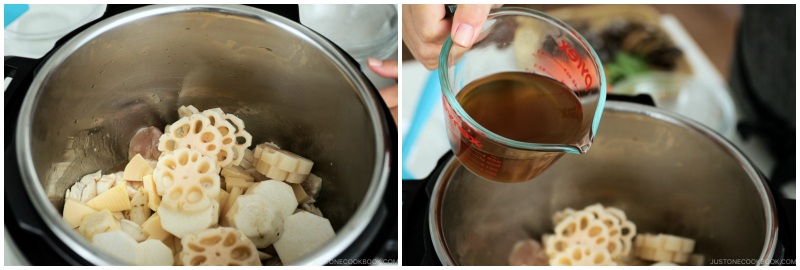
- When the chicken is no longer pink on the outside, add the lotus root, taro, gobo, and bamboo shoot. Stir to combine. Then, add the dashi.
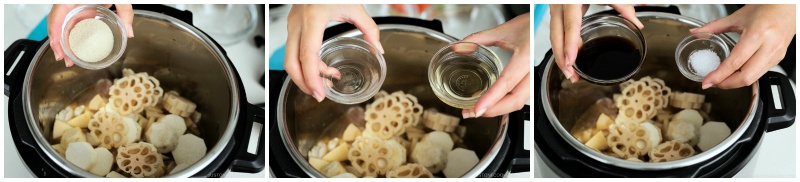
- Next, add 1 Tbsp sugar, 2½ Tbsp mirin, 1 Tbsp sake, 3 Tbsp usukuchi (light-colored) soy sauce, and ½ tsp Diamond Crystal kosher salt.
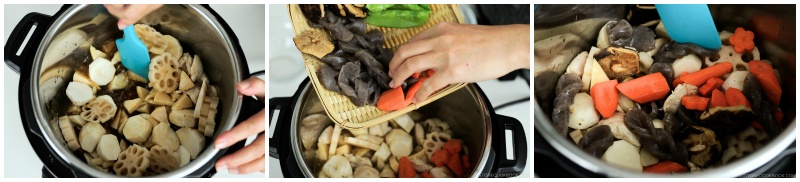
- Mix the seasonings and ingredients together well. Then, add the carrot, konnyaku, and shiitake mushrooms (save the snow peas for garnish).
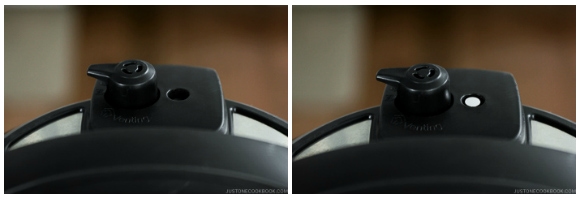
- Press Cancel to stop the Sauté mode. Then, close and lock the lid. Select Pressure Cook mode and cook for 3 minutes under High pressure.

- Make sure the steam release handle points to Sealing and not Venting. The float valve will rise when pressurized. When it’s finished cooking, the Instant Pot will switch automatically to the Keep Warm mode. Let the pressure release naturally.
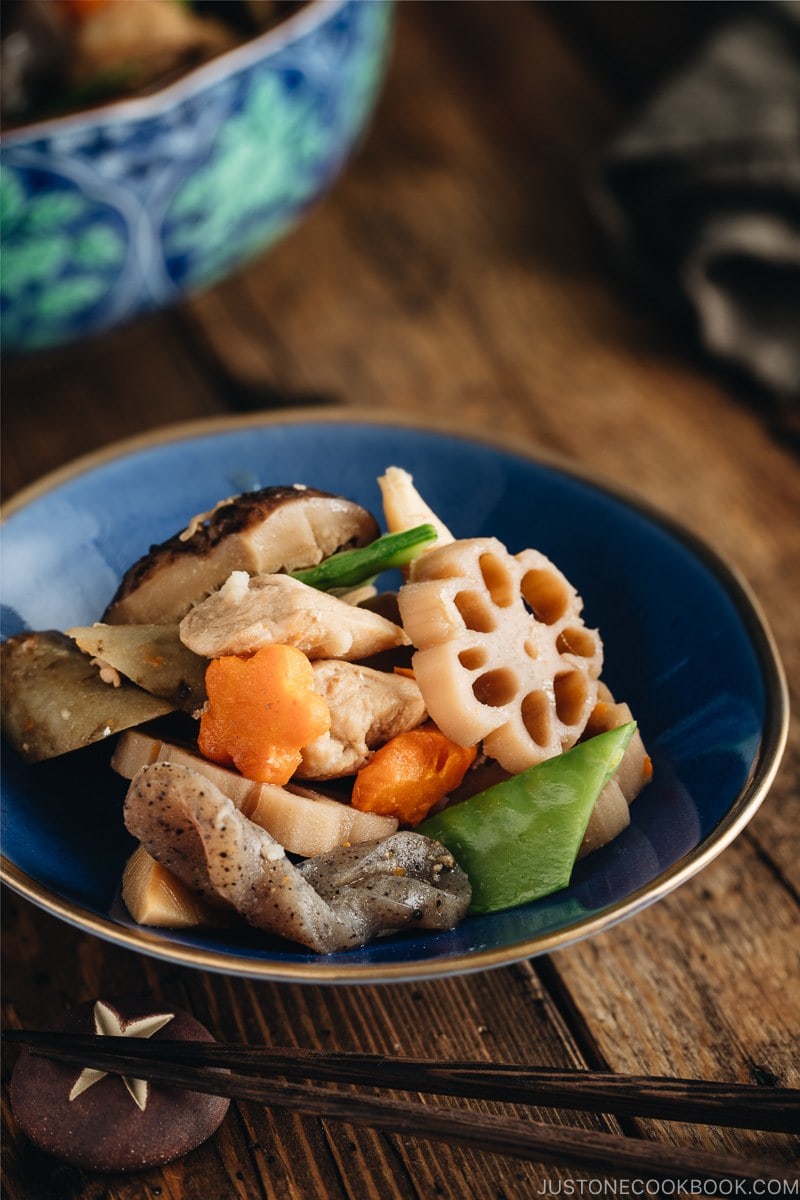
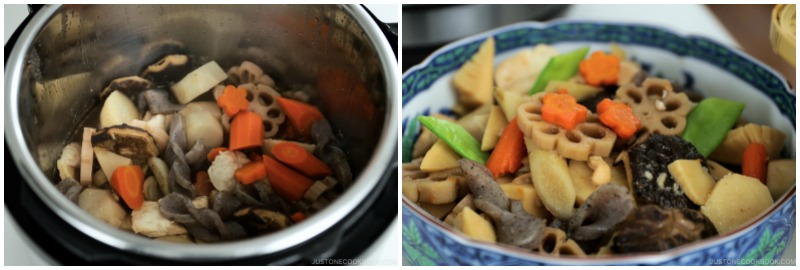
To Serve
- Open the lid and gently mix the ingredients. Serve in individual bowls or in a large bowl, family-style. Garnish with snow peas (I cut each piece diagonally in half).
To Store
- Transfer the Nishime to an airtight container and let it cool completely. Store in the refrigerator for up to 5 days. The flavor will intensify as time passes, so consider reducing the amount of seasoning if you plan to serve it later. Nishime also freezes well, but the konnyaku texture will change, so I recommend removing them before freezing. Defrost overnight and reheat in a pot.
Nutrition
Did you make this recipe?
Tag @justonecookbook on Instagram so we can see your delicious creation!
Editor’s Note: The post was originally published on December 25, 2018. It’s been republished in 2019.