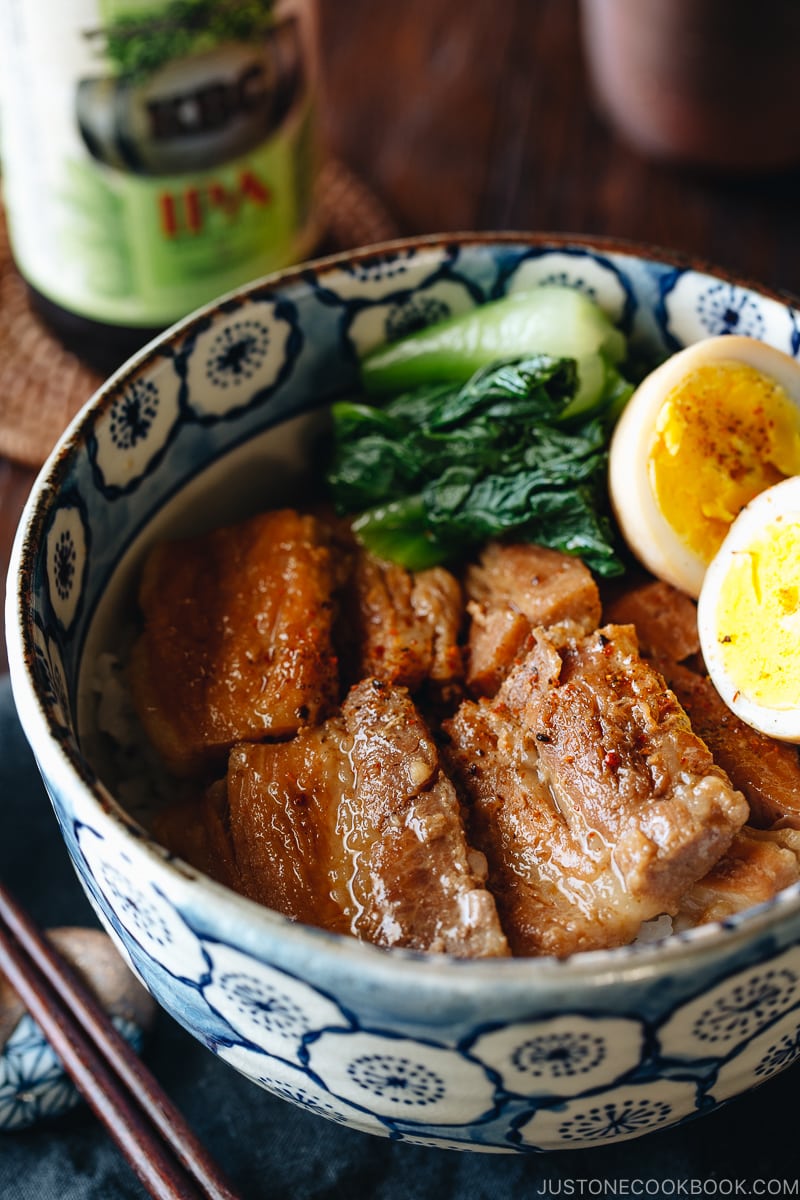
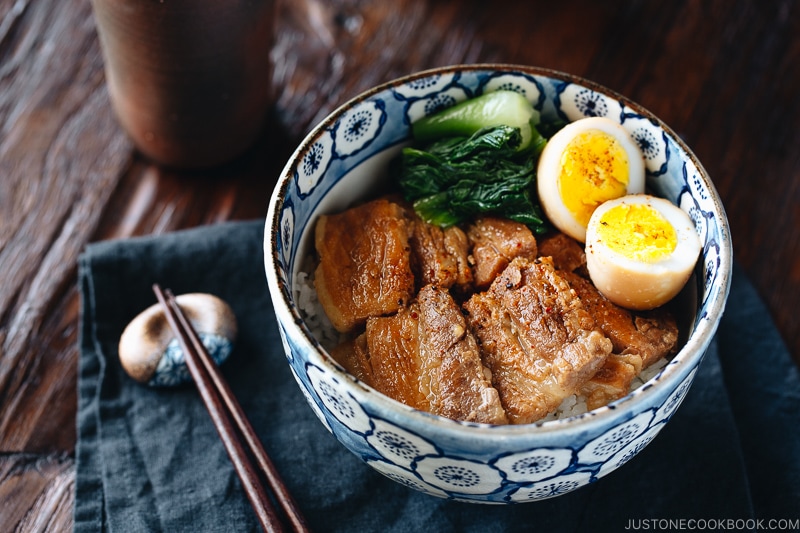
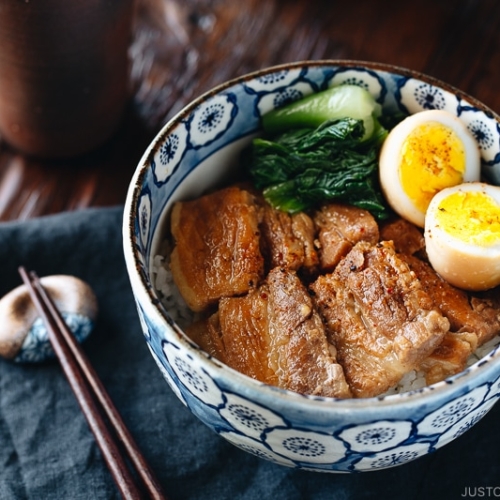
Use your Instant Pot to make this melt-in-your-mouth Pressure Cooker Pork Belly (Kakuni) recipe! Serve the tender morsels over a Japanese steamed rice bowl with the savory sauce drizzled on top. Make this time-saving dish your family‘s new favorite for dinner!
I received many requests for more Instant Pot recipes after I shared my Slow Cooker Chicken Wings recipe. I love my Instant Pot. This electric cooker has both a pressure cooker and s slow cooker function.
Today I’m sharing one of my favorite and super delicious Instant Pot recipes, Pressure Cooker Pork Belly (Kakuni)! I really hope you’ll enjoy this recipe as much as my family does.
If you’ve never had a Japanese pork belly dish called Kakuni (角煮)… oh my gosh, where should I begin? It’s my favorite Japanese pork dish. The tender pork cooking for hours simply melts in your mouth and the sweet and savory sauce…ah, it’s hard not to drool thinking about it. Seriously.
Making Kakuni with a Pressure Cooker
Whether you’re already familiar with how to make Kakuni on the stovetop or have never made it before, I highly recommend making Kakuni with a pressure cooker. Why? Because you can cook it FAST. Much, much, faster than on a stovetop. This special dish that you used to prepare once in a while will soon become a weeknight repertoire. When you cook pork belly over the stovetop, it takes a while (hours) to get the pork super tender and you need to constantly monitor the temperature and amount of liquid remaining in the pot. With a pressure cooker, these worries go away and the process is very simple.
Still hesitant about buying a pressure cooker because of the memories of your mom’s old-fashioned pressure cooker? I was. My mom has this stovetop pressure cooker that makes everyone nervous when it makes a hissing, whistling, and rattling sound. I was used to hearing the sound, yet for the longest time (and still), I didn’t feel safe using it by myself in my kitchen.
Instant Pot Pressure Cooker
However, having the Instant Pot changed me. This electric pressure cooker is very easy and user-friendly. Even though it is both a slow cooker and a pressure cooker, I actually use the pressure cooker function more often than the slow cooker function. Why? It cuts down cooking time significantly, and it’s a perfect cooking gadget for busy cooks!
In case you’re interested, I put the recipe below for my regular Kakuni recipe you can make using the stovetop.
I hope you enjoy my Kakuni recipe using a pressure cooker. I have never used other types/brands of pressure cookers so for instructions on how to use your device, please refer to the manual.
Wish to learn more about Japanese cooking? Sign up for our free newsletter to receive cooking tips & recipe updates! And stay in touch with me on Facebook, Pinterest, YouTube, and Instagram.
Pressure Cooker Pork Belly (Kakuni)
Video
Ingredients
- 3 green onions/scallions (use only the green part)
- 1 knob ginger (1 inch, 2.5 cm per knob)
- 1 Tbsp neutral oil
- 2 lb pork belly block (or use 3–4 lb, 1.35–2 kg and increase the seasonings by 50%; Japanese grocery stores sell pork belly without the rind; if needed, ask your butcher to remove it)
- water (for cooking the pork belly)
- 4 soft or hard-boiled eggs (you can use my soft-boiled or hard-boiled egg recipes)
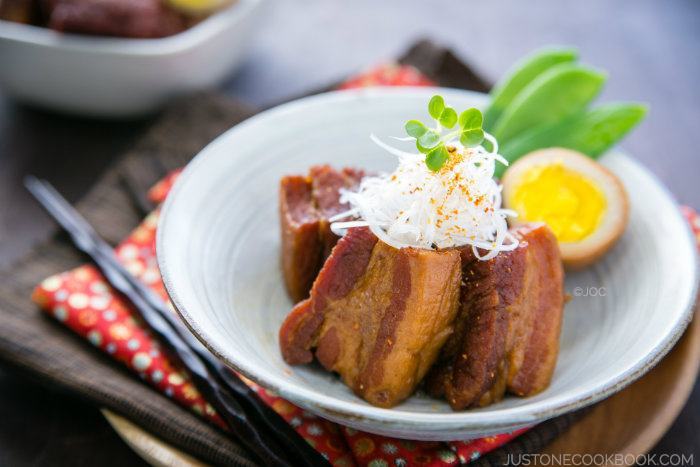
- shichimi togarashi (Japanese seven spice) (for a spicy kick)
Instructions
- Gather all the ingredients. My pork belly was from a Korean market and pre-cut into ¼ inch (6 mm) slices. If you buy a pork belly block, you can freeze the meat for 30–60 minutes and cut it with a sharp knife (see my post on how to slice meat). You could also cut it into cubes 2 x 2 inches or 5 x 5 cm, which is a typical Japanese pork belly (kakuni) shape.

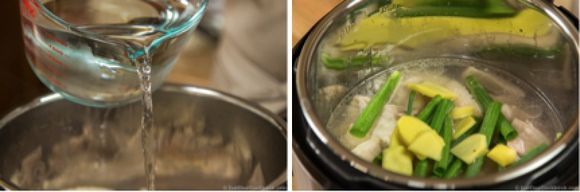
- We will only use the green part of 3 green onions/scallions. Cut the green part in half. (Reserve the white part for another dish like Homemade Miso Soup to serve with this Kakuni.) Peel 1 knob ginger and slice it thinly.


To Cook
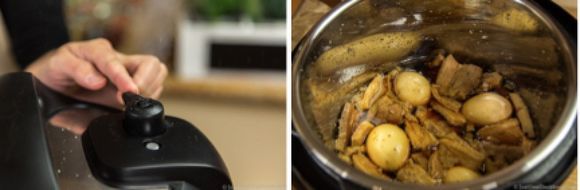
- Press the Sauté button on your Instant Pot (I use a 6 QT Instant Pot) or heat your stovetop pressure cooker. Heat 1 Tbsp neutral oil. Add 2 lb pork belly block in a single layer, searing both sides. You may need to work in batches. If so, transfer the seared pieces to a plate and sear the next batch. When finished, put all the seared pork belly back into the pot. Tip: You can skip the searing process to cut down your cooking time, but this step will render more fat and make the dish tastier.

- Pour in just enough water to cover the meat. Then, add the green parts of the green onions and the sliced ginger. Cover and lock the lid. Make sure the steam release handle points at Sealing. Press the Keep Warm/Cancel button on the Instant Pot to stop sautéing. Press the Manual button to switch to the Pressure Cooking mode. Change the cooking time to 35 minutes and start cooking.

- For a Stovetop Pressure Cooker: Lock the lid and cook on high heat until high pressure is reached. Then, reduce the heat to low to maintain high pressure for about 30 minutes. To cook in a regular pot on the stove, see the end notes.
- When cooking is completed, the Instant Pot will switch automatically to the Keep Warm mode. Either slide the steam release handle to the Venting position to quick release the steam OR let the pressure release naturally (about 15 minutes). Unlock the lid. Drain the cooking water and discard the green onion and ginger. Rinse the pork belly under warm water.
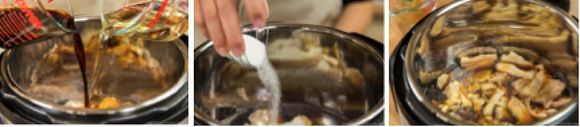
- Put the pork belly back into the Instant Pot. Add ½ cup water, ¼ cup sake, ½ cup mirin, ½ cup soy sauce, and ¼ cup sugar. Mix the seasonings. Add 4 soft or hard-boiled eggs (peeled). Press the Sauté button on the Instant Pot and press the Adjust button to increase the heat. Bring it to simmer to let the alcohol evaporate (only a minute). Then, press the Keep Warm/Cancel button to turn off the Sauté mode. Cover and lock the lid. Make sure the steam release handle points at Sealing. Press Manual and set the cooking time to 10 minutes for sliced pork belly and 20 minutes for pork belly cubes.

- When cooking is finished, the Instant Pot will switch automatically to the Keep Warm mode. Slide the steam release handle to Venting to let out steam until the float valve drops down. Unlock the lid. Optionally, press the Sauté button and simmer on low heat until the liquid in the cooker reduces by half.


To Serve
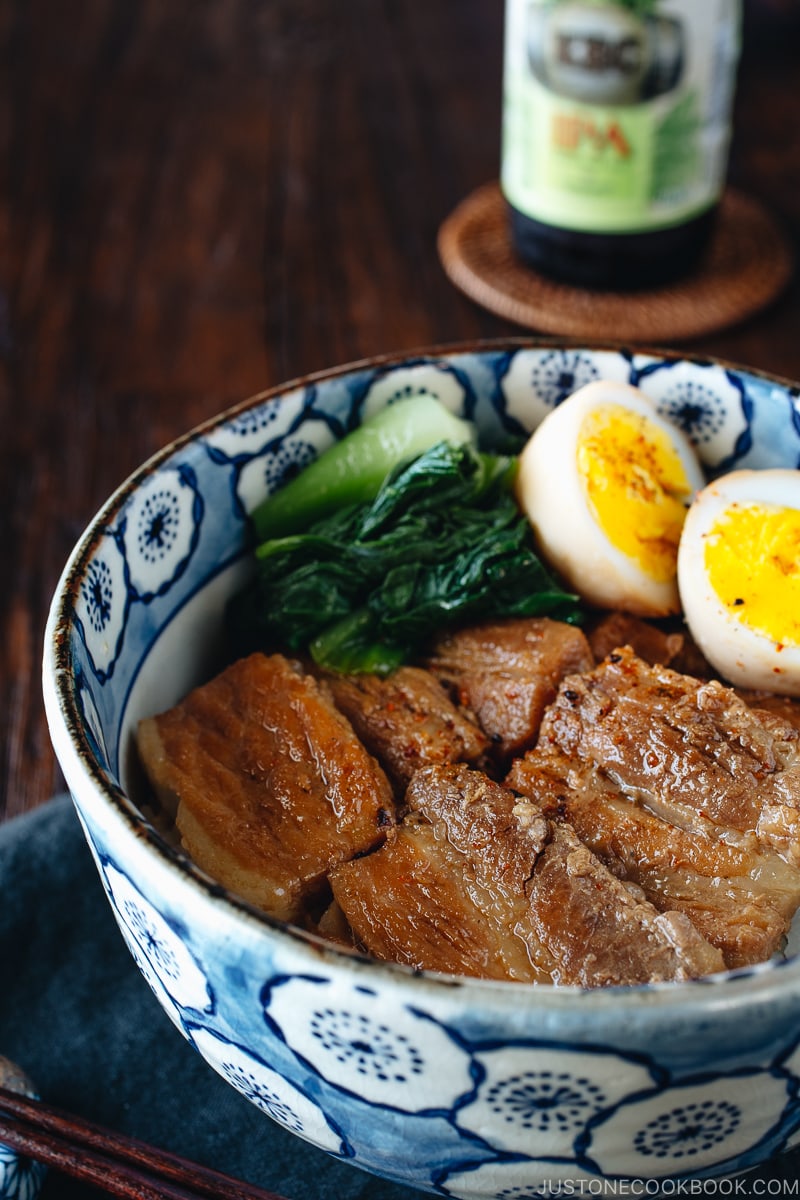
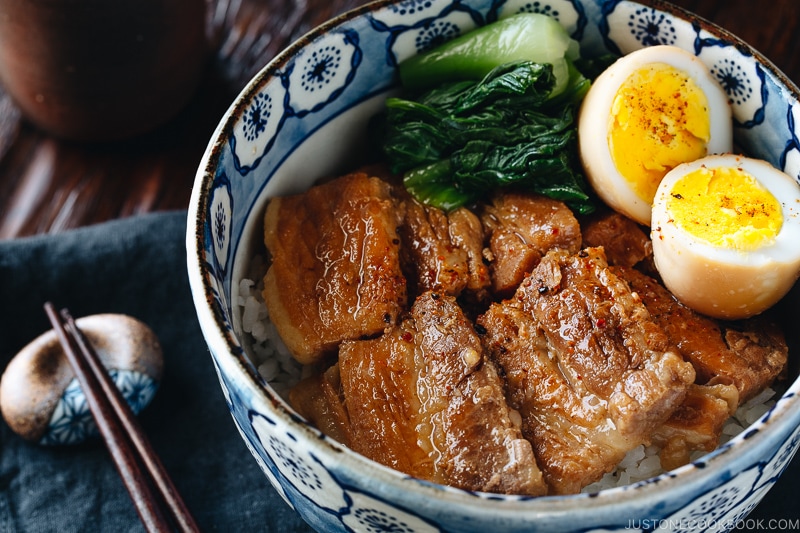
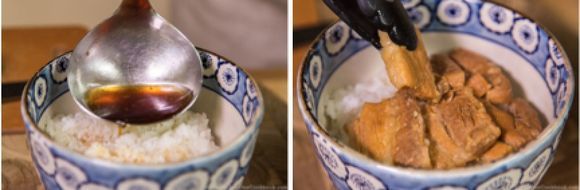
- Serve the rice in a individual donburi (large) bowls and pour some sauce from the pot on top. Place the pork belly and egg on top (add some blanched green vegetables, if you‘d like). Pour additional sauce over the meat and serve immediately. If you like it a bit spicy, sprinkle with shichimi togarashi (Japanese seven spice). Enjoy!
To Store
- You can keep the leftovers in an airtight container and store in the refrigerator for up to 4 days and in the freezer for a month.


Instead of draining out the cooking water in steps 3 and 4, can you use it as a broth base? Or is that water too scummy?
Hi, Amelia! Thank you for reading Nami’s post.
You may use the cooking water if you would like, but it is greasy, so you might want to let it cool and remove some fat.
We hope this helps!
Thank you! I’ve been hooked to this dish- so easy to make and so delicious.
Aww.🥰 Happy Cooking!
yumyumyum! Just made this again today. My 85-year old mom doesn’t like it on the sweet side though so I omitted the mirin and 1/4 c sugar. Her preferred sauce is actually just: dark soy sauce, light soy sauce, 2 pieces of rock sugar (total is about 1 tbsp) and 2 pieces of star anise. We made a lot as she further slices the pork belly pieces and use it as ingredient for her rice vermicelli recipe.
Hi sunflowii! Thank you so much for trying Nami’s recipe!
We are glad you enjoyed the dish.
Thank you for sharing your experience with us. 🤗
Oh and I want to clarify: I’ve made the recipe as is and my husband and I love it. My mom just has a Chinese palette and prefers her own recipe. The improvement is using the Instant Pot, she doesn’t have to watch over the pot on the stove.
🫶🏻🥰
Beautiful recipe! One thing I will say, I tried cooking this twice and got slightly different results. The first time, I pressure cooked on low in my insta pot and I preferred it this way because the meat came out really soft! when I cooked on high, it was a tougher bite, leading me to believe I overcooked it. I used half the amount of ingredients though for smaller portion sizes, so I’m not sure if that could affect this.
But this is so good that its got me worried about how it will affect my pork intake from now on!
Hello there, Jennifer! Thank you for experimenting with Nami’s recipe and sharing your culinary experience with us.
The textural difference could be due to differences in meat size. If you prefer, you can cut it a little larger the next time to avoid overcooking.
We are happy to hear you enjoyed the homemade Kakuni! 😊
Amazing recipe and so easy to make thank you ! The pork was so soft. The only thing is that I could only find “mirin seasoning” in the grocery store which i now know is not the same thing as it has added sugar. So in the end the sauce was too sweet so I watered it down a bit. Will try to find real mirin next time or reduce the sugar
Hello, Marie! Thank you for trying Nami’s recipe!
Mirin has a sweet taste, so you may want to reduce the sugar amount a little if you prefer. We hope this helps you on your next try!
I was wondering why not add the soy sauce,mirin, sake, and sugar during the first high-pressure mode. Would it make the meat too salty?
Hi Bryan! Thank you for taking the time to read Nami’s post and share your thoughts.
To remove excess fat and scum from charred meat, we use a combination of searing and boiling. These two processes help to maintain the meat’s moisture while eliminating unwanted fat. If you’re interested, we have included a link to the recipe for the non-pressure cooker version and a detailed explanation of the method. Hopefully, this information will be useful to you.
https://www.justonecookbook.com/braised-pork-belly-kakuni/
This was abolutely AMAZING! The entire family basically inhaled it!
Hi Charissa! Aww. We are so happy to hear that your family enjoyed this dish very much.
Thank you so much for trying Nami’s recipe and for your kind feedback!🥰
Happy Cooking!
Hey!
really love the recipes, I got one question though:
Is there any sprecific reason for that? Does it change the flavour?
Thank you in advance!
Cheers
Hello, timon. Thank you so much for taking the time to read Nami’s posts and try her recipes!
There are different ways to make Kakuni, and this is one of the quickest.
Yes. You may use Dashi instead of water in this recipe to create a more complex flavor.
We hope this helps!😃
My husband and I live in Japan (he’s Japanese) and we just made this today. Absolutely delicious. We will definitely make this again!
Hi Jennifer! Thank you so much for trying Nami’s recipe!
We are so happy to hear you and your husband enjoyed the homemade Kakuni!
Thank you for your kind feedback. 🤗