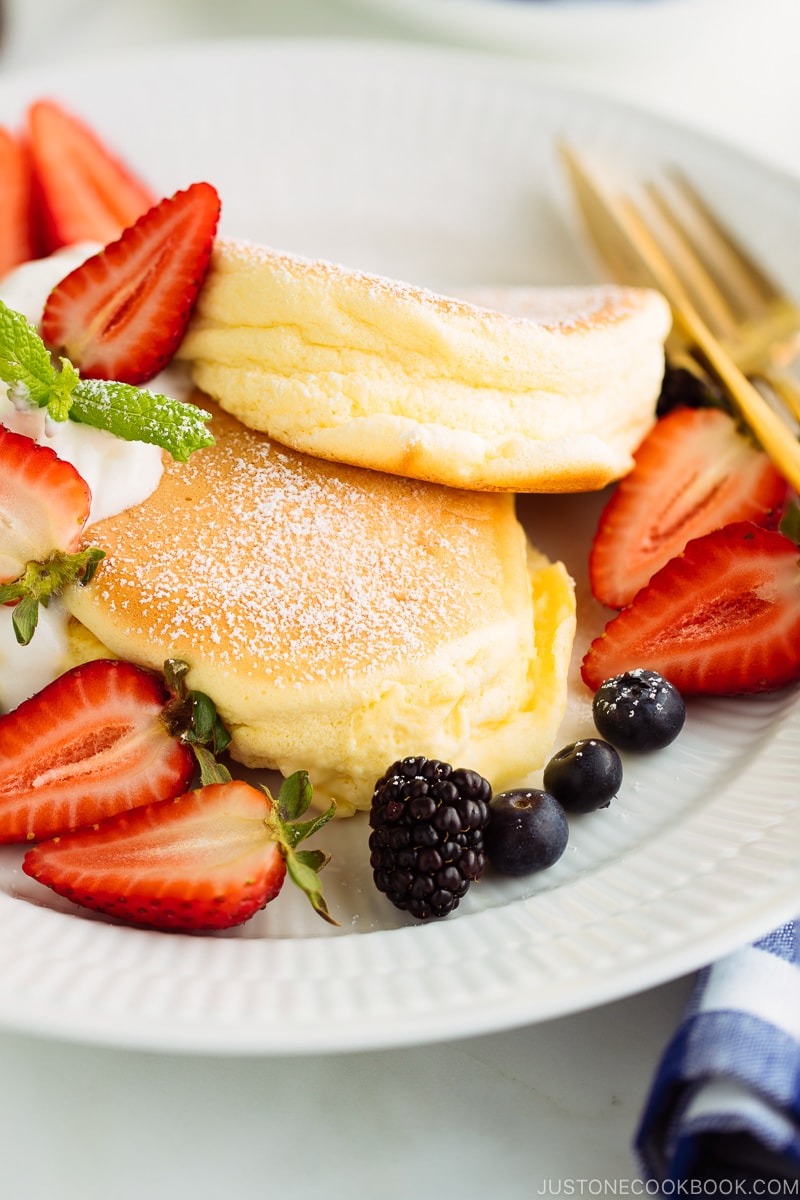
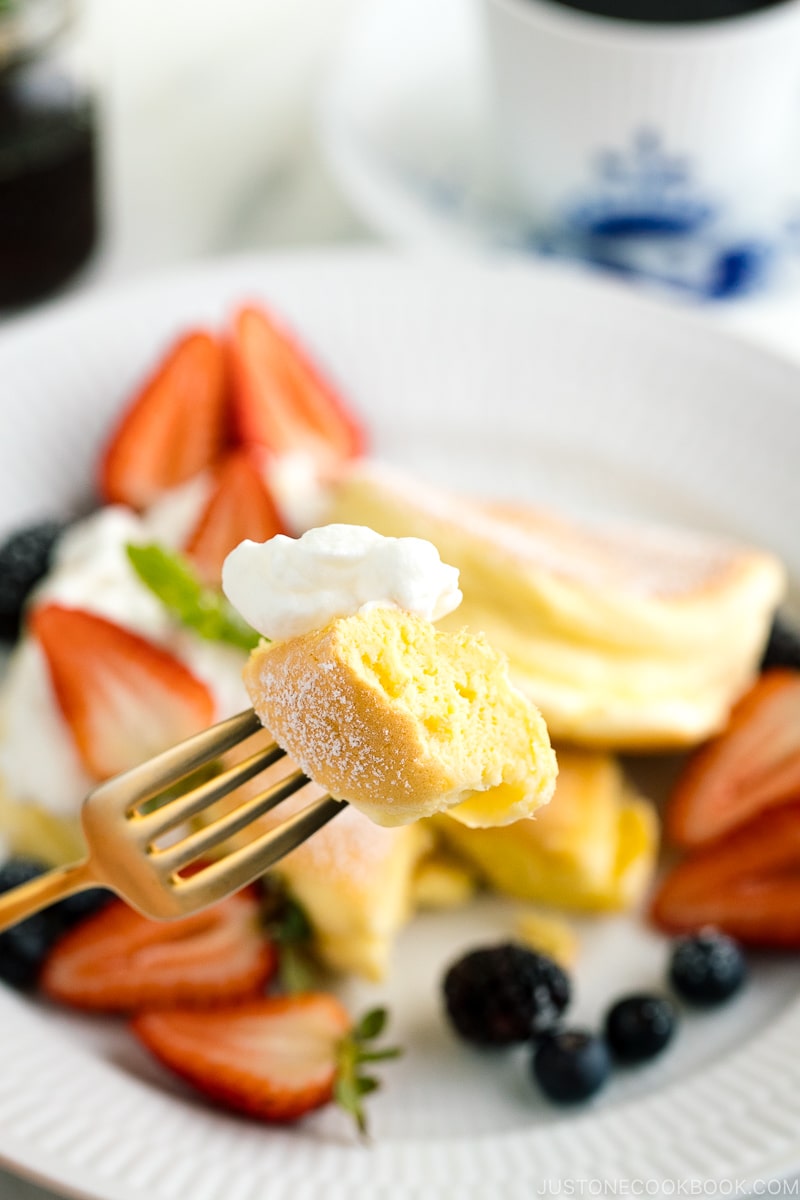
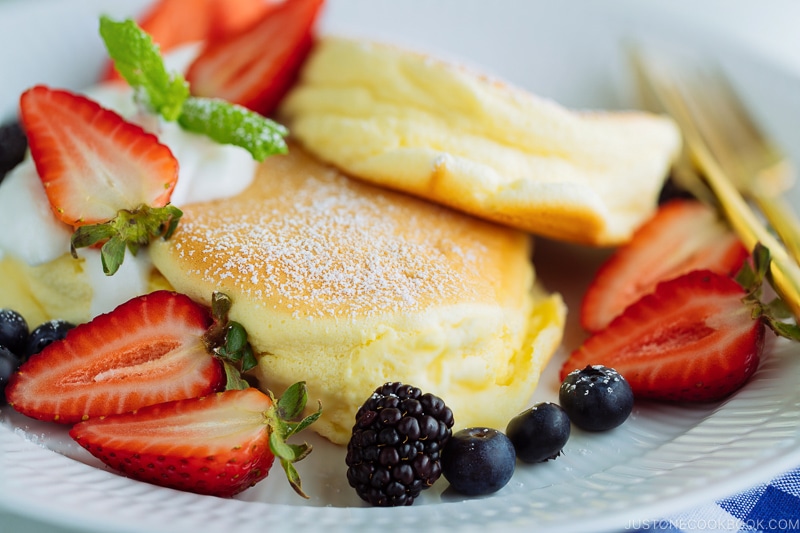
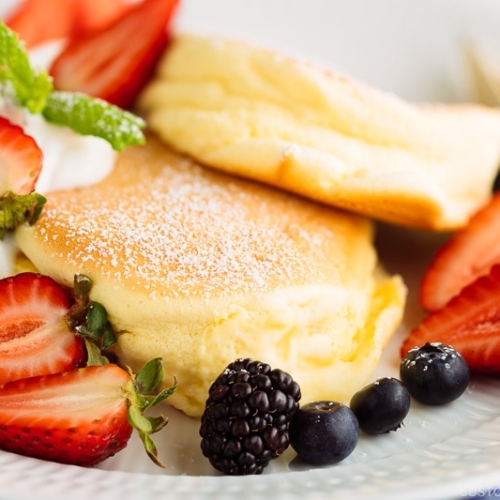
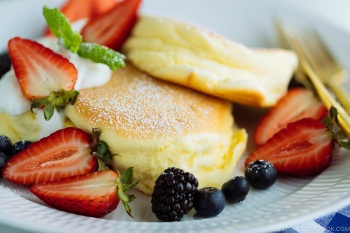
These Fluffy Japanese Soufflé Pancakes are like eating cottony clouds, but even better with homemade whipped cream and fresh berries! Read my best tips in this recipe and learn how to make them perfectly.
The Japanese take pancakes to new heights. Think cottony clouds of heaven that melt in your mouth! Have you seen Fluffy Japanese Soufflé Pancakes (スフレパンケーキ) on social media? Or maybe you have even tasted them when you visited Japan?
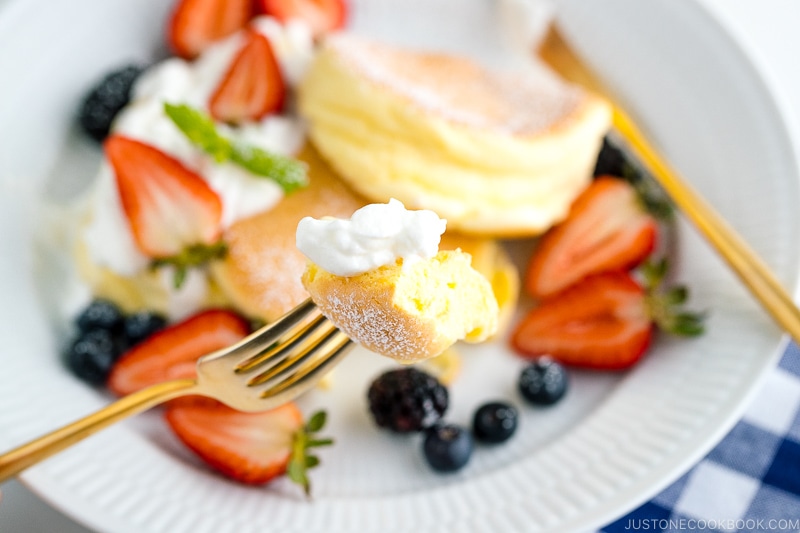
They are fluffy, airy, delicate pancakes that probably look too fancy for a weekday breakfast, but are impossible to resist making on the weekend. These pillowy, soft pancakes are a must-try. You can’t miss the fizzy, bubbly sound from the soufflé pancakes when you cut them open to enjoy!
What are Fluffy Japanese Soufflé Pancakes?
The ingredients for soufflé pancakes are similar to regular pancakes, so what makes them different? What makes soufflé pancakes so pillowy soft and delicious?
Soufflé pancakes are all about eggs. Egg yolks and egg whites are separated, and the whites are beaten to make the meringue. Just like you would with savory and sweet soufflé or chiffon cakes.
The egg whites are beaten until stiff peaks form and then folded gently and carefully into the rest of the batter. The soufflé pancakes are extra fluffy because the air bubbles hold their shape inside the pancake batter.
As a result, the pancakes are super airy, like soufflé. When you cut the pancakes, you can even hear the sound of air bubbles escaping!
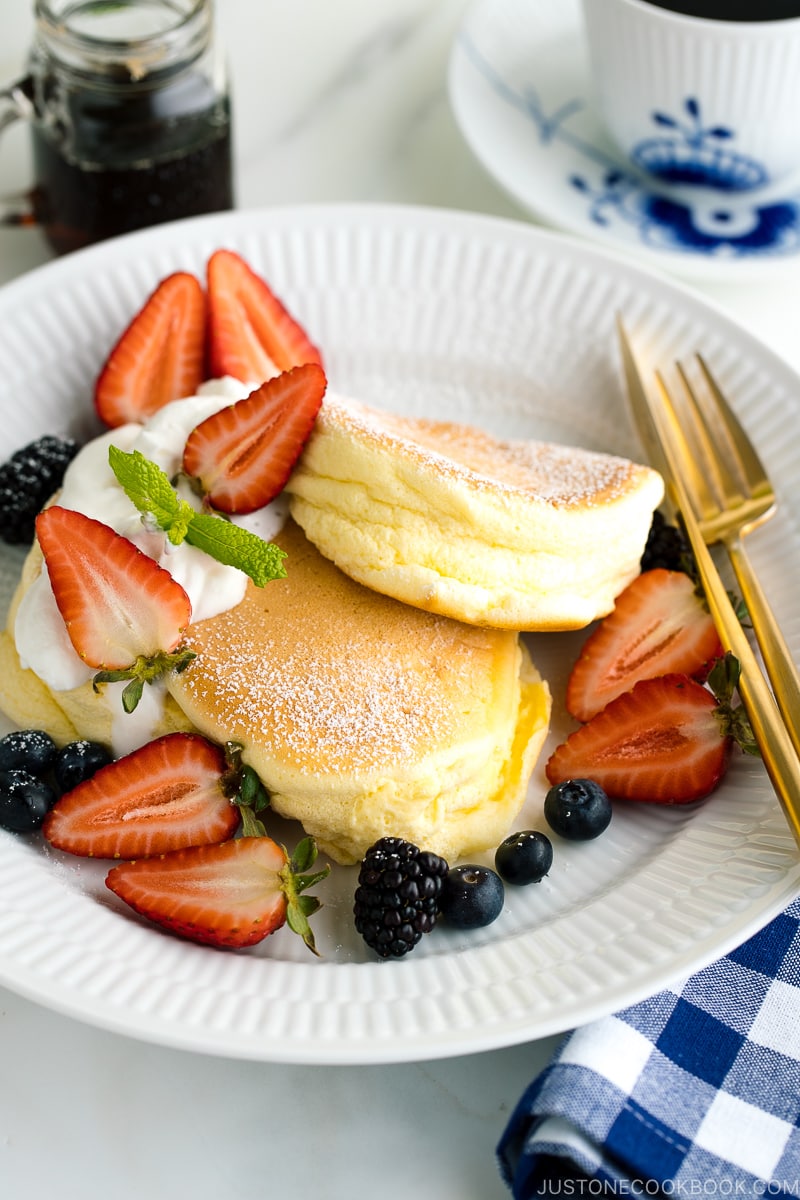
Enjoy these soufflé pancakes the same way you do with standard flapjacks, with fresh whipped cream, some fruits, syrups, and toppings like chocolate chips and nuts.
Recent Pancake Craze in Japan
Pancakes are comfort food. The happiest comfort food. I’m sure you have many joyful memories of waking up on a Saturday, looking up at a stack of pancakes on your plate. And now as an adult, you are probably like me, always searching and trying different pancake recipes, happily eating your way on a journey to find the perfect pancake.
In Japan, even the simplest of comfort foods like pancakes are taken very seriously. In recent years, Japan’s pastry shops and cafes have been in a race to make the fluffiest, softest pancakes. And by 2016, the pancake craze in Japan was in full swing with pancake shops opening all over the country competing for the best soufflé pancakes. Here are some of the most famous:
- Kiln-baked Soufflé Pancakes (窯焼きスフレパンケーキ) at Hoshino Coffee (picture above)
- Miracle Pancakes (奇跡のパンケーキ) at Flippers
- Happy Pancake (幸せのパンケーキ) at A Happy Pancake
These pancake shops did not exist when I was growing up. If they did, I would have been there on every special occasion and birthday! I’m making up for the lost time by creating these soufflé pancakes every chance I get.
5 Important Tips to Make Fluffy Japanese Soufflé Pancakes
Here are some of my personal tips that helped me achieve the perfect soufflé pancakes.
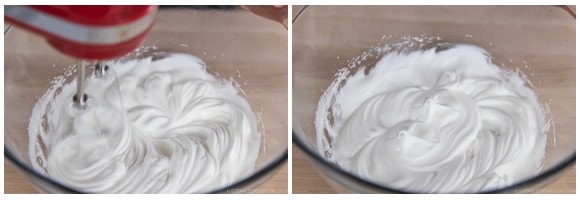
1. Beat the egg whites (meringue) correctly.
To be honest, making meringue requires a lot of practice. Some trials and errors are just part of the process, but I promise it does get easy once you have more experience and understand what it takes to reach the right consistency.
We’re looking for a stiff peak with a tip that folds over. When you lift up your whisk, the egg whites go straight up firmly, but the very tip of the egg whites fold over, like taking a bow. If you overbeat egg whites, they will break into pieces. If you under-beat, egg whites don’t have enough air bubbles and the pancakes won’t be fluffy.
2. Preheat the nonstick frying pan on the lowest setting for a longer time.
Even heating is crucial for the pancakes to cook through all at once. You want to preheat your nonstick frying pan at the lowest heat to help prevent hot spots (meaning some part of the pan is lower in heat, and the other part is too hot). This way you have full control over the cooking time and the final result.
3. Pile the batter vertically (high).
The key to making lofty pancakes is to add a new pile over the batter on the pan after it starts to form.
4. Cook slowly, covered with a lid, on low heat.
Unlike regular pancakes, you will need to cook these thick & fluffy Japanese pancakes for a much longer time. If you use higher heat, the pancakes may look done, but the inside will be too raw. Therefore, steady slow cooking over low heat is necessary. To lock in the heat and moisture inside the pan, cover with a lid.
5. Add water to create a little bit of steam.
I’ve tried without adding water before and the difference can be subtle. But since it doesn’t take much to add water, I include this step in my recipe. Just drop 1 tablespoon of water to empty spaces in the frying pan to add moisture to the pan.
Why Does My Soufflé Pancake Deflate? Trouble Shooting
When making soufflé pancakes, one of the common situations people run into is that the pancakes tend to deflate after cooking. Now, is that normal? No, a souffle, including souffle pancakes, should still stand tall after you place them on the plate.
What goes wrong? What can you do to stop your soufflé from collapsing?
1) You have probably under or overbeaten the egg whites. The goal is to create air bubbles in the batter that will give structure to the pancake. Without them, the pancake will deflate.
2) Stove heat was too strong. Just because the pancake is nicely brown, it doesn’t mean it’s done. The inside of the pancakes may still not be cooked through and if you move them out of the pan earlier, the air deflates. Properly cooked soufflé pancakes will have a solid structure and height. They will hold for 10-15 minutes as long as they are warm (just like hot air balloons).
How to Make More than 3 Pancakes at A Time?
To make two or more servings, you will need multiple non-stick frying pans on the stove. Alternatively, you can purchase an electric griddle with a lid like this.
At the soufflé pancake restaurants in Japan, they use multiple electric griddles with a lid to make pancakes. The staff would usually tell you the souffle pancakes will take at least 20 minutes to make.
These souffle pancakes definitely require extra time and effort, but I promise after that first bite, you will know it was all worth it. Give this unforgettable soufflé pancake recipe a try on the next special occasion!
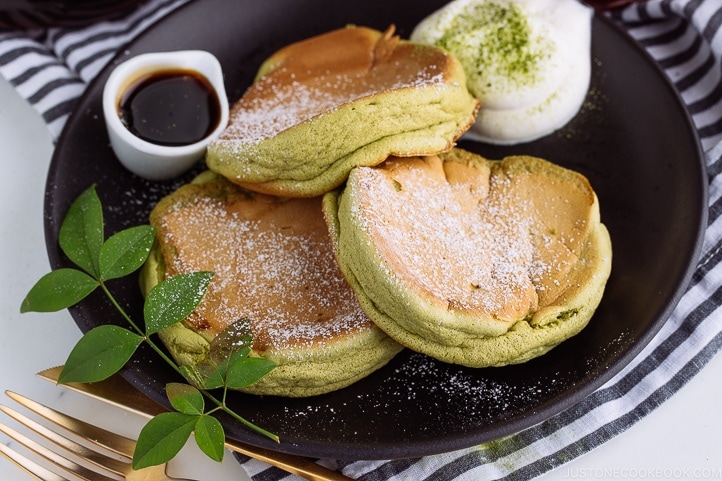
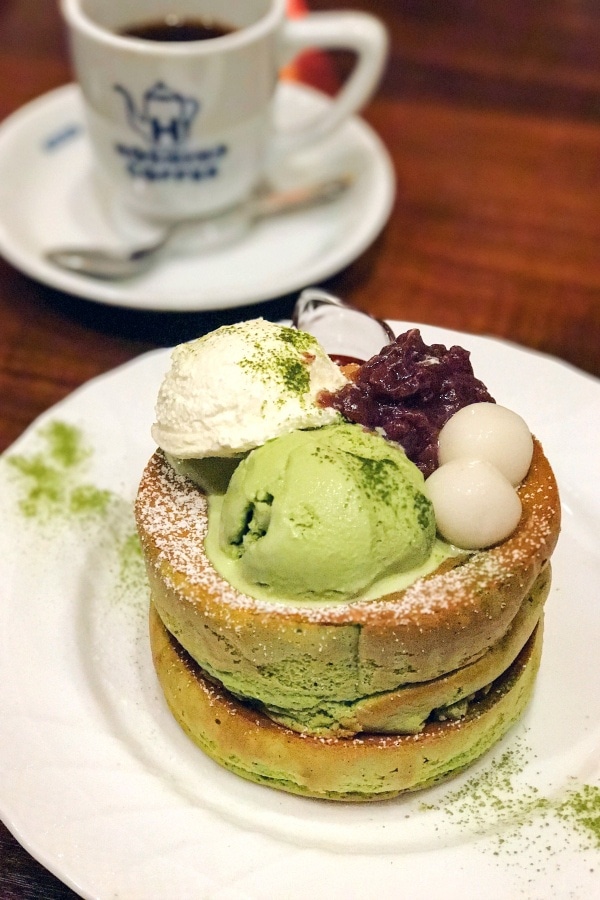
I also have a Matcha Soufflé Pancake recipe that I think you’ll going to love! The brilliant green hue and extra flavor boost from matcha make the pancakes even more irresistible.
More Delicious Breakfast Recipes You’ll Like:
- Red Bean Pancakes
- Matcha Soufflé Pancakes
- Buttermilk Pancakes
- Easy Homemade Granola – Copycat Furugura
Wish to learn more about Japanese cooking? Sign up for our free newsletter to receive cooking tips & recipe updates! And stay in touch with me on Facebook, Pinterest, YouTube, and Instagram.
Fluffy Japanese Soufflé Pancakes
Video
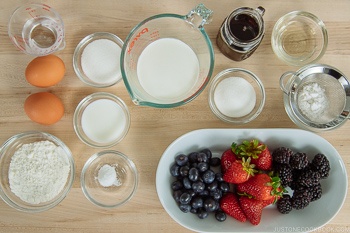
Ingredients
- 2 large eggs (50 g each w/o shell)
- 1½ Tbsp whole milk (I haven‘t tried reduced-fat, low-fat, nonfat, or plant-based milk for this recipe as I believe the batter will be too thin to make souffle pancakes)
- ¼ tsp pure vanilla extract
- ¼ cup cake flour (weigh your flour or use the “fluff and sprinkle“ method and level it off; you can make homemade cake flour)
- ½ tsp baking powder
- 2 Tbsp sugar
- 1 Tbsp neutral oil (for greasing the pan)
- 2 Tbsp water (for steaming)
For the Fresh Whipped Cream (optional)
- ½ cup heavy (whipping) cream
- 1½ Tbsp sugar (add more if you like it sweeter)
For the Toppings
- 1 Tbsp confectioners’ sugar
- fresh berries (strawberries, blueberries, etc.)
- maple syrup
Instructions
- Gather all the ingredients. I highly encourage you to use metric measurements using a kitchen scale for this recipe. Click on the “Metric“ button at the top of the recipe to convert the ingredient measurements to metric. You will also need a 12-inch nonstick frying pan (large enough to cook 3 pancakes at the same time) with a lid. It‘s also nice to have an infrared thermometer gun to check the temperature of the frying pan.

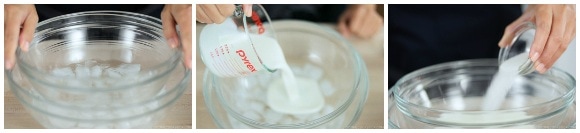
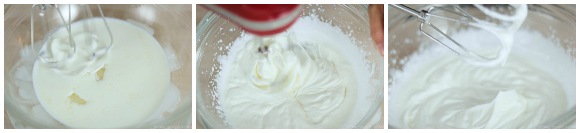
To Make the Fresh Whipped Cream (optional)
- If you‘d like to serve the Fluffy Japanese Soufflé Pancakes with optional fresh whipped cream, make it now. First, prepare an ice bath: Put ice cubes and water in a large bowl and place a clean and dry medium bowl on top of the ice water. Add ½ cup heavy (whipping) cream and 1½ Tbsp sugar to the medium bowl to keep them cold.

- Whisk on high speed until medium to firm peaks form. The cream should not be runny but soft, fluffy, and firm instead. Keep the whipped cream chilled until you‘re ready to serve the pancakes.
To Mix the Batter
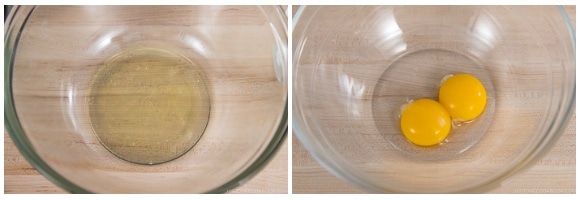
- Separate 2 large eggs (50 g each w/o shell) into whites and yolks in two different bowls. Put the bowl with the egg whites in the freezer for 15 minutes. Why do we partially freeze the egg whites? Please read why in my post 2 Tips to Make Perfect Meringue (Egg Whites).

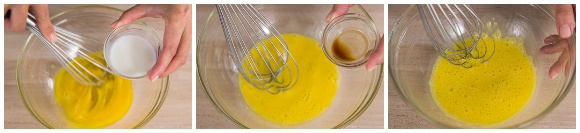
- In the meantime, add 1½ Tbsp whole milk and ¼ tsp pure vanilla extract to the egg yolks and whisk using a hand whisk until thick and frothy.
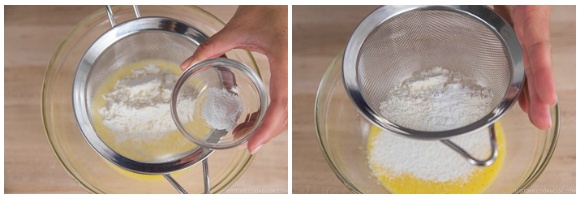
- Sift ¼ cup cake flour and ½ tsp baking powder into the bowl.
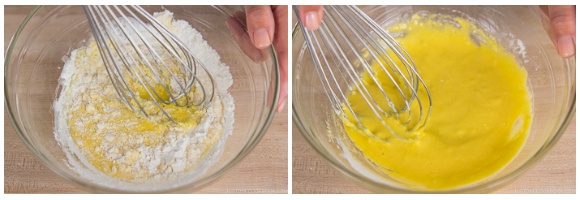
- Whisk to combine thoroughly; do not overmix. Set aside while you make the meringue.
To Make the Meringue
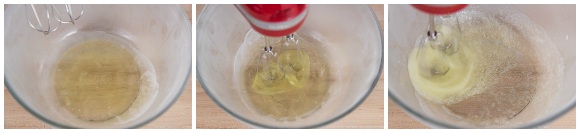
- After 15 minutes, take out the bowl with the egg whites from the freezer. The egg whites should be half frozen. Now, start beating the egg whites with a hand mixer (you can also use a stand mixer or balloon whisk).
- When the egg whites turn frothy and opaque, gradually add in 2 Tbsp sugar, roughly one-third of it at a time. Then, increase the mixer speed to high (Speed 10) and beat vigorously until stiff peaks form (see the next step for how to check). It takes about 2 minutes of beating at high speed to reach stiff peaks. Tip: When using a stand mixer, I usually pause beating when the meringue is almost done. Take off the whisk attachment from the mixer and use it to hand-mix the looser egg whites near the bowl's edge into the stiffer whites near the center until it's all homogenous in texture. Then, put the whisk back on and continue beating.
- To check for stiff peaks, stop whisking and pull up your beaters or whisk. The meringue in the bowl or on the whisk should be firm enough to hold a peak, pointing straight up (or maybe folding over a little bit just at the very tips). By this time, the meringue should have a glossy texture, too. Tip: If you overbeat the meringue, it will become very stiff and grainy and won't incorporate into the batter at all.
- Heat a large nonstick frying pan to 300ºF (150ºC) over the lowest heat. Brush with 1 Tbsp neutral oil and lightly remove any visible oil with a paper towel (otherwise the pancakes will have a spotty pattern). Keep the pan on low heat while you fold in the egg white meringue into the egg yolk mixture in the next step.


To Fold In the Meringue
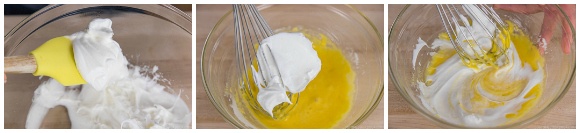
- Take one-third of the egg white meringue and add to the egg yolk mixture. Whisk together by hand (don’t worry too much about breaking air bubbles at this point).
- Next, take half of the remaining meringue and add to the egg yolk mixture. Using a hand whisk, gently fold them in without breaking the air bubbles in the egg whites. Why do we use a whisk instead of a silicone spatula? Please read my post 2 Tips to Make Perfect Meringue (Egg Whites).
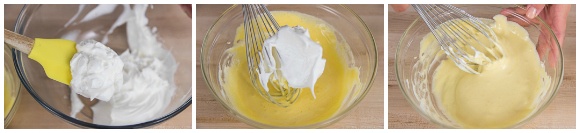
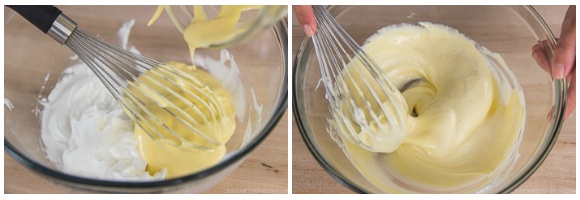
- Now, transfer the egg yolk mixture back into the bowl with the remaining meringue. Very gently fold the two mixtures together, taking care not to deflate the air bubbles in the meringue and batter as you fold. Mix the batter very gently until well combined and homogenous.
To Cook the Pancakes
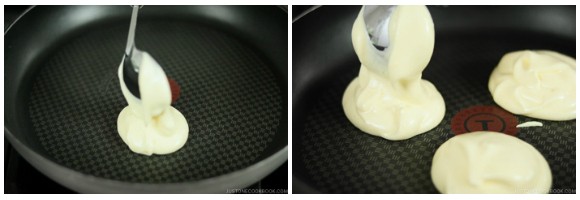
- Keep your nonstick frying pan heated to 300ºF (150ºC) at all times over low heat. Remember, each pancake gets roughly four small scoops of batter, and you will be making three pancakes. For the first pancake, place one scoop of batter and make a tall mound in the frying pan, using a small ladle or a serving spoon (that’s bigger than a regular spoon—probably 2–3 Tbsp). Next, stack one more scoop of batter onto the first scoop already in the pan. Repeat for the next two pancakes, giving each pancake two scoops of batter.
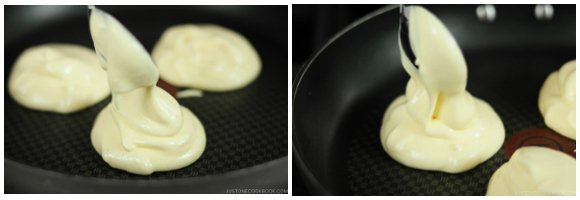
- By the time all three pancakes have two scoops, the surface of the batter is slightly dry already. At this point, you can mound one more scoop on top of each pancake, keeping the batter piled up high. In the bowl, you should still have roughly three scoops left (if you have slightly more, that’s okay).
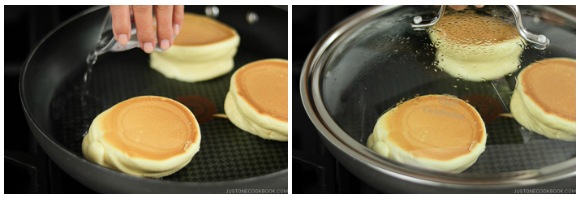
- Set the timer for 6–7 minutes and add 1 Tbsp of the 2 Tbsp water in three empty spaces inside the pan. Cover with a lid. The steam from the water keeps the pancakes moist while they cook. Please note: The suggested time is just a guideline; how long you will cook the pancakes is based on the temperature of your frying pan.
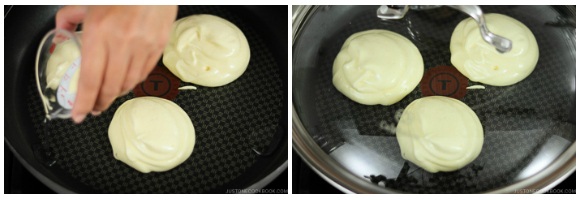
- After 2 minutes have passed, open the lid, and add one final scoop of batter to each pancake (or more scoops if you have more batter). Make sure to stack the batter high, not wide. If the water has evaporated, add a little bit more. Cover with the lid and cook.
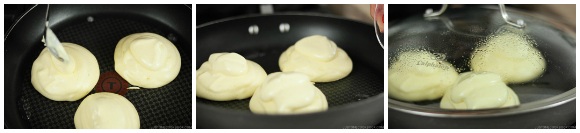
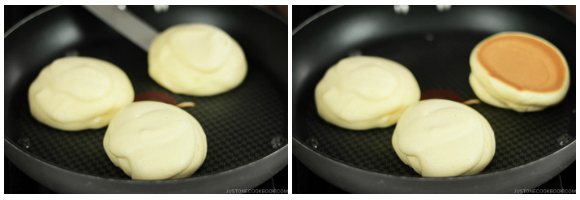
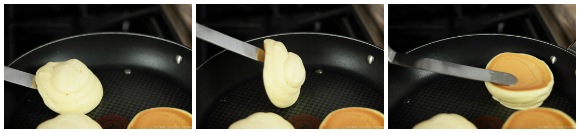
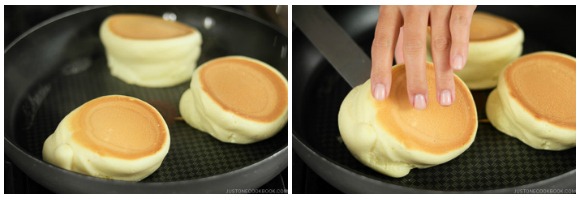
- After 6–7 minutes have passed, lift the pancake VERY GENTLY using an offset spatula. If the pancake is stuck, don’t touch it until it firms up a little. If you force it, the pancake will crack in the middle. When the pancake is ready, you can easily move the pancake. Repeat with the other pancakes.
- Here is another set of images to show the process. Slightly pull the pancake to create an empty space and gently flip it over with a “rolling over” motion.
- Add another 1 Tbsp water to the empty spaces in the pan and cover. Set the timer for 4–5 minutes to cook the other side on the lowest heat setting.
- Once they are nicely browned, transfer the pancakes to your serving plates.
To Serve
- Place the optional fresh whipped cream on the pancakes and top with fresh berries. Dust your Fluffy Japanese Soufflé Pancakes with 1 Tbsp confectioners’ sugar and drizzle with maple syrup. Enjoy!
To Store
- For the fluffiest texture, I recommend making these soufflé pancakes just before serving. If you have leftovers, transfer them to an airtight container and store in the refrigerator for up to 2 days.
Notes
- Soufflé pancakes can be tricky to make (probably not easy for a beginner cook), so make sure to read my tips in the post thoroughly before you start cooking.
- Beat your egg whites correctly. Underbeating or overbeating will cause the pancakes to deflate after cooking.
- Cook over low heat, and make sure the insides of the pancakes are properly cooked through. If the inside is not cooked through, there is no structure to hold up the pancakes and they will collapse as soon as the temperature drops.


I have never made souffle pancakes before, because in other recipes they use some kind of forms and in your recipe you layer it and it seems so easy to make. I am a big fan of cotton sponge cake and this is like little version of it without baking. Cant wait to try it! ❤️❤️❤️
Hi Ivana! I hope you enjoy! From my experience, the pancake recipe that uses a mold tends to be dry and not really “souffle” texture. When you make good meringue, it’s easy to stack the batter on top of the other (once it’s formed into a shape). That way you can pile up higher instead of the new batter disintegrating to the previous pile. 🙂
Best point why I really into this blog is, there’s so many my favourite recipe here. And the special one is my lovely green tea. #Greentealover here ????
I’m a huge fan of matcha too. Here are all the matcha recipes I have: https://www.justonecookbook.com/tags/matcha/ Enjoy!
This is my first time find a blog with perfect and complete menu. Moreover each menu has detail step (And I can print it yeay!) , so I can follow all of it. It sure there’s a hard work for these kind of perfection.
Hi Damara! Thank you for your kind words. We’re used to creating step by step images for the recipes, but we had a point in the past that we almost gave up because it’s a lot of work to shoot steps, edit them, and putting into the recipe….. but we got used to it by now. 🙂
What very nice from your blog is I can print all the recipe I need. Thank you for your hard work, I’m sure it help many Mom in the world, including me ????
Hi Damara! Thank you for your kind words! I’m happy to hear my blog is helpful for moms in the world. 🙂 xo
I love this video!! I would love these pancakes paired with ice cream and fruit!
Hi Meagan! Thank you so much! I’m so happy to hear you enjoy this video. 🙂 Yes, ice cream and fruit would be wonderful!
I really love this recipe!
So glad that there are still people in the world who care for good food. I love reading all your recipes, watch your vlog and try them myself. (even though it is sometimes a bit difficult without the proper equipment ^^*)
looking forward for new great recipes! Thank you for sharing them all with us
Hi Mac! Thank you for your kind words! I’m glad to hear you like this recipe. 🙂
Wow Nami , this recipe of Souffle Pancake looks so fluffy and delicious❤!! I made this recipe for my mom on mother’s day and she loved it , though it was not fluffy as your Nami ????????❤!
Thanks so much for trying this recipe! I’m so happy to hear your mom enjoyed it! Next time whip up egg whites a bit more – if yours weren’t breaking to pieces, then it was probably under-beaten. Egg whites should be stiff enough that hold the batter really high. 🙂
I tried this pancake following your instructions it came out super.
All my friends love it
First attempt successfully. Thank you
Hi Margaret! That’s awesome! I’m so happy to hear yours came out nicely! Thank you for using my recipe and for your kind feedback. 🙂
Hello Naomi, thanks for sharing the recipe! I am a little confused witb the recipe for the measurements. You mentioned 1/4 cup of cake flour (30-34g) but isn’t 1/4 cup 60g? Or did I read it incorrectly? Thanks.
Hi Ponku! The recipe is correct, 1/4 cup is 30-34 g. It seems like you “pack” flour into your cup. Remember to fluff the flour, scoop up the flour with a spoon (not measuring cup), and level off. That’s the correct way to measure flour into cups. I highly recommend using a kitchen scale because everyone’s 1 cup is different based on how you scoop, and if you use 60 g flour, it is way too much flour in these pancakes. Hope that helps! 🙂
https://www.justonecookbook.com/how-to-measure-flour/
Thanks so much for posting this recipe, Nami! I made them twice—the first time the batter was runny and the pancakes did not fluff up. The second time they fluffed up beautifully but once I removed them from the pan they fell and went flat!!!! Boo hoo! Can you please help me problem solve to find out what went wrong?
Hi TZ! Thank you so much for trying this recipe already twice! From the way you describe… I think my guess is that first time you didn’t beat the egg whites enough (under beaten). I could be over-beaten, but if you didn’t see egg whites being separated, then it’s under beaten. The second trial… let’s say you beat the egg whites correctly. Pretty stiff but only tip bends a little. You saw it puffed up. But when you remove from the pan, it collapse. So that seems like it’s undercooked. The structure is not set yet. Maybe slightly cook a little longer so inside is cooked a bit more. And it will hold the shape. When it’s still raw, it will collapse. Or… possibly you didn’t mix the batter thoroughly, which end up with spotty air bubbles in the batter and the structure didn’t hold evenly, so it collapse. Hard to know what causes without seeing how it’s made.. do you think one of them could be the reason? Hope you don’t give up! I had to make several times too, to make sure my timing works. Once you get it right (and take notes!), next time do exactly same… and every time it’ll work. 🙂 Good luck! Thanks again for trusting my recipe. 🙂
Aww man, yet another recipe to try!
Your videos and photography are beautiful, and now I gotta try another recipe!
Hi Dee Ann! Thank you for your kind words! Hope you enjoy this recipe!
These look delicious. Wonder if I can make them gluten free… Should be OK as there’s only a 1/4 cup of flour in them anyway. I’ll have to give it a go later in the week.
Hi Claire! I didn’t try this recipe with GF flour before… I hope it’ll work. Please keep me posted. 🙂
Made these the other day with GF plain flour with a teaspoon subbed with cornstarch (instead of cake flour). So fluffy and delicious! They did stick a bit, but that was down to my stove & pan not being the best. Still yummy just not quite as pretty as yours. Thanks for the recipe!
Hi Claire! I’m so happy to hear you enjoyed this recipe.
You’re so kind and sweet. THANK YOU so much for your feedback. I think a lot of people will appreciate your feedback. Thank you!!!!! xoxo
Hi,
Your recipe is great. Just one question, what’s the purpose of the baking soda? Can I go without it?
Hi Kelvin! It’s to increase the volume and lighten the texture. It works by releasing carbon dioxide gas into a batter or dough through an acid-base reaction, causing bubbles in the wet mixture to expand and thus leavening the mixture. So don’t skip. 🙂
Hi! Is there a good substitute for Whole Milk if I can’t eat milk? Something with enough fat content?
Hi Kellie! I haven’t tried it myself but someone made it with other types of milk and it went okay. I can’t compare the result but I think it might be worth experimenting. 🙂
Video offers a good detailed visualization of what each step in the typed instructions should look like. Helps when viewers are new to cooking.
Hi Tiffany! I’m glad to hear the video helps/confirm each step visually. Sometimes I can’t explain in words, which the video will help. Sometimes video can be too fast to explain everything, so written instruction helps. I think both helps cooking differently. 🙂
I’ve made these before but lost that recipe! I’m so glad that you’ve made one. I know I can trust it and now I’m excited to make them! I can’t wait to make my own versions with red bean or matcha. Thank you, Nami!
Hi Ariana! Hope you will enjoy this recipe! Oh yeah matcha and red bean… that is delicious!! 😀
Can’t wait to try the recipe!! However, may I use a griddle without lid? Many thanks!!
Hi Kelly! I hope you enjoy the recipe. I highly recommend using a lid for this recipe. It’s very hard to keep the consistent heat without the lid. It is not hot enough to cook inside the pancake. If you don’t cover, the surface of the pancake gets burnt too fast while inside the pancakes need more time to cook. Covering helps to maintain the heat pancakes need. Hope that helps… Or maybe cook even lower heat, allowing inside the pancakes cook extra longer so the pancakes won’t be too burnt. My stove has no way to lower the heat lower, but maybe your electric griddle or stove can do that.
Thank you so much!! I will refund the griddle and buy one with lid then! Can’t wait to try!!
Hope it’ll work out with the lid! 🙂
Thanks for the recipe! Usually my pancakes are not soft enough and too firm. I hope that this recipe will help me making the nicest pancakes!
Hi Said! I hope you enjoy this recipe! I included tips that helped me achieve this result in the blog post, so please read before you make the pancakes. 🙂