Here‘s my step-by-step method for how to cook Japanese short-grain white rice in a rice cooker. Follow my rice-to-water ratio tips to make perfectly steamed white rice every time. No more mushy or dry rice!
The Japanese eat rice almost every day, sometimes 3 meals a day! Cultivated for thousands of years in Japan, rice occupies a significant place in the culture and is the quintessential staple of the Japanese diet. When it comes to the quality of the rice down to the cooking technique, we take every aspect seriously.
Today I will share how the Japanese cook white rice in a rice cooker. We also have a recipe for cooking rice on the stove.
Table of Contents
- What is Japanese Short-Grain Rice?
- My Favorite Japanese Rice Brands
- The Right Rice-to-Water Ratio for Short-Grain White Rice
- How to Cook Japanese Short-Grain Rice
- How Much Rice Do I Need to Cook
- Cooking Tips
- The Best Way to Store Cooked Rice
- Other Methods of Cooking Japanese Short-Grain Rice
- My Favorite Rice Cooker
- Delicious Rice Recipes
What is Japanese Short-Grain Rice?
Japanese white rice is a type of Japonica short-grain rice that is short, plump, and rounded oval.
In general, Japanese rice has a higher water content compared to long-grain varieties like basmati or jasmine rice. This means that Japanese rice is more tender and moist. It‘s also more sticky and chewy because the grains contain less amylose—a type of starch that separates rice grains—than long-grain rice.
It’s worth noting that outside of Japan, Japanese short-grain rice is often called “sushi rice” for marketing purposes. In reality, Japanese rice is typically used in everyday meals and less often in sushi recipes.
You may also notice that Japanese short-grain rice has been incorrectly called “sticky rice.” Sticky rice is actually another name for glutinous rice or short-grain Japanese mochigome. We use this type of glutinous rice to make Mochi, Sekihan, and Okowa.
👉🏻 To brush up on your knowledge, I highly recommend reading “Everything You Need to Know about Japanese Rice” and “Types of Japanese Rice.“
My Favorite Japanese Rice Brands
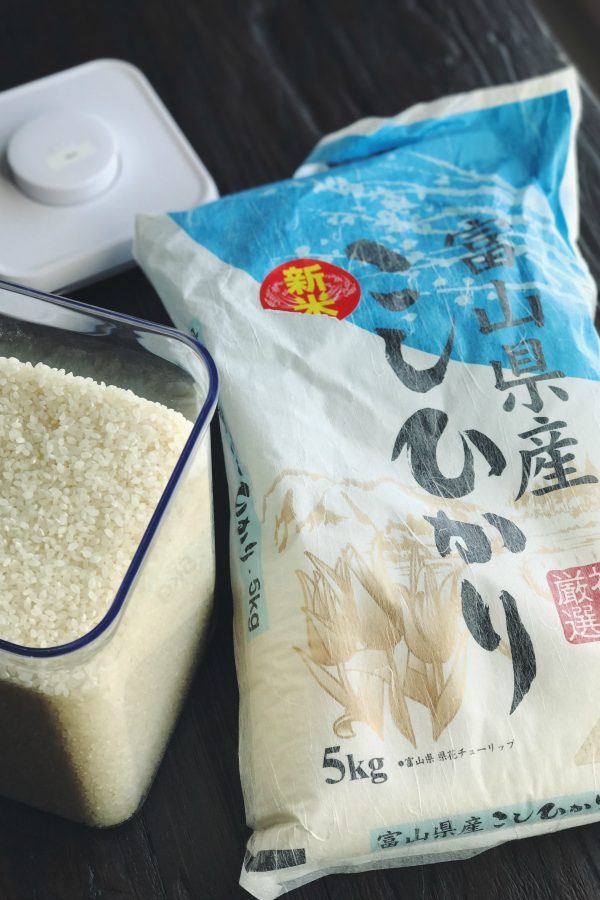
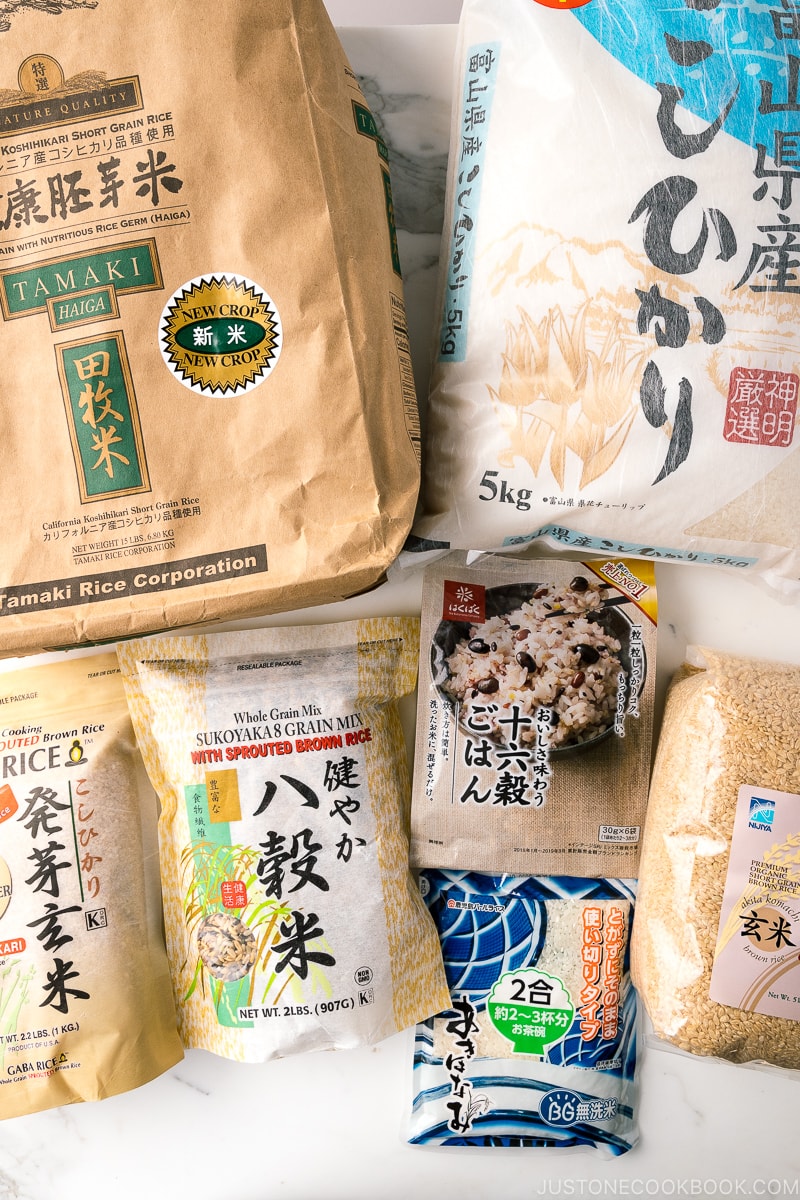
When it comes to high-quality Japanese rice, I would recommend the Koshihikari variety, which is available from various brands at Japanese grocery stores. Known for its sweet taste and fragrance, it is the most popular variety in Japan.
My family particularly likes koshihikari rice imported from Toyama prefecture (blue and white package).
The Right Rice-to-Water Ratio for Short-Grain White Rice
Over the years, I’ve received a lot of questions from my readers asking why their rice comes out dry.
And I think I know the reason.
Most online resources (in English) will tell you the rice-to-water ratio for Japanese short-grain white rice is 1 to 1.
But what you probably didn’t know is this:
The Japanese golden ratio for white rice to water is 1 to 1.1 (or 1.2).
That is 10-20% more water that you didn’t add! For example, one rice cooker cup (180 ml or ¾ US cup) of uncooked short-grain white rice will need 200 ml of water, not 180 ml.
That means, if you still want to use a “1-to-1 ratio,” the rice must be soaked in separate water for 20–30 minutes (to absorb an extra 10–20% of water) and drained well before you measure water at a 1-to-1 ratio. This way, you made sure your rice got the moisture it needed.
Most recipes online do not include that soaking step, which means the rice is missing the additional 10-20% of water.
Please note that the rice-to-water ratio is different for Japanese short-grain brown rice. To learn more, see my post How to Cook Short-Grain Brown Rice in a Rice Cooker.

So… Exactly how much water do you need for each rice cooker cup?
The plastic rice cooker cup that comes with the rice cooker is ¾ cup (180 ml). In Japan, this amount is called ichi go (一合). Here’s how much room-temperature water you need for each rice cooker cup of Japanese short-grain white rice when you follow the 1-to-1.1 (or 1.2) ratio:
1 rice cooker cup (180 ml) = add 200 ml of water
2 rice cooker cups (360 ml) = 400 ml
3 rice cooker cups (540 ml) = 600 ml
4 rice cooker cups (720 ml) = 800 ml
5 rice cooker cups (900 ml) = 1000 ml
Calculation: 180 ml x 1.1 (or 1.2) = 198 ml (or 216 ml)
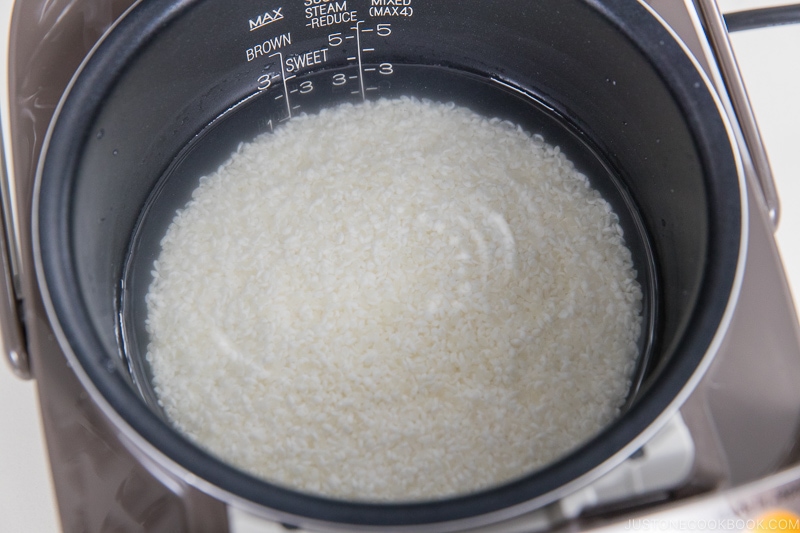
Most Japanese rice cookers have a setting for white rice. If yours does, the inner pot will have marked lines for how much water to add for the number of rice cooker cups that you’re cooking. In this case, you can simply add your rinsed and washed white rice to the pot and pour water to the marked line.
My family and I actually prefer to add a bit more water than the water line in the rice cooker bowl for the imported Japanese rice we typically buy. Whenever we cook the rice according to the specified water line, the rice comes out a bit too dry. So, I highly encourage you to test and adjust the water amount whenever you switch the rice brand or the region where the rice is harvested.
How to Cook Japanese Short-Grain Rice
The Ingredients You’ll Need
- Japanese short-grain white rice
- Water (at room temperature)
The Cooking Steps
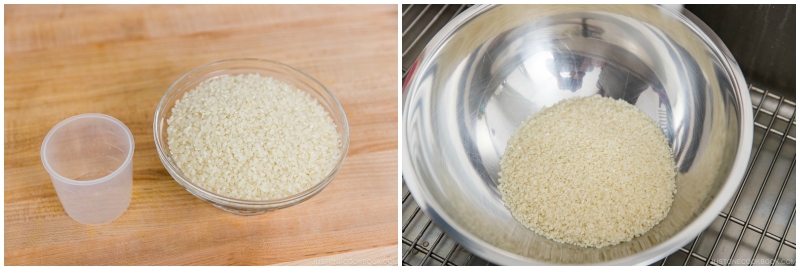
- Measure the Rice: Overfill your rice cooker cup (or US measuring cup) with uncooked rice, then level it off.
- Wash and Rinse: Start with an initial quick rinse, followed by washing and rinsing the rice three times. See the recipe card for my detailed step-by-step instructions and photos.
- Drain Well: Drain the rice very well in a fine-mesh sieve and shake off any excess water.
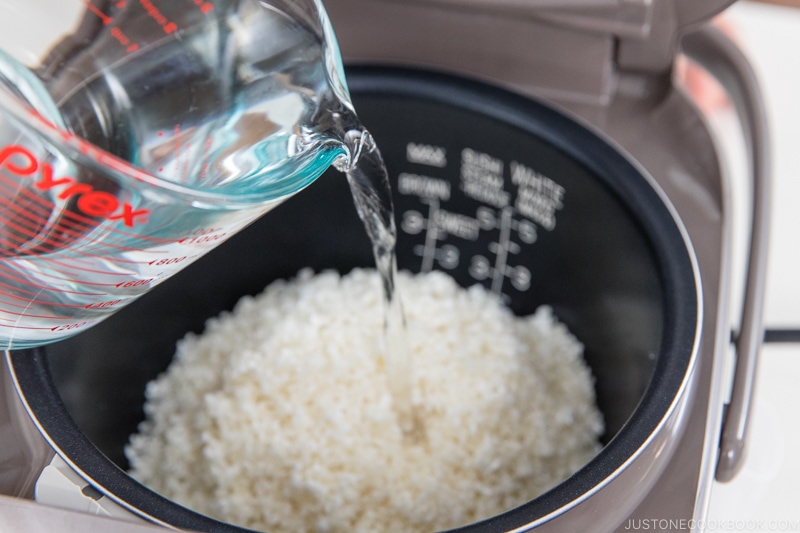
- Add Water: Add the drained rice and the measured water to the inner pot of your rice cooker.
- Soak the Rice: Very important! Soak the rice for at least 20–30 minutes.
- Select the White Rice Program: Most Japanese rice cookers have a setting for white rice.
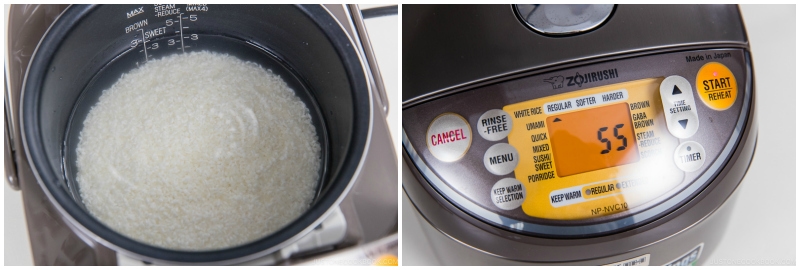
- Cook: Press the Start button. The program on my rice cooker takes about 55 minutes from start to finish, including 10 minutes of steaming at the end.
- Steam: After cooking, let the rice steam for 10 minutes (if it’s not included in the program).
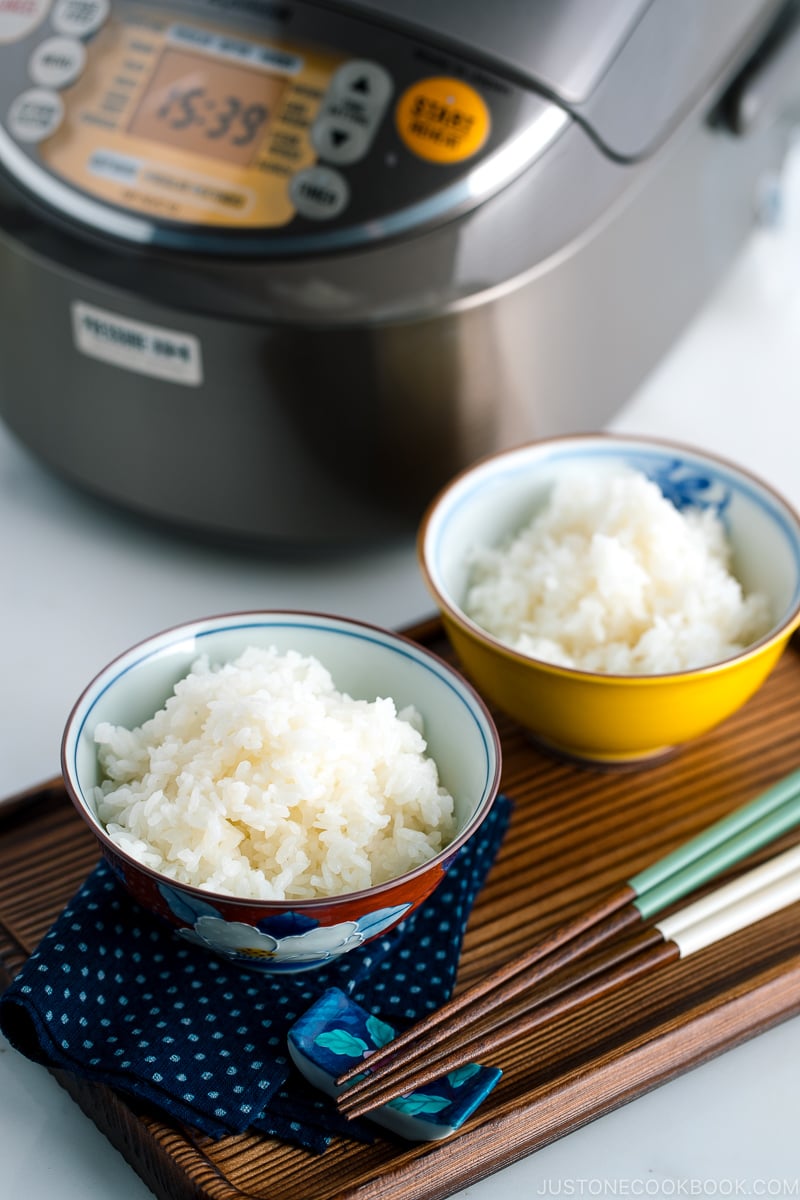
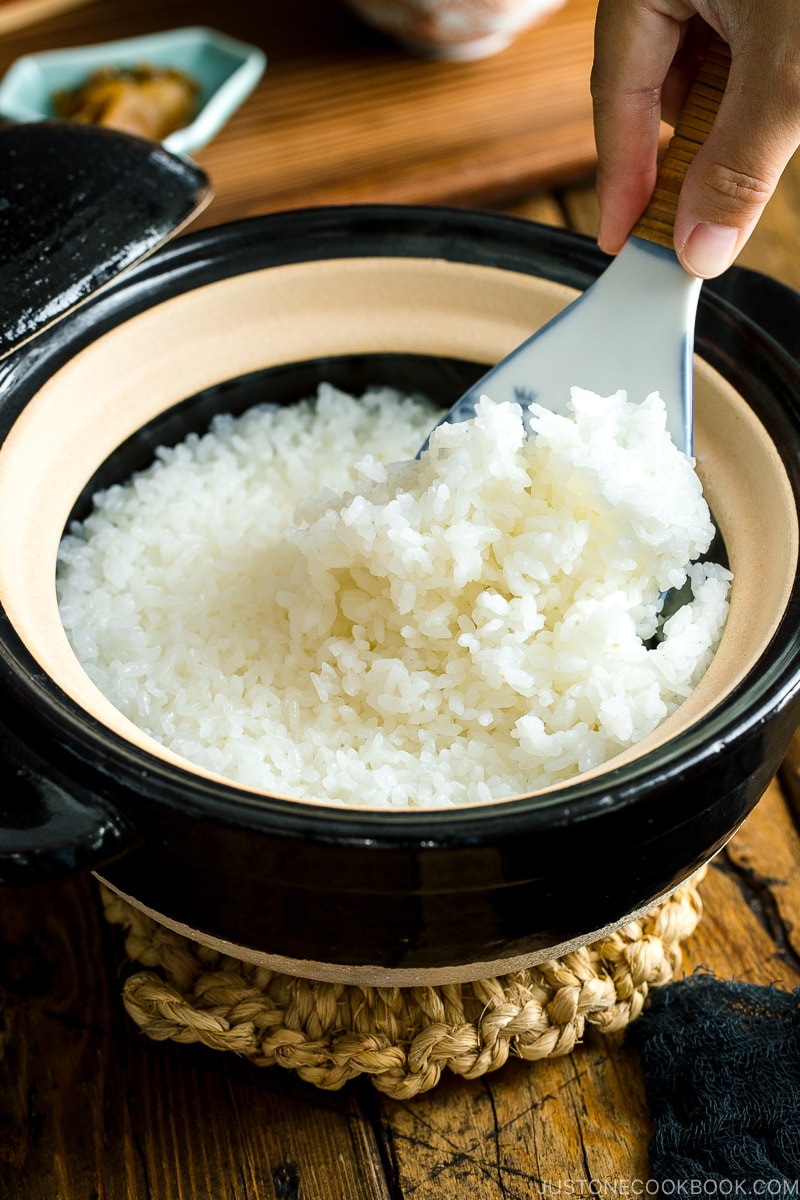
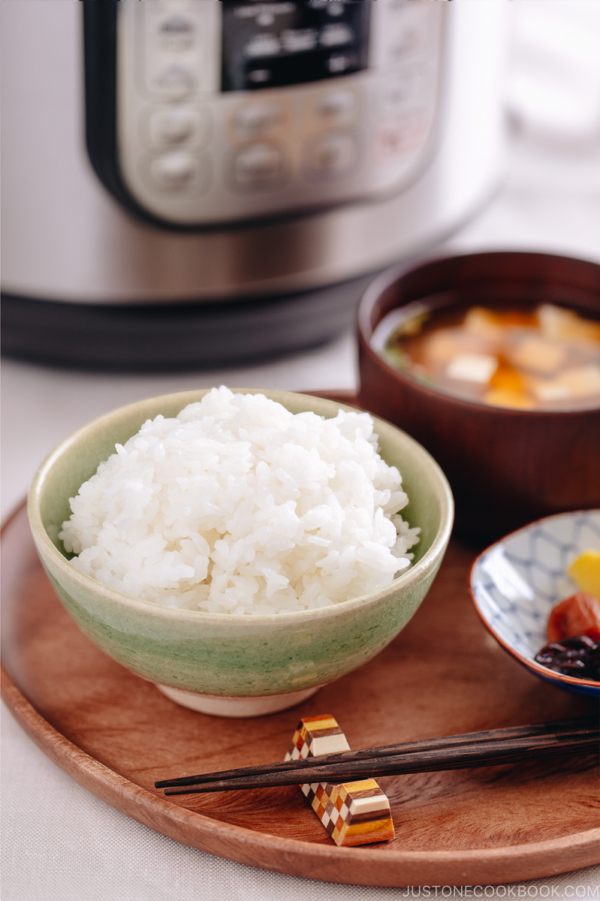
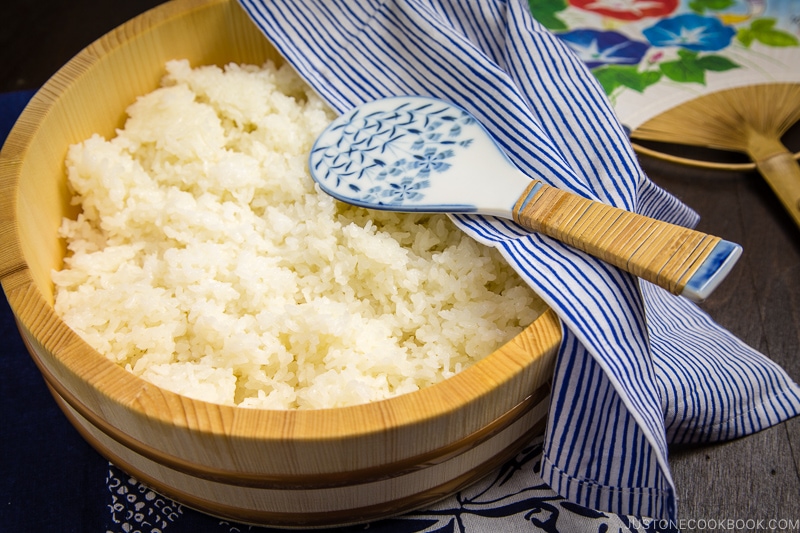
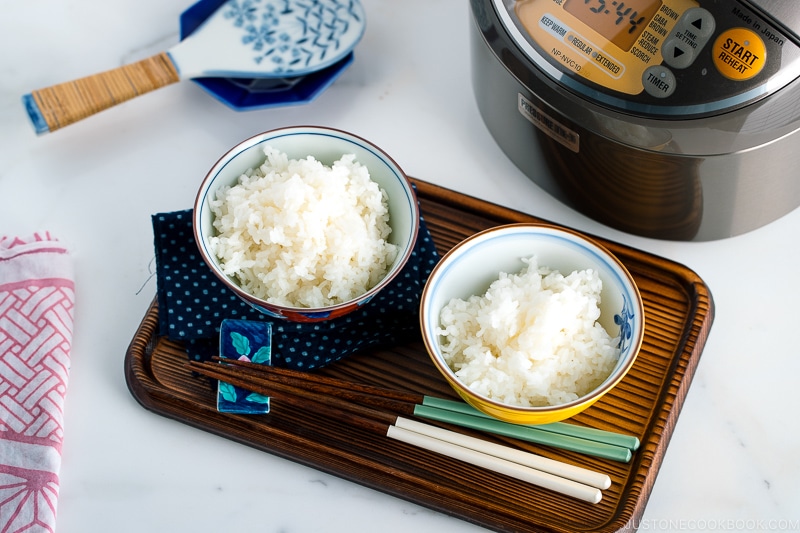
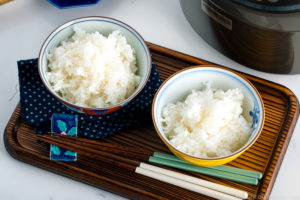
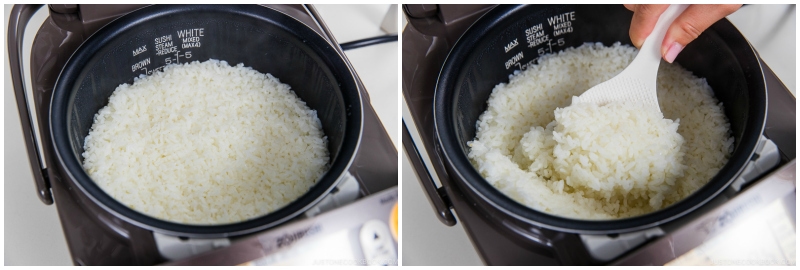
- Fluff and Serve: Insert a rice paddle vertically into the cooked rice. Turn over a scoop of rice from the bottom. Then, use a slicing motion to fluff the rice. Repeat until fluffed, then enjoy!
How Much Rice Do I Need to Cook
- 1 rice cooker cup (180 ml, ¾ cup, 150 g) of uncooked short-grain white rice
- 2¼ cups or 330 g of cooked rice
- 2 rice bowls
- 3 onigiri rice balls
- 1 donburi bowl
- 2¼ cups or 330 g of cooked rice
- 2 rice cooker cups (360 ml, 1½ cups, 300 g) of uncooked rice
- 4⅓ cups, 660 g of cooked rice
- 4 rice bowls
- 6 onigiri rice balls
- 2.5 donburi bowls
- 4⅓ cups, 660 g of cooked rice
- 3 rice cooker cups (540 ml, 2¼ cups, 450 g) of uncooked rice
- 6⅔ cups or 990 g of cooked rice
- 6 rice bowls
- 9 onigiri rice balls
- 4 donburi bowls
- 6⅔ cups or 990 g of cooked rice
- 4 rice cooker cups (720 ml, 3 cups, 600 g) of uncooked rice
- 8¾ cups or 1320 g of cooked rice
- 8 rice bowls
- 12 onigiri rice balls
- 5 donburi bowls
- 8¾ cups or 1320 g of cooked rice
- 5 rice cooker cups (900 ml, 3¾ cups, 750 g) of uncooked rice
- 11 cups or 1650 g of cooked rice
- 10 rice bowls
- 15 onigiri rice balls
- 6 donburi bowls
- 11 cups or 1650 g of cooked rice
Helpful Notes to Remember:
- One cup of cooked white rice weighs 5.3 oz (150 g).
- A typical rice bowl serving is 1 cup (150 g) of cooked white rice.
- A typical donburi bowl serving is 1⅔ cups (250 g) of cooked white rice.
- A typical onigiri (rice ball) weighs 110 g each.
Cooking Tips
- Always rinse and wash the rice. We always quickly rinse and wash the rice a few times. This is important to help remove impurities and the natural occurrence of arsenic on the rice.
- Short-grain rice always requires soaking (20–30 minutes), unlike other kinds of rice. The rice grains are rounder and fatter, so they need a head start to absorb moisture to the core of the kernel.
- Let the cooked rice steam for 10 minutes when the rice cooker turns off. Steaming is essential! It’s the final step in cooking Japanese rice. Without it, your rice will not cook fully. You can skip this step if your rice cooker program already includes 10 minutes of steaming time. Resist the urge to peek under the lid during this time! If you open the lid, you’ll release the precious steam that’s crucial for this resting period.
- When you use new crop rice (新米), reduce the water slightly.
- When you get a different brand of rice, test cooking the rice and adjust the amount of water, if needed
- The more rice you have in the pot, the more delicious your cooked rice will be. That’s because the most evenly cooked rice is in the center of the pot. The rice near the bottom and top simply cooks too fast. More rice in the pot means you’ll increase the central proportion of steamed rice for a more delicious outcome. That’s why I recommend cooking at least 2–3 rice cooker cups of uncooked rice at a time, even if you only need 1 cup. You can always freeze the extra rice with good results.
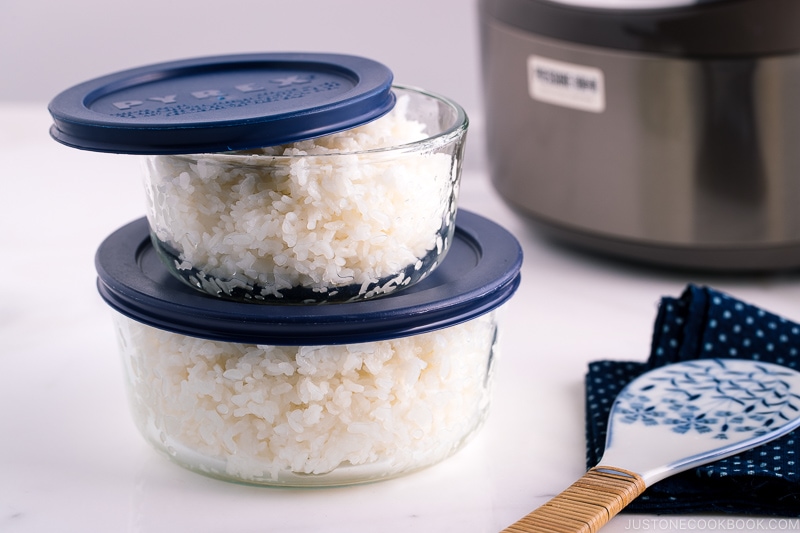
The Best Way to Store Cooked Rice
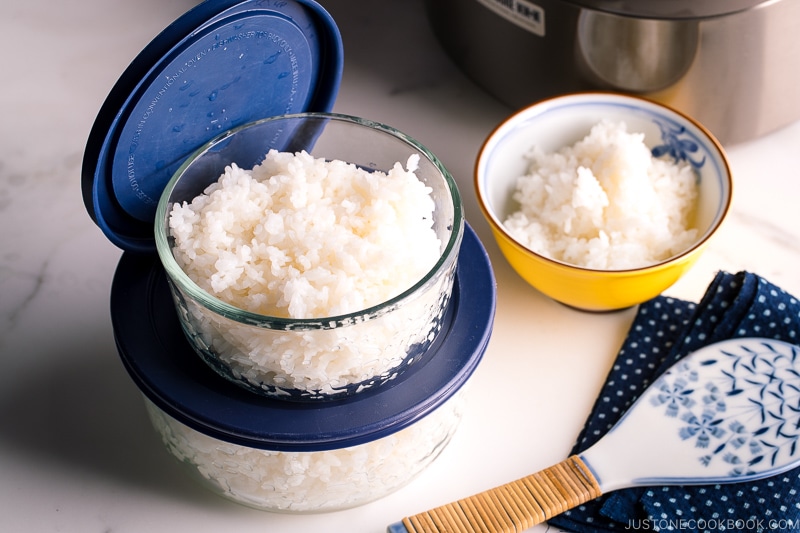
What’s the best method to store cooked rice? Simply freeze the rice in airtight containers and reheat to enjoy later on! This is by far the best approach to keeping your rice fresh and moist.
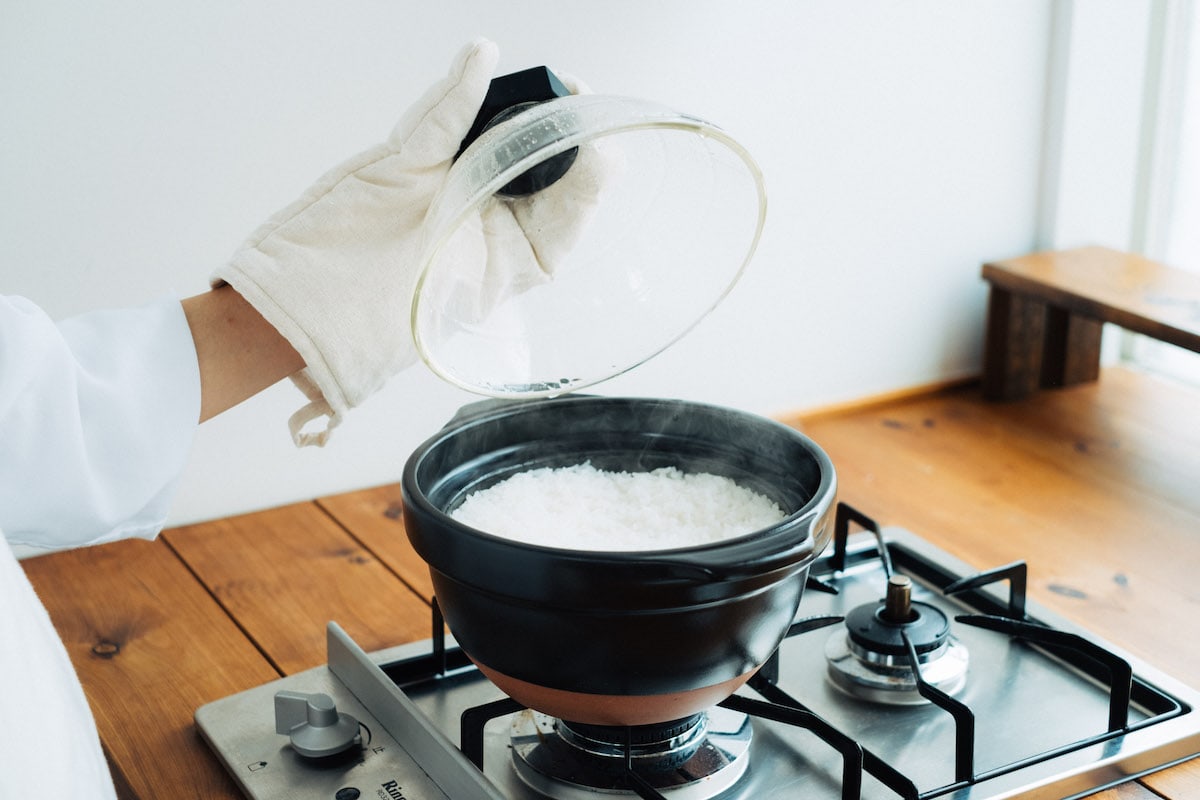
Other Methods of Cooking Japanese Short-Grain Rice
- How to Cook Rice in a Pot over Stovetop
- How to Cook Rice in an Instant Pot
- How to Cook Rice in a Donabe (Japanese Earthenware Pot)
My Favorite Rice Cooker
Those of us who live outside of Japan don’t have too many (fancy) choices. Since I came to the US, I’ve been using only Zojirushi brand rice cookers (3 of them).
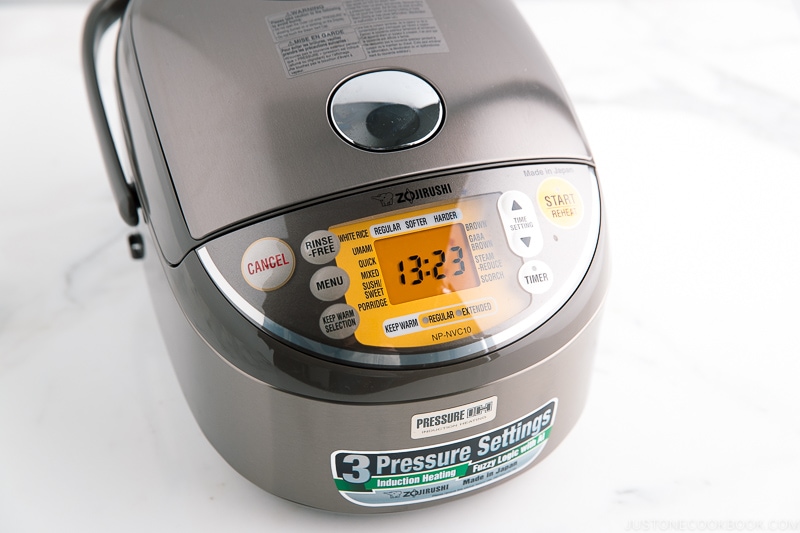
This is my current rice cooker by Zojirushi. It is a Zojirushi Pressure Induction Heating Rice Cooker & Warmer (5.5 cups).
As we eat rice at home almost every single day, I depend highly on a superior-quality rice cooker to cook the perfect rice for my family.
Zojirushi rice cooker uses pressurized cooking and AI (Artificial Intelligence) to cook rice. It also has a platinum-infused nonstick inner cooking pan that brings out the natural sweetness of the rice.
The other features include:
- Automatically selects from three pressure levels according to the menu selected
- Healthy cooking options: brown rice and GABA brown rice settings
- Menu settings include: white (regular, softer or harder), umami, mixed, sushi/sweet, porridge, brown, GABA brown, steam-reduce, scorch, rinse-free and quick cooking
- Made in Japan
With this rice cooker, I’ve never once needed to worry about dry or mushy rice. It is absolutely one of the must-have kitchen gadgets I can’t live without!
If you’re interested, you can purchase the rice cooker on Amazon.
Delicious Rice Recipes
- How to Make Sushi Rice – You need sushi rice (seasoned rice) to make all kinds of sushi!
- How to Cook Short-Grain Brown Rice in a Rice Cooker
- Takikomi Gohan (Mixed Rice)
- 12 Donburi (Rice Bowl) Recipes
- Onigiri (Japanese Rice Balls)
- Shrimp Fried Rice
I hope you’ve found the above tips helpful. I’ve also included more topics on rice after the recipe below. If you have more questions, leave me a comment below!
Wish to learn more about Japanese cooking? Sign up for our free newsletter to receive cooking tips & recipe updates! And stay in touch with me on Facebook, Pinterest, YouTube, and Instagram.
How To Cook Rice in a Rice Cooker
Ingredients
For 2 Rice Bowls (2¼ cups, 330 g cooked rice)
- ¾ cup uncooked Japanese short-grain white rice (1 rice cooker cup; 180 ml)
- ⅞ cup water (200 ml)
For 4 Rice Bowls (4⅓ cups, 660 g)
- 1½ cups uncooked Japanese short-grain white rice (2 rice cooker cups; 360 ml)
- 1⅔ cups water (400 ml)
For 6 Rice Bowls (6⅔ cups, 990 g)
- 2¼ cups uncooked Japanese short-grain white rice (3 rice cooker cups; 540 ml)
- 2½ cups water (600 ml)
For 8 Rice Bowls (8¾ cups, 1320 g)
- 3 cups uncooked Japanese short-grain white rice (4 rice cooker cups; 720 ml)
- 3⅓ cups water (800 ml)
For 10 Rice Bowls (11 cups, 1650 g)
- 3¾ cups uncooked Japanese short-grain white rice (5 rice cooker cups; 900 ml)
- 4⅛ cups water (1000 ml)
Instructions
Before You Start…
- Please note that Japanese short-grain white rice requires a soaking time of 20–30 minutes. The rice-to-water ratio is 1 to 1.1 (or 1.2) for short-grain white rice. Please read the blog post for a detailed explanation. ¾ cup uncooked Japanese short-grain rice is 1 rice cooker cup (150 g, 5.3 oz), which yields roughly 2¼ cups (330 g) of cooked rice. This is enough for 2 Japanese rice bowls (typically 150 g each) or 3 onigiri rice balls (typically 110 g each). 1 cup of cooked white rice weighs about 5.3 oz (150 g).
- To make Japanese brown rice, see my post How to Cook Short-Grain Brown Rice in a Rice Cooker.
To Wash the Rice
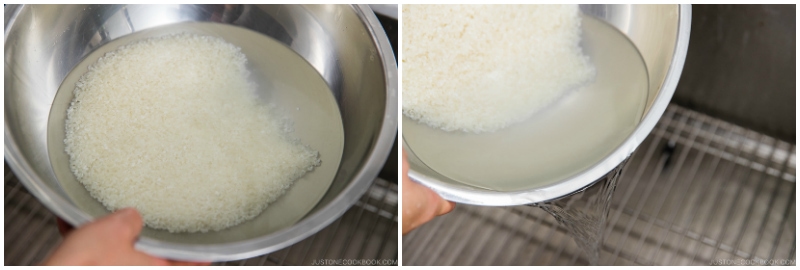
- Measure: Overfill a US cup measure (a ¾-cup measure works well for this) or a rice cooker cup with uncooked short-grain rice and level it off. Put the rice in a large bowl. Repeat until you have the measured amount of rice needed. Here, I‘m preparing 3 rice cooker cups (2¼ cups, 540 ml) of white rice.

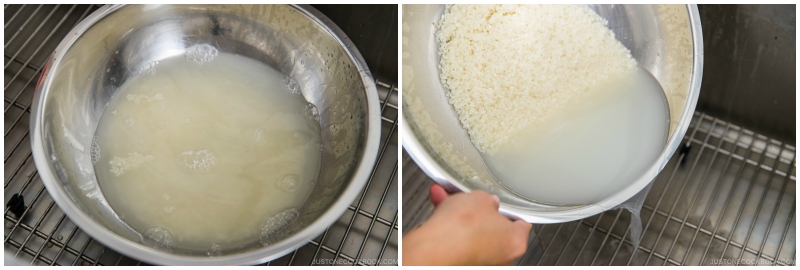
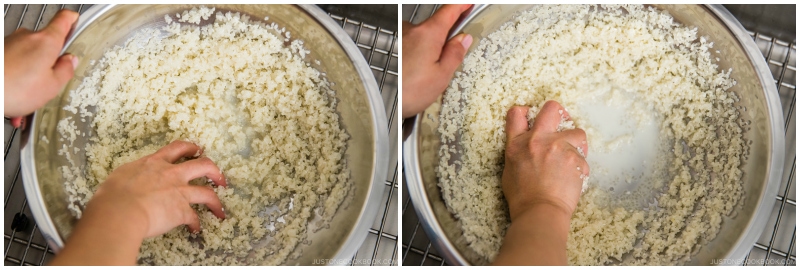
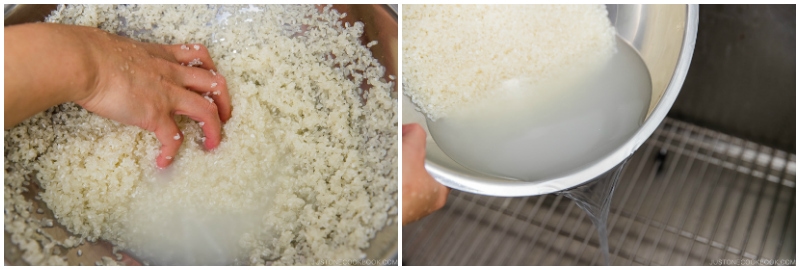
- Quick Rinse: Add just enough water to the bowl to submerge all the rice. Then, discard the water immediately. Repeat one more time. Tip: Rice absorbs water very quickly when you start rinsing, so this step helps remove impurities from the rice and prevent it from absorbing the first few rounds of milky water.
- Wash: Next, use your fingers to gently agitate the wet rice grains in a circular motion for 10–15 seconds. Using very little water allows the grains to rub against each other. It also reduces the absorption of impurities from the milky water.
- Rinse: Add water and immediately discard the cloudy water. Repeat one more time.
- Repeat Wash and Rinse (steps 3 and 4) two more times.
- Drain: When the water is almost clear, drain the rice very well. Tip: Use a fine-mesh sieve to drain and shake off any excess water.

To Soak and Cook the Rice
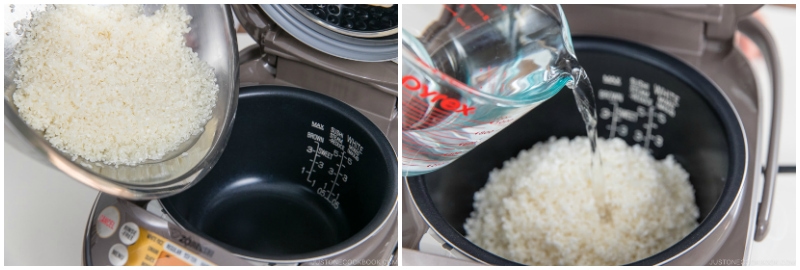
- Transfer the well-drained rice to the inner pot of a rice cooker (I use the Zojirushi IH). Add the measured amount of room-temperature water (600 ml for my 3 rice cooker cups) to the pot. The water must not be warm or hot. Level the rice with your fingers so that it's evenly submerged in the water.
- Soak the white rice for 20–30 minutes (especially if you‘re using an older rice cooker). Then, select your menu and press Start. Tip: Even though my rice cooker includes soaking time, I still soak my white rice for 20–30 minutes before I start the cooker. Note: This Zojirushi rice cooker takes 55 minutes to cook 3 cups of Japanese short-grain white rice; the program includes 10 minutes of soaking time and 10 minutes of steaming time.
- When the rice is done cooking, let it steam for 10 minutes (if your rice cooker program does not include steaming time.) Open the lid and fluff the rice with a rice paddle.
To Store the Cooked Rice
- Transfer the rice to airtight containers and close the lid to keep the moisture in. Let it cool completely before storing the containers in the freezer (read my tutorial post).


How long does it take to cook brown rice in your rice Cooke?
LIKED and LOVE Your FACEBOOK PAGE!!
Thanks for the tips on storing rice & the details on the Handling & proportions of water to each type of rice.
Rice is eaten daily by Asian .
A lot of effort is put into the dishes but having the rice cooked well is o very important.
Thanks again .
Have a great safe day !
Hi Laiming! I’m so glad that this post is helpful. Thank you for your kind feedback! 🙂
Hello! If I use the Zojirushi rice cooker, should I follow the water level markings? Or is it better to follow the ratio that you’ve shared? Also, when I cook my rice, somehow there’s always a like a thin film when the rice starts to cool. Initially I would assume it is excess starch, however I tried rinsing my rice multiple times and ensuring that the water was much clearer before I place it into the rice cooker. What do you think the issue is? 🙂 Thanks!
Hi Eunicey! You can follow the Zojirushi rice cooker watermark. Depending on your rice, you really need to adjust though. For example, we’re used to cooking with a little bit more water with the rice we use (and also we prefer more moist rice than drier rice). When I cook 2 cups, I add water to 2.5 cups, and soak for 30 minutes before I turn on the machine (or set timer). So if you’re going to follow the watermark, try making once and see if the waterline is good for you and adjust. Just make sure you soak Japanese short grain rice. 🙂
A Japanese friend taught me the method she used passed down from her grandmother. After the rice has been soaked and transferred to the rice cooker she adds enough water that the amount of water above the rice is the equivalent of a flat hand. Perfect rice every time.
Hi Donna! Thank you for sharing! My grandma used to do that too. 🙂
I wound up– after over 15 years of doing Japanese “bachelor” cooking (in other words, simpler things for a single guy without as much access to some ingredients as I might like!) with cheap 20 dollar rice cookers (you know, the simple pot + lid with a heating plate at the bottom, that have a cook setting and a warm setting, and that’s it)– taking the plunge and buying a Zojirushi.
It’s not as advanced as the one you describe above, but it’s smaller (3 cups is big enough for me), has the fuzzy logic and digital things, a bunch of settings, and instead of cooking with only heat from the bottom, says that it cooks with heat from all sides, including the lid. No pressure, no induction heating, but a heck of a lot more advanced than what I had been using.
Also, a heck of a lot more expensive, at 140$ USD compared to about 20$ at the local Walmart for a simple pot type…
AND I LOVE IT. The difference in my rice is amazing! Yeah, it cost a lot more than I would have normally spent, but I figured “Hey, I’m old now, who’s gonna complain?” Not me, for sure!
It’s also got a setting that you would probably never use– for Long Grain White rice. Not all my cooking is based on Japanese cuisine, I live in the southern US, and there are a few recipes that simply don’t taste (or feel!) right with Japanese rice, I’m afraid. The texture and separate grains of Long Grain are kinda a part of a Jambalaya or for New Orleans style Red Beans and Rice, for example. But I tend to use Japanese rice for almost everything else, and oh boy does this make a difference there. (Well, it also makes a difference with the long grain.)
Just thought you’d like to know one of your readers has upgraded to a real rice cooker after a while, and does not regret it in the least. (And everyone else, what are you waiting for? If you can afford it, throw your money at Zojirushi right now!)
Hi Robert! Hahaha!!! Your comment brightened my day and thank you for sharing your experience with me and my readers. Because Zojirushi lasts for a long time, I rarely get to update to a newer model, but I truly enjoy my latest one (pressure cook function) and see the difference from my previous one (IH). I thought IH was pretty good! It’s really interesting how technology keeps improving and the same rice tastes better and better. Thank you again for sharing!
I’m sure this is common knowledge for most people who grew up with rice as a staple in their diet, but coming from someone who didn’t – WOW. What a world of difference the soaking makes! I just reheated leftover rice, which I stored in the freezer according to the directions, and it reheated beautifully! No burnt pieces, and it tasted like I had just made it. Fantastic, informative post 🙂 Thank you!
Hi Judy! Aww thank you so much for your kind feedback. It meant so much to me! Enjoy the delicious Japanese rice whenever you want, by freezing it. We always have some in the freezer. 🙂 Thank you for soaking the Japanese rice. It’s so important and most people (or instructions) don’t stress enough. 🙂
Hello. I find the water/rice ratio here a little confusing. Early in the article, it says:
“ If you want to use a 1:1 ratio, the rice must be soaked in separate water for 20-30 minutes and then drain well before adding the measured (a 1:1 ratio) water.”
However later on, you state that rice must *always* be soaked, even when using the 1:1.1 (or 1.2) ratio.
Could you please clarify how to use the 1:1 ratio successfully?
Thank you.
Hi Caroline! I apologize for the confusion. First thing first. Japanese rice requires soaking and it’s a must.
In Japan, we only follow the 1:1.1 (or 1.2) ratio. And my recipe goes by this.
Now, online recipes often say Japanese rice to water ratio is 1:1, which I do not follow, if you measure 1 part of rice and 1 part of water and cook.
I would only agree 1:1 ratio IF you soak the rice first in separate water (this is not your measured water, just random water from faucet), let the rice absorb water fully, then add the measured 1 part water. What you just did is making sure rice has additional moisture (not coming from 1 part water).
Most recipes online DO NOT do that. So the 1:1 ratio does not make ideal Japanese rice because you’re missing extra water that required for the rice to absorb before cooking.
Hope this makes sense. I’m sorry my English is not very good. Let me know if you have more questions. 🙂
I rephrased the section of the post. I hope it’s clear now…
Hello Nami, I was wondering if the water ratio is to the soaked rice or the prewashed dry rice! Thank you in advance, Annie
Hi Annie, If you measure the uncooked/unwashed Japanese rice, Please use 1:1.1 (or 1.2). If you measure the rice after you soaked the rice in water, Please use 1:1. The 10% difference is for the water to soak in the rice. We hope this helps!
Hi I am Noriko. Thank you for putting Rice cooking episode. My husband is insisting to use IP but I am saying that don’t through away the rice cooker.
Now it is clear that I would like to cook rice in rice cooker. And you agree. Now you made it clear I should not through the rice cooker.
Hi Noriko! You can purchase the non-stick inner bowl for IP then it’s like rice cooker. However, it’s nice to cook rice in a rice cooker while you make a main dish in the instant pot. 😊
My rice steamer does not have sushi measures marked. If I use 150 g of rice should I add 200 ml of water to the wet, drained rice? In other words, the total water will be whatever remains with the rice after washing and draining plus an ADDITIONAL 200 ml of water?
Hi Richard! Yes, you’re correct. 200 ml water is going to the pot along with rice that’s rinsed, soaked for 20-30 mins, and drained completely (no excess water). 🙂
Hi Nami! Nikki J. From Idaho again.
I literally just fluffed the rice from your recipe and I think I’m in love. I’ve been experimenting with rice for the last 2 + years and have settled on your recipe. I purchased Japanese short grain rice from Amazon because while we were in Boise last, all of the Asian markets were between shipments and had nothing in stock! I have loads of medium grain and long grain rice but I wanted to try authentic Japanese short grain rice. Tamanashiki Super Premium, 15 lb bag is what I bought. Now, I have to find bigger bags!! It’s perfect. I have to admit, when I read the rice -to- water ratio, I was a bit sceptical but silly me…. “NEVER entertain scepticism when it comes to one of Nami’s recipes!” Even my husband, who hates mushy, flavorless rice (actually wouldn’t eat it at all until I started cooking East Asian cuisine), thought it came out perfect. Now, I don’t have a big, beautiful, fancy Zojirushi rice cooker, or a Tiger or any other Japanese machine, I have an Aroma BUT….. it works just fine. Although……if someone wanted to GIFT one of those beautiful cookers to me, you would NOT hear me complain!! Hahahahaha! Thank you again Nami for another fan-tabulous recipe! Keep ’em coming. ; )
Hi Nikki! Aww I’m so happy to hear you enjoyed the Japanese rice! I really enjoy reading your Japanese cooking journey in Idaho! I know it’s not so easy to find ingredients without buying online, and I really appreciate that you are trying to cook Japanese food with authentic ingredients. 🙂 xo
My Zojirushi induction rice cooker says in the manual that I do not need to soak rice (no matter what kind), but that all I need to do is wash it and then add the right amount of water. The manual says soaking it will give “softer rice” but is optional. THIS IS NEWS TO ME. Right? Every Japanese cook I have met or read recipes from soaks Japanese rice for at least half an hour before cooking it, and this is how I teach every friend how to make Japanese rice when they don’t know how. I thought maybe this claim has something to do with the induction heating cooking the rice from all sides at once (do the non-induction models say in the manual that you can cook without soaking?), and maybe it is a “feature” of my new rice cooker, even though it is different from what I learned. So of course, I had to try it (for science).
The rice came out fine, and yes, a little firmer than I’m used to (more firm than I prefer, but definitely fully cooked). It makes me wonder, if I do not soak the rice, then use “softer” cooking setting, will I get rice that is the same as if I did soak it and used the “regular” setting? Hmmmm. Unfortunately, I only have one rice cooker, so I cannot make the rice side-by-side to compare. I feel that is the only way I would be able to tell the subtle differences exactly, but I’m sure every factor you change will result in slightly different rice. For example, to me it seems like rice is a better texture if you cook at least 1 cup. You can cook 0.5 cups in my rice cooker, which is handy for me sometimes when I just need one meal for myself, but the rice seems just slightly less luxurious in the end, or is it just my imagination? ????
I will have to do some more experiments with not soaking the rice first (and use different cooking settings) and pay very close attention to the results. I suspect that it will always be a little less good than rice that is soaked first (because Japanese cooks recommend this, and to me it makes sense that doing this will “open” up the rice texture to prepare it for cooking), but I guess it’s good news that if I’m in a hurry I can still get edible rice on the table without having to soak it first… and I haven’t even tried the “quick cook” option yet (kind of scared to, lol). The many mysteries of cooking…
Hi Lion! The recent rice cookers do include the soaking time in their programmed time (may not be ALL rice cookers), so if your rice cooker instructions say it does, you don’t have to. But I would suggest to try with your rice. Rice is quite different from one type to another, and I do adjust based on rice I get (first time is always finding out). When I don’t have time, I skip soaking time, and I even use “Quick” cooking instead of regular time. In that case, I usually add extra water (if it’s 2 cups, I would add 2.5).
My rice cooker has different functions for cooking – Regular, Softer, Harder, and I find my “regular” quite dry, so I add extra water for my rice (even new crop) and usually cook at “Softer”. So my point is that you have to figure out what is your perfect setting based on rice, water, soaking time, and cooking time (your program selection). 🙂
And it’s true that rice is best to cook more than just 1/2 cup, or even 1 cup. The reason is that there will be a lot of steam even a small amount of rice, and the surface of rice gets cooked too fast while inside won’t be cooked through. Or something like that. I do minimum 2 cups and freeze the rest if we have leftover.
Have fun experimenting! 😀
I have one question…
We have a Tiger rice cooker that we have been using for years and it will do both Japanese (Short grained white) or traditional Chinese Jasmine rice to perfection in ~12 minutes + 5 minutes sit time. I think we paid around $90 USD for it. I was looking at the higher end cookers (~$300+ USD) and the manuals say it would take ~40 minutes for the same. What is the reasoning for that?
Hi NeilVN! I have one of those “high end” rice cooker, and it takes 40 mins for regular cooking, but quick cooking mode is much shorter time (I never checked exactly how long). So you have the option of quick cooking.
I think the newer rice cooker is all about enhancing the rice. Japanese people are CRAZY about the rice. The quality of rice itself is one thing, but how the rice cooker cooks the rice is another thing. The rice cooker which makes the rice fluffy and moist, shiny, and all the stuff… wins. More expensive rice cooker also has thicker inner pot and the materials are a lot nicer, using the technology as earthenware pot cooking method. The heat distribution and everything matters… so I actually believe the rice cooker is evolving to make much better rice than before. Though, there are some rice cookers that cost over $1000 in Japan. I personally think that’s a bit too much…. 😀
Thanks for the feedback Nami,
We have been using that toaster style Tiger cooker for a while; and while it works well (once you get it down to a science) we would rather have something that beeps at us and not babysit it.
Outside of the Japanese cooking; the wife (and family) is Chinese so we cook rice in various forms every day and buy it by the 50 lb. bag. The extra features wouldn’t be wasted.
I get the “time vs quality” and probably missed the “quick mode” in the manuals I downloaded; for when you just want to “get it done now”. Just didn’t want to be paying for software 😉
Thanks for the response!
You’re welcome! Haha. I use my rice cooker everyday, and I especially love the timer setting (as I make lunchbox for my kids and it’s nice to set timer before going to sleep or dinner time so rice is already being cooked). My first rice cooker was a cheaper version of Zojirushi with inner pot was really cheap material. When I changed to current one, I definitely noticed the quality improvement of rice (even tho using the same rice). Having really good rice is important to me. 😀
I’m just a little confused. Do you fill water to the sushi line, or white rice line? Your picture doesn’t look like it is either.
Hi Amanda! We only use Sushi Rice measuring when you make sushi rice (rice that we use for making sushi). Sushi rice is made with steamed rice seasoned with sushi vinegar. But in outside of Japan, people call Japanese rice “sushi rice” which could be confusing to some…
Hope this helps!
Hi Nami,
Is there a reason why you specifically said to not wash the rice in rice cooker’s bowl? My hubby loves to do this because it saves him one less bowl to wash after dinner.
Hi Dora! It’s recommended not to do that. The rice cooker bowl nowadays are very expensive and may get scratches while you are washing/handling and coating may come off. Usually rice cooker company sells the bowl for replacemenet, but it is very expensive, so it’s recommended to keep it just for cooking. Also you need to drain in a sieve, so you don’t really need the rice cooker bowl until later on. Hope that helps. 🙂
Look up Japanese Rice Washing Bowl on an online store (like Amazon) and you will find some very cheap and awesome ones in either plastic or metal that have a built in strainer on one end where you can tilt the bowl to drain. I found one of these at my local Asian market and it has been a lifesaver. I used to wash the rice in my rice cooker pot and it gradually made the numbers and lines wear off. Now that I have a new rice cooker, I will never be doing that again!
Thanks for the tip, Lion! I’ve NEVER seen this bowl (https://amzn.to/2LXHDcx) until now! Wow!!!
If you get the stainless steel one, Nami, let me know how you like it! I have one of the clear plastic ones. I love that it has little nubs and ridges along the inside of the bowl to help clean the rice, but I would certainly be interested in upgrading to the stainless steel one if it’s good!
I’m very tempted (you can imagine all the kitchen tools I have in the kitchen for just one job)!!! But at the same time I’ve been rinsing rice since I was before my age is two digit and I kind of have my own way of doing it, so it doesn’t bother me. I just wish that someone invented this a lot sooner. 😀
Thanks Lion and Nami, I just ordered the stainless steel one using your link: last in stock on Amazon! I look forward to using it to help me with soaking and washing 🙂