Make fresh Homemade Mochi (Japanese rice cakes) using a stand mixer and an electric rice cooker! Stuff the mochi with your favorite dessert filling, dip it in a savory or sweet coating, or enjoy it in red bean soup or Japanese New Year soup (ozoni).
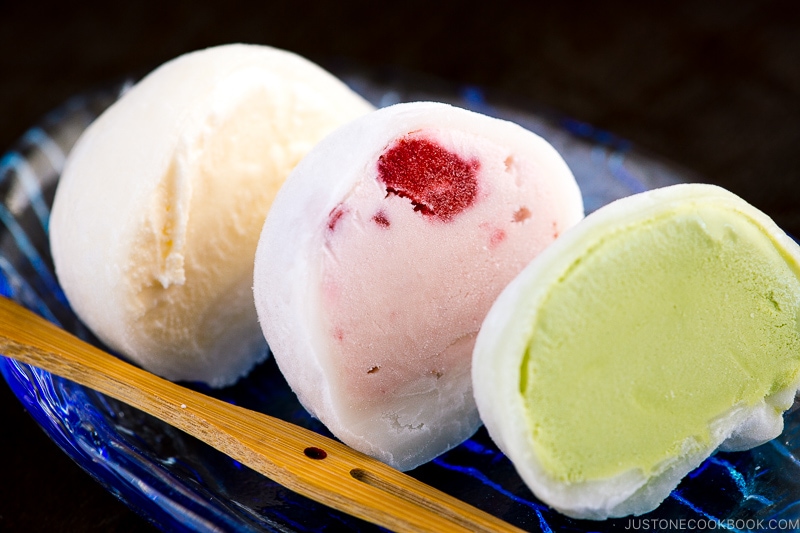
Sticky and chewy Mochi (餅) is irresistible. Whether it’s Mochi Ice Cream, Strawberry Daifuku Mochi, or mochi enjoyed during traditional Japanese New Year, these elastic wonders of glutinous rice cakes have captured the hearts of people worldwide. In the US, you can even find the mainstream mochi creations at major grocery stores like Trader’s Joe and Whole Foods.
Today I’ll show you how to make fresh homemade mochi with a rice cooker and a stand mixer. It is a fairly easy affair, but I do want to warn you – mochi is super sticky and the process can be a handful. Don’t let that stop you though because there is nothing like eating freshly pounded mochi! They are smooth, springy, and tactile. A nostalgic reminder of my childhood and all the happy memories in Japan.
Table of Contents
What is Mochi?
A fun fact: Mochi (餅, もち) is often pronounced as [MO-chi] in English, but we actually pronounce it [mo-CHI] in Japanese.
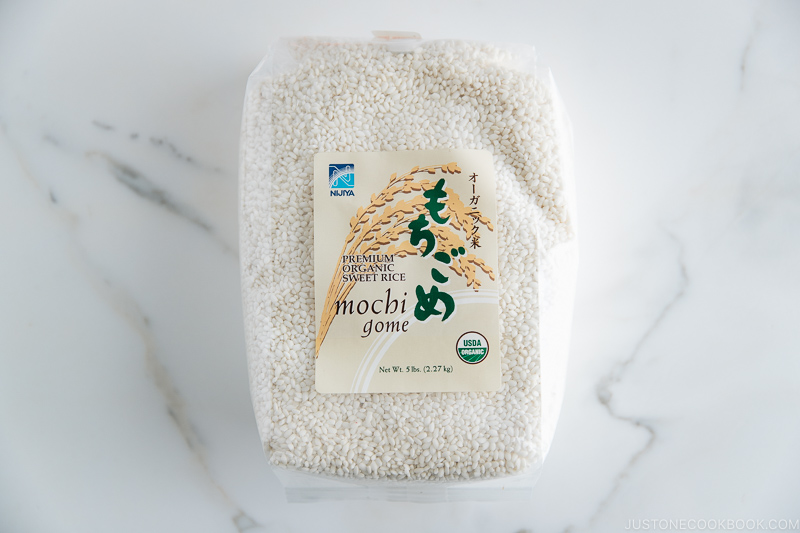
Mochi is a Japanese rice cake made of mochigome (糯米), a short-grain glutinous rice*. It’s naturally white, sticky, elastic, and chewy. It tastes like rice without filling or coating, but mochi is all about the texture. There is no other food that has this unique texture similar to mochi.
Outside of Japan, mochi seems to be associated with desserts like mochi ice cream and mochi stuffed with a sweet filling. However, when the Japanese hear the word “mochi”, it usually implies the plain mochi that can be used for both savory and sweets. Think of it this way: if steamed rice is one form of rice, then mochi is another form of rice.
*It’s sometimes called “sweet rice” although they both mean the same thing. I’d just call “glutinous rice” in this post.
How Mochi is Made
Traditionally, glutinous rice is first steamed, then transferred into a usu (臼), a large Japanese stamp mill, and pounded with a pestle called kine (杵). This mochi-pounding event is called mochitsuki (餅つき).
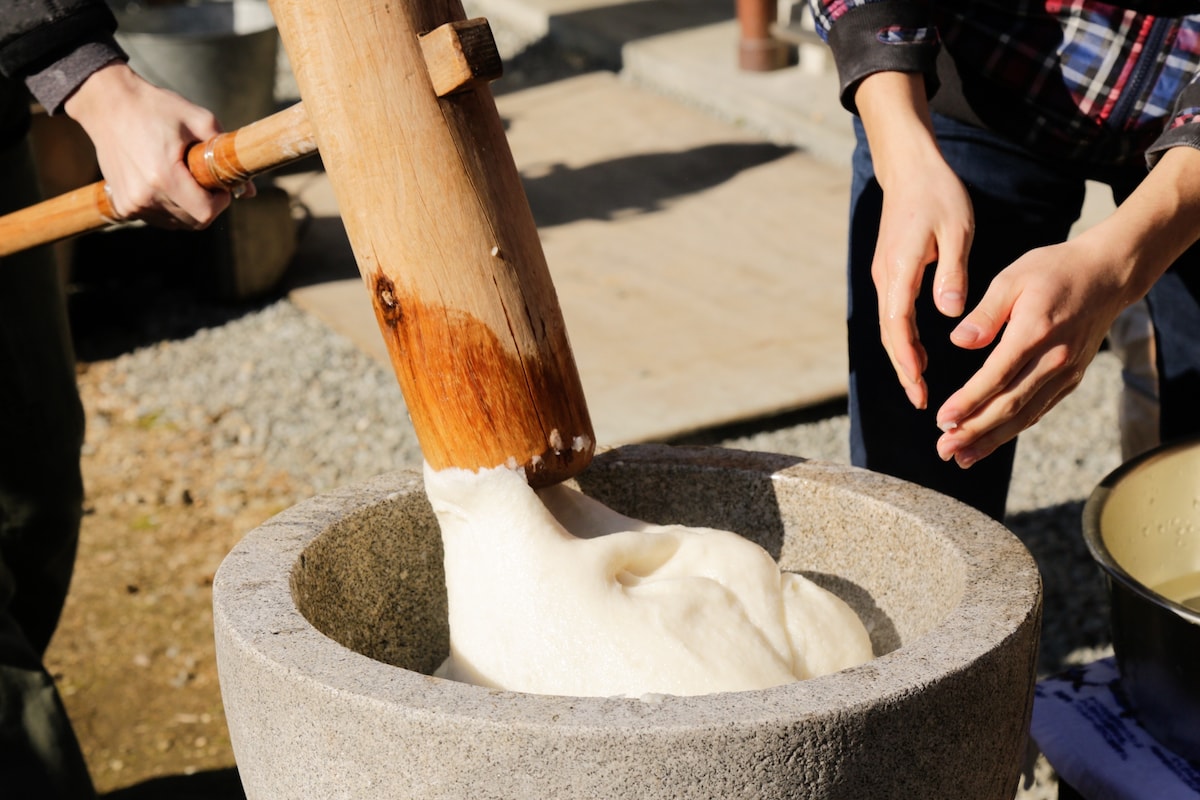
The glutinous rice is pounded repeatedly until smooth, sticky, and elastic. Some households own a bread machine with a “mochi making” function, which can cook and pound the glutinous rice (Isn’t it genius?). Some people even own a mochi-pounding machine. Outside the big cities, people still make mochi the traditional way using the family’s heirloom usu and kine. Mochitsuki is a family event that they continue on.
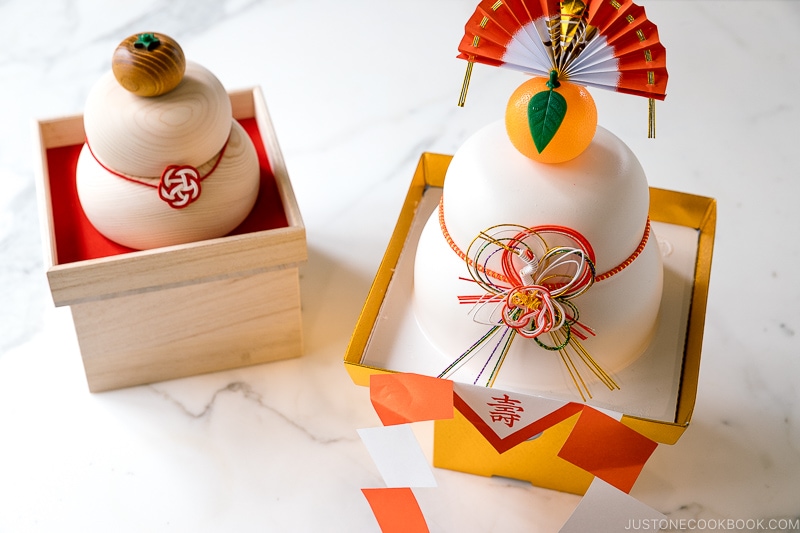
After the mochi is pounded, it is transferred to a working station where you shape it into round mochi balls or make big round pieces used for a decoration called kagami mochi (鏡餅) during the Japanese New Year. Making mochi is a big part of Japanese New Year preparation.
Today we will make fresh mochi with a rice cooker and a stand mixer!
Keep in Mind:
- Mochi is an extremely sticky food. Embrace the gooeyness and have fun!
- Don’t touch mochi with your bare hands/utensils. When kneading and pounding, always wet your hands and utensils. When shaping mochi, make sure your hands are dry and lightly dusted with starch.
- Soak the bowls and tools in water immediately. Mochi will come off easily by the time you clean up.
How to Make Mochi with a Stand Mixer (3 Steps)
- Cook glutinous rice in a rice cooker (or whatever method you use) – Easy
- “Knead” and “Pound” the cooked rice with a stand mixer. – Fairly easy
- Divide and make mochi balls – Mess alert! (just kidding, you can do it)
Note: Instead of using mochiko (glutinous rice flour), we will cook glutinous rice to make the dough in this recipe so it yields the freshest taste.
Step 1: Cook Glutinous Rice
I decided to use a rice cooker method since it’s a standard electric appliance if you cook Japanese or Asian food frequently.
Rice Cooker: You do not need to soak the glutinous rice in water prior to cooking. Just rinse and cook the glutinous rice just like you would with regular steamed rice.
Steamer: Traditionally, glutinous rice is steamed in a steamer because it’s considered the best way. You would rinse and soak the rinsed glutinous rice in water overnight, put the rice in cheesecloth, place it inside the steamer, and steam for 30 minutes.
Instant Pot: You can use your Instant Pot if you have one. Soak the glutinous rice for 1 hour after rinsing, high-pressure cook for 5 minutes, and natural release for 15 minutes.
Pot on Stove: Rinse the glutinous rice, soak for 10 minutes, then put the rice and water in the pot. Start with high heat, and once boiling, mix the rice once and put the lid on. Turn the heat down to the lowest setting and cook for 8-10 minutes. Remove from the heat and let it steam for 10-15 minutes.
Step 2: “Knead” and “Pound” Using a Stand Mixer
At this step, you will need a few things:
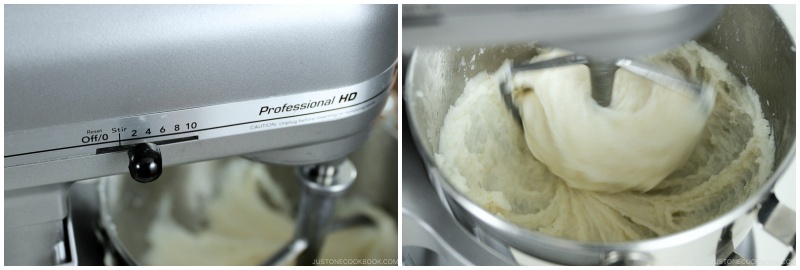
- A KitchenAid® stand mixer – Professional series (This is the only appliance that I’ve tried making mochi successfully many times)
- A timer (your smartphone would do)
- Hot water ready for use
- Silicone spatula (A flexible silicone spatula is easy to scrape down the mochi in the stand mixer)
- A 2-cup measuring cup for soaking the spatula
This stand mixer process involves 2 stages:
- Knead with a dough hook for 3 minutes – repeat 4 times [total 12 minutes]
- “Pound” with a flat beater for 30 seconds – repeat 4 times [total 2 minutes]
Step 3: Shaping Mochi Balls
Here’s what you’re going to do:
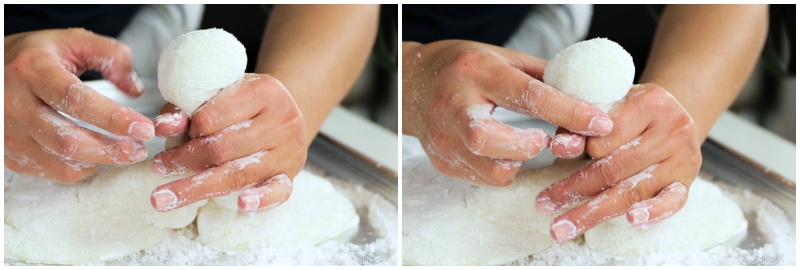
1. Prep your work surface and two rimmed baking sheets. Thinly coat the mochi dough with potato starch (or cornstarch).
2. Pull up a corner and tuck in the edges underneath to create a small mound. Keep pulling and tucking until it’s thick enough.
3. Make a “C” with your well-dusted, left pointing finger and thumb, and then place the “C” fingers on top of the thick corner.

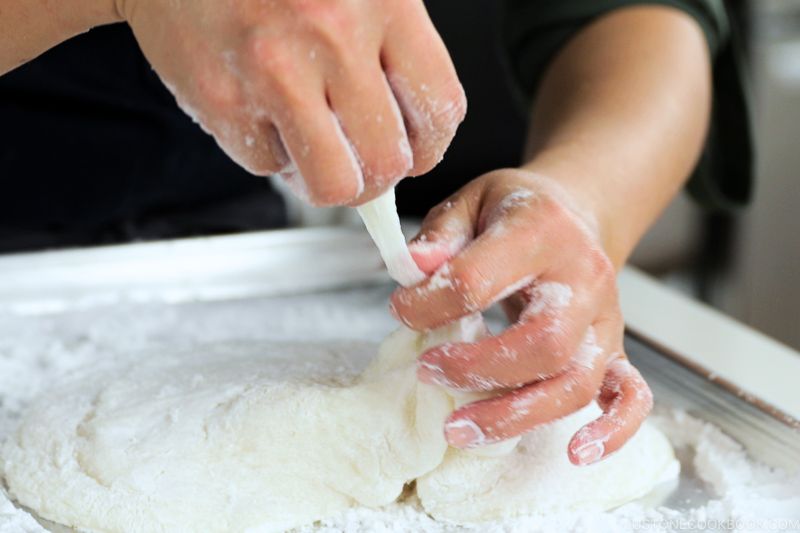
3. With your right hand, tuck and squeeze the mochi into the left “C” fingers from underneath and side to make a ball shape.
4. Once you get a good-size ball shape that’s slightly bigger than a golf ball, pinch the mochi with your left “C” fingers. Use the right hand to twist it off.
When pinching, do not pull the mochi because the sticky surface would appear and your hands would get messy. Instead, use a pinch & twist motion to cut the mochi with two “C” fingers and right hand. Make sure your hands are dry and well-dusted with potato starch.
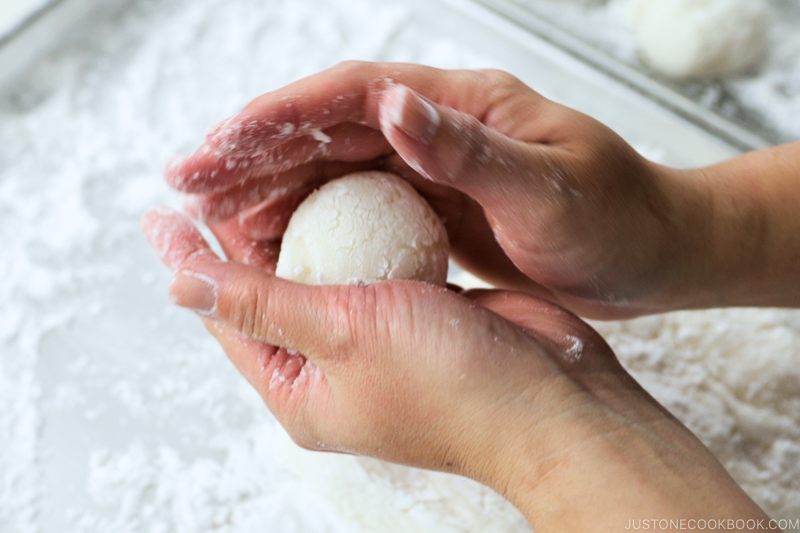
5. Quickly rotate the mochi on dusted hand to cover up the sticky new surface.
REMINDER:
- Handle the areas dusted by starch only and make sure your hands are dry and well-dusted.
- Do not to “pull” the mochi, which creates a fresh sticky surface.
- If you see any sticky surface appearing on mochi, lightly dust a thin layer of starch and brush the excess away. Too much starch would be troublesome when you stuff the filling and close the mochi.
*Please watch my video. Sometimes it’s easier to see in action than reading my instructions.
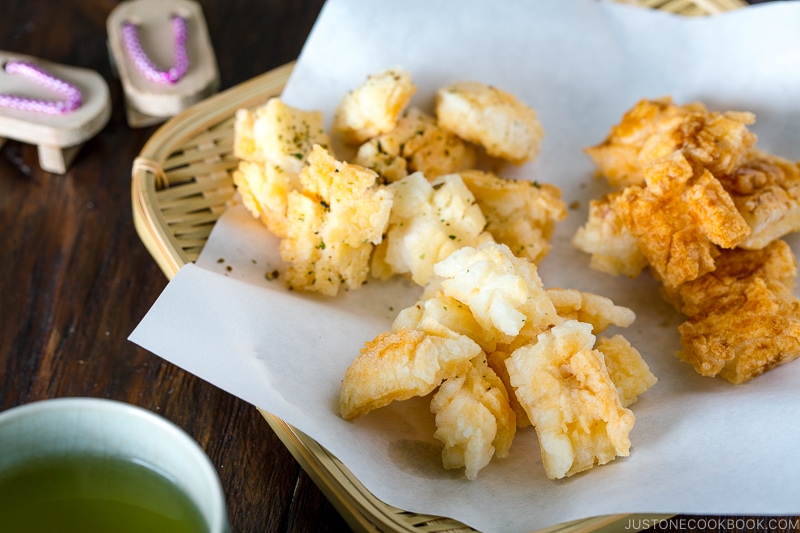
5 Ways to Enjoy Homemade Mochi
There are so many ways to enjoy fresh homemade mochi. Here are some common ways to enjoy it.
1. Put mochi in a soup
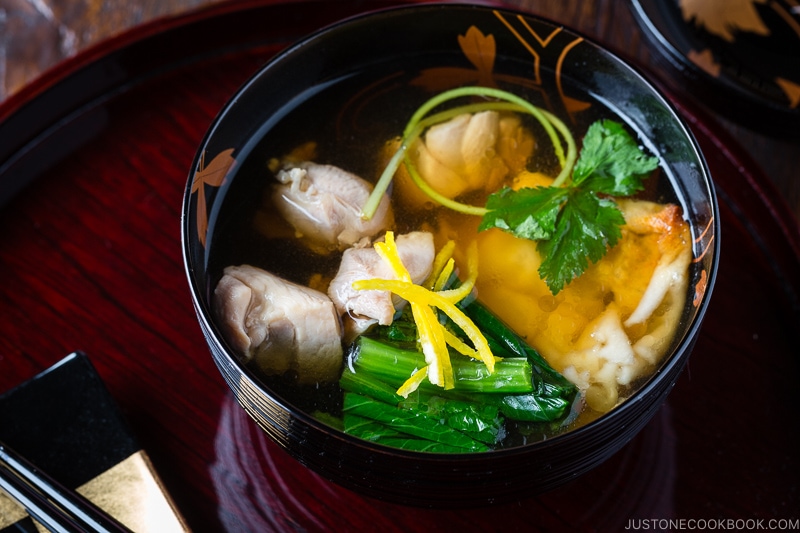
- Kanto (Tokyo)-style Ozoni (New Year Soup)
- Kansai (Osaka)-style Ozoni (New Year Soup)
- Zenzai/Oshiruko (Red Bean Soup)
2. Stuff mochi with a sweet filling
- Anko (Red bean paste) – See the recipe below
- Make the best mochi ice cream with flavors like matcha, strawberry, chocolate, and mango.
3. Coat mochi with a sweet/savory sauce
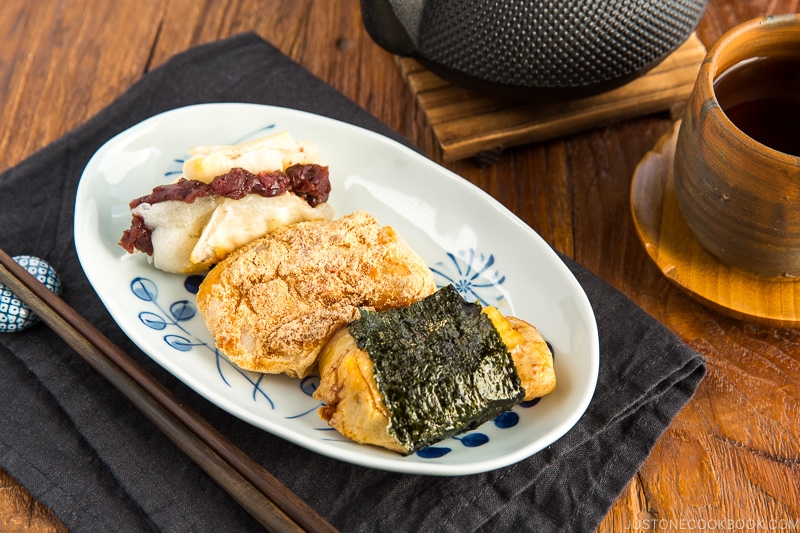
- Kinako (soybean flour) + sugar – See the recipe below
- Soy sauce + sugar
- Anko (sweet red bean paste) – Pressure Cooker Anko or Stovetop Anko
4. Make mochi into Japanese New Year decoration
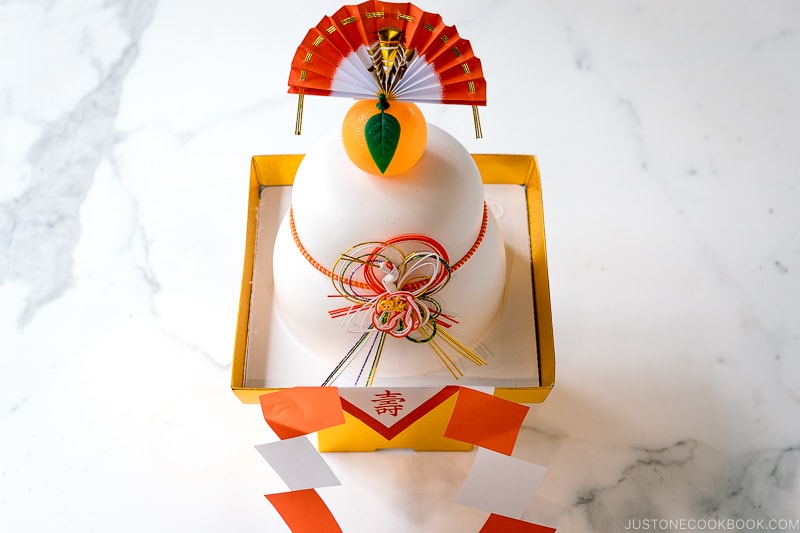
- Kagami Mochi (decorate until 1/15)
5. Make mochi into rice crackers
- Make it flat and air dry until completely dry. Then toast the mochi on both sides in the oven. Brush with soy sauce and air dry. See my Rice Cracker (Kaki Mochi) recipe.
Frequently Asked Questions
1. Can I use other types of rice?
No, for this recipe, I only tried with Japanese short-grain glutinous rice (sweet rice) or what we call, mochigome (もち米).
I had never tried other types of rice such as long-grain glutinous rice, therefore I would not know how much water you need to cook the rice, how long it takes to knead/beat, etc.
2. Can I make a bigger batch?
To be honest, I am not so sure because I don’t think my Kitchen Aid stand mixer would be able to knead more mochi inside the bowl. With 3 rice cooker cups of glutinous rice, it was working hard, and I wouldn’t feel comfortable doing even a bigger batch. So I would suggest making a few batches.
3. How can I keep mochi softer for a long time?
The answer is sugar. If you plan to make sweet mochi such as daifuku mochi, then you should add sugar. I researched, and it recommends using 50-100 grams of sugar for 100 grams of cooked glutinous rice. You will need to add sugar while you’re kneading the mochi. Start with 50 grams and increase the amount as you like. The more sugar you added, the longer the mochi stays soft.
4. Can I freeze the mochi? How long does it last?
Yes, you can freeze the mochi! For the best quality, eat it within a month, but mochi can be kept in the freezer for 6 months if you store them well.
5. Does it taste like freshly pounded mochi made with the traditional method using usu and kine?
I wish! The stand mixer cannot do a real “pounding” motion and the mochi is not 100% made in the same way. However, if my choice was between store-bought mochi vs. homemade mochi, I would choose to make fresh mochi in my stand mixer. It is actually amazing! The mochi’s texture is 95% close to the ones made traditionally. I just wish that it yields a real smooth and silky surface. That said, the difference is not obvious.
Ready to make some mochi from scratch? Time to gather your kids or mochi-loving friends for this sticky, fun and auspicious activity!
Other Mochi Recipe

Matcha Green Tea Mochi – This recipe uses glutinous rice flour and matcha powder, and it’s perfectly chewy with a hint of earthy sweetness.
Wish to learn more about Japanese cooking? Sign up for our free newsletter to receive cooking tips & recipe updates! And stay in touch with me on Facebook, Pinterest, YouTube, and Instagram.
How to Make Mochi with a Stand Mixer
Video
Ingredients
- 2¼ cups sweet rice/glutinous rice (mochigome) (or 3 rice cooker cups)
- 1⅔ cups water (in your rice cooker, the water level should reach the line on the inner pan for 3 rice cooker cups of Sweet Rice)
- potato starch or cornstarch (for dusting)
For the Anko Mochi (optional)
- sweet red bean paste (anko) (store bought, or you can make my Homemade Anko or Pressure Cooker Anko)
For the Kinako Mochi (optional)
- 2 Tbsp kinako (roasted soybean flour) (enough for 2 mochi balls; follow a ratio of 2 parts kinako to 1 part sugar)
- 1 Tbsp sugar
Instructions
Before You Start…
- I created this recipe using the KitchenAid Professional series stand mixer. I cannot guarantee that other equipment will work, as I have not tested it. Please do not use a hand mixer to make this recipe, as the motor is not powerful enough to handle mochi. You can always pound the cooked glutinous rice with a wooden mallet.
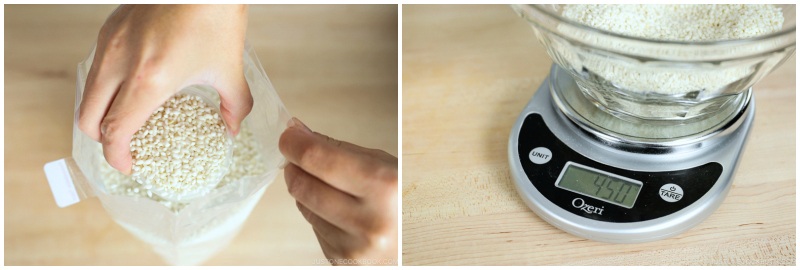
To Measure and Rinse the Glutinous Rice
- Measure 2¼ cups sweet rice/glutinous rice (mochigome). Tip: One rice cooker cup (180 ml) of uncooked glutinous rice is 150 g or ¾ US cup. You will need 3 rice cooker cups (540 ml, 450 g) for this recipe.

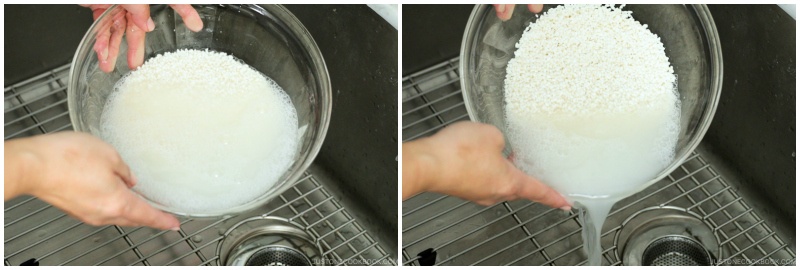
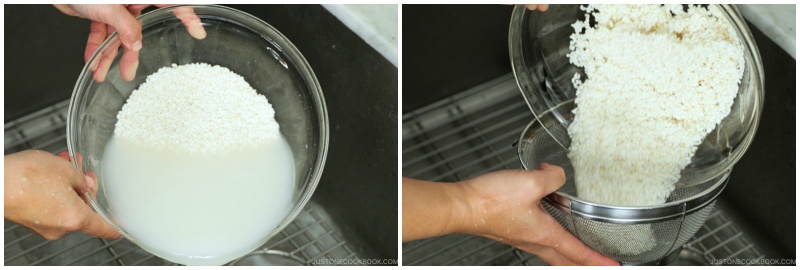
- To rinse the glutinous rice, put the rice in a large bowl and add some water. Stir with your hands and quickly drain the water.
- Then, gently stir the rice with your fingertips. Glutinous rice breaks easily, so do not apply any extra pressure. Just lightly stir it a few times.

- Add more water to the bowl and carefully rinse. Repeat rinsing 3–4 more times. Drain the rice in a fine-mesh sieve.
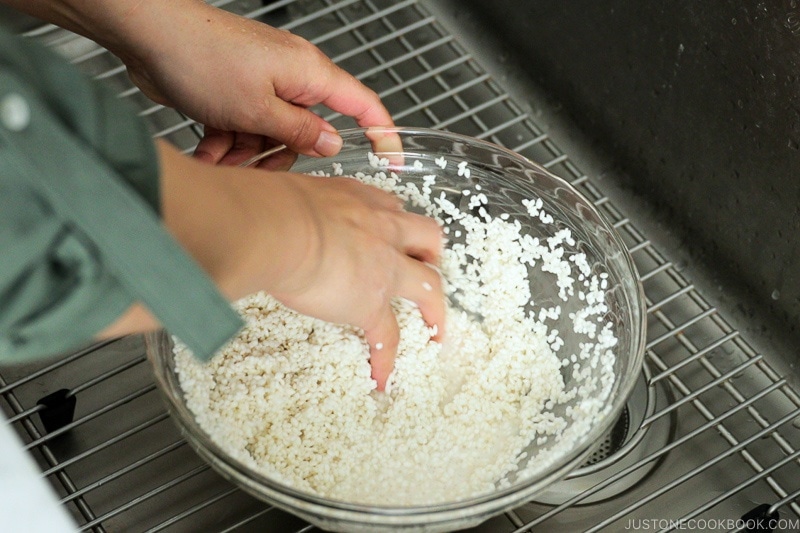
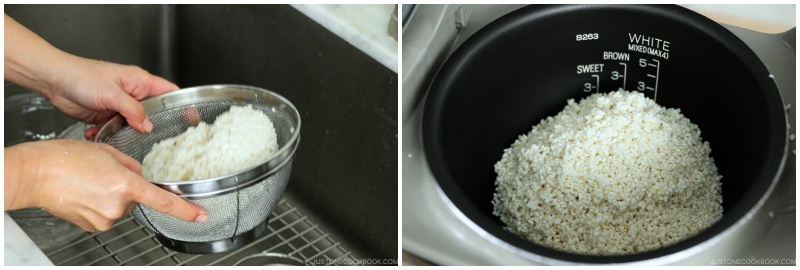
- Shake the sieve to remove the excess water. Then, transfer the rice to the inner pot of a rice cooker.
- Even the level of the rice in the pot and add 1⅔ cups water. The water level should be at the inner pot‘s 3-cup line for Sweet Rice. Evenly distribute the rice with chopsticks or your fingers.
To Cook the Glutinous Rice
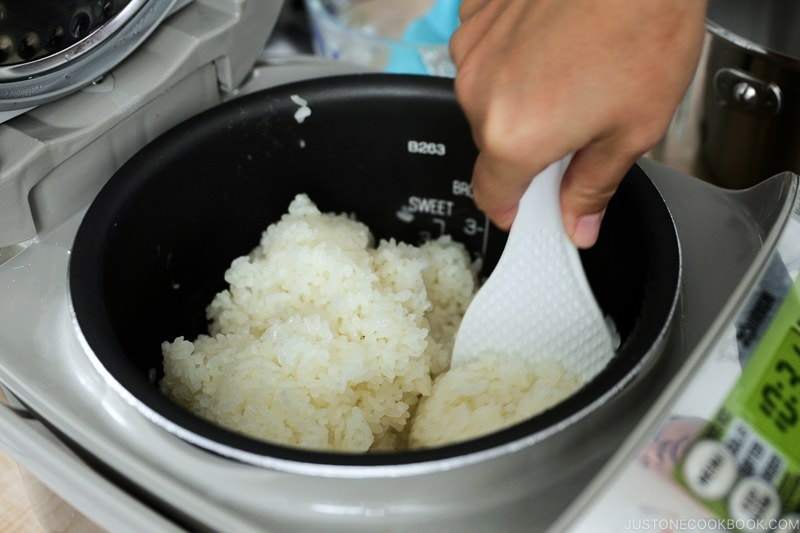
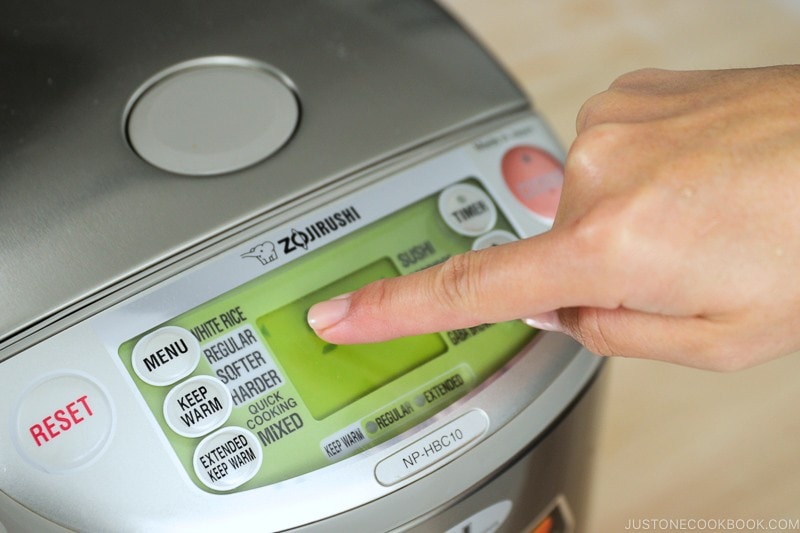
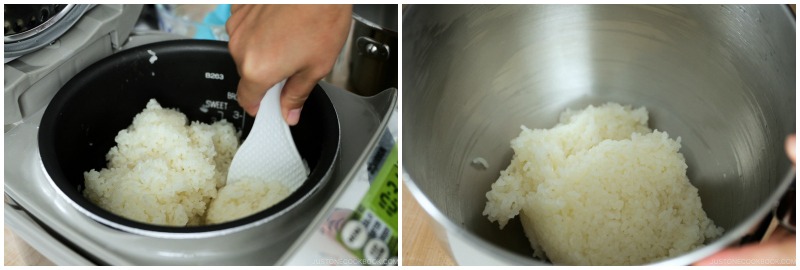
- Close the lid of the rice cooker. Select Regular on the menu and start cooking. Regular mode cooking is usually 5–10 minutes longer than the Sweet Rice setting. When the rice is finished cooking, we can take it out immediately.
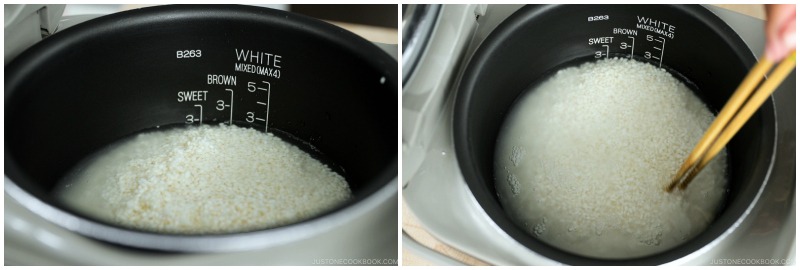
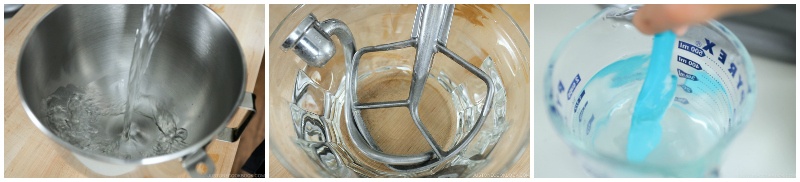
- When the rice is almost done, prepare about 4–5 cups of boiling water. Once the hot water is ready, pour one-third of the boiled water into your stand mixer bowl to warm it up, one-third into a mixing bowl to warm a dough hook and flat beater, and the rest into a 2-cup measuring cup to keep a silicone spatula wet. Make sure there is enough hot water to submerge all the tools.

- Once the mixer bowl is warm, discard the hot water. Then, transfer all the cooked glutinous rice into the stand mixer bowl.
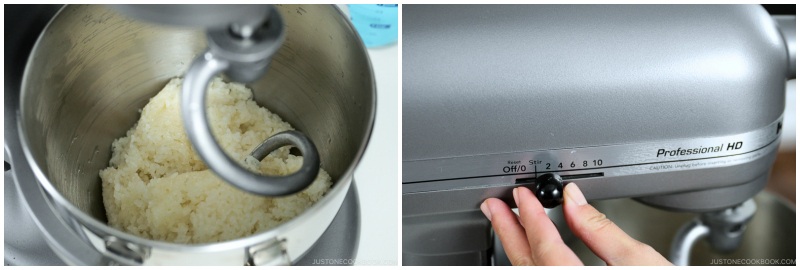
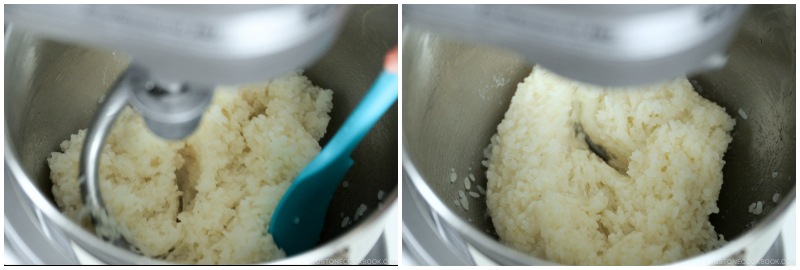
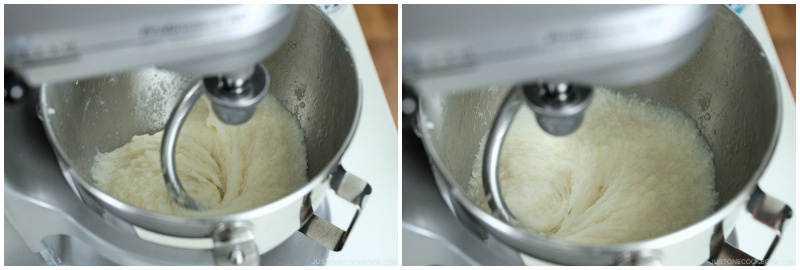
To Knead with the Dough Hook Attachment
- Set the dough hook attachment on the stand mixer. Start kneading the glutinous rice on Speed 2. Set a timer for 3 minutes (first round).
- The dough hook will start pulling in the rice.
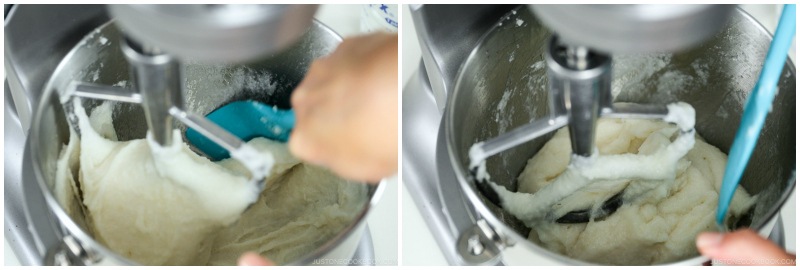
- Tip: While kneading, you can use your wet silicone spatula to detach the glutinous rice from the wall of the stand mixer bowl.
- When the 3-minute timer beeps [03:00], remove the bowl from the stand mixer, keeping the dough hook attached. Using the wet silicone spatula, flip over the glutinous rice. Dip the spatula in the water a few times so it doesn’t stick to the rice.
- Set the bowl back onto the stand mixer and start kneading again on Speed 2. Reset the timer for 3 minutes (second round).
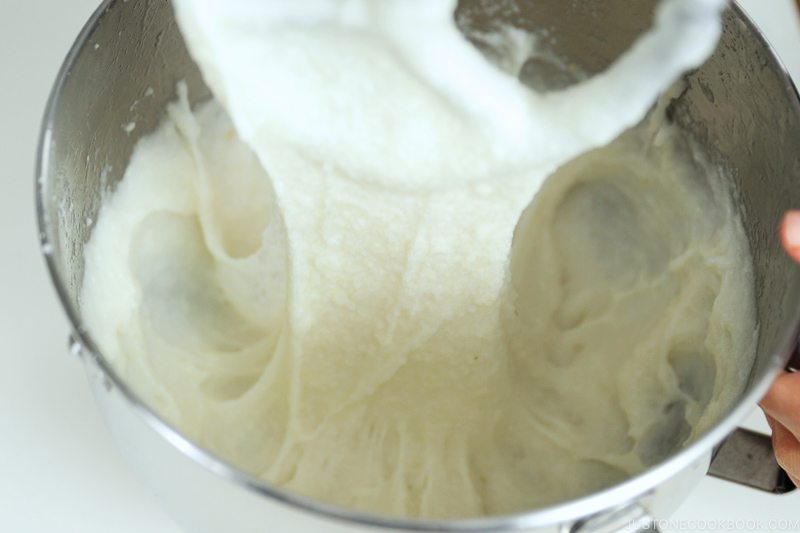
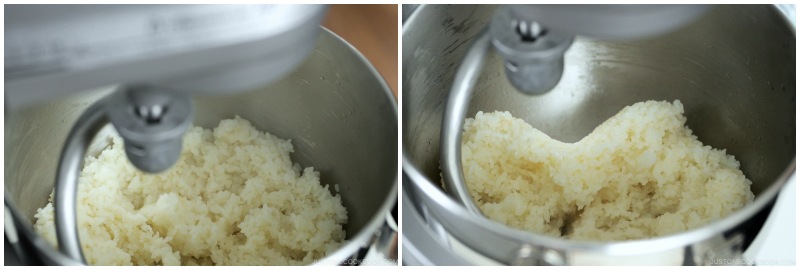
- When the 3-minute timer beeps [06:00], remove the bowl from the stand mixer and flip the glutinous rice again, using the wet silicone spatula. Now, the rice grains are less visible and are starting to look like mochi.
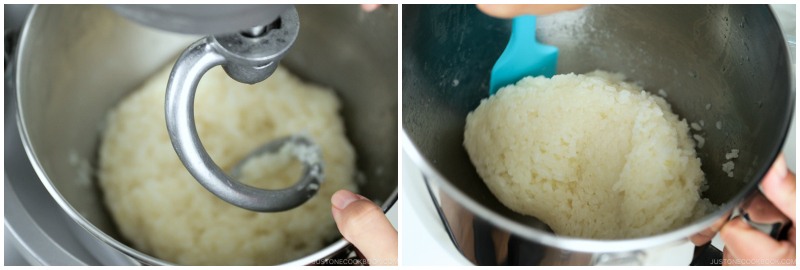
- Put the bowl back onto the stand mixer and start kneading again on Speed 2. Reset the timer for 3 minutes (third round).
- When the 3-minute timer beeps [09:00], remove the bowl from the stand mixer and flip the glutinous rice again, using the wet silicone spatula. Now it’s getting stickier and elastic.
- Put the bowl back onto the stand mixer and start kneading again on Speed 2. Reset the timer for 3 minutes (fourth round).
- When the 3-minute timer beeps [12:00], remove the bowl from the stand mixer and flip the glutinous rice again, using the wet silicone spatula. Now the kneading is complete.
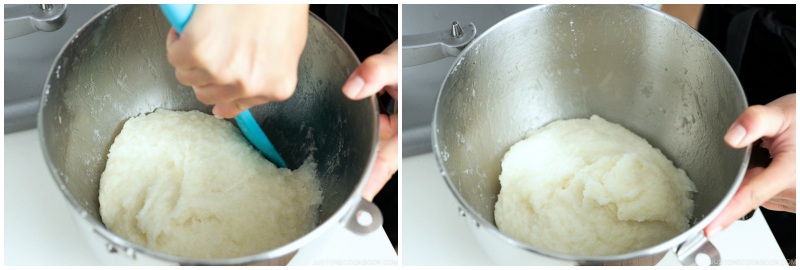
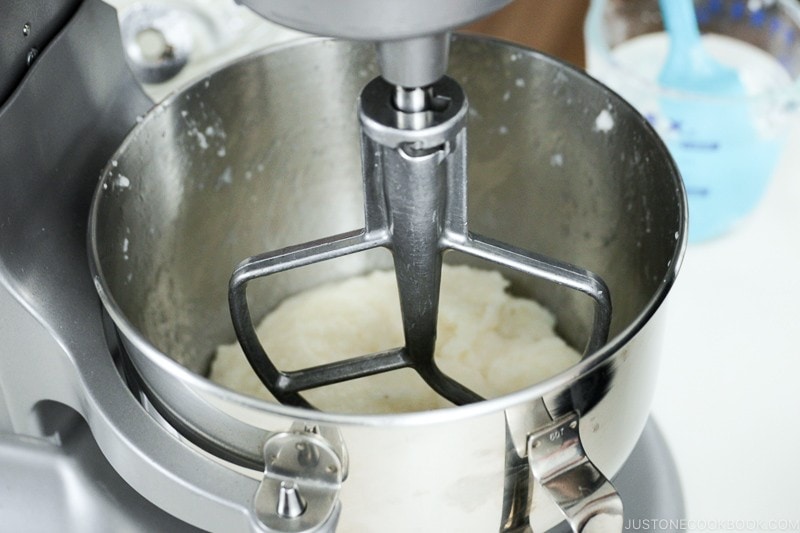
To “Pound“ with a Flat Beater Attachment
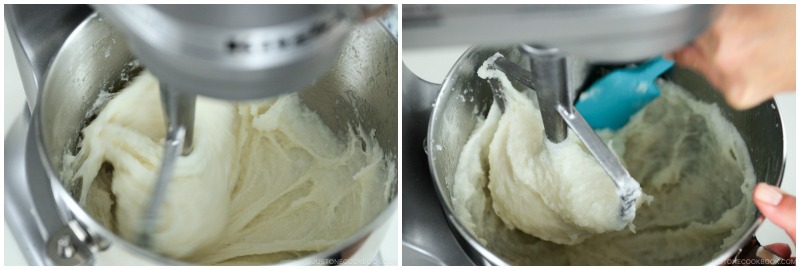
- Remove the dough hook attachment from the stand mixer and change to a flat beater attachment.
- Beat the mochi on Speed 3. Set the timer for 30 seconds (first round).
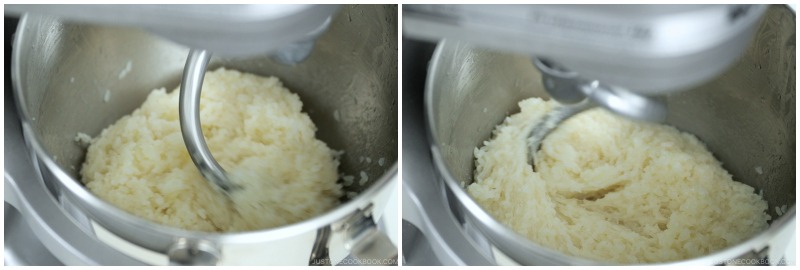
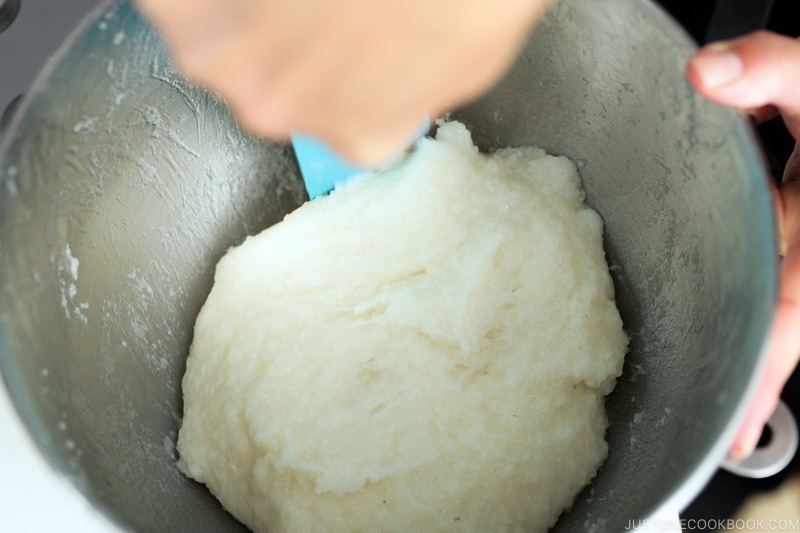
- When the 30-second timer beeps [00:30], do not remove the bowl from the stand mixer. Scrape the mochi as much as you can from the sides of the bowl, using the wet silicone spatula.
- Reset the timer for 30 seconds (second round). Start beating again on Speed 3. When the 30-second timer beeps [01:00], scrape the mochi again from the sides of the bowl, using the wet silicone spatula.
- Reset the timer for 30 seconds (third round). Start beating again on Speed 3. When the 30-second timer beeps [01:30], scrape the mochi again from the sides of the bowl, using the wet silicone spatula.
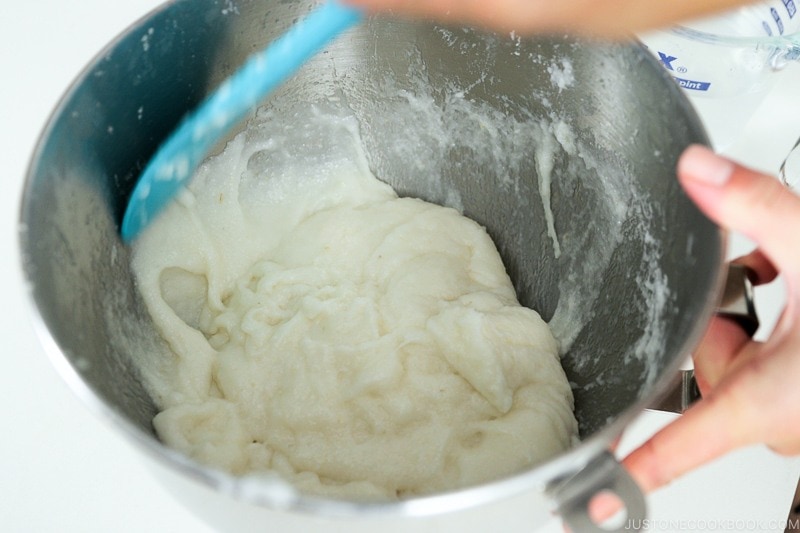
- Reset the timer for 30 seconds (fourth round). Start beating again on Speed 3. When the 30-second timer beeps [02:00], scrape the mochi again from the sides of the bowl, using the wet silicone spatula. Now, the pounding is done.

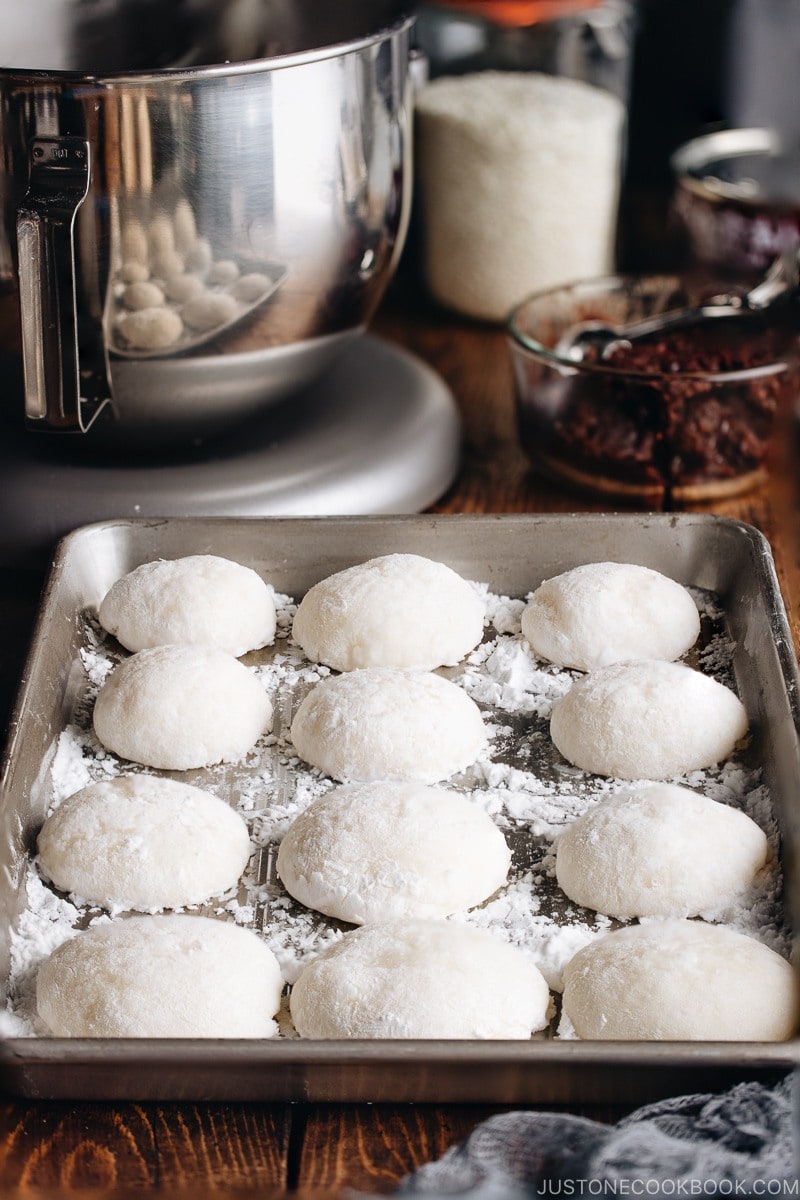
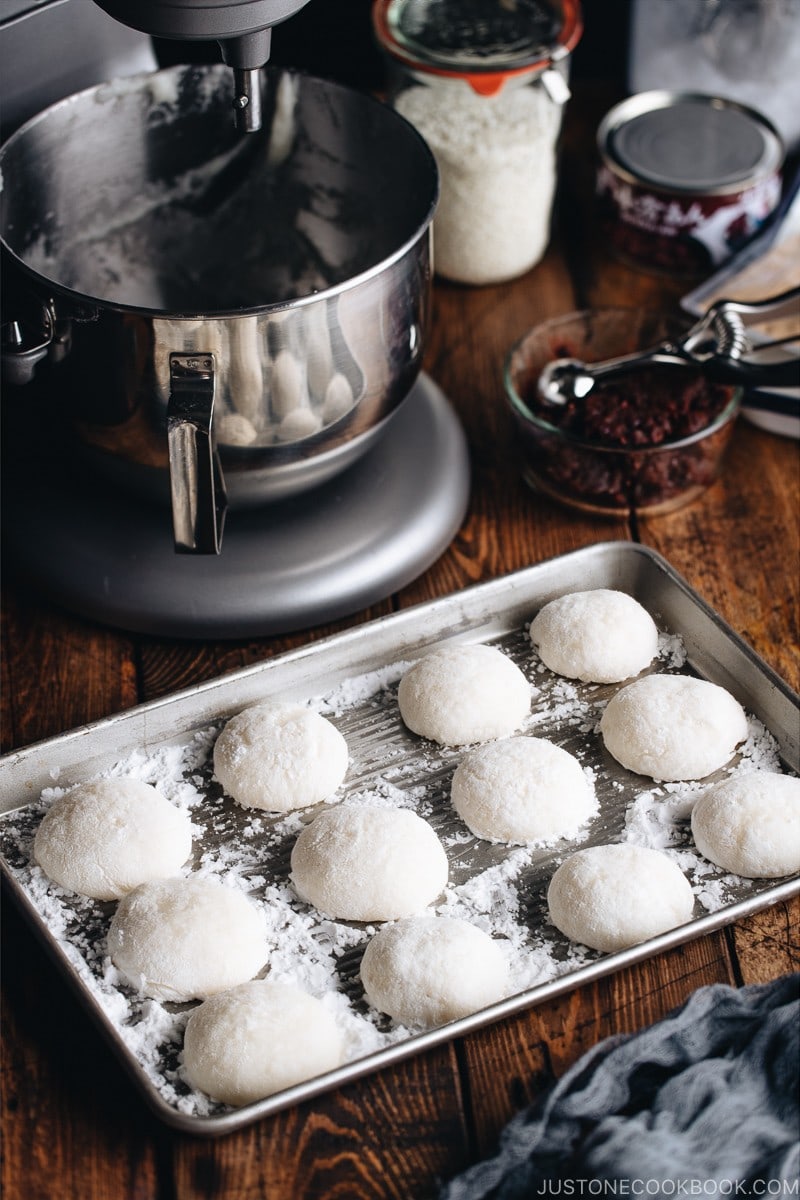
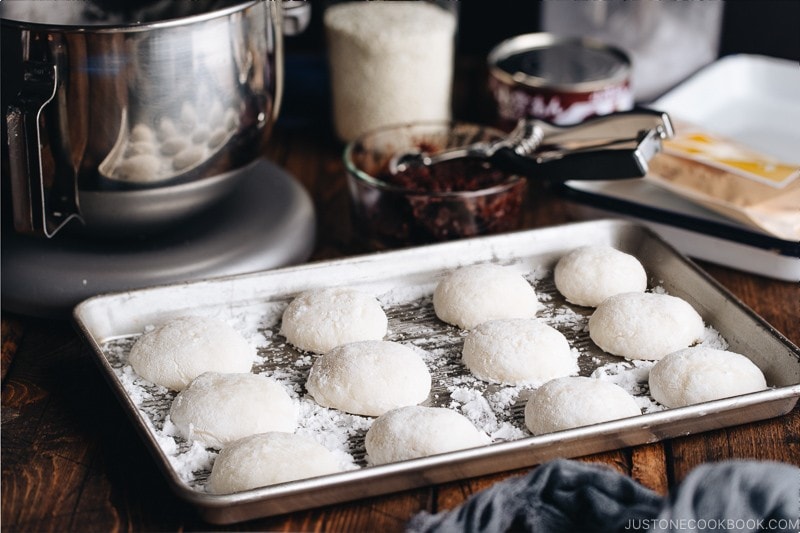
To Shape into Mochi Cakes
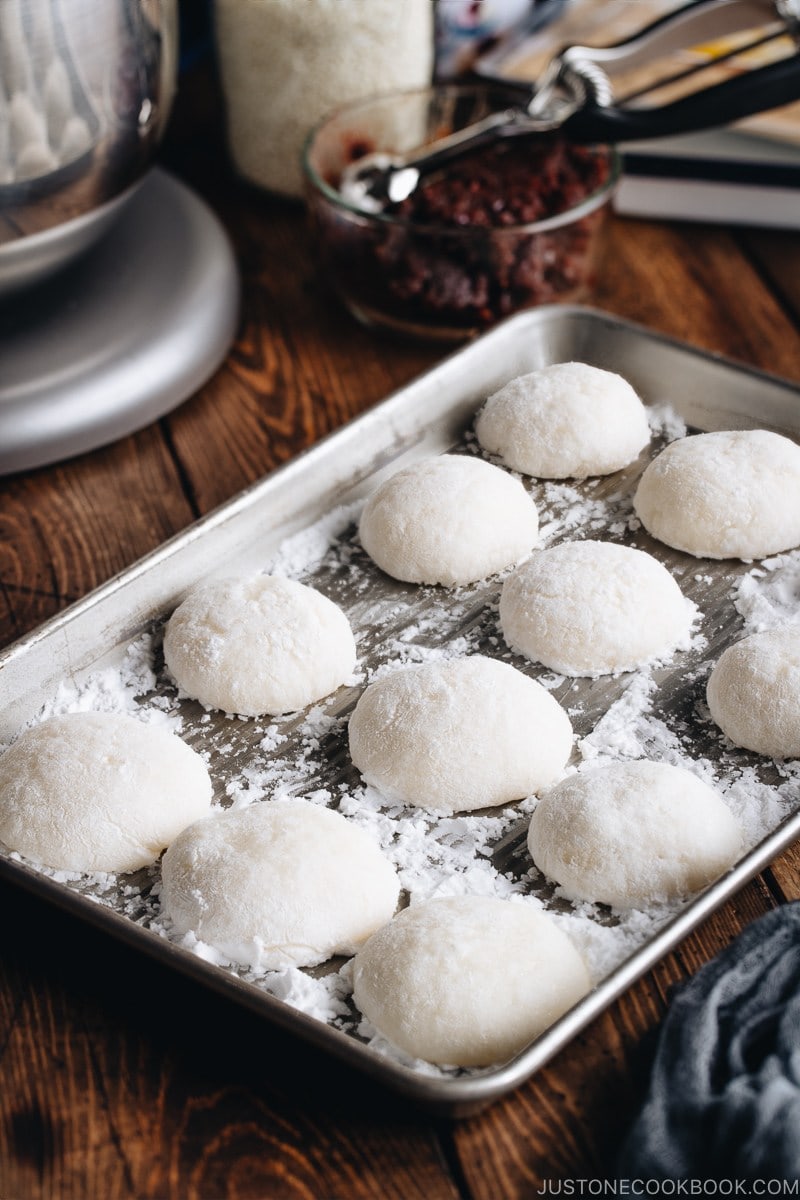
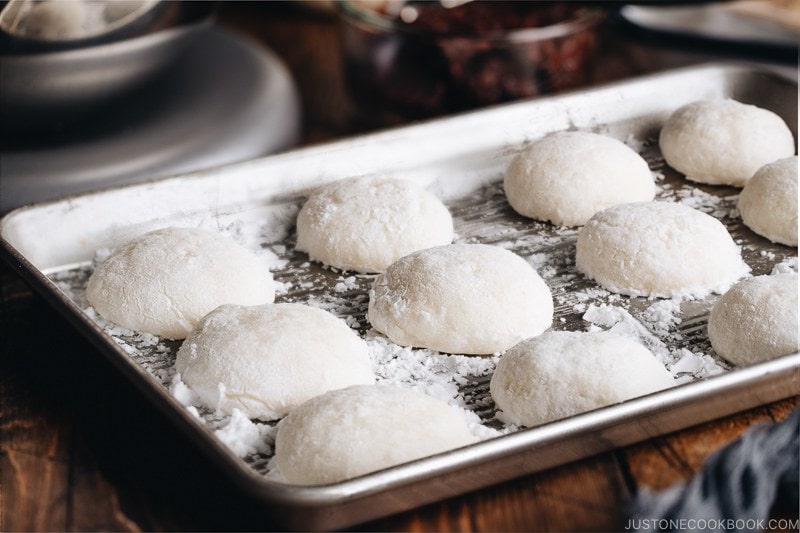
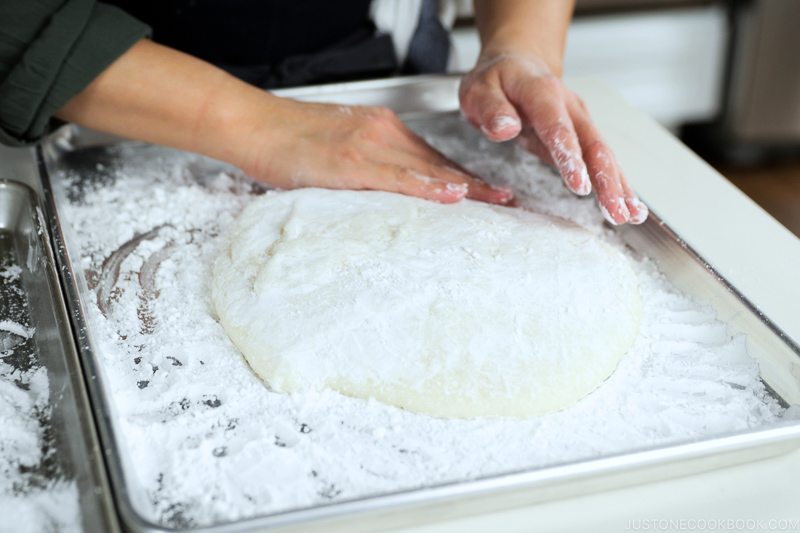
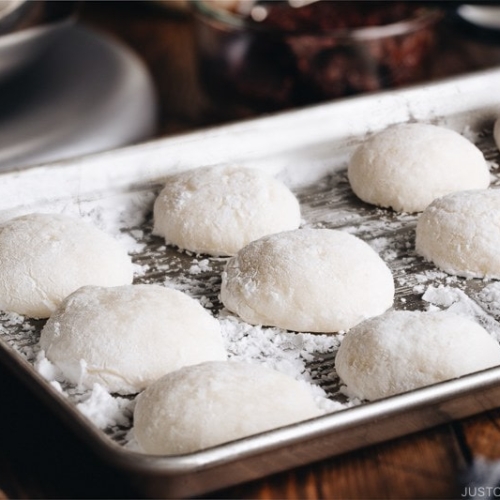
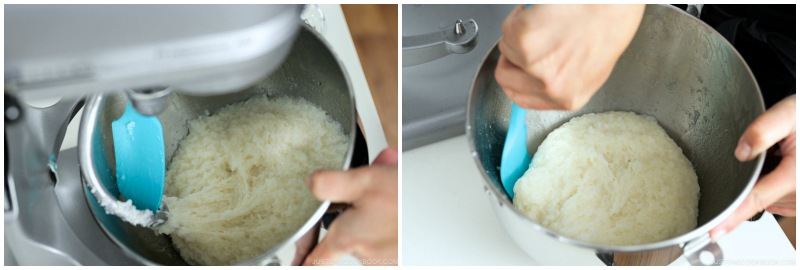
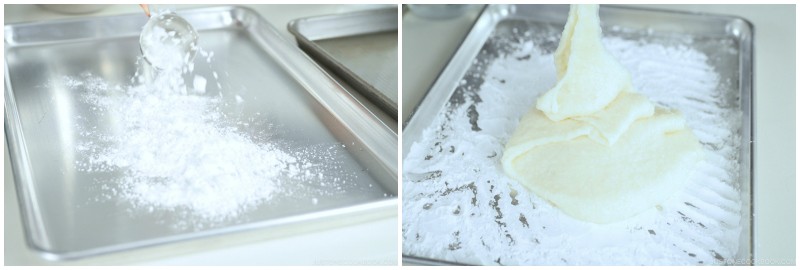
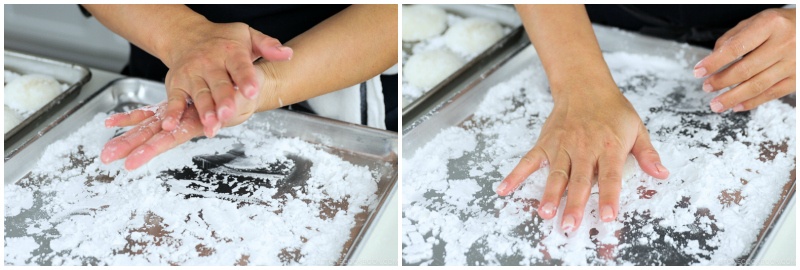
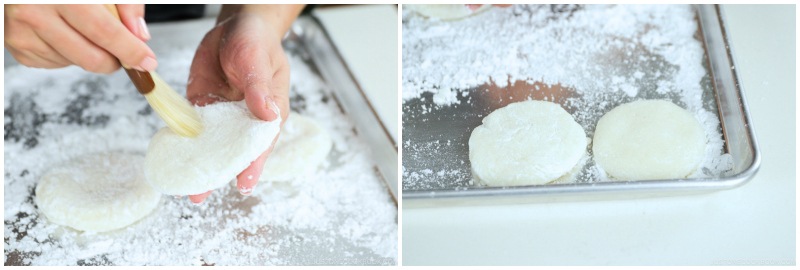
- Prepare two rimmed baking sheets by covering them with potato starch or cornstarch. Put all the pounded mochi on one of the baking sheets. The other one is for keeping the mochi cakes.
- Sprinkle some potato starch on top of the freshly pounded mochi. Make sure your hands are completely dry and dust them with potato starch. Keep extra starch handy so you can always dust your hands when needed.
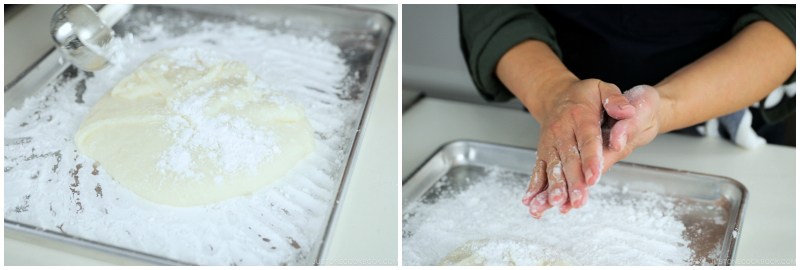
- Spread the potato starch on top of the mochi, making sure there is no sticky part exposed. While the mochi is still hot, but cool enough to handle, pick up a corner of the mochi and start tucking in the edges underneath. Tip: Work quickly while the mochi is still quite warm. As it cools down, it will firm up and harden and be impossible to shape.
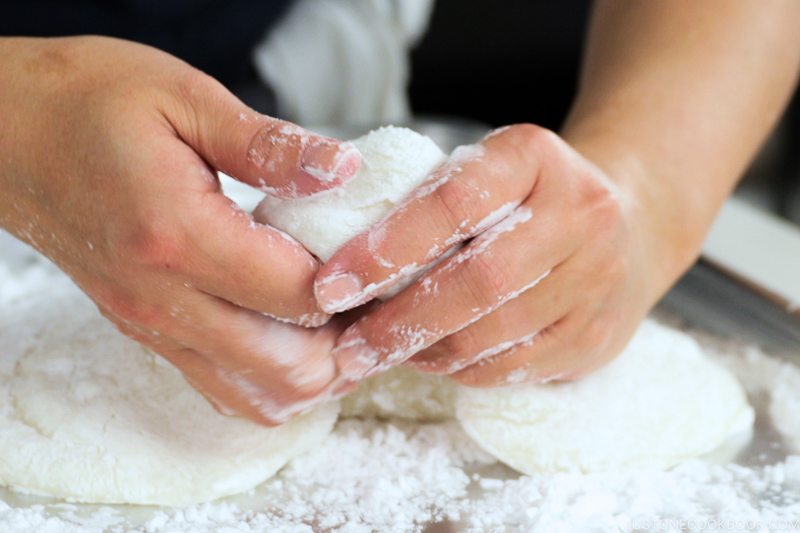
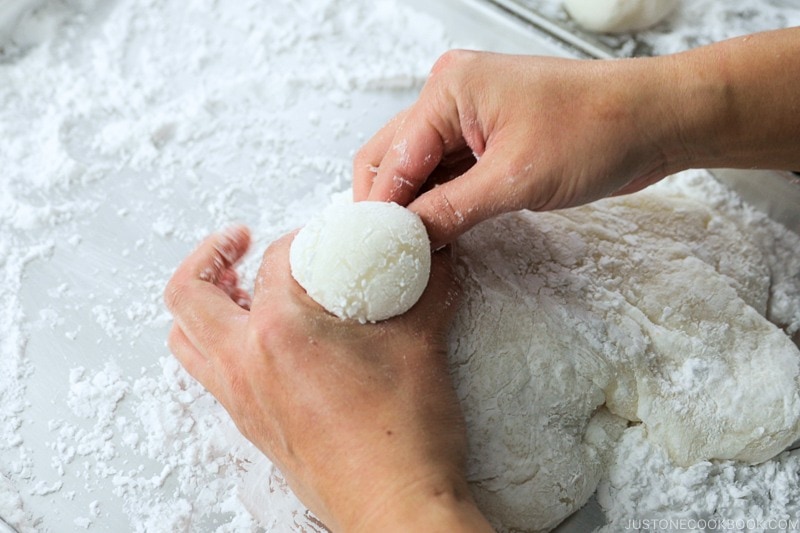
- Once you’ve mounded up a thick layer of mochi, make a C shape with your left index finger and thumb against the edge of the mochi.
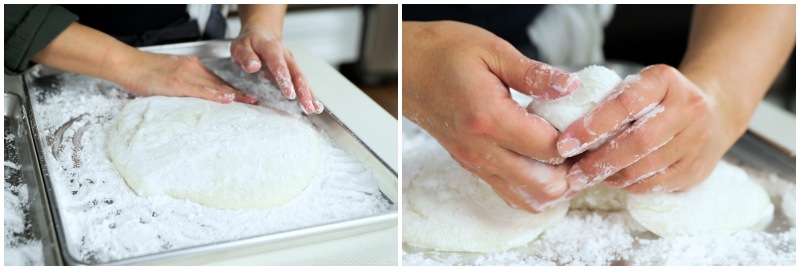
- Use your right hand to tuck in and push up the mochi underneath to create a ball shape above your left C-shaped fingers.
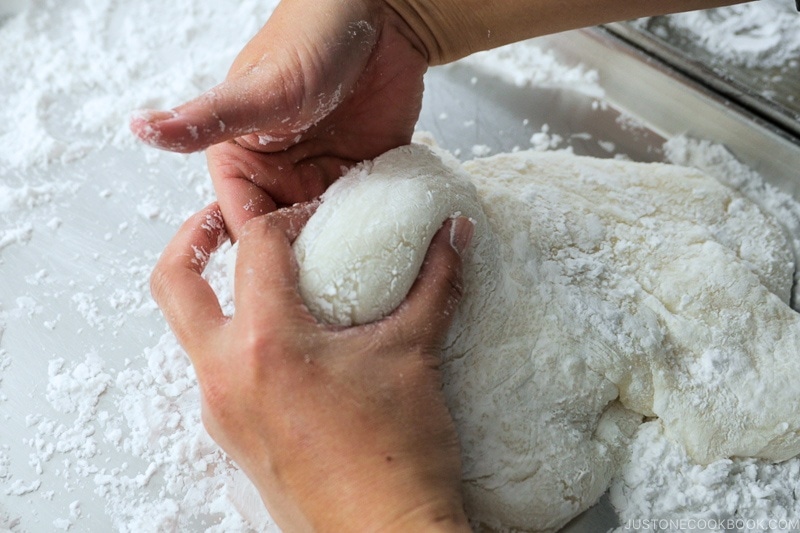
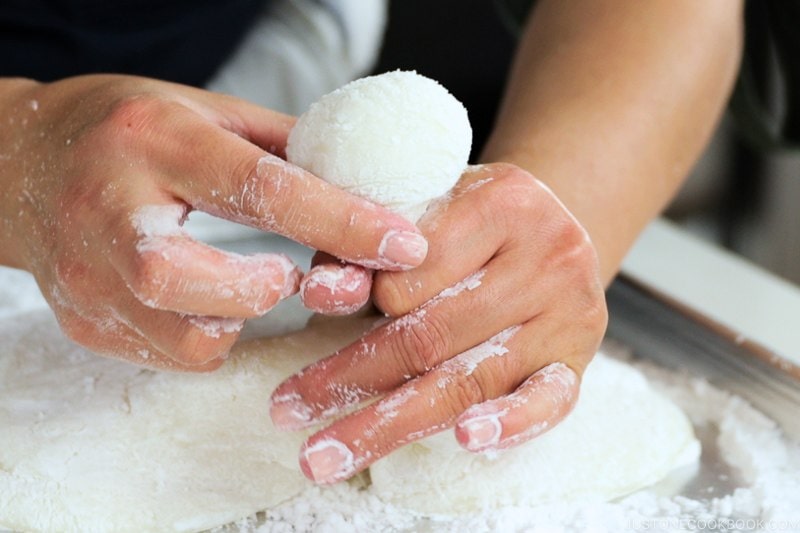
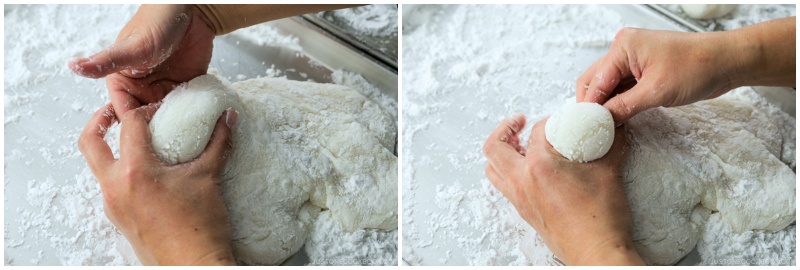
- Pinch and twist: Using your C-shaped fingers, pinch underneath the ball to cut off the mochi. Use your right hand to twist off the mochi. Do not pull the mochi, as it creates a sticky surface.
- This photo is a bad example. You don’t want to pull the mochi. The sticky mochi surface appears and now your hands get sticky when you touch it. REMEMBER: Pinch and twist. Pinch and twist.
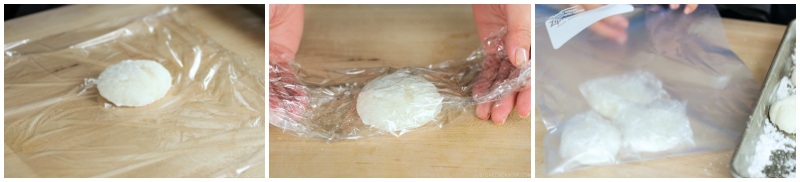
- As you form the mochi cakes, place them on the other rimmed baking sheet. When you're ready to eat them, dust off the starch with a pastry brush or with your dry hands. Enjoy your mochi in Japanese New Year Soup (Ozoni) and Red Bean Soup, or make Anko Mochi or Kinako Mochi (see below).
To Store
- If you do not use the mochi cakes immediately, let them cool completely, then cover each one individually in plastic wrap and put in a freezer bag. Store in the freezer for 3 months.
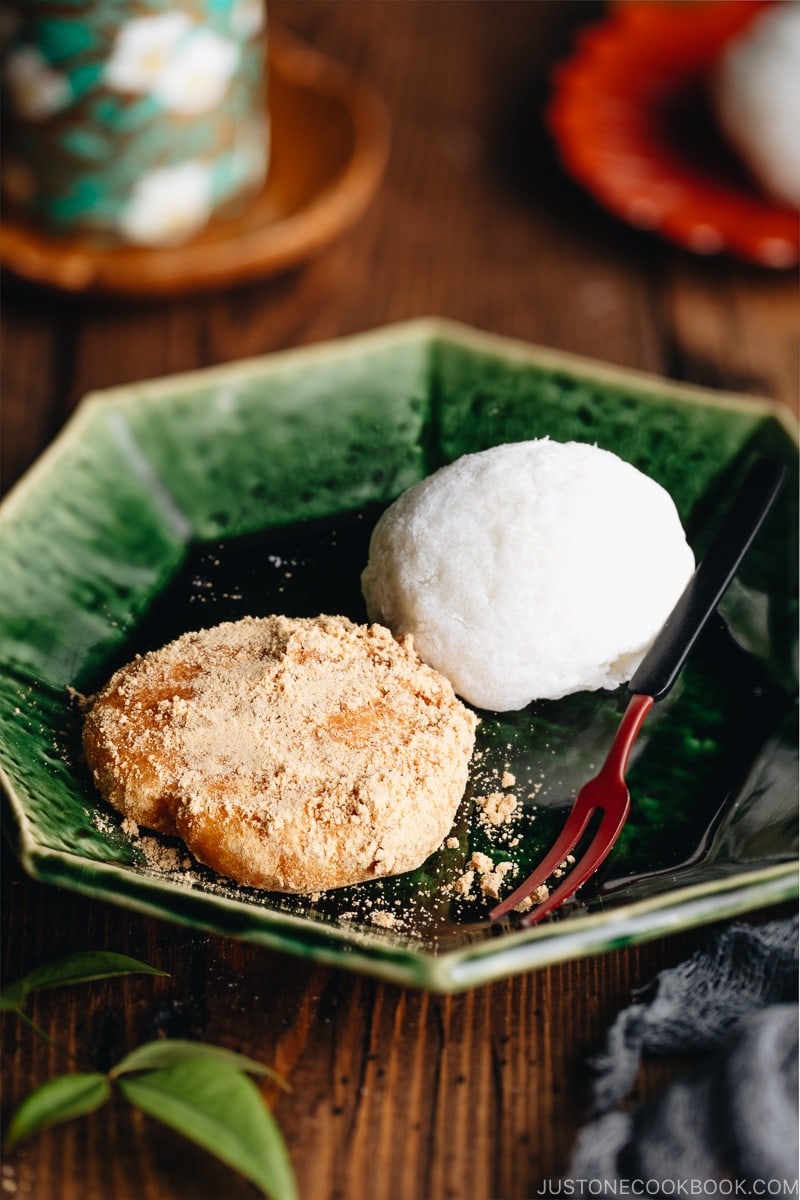
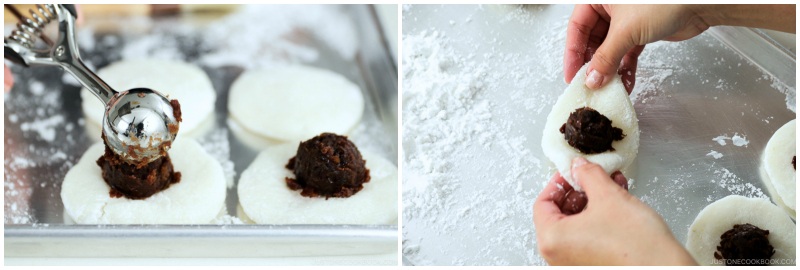
To Make the Anko Mochi (optional)
- Prepare the Anko Mochi while the mochi cakes are still warm. First, flatten the cakes by pressing down with the palm of your hand.
- Brush off the excess starch with a pastry brush or your dry hands. It’s important to remove the starch, so don’t skip this step.
- Put a scoop of sweet red bean paste (anko) in the center of each mochi. Pull two opposite sides of the mochi out and away from the center.
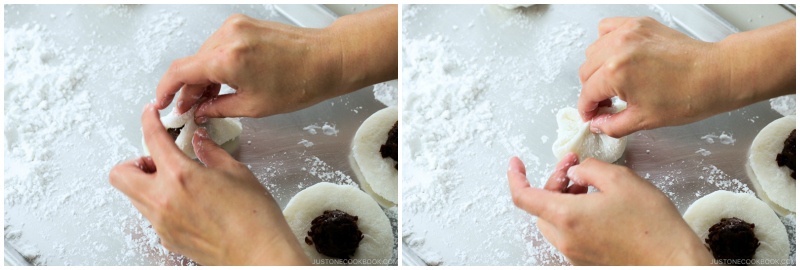
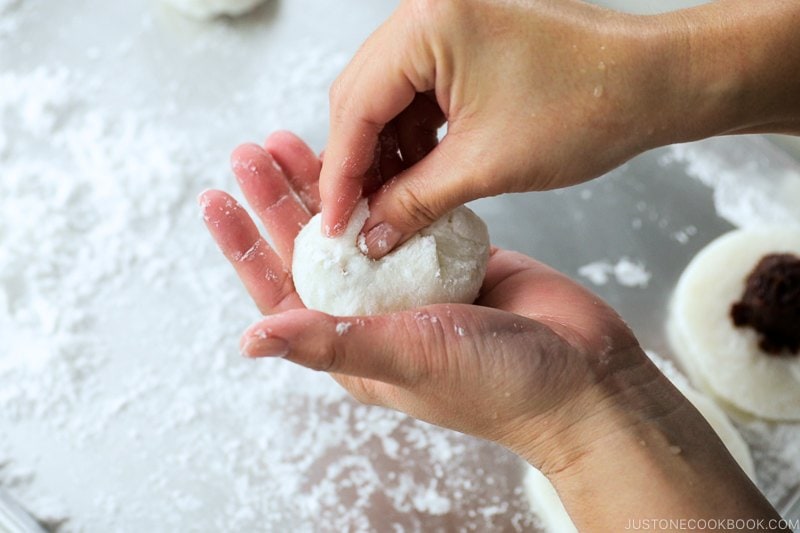
- Pull up the sides and pinch the ends over the anko. Repeat for the other sides and pinch the ends together on top.
- Lightly dust your hands with potato starch (do not coat too heavily). Use light pressure to pinch and seal the top of the mochi. Repeat with the rest of the mochi pieces. Serve immediately.
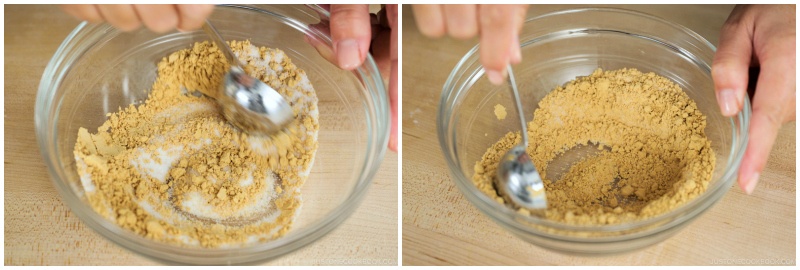
To Make the Kinako Mochi (optional)
- Prepare the Kinako Mochi while the mochi cakes are still warm. In a bowl, combine 2 Tbsp kinako (roasted soybean flour) and 1 Tbsp sugar and mix well. This is enough kinako mixture for 2 mochi cakes.
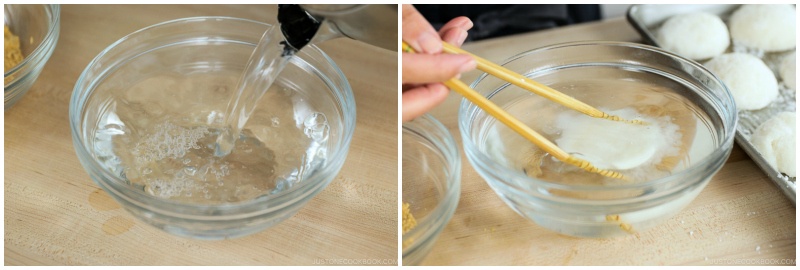
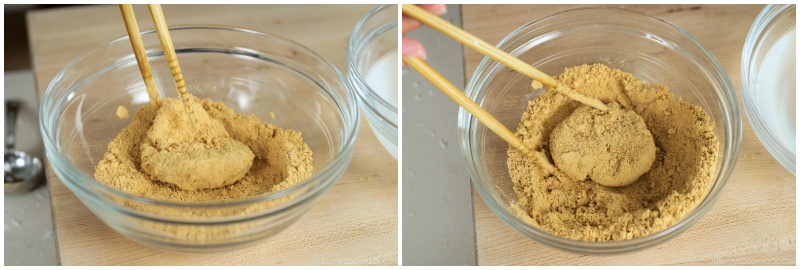
- Pour some hot water in a separate bowl. Use chopsticks to dip a mochi cake in the hot water.
- Then, dip the mochi in the kinako mixture and coat well. Repeat with the rest of the mochi pieces. Serve immediately.
Nutrition
Editor’s Note: This post was originally published on December 19, 2018. It’s been re-published with more information on December 23, 2023.


I made 95% of the food from scratch. I bake breads and rolls on my decade old sourdough starter, I ferment my vinegars, make pastas and dumplings, pickles, fermented foods, condiments and sauces, preserves, jams, dry fruits, vegetables, and herbs from my garden. Not only that, but I even make chocolate bars and crisps and other treats. This recipe is a very rare instance where I draw the line. I tried it and had a “success” but the mess, cleaning and whole process are not worth it at the end. I also think it relies on a very specific setup and will work for a hardly any people. To many variables. I strongly suggest skipping this recipe to avoid frustration.
Hi Megaira! Thank you so much for trying this recipe! I’m not sure if you’ve read my post, but I did give a fair “messy” warning. If someone did not grow up with making mochi, I can imagine the shock when you deal with super sticky mochi situation…and it can be frustrating as you said. But that’s the nature of mochi.
Most Japanese who make mochi at home has a mochi making machine like this (https://amzn.to/3y4S7ms) or a bread making machine that comes with mochi making function. In the countryside, some people still pound mochi in a traditional way but it’s rare. Anyway, in our American home, a stand mixer helps the kneading procoss and I’m not sure what other tools can help.
I’m not sure what type of mochi you were trying to make, but if it’s for daifuku type of mochi with filling, we use Shiratamako (Japanese glutinous rice flour) in Japan and we don’t make it with this fresh mochi like this. However, for the Japanese New Year savory mochi soups, New Year mochi decoration, or simple fresh mochi, we have to pound and knead the mochi… we all learn to cover our hands with potato starch to avoid the mess, if not covered, mochi sticks to everywhere. 🙁
Thank you again for your feedback. Hope others find this information helpful.
When I tried adding sugar to my mochigome while pounding it, the mixture became really liquidy and wouldn’t form into a dough. Do you know why this happened or have any other tips to sweeten the mochi? Do you also have any recommendations for kneading the mochi at home without a stand mixer? Thanks so much! 🙂
Hi, Matthew! Thank you for trying Nami’s recipe.
We’re not sure how much sugar you put into the dough, but sugar makes mochi very soft.
In Japan, we typically sweeten the mochi with Anko or Kinako after folding it up.
https://www.justonecookbook.com/how-to-enjoy-japanese-mochi/
Thank you for these wonderful instructions. I have grown up in Hawaii where my family has always carried on the New Year tradition of making mochi. I have made this recipe a bunch of times and find that the mochi comes out a bit too thin. I use the mochi for ozoni as well as kagami mochi. What ratio of water to rice would you use to help make the mochi hold up a little better for the kagami mochi?
Also, I know your instructions say that steaming is best. I have a Thai basket steamer that I use to make Thai sticky rice. Would that work the same? Or is there a particular method you use to steam the rice?
Thank you again for the wonderful instructions and recipe. I love your website!
Hello, Julie! Thank you for trying Nami’s recipe!
You may try reducing roughly 20 ml of water to see if it improves your situation.
Yes, if you’re steaming the rice, you may use a Thai basket steamer, and the process is the same. The mochi will be a bit more firm with steamed rice.
We hope this helps!
You can use a Kenwood Chef or Chef Major stand mixer (though now are only called Chef plus designation XL or Baker for larger or specific feature models). My 8 year old one worked fine. They have a 1200 watt motor which is several times that of the KitchenAid. So you could undoubtedly double the recipe if you wanted no problem. Will try that next as it takes the same amount of time and freeze for later.
One question to the author: If adding sugar at the end for sweet mochi, this would increase the total dry ingredients, does one have to compensate for this by increasing the total water or adding additional water along with the sugar?
Hello, Markus. Thank you for trying Nami’s recipe and sharing your findings with us.
We are happy to learn that other types of mixers also performed admirably.
Regarding your inquiry, you do not need to add any more water; instead, we recommend adding sugar while kneading the mochi.
We hope this helps!
Filipinos desserts are all rice based and we have several that are exactly like Japanese mochi. In fact, similar to mochi the Filipinos also flavor the desserts with mango, chocolate, caramel, red bean, coconut, pandan and ube (purple yam)
Hi Claudette! Thank you for your input!🙂
uhh that sounds delicious! Thanks for more filling ideas Claudette
I made it for my son’s first birthday and it was the best mochi we’ve had outside of Japan (haven’t been back since covid). I have a kenwood chef xl and used the dough hook. I also have a zojirushi, maybe that also helped for perfectly cooked mochikome. Will be making this on a regular basis now. Thanks for the recipe.
Hi Pauline! We are so happy to hear this recipe worked well for you! 🥰
Thank you for trying Nami’s recipe and for your kind feedback.
Happy Cooking!
Hey Nami,
I know you recommended the professinal KitchenAid machine. What if I half the batch? Or is it because of the size of the engine? 🙂
If so, How can I make it without the KitchenAid?
And Thank you so much for you homepage. It helps stay connected too Japan when homesick 🥰🎌
Ann (Denmark)
Hi Ann! Thank you very much for reading Nami’s post and trying her recipe!
The Kitchen Aid is the only appliance that Nami has tried making Mochi successfully many times, and we are unsure if the other appliance would work or not.
If you are making Mochi without it, we can only think that you have to pound the Mochi traditionally.
Other readers left comments saying that other appliances did not work well.
We hope this helps!
It works well with the Kenwood Chef/Major. Its the motor power that is important, so check out the W rating on yours. Alternatively, manufacturers sometimes only give the maximum weight of dough it can knead, so compare yours to that of a KitchenAid which would give you a good indication of its capabilities. My Kenwood has a 1200W motor which is quite a bit stronger than the KitchenAid so handled the recipe well.
[…] Making mochi from glutinous rice takes time and effort. Most opt to buy dried mochi at the supermarket or occasionally make it at home (some Japanese bread makers have an option for mochi). Homemade mochi is irresistible, and the chewy texture is incomparable to storebought. To make mochi with a stand mixer, follow this recipe. […]
Hi Nami! I made this mochi for New Years. It was very good. I know you used the Kitchenaid Pro mixer. I used an Artisan model since that is what I had. It worked but ended up messing up my mixer. My fault. Anyway I read that you can use a Bread Machine to knead mochi. Do you have any experience or advice for using Bread Making machine? Thanks
Hi Reiko! Thank you very much for reading Nami’s post and trying her recipe!
We have never tried making Mochi with a bread maker before. However, some of the bread makers in Japan have a function for making Mochi, and it uses a different blade just for making Mochi.
We hope this helps!