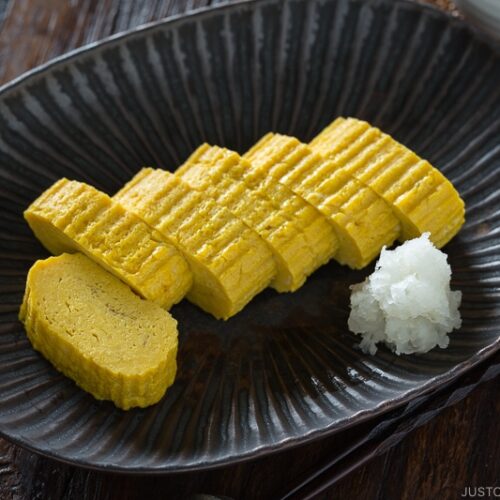
Lightly sweet yet savory, Tamagoyaki (Japanese Rolled Omelette) is flavored with dashi stock and makes a delightful Japanese breakfast or side dish for your bento lunches.
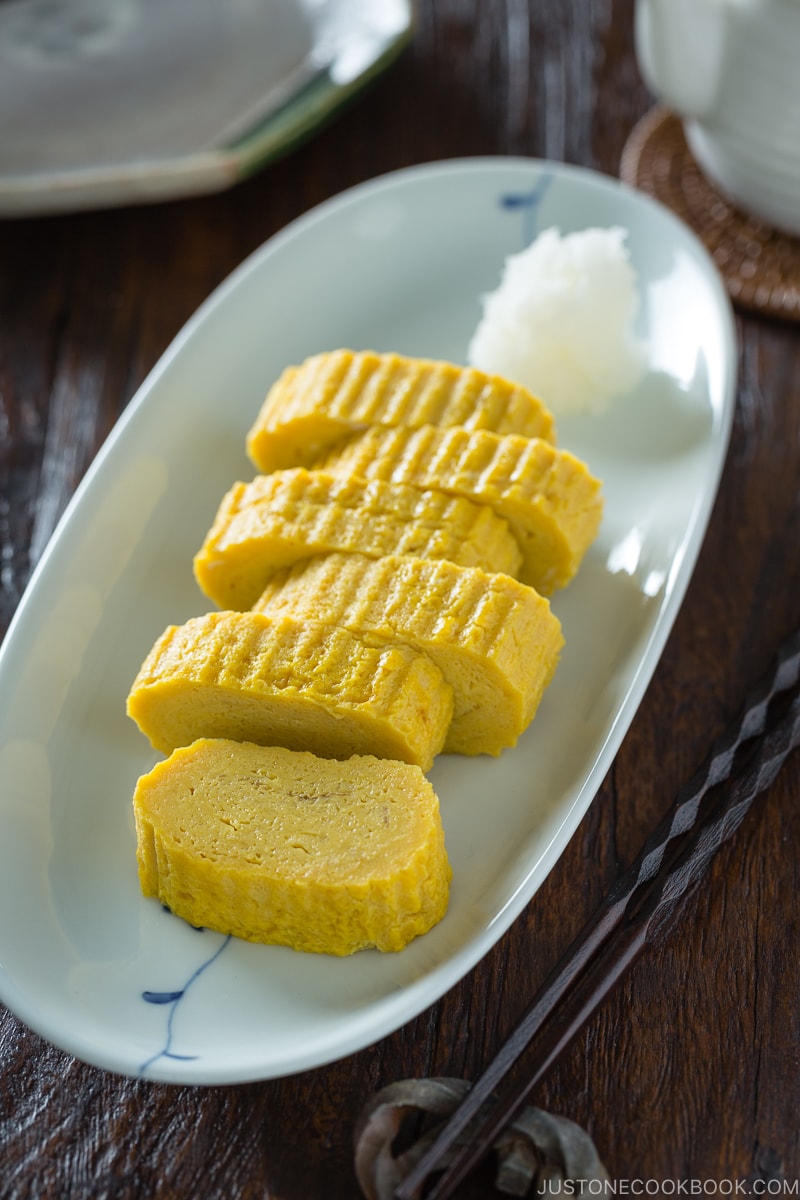
Tamagoyaki (卵焼き or 玉子焼き) is a sweetened Japanese omelette that resembles mini bars of golden pillows. With a slightly sweet taste and custardy texture, tamagoyaki is well-loved amongst Japanese children and adults alike. You’ve most likely tasted the rolled eggs as part of a Japanese-style breakfast or as a side dish in a bento (Japanese lunch box) or atop sushi. Let’s learn how to make tamagoyaki today!
Table of contents
What is Tamagoyaki?
In Japanese, tamago means egg and yaki means grill, so tamagoyaki literally translates to ‘grilled egg’. This classic dish is made by rolling together thin omelettes in a frying pan, folding them into a layered log, and then sliced into pillows. It has a light sweet taste, thanks to flavoring the egg mixture with mirin, sugar, and dashi.
The rolled egg can look deceivingly difficult to make because of the artful presentation, but it’s not an impossible task for home cooks like you and me.
In fact, it is a staple in Japanese home cooking. We love the eggy goodness so much that we even invest in a special pan just for making tamagoyaki at home! My children adore tamagoyaki so I make it regularly for their bento box.
How to Make Tamagoyaki
To make a basic tamagoyaki, you first beat the eggs just like you would with a regular American-style omelette. Then season the whisked eggs with sugar, mirin, soy sauce, and a pinch of salt before pouring a thin layer of the egg mixture into a pan to cook. Once the bottom of the egg mixture is set, roll it up in multiple thin layers until the egg looks like a thick log. Finally, shape the egg and slice it into thick pieces for serving.
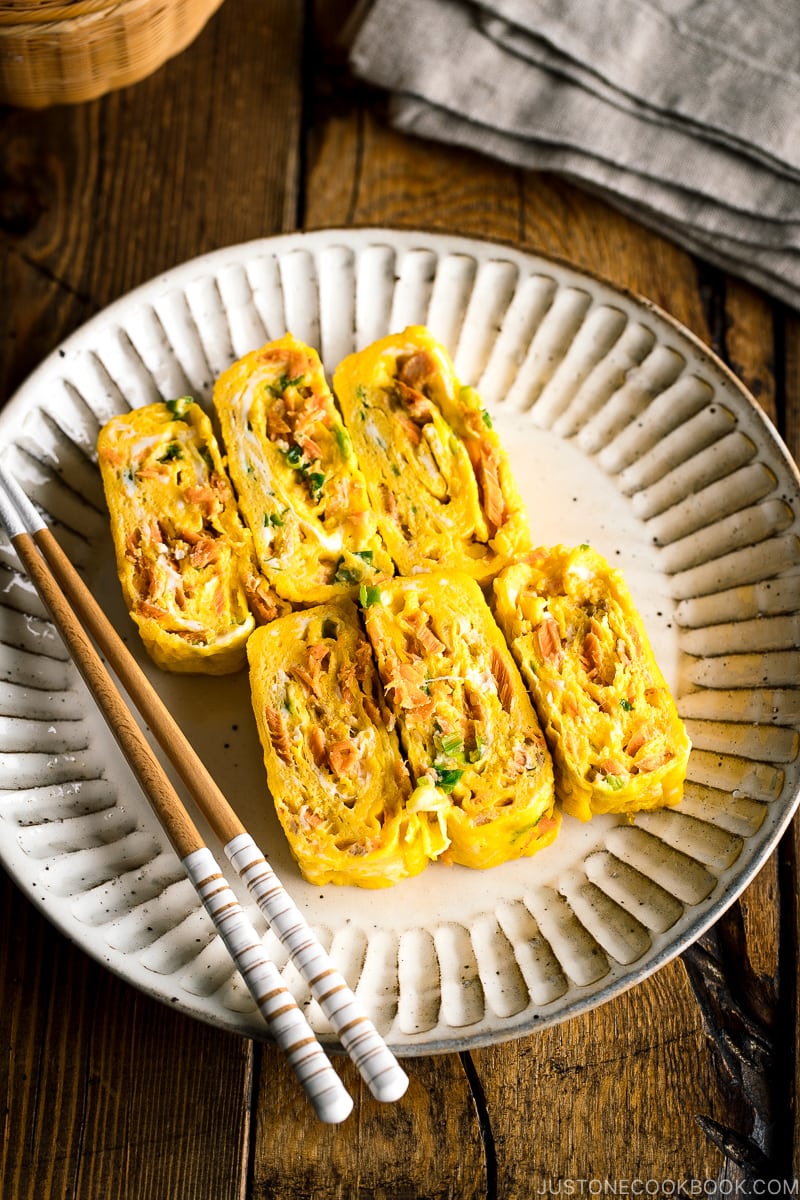
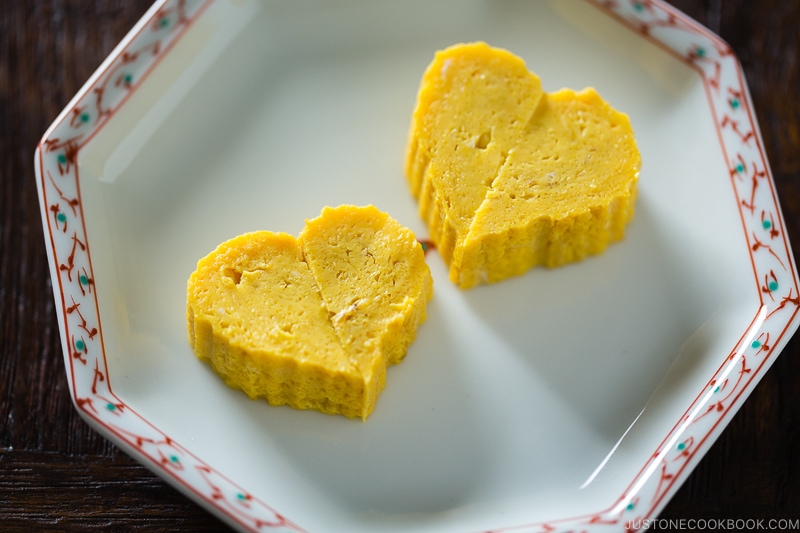
The great thing about making Japanese rolled omelette at home is that you have the flexibility to experiment and be creative with the shapes and fillings. You can also add other ingredients such as seaweed, cheese, veggies, salmon flakes (picture above), and meat into tamagoyaki to change up the flavors.
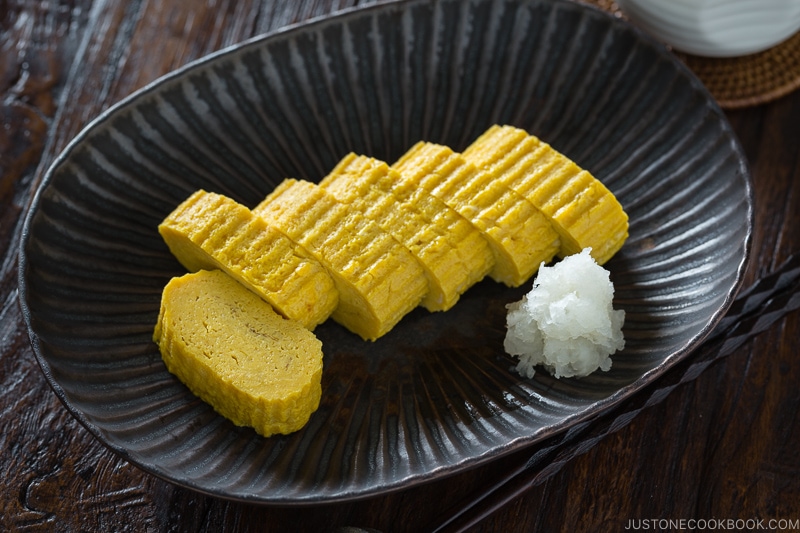
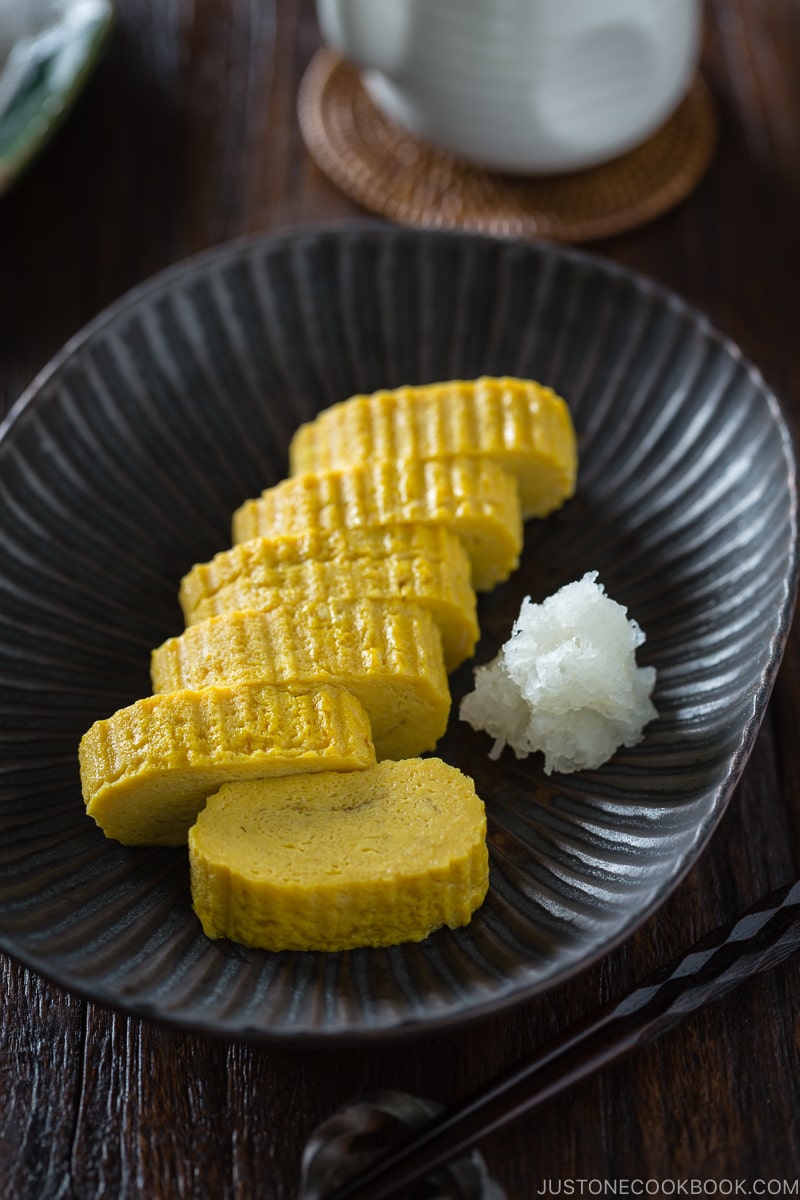
The recipe that I am sharing today is called Dashimaki Tamago (だし巻き玉子) because of the addition of dashi. It’s fluffy, moist, and deeply flavorful.
Helpful Tips on Making the Best Tamagoyaki at Home
Tamagoyaki might require some practice to get right, but it’s something you will get better at each time you cook it. Here are a few helpful tips:
- The ratio of dashi to eggs – When we add dashi into the egg mixture, it enhances the overall flavor and texture, but the liquid does make the cooking trickier. I used 3 tablespoons of dashi to make it easier for everyone to try. As a rule of thumb, 1 tablespoon of dashi per egg is a good ratio, but you can definitely add more once you’re better at it.
- Do not worry about the first few rolls. The inner rolls do not need to be neat at all, as you will keep rolling more layers on top. The first few rolls are the center of the tamagoyaki, so even if the layers are not perfectly lined up, do not worry!
- Do not skip oiling the pan. I know you want to use less oil. Me, too! However, make sure you coat the pan with oil very well. You don’t want your egg mixture to stick to the pan – even for a non-stick pan.
- Wait till the pan is completely heated up. Test the temperature of the pan with a small amount of the egg mixture. You need to see the egg sizzle to confirm the pan is hot enough.
- Don’t turn off the heat; instead, move the pan away from the heat source. Keep your heat at medium at all times. We need to quickly roll up the thin omelette layer before it’s completely cooked, so there is no time to adjust the heat. The best way to control the heat is to move the pan closer and away from the stove.
It’s also important to find the right ratio of each seasoning, creating a balance between sweet and savory. If you like, adjust the amount of sugar and salt until it suits your taste.
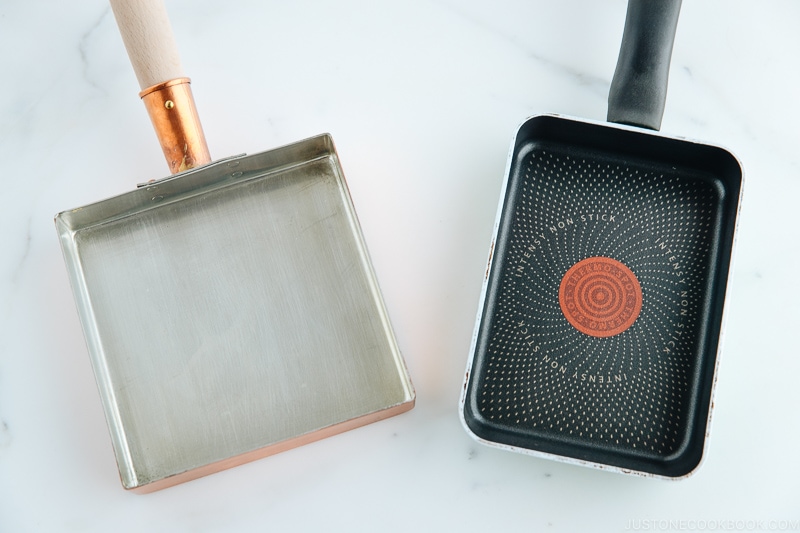
Tamagoyaki Pan
A typical Japanese kitchen has one set of tamagoyaki pan because we commonly enjoy the rolled omelette for breakfast and bento. It’s either square or rectangular so the tamagoyaki will turn into a rectangular shape easily.
I used to use a non-stick T-fal Tamagoyaki pan (right on the picture below) but I switched to a 15 cm (roughly 6 inches) copper tamagoyaki pan (Silver Arrow/Endo Shoji brand) and I love it. Both of my tamagoyaki pans were purchased at TokyuHands in Japan.
I personally recommend the copper tamagoyaki pan (nickel coating inside). The copper transfers heat so easily, and my egg never sticks to the pan (you will still need to grease the pan). The pan is very light that you can move the pan easily while cooking.
Can I Use Round Frying Pan for Tamagoyaki?
My answer is yes! You don’t need a special tamagoyaki pan as long as you are not aiming for the classic shape. A tamagoyaki pan definitely helps to make the rolled omelette into a nice thick rectangular log; but a round frying pan will work just fine. You will see both methods demonstrated in my cooking video and the step-by-step pictures in the recipe below.
I recommend using a 9 or 10-inch non-stick frying pan for a thicker tamagoyaki. In the recipe below, I used my 12-inch pan which works as well.
As you can see with the result, it will be flatter when your frying pan is bigger. If you only have a 12-inch pan, you can solve the issue by doubling the recipe. If you don’t mind the shape too much, then don’t worry about it.
Now, if you’re concerned about non-stick coating, I recommend using a carbon steel pan. However, please remember that you will need to control the amount of heat by lifting the pan from the stove and a heavy skillet would be challenging.
I’ve tried using stainless-steel or cast-iron frying pan for tamagoyaki, but without adding a lot of oil, I haven’t been successful. Since I don’t like my tamagoyaki too oily, I steer away from using stainless steel or cast iron. For most of my cooking, I refrain from using non-stick cookware, but it is easier to make tamagoyaki with a non-stick pan.
Easy Tamagoyaki for Beginners
If you’re a beginner cook or prefer to take a shortcut, you can try my Quick & Easy Tamagoyaki recipe which takes only 3 minutes to make! It’s perfect to make just one tamagoyaki for your meal or bento box.
Differences Between Tamagoyaki, Atsuyaki Tamago, and Dashimaki Tamago
There are actually a few versions of tamagoyaki in Japanese cuisine, which can be confusing.
In general, you can find atsuyaki tamago (厚焼き玉子) and dashimaki tamago (だし巻き卵). Each variation uses slightly different ingredients, varying ratios of seasonings, and cooking methods, but sometimes the names are interchangeable.
When Japanese people say tamagoyaki, it typically refers to rolled egg or rolled omelette in broad term. Atsuyaki tamago refers to a thick grilled omelette, but we usually just call it tamagoyaki. The texture of astuyaki tamago is firm and dense, and it’s much easier to make.
On the other hand, dashimaki tamago (出し巻き卵) refers to rolled egg which includes dashi (Japanese soup stock). In the Kanto region (Tokyo area), dashimaki is also called tamagoyaki. However, in the Kansai region (Osaka area), these two rolled eggs are considered totally separate dishes. The main difference lies in the use of dashi, which results in a much more refined, juicy, silky, and flavorful rolled egg. At high-end sushi restaurants, they use an even higher amount of dashi and sugar and sometimes by mixing seafood into the egg mixture. You’d get a really flavorful and elegant egg dish that is served toward the end of a sushi course.
Compared to astuyaki tamago, dashimaki tamago is a lot softer due to the higher liquid content in the egg mixture. You can easily tell both versions of tamagoyaki apart by the textures and flavors, but both are delicious in their own way.
More Tamago (Egg) Recipes

- Onsen Tamago (Japanese Hot Spring Eggs)
- Hanjuku Tamago (Perfect Soft-Boiled Eggs)
- Omurice (Japanese Omelette Rice)
- Tamago Sando (Japanese Egg Sandwich)
- Ajitsuke Tamago (Ramen Egg)
Wish to learn more about Japanese cooking? Sign up for our free newsletter to receive cooking tips & recipe updates! And stay in touch with me on Facebook, Pinterest, YouTube, and Instagram.
Tamagoyaki (Japanese Rolled Omelette)
Video
Ingredients
- 3 large eggs (50 g each w/o shell)
For the Seasonings
- 3 Tbsp dashi (Japanese soup stock) (use standard Awase Dashi, dashi packet or powder, or Vegan Dashi)
- 2 tsp sugar
- 1 tsp soy sauce (use GF soy sauce for gluten-free)
- 1 tsp mirin
- 2 pinches Diamond Crystal kosher salt
For Cooking
- 2 Tbsp neutral oil
- 1½ sheets nori (dried laver seaweed) (optional; see Method 2 below)
For the Garnish
- 3 oz daikon radish (1 inch, 2.5 cm; use the sweeter, greenish part near the top of the radish)
- soy sauce (use GF soy sauce for gluten-free)
Instructions
- Gather all the ingredients.

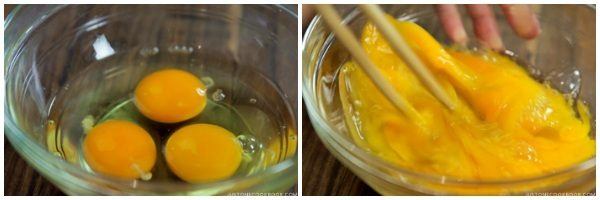
- In a bowl, gently whisk 3 large eggs (50 g each w/o shell). It‘s best to “cut“ the eggs with chopsticks in a zig-zag motion; do not overmix.

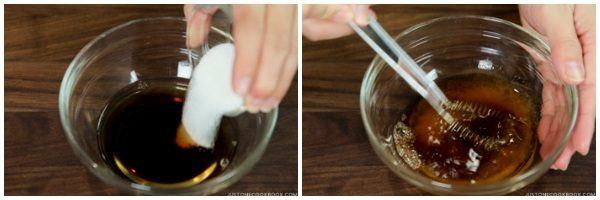
- In another bowl, combine the seasonings: 3 Tbsp dashi (Japanese soup stock), 2 tsp sugar, 1 tsp soy sauce, 1 tsp mirin, and 2 pinches Diamond Crystal kosher salt. Mix well.
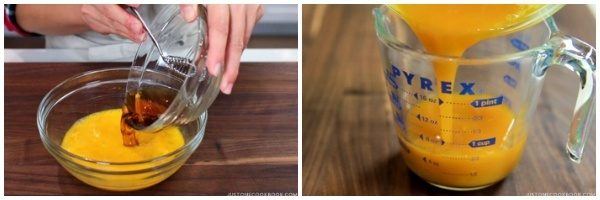
- Pour the seasonings mixture into the eggs and whisk gently to combine. Then, pour the mixture into a measuring cup with a spout and handle so that it‘ll be easier to pour into the frying pan. Next, I‘ll show you how to make your omelette in either a tamagoyaki pan or a round frying pan.

(Method 1) To Cook in a Tamagoyaki Pan
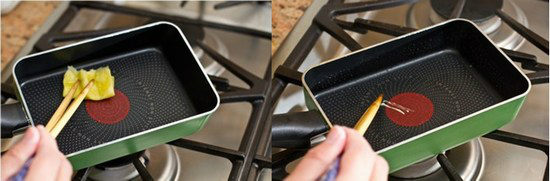
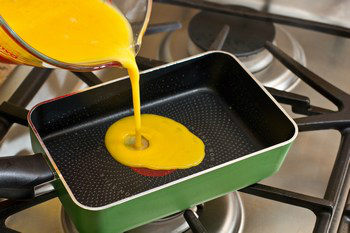
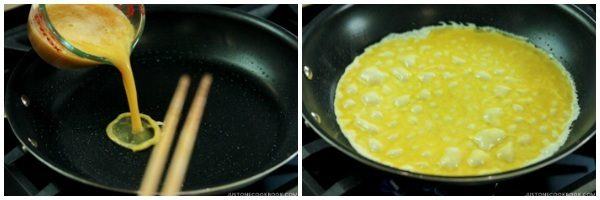
- Heat the pan over medium heat. Then, dip a folded paper towel in 2 Tbsp neutral oil and apply a thin layer of oil to the pan. To check if the pan is hot enough, put a drop of the egg mixture in the pan. When you hear a sizzling sound, the pan is ready.

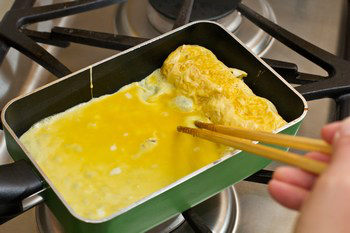
- Pour a thin layer of the egg mixture into the pan, quickly tilting the pan so that the egg mixture coats the entire cooking surface.
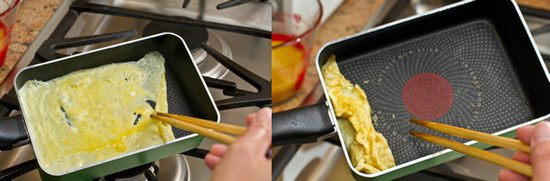
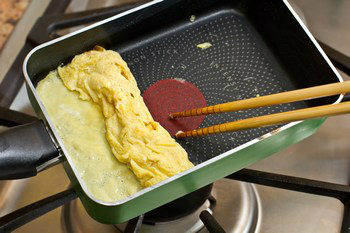
- Poke any air bubbles to release the air. After the bottom of the egg has set but is still soft on top, start rolling the egg into a log shape from one side to the other, starting from the far side of the pan and rolling toward the pan handle.
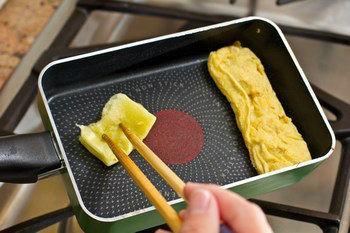
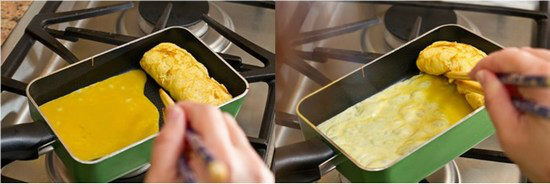
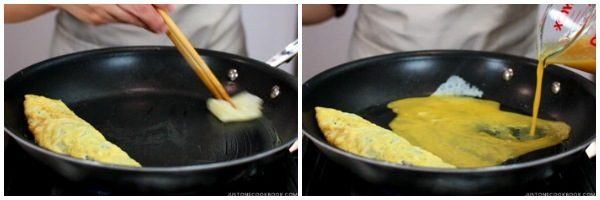
- Move the rolled omelette to the far side of the pan where you started to roll, and apply more oil to the pan with a paper towel, even under the omelette.

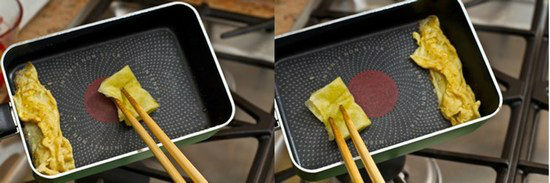
- Pour in a thin layer of the egg mixture to just cover the bottom of the pan again. Make sure to lift the omelette to spread the mixture underneath.
- When the new layer of egg has set and is still soft on top, start rolling it from one side to the other.
- Move the rolled omelette to the side where you started to roll and apply more oil to the pan with a paper towel, even under the omelette.
- Pour in a thin layer of the egg mixture to just cover the bottom of the pan again. Make sure to lift the omelette to spread the mixture underneath.
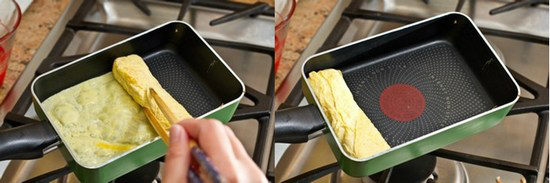
- When the new layer of egg has set and is still soft on top, start rolling it from one side to the other.
- Repeat the process. This is now the third round.
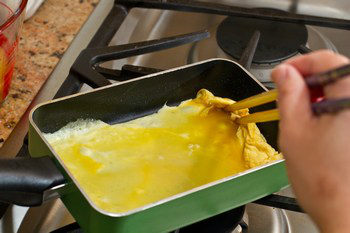
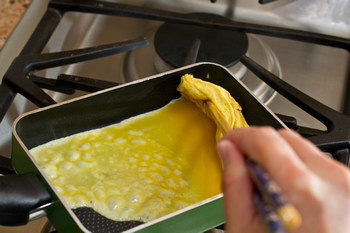
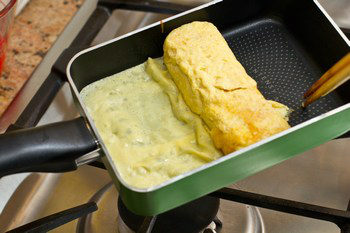
- This is the fourth round. Pour in more egg mixture and make sure it thinly coats the bottom of the pan, including under the rolled omelette.

- Continue rolling it into a log shape. Tip: Control the temperature of the pan by lifting the frying pan rather than adjusting the stove heat. If the heat is too weak, the egg will stick to the frying pan, so be careful.
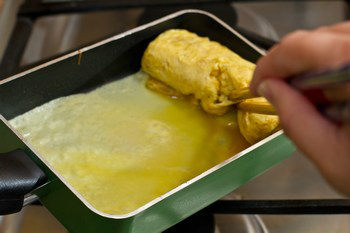
- This is the fifth round.
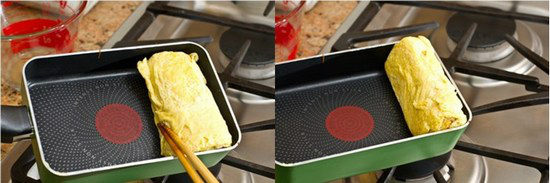
- This is the sixth and final round.
- You can brown the omelette a little bit.
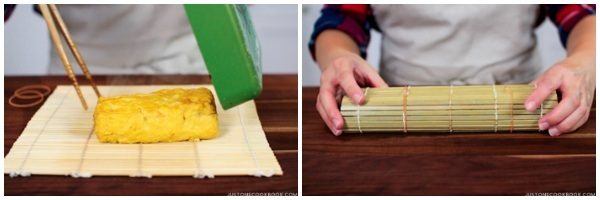
- Remove it from the pan and place the omelette on a bamboo sushi mat. While it’s still hot, roll up the omelette in the bamboo mat to help set its shape. Let it stand for 5 minutes.

(Method 2) To Cook in a Round Frying Pan
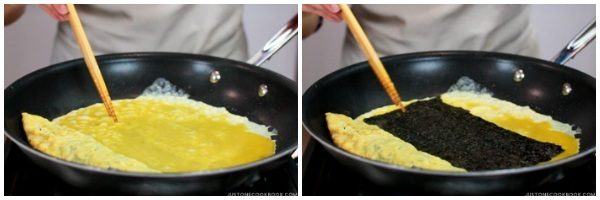
- Heat the pan over medium heat. Then, dip a folded paper towel in 2 Tbsp neutral oil and apply a thin layer of oil to the pan. To check if the pan is hot enough, put a drop of the egg mixture in the pan. When you hear a sizzling sound, the pan is ready. Then, pour a thin layer of the egg mixture into the pan, quickly tilting the pan so that the egg mixture coats the entire cooking surface.
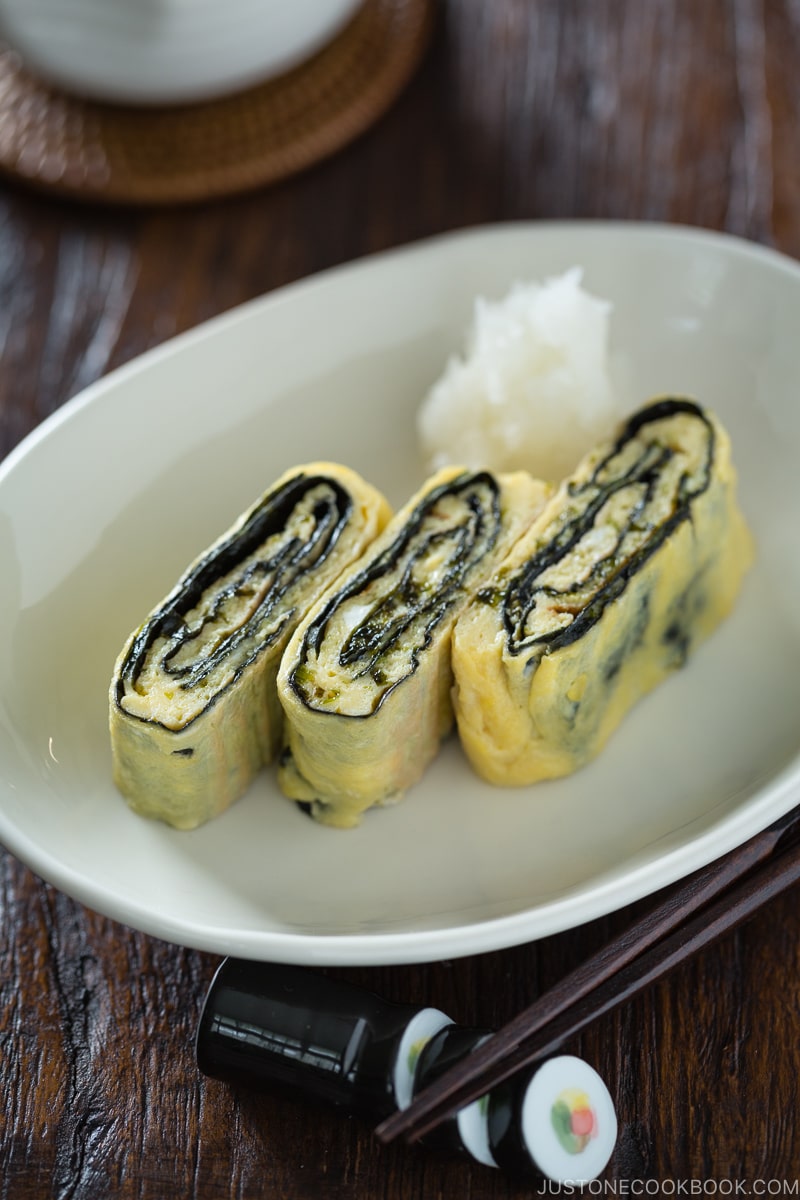
- Poke any air bubbles to release the air. After the bottom of the egg has set but is still soft on top, start rolling the egg into a log shape from one side to the other, starting from the far side of the pan and rolling toward the pan handle. Here, I added ½ sheet of nori (optional) to my omelette and then rolled.
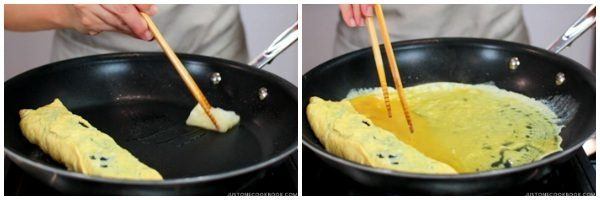
- Move the rolled omelette to the far side of the pan where you started to roll and apply more oil to the pan with a paper towel, even under the omelette. Pour in a thin layer of the egg mixture to just cover the bottom of the pan again. Make sure to lift the omelette to spread the mixture underneath.
- When the new layer of egg has set and is still soft on top, start rolling it from one side to the other. This is optional, but I placed another layer of ½ nori sheet on top before rolling.
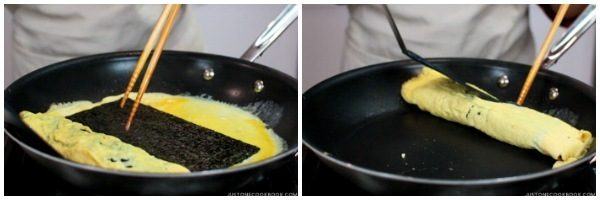
- Move the rolled omelette to the far side of the pan where you started to roll and apply more oil to the pan with a paper towel, even under the omelette. Then pour in a thin layer of the egg mixture to just cover the bottom of the pan again. Make sure to lift the omelette to spread the mixture underneath.
- When the new layer of egg has set and is still soft on top, start rolling it from one side to the other. I placed another ½ sheet of nori here before rolling. Continue until you’ve used all of the egg mixture.
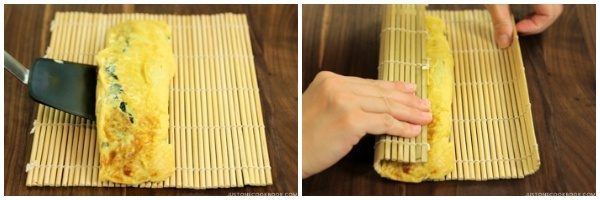
- Remove it from the pan and place the omelette on a bamboo sushi mat. While it’s still hot, roll up the omelette in the bamboo mat to help set its shape. Let it stand for 5 minutes.

To Serve
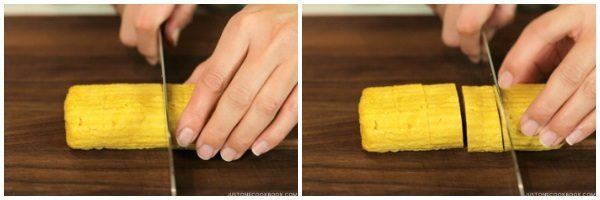
- Slice the omelette into ½-inch (1-cm) pieces.
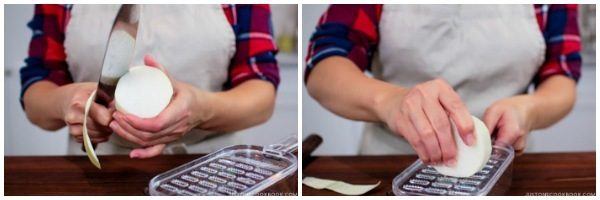
- Peel and grate 3 oz daikon radish. Gently squeeze the water out and place in a small dish or bowl. Pour soy sauce over the grated daikon and serve on the side with the Tamagoyaki.
To Store
- You can put the Tamagoyaki in an airtight container and store in the freezer for up to 2 weeks. Defrost overnight in the refrigerator or microwave.
Nutrition
Editor’s Note: This post was originally published in March 2012. The video and new photos were added in January 2016. The post content was updated in August 2019.


Hello,
Thank you for your wonderful recipes.
Please, how long ahead a tamagoyaki can be prepared ? For example in the morning for dinner ?
Can I put in the refrigerator ?
Very grateful for your site
Feriale
Hi Feriale! Sure, you can make it in the morning and save it for dinner. I recommend keeping it in the fridge till serving though. 🙂 Thank you for reading my blog and trying out my recipe! 🙂
Thank you for answering my question so clearly and promptly.
Keep on the good work
I experimented with this recipe by using a mini-loaf pan in place of a tamagoyaki pan. It worked very well! Thank you for sharing this recipe, I’ve also used it for tamago zushi.
Hi Naressa! Oh mini loaf pan? Wow! I’m so happy to hear you adapted this recipe well! Thank you so much for your kind feedback! 🙂
Nana just ate half of the tamago by herself. I will make this again soon.
Hi Rose! I’m so happy to hear that your Nana enjoyed it! Thank you!!!
I would like to know where you bought the tamago pan I saw it on line (the same exact green one) when I was searching for it but now I cant find it again. Also wanted to know why was it that you added a sheet of seaweed to the egg when you showed it using the round pan, is it to give it more thickness or just a variation? thank you again in advance for your response.
Hi Angela! The link for the exact pan is here:
http://www.amazon.co.jp/T-fal-%E3%83%87%E3%82%A3%E3%83%95%E3%83%A5%E3%83%BC%E3%82%B6%E3%83%AB-%E3%82%A8%E3%83%83%E3%82%B0%E3%83%AD%E3%83%BC%E3%82%B9%E3%82%BF%E3%83%BC-12%C3%9718cm-C04618/dp/B005I1P94S/ref=pd_sim_k_8
I put the link in the recipe (under “What you will need”). I can’t find the same product anywhere on English site. My mom bought the pan and sent to me from Japan.
As for the nori, I didn’t want to make the same plain tamagoyaki for the round pan, so I added Nori inside. No specific reason. Just wanted to show you another variation while showing how to make in a round pan, so the video won’t be over 10 minutes. 🙂
Hope that helps!
Thank you for posting this recipe. It’s my son’s favourite and I want to try and make it. I think I have tried about 20 of your recipes in the past month and I must say, they have all turned out great without me having to adjust sugar or salt amounts which I sometimes do when I use Japanese recipes. Looking forward to try more recipes and I’m gonna try a dessert recipe soon too!
Hi Carol! I’m so happy to hear you like my recipes! Thank you for trying them! So happy to hear your son likes this recipe. Hope he’ll enjoy it! 🙂
Hi Jean! Thanks so much for your kind words! Oh boy, I hope the final videos will be good… We haven’t started to edit yet…so I haven’t see yet. Ahh! 🙂
I can`t believe how thick the tamagoyaki is with only 3 eggs! Since I love nori, I will certainly add it. I didn`t know there was such a thing as cooking chopsticks. I will be looking for some the next time I am at an Asian grocery store. Thanks Nami!
Hi Kitblu! My tamagoyaki pan is narrow, so 3 eggs are plenty for the size of my pan. Plus, adding dashi increase the volume. Yes, we have cooking chopsticks! They are longer than regular chopsticks so that you don’t burn your hands / fingers while cooking. 🙂
I love tamagoyaki/dashimaki and I love making them it’s fun. I’ve never got them as cute as yours but I try to do my best…. I love your green pan, too!
Hi Genus! It’s the same when you put it in your tummy! 😀 I’m sure your make delicious tamagoyaki, Genus! 🙂
Pretty good! I only had the soy sauce and sugar to add, used a round pan, didn’t strain it, rolled it with spatulas and didn’t roll it in a matt afterward either. Still turned out pretty good and held its shape well. Cool recipe that can be simplified a lot if you don’t have the required bits. Fun to make too!!
Hi Doom! Awesome! Yes you can simply use regular eggs to make this way and I do that for my kids bento (easy and quick). 🙂 Thanks so much for trying this recipe and for your kind feedback!
A couple of hours ago I came back home from a trip to Japan and just HAD to try your recipe ( I bought the tamagoyaki pan in Osaka) and my omelette turned out really good. Thank you for your oh so fabulous tutorial!
Hi Alexandra! Wow, you’re already cooking after the trip! Hope you had a wonderful time in Japan! I’m so happy to hear you enjoyed this recipe and thanks so much for your kind feedback! Tamagoyaki pan from Japan is very good (if it’s from good source). Enjoy making lots of tamagoyaki! 🙂
I love your site and recipes. Last night I decided to go all out and make a complete bento box for my husband. I finally got to use the bento box sets I had bought for him. ????
The lunch was centered around this recipe. I made two Tamagoyaki rolls, one sliced and put on rectangles of rice bound with nori and some wasabi between them. This was a first for me. The other I left more or less intact (I am still trying to get the hang of making them into a nice neat roll ????), with a bunch of seasoned rice. I even got out my punches and sprinkled nori shapes on top of the rice. I finished it off with kappa maki, and onigiri.
Anyway, my husband was so impressed that he took photos of it and posted it on his Facebook page (he had always said that he would ever post photos of food). They got him more likes and comments than anything else has ever had! I am going to get him to put a link to your fabulous site so everyone else can do this! ????
Hi Danielle! What a cute story! Thank you so much for sharing! I’m so happy to hear your husband enjoyed it (and even took a photo of it!). 🙂 It seems like you made a fantastic lunch box! It’s only the beginning, I know you’ll be hooked to make more bentos! 😉
I always thought this recipe was something Mama made up. She changed it because she was unable to get certain ingredients until we transferred to Japan in 1968. But by then my sister and I only wanted them the way she originally made…sans Mirin and dashi. We also make them scrambled and served over fresh rice.
Hi Mary! That’s wonderful! Your mom is an amazing cook! It’s family recipe and family taste. You can totally enjoy without them. 🙂
Seriously you are like the best cook of Japanese food ever. I love your recipes. It’s always just so perfect!
Hi Teia! Your words are too kind. Thank you so much! 🙂
ちぇんさん、アメリカ人ですそしてあの平鍋amazon.co.jpで買いますことができません。アメリカにどこ買いますか。三ツ和か。
こんにちは、Elizarさん!台湾の東急ハンズで買いました。アマゾンでも売ってます。
http://amzn.to/1GLahVs
雪平鍋のことですよね?
Hey! Thank you for the recipe <3
I'm a little confused about the amounts. Do you really need 4 tablespoons of dashi and only one teaspoon mirin and soy sauce? In the pictures it looks like you have more liquid. I made it and it turned out very pretty thanks to your guide!
But it was also very strong, which made me wonder if I understood the amounts correctly? Would love if someone could help me with that..:)
Hi Ditte! Yes, the amount is correct. The picture may not show you well in terms of the size/amount as the image is zoomed in shot (the bowl is small size, but camera is more close up). You can adjust the amount of seasonings as you like, but we usually put this in bento box, so it’s seasoned well enough to be enjoyed at room temperature.