
In Japan, we have a few dedicated dishes that are strongly tied to special occasions or celebratory events, and one of them is the brightly colored Chirashi Sushi (ちらし寿司).
What is Chirashi Sushi?
The word chirashi means “scattered” (散らし), so chirashi sushi literally means ‘scattered sushi’. It is a traditional style of sushi said to have inspired the modern-day sashimi bowl.
The most distinctive feature of chirashi sushi is its presentation. Unlike the individually hand pressed (or rolled then sliced), single bite-size pieces of sushi, chirashi serves the rice in a large rice tub or a lacquer box and top it with a variety of raw fish and vegetable garnishes.
There are generally 2 types of chirashi sushi you can find in Japan:
Type 1: Sashimi Over Sushi Rice
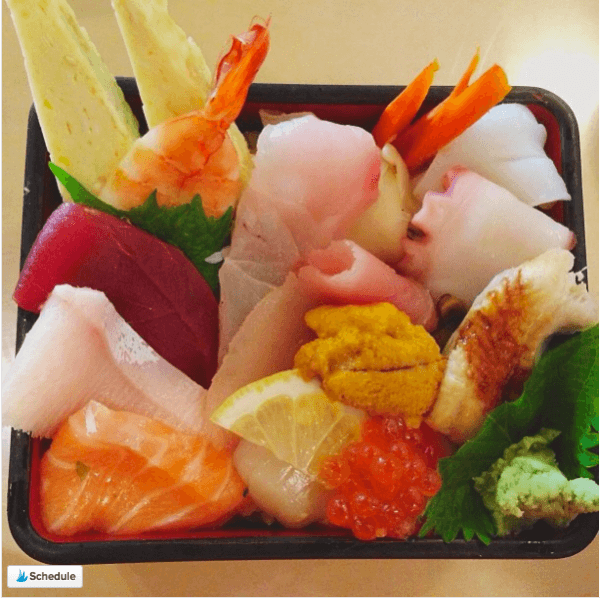
Chirashi sushi (chirashi don) with sashimi — @justonecookbook on Instagram
I believe this chirashi sushi (also known as chirashi don) is what most people are familiar with. When you order chirashi sushi at Japanese restaurants, you’ll get a lacquer box of assorted sashimi nicely plated over the sushi rice.
Around the early 1900s, sushi chefs in Edo (current Tokyo area) started to serve assorted sashimi (raw seafood) on top of sushi rice and called it chirashi sushi.
However, when you go outside of the Tokyo area, this is called Edomae* chirashi sushi (江戸前ちらし寿司) or kaisen chirashi sushi (海鮮ちらし寿司) to differentiate the mainstream chirashi sushi, which I’ll talk about next. * Edomae or Edo-style means old Tokyo style.
* On a side note, when sashimi is placed over regular steamed rice, not vinegared sushi rice, it’s called kaisen don (海鮮丼). You can get these sashimi bowls at non-sushi restaurants. I also have a recipe for Sashimi Bowl. Sushi restaurants make only sushi rice so they only offer sashimi over vinegared sushi rice. Now you know the difference between kaisen don and kaisen chirashi sushi — it’s all in the rice.)
Type 2: Chirashi Sushi
This festive and visually stunning chirashi sushi is one that we often serve at happy or celebratory events, such as Hinamatsuri (Girls’ Day) in March and Kodomo no hi (Children’s Day) in May.
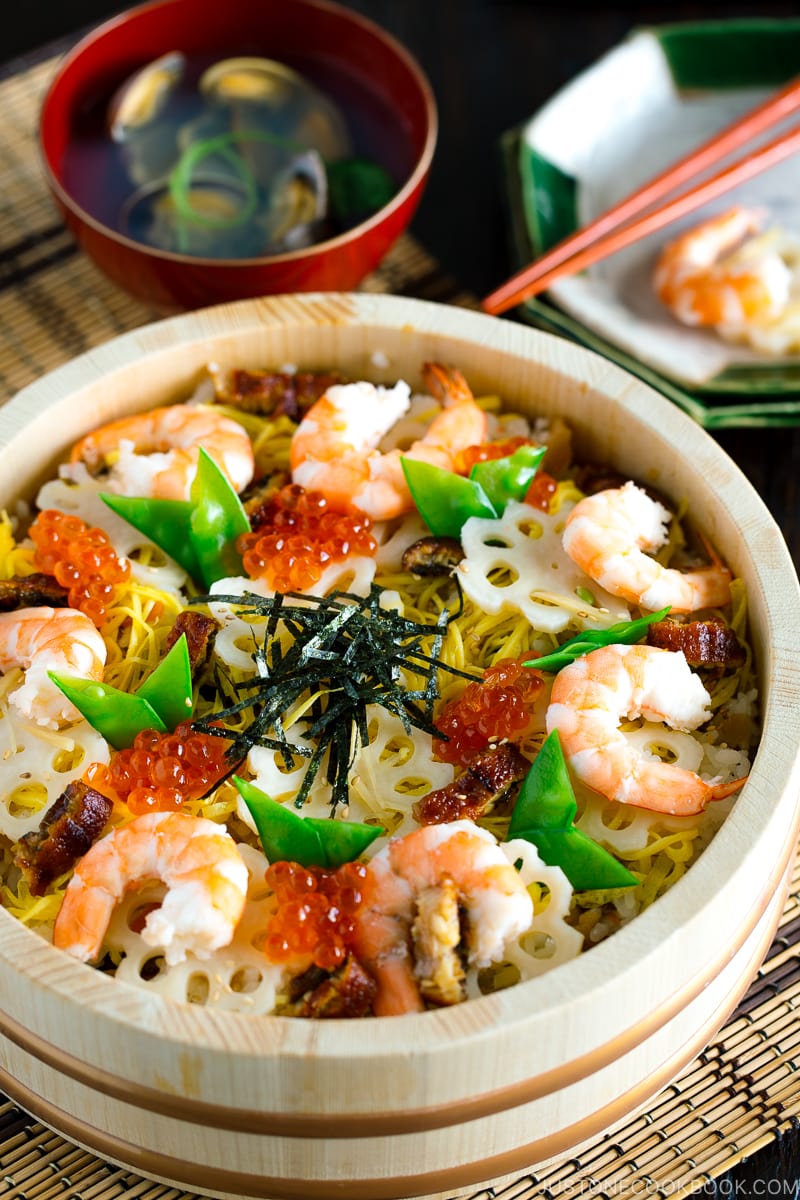
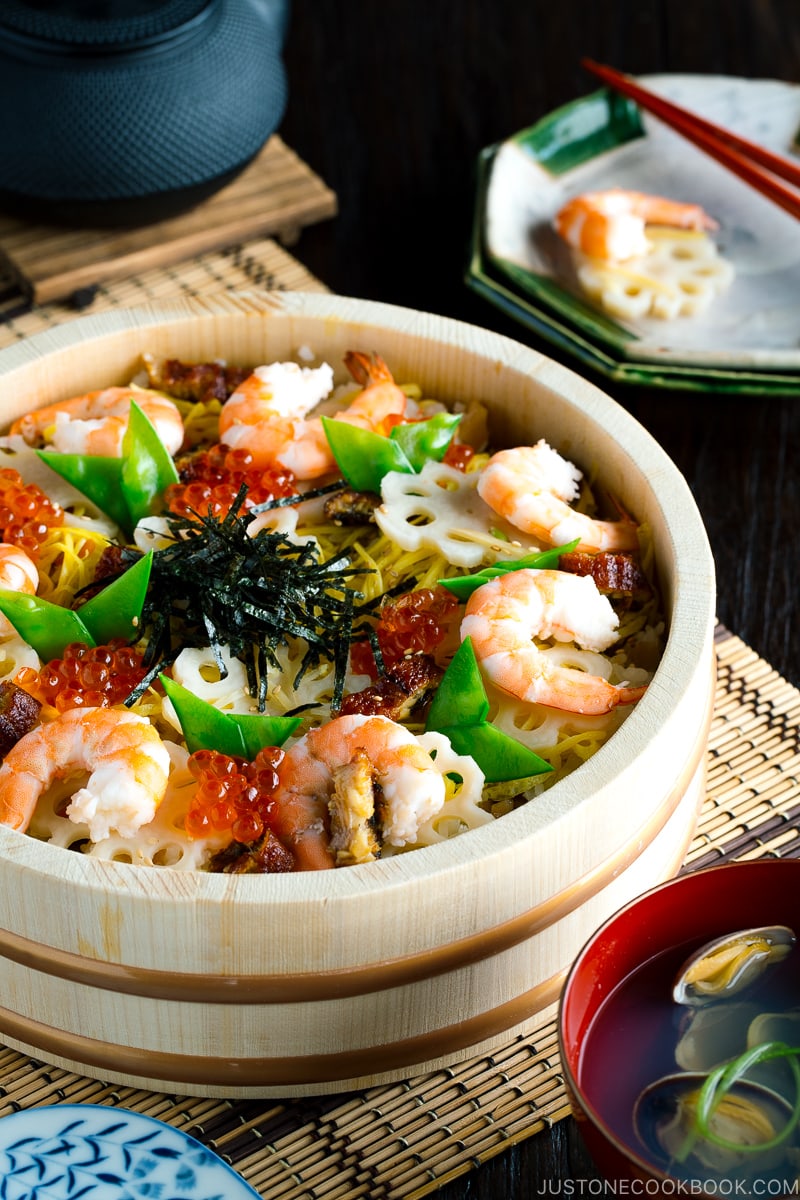
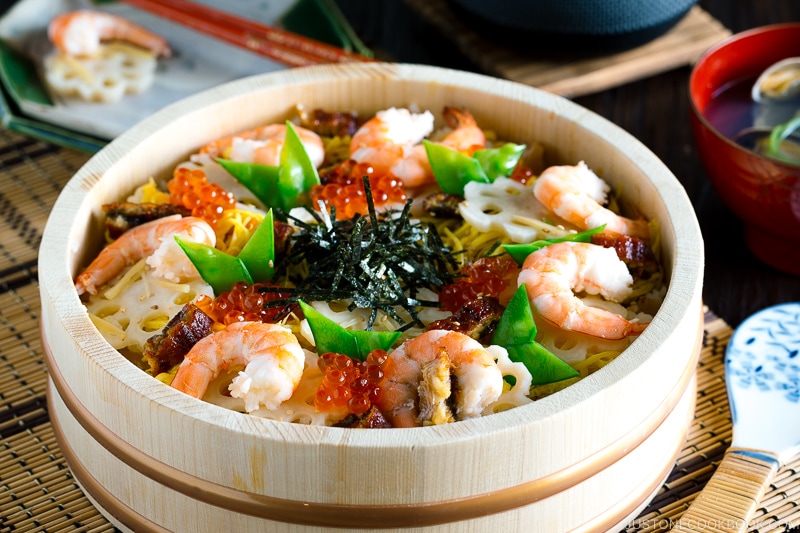
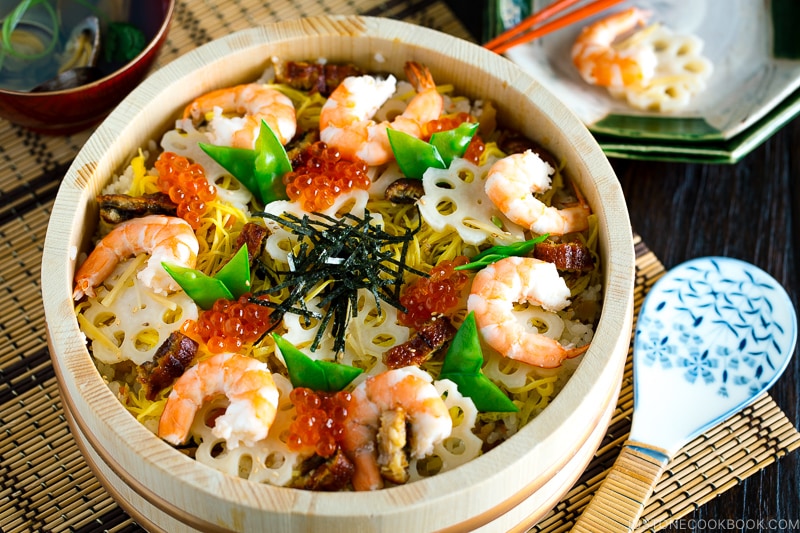
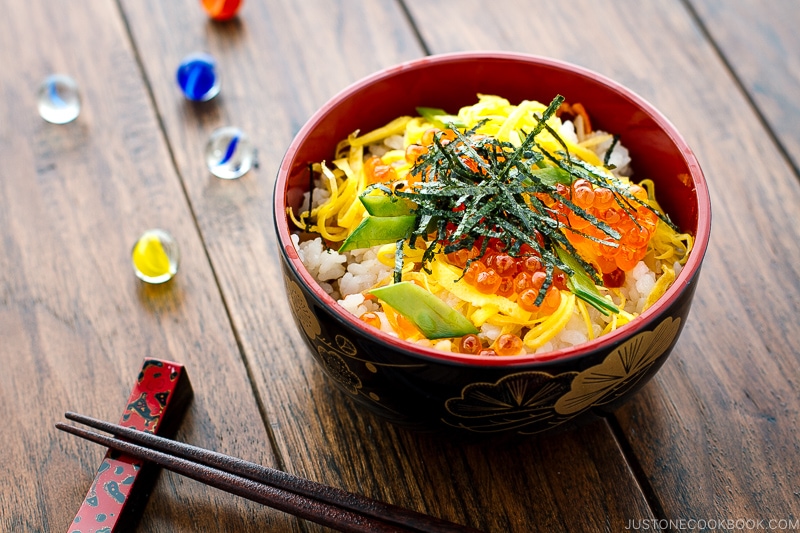
The rice is served in a large wooden platter called hangiri and the ingredients are mixed in and topped on the sushi rice. It’s often vegetarian, and if it is not, it usually contains only cooked seafood like unagi and shrimp rather than raw fish.
Regional Differences
Depending on the regions, chirashi sushi is also called gomoku sushi (五目寿司), gomoku chirashi (五目ちらし), or barazushi (ばら寿司). The alternate naming conveys the regional nuances and helps distinguish the dish from the other chirashi (Type 1 above).
My mom is originally from Osaka before she moved to Tokyo, so she always calls this type of sushi bara sushi, which is commonly used in the Osaka area.
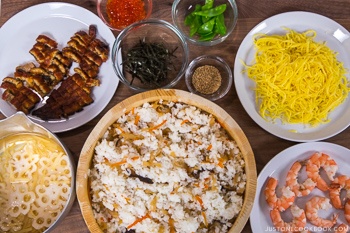
Ingredients and Topping Choices
Every family has their own version of chirashi sushi, and today I’ll show you how you can make it your own too!
In my recipe, I included some traditional ingredients which can be hard to find if you don’t live near a Japanese grocery store. However, you have the flexibility to simplify and modify! Feel free to leave out any ingredients you can’t find.
Here are my suggestions for ingredients and toppings that go well with chirashi sushi:
Ingredients (to mix in with the sushi rice):
- Dried shiitake mushrooms
- Carrots
- Gobo (burdock root) — can also be found at Whole Foods or local co-ops.
- Dried kanpyo (gourd strips)
- Bamboo shoot (blanched)
- Inari age (seasoned deep-fried tofu pouch)
- Kamaboko and chikuwa (fish cakes)
- Koyadofu (seasoned dehydrated tofu)
Toppings:
- Avocado (sliced or cubed)
- Snow peas
- Green beans (blanched)
- Egg crepe
- Shrimp
- Crab (real or imitation)
- Kinome (木の芽 (山椒)) – I look for it locally but no luck…
- Octopus (boiled)
- Sakura denbu (seasoned ground codfish) – pink color adds a nice touch for Girl’s Day celebration!
- Tobiko (flying fish roe)
Make Chirashi Sushi for Hinamatsuri & Potluck!
Traditionally, Chirashi Sushi is eaten on Hinamatsuri (雛祭り) or Doll’s Festival on March 3 every year. You can read more about this Japanese custom in this post.
Chirashi Sushi is a very easy type of sushi and does not involve any raw fish. It’s a perfect dish for big family gatherings and potluck parties!
You can purchase the sushi mixing bowl called hangiri (or sushi oke) on Amazon. My hangiri below is 10″ (26 cm) which is great for a family of four.
Quick & Easy Chirashi Sushi Recipes
1. Simplified Chirashi Sushi using a packaged seasoning mix — this is one of the easiest sushi recipes you can make at home!
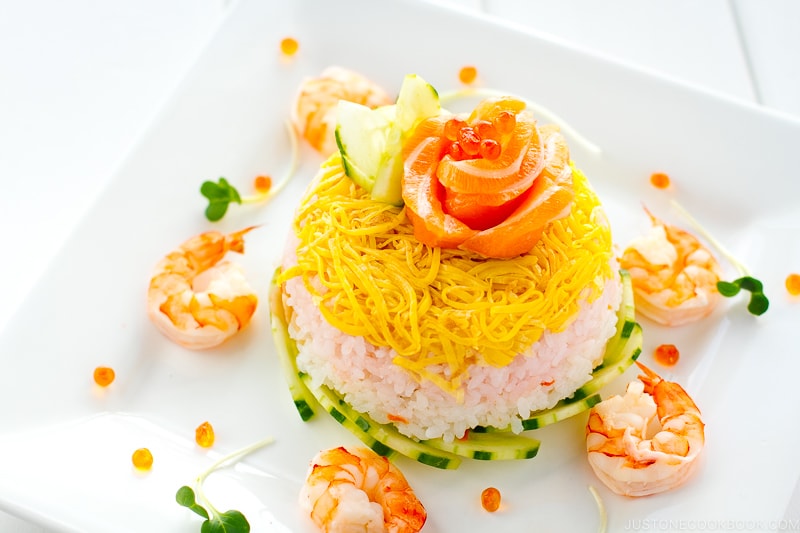
2. Chirashi Sushi Cake – This is a modern take on chirashi sushi and very popular at weddings.
Wish to learn more about Japanese cooking? Sign up for our free newsletter to receive cooking tips & recipe updates! And stay in touch with me on Facebook, Pinterest, YouTube, and Instagram.
Chirashi Sushi
Ingredients
For the Pickled Lotus Root & Ginger
- 2 inches lotus root (renkon)
- 1 knob ginger (1 inch, 2.5 cm)
- ½ cup rice vinegar (unseasoned)
- ⅓ cup sugar
- ½ tsp Diamond Crystal kosher salt
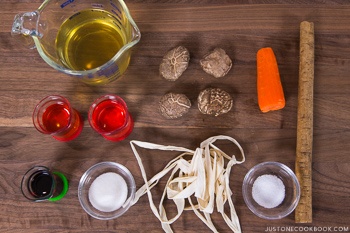
For the Chirashi Sushi Mix
- 4 dried shiitake mushrooms
- ½ cup water (for soaking the shiitake)
- ⅔ gobo (burdock root)
- 0.8 oz dried kanpyo (gourd strips)
- 1 tsp Diamond Crystal kosher salt (for the kanpyo)
- ½ carrot
- 1¼ cups dashi (Japanese soup stock)
- ¼ cup sake (4 Tbsp)
- 3 Tbsp mirin
- 1 Tbsp sugar
- 2 Tbsp soy sauce
For the Egg Crepe (Kinshi Tamago)
- 3 large eggs (50 g each w/o shell)
- 1 Tbsp sugar (optional)
- 1 Tbsp dashi (Japanese soup stock) (or sake or water)
- ¼ tsp Diamond Crystal kosher salt
- ½ Tbsp neutral oil
For the Snow Peas
- 6 snow peas
- ⅛ tsp Diamond Crystal kosher salt
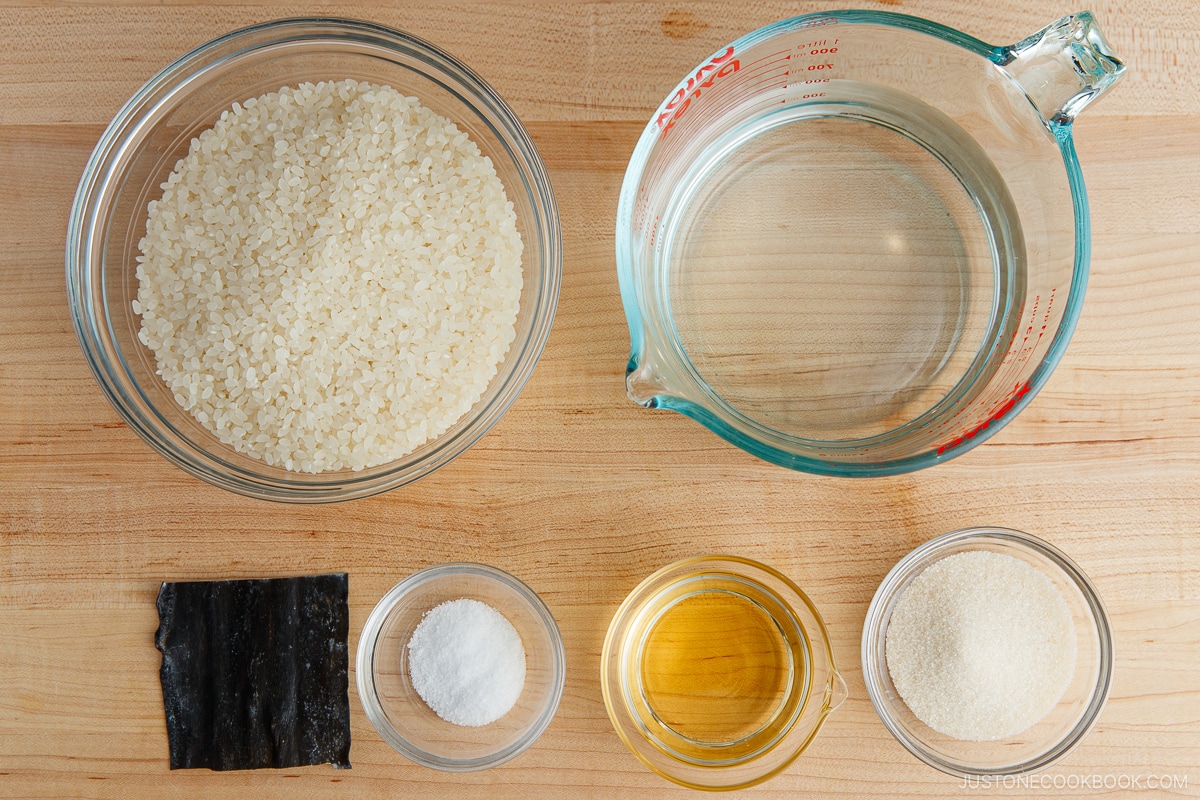
For the Sushi Rice
- 2¼ cups uncooked Japanese short-grain white rice (3 rice cooker cups, 540 ml; yields 6⅔ cups or 990 g of cooked rice)
- 2¼ cups water (540 ml)
- 1 piece kombu (dried kelp) (5 g; 2 x 2 inches, 5 x 5 cm per piece)
- ⅓ cup rice vinegar (unseasoned)
- 3 Tbsp sugar
- 1½ tsp Diamond Crystal kosher salt
For the Unagi (Eel)
- 1 fillet unagi (freshwater eel) fillet (5.6 oz, 160 g)
For the Shrimp
- 8–10 large and jumbo shrimp
- 1 Tbsp sake
- ⅛ tsp Diamond Crystal kosher salt
For the Toppings (optional)
- 4 Tbsp ikura (salmon roe)
- ½ Tbsp toasted white sesame seeds
- 4 Tbsp shredded nori seaweed (kizami nori)
Instructions
To Make the Pickled Lotus Root & Ginger
- Gather all the ingredients.
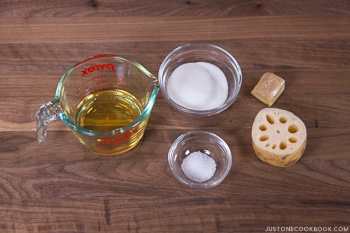
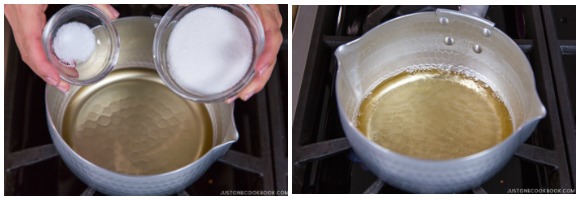
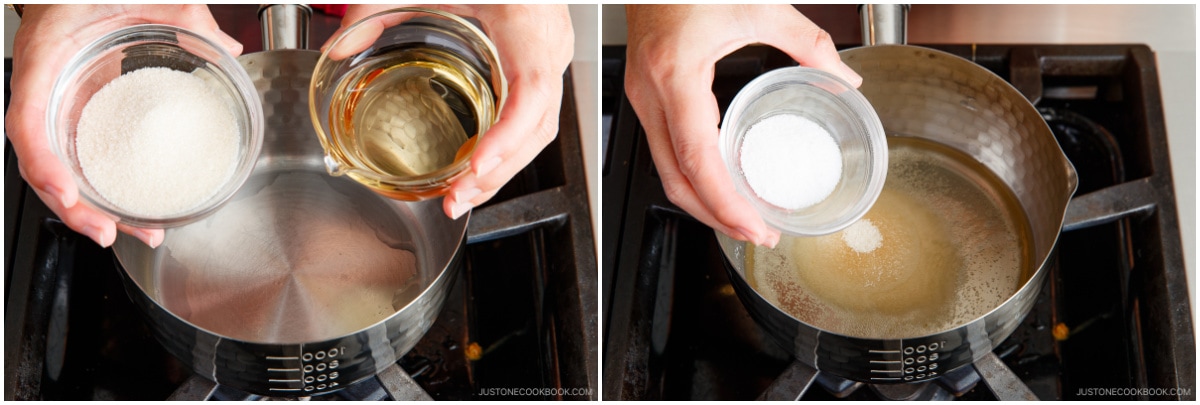
- Combine ½ cup rice vinegar (unseasoned), ⅓ cup sugar, and ½ tsp Diamond Crystal kosher salt in a small saucepan. Bring it to a boil and let the sugar dissolved completely. Set aside to cool.
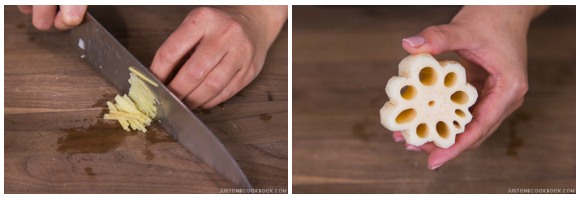
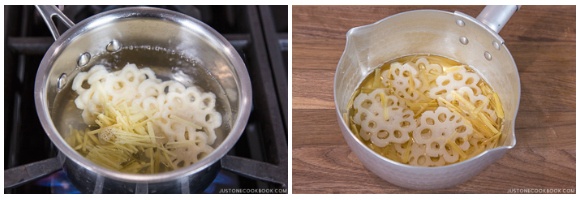
- Peel and cut 1 knob ginger into thin julienned strips (the thinner, the better). Peel 2 inches lotus root (renkon) and cut out the edge to make a flower shape (read how in my hana renkon tutorial).
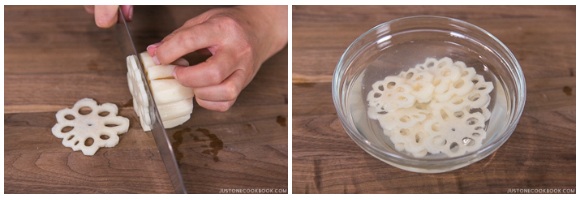
- Cut the lotus root into ⅛-inch (3-mm) slices. Soak them in vinegared water (add 1 tsp rice vinegar to a bowl of water) for 5 minutes to prevent it from turning brown.
- Boil some water in a small saucepan and blanch the ginger and lotus root for 3 minutes. Drain well and transfer them to the vinegar and sugar mixture to marinate. Make in advance: You can make this ahead of time and keep it up to 1 week in the refrigerator.
To Make the Chirashi Sushi Mix
- Gather all the ingredients.
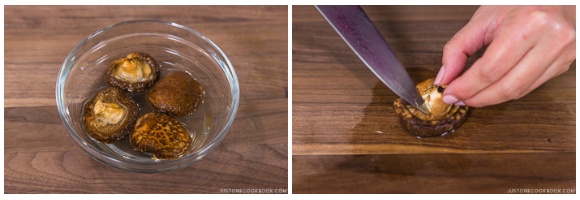
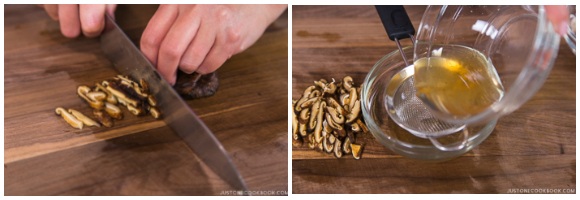
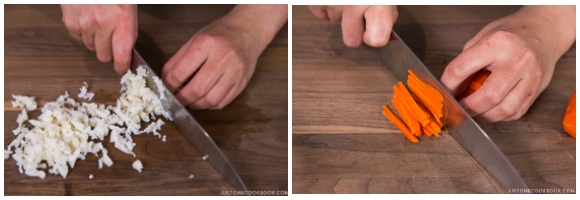
- Soak 4 dried shiitake mushrooms in ½ cup water until they are hydrated and tender. Then, squeeze the mushrooms and reserve the liquid (this is called shiitake dashi) in the bowl. Cut off and discard the stems.
- Slice the shiitake mushrooms. Strain the reserved shiitake dashi to remove any impurities. Save this shiitake dashi until you’re ready to use it in Step 8.
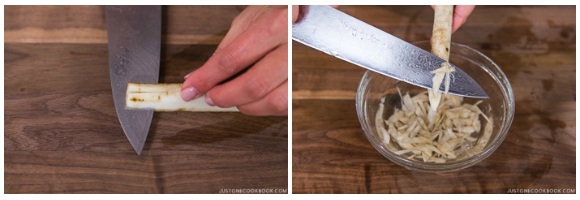
- Make a crisscross incision at one end of ⅔ gobo (burdock root). This incision will help you shave the gobo like a pencil. Shave it into small, thin pieces as you rotate the gobo. Soak the cut pieces in water so they won‘t turn brown. Change the water 1–2 times. Drain right before you start cooking in Step 8.
- In a small saucepan, bring some water to a boil. Quickly rinse 0.8 oz dried kanpyo (gourd strips) in running water and drain. Rub the kanpyo with 1 tsp Diamond Crystal kosher salt. Rinse and drain well.
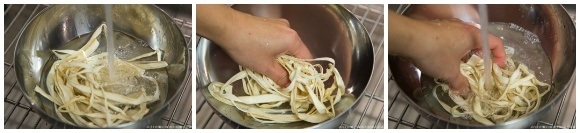
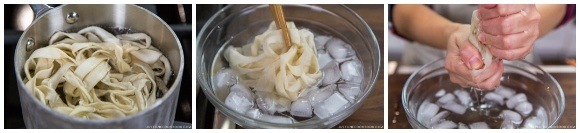
- When the water is boiling, cook the kanpyo for 3 minutes. Transfer to iced water to stop the cooking process and squeeze the water out.
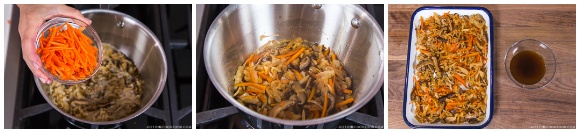
- Cut the kanpyo into small pieces. Next, cut ½ carrot into julienned strips.
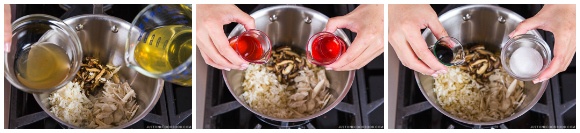
- Add the shiitake mushrooms, gobo, and kanpyo to the empty pot (keep the carrot aside for now). Add 1¼ cups dashi (Japanese soup stock), the reserved shiitake dashi (the liquid from hydrating dried shiitake), ¼ cup sake, 3 Tbsp mirin, 1 Tbsp sugar, and 2 Tbsp soy sauce. Bring it to simmer on medium heat.
- Skim the foam and scum on the surface as much as you can, decrease the heat to a simmer, and cover with an otoshibuta (drop lid). This lid ensures that the ingredients are submerged under the liquid and the flavorful cooking liquid circulates well. To easily make one with aluminum foil, follow my tutorial.

- Add the carrot while there is still liquid in the pot but toward the end of cooking so that you don‘t overcook carrot (you don‘t want it mushy). Continue to cook with the otoshibuta until the liquid is almost gone. The whole cooking process is about 20–25 minutes, depending on the heat. Transfer the Chirashi Sushi Mix to a plate to cool completely. If you end up with some extra cooking liquid, you can save a little bit to season the rice later. Make in advance: You can make this ahead and keep it in the refrigerator for up to 3–4 days.
To Make the Egg Crepes
- Gather all the ingredients for the Kinshi Tamago.
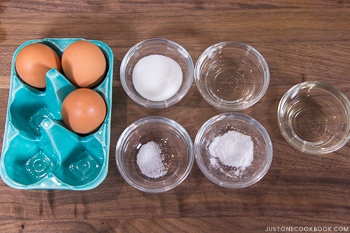
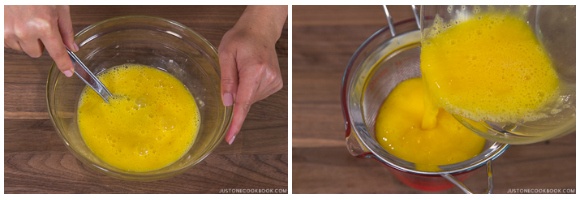
- Whisk 3 large eggs (50 g each w/o shell). Add the rest of the ingredients into the bowl: 1 Tbsp sugar, 1 Tbsp dashi (Japanese soup stock), and ¼ tsp Diamond Crystal kosher salt. Whisk to combine; then, strain the egg mixture to get a silky texture.
- Heat a large nonstick frying pan and grease the pan with a paper towel dipped in ½ Tbsp neutral oil. Make sure to wipe off the excess oil. When the pan is hot, pour just enough egg mixture to cover the bottom of the entire frying pan.
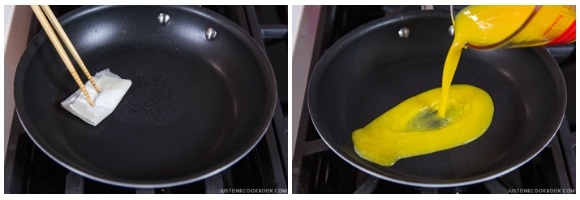
- Tilt the pan to fill the frying pan with the egg mixture and cover with the lid. Remove the pan from the heat and place it on a cold towel to cool so the egg doesn‘t become brown. Once the egg crepe is cooked through, transfer to a wire rack and let cool completely. Continue this process until all the egg mixture is gone.
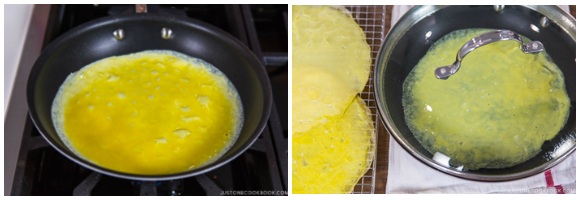
- Roll up the egg crepes and cut thinly into julienned strips. Loosen them up and set aside. Make in advance: You can make this ahead and keep it in the refrigerator for up to 2–3 days or in the freezer for up to a month.

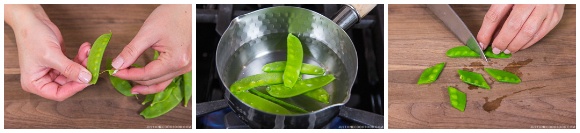
To Prepare the Snow Peas
- Remove the tough strings from the edges of 6 snow peas. Bring some water to boil in a small saucepan. Add ⅛ tsp Diamond Crystal kosher salt and blanch the snow peas for 2 minutes. Drain and cut diagonally in half or thirds.
To Cook the Sushi Rice
- Gather all the ingredients. For detailed, step-by-step instructions with photos, please see my post on How to Make Sushi Rice.
- Rinse and wash 2¼ cups uncooked Japanese short-grain white rice (3 rice cooker cups) 3 times and drain well.
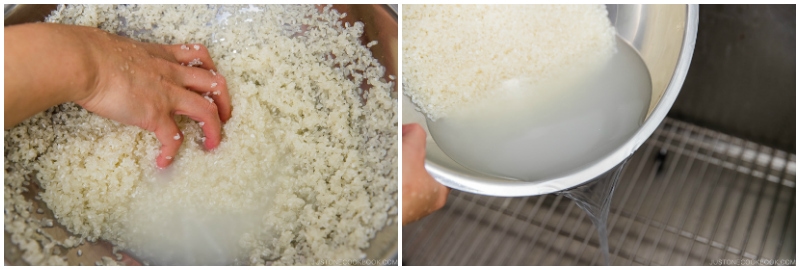
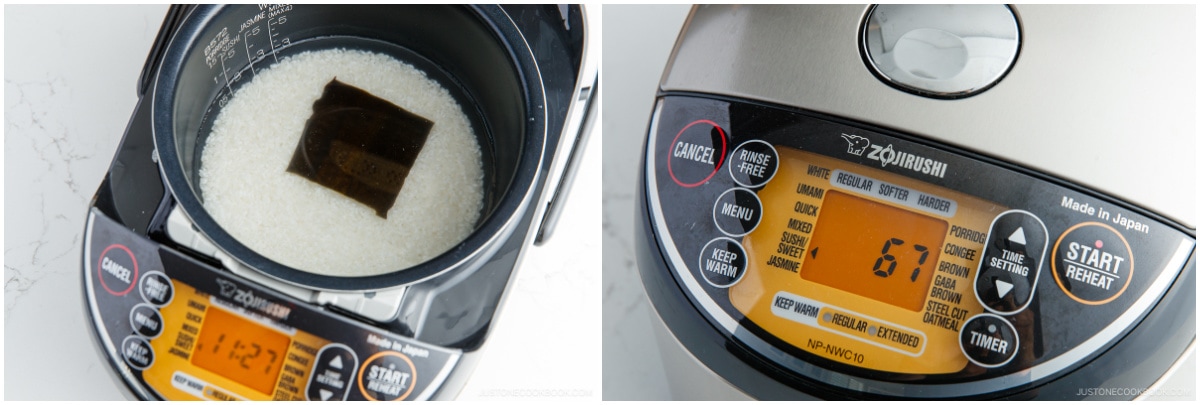
- Put the rice in a rice cooker bowl and add 2¼ cups water, or up to the “sushi“ water level for 3 rice cooker cups (a bit less than regular rice). Place 1 piece kombu (dried kelp) on top. Soak the rice for 20–30 minutes. Then, start cooking. Tip: If you don‘t have a rice cooker, see how to cook short-grain rice using a pot over the stove, Instant Pot, or donabe.
- Meanwhile, prepare the sushi vinegar seasoning. In a bowl, combine ⅓ cup rice vinegar (unseasoned), 3 Tbsp sugar, and 1½ tsp Diamond Crystal kosher salt. Mix them together. You can microwave or heat the mixture in a saucepan over the stove to dissolve the sugar completely and remove the strong vinegar taste/smell. Set aside to add the sushi seasoning in a later step.
To Prepare the Unagi
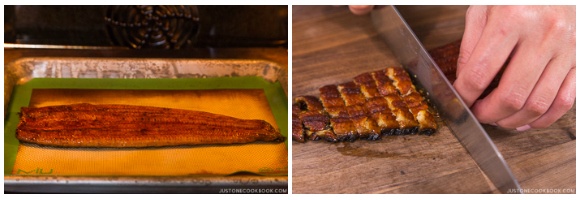
- Unagi is typically already cooked/broiled when you purchase it. All you need to do is reheat in the oven. Set your oven to broil on High (550ºF/290ºC) and preheat for 3 minutes. Line the baking sheet with aluminum foil. Spray a bit of oil on the aluminum foil and place 1 fillet unagi (freshwater eel) fillet on top. Put the baking sheet in the middle rack of your oven and broil for 5–7 minutes (no need to flip). Once it’s cool to the touch, you can cut it into ¼-inch (0.6-mm) pieces. Set aside.
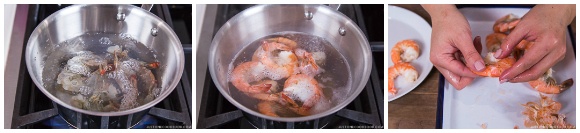
To Prepare the Shrimp
- Using a skewer, devein 8–10 large and jumbo shrimp without removing the shell (see my tutorial on how to devein shrimp). We peel the shell after cooking to retain the flavor of the shrimp. Boil water in a medium saucepan. Add ⅛ tsp Diamond Crystal kosher salt. Once boiling, add 1 Tbsp sake and the shrimp and simmer until pink, about 2–3 minutes. Remove the shell and set aside.
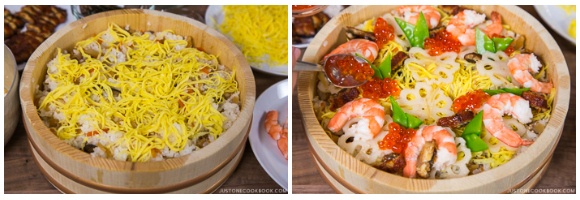
To Assemble the Chirashi Sushi
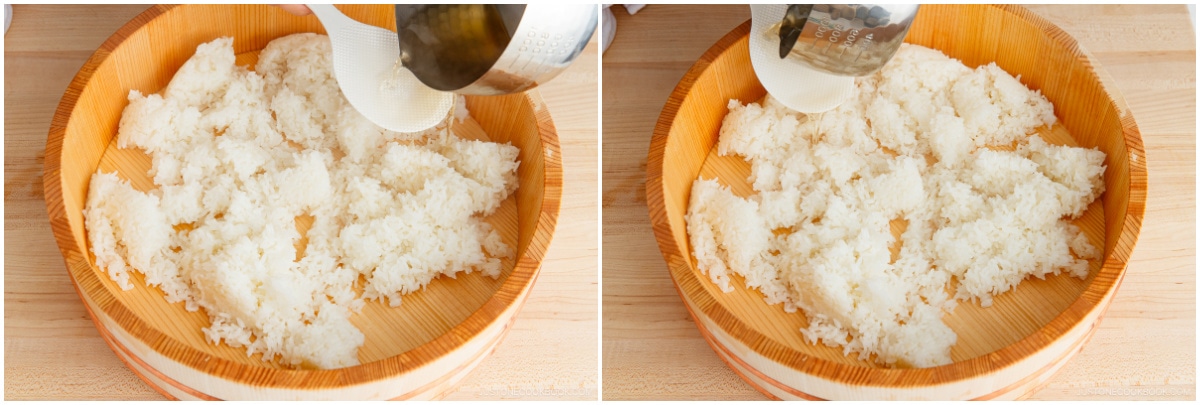
- Start this step when all the steps above are completed. When the rice is done cooking, discard the kombu from the cooked rice. Then, transfer the hot rice to a hangiri (sushi oke) (or a baking sheet lined with parchment paper). If you use a hangiri, quickly run it under water so the rice doesn’t stick.

- Pour the sushi vinegar seasoning over the rice paddle to evenly distribute the sushi vinegar over the rice.
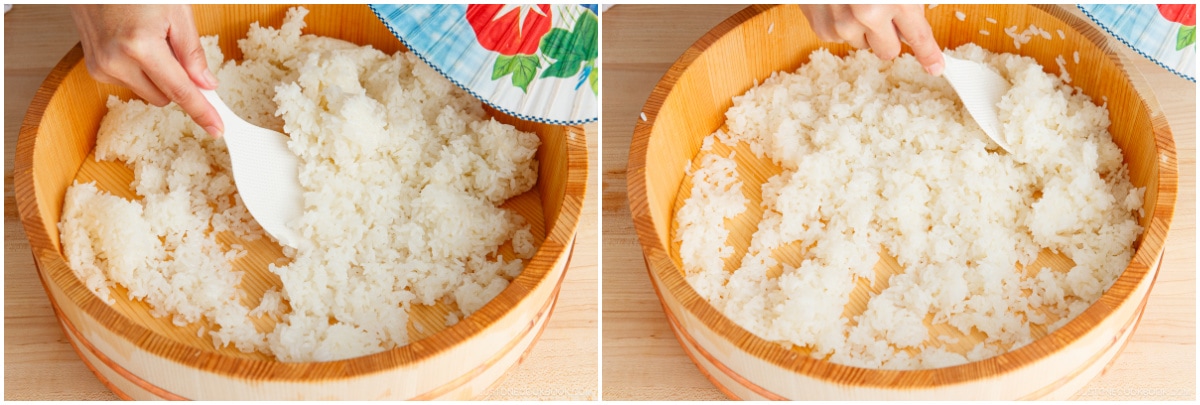
- With the rice paddle, slice the rice at a 45-degree angle to separate the rice and incorporate the seasoning (instead of mixing or stirring). At the same time, use a fan to cool the rice so the rice will shine and doesn‘t get mushy.
- Once the sushi rice is cooled, squeeze the Chirashi Sushi Mix to remove excess liquid (otherwise the rice gets too soggy). Add it to the sushi rice and gently combine with the rice paddle using a slicing motion. You can always add a few tablespoons of the reserved liquid to season the rice if you‘d like (I don‘t usually do it).
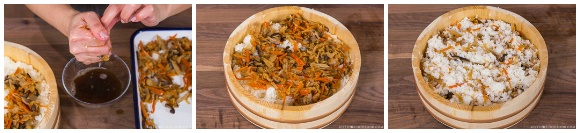
- Gather all the toppings you’ve prepared.
- First, scatter the shredded egg crepe on the sushi rice. Then, decorate the chirashi sushi as you like. I usually add the toppings in the following order: Lotus root, shrimp, unagi, snow peas, 4 Tbsp ikura (salmon roe), ½ Tbsp toasted white sesame seeds, and 4 Tbsp shredded nori seaweed (kizami nori) in the center. Enjoy!
To Store
- You can keep the leftovers in an airtight container and store in the refrigerator for 3 days and in the freezer for a month.
Nutrition
Did you make this recipe?
Tag @justonecookbook on Instagram so we can see your delicious creation!