Appearing in Japan in the 1950s, keema is a delicious Indian dish of ground meat, minced vegetables, and spices. Now adapted to local tastes and ingredients, Japanese-style Keema Curry is a one-pan recipe made quick and easy using Japanese curry roux.
Keema Curry (キーマカレー) is a traditional Indian curry dish made of ground meat, minced vegetables, and spices. In Japan, we have been enjoying this flavorful curry since the 1950s.
Today I’ll show you how to make quick and easy Japanese-style Keema Curry at home. 30 minutes is all you need! You can also swap out the meat for vegetarian/ vegan options.
What makes it Japanese-style? The spices are toned down, and other umami seasonings and curry roux are incorporated to suit the Japanese palate. Anyone who prefers milder heat, you’re going to love this curry!
Keema Curry In Japan
The first Keema Curry appeared in 1957 at a curry and coffee shop, Ajanta in Asagaya, Japan (currently located in Kojimachi). Since then Keema Curry has become a regular menu at Indian restaurants all over Japan.
Because of religious reasons, mutton is generally used in keema curry in India, but it was, and still is, difficult to obtain meat in Japan. Therefore, restaurants have been serving the curry with chicken or pork.
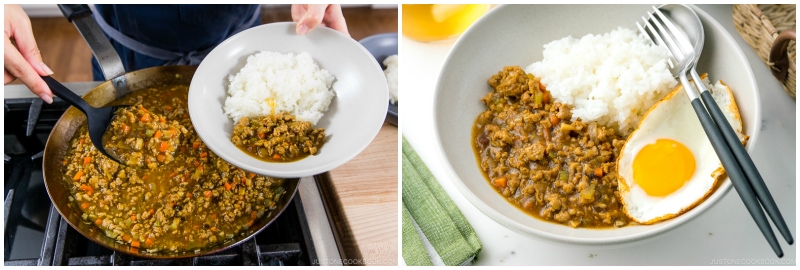
How to Make Japanese-Style Keema Curry
Keema Curry is also a popular dish among Japanese home cooks. Not only it tastes delicious, but it’s also a lot easier to make as compared to regular Japanese curry. The use of ground meat makes Keema Curry a breezy affair when you’re in a hurry. Here are the 3 simple steps:
- Chop vegetables into small pieces, similar to ground meat.
- Stir fry vegetables and meat first, add broth/water and curry powder, and simmer till the ingredients are tender.
- Add Japanese curry roux and simmer for a few minutes.
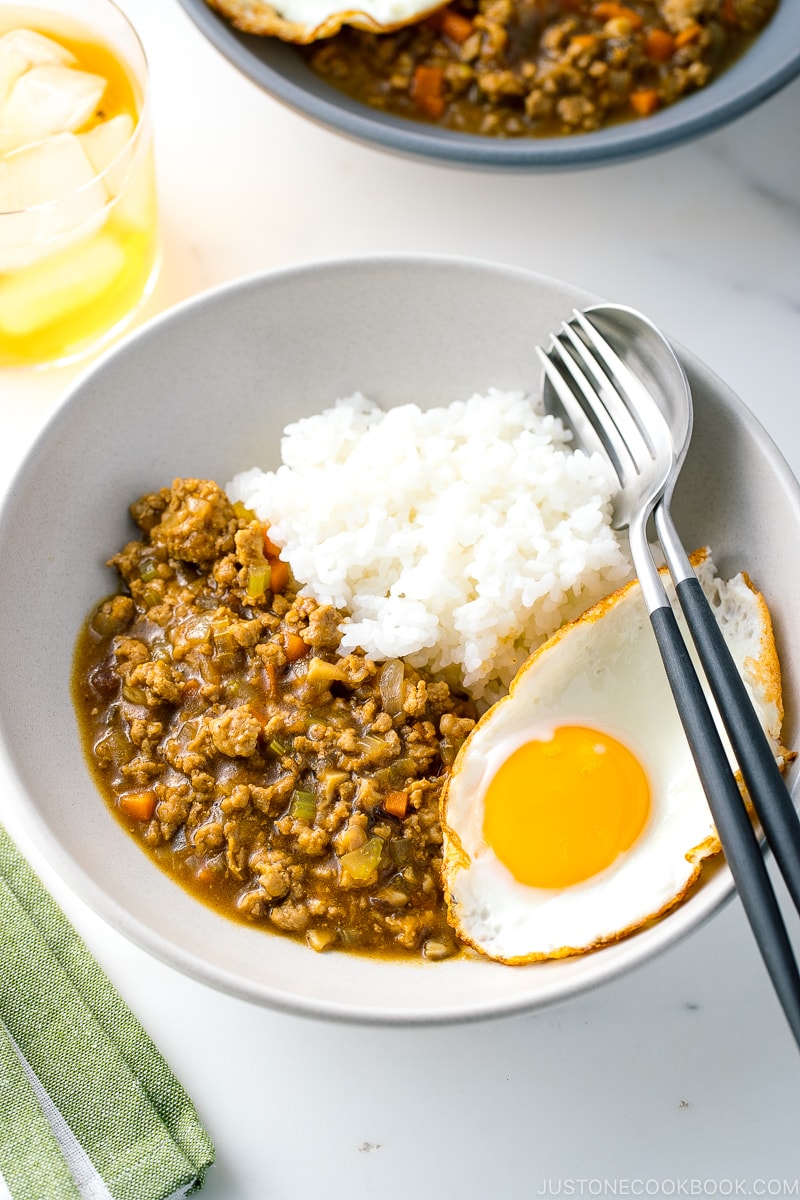
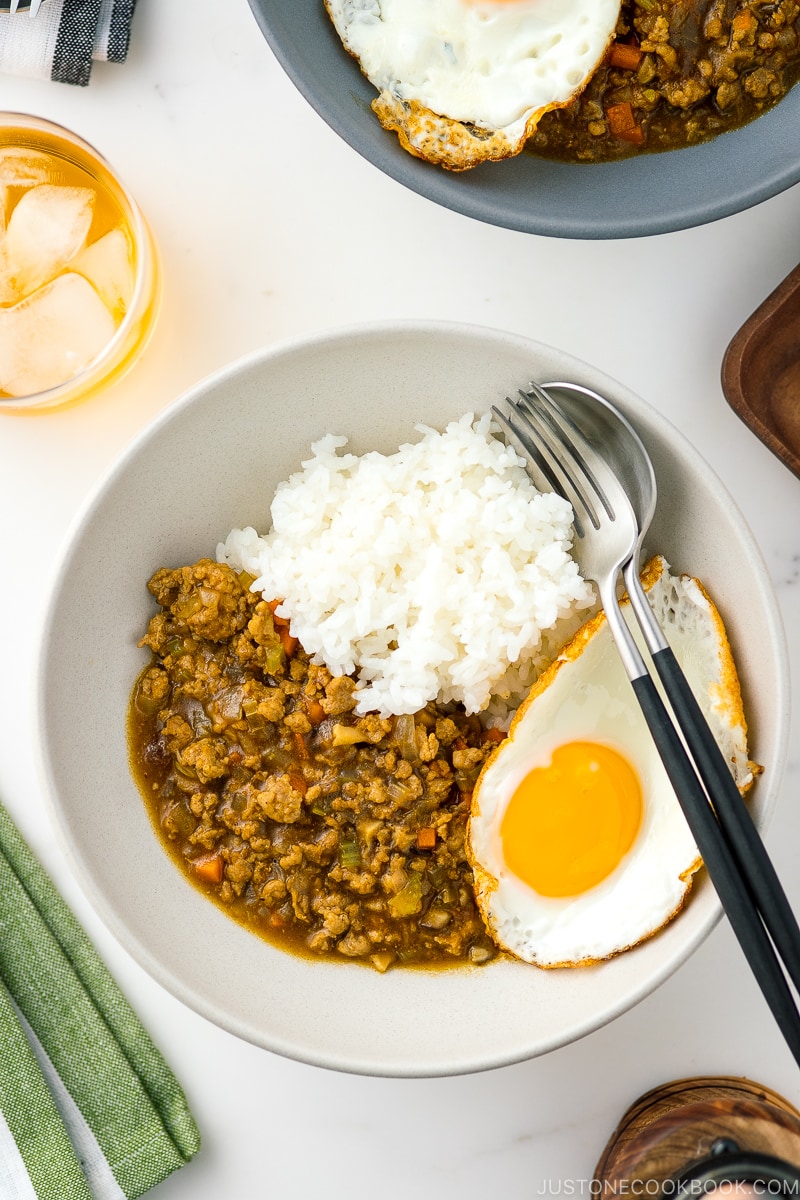
In India, Keema is usually served with basmati rice, paratha or roti, chapati, and naan, but Japanese-style Keema Curry is served with (short-grain) steamed rice. I like to serve it with a fried egg or halved boiled egg on top, which adds a nice creamy texture to the curry.
Difference Between Keema Curry and Dry Curry
If you’re familiar with Japanese “Dry Curry”, or ドライカレー, you may wonder about the differences between Keema Curry and Dry Curry. Both dishes look extremely similar but here are how they differ:
Keema Curry
- Originated in India
- Use ground meat (mutton, especially in Indian restaurants)
- Can be soupy (more broth)
Dry Curry
- Originated in Japan (it’s a home-style dish)
- Almost no soup or sauce
- Curry Fried Rice or Curry Pilaf is also considered Dry Curry variety.
Other Delicious Rice Recipes

Wish to learn more about Japanese cooking? Sign up for our free newsletter to receive cooking tips & recipe updates! And stay in touch with me on Facebook, Pinterest, YouTube, and Instagram.

Keema Curry
Ingredients
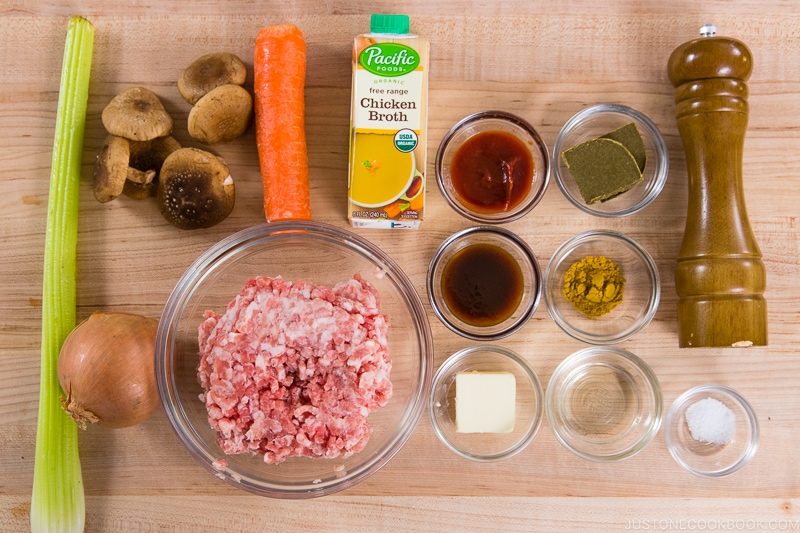
- 1 onion (7 oz, 200 g)
- 1 rib celery (2 oz, 57 g)
- ½ carrot (3.5 oz, 100 g)
- 6 shiitake mushrooms (fresh; 1.7 oz, 48 g; to use dried shiitake, soak in 1 cup water for 15 minutes, squeeze out the liquid, and use the liquid in place of water in the recipe)
- 1 Tbsp neutral oil
- 1 lb ground pork (you can use ground beef or ground chicken; for vegan/vegetarian, use mushrooms, zucchini, eggplant, tofu, etc.)
- ¼ tsp Diamond Crystal kosher salt
- freshly ground black pepper
For the Seasonings
- 1 cup chicken stock/broth (use vegetable stock for vegetarian/vegan)
- ½ cup water (or more)
- 1 tsp Japanese curry powder
- 2 cubes Japanese curry roux (roughly 2 oz, 50 g; you can make homemade Japanese curry roux)
- 1 Tbsp unsalted butter
- 1 Tbsp ketchup
- 1 Tbsp tonkatsu sauce
For Serving
- 4 servings cooked Japanese short-grain rice
- 4 fried eggs (I always like to add, but optional)
Instructions
- Gather all the ingredients. We usually serve this dish with steamed Japanese short-grain rice. Cook the rice ahead of time; see how to make it with a rice cooker, pot over the stove, Instant Pot, or donabe.

To Cut the Vegetables
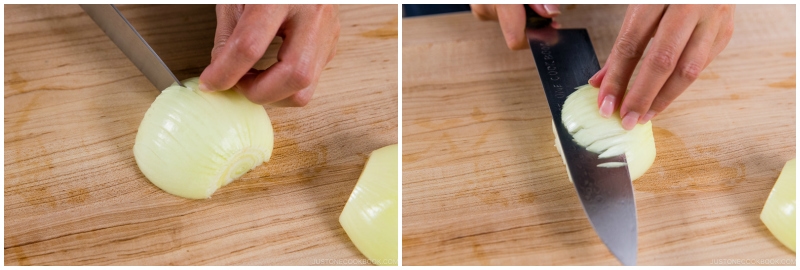
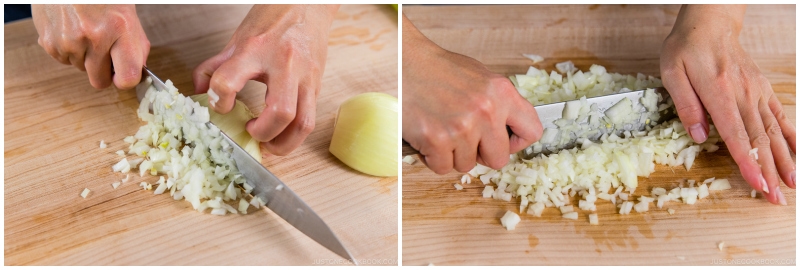
- Chop 1 onion finely. Cut the onion in half. Lay one half on the cutting board, flat side down. With the knife edge toward the root end, make ¼-inch horizontal slices to within ½ inch of the root end, keeping it intact. With the knife tip pointing toward the root end, make ¼-inch vertical slices.

- Finally, make perpendicular cuts down through the vertical slices you made. Repeat with the other onion half. If you need to chop the onions finer, run your knife through them using a rocking motion. Hold down the tip of the knife; otherwise, the onions will go flying around the room.
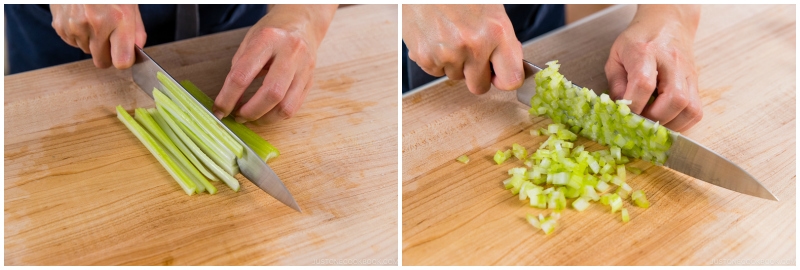
- Cut 1 rib celery into 4-inch pieces. Cut them into thin sticks, then mince them.
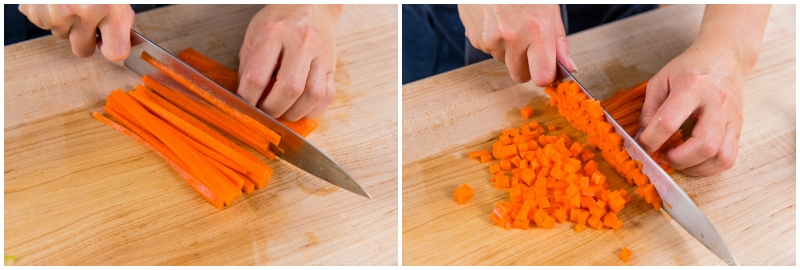
- Cut ½ carrot into 4-inch thin slabs. Cut the slabs into thin sticks, then mince them.
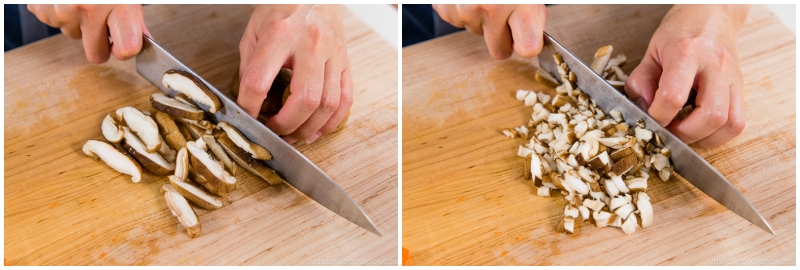
- Remove and discard the stems of 6 shiitake mushrooms. Slice the caps, then mince them.
To Cook the Keema Curry
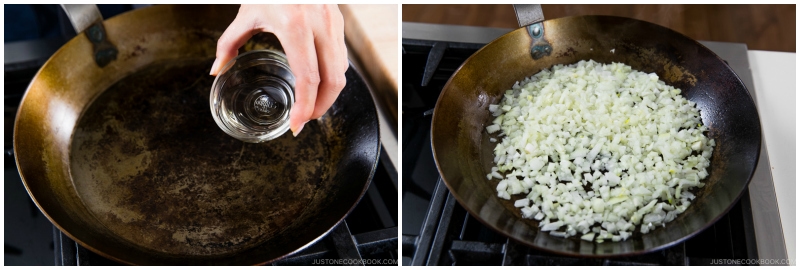
- In a large skillet, heat 1 Tbsp neutral oil over medium heat. Add the onion and sauté until translucent.
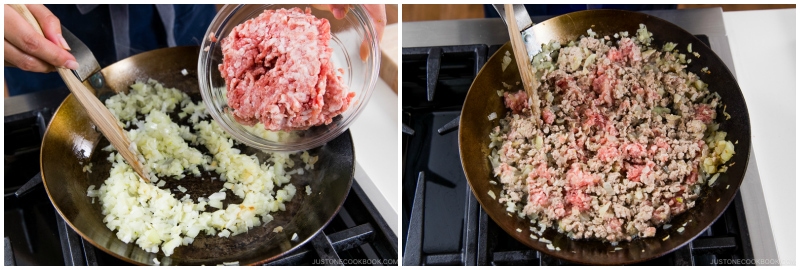
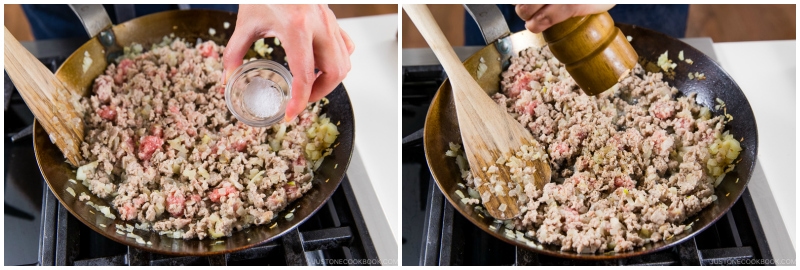
- Add 1 lb ground pork and cook until no longer pink.
- Season with ¼ tsp Diamond Crystal kosher salt and freshly ground black pepper.
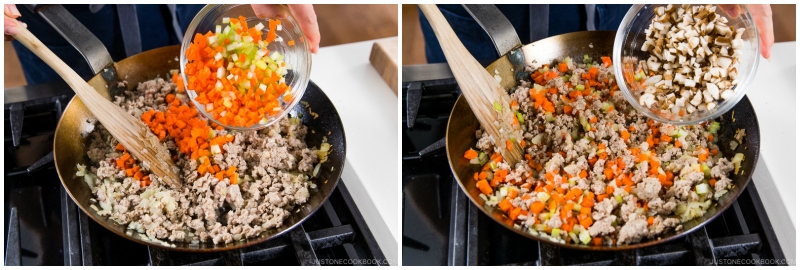
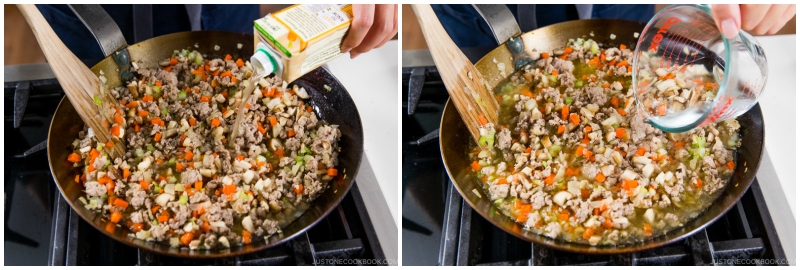
- Add the celery, carrots, and shiitake mushrooms. Mix well with the rest of the ingredients.
- Add 1 cup chicken stock/broth and ½ cup water. If needed, add more water so the cooking liquid covers the ingredients.
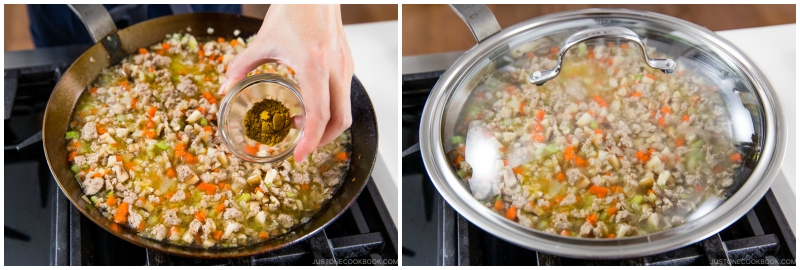
- Add 1 tsp Japanese curry powder and mix well. Cover and bring it to a boil. Skim off the scum and foam on the surface with a fine-mesh skimmer. Reduce the heat to medium low and cook, covered, until the vegetables are tender, about 6–8 minutes.
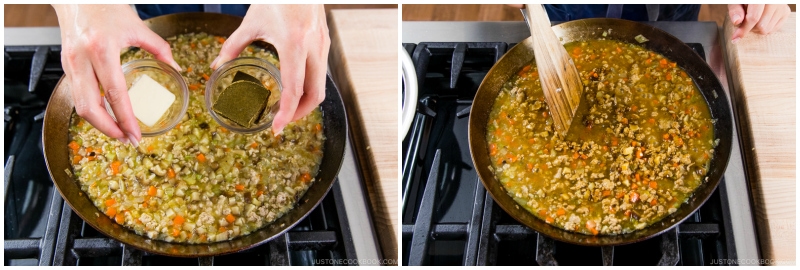
- Add 1 Tbsp unsalted butter and 2 cubes Japanese curry roux, one cube at a time. Dissolve it completely in the cooking liquid before adding the next cube. The curry will thicken as it heats up. Add more water or broth to adjust the thickness to your liking (you can make it soupy, if you prefer.)
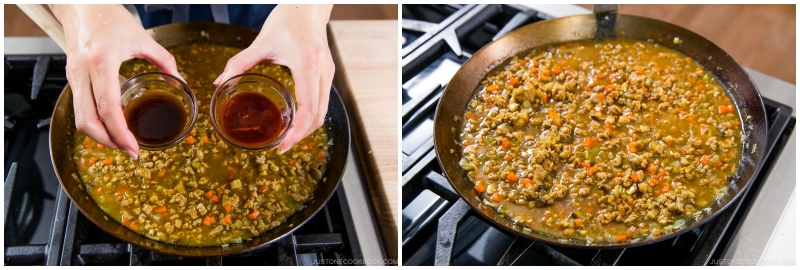
- Add 1 Tbsp ketchup and 1 Tbsp tonkatsu sauce. Mix well and simmer for 3–5 minutes. If the sauce is too thick, add a small amount of water to loosen it.
To Serve
- Portion the steamed rice on individual serving plates and serve the Keema Curry on top. Add one of the 4 fried eggs (optional) to each plate.
To Store
- Keep in the airtight container for up to 2–3 days. This recipe freezes well, so make a large portion, divide it up, and freeze for up to a month.
To Reheat
- Curry thickens as it cools, so it tends to burn while reheating. To avoid this, stir in ¼ cup (60 ml) water or more to loosen up the sauce. Then, gently reheat it on low heat. If it seems thin, continue heating with the lid off to reduce the sauce.
Notes
Nutrition
Editor’s Note: The post was originally published on January 4, 2011. The new images are added and the post is updated and republished in August 2020.


Thank you for this quick and easy recipe, Nami! I cooked this tonight and my family loved it. The only change I made was to use garam masala instead of curry powder as (even though I was using mild curry roux) my kids don’t take to spicy food well. I froze the leftovers, and my son will be taking them to work next week for one of his meals – that shows how much he liked the curry!
Hi Shl, We are so glad to hear your family enjoyed this curry very much. Thank you for trying this recipe and for your kind feedback.
Oh my goodness, when I made this for my family one day, my mum doesn’t like a lot of spice, so this was perfect! This recipe is so delicious! I can’t wait to make it again. I always look forward to seeing your recipes! ^_^
Hi Megumi! We are so happy to hear your family enjoyed this curry. Thank you very much for trying this recipe and for your kind feedback!
Your recipe is excellent, it might one of my favourite because it’s very simple to prepare, perfect for food prep and also very budget friendly. (and it smells and tastes delicious!)
Hi Amélie,
Aww. You have no idea how much your kind words meant to us!
Thank you very much for trying this recipe and for your kind feedback.☺️
Recipe turned out perfectly! So comforting for lunch 🙂
Hi Michelle!
Thank you very much for trying this recipe and for your kind feedback!
We are glad to hear you enjoyed this recipe!
Thank you Nami. This recipe was another winner. Simple yet so delicious. I’ll be making this again and again. Thank you so much again 🙂
Hi Sandy,
Thank you so much for trying this recipe and for your kind feedback. We’re so glad to hear you enjoyed the Keema Curry!
I made this today and OMG!!! Divine!!! Thank you so much for another incredible recipe!
Hi Violetta! I’m so glad to hear that. Thank you for your kind feedback! 🙂
Delicious! Quick, easy and filling! I will definitely be adding this to the weekly menu. Can’t wait to try more recipes!
Hi A! Thank you so much for trying this recipe! I’m so happy to hear you enjoyed it. 🙂
The Keema Curry was delicious. I made it with ground turkey instead of pork — less fat and calories.
Hi Dall! Thanks so much for trying this recipe. I’m glad you enjoyed it! 🙂
Oh I haven’t made this recipe in a while, before it was a once a month meal that we really enjoyed, but just fell out of rotation for no reason. Today, I decided to make it again and basically I remember it, but around halfway I opened up the website just in case I forgot some seasonings. I was so shocked… like omg pregnancy brain is real, I did everything wrong and in the wrong order haha. And then I noticed no parmesan and I was stumped. That’s when I realized the recipe was changed. I still added the parmesan in the end as I think it just gives it an amazing flavor and sets it apart from the keema curries that we can buy at restaurants and convenience stores here. This is a great recipe, one of our favorite go to meals, the changes are subtle and I do understand some of them.
Hi Kornelia! I updated the pictures for this recipe, but I followed the same recipe and I did not make adjustment. Maybe my original recipe written in 2011 might have added Parmesan, but the recipe hasn’t been changed for YEARS… so maybe I removed it a long time ago? I do put cheese on Curry Doria though, but don’t add in Keema Curry anymore (if I added, which I forgot…). I update my recipes from time to time if I feel I need to, and if I do, I usually write what I changed at the end of the post (below the recipe card) so I (or readers) keep track. Thanks so much for your feedback!
Love this recipe! Very easy to make. It’s a great way to use up leftover veggies. Hubby approved, so this is a keeper. 🙂 Served the daikon and cucumber salad as a side.
Hi Diane! I’m so glad you and your husband liked the recipe and thank you for your kind feedback! With the salad on the side, it seemed like you had a great meal!
This comes just in time for the start of fall next week (by the meteorological calendar, and you can bet my fall decorations are coming out Sep 1) and my craving for more heavily spiced foods, and some leftover ground kurobuta I have in the freezer that needed a good use! I am so excited to try it. I have been super busy lately and need some quick prep meals. Curry is always great since you can make a few meals ahead. 🙂 Thanks for the recipe!
Hi Lion! Oh kurobuta for this! It’s going to taste awesome! I hope you enjoy the recipe! 🙂
Made this tonight. It was amazing,… So good I could’ve easily eaten the whole pan by myself. I will definitely make it again.
Hi Christine! LOL! I’m with you. It freezes well too. So it is great to make a lot and save it for later. 🙂 Thank you for trying this recipe and for your kind feedback!
I love your website. Thank you for the recipe. I can’t wait to try this with ground chicken. Can you clarify the amount of homemade curry roux to use? Would I use all the roux made from the homemade curry roux recipe?
Hi Jean! Sure, ground chicken will work. I haven’t made this particular recipe with my homemade curry roux (yet)… You only need 2 cubes out of the whole curry roux package, which means…1/4 of the whole package. So estimate using 1/4 of the roux first. It’s best to add slowly and see the consistency and taste. FYI, the homemade roux will never be thick like the store-bought curry roux (not so natural in a way). 🙂
Hi Nami. I made Keema curry with ground turkey for dinner and it was SO delicious. Hubby and I over ate because we just couldn’t stop eating. Since we like lots of sauce, I added more chicken broth and ended up using all the roux made from the homemade roux recipe. Thank you again for the recipe.
Hi Jean! Thank you so much for trying out this recipe with turkey. I’m so glad to hear that it worked out well. Thank you for your kind feedback. 🙂
Have you tried making this with crumbled tempeh instead of pork? I cook for a vegetarian, and I was wondering if that would work.
Hi Larry! No, I haven’t but I think it’d work. Hope you enjoy it! 🙂
Can I use ground beef instead of ground pork?
Hi Pauline! Sure! 🙂