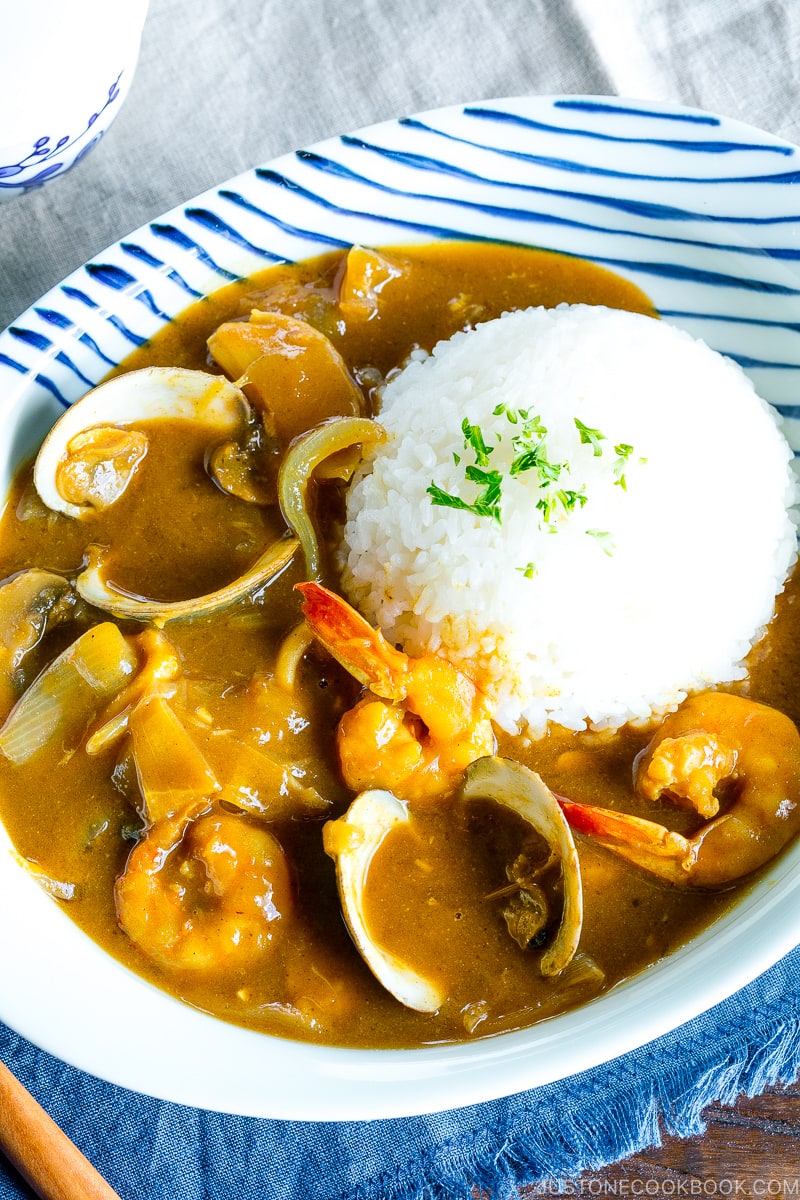
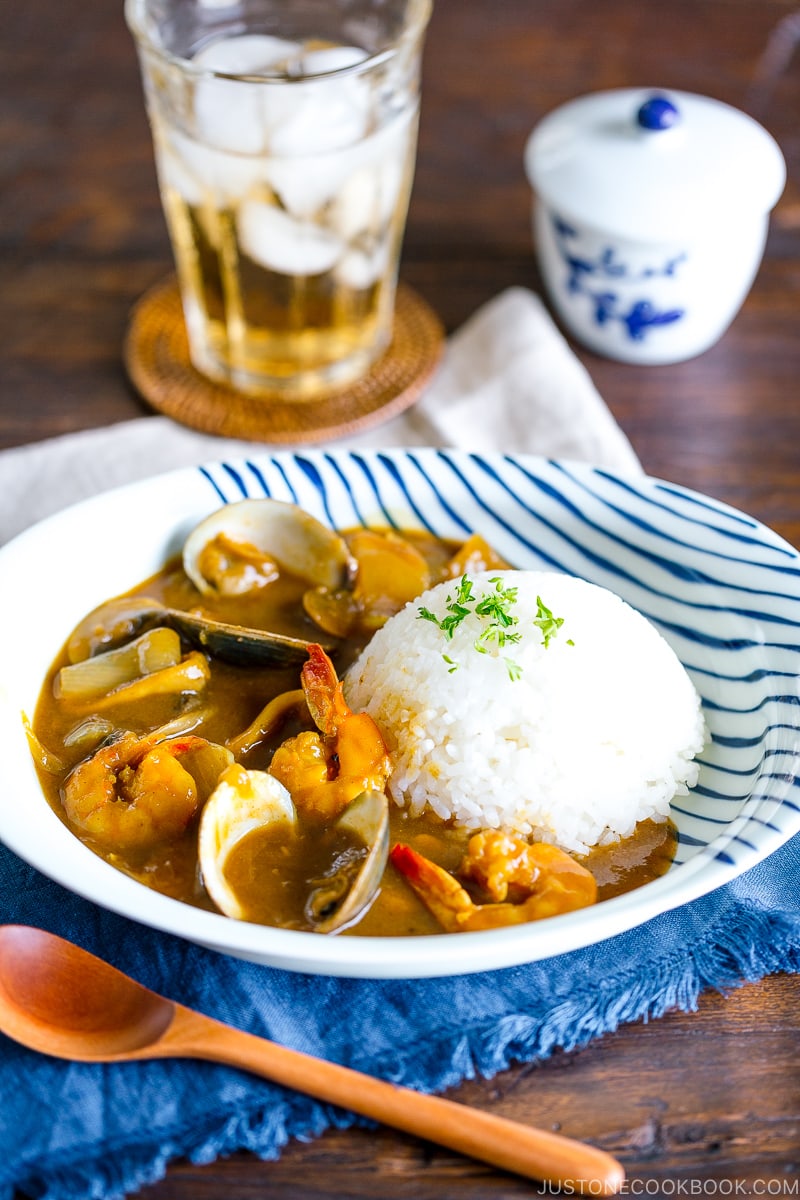
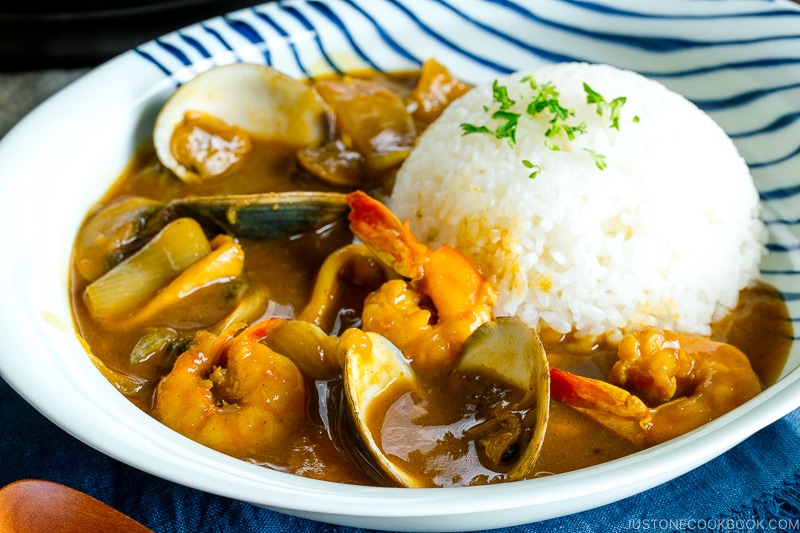
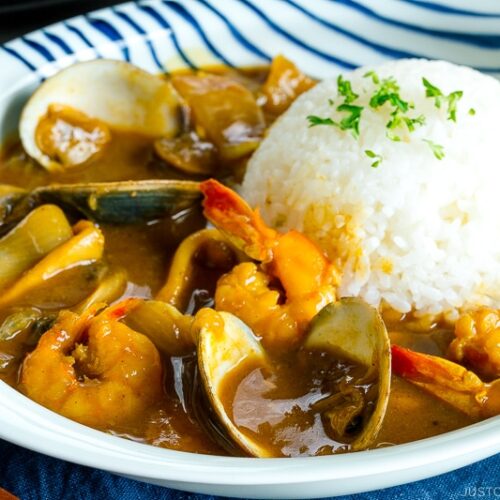
If you love curry rice, it‘s time to try Japanese Seafood Curry! It‘s packed with amazing flavors from the shrimp, clams, calamari, scallops, spices, and kombu dashi. This recipe is so quick to make in the Instant Pot, too.
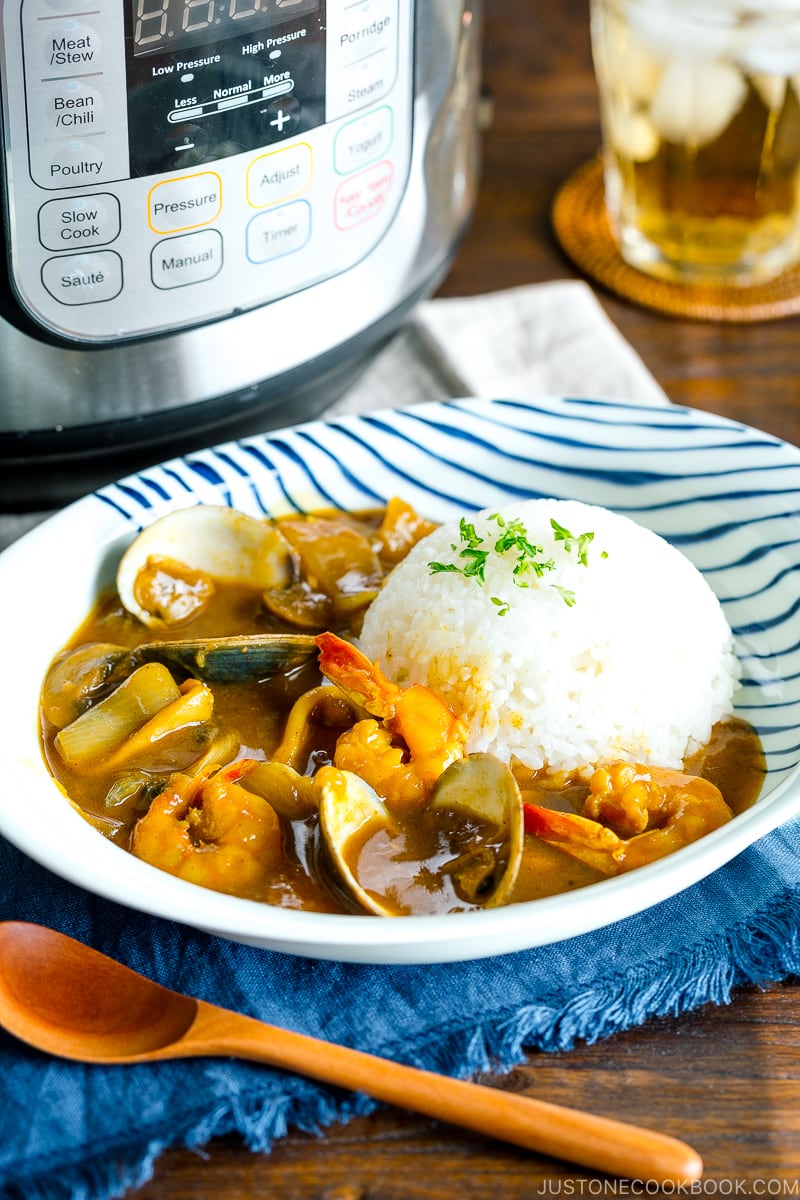
To me, one of the most underrated Japanese Curry is Seafood Curry (シーフードカレー). All the delicious flavors of various seafood culminate in an amazing umami flavor to the curry. If you love beef and chicken curry but haven’t tried Japanese Seafood Curry, you have to make it today!
Watch How To Make Pressure Cooker Japanese Seafood Curry
The Key Ingredients for Japanese Seafood Curry
1. Seafood Choice
Most of the Japanese seafood curry include 2 to 3 of the following ingredients or all of them. Fish is usually not part of Japanese seafood curry (although Indian fish curry is one of my favorites!).
- Calamari
- Scallop or baby scallop
- Manila clams and/or mussels
- shrimp/prawn
I usually check out what fresh seafood the market has to offer that day to pick and choose my ingredients. For convenience, you can also use a frozen seafood mix if you like all the seafood choices in the bag.
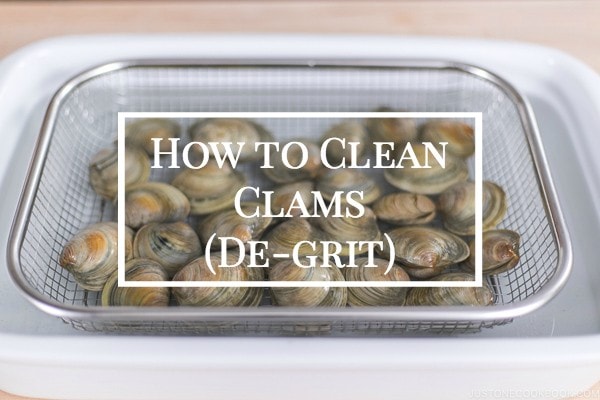
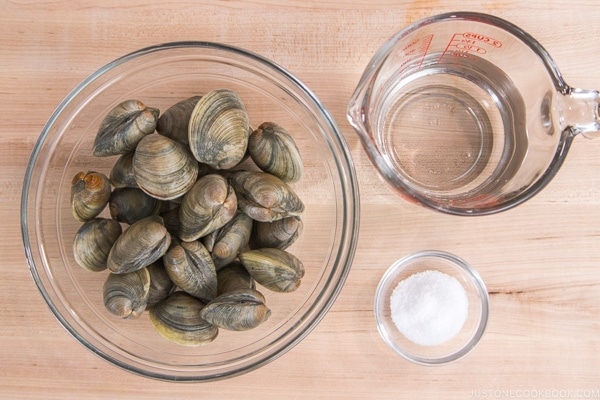
And if you use fresh clams, don’t forget to de-grit (let the clams purge sand and grit) before you cook. You should do this even though the package or fishmongers say “ready to use”. I often taste sand/grit in them, and you don’t want to experience that while eating your delicious curry. I will show you how to do it on this page.
2. Stock Choice
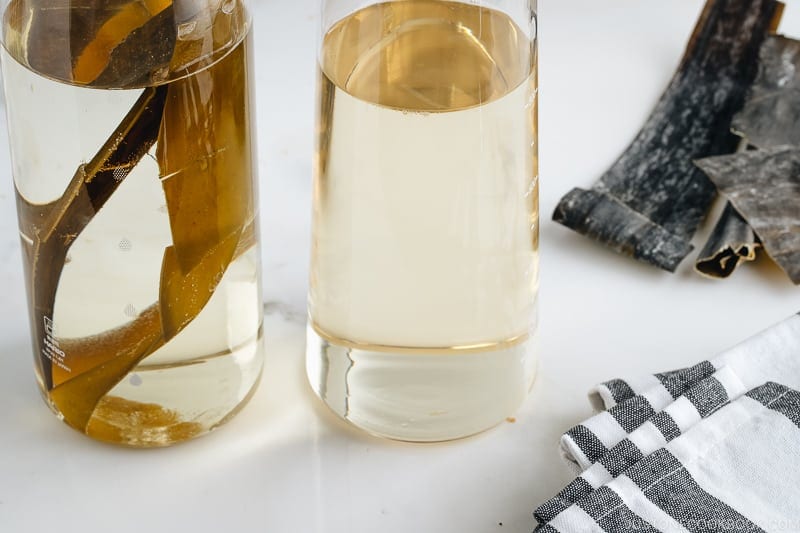
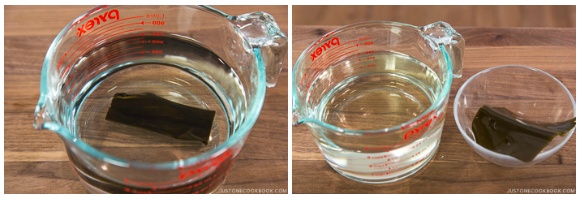
In today’s recipe, I used kombu dashi. This is SO easy to make, and it’s the right amount of flavors for the basic stock for the Japanese seafood curry. If you plan to make the seafood curry ahead of time, soak the kombu in water overnight. It’s good to give plenty of time for umami to ooze out from the kombu.
You might wonder if you can use chicken or beef stock for this recipe. The answer is no, I do not recommend using meat stock for a seafood dish. However, you can use/make shellfish stock. If you choose to make shellfish stock, make sure to buy shrimp with shell and head still attached (and at least 8-10 shrimp).
Simply put shrimp shell and head, chopped veggies (small bits of onion, carrot, celery), bay leaf, parsley (if you have any), and peppercorn in a pot. Pour 6 cups water and cook on a low simmer (not boiling) for 30 minutes, skimming the foam often. Strain, and it’s ready to use. If you would enjoy a rich and bold SEAFOOD kick in your curry, use this shellfish stock instead of kombu dashi.
3. Vegetable Choice
Onions are almost always included in Japanese curry recipes as soft and tender onions naturally sweeten the curry. If time allows, I’d even caramelize the onions. Delicious!
In Japan, seafood curry is often on the restaurant menu during the summer, and it usually includes summer vegetables like eggplant, zucchini, and bell peppers. But today, I am keeping the recipe simple for everyone.
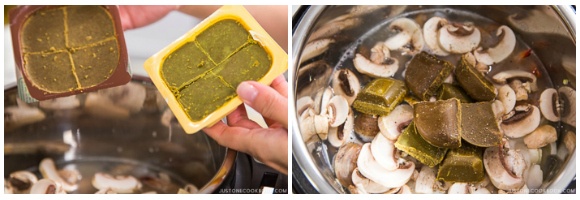
4. Japanese Curry Roux
Supermarkets in Japan have endless selections of Japanese curry roux brands. But for us living outside of Japan, we are lucky if we have some choices. That’s okay, it’s still convenient! Here’s how the store-bought curry roux looks like.

But for those who prefer to make homemade Japanese Curry Roux, I have a recipe for you here. The roux is pretty easy to make, and it’s MSG-free. 🙂
For gluten-free curry roux, you can use gluten-free flour (thanks JOC friends for your feedback!).
“Kakushi Aji” for Japanese Seafood Curry
Kakushi Aji (隠し味) means a secret ingredient. The direct translation would be “Hidden Taste/Flavor”, and I feel like the Japanese like to say “Add this and that for kakushi aji” a lot while they are cooking. Or is it just my mom?
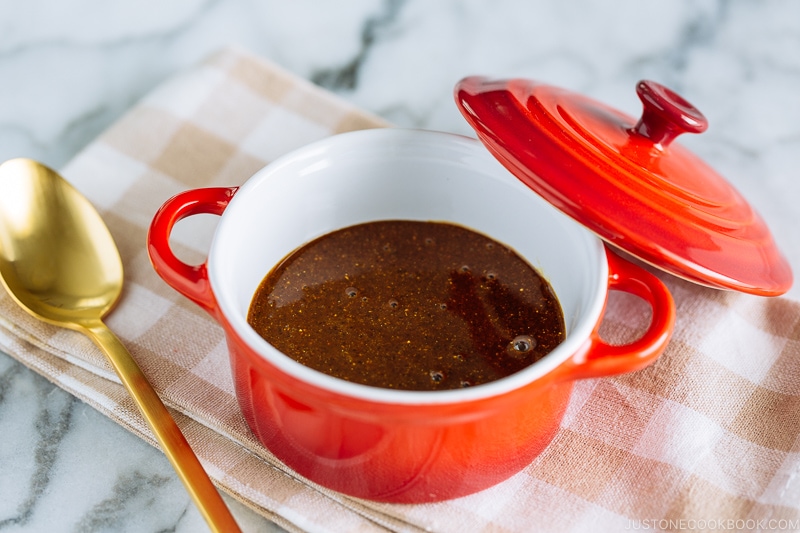
I think the most popular Kakushi Aji for western-style Japanese food is soy sauce. It makes me smile thinking that adding a splash of soy sauce justifies “Japanese-ness” in foreign/western food. We need to squeeze in our familiar taste in the food!
If you want to join the kakushi aji club, add a splash of soy sauce to this Japanese seafood curry. What else can we put in the curry? Check out this post.
Wish to learn more about Japanese cooking? Sign up for our free newsletter to receive cooking tips & recipe updates! And stay in touch with me on Facebook, Pinterest, YouTube, and Instagram.
Pressure Cooker Japanese Seafood Curry
Video
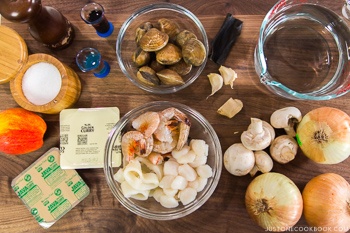
Ingredients
- 12 manila clams (see my instructions on how to degrit clams as soon as you bring them home)
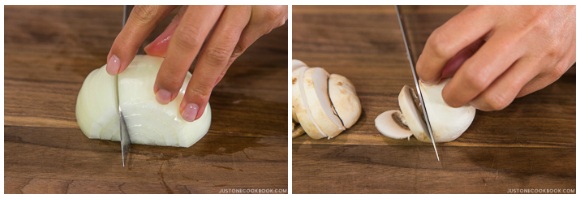
- 3 onions
- 6 mushrooms
- 2 cloves garlic
- 1 knob ginger (1 inch, 2.5 cm; peeled)
- 6 oz medium shrimp
- 6 oz bay scallops
- 6 oz calamari
For the Kombu Dashi
- 3 cups water
- 1 piece kombu (dried kelp) (2 x 3 inches, 5 x 7.5 cm per piece)
For Cooking
- 1 Tbsp neutral oil
- 1 package Japanese curry roux (8.4 oz, 240 g per package; I use a mixture of mild and medium hot spice level; you can make my Homemade Curry Roux)
- ¼ cup white wine (optional; I recommend sherry, sauvignon blanc, and chardonnay; any white wine works)
- ⅛ tsp freshly ground black pepper
- 1 Tbsp soy sauce
- ¼ apple (I use fuji apple)
Instructions
- Gather all the ingredients. For the steamed rice, please note that 2¼ cups (450 g, 3 rice cooker cups) of uncooked Japanese short-grain rice yield 6⅔ cups (990 g) of cooked white rice. See how to cook short-grain rice with a rice cooker, pot on the stove, Instant Pot, or donabe.

To Prepare the Clams (1 hour before cooking)
- It‘s very important to degrit the clams. Follow my instructions (it‘s easy!) on how to degrit clams.

To Prepare the Cold-Brew Dashi Stock (1 hour to overnight before cooking)
- To 3 cups water, add 1 piece kombu (dried kelp). Set aside to steep for at least 1 hour to overnight. Then, remove the kelp before using this kombu dashi.

To Prepare the Ingredients
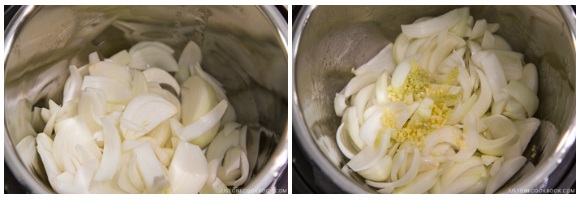
- Cut 3 onions in half and then cut the halves into 5 wedges. Cut 6 mushrooms into ¼-inch (5-mm) slices.
- Mince 2 cloves garlic and grate 1 knob ginger (keep the juice, too).
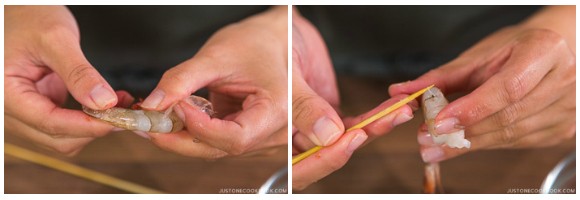
- Peel 6 oz medium shrimp and devein the back of shrimp with a skewer (the vein runs right along the back so you can insert the skewer and pull out the vein). For step-by-step photos, see my tutorial on how to devein shrimp.

To Cook the Seafood Curry
- Press the Sauté button on your Instant Pot (I use a 6 QT Instant Pot) and heat 1 Tbsp neutral oil.
- When the pot is hot, add the onion and coat with the oil. Then, add the minced garlic and grated ginger with juice.
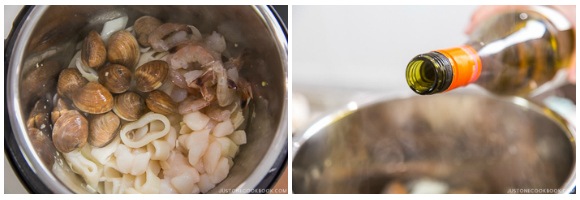
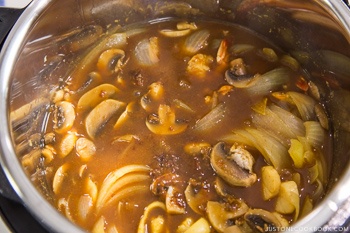
- Add all the seafood (12 manila clams, the shrimp, 6 oz calamari, and 6 oz bay scallops). Add ¼ cup white wine to deglaze the bottom of the pot with a wooden spoon. The brown bits (called fond) stuck to the bottom of the pot are where all the flavors are.
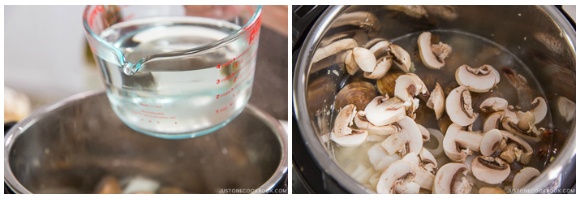
- When the alcohol has evaporated, add the kombu dashi (the stock you made earlier) and add the mushrooms.
- Add 1 package Japanese curry roux (or homemade curry roux) and ⅛ tsp freshly ground black pepper. Use a spatula to push down the ingredients but keep the curry roux blocks on top so they won’t get stuck and burn at the bottom.
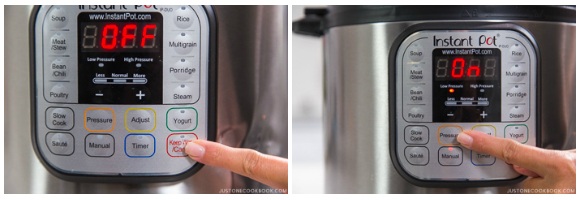
- Cover and lock the lid. Make sure the steam release handle points at Sealing and not Venting. Press the Keep Warm/Cancel button on the Instant Pot to stop the Sauté mode. Press the Pressure button to switch to the manual pressure cooking mode. Select Low pressure and press the Minus (-) button to change the cooking time to 5 minutes.
- For a stovetop pressure cooker: Cook on high heat until high pressure is reached. Then, reduce the heat to low but maintain low pressure for about 5 minutes.
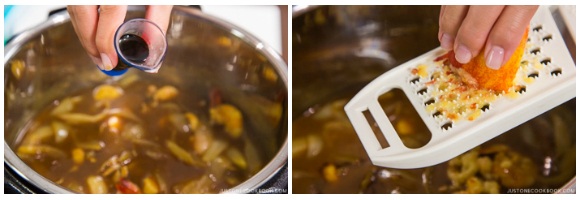
- When it is finished cooking, the Instant Pot will switch automatically to the Keep Warm mode. Immediately quick release the pressure/steam by sliding the steam release handle to the Venting position until the float valve drops down. Important: We don’t want to naturally release seafood curry because the seafood could overcook with the remaining heat. Unlock the lid and add 1 Tbsp soy sauce and grate ¼ apple into the pot. Mix well and make sure all the curry roux has been dissolved.
- Divide the 4 servings cooked Japanese short-grain rice on individual plates and serve the curry either to the side or on top.

To Store
- You can keep the leftovers in an airtight container and store in the refrigerator for up to 3 days.
To Reheat
- Leftover curry sauce will thicken into a paste as it cools, so it tends to burn while reheating. To avoid this, stir ½ cup (120 ml) water or more into the leftover sauce until loosened. Then, gently reheat it on low heat. If the sauce seems thin, continue heating with the lid off to reduce the sauce.


Isn’t 1package of Japanese curry roux too much?
I don’t quite understand why it use so much in this particular recipe than the other curry recipes.
Hi Shujie, Thank you very much for trying Nami’s recipe!
According to the curry roux package, that is recommended amount for the water amount cooking in a pressure cooker.
But certainly, you can reduce it if you like.
We hope you enjoy the Seafood Curry.
こんにちは、なみこさん!I’ve been browsing your seafood recipes recently because I want to increase my seafood consumption and I know that seafood is staple in Japanese cuisine. I wish to try seafood curry soon! I love your Japanese beef curry! The side link into cleaning clam shells is also very helpful. I also noticed the “Make it Into a Meal” box just now. These suggestions are highly appreciated. ありがとう!
Hi Christelle, Thank you very much for trying Nami’s recipe and for your kind feedback!
Nami and JOC team are so happy to hear the side link, and our suggestions are helpful. ありがとう!💕
Hi! We really enjoyed this for lunch today, thank you for the recipe. I think perhaps it’s not very appreciated via comments because people don’t own a pressure cooker or don’t feel like dealing with in-shell clams, or can’t find them. Instead of the clams I just used some defrosted mussels which were frozen without their shells, and dumped them in along with defrosted calamari and prawns. I also added 2 sliced carrots for a bit more veggies. I didn’t use a pressure cooker; after sauteing the onion and then garlic and ginger, I just simmered everything for 15mins or so, till the carrots got tender, and added the seafood just in the last 5mins. It was quite delicious, and I hope my notes nudge someone towards making it even if they can’t totally follow the recipe.
Hi Tea, Thank you very much for trying Nami’s recipe and sharing your cooking experience with us!
We are glad to hear you enjoyed this dish.😊
Hi Nami,
Can you used canned clams instead of fresh clams?
Hi Hannah, Thank you very much for trying this recipe! The canned clams are cooked in the canning process already, so if you would like to use them, we recommend adding them after pressure cooking (Step 8). We hope this helps!
Nami, I would really like to try your seafood curry, but I do not own a pressure cooker. Do you have a seafood curry recipe that can be made without one, or is it possible to cook this recipe without one? What would your recommendation be? Thank you in advance.
Hi Amanda,
Yes, You may try this recipe without a pressure cooker.
Please skip adding the seafood to the pot at Step 6. Then change the cooking time in Step 9 to 15~20 minutes.
Add the seafood to the pot in the last 5 minutes of the cooking time. (You don’t want to overcook the seafood!)
I hope this is helpful!
[…] Japanese Seafood Curry […]
[…] Japanese seafood curry from Just One […]
[…] GET THE RECIPE […]
[…] Instant Pot Japanese Seafood Curry […]
[…] Japanese Seafood Curry […]
[…] 12. Pressure Cooker Japanese Seafood Curry […]
I love to cook and I cook from scratch. I like cooking a variety of different foods in different cultures. Unfortunately Asian food was the one area that I wasn’t comfortable cooking so I kind a strayed away from cooking it and left it up to the Asian restaurants for my Food fix. However I decided that I wanted to take a venture into cooking Asian food so I started looking around at different websites and studying and seeing what Ingredients were and what ingredients were and what I needed to purchase. I found your website extremely helpful in explaining ingredients and giving me directions on how to cook with them. I stocked up my pantry with the items that I need and I have about 10 recipes to start off that I want to make. Thank you for a wonderful website I’ve already put this in my favorite file!
Hi Vicky! Aww thank you so much for your kind feedback and note. I’m so happy to hear that you’re cooking Asian foods at home! I feel that Japanese restaurants outside of Japan don’t represent Japanese food we eat in Japan at all, and if you could enjoy some recipes from my website I’m just so happy that you’re cooking and eating more authentic food. Thank you for trying! If you have any questions, please feel free to email me or leave a comment on the recipe you have a question. I’ll be happy to help you! xo
I love Japanese curry! But never have seafood curry before. So I will give it a try tomorrow. Thank you for your recipe.
Hi Vee! I hope you enjoy this seafood curry! Yeah, I didn’t realize for a long time why Japanese restaurants outside of Japan don’t really offer seafood curry…. It’s so delicious! 😀
I had no idea 4 hrs to clean clams…I’m like you I dislike sandy taste which I’ve experienced in restaurants etc. Thanks for great recipe…I will look forward to making it…
Hi Lyn! 4 hours is inactive time, and most people “should” have the time to do this process unless you just came home with ingredients and make this recipe right away. Even so I still recommend to de-grit process as long as you can do.
I think Japanese method or people in Japan do this process more thoroughly as I rarely experience that sand/grit in the food, but I noticed it happens more often when I eat the food here in the US. Either the method makes difference OR the time we spend to prepare clams are different. You’ll see lots of dirty stuff on the bottom of the tray – make sure to raise the clams so they don’t take it back. 😉
Enjoy!