Kakuni or Japanese Braised Pork Belly is tender chunks of succulent meat coated in a savory soy sauce glaze. There‘s something about this dish that I cannot resist! The slow cooking method turns the pork belly into a delicious creation that simply melts in your mouth.

Kakuni (角煮) is a Japanese braised pork belly, and it literary means “square simmered” referring to the shape of this dish. I’m not usually into fatty meat but there is something about this dish that I cannot resist. The slow cooking method turns the meat into a delicious creation.

For my day-to-day cooking, I enjoy experimenting with existing recipes to see if I can improve them. I had been cooking a simpler version of kakuni until one day my husband asked if the meat can be softer after I made it. I kept experimenting with different methods and changing the ingredients’ portions, and I think I finally got the kakuni that will melt in your mouth.
Tips to Make Delicious Kakuni
The key to a good kakuni recipe is the initial simmering. For this recipe, I spent 2-3 hours simmering the meat, but you could spend additional hours doing so if you have the time. This important process renders out the majority of fat from the pork belly and makes the meat and the fat have that melt-in-your-mouth texture.
Although it takes hours of preparation (unless you have a pressure cooker), the result is really worth it. If you plan to cook this for your family, I would recommend you to make a double portion. Since you have to spend hours in the kitchen anyway, you might want to make extra for a second meal. I hope you enjoy this recipe as much as my family does.

Japanese Ingredient Substitution: If you want to look for substitutes for Japanese condiments and ingredients, click here.
Wish to learn more about Japanese cooking? Sign up for our free newsletter to receive cooking tips & recipe updates! And stay in touch with me on Facebook, Pinterest, YouTube, and Instagram.

Braised Pork Belly (Kakuni)
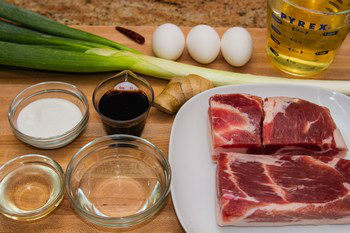
Ingredients
- 1 lb pork belly
- 9–10 slices ginger (unpeeled; slice a 2-inch, 5-cm knob)
- 1 Tokyo negi (naga negi; long green onion) (or several green onions/scallions)
- 3 large eggs (50 g each w/o shell)
For the Seasonings
- 2½ cups dashi (Japanese soup stock) (use standard Awase Dashi, dashi packet or powder, or Vegan Dashi)
- ¼ cup sake
- 3 Tbsp mirin
- ¼ cup sugar
- ¼ cup soy sauce
- 1 dried red chili pepper (optional)
For Serving
- shichimi togarashi (Japanese seven spice) (optional, to taste)
Instructions
- Gather all the ingredients.

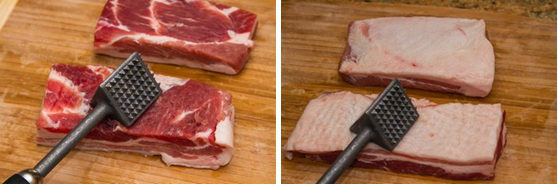
- Pound 1 lb pork belly on both sides with a meat pounder (or the back of the knife) to tenderize it.

- Press and mold the meat back into its original shape with your hands. Then, cut the pork belly into 2-inch (5 cm) pieces. My pieces are roughly 1½ x 1½ x 2 inches (4 x 4 x 5 cm).

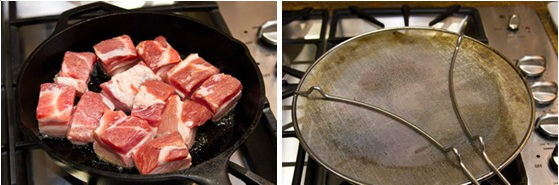
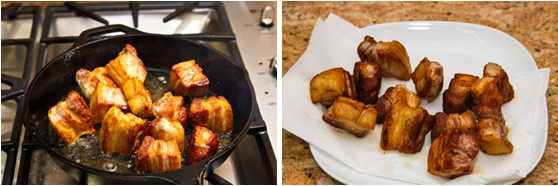
- Heat a heavy skillet over medium-high heat. When it‘s hot, add the meat fat side down on the ungreased skillet. Cook the meat until all sides are nicely browned. To prevent oil splatter, you can use a splatter screen. Tip: Searing the surface of the meat before boiling helps draw out excess fat and lock in the flavor.

- When the meat is nicely browned, transfer the pieces to a plate lined with paper towels to absorb the excess fat.

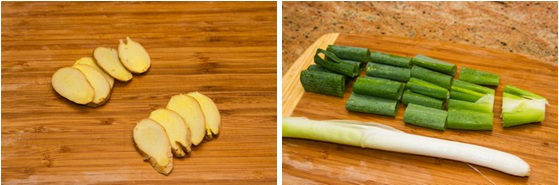
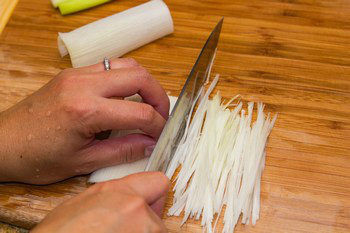
- Cut the unpeeled ginger thinly into 9–10 slices ginger; set aside half of the slices for later. Next, cut the green part of 1 Tokyo negi (naga negi; long green onion) into 2-inch (5-cm) pieces. Set aside the white part to make Shiraga Negi later for garnish (see below).

To Cook the Pork Belly
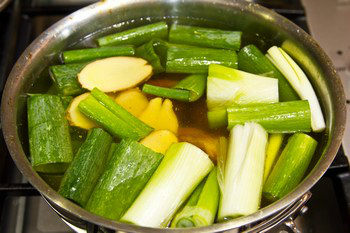
- In a large pot, put the seared pork belly, green part of the negi, and half of the sliced ginger (saving the other half for the braising liquid). Next, add enough water to the pot to cover the meat. Tip: Boiling the seared meat removes the excess fat and scum. These two steps (searing and boiling) remove excess fat while keeping the meat juicy.
- Bring it to a boil over high heat, and then reduce the heat to a simmer. Cook, uncovered (so the unwanted odor goes away), for 2–3 hours. Turn the pork occasionally during this time. When the liquid is running low, add more water or hot water to the pot so the meat remains covered at all times. Tip: If you want really tender meat, cook for at least 3 hours.
To Prepare the Eggs and Shiraga Negi
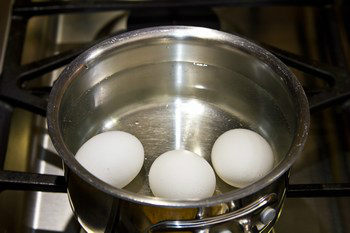
- Meanwhile, hard-boil 3 large eggs (50 g each w/o shell) and peel them. Set aside. For more details, see my post on How To Make Perfect Hard-Boiled Eggs.
- Next, use the white part of 1 Tokyo negi (naga negi; long green onion) to make shiraga negi. First, cut the white part into pieces that are 3 inches (7.6 cm) long. Then, make a lengthwise incision to remove the soft green core (save for another use). Stack the outer layers, holding them flat against the cutting board, and slice lengthwise into very thin julienned strips. Soak in a bowl of iced water for 10 minutes to remove the bitterness, and drain well. Set it aside to use later as a garnish. Tip: For step-by-step photos, see my tutorial on How To Make Shiraga Negi.
To Braise the Pork Belly
- After cooking for 2 hours, drain the water and remove the pork to a paper towel to wipe off the excess oil.
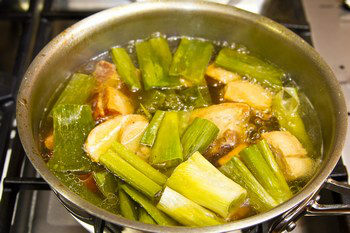
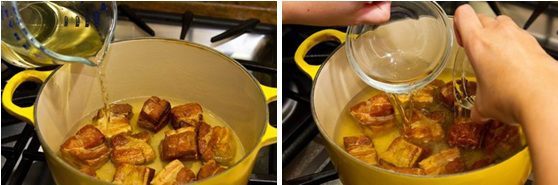
- To a large, heavy-bottomed pot (I use a Dutch oven), add the cooked pork belly, 2½ cups dashi (Japanese soup stock), ¼ cup sake, and 3 Tbsp mirin. Start cooking on medium heat.
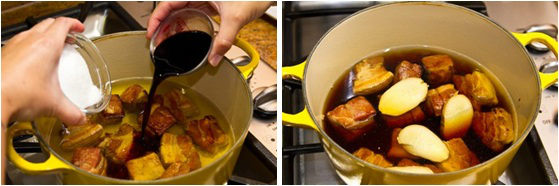
- Next, add ¼ cup sugar, ¼ cup soy sauce, the rest of the ginger slices, and 1 dried red chili pepper. Tip: I remove the chili seeds so it won‘t be too spicy for my kids.

- When it reaches a boil, reduce the heat to low or medium low to maintain a simmer. Place an otoshibuta (drop lid) on top of the meat; do not cover the pot with the regular pot lid. Cook for 1 hour. Tip: If you don‘t have an otoshibuta, make one! See my post on How To Make Otoshibuta.
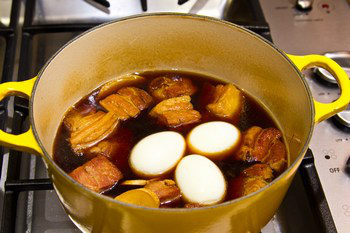
- After the halfway point (cooking for 30 minutes), add the peeled hard-boiled eggs to the pot. You can now remove the otoshibuta.
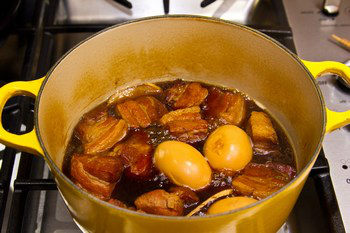
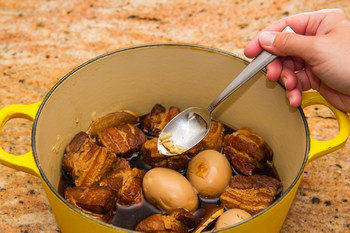
- Continue simmering, uncovered, for another 30 minutes. If the cooking liquid is pretty low, reduce the heat to low or lowest. Occasionally, baste the meat with the braising liquid and gently turn the meat and eggs. Make sure there‘s enough liquid in the pot so the pork and eggs don‘t burn. When the sauce is reduced and the meat has a nice glaze, it’s ready to serve.


To Serve
- Serve the Kakuni and eggs and garnish with shiraga negi on top. Season with shichimi togarashi (Japanese seven spice) (optional) to taste.


To Develop Flavor (optional)
- If you prefer a more flavorful and less oily Kakuni, wait one day before serving. Let it cool completely, then refrigerate the pork belly in its braising liquid overnight. The next day, remove and discard the solidified fat (optional) before gently reheating the Kakuni. Heat thoroughly and serve.
To Store
- You can keep the leftovers in an airtight container and store in the refrigerator for up to 3–4 days and in the freezer for a month.


I am pork belly obsessed, so this is right up my alley. Looking forward to a quiet winter weekend when I can give this a try. YUM!
How very flavorful this looks!
I had a pork belly ones at Morimoto restaurant in Philadelphia, it was divine, very soft. You have the most interesting recipes here. I would love to learn to cook Japanese food, maybe one day when I visit you and we can cook together!
Even if I like healthy food, I cannot resist pork belly! This looks delicious Nami!
As a loooover of bacon, I can’t see how this couldn’t be even MORE amazing. Lovely, Nami!!
Gorgeous presentation. You make even brown food look good. How do you do that!
I love the simplicity and purity of ingredients in this recipe and what amazes me most I think about Japanese cuisine generally, is that despite this simplicity, there is enormous flavour through the use of key ingredients… a pretty wonderful return. Your step by step illustrations are so helpful Nami. Great recipe.
I wish I could say that I didn’t love the jellied, fatty texture but I do! 😛 And you know I never thought about the collagen but I’m going to stick to that reasoning 😛
Hi Nami, long time no talk! Looks like you had a great trip at Taiwan, lots of yummies.
I am making a much much more simplified braised pork recipe right now, in fact the slow cooker is doing all the work, I am sure your pork belly dish has a much better flavor depth though!
Are you getting ready for the holidays? Our house is officially done, I signed off on the repair works yesterday, Jon’s been obsessed with cleaning the floor since the dark laminate got put in. He mentioned how much pet hair there is, I told him sorry we are not getting rid of the pets due to the mess they make. Haha!
I am taking it easy with work during the Month of December, still designing here and there, though mostly just reading, learning, and gearing up for the new year. Though I do wonder what’s going to happen on December 21 (Mayan Calendar), maybe all these prep is unnecessary if the calendar is correct. Hope not!
I have been enjoying the newly renovated kitchen, though still not posting on my blog. Facebook makes it so convenient to share photos, so my lazy bone is winning the battle, and I just can’t get into the swing of writing blog postings. Maybe I will pick it back up in 2013.
Have a great week!
Oh, marvelous! I love pork belly and that dish looks ever so good.
Cheers,
Rosa
I love braised pork belly! I usually cook it using the Chinese red-cooking method, but this look tastier and a bit lighter. Good stuff – thanks.
I normally don’t like eating meat, let it alone fatty meat. However this dish looks absolutley divine. I would definitely invest time into preparing this dish on a weekend. =)
Thank you Candice! It’s a guilty pleasure for me too. Today I had Chinese version at my favorite Chinese restaurant and that was excellent too! 🙂
wow- this looks so delicious!
Anybody who loves pork belly is my friend! 🙂
Whenever I eat this, I always have extra helping of rice. And it’s also a favourite with the kids. Will try this recipe next time 🙂
I make a dish very similar and my family and friends love it.
Hi Danielle! It’s always popular among my friends and family too. 🙂