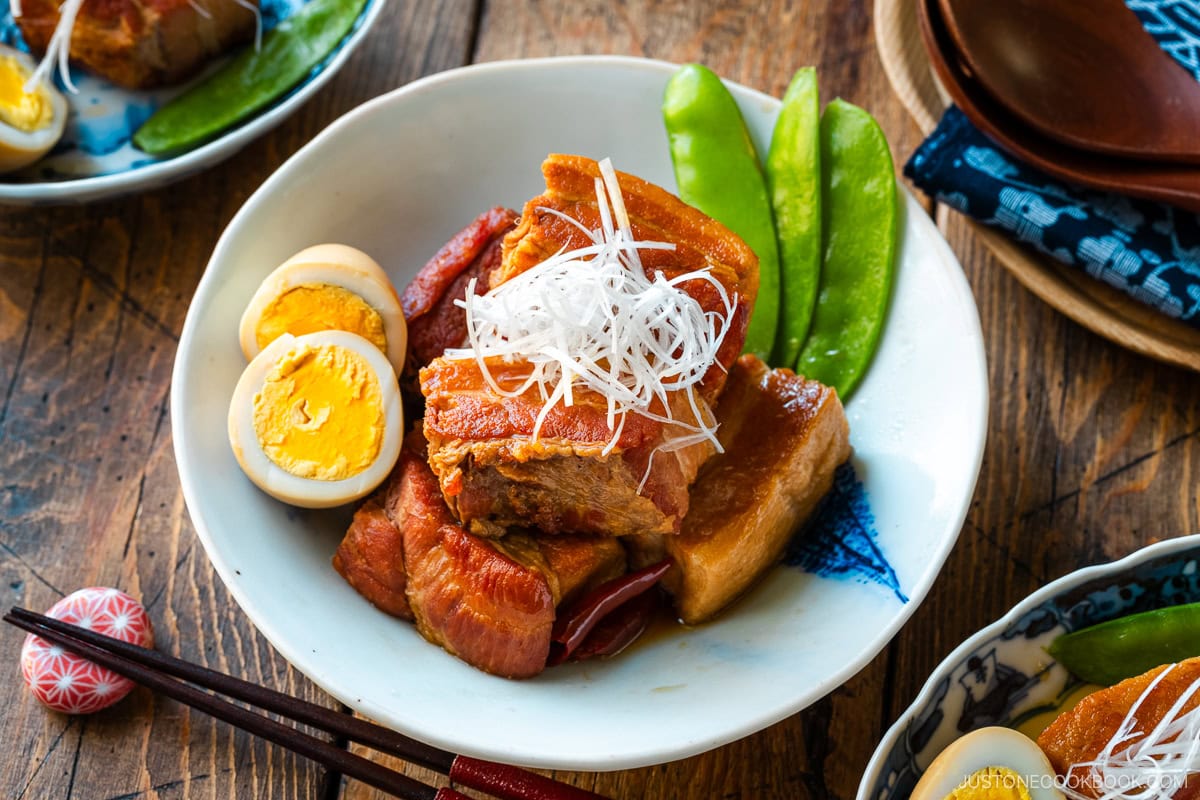
Kakuni or Japanese Braised Pork Belly is tender chunks of succulent meat coated in a savory soy sauce glaze. There‘s something about this dish that I cannot resist! The slow cooking method turns the pork belly into a delicious creation that simply melts in your mouth.
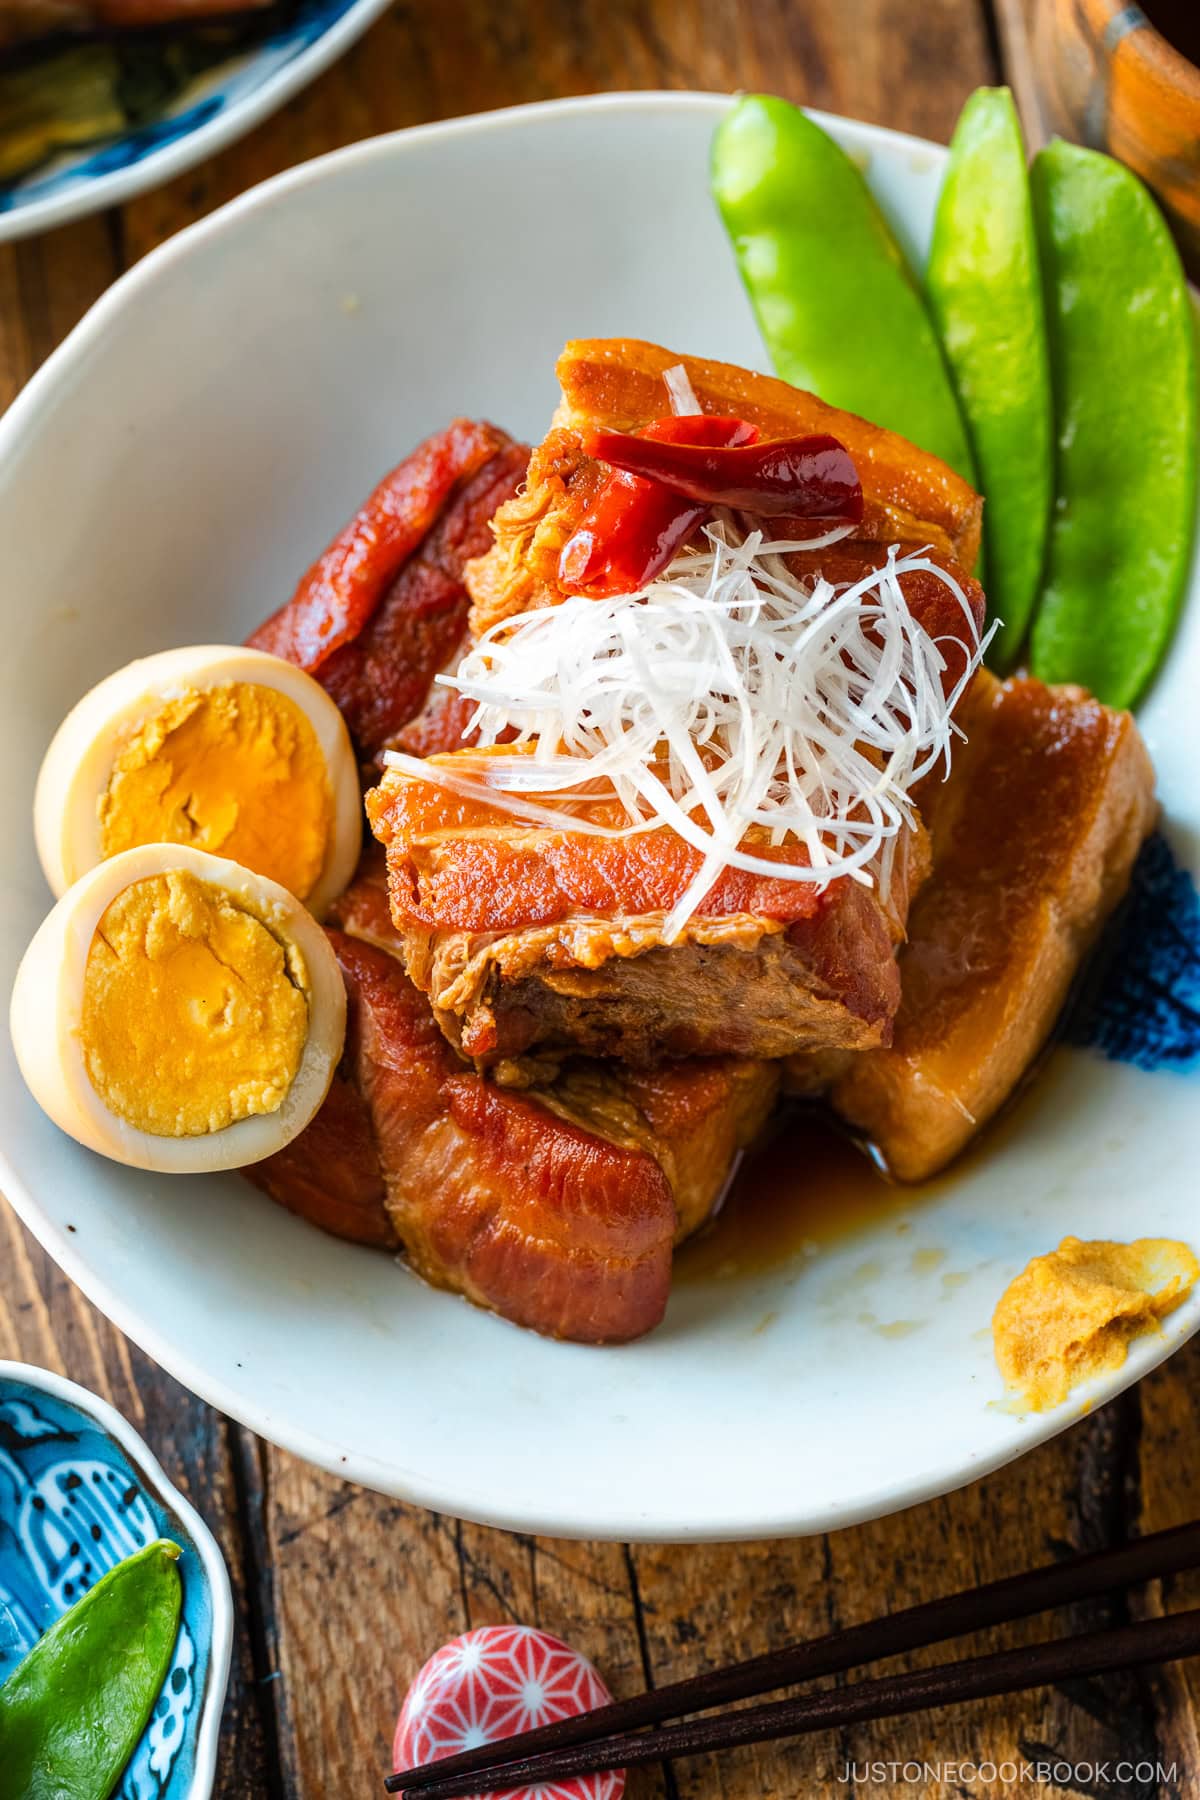
Kakuni (角煮) is a Japanese braised pork belly, and it literary means “square simmered” referring to the shape of this dish. I’m not usually into fatty meat but there is something about this dish that I cannot resist. The slow cooking method turns the meat into a delicious creation.
For my day-to-day cooking, I enjoy experimenting with existing recipes to see if I can improve them. I had been cooking a simpler version of kakuni until one day my husband asked if the meat can be softer after I made it. I kept experimenting with different methods and changing the ingredients’ portions, and I think I finally got the kakuni that will melt in your mouth.

Tips to Make Delicious Kakuni
The key to a good kakuni recipe is the initial simmering. For this recipe, I spent 2.5-3 hours slow-cooking the meat. This important process renders out the majority of fat from the pork belly and makes the meat and the fat have that melt-in-your-mouth texture.
Although it takes hours of preparation (unless you have a pressure cooker), the result is really worth it. If you plan to cook this for your family, I would recommend you make a double portion. Since you have to spend hours in the kitchen anyway, you might want to make extra for a second meal. I hope you enjoy this recipe as much as my family does.
Wish to learn more about Japanese cooking? Sign up for our free newsletter to receive cooking tips & recipe updates! And stay in touch with me on Facebook, Pinterest, YouTube, and Instagram.

Kakuni (Japanese Braised Pork Belly)
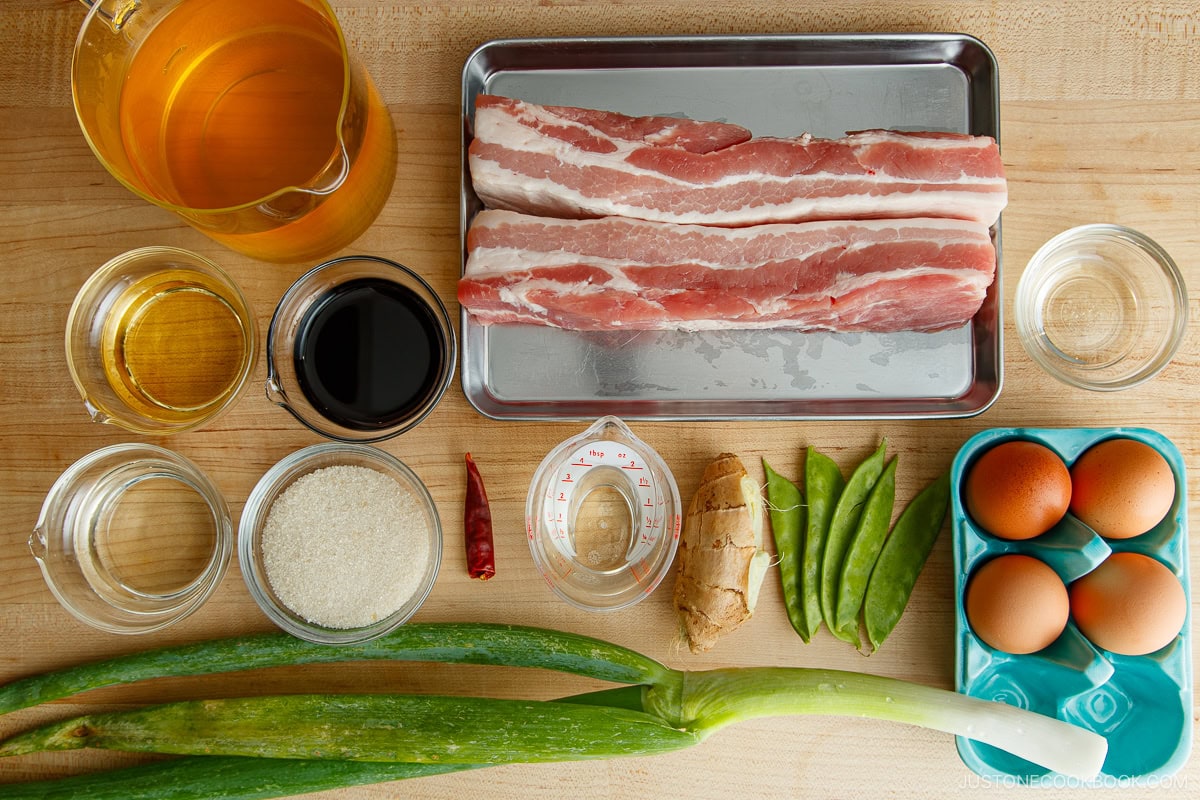
Ingredients
- 1 Tokyo negi (naga negi; long green onion) (or several green onions/scallions)
- 1 knob ginger (unpeeled; 2-inch, 5-cm)
- 1⅔ lb pork belly (skinless; up to 1¾ lb, 790 g for the batch of seasonings; ask a butcher to remove the skin)
- ½ Tbsp neutral oil (for searing)
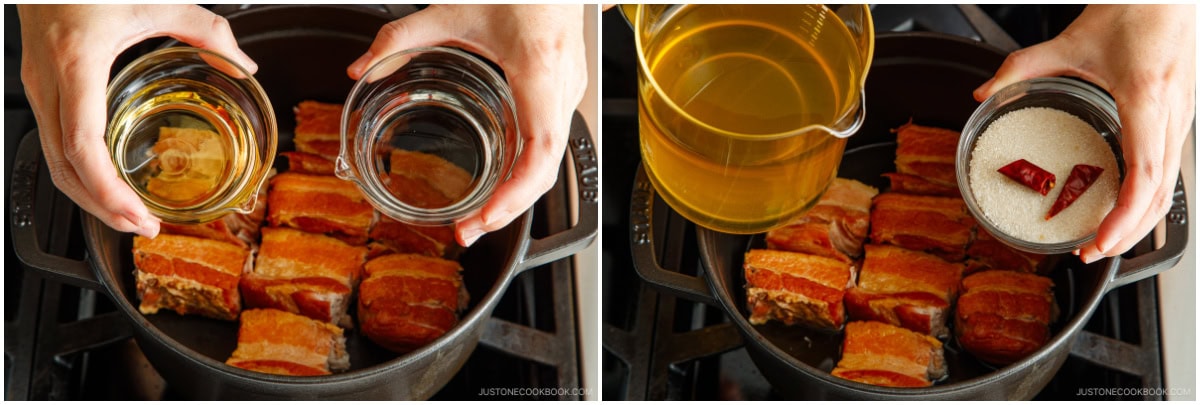
- ¼ cup sake
- 4 large eggs (50 g each w/o shell) (optional)
- 5 snap peas (optional for decoration; or green beans)
For the Seasonings
- 1 dried red chili pepper (optional)
- 2½ cups dashi (Japanese soup stock) (use standard Awase Dashi, dashi packet or powder, or Vegan Dashi)
- ¼ cup sake
- ¼ cup mirin
- ¼ cup sugar
- ¼ cup soy sauce
For Serving
- shichimi togarashi (Japanese seven spice) (optional, to taste)
Instructions
- Gather all the ingredients. I made quick dashi using a dashi packet (it only takes 3 minutes).

To Prepare the Aromatics
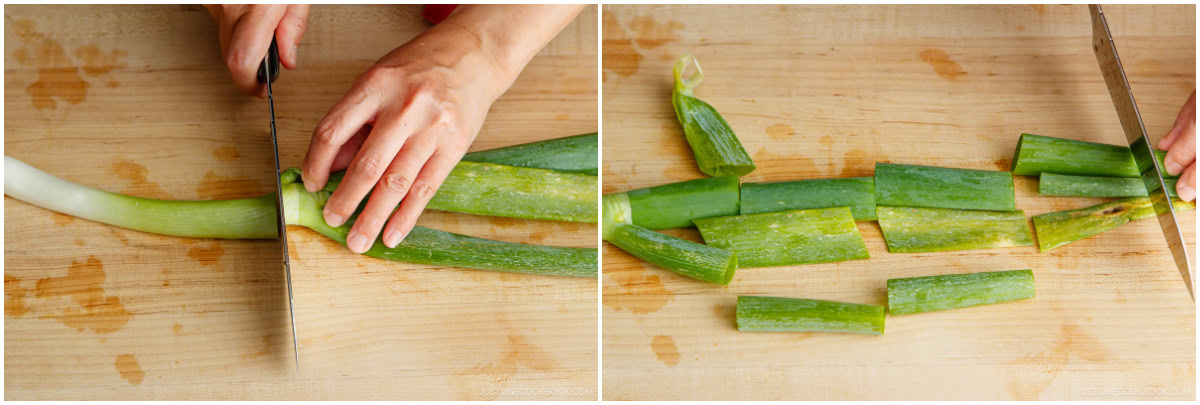
- Cut 1 Tokyo negi (naga negi; long green onion) in half, separating the green and white parts. Cut the green part into 2-inch (5-cm) pieces. Set aside the white part to make Shiraga Negi later for garnish (see below in To Serve).

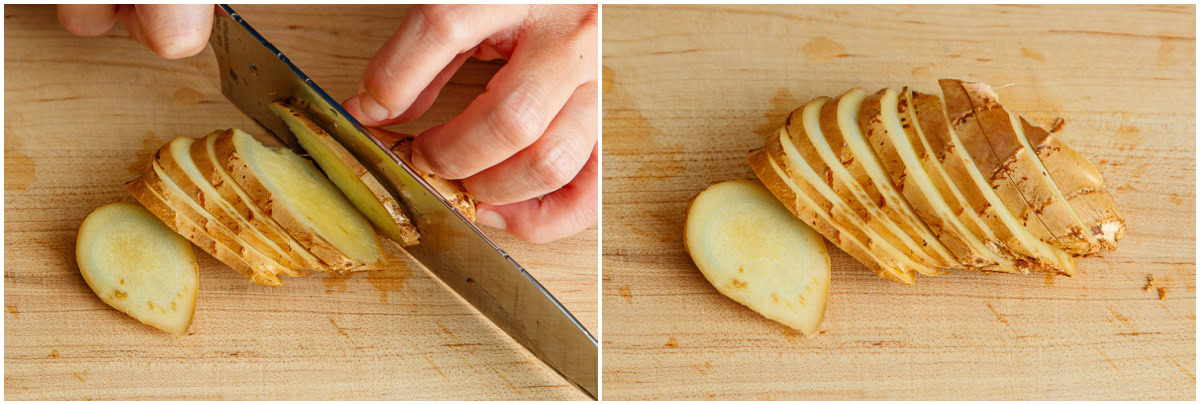
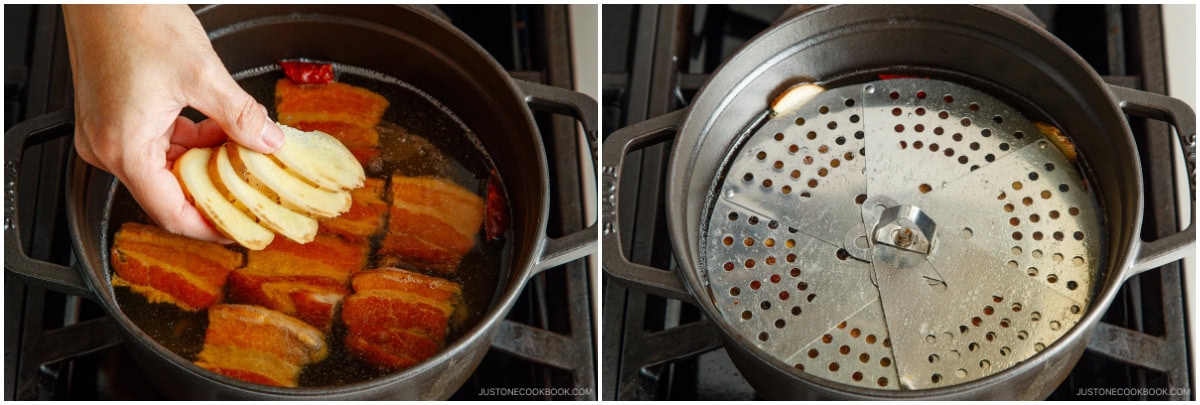
- Cut 1 knob ginger into thin slices. Divide them in half for slow cooking and braising.
To Sear the Pork Belly
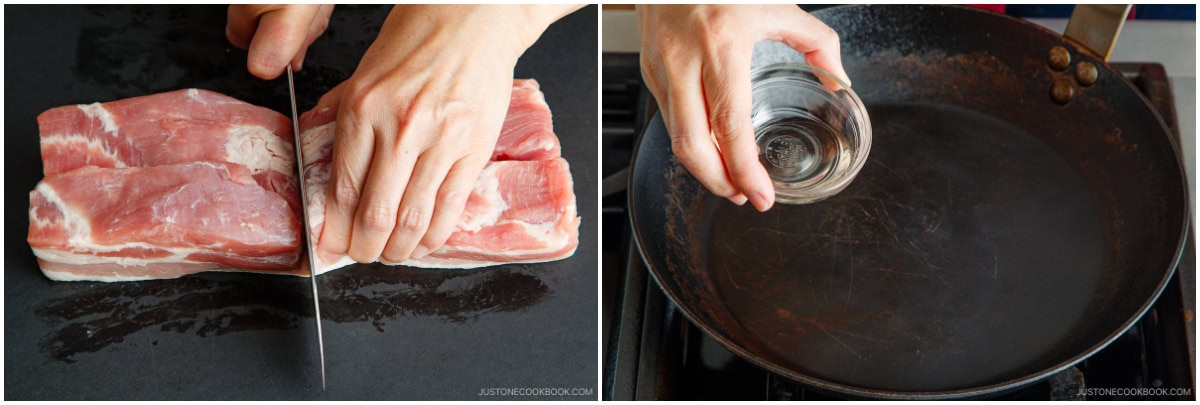
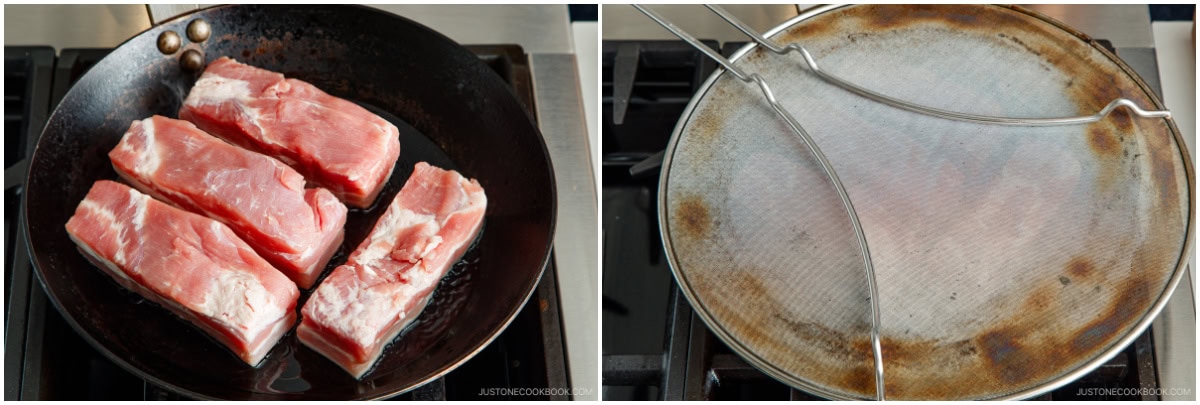
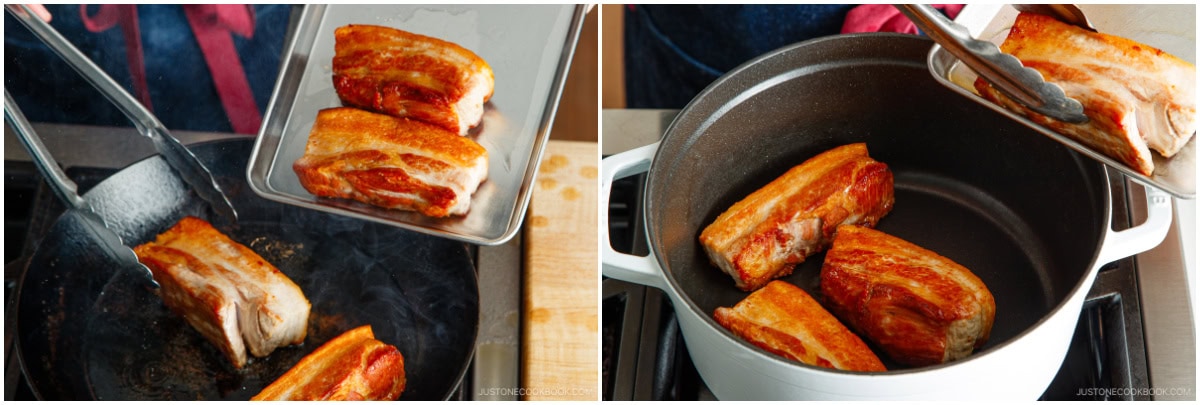
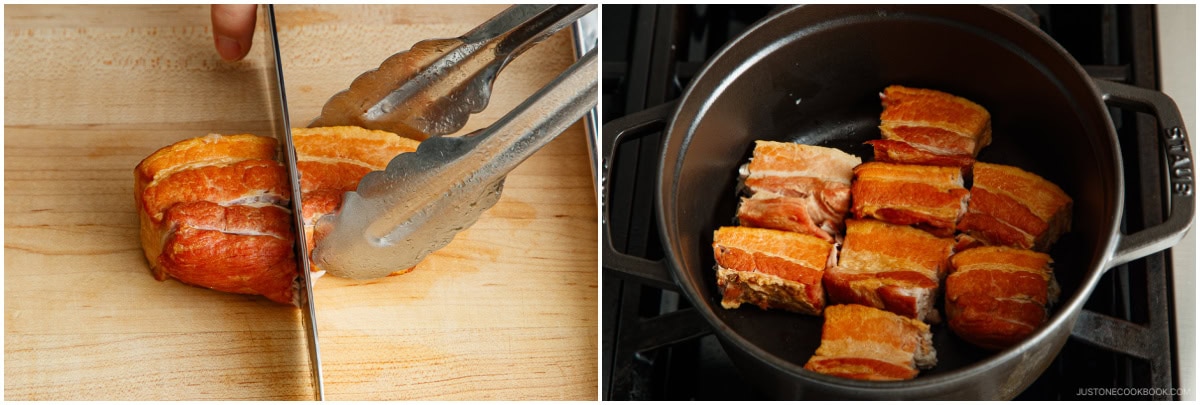
- Cut 1⅔ lb pork belly into smaller pieces so they fit straight in a large pot (I use a 4QT Staub). If your pork belly is already smaller blocks, you don't need to cut. Heat a heavy skillet over medium-high heat. When it‘s hot, add the oil. Tip: Using the oil helps render the fat faster.
- Place the pork belly fat side down. To prevent oil splatter, you can use a splatter screen. Tip: Searing the surface of the meat before boiling helps draw out excess fat and lock in the flavor.
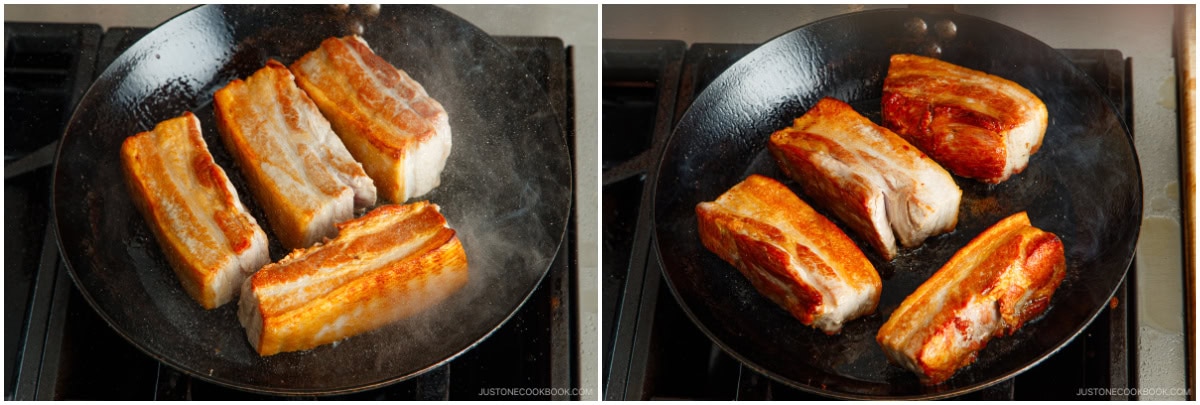
- Sear the meat until all sides are nicely browned, 2–3 minutes on each side.
- Transfer the seared pork belly pieces to the large pot and arrange them in a single layer.
To Slow Cook the Pork Belly (2½–3 hours)
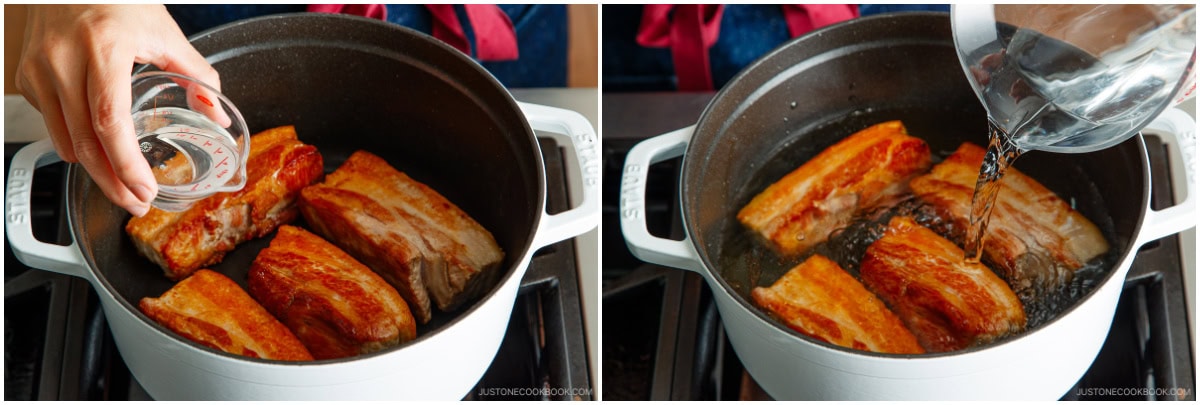
- In the pot, add ¼ cup sake and enough water to cover the meat. To start off, I added 1.5QT or 1.5L water; however, if your pot fits, add 2QT/2L of water.
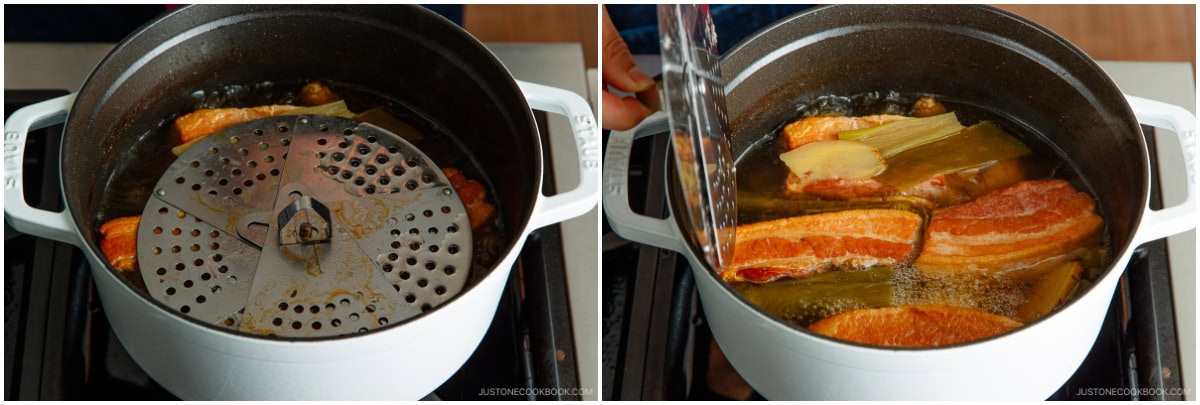
- Add the green part of the negi and half of the sliced ginger (saving the other half for the braising liquid). Bring it to a boil over medium heat. Tip: Boiling the meat removes the excess fat and scum while keeping the meat juicy.
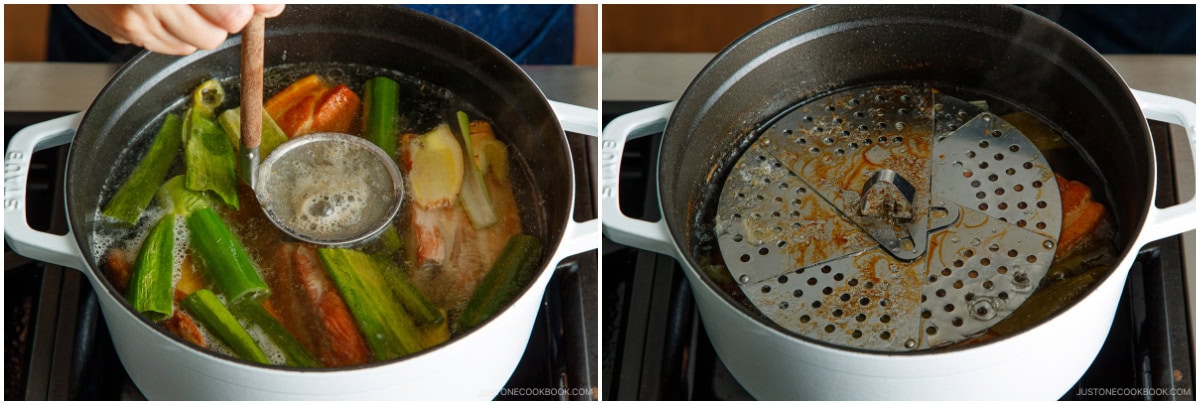
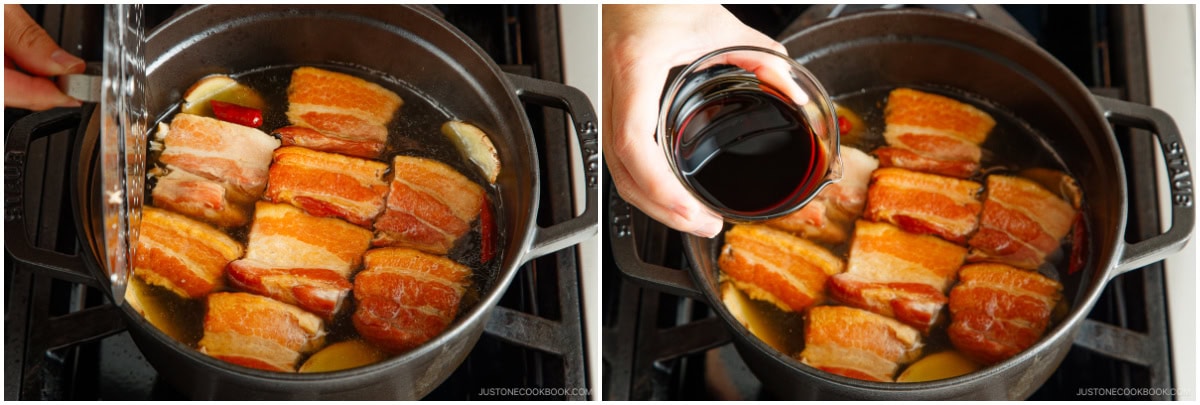
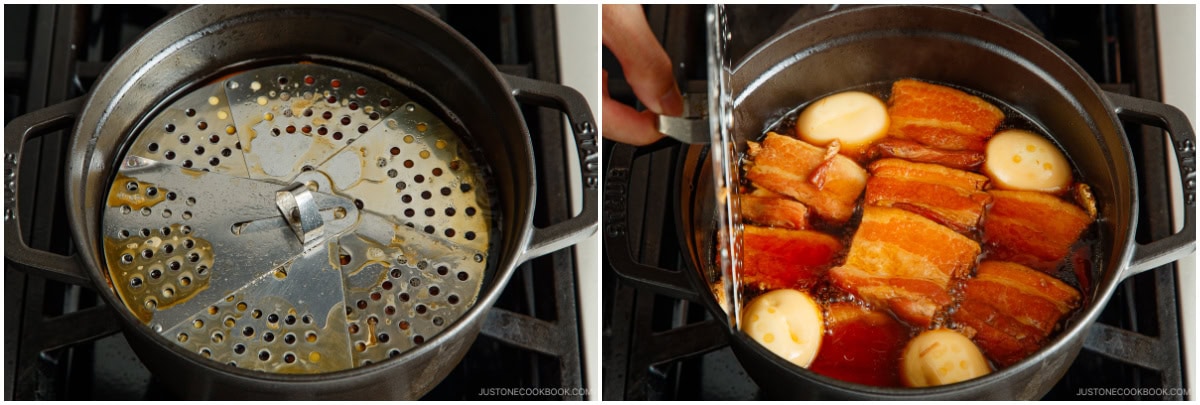
- Skim the scum and fat with a fine-mesh skimmer, and then reduce the heat to a simmer. Place an otoshibuta (drop lid) on top of the pork belly. We do not use a pot's lid so the unwanted odor goes away. You can buy an otoshibuta on Amazon or make one with aluminum foil following my post on How To Make Otoshibuta. Cook, uncovered, on a *gentle simmer*, for 2½–3 hours. Tip: I can't emphasize enough that slow, gentle cooking is the key. If you cook on strong heat, the meat will become tough.
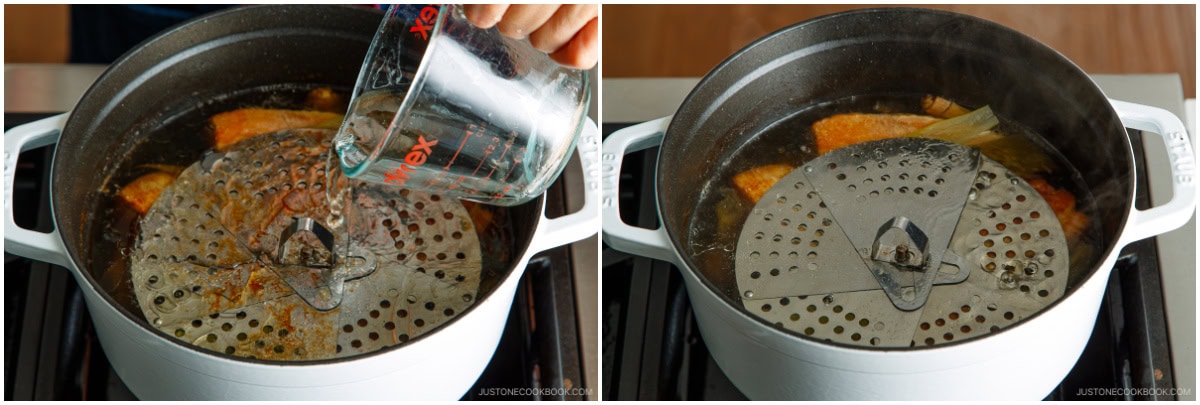
- When the liquid is running low, add more water or hot water(I added .5QT/.5L) to the pot so the meat remains covered at all times. Tip: Make sure the meat is not exposed, or else it will become dry.

To Prepare the Eggs and Snap Peas
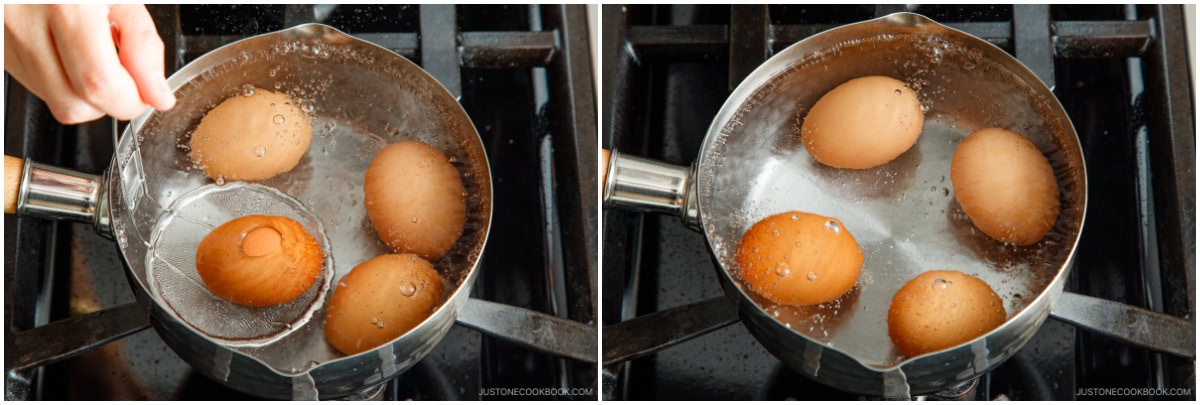
- Meanwhile, soft-boil 4 large eggs (50 g each w/o shell). To the boiling water, gently submerge the cold eggs from the refrigerator using the fine-mesh skimmer. Set a timer for 6.5–7 minutes and cook on medium-low heat.
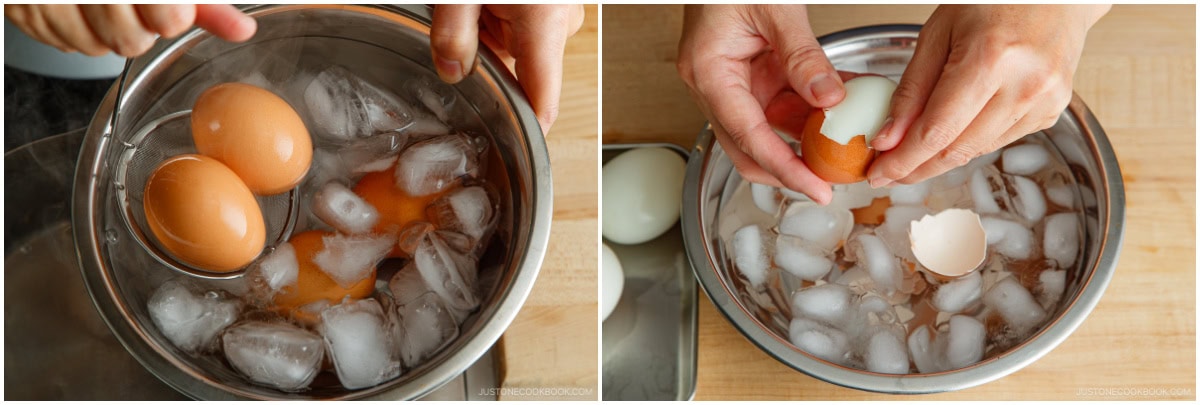
- As soon as the timer is up, transfer the eggs to iced water to stop cooking. Let them cool, peel them, and set aside.
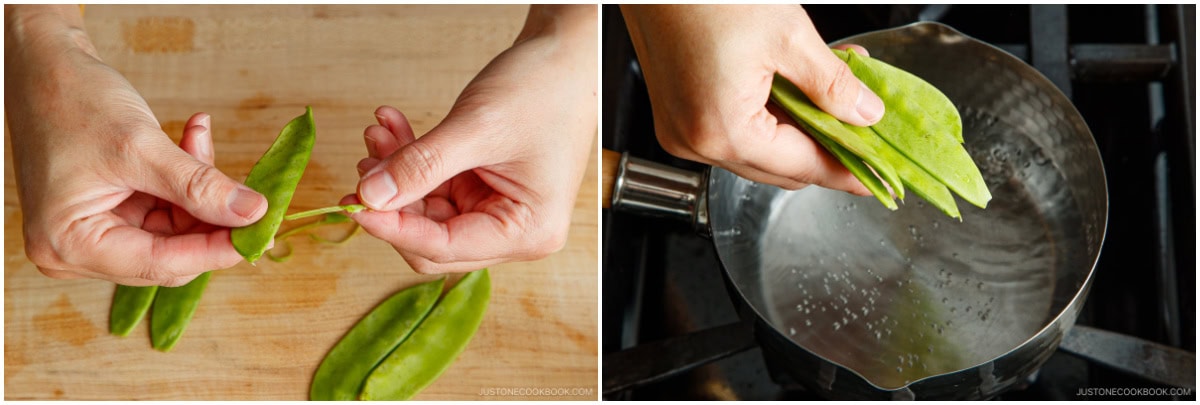
- Bring a small amount of water in the same pot to a boil. Remove tough strings from 5 snap peas and add them to boiling water.
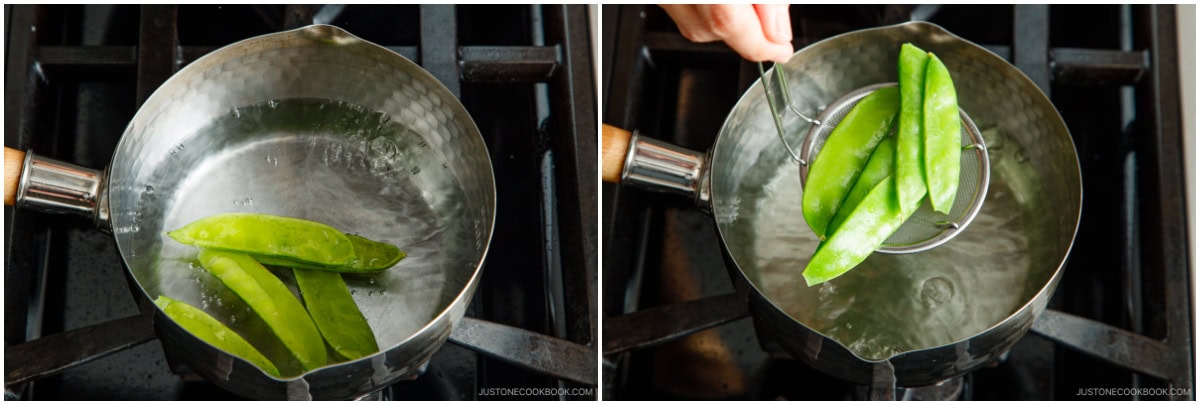
- Blanch them until tender, about 1½–2 minutes. Set aside until serving.
To Braise the Pork Belly (1 hour)
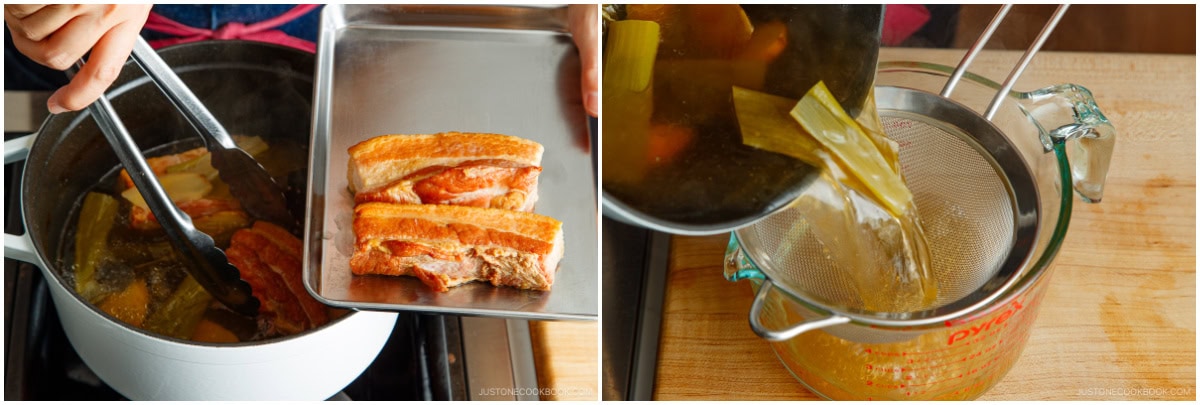
- After cooking for 2½–3 hours, remove the otoshibuta (drop lid) and check the tenderness. Tip: For really tender meat, cook for at least 3 hours and add more water if necessary.
- Remove the pork belly to a tray or plate. If you like, you can reserve the cooking liquid for other recipes.
- Gently cut the pork belly into 2-inch (2.5 cm) pieces. Be careful as they are tender. Place them in a medium, heavy-bottomed pot (I use a 2.75QT Staub).Tip: I use a medium pot for a tighter fit. If I used the same large pot, I may need to increase the amount of seasonings so they will cover the meat.
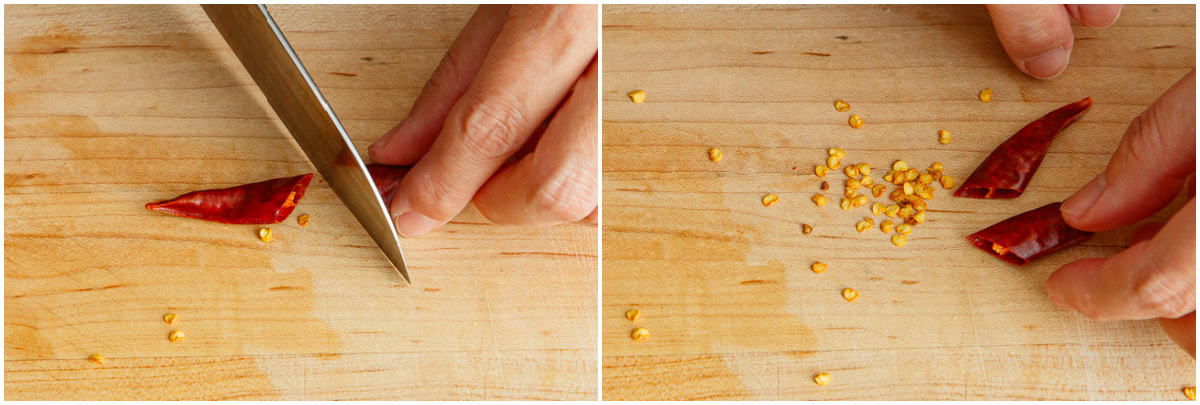
- Cut 1 dried red chili pepper in half and discard the seeds. If you like it spicy, include the seeds.
- Add 2½ cups dashi (Japanese soup stock), ¼ cup sake, ¼ cup mirin, ¼ cup sugar, and 1 dried red chili pepper.
- Add the rest of the ginger slices and place the otoshibuta (drop lid) on top. Again, do not cover with the pot's lid. Start cooking on medium heat. Once simmering, reduce the heat to low or medium low and cook on a *gentle simmer*. Set a timer for 1 hour.
- After the halfway point (cooking for 30 minutes), add ¼ cup soy sauce.Tip: We add the soy sauce later on so that the meat does not become salty from cooking in it for a long time.
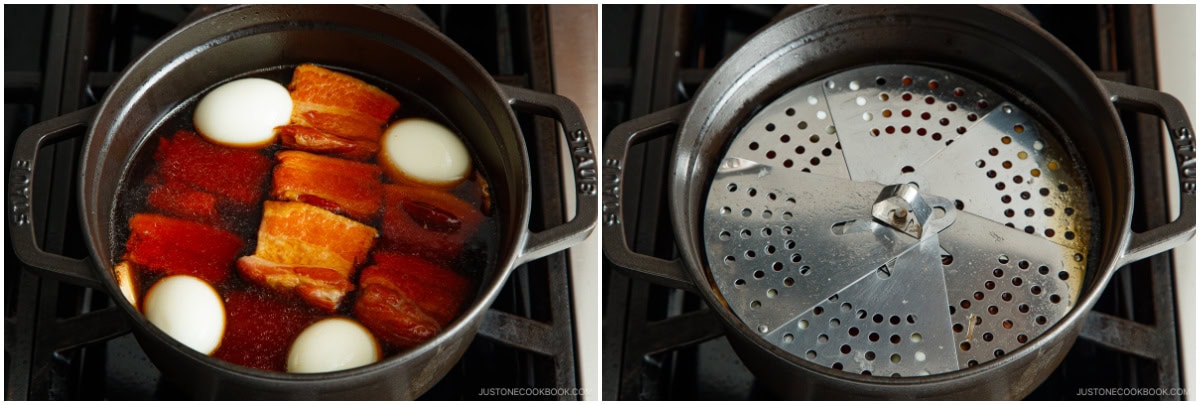
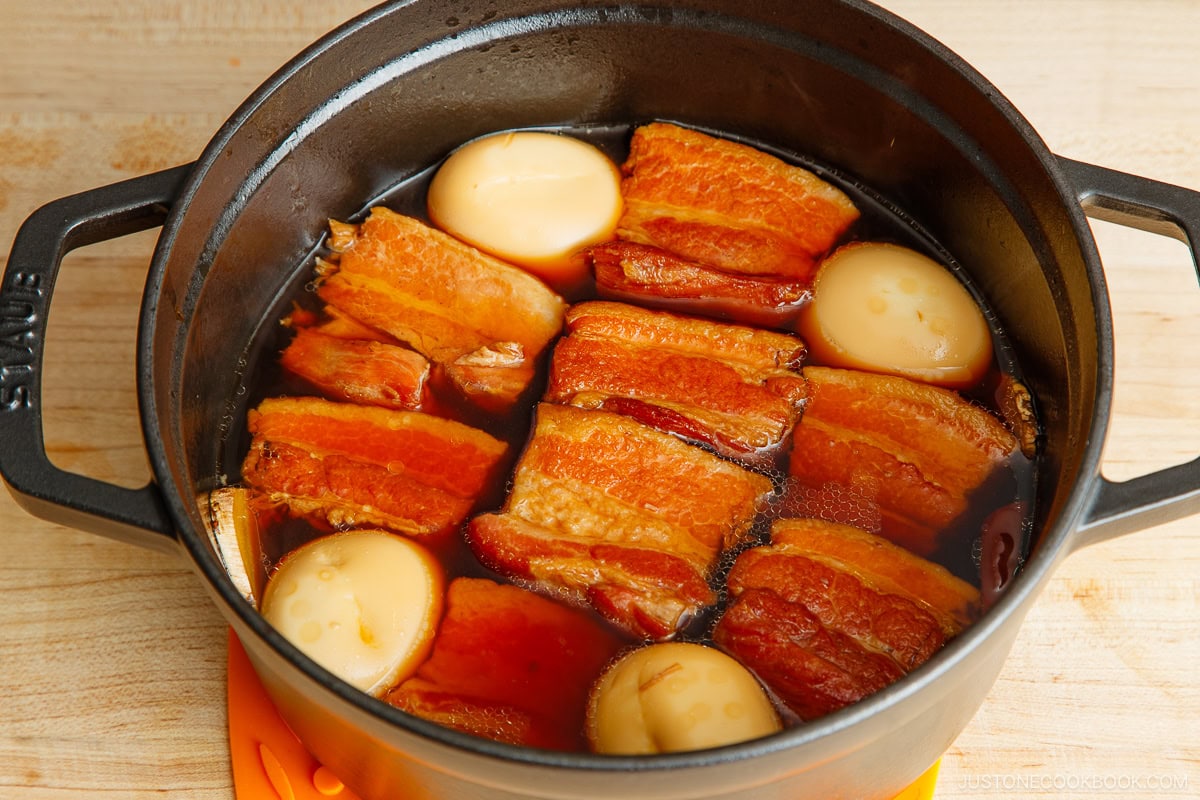
- Add the peeled hard-boiled eggs to the pot. Place the otoshibuta (drop lid) and continue simmering, uncovered, for another 30 minutes.
- If the cooking liquid is getting low, reduce the heat to low or lowest. Occasionally, shake the pot to cover the meat and eggs with the braising liquid. Make sure there‘s enough liquid in the pot so the pork and eggs don‘t burn. After braising for one hour, turn off the heat and it’s ready to serve.
To Serve
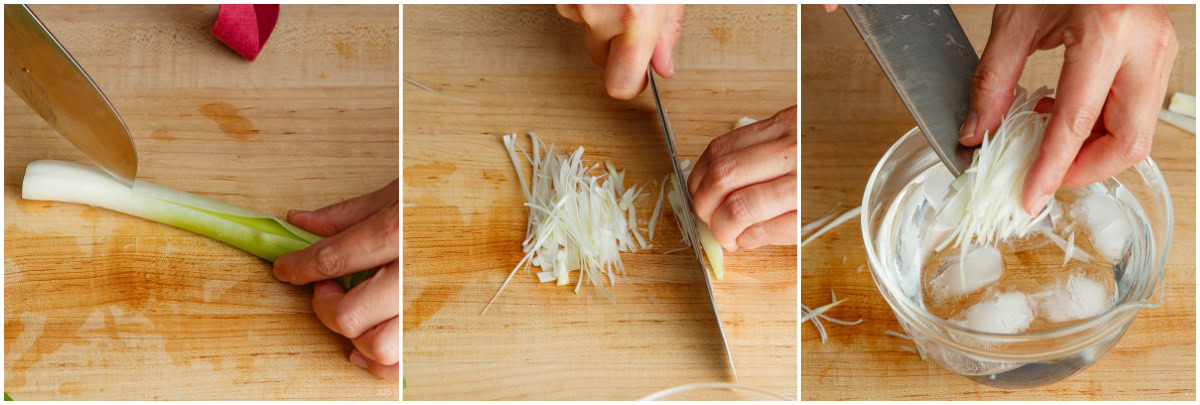
- Use the white part of 1 Tokyo negi (naga negi; long green onion) to make shiraga negi. First, cut the white part into pieces that are 3 inches (7.6 cm) long. Then, make a lengthwise incision to remove the soft green core (save for another use). Stack the outer layers, holding them flat against the cutting board, and slice lengthwise into very thin julienned strips. Soak in a bowl of iced water for 5–10 minutes to remove the bitterness, and drain well. Tip: For step-by-step photos, see my tutorial on How To Make Shiraga Negi.
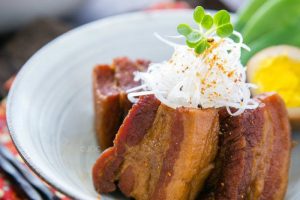
- Serve the Kakuni, eggs, and snap peas. Drizzle some braising liquid. Garnish with shiraga negi on top. Season with shichimi togarashi (Japanese seven spice) (optional) to taste.

To Develop Flavor (optional)
- If you prefer a more flavorful Kakuni, wait several hours before serving. Kakuni tastes better when it is gradually cooled, allowing the food to absorb more flavors, and then reheated before serving. If you prefer a less oily Kakuni, serve it the next day. Let it cool completely, then refrigerate the pork belly in its braising liquid overnight. The next day, remove and discard the solidified fat before gently reheating the Kakuni. Heat thoroughly and serve.
To Store
- You can keep the leftovers in an airtight container and store in the refrigerator for up to 3–4 days and in the freezer for a month.
Nutrition
Editor’s Note: This post was originally published on December 11, 2012. It was updated with a slightly revised recipe and new images on May 14, 2024.


Thanks for this recipe. I love buta no kakuni. Once, I used it as a filling for kuapao–steamed buns with pork and garnished with pickled mustard and roughly ground peanuts.
Today, I’ve just finished cooking chicken feet using the recipe. Can I call it “tori no ashi no kakuni”? Yummy!
Hi John! Ohhh i love to eat these with steamed buns! Hahaha the chicken feet name is funny. Kaku means square tho. 🙂 Thank you for your kind feedback!
Hi,
I read your other recipe for kakuni cooked in a pressure cooker. My question is, why can’t I use this recipe and just cook the first simmer in a pressure cooker and use the same measurements for the sauce. I’m wondering why you had to change the amounts of the ingredients. Thank you!
Hi Jennifer! Pressure cooker doesn’t release the moisture while cooking, so the liquid doesn’t evaporate like how it would when you cook on the stove. Therefore, you have to consider the sauce/liquid amount in the recipe. Also, Japanese cooking often pre-boil the fatty meat to get very clean flavor, so we don’t put the seasonings until you’re done with cooking the meat first. Hope this helps! 🙂
This looks amazing!
I have a question though – If i have twice the amount of meat (2 lbs) that i want to use, does that mean i should double all the other ingredients too?
Thanks.
Thank you! It’s a bit tricky, but you have to also think about the pot size. Are you putting all the ingredients (double amount) in a bigger pot? If it has enough depth, you might not need the double amount of seasonings/sauce. But it doesn’t hurt to make it double. It won’t be saltier due to double amount as long as it’s same ratio. 🙂
Hi Nami,
so I actually performed the experiment we were talking about 🙂
I cooked 2 eggs: the first one for 12 minutes, then I cooled it a bit and peeled it. After that i cooked it in water (already peeled) for another 30 mins, as your recipe also suggests 🙂
The second one was cooking unpeeled for about 45 minutes straight. Here ist the result:
http://114.imagebam.com/download/Y_bRFKpKEL-6sD47Y9YtoA/44127/441266024/DSC03914.JPG
So the one cooked for 45 mins straight looks definitely gross, even though I’ve seen much worse already (like… the whole egg looked dark blue-green). The one I cooked, peeled and continued cooking looks definitely less gross. But still not very appetizing… 🙂
The result of the experiment: do not overcook your eggs and cook it at low temperatures. I think the one which turned out dark blue-green once was boiling really strong, today both eggs were slightly simmering. Yay I’m glad I did it 🙂
Hi Alina! Thank you so much for experimenting! I always use cooked (and cooled) eggs when I need to cook the eggs in a pot. I always cook for 12 minutes (unless soft boiled eggs) and cool in ice water then peel before adding in the sauce and I don’t notice the green layer. It’s interesting that you brought up the topic that I never paid attention before! I’m glad you found out the way to keep the boiled egg less blue-green. 🙂 Thank you for sharing your experiment with us!
Hello Nami,
I’ve been meaning to ask this for a while now… When eggs are boiled longer than they should, they get such a gross gray-green ring around the yolk, like explained here:
http://www.cookinglight.com/cooking-101/techniques/cooking-questions-tips/how-to-avoid-ruining-hard-cooked-eggs
How come you boil them for 40 minutes altogether and they still look bright yellow? 🙂
Hi Alina! I am not sure, but I feel that initial 10 minutes of cooking boiled eggs is the actual cooking. We didn’t boiled eggs for 40 minutes total. We added the boiled eggs (finished product) into the kakuni and cook. Did yours get green color?
No, I didn’t boil the eggs together with the meat since I was sure they would turn green. I had it once before when I only cooked them for 15-20 minutes. so I don’t want to risk it anymore 🙂
Well you wrote that first you cook the eggs for 10 mins, and then you put to othe meat and cook for another 30 minutes which equals 40 min in total: “After cooking for 30 minutes, add the hard boiled eggs… Simmer for another 30 minutes.”
Hi Alina! Sorry my English is not good enough to explain this… but what I meant is that when you put the eggs into the Le Creuset pot, the egg is already a perfect hard boiled egg (without green layer). Therefore, even after I put the boiled eggs in the pot and cook for 30 minutes, eggs are not affected?
Because boiled eggs required 12 mins of cooking, and it’s done. You let them cool and the process is completed. So whether you add to the another dish or not, it doesn’t “cook further”.
I hope I’m making sense?!
Hi Nami!
Ah I think I should just try to do i myself…:) I just fail to see how “the egg is not affected” if you cook it for another 30 minutes… It means it is cooked for 30 minutes more than a hard boiled egg needs to be cooked.
Anyway, i think i will make an experiment and cook an egg for 10 minutes, peel it and cook in water for another 30 mins. That should be pretty similar 😉
Ohh that is actually a fun experiment. If you have a result, let me know!
If you don’t like the green layer, you can add the eggs only at the end (or not include it at all and add it at serving). We like flavored egg, so we put it in and cook with the meat… 😀
Dear Nami,
Your recipes has been my The-Go-To when it comes to Japanese food. This Kakuni recipe is especially delicious. The pork belly turned out SO soft and tender it just melts in your mouth. It is the right amount of flavoring and even better the next day. I doubled the portion when I made this for my family and they loved it! My total cook time was 4.5 hours, simmering in low heat as instructed. I left the skin on and it didn’t turn out rubbery. Thank you so much for sharing you wonderful recipes!
Hi Lashan! Thank you so much for trying this recipe and I’m so happy to hear you enjoy it! Good to know you could make it with the skin on. Thank you for your kind feedback! 🙂
Hello!~
I was wondering if the portion you’re using is the double portion or just a single portion? As you were saying that it is best to make double portion because it takes a long time to make and it is absolutely delicious 🙂
Hi Kassie! I suggest to make double portion (especially a family of four like us) but the recipe wasn’t double portion. I’ve been making double portion for my own use, but that can be a lot of meat for a couple or single person. 😀 Hope that helps!
Hi Nami!
I have a pressure cooker…. I can use it between the steps 7~10?
Hugs from Brazil!
Hi Naty! It should work – I just got a pressure cooker/slow cooker machine and will have to try all the long-cooking recipes with this new machine. Hope it’ll work out! 🙂
I was Thinking about Trying Your same Method on how you cook the Pork Belly But Use an Slow Cooker and cook the Pork Belly???
Hi John! Yes you can certain do that! I don’t own a slow cooker, otherwise I’d try it too. Please adjust my recipe as you need. 🙂
Hi Nami san, yes the next I make your recipe i’ll try this with an slow cooker and cook it for 6hr to 8hr on low
I hope you enjoy the recipe! 🙂
Thank you Nami for sharing this dish. I have made it 3 times and it is always a huge hit. I plan on making a book of all of my favourite recipes as gifts to my family and it goes without saying this will be in it. It was my number 1 dish of 2013!! Thank you so much!
I am obsessed with all of your recipes! This one in particular! The Okinawan Restaurant the boyfriend and I go to has a Shoyu Ramen that tastes just like this, the only thing is that they sear the pork belly at the end as well! I made this following the recipe but multiplied ingredients by four and used the liquid as broth for my Ramen. I only used a couple of pieces of pork belly for my ramen but I stored the rest for the next day to serve like in this recipe! The boyfriend compared it to our favorite Okinawan Restaurant and said it might even be better! Thanks!
Hi Sita! Aww thanks so much! I’m really happy to hear you enjoy my blog! Thanks for trying out this recipe. I’m thinking about making seared version this year… since I have to make use of my cooking torch. 😀 Thank you for your feedback. Now I want to go to your OKinawan restaurant… 🙂
If you are ever in Orange County, CA then the name of the place is Habuya Okinawan Dining! It is a gem of a place!
Thank you Sita for letting me know! I sometimes visit SoCal, so I’ll remember! I heard about this place before. I hope I can visit one day! 🙂
Oh YUM!!
This looks like a labour of love and I can understand why, my mouth is watering!!
Thanks! I’m so glad you made this recipe. Can’t wait to try it at home.
Hi Nami,
Last night was the first time I have ever cooked Japanese following your instructions for Yaki Udon. This is a simple and easy to follow recipe and most of all it was so scrumptious (my youngest son went for second! He is extremely fussy!) and I could easily take this to work instead of buying takeaway!
Tonight I made Pork Belly. Boy, that was a long process! I had to take a 20 minutes nap during the simmering stage! In between the simmering I also made desert which all came together at the same time.
I have one issue. I did double this recipe as I have too many mouths to feed and I knew they would go for second. My concern is with the simmering stage I did not lose any liquid nor did I lose any at the time where you put the rest of the ingredients, therefore, the meat did not get the glazed. Are we suppose to put less liquid in when we are doubling and also less sugar? (it was quite sweet) All in all the Pork Belly was devine! It still melted in your mouth and the fat you cannot even taste, it just blended with the flesh, for the sweetness, I made a side plate of mixed steamed vegetables as well as rice. Thank you for sharing this and the many more recipes I have listed to try out on weekends. Happy Girls Day!
Jacqui
Melbourne, Australia.
Happy Girl’s Day Jacqui! Thank you for writing, and I’m glad you enjoyed both Yaki Soba and the Pork Belly. 🙂
Regarding the liquid that wasn’t reduced… it depends on the cooking heat, the size of pot, etc. Was it constantly simmering (not boiling, but simmering)? Between step 14 to 15, there is no lid (otoshibuta) required, so the sauce evaporates during this time. However, if you take a look at my last photo, I still have some liquid left. Since you double the amount of liquid, maybe you mean you had a lot more? As long as the meat does not overlap in your pot that you are using, you do not need to double the amount of liquid. You want to make sure that the meat is covered with liquid at least 80%, then otoshibuta will help the liquid goes around while simmering. I hope this makes sense… 🙂
I bought pork belly today and look forward to making this recipe. Have you ever tried to do the braising in a slow cooker? I’m tempted as I would like to cook this on a weeknight but don’t want to sacrifice taste. Thanks!
Hi Natalia! I don’t own a slow cooker, so I’ve never tried making it. However, I’m sure you can use it from Step #11. I don’t know if you need more liquid to cook for a slow cooker, but you can also put otoshibuta inside the slow cooker to make sure the flavors go around evenly. Hope it will work out. 🙂