Kakuni or Japanese Braised Pork Belly is tender chunks of succulent meat coated in a savory soy sauce glaze. There‘s something about this dish that I cannot resist! The slow cooking method turns the pork belly into a delicious creation that simply melts in your mouth.

Kakuni (角煮) is a Japanese braised pork belly, and it literary means “square simmered” referring to the shape of this dish. I’m not usually into fatty meat but there is something about this dish that I cannot resist. The slow cooking method turns the meat into a delicious creation.

For my day-to-day cooking, I enjoy experimenting with existing recipes to see if I can improve them. I had been cooking a simpler version of kakuni until one day my husband asked if the meat can be softer after I made it. I kept experimenting with different methods and changing the ingredients’ portions, and I think I finally got the kakuni that will melt in your mouth.
Tips to Make Delicious Kakuni
The key to a good kakuni recipe is the initial simmering. For this recipe, I spent 2-3 hours simmering the meat, but you could spend additional hours doing so if you have the time. This important process renders out the majority of fat from the pork belly and makes the meat and the fat have that melt-in-your-mouth texture.
Although it takes hours of preparation (unless you have a pressure cooker), the result is really worth it. If you plan to cook this for your family, I would recommend you to make a double portion. Since you have to spend hours in the kitchen anyway, you might want to make extra for a second meal. I hope you enjoy this recipe as much as my family does.

Japanese Ingredient Substitution: If you want to look for substitutes for Japanese condiments and ingredients, click here.
Wish to learn more about Japanese cooking? Sign up for our free newsletter to receive cooking tips & recipe updates! And stay in touch with me on Facebook, Pinterest, YouTube, and Instagram.

Braised Pork Belly (Kakuni)
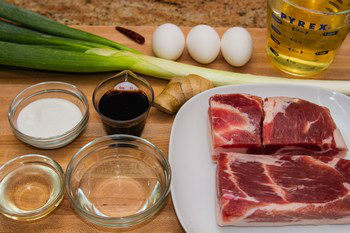
Ingredients
- 1 lb pork belly
- 9–10 slices ginger (unpeeled; slice a 2-inch, 5-cm knob)
- 1 Tokyo negi (naga negi; long green onion) (or several green onions/scallions)
- 3 large eggs (50 g each w/o shell)
For the Seasonings
- 2½ cups dashi (Japanese soup stock) (use standard Awase Dashi, dashi packet or powder, or Vegan Dashi)
- ¼ cup sake
- 3 Tbsp mirin
- ¼ cup sugar
- ¼ cup soy sauce
- 1 dried red chili pepper (optional)
For Serving
- shichimi togarashi (Japanese seven spice) (optional, to taste)
Instructions
- Gather all the ingredients.

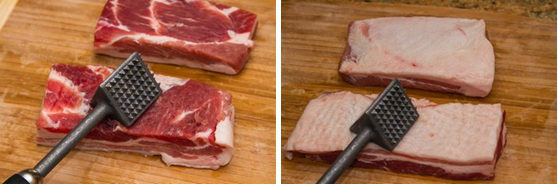
- Pound 1 lb pork belly on both sides with a meat pounder (or the back of the knife) to tenderize it.

- Press and mold the meat back into its original shape with your hands. Then, cut the pork belly into 2-inch (5 cm) pieces. My pieces are roughly 1½ x 1½ x 2 inches (4 x 4 x 5 cm).

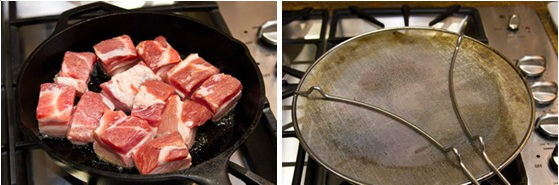
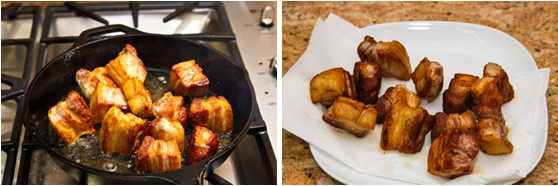
- Heat a heavy skillet over medium-high heat. When it‘s hot, add the meat fat side down on the ungreased skillet. Cook the meat until all sides are nicely browned. To prevent oil splatter, you can use a splatter screen. Tip: Searing the surface of the meat before boiling helps draw out excess fat and lock in the flavor.

- When the meat is nicely browned, transfer the pieces to a plate lined with paper towels to absorb the excess fat.

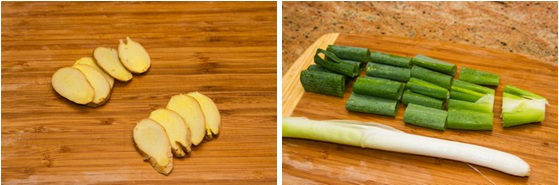
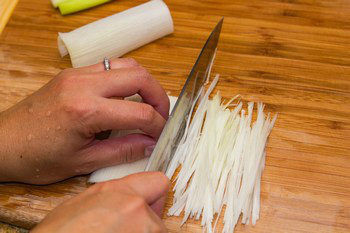
- Cut the unpeeled ginger thinly into 9–10 slices ginger; set aside half of the slices for later. Next, cut the green part of 1 Tokyo negi (naga negi; long green onion) into 2-inch (5-cm) pieces. Set aside the white part to make Shiraga Negi later for garnish (see below).

To Cook the Pork Belly
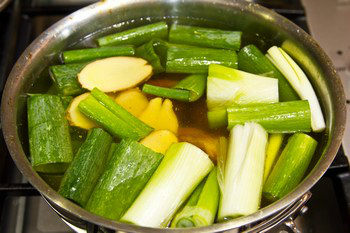
- In a large pot, put the seared pork belly, green part of the negi, and half of the sliced ginger (saving the other half for the braising liquid). Next, add enough water to the pot to cover the meat. Tip: Boiling the seared meat removes the excess fat and scum. These two steps (searing and boiling) remove excess fat while keeping the meat juicy.
- Bring it to a boil over high heat, and then reduce the heat to a simmer. Cook, uncovered (so the unwanted odor goes away), for 2–3 hours. Turn the pork occasionally during this time. When the liquid is running low, add more water or hot water to the pot so the meat remains covered at all times. Tip: If you want really tender meat, cook for at least 3 hours.
To Prepare the Eggs and Shiraga Negi
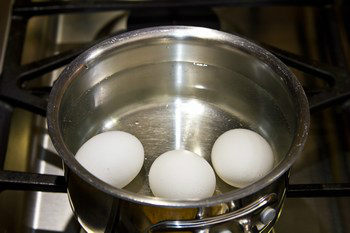
- Meanwhile, hard-boil 3 large eggs (50 g each w/o shell) and peel them. Set aside. For more details, see my post on How To Make Perfect Hard-Boiled Eggs.
- Next, use the white part of 1 Tokyo negi (naga negi; long green onion) to make shiraga negi. First, cut the white part into pieces that are 3 inches (7.6 cm) long. Then, make a lengthwise incision to remove the soft green core (save for another use). Stack the outer layers, holding them flat against the cutting board, and slice lengthwise into very thin julienned strips. Soak in a bowl of iced water for 10 minutes to remove the bitterness, and drain well. Set it aside to use later as a garnish. Tip: For step-by-step photos, see my tutorial on How To Make Shiraga Negi.
To Braise the Pork Belly
- After cooking for 2 hours, drain the water and remove the pork to a paper towel to wipe off the excess oil.
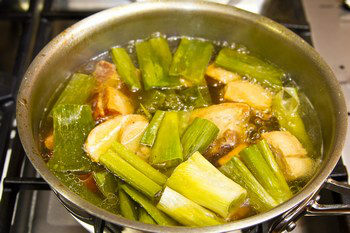
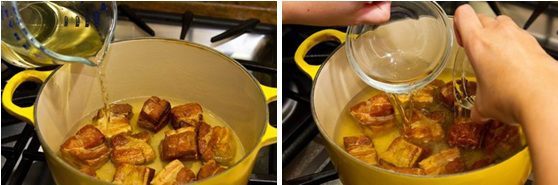
- To a large, heavy-bottomed pot (I use a Dutch oven), add the cooked pork belly, 2½ cups dashi (Japanese soup stock), ¼ cup sake, and 3 Tbsp mirin. Start cooking on medium heat.
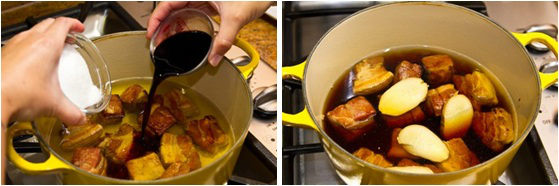
- Next, add ¼ cup sugar, ¼ cup soy sauce, the rest of the ginger slices, and 1 dried red chili pepper. Tip: I remove the chili seeds so it won‘t be too spicy for my kids.

- When it reaches a boil, reduce the heat to low or medium low to maintain a simmer. Place an otoshibuta (drop lid) on top of the meat; do not cover the pot with the regular pot lid. Cook for 1 hour. Tip: If you don‘t have an otoshibuta, make one! See my post on How To Make Otoshibuta.
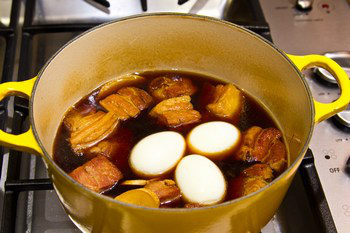
- After the halfway point (cooking for 30 minutes), add the peeled hard-boiled eggs to the pot. You can now remove the otoshibuta.
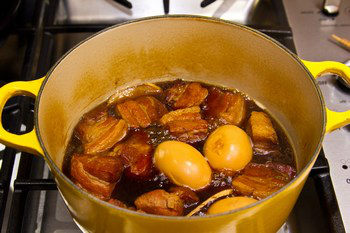
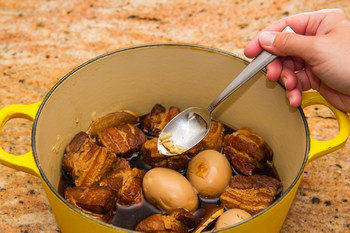
- Continue simmering, uncovered, for another 30 minutes. If the cooking liquid is pretty low, reduce the heat to low or lowest. Occasionally, baste the meat with the braising liquid and gently turn the meat and eggs. Make sure there‘s enough liquid in the pot so the pork and eggs don‘t burn. When the sauce is reduced and the meat has a nice glaze, it’s ready to serve.


To Serve
- Serve the Kakuni and eggs and garnish with shiraga negi on top. Season with shichimi togarashi (Japanese seven spice) (optional) to taste.


To Develop Flavor (optional)
- If you prefer a more flavorful and less oily Kakuni, wait one day before serving. Let it cool completely, then refrigerate the pork belly in its braising liquid overnight. The next day, remove and discard the solidified fat (optional) before gently reheating the Kakuni. Heat thoroughly and serve.
To Store
- You can keep the leftovers in an airtight container and store in the refrigerator for up to 3–4 days and in the freezer for a month.


[…] taro in the Ichiju Sansai ‘one soup three dishes’ style, by complimenting it with braised pork belly (kakuni), chawanmushi, steamed rice, pickled cucumber and miso […]
Do you discard the pork broth after boiling the pork belly for 3 hours? Thank you!
Hi Lu! Yes, in Japan, we typically throw away as we don’t really use pork broth in our cooking much. However, in Okinawa where food is quite different from the mainland, they use the pork broth for their famous Okinawa Soba. Basically you can use the cooking broth as long as you skim the foam and scum on the surface diligently.
The only thing I regret after trying this recipe is not having followed the advice of doubling the amount…. I need more!! ????
Hi Daniel! Ahahaha! I’m happy to hear you enjoyed this dish. Thank you for your kind feedback. 🙂
Hi Nami, can I do this with boneless pork ribs too?
Hi Emy! I have never tried but I think you can… Let me know how it goes if you try. 🙂
This recipe was ABSOLUTELY delicious!!!
I attempted it with pork jowl as that’s how a restaurant that I regularly frequent does it and I was so impressed. I’ll use pork belly next time though.
Thank you so much for sharing this recipe!
Attempting with pork belly now! I’m so excited, hope it turns out as well as the first time I made this,,,
Hi Virginia! I am sorry for my late response. I’m really happy to hear yours came out well. How did the pork belly came out? It’s so cool you can get pork jowl – I used that for my pressure cooker recipe for the first time and I really like that piece (I could get it in a Korean meat shop). Thank you for trying my recipe! I’m glad you enjoy this recipe!
The pork belly was an absolute hit! My partner is Japanese and he said he couldn’t tell that the Buta No Kakuni was made by a “gaijin”!!! I have you to thank!
AWESOME!!!!! I’m so happy to hear that! Thank you for your kind feedback. 🙂
Hi Nomi, it’s been awhile since this was posted, so I don’t know if you’ll get this comment. If you do, I was wondering if you have pressure cooker instructions for this recipe. I have an instant pot (thanks to you introducing it to us!) and would like to try it on this recipe.
Hi Shirley! I have the instant pot specific recipe for this recipe: https://www.justonecookbook.com/pressure-cooker-pork-belly-kakuni/
Hi Nami , hope you are well! May I ask if I use the pressure cooker how much time do I cook it for? I notice this pork you simmer it 2 times so how do I do it using pressure cooker? By the way, I have tried many of your recipes and they are fantastic! I just baked the strawberry shortcake for my hubby ‘s Birthday and it was fantastic ‘!
Hi Min! Happy to hear your strawberry shortcake came out well, and happy belated birthday to him! 🙂
Here’s the recipe for Instant Pot (pressure cooker) for pork belly recipe. You have to pre-boil it before seasoning the pork. https://www.justonecookbook.com/pressure-cooker-pork-belly-kakuni/
do you think i could make this in Instant Pot to save time? Would I just skip the boiling part and just went straight to the part where you cook the pork belly with sake, mirin and dashi?
Hi Jos! I have the IP version of the recipe here (https://www.justonecookbook.com/pressure-cooker-pork-belly-kakuni/). As a Japanese home cook I recommend pre-boiling part because it gives clean taste. You’re not losing any flavor by doing it, but that extra time spent on pre boiling makes the pork tender (not during the seasoning stage). With the seasonings, meat is not loosen so I highly recommend…
If I double the recipe by using 2 lbs of pork belly, , should I also double the dashi, ginger, scallions, sake, mirin, soy sauce?
Also, during the simmering of pork in water, scallions, ginger, do you summer with or without a lid, and does it affect the outcome whether you use a lid or not?
Thanks!
Hi Ren! Yes, I’d recommend to double the sauce so the meat is seasoned well.
At step 9, I keep it open so unwanted smell goes away. 🙂
Hi Nami, as mentioned, I am going to try this recipes this week. Just curious, Is step 2 you listed above very important? “Pound the pork on both sides with a meat pounder”, how would this step help the overall cooking process? Thanks!
Hi J! It makes the meat tender. 🙂
Hi Nami, Hope all is well. I wanted to try this recipe this week. It looks delicious! Quick question: I currently does not own a Splatter Screen. I saw that you used it and also noticed that you listed the Progressive International Stainless Steel Splatter Screen on the shop page. How do you like it? Wondering if you have seen any other similar product that you would recommend? Thanks for your recommendations as always!
Hi J! Thank you for asking, I’m doing good in Japan. 🙂 I love splatter screen! It is a fine mesh, so the steam can go away while regular lid will keep moisture inside the lid.
It also keeps the stove top less messy from oil splatter. Without this screen, I would have to wipe lots of oil splatter…. so this is a must shield for me when I fry bacon and fatty meat like pork belly. 🙂
Thank you, Nami! How do you clean the screen splatter? Is it easy to hand wash and get off the grease? does the handle transmit heat while cooking? Thanks!
I usually throw into the dish washer (bottom, tallest side as diameter is pretty big). Grease will go away but it’s easily brown. I don’t scrub it as I use it often. The handle part – no, I don’t have any problem lifting it while cooking so I don’t think heat transmit that much. Also one side of splatter has a stand attach, so the splatter screen won’t touch the counter if you put it at the counter.
Hello Nami!
Totally weird question but I plan on making this tomorrow night for my fam-jam. I was wondering what the green onion actually does for the dish? Negi itself doesn’t really have any flavours right? Is it really necessary to cook it with the pork for 3 hours? Thanks!
Hi Kassie! Ginger and green onions are used to remove the unwanted smell, and they are necessary for this process. It’s important, so don’t skip it. 🙂 Hope your family will enjoy this dish!
Made this tonight and it was a hit! Namie, you are truly a savior. The meat was very soft but next time, I will definitely make this the night before, refrigerate it and serve the next day (as you suggested). The sauce will definitely seep more flavor into the meat this way, and I also imagine the meat to be even more melt-in-your-mouth.
On a sidenote, I didn’t find this to be oily in any way.
Thanks Namie!
Hi Rebecca! I’m so happy to hear you liked the recipe! Yeah next day is soo good! You can even scoop up extra fat too, if you see it when the sauce is cold. We boil the meat first, so it’s much less oily from that extra step. 🙂
Thank you for all of your recipes. I was wondering if you made a large batch is it ok to freeze & reheat later??
Hi Jeanette! Sure! I freeze it all the time. 🙂
Thanks for the recipe! Do you think it would freeze well?
Hi Victoria! Sure, you can. Save some sauce so you can heat up together to moisten the meat when you reheat it. 🙂